

Page 1
EN
Snapp™ Digital Camcorder
Instruction Manual ............................................Page 2
ES
Snapp™ Videocámara Digital
Manual de Instrucciones ................................Pagina 66
FR
Snapp™ Caméscope Numérique
Manuel D’instruction ..................................... Page 132
Please read carefully before use • Léa el manual antes de usar • Veuillez lire ce livret avant utilisation
For series /
Para la serie /
Pour la série
CAM4505
Page 2

Page 2 Table Of Contents
English
Table of Contents Â
Thank You .....................................................................................................................................5
Package Contents ..........................................................................................................................5
Features ............................................................................................................................................5
CamCorder aT a GlanCe .........................................................................................................7
GeTTinG STarTed .........................................................................................................................15
Inserting a Memory Card .............................................................................................................15
Charging the Camcorder ............................................................................................................16
Turning the Camcorder On .........................................................................................................16
Function Modes .............................................................................................................................17
CamCorder mode ....................................................................................................................18
Camcorder Screen at a Glance .................................................................................................18
Recording a Video .......................................................................................................................19
Camcorder Controls ....................................................................................................................20
Camcorder Options Menu ..........................................................................................................21
Page 3

English
Table Of Contents Page 3
Camera mode ...........................................................................................................................22
Camera Screen at a Glance ......................................................................................................22
Taking a Photo ...............................................................................................................................23
Camera Controls ..........................................................................................................................24
Camera Options Menu ................................................................................................................25
review mode ..............................................................................................................................27
Review Screen at a Glance .........................................................................................................27
Review Mode Controls .................................................................................................................28
Review Options Menu...................................................................................................................29
ConneCTinG To a Tv ................................................................................................................32
manaGinG FileS on The CamCorder ...................................................................................33
Transferring Video and Photo Files .............................................................................................33
Deleting Files on the Camcorder ................................................................................................35
SeTTinG The SYSTem opTionS ....................................................................................................36
uSinG The inCluded SoFTware ................................................................................................39
Installing muvee™ autoProducer ................................................................................................40
Using muvee™ autoProducer ......................................................................................................45
Making a muvee™ ............................................................................................................46
Page 4

Page 4 Table Of Contents
English
web Camera FunCTion ............................................................................................................50
Installing the Web Camera Driver ..............................................................................................51
Using the Web Camera ................................................................................................................56
SpeCiFiCaTionS ...........................................................................................................................57
TroubleShooTinG & SupporT ...................................................................................................58
SaFeTY & reGulaTorY STaTemenTS ...........................................................................................60
FCC Statement ..............................................................................................................................61
Important Safety Instructions .......................................................................................................62
Maintenance and Care ...............................................................................................................63
Page 5

English
Table Of Contents Page 5
Page 6

Page 6 Thank You
English
Thank You Â
Thank you for purchasing this product from Coby Electronics. For optimal performance and safety,
please read this manual carefully. Before connecting, operating, or adjusting this product, please
read the instructions completely. Please retain this manual for future reference.
Package Contents
Please make sure that the items shown below
are included in the package. Should an item be
missing, please contact the local retailer from
which you purchased this product.
Main unit: C AM4505
A/V cable
USB cable
Hand strap
Pouch
Installation CD
Instruction Manual
This package may contain plastic bags
or other materials that pose a hazard
to children. Be sure to safely dispose
of all packing materials after opening.
Features
Brilliant 2.0” TFT LCD full color display
Over 2 hours of video recording (with SDHC
card)
†
Camera mode lets you take 3 MP photos*
Advanced features including web camera
and digital zoom
Page 7

English
Thank You Page 7Thank You Page 7
English
View recorded videos and photos on a TV
with the included A/V cable
Edit video and upload to YouTube™ with
included software from muvee™
‡
Supports SD/SDHC cards up to 16 GB in
size
Integrated Hi-speed USB 2.0 plug for fast le
transfers
Rechargeable lithium-polymer battery
† 2 hours of video recording based on use with 4GB
SDHC card. SDHC card not included. Actual record
time may vary.
‡ Function available in Windows only.
* 5MP interpolated resolution; 3MP optical resolution.
Page 8

Page 8 Camcorder At A Glance
English
Page 8 Camcorder At A Glance
English
 Camcorder at a Glance Â
Part Name
Function Mode/Description
Camcorder Camera Review
1 Strap mount Attach the included hand strap here.
2 SD card slot Load SD or SDHC memory cards here.
3 [Power]
Press and hold to turn the camcorder on or off.
4 A/V output connector
Connection to view your photos and videos on a TV. Use with the included
A/V cable.
5 USB connector
Connection to charge/transfer les to a computer. Use with the included
USB cable.
Page 9

English
Camcorder At A Glance Page 9
Page 10
Page 10 Camcorder At A Glance
English
Part Name
Function Mode/Description
Camcorder Camera Review
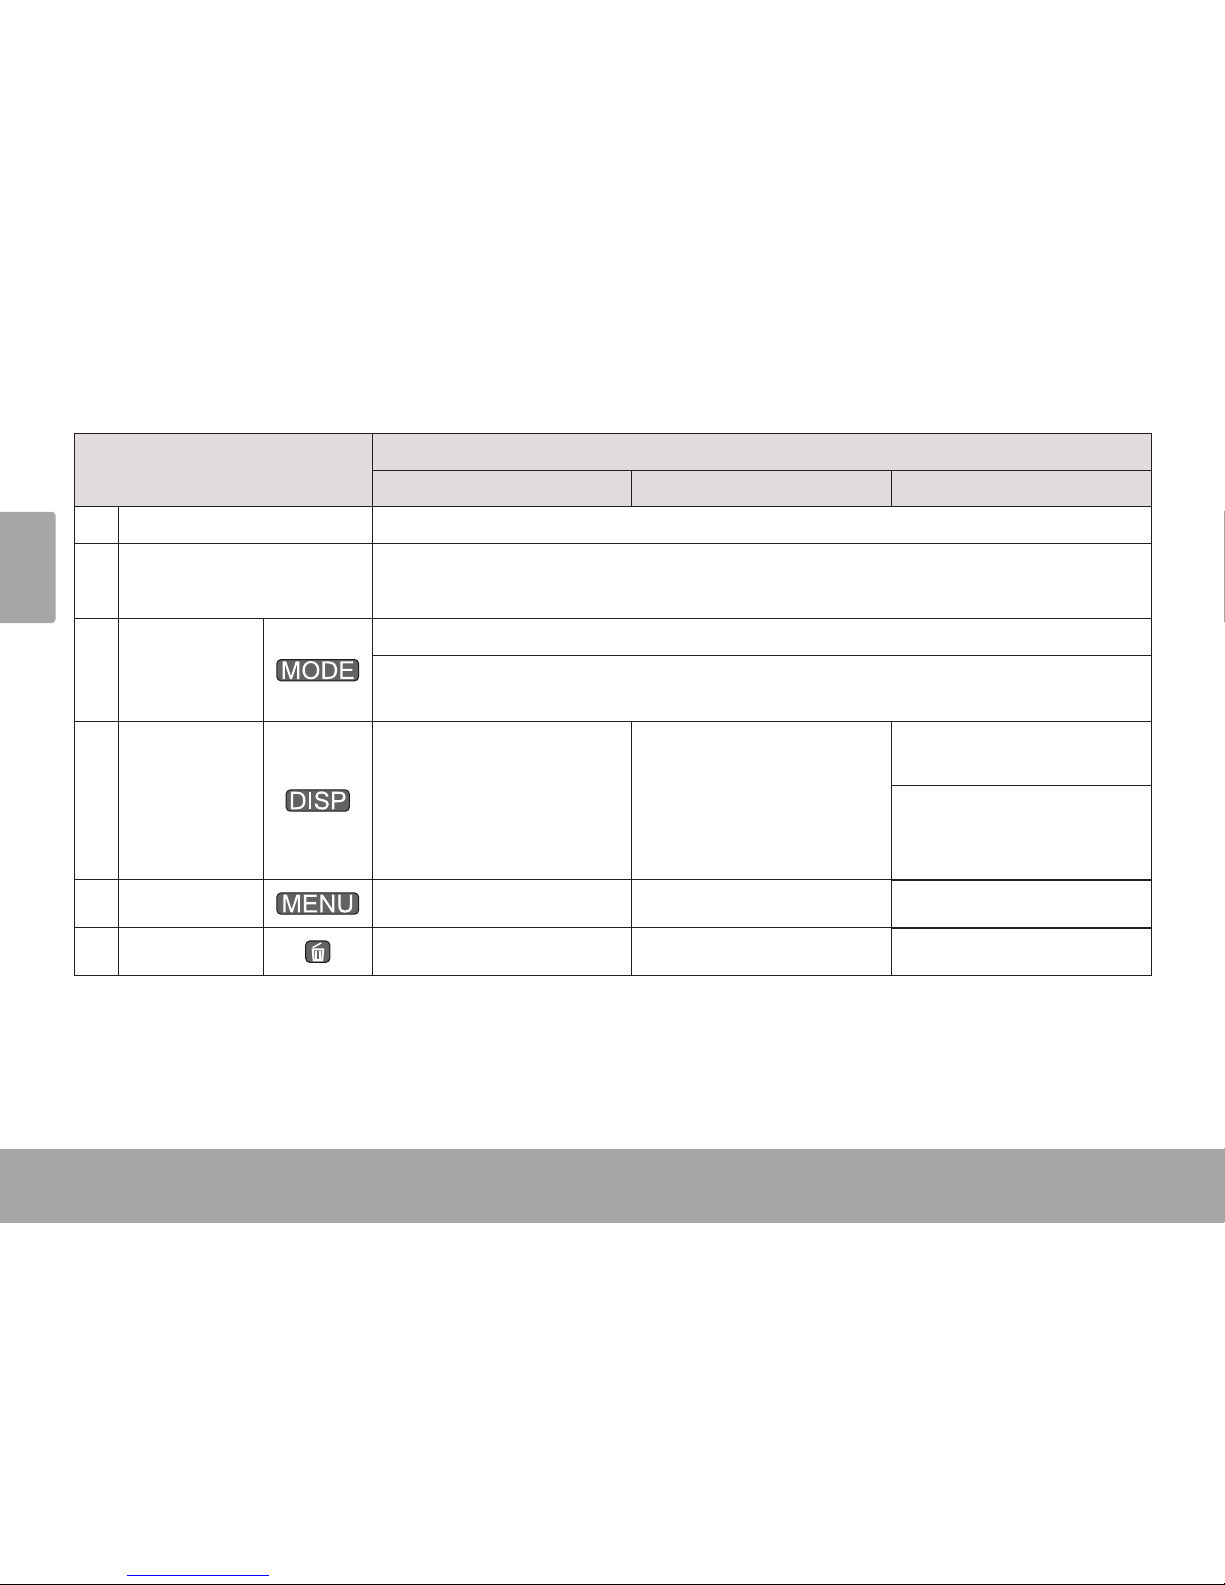
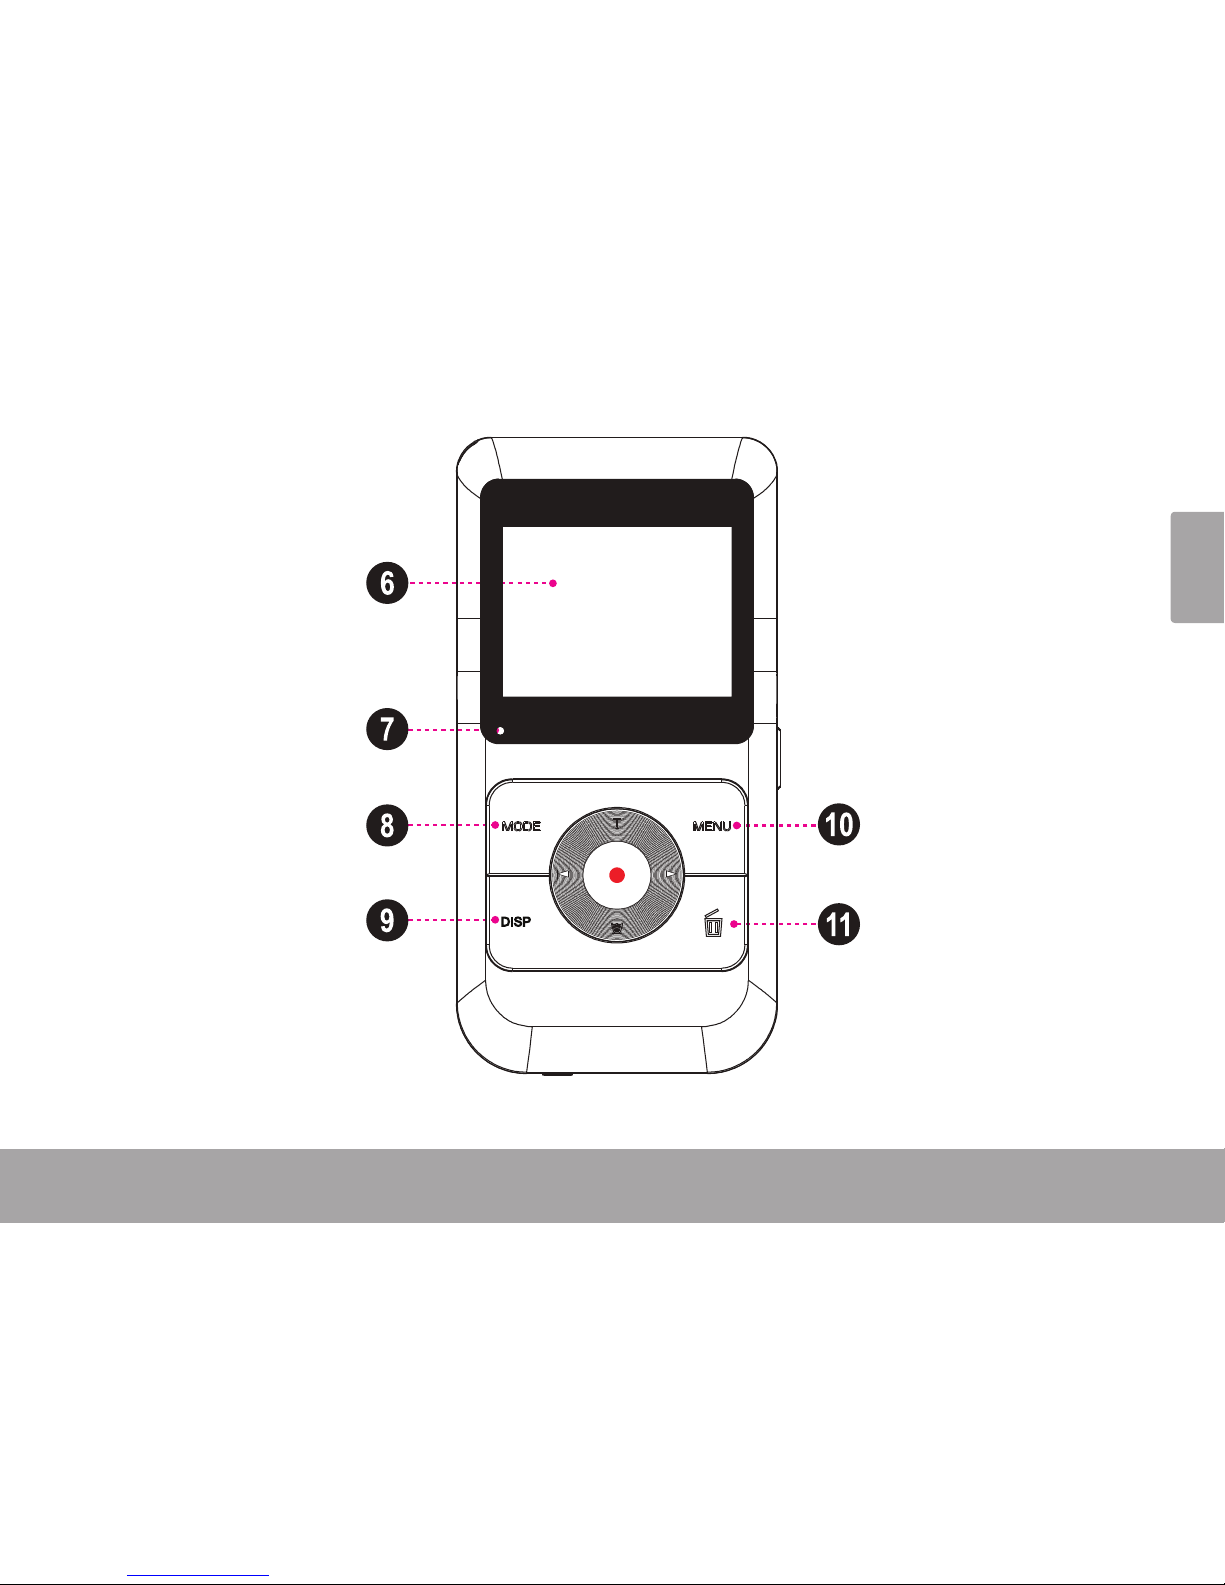
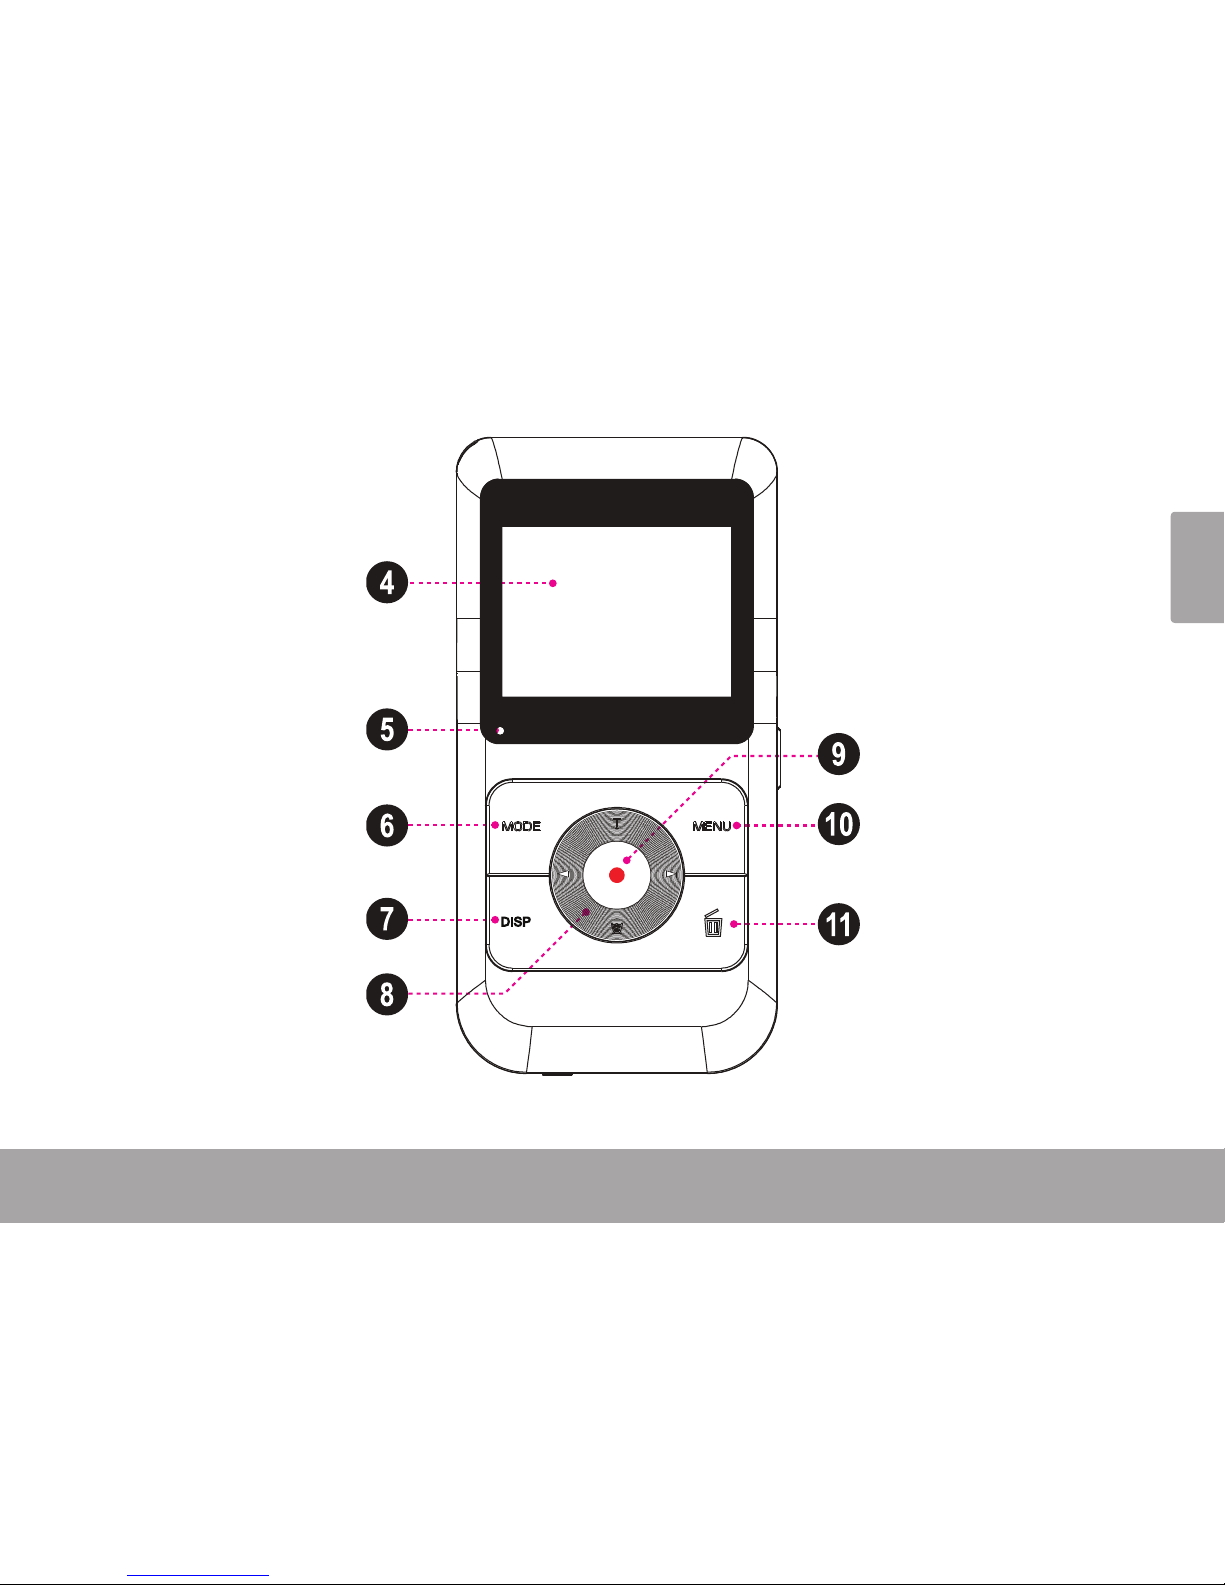
6 Display LCD screen.
7 Charge indicator
Lights red when the camcorder is charging.
Lights green when the camcorder is fully charged.
8 [MODE]
Change the function mode.
Change the connection mode when connected to a computer (camcorder, MSDC
disk, PC web cam)
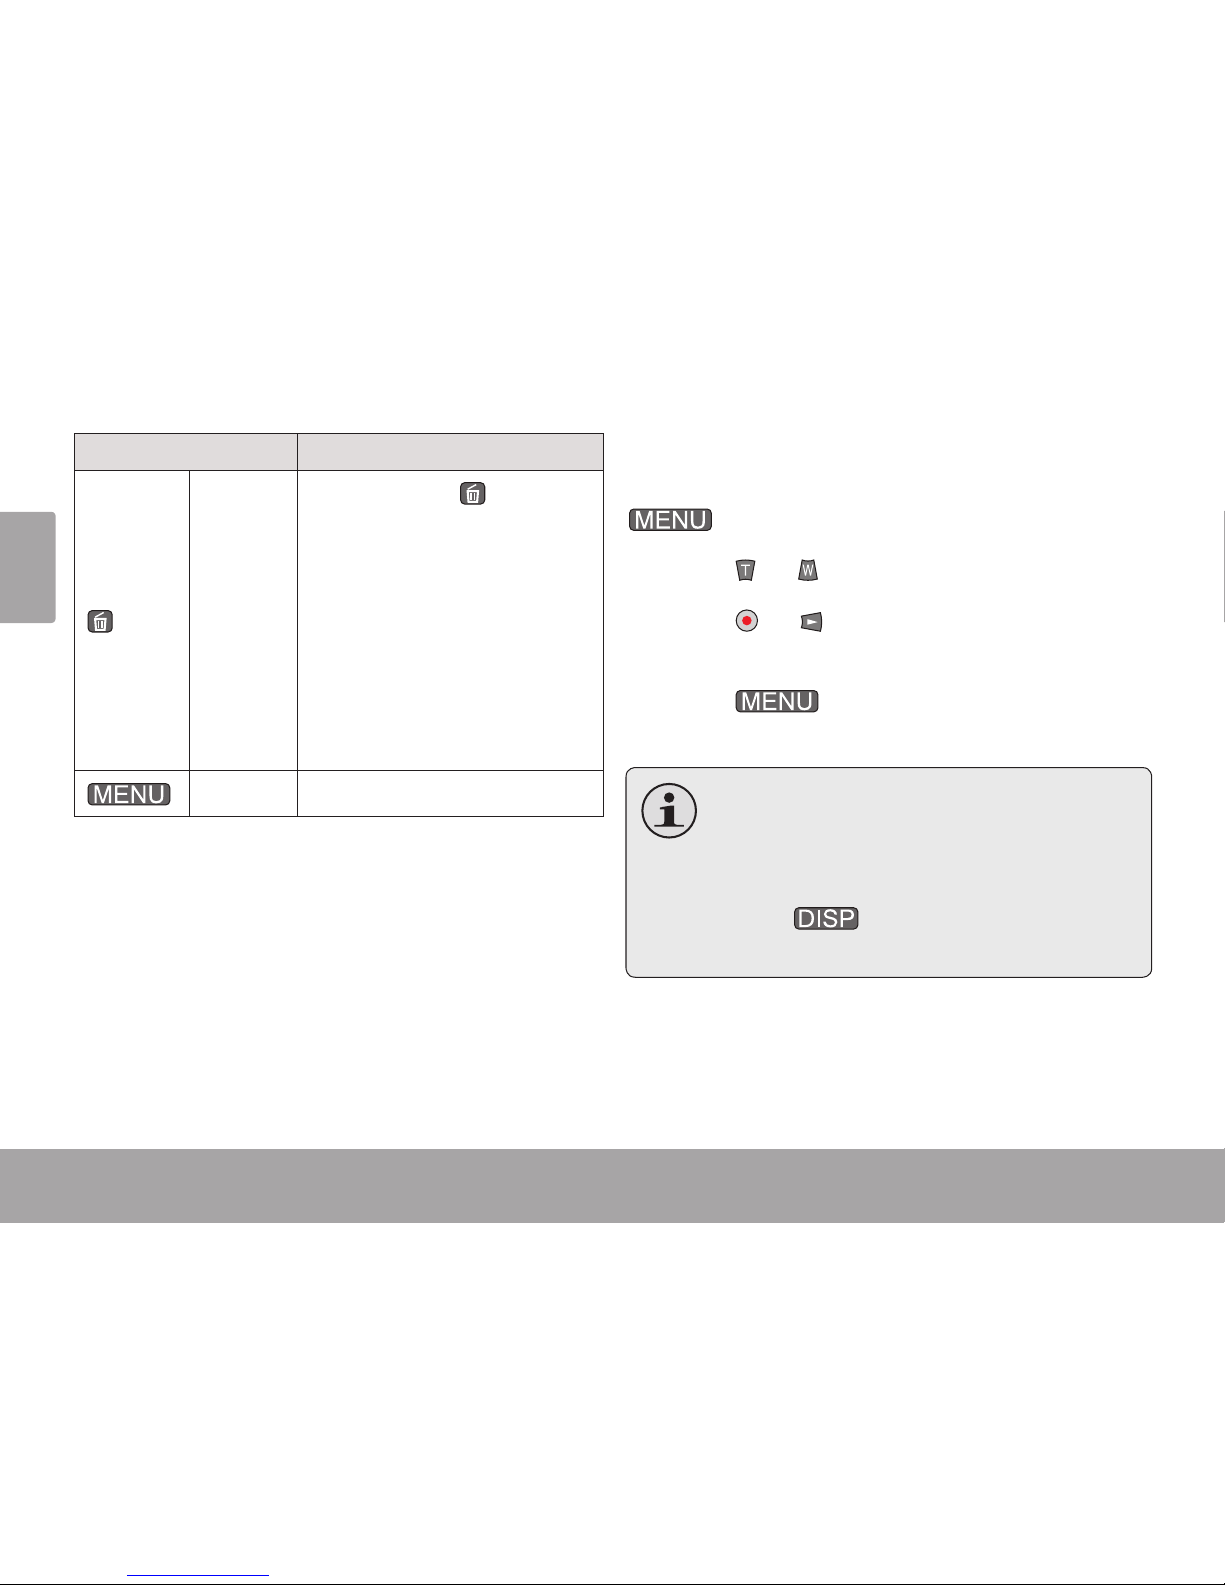
9 [DISP]
Change the movie recording size.
Change the pho to re solution.
Change the display mode
(fullscreen, thumbnail).
During video review only:
Toggle the on-screen
display.
10 [MENU]
Access the option menu. -- --
11 [DELETE]
-- -- Delete the selected le.
Page 11
English
Camcorder At A Glance Page 11
Page 12
Page 12 Camcorder At A Glance
English
Part Name
Function Mode/Description
Camcorder Camera Review
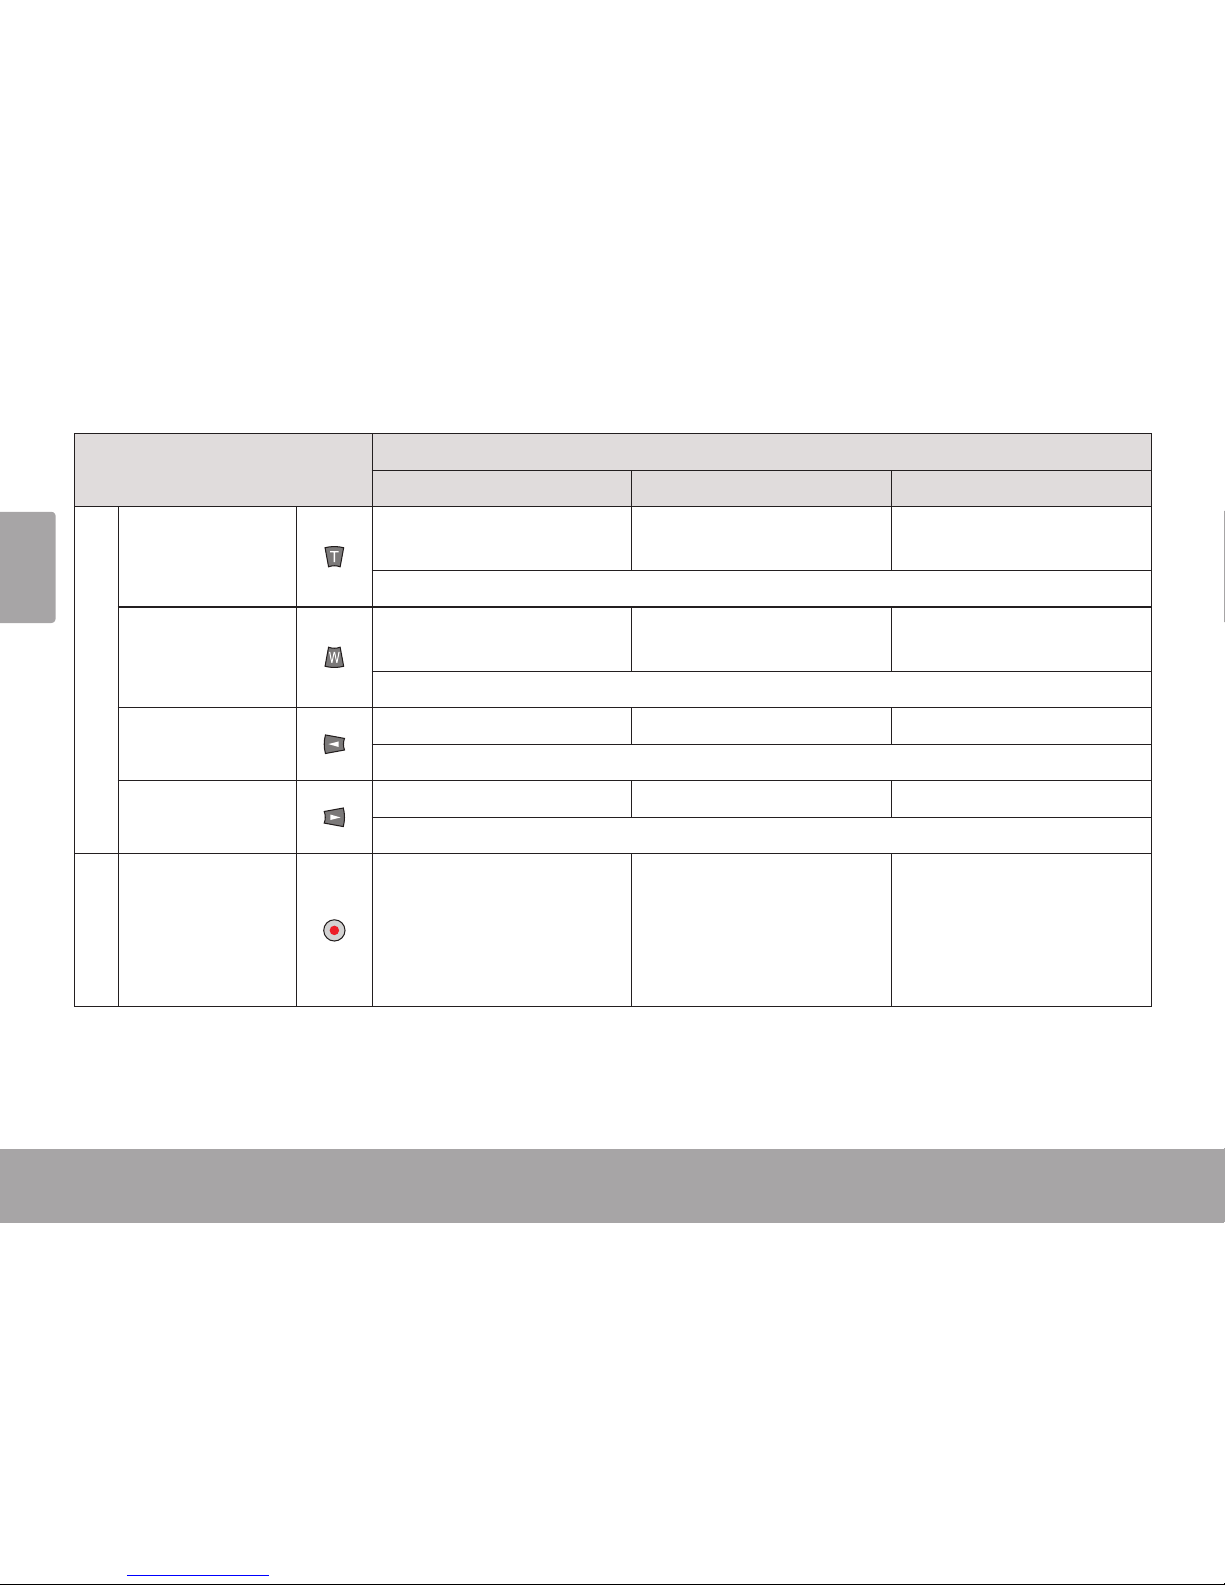
12
[UP]
Increase the zoom level. Increase the zoom le v el .
Photo review only: Increase the zoom level.
Menu: Browse the menu list.
[DOWN]
Decrease the zoom level. Decrease the zoom level .
Photo review only: Decrease the zoom level.
Menu: Browse the menu list.
[LEFT]
-- -- View the previous le.
Menu: Return to the previous screen.
[RIGHT]
-- -- View the next le.
Menu: Go to the next option screen.
13 [RECORD/OK]
Start or stop recording a
video.
Take a phot o .
Toggle “pan” mode when the
zoom level is greater than 1.
When “pan” mode is active,
use the direction keys to pan
around the magnied photo.
Page 13
English
Camcorder At A Glance Page 13
Page 14
Page 14 Camcorder At A Glance
English
Part Name
Function Mode/Description
Camcorder Camera Review
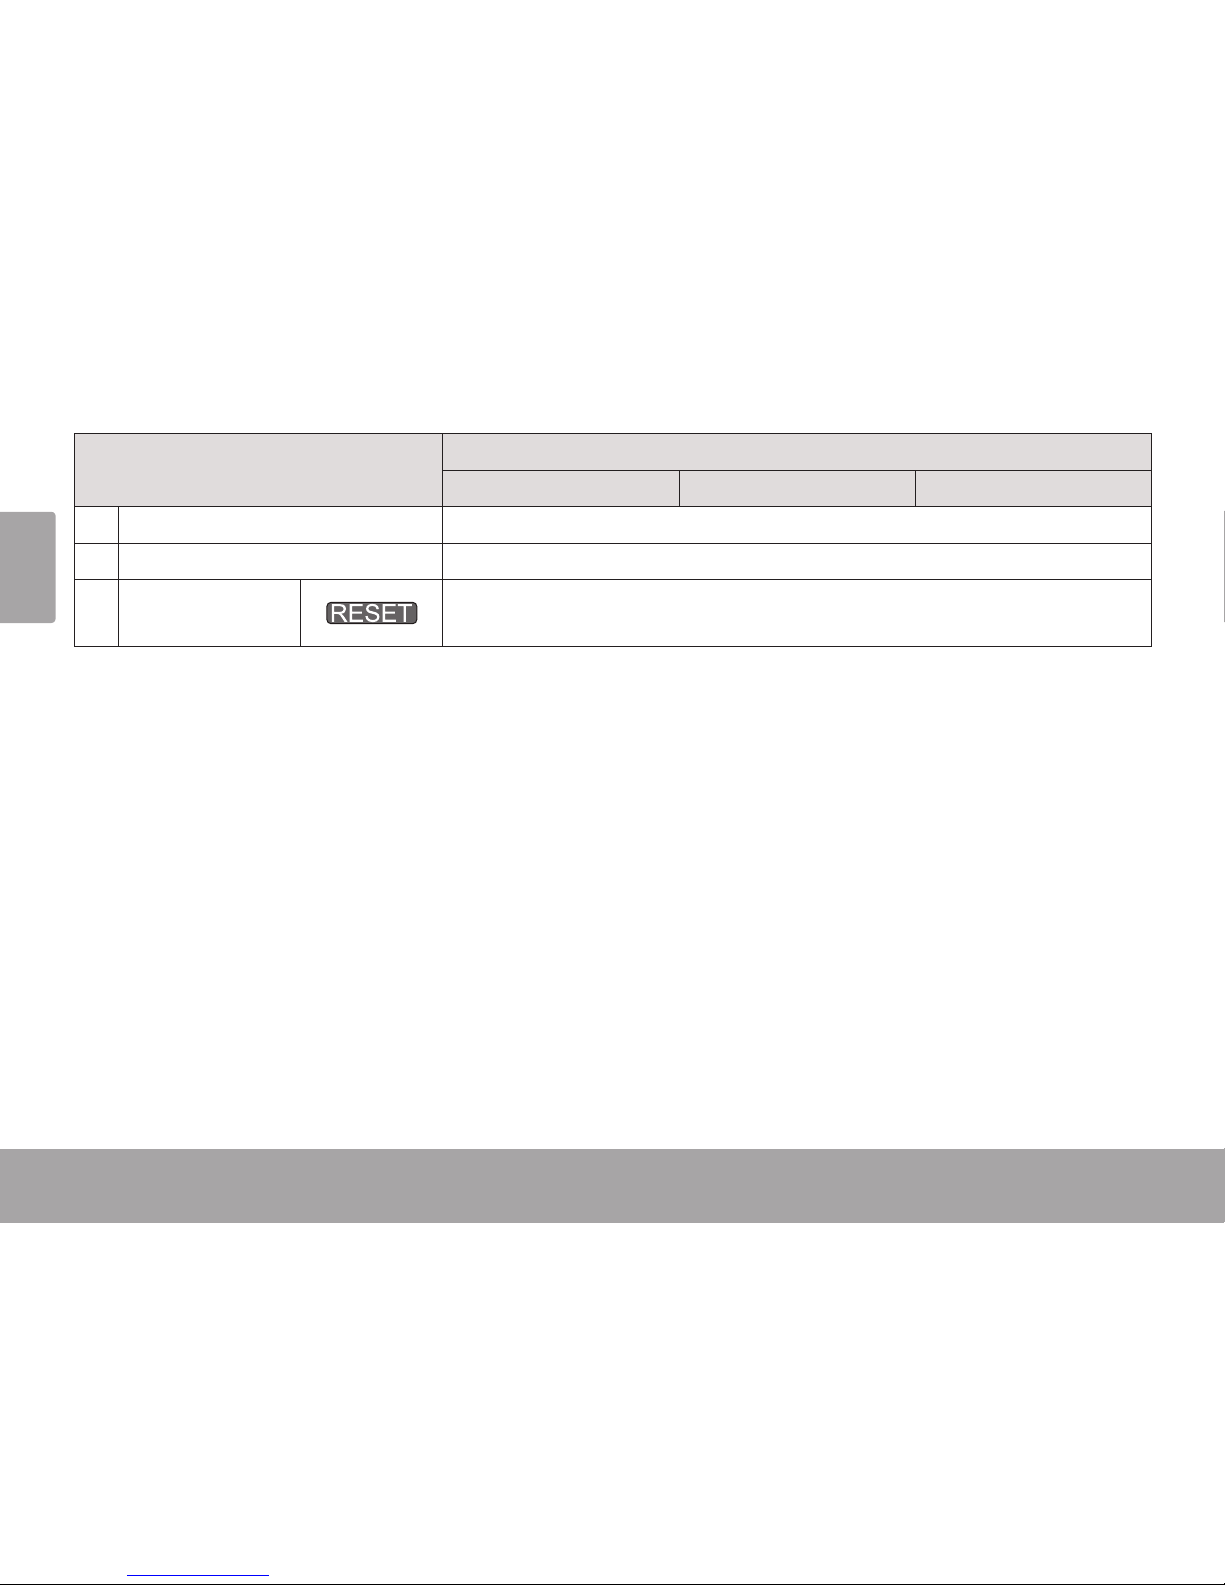
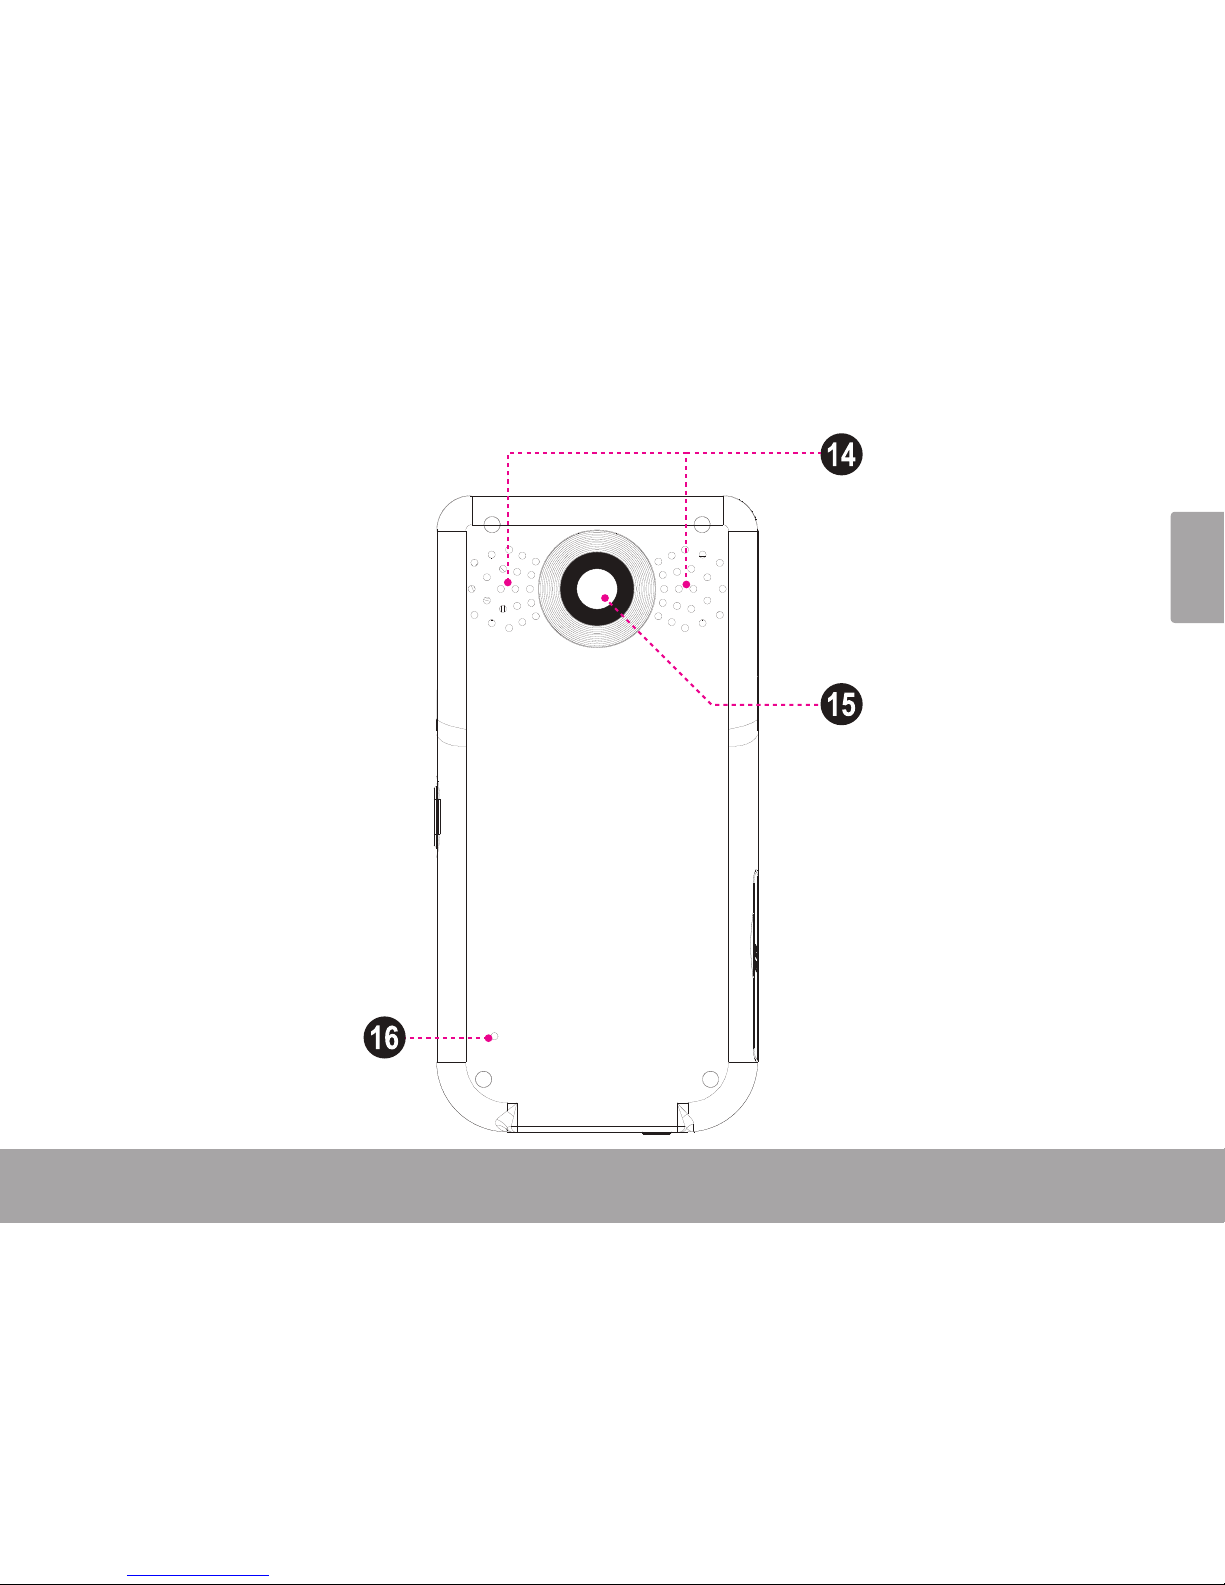
14 Speakers Sound output.
15 Lens Shoot video and photos. Avoid touching or scratching the lens surface.
16 [RESET]
Reinitializes the unit. Gently press this button with a paper clip should the unit
freeze or otherwise behave abnormally.
Page 15
English
Camcorder At A Glance Page 15
Page 16
Page 16 Getting Started
English
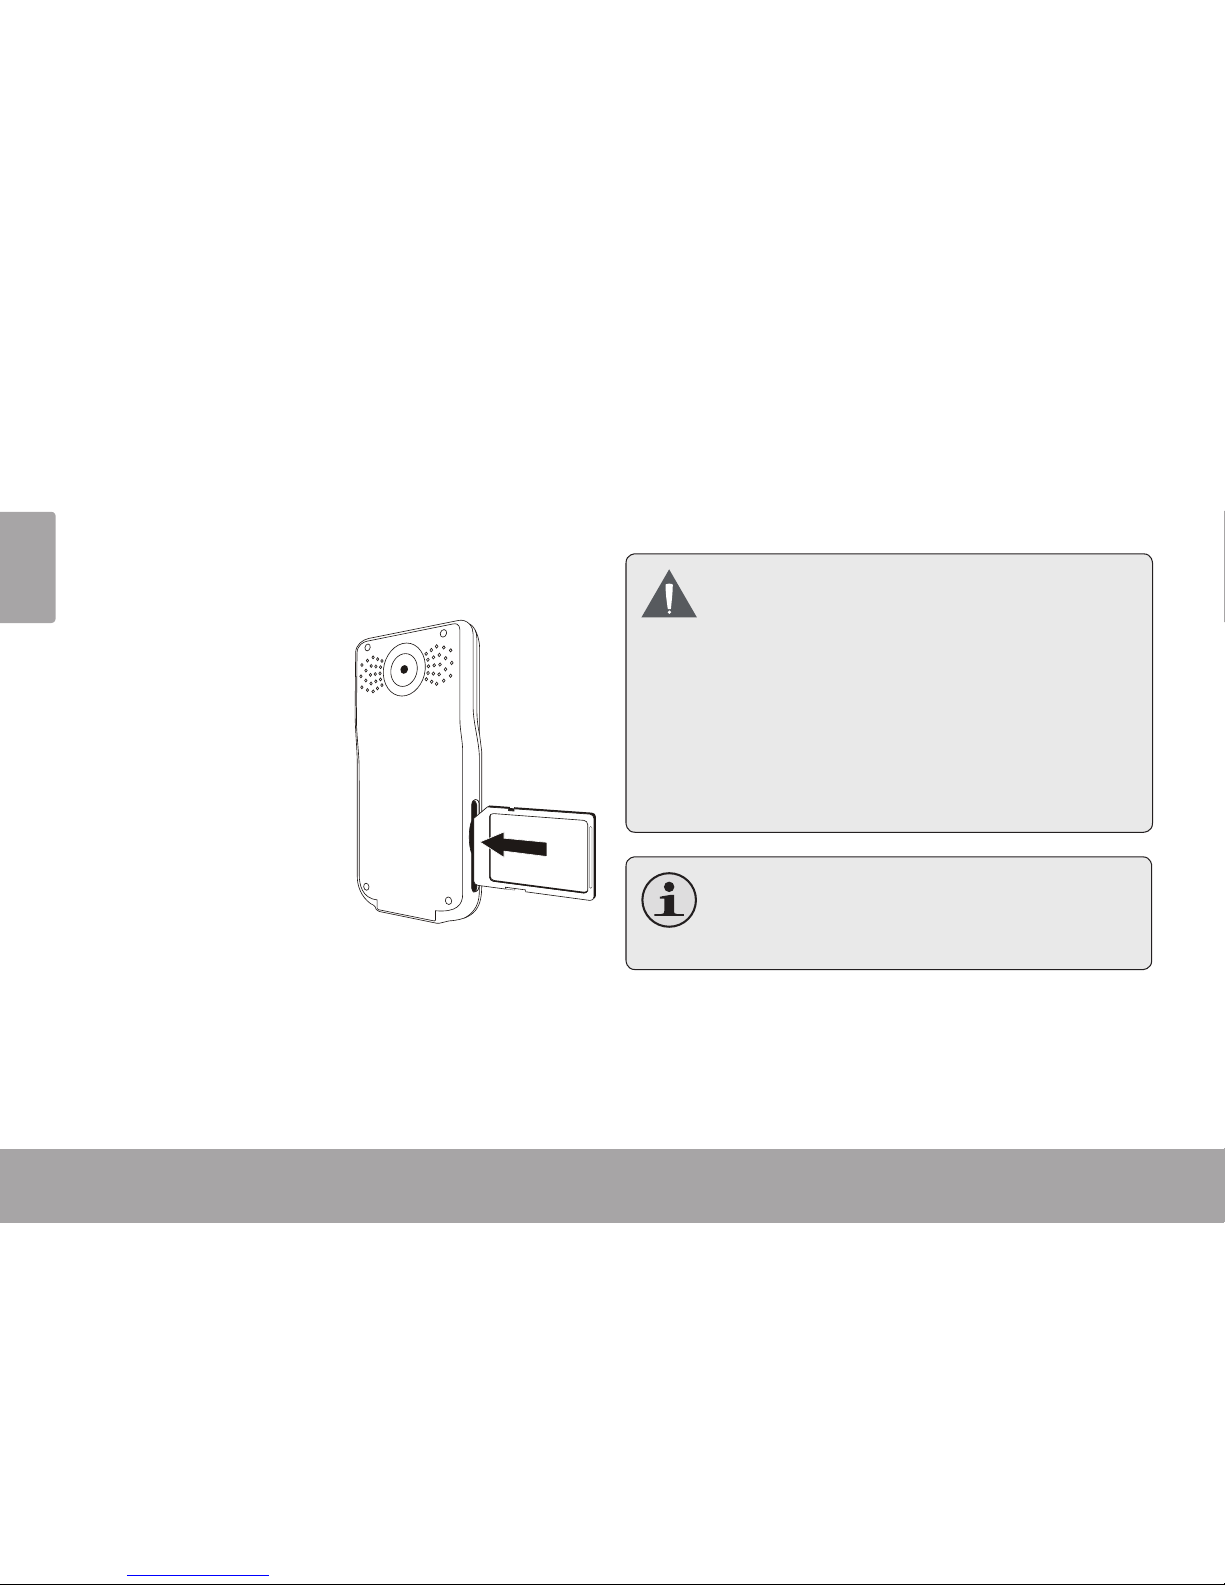
Inserting a Memory Card
Use an SD/SDHC
memory card to
expand your digital
video camera’s available memory. The
CAM4505 can accommodate memory cards
of up to 16GB. Install a
memory card by inserting it gently into the SD
card slot on the leftside
of the video camera.
To remove the memory card, press it further into
the card slot and then release. The card should
automatically eject from the slot. Grasp it by the
edge and pull gently to fully remove.
To avoid data corruption, turn off the
digital video camera before inserting or
removing a memory card.
Do not attempt to place any object
other than an SD memory card into
the SD card slot. A compatible memory
card should slide easily into the SD
card slot; if you encounter resistance,
do not attempt to force the card in.
For information on formatting a memory
card, please see the “Setting the System
Options” section of this manual.
Getting Started Â
Please read and complete the following steps to begin using your digital video camcorder.
Page 17

English
Getting Started Page 17
Charging the Camcorder
Your camcorder has an integrated rechargeable
battery. Upon initial use, the battery should be
charged fully to ensure optimal performance
and battery life. If the camcorder has not been
used in a while, the battery may need to be
recharged.
Upon initial use, the battery should be
charged fully to ensure optimal performance and battery life.
The battery used in this device may pres-
ent a re or chemical burn if mistreated.
Do not disassemble, incinerate, or heat
the battery. Do not leave the device in a
place subject to direct sunlight, or in a car
with its windows closed.
Do not connect the device to a power
source other than that which is indicated
here or on the label as this may result in
the risk of re or electric shock.
Turning the Camcorder On
To turn the camcorder on, press and hold
until the screen turns on.
To turn the camcorder off, press and hold
until the screen turns off.
Page 18

Page 18 Getting Started
English
Function Modes
Your camcorder has three function modes.
Icon Function Mode
Camcorder Mode.
Select to record video clips.
Camera Mode.
Select to take photos.
Review Mode.
Select to play/view video and photo les.
Press the <MODE> button to change the
function mode.
The mode icon displayed at the top of the
screen indicates the current function mode.
Page 19
English
Camcorder Mode Page 19Camcorder Mode Page 19
English
 Camcorder mode Â
Use Camcorder mode to shoot videos.
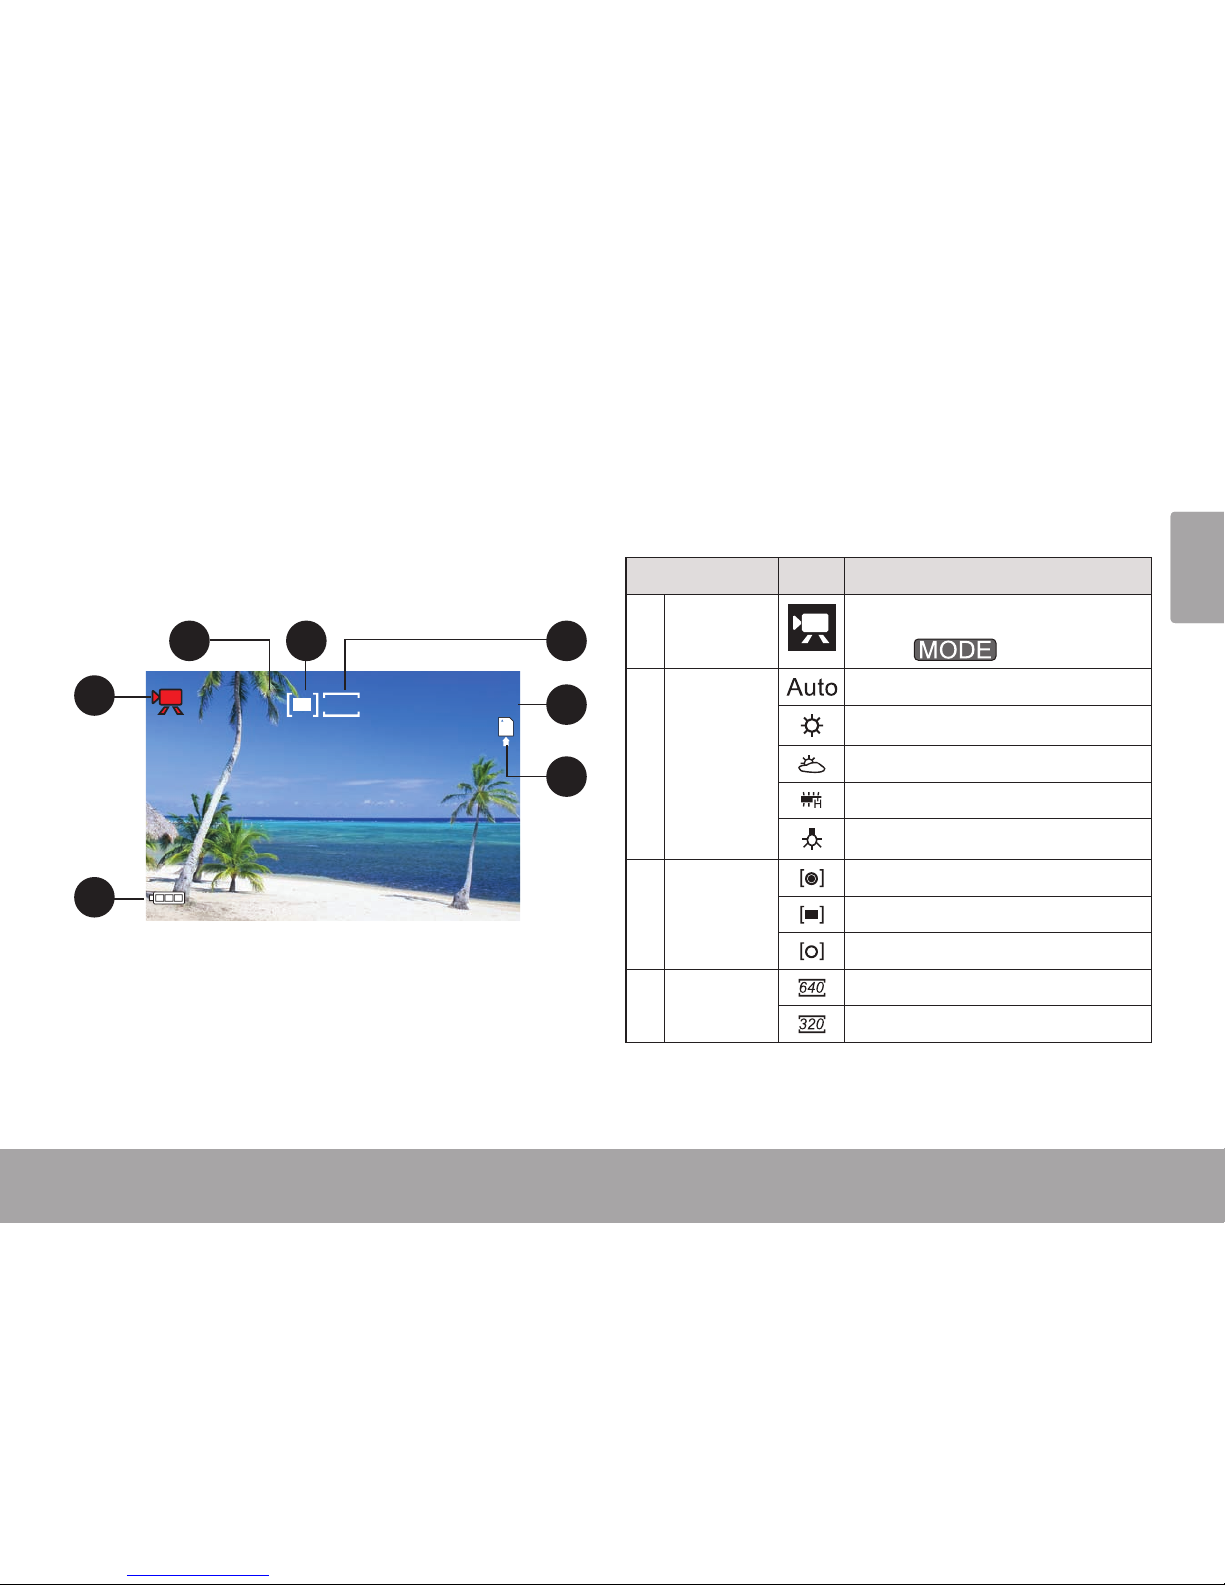
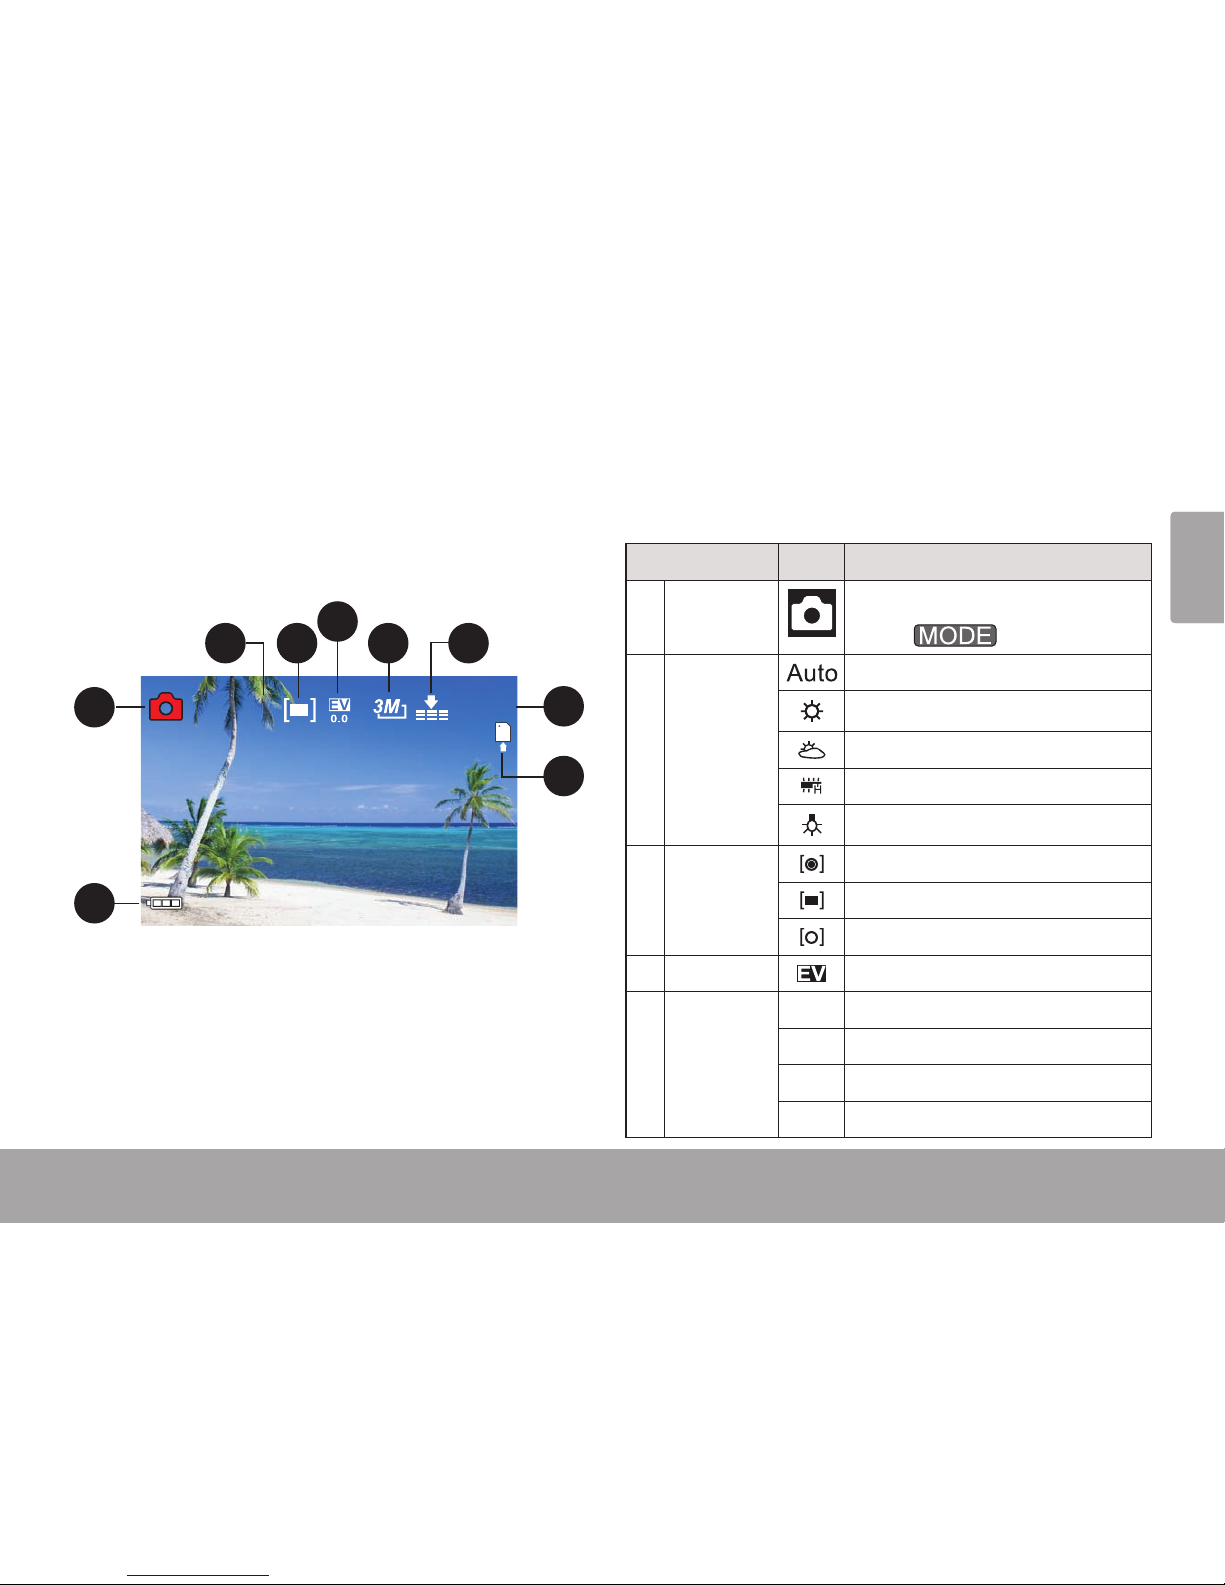
Camcorder Screen at a Glance
AUTO
00 : 06 : 12320
1
7
2 3 4
5
6
Indicator Icon Description
1 Mode
Camcorder Mode.
Press
to change.
2 White
Balance
Auto
Daylight
Cloudy
Fluorescent
Tungsten
3 Metering
Center
Multi
Spot
4 Video
Resolution
640 x 480
320 x 240
Page 20
Page 20 Camcorder Mode
English
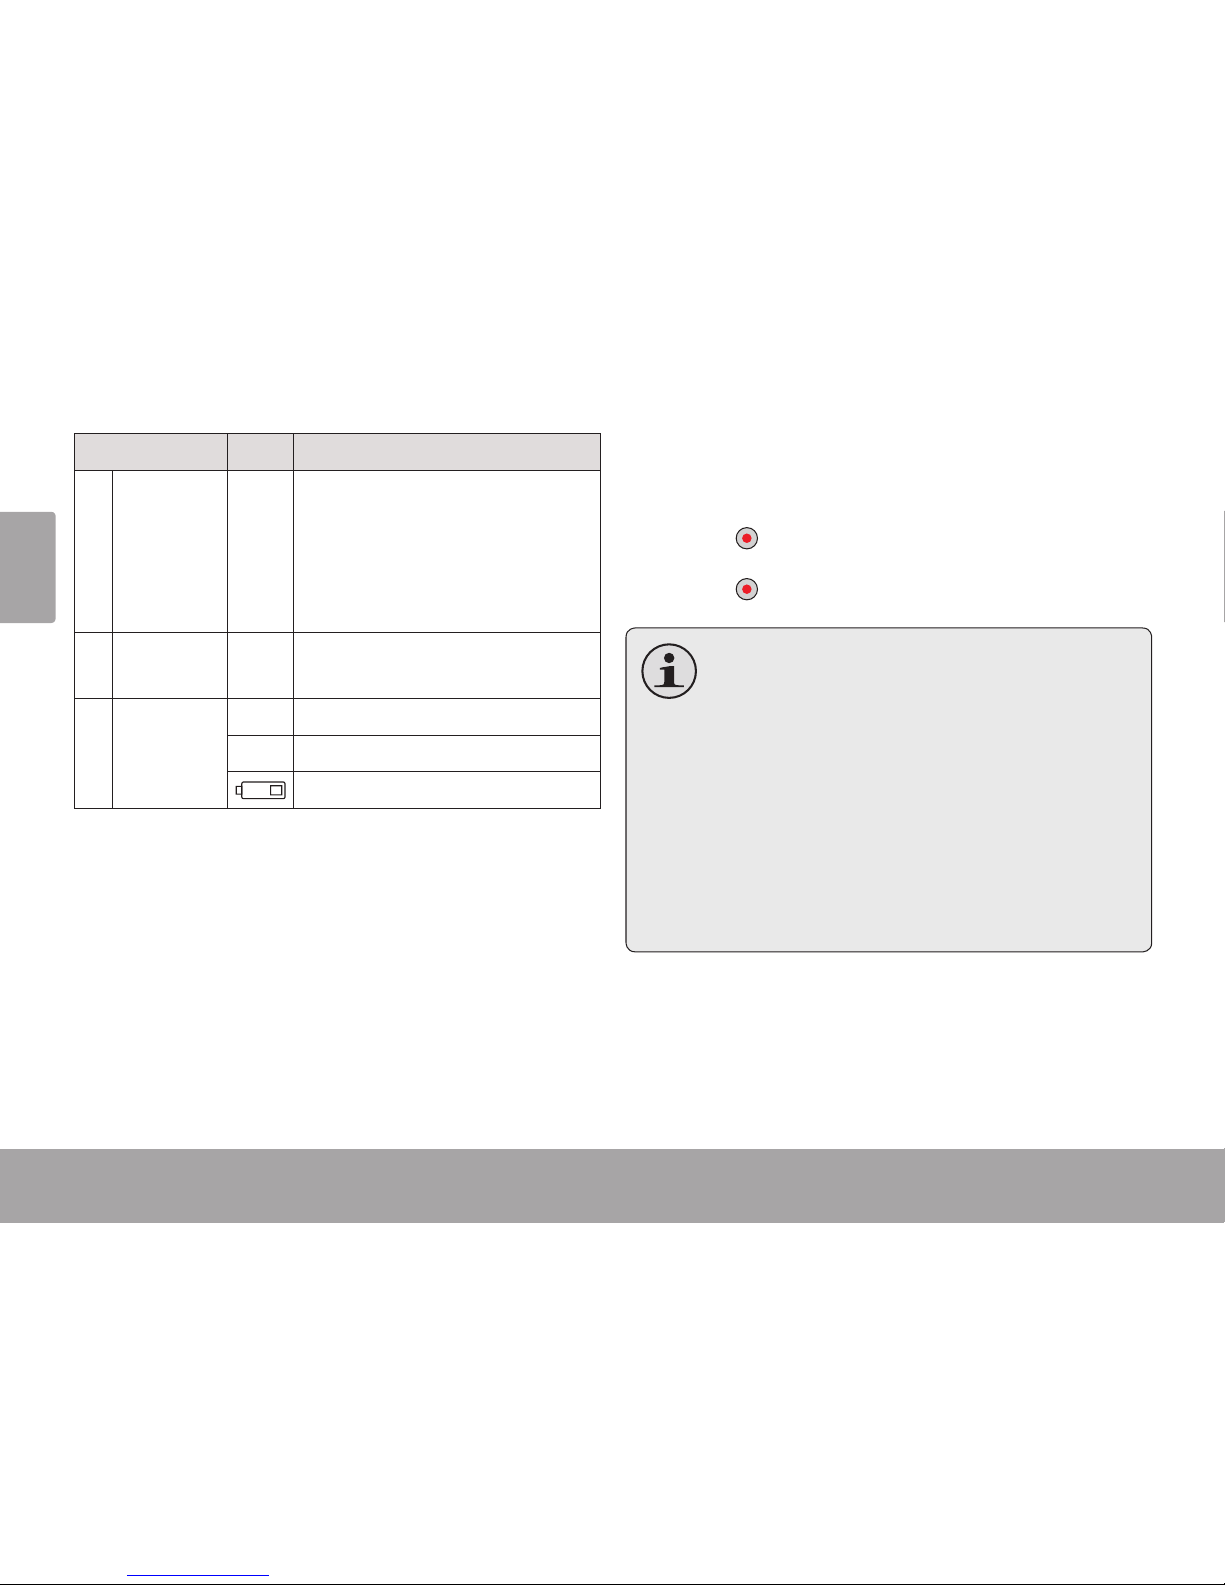
Indicator Icon Description
5 Timer --
Displays the amount of recording time remaining when recording is stopped.
Displays the elapsed recording
time when recording.
6 Memory
Card
--
Indicates that an SD memory
card has been loaded.
7 Battery
Level
Full
Half
Low
Recording a Video
When the camcorder is in Camcorder mode:
Press
to begin recording.
Press
to stop and save the recording.
Recording will stop automatically when
the memory card becomes full.
When the camcorder is recording, the
total elapsed recording time is displayed in the upper right hand corner
of the LCD screen.
When the camcorder is not recording,
the estimated available recording time
will be displayed in the upper right hand
corner.
Page 21
English
Camcorder Mode Page 21
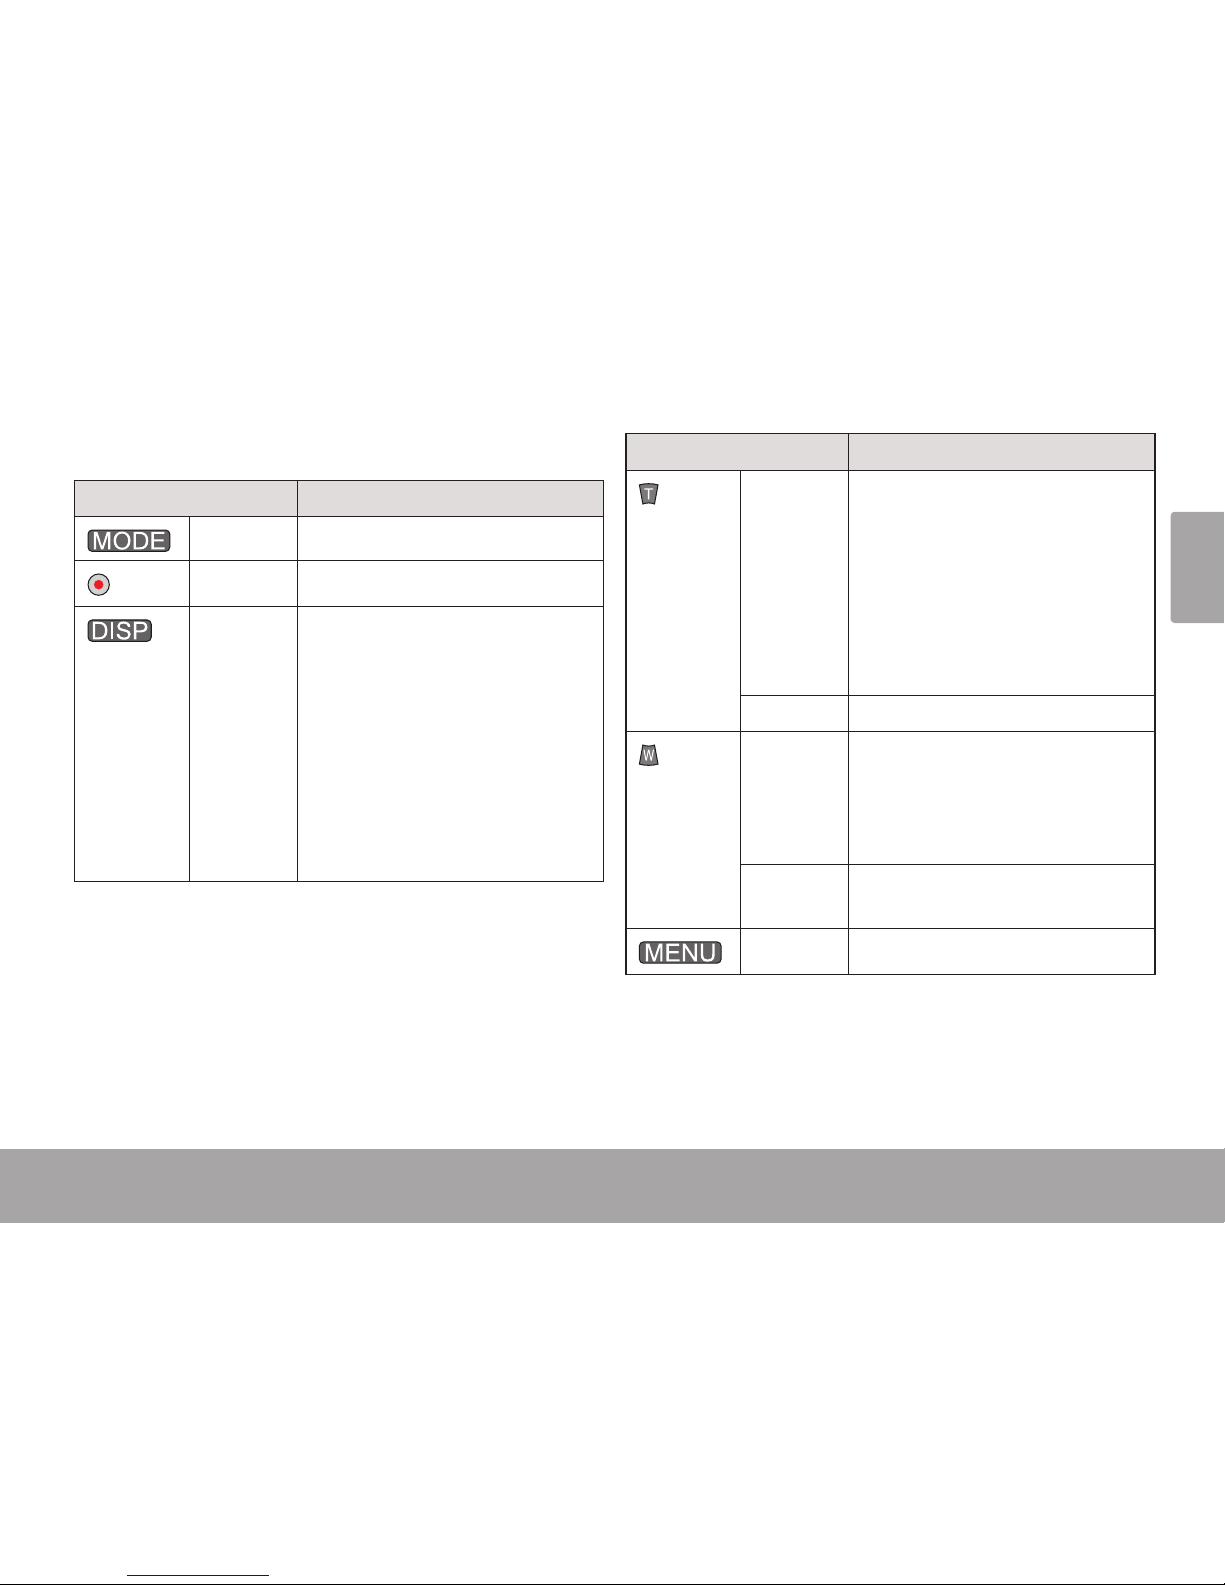
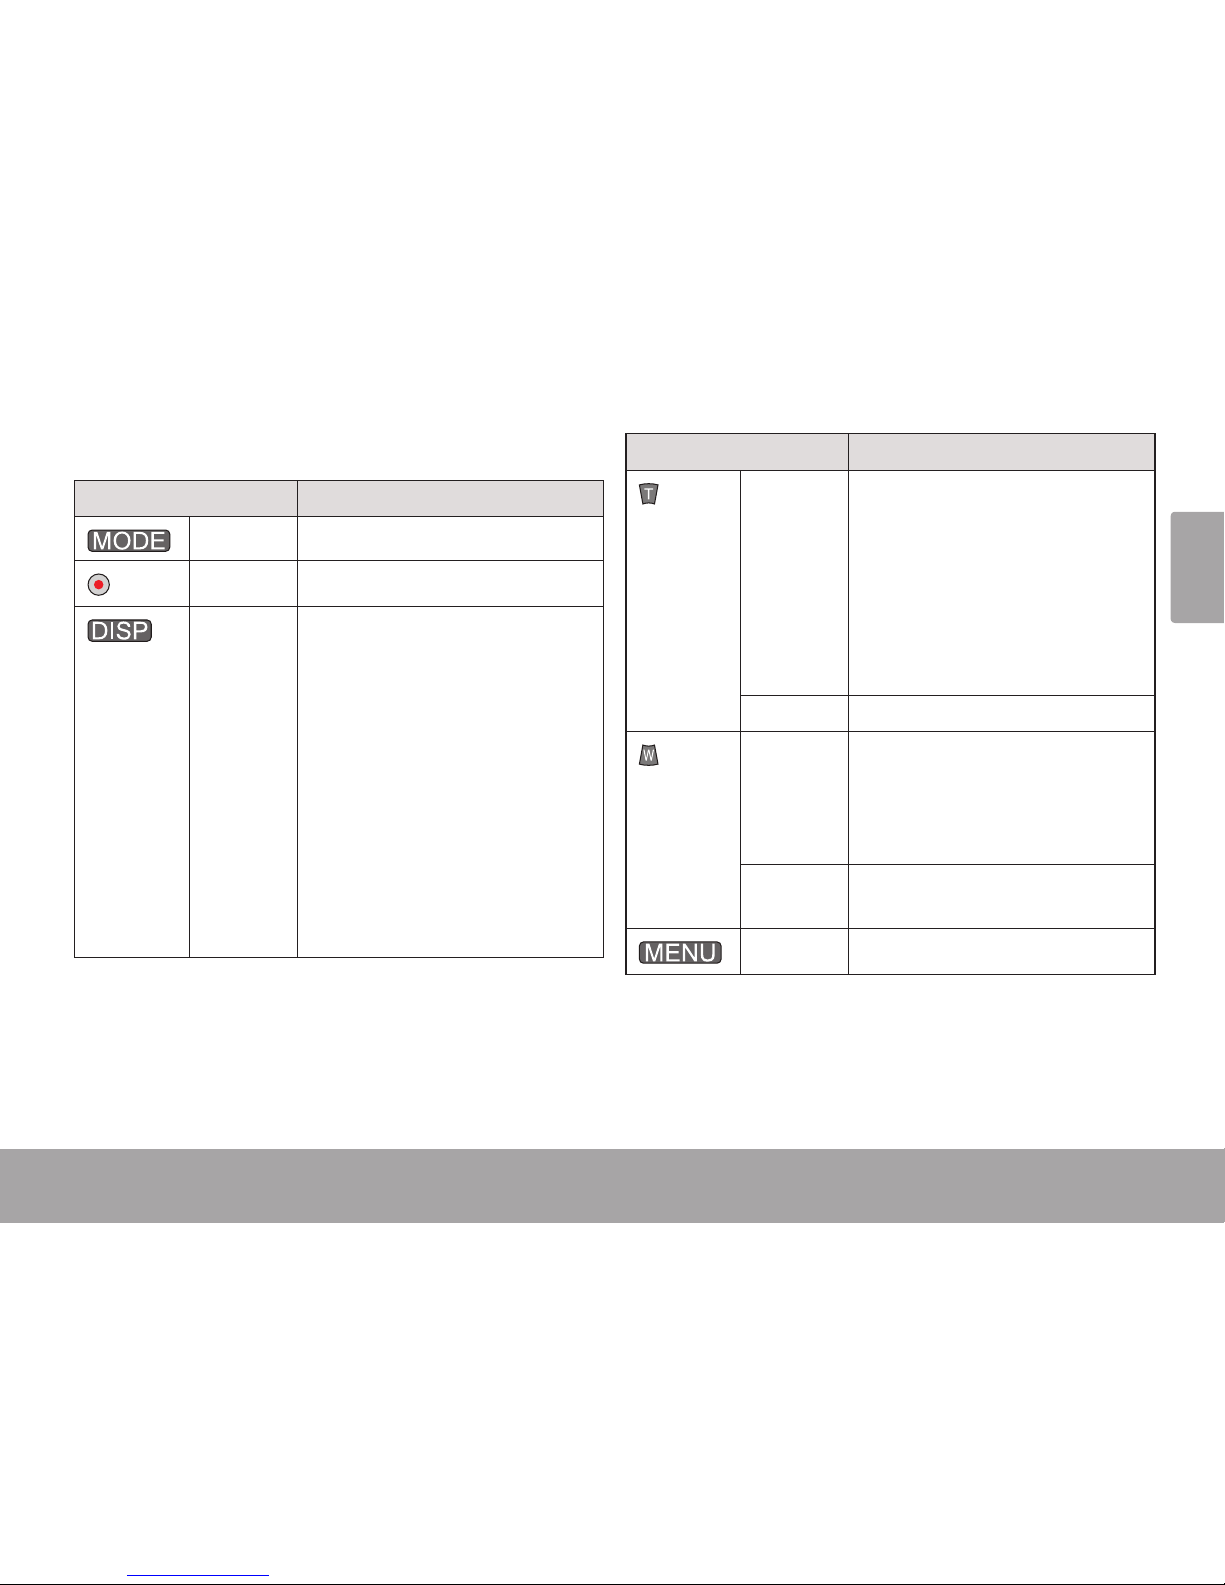
Camcorder Controls
Key Action
Press
Change the function mode.
Press
Start or stop recording a video.
Press
Change the video size of the
recording.
The size indicator appears on
the top of the screen.
[640] = 640 x 480
[320] = 320 x 240
Note: A larger video size will result
in larger le sizes.
Key Action
Press
Increase the zoom level.
The zoom level will appear on
the bottom right corner of the
screen.
Note: The quality of the image will
decrease as the zoom level
increases.
Hold
Increase the zoom level quickly.
Press
Decrease the zoom level.
The zoom level will appear in
the bottom right corner of the
screen.
Hold
Decrease the zoom level
quickly.
Press
Access the options menu.
Page 22
Page 22 Camcorder Mode
English
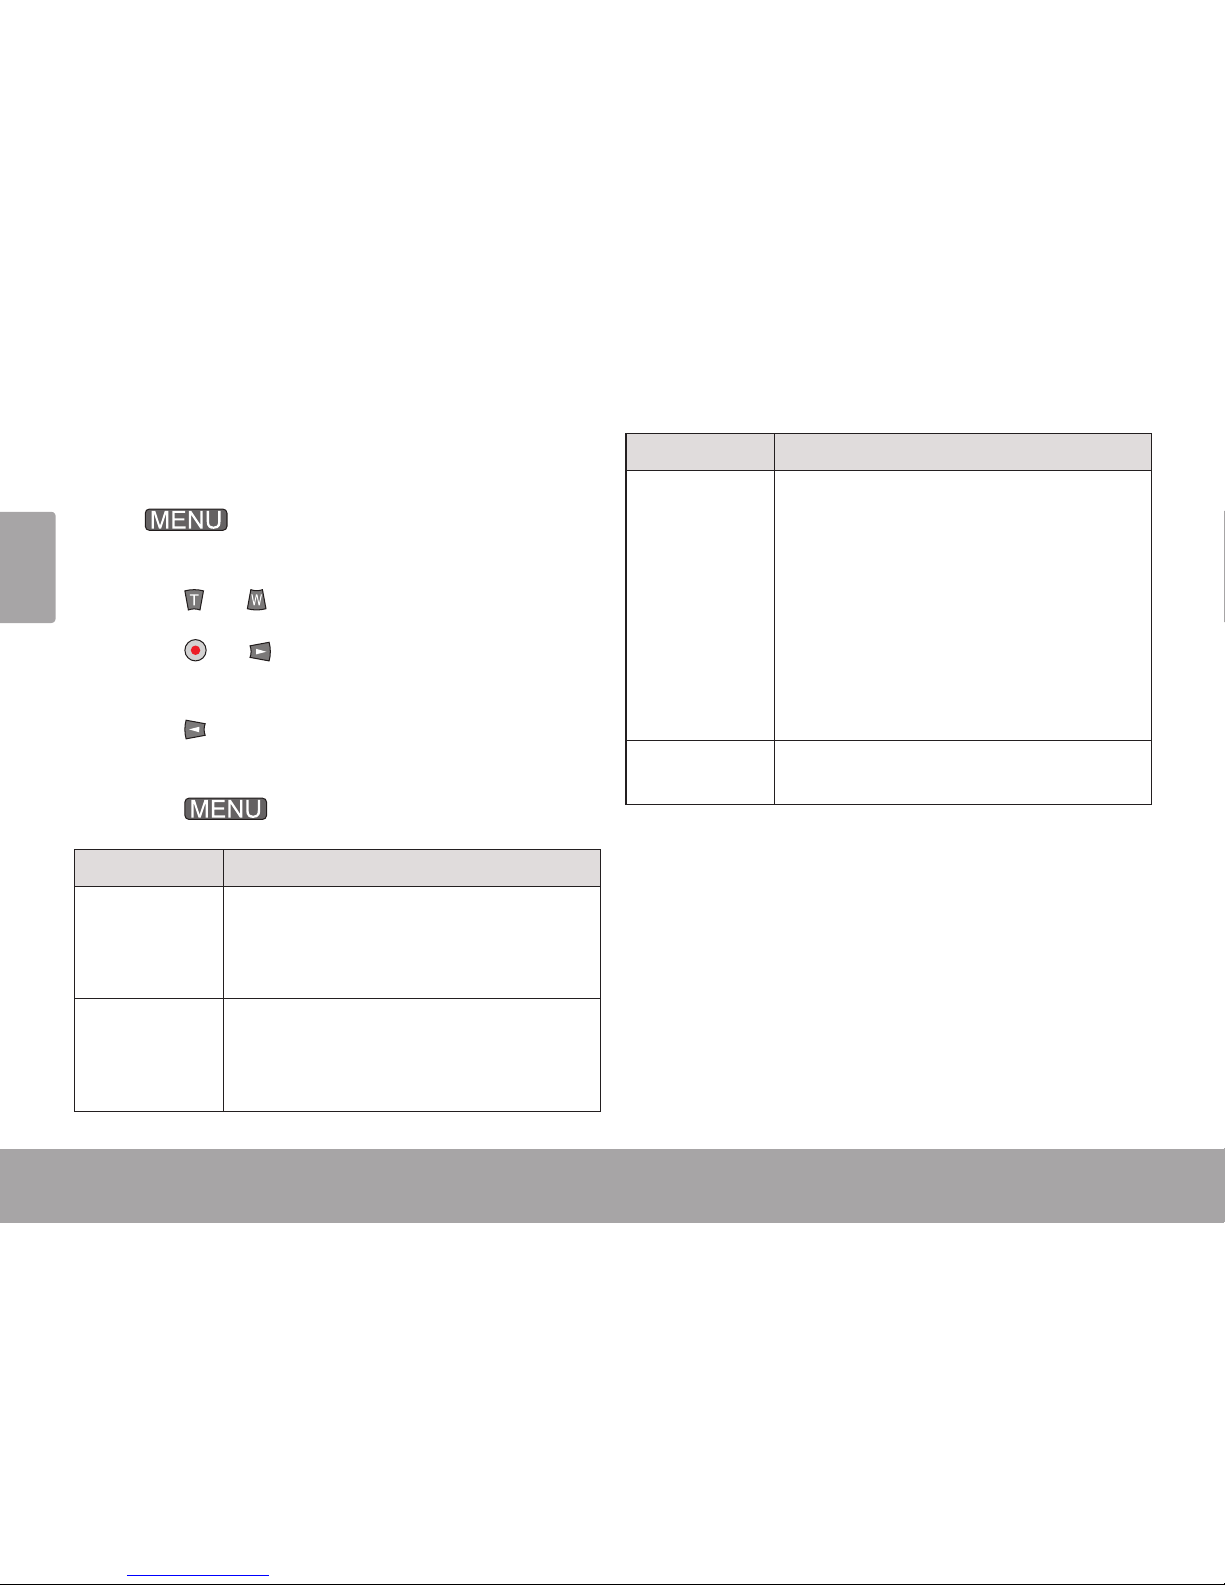
Camcorder Options Menu
When the camcorder is in Camcorder mode,
press
to access the camcorder options
menu.
Press
or to browse the menu items.
Press
or to select an item and ad-
vance to the next screen.
Press
to return to the previous menu
screen.
Press
to exit the menu.
Option Description
Movie Size
Change the video size of the recording.
[640] = 640 x 480 •
[320] = 320 x 240 •
Frame Rate
Set the frame rate of the recording.
High = 30 frames per second•
Low = 15 frames per second•
Option Description
Metering
Set the metering mode. Affects the
exposure of the image.
Center: Measures from the center of •
the screen.
Multi: Measures across multiple •
zones.
Spot: Measures from a small spot at •
the center of the screen.
White Balance
Set the white balance. Affects the color
of the image.
Page 23
English
Camera Mode Page 23Camera Mode Page 23
English
 Camera mode Â
Use Camera mode to take photos.
Camera Screen at a Glance
AUTO
558
1
9
2 6
7
8
3 5
4
Indicator Icon Description
1 Mode
Camera Mode.
Press
to change.
2 White
Balance
Auto
Daylight
Cloudy
Fluorescent
Tungsten
3 Metering
Center
Multi
Spot
4 EV Level
Exposure Value
5 Photo
Resolution
5M
5 Megapixels = 2592 x 1944
3M
3 Megapixels = 2048 x 1536
1M
1 Megapixels = 1280 x 960
VGA
VGA = 640 x 480
Page 24

Page 24 Camera Mode
English
Indicator Icon Description
6 Com-
pression
Quality
Super Fine
Fine
Normal
7 Memory
Capacity
--
Displays the number of photos
remaining.
8 Memory
Card
--
Indicates that an SD memory
card has been loaded.
9 Battery
Level
Full
Half
Low
Taking a Photo
When the camcorder is in Camera mode:
Aim the lens at the subject. Use the screen
to frame the subject.
Hold the unit steady. Press
to take the
photo.
For best results, ensure that the subject
is well lit. Image quality will suffer if photos are taken under low-light conditions.
Keep the unit and the subject as still
as possible when taking photos under
low-light conditions.
Page 25
English
Camera Mode Page 25
Camera Controls
Key Action
Press
Change the function mode.
Press
Take a photo.
Press
Change the size of the photo.
The size indicator appears on
the top of the screen.
[5M] = 2592 x 1944 •
[3M] = 2048 x 1536•
[1M] = 1280 x 960•
[VGA] = 640 x 480 •
Note: The [5M] setting uses soft-
ware interpolation to achieve
a resolution of 2592 x 1944
Key Action
Press
Increase the zoom level.
The zoom level will appear on
the bottom right corner of the
screen.
Note: The quality of the image will
decrease as the zoom level
increases.
Hold
Increase the zoom level quickly.
Press
Decrease the zoom level.
The zoom level will appear in
the bottom right corner of the
screen.
Hold
Decrease the zoom level
quickly.
Press
Access the options menu.
Page 26

Page 26 Camera Mode
English
Camera Options Menu
When the camcorder is in Camera mode, press
to access the camera options menu.
Press
or to browse the menu items.
Press
or to select an item and ad-
vance to the next screen.
Press
to return to the previous menu
screen.
Press
to exit the menu.
Option Description
Resolution
Set the photo resolution.
Note: The [5M] setting uses software
interpolation to achieve a resolution
of 2592 x 1944.
Option Description
Quality
Set the quali ty of the saved photo ima ge.
Super-ne: Low compression results •
in a large le size.
Fine: Medium compression results in •
a medium le size.
Normal: High compression results in a •
small le size
Metering
Set the metering mode. Affects the
exposure of the image.
Center: Measures from the center of •
the screen.
Multi: Measures across multiple •
zones.
Spot: Measures from a small spot at •
the center of the screen.
White Balance
Set the white balance. Affects the color
of the image.
Page 27

English
Camera Mode Page 27
Option Description
Exposure
Set the exposure level.
A higher value results in a brighter •
image.
A lower val u e res u l ts in a d a rk e r i ma ge.•
Driver Mode
Activate the self-timer or burst mode.
Self-timer 2S: Pause 2 seconds after •
pressing
to take a photo.
Self-timer 10S: Pause 10 seconds •
after pressing
to take a photo.
Burst: Press •
to take 3 photos in a
row quickly.
Effect
Set a photo effect.
Date Stamp
Set a date/time overlay.
Page 28
Page 28 Review Mode
English
Page 28 Review Mode
English
review mode Â
Use Review mode to view and play videos and photos that have been saved on your camcorder.
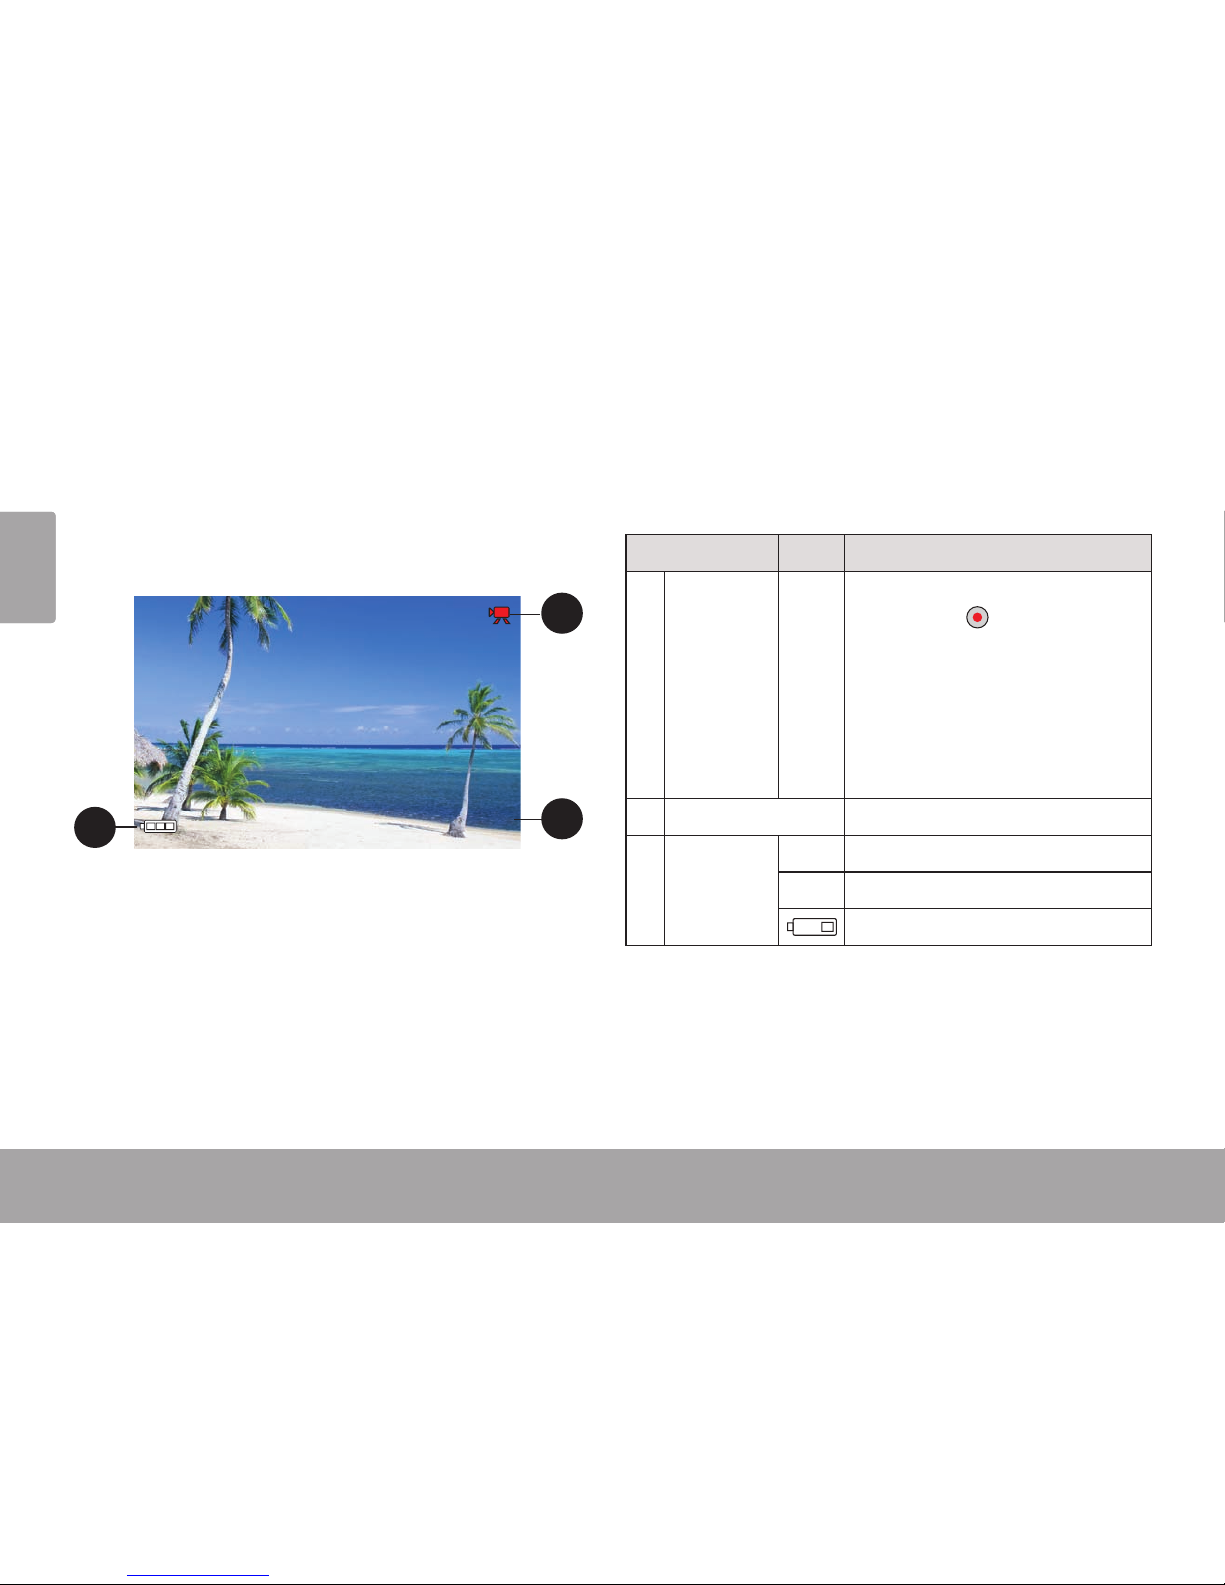
Review Screen at a Glance
8 / 8
1
2
3
Indicator Icon Description
1 Video
Indicates that the current le is a
video. Press
to play the vide o .
If no icon is present, the le is a
photo.
Note: In thumbnail view, video
les are marked with the
letter “V.”
2 File number
Current le / Total les
3 Battery
Level
Full
Half
Low
Page 29
English
Review Mode Page 29
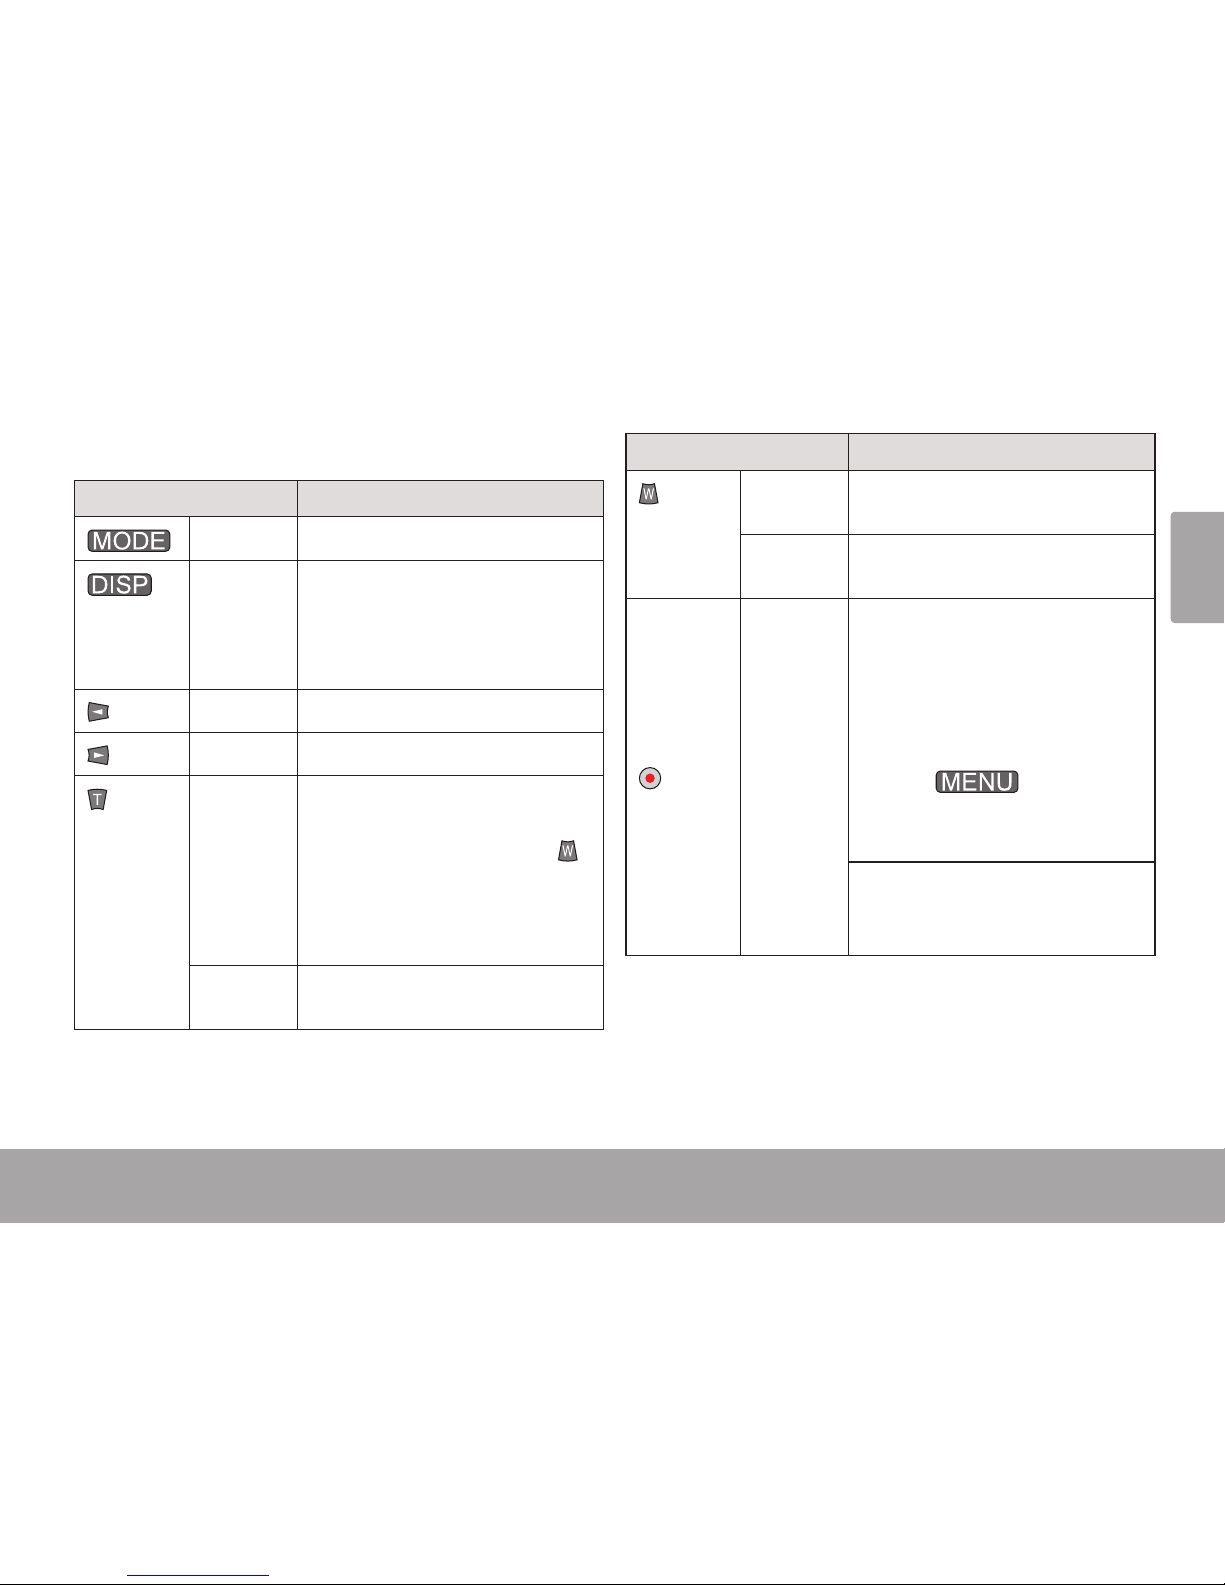
Review Mode Controls
Key Action
Press
Change the function mode.
Press
Change the display mode (full
screen, thumbnail).
Note: Full screen is the default
display mode.
Press
View/select the previous le.
Press
View/select the next le.
Press
Full screen mode:
Increase the zoom level when a
photo le is selected (press
to decrease the zoom level).
Note: Zoom will not work for video
les.
Press
Thumbnail mode:
Select the le above.
Key Action
Press
Full screen mode:
Change to thumbnail mode.
Press
Thumbnail mode:
Select the le below.
Press
Full screen mode:
Start playback when a video le
is selected.
Use the keys shown on •
screen to control playback.
Press •
to stop the
video and return to full screen
mode.
Thumb nail mode:
Select and display the current
le in full screen mode.
Page 30
Page 30 Review Mode
English
Key Action
Press
When you press
, the “De-
lete One” menu will appear.
Select “No” to cancel without •
deleting the current le.
Select “Yes” to delete the •
current le. The le will be
deleted, and you will have the
option to delete the next le
on the camcorder.
Press
Access the options menu.
Review Options Menu
When the camcorder is in Review mode, press
to access the camera options menu.
Press
or to browse the menu items.
Press
or to select an item and ad-
vance to the next screen.
Press
to return to the previous
screen and to exit the menu.
When the display mode is set to thumb-
nail, the only option available is Delete
File(s). To access all options, change
the display mode to full screen.
Press
to change between full
screen and thumbnail modes.
Page 31

English
Review Mode Page 31
Option Description
Lock File(s)
Lock a le to keep it from being deleted.
Lock/Unlock one: Lock or unlock the •
current le.
Lock All: Lock all les.•
Unlock All: Unlock all les.•
Delete File(s)
Delete a le.
One: Delete the current le.•
All: Delete all les.•
Slide Show
Set and start slide show photo display.
Interval: Change the time between •
photos.
Repeat: Set the slide show to repeat.•
Start: Start the slide show with the •
options set above.
Note: This option is not available for video
les.
Option Description
Effect
Apply a special effect to the current
photo. A copy of the photo with the
effect will be created; the original photo
will not be modied.
Note: This option is not available for video
les.
Rotate
Rotate the current photo.
Rotate: Rotates the photo 90 degrees •
clockwise.
Save: Save the rotated photo. A copy •
of the rotated photo will be created;
the original photo will not be modied.
Resize
Decrease the resolution of the current
photo. A copy of the resized photo will
be created; the original photo will not be
modied.
Note: This option is not available for pho-
tos taken at VGA size. This option is
not available for video les.
Page 32

Page 32 Review Mode
English
Option Description
Favorite
Image
Set the current photo for use as the start
up image.
Selection: Select the current photo.•
Note: After the Favorite Image selection
has been made, change the “Start-
up Image” option in the System
Settings menu; the camcorder will
display this photo during the power-
on sequence.
This option is not available for video
les.
Date Stamp
Set a date/time overlay.
Page 33

English
Connecting To A Tv Page 33Connecting To A Tv Page 33
English
Connecting to a Tv Â
To view your video and photo les on a bigger
screen, use the included A/V cable to connect
your camcorder to a television.
Locate the Composite Video input connec-1.
tors on the TV.
Connect the cable’s yellow RCA plug to
the Composite Video In jack of the TV.
Connect the cable’s white RCA plug to
the white Audio In jack of the TV. (The
red jack is unused.)
Turn the camera on. Connect the cable’s 2.
mini plug to the A/V output jack located on
the bottom of the camcorder. The camcorder’s screen will turn off automatically.
Turn on the TV. Set the TV’s input source 3.
mode to display the composite video signal.
When the TV source mode is set properly,
you will see the camcorder’s display on the
TV screen.
Press <MODE> on the camera to place it 4.
Review mode. Use the review mode controls
to play videos or view photos on the TV.
Please refer to the documentation provided with
your TV If you need help setting its input source
mode.
Please refer to the documentation pro-
vided with your TV If you need help
setting its input source mode.
The Video Out format of the camcorder
can be changed in the System Settings
menu. By default, the camcorder is set
to be used in North America (NTSC
format, 60 Hz refresh rate).
For more information, please refer to
the section “Setting the System Options”.
Page 34

Page 34 Managing Files On The Camcorder
English
Page 34 Managing Files On The Camcorder
English
managing Files on the Camcorder Â
Transferring Video and Photo
Files
Connect your camera to a computer to transfer
les from the camcorder to the computer.
Note: If you are planning to install the software
on the included CD, please install these programs BEFORE connecting the camera to your
computer.
Connect the large end of the included USB 1.
cable to a USB port on the computer.
Connect the small end of the USB cable 2.
to the USB connector on the bottom of the
camcorder.
Turn the camcorder on; it will display a USB 3.
icon labeled “MSDC”. The computer will
automatically recognize the camcorder as a
removable disk.
If this is the rst time you are making this
connection, your computer will automatically install device drivers. Wait until the
computer has completed installation of
the drivers before proceeding.
If you have not made the web camera
connection yet (PC CAM), you may see
the message “Device driver software
was not successfully installed”. This is
normal and will not affect operation of the
camcorder. This message will not appear
once the PC CAM connection is made;
please refer to the section “Web Camera
(PC CAM)” for more information.
Page 35

English
Managing Files On The Camcorder Page 35
Follow the prompt on the computer screen 4.
to view les on the camcorder (e.g., “Open
folders to view les”).
If no prompt appears, you may view les
on the camcorder via “My Computer”
on a Windows computer, or via a Finder
window on Mac OS X.
Use your computer’s operating system com-5.
mands to transfer les from the camcorder
to your computer as you would with any
external disk.
Use your mouse to drag and drop les
from one window to another
Use your keyboard to copy/paste les
(e.g., Ctrl-C/Ctrl-V)
If your computer has an SD card read-
er, you can simply remove the SD card
from the camcorder and load it into the
card reader to transfer/manage les.
When the camcorder is connected to a
computer, you can also use the operating system commands to browse, de-
lete, and move les on the camcorder.
The camcorder must be connected to
a powered USB computer port. The
camcorder will not work with low-power
USB ports designed for use with keyboards/mice.
For best performance, connect the
camcorder to a USB 2.0 Hi-speed computer port.
The rst time you connect the camera
to a computer, it may take a moment for
the computer to recognize and install
the appropriate drivers for the camera.
Page 36

Page 36 Managing Files On The Camcorder
English
Deleting Files on the Camcorder
If you do not have immediate access to a computer, place the camcorder in Review mode to
delete les.
Press 1.
to place the camcorder in
Review mode.
Press 2.
or to select a photo or video to
delete.
Press 3.
to delete the le.
Page 37

English
Setting The System Options Page 37Setting The System Options Page 37
English
Setting the System options Â
Access the System Settings menu to adjust the
camcorder’s system options.
To access the System Settings menu:
Press 1.
. The mode options will ap-
pear.
Press 2.
to select the System Settings tab.
Press
or to browse the menu items.
Press
or to select an item and
advance to the next screen.
Press
to return to the previous
screen and to exit the menu.
The System Settings tab can be ac-
cessed in all modes (Camcorder, Camera, and Review).
Option Description
Sounds
Customize the sound cues.
Shutter: Turn the sound on/off when •
you take a picture.
Start-up: Customize the sound when •
you turn on the camcorder. Choose
“None” to turn the start-up sound off.
Beep: Turn the sound on/off when you •
press a key.
Volume: Set the loudness of the •
sound cues.
Page 38

Page 38 Setting The System Options
English
Option Description
Auto Review
After you take a picture, the camcorder
can be set to display the results on
screen immediately for your review.
Off: Disable the Auto Review feature.•
1 sec: Display the review results for •
one second.
3 sec: Display the review results for •
three seconds.
Auto Power
Off
When the camcorder is idle, it can be
set to turn off automatically in order to
conserve battery power.
1min.: Turn the camcorder off after •
one minute of idle time.
3min.: Turn the camcorder off after •
three minutes of idle time.
5min.: Turn the camcorder off after •
ve minutes of idle time
Option Description
Start-up Image
Customize the image that is shown on
screen when you turn on the camera.
Off: Do not display an image.•
System: Show the default image.•
My image: Show a custom image. •
Note: The “My image” option is available
only if you have saved a “Favorite
Image” in Review mode. Please
refer to the section “Review Mode
> Review Options Menu” for more
information.
Date & Time
Set the system clock.
Press •
or to select a eld.
Press •
or to adjust the selected
eld.
Language
Set the menu display language.
Page 39

English
Setting The System Options Page 39
Option Description
USB
Set the default USB mode when the
camcorder is connected to a computer.
MSDC: USB disk mode. Use this •
mode to transfer/manage les on the
camcorder.
PCCAM: Web cam mode. Use the •
camcorder as a web cam (requires
web cam driver installation).
Charge: USB charge mode. Use this •
mode to charge/power the camcorder.
Note: You can change between USB
modes by pressing
.
Video Out
Set the video out format.
TV System: Change between NTSC •
and PAL formats. The standard video
system used in North America is
NTSC.
Refresh Rate: Change between 50Hz •
and 60Hz. The standard refresh rate
used in North America is 60Hz.
Option Description
Format
Reinitialize the internal memory or
memory card.
If a memory card is installed, the •
memory card will be formatted.
If there is no memory card, the •
camcorder’s internal memory will be
formatted.
FORMATTING WILL ERASE AND
DESTROY ALL FILES/DATA. Make a
backup copy of all your video and photo
les before using this feature.
Reset All
Return all of the camcorder’s options to
their factory-default state.
Page 40

Página 40 Using The Included SoftwarePágina 40 Using The Included Software
Español
using the included Software Â
For your convenience, the following software is
included:
muvee™ autoProducer 6.1 Basic.
muvee autoProducer 6 is the latest release in
the range of award-winning autoProducer software. With over 100 styles, there are many ways
to personalize your home production. Whether
you are trying to create a slideshow or a quick
home movie – muvee autoProducer 6 brings a
level of simplicity to the task. Add your photos
and video, select a style, and let it automatically
create and sync a movie to the beat of your
music.
The minimum system requirements for this
software are:
A computer running Windows 7, Windows
Vista, or Windows XP.
A computer with an optical DVD/CD-ROM
drive.
Processor: Intel Pentium III 1 GHz, AMD
Athlon, or equivalent with MMX support
Memory: 512MB RAM
Other Requirements: Microsoft DirectX 9.0
or higher, Apple QuickTime (for MOV les)
For more information about DirectX,
please visit the Microsoft support website:
http://support.microsoft.com/kb/179113/.
For more information about Apple Quick-
Time, please visit the Apple website: http://
www .apple.com/quicktime/download/.
Page 41

English
Using The Included Software Page 41
Installing muvee™ autoProducer
To install muvee autoProducer 6.1 Basic:
Load the included software CD
into your computer’s optical DVD/
CD-ROM drive. When the AutoPlay
window appears, click “Open folder
to view les”.
Note: If an AutoPlay window
does not appear, open Windows
Explorer and double-click the DVD/
CD-ROM drive icon to view its
contents.
Page 42

Page 42 Using The Included Software
English
Double-click the folder “muvee” to
view its contents, then double-click
the folder “Installer” to view its
contents.
Page 43

English
Using The Included Software Page 43
Double-click the le “setup” to start
the installer.
Page 44

Page 44 Using The Included Software
English
Follow the on-screen instructions
to install the driver.
Page 45

English
Using The Included Software Page 45
Restart your computer to complete
the installation.
Page 46

Page 46 Using The Included Software
English
Using muvee™ autoProducer
muvee autoProducer allows you to get creative with your videos and photos. Whether you are trying to create a slideshow or a quick home movie – muvee autoProducer 6 brings a level of simplicity to the task.
To learn more about muvee autoProducer, press the “F1” key on your keyboard to view the Help
les (or select “Help” from the menu bar).
The help documentation refers to the full version of autoProducer 6, not the Basic version that
is included. The basic version of muvee autoProducer 6.1 has the following limitations:
Video les per muvee: 3 Add voiceovers: No
Pictures per muvee: 30 MPEG-1 and MPEG-2 output: No
Music tracks per muvee: 1 DVD burning: No
Add captions: No
Page 47

English
Using The Included Software Page 47
Making a muvee™
Start the program.1.
From your computer’s Start menu, click:
All Programs → muvee → muvee autoProducer
6.1 → Home movies made easy!
Turn on the CAM4505 and connect it to your 2.
computer using the supplied USB cable.
Press 3.
until the screen displays a
USB icon labeled “MSDC”.
Page 48

Page 48 Using The Included Software
English
Add videos and photos from the CAM4505:4.
Click on the “Import from Device” icon.a.
Click “From My Camera Device”b.
Page 49

English
Using The Included Software Page 49
Use the drop-down menu to choose the c.
CAM4505. The internal memory will ap-
pear as the rst removable disk; the SD
card (if loaded) is the second removable
disk.
Click “OK”.d.
To add a soundtrack to the project, click the 5.
music icon.
Page 50

Page 50 Using The Included Software
English
Click on a style to choose a visual style for 6.
this project.
Click the “make muvee” icon to nish creat-7.
ing your muvee.
To save and share your nished muvee, 8.
click the muveeShare icon.
To upload videos to YouTube, you must have a valid YouTube account. To sign up for a
free account, please visit http://www.youtube.com/create_account/.
Page 51

English
Web Camera Function Page 51Web Camera Function Page 51
English
web Camera Function Â
Use your camcorder as a web camera (PC CAM mode).
The web camera function requires:
A computer running Windows 7, Windows Vista, or Windows XP.1.
A computer with an optical DVD/CD-ROM drive.2.
Installation of the included web camera driver.3.
The CAM4505 supports video only in web camera mode;
the integrated microphone is disabled.
Page 52

Page 52 Web Camera Function
English
Installing the Web Camera Driver
To install the SPCA1528 PC Driver:
Load the included software 1.
CD into your computer’s
optical DVD/CD-ROM drive.
When the AutoPlay window
appears, click “Open folder
to view les”.
Note: If an AutoPlay window
does not appear, open Windows
Explorer and double-click the
DVD/CD-ROM drive icon to
view its contents.
Page 53

English
Web Camera Function Page 53
Double-click the folder
“SPCA1528_V2250_WHQL_
MultLan” to view its contents.
Page 54

Page 54 Web Camera Function
English
Double-click the le
“SPCA1528_v2250_WHQL_
MultiLan” to start the installer.
Page 55

English
Web Camera Function Page 55
Follow the on-screen instructions to install the driver.
Page 56

Page 56 Web Camera Function
English
Restart your computer to complete the installation.
Page 57

English
Web Camera Function Page 57
Using the Web Camera
After the web camera driver has been installed:
Connect the camcorder to your computer with the included USB cable.1.
Press 2.
until the camcorder’s display shows a USB icon labeled “PC CAM”.
If this is the rst time you are making this connection, your computer will automatically install
device drivers. Wait until the computer has completed installation of the drivers before proceeding.
After the drivers are installed, your camcorder is ready for use as a web camera with other programs that support video.
The CAM4505 supports video only in web camera mode; the integrated microphone is
disabled.
Page 58

Page 58 Specications
English
Page 58 Specications
English
 Specications Â
Please visit www.cobyusa.com for the latest product information. Design, specications, and
manual are subject to change without notice.
Display Type 2.0” TFT LCD
Image Sensor 3.0 MP CMOS (2048 x 1536)
Video Resolution VGA (640 x 480), 30 fps
QVGA (320 x 240), 30 fps
Zoom 4x digital
Memory 32 MB Flash
Removable Memory Support SD/SDHC (up to 16GB)
Video Format MJPEG (AVI)
Photo Format JPEG
A/V Output 3.5mm Composite Video/Mono Audio
Power Rechargeable lithium-polymer battery
Page 59

English
Troubleshooting & Support Page 59Troubleshooting & Support Page 59
English
 Troubleshooting & Support Â
If you experience a problem with this device, please read the troubleshooting guide below and
check our website at www.cobyusa.com for Frequently Asked Questions (FAQ) and rmware up-
dates. If these resources do not resolve the problem, please contact Technical Support.
Address COBY Electronics Technical Support
150 Knowlton Way
Savannah, GA 31407
Email techsupport@cobyusa. com
Web www.cobyusa.com
Phone 800-727-3592: Monday–Friday, 8:30AM–9:00PM EST
Saturday, 9:00AM-5:30PM EST
718-416-3197: Monday–Friday, 8:00AM–5:30PM EST
Page 60

Page 60 Troubleshooting & Support
English
Camera does not power on.
The battery level may be low. Connect the
camera to a computer to charge.
The camera does not take pictures/video.
The camera’s memory or memory card may
be full. Delete several les and try again.
The memory card type may not be sup-
ported. Make sure that you are using an SD
or SDHC memory card 16GB or less in size.
The memory card format may not be sup-
ported. Make sure that you are using a FATformatted card.
image is blurry or out of focus.
Blurry images or video may result when the
camera is not held steady during recording.
Hold the camera steady and try again.
Blurry images or video may result when
there is not enough light on the subject. Try
recording in a brightly lit location.
recorded images are not saved in memory.
Images will not save if the camera is turned
off before data has nished processing. Be
sure to allow adequate time for the image to
save completely before turning off the video
camera.
Page 61

English
Safety & Regulatory Statements Page 61
Safety & regulatory Statements Â
The lightning ash with arrowhead symbol
within an equilateral triangle is intended to
alert the user to the presence of uninsulated
“dangerous voltage” within the product’s en-
closure that may be of sufcient magnitude
to constitute a risk of electric shock.
The exclamation point within an equilateral
triangle is intended to alert the user to the
presence of important operation and servicing instructions in the literature accompanying the appliance.
For Customer Use:
Enter below the serial number that is located on the rear
of the unit. Retain this information for future reference.
Model No.
Serial No.
For recycling or disposal information
about this product, please contact your
local authorities or the Electronics Industries Alliance: www.eiae.org.
WARNING: To prevent re or shock hazard, do not expose
this device to rain or moisture. Dangerous high voltage is
present inside the enclosure. Do not open the cabinet.
Page 62

Page 62 Safety & Regulatory Statements
English
FCC Statement
This device complies with Part 15 of the FCC Rules. Operation is subject to the following two conditions:
(1) This device may not cause harmful interference.
(2) This device must accept any interference received, including interference that may cause undesired operation.
Note: This equipment has been tested and found to comply with the limits for Class B digital devices, pursuant to Part 15
of the FCC rules. These limits are designed to provide reasonable protection against harmful interference in a residential
installation. This equipment generates, uses and can radiate radio frequency energy and, if not installed and used in accordance with the instructions, may cause harmful interference to radio communications. However, there is no guarantee
that interference will not occur in a particular installation. If this equipment does cause harmful interference to radio or
television reception, which can be determined by turning the equipment off and on, the user is encouraged to try to correct the interference by one or more of the following measures:
Reorient or relocate the receiving antenna.•
Increase the separation between the equipment and receiver.•
Connect the equipment into an outlet on a circuit different from that to which the receiver is connected.•
Consult the dealer or an experienced radio/TV technician for help•
Use of shielded cable is required to comply with Class B limits in Subpart B of Part 15 of the FCC rules.
Do not make any changes or modications to the equipment unless otherwise specied in the manual. If such changes or
modications should be made, you could be required to stop operation of the equipment.
Page 63

English
Safety & Regulatory Statements Page 63
Important Safety Instructions
Read Instructions: All the safety and operating instruc-1.
tions should be read before the product is operated.
Retain Instructions: The safety and operating instruc-2.
tions should be retained for future reference.
Heed Warnings: All warnings on the product and in the 3.
operating instructions should be adhered to.
Follow Instructions: All operating and usage instruc-4.
tions should be followed.
Cleaning: Unplug this product from the wall outlet 5.
before cleaning. Do not use liquid cleaners or aerosol
cleaners. Use a damp cloth for cleaning.
Attachments: Use only attachments recommended by 6.
the manufacturer. Use of other attachments may be
hazardous.
Water and Moisture: Do not use this product near 7.
water (e.g., near a bath tub, washbowl, kitchen sink,
laundry tub, in wet basements, or near a swimming
pool and the like).
Ventilation: Slots and openings in the cabinet are 8.
provided for ventilation to ensure reliable operation of
the product and to protect it from overheating. These
openings should never be blocked by placing the product on a bed, sofa, rug, or other similar surface. This
product should not be placed in a built-in installation
such as a bookcase or rack unless proper ventilation
is provided or the manufacturer instructions have been
adhered to.
Power Sources: This product should be operated only 9.
from the type of power source indicated on the rating
label. If you are not sure of the type of power supply
to your home, consult your product dealer or local
power company. For products intended to operate from
battery power or other sources, refer to the operating
instructions.
Overloading: Do not overload wall outlets, extension 10.
cords, or integral convenience receptacles as this can
result in a risk of re or electric shock.
Page 64

Page 64 Safety & Regulatory Statements
English
Object and Liquid Entry: Never push objects of any 11.
kind into this product through openings as they may
tap dangerous voltage points or shout-out parts that
could result in a re or electric shock. Never spill liquid
of any kind on the product.
Servicing: Do not attempt to service this product your-12.
self as opening or removing covers may expose you to
dangerous voltage or other hazards. Refer all servicing
to qualied service personnel.
Damage Requiring Service: Unplug this product from 13.
the wall outlet and refer servicing to qualied service
personnel under the following conditions: a) when the
power-supply or plug is damaged; b) if liquid has been
spilled or if objects have fallen into the product; c) if
the product has been exposed to rain or water; d) if
the product does not operate normally by following the
operating instructions. Adjust only those controls that
are covered by the operating instructions as improper
adjustment of other controls may result in damage and
will often require extensive work by a qualied technician to restore the product to its normal operation; e)
if the product has been dropped or damaged in any
way; f) when the product exhibits a distinct change in
performance—this indicates a need for service.
Replacement Parts: When replacement parts are 14.
required, be sure that your service technician has
used replacement parts specied by the manufacturer
or have the same characteristics as the original part.
Unauthorized substitutions may result in re, electric
shock, or other hazards.
Safety Check: Upon completion of any service or 15.
repairs to this product, ask the service technician to
perform safety checks to ensure that the product is in
proper operating condition.
Heat: The product should be situated away from heat 16.
sources such as radiators, heat registers, stoves, or
other products (including ampliers) that produce heat.
Maintenance and Care
Always secure the camera with the wrist 1.
band when in use to prevent accidental damage to the camera.
Always store the camera in the pouch pro-2.
vided to prevent scratches to the camera
lens and screen.
Page 65

English
Safety & Regulatory Statements Page 65
To clean the lens:3.
Blow away the dust from the surface of a.
the lens.
Gently wipe the lens clean with a micro-b.
ber cloth designed for cleaning lenses/
optical devices. If necessary, use lens
cleaner ONLY. Never use organic sol-
vents to clean the camera.
Never touch the lens.4.
This digital video camera is suitable for 5.
environments between 0°C- 40°C (32°F-104°F). Do not expose the camera to extremely
high temperatures, such as in a car parked
in direct sunlight, or to excessive humidity.
To prevent condensation, keep the camera 6.
in a sealed plastic bag when moving from a
cold place to a warm place. The camera can
be removed from the bag when it reaches
the indoor temperature.
Legal and Trademark Notices
Coby is a registered trademark of Coby Electronics Corporation.
Snapp and the Snapp logo used are trademarks of COBY Electronics
Corporation.
The YouTube logo used is a registered trademark of Google, Inc.
muvee and the muvee logo are trademarks of muvee Technologies
Pte. Ltd., Inc.
SDHC is a registered trademark of the SD Card Association.
USB is a registered trademark of the USB Implementers Forum, Inc.
All other trademarks and logos are property of their respective owners
unless indicated otherwise.
Page 66

Español
Página 66 Índice De Contenidos
Índice de Contenidos Â
muChaS GraCiaS ........................................................................................................................6
Contenidos del paquete ...............................................................................................................6
Características ................................................................................................................................6
panorama de la Grabadora de video ................................................................................8
para empezar .............................................................................................................................16
Inserción de una tarjeta de memoria ........................................................................................16
Carga de la grabadora ...............................................................................................................17
Encendido de la grabadora .......................................................................................................17
Modos de función .........................................................................................................................18
modo Grabadora ...................................................................................................................19
Panorama de la pantalla de la grabadora de video .............................................................19
Grabación de video ....................................................................................................................20
Controles de la Grabadora ........................................................................................................21
Menú de opciones de la grabadora .........................................................................................22
Page 67

Español
Índice De Contenidos Página 67
modo de Cámara ....................................................................................................................23
Panorama de la pantalla de la cámara ...................................................................................23
Tomar una fotografía ....................................................................................................................24
Controles de la cámara .............................................................................................................25
Menú de opciones de la cámara ..............................................................................................26
modo de viSTa previa ..............................................................................................................28
Panorama de la pantalla de vista previa ..................................................................................28
Controles del modo de revisión ..................................................................................................29
Menú de opciones de vista previa .............................................................................................31
Conexión a un aparaTo de Tv ..............................................................................................34
adminiSTraCión de arChivoS en la Cámara de video ..................................................35
Transferencia de archivos de video y fotografía ....................................................................35
Borrado de archivos en la grabadora .......................................................................................37
ConFiGuraCión de laS opCioneS del SiSTema ..................................................................38
uSo del SoFTware inCluido ....................................................................................................42
Instalación de muvee™ autoProducer .....................................................................................43
Uso de muvee™ autoProducer ...................................................................................................48
Realización de un muvee™ ..............................................................................................49
Page 68

Español
Página 68 Índice De Contenidos
FunCión de Cámara web ........................................................................................................53
Instalación del controlador de cámara Web ..........................................................................54
Uso de la cámara Web ................................................................................................................59
SpeCiFiCaTionS ...........................................................................................................................60
SoluCión de problemaS Y SoporTe ......................................................................................61
inFormaCión imporTanTe ......................................................................................................63
Declaración de la FCC ................................................................................................................64
Instrucciones de Seguridad Importantes ...................................................................................65
Mantenimiento y Cuidado ..........................................................................................................66
Page 69

Español
Índice De Contenidos Página 69
Page 70

Español
Página 70 Muchas Gracias
muchas Gracias Â
Gracias por comprar este producto de Coby Electronics. Para un rendimiento y seguridad óptimos,
lea este manual cuidadosamente. Antes de conectar, operar o regular este producto, lea completamente las instrucciones. Conserve este manual para referencias futuras.
Contenidos del paquete
Asegúrese de que los elementos que se muestran más abajo estén incluidos en el paquete.
Si faltara algún artículo, comuníquese con el
minorista local a quien compró el producto.
Unidad principal (CAM4505)
Cable A/V
Cable USB
Correa para mano des mon table
Estuche
CD de instala ción
Manual de instrucciones
Este paquete puede contener bolsas
plásticas u otros materiales que son
riesgosos para los niños. Asegúrese
de eliminar todo el material de empaque de forma segura luego de abrir
el paquete.
Características
Pantalla LCD TFT brillante a todo color de
2.0”
Más de 2 horas de grabación de video (con
la tarjeta SDHC)
†
Modo de cámara le permite tomar fotos de
3MP *
Page 71

Español
Muchas Gracias Página 71
Algunas de las características avanzadas
que posee son captura estática y zoom
digital
Ver vídeos grabados y fotos en un televisor
con el cable de HDMI
Editar vídeo y subirlos a YouTube ™ con el
software incluido de muvee™
‡
Compatible con tarjetas de memoria SD/
SDHC de hasta 16 GB de tamaño
Conector integrada USB 2.0 Hi-speed para
transferencia rápida de archivos
Batería recargable de litio-polímero
† 2 horas de grabación si se utiliza una tarjeta SDHC de
4GB. No se incluye tarjeta SDHC. El tiempo de gra-
bación real puede variar.
‡ Fonction disponible sous Windows uniquement.
* 5MP es posible mediante el uso de resolución interpo-
lada
Page 72

Español
Página 72 Panorama De La Grabadora De Video
panorama de la grabadora de video Â
Nombre/botón
Función / Descripción
Grabadora Cámara Vista previa
1 Montaje de la correa Adjunte la correa de mano incluida aquí.
2 Ranura para tarjeta SD Coloque tarjetas de memoria SD o SDHC aquí.
3 [Power]
Presione y mantenga presionado para encender o apagar la grabadora.
4 Conector de salida A/V
Conexión par ver fotografías y videos en el televisor. Use con el cable A/V
incluido.
5 Conector USB
Conexión para cargar/transferir archivos a una computadora. Use con el
cable USB incluido.
Page 73

Español
Panorama De La Grabadora De Video Página 73
Page 74

Español
Página 74 Panorama De La Grabadora De Video
Nombre/botón
Función / Descripción
Grabadora Cámara Vista previa
6 Pantalla Pantalla de LCD.
7 Indicador de carga
Las luces son de color rojo cuando se está cargando la grabadora.
Las luces son de color verde cuando la grabadora está totalmente cargada.
8 [MODE]
Cambie la función.
Cambie el modo de conexión durante la conexión a una computadora (grabadora,
disco MSDC, cámara Web de PC)
9 [DISP]
Cambie el tamaño de grabación de una película.
Cambie la resolución de
una fotografía.
Cambie el modo de visualización (pantalla completa,
miniatura).
Sólo durante la vista
previa de video: Muestra la
pantalla.
10 [MENU]
Acceda al menú de opciones.
11 [DELETE]
-- --
Borre el archivo seleccionado.
Page 75

Español
Panorama De La Grabadora De Video Página 75
Page 76

Español
Página 76 Panorama De La Grabadora De Video
Nombre/botón
Función / Descripción
Grabadora Cámara Vista previa
12
[ARRIBA]
Aumente el nivel de zoom.
Aumente el nivel de
zoom.
Sólo para vista previa de fotografías: Aumente el nivel de
zoom.
Menú: Desplácese por la lista de menú.
[ABAJO]
Disminuya el nivel de
zoom.
Disminuya el nivel de
zoom.
Sólo para vista previa de fotografías: Disminuya el nivel de
zoom.
Menú: Desplácese por la lista de menú.
[IZQUIERDA]
-- -- Vea el archivo anterior.
Menú: Regrese a la pantalla anterior.
[DERECHA]
-- -- Vea el archivo siguiente.
Menú: Pase a la siguiente pantalla de opciones.
13
[RECORD/
OK]
Inicie o detenga la grabación de un video.
T o me un a fot ogra fía .
Muestra el modo de “d espl azamien t o”
cuando el nivel de zoom es mayor a
1. Cua ndo el modo de “ desplazamiento” está activado, use las teclas de
dirección para desplazarse por la
fotografía aumentada.
Menú: Seleccione una opción.
Page 77

Español
Panorama De La Grabadora De Video Página 77
Page 78

Español
Página 78 Panorama De La Grabadora De Video
Nombre/botón
Función / Descripción
Grabadora Cámara Vista previa
14 Altavoces Salida de sonido.
15 Lente Grabe videos y tome fotografías. Evite tocar o rayar la supercie de la lente.
16 [RESET]
Reinicia la unidad. Presione suavemente este botón con un sujetapapeles en
caso de que la unidad se bloquee o funcione en forma anormal.
Page 79

Español
Panorama De La Grabadora De Video Página 79
Page 80

Español
Página 80 Para Empezar
Inserción de una tarjeta de
memoria
Use una tarjeta de memoria SD/SDHC para
expandir la memoria
disponible de su cámara de video digital.
La CAM4505 puede
alojar tarjetas de
memoria de hasta 16
GB. Instale una tarjeta
de memoria insertándola suavemente en la
ranura para tarjetas SD que se encuentra en el
lado izquierdo de la cámara de video.
Para quitar la tarjeta de memoria, presione un
poco más la tarjeta dentro de la ranura y luego
suéltela. La tarjeta debe eyectarse automática-
mente de la ranura. Tómela por el borde y tire
suavemente de ella para quitarla totalmente.
Para evitar la corrupción de datos,
apague la cámara de video digital antes de insertar o quitar una tarjeta de
memoria.
No intente colocar ningún otro objeto
que no sea una tarjeta de memoria
SD en la ranura correspondiente. Las
tarjetas de memoria compatible se
deslizan fácilmente en la ranura; si encuentra resistencia, no trate de forzar
la tarjeta.
Para información sobre cómo dar formato
a una tarjeta de memoria, vea la sección
Menú Conguración de este manual.
para empezar Â
Lea y complete los siguientes pasos para comenzar a utilizar su grabadora de video digital.
Page 81

Español
Para Empezar Página 81
Carga de la grabadora
La grabadora cuenta con una batería recargable
integrada. Luego del primer uso, la batería debe
cargarse completamente para garantizar que
el rendimiento y la vida útil de la batería sean
óptimos. Si la grabadora no se ha utilizado por
un tiempo, se deberá recargar la batería.
Luego del primer uso, la batería debe
cargarse completamente para garantizar
que el rendimiento y la vida útil de la batería sean óptimos.
La batería utilizada en este dispositivo
puede producir incendios o quemaduras
químicas si se la trata de manera incorrecta. No desarme, incinere ni caliente la
batería. No deje el dispositivo en lugares
con luz solar directa o en un vehículo con
las ventanas cerradas.
No conecte el dispositivo a una fuente
de alimentación que no sea la indicada
en este manual o en la etiqueta, ya que
puede provocar incendio o descarga
eléctrica.
Encendido de la grabadora
Para encender la grabadora, mantenga presionado hasta que se encienda la pantalla.
Para apagar la grabadora, mantenga presionado hasta que se apague la pantalla.
Page 82

Español
Página 82 Para Empezar
Modos de función
La grabadora tiene 3 funciones.
Icono Función
Modo grabadora.
Seleccione para grabar películas de video.
Modo de cámara
Seleccione para tomar fotografías.
Modo de vista previa.
Seleccione para reproducir/ver archivos de
video y fotografías.
Presione
para cambiar el modo de
reproducción.
El icono de modo en la parte superior de la
pantalla indica la función actual.
Page 83

Español
Modo Grabadora Página 83
modo grabadora Â
Use el modo de grabadora para grabar videos.
Panorama de la pantalla de la
grabadora de video
AUTO
00 : 06 : 12320
1
7
2 3 4
5
6
Indicador Icono Descripción
1 Mode
(modo)
Modo grabadora. Presione
para cambiar.
2 Balance de
blanco
Auto (automático)
Luz de día
Nublado
Fluorescente
Tungsteno
3 Medición
Central
Multi
Spot
4 Resolución
de video
640 x 480
320 x 240
Page 84

Español
Página 84 Modo Grabadora
Indicador Icono Descripción
5 Temporiza-
dor
--
Muestra la cantidad de tiempo de grabación restante
al detenerse una grabación.
Muestra el tiempo transcurrido de grabación al grabar.
6 Tarjeta de
memoria
--
Indica que se ha cargado
una tarjeta de memoria SD.
7 Carga de
las baterías
Completa
Media
Baja
Grabación de video
Cuando la grabadora está en modo de grabación:
Presione
para comenzar la grabación.
Presione
para guardar la grabación.
La grabación se detendrá automática-
mente cuando la tarjeta de memoria
esté llena.
Durante la grabación, se muestra el ti-
empo total transcurrido en la esquina
superior derecha de la pantalla de LCD.
Cuando la grabadora no está graban-
do, aparecerá el tiempo estimado de
grabación disponible en la esquina superior derecha.
Page 85

Español
Modo Grabadora Página 85
Controles de la Grabadora
Tecla Acción
Presione
Cambie la función.
Presione
Inicie o detenga la grabación de
un video.
Presione
Cambie el tamaño de video de
la grabación.
El indicador de tamaño se
muestra en la parte superior de
la pantalla.
[640] = 640 x 480
[320] = 320 x 240
Nota: Un tamaño más grande de
video resultará en tamaños
más grandes de archivos.
Tecla Acción
Presione
Aumente el nivel de zoom.
El nivel de zoom se mostrará en
la esquina inferior derecha de la
pantalla.
Nota: La calidad de la imagen
disminuirá a medida que
aumente el nivel de zoom.
Mantenga
presionado
Aumente rápidamente el nivel
de zoom.
Presione
Disminuya el nivel de zoom.
El nivel de zoom se mostrará en
la esquina inferior derecha de la
pantalla
Mantenga
presionado
Disminuya rápidamente el nivel
de zoom.
Presione
Acceda al menú de opciones.
Page 86

Español
Página 86 Modo Grabadora
Menú de opciones de la
grabadora
Cuando la grabadora está en modo de grabadora, presione
para acceder al menú
de opciones de la grabadora.
Presione
o para buscar los elementos
del menú.
Presione
o para seleccionar un el-
emento y avanzar a la pantalla siguiente.
Presione
para regresar al nivel de menú
anterior.
Presione
para salir del menú del
sistema.
Opción Descripción
Dimensión de
la película
Cambie el tamaño de video de la grabación.
[640] = 640 x 480 •
[320] = 320 x 240 •
Opción Descripción
Velocidad de
cuadro
Congura la frecuencia de cuadros de
la grabadora.
Alto = 30 cuadros por segundo•
Bajo = 15 cuadros por segundo•
Medición
Congure el modo de medición. Afecta
la exposición de la imagen.
Central: Mide desde el centro de la •
pantalla.
Multi: Mide a través de varias zonas.•
Spot: Mide desde un pequeño punto •
hasta el centro de la pantalla.
Balance de
blanco
Congure el balance de blanco. Afecta
el color de la imagen.
Page 87

Español
Modo De Cámara Página 87
modo de Cámara Â
Use el modo de cámara para tomar fotografías.
Panorama de la pantalla de la
cámara
AUTO
558
1
9
2 6
7
8
3 5
4
Indicador Icono Descripción
1 Mode
(modo)
Modo de cámara. Presione
para cambiar.
2 Balance
de blanco
Auto (automático)
Luz de día
Nublado
Fluorescente
Tungsteno
3 Medición
Central
Multi
Spot
4 Nivel de EV
Valor de exposición
5 Reso-
lución
fotográca
5M
5 megapíxeles = 2592 x 1944
3M
3 megapíxeles = 2048 x 1536
1M
1 megapixel = 1280 x 960
VGA
VGA = 640 x 480
Page 88

Español
Página 88 Modo De Cámara
Indicador Icono Descripción
6 Com-
pression
Quality
Súper no
Fino
Normal
7 Memory
Capacity
--
Muestra la cantidad de fotografías restantes.
8 Memory
Card
--
Indica que se ha cargado una
tarjeta de memoria SD.
9 Battery
Level
Completa
Media
Baja
Tomar una fotografía
Cuando la grabadora está en modo de cámara:
Dirija el lente al sujeto. Use la pantalla para
enmarcar al sujeto.
Sostenga rmemente la unidad. Presione
para tomar la fotografía.
Para obtener mejores resultados,
asegúrese de que los sujetos estén bien
iluminados. La calidad de la imagen
se deteriorará si las fotos se toman en
condiciones de poca luz.
Mantenga la unidad y el sujeto lo más
quietos posibles cuando tome fotografías en condiciones de poca luz.
Page 89

Español
Modo De Cámara Página 89
Controles de la cámara
Tecla Acción
Presione
Cambie la función.
Presione
Tome una fotografía.
Presione
Cambie el tamaño de la
fotografía.
El indicador de tamaño se
muestra en la parte superior de
la pantalla..
[5M] = 2592 x 1944 •
[3M] = 2048 x 1536•
[1M] = 1280 x 960•
[VGA] = 640 x 480 •
Nota: La conguración [5M] usa
interpolación de software
para lograr una resolución
de 2592 x 1944.
Tecla Acción
Presione
Aumente el nivel de zoom.
El nivel de zoom se mostrará
en la esquina inferior derecha
de la pantalla. .
Nota: La calidad de la imagen
disminuirá a medida que
aumente el nivel de zoom..
Mantenga
presionado
Aumente rápidamente el nivel
de zoom.
Presione
Disminuya el nivel de zoom.
El nivel de zoom se mostrará
en la esquina inferior derecha
de la pantalla.
Mantenga
presionado
Disminuya rápidamente el nivel
de zoom.
Presione
Acceda al menú de opciones.
Page 90

Español
Página 90 Modo De Cámara
Menú de opciones de la cámara
Cuando la grabadora está en modo de cámara,
presione
para acceder al menú de
opciones de la cámara.
Presione
o para buscar los elementos
del menú.
Presione
o para seleccionar un el-
emento y avanzar a la pantalla siguiente.
Presione
para regresar al nivel de menú
anterior.
Presione
para salir del menú del
sistema.
Opción Descripción
Resolución
Congure la resolución de una fotografía.
Nota: La conguración [5M] usa interpo-
lación de software para lograr una
resolución de 2592 x 1944.
Opción Descripción
Calidad
Congure la calidad de la fotografía
guardada.
Súper no: La baja compresión resulta •
en un tamaño más g ra nd e de a rch ivo.
Fino : La compres ió n med i a res u lta e n •
un tamaño media no d e ar chi v o.
Normal: La compresión alta resulta en •
un tamaño pequeñ o de a r chi v o.
Medición
Congure el modo de medición. Afecta
la exposición de la imagen.
Central: Mide desde el centro de la •
pantalla.
Multi: Mide a través de varias zonas.•
Spot: Mide desde un pequeño punto •
hasta el centro de la pantalla.
Balance de
blanco
Congure el balance de blanco. Afecta
el color de la imagen.
Page 91

Español
Modo De Cámara Página 91
Opción Descripción
Exposición
Congura el nivel de exposición.
Un valor más a lt o p rod uce un a i ma ge n •
más brillante.
Un valor más bajo produce una imagen •
más oscura.
Modo Controlador
Active el temporizador automático o el
modo ráfaga.
Temporizador automático 2S: Espera •
2 segundos luego de presionar
para tomar una fotografía.
Temporizador automático 10S: Espera •
10 segundos luego de presionar
para tomar una fotografía.
Ráfaga: Presione •
para tomar 3
fotografías seguidas rápidamente.
Efecto
Congure un efecto de fotografía.
Sello de fecha
Congure superposición de fecha/hora.
Page 92

Español
Página 92 Modo De Vista Previa
modo de vista previa Â
Use el modo de vista previa para ver y reproducir videos y fotografías guardados en la grabadora.
Panorama de la pantalla de vista
previa
8 / 8
1
2
3
Indicador Icono Descripción
1 Salida de
video
Indica que el archivo actual es
un video. Presione
para
reproducir el video.
Si no hay icono, el archivo es
una fotografía.
Nota: En la vista en miniatura,
los archivos de video están
marcados con la letra “V”.
2 Cantidad de
archivos
Archivo actual / Archivos
totales
3 Carga
de las
baterías
Completa
Media
Baja
Page 93

Español
Modo De Vista Previa Página 93
Controles del modo de revisión
Tecla Acción
Presione
Cambie la función.
Presione
Cambie el modo de visualización (pantalla completa,
miniatura).
Nota: La pantalla completa es el
modo de visualización por
defecto.
Presione
Vea/seleccione el archivo
anterior.
Presione
Vea/seleccione el archivo
siguiente.
Tecla Acción
Presione
Modo de pantalla completa Aumente el nivel de zoom cuando
seleccione una fotografía (presione
para disminuir el nivel
de zoom).
Note: El zoom no funciona en
archivos de video.
Modo de miniatura: Seleccione
el archivo superior.
Presione
Modo de pantalla completa
Cambie al modo de vistas en
miniatura.
Modo de miniatura: Seleccione
el archivo inferior.
Page 94

Español
Página 94 Modo De Vista Previa
Tecla Acción
Presione
Modo de pantalla completa
Inicie la reproducción cuando
seleccione un archivo de video.
Use las teclas en pantalla •
para controlar la reproducción.
Presione •
para
detener el video y regresar al
modo de pantalla completa.
Modo de vistas en miniatura:
Seleccione y muestre el archivo
actual en modo de pantalla
completa.
Tecla Acción
Presione
Cuando presiona
, el menú
“Borrar uno” aparecerá en
pantalla.
Seleccione “No” para cancelar •
sin borrar el archivo actual.
Seleccione “Sí” para borrar el •
archivo actual. El archivo se
borrará y tendrá la opción de
borrar el archivo siguiente en
la grabadora.
Presione
Acceda al menú de opciones.
Page 95

Español
Modo De Vista Previa Página 95
Menú de opciones de vista previa
Cuando la grabadora está en modo de vista
previa, presione
para acceder al menú
de opciones de la cámara.
Presione
o para buscar los elementos
del menú.
Presione
o para seleccionar un el-
emento y avanzar a la pantalla siguiente.
Presione
para regresar a la pantalla
anterior y salir del menú.
Cuando el modo de visualización está
congurado en miniatura, la única opción disponible es Borrar archivo(s).
Para acceder a todas las opciones,
cambie el modo de visualización a
pantalla completa.
Presione
para cambiar entre
los modos de pantalla completa y miniatura.
Opción Descripción
Bloquear
archivos
Bloquee un archivo para evitar que se
borre.
Bloquear/desbloquear uno: Bloquee o •
desbloquee el archivo actual.
Bloquear todos: Bloquea todos los •
archivos.
Desbloquear todos: Desbloquea todos •
los archivos.
Borrar archivos
Borra un archivo.
Uno: Borre el archivo actual.•
Todos: Borra todos los archivos.•
Page 96

Español
Página 96 Modo De Vista Previa
Opción Descripción
Muestra de
imágenes
Congure e inicie la visualización de
fotografías como muestra de imágenes.
Intervalo: Cambie el tiempo entre •
fotografías.
Repetición: Congure para que se •
repita la muestra de imágenes.
Inicio: Inicie la muestra de fotografías •
con las opciones anteriormente con-
guradas.
Nota: Esta opción no está disponible para
archivos de video.
Effect
Aplique un efecto especial a la foto
actual. Se creará una copia de la
fotografía con el efecto; la fotografía
original no se modicará.
Nota: Esta opción no está disponible para
archivos de video.
Opción Descripción
Rotate
Rote la fotografía actual.
Rotar: Rote la fotografía a 90 grados •
en sentido horario.
Guardar: Guarde la foto rotada. Se •
creará una copia de la fotografía
rotada; la fotografía original no se
modicará..
Redimensionar
Disminuya la resolución de la fotografía
actual. Se creará una copia de la
fotografía redimensionada; la fotografía
original no se modicará.
Note: Esta opción no está disponible para
fotografías tomadas en tamaño
VGA. Esta opción no está disponible
para archivos de video.
Page 97

Español
Modo De Vista Previa Página 97
Opción Descripción
Imagen
favorita
Congure la fotografía actual para
usarla como imagen de inicio.
Selección: Seleccione la foto actual.•
Nota: Luego de seleccionar la imagen
favorita, cambie la opción “Imagen
de inicio” en el menú de congu-
raciones del sistema; la grabadora
mostrará esta fotografía durante la
secuencia de encendido.
Esta opción no está disponible para
archivos de video.
Sello de fecha
Congure superposición de fecha/hora.
Page 98

Español
Página 98 Conexión A Un Aparato De Tv
Conexión a un aparato de Tv Â
Para ver los archivos de video y fotografía en una
pantalla m á s gr an de, use el cable A/V incluido
para conectar la graba d ora a u n t e levisor.
Ubique los conectores de entrada de video 1.
compuesto en el televisor.
Conecte el enchufe RCA amarillo del
cable en el enchufe de video compuesto
del televisor.
Conecte el enchufe RCA blanco del
cable en el enchufe blanco de entrada de
audio del televisor. (El enchufe rojo no
se utiliza.)
Encienda la cámara. Conecte el mini 2.
enchufe del cable al enchufe de salida A/V
ubicado en la parte inferior de la grabadora.
La pantalla de la grabadora se apagará
automáticamente.
Encienda el televisor. Congure el modo de 3.
fuente de entrada del televisor para que se
muestre la señal de video compuesto. Cuan-
do el modo de fuente del televisor se haya
congurado correctamente, verá la pantalla
de la grabadora en la pantalla del televisor.
Presione 4.
en la cámara para cambiar a modo de vista previa. Use el modo
de vista previa para reproducir videos o ver
fotografías en el televisor.
Consulte la documentación provista con su
televisor en caso de necesitar ayuda para
congurar el modo de fuente de entrada.
El formato de salida de video de la gra-
badora se puede cambiar desde el menú
Conguraciones del sistema. Por defec-
to, la grabadora está congurada para
usarse en Norteamérica (formato NTSC,
frecuencia de refresco de 60 Hz).
Para obtener más información, con-
sulte la sección “Conguración de las
opciones del sistema”
Page 99

Español
Administración De Archivos En La Cámara De Video Página 99
administración de archivos en la cámara Â
de video
Transferencia de archivos de
video y fotografía
Conecte la cámara a una computadora para
transferir los archivos de la grabadora a la
computadora.
Nota: Si planea instalar el software del CD
incluido, instale estos programas ANTES de
conectar la cámara a la computadora.
Conecte el extremo grande del cable USB 1.
incluido a un puerto USB en la computadora.
Conecte el extremo pequeño del cable USB 2.
al conector USB en la parte inferior de la
grabadora.
Encienda la grabadora; mostrará un icono 3.
USB denominado “MSDC”. La computadora
reconocerá automáticamente la grabadora
como un disco extraíble.
Si esta es la primera vez que realiza esta
conexión, la computadora instalará los
controladores del dispositivo automáticamente. Espere hasta que la computadora
haya completado la instalación de los
controladores antes de continuar.
Si aún no realizó la conexión de la cá-
mara web (PC CAM), verá el mensaje “El
software de controlador del dispositivo no
se instaló correctamente”. Esto es normal
y no afectará el funcionamiento de la
grabadora. Este mensaje desaparecerá
cuando realice la conexión PC CAM.;
consulte la sección “Cámara web (PC
CAM)” para obtener más información.
Page 100

Español
Página 100 Administración De Archivos En La Cámara De Video
Siga las indicaciones en la pantalla de la 4.
computadora para ver los archivos en la
grabadora (p. ej., “Abra las carpetas para ver
los archivos”).
Si no hay indicaciones en pantalla, puede
ver los archivos en la grabadora en “Mi
PC” en una computadora con Windows o
en la ventana Finder en Mac OS X.
Use los comandos del sistema operativo de 5.
su computadora para transferir archivos de
la grabadora a la computadora, como haría
con cualquier disco externo.
Use el ratón para arrastrar y soltar archi-
vos de una ventana a la otra
Use el teclado para copiar/pegar archivos
(p. ej. Ctrl-C/Ctrl-V)
Si la computadora tiene una lectora de
tarjetas SD, puede simplemente quitar
la tarjeta SD de la grabadora e insertarla en el lector de tarjetas para transferir/administrar archivos.
Cuando la grabadora está conectada a
una computadora, también puede usar
los comandos del sistema operativo
para ver, borrar y mover archivos en la
grabadora.
 Loading...