

Page 1
Instruction Manual
Please read this manual carefully before operation.
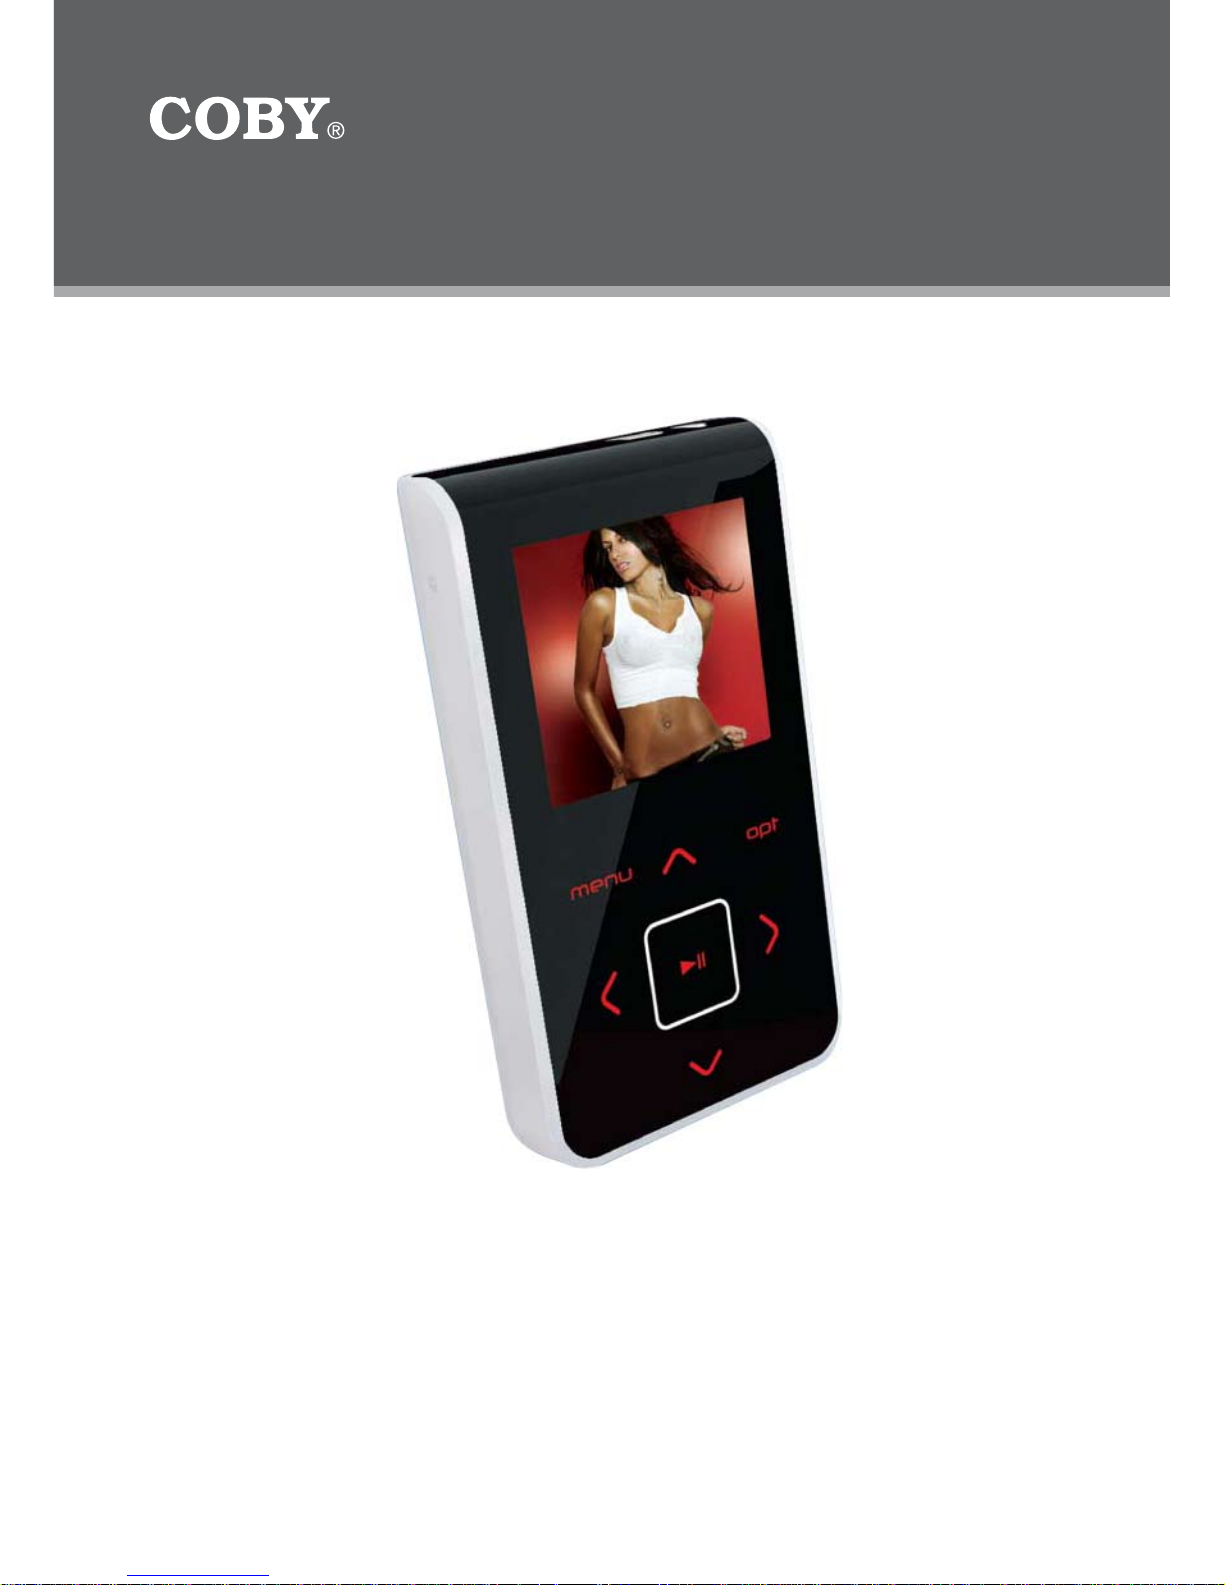
8GB MICRO HARD DISK MP3 PLAYER with
VIDEO PLAYBACK
MP-C983
Page 2
2
Page 2 Coby Electronics Corporation
www.cobyusa.com Page 3
For Customer Use:
Enter below the serial number that is located on the
bottom of the unit. Retain this information for future
reference.
Model No. MP-C983
Serial No.
CAUTION
RISK OF ELECTRIC SHOCK
DO NOT OPEN
CAUTION: TO REDUCE THE RISK OF FIRE AND ELECTRIC SHOCK, DO NOT REMOVE THE COVER (OR BACK)
OF THE UNIT. REFER SERVICING ONLY TO QUALIFIED
SERVICE PERSONNEL.
The lightning ash with arrowhead symbol within an equilateral triangle is intended to alert
the user to the presence of uninsulated “dangerous voltage” within the product’s enclosure
that may be of sufcient magnitude to constitute a risk of electric shock.
The exclamation point within an equilateral triangle is intended to alert the user to the presence of important operation and servicing instructions in the literature accompanying the
appliance.
WARNING:
To prevent re or shock hazard, do not expose this device to rain or moisture. Dangerous high voltage is present inside the
enclosure. Do not open the cabinet.
CAUTION:
To prevent electric shock, match wide blade of plug to wide slot of outlet and fully insert.
WARNING:
Handling the cords on this product will expose you to lead, a chemical known to the State of California to cause cancer, and birth
defects or other reproductive harm. Wash hands after handling.
NOTICE:
This product is protected by certain intellectual proper ty rights of Microsoft. Use or distribution of such technology outside of this
product is prohibited without a license from Microsoft.
Protect your hearing:
Hearing experts advise against the constant use of personal stereos played at high volume. Constant exposure to high volumes
can lead to hearing loss. If you should experience ringing in the ears or hearing loss, discontinue use and seek medical advice.
PRECAUTIONS
For recycling or disposal information about this product, please
contact your local authorities or the Electronics Industries Alliance:
www.eiae.org.
Page 3

www.cobyusa.com Page 3
PRECAUTIONS
Regulatory Information
This device complies with part 15 of FCC rules. Operation is subject to the following two conditions:
This device may not cause harmful interference, and
This device must accept any interference received, including interference that may cause
undesired operation.
FCC Notice:
This equipment has been tested and found to comply with the limits for a Class B digital device,
pursuant to part 15 of the FCC Rules. These limits are designed to provide reasonable protection
against harmful interference in a residential installation. This equipment generates, uses, and can
radiate radio frequency energy and, if not installed and used in accordance with the instructions,
may cause harmful interference to radio communications. However, there is no guarantee that
interference will not occur in a particular installation. If this equipment does cause harmful interference to radio and television reception, which can be determined by turning the equipment off
and on, the user is encouraged to try to correct the interference by one or more of the following
measures:
Reorient or relocate the receiving antenna.
Increase the separation between the equipment and receiver.
Connect the equipment into an outlet on a circuit different from that to which the receiver is
connected.
Consult the dealer or an experienced radio/ TV technician for help.
If the product suddenly has no response or powers off, an electrostatic discharge may be the
cause. In this circumstance, please follow the procedures below for recovery:
Turn off the unit by pushing and holding the slide button at the right (Power off position) for
15 seconds.
Turn on the unit again
1.
2.
•
•
•
•
•
•
Page 4
4
Page 4 Coby Electronics Corporation
www.cobyusa.com Page 5
IMPORTANT SAFETY INSTRUCTIONS
Read Instructions: All the safety and operating instructions should be read before the product
is operated.
Retain Instructions: The safety and operating instructions should be retained for future reference.
Heed Warnings: All warnings on the product and in the operating instructions should be
adhered to.
Follow Instructions: All operating and usage instructions should be followed.
Cleaning: Unplug this product from the wall outlet before cleaning. Do not use liquid cleaners
or aerosol cleaners. Use a damp cloth for cleaning.
Attachments: Use only attachments recommended by the manufacturer. Use of other attachments may be hazardous.
Water and Moisture: Do not use this product near water (e.g., near a bath tub, washbowl,
kitchen sink, laundry tub, in wet basements, or near a swimming pool and the like).
Accessories: Do not place this product on an unstable cart, stand, tripod,
bracket, or table. Use only with carts, stands, tripods, brackets, or tables
recommended by the manufacturer or sold with the product. Any mount-
ing of the product should follow the manufacturer’s instructions and
should use a mounting accessory recommended by the manufacturer.
A product and cart combination should be moved with care. Quick
stops, excessive force, and uneven surfaces may cause the product
and cart combination to overturn.
Ventilation: Slots and openings in the cabinet are provided for ventilation to ensure reliable
operation of the product and to protect it from overheating. These openings should never
be blocked by placing the product on a bed, sofa, rug, or other similar surface. This product
should not be placed in a built-in installation such as a bookcase or rack unless proper
ventilation is provided or the manufacturer instructions have been adhered to.
Power Sources: This product should be operated only from the type of power source indicated on the rating label. If you are not sure of the type of power supply to your home, consult
your product dealer or local power company. For products intended to operate from battery
power or other sources, refer to the operating instructions.
Grounding or Polarization: This product may be equipped with a polarized alternating-current
line plug that has one blade wider than the other. This plug will only t into the power outlet in
one direction. This is a safety feature. If you are unable to insert the plug fully into the outlet,
try reversing the direction of the plug. If the plug should still fail to t, contact an electrician to
replace the obsolete outlet. Do not defeat the safety purpose of the polarized plug.
Power-Cord Protection: Power supply cords should be routed so that they are not likely to
be walked on or pinched by items placed upon or against them, paying particular attention to
cords at plugs, convenience receptacles, and at the point which they exit from the product.
Protective Attachment Plug: The product may be equipped with an attachment plug with
overload protection. This is a safety feature. See the operating instructions for replacement
or directions to reset the protective device. If replacement of the plug is required, be sure the
service technician has used a replacement plug that has the same overload protection as the
original plug as specied by the manufacturer.
1.
2.
3.
4.
5.
6.
7.
8.
9.
10.
11.
12.
13.
14.
Page 5
www.cobyusa.com Page 5
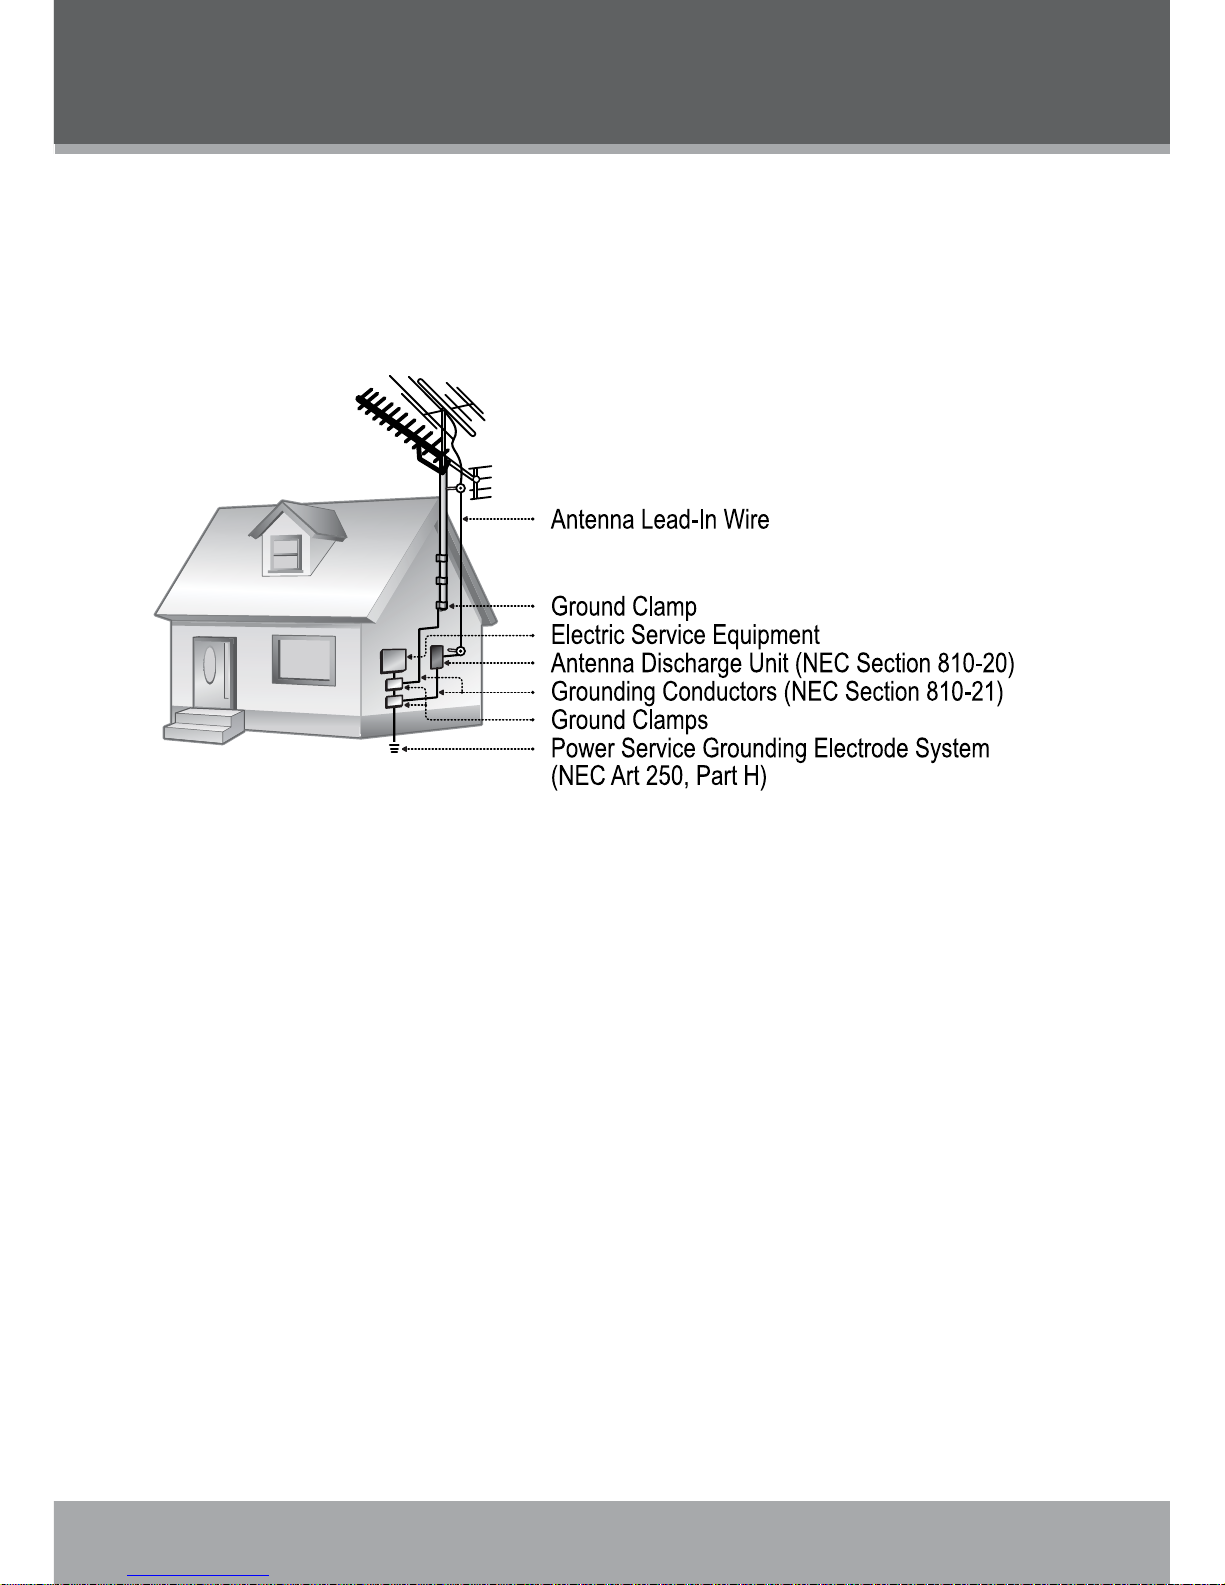
Outdoor Antenna Grounding: If an outside antenna is connected to the product, be sure the
antenna system is grounded so as to provide some protection against voltage surges and
built-up static charges. Article 810 of the National Electrical Code, ANS/NFPA 70 provides
information with regard to proper grounding of the mast and supporting structure, ground-
ing of the lead-in wire to an antenna-discharge unit, size of grounding conductors, location
of antenna-discharge unit, connection to grounding electrodes, and requirements for the
grounding electrode (see gure).
Lightning: For added protection for this product, unplug it from the wall outlet and disconnect
the antenna or cable system during a lightning storm or when it is left unattended and unused
for long periods of time. This will prevent damage to the product due to lightning or power-line
surges.
Power Lines: An outside antenna system should not be located in the vicinity of overhead
power lines or other electric light or power circuits, or where it can fall into such power lines
or circuits. When installing an outside antenna system, extreme care should be taken to keep
from touching such power lines or circuits, as contact with them might be fatal.
Overloading: Do not overload wall outlets, extension cords, or integral convenience receptacles as this can result in a risk of re or electric shock.
Object and Liquid Entry: Never push objects of any kind into this product through openings
as they may touch dangerous voltage points or shout-out parts that could result in a re or
electric shock. Never spill liquid of any kind on the product.
Servicing: Do not attempt to service this product yourself as opening or removing covers may
expose you to dangerous voltage or other hazards. Refer all servicing to qualied service
personnel.
Damage Requiring Service: Unplug this product from the wall outlet and refer servicing to
qualied service personnel under the following conditions: a) when the power-supply or plug
is damaged; b) if liquid has been spilled or if objects have fallen into the product; c) if the
product has been exposed to rain or water; d) if the product does not operate normally by following the operating instructions. Adjust only those controls that are covered by the operating
instructions as improper adjustment of other controls may result in damage and will often
require extensive work by a qualied technician to restore the product to its normal operation;
e) if the product has been dropped or damaged in any way; f) when the product exhibits a
distinct change in performance—this indicates a need for service.
15.
16.
17.
18.
19.
20.
21.
IMPORTANT SAFETY INSTRUCTIONS
Page 6

6
Page 6 Coby Electronics Corporation
www.cobyusa.com Page 7
Replacement Parts: When replacement parts are required, be sure that your service technician has used replacement parts specied by the manufacturer or have the same characteristics as the original part. Unauthorized substitutions may result in re, electric shock, or
other hazards.
Safety Check: Upon completion of any service or repairs to this product, ask the service technician to perform safety checks to ensure that the product is in proper operating condition.
Wall or Ceiling Mounting: The product should be mounted to a wall or ceiling only as recommended by the manufacturer.
Heat: The product should be situated away from heat sources such as radiators, heat registers, stoves, or other products (including ampliers) that produce heat.
22.
23.
24.
25.
IMPORTANT SAFETY INSTRUCTIONS
Page 7

www.cobyusa.com Page 7
FEATURES
Integrated 8GB 1” Micro Hard Drive
Touchpad control with LED backlight
1.8” advanced OLED color display
Plays MP3, WMA, and WAV digital audio les
Plays MPEG-4 videos
Pleays Digital Music from most online stores and subscription services*
Music library groups music les by album name, artist name, song title, genre, year and
playlist
Playlist support (WMP format)
ID3 and LRC Support for SOng and Synchronized Lyric information display
Integrated FM Radio and Recorder
Integrated Microphone for Digital Voice Recording
View photos and slideshows while enjoying your music collection
USB 2.0 high-speed transfers
20 hours of music playback
*Musi c Servic e must support Windows Media DR M (WMDR M). WMDRM10 require Windows XP and WIndows Media Player 10 o r newer.
•
•
•
•
•
•
•
•
•
•
•
•
•
•
Page 8

8
Page 8 Coby Electronics Corporation
www.cobyusa.com Page 9
TABLE OF CONTENTS
PRECAUTIONS ................................................................................................................................. 2
IMPORTANT SAFETY INSTRUCTIONS ............................................................................................. 4
FEATURES ......................................................................................................................................... 5
TABLE OF CONTENTS
...................................................................................................................... 6
PACKAGE CONTENTS .................................................................................................................... 8
POWERING YOUR PLAYER ............................................................................................................. 9
Charging the Battery ................................................................................................................9
\Turning Your Player On/Off .....................................................................................................9
Locking/Unlocking Your Player’s Keys (Hold) .........................................................................9
Resetting Your Player ............................................................................................................10
LOCATION OF CONTROLS ...........................................................................................................11
Top View................................................................................................................................. 11
Front View .............................................................................................................................. 11
Side View ...............................................................................................................................11
DISPLAY OVERVIEW ..................................................................................................................... 12
BASIC OPERATIONS ..................................................................................................................... 13
Using the Touchpad Controls ................................................................................................13
Using the Controls to Navigate ..............................................................................................13
Main Menu Overview .............................................................................................................13
Smart Menu Options ..............................................................................................................14
Browsing/Playback ........................................................................................................14
Volume ...........................................................................................................................15
EQ (Equalizer) ................................................................................................................15
Repeat ............................................................................................................................15
Shufe ............................................................................................................................16
Backlight ........................................................................................................................16
MUSIC MODE ................................................................................................................................ 17
Browsing Your Music Library ................................................................................................. 17
Play All ...........................................................................................................................17
Playlists ..........................................................................................................................17
Music Playback Controls .......................................................................................................17
QUICK PLAY .................................................................................................................................. 18
Quick Play Controls ...............................................................................................................18
PHOTO MODE ............................................................................................................................... 19
Browsing Your Photo Library .................................................................................................19
Displaying Your Photos as a Slideshow ........................................................................19
VIDEO MODE ................................................................................................................................ 20
Browsing Your Video Library ................................................................................................20
Page 9

www.cobyusa.com Page 9
RECORD MODE ............................................................................................................................ 21
Voice Recording .....................................................................................................................21
SETTING MODE
............................................................................................................................. 22
USB CONNECTIONS
..................................................................................................................... 23
Minimum PC Requirements ...................................................................................................23
USB Mode Auto-Detection (MSC/MTP) ................................................................................23
USB Driver Installation (Required for Windows 98 SE Only) ................................................24
Connecting to a Computer .....................................................................................................25
USB-MTP Mode ............................................................................................................25
USB-MSC Mode ............................................................................................................26
Transferring Files ...................................................................................................................26
USB-MTP Mode ............................................................................................................27
USB-MSC Mode ............................................................................................................27
Disconnecting from a Computer ............................................................................................28
USB-MTP Mode ............................................................................................................28
USB-MSC Mode ............................................................................................................28
Build Music Library (USB-MSC Mode Only) .................................................................28
VIDEO CONVERSION
...................................................................................................................29
Installation ..............................................................................................................................29
Converting Video ...................................................................................................................29
WINDOWS MEDIA PLAYER .......................................................................................................... 31
Windows Media Player 9 (WMP9) .........................................................................................31
Music File Transfers .......................................................................................................31
Windows Media Player 10 (WMP10) .....................................................................................32
Music File Transfers .......................................................................................................32
Creating Playlists ...........................................................................................................33
Automatic Windows Media Playlist Synchronization.....................................................35
TROUBLESHOOTING ..................................................................................................................... 38
SPECIFICATIONS ...........................................................................................................................40
TABLE OF CONTENTS
Page 10

10
Page 10 Coby Electronics Corporation
www.cobyusa.com Page 11
PACKAGE CONTENTS
Please make sure that the items shown below are included in the package. Should an item be
missing, please contact the local retailer from which you purchased this product.
COBY MP-C983 MP3 Player
USB Cable
Instruction Manual
Professional Stereo Earphones
AC Adapterl
Installation CD
1.
2.
3.
4.
5.
6.
Page 11
www.cobyusa.com Page 11
POWERING YOUR PLAYER
Charging the Battery
Your player has an integrated rechargeable battery that will provide up to 20 hours of music play time.
The battery should be charged fully (minimum 4 hours) before its initial use to ensure optimum lifetime performance.
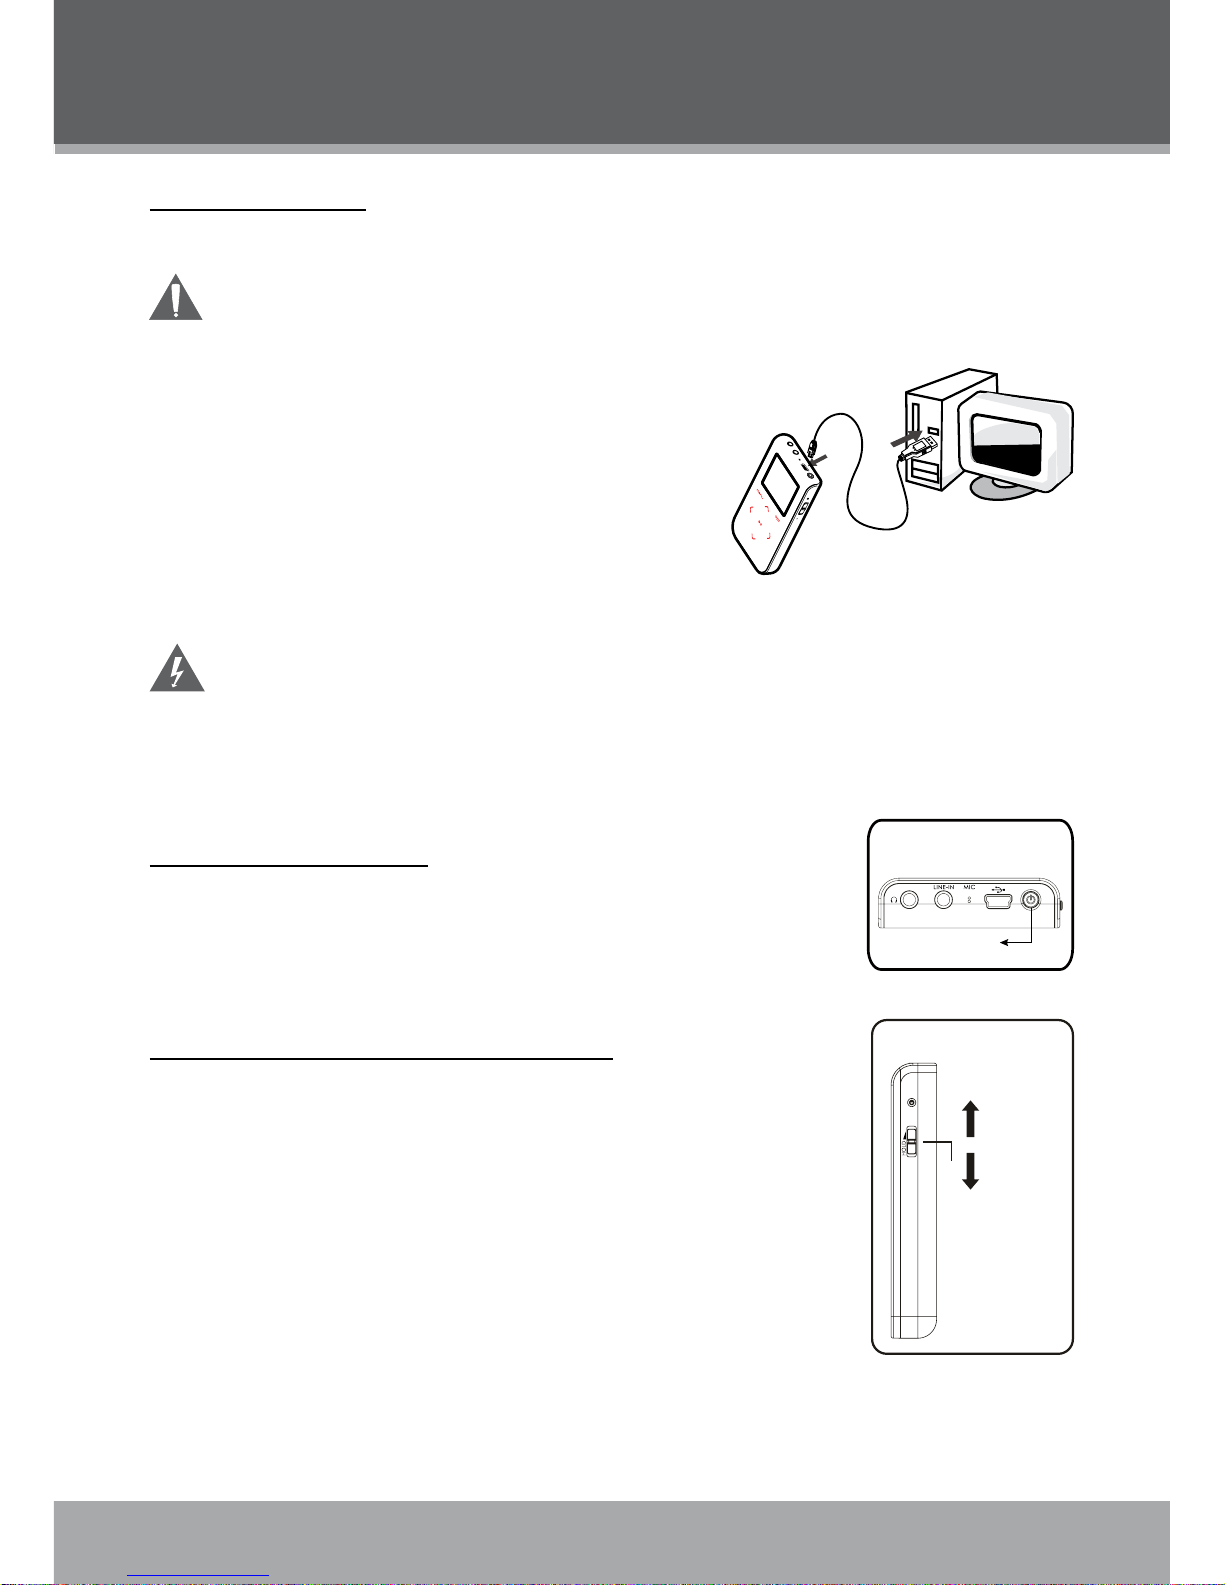
To charge your player:
USB Charge: Your player can be charged through a
PC USB connection.
Plug one end of the USB cable into the player’s USB
port and plug the other end into the USB port of a
powered-on computer.
When connected to a USB hub, the hub must
be self-powered to charge the player’s battery.
File transfers will extend the charging time.
The battery used in this device may present a re or chemical burn if mistreated.
Do not disassemble, incinerate, or heat the battery.
Do not connect the player to a power source other than that which is indicated here
or on the label as this may result in the risk of re or electric shock.
Do not handle the power plug with wet hands. Doing so may cause electric shock.
Turning Your Player On/Off
To turn the player on, press and hold the POWER button until you
see the “Initializing” screen.
To turn the player off, press and hold the POWER button until you
see the “Power off”. Don’t release until the LCD display off.
Locking/Unlocking Your Player’s Keys (Hold)
When engaged, the Key Lock feature disables your player’s controls to
prevent accidental key presses when it is in your pocket or bag.
To lock the player, slide the Power/Key Lock switch to the up. The
Lock icon will appear on-screen.
To unlock the player, slide the Power/Key Lock switch to the down
from the Lock position.
•
•
•
•
•
•
•
PO WER But ton
TOP VIEW
HOLD Sw itc h
HOLD On
HOLD Of f
RIGHT VIEW
USB Port
USB Port
Computer
Page 12
12
Page 12 Coby Electronics Corporation
www.cobyusa.com Page 13
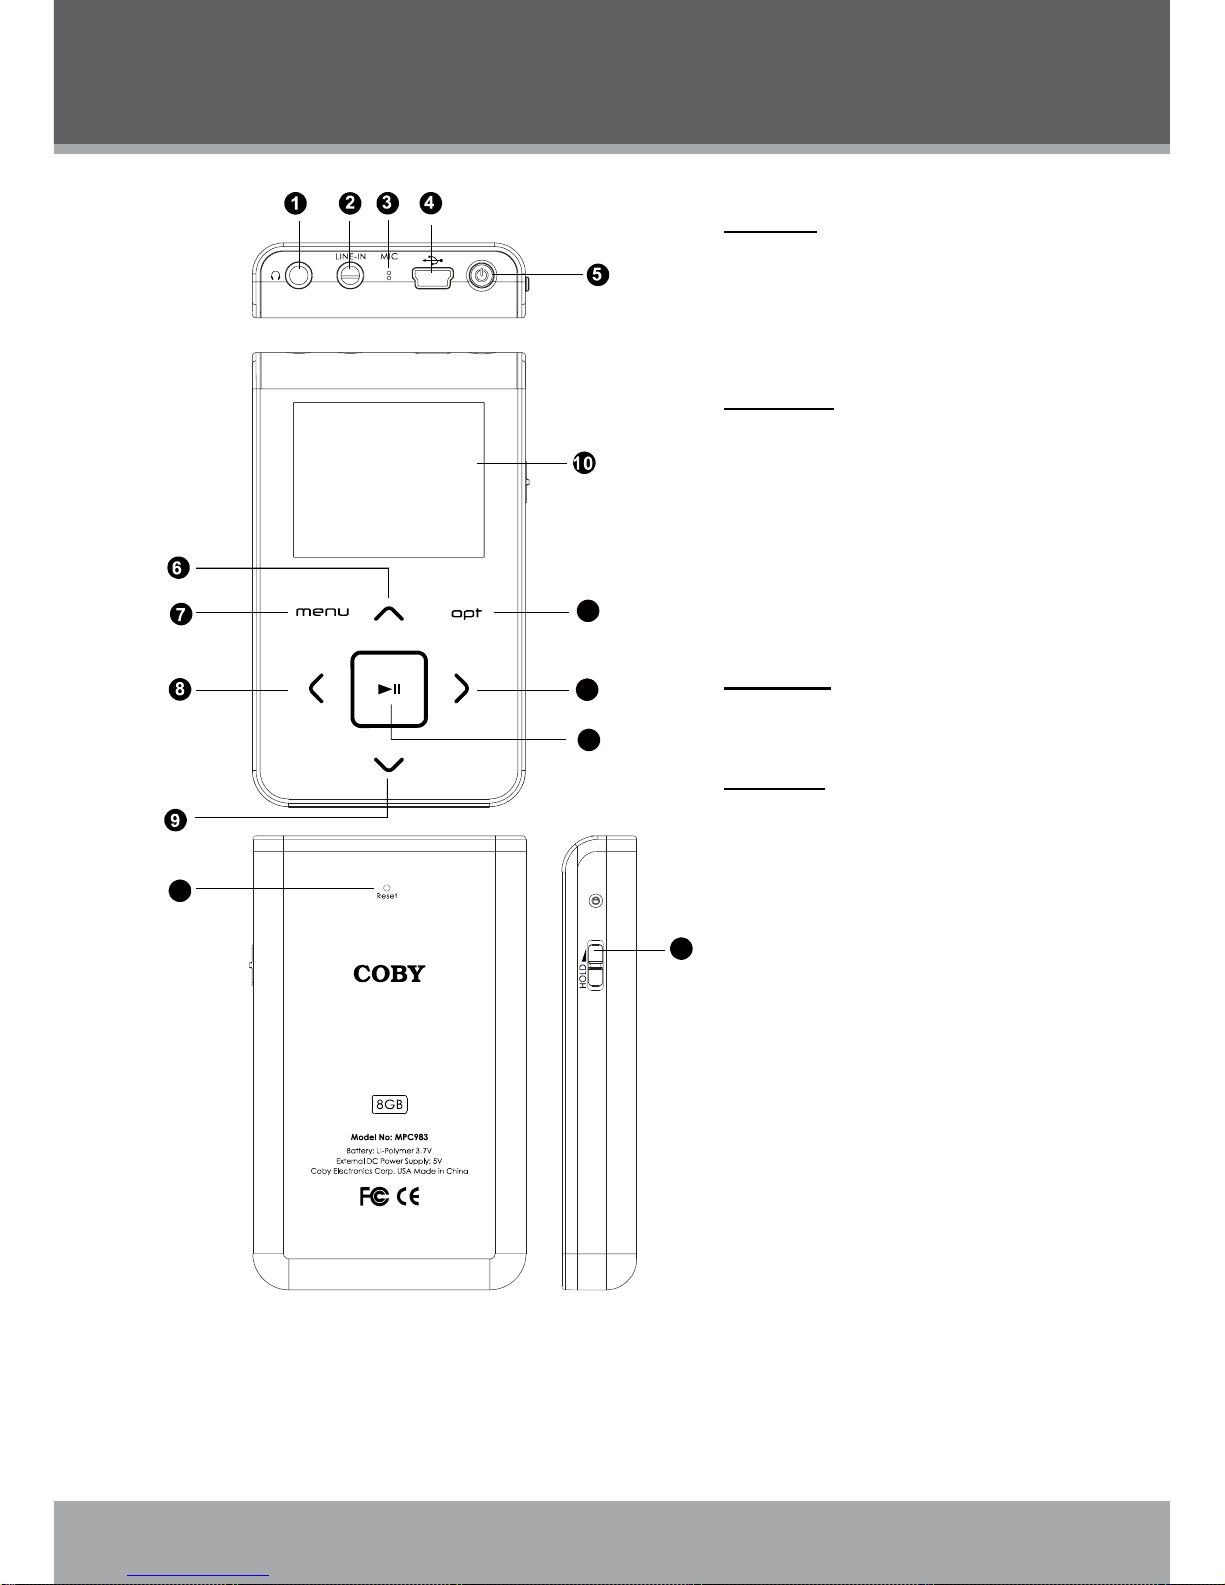
LOCATION OF CONTROLS
11
12
13
14
15
Top View
1. Headphone Jack
2. Line-In Jack
3. Microphone
4. USB Port
5. Power On/Off button
Front View
6. Up / Volume +
7. Menu
8. Left / Previous
9. Down / Volume 1
10. LCD Display
11. Opt
12. Right / Next
13. Play/Pause
Back View
14. Reset
Side View
15. HOLD Switch
Page 13
www.cobyusa.com Page 13
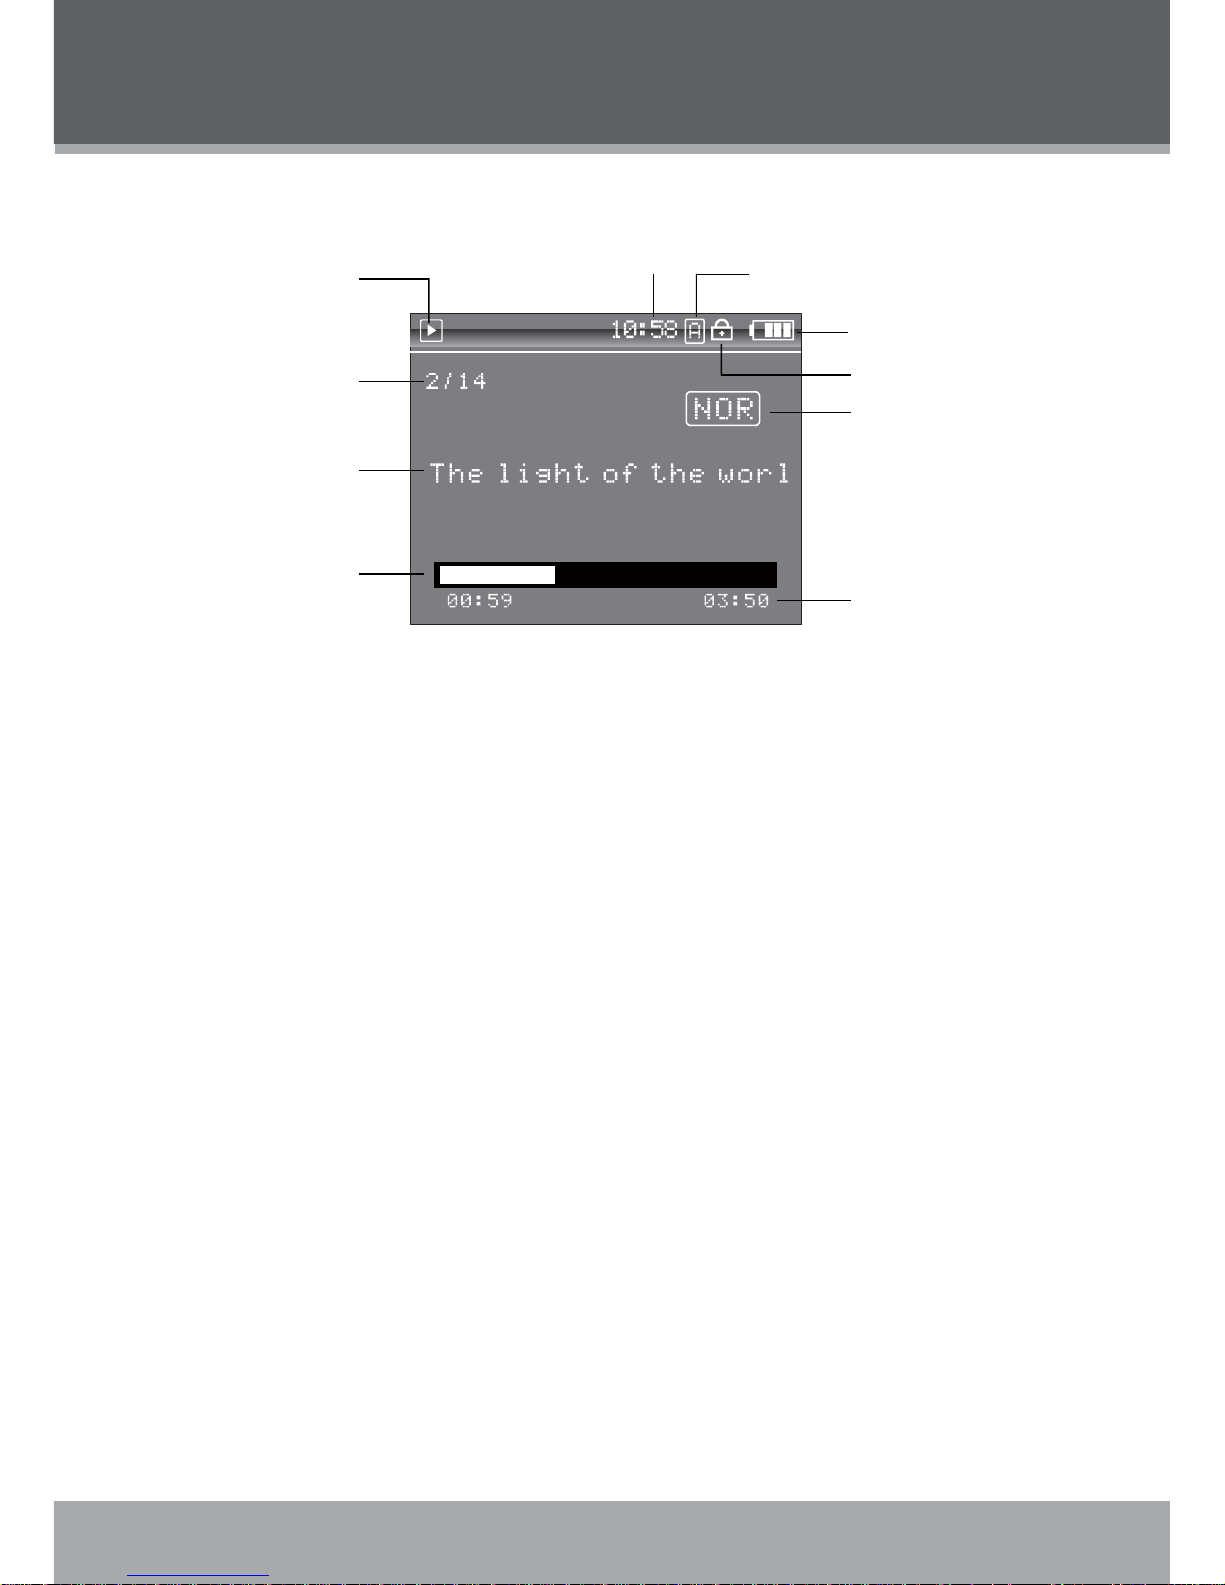
DISPLAY OVERVIEW
Playing
Plays Status Indicator
Curr ent t rack /
Total t ra ck
File name
Elapsed time
Time Clock
Pl ay Mo de Indicator
Lock icon
Battery Level Indicator
Equalizer Indicator
Total Time
Page 14
14
Page 14 Coby Electronics Corporation
www.cobyusa.com Page 15
BASIC OPERATIONS
Using the Touchpad Controls
Your player comes equipped with a touch-sensitive control pad. To use the controls, touch the arrow keys on the front of the player lightly just as you would a button and the controls will light up.
If you touch and hold a key, it will register as a continuous button press.
Using the Controls to Navigate
To navigate through the different menu options and les on your player:
Touch the Arrow keys to move the selection in the direction of the arrow.
UP: Moves the selection up.
DOWN: Moves the selection down.
RIGHT: Enter a selection (i.e., conrm the selection)
LEFT: Go back to the previous screen (i.e., “Cancel”).
Press the MENU button to view the Smart Menu.
Press and hold MENU to return to the Main Menu at any time.
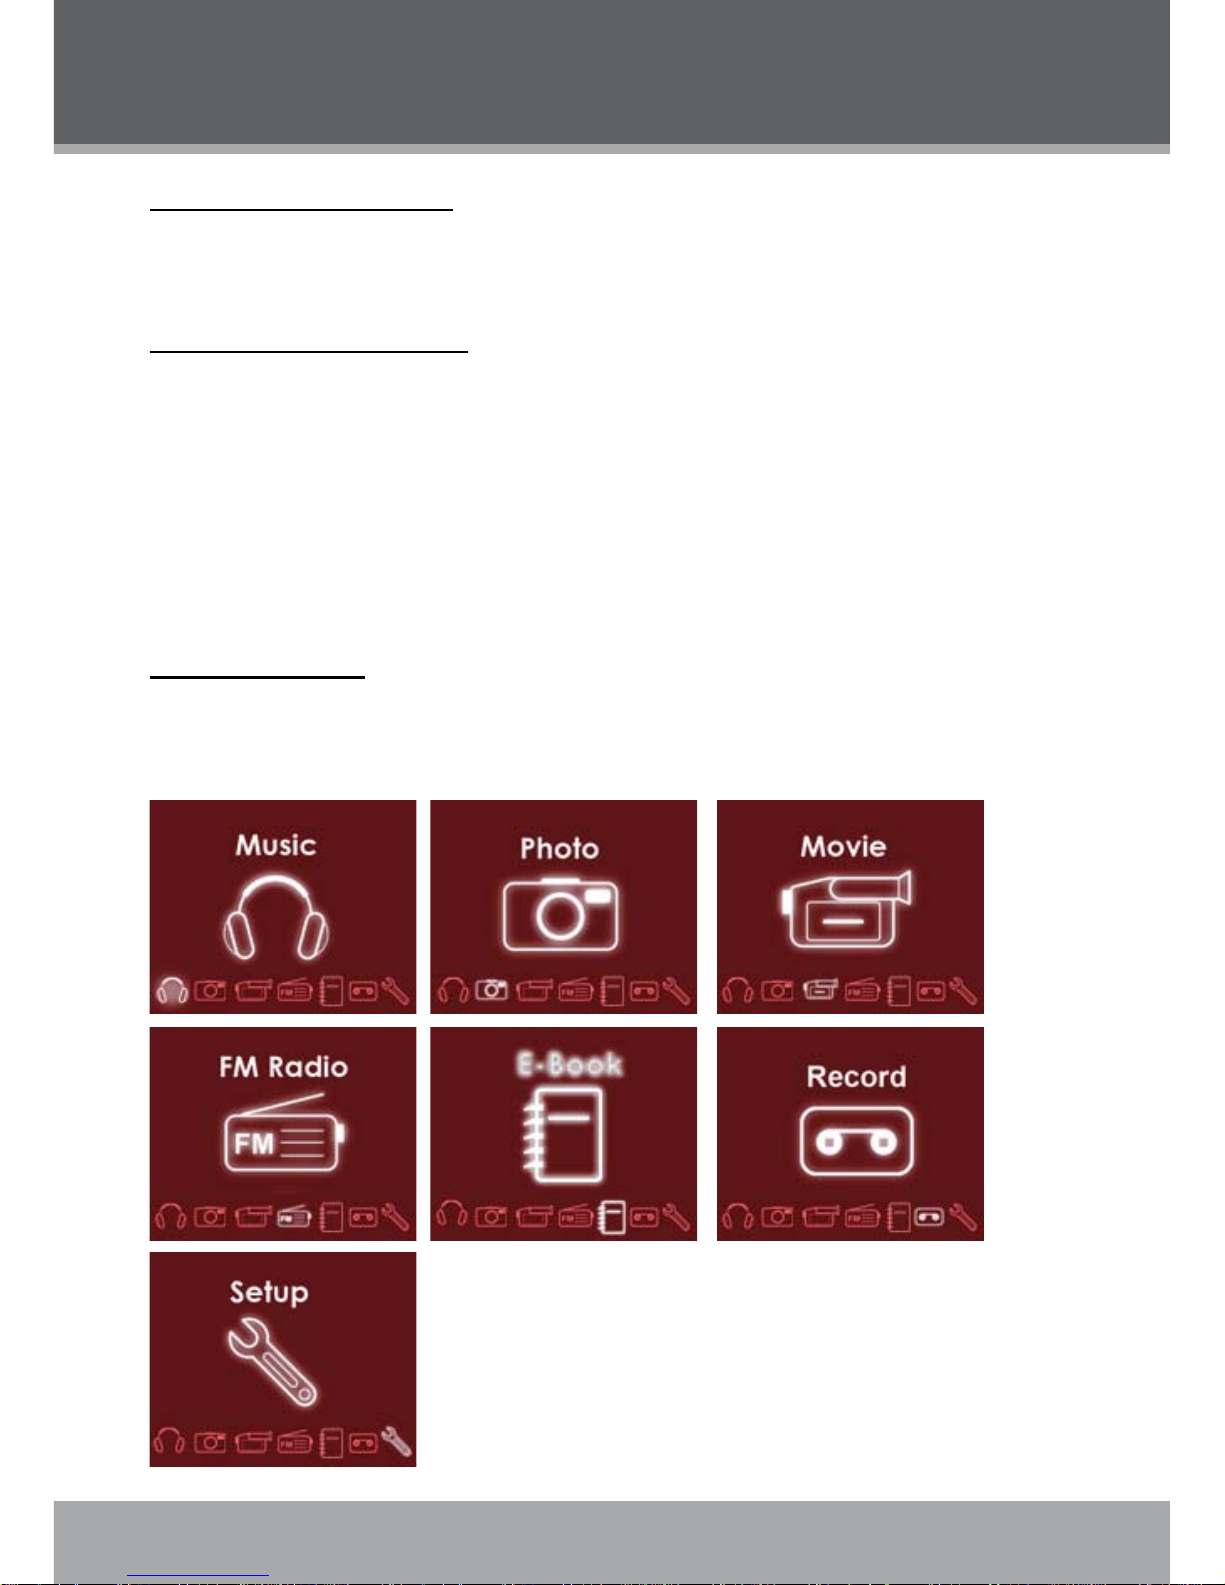
Main Menu Overview
The Main Menu gives you access to the different function modes of your player. To access the
Main Menu at any time, press the MENU button.
Press UP or DOWN to select a mode and then press RIGHT to Enter.
•
•
•
•
•
•
•
•
Page 15

www.cobyusa.com Page 15
MUSIC MODE
Enter Music mode to play your MP3, WMA, OGG or WAV audio les.
To enter MUSIC mode, select and conrm from the Main Menu.
Upon entering Music mode, you will have the following options: Artist, Album, Song, Genre, Year
, Playlist and Favourite.
Playback Controls
Select a track and press RIGHT to start playback (see the Music Mode or Video Mode section for
more information). While the track is playing:
Press RIGHT to play the next track.
Press LEFT to play the previous track.
Press and hold RIGHT to fast forward through the track.
Press and hold LEFT to reverse through the track.
Press UP to pause playback. Press UP again to resume playback
Press DOWN to display the Volume Bar.
Smart Menu Options
The Smart Menu gives you quick access to your player’s option settings. To access the Smart
Menu at any time, press “Opt”.
The Smart Menu options are Browsing/Playback, Volume, EQ, Repeat, Shufe, and Backlight.
Browsing/Playback
This option allows you to browse your media library while a song is being played in the background. Whether this option appears as “Browsing” or “Playback” depends on what you were
doing when you accessed the Smart Menu.
From the “Playing” screen, select “Browsing” to browse your media library.
You can also press MENU to return to the Main menu to enter another mode (e.g., you
can enter Photo mode to view pictures while music is playing).
To return to the “Playing” screen, select “Playback” from the Smart Menu.
•
•
•
•
•
•
•
•
•
Press
“Opt”
Favourite Off
EQ Normal
Page 16

16
Page 16 Coby Electronics Corporation
www.cobyusa.com Page 17
Favorite On/Off
Use the Favourite function to quickly add a song to your Favourites Playlist. Favourite tracks can
be found in by selecting Music > Favourite.
EQ (Equalizer)
The Equalizer option optimizes the way your player processes audio signals. The Equalizer options are Normal, Rock, Jazz, Classic, Pop, and User. Select the option which best suits the music
you are listening to.
To change the Equalizer options:
Highlight EQ in the Smart Menu.
Press RIGHT to change the Equalizer setting.
The User EQ setting can be customized in the “Setting” menu; please see the Setting
Mode section for more information.
Repeat
The Repeat options can set your player to play tracks again.
To change the Repeat options
Highlight Repeat in the Smart Menu.
Press RIGHT to change the Repeat setting (Off, One, All).
Shufe
The Shufe options can set your player to play tracks in a random order.
To change the Shufe options
Highlight Shufe in the Smart Menu.
Press RIGHT to change the Shufe setting (Off, On).
Speed
Use the Speed function to adjust playback tempo. The Play options are: 70%, 80%, 90%, 100%,
110%, 120% and 130%.
Highlight Speed in the Smart Menu.
Press RIGHT to change the Speed setting (70%, 80%, 90%, 100%, 110%, 120% and
130%).
Introduction
Set the Introduction function On to play the rst 5 seconds of each track.
Highlight Introduction in the Smart Menu.
Press RIGHT to change the Introduction setting (On or Off).
1.
2.
1.
2.
1.
2.
1.
2.
1.
2.
MUSIC MODE
Page 17

www.cobyusa.com Page 17
PHOTO MODE
Enter Photo mode to display your JPEG photo les.
To enter Photo mode, select and conrm PHOTO in the Main menu.
Browsing Your Photo Library
Upon entering Photo mode, you will see a preview list of all JPEG
photos on your player.
Press the LEFT/RIGHT/UP/DOWN keys to highlight a photo
and press to display.
While a photo is displayed:
Press DOWN to display the next photo in the list
Press UP to display the previous photo in the list
Press LEFT to return to the photo list.
Smart Menu Options
The Smart Menu gives you quick access to your player’s option settings. To access the Smart
Menu in Photo Mode, press “Opt”.
The Smart Menu options are Playback, Browsing, Set Wallpaper, SlideShow and Show Time.
Playback
Highlight and select this option to back to the Music Playing mode.
Browsing
This option allows you to browse your photo library while a picture is being display.
Set Wallpaper
This option allows you to set the current picture as a Wallpaper when the player is in Music Playing mode.
Highlight and select Set Wallpaper in the smart Menu.
Press to conrm.
SlideShow
Set “SlideShow” function On will automatically display all your photos in sequence.
Highlight and select SlideShow in the smart Menu.
Press RIGHT to change the SlideShow setting (On or Off).
Show Time
This option allows you to set the time interval between slides.
Highlight and select Show Time in the smart Menu.
Press RIGHT to chang the Show Time setting (1s - 10s).
•
•
•
•
•
1.
2.
1.
2.
1.
2.
Page 18

18
Page 18 Coby Electronics Corporation
www.cobyusa.com Page 19
VIDEO MODE
Enter Video mode to play your XviD-encoded AVI video les.
To enter Video mode, select and conrm VIDEO in the Main menu.
The MP-C983 supports playback of XviD-encoded AVI les. Please see the Video
Conversion section for details on how to create video les that are compatible with
your player.
Browsing Your Video Library
Upon entering Video mode, you will see a list of all AVI videos on your player.
Press the UP/DOWN keys to highlight a video and press to play it.
While a video is playing:
Press to pause playback. Press again to resume playback.
Press RIGHT to play the next track.
Press LEFT to play the previous track.
Press and hold RIGHT to fast forward through the track.
Press and hold LEFT to reverse through the track.
To return to the video list, pause playback and press LEFT.
•
•
•
•
•
•
•
•
Page 19

www.cobyusa.com Page 19
FM RADIO MODE
Enter FM Radio Mode to listen the FM Radio broadcasts.
You must have a pair of headphones connected to the headphone jack to receive
FM broadcasts; your player will utilize the headphone cord as an antenna.
To enter FM Radio Mode, select and conrm FM Radio from the Main Menu.
Basic FM Radio Operation
Upon entering FM Radio mode, you can tune into stations manually(Normal) or by using preset
stations(Preset).
Press to toggle between Normal and Preset tuning modes.
Normal: Listen to Manually-Tuned Channels.
Press RIGHT to tune to higher frequencies; press LEFT to tune to lower frequencies.
Preset: Listen to Preset Channels.
Press RIGHT to tune to highter Preset channels or LEFT to tune to lower Preset
channels.
To auto-seek the next availabel broadcase station, press and hold LEFT or RIGHT.
Press and hold to automatically detect and save as a preset station any frequecny with
a signal. This will overwrite any previously saved preset stations.
Smart Menu Option
The Smart Menu gives you quick access to your player’s option settings. To access the Smart
Menu in Recording Stop Mode, press “Opt”.
The Smart Menu options are Add Preset/Del Preset, Start Record, Track, Sense and Area.
Add Preset/Del Preset
When the player is in Normal Tuning mode, this section will display “Add Preset”, highlight and
conrm Add Preset to manually save the current station as a preset.
When the player is in Preset Tuning mode, this section will display “Del Preset”, highlight and
conrm Del PReset to delete the current preset station.
Start Record
This section allows you to make recordings of FM Radio broadcasts.
Tune to the FM broadcast station you would like to record.
Press Opt.
Highlight and press RIGHT or to start FM Recording.
During recording:
To pause recording, press ; press again to resume recording.
To stop and save the recording, press MENU. The recorded le will be named “FMRCXXX.WAV” where XXX corresponds to the numberical sequence in which the
recording was made (numbering starts from 00001).
•
•
•
•
•
•
•
1.
2.
3.
•
•
Page 20

20
Page 20 Coby Electronics Corporation
www.cobyusa.com Page 21
Track
This section allows you to set the recrptions modes between Stereo and Mono.
Highlight and select Track from the Smart Menu.
Press RIGHT to change the Track setting (Stereo or Mono).
Sense
This section allows you to set the sensitivity of the Auto-Scan feature among Low, Middle and
High.
Highlight and select Sense from the Smart Menu.
Press RIGHT to change the Sense setting (Low, Middle or High).
Area
This section allows you to set the the FM frequency range area among World, Europe and Japan.
Highlight and select Area from the Smart Menu.
Press RIGHT to change the Area setting ( World, Europe or Japan).
•
•
•
•
•
•
FM RADIO MODE
Page 21

www.cobyusa.com Page 21
E-BOOK MODE
Enter E-BOOK mode to read TXT E-book les.
To enter E-BOOK mode, select and conrm E-BOOK from the Main Menu. Upon entering EBOOK mode, you can use the le
Page 22

22
Page 22 Coby Electronics Corporation
www.cobyusa.com Page 23
RECORD MODE
Enter Record mode to make voice recordings through external audio sources: Microphone or Line-In.
To enter Record mode, select and conrm RECORD in the Main menu.
Upon entering RECORD mode, you will see a list of previously recorded les (if available).
Smart Menu Options
The Smart Menu gives you quick access to your player’s option settings. To access the Smart
Menu in Recording Stop Mode, press “Opt”.
The Smart Menu options are Playback, REC, Start Record, MIC, Line-In, and FM.
Playback
Select Playback to back to the Music Playing Mode.
REC
This section allows you change the recording type.
Highlight and select REC from the Smart Menu.
Press RIGHT to change the REC setting (Voice or Line-in)
Start Record
Select Start Record to start recroding from the exteranl audio source that you have set in the REC
section.
Highlight and select Start Record from the Smart Menu.
Press RIGHT or to start recording.
Press again to pause the recording. Press MENU to stop and save the recording.The
recorded le will be named “VORCXXX.WAV” or AUDIXXX.WAV where XXX corresponds
to the numerical sequence in which the recording was made (numbering starts from 001.)
You can play your recorded les using the same controls as you would in Music mode.
1.
2.
1.
2.
3.
Recording Indicator
Recording file name
(/Voice)
Recording time
Remain time
Page 23

www.cobyusa.com Page 23
RECORD MODE
MIC
This section allows you to set the Microphone Recording Quality.
Highlight and select MIC from the Smart Menu.
Press RIGHT to change the MIC setting (Low, Middle or High).
Line-In
This section allows you to set the Line-In Recording Quality.
Highlight and select Line-In from the Smart Menu.
Press RIGHT to change the Line-In setting (Low, Middle or High).
FM
Highlight and select FM from the Smart Menu.
Press RIGHT to change the FM setting (Low, Middle or High).
Higher-qulity recording will take up more memory on your player.
1.
2.
1.
2.
1.
2.
Page 24

24
Page 24 Coby Electronics Corporation
www.cobyusa.com Page 25
SETTING MODE
Enter the Setting mode to set your player’s system options.
To enter Setting mode, select and conrm SETTING in the Main menu.
Upon entering Setting mode, you will have the following options: Sound, Display, General, Time,
Rec Quality and Information.
Press UP/DOWN to select a setting and press to conrm. Press LEFT to back to the previous
menu.
Sound
Select and conrm SOUND in the setting menu to set options relating to the way audio is processed by your player. The sound options are: EQ, User, Balance and Beep.
EQ(Equalizer)
Set a digital equalizer preset. The options are: Normal, Rock, Jazz, Classic, Pop and User.
User
Set your customer, user-dened equalizer setting.
Press LEFT or RIGHT to select a band to adjust. Select the bands to the left to adjust low
(bass) frequencies; select the bands in the middle to adjust mid-frequencies and select the
bands to the right to adjust high frequencies (treble).
Press UP to raise the selected band level; press DOWN to lower the selected band level.
Press when you are nished to save.
Once this has been set up, you can access this digital equalizer preset through the equalizer menu (please refer to SETTING > SOUND or MUSIC > Smart Menu > EQ section for
details).
Balance
Set the left-channel and right-channel levels.
Press LEFT to increase the left-channel level(Left); press RIGHT to increase the right-channel level(Right). The center-position (Middle) will result a balanced left/right stereo mix.
Press when you are nished to save.
Beep
Set the beep-tone On or Off when you press a key.
Press UP or DOWN to select On or Off.
Press when you are nished to save.
Display
Select and conrm DISPLAY in the setting menu to set options relating to your player’s display.
The Display options are: Backlight, Brightness, Language and Lyric.
1.
2.
3.
1.
2.
1.
2.
Page 25

www.cobyusa.com Page 25
SETTING MODE
Backlight
Set the duration of time (in seconds) that the LCD backlight remains on after a key-press.
Press UP or DOWN to select a time(5s, 10s, 30s or 60s).
Press when you are nished to save.
Brightness
Set the Brightness of LCD Screen.
Press LEFT or RIGHT to decrease/increase the screen's brightness. A setting of "1" is
darkest; a setting of "5" is brightest.
Press when you are nished to save.
Language
Set the language of the player's on screen menu. The language options are: English, French,
German, Italian, Spanish, CHS, Japanese, Korean, Portugal and Russian.
Press UP or DOWN to select a language option.
Press when you are nished to save.
Lyric
Set song lyric display support on or off. Lyric display requires ".LRC" lyric le which may be found
on the internet or may be created wiht a Lyric le creator. Lyric le can contain synchronized timing
information as well as lyric information.
Lyric les must have the same name as its corresponding music le (e.g., "SongTitle1.lrc" and
"SongTitle1.mp3") and must be placed in the same directory.
Press UP or DOWN to select On or Off.
Press when you are nished to save.
General
Select and conrm GENERAL in the setting menu to set options relating to your player's general
features. The general options are: Repeat, Shufe, Auto Play, Resume, Wallpaper, USB Mode
and Load Default.
Repeat
Set Repeat Play Mode on/off, One or All. Select One to repeat current track; select All to play all
tracks sequentially.
Press UP or DOWN to select a repeat option.
Pres when you are nished to save.
Shufe
Set Shufe play mode on or off. Select On to play all tracks randomly.
Press UP or DOWN to select On or Off.
Press when you are nished to save.
Auto Play
Set the Auto Play feature on or off. When Auto Play is set to ON, your player will automatically
resume playback from where it left off when it wakes from standby.
1.
2.
1.
2.
1.
2.
1.
2.
1.
2.
1.
2.
Page 26

26
Page 26 Coby Electronics Corporation
www.cobyusa.com Page 27
SETTING MODE
Press UP or DOWN to select On or Off.
Press when you are nished to save.
Resume
Set the Resume feature on or off. When Resume is set to ON, your player will automatically resume playback when it wakes from standby.
Press UP or DOWN to select On or Off.
Press when you are nished to save.
Wallpaper
Set the Wallpaper feature on or off. When Wallpaper is set to ON, the background will displays with
the picture that you have set in PHOTO mode (please refer PHOTO > Smart Menu > Wallpaper
section for more details).
Press UP or DOWN to select On or Off.
Press when you are nished to save.
USB Mode
Set the USB Charge on or off. When USB Mode is set to MSC, your player will start charging
when it is connected to a computer. When it is set to Auto, your player will connect to the computer
automatically.
Press UP or DOWN to select MSC or Auto.
Press when you are nished to save.
Load Default
Restore all of the player’s setting to their factory-default state.
Press UP or DOWN to select Yes or No.
Press when you are nished to save.
Time
Select and conrm TIME in the setting menu to set options relating to your player’s internal clock
features. The time options are: Sleep time, Data/Time and Auto Page.
Sleep time
Set the sleep time (in minutes). The player will automatically turn off after the set amount of time.
Press UP or DOWN to select a Sleep option (Off, 10 Min, 30 Min, 60 Min or 120 Min).
Press when you are nished to save.
A setting of “Off” will disable the Sleep time feature.
Data/Time
Set the internal clock of your player.
Press LEFT or RIGHT to select which date or time eld to adjust.
For the date, the elds are Year, Month, and Date (from left to right).
For the time, the elds are Hour, Minute, and Seconds (from left to right).
2. Press UP or DOWN to adjust the value of the selected elds. Press LEFT or RIGHT to
move to the next eld.
1.
2.
1.
2.
1.
2.
1.
2.
1.
2.
1.
2.
1.
•
•
Page 27

www.cobyusa.com Page 27
SETTING MODE
3. Press when you are nished to save.
Auto Page
Set the Auto Page function on or off when the player is in E-BOOK mode.
Press UP to DOWN to select On or Off.
Press when you are nished to save.
Rec Quality
Select and conrm REC QUALITY in the setting menu to set options relating to your player’s Recording Quality. The Rec Quality options are: MIC, Line_in, FM and VAD.
High-quality recordings will sound best, but will take up more of the player’s memory.
MIC
Set the quality of recordings made through the integrated microphone. The options are: Low,
Middle and High.
Press UP or DOWN to select a MIC option (Low, Middle or High).
Press when you are nished to save.
Line_in
Set the quality of recordings made through the Line-in Jack. The options are: Low, Middle and
High.
Press UP or DOWN to select a Line-in option (Low, Middle or High).
Press when you are nished to save.
FM
Set the quality of recordings made from the FM Radio. The options are: Low, Middle and High.
Press UP or DOWN to select a FM option (Low, Middle or High).
Press when you are nished to save.
VAD
Set the VAD feature on or off. When this is set to ON, your player will detect audio signals from the
integrated microphone and automatically pause recording when no signal is detected.
Press UP or DOWN to select On or Off.
Press when you are nished to save.
Information
Select and conrm INFORMATION in the setting menu to view information about your player. The
information options are: Total Files and Version.
Total Files: View total number of les that located on your player.
Version: View information about your player’s rmware.
1.
2.
1.
2.
1.
2.
1.
2.
1.
2.
•
•
Page 28

28
Page 28 Coby Electronics Corporation
www.cobyusa.com Page 29
Connect the MPC983 to a computer with the USB 2.0 cable provided to:
Transfer les to and from your player
Perform basic le management functions.
USB Driver Installation (Required for Windows 98 SE Only)
It is not necessary to install the USB driver if your computer is running Microsoft Windows ME/2000/
XP or newer, or Macintosh OS X. Computers running these operating systems will recognize your
player automatically when connected.
If your computer is running Windows 98 SE:
Insert the Installation CD into your computer’s CD or DVD drive. Make sure to place the
mini-CD in the center, recessed well of the drive tray.
Navigate to MY COMPUTER and double-click on the CD/DVD drive icon (usually “D:”).
Double-click on the folder “Win98 USB Drivers” and then on the folder “english”.
Double-click on the SETUP icon (SETUP.EXE) to start the USB driver installation program.
Follow the on-screen instructions to complete the installation and then restart your computer.
Mini-CDs should only be used in normal tray-loading CD/DVD drives. Mini-CDs
may be used in slot-loading drives with the proper adapter; please contact your
computer or drive manufacturer for more information.
Connecting to a Computer
Connect the player to your computer with the supplied USB cable. Upon connection:
Your computer will automatic ally recognize the player as an MTP Device. An icon
representing your player will appear under “Audio Devices” when you open “My Computer”.
It may take Windows several minutes to recognize and set up the device the rst time it is
connected depending on your hardware conguration.
For more information and support regarding music transfer and synchronize with
Windows Media Player (WMP), please see the help section including wiht WMP
(Click Help > Synchronizing Content to Devices).
Transferring Files
The USB 2.0 High-Speed connection makes it easy to transfer music, video, photo, and text les (or
any other data) quickly between the player and your computer. Simply use the player as you would
a oppy disk using basic operating system commands.
•
•
1.
2.
3.
4.
5.
•
•
USB CONNECTIONS
USB Port
USB Port
Computer
Page 29
www.cobyusa.com Page 29
USB CONNECTIONS
If you need further assistance with transferring les, please refer to your operating system’s instruction manual or on-screen help. If you are using media management software such as iTunes,
Winamp, or Windows Media Player, please refer to their documentation for support.
Do not disconnect or otherwise interrupt the player during transmission - this could
damage or corrupt the player’s rmware or your les. If the player is accidentally
disconnected and is not working properly, reset your player (see the Powering Your
Player section for details).
Microsoft Windows
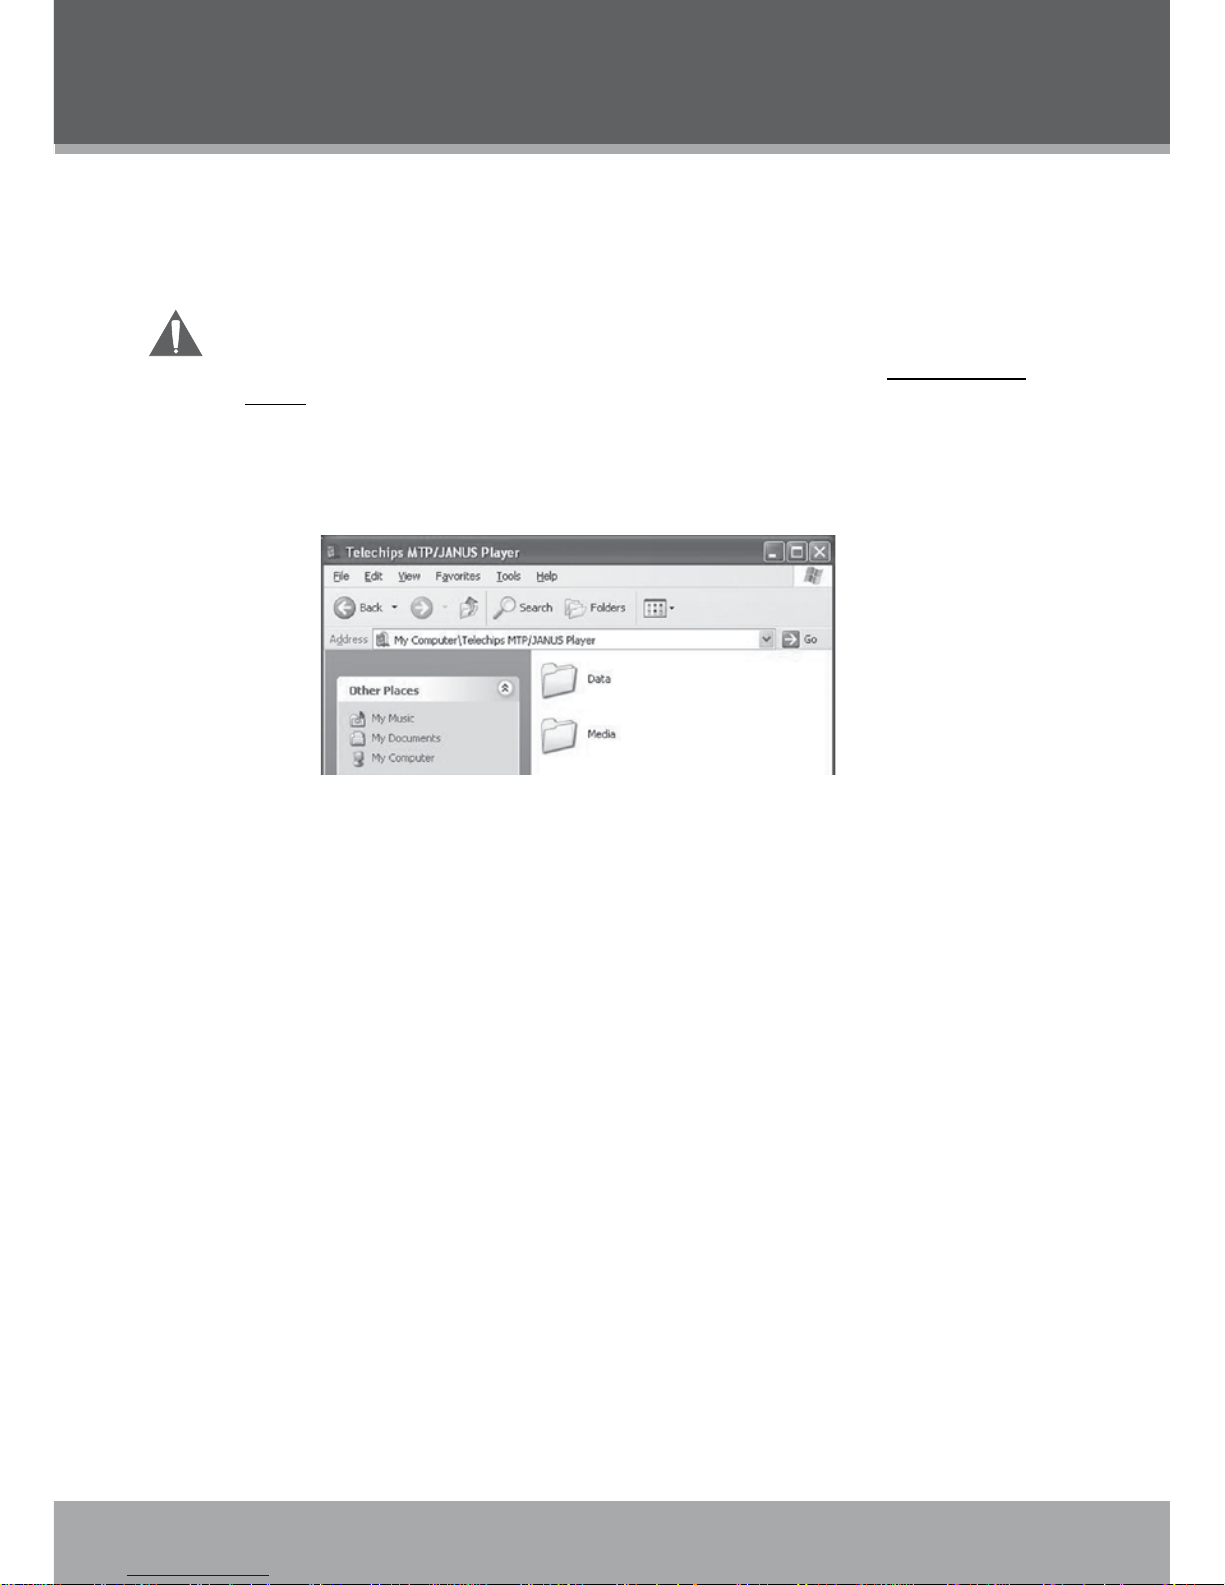
Double-click the “My Computer” icon on your desktop and then double-click the MPC983
icon (MTP Multimedia Player).
Your player contains two folders: Data and Media.
Drag your media les to the Media folder (e.g., MP3, WMA les).
Drga all other types of les to the Data folder for storage. Data les are only visible
from a computer; these les will not be available from within the player itself.
Macintosh OS X
Open a nder window. Located the les you would like to transfer from your computer.
Select the les/folders with the mouse and press APPLE-C(copy) on the keyboard.
Click on the Removable Disk icon located on the left side of the nder window. The computer will display all les and folders currently stored in the player.
Press APPLE-V(paste) on the keyboard to transfer the les you selected in Step 1 to the
player.
1.
2.
•
•
1.
2.
3.
Page 30

30
Page 30 Coby Electronics Corporation
www.cobyusa.com Page 31
Disconnecting from a Computer
Disconnect your player as instructed below to detect data loss or le/rmware corruption.
Microsoft Windows
Double-click the green arrow in the taskbar located on the
lower-right side of the computer screen (Safely Remove
Hardware).
Safely Remove Hardware:
Select “USB Mass Storage Device” from the list
that appears and then click on “Stop”.
Stop a Hardware Device: Select “USB Mass
Storage Device” from the list that appears and then
click on “OK”.
3. When the “Safe to Remove Hardware” window
appears, click the OK button and disconnect
the USB cable from the player and your computer.
Macintosh OS X
On the left side of the Finder Window, identify the appropriate
Removable Disk icon.
Click on the “Eject” arrow on the right of the Removable Disk
icon.
Disconnect the USB cable from the player and your computer.
1.
2.
1.
2.
3.
USB CONNECTIONS
Page 31
www.cobyusa.com Page 31
Use the video conversion software utility included on the Installation CD to create video les that
are suitable for playback on the MP-C983.
Your player supports XviD-encoded AVI les with the following specications:
128 x 128 resolution at 15 frames per second (fps)
Note:
The video conversion software is included for your convenience and is compatible with Microsoft
Windows operating systems only. There are many other video conversion utilities available for
download or purchase on the internet.
Because the program is licensed free of charge, there is no warranty for the program, to the extent
permitted by applicable law. Except when otherwise stated in writing the copyright holders and/or
other parties provide the program “as is” without warranty of any kind, either expressed or implied,
including, but not limited to, the implied warranties of merchantability and tness for a particular
purpose. The entire risk as to the quality and performance of the program is with you. Should the
program prove defective, you assume the cost of all necessary servicing, repair or correction.
In no event unless required by applicable law or agreed to in writing will any copyright holder, or
any other party who may modify and/or redistribute the program as permitted above, be liable to
you for damages, including any general, special, incidental or consequential damages arising out
of the use or inability to use the program (including but not limited to loss of data or data being
rendered inaccurate or losses sustained by you or third parties or a failure of the program to operate with any other programs), even if such holder or other party has been advised of the possibility
of such damages.
Installation
Please refer to the Installation CD for software installation procedures.
Converting Video
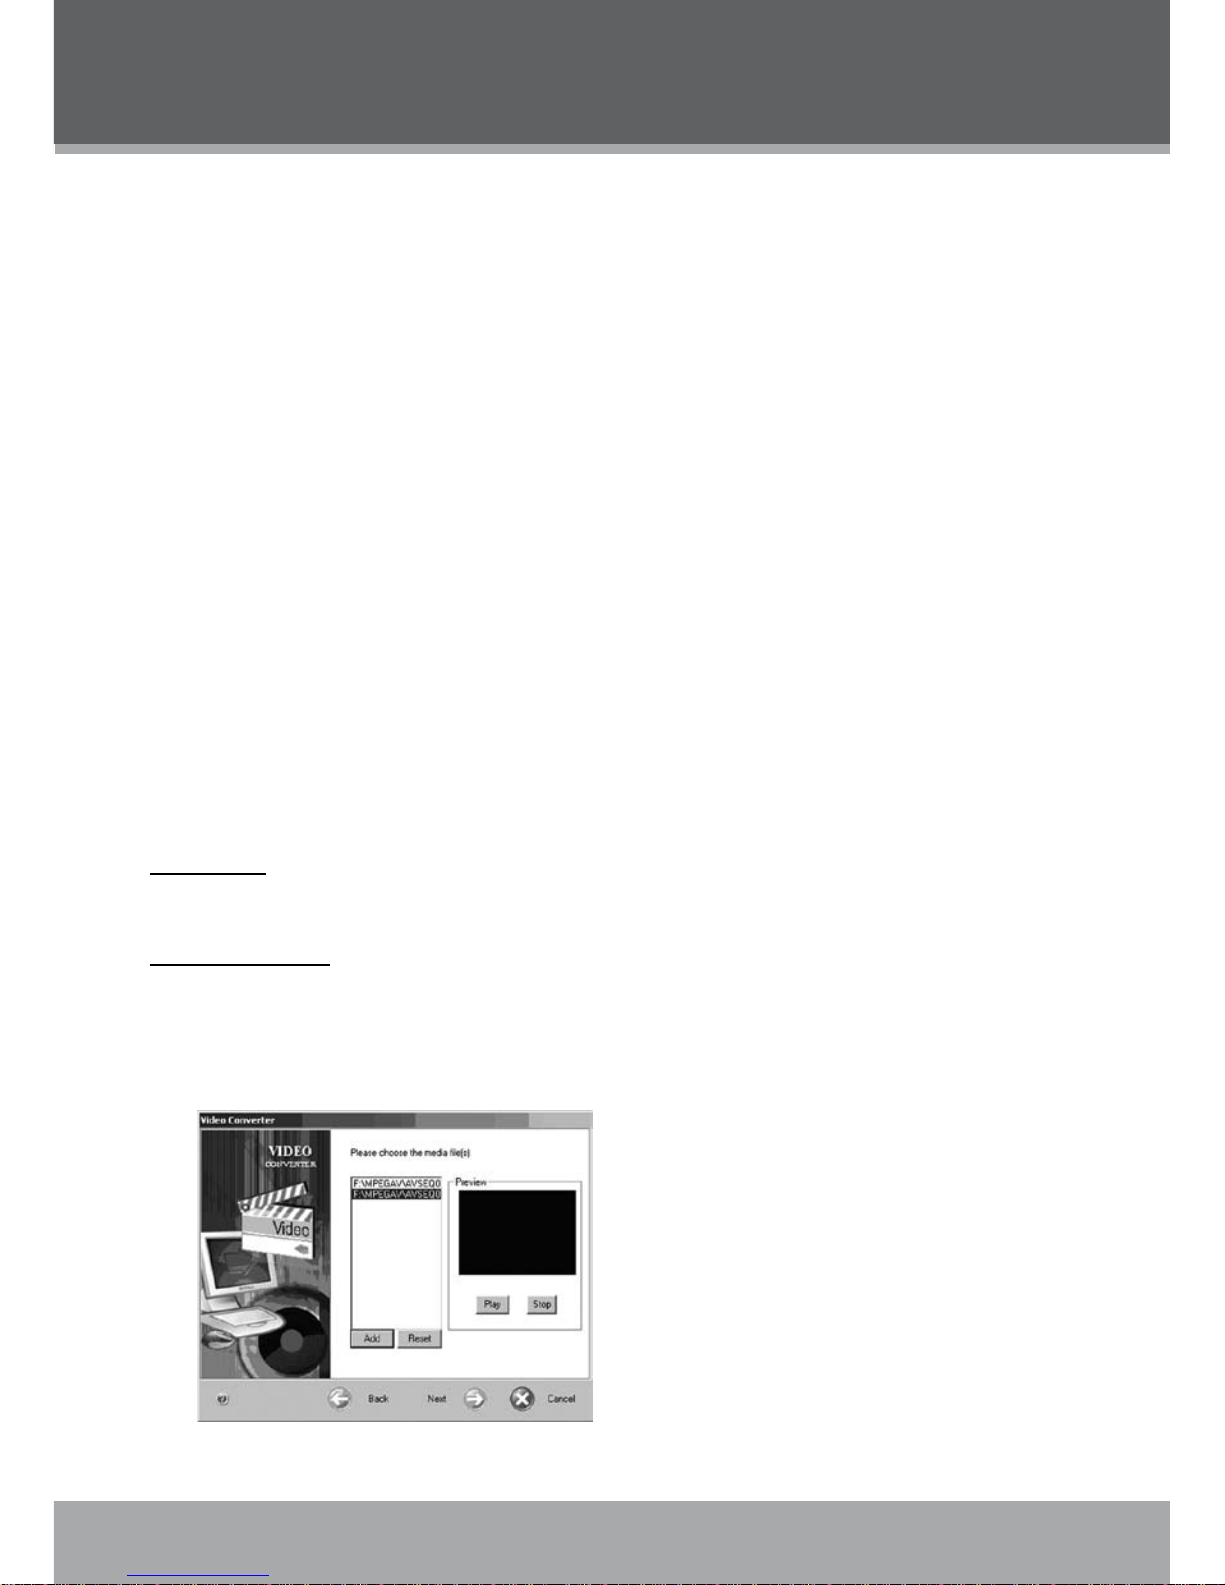
Select the source video le to convert. The source le must be a generic AVI or MPEG-1
format.
Start the video conversion software. Click “Add” and choose the source le (you can
preview the video in the right panel) and then click “Next”.
•
1.
2.
VIDEO CONVERSION
Page 32

32
Page 32 Coby Electronics Corporation
www.cobyusa.com Page 33
WINDOWS MEDIA PLAYER
Windows Media Player 9 (WMP9)
You can use Windows Media Player 9 (WMP9) and a USB-MSC connection to manage your music
media library with Microsoft Windows 98SE/ME/2000.
Music File Transfers
To transfer les using WMP9:
Run Window Media Player 9
Connect your player to the computer
Select “Copy to CD or Device”.
Drag the desired songs, photos, or converted video les from the PC to the left pane.
Select “Removable Disk”.
Click “Copy”.
1.
2.
3.
4.
5.
6.
Page 33
www.cobyusa.com Page 33
WINDOWS MEDIA PLAYER
Windows Media Player 10 (WMP10)
You can use Windows Media Player 10 (WMP10) and a USB-MTP connection to manage your
music media library with Microsoft Windows XP or newer.
Music File Transfers
To transfer les using WMP10:
Run Window Media Player 10
Connect your player to the computer. A “Device Setup” window will appear.
In the ‘Device Setup” window, choose “Synchronize this device with this library for this
session only” and click “Finish”.
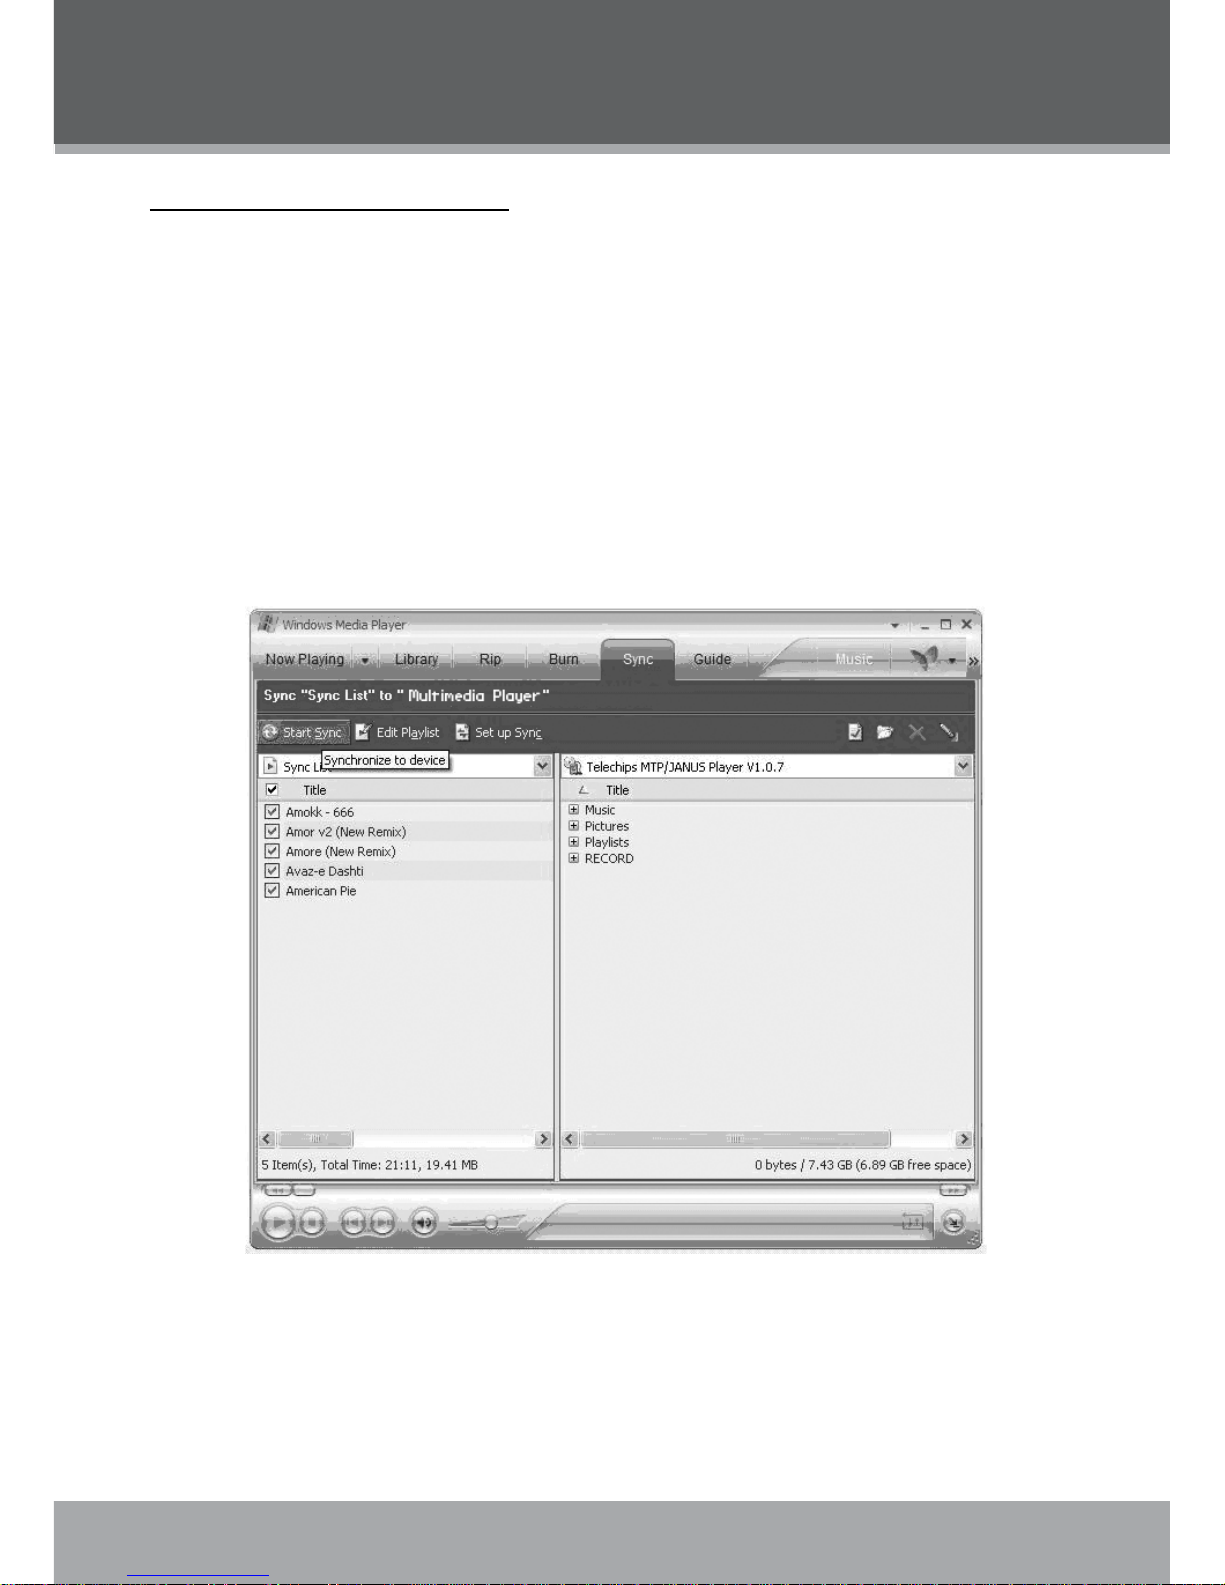
Select “Sync”. There are 2 ways to sync your les with your player:
Drag your songs, photos, or converted video les to the sync list on the left
hand side. Click “Start Sync” to start transferring the selected les.
1.
2.
3.
4.
•
Page 34

34
Page 34 Coby Electronics Corporation
www.cobyusa.com Page 35
Select a playlist from the “Sync List” drop-down menu. Click “Start Sync” to start
transferring the les in the selected playlist.
For more information and support regarding music transfer and synchronization with
Windows Media Player (WMP), please see the help section included with WMP (click Help
> Synchronizing Content to Devices).
Creating Playlists
Playlists are an easy way to organize and store your favorite music mixes so you can listen to them
whenever you want.
When a playlist is transferred using Windows Media Player, every song in the playlist will be
transferred as well.
•
WINDOWS MEDIA PLAYER
Page 35

www.cobyusa.com Page 35
To create playlists using WMP10:
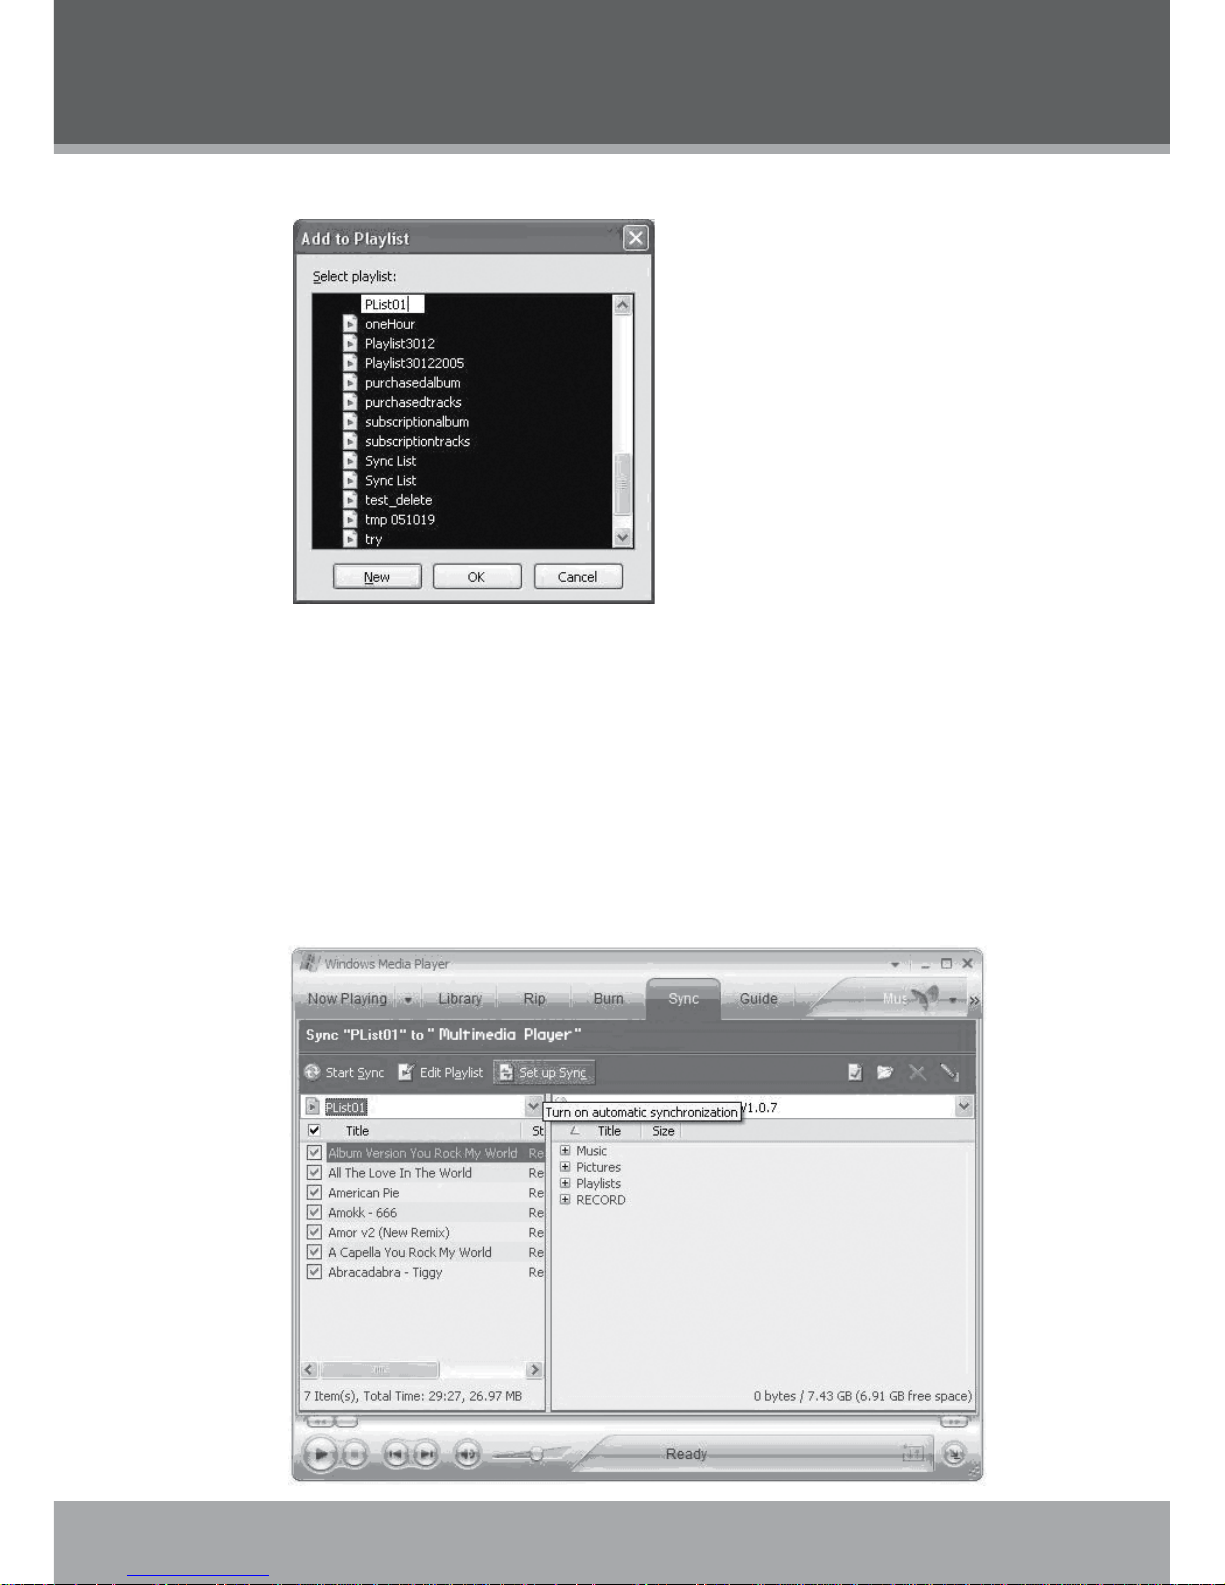
Run Window Media Player 10
Select “Library” and then drag the desired song(s) to the “Now Playing List” on the right side.
Highlight all of the songs in the “Now Playing List” and then use the mouse to right-click the
list. Choose “Add to” and then “Additional Playlists...”
An “Add to Playlist” window will appear.
1.
2.
3.
WINDOWS MEDIA PLAYER
Page 36
36
Page 36 Coby Electronics Corporation
www.cobyusa.com Page 37
Select “New” and enter the playlist name, then click “OK”. A new playlist will be created.
Automatic Windows Media Playlist Synchronization
By default, WMP is set to transfer and synchronize les manually. You can choose to have Windows Media Player automatically synchronize your playlists when you connect your player to the
computer.
To change the synchronization settings:
Connect your player with the computer and run Window Media Player 10.
In the SYNC menu, click the “Set up Sync” button. A “Synchronization Settings” window will
appear.
Check “Synchronize device automatically” and check the playlist(s) you want to sync.
4.
1.
2.
3.
WINDOWS MEDIA PLAYER
Page 37

www.cobyusa.com Page 37
Click “OK” to start the synchronization.
When synchronization is complete, disconnect your player from the computer.
Turn on your player and select “Music”.
The synchronized playlist(s) from WMP will have been added under the “Playlist” category.
4.
5.
6.
7.
Page 38

38
Page 38 Coby Electronics Corporation
www.cobyusa.com Page 39
FIRMWARE UPDATES
From time to time, COBY may release rmware updates to improve MP-C983 performance or to
add additional features. Please check the COBY website at www.cobyusa.com periodically to see
if new rmware (and update instructions) have been released for your player.
If you are experiencing abnormal behavior with your player, you may choose to rst restore (format) the player and then update its rmware.
Page 39

www.cobyusa.com Page 39
COBY Electronics Technical Support
Hours: Monday to Friday, 8:30 AM–11:00 PM EST
Saturday to Sunday, 9:00 AM–11:00 PM EST
Email: techsupport@cobyusa.com
Phone: 800-681-2629 or 718-416-3197
Web: www.cobyusa.com
TROUBLESHOOTING
If you have a problem with this player, please read the troubleshooting guide below and check our
website at www.cobyusa.com for Frequently Asked Questions (FAQs) and rmware updates. If
these resources do not resolve the problem, please contact Technical Support.
The player does not turn on.
The battery level may be too low. Try charging the player or operate the player on AC power.
Ensure that the Lock switch is disengaged.
Reboot the player (slide and hold the Power/Lock switch to the right for several seconds) and
try again.
The player does not turn charge when connected to a computer (USB charge).
Reboot the player (slide and hold the Power/Lock switch to the right for several seconds) and
try again.
There is no sound during playback.
Check the volume level.
Ensure that the headphones are attached securely to the player.
The sound quality of the music is poor.
Try playing the le on your computer. If the sound quality is still poor, try downloading the le
again or re-encoding the le yourself.
Ensure that the bit rate of the le is not too low. The higher the bit rate of the le, the better it
will sound. The minimum recommended bitrate is 128kbps for MP3s and 96kbps for WMAs.
Ensure that the headphones are attached securely to the player.
The buttons do not work.
Ensure that battery is charged or that the player is operating on AC power.
Ensure that the Lock switch is disengaged.
The player will not play my music le.
Ensure that the le is in a compatible format (MP3, WMA, or WAV).
The le may be copy-protected. Use Windows Media Player to transfer the le.
The le may be copy-protected. Ensure that the license has not expired.
The LCD characters are corrupted.
Ensure that the correct language has been selected. Try transferring some songs and restart
the player to automatically rebuild the Music Library.
•
•
•
•
•
•
•
•
•
•
•
•
•
•
•
Page 40

40
Page 40 Coby Electronics Corporation
www.cobyusa.com Page 41
TROUBLESHOOTING
The player will not play my video le.
Ensure that the video le will play on your computer using Windows Media Player 10. If the
le works on the computer, use the same computer to convert the video.
I cannot transfer les to the player.
Ensure that your computer is running a supported operating system.
If you are running Microsoft Windows 98 SE, ensure that the USB driver has been properly
installed.
Ensure that the supplied USB cable is securely attached to the player and the PC, or try using
another USB cable.
If you have connected the player through a USB hub, try connecting the player directly to
your computer.
Ensure that the player’s memory capacity is not full.
Ensure that there are less than 2500 items loaded on the player.
I transferred les to my player but they are missing from the Music Library
Ensure that the le in a supported format (MP3, AVI, JPG, WAV, WMA).
Ensure that there are less than 2500 items loaded on the player.
If the player is in MTP mode, ensure that there are less than 2500 items loaded on the
player.
I cannot see some les on my computer.
Ensure that the correct USB mode is in use (MSC or MTP). Files transferred in one mode will
not be seen when connected in another mode.
The player has malfunctioned.
Reboot the player (slide and hold the Power/Lock switch to the right for several seconds).
Try updating the player’s rmware. Please refer to the Firmware Update section of this man-
ual for detailed instructions.
•
•
•
•
•
•
•
•
•
•
•
•
•
Page 41

www.cobyusa.com Page 41
SPECIFICATIONS
Display Type 1.8” True-Color OLED
Display Resolution 128 x 128
Memory 8GB 1” Micro-HDD
2500 le/folder system limit
Audio Format Support MP3, WMA, WAV
Video Format Support MPEG-4 (XviD): 128 x 128, 15fps
Photo Format Support JPEG
Song Info Support ID3, Windows Media
PC Interface USB 2.0 High-Speed Dual-Mode (MSC and MTP)
DRM Support Windows Media DRM 10
(Requires Windows XP and Windows Media Player 10
or higher)
Windows Media DRM 9
(Requires Windows 98SE and Windows Media Player 9
or higher)
Plug and Play Support Windows 98SE/2000/ME/XP or newer
Audio Output 3.5mm Stereo (Headphone)
Audio Input Integrated Microphone
Menu Language Support English, Spanish, Portuguese
Power Supply Integrated Rechargeable Lithium-ion Battery
USB Charge
Unit Dimensions 2.0” x 3.5” x 0.5” (WHD)
Weight 2.1 oz
Specications and manual are subject to change without notice.
Page 42

42
Page 42 Coby Electronics Corporation
www.cobyusa.com Page 43
NOTES
Page 43

www.cobyusa.com Page 43
NOTES
Page 44

44
Page 44 Coby Electronics Corporation
NOTES
Page 45

COBY Electronics Corp.
56-65 Rust Street
Maspeth, NY 11378
ww w.cobyusa.com
ww w.ecoby.com
COBY Electronics Corp.
56-65 Rust Street
Maspeth, NY 11378
ww w.cobyusa.com
ww w.ecoby.com
 Loading...