

Page 1
9020 QRB3000CA-3-ENGLISH 9/28/04 3:43 PM Page 1
QUICK REFERENCE MANUAL FOR
MOBILE NAVIGATION SYSTEM:
Nothing comes close to a Cobra
®
TM
3000
Printed in the Philippines
Part No. 480-180-P
English
Page 2

9020 QRB3000CA-3-ENGLISH 9/28/04 3:43 PM Page 2
Controls, indicators and System logic
Controls and indicators
LCD
NAV ONE Signal
Indicator
Best signal reception
Function Icons
Vehicle
Heading
Function Buttons
Left
Button
Power
LCD Brightness
Control (+/-)
On/Off
Button
OK signal reception
LCD Contrast
Control (+/-)
Infrared Port and
Light Sensor
Not enough signal reception
Connection
Menu
Button
Up
Button
Right
Button
Enter
Button
Down
Button
USB
Antenna
Mounting
Bracket
12 Volt
Power
Quick Release
Lever
Connection
Port
1
⁄4 – 20 Tripod
Socket
External Antenna
Connection Port
Mounting Bracket
Quick Release
Lever (side view)
(side view)
Menu button ( MENU )
Goes to the 2Main menu.
Enter button ( ENTER )
Enters the current
selection/entry.
Up button (5)
Scrolls up through list line-by-line, scrolls
up character lists, scrolls up increment
numbers, moves map cursor up and
navigates up in preferences selections.
(
Down button
Scrolls down through list line-by-line,
scrolls down character lists, scrolls
down decrement numbers, moves map
cursor down and navigates down in
preferences selections.
Left button (3)
Moves to previous character or number,
sequences to previous alphanumeric
character group, moves map cursor left
and navigates left in preferences selections.
Right button (4)
Moves to next character or number,
sequences to next alphanumeric character
group, moves map cursor right and
navigates right for preferences selections.
6
)
2
2
Page 3
Do not enter route request or
make any adjustment to this
device while driving.
Safe and lawful vehicle use is
the driver’s responsibility.
Fai lure to pay attention to the
road and traffic conditions
could result in death, serious
injury or property damage.
This unit is for guidance only.
Do not follow any hazardous,
unsafe or unlawful route
suggestions.
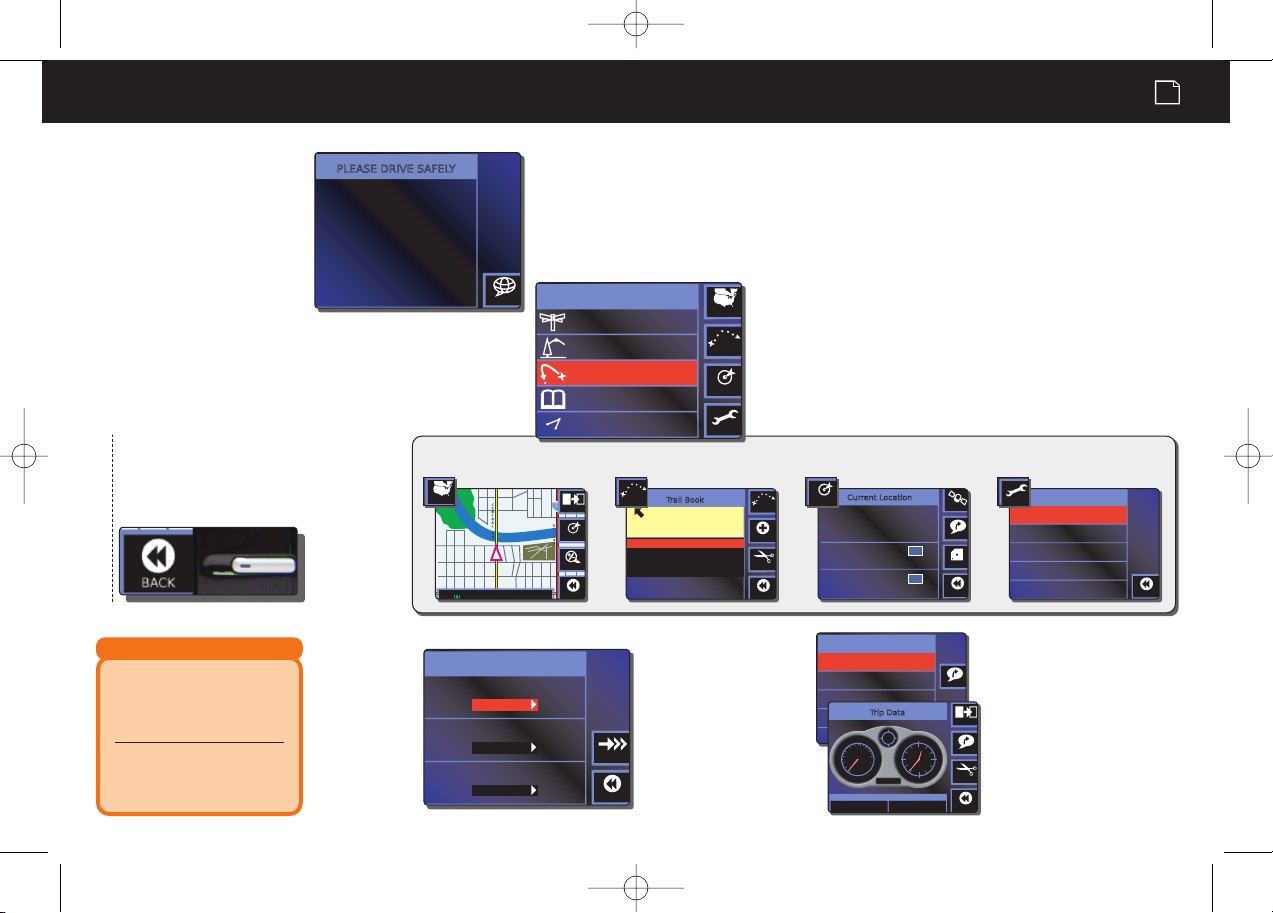
PLEASE DRIVE SAFELY
Press ENTER to accept.
LAN
G
A
B
C
MAP
OPTION
HERE
TRAIL
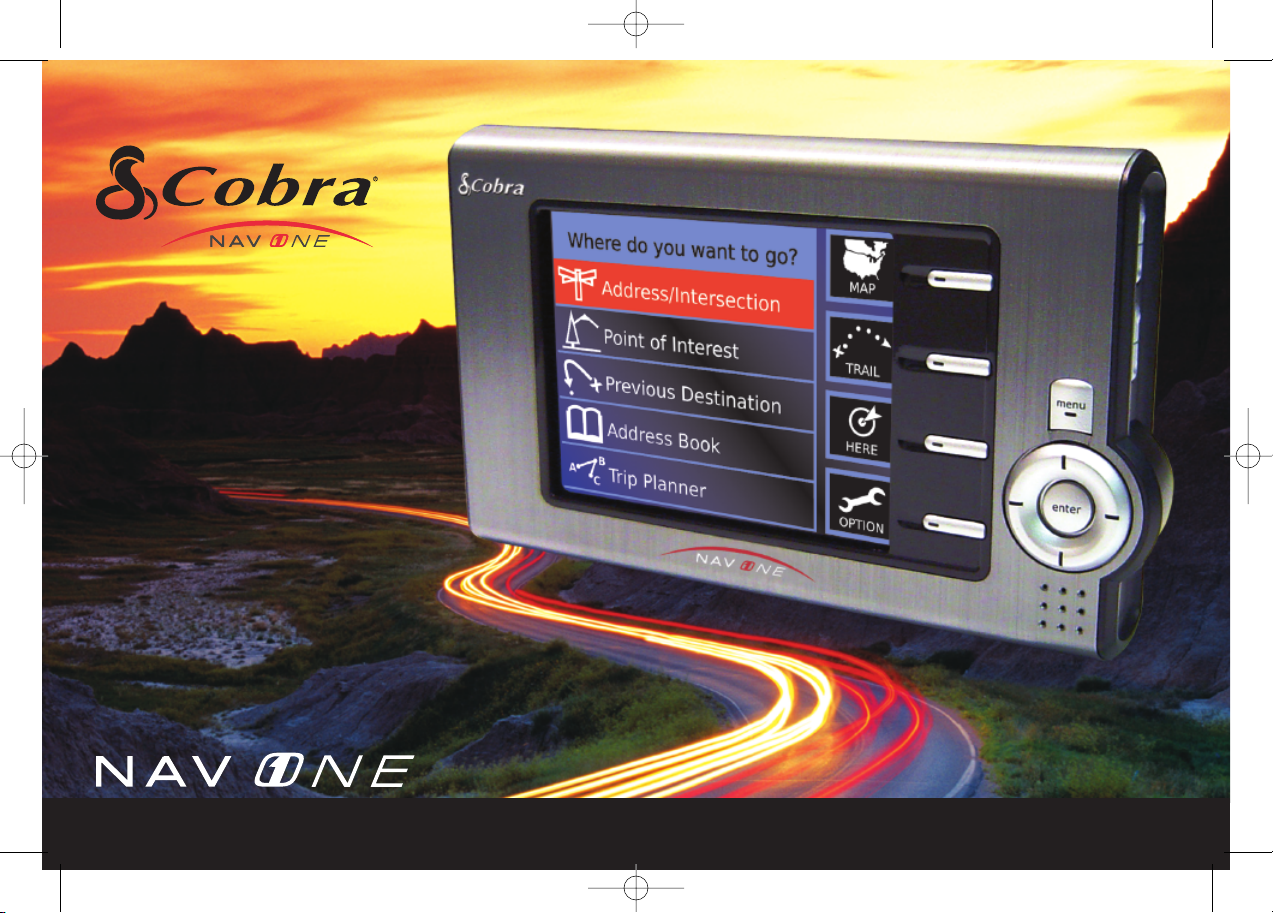
Where do you want to go?Where do you want to go?
Address/Intersection
Point of Interest
Previous Destination
Address Book
Tr ip Planner
BACK
GO
Select Route CriteriaSelect Route Criteria
Route by Shortest
Time
Use Freeways?
Ye s
Use Toll Roads?
Ye s
PAGE
HERE
ZOOM
BACK
GPS
SAVE
GPS
VOICE
BACK
LANDWEHR RD
NORTHBROOK
ILLINOIS
Between
IL-68
And
MAXINE COHEN CIRC
Current Location
0.0 mi
0.0 mi
BACK
Preferences
Languages
Vehicle Position
System Information
Map Regions
Option MenuOption Menu
0.1mi
Latitude: N 42° 22’ 30”
Longitude: W 88° 07’ 30”
ADD
EDIT
VIEW
BACK
Tra il-1
Tra il-2
Off-Roading
Sight Seeing
Tra il Book
VOICE
BACK
Select Routing MethodSelect Routing Method
Detour
Route Criteria
Tri p Planner
Cancel Route
EDIT
0
10
20
30
40
50
60 70
80
90
100
mph
10
11
12
1
2
3
9
4
5
7
6
8
000000.0
time
NW
VOICE
PAGE
BACK
65.4mph
Max Speed Stopped Time
0:23:41
Tri p Data
MAP
TRAIL
HERE
OPTION
9020 QRB3000CA-3-ENGLISH 9/28/04 3:43 PM Page 3
System logic
3
System logic
While using the
NAV ONE system, the
system proceeds from
the opening screen to
the main menu, then
through the processes
needed to get to the
desired destination
as shown.
ì NOTE
Pressing the icon on the LCD will not invoke
the function — and may damage the display.
Be sure to press only the function button.
Icon Function Button
Throughout this manual
[ ] Brackets
Used to identify the
highlighted bar or text
to be found on the menu.
2
Used to identify screens
and menus.
Screens and menus
When the NAV ONE system is turned on, an opening screen and
safety reminder are shown and an option is provided to change
the language used.
2
Next, the
Main menu becomes available that provides five
means of selecting a destination. And, that is what the system
is all about — to guide users to destinations with maximum
confidence and minimum fuss.
Below are examples of available functions and samples of their screens and menus.
Once a destination is
selected, the user
chooses how to reach
the desired destination.
Detours take care
of unexpected
encounters.
Trip data tracks progress.
Bottom two fields
are user selectable.
Page 4

9020 QRB3000CA-3-ENGLISH 9/28/04 3:43 PM Page 4
Important safety information
4
Important
. . . . . . . . .
safety
information
Warning symbols
and statements
Please pay special attention to
the WARNING symbols and
statements in this manual.
WARNING
Statements identify
conditions that could
result in personal
injury or loss of life.
. . . . . .
Before installing and using the Cobra NAV ONE system, please read these general
Ü
precautions and warnings. Without reading the important safety information, the user
may be placed in a dangerous situation or may damage the unit before having any
practical use from it. Also read pages 7 – 20 in this manual to learn the basics of
installing and operating the system. It is strongly recommended to read this entire
manual to be familiar with the system’s features, and know how to operate it.
Ü
WARNINGS
n
DO NOT think this NAV ONE is a substitute for personal judgment. The route suggestions should never supersede
any local traffic regulation or personal judgment and/or knowledge of safe driving practices. Before making any
maneuvers suggested by the NAV ONE system (for example, a U-turn or a left turn), verify that the maneuver
can be legally and safely completed. Do not follow route suggestions if they suggest an unsafe or illegal maneuver,
would place the vehicle in an unsafe situation or would route the vehicle into an area that could be unsafe.
n
DO NOT program this NAV ONE while driving. Only a passenger should operate controls or program the unit while
the vehicle is in motion. The driver should not program the system unless the vehicle is parked in a safe location.
n
ONLY glance at the screen when necessary and safe to do so. Listen to the computer voice guidance. If prolonged
viewing is necessary, pull off the road to a safe location.
n
DO NOT use this NAV ONE system to locate emergency services (such as police, fire stations, hospitals and clinics). The
database may not include all emergency service providers. Use best judgment and ask for directions in these situations.
n
DO NOT position the unit in a location that obstructs the driver’s view of the road, instruments or controls to operate the vehicle.
n
DO NOT drive the vehicle unless the unit is securely attached to the windshield with the supplied bracket and
suction cup or is fastened by other reliable means to keep it from becoming a projectile hazard inside the vehicle
in the event of a violent maneuver or collision.
n
DO NOT mount the unit over airbag panels or within airbag expansion spaces. The force of an expanding airbag
can thrust objects in its path toward the driver or passengers with injurious result.
n
DO position the unit so the screen can be viewed with just a quick glance.
n
DO set the volume at a level that will allow the hearing of outside traffic and emergency services.
Page 5
9020 QRB3000CA-3-ENGLISH 9/28/04 3:43 PM Page 5
Important safety information
5
Caution symbols
. . . . . .
and statements
Please pay special attention to
the CAUTION symbols and
statements in this manual.
CAUTION
Statements identify
conditions that could
cause damage to the
system or other
equipment.
Ü
CAUTIONS
n
The user is responsible for operating this product wisely. This NAV ONE system is intended for use only as a navigational
aid and should not be relied upon to the exclusion of other information. Be aware of conditions around the vehicle
and compare them to the information provided by the NAV ONE system.
n
The Global Positioning System is provided and operated by the U.S. government, which is solely responsible for its accuracy
and maintenance. The system is subject to changes, which could affect the accuracy and performance of this NAV ONE system.
n
This NAV ONE is not waterproof. Do not allow liquids to splash on it nor expose it to rain during operation or
transfer from vehicle to vehicle.
n
Do not disassemble or modify the unit as this may lead to damage. If a problem occurs, stop using the system immediately
and contact a Cobra dealer. Changes or modifications to the unit may void its compliance with government rules and make
it illegal to use.
n
The NAV ONE system’s map database provides information on suggested routes without regard to factors that may affect
the user’s driving experience or the time required to arrive at the desired destination. For example, the system does not
reflect road detours, closures or construction, some road characteristics (e.g., road surface, slope or grade, weight or
height restrictions, etc.), temporary traffic congestion, weather conditions and similar factors. Use personal judgment or
the NAV ONE system’s detour mode to develop an alternate route if necessary.
n
The gyro in the NAV ONE will operate properly only if the unit is in a vertical position. This means that the unit
should not be tilted front-to-back or side-to-side. With the unit in the vertical position, it can be rotated in the
horizontal plane to any convenient viewing angle.
n
Do not remove the unit from the windshield or quick release bracket while the unit is turned on. The NAV ONE
contains a hard drive, which spins at high speed while the unit is turned on. Handling the unit while the drive
is spinning could damage it. When the unit is off, the hard drive is parked in a more secure condition.
n
Dismount the unit when parked. This will not only minimize the chance of theft but will also reduce the
unit’s exposure to heat and strong sunlight which can shorten the life of the internal components.
n
Do read the important safety information section on page 4 of this manual before using this NAV ONE system.
Page 6
9020 QRB3000CA-3-ENGLISH 9/28/04 3:43 PM Page 6
Included in this package, FCC compliance and Industry Canada notice
6
Included in
. . . . . . . .
this package
IN THIS MANUAL
2
The unit shown is
not necessarily the
one purchased. Images
shown in this manual
are for illustration
purposes only.
. . . . . . . . . . . . . . . .
FCC
compliance
Industry
. . . . . . . . . . .
Canada notice
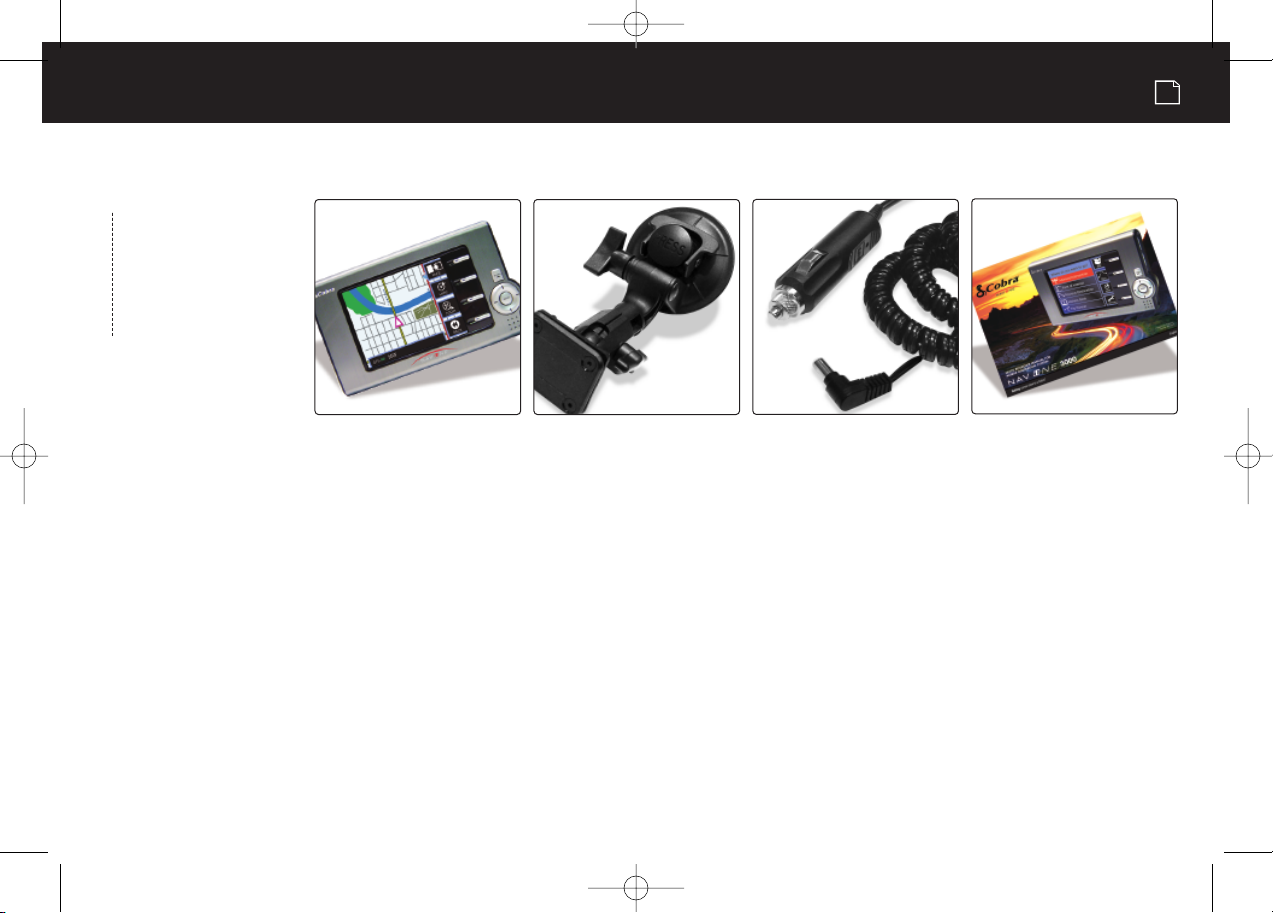
All of the following items should be in the package with the NAV ONE system.
Ü
NAV ONE system unit
This device complies with Part 15 of the FCC interference limits for Class B digital devices for home or office use.
Ü
These limits are designed to provide more reasonable protection against harmful interference in a residential installation
and are more stringent than “outdoor” requirements.
Operation of this device is subject to the following conditions:
1. This device may not cause harmful interference, and
2. This device must accept any interference received, including interference that may cause undesired operation.
For Products Used in Canada
Ü
Operation is subject to the following two (2) conditions:
1. This device may not cause interference, and
2. This device must accept any interference, including interference that may cause undesired operation of the device.
«IC» before the equipment certification number signifies that the Industry Canada technical specifications were met.
It does not guarantee that the certified product will operate to the user’s satisfaction.
Mounting bracket with quick
release and suction cup
12 volt fused power cord
This quick reference manual
for Mobile Navigation Systems
Page 7
9020 QRB3000CA-3-ENGLISH 9/28/04 3:43 PM Page 7
Installation
7
Installation
ì NOTE
Some vehicles have windshields with metallic coatings
or integral heating systems
that will block the satellite
signals even though the unit
“sees” the sky through the
glass. In those vehicles, it
will be necessary to mount
the accessory external
antenna outside the vehicle
and connect it to the unit.
See accessories and order
form on pages 27 – 28 for
ordering information.
. . . . . . . .
The NAV ONE requires very little installation beyond the
Ü
need to put it at a convenient location and to secure it in
place. The only connection required is between the unit’s
power socket and the vehicle’s 12 volt power socket.
When locating and securing the NAV ONE in the vehicle, keep in mind the
warnings and cautions on pages 4 – 5 to allow using the NAV ONE safely
while driving the vehicle:
n
Put the unit where it is visible at a glance
and the voice instructions can be heard.
n
Do not put the unit where it will obstruct the
driver’s view of the road or interfere with use
of vehicle instruments and controls.
n
Do not put the unit over airbag panels
or within airbag expansion spaces.
n
Attach the unit to the vehicle so that it does
not become a projectile hazard in a collision.
n
Position the unit vertically to allow the gyro in
the NAV ONE to operate properly.
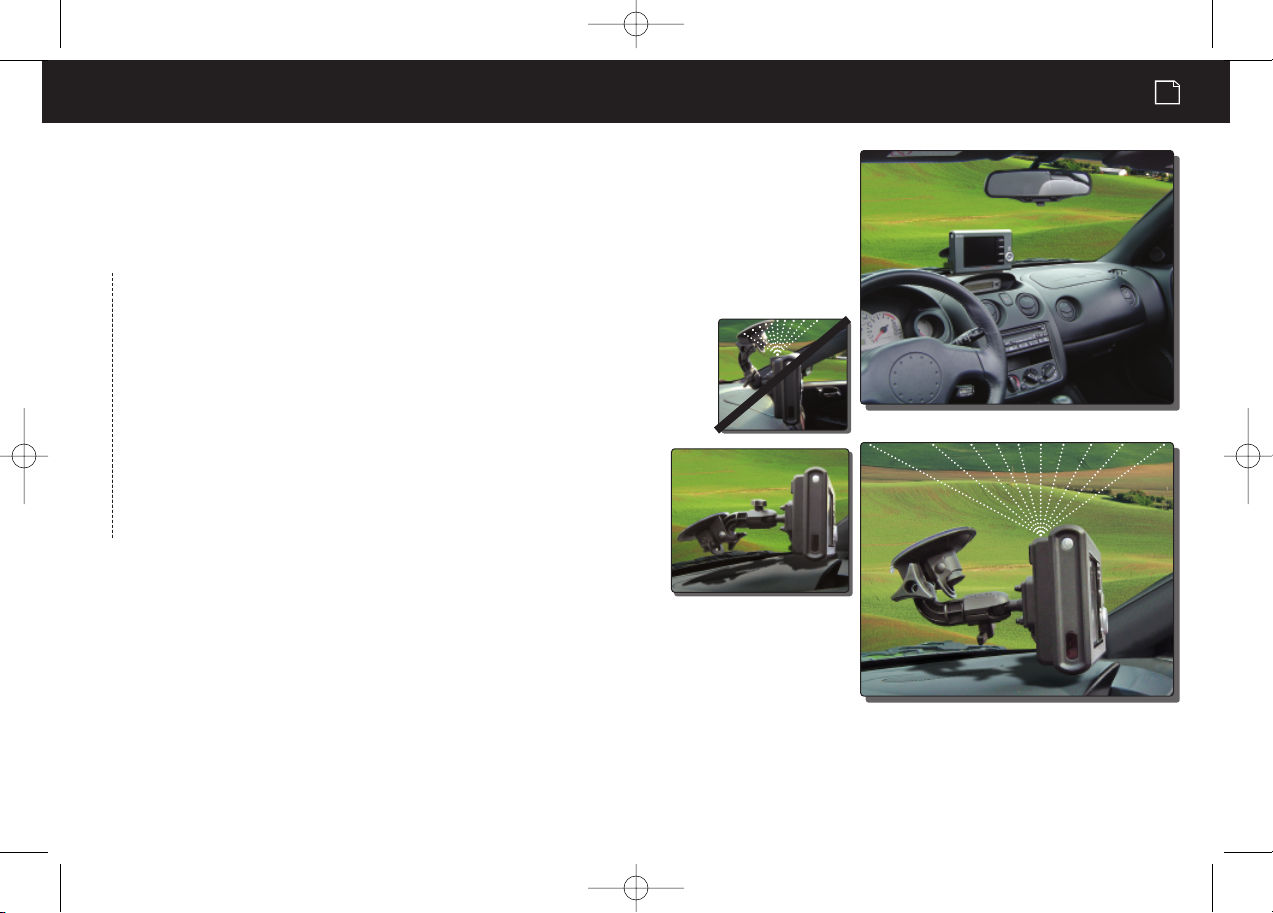
Two important considerations
in positioning the unit are:
A. Its ability to “see” the sky. Signals from the GPS
constellation of satellites are weak and cannot
penetrate the solid portions of the vehicle’s structure. The top of the
unit contains the GPS antenna and needs maximum exposure to the
sky through the windshield. This will allow the unit to receive signals
from as many satellites as possible in various vehicle headings.
Do not let
the mount
block the
view of
the sky.
Alternative mounting
recommended for highpitched windshields.
Put the unit where it is visible at a glance.
Let the NAV ONE “see” the sky.
Page 8
9020 QRB3000CA-3-ENGLISH 9/28/04 3:43 PM Page 8
Installation
B. The gyro in the NAV ONE will operate properly only if the unit is in
a near-vertical position. This means that the unit should not be tilted
WARNING
If the unit is not securely
attached to the vehicle, it
can become a projectile
hazard to the vehicle’s
occupants during a violent
maneuver or a collision.
The unit can cause serious
injury under the influence
of forces resulting from such
accelerations or decelerations.
Secure and
connect the
NAV ONE
. . . . . . . . . . .
front-to-back or side-to-side. With the unit in the vertical position,
it can be rotated in the horizontal plane to any convenient viewing angle.
The unit should be as close
to vertical as possible and
not tilted front-to-back or
side-to-side.
To secure and connect the NAV ONE:
Ü
1. Select a suitable location where the unit can be mounted vertically
and clean the mounting area.
2. Separate the suction cup and mounting bracket assembly from the unit.
3. FIRMLY press the suction cup against the windshield by applying pressure
to the central PRESS button. Be sure the button is pressed all the way in
to make sure ALL the air is out of the suction cup.
4. While maintaining FIRM pressure on the button, pull the lock lever up or
down over the button.
5. Test suction cup adhesion by pulling on the bracket. THE ASSEMBLY
SHOULD NOT WIGGLE. If it does, unlock the lever and repeat steps 3 and 4.
6. Attach the unit to the mounting bracket by means of the quick release feature.
7. Plug the power cord into the unit and the vehicle’s 12 volt power socket.
Top view of rotation in the
horizontal plane.
8
CAUTION
All air must
be removed.
Attach the mounting bracket to the windshield.
3
3
3
3
3
3
Attach the unit to the mounting bracket.
Page 9
PAG
E
HERE
ZOOM
BACK
GPSNWGPS
NW
GPS
NW
9020 QRB3000CA-3-ENGLISH 9/28/04 3:44 PM Page 9
Installation
9
Alternative
securement
Check for
GPS signal
Start-up time
. . . . . . . . . . . .
. . . . . . . . . . .
. . . . . . . . .
Alternative securement of the NAV ONE:
Ü
If it is not practical to mount the unit to the windshield with the supplied suction cup and bracket,
the user can develop an alternative mounting using the 1⁄4-20 threaded socket — compatible with
most camera mounting equipment — in the bottom ofthe unit. The supplied bracket may be removed
or left attached when an alternative mounting arrangement is employed. Additional mounting bracket
options, that may be more suited to your vehicle, are available at www.cobra.com.
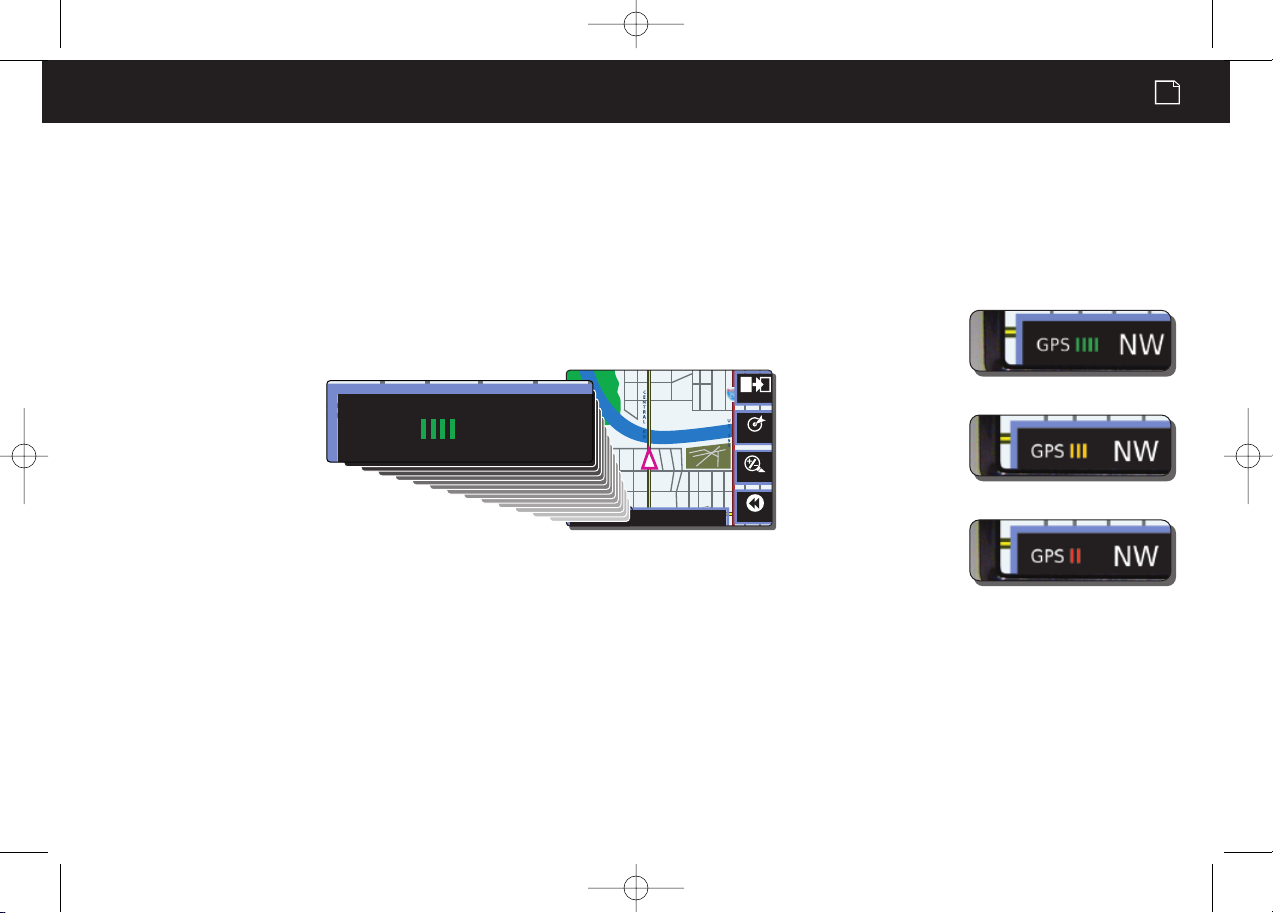
After installation is complete and the vehicle is in an open area, turn on the unit. The GPS signal
Ü
strength indicator at the lower left corner of the LCD should show four green bars to confirm the
antenna is “seeing” the sky properly. If the bars are fewer than four and are either yellow or red,
the unit may need to be repositioned.
When the GPS Navigation System is new (or has been idle for more than seven days or has
Ü
moved more than 500 miles while off), it can take up to five minutes for the system to lock
onto the GPS satellites. After such a start-up, the system should be left turned on for at least
20 minutes to download GPS satellite data. Having updatedsatellite data will allow much faster
satellite acquisition and lock — typically less than a minute — when the unit is turned on again.
NAV ONE Signal Indicator
Best signal reception
OK signal reception
Not enough signal reception
Page 10

9020 QRB3000CA-3-ENGLISH 9/28/04 3:44 PM Page 10
Installation
10
Removing the
NAV ONE
Temporary removal
Transferring the
Using the GPS
unit at home or
in the office
. . . . . . . . .
NAV ONE
The NAV ONE should temporarily be removed when parking the vehicle to
Ü
prevent theft or heat damage. It may also be removed to transfer the entire
unit to a different vehicle or to use it at home or in the office to program a
trip plan using the optional Cobra indoor adapter.
To temporarily remove the NAV ONE from a vehicle:
Ü
1. Unplug the power cord from the vehicle’s 12 volt power socket.
2. Pull the QUICK RELEASE lever on the back of the unit and remove the
unit to store it in a protected location or to use indoors. The suction cup
portion of the bracket can be left attached to the windshield for quick
reinstallation of the unit.
To transfer the NAV ONE to a different vehicle:
Ü
1. Unplug the power cord from the vehicle’s 12 volt power socket.
2. Rotate the lock lever off the PRESS button, then pull the tab
to release the suction cup.
3. Move the unit to the other vehicle and install it as described on page 7.
To use the NAV ONE at home or in the office to program a trip plan:
Ü
1. Connect the unit to an electrical outlet using an optional Cobra
indoor adapter developed especially for use with the NAV ONE.
See accessories and order form on pages 27 – 28 for information
on ordering a Cobra adapter.
2. Turn the unit on and program the desired trip as referenced in
the trip planner section on page 15.
The suction cup portion of the bracket can
be left attached to the windshield for quick
reinstallation.
Page 11

2003, 2004,
NAVIGATION TECHNOLOGIES.
ALL RIGHTS RESERVED.
c
Mobile Navigation System
Do not enter route request or
make any adjustment to this
device while driving.
Safe and lawful vehicle use is
the driver’s responsibility.
Fai lure to pay attention to the
road and traffic conditions
could result in death, serious
injury or property damage.
This unit is for guidance only.
Do not follow any hazardous,
unsafe or unlawful route
suggestions.
PLEASE DRIVE SAFELY
Press ENTER to accept.
LANG
9020 QRB3000CA-3-ENGLISH 9/28/04 3:44 PM Page 11
Basic operation and start-up
Basic operation and start-up
Be sure to read the IMPORTANT SAFETY INFORMATION on
pages 4 and 5 before the first use of the NAV ONE system.
Power on/off
After installation is complete and the vehicle is in an open area, turn on the unit (press and hold the POWER
button on the side of the unit). Each time the unit is turned on, a start-up screen appears on the LCD followed
by a safety reminder and an opportunity to select a language. Then, pressing ENTER will bring up either the
2
Main menu or the 2Continue route guidance menu. Each time the system is turned off (press the POWER
button again), the system will retain all information to be recalled when it is turned on again.
When the GPS Navigation System is new (or has been idle for more than seven days or has moved more than
500 miles while off), it can take up to five minutes for the system to lock onto the GPS satellites. After such a
start-up, the system should be left turned on for at least 20 minutes to download GPS satellite data. Having
updated satellite data will allow much faster satellite acquisition and lock — typically less than a minute —
when the unit is turned on again.
Display saver and sleep mode
The 2Display Saver screen conserves power and the life of the LCD whenever the system is in sleep mode.
Sleep mode is activated automatically if the user takes no action at the 2PLEASE DRIVE SAFELY screen for
ten seconds after it appears. This occurs only at the 2PLEASE DRIVE SAFELY screen and is different from a
SmartPower shutdown. See page 12 for information on SmartPower.
11
Page 12

9020 QRB3000CA-3-ENGLISH 9/28/04 3:44 PM Page 12
Preferences
Preferences
Users can select settings from the 2Preferences menu as shown below. To reach this menu, press the
OPTION function button at the 2Main menu, then ENTER at the [Preferences] bar on the 2Option menu.
Preferences menu
Preferences
Volume
- 0 1 2 3 4 5 6 7 8 +
Zoom Level
- 1 2 3 4 5 +
Map View Heading Up >
Auto Reroute On >
Color Scheme Auto >
Units Mile >
Smart Power On >
Key Click On >
Options
0 (off – no sound)
1 – 8 (softest to loudest)
1 – 5 (smallest to largest area)
Heading up or north up
On or off
Auto, day or night
Mile, mile/yd, km or km/m
On or off
On or off
The preferences that the user can change are:
Volume — sets the volume level from softest at
1 to loudest at 8 (0 is off – no sound).
Zoom level — limits the map to the immediate
vicinity at 1 and shows the widest area at 5.
Map view — allows either current heading or
north to be always at the top of the map.
Auto reroute — when on, causes the system to
automatically recalculate the route to the desired destination
if the driver strays from the route originally developed.
Color scheme — allows the user to default the system
to either day or night mode or to allow the system to
automatically switch between day or night mode in
response to the light sensor.
LCD color scheme
Map detail item Day Night
Airports Light brown Light brown
Arteries Light gray Light gray
Background White Black
Expressways Orange Orange
Freeways/interstates Red Red
Parks/golf courses/national forests Green Green
Railroads Yellow Yellow
Rivers Blue Blue
Route Light green Light green
Streets Dark gray
Street names Dark gray White
Vehicle icon White and magenta triangle
Light gray
Units — provides a choice of English or metric values.
SmartPower — when SmartPower is off, the system operates
until it is turned off with the POWER button. When SmartPower
is on, it shuts down the system in response to a combination
of all three conditions:
q
No vehicle motion or satellite lock for 10 minutes
q
No button presses for 10 minutes
q
Engine not running as indicated by supply voltage.
Key click — provides a choice of beep to confirm button
press or silent operation.
Set clock is a function. It is available only at the
2
Preferences menu.
ì NOTE
ì NOTE
ì NOTE
12
Cobra recommends
that the system be
used for a while with
the default settings;
then users may
make changes.
With SmartPower off and
the unit plugged into a power
socket that does not turn
off with the ignition, NAV ONE
system operation at full power
can drain the vehicle’s battery
if parked for a long time,
such as at an airport lot.
Cobra recommends this
feature be left at the
factory setting of on.
If the desired option
cannot be seen:
1. Scroll5or6until it
comes on the screen.
Page 13

SPELL
CLEAR
LIST
BACK
Select Street Name
Select Street Name
Mable Ave
Maiden Ave
Main St
Meadow Blvd
Medina Rd
Naples Pkwy
North Ave
Princeton Dr
MA
SPELL
CLEAR
LIST
BACK
Select Street NameSelect Street Name
Applegate Ave
Arial Dr
Blackstone Blvd
Brickyard Ct
Byron St
Cornell Ave
Cypress Pkwy
Dearlove Blvd
A
9020 QRB3000CA-3-ENGLISH 9/28/04 3:44 PM Page 13
Text and list entries (spell and list modes)
13
Text and list entries (spell and list modes)
The spell and list modes are used to enter information or
choose from lists when selecting destinations, entering data
item names and editing entries. Most times, the system will
default to list mode, but both methods are available by
using the SPELL and LIST function buttons to toggle
between them. Using a combination of the methods
often is the fastest way to make an entry.
Spell mode
Spell mode enables the user to spell out information using the alphanumeric
and numeric-only character loops built into the system as shown at right.
When spelling, scroll5or6to the first character of the entry; then press
the4button to advance to the next character(s).
To make corrections, press the3button to erase one character at a time
or press the CLEAR function button to erase the whole entry and start over.
List mode
List mode enables the user to select entries from data lists in the system database.
When selecting from a list, the5or6buttons scroll up or down the list.
Scroll feature in spell mode
Scroll5or6to move through
the endless loop of characters
in both directions.
See the chart below for list order
and characters available.
If the entry is entirely numeric,
such as a zip code, the shorter
numeric list will be presented.
List order and characters available
Alphanumeric
0
1
2
3
4
5
6
D
R
.
Numeric
F
E
G
S T U
[
/
H
V
]
:
0 1 2 3 4
The “blank” character shown in these diagrams is the space character.
When scrolling
or6the characters will move in an endless loop.
5
J
I
W X Y &
5
5
6
7
K
6
9
A
B
C
8
9
L
M
N
Z
$ ‘ , -
7
8
9
A
O
B
P
C
Q
The3or4buttons
jump to the previous
or next alphabetic
group in the list.
Page 14

STOP
Calculating a RouteCalculating a Route
5%
STOP
Calculating a RouteCalculating a Route
55%
STOP
Calculating a RouteCalculating a Route
100%
VOICE
PAGE
HERE
ZOOM
GPS
05:09 263.6mi
NW
A
B
C
MAP
OPTION
HERE
TRAIL
Where do you want to go?Where do you want to go?
Address/Intersection
Point of Interest
Previous Destination
Address Book
Tr i p Planner
BACK
GO
Select Route CriteriaSelect Route Criteria
Route by Shortest
Time
Use Freeways?
Ye s
Use Toll Roads?
Ye s
9020 QRB3000CA-3-ENGLISH 9/28/04 3:44 PM Page 14
Destination selection, Route selection limits and Route calculation
Destination selection
Each trip begins with a destination in mind. The 2Main menu provides five
methods of choosing one. After choosing a method, press ENTER to use it.
n
A specific street address or an intersection of two streets by spelling or choosing from lists.
n
A point of interest, such as a park, restaurant or shopping mall, from extensive lists in the system.
n
The previous origin or any of the last nine destinations entered in the system.
n
Any of up to 100 locations that can be saved to the address book.
n
Multiple destinations (up to ten) in sequence that are saved as named trips (up to five).
Route selection limits
When ENTER or the GO function button is pressed after selecting a destination,
the system proceeds to the 2Select Route Criteria menu. The user can define
how the system will develop the route to the destination by specifying:
n
Shortest distance or time
n
Whether to use freeways and toll roads
The most recent choices are shown when the menu opens.
Route calculation
When ENTER or the GO function button is pressed at the 2Select Route
Criteria menu, the system develops the route.
Calculation can be stopped with the STOP function to change route criteria or to cancel it altogether.
When the calculation is finished, the system will automatically proceed to 2Route Guidance at the
2
Map screen with the route highlighted in light green to begin navigation along it. The voice prompt
will say, “Please proceed to the highlighted route.”
14
Page 15

ADD
EDIT
VIEW
BACK
Mondays Trip
Thursdays Trip
Vac ation
Weekend Trip
Tr i p Planner
BACK
Add Destination to Trip
Address/Intersection
Point of Interest
Previous Destination
Address Book
Current Location
9020 QRB3000CA-3-ENGLISH 9/28/04 3:44 PM Page 15
Trip planner
Trip planner
In addition to individual destinations, the NAV ONE can store up to five trips with
up to ten destinations to be visited in sequence on each trip. Trips stored in system
memory can be repeatedly recalled and used, and trips can be added, named,
edited and deleted.
Plan a trip
Select ADD at the 2Trip Planner menu and enter a name for the trip. Then, add destinations using the programming
sequences for Address/Intersection, Point of Interest, Previous Destination, Address Book or Current Location.
After all destinations have been added, press the SAVE function button.
Navigate a trip
Select the trip at the 2Trip Planner menu and press ENTER. Select any destination on the list as the first one to
be reached and press ENTER or the GO function button to proceed to the 2Select Route Criteria menu, then route
calculation. Navigate to the destination using Route Guidance procedures.
As each destination is reached, the next one can be selected and navigated to.
At the end of the trip, or at any point along it, select [Discontinue Trip] and press ENTER to return to the 2Main menu.
Modify a trip
Any trip stored in system memory can be deleted. Also trip and destination names can be changed and destinations
can be added and deleted by selecting the trip and pressing the EDIT function button and following the steps on
succeeding menus.
15
Page 16

A
B
C
MAP
OPTION
HERE
TRAIL
Where do you want to go?Where do you want to go?
Address/Intersection
Point of Interest
Previous Destination
Address Book
Tr i p Planner
CLEAR
GO
INTER
BACK
Address
No.
Street
City
State Illinois
Zip
Lincolnshire
ADDRESS
Intersection
Intersection
X-str.
Street
City
State
Zip
Heathrow Dr
Lincolnshire
Illinois
60069
CLEAR
BACK
GO
9020 QRB3000CA-3-ENGLISH 9/28/04 3:44 PM Page 16
Address/intersection
16
Address/intersection
The NAV ONE system allows selection of any street address
or intersection in its database as a destination.
Starting with zip code (postal code)
When selecting an address or intersection, the best starting point is the zip code for the desired
destination. By entering the zip code as the first element of the address, the NAV ONE system will
zoom in and look at only that area. It will always return an associated state and either a single city
or a short list to choose from if more than one city shares the zip code. It allows the quickest
destination address selection. At the 2Address menu, scroll5or6to zip and press ENTER.
Starting with state (province)
If the zip code is not known, the state in which the destination is located must be the first address element
to be entered. This also allows the system to zoom in on a segment of its database for efficient searching.
At the 2Address menu, scroll5or6to [State] and press ENTER.
Completing the address or intersection
After the state has been selected, scroll5or6to the next blank elements — city, street, and number or
cross-street — in turn. Press ENTER and select the element using spell or list modes.
Once the address or intersection is completely filled in, the GO function button will become active. Pressing
ENTER or the GO function button will proceed to the 2Select Route Criteria menu.
Street or intersection
The INTERSECTION function button toggles the system from the 2Address menu to the 2Intersection menu.
The address element entry process is the same for both methods until the last step at which either the street
number or the cross street is entered. It is possible to toggle between these modes after the state, city and
street have been entered. Instructions for the 2Address menu apply to the 2Intersection menu as well.
Clear function
When using the address/intersection method to select a destination, the CLEAR function will clear the
highlighted entry as well as any sub-fields. For instance, clearing the city field will also clear the street
and number or cross-street fields.
ì NOTE
In any list,
in addition to
scrolling individual
items using the
or6buttons,
5
you can scroll more
quickly by using
the3or
4
buttons to scroll
by starting letter.
Page 17

A
B
C
MAP
OPTION
HERE
TRAIL
Where do you want to go?Where do you want to go?
Address/Intersection
Point of Interest
Previous Destination
Address Book
Tr i p Planner
BACK
Select POI Search Method
Select POI Search Method
By Category
By Name
By Phone Number
BACK
Select POI Category
Select POI Category
Airport
Amusement Park
Atm
Auto Dealership
Auto Service & Maintenan
Automobile Club
Bank
9020 QRB3000CA-3-ENGLISH 9/28/04 3:44 PM Page 17
Point of interest
Point of interest
Selecting a POI as a destination allows a public place to be found without necessarily
knowing the address. The NAV ONE database includes thousands of points of interest
in over 40 categories from airports to museums to restaurants. This mode can also be
used as a means of finding the address and telephone number of any location in the
POI database — the data is shown in the final screen of each selection process.
Select by category
Selects one of the categories from the NAV ONE database, then narrows the choice to one of the points in that category.
At the [By Category] bar of the 2Select POI Search Method menu, press ENTER to proceed to the 2Select POI Category
menu. Scroll5or6to the desired category and press ENTER to proceed to a series of menus that allow refining the
selection to a single location.
Select by name
Allows the name of the destination to be entered. Then narrows the choice to one location if there are multiple locations with
the same name, such as a restaurant chain. At the [By Name] bar of the 2Select POI Search Method menu, press ENTER to
proceed to a series of menus that allow completion of the selection.
Select by phone number
Allows the telephone number of the destination to be entered. Then narrows the choice to one location if there are multiple
locations with the same telephone number, such as an 800 number for a hotel chain. At the [By Phone Number] bar of the
2
Select POI Search Method menu, press ENTER to proceed to a series of menus that allow completion of the selection.
Search limits
When the [Sort by Distance] preference is chosen during the POI selection process, the system will return a list of locations
with the nearest one first. Some of those may be across the border of a nearby state. When the STATE function icon is shown,
the system will search only in that state. In that case, change the state to find points in other states.
17
Page 18

VOICE
PAGE
HERE
ZOOM
GPS
05:09 263.6mi
NW
VOI
CE
PAGE
HERE
ZOOM
GPS
05:09 263.6mi
NW
EDIT
VOICE
PAGE
BACK
05:09 263.6mi
NW
Current: E IL-290
Expressway
Planned RoutePlanned Route
0.6 S Nagle Ave
0.3 Cortland Ave
5.2 E IL-290
GPS
VOICE
PAGE
HERE
BACK
GPS
05:09 263.6mi
NW
GuideGuide
5.2mi
E IL-290 EXPRESSWAY
EDIT
0
10
20
30
40
50
60 70
80
90
100
mph
10
11
12
1
2
3
9
4
5
7
6
8
000000.0
time
NW
VOICE
PAGE
BACK
65.4mph
Max Speed Stopped Time
0:23:41
Tr ip Data
9020 QRB3000CA-3-ENGLISH 9/28/04 3:44 PM Page 18
Route guidance
Route guidance
Once a destination is chosen and a route is calculated, the NAV ONE system is ready to provide guidance
to navigate the trip from the starting voice prompt, “Please proceed to the highlighted route,” until the final
announcement, “Arrived at destination.”
18
Vehicle Icon
Highlighted Route
ETA
(Estimated
Time to
Arrival)
Vehicle Heading
NAV ONE Signal Strength
Distance to
Destination
Direction to
Destination
Navigation
During navigation, four screens are available. The 2Map screen will come up automatically
after route calculation, but whichever is most useful at any given time can be selected:
Map
Shows the map
with the vehicle
icon and the
highlighted route.
Planned Route
Shows the currently
traveled road and a
scrollable list of the
next roads. It is
the only navigation
screen with the
edit function.
Guide
Shows an
enlarged, fullscreen version
of each next
maneuver to
be performed.
Trip Data
Provides
comprehensive
data about the
trip in progress
or the one
most recently
completed.
Page 19

VOICE
BACK
Select Routing MethodSelect Routing Method
Detour
Route Criteria
Tr ip Planner
Cancel Route
VOICE
BACK
Select Detour CriteriaSelect Detour Criteria
Avoid Current Road
Avoid Next Road
Detour Distance
Avoid Specific Road
VOI
CE
BACK
Pressing ENTER will
cancel navigation in
progress.
Confirm CancellationConfirm Cancellation
9020 QRB3000CA-3-ENGLISH 9/28/04 3:44 PM Page 19
Off route events
19
Off route events
During a trip, the
NAV ONE system
offers help if a turn
is missed or a side
trip is taken from a
calculated route. It
also allows changes
to be made enroute
— including detours,
changing route criteria
and trip plans, and
canceling navigation.
Leaving a calculated route
Within a short distance of the vehicle leaving a calculated route, the NAV ONE system will recognize the deviation and provide helpful
information. In the case of a missed turn or similar situation, the system will provide voice prompts, such as, “Please make a legal
U-turn,” to return to the calculated route while the system remains in the active navigation screen.
If a longer deviation is made and the prompts to return to the route are ignored, the system will calculate a new route to the destination
— often a mini-route to intercept the original route at a later point — provided the auto reroute option is turned on. The new route will
be displayed in the active navigation screen and the voice prompts will adjust accordingly. If auto reroute is turned off, the system will
suspend guidance until the user takes some action such as [Detour] or [Cancel].
Changes enroute
Changes can be made at any
time during a trip, but only from
the 2Planned Route Navigation
screen. At that screen, press
the EDIT function button to
bring up the 2Select Routing
Method menu.
Detour
In case of road construction, traffic
jams or undesirable roads, the NAV
ONE system can quickly calculate a
detour to reach the currently selected
destination. At the 2Select Routing
Method menu, scroll5or6to
[Detour] and press ENTER to proceed
Cancel navigation
To cancel the current trip,
scroll5or6to [Cancel]
at the 2Select Routing Method
menu, then press ENTER.
At the 2Confirm Cancellation
screen, press ENTER to confirm
and return to the 2Main menu.
to the 2Select Detour Criteria menu.
At that menu, scroll 5or6to
the type of detour desired and press
ENTER. Successive menus will allow
completion of the selected detour type.
Page 20

A
B
C
MAP
OPTION
HERE
TRAIL
Where do you want to go?
Where do you want to go?
Address/Intersection
Poi
nt of Interest
Previous Destination
Address Book
Tr ip Planner
A
B
C
MAP
OPTION
HERE
TRAIL
Where do you want to go?Where do you want to go?
Address/Intersection
Point of Interest
Previous Destination
Address Book
Tr ip Planner
A
B
C
MAP
OPTION
HERE
TRAIL
Where do you want to go?Where do you want to go?
Address/Intersection
Point of Interest
Previous Destination
Address Book
Tr ip Planner
VOI
CE
PAGE
HERE
ZOOM
GPS
05:09 263.3mi
NW
+
5
4
3
2
1
I
Set Zoom LevelSet Zoom Level
0
10
20
30
40
50
60 70
80
90
100
mph
10
11
12
1
2
3
9
4
5
7
6
8
000000.0
time
NW
EDIT
PAGE
BACK
65.4mph
Max Speed Stopped Time
0:23:41
Tr ip Data
STOP
PAGE
HERE
ZOOM
GPS
NW
Tr ail Mode
PAGE
HERE
ZOOM
BACK
GPS
05:09 263.3mi
NW
9020 QRB3000CA-3-ENGLISH 9/28/04 3:45 PM Page 20
Other useful features
20
Other useful
features
PDA positioned for
infrared transfer
Previous destination
The NAV ONE system saves the
most recent origin and the last
nine destinations in memory
for quick retrieval.
Address book
The address book allows users
to store up to 100 destinations
of their choice for ready reference
and retrieval. They can also be
added from a PDA using the
infrared port, then edited and
deleted with the system resources.
Trip planner
In addition to individual
destinations, the NAV ONE
system allows up to five trips
to be stored with up to ten
destinations to be visited
in sequence on each trip.
Useful Tools
Four functions are built into
the NAV ONE system to provide
added utility. ZOOM, PAN and
HERE can be used whether or
not a trip is in progress. VOICE
is active only while a trip is in
progress.
Trip data
The NAV ONE system keeps
track of information about each
trip and the 2Trip Data screen
can be viewed at any time to
retrieve data for the current or
most recent trip. Users can select
two of the data items for display.
Trail mode
This feature can be used to record
vehicle movements. Instead of
guiding the vehicle on a route
calculated in advance, it captures
the route actually taken. Once a
trail is recorded and saved, it can
be used to retrace the route or
to repeat it in the future.
Page 21

9020 QRB3000CA-3-ENGLISH 9/28/04 3:45 PM Page 21
NAV ONE system specifications
21
Physical
. . . . . . . . . . .
specifications
Unit dimensions
Ü
201 mm x 120 mm x 65 mm
(4.73" H x 7.91" W x 2.28" D)
Unit weight
710 g (1 lb., 8.96 oz.)
Display size
132 mm (5.2") Diagonal
Display resolution
320 x 240 Pixel
STN Color Display
Keypad
Back-lit
Power
12-volt DC Vehicle Power Adapter Included
Usage 1.2A max
Fuse 3A
Antenna
Built-in Patch (Optional External Antenna Available)
Temperature range
Operation -15˚C to + 60˚C (5˚F to 140˚F)
Storage -30˚C to +80˚C (-22˚F to 176˚F)
Map storage
Automotive-Grade Hard Disk Drive
Performance
. . . . . .
Receiver
Ü
12 Parallel Channels for
tracking up to 12 satellites
Acquisition times
Approximately
(hot) 8 sec.
(warm) 38 sec.
(cold) 45 sec.
using i.A.S.A.P Technology
Update rate
1/second, continuous
GPS accuracy
Position 10 meters, 2D RMS
Velocity 0.1 m/sec.
Dynamics
4g
Interface
USB 2.0
Page 22

9020 QRB3000CA-3-ENGLISH 9/28/04 3:45 PM Page 22
Maintenance and Troubleshooting
22
Maintenance
. . . . . .
Troubleshooting
Very little maintenance is required to keep this NAV ONE system in good operating condition.
Ü
n
Keep the unit components clean by wiping with a soft cloth slightly moistened with lens cleaner or isopropyl alcohol.
Do not use solvents or harsh or abrasive cleaners, which could damage the case or scratch the LCD.
n
Protect the unit from moisture and from being dropped or struck by hard objects to prevent damage.
Do not apply pressure to the LCD screen.
n
Consult the Cobra web site (www.cobra.com) for the latest software and database versions and compare them to those
stored in your unit to determine if updating is needed. Software and information updates are also available in DVD format
and can be purchased as accessories. NAV ONE needs to be connected to a computer running a Windows 98 Second
Edition or higher operating system with a DVD drive using a USB-2.0 cable to install the updates.
. .
Problem Possible cause(s) Solution(s)
Ü
Display does
not power up.
GPS indicator will
not turn green.
Push buttons on front
of unit do not work.
Vehicle icon or map
does not move after
driving some distance.
Power switch is turned off. Turn the unit on with the button on the left side of the unit.
Brightness and contrast are
turned completely down.
Fuse in unit cigarette lighter
adapter is blown.
No voltage is present at cigarette
lighter or other power point.
GPS antenna cannot
“see” the sky.
Power switch is turned off. Turn the unit on with the button on the left side of the unit.
GPS is not working properly.
Geographic area is
not fully mapped.
Use the controls on the right side of the unit to adjust
the display until it is comfortable to view.
Unscrew the adapter tip and inspect the fuse.
Replace fuse if blown.
Troubleshoot vehicle wiring.
ignition key must be at RUN for the point to be energized.
Move vehicle to open area and make sure the GPS
antenna has a clear view of the sky.
Is GPS signal indicator green? If yes, go to next step.
If no, go to “GPS indicator will not turn green” step.
Drive to a main road. If the map shows the road, the system
is working properly, but the area is not fully mapped.
NOTE for some power points,
Page 23

9020 QRB3000CA-3-ENGLISH 9/28/04 3:45 PM Page 23
Product service
. .
Product service
For any questions about operating or installing this new Cobra product, or if parts are
Ü
missing…Please call Cobra first! DO NOT RETURN THIS PRODUCT TO THE STORE!
See Customer Assistance on page 24.
23
Canada or U.S.A.
. . . . . .
For products purchased in Canada or the U.S.A.
Ü
If this product should require factory service, please call Cobra
first before sending the product. This will ensure the fastest turnaround time on any repair. If Cobra asks that the product be sent
to its factory, it will be necessary to furnish the following to have
the product serviced and returned:
1. For warranty repair include some form of proof-of-purchase,
such as a copy of a sales receipt making sure the date of
purchase and product model number are clearly readable.
If available, also include a reproduction of the dealer purchase
form making sure the dealer address and phone number
are clearly readable. If the originals are sent, they cannot
be returned.
2. Send the entire product.
3. Enclose a description of what is happening with the product.
Include a clearly printed name and address of where the
product is to be returned, with phone number (required
for shipment).
4. Pack the product securely to prevent damage in transit.
If possible, use the original packing material.
5. Ship prepaid and insured by way of a traceable carrier
such as United Parcel Service (UPS) or Priority Mail
to avoid loss in transit to:
Cobra Factory Service
Cobra Electronics Corporation
6500 West Cortland Street
Chicago, Illinois 60707 U.S.A.
6. If the product is in warranty, upon receipt of the product,
it will either be repaired or exchanged depending on the
model. Please allow approximately 3 weeks before contacting
Cobra for status. If the product is out of warranty, a letter
will automatically be sent with information as to the repair
charge or replacement charge.
For any questions, please call 773-889-3087 for assistance.
Page 24

9020 QRB3000CA-3-ENGLISH 9/28/04 3:45 PM Page 24
Customer assistance and Trademark acknowledgement
24
Customer
. . . . . . . . .
assistance
Cobra Electronics
Corporation reserves
the right to change or
improve information
in this manual without
notice. Please visit
www.cobra.com for
updates or questions.
Trademark
. . . . . . . .
acknowledgement
Should you encounter any problems with this product, or not understand its many features, please refer to
Ü
this Quick Reference Manual. If you require further assistance after reading this manual, Cobra Electronics
offers the following customer assistance services:
For assistance in Canada or the U.S.A.
n
Automated help desk (English only)
24 hours a day, 7 days a week at 773-889-3087 (phone).
n
Customer assistance operators (English and Spanish)
8:00 a.m. to 6:00 p.m. C.S.T. Mon. through Fri. (except holidays) at 773-889-3087 (phone).
n
Questions (English and Spanish)
Faxes can be received at 773-622-2269 (fax).
n
Technical assistance (English only)
www.cobra.com (on-line: Frequently Asked Questions).
n
Technical assistance (English and Spanish)
productinfo@cobra.com (e-mail).
For assistance outside Canada or the U.S.A., or for assistance in French
n
Contact your local dealer
Cobra®, HighGear®, microTALK®, Safety Alert®Traffic Warning System, Nothing comes close to a Cobra
Ü
and the snake design are registered trademarks of Cobra Electronics Corporation, USA.
Cobra Electronics Corporation™, iASAP™, Accelerated Satellite Acquisition Protocol Technology™, CobraMarine™,
RoadReady™, SmartPower™ and NAV ONE™ are trademarks of Cobra Electronics Corporation, USA.
SiRF®is a registered trademark of SiRF Technology Incorporated.
Windows®, Windows Pocket PC®and Windows CE®are registered trademarks of Microsoft Corporation.
®
Palm
and Palm OS®are registered trademarks of PalmSource, Inc.
NAVTEQ®and NAVTEQ ON BOARD™ are registered trademarks of NAVTEQ
®
®
Page 25

9020 QRB3000CA-3-ENGLISH 9/28/04 3:45 PM Page 25
User license
25
User license
. . . . . .
Copyright © 2004 Cobra Electronics Corporation. All rights reserved.
Ü
Copyright © 2003-2004 NAVTEQ. All rights reserved.
This data includes information taken with permission from Canadian authorities, including © Her Majesty,
© Queen’s Printer for Ontario.
This document and the software described in it are furnished under license and may be used or copied only in
accordance with such license. Except as permitted by such license, the contents of this document and software
may not be disclosed to third parties, copied or duplicated in any form, in whole or in part, without the prior written
permission of Cobra Electronics Corporation. This document and software contain proprietary and confidential
information of Cobra Electronics Corporation and its licensors.
Cobra grants the purchaser a limited license for use of this document and the software incorporated in the NAV ONE
for its normal operation. By using the NAV ONE, the purchaser agrees to be bound by the terms and conditions of
this license agreement. The purchaser acknowledges that the content of this document and the software are the
property of Cobra and its licensors and are protected by copyright laws of the U.S.A. and international treaties. The
purchaser agrees not to modify, decompile, disassemble, reverse engineer or reduce to human readable form the
software or any part of it, nor to create any derivative works based on the contents of this document or the software.
The purchaser agrees not to export or re-export this document or the NAV ONE to any country in violation of the
export control laws of the U.S.A.
The contents of this document and software are for informational use only, and are subject to change without
notice. Cobra and its licensors intend to provide their customers the most complete and accurate navigation
information available at a reasonable cost from government and private data sources. However, all data sources
have limitations and some have inaccuracies or are incomplete to some degree. These characteristics carry
over to the NAV ONE as well.
Cobra encourages customers to report any errors found in our electronic maps by contacting technical assistance
(available in English and Spanish) at productinfo@cobra.com (e-mail), by visiting our web site: www.cobra.com,
or by calling customer assistance (available in English and Spanish) at 773-889-3087 between 8:00 a.m. and
6:00 p.m. C.S.T. Monday through Friday (except holidays).
Restricted Rights Legend. For defense agencies: Use, reproduction or disclosure is subject to restrictions set forth
in subparagraph (c) (1) (ii) of the Rights in Technical Data and Computer Software clause at DFARS 52.227-7013,
and/or similar successor clauses in the FAR, or the DOD or NASA FAR Supplement.
Page 26

9020 QRB3000CA-3-ENGLISH 9/28/04 3:45 PM Page 26
Warranty
26
Warranty
CAUTION
Cobra makes no warranty
as to the accuracy or
completeness of the
map data in the NAV ONE
and disclaims any and
all express, implied or
statutory warranties,
including any implied
warranty of merchantability
or fitness for a particular
purpose. It is the user’s
responsibility to use this
product prudently. This
product is intended to be
used only as a travel aid
and must not be used for
any purpose requiring
precise measurement
of direction, distance,
location or topography.
. . . . . . . . . .
For products purchased in Canada
Ü
Your new Cobra NAV ONE is covered by a one (1) year warranty. If any manufacturing defect becomes apparent
in this product within one (1) year from the original date of purchase, it will be repaired or replaced.
Please return the NAV ONE to Cobra with original or copy of dated proof of purchase. This warranty does not cover
damages due to careless handling, negligence, accident, abuse or failure to follow operating instructions. Alteration
of this product or defacing of the serial number cancels all obligations of this warranty. This warranty gives you
specified legal rights. Additional warranty rights may be provided by law in some areas.
For products purchased in the U.S.A.
Cobra Electronics Corporation warrants that its Cobra NAV ONE, and the component parts thereof, will be free of defects
in workmanship and materials for a period of one (1) year from the date of first consumer purchase. This warranty may be
enforced by the first consumer purchaser, provided that the product is utilized within the U.S.A.
Cobra will, without charge, repair or replace, at its option, defective NAV ONE products or component parts upon
delivery to the Cobra Factory Service Department, accompanied by proof of the date of first consumer purchase, such as
a duplicated copy of a sales receipt. The consumer must pay any initial shipping charges required to ship the product for
warranty service, but the return charges will be at Cobra’s expense, if the product is repaired or replaced under warranty.
This warranty gives the consumer specific rights, and he or she may also have other rights which vary from state to state.
Exclusions: This limited warranty does not apply:
1. To any product damaged by accident;
2. In the event of misuse or abuse of the product or as a result of unauthorized alterations or repairs;
3. If the serial number has been altered, defaced or removed;
4. If the owner of the product resides outside the U.S.A.
All implied warranties, including warranties of merchantability and fitness for a particular purpose are limited
in duration to the length of this warranty.
Cobra shall not be liable for any incidental, consequential or other damages; including, without limitation,
damages resulting from loss of use or cost of installation.
Some states do not allow limitations on how long an implied warranty lasts and/or do not allow the exclusion
or limitation of incidental or consequential damages, so the above limitations may not apply to some consumers.
Page 27

9020 QRB3000CA-3-ENGLISH 9/28/04 3:45 PM Page 27
Accessories
27
Optional
. . . . . . . . . . .
accessories
The Cobra line of quality
products includes:
CB Radios
microTALK®Radios
Radar/Laser Detectors
Safety Alert®Traffic
Warning Systems
Handheld GPS Receivers
Mobile GPS Navigation Systems
HighGear®Accessories
CobraMarine™ VHF Radios
Power Inverters
Accessories
Ü
These accessories are available from a local Cobra dealer or directly from Cobra.
120V AC power supply allows trip
plan programming and data access
in home or office.
To order by phone
In the U.S.A.
Call 773-889-3087 (please follow the prompts)
8:00 a.m. - 6:00 p.m. C.S.T.
Mon. through Fri. (except holidays)
In Canada
Call 514-683-1771 (please follow the prompts)
9:00 a.m. - 5:00 p.m. E.S.T. Mon. through Fri.
(except holidays)
To order by mail or fax
Call 773-889-3087 for pricing. Please fill out
order form and mail/fax directly to Cobra.
Fax 773-622-2269.
Deluxe carrying case organizes
the NAV ONE and its accessories —
and keeps them out of sight when
not in use.
Make check or money
order payable to
In the U.S.A.
Cobra Electronics Corporation
6500 West Cortland Street
Chicago, Illinois 60707 U.S.A.
Attn: Accessories Department
In Canada
AVS Technologies, Inc.
2100 Trans Canada Highway South
Montreal, Quebec H9P 2N4
To order online
Please visit our web site at: www.cobra.com
External antenna allows GPS signal
reception in heavily shielded vehicles
and those with heated or metallic
coated windshields.
ì NOTE
Additional mounting bracket
options, that may be more
suited to your vehicle, are
available at www.cobra.com.
Page 28

9020 QRB3000CA-3-ENGLISH 9/28/04 3:45 PM Page 28
Order form
28
Order form
Name
Address (no P.O. box)
City
State/Province Zip
Country
Telephone
Credit card number Exp. date
Please check one:
Customer signature
. . . . . . . .
❑
e ❑y ❑r
Please print clearly
Ü
Item # Description
Cost Each
U.S.A.
MNA-UPD3000 NAV ONE 3000 map update*
MNA-120 AC 120V AC adapter
MNA-2300 CS Carrying case
MNA-2300 EXT External antenna
MNA-2300 USB USB cable
MNA-2300
UPGKIT
Tax Table
California. . . . 7.25%
Illinois . . . . . . 8.75%
Indiana . . . . . 6%
Michigan . . . . 6%
Ohio . . . . . . . 6%
Wisconsin . . . 5%
*The Map Update is available on disks by telephone to Cobra’s consumer response group at
773-889-3087. Purchase of MNA-2300 AC (120V AC Adapter) and MNA-2300 USB (USB Cable)
required for updating map.
Upgrade kit
(with AC adapter and USB cable)
Amount Shipping/Handling
$10.00 or less $3.00
$10.01-$25.00 $5.50
$25.01-$50.00 $7.50
$50.01-$90.00 $10.50
$90.01-$130.00 $13.50
$130.01-$200.00 $16.50
$200.01 or over 10% of purchase
For AK, HI and PR add additional
$26.95 for FedEx Next Day or $10.95 for
FedEx 2nd Day. Excludes weekends and
holiday shipments. Please allow 2-3 weeks
for delivery of Ground shipments within the
Continental U.S. and delivery of Ground
shipments in Canada. Prices subject
to change without notice.
(Quebec residents only) Q.S.T. 7.5%
Cost Each
Canada
Qty. Amount
U.S. Subtotal
(Tax if applicable)
Shipping/Handling
Canada Subtotal
G.S.T. 7%
Shipping/Handling
Total
©2004 Cobra Electronics Corporation
6500 West Cortland Street
Chicago, Illinois 60707 U.S.A.
$5.50
www.cobra.com
 Loading...