

Cobra Marine MR HH600 FLT GPS BT E Owner's Manual
Owner’s Manual
Our Thanks to You and
Introduction
Our Thanks to You
Thank you for purchasing a CobraMarine® VHF radio.
Properly used, this Cobra® product will give you
many years of reliable service.
How Your CobraMarine VHF Radio Works
This radio is a battery-powered portable transceiver for use afloat. It gives you
two-way vessel-to-vessel and vessel-to-shore station communications, primarily
for safety and secondarily for navigation and operational purposes. With it, you
can call for help, get information from other boaters, talk to lock or bridge tenders,
and make radiotelephone calls to anywhere in the world through a marine operator.
Customer Assistance
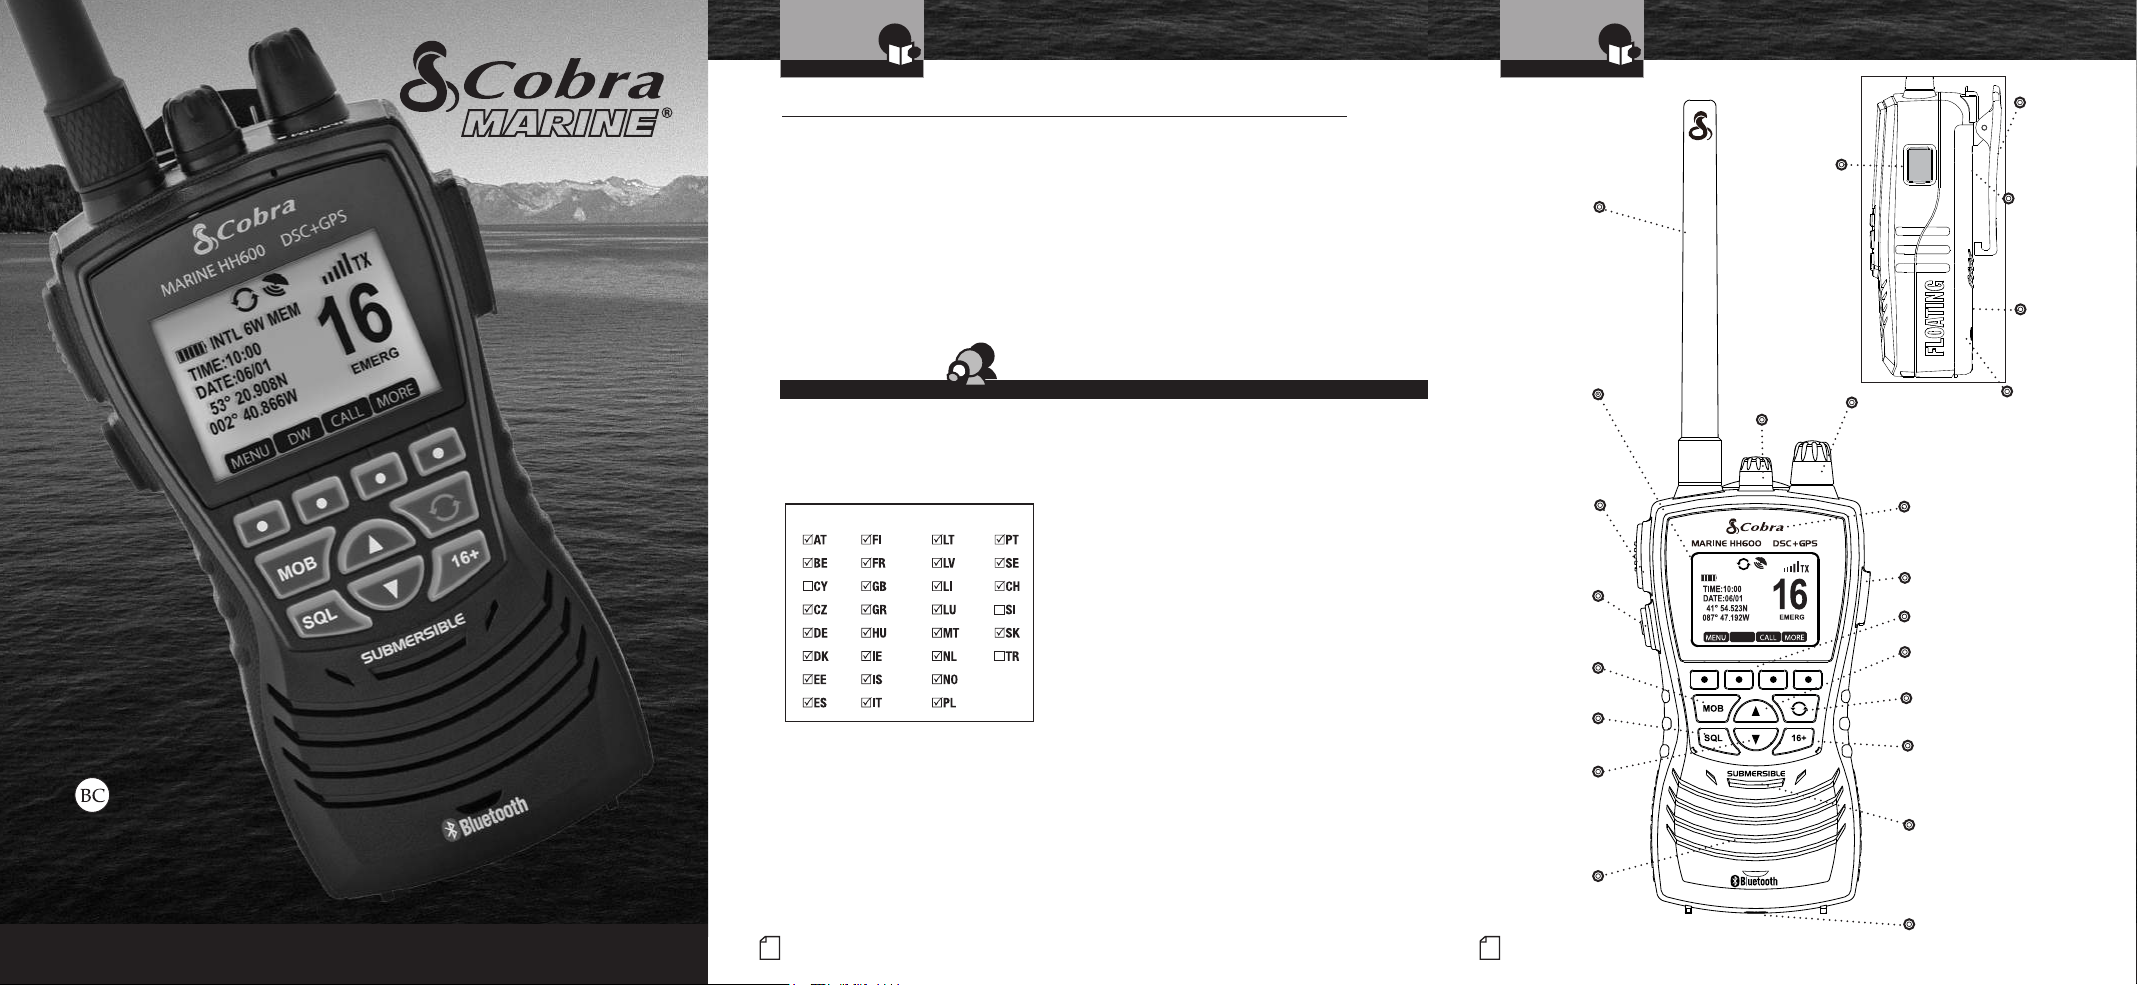
Radio Controls
Introduction
•
Antenna
and Indicators
Distress
Key
DISTRESS
DISTRESS
Belt Clip
Battery
Door
Screw
Battery
VHF MARINE RADIO
MR HH600 FLT GPS BT E
Printed in China Part No. 480-1108-P Version B
Nothing Comes Close to a Cobra
®
English
Customer Assistance
Customer Assistance
Should you encounter any problems with this product, or not understand
its many features, please refer to this owner’s manual. If you require further
assistance after reading this manual, please contact your local dealer.
This equipment is intended for use in:
For Warranty, Product Service and
Accessory Information
Please contact your local dealer or distributor.
Adapter: ASSA55W-120100 - AQUIL STAR PRECISION INDUSTRIAL (SHENZHEN) CO., LTD.
Car charger: 12V, 1000mA - SHENZHEN NUO HENG YUAN TECHNOGY CO.,LTD.
Battery: FT704159P - Hangzhou Future Power Technology Co., Ltd.
©2017 Cobra Electronics Europe Limited
English
A1
www.cobra.com
Backlit
LCD
Screen
Push
to Talk
Button
Backlight/
Key Lock
Button
Man Overboard
(MOB) Button
Squelch
Button
Channel
Down
Button
Speaker
English
A2
Speaker/
Microphone
External Cover
INTL 6W MEM
DW
ON/OFF/
Volume Control
Bluetooth® Calling
Microphone
Distress
Key
Soft Key Functions
Channel
Up Button
Rewind-Say-Again®
Button
Instant
Channel
16+ Button
VHF Microphone
LED Flashlight/
S.O.S.
Battery
Door
Screw

ROG
Introduction
Backlit Screen
and Product Features
Introduction
Product Features
Introduction
Notes
Backlit Screen
Bluetooth VOX Icon
Battery Power Icon
MENU Soft Key
Dual Watch
Soft Key
Rewind-Say-Again® Icon
INTL 6W MEM
TIME:10:00
DATE:06/01
41° 54.523N
087° 47.192W
DW
MENU
Product Features
Built-In GPS Receiver
Shows GPS coordinates on screen and
automatically sends GPS location with
DSC calls.
Digital Selective Calling (DSC Class-D)
Allows the ability to maintain a listening
watch on VHF Channel 16 while
simultaneously monitoring Channel 70
for DSC calls. Allows sending a distress
message at the touch of a button as well
as specific station-to-station calls. Radio
utilizes two (2) built-in encoders (receivers).
MicroBlue
TM
Bluetooth® Wireless Technology in a unique
noise canceling design. Widely compatible
for all mobile phones with Bluetooth®
wireless technology.
Easy Redial Operation
Redial of last phone number dialed.
Voice Dialing
Supports standard mobile phone
voice dialing when paired to a
compatible mobile phone.
GPS Icon
Signal Level Icon
Transmit and
Receive Icons
16
EMERG
CALL MORE
CALL
Soft Key
Active Channel
Channel Description
MORE Soft Key
Floating
This radio will float if dropped overboard.
It has an orange stripe so it’s easy to
retrieve.
Must use included battery to float.
Rewind-Say-Again
®
Replays missed VHF calls.
6 Watt VHF
Select between 1, 3 or 6 watts for short and
long range communication.
Flashlight/S.O.S. Light
The radio can be used as a flashlight, strobe
light or S.O.S. signal.The light flashes when
dropped in the water.
Submersible to IPX8 Standards
Waterproof to 3.3 ft (1 m) of water
for 30 minutes.
MOB (Man Over Board)
The radio dedicated MOB button marks and
memorizes the position information if a crew
member falls overboard.
•
•
Product Features (continued)
Noise Canceling Microphone
Reduces effect of environmental
noise when speaking.
Basic Navigation
Basic navigation features include digital
compass, waypoint navigation, course,
speed, etc.
International/Canada/USA Channels
Allows operation on any of the three (3)
different channel maps established for
these areas.
BURP
The Cobra exclusive BURP feature expels
water from the speaker grill if the unit is
dropped in the water or is subjected to
extreme rain and weather.
Speaker/Mic Jack
Allows connecting optional Cobra
Lapel Speaker/Mic and other Cobra
accessories.
Instant Channel 16
Provides instant access to priority
Channel 16.
NMEA Out
NMEA 0183 output to display other vesels
and their information transmitted by DSC
or your chartplotter.
Unlimited Memory Channels
Allows programming of unlimited
Dual Watch
Use to monitor two (2) channels
at once — Channel 16 and one other
selected channel.
Channel Names
Friendly VHF channel names under the
channel number.
Channel Scan/Memory Scan
Use to scan through unlimited
channels or memory locations to find
conversations in progress.
Signal Strength Meter
Shows the strength of incoming or outgoing
signals.
Button/Key Lock
Prevents accidental setting changes
when button lock is set.
Illuminated Buttons
Allows high visibility of all function buttons.
AA Battery Compatible
Good for emergency backup.
Includes AA battery tray (P/N CM 110-035).
120V/12V Charger Included
Use to charge battery pack, at home,
in a car or in a boat.
Locking Desktop Charger
Holds the radio or battery in place while
charging. Vertical or horizontal mounting.
•
Left blank intentionally for your notes
VHF memory channels.
A3
English
A4
English
Introduction
Assistance
Warranty
Table of Contents
Introduction
Our Thanks to You .............................................. A1
Customer Assistance ............................................ A1
Radio Controls and Indicators ...................................... A2
Backlit Screen ................................................. A3
Product Features ............................................... A3
Important Safety Information ........................................ 2
General Precautions ..............................................3
Recommendations for Marine Communication .......................... 4
Licensing Information ............................................. 5
Installation
Included in this Package ........................................... 6
Install/Remove Antenna ...........................................7
Wrist Strap and Belt Clip ........................................... 8
Batteries and Charger ............................................. 9
Operating Your Radio
Getting Started ................................................. 11
Setup Mode Programming ........................................17
Bluetooth® Mode Pairing and Programming ...........................28
Standby/Receive and Transmit ..................................... 29
Advanced Operation ............................................. 30
Rewind Operation ...............................................34
Mobile Phone Operation With Bluetooth® .............................36
Floating Feature ................................................42
Troubleshooting and Maintenance .................................. 43
VHF Marine Radio Protocols
VHF Marine Radio Procedures ...................................... 44
Voice Calling ................................................... 46
Routine DSC Calling .............................................48
Radiotelephone Calls ............................................58
Emergency Messages and Distress Procedure ......................... 59
Trademark
Trademark Acknowledgement .....................................62
Specications
Specications (Typical) ........................................... 63
Appendix
VHF Marine Channel Assignments ...................................64
Accessories ................................................... 83
Declaration of Conformity .........................................84
Nothing Comes Close to a Cobra
®
1
Assistance
Warranty
Customer
Assistance
Introduction
Assistance
Warranty
Customer
Assistance
Warranty
Warranty
Introduction
Important Safety Information
Introduction
General Precautions
Important Safety Information
Before using your CobraMarine VHF radio, please read these general precautions
and warnings.
Warning and Notice Statements
To make the most of this radio, it must be used properly.
Please read the installation and operating instructions carefully before using the radio.
Special attention must be paid to the WARNING and NOTICE statements in this manual.
WARNING
Statements identify conditions that could result in personal injury or loss of life.
NOTICE
Statements identify conditions that could cause damage to the radio
or other equipment.
General Precautions
The following WARNINGS and NOTICES will make you aware of RF exposure hazards and
how to assure you operate the radio within the FCC RF exposure limits established for it.
WARNINGS
Your radio generates electromagnetic RF (radio frequency) energy when it is transmitting.
To ensure that you and those around you are not exposed to excessive amounts of that
energy, DO NOT touch the antenna when transmitting. KEEP the radio at least two (2)
inches (5 cm) away from yourself and others when transmitting. DO NOT transmit more
than 50% of the time the radio is in use — 40% duty cycle. The radio is transmitting
when the Talk button is pressed and the transmit information shows on the LCD screen.
ALWAYS use only Cobra authorized accessories.
NEVER connect the transceiver to AC power. It can be a re hazard, may cause an
electric shock, and may damage the transceiver.
NEVER mount the transceiver or microphone where they might interfere with operation
of your vessel or cause injury.
DO NOT allow children or anyone unfamiliar with proper procedures to operate the radio
without supervision.
Failure to observe any of these warnings may cause you to exceed
FCC, Industry Canada or EU RF exposure limits or create other dangerous conditions.
•
The device complies with RF specications when the device is used at a distance 25mm
from your front face and 0mm from your body, Maximun SAR Value (1g): 5.76 W/Kg.
Separation Distance:
Maximum SAR Value (1g):
(Specic Absorption Rate)
Body:
Face:
Body:
Face:
0mm
25mm
5.76 W/Kg
3.51 W/Kg
NOTICE
Your radio is waterproof only when the batteries are properly installed.
AVOID using or storing the radio at temperatures below -4˚F (-20˚C) or above
140˚F (60˚C).
KEEP your radio at least 3 ft (0.9 m) away from your vessel’s magnetic
navigation compass.
DO NOT attempt to service any internal parts yourself. Have any necessary
•
service performed by a qualied technician.
This radio is supplied with a lithium-ion (LiON) rechargeable battery pack.
n
Use only the Cobra charger to recharge lithium-ion (LiON) batteries in the radio.
n
Do not short circuit the battery pack.
n
When replacing the batteries, dispose of the old batteries properly. Batteries
may explode if disposed of in a re.
CAUTION Risk of explosion if battery is replaced by an incorrect type. Dispose of used
batteries according to the instructions.
2
English
Nothing Comes Close to a Cobra
®
3
Introduction
Introduction
General Precautions
Introduction
Licensing Information
Recommendations for Marine Communication
The frequencies your radio uses are set aside to enhance safety afloat and for vessel
navigation and operational messages over a range suitable for nearshore voyages.
If the maximum output of your radio is not sufficient for the distances you travel from
the coast, consider a higher powered handheld or installing a Cobra Marine fixed mount
radio with up to 25 watts of output power. (Visit www.cobra.com or your local
dealer for model availability.)
If traveling far offshore, you should consider adding even more powerful radio
equipment such as HF single side band or satellite radio for your vessel.
The coastguard does not endorse mobile phones as substitutes for marine radios.
They generally cannot communicate with rescue vessels and, if you make a distress
call on a mobile phone, only the party you call will be able to hear you. Additionally,
mobile phones may have limited coverage over water and can be hard to locate.
If you do not know where you are, the coastguard will have difficulty finding you if
you are using a mobile phone.
However, mobile phones can have a place on board where mobile coverage
is available — to allow social conversations and keep the marine frequencies
uncluttered and available for their intended uses.
VHF Marine Radio Procedures
If you are not familiar with or need to brush up on the protocols that must be
followed when using a VHF Marine Radio, please study the section beginning
at page 45 before putting your radio into service.
•
Licensing Information
The radio operates on all currently allocated marine channels and is switchable for
•
use according to International, Canadian or U.S.A. regulations. It features instant
access to emergency Channel 16 by pressing one key.
Station License
The UK requires a ship’s radio license and a marine radio operator’s certificate before
transmitting equipment can be used aboard a vessel. Other European countries have
specific requirements of their own.
For detailed information and applications, contact the Radio Licensing Centre run
by OFCOM in the UK. In other countries, contact the relevant national postal
or telecommunications authority.
Canadian or U.S.A. Station License
If your vessel will be entering the sovereign waters of Canada or the U.S.A.,
you should contact Industry of Canada, Radio Regulatory Branch or the U.S. FCC
(Federal Communications Commission) for licensing and operating information.
Radio Call Sign
•
A radio call sign is included as part of the ship’s radio license in the UK.
Other countries may have different practices; contact your local regulatory
authority for information.
User Responsibility and Operating Locations
All users are responsible for observing domestic and foreign government regulations
and are subject to severe penalties for violations. The transmitting frequencies in
your radio are reserved for maritime use; any frequency you use for transmission
must be specifically included on your ship’s license. The VHF frequencies on your
radio are reserved for marine use and require a special license to operate from land,
including when your boat is on its trailer. The use of ATIS is prohibited outside the
European inland waterways covered by the Basel Agreement.
4
English
Nothing Comes Close to a Cobra
®
5
Introduction
Assistance
Warranty
Warranty
Included in this Package
VHF Marine Radio Protocols
Installation
Install/Remove Antenna
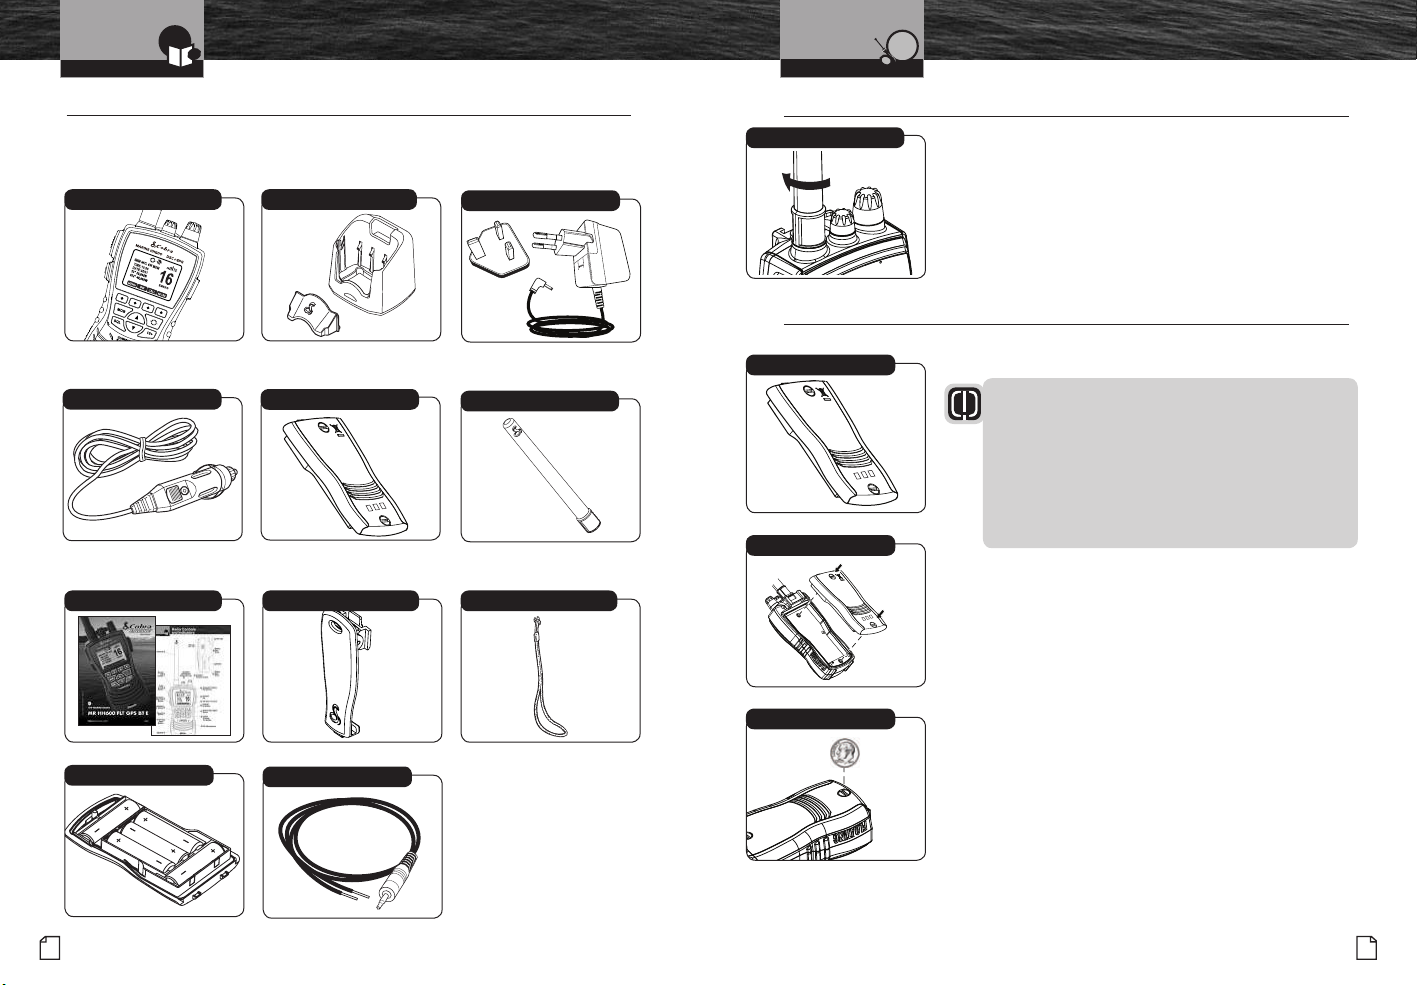
Included in this Package
The frequencies your radio uses are set aside to enhance safety aoat and for vessel
navigation and operational messages over a range suitable for nearshore voyages.
Radio Drop-In Battery Charger
DC Charger
For connection to 12-volt power
sources.
Operating Instruction Manual Spring-Loaded Belt Clip
Alkaline Battery Tray
LiON Battery Pack
NMEA Output Cable
AC Charger
Antenna
Wrist Strap
•
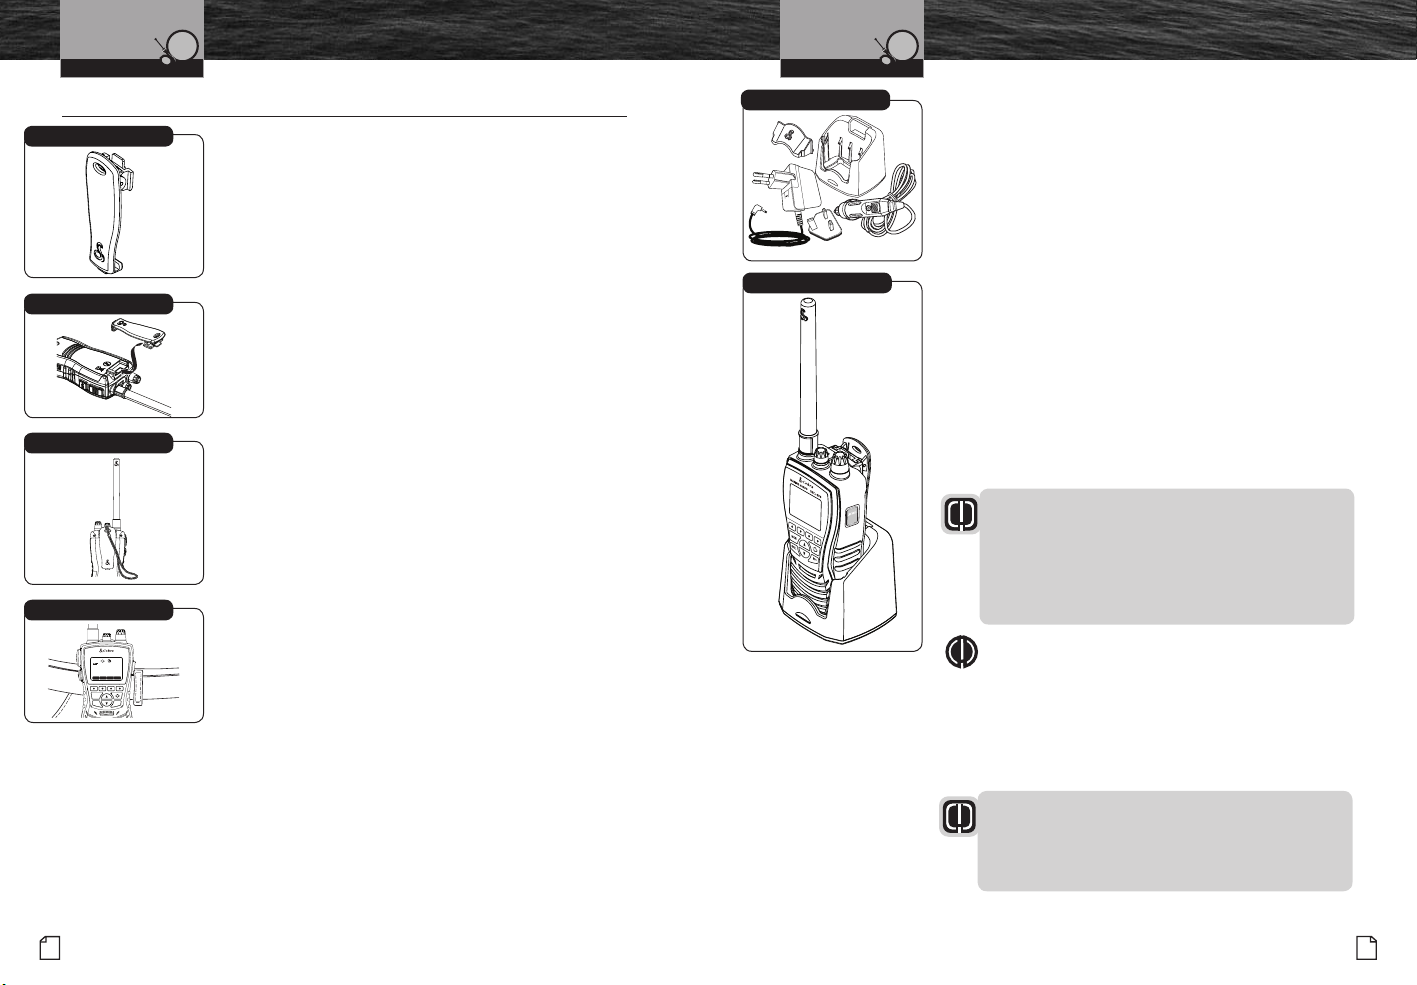
Install/Remove Antenna
Antenna
1. To install the antenna turn the antenna into the radio
•
clockwise to tighten. Do not overtighten.
2. To remove the antenna turn the antenna counterclockwise.
Batteries and Charger
•
The radio is shipped with a sealed lithium-ion (LiON) battery pack
LiON Battery Pack
(P/N CM 110-034) that is rechargeable.
WARNING
The charger provided for this radio is only to be used
to charge the battery pack provided. Do not charge any
other type of batteries in the charger as re, explosion
or battery damage may occur. Avoiding extreme
temperatures will also help prolong the life of the battery
pack for the radio. The device operating voltage is DC
Install Battery Pack
6.29V - DC 8.40V.
When your rechargeable batteries begin to discharge too quickly,
it is time to install a new battery pack. Your radio
will also operate with ve (5) high-quality AA alkaline batteries,
using the included alkaline battery tray.
Installing the Battery Pack
1. Position the battery pack over the back of the radio.
Tighten Screw
2. Engage the battery pack into the radio until battery pack is
fully seated into the radio housing.
3. Tighten the screws using a dime-size coin or at object to
secure the battery pack to the radio. Do not overtighten.
6
English
Nothing Comes Close to a Cobra
®
7
HML
MOB
SQL16+
MARINE HH600 DSC+GPS
WX
MENU
CALL MORE
16A
EMERGENCY
USA 6W
32 49.800N
SOG: 3.7
KTS
COG: 015 M
999.11.077W
DATE:06/30
TIME:10:00 LOC
Assistance
Warranty
VHF Marine Radio Protocols
Assistance
Warranty
Warranty
Warranty
Assistance
Warranty
Customer
Assistance
Wrist Strap and Belt Clip
Installation
Wrist Strap and Belt Clip
Belt Clip
Use the spring-loaded belt clip to carry the radio on your person.
1. Slide the belt clip into the guide channel on the back of the
radio until it is locked in place.
2. To attach the wrist strap, insert it through the hole at the top
of the belt clip, feed it through the looped end and pull tight to
secure to the belt clip.
3. Press open the belt clip, slide it over the belt and release the
Insert Belt Clip onto Radio
Wrist Strap Attachment
Secure Radio
clip.
4. To remove the belt clip from the radio press the tab on the belt
clip, which unlocks the clip, and slide it out.
VHF Marine Radio Protocols
Installation
•
Power Sources
Charging
The Cobra-provided LiON battery pack may be charged at home,
in a car or in a boat using the appropriate 12V or 120V power cord
with the charger.
1. Insert one (1) of the power cords into the back of the drop-in
charger.
2. Insert the other end of the power cord into the appropriate 12V
or 120V power source.
Initial Battery Charge
3. Remove the battery pack spacer from the charger and insert the
entire radio/battery into the charger. The metal charge contacts
on the battery will contact the mating prongs in the charger to
transfer the charging current.
4. Observe that the red light on the front of the charger glows to
indicate that the battery pack is properly seated and the charger
is operating.
5. Allow the batteries to charge for ve (5) to six (6) hours before
use. The charge light will turn off when the battery is fully
charged.
WARNING
The charger provided for this radio is only to be used to
charge the battery pack provided. Do not charge any other
type of batteries in the charger as re, explosion or battery
damage may occur. Avoiding extreme temperatures will
also help prolong the life of the battery pack for the radio.
8
English
NOTE
If the drop-in charger is used on a boat, Cobra
recommends you attach it to a horizontal shelf or vertical
bulkhead (using the screw holes provided) to prevent
possible damage due to the boat rolling or pitching. The
charging base has been designed to hold the battery pack in
place during rough sea conditions.
WARNING
The adapter shall be installed near the radio’s charger
and shall be easily accessible. The plug is considered a
disconnect device of the charging base.
Nothing Comes Close to a Cobra
®
9

Warranty
Assistance
Warranty
Customer
Assistance
Assistance
Warranty
Customer
Assistance
VHF Marine Radio Protocols
Assistance
Warranty
Assistance
Warranty
Customer
Assistance
Assistance
Warranty
Customer
Assistance
Installation
Batteries and Charger
VHF Marine Radio Protocols
Operating Your Radio
Getting Started
Remove Battery
To Remove Battery Pack from Radio
1. Loosen the screws on the back of the battery pack.
2. Lift the bottom of the battery pack slightly to remove
it from the radio housing.
3. Pull the battery pack out of the radio housing.
NOTE
The LiON battery pack can also be charged in the battery
Battery Pack Charging Only
charger without being installed in the radio. Insert the spacer
into the battery charger to support the battery pack during
this charging process. Follow the same procedures in “Initial
Charge” to charge the battery pack.
NOTICE
Lithium-ion (LiON) batteries are toxic. Please dispose of
properly. Some marine suppliers and electronics retailers
accept old battery packs for recycling and some municipal
waste disposal agencies have special provisions for battery
disposal.
Alkaline Battery Tray
Alkaline Batteries
The alkaline battery tray acts as a backup or “Emergency” power
source should the battery pack run low on power and need to be
recharged. The radio will transmit at full power when using ve (5)
new AA alkaline batteries.
WARNING
Never attempt to recharge alkaline batteries. They are not
Fully Charged
made to be recharged, and should be disposed of
in a proper manner.
Maintaining the Battery Charge
Partially Charged
Fully Discharged
English
10
As you use your radio, the battery power icon will show the battery
power remaining. When the battery icon begins to ash, the battery is
empty and needs to be recharged. The radio will beep three (3) times
and ash “Low Battery” every 10 minutes until the radio turns off.
NOTE
The radio will continue to receive signals when blinking
but cannot transmit.
It is a good idea to keep a set of fresh, high-quality AA alkaline
batteries with your radio. Should the rechargeable battery pack
become discharged and no electrical power source is available,
you can insert the included alkaline battery tray with fresh alkaline
batteries and continue to use your radio.
Getting Started
Refer to the foldout at the front of this manual to identify the
various controls and indicators on your radio. Throughout this
manual you will be instructed to “Press” or to “Press and
Hold” various buttons (except “Push to Talk”) on the radio.
“Press” means a momentary press of approximately one (1)
second. “Press and Hold” means to hold the button down for
approximately two (2) seconds.
Whenever you press any button except the Talk button on your
radio, a brief tone (if key tones are selected On) will sound to
conrm the button press. With all button presses, the appropriate
icon will appear on the LCD and the backlight will turn On. The
backlight will stay On for 10 seconds after the button is released.
Tones And Alarms
When your CobraMarine VHF radio is On, you can expect to hear the following tones and
alarms. The volume of these sounds is controlled by the circuitry in the radio and is not
affected by the volume set with the On-Off Power/Volume knob.
Conrmation Tone
Single high-pitched beep conrms all button presses except the Talk button.
It can be turned On or Off. See set-up routines on page 18.
Error Tone
Three low-pitched beep indicates an invalid button press.
DSC Distress Alarm
High—low—high—low—high. Pause, then repeat. The volume of all alarms will increase
after 10 seconds. Press any button to turn it Off.
NOTE
This alarm sounds only for DSC distress calls on Channel 70.
It does not sound for voice calls on Channel 16 — you still
must listen for those.
Distress Acknowledgement Alarm
High—low—high—low—high. Pause, then repeat. The volume of all alarms will increase
after 10 seconds. Press any button to turn it Off.
DSC Routine Call Alarm
High—pause—high—pause—high. Long pause, then repeat. Press any button to turn it
Off.
DSC Geographical Alarm
Loud, continuous, medium-pitched, high-low tones (warble) — sounds
when a geographical call is received. Press any button to turn it Off.
Nothing Comes Close to a Cobra
•
®
11

VHF Marine Radio Protocols
Assistance
Warranty
Customer
Assistance
Operating Your Radio
Getting Started
DSC Position Request Alarm
Medium-loud, continuous, low-pitched series of closely spaced, four (4) beeps [three (3)
short – one (1) long] groups — sounds when a position request call
is received. Press any button to turn it Off.
DSC Individual Alarm
High—pause—high—pause—high. Long pause, then repeat. Press any button to turn
it Off.
Common Radio Functions
The following procedures dene common operating functions of the radio when in
Marine Standby mode.
Power/Volume Control
On/Off/Volume Control
(Clockwise)
On/Off/Volume Control
(Counterclockwise)
Power On/Off Control
The On/Off/Volume control is located at the upper right
side of the radio. Turning the On/Off/Volume control past
the detent position will turn the radio On or Off.
Volume Control
Volume is controlled by turning the On/Off/Volume control.
n To increase the volume, turn the On/Off/Volume control
clockwise.
n To decrease the volume, turn the On/Off/Volume
control counterclockwise.
VHF Marine Radio Protocols
Operating Your Radio
Speaker/Mic Port
Talk Button
Backlight/Flashlight/S.O.S./
Key Lock Button
Key Locked Buttons
Getting Started
Radio Speaker and Microphone
The internal Radio Speaker and Microphone are located on the bottom
front face of the radio below the lower control buttons.
An optional Speaker/Microphone port is located at the top of the radio
between the antenna and the Power/Volume control. Unthread the
Speaker/Microphone port cover to access and install an optional Cobra
speaker or microphone into this port.
NOTE
Please make sure the port cover is secured and rmly tightened in
place when the speaker/microphone is not is use.
Talk Button
Press and hold the Talk button to transmit messages. Release the Talk
button to stop transmitting.
Light/Key Lock Button
To Display the Backlight Momentarily:
Press the Light/Key Lock button. The backlight will remain On for
10 seconds. If the backlight is already On, another press of the
Light/Key Lock button will cycle through the light mode.
To Activate the Flashlight, Strobe and S.O.S. Light:
Press the Light/Key Lock button two times to activate the ashlight
function. Press again to activate the Strobe function, press a third
time to activate S.O.S. signal and a fourth time to turn it off.
12
English
Key Lock Icon
Key Lock
To prevent accidental changes to your settings, you can lock most of
the buttons.
To Lock or Unlock the Buttons:
Press and hold the Light/Key Lock button for two
Key Lock icon will appear or disappear
in the LCD. When Key Lock
(2) seconds. The
is On, pressing any of the listed buttons on the front of the radio
will result in a three (3) beep error messag and the radio will show
“Radio Locked. Hold Lock Key To Unlock”.
The Light/Key Lock button, the Emergency button and the Talk
button are active — you can Receive (Rx) or Transmit (Tx)
a message with Key Lock On, but you cannot change the channel.
Nothing Comes Close to a Cobra
®
13
Assistance
Warranty
Customer
Assistance
Assistance
Warranty
Customer
Assistance
88A
VHF Marine Radio Protocols
SCAN
H/M/L
MEM MORE
16A
EMERGENCY
USA 6W
32 49.800N
SOG: 3.7
KTS
COG: 015 M
999.11.077W
DATE:06/30
TIME:10:00 LOC
EMERG
USA 6W MEM
SCAN
MEM MORE
ROG
16
Assistance
Warranty
Customer
Assistance
Assistance
Warranty
Customer
Assistance
Operating Your Radio
Getting Started
VHF Marine Radio Protocols
Operating Your Radio
Getting Started
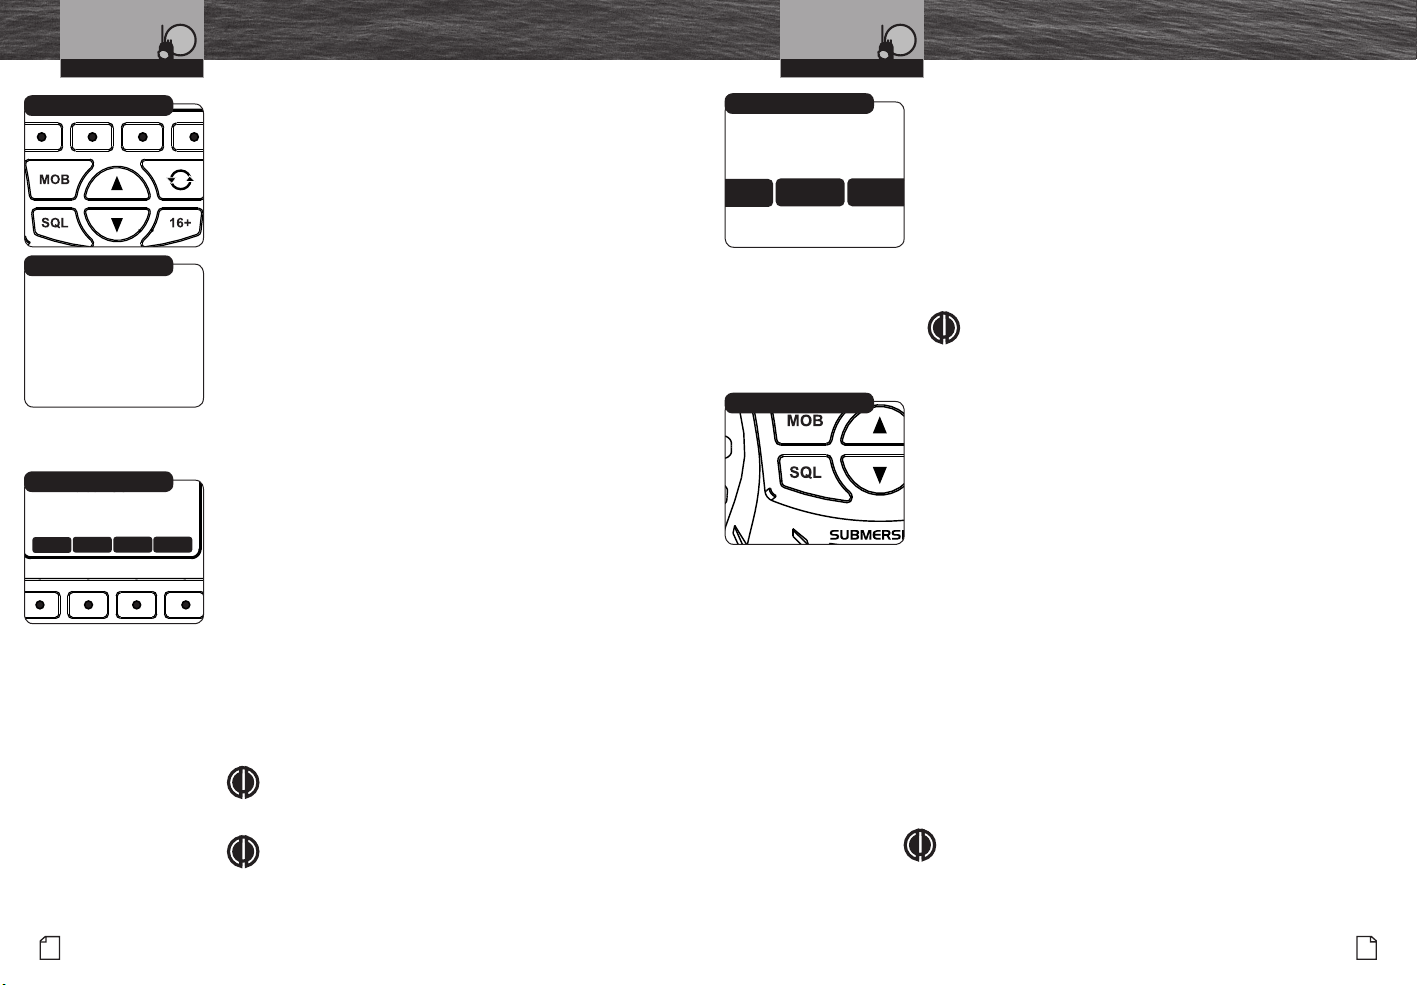
Channel Up/Down Buttons
Currently On Channel 88
H/M/L Power Button
Channel Up/Down Buttons
Your radio will Receive (Rx) and Transmit (Tx) VHF signals on
the channel indicated on the LCD display. You can change the
channel at any time using the Channel Up/Down buttons.
To Change Channels:
Press the Channel Up/Down button.
If you are on Channel 88, pressing the Channel Up
button will advance to Channel 01. If you are on Channel
01, pressing the Channel Down button will advance to
Channel 88.
You can press and hold the Channel Up/Down button
for fast advance. If the new channel selected is restricted
to low power, the radio will automatically switch to Low
Power mode and the Low Power icon will appear on the
LCD.
If the radio is in the Key Lock mode, the channel will not
change and the three (3) beep error signal will sound.
High/Medium/Low (H/M/L) Power Selection
Your radio can transmit selectively at 1, 3 or 6 watts of power.
Cobra suggests you maintain the low power setting for shortrange communications. You will conserve battery life and avoid
overpowering nearby stations with a low power setting signal.
Use the high power setting for long-range communications or
when you do not receive a response to a signal sent at 1 watt.
To Toggle Between H-M-L Power Modes:
Press the MORE soft key until the screen shows as illustrated.
Pres the H-M-L soft key to set the power 1W, 3W, or 6W.
The LCD will show which mode is in effect. Some channels
are restricted for a maximum use of 1 watt. Your radio will
automatically set the power to Low Power mode when you
select those channels.
NOTE
Some channels, frequency bands and countries of use
might not be able to operate in High Power mode.
NOTE
A few channels are Receive only and will not transmit in
these channels.
SCAN Button
Squelch Control
SCAN
Press and release the SCAN soft key to scan all channels. Scanning
begins at the selected lower channel, and scans to higher channels.
Press the Channel Up/Down button to change the scan direction.
When a signal is received in SCAN mode, the radio will pause 10
seconds before resuming SCAN operation. The scan will stop on the
paused channel and remain there when the Talk button is pressed.
If memory channels are saved, press and release the SCAN button to
scan all memory channels.
NOTE
If even one memory channel is saved, SCAN will only scan
memory channels.
Squelch Control
Squelch Control lters weak signals and radio frequency (RF)
so that you will clearly hear the signals you want.
The Squelch Control on this radio is set through the following
keypad operation.
To Set Squelch Control:
1. With the power On, press the SQL button to access the
squelch screen.
2. Press the Channel Up and Channel Down soft keys to set
level. The signal level graphic shows squelch level 1 - 8.
3. To adjust your squelch, press the Channel Down soft
key until you hear a hissing sound, then press
and release the Channel Up soft key until the hissing
stops. This will establish a “Baseline” squelch.
4. By pressing the Channel Up soft key further, you will lter
weak and medium strength signals. By pressing Channel
Down soft key, you will receive weaker signals.
5. Press the Enter soft key to save this entry and move to the
next Setup mode programming.
NOTE
If the Squelch is set so that you can hear a continuous
sound, the Memory Scan and Tri-Watch functions will be
unusable.
noise
hissing
English
14
Nothing Comes Close to a Cobra
®
15
VHF Marine Radio Protocols
Operating Your Radio
Getting Started
VHF Marine Radio Protocols
Operating Your Radio
Setup Mode Programming
Set-Up Routines
Settings Menu
The Settings menu in the CobraMarine VHF radio allows you to turn On and Off many of
its features, to adjust other features to suit your preferences, and to enter your user MMSI
number.
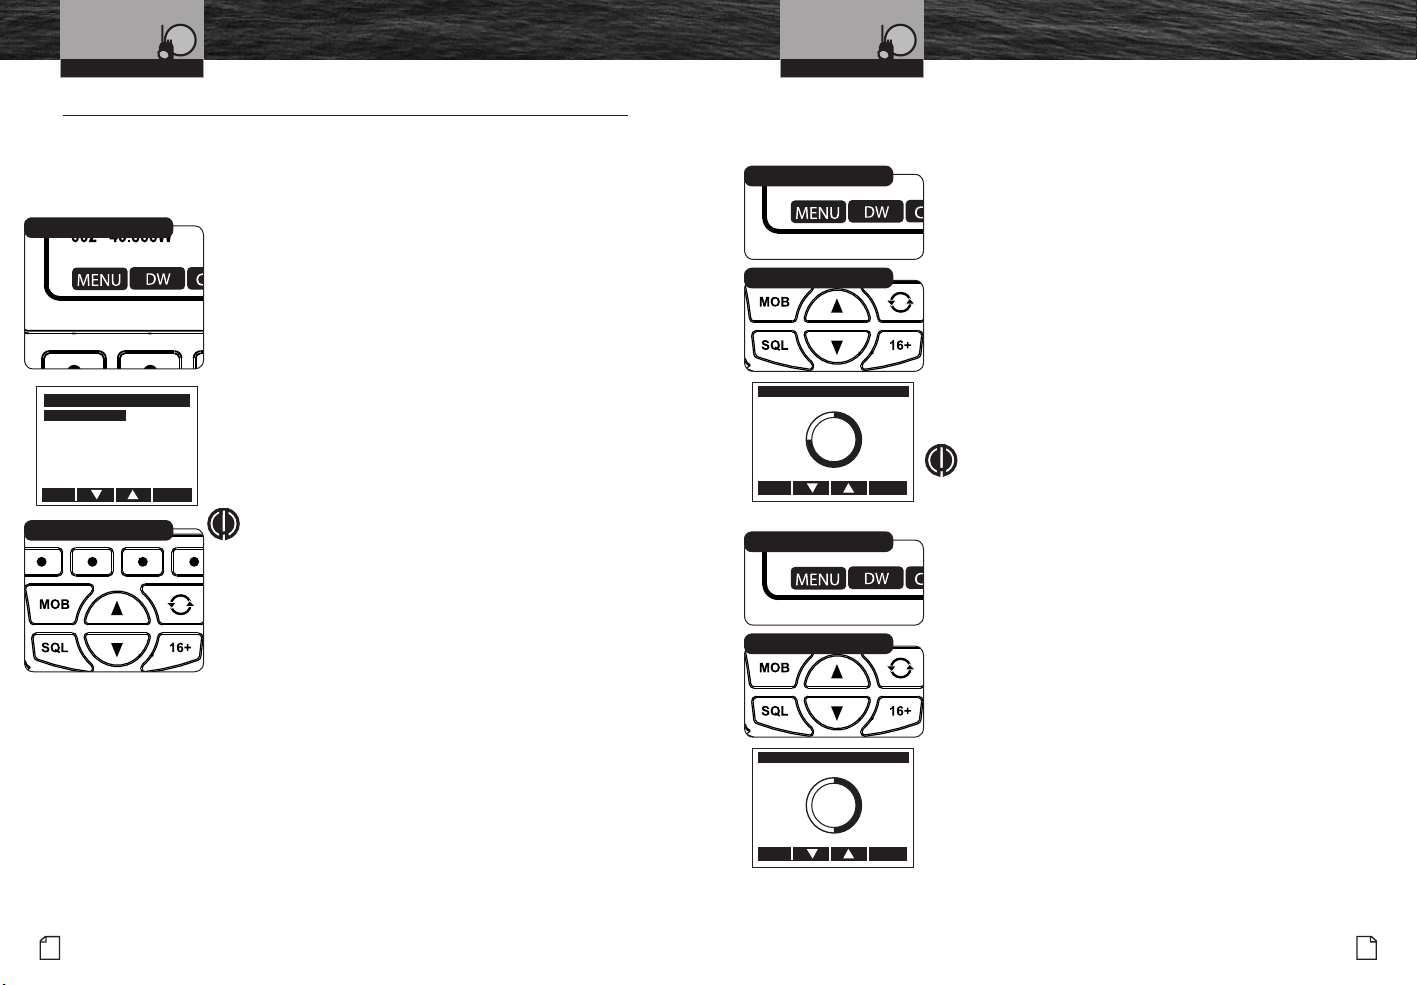
To Enter The Settings Menu:
Menu Soft Key
Press the Menu button.
The Settings menu will appear on the LCD.
After entering the Settings menu, you can scroll through it
to make as many entries as you like. Whenever the setting
selection highlight appears in a feature portion of the menu, the
current active setting is highlighted.
When you are nished with changes, you can exit the Settings
MENU
DSC SETUP MENU
To Exit The Settings Menu:
LAMP ADJUST
CONTRAST ADJUST
Use the Up/Down buttons to scroll down to EXIT at the bottom
KEY TONE
UIC CHANNEL MODE
of the menu, or press the Exit soft key to move up through the
TIME ADJUST
menu until the radio returns to the Standby mode.
EXIT ENTER
Channel Up/Down Buttons
menu by pressing the Exit soft key and return to Standby mode.
NOTE
Basic set-up routines are described here. For set-up routines
that apply specically to a particular function, they are included
in the section for that function.
•
Backlight Lamp Adjust
The LCD has a Backlight lamp to make it visible in the dark.
This lamp can be adjusted for brightness or turned Off.
Menu Soft Key
To Adjust The Backlight Level:
1. Enter the Settings menu and scroll to LAMP ADJUST with the
Up/Down soft keys or using the Up/Down channel buttons.
2. Press the ENTR soft key and observe the current backlight
Channel Up/Down Buttons
3. Use the Up/Down buttons or Right/Left soft keys to switch to
setting — HIGH, MEDIUM, LOW or OFF.
the setting you want.
4. Press the ENTR soft key to select the backlight setting. Or
press the EXIT soft key to EXIT without making changes to the
backlight setting.
LAMP ADJUST
5. The radio will return to the Settings menu. The radio will
remember the saved backlight setting, when powering off the
MED
2
NOTE
Setting the radio to a lower backlight setting will conserve
EXIT ENTER
LCD Contrast Adjust
Menu Soft Key
The LCD backlight will not be visible in daylight, but the LCD
radio, or disconnecting power to the radio.
battery power.
Contrast can be adjusted to make it easier to read in different
light conditions.
To Change The Contrast:
Channel Up/Down Buttons
1. Enter the Settings menu and scroll to CONTRAST ADJUST
Up/Down soft keys or the UP/Down channel buttons.
2. Press the ENTR soft key and observe the current contrast
setting — a number between one 0 and 16.
3. Use the Up/Down buttons or the Right/Left soft keys to
CONTRAST ADJUST
change the number up or down.
4. Press the ENTR soft key to select a contrast level. Or press the
8
5. The radio will return to the settings menu. The radio will
EXIT ENTER
EXIT soft key to EXIT without making changes to the Contrast
setting.
remember the saved contrast level, when powering off the
radio, or disconnecting power to the radio.
16
English
Nothing Comes Close to a Cobra
®
17
VHF Marine Radio Protocols
Operating Your Radio
Setup Mode Programming
VHF Marine Radio Protocols
Operating Your Radio
Setup Mode Programming
Conrmation Key Tone
The Conrmation Tone sounds to conrm all button presses except for the Talk button. If you
would prefer not to hear the Conrmation Tone, you can turn it Off and On as you choose.
Menu Soft Key
To Turn The Conrmation Tone On Or Off:
1. Enter the Settings menu and scroll to KEY TONE
with the Up/Down soft keys or the Up/Down channel
buttons.
Channel Up/Down Buttons
2. Press the ENTR soft key and observe the current conrmation
tone setting — ON or OFF.
3. Use the Up/Down soft keys or the Up/Down channel buttons
to switch to the setting you want.
4. Press the ENTR soft key to select the setting. Or press the
KEYTONE
ON
OFF
5. The radio will return to the settings menu. The radio will
EXIT soft key to EXIT without making changes to the Key Tone
setting.
remember the saved Key Tone setting, when powering off the
EXIT ENTER
radio, or disconnecting power to the radio.
International/Canada/U.S.A. Channel Maps
Three (3) sets of VHF Channel Maps have been established for marine use in International,
Canada, and U.S.A. Most of the channels are the same for all three (3) maps, but there are
denite differences (see table on pages 64 through 78). Your radio has all three (3) maps built
into it and will operate correctly in whichever area you choose.
Menu Soft Key
1.
2. Press the ENTR soft key and observe the current channel mode
Channel Up/Down Buttons
3. Use the Up/Down soft keys or the Up/Down channel buttons
4. Press the ENTR soft key to select the setting. Or press the EXIT
DSC SETUP MENU
LAMP ADJUST
CONTRAST ADJUST
KEY TONE
UIC CHANNEL MODE
TIME ADJUST
18
MENU
5. The radio will return to the settings menu. The radio will
EXIT ENTER
English
To Set Your Radio For The Area In Which You Will Be Using It:
Enter the Settings menu and scroll to CHANNEL MODE with the
Up/Down soft keys or the Up/Down channel buttons.
setting — INTERNATIONAL, CANADA or USA.
to switch to the setting you want.
soft key to EXIT without making changes to the Channel Map
setting.
remember the saved Channel Map setting, when powering off
the radio, or disconnecting power to the radio.
Time Adjust
All VHF, DSC, and GPS activities use a 24-hour clock and Universal Coordinated Time (UTC)
which was formerly known as Greenwich Mean Time (GMT). Time Adjust uses your built-in
GPS to gather time input. Time Adjust will allow the radio to display the time as Local time
or UTC time. For time input to be converted to local time, you need to enter the hour offset
of your local time zone from Greenwich. (See world city time zone chart on page 81). You
can also choose to have the time displayed in a 12 or 24 hour format.
To Change The Time Offset/Adjustment:
Menu Soft Key
1. Enter the Settings menu and scroll to TIME ADJUST
with the Up/Down soft keys or the Up/Down channel
buttons.
2. Highlight the TIME OFFSET option in the menu.
Channel Up/Down Buttons
3. Press the ENTER key and observe the current setting.
4. Use the Up/Down soft keys or the UP/Down channel buttons
to change the setting for your local time zone.
5. Press the ENTER soft key to select the setting. Or press the
MENU
LAMP ADJUST
CONTRAST ADJUST
6.
KEY TONE
UIC CHANNEL MODE
TIME ADJUST
PRIORITY CHANNEL
EXIT ENTER
TIME OFFSET
SET LOCAL OFFSET
-06:00
EXIT ENTER
EXIT soft key to EXIT without making changes to the Local
Time Zone setting.
The radio will return to the Time Adjust menu. The radio will
remember the saved Local Time Zone setting when powering off
the radio. If a
in local time.
TIME OFFSET
is saved the time will be displayed
Nothing Comes Close to a Cobra
®
19
VHF Marine Radio Protocols
Operating Your Radio
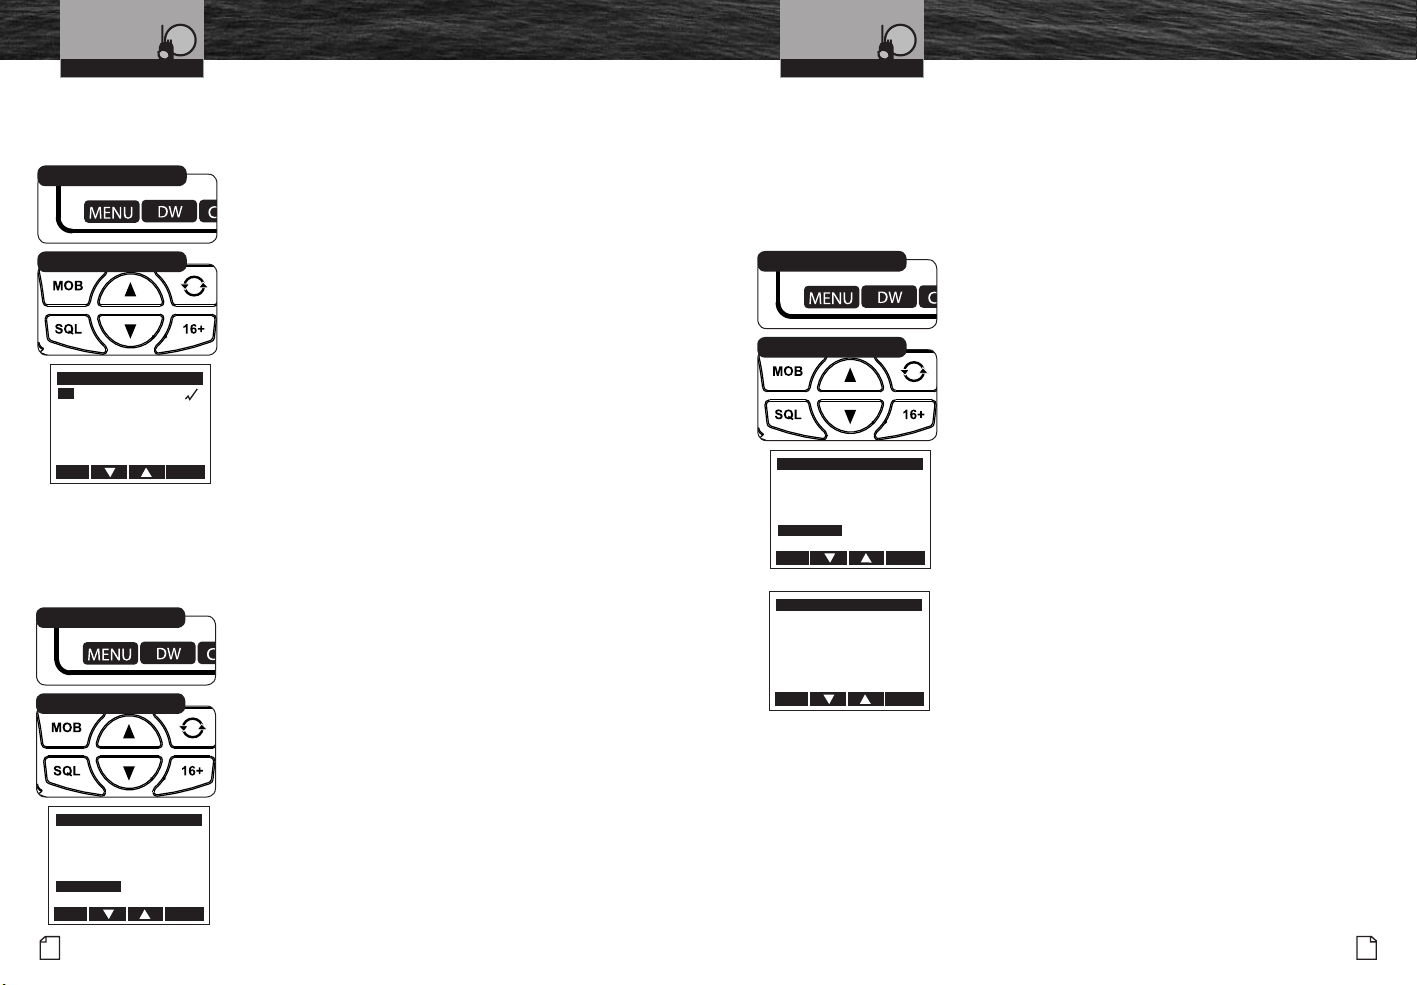
To Select 12 or 24 Hour Format Time Display:
Menu Soft Key
Setup Mode Programming
1. Enter the Settings menu and scroll to TIME ADJUST
with the Up/Down soft keys or the Up/Down channel buttons.
2. Highlight the 12H/24H TIME DISP option in the menu.
Channel Up/Down Buttons
3. Press the ENTER key and observe the current setting.
4. Use the Up/Down soft keys or the UP/Down channel
buttons to change the setting for how the radio will
display the time (12 Hour or 24 Hour format).
5. Press the ENTER soft key to select the setting. Or press the
EXIT soft key to EXIT without making changes to the
12/24 HOUR TIME DISPLAY
12 HOUR FORMAT
time format display setting.
24 HOUR FORMAT
6. The radio will return to the Time Adjust menu. The radio
will remember the saved 12 or 24 hour radio display
setting when powering off the radio.
EXIT ENTER
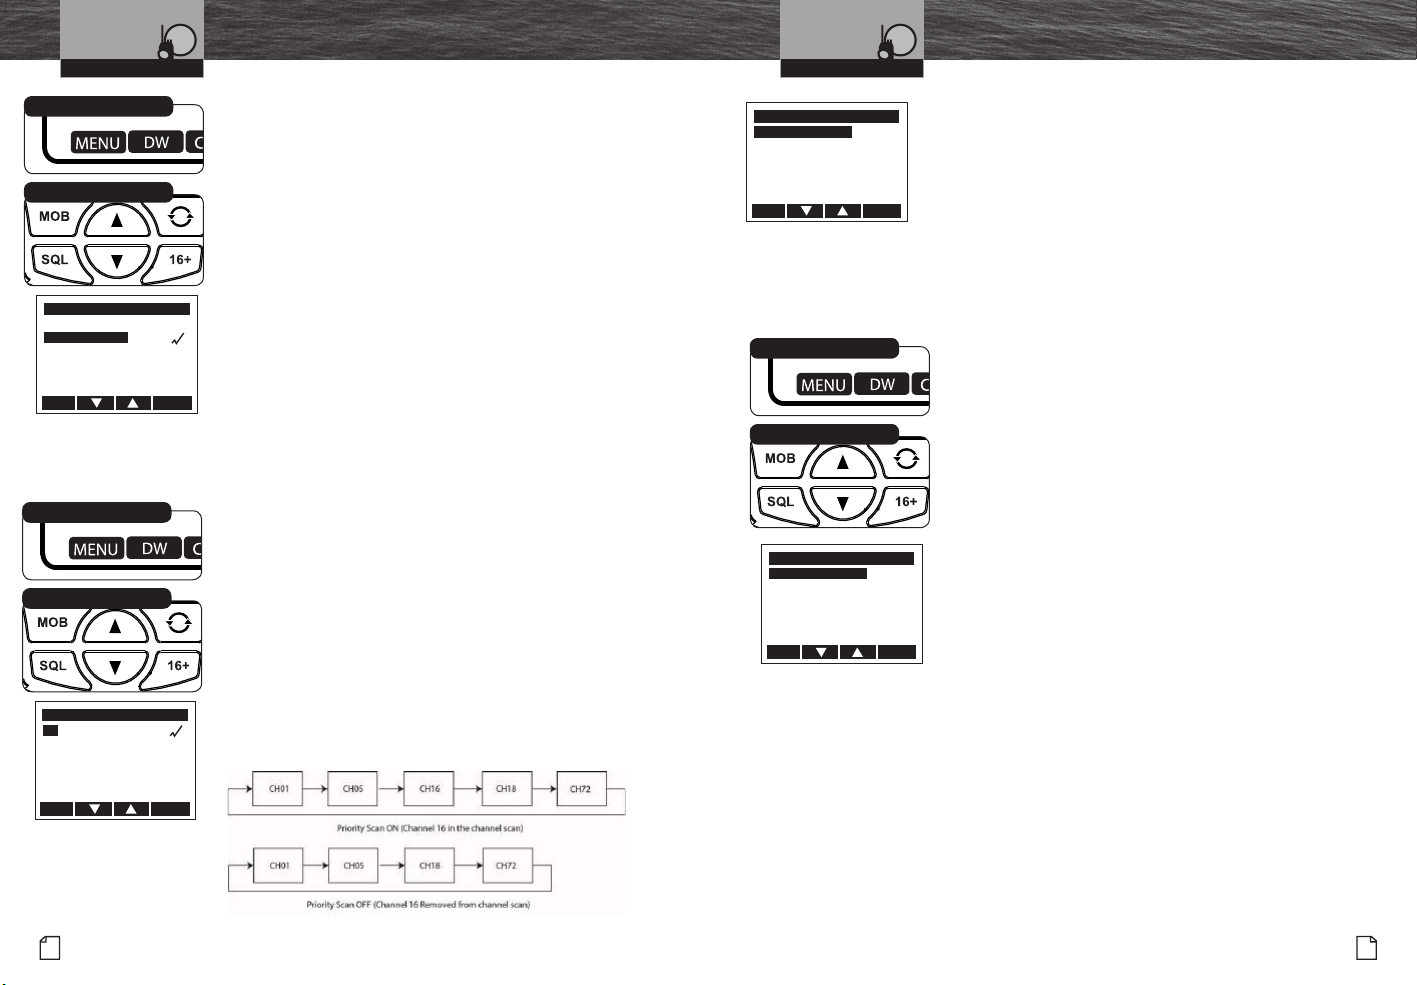
Priority Channel
This setting will allow you to choose whether channel 16 is or is not included when
channel scanning.
To Turn The Priority Channel On Or Off:
Menu Soft Key
1. Enter the Settings menu and scroll to PRIORITY
CHANNEL with the Up/Down soft keys or the Up/Down
channel buttons.
Channel Up/Down Buttons
2. Press the ENTER soft key and observe the current priority
channel setting — ON or OFF.
3. Use the Up/Down soft keys or the Up/Down channel
buttons to switch to the setting you want.
4. Press the ENTER soft key to select the setting. Or press the
EXIT soft key to EXIT without making changes to the
PRIORITY CHANNEL
priority channel setting.
ON
OFF
EXIT ENTER
Setup Mode Programming
COORDINATE SYSTEM
TRUE/MAGNETIC
SBAS
GPS STATUS
SPEED MEASUREMENT
COURSE UP/NORTH UP
EXIT ENTER
GPS
This menu allows you to select and allows you to test the GPS receiver to be sure that you
are receiving good satellite information and check the GPS signal strength.
Menu Soft Key
Coordinate System
The Coordinate System allows adjusting to your navigating
preference. The most common is already selected.
To Select the Coordinate System:
Channel Up/Down Buttons
1. Enter the Settings menu and scroll to GPS MENU
with the Up/Down soft keys or the Up/Down channel
buttons.
2. Highlight the COORDINATE SYSTEM
3. Press the ENTER key and observe the current setting.
GPS
4. Use the Up/Down soft keys or the UP/Down channel
COORDINATE SYSTEM
buttons to change the setting to use the desired
TRUE/MAGNETIC
SBAS
coordinate system.
GPS STATUS
SPEED MEASUREMENT
5. Press the ENTER soft key to select the setting. Or press the
COURSE UP/NORTH UP
EXIT soft key to EXIT without making changes to the
EXIT ENTER
Coordinate System setting.
6.
remember the saved Coordinate System setting when
powering off the radio.
GPS Menu
All VHF Marine radios SHOULD / NEED to have a GPS receiver
connected and operating to effectively use the DSC (Digital
Selective Calling) features built-in to the radios. In an Emergency
you want the rescue authorities and surrounding vessels to know
where you are and to be able to quickly assist you in your time
of need. Your MR HH600 handheld VHF radio has a GPS receiver
built right in!
option in the menu.
The radio will return to the GPS menu. The radio will
20
English
Nothing Comes Close to a Cobra
®
21
VHF Marine Radio Protocols
Operating Your Radio
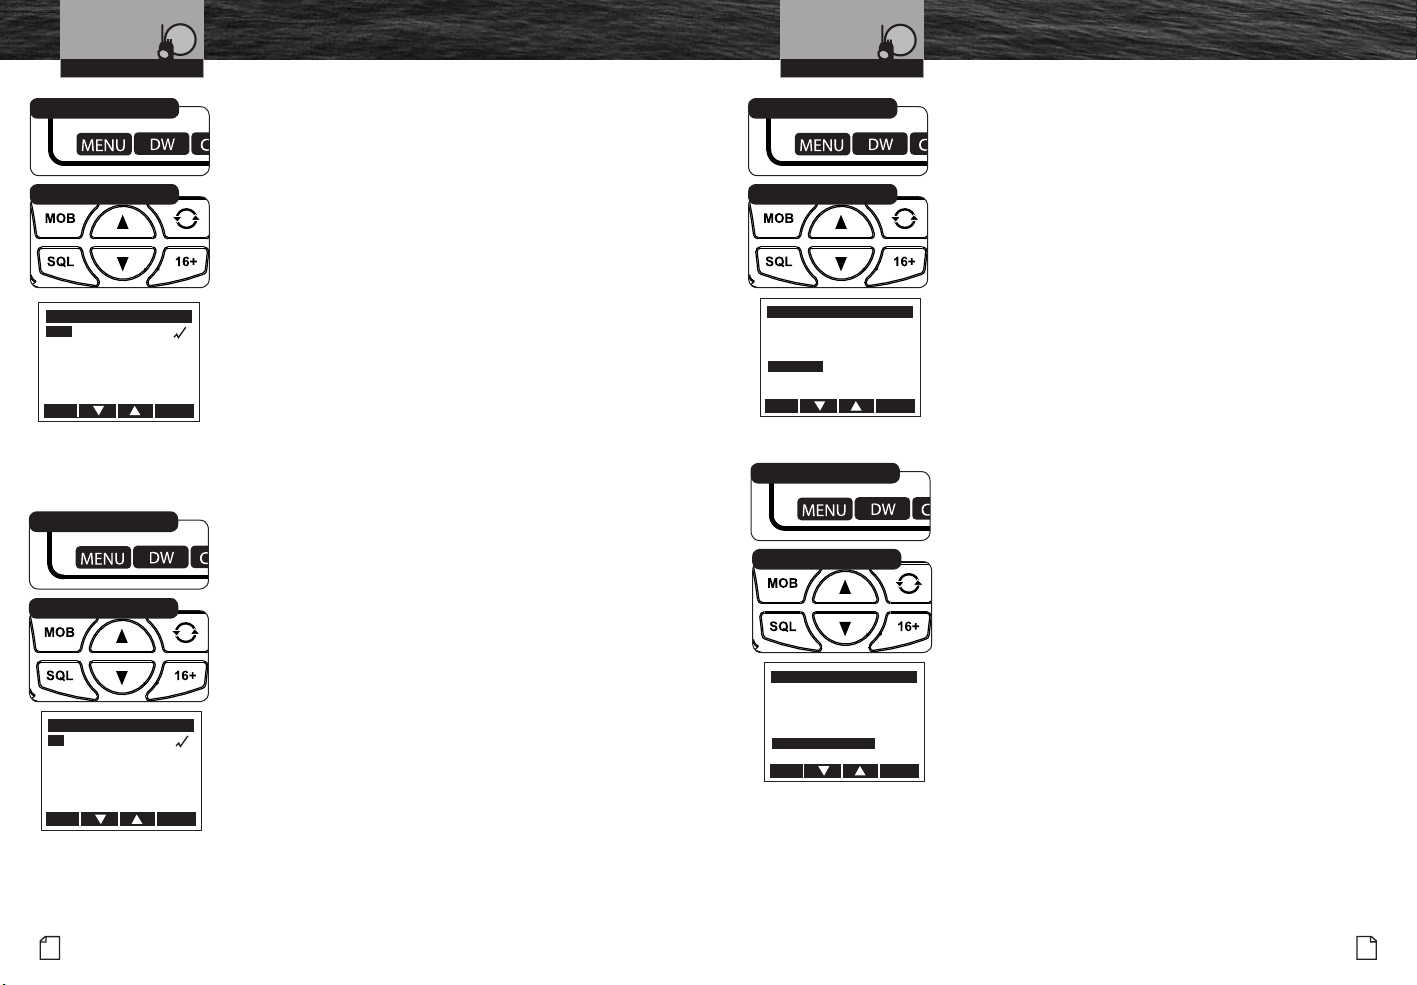
True or Magnetic System
Menu Soft Key
Setup Mode Programming
Select TRUE or MAGNETIC to change if bearings are shown as
relative to either true or magnetic north. If MAGNETIC
is selected then the variation is computed and displayed
automatically for every zone.
Channel Up/Down Buttons
To Select True or Magnetic System:
1. Enter the Settings menu and scroll to GPS with the Up/Down
soft keys or the Up/Down channel buttons.
2. Highlight the TRUE/MAGNETIC option in the menu.
3. Press the ENTER key and observe the current setting.
TRUE/MAGNETIC
TRUE
4. Use the Up/Down soft keys or the Up/Down channel
MAGNETIC
buttons to select the desired setting.
5. Press the ENTER soft key to select the setting. Or press the
EXIT soft key to EXIT without making any changes to the True
EXIT ENTER
or Magnetic setting.
6. The radio will return to the GPS menu. The radio will
remember the True or Magnetic setting when powering off
the radio.
Menu Soft Key
Satellite Based Augmentation (SBAS)
The SBAS can be turned ON or OFF. Some areas of the earth
need it turned off for greater accuracy. It is set ON by default.
To Select the Satellite Based Augmentation System:
Channel Up/Down Buttons
1. Enter the Settings menu and scroll to GPS with the Up/Down
soft keys or the Up/Down channel buttons.
2. Highlight the SBAS option in the menu.
3. Press the ENTER key and observe the current setting.
4. Use the Up/Down soft keys or the Up/Down buttons to
SAT BASED AUG SYSTEM
select the desired setting.
ON
5. Press the ENTER soft key to select the setting. Or press the
OFF
EXIT soft key to EXIT without making changes to the Sat
Based Aug Sys setting.
EXIT ENTER
VHF Marine Radio Protocols
Operating Your Radio
Menu Soft Key
GPS Status
Setup Mode Programming
This screen allows you to test the GPS receiver to be sure it is
receiving good satellite information and GPS signal strength.
To Select the GPS Status Screen:
Channel Up/Down Buttons
1. Enter the Settings menu and scroll to GPS with the Up/Down
soft keys or the Up/Down channel buttons.
2. Highlight the GPS STATUS option in the menu.
3. Press the ENTER key and observe the current setting.
4. The GPS Status screen reports the following information:
COORDINATE SYSTEM
TRUE/MAGNETIC
SBAS
GPS STATUS
SPEED MEASUREMENT
COURSE UP/NORTH UP
EXIT ENTER
Menu Soft Key
Channel Up/Down Buttons
COORDINATE SYSTEM
TRUE/MAGNETIC
SBAS
GPS STATUS
SPEED MEASUREMENT
COURSE UP/NORTH UP
GPS
a. How many satellites are currently being tracked.
b. The overall health of the GPS satellite signals being
received.
5. Press the EXIT soft key to EXIT the GPS Status screen.
6. The radio will return to the GPS menu.
Speed Measurement Units
Select KNOTS, MPH or KM/H to change if speed is indicated in
either nautical miles per hour, miles per hour or kilometers per hour.
To Select Speed Measurement Units:
1. Enter the Settings menu and scroll to GPS with the Up/Down
soft keys or the Up/Down channel buttons.
2. Highlight the SPEED MEASUREMENT option in the menu.
3. Press the ENTER key and observe the current setting.
4. Use the Up/Down soft keys or the Up/Down channel
GPS
buttons to select the desired setting.
5. Press the ENTER soft key to select the setting. Or press the
EXIT soft key to EXIT without making any changes to the
Speed Measurement setting.
EXIT ENTER
6. The radio will return to the GPS menu. The radio will
remember the Speed Measurement setting when powering
off the radio.
22
English
Nothing Comes Close to a Cobra
®
23
 Loading...