

Page 1
®
AN-8630
INTENNA
®
TELEPHONE
ANSWERING
SYSTEM
USER’S GUIDE
COBRA ELECTRONICS
CORPORATION
6500 W. Cortland Street
Chicago, Il. 60707
PRINTED IN CHINA ©1997 COBRA ELECTRONICS CORPORATION 480-101-P-001
Cobra
®
Page 2

24 HOURS A DAY,
7 DAYS A WEEK...
WE’RE HERE FOR YOU!
Your new Cobra Intenna® Cordless Phone Answering System is the world‘s first and only
cordless system with no antenna to bend, break or interfere with your life. That, along with
the fact that it‘s all digital (no tapes to replace) and designed with an electronic mailbox
(similar to the ones found in many offices), makes this one of the most sophisticated yet easy-
to-use cordless telephone answering systems on the market today. There’s even VOICE HELP
built in to give you assistance when using the functions. To get started, turn to page 9 and
follow the steps, 1-2-3, and your system is soon ready to go. When you’re ready to add more
functions, simply refer back to the information guide for the feature you want and we’ll
help you through it, step by step. Still can’t get it to work?
Give us a call. Cobra wants to be your partner in clear communication.
CALL YOUR COBRA CONSULTANT
AT
1-773-889-3087
Introduction 2
Information Guide 3
Important Safety Instructions 4 & 5
Features Information 6 & 7
Things To Know 8
Getting Started 9
Plugging In
Setting The Clock
Recording Your Outgoing Message
Wall Mounting 10
On A Plate
Directly On The Wall
Using Your Phone 11
To Answer A Call From The Base
To Place A Call At The Base
To Answer Or Place A Call Away
From The Base
Memory Dialing 12 & 13
To Store A Number In Memory
Creating A Directory
To Store A Number Over 16 Digits
To Dial A Number Stored In Memory
To Replace Or Change A Number
Stored In Memory
Intercom/Paging System 13, 14 & 15
To Use The Intercom
To Use The Pager As A Handset Locator
To Use Intercom As 2-Way Monitor
To Use 2-Way Recording Feature
Digital Answering System
(from the base) 16 & 17
Getting Ready
To Record Your Outgoing Message
To Access Your Incoming Messages
To Erase Your Messages
To Screen A Call
When The Memory Is Full
To Record A Memo
To Access A Memo
Digital Answering System
(from the handset) 18
To Access Your
Incoming Messages
To Screen A Call
Digital Answering System
(from a remote location) 19
Getting Ready
To Access Your
Incoming Messages
To Record Your
Outgoing Message
To Record A Memo
To Turn Your System On
When The Memory Is Full
Using The Mailbox Feature 20 & 21
Programming Your Mailbox
To Record Individual Mailbox
Outgoing Messages
To Access General Messages
To Access Individual Messages
To Record OGM From Remote Location
To Access Messages From Remote
Location
To Record OGM From Handset
To Access Messages From Handset
To Erase Individual Messages
Additional Features 22 & 23
Rechargeable Battery Information 24 & 25
Troubleshooting Checklist 26 & 27
Service Information/FCC Guidelines 28
Limited Warranty 29
Reminder Card (Duplicate) 30
Accessories Order Form 31
3
1-773-889-3087
NEED HELP?
AN8630
Cobra
®
INFORMATION GUIDE
Page 3

When using your telephone equipment, basic safety
precautions should always be follow ed to reduce the
risk of fire, electric shock and injury to persons,
including the following:
1. Read and understand all instructions.
2. Follow all warnings and instructions mark ed on the
product.
3. Unplug this product from the wall outlet before
cleaning. Do not use liquid cleaners or aerosol
cleaners. Use a damp cloth for cleaning.
4. Do not locate base unit near water, for example,
near a bath tub, wash bowl, kitchen sink, or laundry
tub, in a wet basement or near a swimming pool.
5. Do not place this product on an unstable cart, stand
or table. The product may fall, causing serious
damage to the product.
6. Slots and openings in the cabinet and the bottom or
back are provided for ventilation, to protect it from
overheating; these openings must not be blocked or
covered. The openings should never be block ed by
placing the product in the bed, sofa, rug or other
similar surface. This product should never be placed
near or over a radiator or heat register . This product
should not be placed in a built-in installation unless
proper ventilation is provided.
7. This product should be operated only from the type
of power source indicated on the marking label. If
you are not sure of the type of power supply to your
home, consult your dealer or local power company.
8. Do not allow anything to rest on the power cord. Do
not locate this product where the cord will be
abused by persons walking on it.
9. Do not overload outlets and extension cords as this
can result in the risk of fire or electric shock.
10. Never push objects of any kind into this product
through cabinet slots as they may touch dangerous
voltage points or short out parts that could result in
a risk of fire or electric shock. Never spill liquid of
any kind on the product.
11. To reduce the risk of electric shock, do not
disassemble this product, but take it to qualified
servicemen when service or repair work is required.
Opening or removing covers may expose y ou to
dangerous voltages or other risks. Incorrect
reassembly can cause electric shock when the
appliance is subsequently used.
12. Avoid using telephone (other than a cordless type)
5
1-773-889-3087
NEED HELP?
AN8630
Cobra
®
IMPORTANT
SAFETY
INSTRUCTIONS
SAVE THESE INSTRUCTIONS
Power Supply Specifications
This symbol signifies that only the Cobra AC
Adapter supplied with this cordless telephone
(Part No. 768-023-N-001) should be used
Input: AC 120V, 60Hz, 15W
Output: DC 12V, 500mA
!
THE LIGHTNING FLASH AND ARROW
HEAD WITHIN THE TRIANGLE IS A
WARNING SIGN ALERTING YOU OF
“DANGEROUS VOLTAGE” INSIDE THE
PRODUCT.
CAUTION: TO REDUCE THE RISK OF ELECTRIC
SHOCK DO NOT REMOVE COVER (OR BACK).
NO USER SERVICEABLE PARTS INSIDE.
REFER SERVICING TO QUALIFIED SERVICE
PERSONNEL.
THE EXCLAMATION POINT WITHIN THE
TRIANGLE IS A WARNING SIGN ALERTING
YOU OF IMPORTANT INSTRUCTIONS
ACCOMPANYING THE PRODUCT.
SEE WARNING ON BOTTOM/BACK OF PRODUCT
RISK OF ELECTRIC SHOCK
DO NOT OPEN
WARNING: TO PREVENT FIRE OR ELECTRIC SHOCK
HAZARD DO NOT EXPOSE THIS PRODUCT TO RAIN
OR MOISTURE
CAUTION
during an electrical storm. There may be a remote
risk of electric shock from lightning.
13. Do not use the telephone to report a gas leak in the
vicinity of the leak.
14. Unplug this product from the wall outlet and refer
servicing to qualified service personnel under the
following conditions:
A. When the power supply cord or plug is damaged
or frayed.
B. If liquid has been spilled into the product.
C. If the product has been exposed to rain or water.
D. If the product does not operate normally by
following the operating instructions. Adjust only
those controls that are covered by the operating
instructions because improper adjustment of
other controls may result in damage and will
often require extensive work by a qualified
technician to restore the product to normal
operation.
E. If the product has been dropped or the cabinet
has been damaged.
F. If the product exhibits a distinct change in
performance.
The cordless handset operates on batteries. There is also
a battery supplied for the base unit memory.
CAUTION:To reduce the risk of fire or personal injury,
read and follow these instructions:
A. Use only the following types and sizes of
batteries:
A1. For Handset Unit: Cordless Telephone (Ni-Cd
rechargeable) Bat tery Pack 3.6V , 270 mAh
(Cobra Model 213-0 13-9-001).
A2. For Base Unit: 9Volt (Alkaline non-
rechargeable) Bat tery.
B. Do not dispose of battery pack in a fire. The cells
may explode. Check with local codes for possible
disposal instruction.
C. Since released electrolyte is corrosive and may
cause damage to eyes or skin and may be toxic if
swallowed:
C1. Do not open or mutilate battery pack.
C2. Always replace the entire bat tery pack rather
than reusing one or more cells.
C3. Do not expose batteries to heat or flame.
D. Exercise care in handling the battery pack in
order not to “short” the battery contacts with
conducting materials such as rings, bracelets,
and keys. The battery or conductor may
overheat and cause burns.
E. Follow the handset battery charging instructions
outlined in this manual.
F. For Base Unit Battery:
F1. Do not attempt to recharge the 9V bat tery
provided with or identified for use with this
product. T he battery may leak corrosive
electrolyte or explode.
F2. Do not attempt to rejuvenate the battery
provided with or identified for use with this
product by heating it. Sudden release of the
battery electrolyte may occur, causing burns
or irritation to eyes and skin.
F3. Remove the 9V battery from this product if
the product will not be used for a long
period of time (several months or more),
since the battery could leak inside the
product during this time.
F4. Discard “dead” batteries as soon as
possible, since “dead” batteries are more
likely to leak in a product.
F5. Do not store this product or the battery
provided with or identified for use with this
product in high temperature areas. Batteries
which are stored in a freezer or refrigerator
for the purpose of extending shelf life
should be protected from condensation
during storage and defrosting. Batteries
should be stabilized at room temperature
prior to use after cold strorage.
Page 4

?
You can REPLACE THE
BATTERIES
in the
handset yourself. It’s fast
and easy.
SEE PAGE 25
for simple-to-follow
instructions.
◆
Your new Cobra Intenna
Cordless Telephone
Answering System has a
true
TWO-WAY
INTERCOM
built in. You
can page remotely, page
from the base or the
handset and use the
intercom as a baby
monitor—You can even turn
The Answering System off
and on from a remote
location. For more
information,
SEE PAGE 13.
◆
This deluxe answering
system has a complete
REMOTE VOICE HELP
MENU
to guide you
through all of the possible
operations, Including
Message Retrieval, from a
touch-tone phone anywhere
in the world. For details
on how it can work for you,
SEE PAGE 19.
Your new Cobra Intenna
Cordless Telephone
Answering System has
5 DIGITAL
MAILBOXES
.
One is for general
messages, and the other
four may be used for
individually accessed
messages. Use one for mom,
two for the kids, one for
business or all for
business.
The choice is yours!
SEE PAGE 20for
information.
◆
You can select from
any one of the
10 CHANNELS
AVAILABLE
any time you wish by
pressing a button. If the
channel you’re using gets
too much noise or static,
pick a cleaner one, without
disconnecting your call.
SEE PAGE 22
for more details.
You can use any features
that you want of this
advanced
Answering system from the
Cordless Handset.
The
VOICE HELP
SYSTEM
gives you all of
the information you’ll
need.
SEE PAGE 16for
directions.
◆
Your new Cobra Intenna
Cordless Telephone
Answering System comes
with
MEMORY DIALING.
Program 10 of your most
frequently called numbers
into the digital memory
system. Retrieve any of
them with just the touch of
a button. To find out how,
SEE PAGE 12.
7
1-773-889-3087
NEED HELP?
AN8630
Cobra
®
?
DID
YOU
KNOW
THAT...
Page 5

Set The Clock
Press and hold the button that say s
”Clock” and VOICE HELP will direct you
to press the “SKIP” button until you
hear the correct day of the week, then
release. Press and release ”Clock” again,
then SKIP or REPEAT button until the
correct hour is displayed in the LED
window. R epeat again for the minutes.
Press ”Clock” again and VOICE HELP will
verify the time that has been set. Every
message received will then be identified
by day of the week and time.
Record your
outgoing message
Check to be sure the ICM (Incoming
Message) Recording switch on the side of
the phone is set at “2 Min.” (as opposed
to “Annc Only”). Press and hold the
button that says “OGM” (Outgoing
Message) and VOICE HELP will direct you
to start recording your message after the
beep. The LED display window will
indicate the length in seconds; you have
up to 60 seconds recording time for your
OGM. Speak about 6 inches from the
microphone located in small slot on front
of base. Release the button and your
message plays back. Not satisfied with
your message? Simply follow these steps
over again and keep recording your
outgoing message until you’re
comfortable.
Now that your new Cobra Intenna Cordless
Phone Answering System is out of the bo x
and ready to use, here are some things
you’ll need to be aware of before getting
started.
Location
Be sure the location you‘ve c hosen is near
both an electrical outlet and a telephone
wall jack—both are required to connect your
new Cobra Telephone Answering System.
Maximum range is obtained by locating the
base as high as possible in your home.
Charging
After connecting, and before using the
handset of your new system, it will need to
rest in the base overnight (at least 12 hours)
in order to charge.
Ringer
Make sure the RINGER switch, located
on the rear of the base, is set to ON.
Pulse/Tone
Set the PULSE/TONE switch, located
on the rear of the base, to the operation
that is correct for your installation.
Keep This Guide
Put this guide in a handy place. You may
want to refer to it for information when
using or programming different features of
your Cobra Intenna Cordless Telephone
Answering System.
Battery Back Up
Now‘s the time to put your 9v back-up
battery (included) into the base. Simply
open the battery compartment located
below the handset on the base, plug-in
the battery, and your outgoing and
incoming messages will be saved
during power outages or other
disconnections.
9
1-773-889-3087
NEED HELP?
AN8630
Cobra
®
SOME THINGS YOU NEED TO
KNOW BEFORE YOU GET STARTED
GETTING SET UP...
IT’S AS EASY AS 1-2-3
1
1
2
2
4
3
4
6
5
9
6
5
9
7
RINGER
3
BATTERY
BACK UP
CLOCK
BUTTON
SKIP
BUTTON
ICM
RECORDING
SWITCH
7
REPEAT
BUTTON
OGM
BUTTON
10
10
8
8
LED DISPLAY
PULSE/
TONE
▼
▼
▼
▼
Plug it in
Plug the adapter cord into the power jack
on the rear of the base, then plug the
adapter into any standard 1 10V outlet.
(VOICE HELP willdirect you to set clock
and outgoing message).
Set the handset
on the base to charge and in 12 hours
you’re ready to make and receive calls.
The Answering System will work while
the telephone handset is charging.
REPEAT SKIP
Page 6
Cobra
®
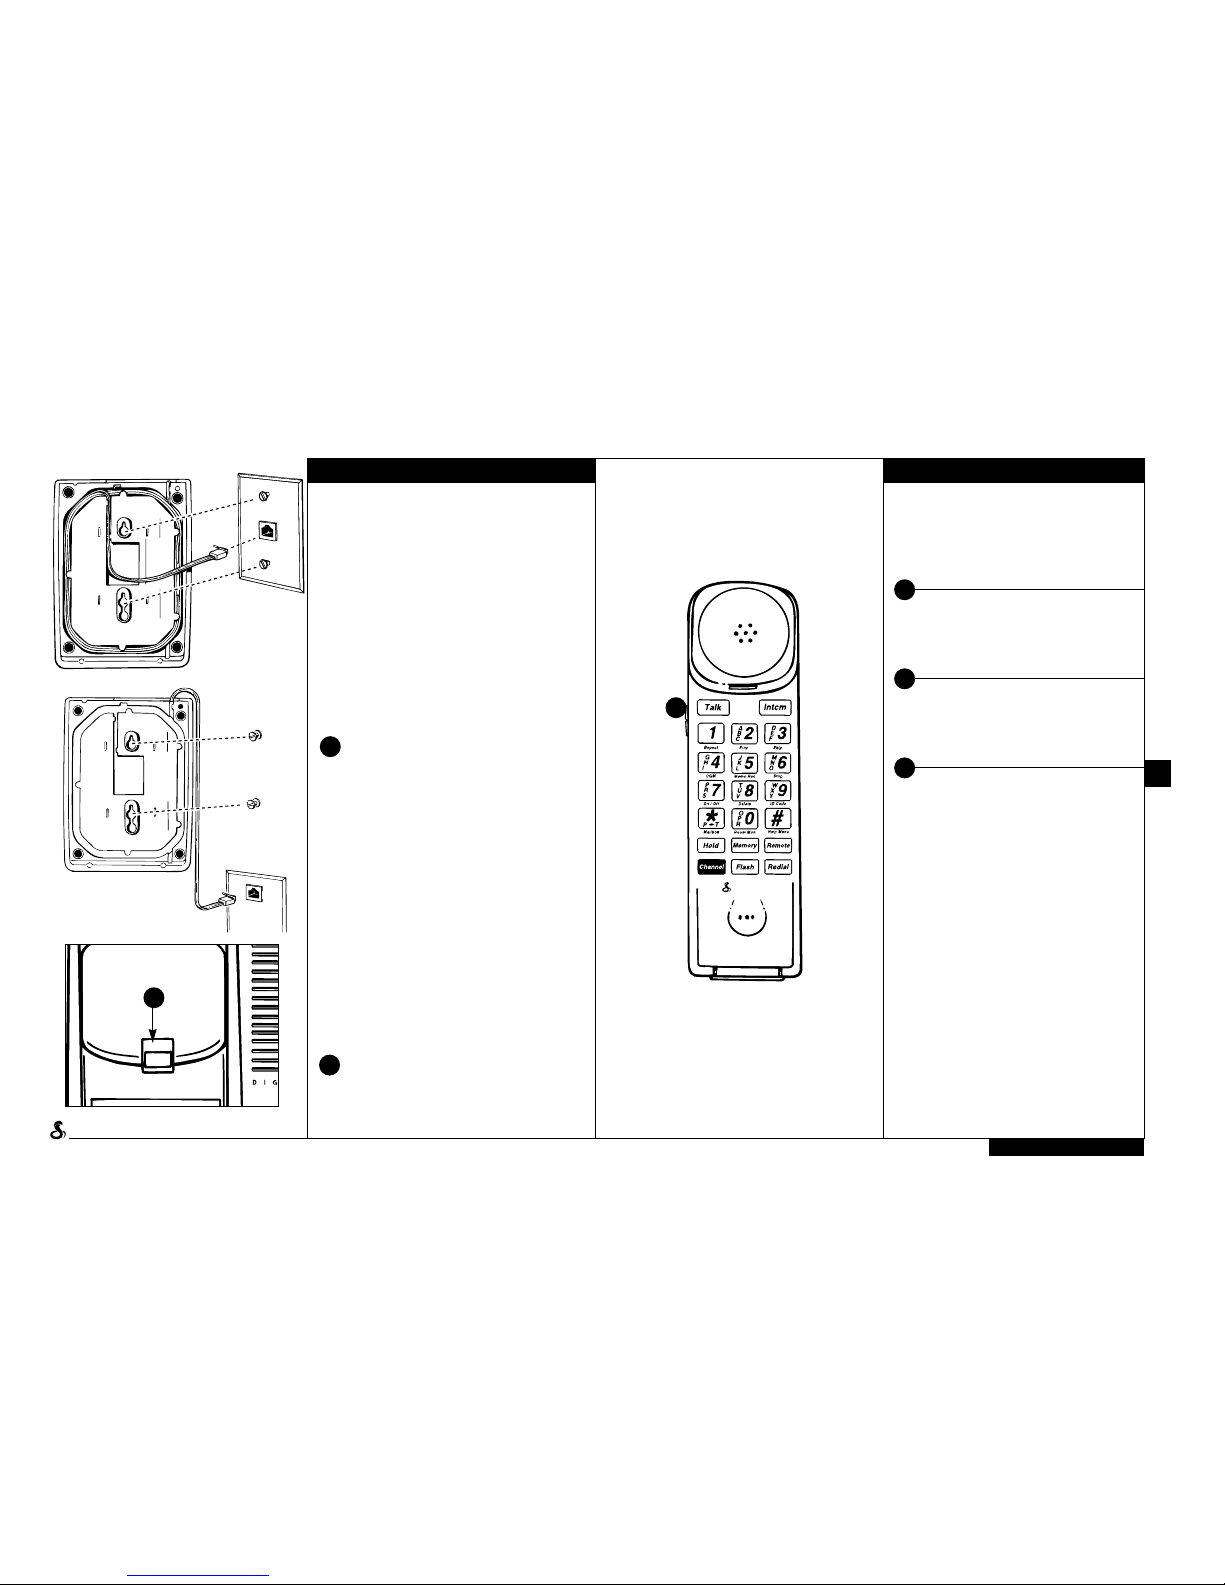
On A Plate
Your Cobra Intenna is designed to be used
with AT&T, GTE or any other wall-mounting
plates that may be purchased from most
local electronics or home repair stores.
1. Press the telephone cord into the slots
under the base and wrap it around the
cord storage area as shown.
2. Plug the phone connector into the
telephone wall jack.
3. Plug the power adapter into the
telephone base and a nearby AC po wer
outlet.
4. To hang the phone base, simply align
the holes on the bottom of the base with
the studs on the wall plate and slide the
base down until it locks into place.
5. To hang up handset, pull cradle hook to
down position.
Directly On The Wall
T o install the base directly on any wall, you’ll
need two screws and wall anchors (not
included).
1. Drill two holes aligned vertically, one
31⁄4" higher than the other, and insert
the wall anchors.
2. Drive the screws into the anchors until
the head of each screw stic ks out about
1⁄8" from the wall.
3. Plug the phone connector into the
telephone wall jack.
4. Plug the power adapter into the
telephone base and a nearby AC po wer
outlet.
5. To hang the phone base, simply align
the holes on the bottom of the base
with the screws on the wall and slide
the base down until it locks into place.
6. To hang up handset, pull cradle hook to
down position.
Now that the handset batteries hav e
charged overnight (at least 12 hours) your
Cobra Intenna Cordless Phone is ready to
use.
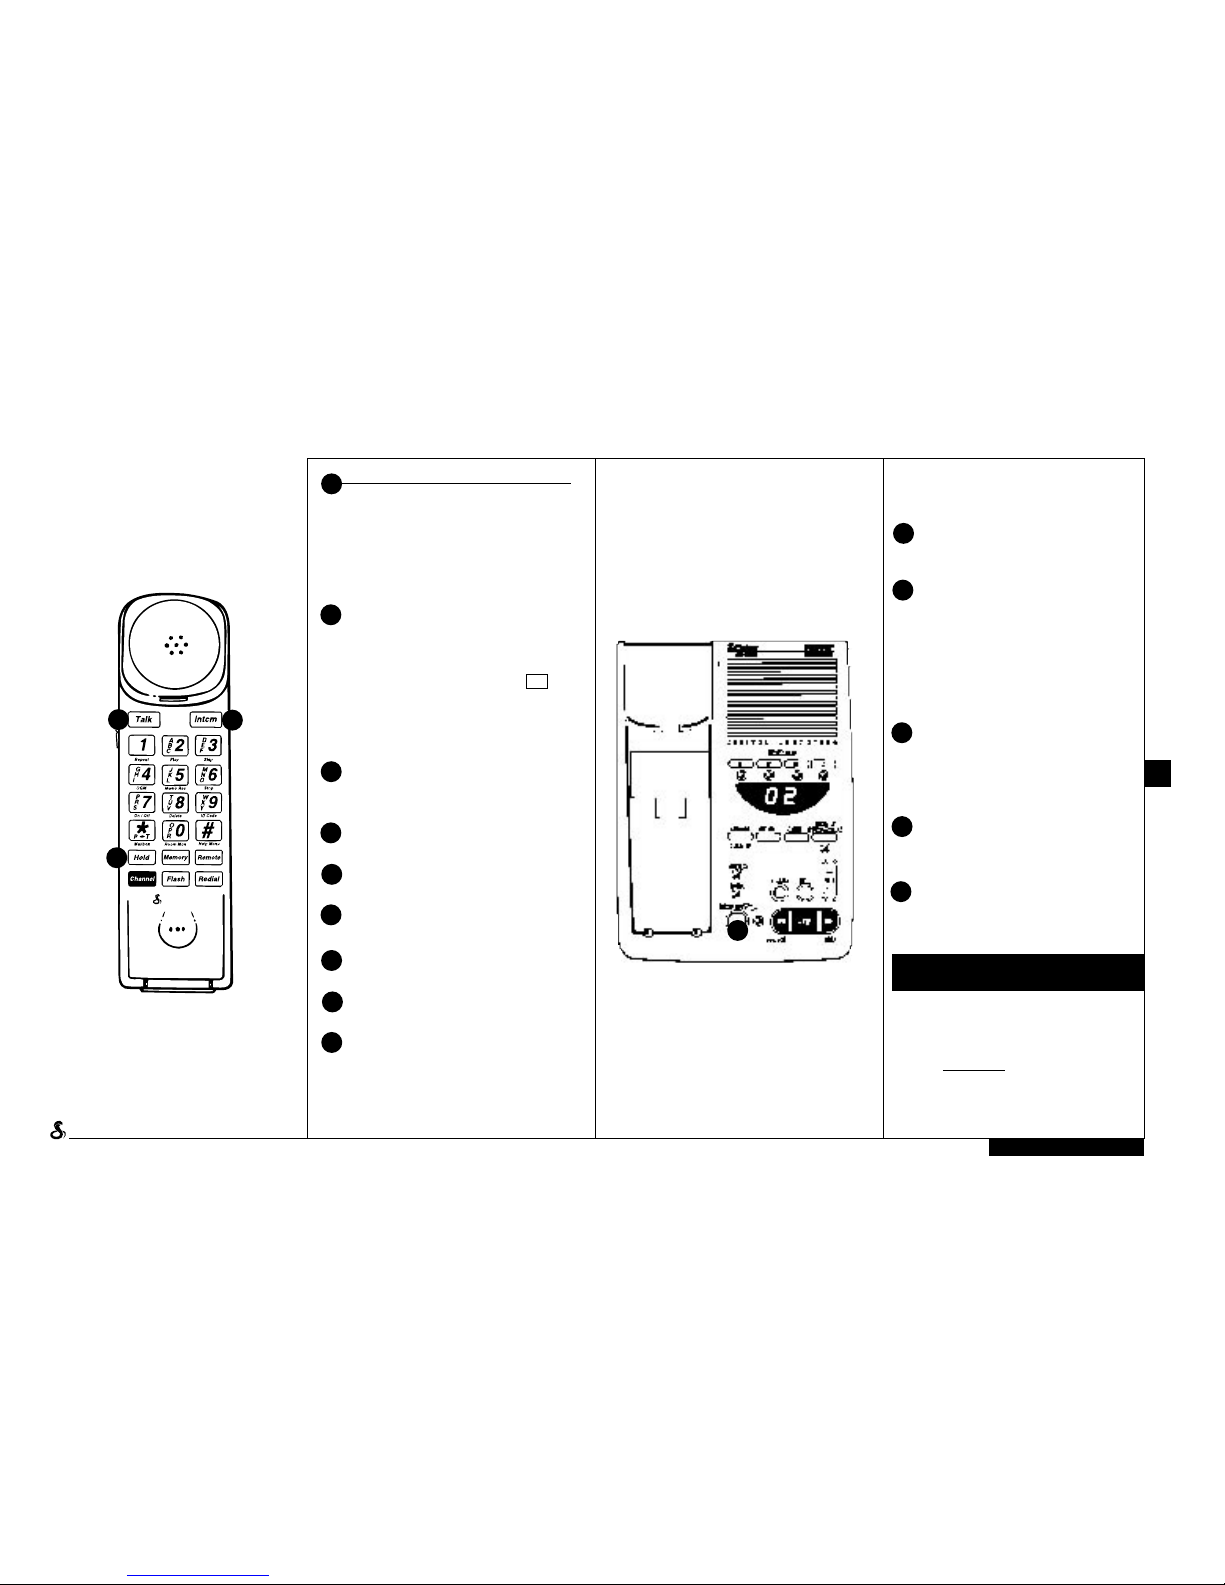
To Answer A Call At The
Base
When the phone rings, simply pick up
the handset from the base and the
TALK button will automatically light.
When you hang up the handset in the
base, it disconnects.
To Place A Call At The Base
Pick up the handset from the base,
then press and release the TALK button.
When you hear the dial tone, place your
call.
To Answer or Place A Call
Away From The Base
The TALK button must be off (not lit)
when the handset is away from the
base and not in use. Press and release
the TALK button and, when your
conversation is finished, press the TALK
button again to disconnect. If you
replace the handset in the base, the
TALK button will disconnect
automatically.
11
1-773-889-3087
NEED HELP?
AN8630
Cobra
®
WALL MOUNTING USING YOUR PHONE
2
2
2
2
1
1
CRADLE
HOOK
1
CRADLE
HOOK
TALK
TALK
TALK
Page 7
To Store A Number
Longer Than 16 Digits
For telephone banking or alternate long
distance service, you may need to program a
number that is longer than 16 digits. To do so,
you will need to divide the number between
two different memory locations. Example:
Store an alternate long distance access
number in location 1 and your personal
indentification number for that service in
location 2. Please call your Cobra Consultant
at 1-773-889-3087 for additional guidance.
To Dial A Number Stored
In Memory
1. Press TALK to get a dial tone.
2. Press MEMORY.
3. Press the keypad button (1-0) that you
assigned to the number you wish to call,
and your Cobra Intenna will dial the
number automatically.
NOTE: For numbers longer than 16
digits, stored separtely, follow steps
1, 2, and 3 above, then press MEMORY
and keypad for second number.
To Replace Or Change A
Number Stored In Memory
Simply repeat the steps under “T oStore A
Number In Memory”, found on the facing
page. The new number will automatically
replace the previous number stored.
NOTE: Numbers stored in memory may be
lost when you disconnect from AC power , if
the 9V battery runs down completely or is not
installed. Follow the steps under “T oStore A
Number In Memory” if you need to program
the numbers again.
Cobra
®
Memory dialing lets you store and dial 10
commonly-called telephone numbers
automatically. No more fumbling with the
phone book, guessing at numbers or
accidentally misdialing the people you call
most.
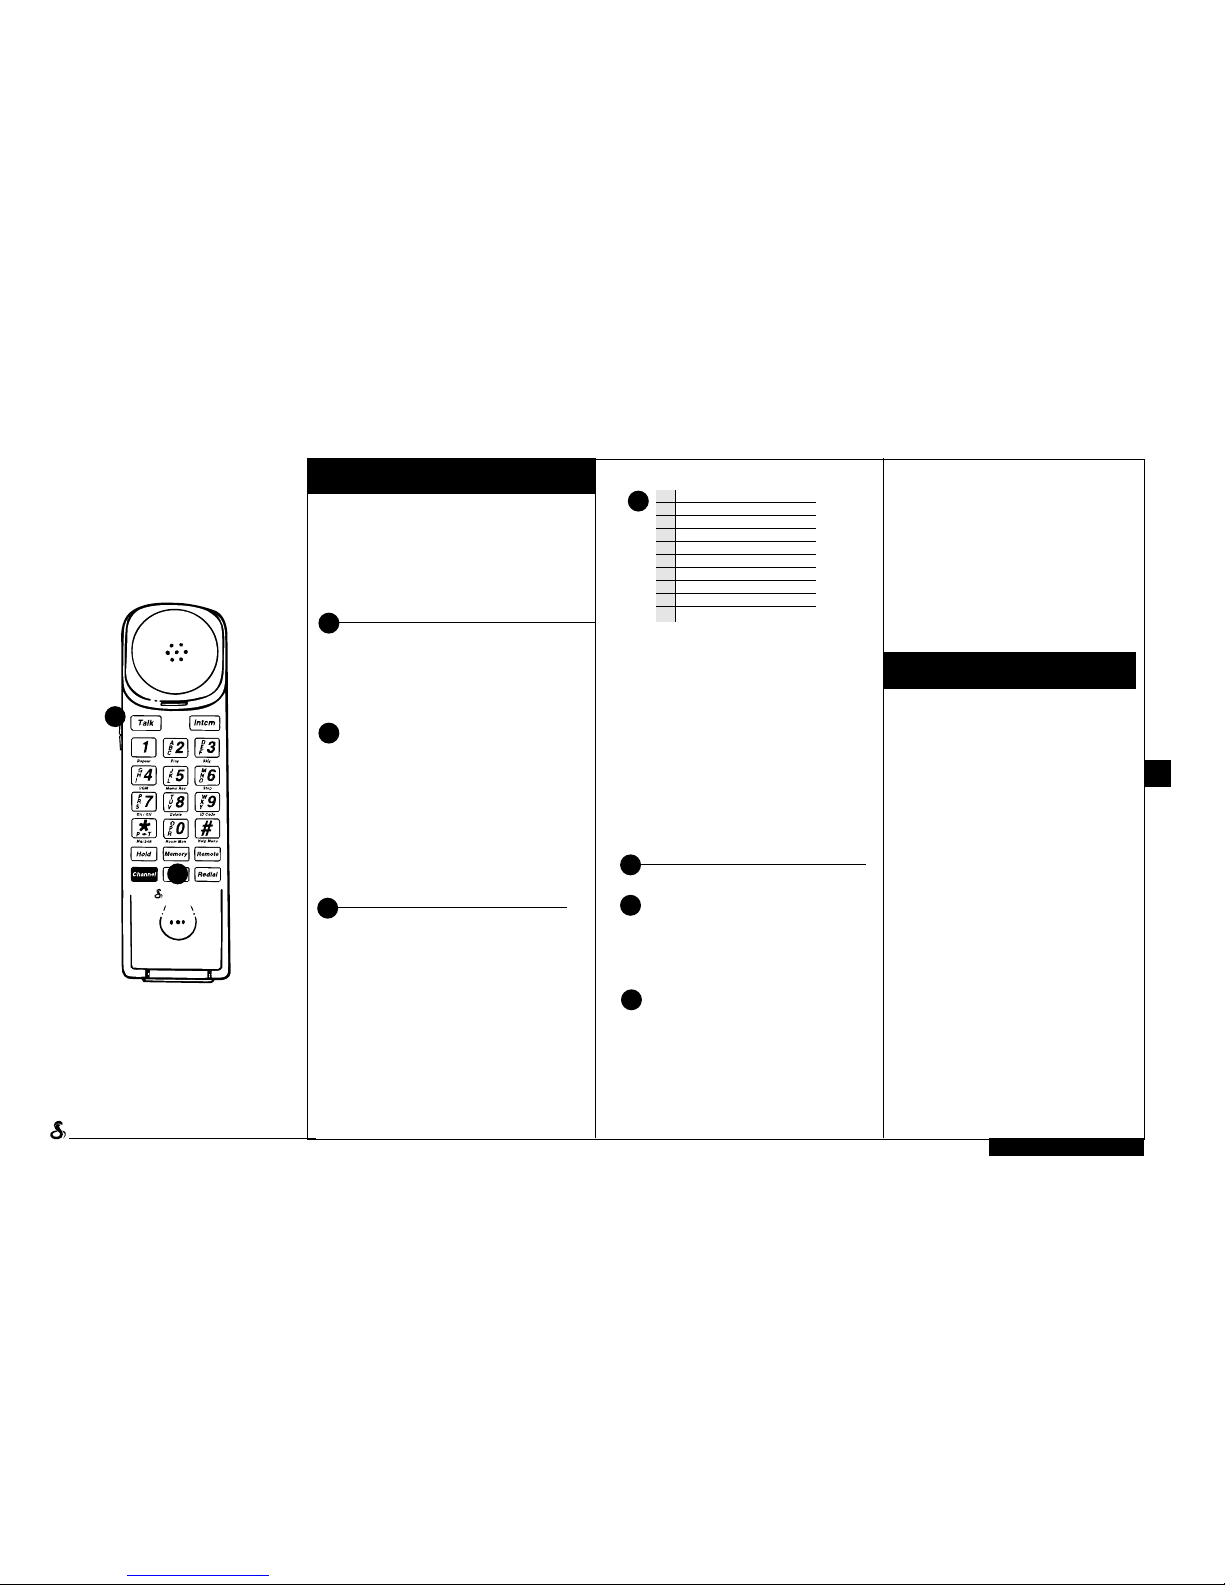
To Store A
Number In Memory
1. With the handset turned of f (TALK
button off), press and release the
MEMORY button.
2. Dial the phone number you wish to
store, including area code if different
from your own, up to 16 digits long.
3. Press and release the MEMORY
button again.
4. Press any keypad button between 1
and 0, which will assign the phone
number to that memory location. You
will hear 2 double beeps, which means
that the number was properly stored. If
you hear nothing, press and release
MEMORY and repeat the steps again.
Follow these same steps for every
number you wish to store, assigning
each to a keypad number, 1 through 0.
Creating A Directory
As you are programming the memory
bank, you will want to keep trac k of
whose number you are assigning to
each location. When finished, you may
indicate who is assigned to each
number by filling in the directory
adhesive label included. This provides a
quick and easy reference. You may
place this directory in any convenient
location on handset or base.
13
1-773-889-3087
NEED HELP?
AN8630
Cobra
®
USING THE MEMORY
DIALING FEATURE
1
2
1
2
3
DIRECTORY
3
TALK
BUTTON
MEMORY
BUTTON
2
MEMORY
BUTTON
1
2
3
4
5
6
7
8
9
10
USING THE BUILT-IN
INTERCOM/PAGING SYSTEM
Call Dad to dinner, monitor the baby while y ou
do laundry or keep an ear out to make sure
that the children aren’t hurt. These options,
along with many others, are at your fingertips
with your Cobra Intenna because it doubles
as a two-way intercom/paging system
between the base and the handset—and
outside calls will still come through! If you
should misplace the handset, simply activate
the pager and follow the signal until you
locate it.
See next page for details.
1
2
TALK
BUTTON
MEMORY
BUTTON
Page 8
To Use The Intercom/Pager
As A Handset Locator
1. To locate a misplaced handset around
the home, press and release the
INTERCOM/PAGE button on the base.
2. T he handset will sound a series of
three beeps for 30 seconds, giving you
time to locate it. Once found, press and
release the INTCM button on the handset
twice to eliminate the signal.
3. If you have not located the handset in
30 seconds, repeat steps above.
If you want to record your conversation,
you must ask the person to whom you
are speaking for their permission. Press
and immediately
release the MEMO/2WAY record button. The LED display will
read 2–. To stop recording, press STOP
button or hang up.
To Use The Intercom
1. If you are at the handset and wish to
speak with someone at the base, press
and release INTCM which will sound
three beeps and light the red indicator
next to the INTERCOM/P AGE button on
the base. The person may then respond
just by speaking into the base.
2. If you are at the base and wish to page
someone at the handset, press and
release INTERCOM/PAGE, which will
sound a series of three beeps and light
the INTCM button on the handset. The
person may then respond by pressing
INTERCOM and speaking into the
handset. The LED display will read In
3. To end the conversation, simply press
the INTCM button on the handset again.
You cannot disconnect the INTCM from
the base.
4. If you receive a call during an intercom
conversation, you will hear a low volume
ringing in the handset. Press TALK, whic h
will disconnect the intercom and connect
you with the incoming call.
5. If you wish to page someone at the
base while you are talking on the phone,
press HOLD then INTCM. TALK button
will flash to remind you you have a call on
hold. Press TALK to disconnect Intercom
and resume your phone call.
6. If someone tries to reach you on the
Intercom while you are talking on the
handset, you will hear three rings. Press
HOLD, then INTCM on the handset. (The
base will beep and Intercom will activate.
LED will flash when there is a call on
hold). Your caller will then be put on hold
while you answer the INTCM. The TALK
button will flash to remind you that you
have a call on hold. Press TALK again to
disconnect the INTCM and reconnect
with your telephone call.
Cobra
®
To Use The Intercom As
A Monitor
Monitor the room in which the base is
located from another location using the
Intercom feature.
1. Press INTCM button on handset. T his
engages the Intercom microphone in
the base, allowing you to listen to the
base location area.
2. Listen through the handset for as long
as you like.
3. Disconnect by pressing INTCM again.
4. If you receive an incoming call while
you are using the monitor, y ou will
hear a ringing in the handset.
5. Press TALK to connect the call. T he
Intercom is automatically
disconnected.
15
1-773-889-3087
NEED HELP?
AN8630
Cobra
®
3
4
USING THE 2-WAY RECORDING
FEATURE
1
2
1
INTCOM
BUTTON
1
INTCOM
BUTTON
1
INTCM
BUTTON
2
INTERCOM/
PAGE
BUTTON
3
TALK
BUTTON
1
2
INTCM
BUTTON
1
INTCM
BUTTON
INTERCOM/
PAGE
BUTTON
3
TALK
BUTTON
3
TALK
BUTTON
4
HOLD
BUTTON
1
INTCM
BUTTON
3
TALK
BUTTON
4
HOLD
BUTTON
REPEAT SKIP
Page 9

2. To erase all messages, simply press
and hold DELETE while the system is
not in use. VOICE HELP will inform you
when all messages have been deleted.
When delete is finished, the display will
read “0”.
To Screen A Call From The
Base
If the phone rings while you are at the base
and the handset is in the cradle, you may
determine if you want to answer the call or
not.
1. Let the system answer and listen to the
caller’s voice over the speaker. If you wish
to take the call, lift the handset.
2. If you do not wish to take the call, do
nothing and the system will record the
message.
To Record A
Memo At The Base
1. Press and hold the MEMO/2 W AY
RECORD button. Display will read – –
2. VOICE HELP will direct you to listen
for a beep, then record your memo.
3. MEMO button will flash to indicate
that there is a message, and memo
message will be added to display.
Use this feature to leave a message for
someone who will be picking up
messages–it’s an “ electronic” note!
To Retrieve A Memo
From The Base
Press and release the PLAY button, just
the same as if you had received a
telephone message.
Your new Cobra Intenna Cordless Phone
Answering System is equipped with an alldigital answering system built right in. That
means there are no cassette tapes to
malfunction, break or replace. It allows a full
20 minutes recording time (most tapes
allow only 15 minutes per side) and permits
each caller 2 full minutes to leave y ou a
message (most messages average only a
minute each).
Getting Ready
1. Make sure digital display is on. If
display is blank, press
ANSWER/ON/OFF button and display
will light
2. Set the NUMBER RINGS selector,
located on the side of the base:
2 position: System answers on the
2nd ring
5 position: System answers on the
5th ring
T/S (toll-saver): System answers on
5th ring if there are no messages
waiting and on the 2nd ring if there
are. T his is useful if you will be calling
in to retrieve messages long
distance or from a pay phone. If the
phone rings 3 times, you know you
have no messages and may hang up
without paying for the call.
NOTE: If you are using the Mailbox feature,
please refer to the specific guidance on
pages 20-21.
To Set Clock And Record Your
Outgoing Message
Please follow instructions in “Getting SetUp” Section, p.9.
To Access Your Incoming
Messages
1. T he number of messages in the
general box will be shown on the LED
display.
2. Press and release the PLAY button to
hear messages from the beginning.
VOICEHELP and the LED display will
indicate number of message being
played.
3. To bypass a message, press and
release SKIP button.
4. To hear a message over, press and
release REPEAT button.
5. To go forward or backward to any
message press SKIP or
REPEATuntil the number of the
message you wish to hear appears in
the LED display window . Release the
button and that message will play.
6. If you wish to hear only part of a
longer message again (to get a name or
phone number, for e xample), locate the
message and “scroll” through by
pressing and holding PLAY. It will skip
ahead by 10 second jumps (identified
by a beep). Resume regular play of
message anytime by releasing PLAY.
7. While listening to messages, you may
pause or stop the system. To do so,
press STOP and the system will pause
for 30 seconds. The LED display will
indicate PA (pause).
A. Resume message play by pressing
and releasing the PLAY button.
B. Play next message by pressing and
releasing the SKIP button.
C. After all messages have played, a
beep will sound and VOICE HELP
will inform you that all messages
have been played and that they are
being saved.
To Erase Your Messages
1. To erase a message as it is playing,
press and release the DELETE button.
Only the message being played will be
deleted and the system will move on to
the next message. The message
number will change at the end of play.
VOICEHELP will inform you that the
message is being deleted, but that you
may still save it by pressing the
REPEAT button. Do nothing, and it
will be deleted.
▼
▼
▼
▼
▼
▼
▼
▼
▼
▼
▼
▼
17
1-773-889-3087
NEED HELP?
AN8630
Cobra
®
USING THE DIGITAL ANSWERING SYSTEM
FROM THE BASE
2
1
4
4
7
5
6
4
8
9
LED
DISPLAY
ANSWER
ON/OFF
1
2
NUMBER
RINGS
SELECTOR
3
3
LED
DISPLAY
PLAY
BUTTON
PLAY
BUTTON
4
PLAY
BUTTON
4
PLAY
BUTTON
7
STOP
BUTTON
5
SKIP
BUTTON
5
SKIP
BUTTON
6
REPEAT
BUTTON
6
REPEAT
BUTTON
1
DELETE
BUTTON
8
DELETE
BUTTON
8
MEMO/
2 WAY
RECORD
BUTTON
9
LED
DISPLAY
1
LED
DISPLAY
1
REPEAT SKIP
Page 10

Cobra
®
You may listen to messages and receive or
screen calls from your handset using the same
commands that you use from a remote location.
The handset indicates the correct keypad
numbers to use for various functions, and, of
course, VOICE HELP guides you through.
To Access Messages From The
Handset
1. Press and release REMOTE button; TALK
button will flash.
2. If you have new messages, they will
automatically play.
3. To pla y back all messages, press and
release 2 then 2 again
4. To skip ahead, press and release 3
5. To repeat current message, press and
release 1
6. To delete current message, press and
release 8
7. To delete all messages, press and release
8 then 2
8. To stop pla yback, press and release 6
9. If you need assistance, press # for VOICE
HELP.
To Screen Calls From The
Handset
1. Press and release REMOTE button on
handset while the phone is ringing, the
Outgoing Message is playing or the caller
is speaking.
2. If you wish to connect, press and release
the TALK button.
3. If you want the system to take a message,
press REMOTE again to disconnect from
Call Screening.
NOTE: During Call Screening, LED display
reads
Retrieve Incoming Messages, record a new
Outgoing Message and even turn the Cobra
Intenna Answering System on or off from any
touch-tone telephone, anywhere in the world.
You’re never more than a phone call away when
you need to be in touch!
Getting Ready
T o access your messages (and keep others
from doing the same) from a remote location,
you will need to establish a Remote Security
Code. Your Answering System comes with a
built-in code of “99”, which you may keep by
doing nothing, or change. To change the
Remote Security Code:
1. Press and release REMOTE button on
the handset.
2 Press 9 on your handset and the
current security code will be
announced.
3. Enter a new 2-digit security code
between 00 and 99. V OICE HELP will
announce your new code.
To Access Your Incoming
Messages From A Remote
Location
1. Call your telephone number from any touchtone telephone.
2. When the system answers, gain access by
entering your Remote Security Code (see
above) at any time. VOICE HELP will tell you
how many new and saved messages y ou
have and automatically begin playing new
messages.
3. To play all messages, press and release 2
then 2 again.
4. To skip ahead, press and release 3.
5. To repeat current message, press and
release 1.
6. To delete current message only, press and
release 8.
7. To stop playback at any time, press and
release 6.
8. When all messages hav e played, a beep will
sound and VOICE HELP will tell you that all
messages have played and ask for another
command. If no command is entered,
remote will announce and disconnect after
10 seconds.
9. To erase all messages, press and release 8
then 2.
NOTE: Don’t forget to carry your handy wallet
card for reference in using the remote. Lost it?
See p. 30.
To Record An Outgoing Message
From A Remote Location
1. Call your telephone number from any
touch-tone telephone.
2. Enter your Remote Security Code.
3. Press 4, listen for VOICE HELP, then begin
recording.
4. When finished recording, press 6 and your
new Outgoing Message will play back for
you.
If you wish to re-record the message, repeat
steps 3 and 4.
To Record A Memo From A
Remote Location
1. If you are in the process of listening to
messages, you must either stop, by
pressing 6, or wait until the last message
has played to record a memo.
2. Press 5 and follow V OICE HELP to record
your memo.
To Turn Your System On From A
Remote Location
1. Call your phone number from a touch-tone
phone; it will ring 10 times and you will
hear your Outgoing Message.
2. Enter your Remote Security Code.
3. Enter 7. You will hear a V OICEHELP
confirmation and may then proceed with
any other remote operation. Y our wallet
card or VOICE HELP will assist you through
any function that you may wish.
19
1-773-889-3087
NEED HELP?
AN8630
Cobra
®
USING THE DIGITAL ANSWERING
SYSTEM FROM THE HANDSET
USING THE DIGITAL ANSWERING
SYSTEM FROM A REMOTE LOCATION
When The Memory Is Full
When the message recording capacity of 20
minutes has been reached, the LED display
indicator will flash FL (full). The sy stem will ring
10 times before answering, the caller will hear
your OGM and the system will disconnect.
Y ou will need to delete messages in order for
it to be able to record again.
When The Memory Is Full
During Remote Playback
When the message recording capacity of 20
minutes has been reached the system will ring
10 times before answering. When it answers,
you will hear your OGM. Enter your Remote
Security Code and you will be able to access
the system. You will need to delete messages
before the system is able to record again.
1
2
CS
REMOTE
BUTTON
1
REMOTE
BUTTON
TALK
BUTTON
1
REMOTE
BUTTON
1
2
Page 11

Your new Cobra Intenna Cordless Telephone
Answering System comes equipped with Voice
Mailboxes (similar to those found in many
businesses) that let callers select and direct
their message to the entire household or just
one of the 4 individual ”Mailboxes”. This f eature
is especially useful in households where
teenagers are present, where one or more
family members receives numerous calls or for
families with home-based businesses. A great
idea for roommates, too! The advantages, of
course, are that callers can leave private
messages for specific individuals and other
members of the household won’t ha ve to
listen to, speed through or accidentally erase
messages that aren’t for them.
To Program Your Cobra
System As A Mailbox
1. Each individual or business is assigned a
Mailbox number, either 1,2, 3 or 4.
2. Change your announcement to one that
will instruct callers on how to access a
specific Mailbox. All messages will be
recorded in the General Mailbox, if not
directed by the caller to another Mailbox.
3. To record your Outgoing Message,
please see directions on page 7. An
example of a general Mailbox Message
might be:
“Thank you for calling the Smith
house. Sorry we can’t take your call
right now, but if you would like to
leave a message for (Home
Business Name) please press
(Star) then 1; T o leave a message
for Susan, press then 2; T o leave
a message for Mr. Smith, press
then 3; T o leave a message for Mr s.
Smith, press then 4. T o leave a
message to the entire family, w ait
for the beep; you will have 2
minutes to speak”.
After the caller presses then a number
(1, 2, 3 or 4) they will be connected to the
Mailbox indicated and will hear the Mailbox
number, then the individual Outgoing
Message if one has been recorded. It is not
necessary to use all 4 available Mailboxes.
However, they are always accessible and
may be used at any time.
To Record Individual Mailbox
Outgoing Messages
1. Press the personal Mailbox button
(1, 2, 3 or 4.)
2. Press “OGM” (Outgoing Message)
button. VOICE HELP will direct you to
record a personal message after the
beep and then play it back for you.
3. Mailbox number will be announced
even if no individual OGM is recorded.
To Access General Mailbox
Messages
General messages may be accessed by
anyone, either from the base or the remote
handset, simply by pressing the PLAY
button on the base or REMOTE button on
the handset, just as you would if the
Mailbox feature were not being used.
To Access Individual Mailbox
Messages From Base
1. Individual messages will not be
reflected in the LED window, but a
flashing red light under each Mailbox
button indicates that there are one or
more messages in that Mailbox.
2. To access your Mailbox messages,
press and release your MAILBOX
button (1,2, 3 or 4) on the base, then
press PLAY. The LED display, along with
VOICEHELP will indicate the number of
messages stored in that Mailbox and
play them. Follow instructions 2-7, p.17
under “To Access Your Incoming
Messages”.
To Record An Outgoing Message
For An Individual Mailbox From
A Remote Location
1. Call your number from any touch-tone
telephone.
2. Enter your Remote Security Code during
the Outgoing Message.
3. Enter the then the number of the
Mailbox (1, 2, 3 or 4) you wish to access.
4. Press 4 to record OGM. Press 6 when
finished. To access another Mailbox, press
then Mailbox number; to re-access general
Mailbox, press 0.
To Access Mailbox Messages
From A Remote Location
1. Call your number from any touch-tone
phone.
2. Enter your Remote Security Code during
the Outgoing Message.
3. Enter then the number of the Mailbox
(1,2, 3 or 4) you wish to access. Follow
instruction 3–9, p.17 under “Listening To Your
Messages From A Remote Location.”
4. To access the general Mailbox, do nothing.
T o re-access it from a personal Mailbox press
then 0.
To Record An Outgoing
Message For An Individual
Mailbox From Handset
1. Press REMOTE button.
2. Enter then the number of the
Mailbox (1, 2, 3 or 4) you wish to access.
3. Press 4 to record OGM. Press 6 when
finished. To access another Mailbox,
press then Mailbox number; to reaccess general Mailbox, press 0.
To Access Mailbox Messages
From Handset
1. Press REMOTE button.
2. Enter then the number of the
Mailbox (1, 2,3 or 4) you wish to access.
Follow instructions 3–9, p. 19 under “To
Access Y our Messages From A Remote
Location”.
3. To access the general Mailbox, do
nothing. To re-access it from a personal
Mailbox, Press then 0.
21
1-773-889-3087
NEED HELP?
AN8630
Cobra
®
USING THE MAILBOX FEATURE
2
✱
✱
✱
✱
✱
✱
✱
✱
✱
✱
✱
✱
✱
Cobra
®
MAILBOX
BUTTONS
1
MAILBOX
BUTTONS
1
REMOTE
BUTTON
3
REMOTE
BUTTON
3
MAILBOX
BUTTONS
OGM
(Outgoing
Message)
BUTTON
1
1
2
3
REPEAT SKIP
Page 12

• ILLUMINATED KEYPAD
When the phone rings, you lift the handset or
touch any but ton, the keypad automatically lights
up, making it easy to read and use, even in the
darkest room or late at night.
• ELECTRONIC HOLD
Save time and steps in houses with more than
one telephone. After you’ ve put a call on hold
your Intenna automatically releases when you,
or someone else, picks up another handset on
the same line. No need to come back and turn it
off, because it turns itself off automatically.
Combine this with the Intercom feature for
added convenience. (See p. 14).
• LAST NUMBER REDIAL
When the number you’ve dialed is busy, just get
a dial tone and press and release the Redial
button and your Cobra Intenna will automatically
redial that number.
• VOICE HELP
Not sure what to do next?The digital VOICE
HELP feature guides you through every process
to help you get the most use out of your Cobra
Intenna. For help from a remote location, press #
and VOICE HELP will list your menu options for
you. From Cordless Handset, press REMOTE
button, then
#
for VOICE HELP menu.
• LED DISPLAY WINDOW
Large, easy-to-read digits display the number of
messages stored, alert you to a power failure or
malfunction and helps guide you through various
procedures.
• FLASH BUTTON
Press and release the FLASH button to briefly
interrupt the phone line and access some of the
advanced options like “Call Waiting” or “T hree
Way Calling” that may be offered by your
telephone company at an extra charge.
• HANDSET VOLUME CONTROL
Y ou can change the volume of your caller’ s voice
from low to high and vice versa by pressing the
volume control Up/Dn button located on the
side of your handset.
Aside from the features that have already
been outlined, your Cobra Intenna Cordless
T elephone Answering System is easier to
program and use than ever before because
many of the features you want most are built
right in—You don’t have to do a thing!
• BUILT-IN ANTENNA
There’s no unsightly antenna to extend,
nothing to get bent or broken or possibly
even cause physical harm, because
antennas are built into the handset and base.
That, along with our Clear Call® PLUS
Compander Noise Reduction system which
minimizes background noise and
interference for optimum audio performance,
makes the Intenna quality comparable to a
standard corded phone.
• SCRAMBLED SIGNALS
Although you may not realize it, other people
with cordless phones, baby monitors or
scanners may be listening in on your
conversations. This is especially disturbing
when discussing personal information such
as credit card numbers, vacation plans, etc.
over the phone. Cobra’s Private Call™ Voice
Scrambling system eliminates that worry
forever!
• 10-CHANNEL RECEPTION
Y our Cobra Intenna automatically scans
through 10 channels every time you pick up
the handset, to offer you the clearest, noisefree connection available. Should
interference occur during a conversation,
simply press and release the CHANNEL
button on the handset until you reach a clear
channel.
• DIGITAL SECURITY
Y our Cobra Intenna is manufactured with
65,000 randomly generated security codes.
• HEARING AID
COMPA TIBLE (HAC)
Y our Cobra Intenna handset is specially
designed to be compatible with standard
hearing aid systems.
• OUT-OF-RANGE SIGNAL
When you press the TALK button and
immediately hear three beeps, you know
your handset is too far away from the base
to work properly. Move closer to the base
and try your call again.
• ANNOUNCE ONLY
OUTGOING MESSAGE
Simply slide the ICM Recording switch
located on the side of the base to the
ANNC ONLY position and your Cobra quits
taking incoming messages and just plays
your outgoing message. (You will want to
change your outgoing message to reflect
that). Upon switching, the VOICE HELP
prompts you to record an outgoing
message if none is recorded. The LED
display will read (Announce Only), to
let you know no incoming messages can be
received.To receive incoming messages
again, slide the ICM Recording switch back
to “2 Min ”.
• BASE ELECTRONIC
VOLUME CONTROL
Gradually move from low to high volume
and vice-versa by pressing either end of the
VOL button on the base.
• PULSE/TONE SWITCH
Y our Cobra Intenna may be set to either
PULSE or TONE, (depending upon your
phone system) by flipping the switch
located on the back of the base. Mixed
PULSE and TONE dialing may be used
(when needed to access certain longdistance or computerized banking services)
by setting the base switch to PULSE and
pressing the button on the handset to
temporarily switch to TONE. Hanging up
resets to PULSE.
• RINGER SWITCH
Y ou’re taking a nap, watching your favorite
TV show or just got the baby to sleep and
don’t want to be dist urbed. Temporarily turn
off the ringer by moving the switch on the
back of the base into the off position. The
answering system remains on, taking
messages for later.
• 2-DIGIT DISPLAY CODES
Easy-to-understand LED codes tell you
instantly if there are messages waiting or a
system problem.
FLASHING CL
Day/time not set
FLASHING An
Outgoing Announcement not recorded
In
Intercom in use
dL
Message being deleted
CS
Call Screening
2–
2-Way Recording
– –
Memo Recording
FLASHING FL
Digital message center full. No more
messages can be recorded
AO
Announce only: no incoming messages
will be recorded
NUMBER DISPLAY
Messages in General Mailbox
PA
Message play paused by pressing
STOP Button. Resume by pressing
PLAY.
23
1-773-889-3087
NEED HELP?
AN8630
Cobra
®
ADDITIONAL FEATURES OF YOUR NEW
COBRA INTENNA CORDLESS
TELEPHONE ANSWERING SYSTEM
AO
✱
Page 13

To Dispose Of Your Battery
The rechargeable nickel-cadmium (NiCad)
battery in this product must be recycled or
disposed of properly in compliance with all
applicable laws. Certain states or
municipalities require recycling and have
established collection programs. Please
contact your local waste removal authority
for instruction or return to Cobra for
recycling. W rap carefully and mail postage
prepaid to:
COBRA ELECTRONICS
CORPORATION
6500 W. Cortland Street
Chicago, Il. 60707
Attn: Battery Recycling
Do not put batteries into fire or
expose to high heat. They may
explode.
“Contains Nickel-Cadmium
rechargeable batteries. Must be
recycled or disposed of properly”.
Your Cobra Intenna Cordless Telephone
Answering System comes complete with a
rechargeable nick el-cadmium battery
already in the handset. You will need to
charge the battery by plugging in the base,
placing the handset in the base and letting it
charge overnight (at least 12 hours).
Battery Recharging
There are three things that can happen to
indicate that your handset battery needs
recharging. When one of these three things
occurs, you will need to return the handset
to the base and recharge for at least 12
continuous hours.
1. T he TALK Button on the handset
flashes.
2. A 2-beep warning sounds while you
are using the phone. This indicates that
you have just a fe w minutes of power
left to complete your conversation
before the phone disconnects.
3. T he handset beeps at 30 second
intervals for five minutes when it has
been away from the base too long.
After five minutes, it will not flash or
beep, nor will you be able to get a dial
tone. Return the handset to the base
for recharging.
NOTE: To prevent your batteries from
running out of power, Cobra suggests that
you leave the handset in the base as muc h
as possible when not in use. The CHARGE
indicator will remain on as long as the
handset is in the base, even after the
batteries are fully recharged. This will not
damage the batteries.
Replacing The Battery
Your phone uses a Ni-Cad battery which can
lose its ability to take a charge after several
hundred hours of use. If you notice a
shorter talk time after charging, your battery
may need replacing.
If you have recharged the battery for 12
hours or more and the handset does not
work when the TALK button is pressed, you
may need to replace the battery. To order a
new battery, call Cobra toll-free at 1-773889-3087, or remove it from the handset
and take it to a local hardware store or
home center store to be certain that you
are getting the proper replacement battery.
To Remove/Replace
The Handset Battery
1. To remove the battery door, press and
slide downward.
2. Carefully disconnect the battery pack
and dispose of it properly. See
BATTERY DISPOSAL below.
3. To replace, connect the new battery
and replace the door. Ret urn the
handset to the base and charge the
battery overnight (at least 12 hours).
To Clean The
Charging Contacts
The two metal charging contacts on both
the handset and the base should be
cleaned regularly with a soft, dry cloth for
optimum recharging performance.
25
1-773-889-3087
NEED HELP?
AN8630
Cobra
®
RECHARGEABLE BATTERY INFORMATION
BATTERY
DOOR ON
HANDSET
1
1
Ni-Cd
Page 14

The phone is dead; there are
no indicator lights on.
Are the power cord and telephone cord
properly connected? If so, battery
power has run out. Return handset to
base and charge for 1 2 or more hours.
The handset beeps during
conversation or away from
the base.
The battery needs to recharge or be
replaced. Return it to the base for
overnight charging.
Poor sound quality; too
much interference.
Don’t cov er the top section of the
handset with your hand or rest it on
your shoulder. This blocks the internal
Intenna. Try switching to a different
channel as well.
The handset disconnects,
loses performance and/or
beeps when in use away
from the base.
You may be out of range or the battery
needs recharging. Move closer to the
base and/or recharge the battery
overnight.
Handset doesn’t work after
power outage or after
disconnecting and
reconnecting the system.
Return the handset to the base for
about 30 seconds to automatically reset
the security codes.
Power doesn’t seem
to be on.
• Make sure power adapter is properly
connected to a working outlet and
the jack on the back of the answering
system.
• Press the ON/OFF button to make
sure the display window is working.
Answering system does
not answer calls.
• Make sure telephone cord is
connected to a working telephone
line and that 0 or a number appears
in display window .
• Press the ON/OFF button to make
sure the display window is working.
• Disconnect AC adapter and battery
back-up for a few seconds then
reconnect. If display is flashing AN,
record an OGM.
• If display is flashing FL, memory
capacity has been reached and
messages must be erased.
System will not play
messages.
Make sure display shows a number of
messages. If there are no messages
recorded, display reads “0.” Press PLA Y
and VOICE HELP will confirm.
System will not play
messages from a remote
location.
• Power has f ailed in base and no 9V
battery back-up is installed.
• Y ou are not using a touch-tone
phone.
• Be sure you are pressing commands
correctly, as directed by VOICE HELP.
Remote System rings 10
times before answering.
• Memory is full; you need to delete
messages.
• Power has failed and no 9V battery
back-up is installed in base; rerecord OGM.
• Press
# for Help Menu
System will not record my
out-going announcement.
Memory is full; you need to delete
messages.
CL is flashing.
Day/time needs to be set. VOICE HELP
will announce “No Time Set” after
incoming message is played.
Personal Remote Security
Code fails to access system.
Power f ailure at system location has
automatically reset code at 99. Enter 99
and proceed with functions. Press 9 to
program new code.
My recorded announcement
sounds weak or distant.
Re-record, being sure to speak no
further than 6 inches from the mic,
located in small slot on front of base.
27
1-773-889-3087
NEED HELP?
AN8630
Cobra
®
CORDLESS TELEPHONE: ANSWERING SYSTEM:
If the problem persists,
don’t hesitate to call :
1-773-
889-3087
24 hours a day,
7 days of the week.
We’re here to help.
COBRA INTENNA
CORDLESS
TELEPHONE
ANSWERING
SYSTEM
TROUBLESHOOTING
CHECKLIST
If your system does not
operate properly, please take
a moment to run through this
checklist and refer to the
appropriate sections of this
guide.
✔
✔
✔
✔
✔
✔
✔
✔
✔
✔
✔
✔
✔
✔
Page 15

29
AN8630
Cobra
®
COBRA ELECTRONICS CORPORATION warrants that its COBRA cordless telephone products, and
the component parts thereof, will be free of defects in workmanship and materials for period of one
(1) year from the date of first consumer purchase. This warranty may be enforced by the first
consumer purchaser, provided that the product is utilized within the U.S.A.
Cobra will, without charge, repair or replace, at its option, defective cordless telephone products or
component parts upon delivery to the Cobra Factory Service Department, accompanied by proof of
the date of first consumer purchase, such as a duplicated copy of a sales receipt.
You must pay any initial shipping charges required to ship the product for warranty service. The return
charges will be at Cobra’s expense if the product is repaired or replaced under warranty. For further details
concerning procedures for obtaining service, see the “If You Need Service” section of this Owner’s Manual.
Exclusions: This limited warranty does not apply 1) to any product damaged by accident, improper
line voltage or weather related circumstances; 2) in the event of misuse or abuse of the product or
as a result of unauthorized alterations or repairs; 3) to non-defective original equipment Nickel
Cadmium rechargeable batteries; 4) if the serial number has been altered, defaced or removed; or 5)
if the owner of the product resides outside the U.S.A.
All implied warranties, including warranties of merchantability and fitness for a particular purpose, are
limited in duration to the length of this warranty. Cobra shall not be liable for any incidental,
consequential or other damages, including, without limitation, damages resulting from loss of use or
cost of installation.
Some states do not allow limitations on how long an implied warranty lasts and/or do not allow the exclusion
or limitation of incidental or consequential damages, so the above limitations may not apply to you.
This limited warranty gives you specific legal rights, and you may also have other rights which vary
from state to state.
Cobra Electronics Corp. 6500 W. Cortland Street Chicago, Il. 60707
1-773-889-3087
NEED HELP?
LIMITED ONE-YEAR WARRANTY
Please note: This cordless telephone system operates in accordance with part 15 and part 68 of
FCC rules. Operation is subject to two conditions: 1) It may not interfere with radio
communications, and 2) It must accept any interference received, including that which may
cause undesirable operation. See the Operational Features section of this booklet for w a ys to
reduce interference.
Your telephone company is required by the Federal Communications Commission to allow you
to connect FCC registered telephones to their lines.
The FCC requires you to provide information, if requested by the local telephone company,
about the connection of an FCC registered telephone to their lines. They may ask you for the
FCC registration number and the ringer equivalence number (REN), both of which are on the
bottom of the base. They may also ask for the Universal Service Order Code (USOC) number,
which is RJ-11C.
REGISTERED WITH THE FCC
It is illegal to use this phone on a party line or to connect it to a coin-operated telephone.
Warning: Changes or modifications to this unit not expressly approved by the party responsible for
compliance could void the user’s authority to operate the equipment.NOTE: T his equipment has
been tested and found to comply with the limits for a Class B digital device, pursuant to Part 15 of
the FCC Rules. These limits are designed to provide reasonable protection against harmful
interference in a residential installation. This equipment generates,
uses and can radiate radio frequency energy and, if not installed and used in accordance with the
instructions, may cause harmful interference to radio communications.
However, there is no guarantee that interference with not occur in a particular installation. If this
equipment does cause harmful interference to radio or television reception, which can be
determined by turning the equipment off and on, the user is encouraged to try to correct the
interference by one or more of the following measures:
• Reorient or relocate the receiving antenna.
• Increase the separation between the equipment and receiver.
• Connect the eqipment into an outlet on a circuit different from that to whic h the receiver
is needed.
• Consult the dealer or an expereinced radio/TV technician for help.
REGISTERED WITH THE FCC continued
Continued on the next page
nd returned.
of-purchase, such as a mec hanical reproduction
or carbon or a sales receipt. If you send the
original receipt it cannot be returned.
. Send the entire product. Must include
telephone handset, base and all cords.
. Enclose a description of what is happening
with the unit. Include a typed or clearly
printed name and address of where the unit
is to be returned.
. Pack unit securely to prevent damage in transit.
If possible, use the original packing material.
. Ship prepaid and insured by way of a
traceable carrier (to avoid loss in transit), such
as United Parcel Service (UPS), Roadway
Parcel Service (RPS) or First Class Insured
Mail to: Cobra Factory Service, Cobra
Electronics Corporation, 6500 W. Cortland St.,
Chicago, IL 60635. Cobra is not responsible
for units not received if package has not been
properly insured.
6. If the unit is in warranty upon receipt of your
unit it will either be repaired or exchanged
depending on the model. Please allow
approximately 3 to 4 weeks before contacting
us for status. If the unit is out of warranty a
letter will automatically be sent informing you
of the repair charge or replacement charge. If
you have any questions, please call 1 -773-8893087 for assistance.
IF YOU THINK YOU NEED SERVICE,
CALL 1-773-889-3087
For technical assistance, please call our Automated Help Desk which can assist you
by answering the most frequently asked questions about Cobra products.
(773) 889-3087
24 hours a day, 7 days a week.
A Consumer Service Representative can be reached through
this same number 8:00 am - 8:00 pm, Monday through Friday, CST.
Technical assistance is also available on-line in the Frequently Asked Question
(FAQ) section at www.cobraelec.com or by e-mail to productinfo@cobraelec.com
Page 16
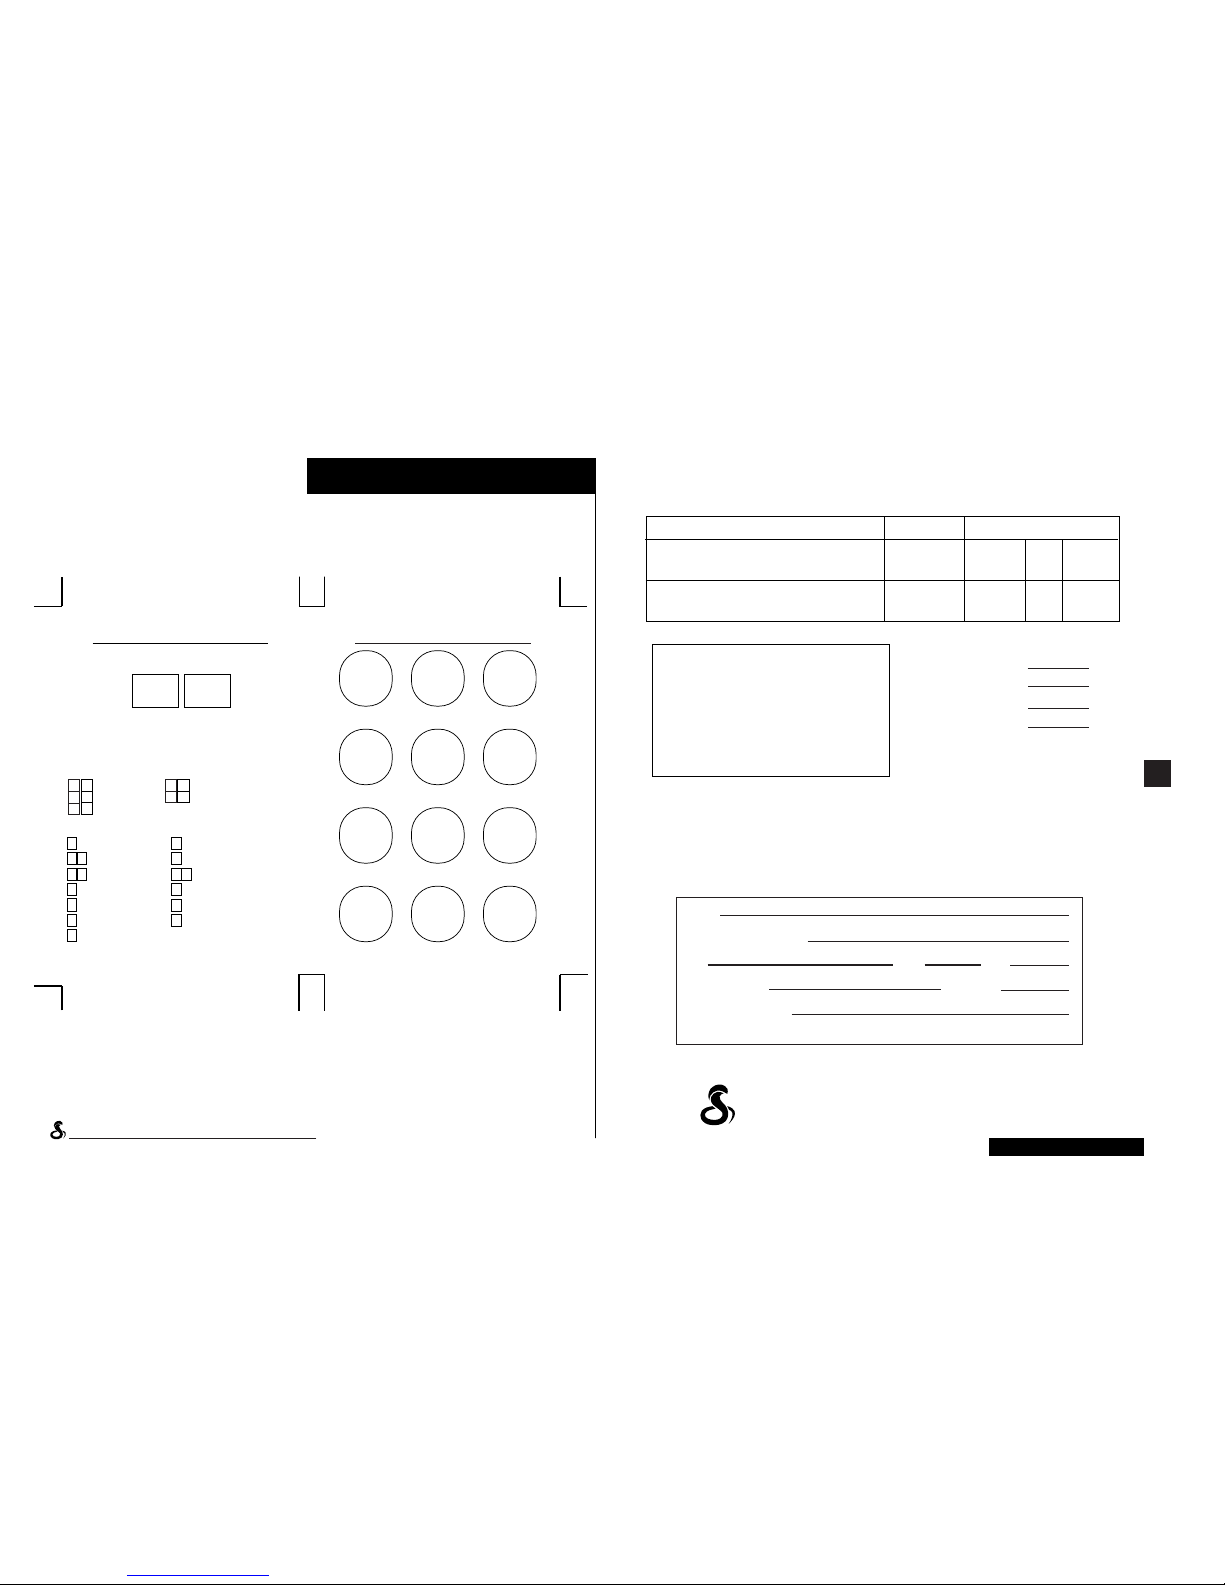
COBRA DIGITAL ANSWERING SYSTEM
REMOTE OPERA
TION (AN-8630)
• Call your phone number from a touch tone phone.
• Enter your security code during greeting.
(PRINT CODE IN BOX)
• Enter Mailbox code for individual mailbox. No mailbox
code is necessary for general mailbox unless you wish to
re-access it from indiviudal mailbox.
Mailbox Codes:
*
1 for Mailbox 1*4 for Mailbox 4
*
2 for Mailbox 2*0 for General Mailbox
*
3 for Mailbox 3
Function Codes:
1 Repeat 7 System On / Off
2 1 Resume Play 8 Single Message Delete
2 2 Play All Messages 8 2 All Messages Delete
3 Skip 9 ID Code Change
4 OGM Recording 0 Room Monitor
5 Memo Recording # Help Menu
6 (Multi Function)
a) Pause Play or b) Stop Memo / OGM Record or
c) Leave Current Function
✱✱✱
✱✱
COBRA DIGITAL ANSWERING SYSTEM
REMOTE OPERA
TION (AN-8630)
REPEAT PLAY SKIP
OGM MEMO STOP
ON/OFF DELETE CODE
MAILBOX ROOM HELP
MONITOR
31
1-773-889-3087
NEED HELP?
AN8630
Cobra
®
WALLET REMINDER CARD
Cobra Cordless Phone Answering System Accessories
Description Part No. Cost Ea. X Qty. = Amount
NICKEL-CADMIUM BATTERY PACK ASSEMBLY
For use with model AN-8630 213-013-9-001 $15.00
AC POWER ADAPTER
For use with model AN-8630 768-023-N-001 $15.00
COBRA ELECTRONICS CORPORATION
6500 W. Cortland Street, Chicago, Il. 60707
Don’t forget to carry your handy wallet card. Lost it?
Just copy this section, cut out and save.
1 2 3
4 5 6
7 8 9
*
0 #
▼
▼
▼
▼
▼
Allow 4 to 6 weeks for delivery. Offer valid in Continental U.S. only.
(Prices subject to change without notice.)
★★
Illinois residents add 7%
★★
Cook Co. residents add .75% (7.75% total)
★★
Chicago residents add 1% (8.75% total)
★★
Indiana residents add 5%
★★
Michigan residents add 4 %
★★
Minnesota residents add 6%
★★
Ohio residents add 6%
★★
Wisconsin residents add 5%
Amount
(Tax if applicable)
Shipping//handling
$3.75
Total
Make check or money order (no stamps) payable to:
Cobra Accessories Dept.
6500 W. Cortland St., Chicago, IL 60707
Call 1-773-889-3087 or FAX 1-773-622-2269 (for credit card orders)
Please print clearly:
Name
Address (Not P.O. Box)
City State Zip
Credit Card No. Exp. Date
Customer Signature
Circle One: Visa MasterCard Discover
 Loading...