

Page 1
MANUALE UTENTE GLOBE 3900
GLOBE 3900 USER INSTRUCTION
DELTA ELETTRONICA s.p.a.
via Astico 41 - 21100 VARESE - ITALY
www.cobra.it
06DE1587A 04/01
La ditta costruttrice declina ogni responsabilità per guasti e anomalie dell’antifurto e/o dell’impianto elettrico della Vostra autovettura dovuti ad una
non corretta installazione e/o al mancato rispetto delle caratteristiche tecniche indicate.
L’antifurto ha esclusivamente funzione dissuasiva contro eventuali furti.
The manufacturer shall not be liable for any faults or malfunctions in the
anti-theft device and / or in the electrical system of the vehicle due to
incorrect installation and / or failure to comply with the indicated technical
specifications. The system must only considered as a deterrent against
theft attempts.
06DE1587A-I_GB-3900-ST-U-seg.p65 24/04/01, 17.581
Page 2
Gentile cliente,
Nel ringraziarla per la scelta fatta la informiamo che questo prodotto è un sistema di antifurto tecnologicamente avanzato,
rispondente agli standards di prestazioni definiti dalle case automobilistiche e conforme alle direttive comunitarie.
A Lei, gentile utente, dopo l’installazione del sistema sono stati consegnati i radiocomandi ed il manuale utente che contiene anche
la dichiarazione di conformità del prodotto ed il relativo certificato di installazione.
Il manuale è suddiviso in 9 parti:
Legga il manuale con attenzione: trarrà la massima soddisfazione dal prodotto acquistato.
Le consigliamo inoltre di conservare questo manuale insieme ai documenti dell’auto per una più facile consultazione in caso di
necessità.
Qualora si manifesti un problema non risolvibile con i suggerimenti del capitolo 9 (pag. 13/14). si rivolga direttamente al
suo installatore di fiducia.
Pagina 3 __________ INTRODUZIONE
4 __________ COMPLEMENTI DI PROTEZIONE
5 __________ ISTRUZIONI IN BREVE
7 __________ FUNZIONI BASE
8 __________ FUNZIONI AVANZATE
10 __________ MEMORIA DI ALLARME
11 __________ EMERGENZA
12 __________ PERSONALIZZAZIONE DEL PIN CODE
13 __________ MANUTENZIONE E RICERCA GUASTI
31
Notes
06DE1587A-I_GB-3900-ST-U-seg.p65 24/04/01, 17.582
Page 3
3
1 - INTRODUZIONE
Questo sistema di allarme anti-intrusione è controllato da un radiocomando con codice ad alta sicurezza. Questa tecnologia offre un elevatissimo
grado di protezione contro ogni tentativo di riproduzione del codice.
1.1 - Codice personale PIN
Ogni sistema della serie 3000 ha un PIN code che deve essere utilizzato per il disinserimento di emergenza. Il PIN –CODE programmato in
fabbrica è 1111. Le consigliamo di cambiare questo numero personalizzandolo con un altro già utilizzato per altri usi (es. utilizzare lo stesso numero
PIN memorizzato nel telefono cellulare, carta di credito, ecc…). Sarà più facile ricordarlo in caso di necessità.
GLOBE 3900 1 - INTRODUZIONE
MOD.
PROTEZIONE ANTIAVVIAMENTO
PROTEZIONE VOLUMETRICA
PROTEZIONE PERIMETRICA
PROTEZIONE TAGLIO CAVI
•
•
•
•
•
•
•
•
•
AB3998
AB3993
AB3991
30
GLOBE 3900
Delta Elettronica S.p.A.
via Astico, 41
I 21100 VARESE
ITALY
___________________________________________________
Declaration of Conformity
The manufacturer hereby declares, at its sole responsibility, that the:
TRANSMITTERS
Models 7726, 7727, 7777, 7779
Conform to the essential requirements of the Radio and Telecommunication Terminal Equipment Directive
1999/5/EC in accordance to the following relevant standards and Directives:
Radio: EN 300220-3 V1.1.1 : 2000-01
EMC: EN 300386 V1.2.1 : 2000-03
Safety: EN 60950 : 1996-10
Supplementary information
Frequency band: 433,05 ÷ 434,79 MHz
Countries of intended use: Belgium, Denmark, Germany, Greece, Spain, France, Ireland, Italy, Luxemburg,
Netherlands, Austria, Portugal, Finland, Sweden, United Kingdom, Switzerland, Norway, Iceland,
Hungary, Czech Republic, Slovak Republic, Estonia
22 December 2000
Graziano Mangiarotti
Homologation Engineer
Tel. +39-0332-825111
Notified Body: EMCCert Dr. Rasek
Boelwiese 5
91320 Ebermannstadt
Germany
Delta Elettronica S.p.A.
via Astico, 41
I 21100 VARESE
ITALY
___________________________________________________
Declaration of Conformity
The manufacturer hereby declares, at its sole responsibility, that the:
RECEIVERS
Models 5601, 5610
Conform to the essential requirements of the Radio and Telecommunication Terminal Equipment Directive
1999/5/EC in accordance to the following relevant standards and Directives:
Radio: EN 300220-3 V1.1.1 : 2000-01
EMC: European Directive 95/54/EC : 1995-11
Safety: European Directive 95/56/EC : 1995-11
22 December 2000
Graziano Mangiarotti
Homologation Engineer
Tel. +39-0332-825111
06DE1587A-I_GB-3900-ST-U-seg.p65 24/04/01, 17.583
Page 4
4
2 - COMPLEMENTI DI PROTEZIONE
L’antifurto da Lei acquistato può essere completato, per aumentare il livello di protezione offerto alla sua vettura, dai seguenti moduli:
5452: Modulo antisollevamento
Ad antifurto inserito, attraverso un sensore speciale, l’antisollevamento protegge il veicolo dai tentativi di traino e sollevamento e di conseguenza dai
furti di accessori di valore come ad esempio i cerchi in lega.
5462: Modulo iperfrequenza
Ad antifurto inserito, tramite l’emissione di onde elettromagnetiche, il modulo, posizionato e nascosto all’interno dell’auto, assicura la protezione
volumetrica dell’abitacolo.
2980: Modulo alzavetri
All’inserimento dell’antifurto i vetri elettrici della Vostra vettura si chiuderanno automaticamente. È adatto a qualsiasi tipo di auto con vetri elettrici.
2 - COMPLEMENTI DI PROTEZIONE GLOBE 3900
CERTIFICATO DI INSTALLAZIONE
INSTALLATION CERTIFICATE
Il sottoscritto, installatore, certifica di aver eseguito personalmente l'installazione del dispositi-
vo di allarme del veicolo descritto qui di seguito, conformemente alle istruzioni del fabbricante.
I undersigned, professional installer, certify that the installation of the vehicle alarm system described
below has been carried out by myself pursuant to the mounting instruction supplied by the
manufacturer on the system.
INFORMAZIONI CLIENTE / PROPRIETARIO VEICOLO
CUSTOMER DETAILS / VEHICLE OWNER
NOME /
NAME
COGNOME /
SURNAME
INDIRIZZO
/ADDRESS
TEL. NO.
CODICE POSTALE /
POST CODE
INFORMAZIONI VEICOLO
VEHICLE DETAILS
MARCA /
MAKE
MODELLO /
MODEL
CHASSIS NO.
TARGA /
REG. NO.
CONTROLLI ANNUALI DEL SISTEMA
ANNUAL SYSTEM HEALTH CHECK
DATA
DATE
INSTALLAT ORE
FITTING CENTER
DATA
DATE
INSTALLATORE
FITTING CENTER
DATA
DATE
INSTALLATORE
FITTING CENTER
A/c NO.
A/c NO.
A/c NO.
DESCRIZIONE PRODOTTO
PRODUCT DESCRIPTION
MARCA /
MAKE
NUMERO DI OMOLOGAZIONE /
APPROVAL NUMBER
TIPO /
TYPE
FIRMA /
SIGNATURE
DATA
DATE
INDIRIZZO
/ ADDRESS
INSTALLATORE /
FITTING CENTER
CODICE POSTALE /
POST CODE
TEL. NO.
DATA D'INSTALLAZIONE
INSTALLATION DATE
INFORMAZIONI INSTALLAZIONE
INSTALLA TION DETAILS
A/c NO.
06DE1587A-I_GB-3900-ST-U-seg.p65 24/04/01, 17.584
Page 5

5
3 - ISTRUZIONI IN BREVE
3.1 - Inserimento
• Premendo il pulsante ‘A’ del radiocomando
si bloccano le porte (se il veicolo è dotato
di chiusura centralizzata).
• Gli indicatori di direzione lampeggiano
due volte.
• Il buzzer emette due segnali acustici
(se abilitato).
• Le protezioni diventeranno attive trascorsi
40 s.
• Il LED si accende a luce fissa per 40 s, poi
lampeggia.
GLOBE 3900 3 - ISTRUZIONI IN BREVE
3.2 - Protezione
Con il sistema inserito l’apertura del cofano, del bagagliaio o di una
delle porte genera un ciclo di allarme acustico e visivo di 30 s circa.
Per i prodotti che prevedono il sensore volumetrico verrà originato
l’allarme a seguito di intrusione nell’abitacolo.
A fine ciclo il sistema resta inserito.
3.3 - Interruzione di un allarme in corso
Quando il sistema é in allarme é possibile disattivare la sirena ed il
lampeggio degli indicatori di direzione premendo una volta il pulsante
‘A’ del radiocomando.
Questa operazione interrompe il ciclo di allarme, ma il sistema rimane
nello stato di inserito. Per disinserire completamente il sistema occorre
premere una seconda volta il pulsante ‘A’ del radiocomando.
3.4 - Disinserimento
• Premendo il pulsante ‘A’ del radiocomando si sbloccano le porte.
• Gli indicatori di direzione lampeggiano una volta.
• Il buzzer emette un segnale acustico (se abilitato).
• Le protezioni si disattivano immediatamente.
• Il LED si spegne.
3.5 - Memoria di allarme
Se durante la Vostra assenza si sono verificati allarmi gli indicatori di
direzione ed il buzzer emetteranno quattro segnali anziché uno. Vedi
anche il capitolo 6 a pag.10.
ISTRUZIONI IN BREVEISTRUZIONI IN BREVE
ISTRUZIONI IN BREVEISTRUZIONI IN BREVE
ISTRUZIONI IN BREVE
mod. 7777
B
A
A
B
mod. 7779
FUNZIONI RADIOCOMANDO
PULSANTE
A
PULSANTE
B
Inserimento
Disinserimento
Interruzione allarme
Allarme panico (ON - OFF)
Disattivazione sensore volumetrico
ultrasuoni e sensore aggiuntivo (se
installato)
•
•
•
•
•
28
This product is guaranteed for 12 months from date of purchase
validated by receipt or invoice.The warranty will be null and void
if the product displays signs of tampering, incorrect installation,
damage caused by falling or transport, negligence and anything
else not imputable to manufacturing defects. If the system operates
incorrectly, manufacturer shall not be liable for injury of any kind,
direct or indirect, to persons or damage to things.Refer any
matters relating to this warranty to your authorized retailer together
with adequate documentation showing date of purchase.
WARRANTY CONDITIONS
Il prodotto é coperto da garanzia di 12 mesi a partire dalla data
di acquisto certificata dallo scontrino di cassa o da un fattura.
La garanzia non si applica se il prodotto risulta danneggiato da
installazione non corretta, danni dovuti a caduta o trasporto, a
negligenza e comunque a cause non imputabili a difetti di
fabbricazione. In caso di errata installazione del sistema, il
costruttore non darà alcun indennizzo per danni - di qualunque
natura e diretti od indiretti - verso persone o cose.
Per beneficiare della garanzia, bisogna rivolgersi al venditore
autorizzato con la prova di acquisto che riporti la relativa data.
CONDIZIONI DI GARANZIA
GLOBE 3900
06DE1587A-I_GB-3900-ST-U-seg.p65 24/04/01, 17.585
Page 6

6
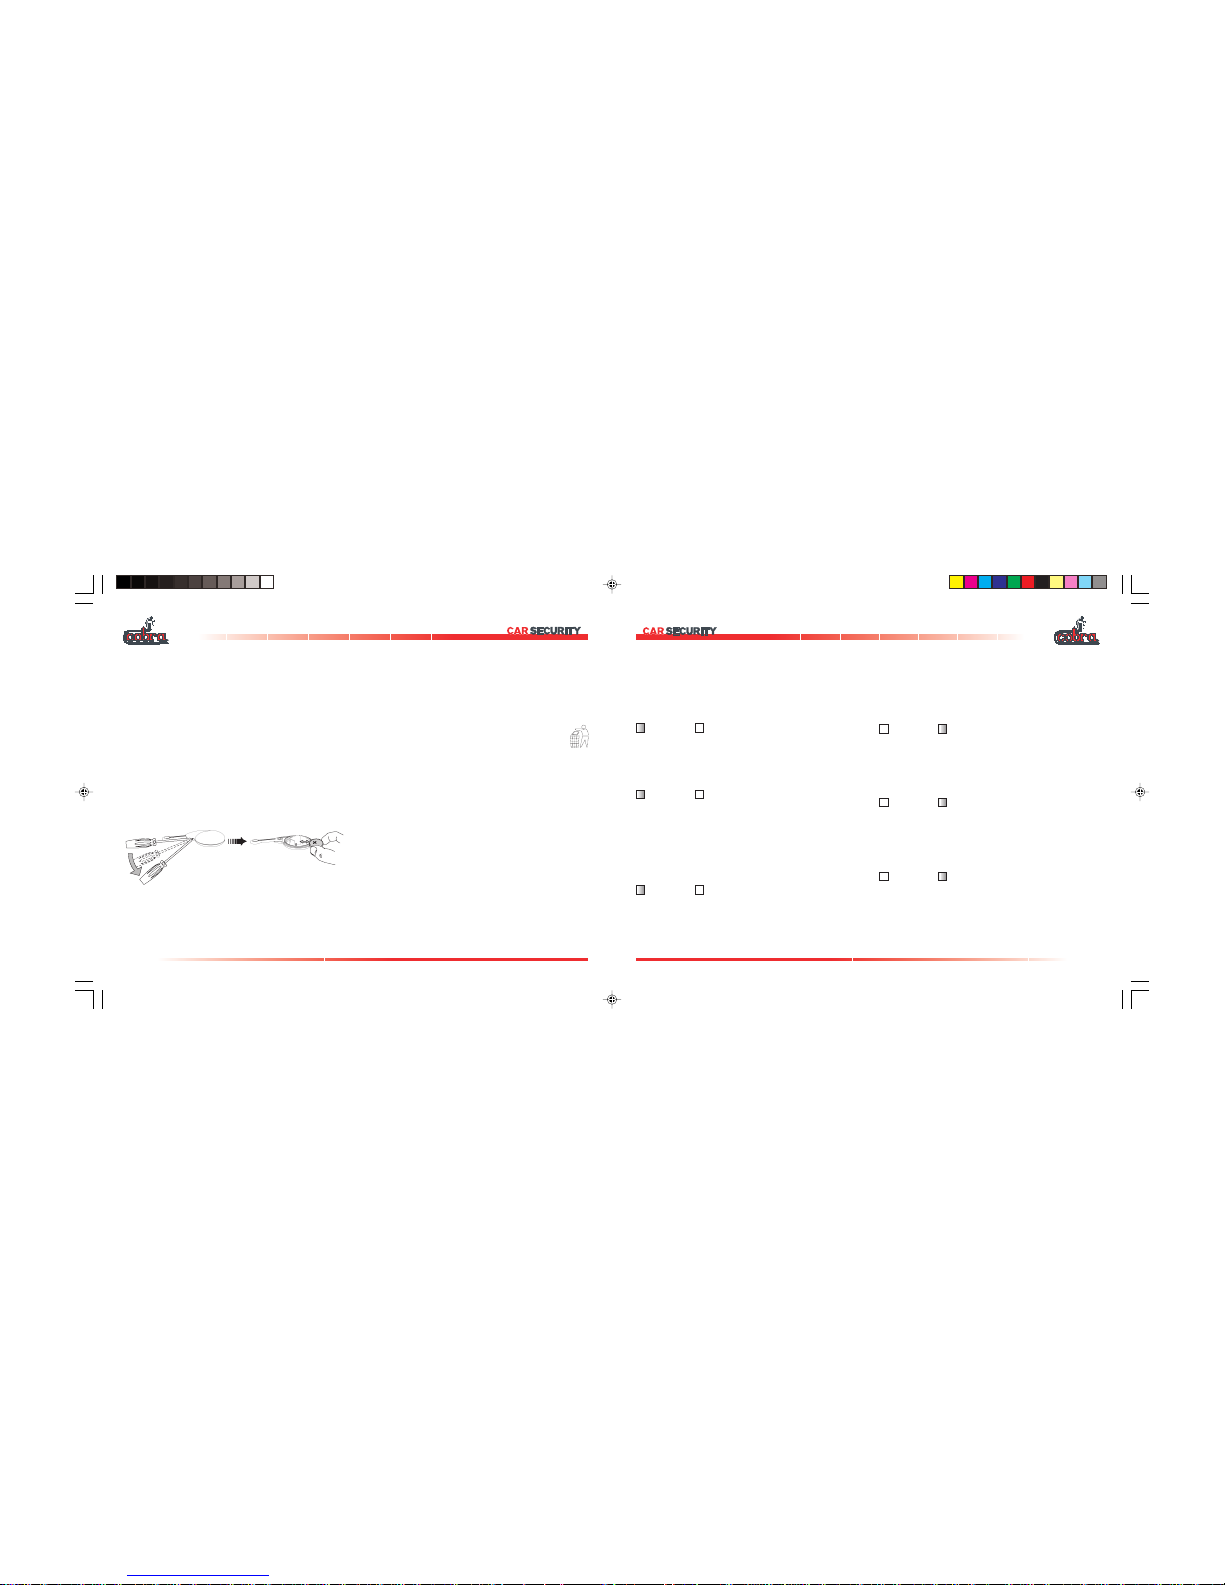
3.6 - Disattivazione del sensore
volumetrico ad ultrasuoni
Se desiderate inserire il sistema di protezione
lasciando i vetri aperti o se un passeggero
resta all’interno dell’abitacolo è possibile
disattivare il sensore volumetrico perché non
si verifichino falsi allarmi.
1)1)
1)1)
1) Attivare il sistema premendo il tasto ‘A’
del radiocomando.
2)2)
2)2)
2) Premere il pulsante ‘B’ del radiocomando
entro 40 s.
Qualora sia installato un sensore ad
iperfrequenza o antisollevamento, è possibile
ottenerne il disinserimento premendo due volte
consecutivamente il tasto ‘B’ entro 40 s.
Il ricevimento del segnale è confermato da un
lampeggio degli indicatori di direzione e da
un segnale acustico del buzzer. Il sensore é
stato escluso; restano attive tutte le altre
protezioni.
I sensori si riattiveranno automaticamente al
successivo inserimento del sistema.
3 - ISTRUZIONI IN BREVE GLOBE 3900
3.7 - Allarme panico
Ogni qual volta premete il pulsante ‘B’ del radiocomando, trascorsi 40
s dall’inserimento o a sistema disinserito, si genera un ciclo di allarme
(suono della sirena e lampeggio degli indicatori di direzione).
Per interrompere l’allarme panico premete ancora il pulsante ‘B’.
3.8 - Funzione garage
La funzione “garage” permette di escludere temporaneamente le
funzioni di inserimento automatico e di antirapina. Si rende
particolarmente utile per lasciare la vettura in parcheggi dove è
necessario consegnare la chiave di avviamento.
É quindi possibile evitare di consegnare insieme alla chiave di
avviamento il radiocomando e il PIN code. Ciò è consigliabile per
evitarne l’uso non autorizzato.
Prima di consegnare la vettura per attivare la funzione, procedere come
segue:
accendere il quadro, aprire la porta e mantenere premuto il tasto ‘A’
del radiocomando per almeno 3 s. Durante questo tempo il LED resta
acceso in modo fisso.
La conferma dell’attivazione della funzione è data da un lampeggio
delle frecce
La funzione si disattiva automaticamente alla prima operazione di utilizzo
del radiocomando oppure dopo 10 attivazioni del quadro della vettura.
mod. 7777
B
A
A
B
mod. 7779
27
noituloSA
.talfebyamyrettablortnocoidareht
.)62egap2.9retpahc(
noituloSB
tsolevahyamlortnocoidareht
.tinuehthtiwnoitasinorhcnys
.)62egap3.9retpahc(
noituloSC
oterudecorpycnegremeehtwollof
egap7retpahc(metsysehtmrasid
.relaedruoytcatnocnehtdna)42
noituloSA
,nwohssireggirtcirtemulovcinosartlufI
riadnafoornus,swodniwtahtkcehc
gnivomontahtdnadesolcerastnev
.elcihevehtnierastcejbo
ruoytcatnoctsisrepmelborpehtfI
.relaed
noituloSB
toob,srood(reggirttcatnoctceridfI
foeno,nwohssi)gninepotennobdna
.tnemetsujdaseriuqersehctiwseht
.relaedruoytcatnoC
The radio control will not arm/disarm the system
An alarm has triggered for no apparent reason
9 - MAINTENANCE AND TROUBLE SHOOTING GLOBE 3900
9.4 - Loss of the PIN code
As the PIN code enables access to the system, it should not be left in
the unattended vehicle as it can be used to deactivate the system or
to add new radio controls without authorization. In case of loss it is
possible to replace the PIN code with the following procedure:
1.1.
1.1.
1. Disarm the system using the radio control.
2.2.
2.2.
2. Open a door, leave it opened during programming.
3.3.
3.3.
3. Turn the ignition “ON”, and keep the emergency panel button
pressed.
4.4.
4.4.
4. Press button ‘A’ of the radio control untill the turn indicators flash,
indicating entry into programming.
5.5.
5.5.
5. Set up the new PIN code:
• Push the button on the emergency panel for the number of times
corresponding to the first digit of the new PIN code.
The led will blink everytime you press the button, a longer blink will
confirm that the right PIN code digit has been input.
Proceed in the same way for the further 3 figures.
• Turn the ignition OFF at the ackowlegement of the fourth digit.
• Repeat the new PIN code entry. If this PIN code is the same as
the previous the system will store it. The storage confirmation is
given by a 3 s blink of the turn indicators and of the LED.
To exit the program at any time, close the opened door and the old
PIN will not be modified.
When you disarm the system the LED displays series a flash
code which indicates the cause of the trigger (chapter 6 pag.
23).
9.6 - Trouble shooting
06DE1587A-I_GB-3900-ST-U-seg.p65 24/04/01, 17.586
Page 7
7
4.2 - Chiusura vetri controllata confort
Attivata
Disattivata
All’inserimento, mantenendo premuto il tasto del radiocomando si
ottiene la chiusura dei vetri in modo controllato.
Ciò consente l’arresto della salita vetri al rilascio del tasto.
4.3 - Segnalazione porte/cofano/baule aperti
Attivata
Disattivata
All’inserimento il sistema segnala tramite il buzzer e il blinker (5 lampeggi
invece di 2) se porte, cofano o baule sono aperti. Se vengono chiusi
entro 40 s, la loro successiva apertura verrà nuovamente rilevata. Se
scadono i 40 s senza che la porta, cofano o baule siano stati chiusi il
sistema non ne controlla più lo stato fino a che non si verifica una nuova
operazione di chiusura/apertura che originerà un allarme.
4.4 - Blinker inserimento/disinserimento
Attivata
Disattivata
Il sistema segnala con due lampeggi degli indicatori di direzione il suo
inserimento, con un lampeggio il disinserimento.
Se la funzione è disattivata, gli indicatori di direzione lampeggiano solo
durante i cicli d’allarme.
4.5 - Inserimento automatico sistema
Attivata
Disattivata
Ogni volta che si spegne il quadro e si chiude l’ultima porta, parte un
conteggio di 2 minuti alla fine del quale il sistema si inserisce senza bloccare
le porte. Se il quadro viene acceso entro i due minuti il sistema non si
inserisce.
4.6 - Inserimento automatico antiavviamento
Attivata
Disattivata
Il blocco motore si inserisce automaticamente circa 4 minuti dopo lo
spegnimento del quadro. Il LED lampeggia. E’ impedito l’avviamento
del motore; per disinserire il sistema dovete premere il tasto ‘A’ del
radiocomando con il quadro della vettura acceso.
4.7 - Allarme antiavviamento
Attivata
Disattivata
Consente di aggiungere la funzione allarme all’inserimento automatico
antiavviamento. Se viene acceso il quadro e trascorsi 25 s viene
generato un allarme.
GLOBE 3900 4 - FUNZIONI BASE
4 - FUNZIONI BASE
4.1 Premessa
Poichè le caratteristiche funzionali di questo sistema sono personalizzabili l’installatore avrà posto in evidenza su questo manuale quali sono quelle
attivate. La programmazione standard di fabbrica è evidenziata dal quadretto annerito.
26
2.2.
2.2.
2. Remove the battery as indicated.
3.3.
3.3.
3. Wait for about 10 s.
4.4.
4.4.
4. Connect the new battery. Only touch it on the sides. Remember to
comply with the polarity indication, as shown in the figure.
5.5.
5.5.
5. Close the radio control and press button ‘A’ twice, check the correct
operation of the system. Do this operation standing by the vehicle.
6.6.
6.6.
6. Dispose the old battery in the special containers.
9.3 - Loss of the radio controls
If radio controls are lost, deactivate the system with the emergency
PIN code. Refer to the emergency overide (see chapter 7).
9 - MAINTENANCE AND TROUBLE SHOOTING
9.1 - The radio control does not disarm the system
(Re-synchronization procedure)
If the radio control battery is not flat and the radio control doesn’t work,
proceed as follows keeping at a distance of 1 meter from the driver’s
window:
A)A)
A)A)
A) Press both buttons on the radio control until the LED on it goes
out. Release them (the LED will come on permanently).
B)B)
B)B)
B) Press button ‘A’ of the radio control, the LED will flash. The re-
synchronization procedure has been completed.
C)C)
C)C)
C) Press button ‘A’ of the radio control again to verify that the system
operates correctly.
If the radio control doesn’t work, refer to the emergency overide (see
chapter 7).
9.2 - Radio control battery low
When the radio control battery becomes low, the radio control LED
will blink in an irregular way or only once instead of permanently until
the button is released. Replace the battery.
1.1.
1.1.
1. To change the battery, open the radio control as indicated in the
figure, levering in the zone marked “OPEN”.
GLOBE 3900 9 - MAINTENANCE AND TROUBLE SHOOTING
06DE1587A-I_GB-3900-ST-U-seg.p65 24/04/01, 17.587
Page 8
8
4.8 - Buzzer
Attivata
Disattivata
Segnala acusticamente in sincronismo con gli indicatori di direzione
l’inserimento ed il disinserimento.
5 - FUNZIONI AVANZATE
5.1 -
Antidistrazione
immobilizzatore
Attivata
Disattivata
Al disinserimento da radiocomando parte un ritardo di circa 4 minuti
entro il quale l’immobilizzatore si reinserisce se non viene acceso il
quadro.
5.2 - Antidistrazione allarme
Attivata
Disattivata
Al disinserimento da radiocomando parte un ritardo entro il quale il
sistema si reinserisce se non viene acceso il quadro. Se la porta o il
baule vengono aperti, il conteggio viene sospeso.
5.3 - Chiusura porte antidistrazione allarme
Attivata
Disattivata
Questa funzione aggiunge la chiusura delle porte alla procedura di
antidistrazione allarme.
5.4 - Autolock - blocco automatico porte
Attivata
Disattivata
Permette la chiusura automatica delle porte ad una velocità prestabilita
oppure entro 5 s dall’accensione del quadro (vedi paragrafo 5.5).
In ambedue i casi le porte vengono automaticamente sbloccate allo
spegnimento del quadro.
5.5 - Autolock - selezione modalità blocco automatico porte
Tempo
Velocità
Determina il blocco automatico delle porte in funzione della velocità o
del tempo.
5.6 - Antirapina automatica
Attivata
Disattivata
Questa modalità prevede che l’utente della vettura debba essere
riconosciuto ogni volta che la stessa viene messa in moto.
Per essere riconosciuti bisogna digitare le prime due cifre del codice
PIN entro 10 s dal momento in cui è stato acceso il quadro.
Il riconoscimento, confermato da un lampeggio lungo del LED,
consente il normale utilizzo della vettura fino al successivo spegnimento
del quadro.
Se non si verifica il riconoscimento, i radiocomandi non vengono più
riconosciuti e trascorsi 4 minuti, viene generato un allarme di 30 s che
si ripete fintanto che il quadro è acceso. Se il quadro viene spento si
interrompe il ciclo d’allarme (il sistema resta inserito) e si attiva il blocco
motore.
Per disinserire il sistema bisogna digitare il PIN code tramite il pulsante
di emergenza.
5 - FUNZIONI AVANZATE GLOBE 3900
25
8 - PERSONAL PIN CODE
The PIN code should be personalised. The system is delivered with the
code 1111 and it must be replaced by a four digits code without the
number ‘0’ .
To program the system with your own four digit PIN code, disarm the
system, then proceed as follows:
• Open a door
• Turn the ignition On.
Keep the emergency panel button and button ‘A’ of the radio control
simultaneously pressed until a blink of the turn indicators occurs,
this indicates that you can now program a new PIN code.
• Push the button on the emergency panel for the number of times
corresponding to the first digit of the new PIN code.
The led will blink everytime you press the button, a longer blink will
confirm that the right PIN code digit has been input.
Proceed in the same way for the further 3 digits.
• Turn the ignition OFF at the ackowlegement of the fourth digit.
• Repeat the new PIN code entry.
• If this PIN code is the same as the previous the system will store
it. The storage confirmation is given by a 3 s blink of the turn
indicators and of the LED.
To exit the program at any time, close the opened door and the old
PIN will not be modified.
8 - PERSONAL PIN CODE GLOBE 3900
PERSONAL PIN CODEPERSONAL PIN CODE
PERSONAL PIN CODEPERSONAL PIN CODE
PERSONAL PIN CODE
06DE1587A-I_GB-3900-ST-U-seg.p65 24/04/01, 17.588
Page 9
9
5.7 - Antirapina volontaria
Attivata
Disattivata
Questa modalità prevede che l’utente della
vettura attivi volontariamente la funzione
mediante la pressione del tasto ‘B’ del
radiocomando a quadro acceso.
Lo stato di attivato è segnalato dal lampeggio
veloce del LED.
Se dopo aver premuto il tasto “B” una porta
viene aperta i radiocomandi non vengono più
riconosciuti e trascorsi 4 minuti, viene
generato un allarme che si ripete fintanto che
il quadro è acceso.
Se il quadro viene spento si interrompe il ciclo
d’allarme (il sistema resta inserito) e si attiva il
blocco motore.
Per disinserire il sistema bisogna digitare il
PIN code tramite il pulsante di emergenza.
Se dovete aprire una porta quando la funzione
è attiva e il LED lampeggia velocemente
dovete prima disattivarla premendo uno dei
due tasti del radiocomando; il LED emette un
lampeggio lungo e poi si spegne.
GLOBE 3900 5 - FUNZIONI AVANZATE
5.8 - Blocco motore antirapina controllato da sensore di
movimento
Attivata
Disattivata
Consente di inserire l’immobilizzatore durante le procedure antirapina
quando la vettura è ferma.
N.B.: questa funzione è disponibile solo per le versioni extra CE.
mod. 7777
B
A
A
B
mod. 7779
24
7 – EMERGENCY OVERRIDE
To deactivate the system without a remote control:
Push the button of the emergency panel the number of times corresponding to the first digit of your PIN code
. The led will blink everytime you press
the button, a longer blink will confirm that the right PIN code digit has been input. Proceed in the same way with the 3 further digits.
The system will disarm as soon as the last digit is input.
SIREN
ON
ALARM
DISARMED
PIN CODE
OK
Enter following
digit of your
PIN CODE
quick
flashing
long
flashing
pause
Push for a number of times
correspondent to the digit of
your PIN code
GLOBE 3900 7 - EMERGENCY
EMERGENCYEMERGENCY
EMERGENCYEMERGENCY
EMERGENCY
06DE1587A-I_GB-3900-ST-U-seg.p65 24/04/01, 17.589
Page 10

10
6 - MEMORIA DI ALLARME GLOBE 3900
6 - MEMORIA DI ALLARME
Al disinserimento il sistema avvisa di un avvenuto allarme con quattro
segnali degli indicatori di direzione e del buzzer. Prestate attenzione
alle segnalazioni del LED che saranno disponibili fino al successivo
inserimento del sistema o fino a che non verrà acceso il quadro.
Le diverse segnalazioni individuano quale é stata la causa dell’allarme.
CAUSE DELL’ALLARME
SEGNALAZIONE
DEL LED
1 lampeggio
2 lampeggi
3 lampeggi
4 lampeggi
5 lampeggi
6 lampeggi
apertura porte, baule
intervento del sensore volumetrico ad
ultrasuoni
apertura cofano
tentativi di avviamento (chiave
quadro)
intervento ingresso sensore di
velocità / sensori aggiuntivi
taglio cavi
23
6 - ALARM MEMORY
If an alarm trigger has occurred the buzzer and the turn indicators will
give four signals. The alarm status history is displayed by LED when
the system is disarmed, this is played until the system will be rearmed
or the ignition will be switched ON.
6 - ALARM MEMORY GLOBE 3900
ALARM DESCRIPTION
LED SIGNAL
1 blink
2 blinks
3 blinks
4 blinks
5 blinks
6 blinks
doors, boot have been opened
ultrasonic volumetric sensor triggered
bonnet has been opened
attemp to start (ignition key/hotwire)
movement sensor input/alarm
cable cutting
06DE1587A-I_GB-3900-ST-U-seg.p65 24/04/01, 17.5810
Page 11

11
GLOBE 3900 7 - EMERGENZA
7 - EMERGENZA
Per disinserire il sistema senza utilizzare il radiocomando, procedete come segue:
premete il pulsante posto sul pannello di emergenza il numero di volte corrispondente alla prima cifra del Vostro PIN code.
Ad ogni pressione del tasto corrisponde un lampeggio veloce del LED. Una pausa più lunga viene interpretata dal sistema come la fine dell’immmisione
della cifra, che viene segnalata con un lampeggio lungo del LED. Fate lo stesso per tutte le altre cifre.
Completata l’immissione delle cifre, se il codice è corretto, il sistema si disinserisce.
SIRENA
ON
ALLARME
DISINSERITO
PIN CODE
OK
Premete un numero di volte
corrispondente al valore della
cifra del PIN code.
Immissione cifra
seguente
PIN CODE
Lampeggio
breve
Lampeggio
lungo
pausa
EMERGENZAEMERGENZA
EMERGENZAEMERGENZA
EMERGENZA
22
5.7 - Voluntary anti-hi-jack
Activated
Deactivated
The driver can activate the anti hi-jack function
by pressing button ‘B’ of the radio control
with the ignition ON. The LED will blink quickly
to signal that anti hi-jack is activated. After the
button ‘B’ has been pressed, if a door is
opened, the radio controls will not operate the
alarm anymore and the vehicle can be driven
for 4 minutes then the siren sounds for 30 s
the alarm cycle will go on as soon as the
ignition is ON. If the ignition is switched off
the alarm stops sounding (the system remains
armed)and the engine is immediately
immobilised. It is necessary to enter the PIN
code using the emergency button to disarm
the system.
If you need to open a door while the anti hijack is active (the LED will flash quickly) you
can deactivate the function by pressing one
of the two radio control buttons the LED will
blink one long flash and go out.
GLOBE 3900 5 - ADVANCED FUNCTIONS
5.8 - Anti hi-jack immobilisation controlled by movement sensor.
(VSS input)
Activated
Deactivated
The vehicle will be immobilised immediately when it stops moving, when
the anti hi-jack is activated.
NOTE: This working mode is available only for non EC products model.
mod. 7777
B
A
A
B
mod. 7779
06DE1587A-I_GB-3900-ST-U-seg.p65 24/04/01, 17.5811
Page 12
12
8 - PERSONALIZZAZIONE DEL PIN CODE GLOBE 3900
8 - PERSONALIZZAZIONE DEL PIN CODE
E’ molto importante che eseguiate la personalizzazione del PIN code.
Il PIN code standard, 1111, deve essere cambiato.
Potete programmare il Vostro sistema con il PIN code che preferite,
purchè sia a quattro cifre e non contenga il numero ‘0’. Per ricordarlo
più facilmente scegliete un numero che già utilizzate per altri scopi
(telefono cellulare,carta di credito,etc.)
A sistema disinserito procedete come segue:
• Aprite una porta
• Accendete il quadro
• Mantenendo premuto il pulsante posto sul pannello di emergenza
premete il tasto ‘A’ del radiocomando fino a quando gli indicatori di
direzione non Vi indicheranno con un lampeggio che potete
immettere il nuovo PIN code.
• Premete il pulsante posto sul pannello di emergenza il numero di
volte corrispondente alla prima cifra del nuovo PIN code che volete
inserire.
Ad ogni pressione del tasto corrisponde un lampeggio veloce del
LED. Una pausa più lunga viene interpretata dal sistema come la
fine dell’immisione della prima cifra, che viene segnalata con un
lampeggio lungo del LED. Fate lo stesso per tutte le altre cifre.
• Completata la quarta cifra spegnete il quadro e ripetete l’immissione
del nuovo codice.
• Se il sistema verifica la corrispondenza dei due codici, viene
memorizzato il nuovo codice; l’avvenuta memorizzazione viene
segnalata da un lampeggio di 3 s degli indicatori di direzione e del
LED.
Se avete il dubbio di aver commesso un errore potete in qualsiasi
momento abbandonare la procedura semplicemente chiudendo la porta.
Il vecchio codice PIN non verrà modificato.
PERSONALIZZAZIONE DEL PIN CODEPERSONALIZZAZIONE DEL PIN CODE
PERSONALIZZAZIONE DEL PIN CODEPERSONALIZZAZIONE DEL PIN CODE
PERSONALIZZAZIONE DEL PIN CODE
21
5.5 - Autolock - Automatic door locking mode
Time
Speed
Automatic door locking according to speed or time delay.
5.6 - Automatic anti-hi-jack
Activated
Deactivated
The anti hi-jack is always active. To drive the vehicle, the first two
digits of the PIN code must be entered into the override button within
10 s of the ignition being switched ON. Confirmation of acceptance is
signelled by a long blink of the LED; the vehicle can now be used
normally until the next ignition OFF/ON cycle.
If this procedure is not followed the radio controls will not operate the
alarm anymore and the vehicle can be driven for 4 minutes then the
siren sounds for 30 s; the alarm cycle will go on as soon as the ignition
is ON. If the ignition is switched off the alarm stops sounding (the
system remains armed) and the engine is immediately immobilised. It
is necessary to enter the PIN code using the emergency button to
disarm the system.
5 - ADVANCED FUNCTIONS
5.1 - Immobilizer auto re-arm
Activated
Deactivated
The immobiliser will automatically rearm if the ignition is not switched
on within 4 minutes after the system has been disarmed.
5.2 - Alarm auto re-arm
Activated
Deactivated
The immobiliser and the alarm system will automatically rearm if the
doors are not opened within 4 minutes after the system has been
disarmed. The 4 minutes timer will reset if the doors are opened and
closed.
5.3 - Alarm auto re-arm with door locking
Activated
Deactivated
This function adds automatic doors locking to the alarm auto re-arm
function.
5.4 - Autolock - Automatic door locking
Activated
Deactivated
The doors are locked at a set vehicle speed not later than 5 s after the
ignition is switched ON (see chapter 5.5).
In either case the doors are automatically unlocked when the ignition
is switched OFF.
5 - ADVANCED FUNCTIONS GLOBE 3900
06DE1587A-I_GB-3900-ST-U-seg.p65 24/04/01, 17.5812
Page 13
13
9 - MANUTENZIONE E RICERCA GUASTI
9.1 - Il radiocomando non disinserisce l’antifurto
(Esecuzione della procedura di risincronizzazione)
Se il radiocomando non funziona, verificate che la pila sia carica,
effettuare ad una distanza di 1 metro circa dal finestrino del conducente
le seguenti operazioni:
A)A)
A)A)
A) Premere entrambi i tasti del radiocomando fino a che il LED diventa
da lampeggiante a spento. Rilasciare i tasti (il LED si accende in
modo fisso).
B)B)
B)B)
B) Premere il tasto ‘A’ del radiocomando e verificare che il LED
lampeggi. La procedura di risincronizzazione é terminata.
C)C)
C)C)
C) Premere nuovamente il tasto ‘A’ del radiocomando per verificare
che il prodotto funzioni correttamente.
Se il radiocomando non funziona eseguite la procedura d’emergenza
(vedi capitolo 7).
9.2 - Batteria del radiocomando scarica
Se con uno dei pulsanti premuti il LED lampeggia per breve tempo
oppure in modo irregolare significa che la batteria si sta scaricando.
Provvedere alla sostituzione della batteria.
GLOBE 3900 9 - MANUTENZIONE E RICERCA GUASTI
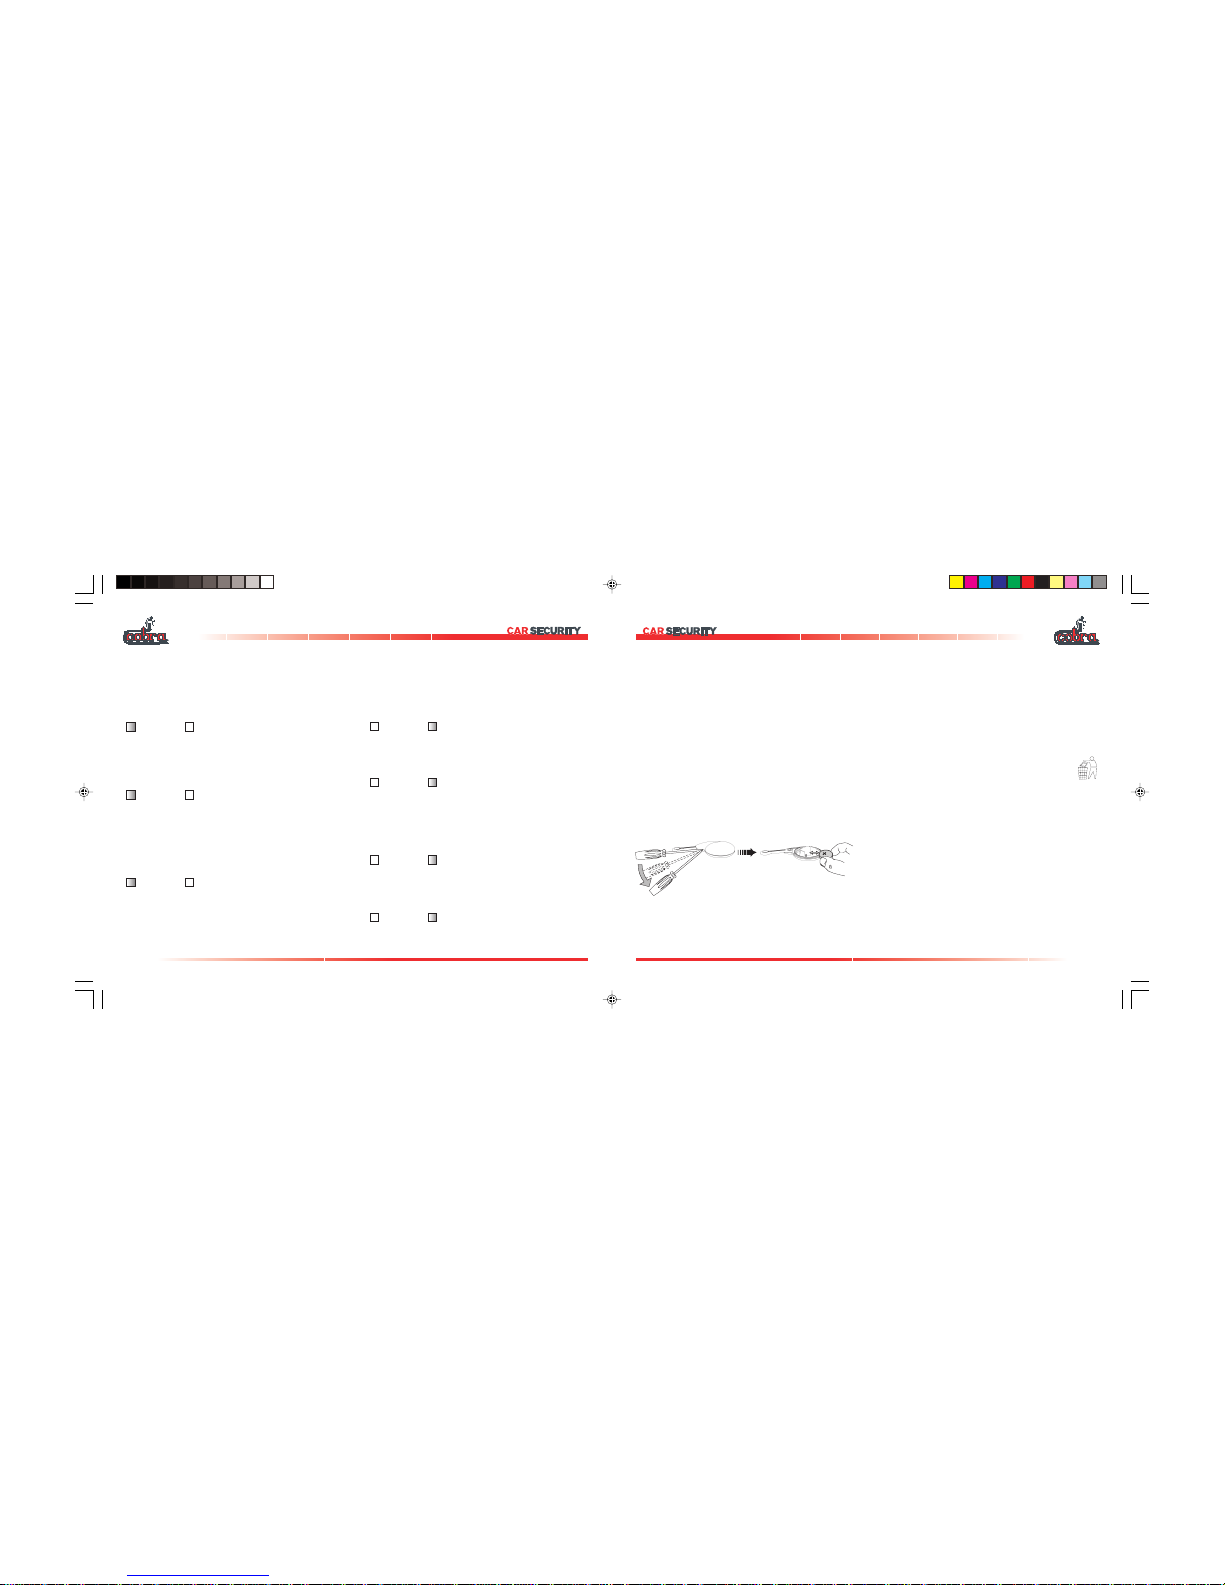
1.1.
1.1.
1. Per cambiare la batteria aprire il guscio del radiocomando come
indicato in figura, avendo cura di far leva nella zona indicata con
“OPEN”.
2.2.
2.2.
2. Togliere la batteria estraendola come indicato.
3.3.
3.3.
3. Attendere 10 s ca.
4.4.
4.4.
4. Inserire la batteria nuova avendo cura di toccarla con le dita solo
sulle pareti laterali. Rispettare la polarità, come indicato in figura.
5.5.
5.5.
5. Richiudere il guscio e premere 2 volte il tasto ‘A’ del radiocomando
verificando la risposta del sistema. Effettuare la prova vicini al veicolo.
6.6.
6.6.
6. Gettate la batteria scarica negli appositi contenitori di raccolta.
9.3 - Smarrimento dei radiocomandi
In caso di smarrimento di entrambi i radiocomandi sarete comunque
in grado di effettuare un disinserimento di emergenza. Fate riferimento
alla procedura di disinserimento/emergenza (capitolo 7).
20
4.2 - Controlled windows lift (confort)
Activated
Deactivated
Keep button ‘A’ pressed, when arming the alarm, the windows close
in a “controlled mode”. The windows will stop closing if the button is
released.
4.3 - Doors/bonnet/boot opened signal
Activated
Deactivated
If the doors, bonnet or boot are opened when you arm the system
the turn indicators will blink 5 times instead of 2. The buzzer will do the
same, if activated. If they are closed within 40 s there subsequent
opening will be signalled again; after the 40 s set up delay there is no
further trigger until they are closed and opened again.
4.4 - Arm/disarm blinker
Activated
Deactivated
The arming of the system is indicated by 2 blinks of the turn indicators
and disarm by 1 blink. If this function is deactivated, the turn indicators
will only blink during an alarm trigger.
4.5 - Automatic arming
Activated
Deactivated
The unit will automatically arm 2 minutes after the last door has been
closed after the engine is switched off, which ever is the sooner.
4.6 - Immobilizer automatic arming
Activated
Deactivated
The engine immobilisation will automatically activate 4 minutes after
the ignition is switched off. The LED will flash. The engine will be
immobilised. Press button ‘A’ on the radio control with the ignition
switched ON to deactivate the system.
4.7 - Immobilizer alarm
Activated
Deactivated
An alarm function can be added to the immobilizer automatic arming.
25 s after the ignition is switched ON the alarm will trigger.
4.8 - Buzzer
Activated
Deactivated
If activated the buzzer will sound in synchronism with the turn indicators
to signal the arm and disarm of the system.
GLOBE 3900 4 - BASIC FUNCTIONS
4 - BASIC FUNCTIONS
4.1 - Introduction
As the standard working features of this system can be modified by the installer he should have indicated the differences with the standard factory
set-up (black squares) on this manual.
06DE1587A-I_GB-3900-ST-U-seg.p65 24/04/01, 17.5813
Page 14

14
AenoizuloS .aciracseresseebbertopalipal
.)31gapa2.9olotipac(
BenoizuloSliosrepahodnamocoidarli
olotipac(.elartnecalnocomsinorcnis
.)31gapa3.9
CenoizuloS aznegremeidarudecorpaletautteffe
7olotipac(ametsislieriresnisidrep
ortsoVlaivetegloviriope)11.gap
.aicudifiderotallatsni
AenoizuloS otasuacemrallanuidotattartèiseS
inousartludaocirtemuloverosneslad
oiccuttet,inirtsenifehcetacifirev
oressofaira’lledettehccobeelibirpa
niitteggooressoficnonehceesuihc
eS.aruttevalledonretni’llaotnemivom
laivetegloviretsisrepamelborpli
.erotallatsniortsoV
BenoizuloS
repemrallanuidotattartèiseS
eluaboonafoc,etroparutrepa
itnaslupiedonuetnemlibaborp
.otalogereresseidatissecen
iderotallatsniortsoVlaivetegloviR
.aicudif
Il radiocomando non inserisce/disinserisce il sistema
Si é verificato un allarme ingiustificato
9 - MANUTENZIONE E RICERCA GUASTI GLOBE 3900
9.4 - Smarrimento del codice personale (PIN)
Poiché il codice personale (PIN) rappresenta una possibilità di accesso
al sistema, non deve essere lasciato incustodito all’interno del veicolo.
Infatti potrebbe essere utilizzato per disinserire il sistema o per abbinare
radiocomandi senza autorizzazione. In caso di smarrimento è sempre
possibile cambiare il PIN code con una semplice procedura:
1.1.
1.1.
1. Disinserire il sistema tramite il radiocomando.
2.2.
2.2.
2. Aprire una porta e tenerla aperta durante la programmazione.
3.3.
3.3.
3. Girare il quadro in posizione “quadro acceso” e tenere premuto il
pulsante del pannello di emergenza.
4.4.
4.4.
4. Premere il tasto “A” del radiocomando fino a quando le frecce non
indicheranno con un lampeggio che si è entrati in programmazione.
5.5.
5.5.
5. Impostare il nuovo codice PIN:
• Premete il pulsante posto sul pannello di emergenza il numero di
volte corrispondente alla prima cifra del PIN code che volete inserire.
Ad ogni pressione del tasto corrisponde un lampeggio veloce del
LED. Una pausa più lunga viene interpretata dal sistema come la
fine dell’immissione della prima cifra, che viene segnalata con un
lampeggio lungo del LED. Fate lo stesso per tutte le altre cifre.
• Completata la quarta cifra spegnete il quadro.
• Ripetete l’immissione del codice. Se il sistema verifica la
corrispondenza tra il codice immesso e quello programmato il codice
viene memorizzato; l’avvenuta memorizzazione viene segnalata da
un lampeggio di 3 s degli indicatori di direzione e del LED.
Per uscire dalla procedura in qualsiasi momento, chiudete la porta;
resterà memorizzato il vecchio PIN code.
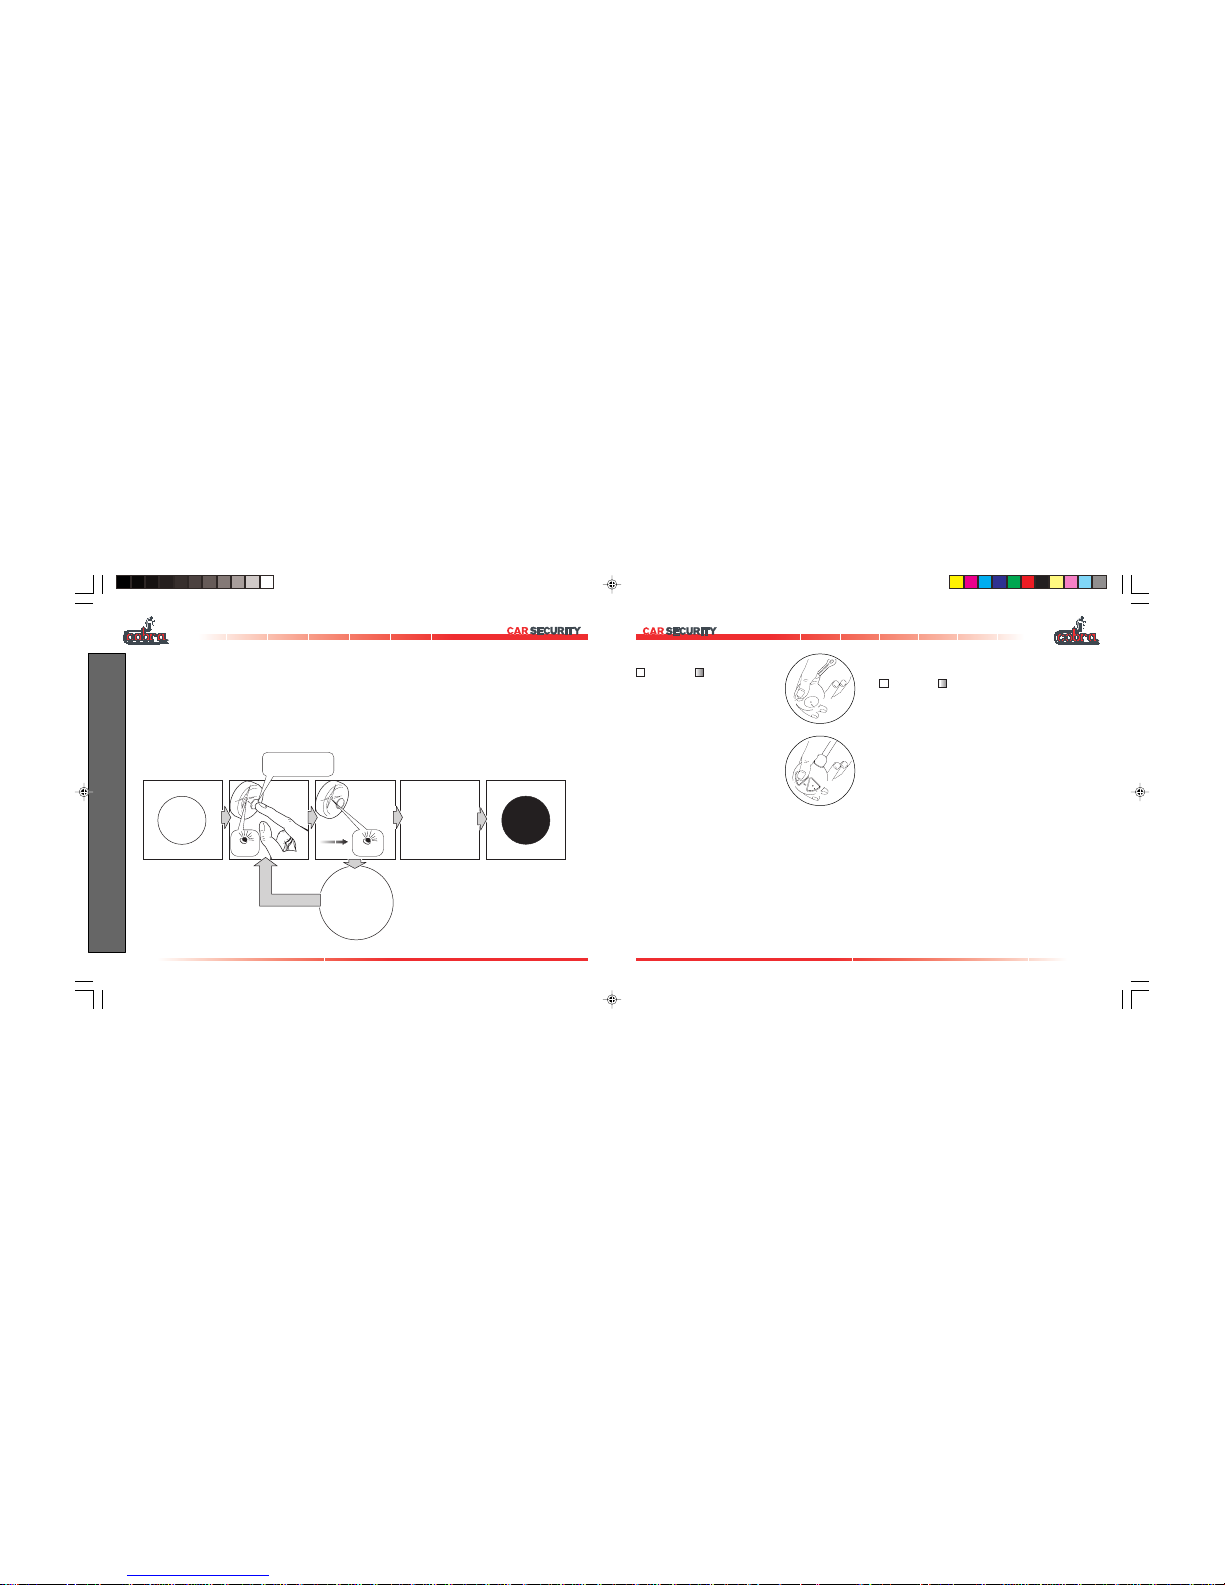
al disinserimento il LED segnala con una serie di lampeggi
quale è stata la causa dell’allarme (capitolo 6 a pag.10).
9.6 - Ricerca guasti
19
3.6 - Deactivating
the volumetric
ultrasonic sensor
To avoid false alarms the volumetric sensor
can be deactivated if you want to leave the
windows open or if someone remains in the
passenger compartment.
1)1)
1)1)
1) Arm the system pressing button 'A' of
the radio control.
2)2)
2)2)
2) Press button 'B' on the radio control
within 40 s.
If hyperfrequency or level monitor sensors
are fitted, it is possible to deactivate them by
pressing ‘B’ button twice within 40 s.
To confirm that the signal has been received,
there will be an acoustic signal of the buzzer.
The sensors have been inhibited; all other
functions remain activated.
Sensors will be automatically armed on the
next arming of the system.
3 - BASIC INSTRUCTIONS GLOBE 3900
mod. 7777
B
A
A
B
mod. 7779
3.7 - Panic alarm
Each time button “B” on the radio key is pressed, except for during
the 40 s after the alarm has been armed, an alarm cycle will be
generated, the siren will sound and the turn indicators will flash.
Press any button to interrupt the panic alarm.
3.8 - Garage function
The ‘garage’ function allows you to temporarily exclude passive arming
and anti-hi-jack functions. This can be useful when you have to take
the car for service interval without having to leave the alarm system
remote control.
IMPORTANT:IMPORTANT:
IMPORTANT:IMPORTANT:
IMPORTANT: never leave remote control key and PIN code together
with car keys in order to prevent copy of remote key.
Before you leave the car, proceed as follows to activate this function:
switch ON the ignition, open a door and keep ‘A’ button pressed for a
minimum of 3 s. During this period the LED will remain ON.
Confirmation of the function activation is given by a single blink of the
turn indicators.
This function is automatically deactivated when the system is armed
and disarmed by the remote control or the ignition key is switched ON
and OFF for 10 times.
06DE1587A-I_GB-3900-ST-U-seg.p65 24/04/01, 17.5814
Page 15

Dear customer,
Congratulation on your purchasing this product which has been designed and manufactured to the highest automotive standards
utilising the latest technology for total reliability.
The manual is divided into 9 parts:
This manual contains also the product installation certificate and the declaration of conformity.
We kindly ask you to read this manual to get the full benefit of the system.
We suggest you keep this manual with the registration documents of the vehicle. It will be easier for you to find the
information in the event of emergency.
Your dealer will be pleased to clarify any queries you may have with the system or its operation.
Page 17 __________ INTRODUCTION
18 __________ ADDITIONAL PROTECTIONS
19 __________ BRIEF INSTRUCTIONS
21 __________ BASIC FUNCTIONS
22 __________ ADVANCED FUNCTI ONS
24 __________ ALARM MEMORY
25 __________ EMERGENCY
26 __________ PERSONAL PIN CODE
27 __________ MAINTENANCE AND TROUBLE SHOOTING
18
3 – BRIEF INSTRUCTIONS
3.1 - Arming
• Press button ‘A’ of the radio control to lock
the doors (if the vehicle has central
locking).
• The turn indicators will blink twice.
• The buzzer will issue two beeps (if
activated).
• The protections activate after a 40 s timer
has elapsed.
• The LED will come on constantly for 40 s
then it will flash.
3.2 - Protection
When armed the system will generate an acoustic and visual 30 s
alarm when the bonnet, boot or one of the doors is opened. System
with the volumetric sensor will generate the alarm in case of intrusion.
The system remains armed at the end of the cycle.
3.3 - Interrupting an alarm in progress
If the system generates an alarm , the siren can be deactivated by
pressing button “A” on the radio control once. The turn indicators
will also stop blinking but the alarm system remains armed. Thus, if
the system is activated (siren sounding), press the button twice to
unlock the vehicle. The first press will stop the siren, the second will
disarm the system and unlock the doors.
3.4 - Disarming
• Press button ‘A’ on the radio control to disarm the system and unlock
the doors.
• The turn indicators will blink once.
• The buzzer will beep once (if activated).
• The protection deactivate immediately.
• The LED will go OFF.
3.5 - Alarm memory
If an alarm has occurred the buzzer and the turn indicators will give
four signals instead of one (See the chapter 6 on page 23).
GLOBE 3900 3 - BRIEF INSTRUCTIONS
mod. 7777
B
A
A
B
mod. 7779
RADIO CONTROL FUNCTION
BUTTON
A
BUTTON
B
Arm
Disarm
Siren interrupt
Panic alarm
Ultrasonic volumetric sensor and
additional sensor exclusion (if
installed)
•
•
•
•
•
BRIEF INSTRUCTIONSBRIEF INSTRUCTIONS
BRIEF INSTRUCTIONSBRIEF INSTRUCTIONS
BRIEF INSTRUCTIONS
06DE1587A-I_GB-3900-ST-U-seg.p65 24/04/01, 17.5815
Page 16
16
1 - INTRODUCTION
This anti-intrusion alarm system is operated by the original high-security radio control of the vehicle. The total protection of your vehicle is assured
by:
1.1 - Personal PIN code
Each of the 3000 series has a PIN-CODE that can be used for the emergency override of the system. The PIN-CODE programmed in the factory
is 1111. We suggest that you replace this number with another commonly used by you (for ex. cellular phone, credit card, etc...). as it would be
easier to remember it.
GLOBE 3900 1 - INTRODUCTION
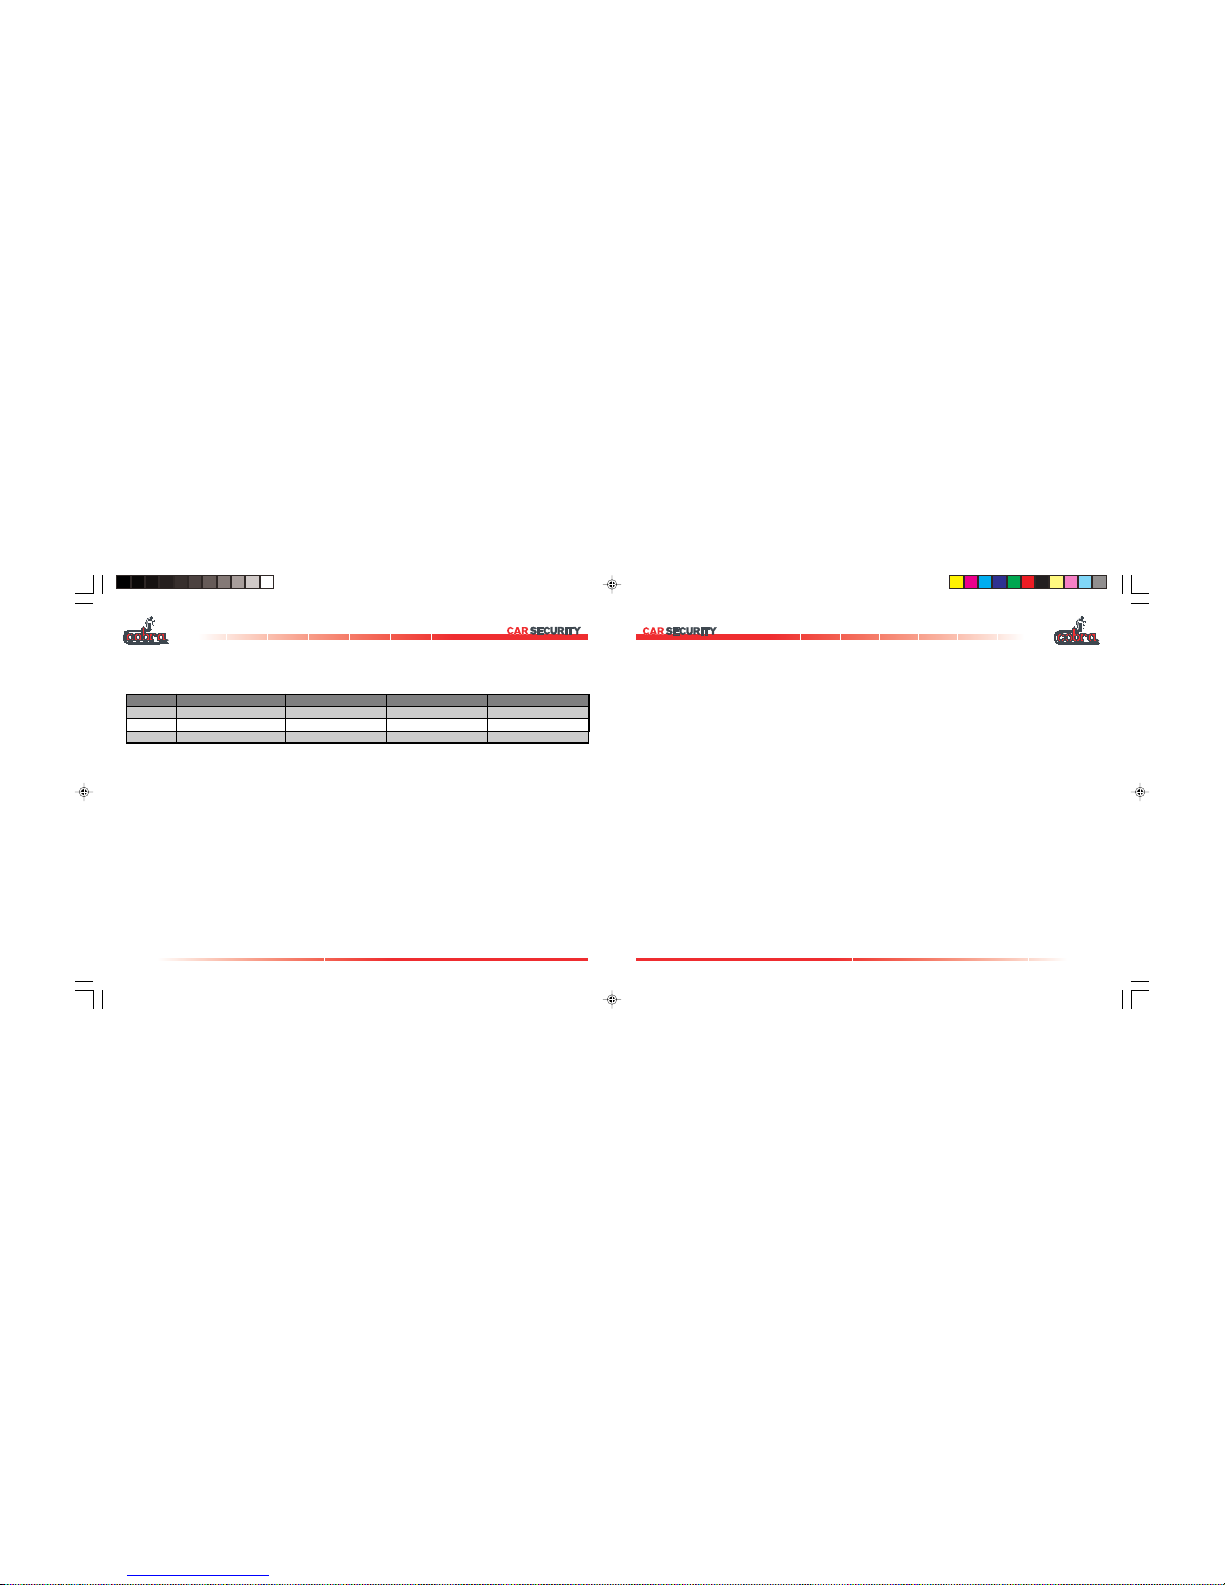
MOD.
HOTWIRE PROTECTION
VOLUMETRIC PROTECTION
PERIMETRIC PROTECTION
CABLE CUTTING PROTECTION
•
•
•
•
•
•
•
•
•
AB3998
AB3993
AB3991
17
2 - ADDITIONAL PROTECTIONS
You can increase the protection level of the system with the following additional sensors:
5452 Level monitor module5452 Level monitor module
5452 Level monitor module5452 Level monitor module
5452 Level monitor module
When the system is armed, this sensor will detect the vehicle being jacked up to tow it away or steal the wheels.
5462 Hyperfrequency module5462 Hyperfrequency module
5462 Hyperfrequency module5462 Hyperfrequency module
5462 Hyperfrequency module
When the system is armed, an electromagnetic waves emission from the hyperfrequency module hidden in the passenger compartment willl
ensure the volumetric protection of the vehicle.
For use on convertible vehicles, the volumetric protection will be stable even with the soft top, windows or sunroof left open.
2980 Window lift module2980 Window lift module
2980 Window lift module2980 Window lift module
2980 Window lift module
When the radio key “A” button is pressed to arm the system, the car electric windows will raise automatically. It can be fitted to any car with
electrical windows.
2 - ADDITIONAL PROTECTIONS GLOBE 3900
06DE1587A-I_GB-3900-ST-U-seg.p65 24/04/01, 17.5816
 Loading...