

Page 1

453-2000 HANDHELD PROGRAMMER
OPERATIONS MANUAL
Document No.: 570-2000, Rev. E
Cobham Avionics
Artex Products
Proprietary Information
This document discloses subject matter in which Artex Aircraft Supplies, Inc. has proprietary rights.
Neither receipt nor possession thereof confers or transfers any right to reproduce or disclose the
document, any part thereof, any information therein, or any physical article or device, or practice any
method or process except by written permission from or written agreement with Artex Aircraft Supplies,
Inc.
Artex Aircraft Supplies, Inc.
doing business as Cobham Avionics
14405 Keil Road NE Aurora, Oregon 97002 USA
Phone 503-678-7929, Fax 503-678-7930
E-mail info@artex.net
www.artex.net
Page 2

570-2000, Rev. E, 453-2000 Handheld Programmer Operations Manual
Revision History
REVISION CHANGE DATE
- RELEASE 02-20-06
A DCN 2803 07-10-06
B DCN 2931 02-06-07
C DCN 3059 08-09-07
C DCN 3178 03-03-08
C DCN 3275 08-14-08
C DCN 3448 06-04-09
D DCN 3466 08-10-09
D DCN 3548 11-02-09
E DCN 3357 01-26-09
Page i
Page 3

570-2000, Rev. E, 453-2000 Handheld Programmer Operations Manual
Copyright Notice
Meazura, Meazura Compatible, MEZ1000 and MZIO
are all trademarks of ACEECA
International, Ltd.
Avionic Tools is a trademark of Avionic Tools, LLC, 88 South Edgewood Rd., Bedminster, NJ
07921.
Palm, Palm OS, HotSync, Palm Powered logo, and PalmPrint are registered trademarks
of PalmSource, Inc., or its affiliates; and Palm Powered is a trademark of Palm Trademark
Holding Company, LLC. Other brands may be trademarks of their respective owners.
Page ii
Page 4

570-2000, Rev. E, 453-2000 Handheld Programmer Operations Manual
This page is blank
Page iii
Page 5

570-2000, Rev. E, 453-2000 Handheld Programmer Operations Manual
TABLE OF CONTENTS
1. INTRODUCTION ................................................................................................................1
1.1 APPLICATION .................................................................................................................... 1
1.2 DIFFERENCES.................................................................................................................... 1
1.3 FEATURES........................................................................................................................ 2
1.4 FUNCTIONALITY................................................................................................................. 2
2. HARDWARE .......................................................................................................................4
2.1 OVERVIEW ....................................................................................................................... 4
2.1.1 Connections ....................................................................................................... 4
2.1.2 Controls............................................................................................................. 5
2.2 BATTERY ......................................................................................................................... 5
2.2.1 Warnings ........................................................................................................... 5
2.2.2 Storage ............................................................................................................. 5
2.2.3 Installation......................................................................................................... 6
2.2.4 Charging............................................................................................................ 7
2.2.5 Recycle and Disposal Methods ............................................................................. 8
2.3 UNIT INITIALIZATION.......................................................................................................... 8
3. PALM™ DESKTOP SOFTWARE............................................................................................9
3.1 HOT SYNC ....................................................................................................................... 9
4. ARTEX PROGRAMMING SOFTWARE................................................................................10
4.1 OVERVIEW ..................................................................................................................... 10
4.2 OPENING THE ARTEX SOFTWARE .......................................................................................... 10
4.3 SELECTING PREFERENCES................................................................................................... 10
4.4 PROGRAMMER DATABASE ................................................................................................... 11
4.5 ELT PROGRAMMING ......................................................................................................... 11
4.6 COUNTRY CODE DATABASE................................................................................................. 16
4.7 PROTOCOLS.................................................................................................................... 16
4.7.1 Aviation User / Tail Number (Short) ................................................................... 17
4.7.2 Serial User / ELT / COSPAS (Short) .................................................................... 17
4.7.3 Serial User / Aircraft 24-Bit Addr (Short)............................................................. 18
4.7.4 Serial User / Aircraft 24-Bit Addr/Ntl (Short)........................................................ 18
4.7.5 Serial User / Aircraft Operator Designator (Short)................................................ 19
4.7.6 Aviation User / Tail Number / Location (Long)..................................................... 19
4.7.7 Std Location / Aircraft 24-Bit Address (Long) ...................................................... 20
4.7.8 Std Location / ELT Serial (Long)......................................................................... 20
4.7.9 National Location / ELT Serial (Long) ................................................................. 21
4.8 PROGRAMMING A DIFFERENT COUNTRY CODE FOR USE WITH A SPECIFIC 24-BIT ADDRESS................... 21
4.9 PROGRAMMING CONCLUSION............................................................................................... 22
4.10 BATTERY DATA READER..................................................................................................... 22
Page iv
Page 6

570-2000, Rev. E, 453-2000 Handheld Programmer Operations Manual
C406-N SERIES PA (PROGRAMMING ADAPTER) ............................................................23
5.
5.1 PA HARDWARE OPERATION ................................................................................................ 23
5.1.1 With Cannon Plug Attached To PA...................................................................... 23
5.1.2 Without Cannon Plug Attached To PA................................................................. 24
5.2 PA SOFTWARE OPERATION ................................................................................................. 24
6. PROGRAMMING VERIFICATION .....................................................................................25
6.1 ELT TESTING PRECAUTIONS ............................................................................................... 25
6.2 ELT READER FUNCTION (SARCALC) ...................................................................................... 25
6.3 MESSAGE DISPLAY ........................................................................................................... 26
6.4 READER DATABASE........................................................................................................... 27
6.5 ELT READER PREFERENCES ................................................................................................ 28
6.6 PRINTING MESSAGES ........................................................................................................ 28
6.7 SARCALC DESKTOP ........................................................................................................... 29
7. LABEL AND REPORT PRINTING.......................................................................................30
7.1 PRINTERS ...................................................................................................................... 30
7.1.1 Dymo LabelWriter Printer .................................................................................. 30
7.1.2 Brady/Datamax Printer...................................................................................... 30
7.2 LABEL PRINTING .............................................................................................................. 31
7.3 REPORT PRINTING ........................................................................................................... 31
8. LABELING REQUIREMENTS.............................................................................................33
9. CIVIL AVIATION AUTHORITY REGISTRATION REQUIREMENTS....................................34
10. SPECIFICATIONS AND CALIBRATION.............................................................................35
10.1 MEAZURA MEZ1000 SPECIFICATIONS................................................................................. 35
10.2 HANDHELD PROGRAMMER MODULE SPECIFICATIONS:................................................................. 35
10.3 CALIBRATION.................................................................................................................. 35
11. COMPONENTS AND OPTIONAL EQUIPMENT...................................................................36
11.1 SYSTEM COMPONENT PART NUMBERS .................................................................................... 36
11.2 OPTIONAL EQUIPMENT ...................................................................................................... 36
12. TROUBLESHOOTING........................................................................................................37
12.1 TROUBLE SHOOTING GUIDE ................................................................................................ 37
12.2 TECHNICAL ASSISTANCE .................................................................................................... 37
13. WARRANTY INFORMATION.............................................................................................38
14. INDEX..............................................................................................................................39
Page v
Page 7

570-2000, Rev. E, 453-2000 Handheld Programmer Operations Manual
1. Introduction
The Handheld Programmer and beacon reader module, installed in an Acceca Meazura
MEZ1000 unit using Palm OS, is designed to program any Artex 406 MHz Emergency
Locator Transmitter (ELT), as well as decode and display the encoded 406 MHz message.
When used as a reader, the programmer can be connected directly to the ELT or
monitored “over the air” using the whip antenna, if allowed by local and/or national
regulations. The reader will decode any 406 MHz aviation protocol for ELTs.
All instructions contained herein refer to Artex ELTs only. Familiarity with Palm devices
and/or the Palm OS software is highly recommended. The words “Meazura MEZ1000”
are used throughout this document to describe the base Palm unit.
NOTE
: The Artex Handheld Programmer does not program or decode PLBs or EPIRBs.
1.1 Application
The Handheld Programmer performs the functions of the Artex 453-1000 ELT Test Set,
with the added capability of programming ELTs. In all instances where existing and/or
previous Artex documentation makes reference to a 453-0131 Test Set, SARSAT Beacon
Test Set, or 453-1000 ELT Test Set, the Artex Handheld Programmer P/N 453-2000 may
be used as a direct substitute.
Follow the general directions for testing the 406 MHz signal, as directed in the applicable
Artex ELT manual, using the operational instructions for the Handheld Programmer as
outlined in this manual. Screen views depicted in ELT manuals for the previous testers
(453-0131 or 453-1000) differ significantly from the Handheld Programmer. Refer to the
screen views shown in this manual and the actual display on the Handheld Programmer
when using documentation that refers to the 453-0131 or 453-1000 tester.
NOTE
interface with the previous Artex Programming Software in any way, shape, or form.
NOTE
MEZ1000/Palm platform or other Palm based applications that may be used.
Contact Aceeca at www.aceeca.com
: The Handheld Programmer uses entirely new and distinct software and will not
: This manual does not describe other functions of the Meazura
for details and user guides.
1.2 Differences
The primary differences between the Sartech test set (ARG 5410 or Artex P/N 453-0131)
and the Handheld Programmer are:
Ability to program the ELT, not just read it
Ease of use
Rapid signal acquisition and processing
Display of all ELT 406 MHz message information on one screen
Position data (when present) displayed in degree’s, minutes, seconds
Use of in-line attenuation not required
Rechargeable long life battery
Does not require periodic calibration
Page 1
Page 8

570-2000, Rev. E, 453-2000 Handheld Programmer Operations Manual
The primary differences between the previous Artex Programming Software (510-0406)
with Level Shifter (500-0232) and the Artex software used in the Handheld Programmer
are:
Ease of use
Portability
Support of additional programming protocols
Retention of programming information
Rechargeable long life battery
NOTE
: The Artex Handheld Programmer does not interface with the previous Artex
Programming Software (510-0406) or Level Shifter (500-0232).
1.3 Features
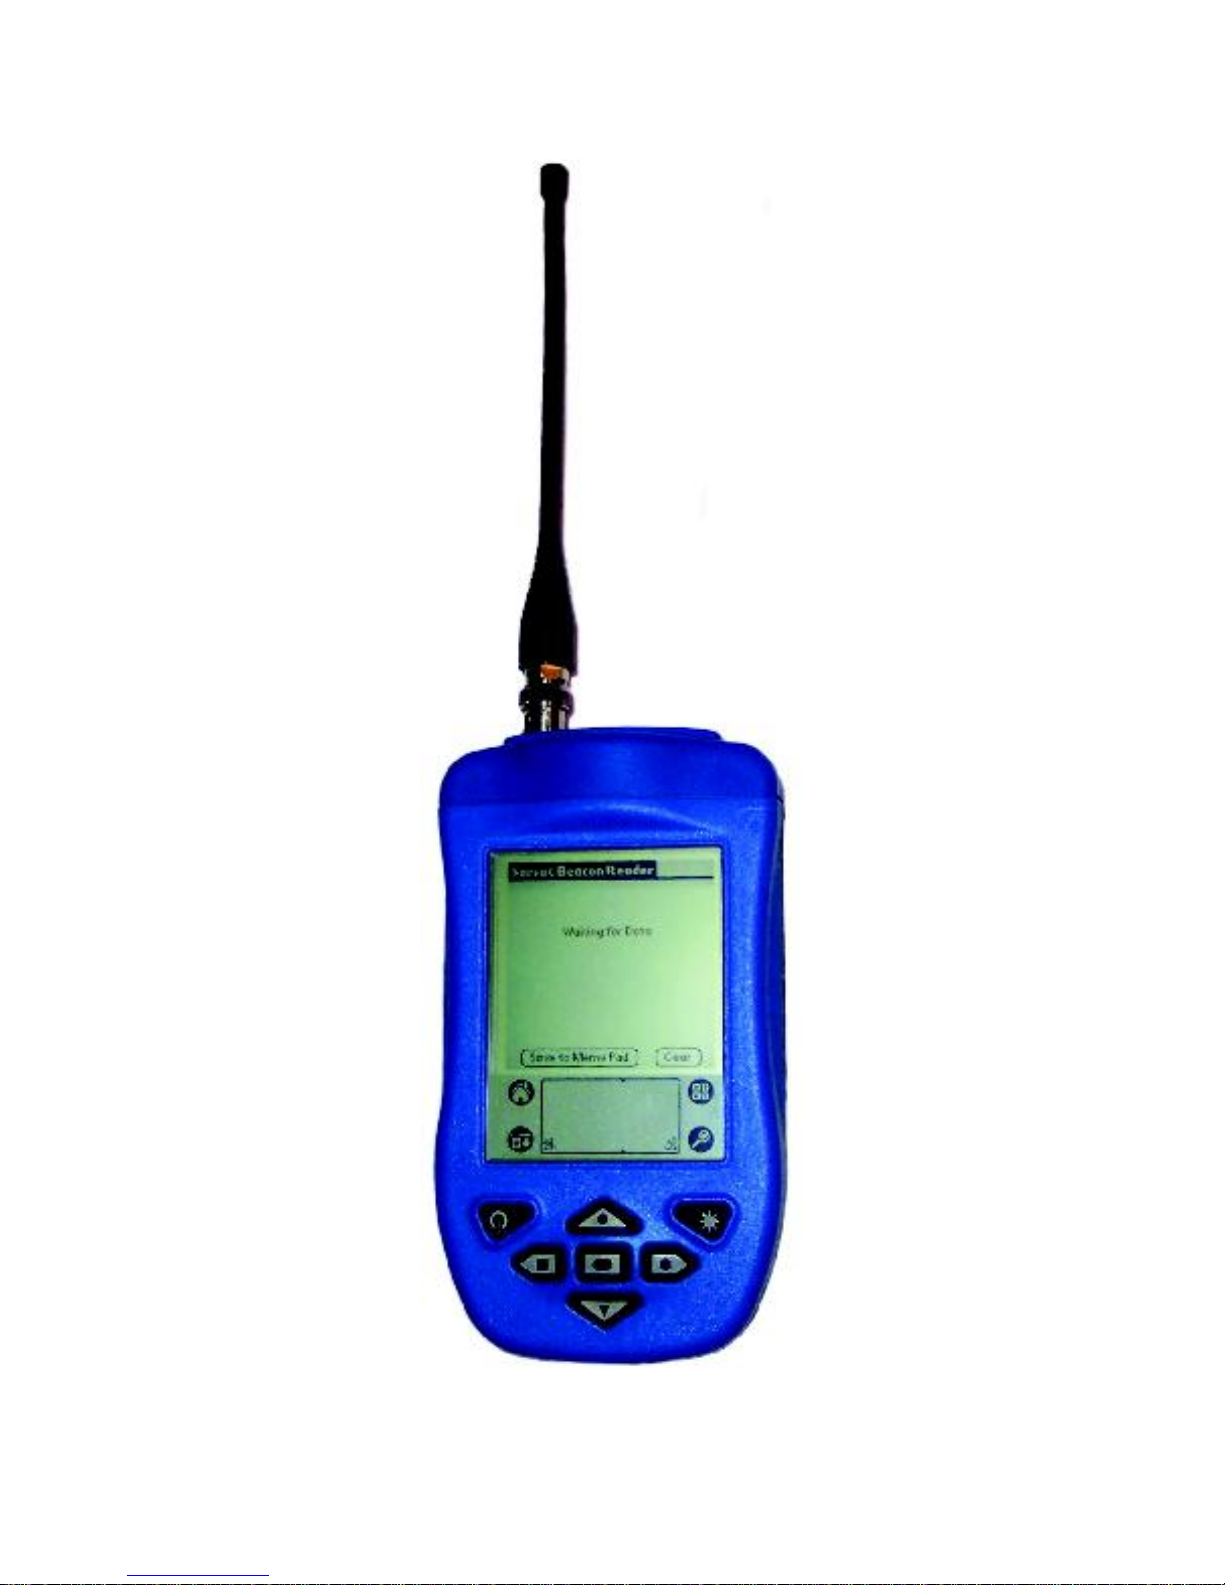
The 453-2000 Handheld Programmer (Figure 1, on the next page) has the following
features and capabilities:
Ability to program all Artex 406 MHz ELTs with supported protocols
All 406 MHz aircraft protocols decoded
Waterproof to IP67 standards
Ruggedized case
Internal database of received messages and programming
Optional printing of current or stored messages via IR or serial links
Desktop application for database storage and review
Long life rechargeable battery
Built-in RF attenuator
1.4 Functionality
The heart of the Handheld Programmer is the Meazura MEZ1000 manufactured by
Aceeca International, Ltd of Christchurch, NZ. The Meazura MEZ1000 uses the Palm
OS operating system.
Artex has customized operation of the Meazura MEZ1000 by utilizing the MZIO
interface inside the Meazura MEZ1000 unit. The “off-the-shelf” Meazura MEZ1000
combined with a custom module containing the Artex programming hardware interface
comprises the Artex Handheld Programmer.
CAUTION: AS DELIVERED BY ARTEX, THE MZIO INTERFACE IS NOT ACCESSIBLE
BY THE USER WITHOUT VOIDING THE ARTEX WARRANTY.
NOTE
stands for “Rugged Digital Assistant”. This terminology is encountered on the Aceeca
web site and in their literature.
Additional operating information can be found at in the Aceeca documents MEZ1000
Quick Reference User Guide and MEZ1000 HotSync Configuration Guide located on the
CD-ROM disc provided as Artex P/N 510-1200.
: Aceeca International, Ltd refers to the Meazura MEZ1000 as an RDA, which
Page 2
Page 9
570-2000, Rev. E, 453-2000 Handheld Programmer Operations Manual
Figure 1: 453-2000 Handheld Programmer
Page 3
Page 10
570-2000, Rev. E, 453-2000 Handheld Programmer Operations Manual
2. Hardware
The Handheld Programmer allows communication with any Artex 406 MHz ELT. It inverts
and raises the data signal from the ELT to an RS-232 signal level. This enables the ELT to
“talk” to the Handheld Programmer for programming and diagnostic purposes.
2.1 Overview
The following subsections provide an overview of the Handheld Programmer hardware:
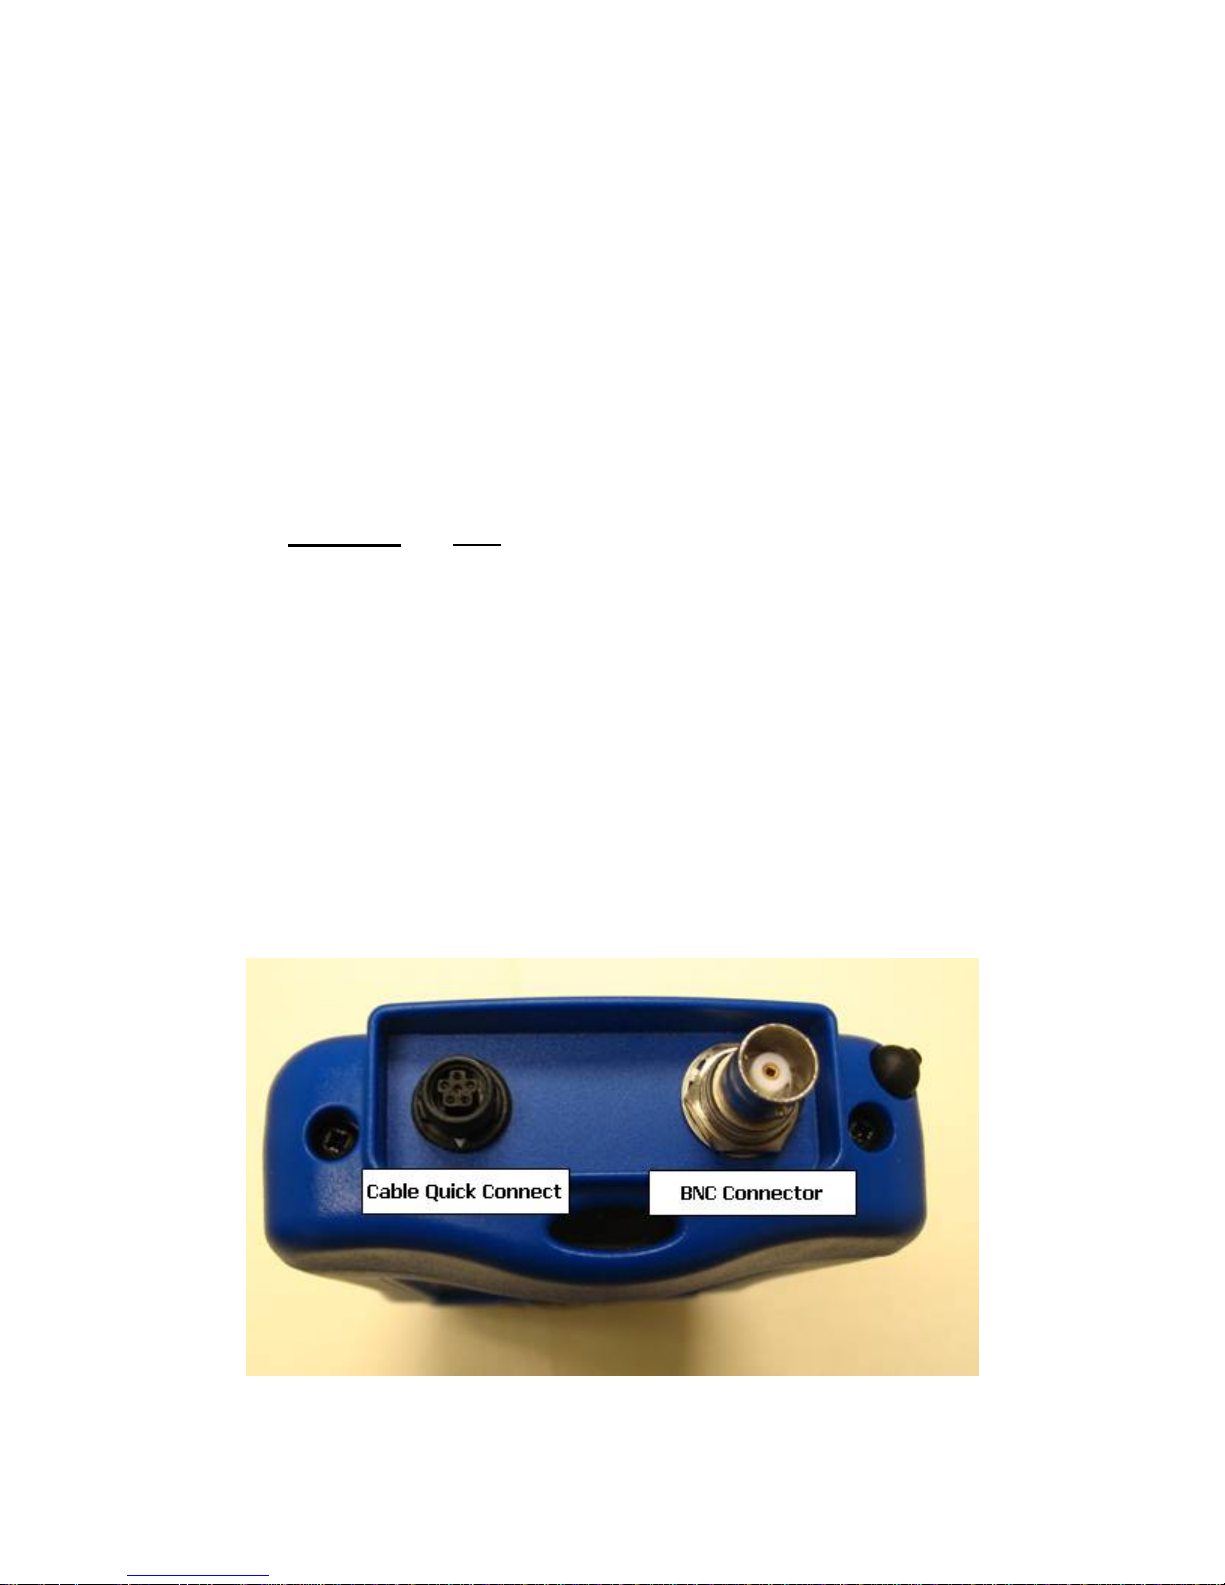
2.1.1 Connections
The Handheld Programmer is fitted with two connectors (Figure 5):
A quick connect/disconnect circular connector for connecting the programming
cables. This connector is push-on/pull-off type.
CAUTION: DO NOT TWIST THE CONNECTOR.
The built-in lock/release mechanism securely locks the mated connectors, while
allowing quick disconnection by simply pulling on the plug release collar. Moldedin grooves prevent hand slippage when pulling on the connector.
Three cables are supplied with the Handheld Programmer to facilitate connection
to current Artex 406 MHz ELT models. The cables are:
611-0110 – For 110-406 and C406 Series; including the C406-1 and C406-2
Series, G406 series, B406 series (i.e., any Artex 406 MHz ELT using a 12-pin
Molex connector).
611-0111 – For C406-N/PA Series
611-0112 – For ME406 Series
The ELT reader portion of the Handheld Programmer uses a BNC connector to
allow connection of a 110-418 antenna or a direct-connect coax cable. See
Subsection 11.2 for optional equipment.
Figure 2: Handheld Programmer Connectors
Page 4
Page 11
570-2000, Rev. E, 453-2000 Handheld Programmer Operations Manual
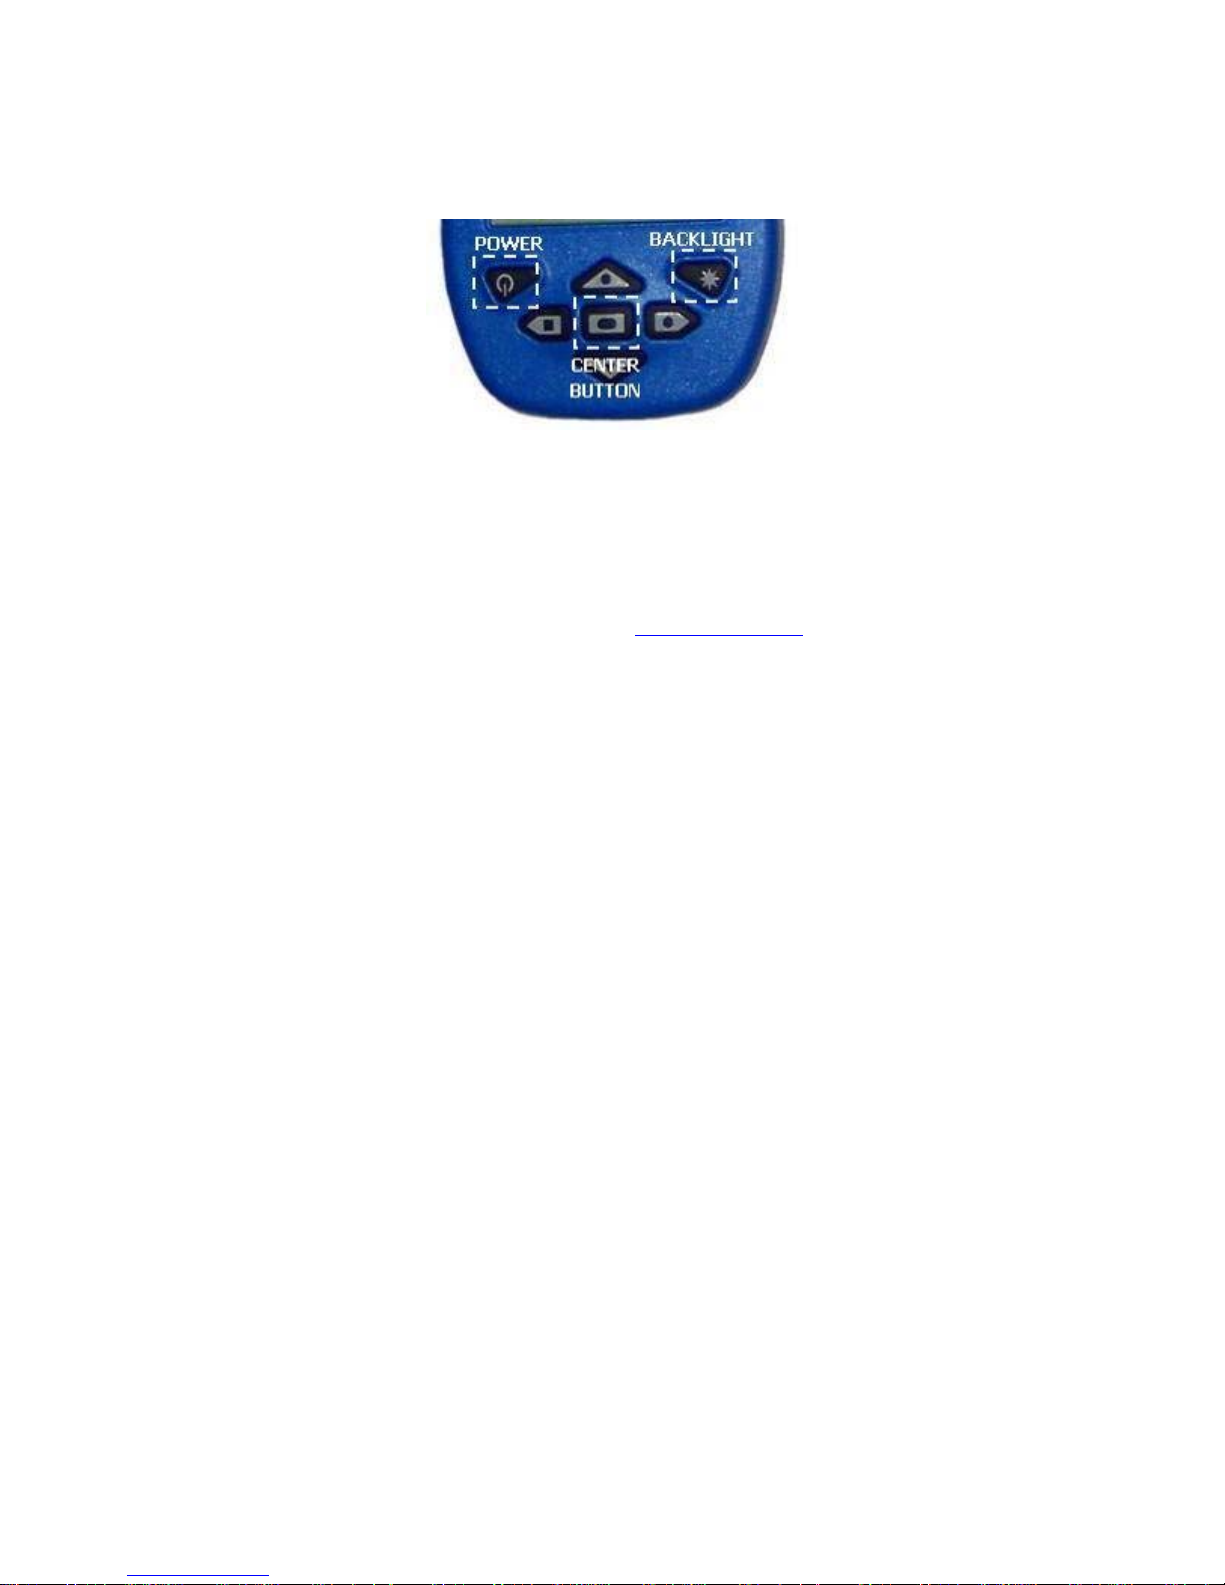
2.1.2 Controls
The Meazura MEZ1000 is controlled with the buttons shown in Figure 3.
Figure 3: Controls
The Power button is used to turn the unit off and on and, when pressed with the
Backlight button, for reset functions described later in this manual.
Center button usage is discussed in detail later in the manual. The Arrow keys
are used for vertical and horizontal scrolling.
®
Operation of Palm OS
Meazura MEZ1000 “User’s Guide” (www.aceeca.com
functions are described in greater detail in the Aceeca
).
2.2 Battery
The Meazura™ MEZ1000 comes with a custom, rechargeable Lithium Ion battery pack
that can only be purchased from Aceeca or Artex. The battery pack allows
approximately 60 hours of continual use.
2.2.1 Warnings
Do not heat or throw the battery into a fire.
Do not use or store the battery close to fire or where the ambient temperature may
be over 60°C.
Do not put the battery in your pocket or in a bag together with metal objects. Do
not store the battery with such objects.
Do not short circuit the (+) and (-) terminals with a metal object.
Do not pierce the battery with a sharp object.
Do not hit with a hammer, step on, throw, drop, or allow the battery to undergo
any strong shock.
Do not disassemble or modify the battery.
Do not solder the battery directly to the terminals.
Do not use a battery that is severely scarred or deformed.
2.2.2 Storage
Unlike NiCad (Nickel Cadmium) batteries or NiMH (Nickel-metal Hydride) batteries,
lithium-ion batteries should be charged early and often. Never use battery
maintenance software to maintain your battery as this can reduce the life of your
battery. Li-ion batteries should be kept cool. They should not be subjected to freezing
temperatures. Aging will occur much faster at high temperatures and will reduce the
life of your battery.
Page 5
Page 12

570-2000, Rev. E, 453-2000 Handheld Programmer Operations Manual
S
CO
OR
C
CLIP
Purchase a Li-Ion battery pack only when you need a replacement, thus ensuring you
receive a fresh battery pack.
Stop using the battery if it exhibits abnormal heat, odor, color, deformation or is in
an abnormal condition.
Keep away from fire immediately when leakage or foul odor is detected.
If liquid leaks onto your skin or clothing wash well with fresh water immediately.
If liquid leaking from the battery gets into your eyes; do not rub your eyes. Rinse
well with clean water and consult a doctor immediately.
Before using the battery, be sure to read the user's manual and cautions on
handling thoroughly.
For information on installing and removing the battery from equipment, thoroughly
read the user's manual for the specific equipment.
Batteries have life cycles, so if the time that the battery is powering the equipment
becomes much shorter than usual, the battery life is at an end. Replace the
battery with a new one.
Remove a battery whose life cycle has expired from equipment immediately.
When the battery is discarded, make it non-conducting by applying vinyl tape to
the (+) and (-) terminals. The battery must either be discarded as specified by
local regulations or put it in the recycling box of a store that is cooperating in the
recycling of rechargeable batteries.
When not using the battery for an extended period remove it from the equipment
and store it in a place with a low humidity and low temperature.
2.2.3 Installation
Referring to Figure 4:
1. Place the battery pack with the top end in first.
2. Push down on the bottom end of the battery ensuring that it is firmly in place.
3. Push the clip firmly towards the bottom of the test set until it clicks into place.
4. Charge the battery in accordance with Subsection 2.2.4.
STYLU
COMMU N I CATIONS
NNECT
Figure 4: Back Side View
BATTERY
PA
K
BATTERY
Page 6
Page 13

570-2000, Rev. E, 453-2000 Handheld Programmer Operations Manual
2.2.4 Charging
The lithium-ion battery can provide between 300-500 charge/discharge cycles. The
lithium-ion battery is different from most other rechargeable batteries as charging
from a partially charged battery keeps the battery in great condition, whereas other
batteries prefer to be fully discharged each time before recharging. Fully discharging
the lithium-ion battery should be avoided wherever possible.
For most users, charging the battery at the end of each day would be the ideal choice.
The lithium-ion battery pack typically lasts about 2-3 years, but potentially longer if
cared for correctly.
When charging the battery, use a dedicated charger and follow the specified
conditions.
Do not use or charge the battery close to fire or inside a car in which the
temperature may exceed 60° C.
Stop charging the battery if charging is not completed within the specified time.
Thoroughly read this manual before charging the battery.
The battery can be charged within a 0° C to 45° C temperature range.
Use the battery only in the specified equipment.
Do not charge the battery in a place where static electricity is generated, or let
the battery touch something that is statically charged.
Charge the battery as follows:
1. Connect the charger cable to the communications cable (Figure 5).
2. Connect the communications cable to the unit (Figure 5).
3. Charge for a minimum of 2 hours, but no more than 3 hours.
CAUTION: DO NOT OVERCHARGE.
Figure 5: Charging Connection
Page 7
Page 14

570-2000, Rev. E, 453-2000 Handheld Programmer Operations Manual
2.2.5 Recycle and Disposal Methods
Lithium ion batteries, like all rechargeable batteries are recyclable and should be
recycled.
CAUTION: IF A BATTERY IS DAMAGED, OR IF IT NO LONGER HOLDS A CHARGE,
DISPOSE OF IT PROMPTLY AND PROPERLY. DO NOT DISPOSE OF IT ALONG WITH
GENERAL WASTE. CALL YOUR LOCAL WASTE DISPOSAL AGENCY OR
ENVIRONMENTAL AGENCY FOR ADVICE ON BATTERY DISPOSAL.
2.3 Unit Initialization
1. Turn on the unit by pressing the Power button.
2. Follow the on-screen instructions for initialization and setting the date and time.
NOTE
: The initialization routine is very important to ensure proper function of the
stylus.
3. Refer to the Meazura MEZ1000 User’s Guide for greater details on initialization.
Page 8
Page 15

570-2000, Rev. E, 453-2000 Handheld Programmer Operations Manual
3. Palm™ Desktop Software
Prior to use, the Palm™ Desktop, as supplied on the CD-ROM disc (Artex P/N 510-1200),
must be installed on the Windows 95/NT/98/2000/Me/XP PC that will be used to interface
with the Handheld Programmer. Follow the on-screen instructions for installation.
NOTES
: The Palm desktop software works most amiably if a single Meazura™ (Palm)
device is associated with a single computer. It is possible to use more than one
Meazura™ device with the same computer, but attention must be given to selection of
appropriate user names when transferring data to and from different units.
The Palm™ software identifies the User Name when the Palm™ Desktop application is
installed on a PC. Only one User Name can be used with the Artex applications.
3.1 Hot Sync
Once installed and configured, the Palm™ Desktop software allows installation of
additional software applications, as well as performing the hot sync function to transfer
data to and from the Handheld Programmer (Meazura MEZ1000). Artex provides a
USB cable (452-0103) to connect to a PC.
The hot sync function is accessed by tapping the HotSync icon on the main Meazura
screen as shown in Figure 6. The hot sync operation is described in greater detail in the
Aceeca “HotSync Guide” available free for download at www.aceeca.com
.
Figure 6: Hot Sync Icon
Page 9
Page 16

570-2000, Rev. E, 453-2000 Handheld Programmer Operations Manual
4. Artex Programming Software
The following subsections describe the functionality and operation of the Artex
programming software.
4.1 Overview
The Artex software is a custom package designed to simplify reading and programming
data to and from Artex ELTs. The Artex software builds a custom 406 MHz hex message
for the user from simple data input provided by the user. This data is then programmed
into the ELT. The Artex software allows the user to print the 406 MHz hex message and
its decoded breakdown for record keeping.
When shipped, the “Artex” and “Sarcalc” software are loaded into the Meazura™
MEZ1000 permanent ROM memory. The Artex ELT Programmer Software has been
released at V1.02. Subsequent versions may be released with incremental numbering
and/or letter suffixes.
4.2 Opening the Artex Software
To open the Artex software:
1. Tap the “Artex” icon on the home screen.
2. The Artex main screen is shown in Figure 7.
Figure 7: Artex Software Main Screen
4.3 Selecting Preferences
The Artex software has several preferences that may be selected prior to use.
1. Tap the upper left-hand corner of the Artex main screen (Artex ELT Programmer
header) to get the Screens drop-down menu (Figure 8).
Figure 8: Screens Drop-Down Menu
Page 10
Page 17

570-2000, Rev. E, 453-2000 Handheld Programmer Operations Manual
2. Tap “Prefs” on the drop-down menu and select the following preferences, as
applicable:
24-Bit Address Format – Select either Octal or Hex
Label Writer – Select Dymo or Brady/Datamax
Clear Database – Erases all saved programming messages
3. Tap “Done” when finished to return to main menu.
4.4 Programmer Database
The Handheld Programmer retains up to 1000 records of programmed ELTs.
NOTE
: The programming operation must be successfully completed in order for the
record to be stored in the database.
The database may be deleted at any time by accessing the “Prefs” drop-down menu
and selecting “Clear Database” (Subsection 4.3).
Stored records may be viewed by tapping “Review” on the main screen (Subsection
4.2).
Stored records may also be programmed into an ELT following the instructions
given herein.
The stored programming may also be viewed using Sarcalc Desktop V1.2. See
Subsection 6.2 for a detailed description of this function.
4.5 ELT Programming
IMPORTANT: When working with any ELT, keep a 121.5 MHz receiver nearby, on, and
at adequate volume. This is necessary to catch and deactivate an ELT that may
accidentally be left on.
The ELT being programmed must properly perform all operations described in this set of
instructions. An ELT that fails any portion must be rejected and repaired.
1. Set the Baud rate to 9600 to program long message ELTs and 2400 to program
older, short message ELTs.
2. Disconnect the battery on older “short message only” ELTs. This prevents several
issues:
The ELT, with the battery installed, will activate when being programmed. The
ELT must be manually reset by moving the switch to “ON” and back to
“OFF/ARM” after programming.
When programming power is applied, the ELT will enter transmit mode, a weak
121.5/243 MHz transmission may be heard and a 406 MHz burst will take place
after 15 seconds, which leaves little time for programming.
If a 406 MHz burst takes place during programming, there is a possibility the
programming will fail.
3. Plug the programming cable into the ELT
4. Connect the cable to the Handheld Programmer.
Page 11
Page 18

570-2000, Rev. E, 453-2000 Handheld Programmer Operations Manual
Table 1 provides data for programming ELTs with certain protocol types. This
information is not used in all protocol types; hence, programming software may not ask
for this information.
The Artex Programming Software divides the ELTs into the following families:
9600 Baud ELT
2400 Baud ELT
9600 PA
Refer to Table 1 as instructed to complete programming sequences. For Table 1,
protocols are defined as follows:
Std Location = Aircraft 24 Bit Address (Long) and ELT Serial (Long)
Aviation User = Tail Number (Short)
Serial User = Aircraft 24 Bit Addr (Short), Aircraft 24 Bit / National (Short), ELT /
COSPAS (Short) and Aircraft Operator (Short)
National Location = ELT Serial (Long)
User Location = Aviation User / Tail Number / Location (Long)
Table 1: ELT Data
ELT Part
Number
Description
Baud
Rate
COSPAS-
SARSAT #
Programmed
Serial #
Supported
Protocols
Model # Sequence
# Range
Production
# Range
C406 Series
453-5060 C406-N 9600 135
453-5061 C406-N HM 9600 135
See
453-5000 C406-2 9600
Note 2
See
453-5001 C406-2HM 9600
Note 2
See
453-5002 C406-1 9600
Note 2
Same as
unit label
(5 digit)
Same as
unit label
(5 digit)
See
Note 2
See
Note 2
See
Note 2
Std Location
Aviation User
Serial User
User Location
National
Location
Std Location
Aviation User
Serial User
User Location
National
Location
Std Location
Aviation User
Serial User
Std Location
Aviation User
Serial User
Std Location
Aviation User
Serial User
7 0-1638 0-9
7 0-1638 0-9
6 0-1638 0-9
6 0-1638 0-9
6 0-1638 0-9
Page 12
Page 19

570-2000, Rev. E, 453-2000 Handheld Programmer Operations Manual
ELT Part
Number
Description
Baud
Rate
COSPAS-
SARSAT #
C406 Series (cont.)
See
453-5003 C406-1HM 9600
Note 2
See
453-5006 C406-3 9600
Note 2
See
453-5056 RB 406-1HM 9600
Note 2
PA SERIES
453-5068 PA (Blank) 9600 135
453-5078
PA (Pre-
Programmed)
9600 135
Programmed
Serial #
See
Note 2
See
Note 2
See
Note 2
Same as
unit label
(5 digit)
Same as
unit label
(5 digit)
Supported
Protocols
Std Location
Aviation User
Serial User
Std Location
Aviation User
Serial User
Std Location
Aviation User
Serial User
Std Location
Aviation User
Serial User
User Location
National
Location
Std Location
Aviation User
Serial User
User Location
National
Location
Model # Sequence
# Range
Production
# Range
6 0-1638 0-9
6 0-1638 0-9
6 0-1638 0-9
7 0-1638 0-9
7 0-1638 0-9
G406 SERIES
453-5100 G406-1 9600 126
453-5102 G406-2 9600 126
See
453-5012 G406-4 9600
Note 2
B406 SERIES
453-0004 B406-1 2400 67
Same as
unit label
(5 digit)
Same as
unit label
(5 digit)
See
Note 2
Same as
unit label
(7 digit)
Std Location
Aviation User
Serial User
Std Location
Aviation User
Serial User
Std Location
Aviation User
Serial User
Aviation User
Serial User
(Short Only)
6 0-1638 0-9
6 0-1638 0-9
5 0-1638 0-9
3 0-1047 0-255
Page 13
Page 20

570-2000, Rev. E, 453-2000 Handheld Programmer Operations Manual
ELT Part
Number
Description
Baud
Rate
COSPAS-
SARSAT #
B406 Series (cont.)
453-0005 B406-A 2400 67
453-0003 B406-2 9600 104
See
453-5004 B406-4 9600
Note 2
110-406 SERIES
453-0406 ELT 110-406 2400 67
453-0407
ELT 110-
406HM
2400 67
Programmed
Serial #
Same as
unit label
(7 digit)
Same as
unit label
(5 digit)
See
Note 2
Same as
unit label
(7 digit)
Same as
unit label
(7 digit)
Supported
Protocols
Aviation User
Serial User
(Short Only)
Std Location
Aviation User
Serial User
Std Location
Aviation User
Serial User
Aviation User
Serial User
(Short Only)
Aviation User
Serial User
(Short Only)
Model # Sequence
# Range
Production
# Range
3 0-1047 0-255
5 0-1638 0-9
6 0-1638 0-9
1 0-1047 0-255
2 0-1047 0-255
453-0421
453-0423
453-0006
453-0424
ELT 110-406
NAV
ELT 110-
406HM NAV
ELT 110-
406ED
ELT 110-
406ED NAV
9600 104
9600 104
2400 67
9600 104
ME406 SERIES
453-6603 ME406 9600
See
Note 2
Same as
unit label
(5 digit)
Same as
unit label
(5 digit)
Same as
unit label
(7 digit)
Same as
unit label
(5 digit)
See
Note 2
Std Location
Aviation User
Serial User
Std Location
Aviation User
Serial User
Aviation User
Serial User
(Short Only)
Std Location
Aviation User
Serial User
Std Location
Aviation User
Serial User
User Location
5 0-1638 0-9
5 0-1638 0-9
4 0-1047 0-255
5 0-1638 0-9
8 0-1638 0-9
National
Location
Page 14
Page 21

570-2000, Rev. E, 453-2000 Handheld Programmer Operations Manual
ELT Part
Number
Description
Baud
Rate
ME406 Series (cont.)
453-6604 ME406HM 9600
453-6611 ME406P 9600
453-6650
ME406
BLACK
9600
COSPAS-
SARSAT #
See
Note 2
See
Note 2
See
Note 2
Programmed
Serial #
See
Note 2
See
Note 2
See
Note 2
Supported
Protocols
Std Location
Aviation User
Serial User
User Location
National
Location
Std Location
Aviation User
Serial User
User Location
National
Location
Std Location
Aviation User
Serial User
User Location
National
Location
Model # Sequence
# Range
Production
# Range
8 0-1638 0-9
8 0-1638 0-9
8 0-1638 0-9
NOTE 1: When entering data into the programming software, most fields not filled with the maximum
allowable number of characters will fill the unused portion with zeros to the left of the data entered.
Exceptions to this are noted in the appropriate subsections below.
NOTE 2
: The COSPAS-SARSAT 15-digit ELT Identifier allows manufacturers 16,383 possible serial
numbers. Artex has reached that limit with the C, B, G, and ME Series. For ELTs that pass serial number
16,383 and move on to a 3-digit prefix, different COSPAS-SARSAT numbers will be assigned to that ELT.
See Table 2.
Table 2: ELT Serial Number Continuations
ELT Series
C, B, G
COSPAS-
SARSAT #
Manufacturing Serial # ELT Programmed Serial #
112 00001 to 16383 00001 to 16383
170 170-00001 to 170-16383 00001 to 16383
152 00001 to 16383 00001 to 16383
ME
188 188-00001 to 188-16383 00001 to 16383
197 197-00001 to 197-16383 00001 to 16383
Because a different COSPAS-SARSAT # is used when the serial numbers reset after
16,383, the 15-digit ELT Identifier remains unique.
NOTE
: There were a small number of ELTs in the C, B, G series that used the letter “A”
as a prefix before the numerical prefix was adopted for use. (i.e., A00001 instead of
170-00001)
Page 15
Page 22

570-2000, Rev. E, 453-2000 Handheld Programmer Operations Manual
4.6 Country Code Database
The Handheld Programmer is loaded at Artex with a Country Code Database to be used
with the Artex software. This database contains all listed countries assigned a threedigit Maritime Identification Digit (MID) by the International Telecommunications Union
(ITU) and ICAO.
The database may be sorted either in alphabetical order (by country name) or in
numerical order (by country code). The complete list can be seen by scrolling, using
your stylus and the scroll bar to the right of the screen. See examples in Figure 9.
Figure 9: Alphabetical and Numerical Sorting Examples
For country codes not listed, “manual entry” may be used.
NOTES
: Many countries have multiple country codes assigned by the International
Telecommunications Union (ITU). Artex has verified the required or preferred country
code for as many countries as possible.
The list contained in the Handheld Programmer represents our best efforts and lists
only one option for each country listed. If a conflict arises with your national authority,
please contact Artex, such that we may update our information.
4.7 Protocols
The desired programming protocol must be selected. Consult with local aviation
authorities for possible programming protocol exceptions/additional rules that may apply
for particular countries.
In the protocol field, select the type of programming desired by tapping on the dropdown menu to show the protocol options. Refer to Table 1 to determine which ELTs are
“Short Message” ELTs and which are “Long Message” ELTs. Short message ELTs accept
short message protocol programming only. Long message ELTs may use either long
message or short message protocol programming. The protocols are:
Aviation User / Tail Number (Short)
Serial User / ELT / COSPAS (Short)
Serial User/ Aircraft 24-Bit Addr (Short)
Serial User/Aircraft 24-Bit/Ntl (Short)
Serial User/ Aircraft Operator Designator (Short)
Aviation User / Tail Number / Location (Long)
Std Location / Aircraft 24-Bit Address (Long)
Page 16
Page 23

570-2000, Rev. E, 453-2000 Handheld Programmer Operations Manual
Std Location / ELT Serial (Long)
Ntl Location/ELT Serial (Long)
4.7.1 Aviation User / Tail Number (Short)
1. Select ELT Baud rate.
2. Select Protocol.
3. Select Country Code.
4. Go to Graffiti screen and tap on letter/numbers.
5. Enter the tail number of the aircraft, which is up to seven alphanumeric
characters.
Acceptable characters are letters (A-Z), numbers (0-9), a hyphen (-), a
space ( ), and a slash (/).
If fewer characters are entered, that will be reflected in the final hex code.
Spaces are automatically filled in on the left of the data.
6. Tap “Done” when finished.
7. Tap “ENTER” button on Program screen. The 24-digit hex code is shown at the
bottom of the screen, with the abbreviated 15-digit hex code below it.
8. Tap the “Program” button to program the ELT.
9. Ensure that screen shows “Programming Successful”.
10. Verify ELT using “Sarcalc”, as described in Subsection 6.2.
4.7.2 Serial User / ELT / COSPAS (Short)
1. Select ELT Baud rate.
2. Select Protocol.
3. Select Country Code.
4. Go to Graffiti Screen and tap on letter/numbers.
5. Enter the serial number, which matches the serial number seen on the product
label, or a number that was designated for use by the competent national
authority.
6. Enter the COSPAS-SARSAT TAC number.
7. Tap “Done” when finished.
8. Tap “ENTER” button on Program screen. The 24-digit hex code is shown at the
bottom of the screen, with the abbreviated 15-digit hex code below it.
9. Tap the “Program” button to program the ELT.
10. Ensure that screen shows “Programming Successful”.
11. Verify ELT using “Sarcalc, as described in Subsection 6.2.
Page 17
Page 24

570-2000, Rev. E, 453-2000 Handheld Programmer Operations Manual
4.7.3 Serial User / Aircraft 24-Bit Addr (Short)
1. Select ELT Baud rate.
2. Select Protocol.
NOTE
: Country Code will be blank. It will be automatically selected by entry of
a valid 24-Bit Aircraft Address.
3. Select the desired number system (Octal: 8 digits from 0-7 or Hex: 6 digits from
0-9 or A-F) to match the format of the 24-bit address provided.
4. Go to Graffiti screen and tap on letter/numbers.
5. Enter the 24-bit address.
NOTE
: The 3-digit country code is automatically determined from the country
data encoded in the 24-bit address.
6. Enter the COSPAS-SARSAT TAC number.
7. Enter number of additional ELTs.
This particular number field represents the number of additional ELTs on
board an aircraft, beyond the primary ELT.
Enter “0” if there is only one ELT on-board, and “1”, “2”, etc., corresponding
to the number of additional ELTs installed on the aircraft.
8. Tap “Done” when finished.
9. Tap “ENTER” button on Program screen. The 24-digit hex code is shown at the
bottom of the screen, with the abbreviated 15-digit hex code below it.
10. Tap the “Program” button to program the ELT.
11. Ensure that screen shows “Programming Successful”.
12. Verify ELT using “Sarcalc”, as described in Subsection 6.2.
4.7.4 Serial User / Aircraft 24-Bit Addr/Ntl (Short)
1. Select ELT Baud rate.
2. Select Protocol.
NOTE
a valid 24-Bit Aircraft Address.
3. Select the desired number system (Octal: 8 digits from 0-7 or Hex: 6 digits from
0-9 or A-F) to match the format of the 24-bit address provided.
4. Go to Graffiti Screen and tap on letter/numbers
5. Enter the 24-bit address.
NOTE
data encoded in the 24-bit address.
6. Enter the National Use designated number.
: Country Code will be blank. It will be automatically selected by entry of
: The 3-digit country code is automatically determined from the country
Page 18
Page 25

570-2000, Rev. E, 453-2000 Handheld Programmer Operations Manual
7. Enter number of additional ELTs.
This particular number field represents the number of additional ELTs on
board an aircraft, beyond the primary ELT.
Enter “0” if there is only one ELT on-board, and “1”, “2”, etc., corresponding
to the number of additional ELTs installed on the aircraft.
8. Tap “Done” when finished.
9. Tap “ENTER” button on Program screen. The 24-digit hex code is shown at the
bottom of the screen, with the abbreviated 15-digit hex code below it.
10. Tap the “Program” button to program the ELT.
11. Ensure that screen shows “Programming Successful”.
12. Verify ELT using “Sarcalc”, as described in Subsection 6.2.
4.7.5 Serial User / Aircraft Operator Designator (Short)
1. Select ELT Baud rate.
2. Select Protocol.
3. Select Country Code.
4. Go to Graffiti screen and tap on letter/numbers.
5. Enter Aircraft Operator Designator - (three digit assigned code)
6. Enter the COSPAS-SARSAT TAC number.
7. Enter designated serial number (between 0 and 4095).
8. Tap “Done” when finished.
9. Tap “ENTER” button on Program screen. The 24-digit hex code is shown at the
bottom of the screen, with the abbreviated 15-digit hex code below it.
10. Tap the “Program” button to program the ELT.
11. Ensure that screen shows “Programming Successful”.
12. Verify ELT using “Sarcalc”, as described in Subsection 6.2.
4.7.6 Aviation User / Tail Number / Location (Long)
1. Select ELT Baud rate.
2. Select Protocol
3. Select Country Code
4. Go to Graffiti Screen and tap on letter/numbers
5. Enter the tail number of the aircraft, which is up to seven alphanumeric
characters.
Acceptable characters are letters (A-Z), numbers (0-9), a hyphen (-), a
space ( ), and a slash (/).
If fewer characters are entered, that will be reflected in the final hex code.
Spaces are filled in on the left of the data.
Page 19
Page 26

570-2000, Rev. E, 453-2000 Handheld Programmer Operations Manual
6. Tap “Done” when finished.
7. Tap “ENTER” button on Program screen. The 32-digit hex code is shown at the
bottom of the screen, with the abbreviated 15-digit hex code below it.
8. Tap the “Program” button to program the ELT.
9. Ensure that screen shows “Programming Successful”.
10. Verify ELT using “Sarcalc”, as described in Subsection 6.2.
4.7.7 Std Location / Aircraft 24-Bit Address (Long)
1. Select ELT Baud rate.
2. Select Protocol.
3. Select the desired number system (Octal: 8 digits from 0-7 or Hex: 6 digits from
0-9 or A-F) to match the format of the 24-bit address provided.
4. Enter the 24-bit address.
5. You may then click on the other number system selection to see the converted
value (Octal or Hex).
NOTE
: The 3-digit country code is automatically determined from the country
data encoded in the 24-bit address.
6. Go to Graffiti screen and tap on letter/numbers.
7. Enter aircraft 24-bt address.
8. Tap “Done” when finished.
9. Tap “ENTER” button on Program screen. The 32-digit hex code is shown at the
bottom of the screen, with the abbreviated 15-digit hex code below it.
10. Tap the “Program” button to program the ELT.
11. Ensure that screen shows “Programming Successful”.
12. Verify ELT using Sarcalc”, as described in Subsection 6.2.
4.7.8 Std Location / ELT Serial (Long)
1. Select ELT Baud rate.
2. Select Protocol.
3. Select Country Code.
4. Go to Graffiti screen and tap on letter/numbers.
5. Enter the serial number, which matches the serial number seen on the product
label, or a number that was designated for use by the competent national
authority.
6. Enter the COSPAS-SARSAT TAC number.
7. Tap “Done” when finished.
Page 20
Page 27

570-2000, Rev. E, 453-2000 Handheld Programmer Operations Manual
8. Tap “ENTER” button on Program screen. The 32-digit hex code is shown at the
bottom of the screen, with the abbreviated 15-digit hex code below it.
9. Tap the “Program” button to program the ELT.
10. Ensure that screen shows “Programming Successful”.
11. Verify ELT using “Sarcalc, as described in Subsection 6.2.
4.7.9 National Location / ELT Serial (Long)
1. Select ELT Baud rate.
2. Select Protocol.
3. Select Country Code.
4. Go to Graffiti screen and tap on letter/numbers.
5. Enter the serial number, which matches the serial number seen on the product
label, or a number that was designated for use by the competent national
authority.
6. Tap “Done” when finished.
7. Tap “ENTER” button on Program screen. The 32-digit hex code is shown at the
bottom of the screen, with the abbreviated 15-digit hex code below it.
8. Tap the “Program” button to program the ELT.
9. Ensure that screen shows “Programming Successful”.
10. Verify ELT using “Sarcalc, as described in Subsection 6.2.
4.8 Programming a Different Country Code for use with a Specific 24-Bit
Address
1. Follow the instructions for the 24-bit address method being used (short or long).
Refer to Subsection 4.7.3, 4.7.4, or 4.7.7, as appropriate.
2. After “Enter” button function used, go to the top of the screen and tap on “Artex
ELT Programmer bar”.
3. Tap on “Options”.
4. Select: “Defaults”.
5. Tap in “Country” entry space and go to numbers selection on Graffiti screen.
6. Enter required country code
7. Tap “Done” when finished.
8. Tap “Return” on the Override default screen.
9. Tap “Program” on the Programmer screen.
10. After programming successful, launch Sarcalc and verify programmed information,
as described in Subsection 6.2.
Page 21
Page 28

570-2000, Rev. E, 453-2000 Handheld Programmer Operations Manual
4.9 Programming Conclusion
After programming an ELT with any of the protocols listed in Subsection 4.7, the
“Programming Successful” screen will be displayed (Figure 10).
Figure 10: Programming Successful Screen
Proceed to Section 6, Programming Verification. The programming may be printed now,
but it is recommended the ELT be verified first. See Section 7, Label and Report for
printing instructions.
4.10 Battery Data Reader
The Artex programming software provides the means to determine battery usage and
total battery activations.
NOTE
30 seconds is added to the battery usage total each time the ELT is activated and deactivated. If the ELT is left activated beyond the first 30 seconds, additional time is
added in 30-second increments.
Battery usage is given in hours and minutes, plus total number of activations (count) is
also provided. To read the battery data:
1. Tap the Artex icon on the Home screen.
2. Tap the upper left-hand corner of the Artex main screen (Artex ELT Programmer
3. Select “Read” in the drop-down menu.
4. Tap the “Down” arrow and select “Read Bat”.
5. Tap “Read”.
: The software routine logs battery life in 30-second increments. A minimum of
header) to get the Screens drop-down menu.
Page 22
Page 29

570-2000, Rev. E, 453-2000 Handheld Programmer Operations Manual
5. C406-N Series PA (Programming Adapter)
The C406-N series ELTs offer an accessory programming adapter (PA) designed to
reprogram the attached ELT to match the programming contained within the programming
adapter. This feature is used by fleet operators to facilitate ELT exchange for
maintenance purposes. The C406-N series PA is programmed in exactly the same manner
as an ELT, as described in Section 4.
A C406-N series ELT intended for use with the PA is typically shipped with generic Serial
User – Aviation/ELT COSPAS (Short) programming, as described in Subsection 4.7.2 and
will be overwritten by the PA. The PA may also be ordered blank.
5.1 PA Hardware Operation
The following subsections describe operation of the PA with and without cannon plugs
attached to the PA.
5.1.1 With Cannon Plug Attached To PA
Communication between the PA and the Handheld Programmer requires translation by
a C406-N series ELT or a Programmable Adapter – Programmer Interface (PAPI), P/N
500-8000.
Program a PA by attaching it to the Handheld Programmer using the cable P/N 611-
0111. The male 22-pin circular connector attaches to the PA and the cable 22-pin
female circular connector attaches to a C406-N series ELT or PA-PI. See Figure 11.
NOTE
: The wiring of the 611-0111 harness only connects the six PA wires to the
Handheld Programmer and ELT or PA-PI. Any other wiring installed on the PA
connector will not be attached. It is therefore irrelevant if the additional lines are
active or powered off at the time of programming.
Figure 11: Programming (PA with Cannon Plug)
Page 23
Page 30

570-2000, Rev. E, 453-2000 Handheld Programmer Operations Manual
5.1.2 Without Cannon Plug Attached To PA
Communication between the PA and the Handheld Programmer requires translation by
the Programmable Adapter - Programmer Interface (PA-PI), P/N 500-8000.
To program a PA, attach it to the PA-PI, using the six wires coming from the PA.
Attach them to the connector on top of the PA-PI matching the wire color codes to the
designated pins on the connector.
Connect the PA-PI to the Handheld Programmer using cable P/N 611-0111 and mating
the cable female 22-pin circular connector to the male connector on the PA-PI, as
shown in Figure 12.
Figure 12: Programming (PA without Cannon Plug)
5.2 PA Software Operation
The PA is programmed in the exact same manner as the C406-N ELT. The reason for
this is that the PA holds programming identical to the programming in the attached ELT,
and simply updates the ELT if there is a difference.
To program a C406-N series PA, follow the ELT programming instructions in Section 4,
except select 9600 Baud PA. Select the protocol intended for the ELTs that will be
attached to the PA in the aircraft.
1. Enter programming information for protocol being used.
2. Tap “ENTER” button on screen.
3. The 32-digit Hex code or 24-digit Hex code is shown at the bottom of the screen
with the abbreviated 15-digit Hex code below it.
4. Tap the “PROGRAM” button to program the PA.
5. Ensure the screen shows “Programming Successful”.
6. Verify the programming using Sarcalc, as described in Subsection 6.2.
Page 24
Page 31

570-2000, Rev. E, 453-2000 Handheld Programmer Operations Manual
6. Programming Verification
Artex requires that a verification test as described in the following subsections be
performed. All testing should be done inside some type of metal enclosure that will
attenuate any radio frequency emissions. It is possible for the 406 MHz transmission to
reach an SAR satellite if the signal is not attenuated or shielded.
6.1 ELT Testing Precautions
CAUTION: PERFORM ALL ELT TESTING IN ACCORDANCE WITH LOCAL OR NATIONAL
REGULATIONS. IF REQUIRED, TERMINATE ELT INTO A 50-OHM LOAD OR PERFORM
TESTING IN AN RF SHIELDED ENVIRONMENT.
ELTS WITH 121.5/243 MHZ TRANSMITTERS MUST BE TESTED WITHIN 5 MINUTES
AFTER THE HOUR (US/CANADA). LIVE TRANSMISSIONS OF THE 406 MHZ SIGNAL
MUST BE LIMITED TO ELTS THAT TRANSMIT A “SELF-TEST” USING TEST FRAME
SYNCHRONIZATION. EXTENDED TESTING OF THE 406 MHZ ELT SIGNAL MUST BE
PERFORMED DIRECTLY CONNECTED TO THE PROGRAMMER WITH PROPER SIGNAL
ATTENUATION AND/OR RF SHIELDING. SEE “OPTIONAL EQUIPMENT”.
6.2 ELT Reader Function (Sarcalc)
The ELT Reader function of the Handheld Programmer uses a separate software
program called “Sarcalc”. This software must be opened and run separately from the
Artex Programming software. The Sarcalc program (sarcalc.prc, version 2.33 or higher)
is pre-installed on the Meazura unit in ROM memory. In the event the program is lost
or needs to be re-installed, it may be installed using the Palm Desktop application and
the Meazura serial or USB cable.
NOTE
: The ELT read function does not detect or verify the presence of 121.5 MHz; this
is a 406 MHz reader only.
1. Select the Sarcalc program by tapping the “Sarcalc” icon (Figure 13).
NOTE
: The exact location of the Sarcalc icon may vary depending on what other
programs or applications are loaded on the Handheld Programmer.
Figure 13: Sarcalc Icon
2. Connect the reader to the ELT directly with a coax cable (no attenuator required for
test set) or connect the whip antenna.
The reader is now ready to receive and decode the message.
3. Select “Measure” from “Avionic Tools” screen, as shown in Figure 14.
Page 25
Page 32

570-2000, Rev. E, 453-2000 Handheld Programmer Operations Manual
Figure 14: Avionic Tools Screen
4. The screen will display “Waiting for Data”, as shown in Figure 15, until a valid ELT
transmission is received.
5. Perform a “Self Test” of the ELT by turning the ELT local or remote switch from
“OFF/ARMED” to “ON” for no more than 3 sweeps of the 121.5/243 MHz signal and
then switch back to “OFF/ARMED”.
6. If the received data is invalid, then “Message Error!” will be displayed. This may
indicate excessive distance from the ELT antenna if testing externally.
0-30 feet distance from the ELT antenna is recommended, although distances
up to 50 feet are possible (as allowed).
The ELT internal 406 MHz oscillator may need to warm up.
7. Repeat the ELT test if necessary.
8. Select “Done” to save the message and proceed. A new message will not over-write
the old message. The message will be automatically saved to a database for later
review.
9. Press “Clear” or the right arrow key to clear screen for next message.
6.3 Message Display
Once a valid message is received, all encoded data is displayed on the screen as shown
in Figure 16.
Figure 15: Waiting for Data Screen
NOTE
: The message will remain on-screen until the “Clear” button is selected.
Page 26
Page 33

570-2000, Rev. E, 453-2000 Handheld Programmer Operations Manual
A
A
Q
Sarsat Beaco n Rea d er
Beacon ID = 2DC75B534AFFBFF
Message Type = Normal, Long
Country = 366 USA
viation ELT S/N = 6521
Type Approval # = 135
Position = N43º 30' 0"
W63º 45' 0"
Position Source = External
121.5 Beacon = Yes
Nov 15, 2009 10:06 am 25 sec
Print Done Clear
Figure 16: Valid Standard Location Message
If the ELT is encoded with the 24-bit ICAO address and country of registry is USA, then
the ICAO address will also be decoded to an 'N' number registration, as shown in Figure
17.
Sarsat Beaco n Rea d er
Beacon ID = 2DC75B534AFFBFF
Message Type = Normal, Long
Country = 366 USA
/C ICAO Addr = 50170364N16S
Position = N43º 30' 0"
W63º 45' 0"
Position Source = External
121.5 Beacon = Yes
Nov 15, 2009 10:06 am 25 sec
Figure 17: Valid 24-Bit Address Message
Referring to Figure 16 and Figure 17:
The first line contains the 15-digit Hex ELT ID. This ID is used to register the ELT
with the national authorities (NOAA in USA).
The second line indicates the message type: Test or Normal, and Short or Long.
The third line displays the country of registry code and the country.
The fourth line contains the ELT identifying data. The ELT identifying data will
consist of one of the following: serial number, aircraft 24-bit ICAO address, aircraft
registration number.
ELT type will be displayed (ELT) and also any auxiliary locating device (121.5 MHz
ELT).
If the ELT includes a navigation function, position data will be displayed in
latitude/longitude.
The received 406 MHz frequency is not displayed.
The message is time stamped.
6.4 Reader Database
All recorded messages are automatically saved to a database (up to 1000 records).
Print Done Clear
Select “Review” from the initial Sarcalc screen. The latest message will be displayed
with the date and time the message was recorded.
Navigate between older and newer saved messages by selecting “Prev” or “Next”. Any
displayed message can also be printed (if optional printer software is installed).
Page 27
Page 34

570-2000, Rev. E, 453-2000 Handheld Programmer Operations Manual
The number of records kept can be changed by selecting “Prefs” from the initial Sarcalc
screen (Subsection 6.5). The database can be erased by deleting the database
“SarcalcDB” from the main Meazura screen, as shown in Figure 18.
1. Tap the upper left-hand corner of the main screen to show the “App” drop-down
screen.
2. Select “Delete”.
3. Select “SarcalcDB” to delete. Individual records cannot be erased.
Figure 18: Database Delete Screen Sequence
6.5 ELT Reader Preferences
If “Prefs” is selected from the initial Sarcalc screen (Figure 14), the following items may
be selected (Figure 19):
Figure 19: Sarcalc Preferences
Readings to keep – 10, 20, 100, 1000 (Maximum number of readings to store in the
database)
ICAO Format – Octal, Hex, Decimal (Format of ICAO Address display)
Display Full Address – checked, unchecked (Check for display of full ELT message,
bits 9 –144 (30 Hex digits) or leave unchecked to display only bits 26-85 (15 Hex
digits)
6.6 Printing Messages
The message may be printed (via IR or serial connection) by selecting “Print” from the
Measure or Review screens. The report will print all the displayed data.
NOTE
recommended source below.
: Artex does not provide or support the optional printer software, contact the
Page 28
Page 35

570-2000, Rev. E, 453-2000 Handheld Programmer Operations Manual
The print function relies on the Stevens Creek Software application PalmPrint or
SCSPrint. Either PalmPrint.prc or SCSPrint.prc must be installed on the base Meazura
unit for printing to function. PalmPrint or SCSPrint are available from:
Stevens Creek Software, LLC
P.O. Box 2126
Cupertino, CA 95015
Fax: 1-603-698-4777
www.stevenscreek.com
Printing preferences are selected from the main Meazura screen by selecting
PalmPrint or SCSPrint and then choosing Infrared or serial connections, and choosing
an appropriate printer type. Poorly formatted or illegible text may be caused by
incorrect serial port speed or printer type selection. For more information contact the
printer software vendor.
6.7 Sarcalc Desktop
The Sarcalc Desktop application SarCalc Desktop V1.2 (or higher) may also be installed
on a PC (available as a free download at www.artex.net
Sarcalc or Artex database can be reviewed.
). Once installed, the entire
NOTE
: The Meazura unit must be Hot Sync'd with the Palm Desktop software to
load the database from the Meazura MEZ1000 to the PC.
Once sync'd, the database can be opened on the PC by starting the SarCalcDesk.exe
application and opening the database from the file menu. The Palm HotSync will
usually store the database file in C:\ProgramFiles\Palm\Artex\Backup\, where Artex is
the Meazura user name. Be sure to use the “Artex” user name whenever performing a
“HotSync”. All Artex provided software is loaded to the Meazura using this user name.
The database will be named SarcalcDB.PDB. If the Meazura MEZ1000 was set-up on
the PC with a different User Name than “Artex”, check the folder for that User Name to
locate the Backup file to find the Sarcalc and Artex database information.
Page 29
Page 36

570-2000, Rev. E, 453-2000 Handheld Programmer Operations Manual
7. Label and Report Printing
After successfully programming and verifying the ELT, tap the “Print” button for the
following options (Figure 20):
15-Digit Hex ID label
Country Code label
Combined label (ME406 series)
Report
Both the 15-Digit Hex ID and Country Code labels can be printed to a serial printer via the
bottom connector on the Meazura MEZ1000.
Figure 20: Print Options
7.1 Printers
Compatible printers for labels ONLY are:
Dymo LabelWriter 300, 330, and 330 Turbo (sites.dymo.com
Brady 1244 (www.bradyid.com
Datamax E-4204 (www.datamaxcorp.com
NOTE
: Artex does not provide or support the printers listed above.
7.1.1 Dymo LabelWriter Printer
The Dymo LabelWriter series of printers are available from most office supply stores.
Please note that only the serial option is supported, printers with USB interface only
are not supported. The Dymo LabelWriter series requires a serial adapter (null
modem) cable, which is not
(P/N CAB-NULLMODEM), contact Aceeca International, Ltd at www.aceeca.com
The recommended label stock for the Dymo series printers is Dymo Model 30327
LabelWriter Labels 3 7/16" x 9/16" (file folder label). It will be necessary to laminate
or overlay the label with a protective weather and wear resistant layer after
application to the ELT. The Dymo labels are not
supplied or available from Artex. For a null modem cable
)
)
)
.
supplied or available from Artex.
7.1.2 Brady/Datamax Printer
For the Brady/Datamax printers, please refer to their respective web sites for
distributors that carry them. Please note that these printers are identical, Datamax is
the manufacturer; Brady is a primary re-seller.
The Brady/Datamax printer requires a serial cable and DB-9 male-to-male adapter.
Page 30
Page 37

570-2000, Rev. E, 453-2000 Handheld Programmer Operations Manual
The cable and adapter are not supplied or available from Artex. For a serial cable
(P/N MEZCAB1SER), contact Aceeca International, Ltd at www.aceeca.com
male-to-male adapter (gender changer) is available from most electronic or computer
suppliers.
The recommended label stock for use with the Brady/Datamax printer is
approximately 3” (76 mm) wide by 0.6” (15 mm) high, adhesive-backed, and should
be weather and wear resistant. Contact your printer vendor for possible label stock
sources. Ink-transfer ribbon is also required and available from Brady (P/N R4301), or
equivalent.
7.2 Label Printing
Prior to printing, be sure to select the applicable printer from the “Prefs” (preferences)
menu. See Subsection 4.3 for instructions on selecting preferences.
Connect the Handheld Programmer to the applicable printer using the specified cable
and adapter, as applicable.
Labels for the ELT can be printed one of two ways:
After the ELT has been successfully programmed select the “print” option, or
From the Review screen, select the “print” option.
. The DB-9
Once selected, the following print options will appear. Refer to Section 8 for labeling
requirements.
15-Digit Hex ID label
Country Label
Combined Label (ME406 series)
Report (Subsection 7.3)
NOTE
: Most Artex 406 MHz ELTs have 2 separate labels for the 15-digit Hex ID and the
Country name/code; whereas, the ME406 series uses a combined label.
1. Make sure the printer is connected, has the correct label stock, and is ready to print.
2. Tap the desired label option, the label should print out.
3. If there is a connection problem, an error message will appear: “Serial Timeout. Is
printer connected and powered on?” Verify connection and power.
4. Refer to the applicable printer manufacturer’s instructions for additional printing
details.
7.3 Report Printing
For the Report print option, third party software is required, along with use of the
infrared (IrDA) interface or serial port. A report can be printed to an IRDA compatible
printer. If you have a parallel printer, an infrared interface device may be used such as
the ACT-IR100M from Actisys Corp., at www.actisys.com
or Tel: (510) 490-8024.
NOTE
: Artex does not provide or support the optional printer software, contact the
following recommended source.
Page 31
Page 38

570-2000, Rev. E, 453-2000 Handheld Programmer Operations Manual
The print function relies on the Stevens Creek Software application PalmPrint or SCS
PrintServer. Either PalmPrint.prc or SCSPrint.prc must be installed on the base
Meazura MEZ1000 for printing to function. PalmPrint or SCSPrint are available from:
Stevens Creek Software, LLC
P.O. Box 2126
Cupertino, CA 95015
Fax: 1-603-698-4777
www.stevenscreek.com
Printing preferences are selected from the main Meazura screen by selecting
PalmPrint or SCSPrint and then choosing infrared or serial connections, and choosing
an appropriate printer type. Poorly formatted or illegible text may be caused by
incorrect serial port speed or printer type selection.
Page 32
Page 39

570-2000, Rev. E, 453-2000 Handheld Programmer Operations Manual
8. Labeling Requirements
Reprogramming any ELT or C406-N series PA makes the existing 15-digit hex code label
obsolete. A new 15-digit hex code label must replace the old one, as ELT labeling must
reflect the programming inside.
If reprogramming the ELT also changes the country of origin and 3-digit country code, a
new country and country code label must replace the old one before the ELT may be
returned to service.
Labels may be printed using the Handheld Programmer and a supported printer. See
Subsection 7.2.
Labels may also be requested on the “ARTEX 406 MHz PROGRAMMING RECORD” included
in this manual that gets returned to the “Artex Repair Station Manager” for every ELT or
C406-N series PA that is reprogrammed. If requested, labels will be created and shipped
overnight to the address listed on the programming record, for a small fee listed on the
reprogramming record.
Artex can also provide preprinted labels with blank data fields in bulk. Contact Artex for
details.
If labels are not requested, the user must create permanent, weatherproof labeling using
indelible ink and a protective layer over the label text. Labeling must meet all regulatory
authority requirements.
NOTE
: Alteration or replacement of the ELT product label, beyond that described above,
must be approved by Artex.
ELT re-labeling set includes: 591-0429-01, Blank Country Code Label
591-0999, Blank Hex Code Label
ME406 re-labeling 591-0999-01
Re-printed full product label available on special request to Artex authorized Repair
Stations only.
PA re-labeling set includes: 591-5070, C406-N PA Re-Labeling Label
Reprinted of a full product label is available upon special request to Artex Authorized
Repair Stations only.
See Subsection 7.1.2 for details of Brady/Datamax printer.
Page 33
Page 40

570-2000, Rev. E, 453-2000 Handheld Programmer Operations Manual
9. Civil Aviation Authority Registration Requirements
After obtaining the proper 15-digit hex code as described in this manual, it is essential the
ELT be registered. Registration forms for the US can be obtained from Artex, by
contacting NOAA at 1-888-212-SAVE, or by visiting their web site www.sarsat.noaa.gov
and clicking on "Beacon Registration Forms".
If the programming of the 406 MHz ELT in a given aircraft changes, the aircraft
owner/operator must update all programming information with the appropriate local
aviation authorities. Realize that if a given aircraft’s ELT is replaced with one that has
identical programming (or an auto-reprogramming function updates the programming to
be the same), the registration does not need to change.
If the correct ELT programming is not registered, search and rescue operations may be
inefficient or nonexistent. An incorrect false alarm conclusion may be made, or valuable
time during a rescue effort may be lost. Proper ELT registration is extremely important.
Many foreign ELT registration forms are available on the Artex web site www.artex.net
.
Page 34
Page 41

570-2000, Rev. E, 453-2000 Handheld Programmer Operations Manual
10. Specifications and Calibration
The following subsections provide specifications and calibration information.
10.1 Meazura MEZ1000 Specifications
Operating System: Palm OS 4.1.2
Memory: 16MB SDRAM, 4MB Flash
Display: 160x160 pixel grayscale, backlit
Communications: USB (cable provided)
Serial (1.2-115Kbs)
IrDA Infrared (1.2-115.2Kbs)
Battery 3.6V Li-Ion 1900mAh
Sealing IP67 – submersible to 1 meter (30 min)
Current Consumption: 21 mA (backlight off) unit ON (excluding module)
2 mA Sleep mode
Contact Aceeca at www.aceeca.com
for more information on the base Aceeca Meazura
unit or for additional accessories.
10.2 Handheld Programmer Module Specifications:
406 receiver range: -60 dBm to +36 dBm (5W)
Power source: Meazura internal battery
Decoding: Per COSPAS/SARSAT C/S T.001, Issue 3 Rev. 5
Current Consumption: 10 mA unit ON
<100 nA Sleep mode
10.3 Calibration
The Handheld Programmer is factory calibrated and does not require periodic recalibration.
Page 35
Page 42

570-2000, Rev. E, 453-2000 Handheld Programmer Operations Manual
11. Components and Optional Equipment
The following subsections provide information on system component part numbers and
optional equipment.
11.1 System Component Part Numbers
The Artex Handheld Programmer is being offered as a complete kit (455-9181) with the
following parts:
1 ea. 453-2000 Handheld Programmer Main Assembly
1 ea. 110-418 Antenna, ¼ Wave Flexible Whip 418 MHz
1 ea. 452-0100 Holster, Padded Handheld Programmer
1 ea. 452-0101 Stylus, Handheld Programmer
1 ea. 452-0102 Battery, Handheld Programmer
1 ea. 452-0103 USB Cable, Handheld Programmer
1 ea. 452-0104 Charger, Handheld Programmer
1 ea. 510-1200 Desktop Software for ELT Test Set (CD-ROM)
1 ea. 570-2000 Manual, Handheld Programmer Operation
1 ea 611-0110 110/C406 Series Programming Cable
1 ea 611-0111 C406-N/PA Series Programming Cable
1 ea 611-0112 ME406 Series Programming Cable
Any of the above part numbers may be ordered as a replacement or as a separate line
item. Contact the Artex Sales department at 1-800-547-8901 for details.
11.2 Optional Equipment
If national or local regulations require that the ELT be attenuated and/or directly
connected to the Handheld Programmer, the following parts may be used:
500-3000 Attenuator, 30 dB
500-3200 Attenuator, 20 dB
611-9010 Cable, Coax 6 ft.TPS to BNC (For Dual Output ELT)
611-6013 Cable, Coax BNC to BNC (For Single Ouput ELT)
Commercial equivalents of any of these parts may also be used.
Page 36
Page 43

570-2000, Rev. E, 453-2000 Handheld Programmer Operations Manual
12. Troubleshooting
The following subsections provide troubleshooting and technical assistance information.
12.1 Trouble Shooting Guide
The following table provides user troubleshooting guidelines. For problems beyond the
scope of this guide, contact Artex for return instructions.
SYMPTOM LIKELY CAUSE ACTION
Perform “soft reset” by holding down
both the power and backlight keys
Meazura is “locked” up,
programs will not respond
Various
simultaneously will perform a soft
reset; the Meazura stops what it was
doing and restarts.
All applications and data stored in the
handheld are retained.
Perform” hard reset” by doing a soft
reset but keeping the power key held
down until the Palm Powered logo
appears.
Meazura will not respond to
“soft reset”
Meazura will not power on Dead battery Charge battery for at least 2 hours
Meazura will not reset
(either “soft” or “hard”)
Meazura will not power on
with known good battery
12.2 Technical Assistance
Programming ELTs with the proper information and the proper protocol is not always a
straightforward process. Please be sure to thoroughly read this manual. If
assistance is required, contact Artex Aircraft Supplies, Inc., in the United States at 503678-7929 or send e-mail to info@artex.net.
A confirmation message is displayed
Various
Defective Meazura unit Return unit to Artex
Defective Meazura unit Return unit to Artex
asking the user to confirm the hard
reset, whereby pressing the UP arrow
key will proceed with the process.
A hard reset does everything a soft
reset does, but also erases all
programs, data, patches, and user
information.
Page 37
Page 44

570-2000, Rev. E, 453-2000 Handheld Programmer Operations Manual
13. Warranty Information
The Handheld Programmer is covered by the Artex Limited Avionics Warranty for 24
months. See “Artex Warranty Statement” (document # 560-0102) on the Artex web
site at www.artex.net
for more details.
Page 38
Page 45

570-2000, Rev. E, 453-2000 Handheld Programmer Operations Manual
14. Index
—A—
Aceeca, 2, 35
Application, 1
Artex software, 10
—B—
Battery life, 35
—C—
Calibration, 35
Country Code Database, 16
—D—
Database, Programmer, 11
—E—
ELT Labeling, 33
ELT Programming, 11
ELT Registration, 34
ELT Testing, 25
—O—
Optional Equipment, 36
—P—
Part Numbers, 36
Preferences, Programmer, 10
Preferences, Reader, 28
Printers, 30
Printing Labels, 30
Printing Messages, 28
Printing Reports, 31
Protocols, 16
—R—
Reset, hard, 37
Reset, soft, 37
—S—
Sarcalc Desktop, 11, 29
Sarcalc software, 25
Software Operation, 10
Specifications, 35
—F—
Features, 2
—H—
Hardware, 4
Hot Sync, 9
—I—
Introduction, 1
—M—
Meazura, 1, 9
—T—
Table 1 ELT Data, 12
Technical Assistance, 37
Troubleshooting, 37
—U—
User name, 9, 29
Using Reader, 25
—V—
Verification, 25
—W—
Warranty, 38
Page 39
 Loading...