


cobas b 101 system
Quick Reference Guide

Protection against infection
• Follow your institution‘s infection control procedures for handling blood specimens.
• There is a potential risk of infection. Healthcare professionals using the cobas b 101 system must be aware that
any object coming into contact with human blood is a potential source of infection. Healthcare professionals
must also be aware that any cross-contamination is a potential source of infection for patients.
Refer to the cobas b 101 system Operator’s Manual and cobas HbA1c or Lipid disc inserts for detailed
information.
Important safety information
WARNING
This quick reference guide is not
intended as an alternative to reading
the operator’s manual. Please read the
cobas b 101 system Operator’s Manual
carefully before using the instrument
for the first time.

For all questions about cobas b 101 system that are not answered in the quick reference guide, operator’s manual or
package inserts, contact your Roche representative.
T
o find your Roche contact details
1 Visit our website at www.roche.com.
2 Choose “Roche Worldwide” at the top of the page.
3 Choose your country to find the appropriate local office contact information.
Materials
You need the following materials to perform patient and control tests:
• HbA1c disc
• Lipid disc
• cobas HbA1c Control kit
• cobas Lipid Panel Control kit
• HbA1c QC Info disc and Lipid QC Info disc
• Optical Check disc
The cobas b 101 system is intended for professional use in a clinical laboratory setting or at the point of care.
The instrument can be configured according to your institution’s needs, and features such as requiring an operator ID
may or may not be used.
If so configured, the cobas b 101 system prevents patient testing when controls have not been run
(QC lockout).
QC lockout occurs when
• Patient testing is attempted and controls have not been run in the time interval or frequency designated by your
institution.
• Controls have been run but the control values were outside the permitted range.
Error messages are displayed to alert you to a condition that needs attention. Take the action suggested on the screen,
select , and proceed with testing.
General information

1
Lid. Use the “Open” button on the screen e.g. to
insert a test disc for measurement. Keep this flap
closed during measurement.
2
Touchscreen. Shows buttons, icons, information, and
test results. To use a function, tap the button on the
screen lightly.
3
Power on/off switch.
4
Lid button. Use this button to open the flap when the
instrument is switched off.
5
DC IN 12 V terminal. Connect the power cable from
the power adapter to supply 12 V DC power to the
instrument.
6
BUH terminal. Connection to a network through a
Base Unit Hub.
7
USB 1 terminal. Connection to a personal computer.
8
Bar code scanner terminal.
9
USB 2 terminal. Connection to USB memory stick or a
printer.
cobas b 101 system
2
3
4
5
6
7
8
9
1

1
Front view of HbA1c disc.
2
Back view of HbA1c disc.
3
HbA1c disc suction point.
4
HbA1c QC Info disc.
5
Front view of Lipid disc.
6
Back view of Lipid disc.
7
Lipid disc suction point.
8
Lipid QC Info disc.
cobas b 101 system – disc overview
Lipid
QC Info Disc
HbA1c
QC Info Disc
Li pi d
HbA1c
4
5 6
8
1
3
2
7
6

Single Test HbA1c
Single Test HbA1c
Single Test HbA1c

Single Test HbA1c
9
With the front of the disc
facing upwards, position
the disc’s suction point
above the drop of blood.
11
Check the sample volume:
turn the disc on its
backside. The area marked
in blue has to be filled
completely with blood.
10
Apply blood and
observe that it has
filled the marked area.
12
Press hinge cover
down firmly to close
disc.
HbA1c
HbA1c
HbA1c
3
Open disc pouch and
remove HbA1c disc.
4
Open disc completely.
HbA1c
HbA1c
1
Power on instrument.
2
Select Patient Test
and then select Single
Test.
HbA1c
5
Front view of HbA1c
disc.
6
Back view of HbA1c
disc.
A
Suction Point: Apply blood
here.
7
Clean the side of the
middle or ring finger with
an alcohol swab and dry
with sterile gauze.
8
Lance the side of the
fingertip. Wipe away
the first drop of blood.
A

13
Once closed
correctly…
15
Open the lid by
selecting Open on the
screen.
14
…the hinge cover
cannot be opened
again.
16
With the disc facing
upwards, place it on
the spindle within the
white circle.
17
Close lid.
The measurement
starts automatically and
takes about 5 minutes.
18
Finish test by selecting
on the screen
and dispose of disc
appropriately.
* If alarm is enabled.
17 18

Single Test Lipid
Single Test Lipid
Single Test Lipid

Single Test Lipid
1
Power on instrument.
2
Select Patient Test
and then select Single
Test.
3
Open disc pouch and
remove Lipid disc.
4
Open disc completely.
Lip id
11
Check the sample volume:
turn the disc on its
backside. The area marked
in blue has to be filled
completely with blood.
12
Press the hinge cover
down firmly to close
disc.
Li pi d
9
With the front of the disc
facing upwards, position
the disc’s suction point
above the drop of blood.
10
Apply blood and
observe that it has
filled the marked area.
Lipid
Lipid
5
Front view of Lipid disc.
6
Back view of Lipid disc.
A
Suction Point: Apply blood
here.
Li pi d
7
Clean the side of the
middle or ring finger with
an alcohol swab and dry
with sterile gaue.
8
Lance the side of the
fingertip. Wipe away
the first drop of blood.
A

13
Once closed
correctly…
15
Open the lid by
selecting Open on the
screen.
14
…the hinge cover
cannot be opened
again.
16
With the disc facing
upwards, place it on
the spindle within the
white circle.
Lipi d
Lipid
Lip
id
17
Close lid.
The measurement
starts automatically and
takes about 6 minutes.
18
Finish test by selecting
on the screen
and dispose of disc
appropriately.
* If alarm is enabled.

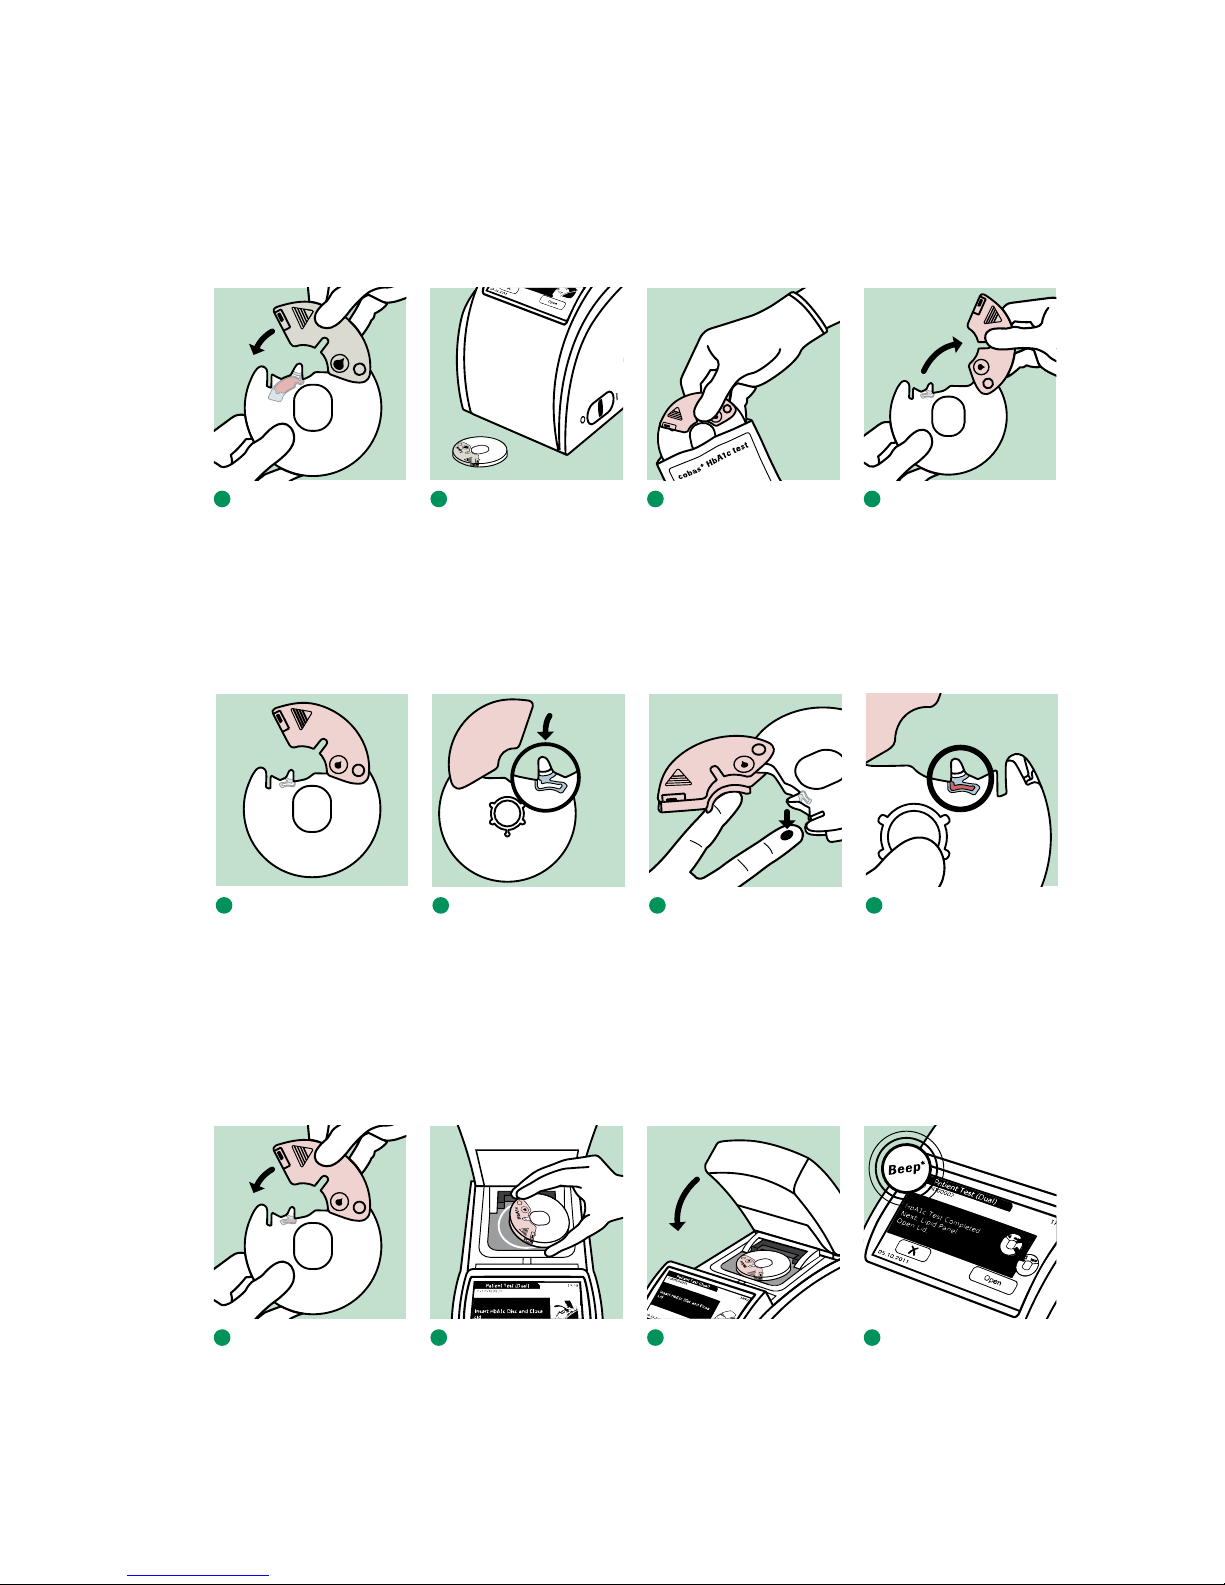
Dual Test
Dual Test
Dual Test

Dual Test
1
Power on instrument.
2
Select Patient Test
and then select Dual
Test.
3
Read on-screen
instructions carefully
and confirm by
selecting
.
4
Open disc pouch and
remove Lipid disc.
9
Lance the side of the
finger. Wipe away the
first drop of blood.
12
Check sample volume:
The area marked in
blue has to be filled
completely with blood.
10
With the front of the disc
facing upwards, position
the disc’s suction point
above the drop of blood.
11
Apply blood and
observe that it has
filled the marked area.
Lipid
Lipid
5
Open disc completely.
8
Clean the side of the
middle or ring finger with
an alcohol swab and dry
with sterile gauze.
Lip id
Li pi d
6
Front view of Lipid disc.
7
Back view of Lipid disc.
A
Suction Point: Apply blood
here.
A
14
Put Lipid disc aside.
Li pi d
13
Press the hinge cover down
firmly to close disc. Once
closed correctly the hinge
cover cannot be opened
again.
15
Open pouch of disc and
remove HbA1c disc.
16
Open disc completely.
HbA1c
HbA1c
22
Open the lid by
selecting Open on the
screen. Insert HbA1c
disc immediately.
23
Close lid. The
measurement starts
automatically and
takes about 5 minutes.
24
Wait for message
‘HbA1c Test completed’.
Open lid. Remove
HbA1c disc.
* If alarm is enabled.
HbA1c
21
Press the hinge cover
down firmly to close disc.
Once closed correctly
the hinge cover cannot
be opened again.
20
Check sample volume:
Turn the disc on its
backside. The area
marked in blue has to
be filled completely
with blood.
HbA1c
17
Front view of HbA1c
disc.
18
Back view of HbA1c
disc.
A
Suction Point: Apply blood
here.
19
Apply blood directly
to the disc from
previously lanced
finger, make sure the
blood has filled the
marked area.
HbA1c
A

25
Insert Lipid disc
immediately. Close
lid. The measurement
starts automatically and
takes about 6 minutes.
26
HbA1c and Lipid test
results are displayed.
* If alarm is enabled.
27
Finish test by selecting
on the screen
and dispose of disc
appropriately.
Lipid

QC Test HbA1c
QC Test HbA1c
QC Test HbA1c

QC Test HbA1c
HbA1c
HbA1c
1
Material needed:
2 HbA1c discs
…
3
Power on instrument.
HbA1c
QC Info Disc
2
1 QC solution level 1
1 QC solution level 2
1 HbA1c QC Info disc.
4
Select Control Test
and then select QC
Test.
9
Close instrument lid.
The QC information
will be saved on the
system.
10
Target value and target
value range are displayed.
Validate by selecting
.
11
Select level of QC test
(Level 1 or 2).
12
Open disc pouch and
remove HbA1c disc.
HbA1c
HbA1c
QC Info Disc
6
For new QC lot: Take
HbA1c QC Info disc
from the QC solution
kit.
5
For a new QC lot select
New QC Lot. Previously
tested QC lots can be
selected via lot button in
display.
7
Open the lid by
selecting Open on the
screen and follow the
on screen instructions.
8
Place QC Info disc
on spindle within the
white circle.

13
Open disc completely
and turn disc on its
backside (blank side
facing up).
14
Carefully apply a drop
of QC solution (level
as defined in
11
) to the
suction point.
15
Check sample volume:
The area marked in
blue has to be filled
completely with QC
solution.
HbA1c
HbA1c
16
Press the hinge cover down
firmly to close disc. Once
closed correctly the hinge
cover cannot be opened
again.
21
Open lid by selecting
Open on the screen,
remove first HbA1c disc,
insert second HbA1c
disc, and close lid.
22
Verify that the QC solution lot
number matches the lot number displayed on the screen.
Select
to begin the mea-
surement.
23
When measurement is
complete the results of
both levels (1+2) are
displayed.
* If alarm is enabled.
24
Finish test by selecting
on the screen
and dispose of discs
appropriately.
17
Open lid, remove HbA1c
QC Info disc, insert
HbA1c disc and close lid.
18
Verify that the QC solution
lot number matches the lot
number displayed on the
screen. Select
to begin the
measurement.
19
When measurement is
complete, select to
proceed with the QC test
of the other level.
20
Open disc pouch and
remove second HbA1c
disc. Repeat procedure
shown in steps 14-16.
HbA1c

QC Test Lipid
QC Test Lipid
QC Test Lipid

QC Test Lipid
Li pi d
Li pi d
1
Material needed:
2 Lipid discs
…
3
Power on instrument.
Lipid
QC Info Disc
2
1 QC solution level 1
1 QC solution level 2
1 Lipid QC Info disc.
4
Select Control Test
and then select QC
Test.
9
Close instrument lid.
The QC information
will be saved into the
system.
10
Target value and target
value range are displayed.
Validate by selecting
.
11
Select level of QC test
(Level 1 or 2).
12
Open disc pouch and
remove Lipid disc.
Lipid
QC Info Disc
6
For new QC lot: Take
Lipid QC Info disc from
the QC solution kit.
5
For a new QC lot select
New QC Lot. Previously
tested QC lots can be
selected via lot button in
display.
7
Open the lid by
selecting Open on the
screen and follow the
on screen instructions.
8
Place QC Info disc
on spindle within the
white circle.

13
Open disc completely
and turn disc on its
backside (blank side
facing up).
14
Carefully apply a drop
of QC solution (level
as defined in
11
) to the
suction point.
Lip id
Li pi d
16
Press the hinge cover down
firmly to close disc. Once
closed correctly the hinge
cover cannot be opened
again.
21
Open lid by selecting
Open on the screen,
remove first Lipid disc,
insert second Lipid disc,
and close lid.
22
Verify that the QC solution
lot number matches the lot
number displayed on the
screen. Select
to begin
the measurement.
24
Finish test by by
selecting on the
screen and dispose of
disc appropriately.
Lipid
23
When measurement is
complete the results of
both levels (1+2) are
displayed.
* If alarm is enabled.
15
Observe that the drop of
QC solution is completely
absorbed by the disc. The
area marked in blue has to
be filled completely with the
clear solution.
17
Open lid by selecting
Open on the screen,
remove QC Info disc,
insert Lipid disc, and
close lid.
18
Verify that the QC solution
lot number matches the lot
number displayed on the
screen. Select
to begin the
measurement.
Lipid
19
When measurement is
complete, select
to
proceed with the QC
test of the other level.
20
Open disc pouch and
remove second Lipid
disc. Repeat procedure
shown in steps 14-16.

c
COBAS, COBAS B and LIFE NEEDS ANSWERS
are trademarks of Roche.
Manufactured in Japan
for Roche Diagnostics GmbH
©2012 Roche Diagnostics. All rights reserved.
Roche Diagnostics GmbH
Sandhofer Strasse 116
68305 Mannheim
Germany
www.cobas.com
0 6631002 018 (01) 2012-12 EN
 Loading...