

Page 1
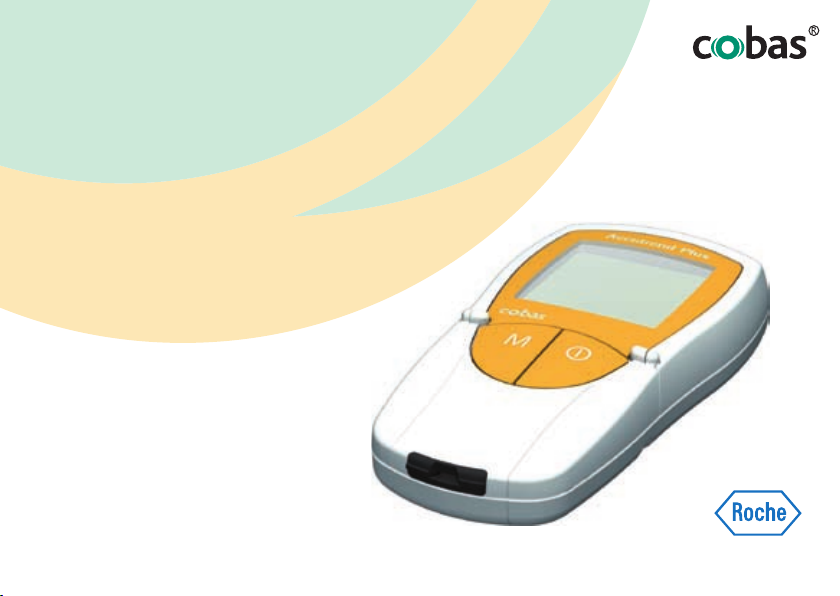
Accutrend
Plus
User’s Manual
Page 2

Date of issue: January 2009
© 2009, Roche Diagnostics
All rights reserved.
ACCU-CHEK, ACCU-CHEK MULTICLIX, ACCUTREND, COBAS, and SAFE-T-PRO are trademarks of Roche.
The system fulfills the Canadian and U.S. safety requirements (UL LISTED, in accordance with UL 3101-1 and
CAN/CSA C22.2 no. 1010-1).
This instrument complies with DIN EN 61010-1 (“Safety requirements for electrical equipment for
measurement, control and laboratory use; General requirements”) and was in a perfect safety condition when it
left the factory.
Installation, use and maintenance of the Accutrend Plus instrument is the full responsibility of the user.
Page 3
LOT
IVD
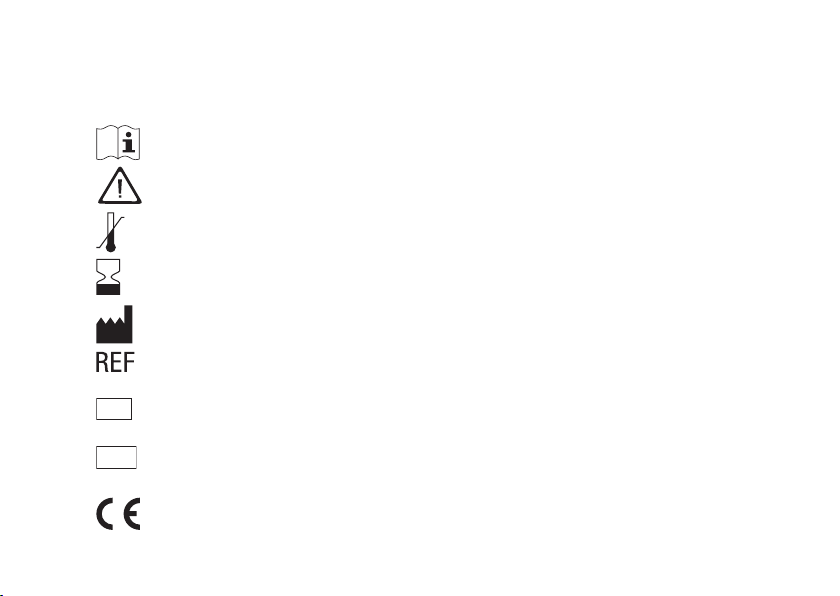
The packaging material, the identification plate of the instrument and the manual may contain the
following symbols or abbreviations which are listed below with their meaning:
Consult instructions for use.
Caution (refer to accompanying documents)! Refer to safety-related notes in the manual
accompanying this instrument.
Store at
Use by date
Manufacturer
Catalog number
Batch number
In vitro diagnostic medical device.
This product fulfills the requirements of the European Directive 98/79/EC on in vitro
diagnostic medical devices.
Page 4

Page 5

The Accutrend Plus instrument
The Accutrend Plus instrument
Thank you for your purchase of the Accutrend Plus instrument!
The Accutrend Plus instrument is used for quantitative measurement of two blood parameters:
glucose and cholesterol. The reflectance photometric measurement is performed using test strips specific
for each of these blood parameters. For detailed information about the two tests, see the package inserts of the
respective test strips.
Note: This manual contains all the information needed to use the instrument and keep it ready to operate. Please
read this manual carefully before using the instrument. Familiarize yourself with the required preparations and
the measurement procedure before performing the first measurement.
Also, read the package inserts of the test strips to be used.
Last update: January 2009
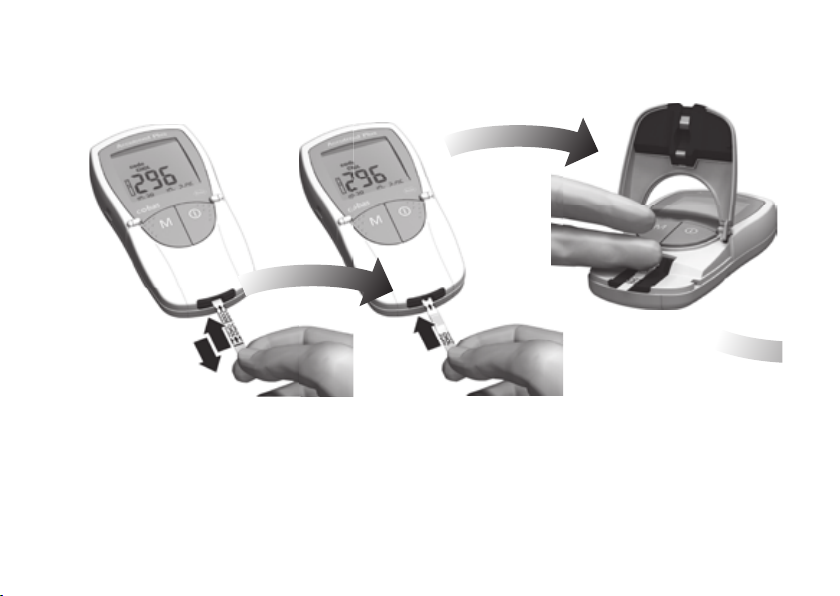
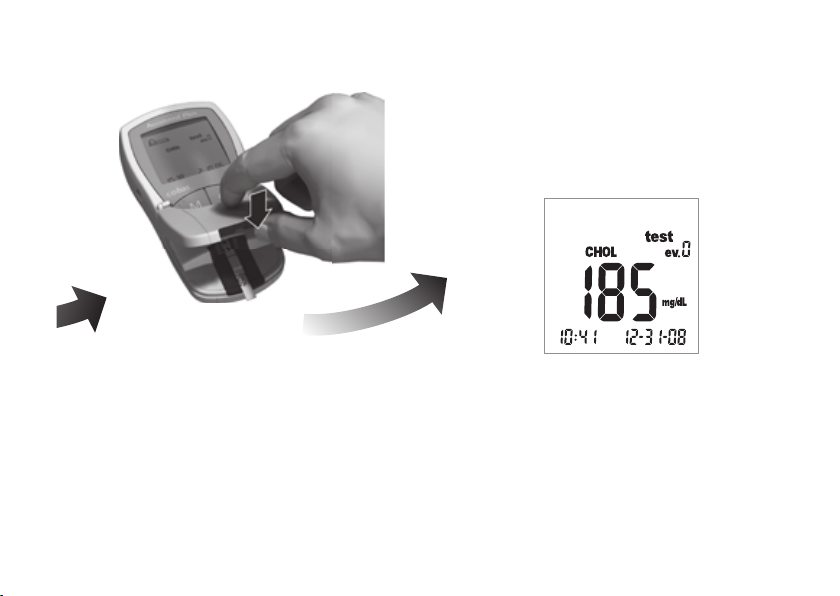
5
Page 6

Page 7

Contents
Contents
The Accutrend Plus instrument 5
Introduction 11
The Accutrend Plus instrument ............................................................................................................................................................11
Test principle .............................................................................................................................................................................................12
Checking the contents ...........................................................................................................................................................................13
Safety information .................................................................................................................................................................................... 14
Operating conditions .............................................................................................................................................................................. 15
Integrated control functions ..................................................................................................................................................................16
About this manual 17
Page layout ................................................................................................................................................................................................17
The Accutrend Plus instrument 20
Overview of instrument elements ........................................................................................................................................................20
Display and symbols ...............................................................................................................................................................................24
Power .........................................................................................................................................................................................................26
Operating the instrument 27
Inserting batteries ................................................................................................................................................................................... 28
7
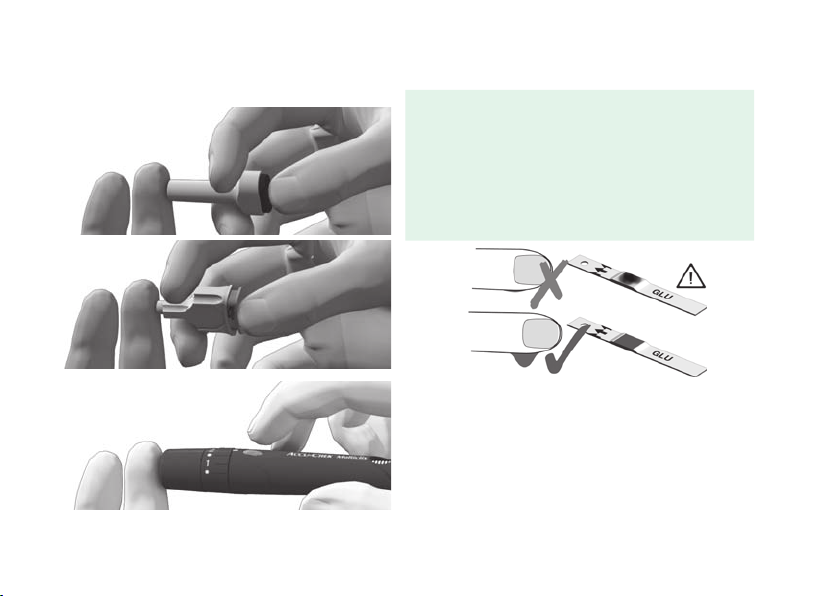
Page 8

Contents
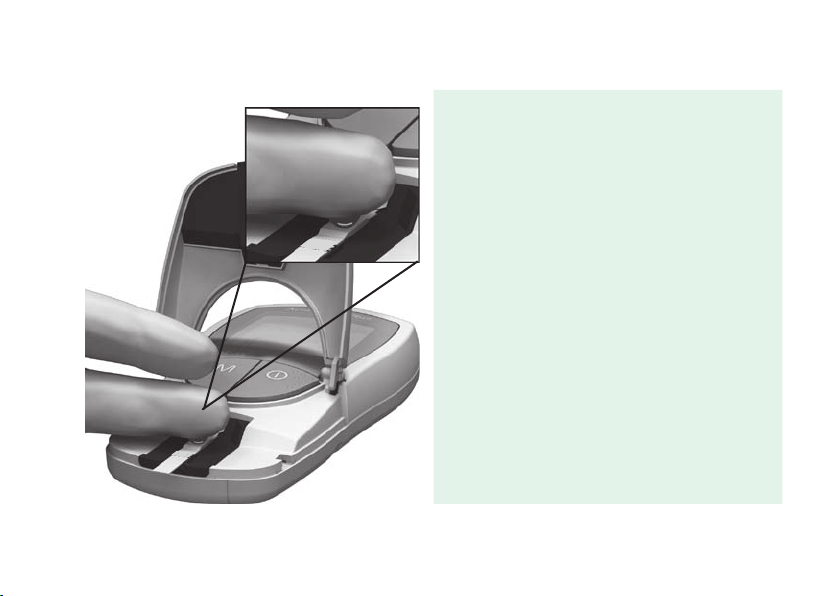
Instrument settings 32
Brief overview of the instrument settings ...........................................................................................................................................32
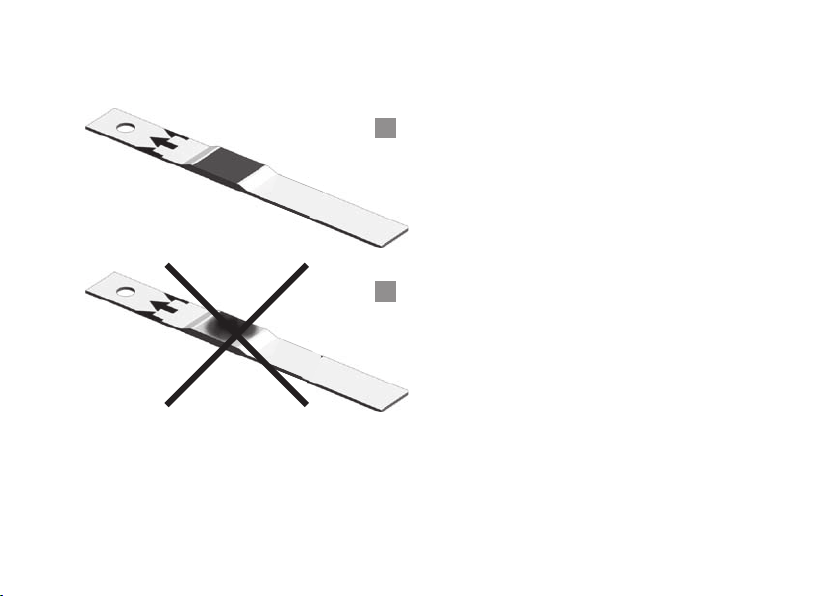
General procedure for setting up the instrument (set mode) .......................................................................................................33
Setting the date format ...........................................................................................................................................................................37
Setting the date ........................................................................................................................................................................................38
Setting the time format ........................................................................................................................................................................... 41
Setting the time ........................................................................................................................................................................................42
Setting the beeper ...................................................................................................................................................................................43
Performing a measurement 44
Brief overview of the steps to be carried out .....................................................................................................................................45
Important notes ........................................................................................................................................................................................47
Code strips ................................................................................................................................................................................................51
Switching on the instrument ................................................................................................................................................................. 52
Inserting the code strip ..........................................................................................................................................................................54
Switching the code display....................................................................................................................................................................56
Sample material........................................................................................................................................................................................57
Performing measurements in the professional sector .....................................................................................................................58
Preparing to perform a measurement .................................................................................................................................................59
Performing a measurement ...................................................................................................................................................................61
Recommendations for the collection and measurement of capillary blood ............................................................................... 67
Blood collection .......................................................................................................................................................................................68
Starting the measurement .....................................................................................................................................................................72
Display of results ...................................................................................................................................................................................... 74
Flagging measurements ........................................................................................................................................................................ 77
8
Page 9

Contents
Quality control recommendation 80
Preparing to perform a control test ......................................................................................................................................................82
Performing a control test ........................................................................................................................................................................83
Applying the control solution ................................................................................................................................................................88
Starting the measurement .....................................................................................................................................................................89
Display of results ......................................................................................................................................................................................91
Memory 92
Displaying stored measured values ....................................................................................................................................................92
Cleaning 97
Cleaning the outer instrument components .....................................................................................................................................98
Cleaning the inner instrument components ...................................................................................................................................... 98
Cleaning the optical measuring system............................................................................................................................................100
Error messages 102
Further information 111
Ordering information ........................................................................................................................................................................... 111
Product limitations ................................................................................................................................................................................ 111
9
Page 10

Contents
Product specifications 112
Operating conditions and technical data .........................................................................................................................................112
Sample material......................................................................................................................................................................................113
Storage and transport conditions ......................................................................................................................................................113
Disposal of instrument, strips, lancets and batteries .....................................................................................................................113
Service information ...............................................................................................................................................................................114
Alphabetical index 115
10
Page 11

Introduction
Introduction
The Accutrend Plus instrument
The Accutrend Plus instrument is used for quantitative measurement of 2 blood parameters: glucose and
cholesterol. The instrument is suitable for professional use as well as for self-testing.
If you have any questions which are not answered by this manual, call the ACCU-CHEK Customer Care Service
Center 24 hours a day, 365 days a year at 1-800-440-3638
11
Page 12

Introduction
Test principle
By means of a code strip, the instrument reads the lot-specific characteristics of the test strips currently in use. This
information is stored and must therefore only be read once per test strip container. To run a test, an unused test
strip is taken from the container and inserted into the instrument. When inserted, the application area of the test
strip is illuminated by an LED (light-emitting diode) from below. Before sample application, the reflection behavior
of the test strip is determined by means of the light which is reflected from the application area (blank value).
The blood sample is then applied to the application area and the measurement chamber flap is closed. The
constituent to be determined in the applied sample undergoes an enzymatic reaction with formation of a dye. The
amount of dye formed increases with the concentration of the substance to be determined.
After a certain period of time (dependent on the test parameter), the color intensity is measured by illuminating the
application area again from below using the LED. The intensity of the reflected light is measured with a
detector (reflectance photometry). The measured value is determined from the signal strength of the reflected
light, using the previously measured blank value and the lot-specific information from the code strip. Finally, the
result is displayed and simultaneously stored in the memory.
12
Page 13

Introduction
Checking the contents
Accutrend Plus meter•
User’s Manual•
Four 1.5 V AAA alkaline batteries•
Quick Reference Guide•
Carrying Case•
Warranty Card•
13
Page 14

Introduction
Safety information
Protection against infection
There is a potential risk of infection. Medical staff and other persons using the Accutrend Plus
instrument to perform measurements for more than one patient must be aware that any object
coming into contact with human blood is a potential source of infection.
Use gloves•
When performing several measurements, apply blood outside the instrument•
Discard used test strips in a sharps container or sturdy container with lid•
Follow all other locally applicable health and safety regulations•
Use a professional lancing device such as the Accu-Chek Safe-T-Pro to prevent cross contamination.•
14
Page 15

Introduction
Operating conditions
To ensure proper function of your Accutrend Plus instrument, observe the following guidelines:
Operate the instrument only within the acceptable temperature range. This range is test-dependent:•
For cholesterol: 18-30ºC (64-86ºF)•
For glucose: 18-32ºC (64-90ºF)•
Use the instrument only at a relative humidity of 85% or less•
In order to perform a measurement, place the instrument on a level surface or hold it in your hand.•
Electromagnetic interference
Strong electromagnetic fields may impair the function of the instrument. Do not use the instrument
close to sources of strong electromagnetic radiation.
15
Page 16

Introduction
Integrated control functions
The Accutrend Plus instrument has numerous integrated or available control functions, including the
following:
An automatic check of the electronic components and functions when the instrument is powered on.•
An automatic check of the ambient temperature before and during the measurement.•
An automatic check of the test strip to make sure that the code information necessary for measurement is in •
memory.
A check of the optical system and the overall function by means of control solutions. For more information, •
refer to the Quality control recommendation section of this user’s manual.
16
Page 17

About this manual
About this manual
Page layout
The page layout of this manual enables you to easily locate the most important information.
Where illustrations are used, they always appear on the left side with the accompanying explanation on the right.
All instructions which require you to perform an action, in addition to very important information, appear on a
colored background.
This symbol draws attention to the possible risk of sustaining injury or of damaging your health and to
possible application errors during measurement which may result in a health hazard.
17
Page 18
About this manual
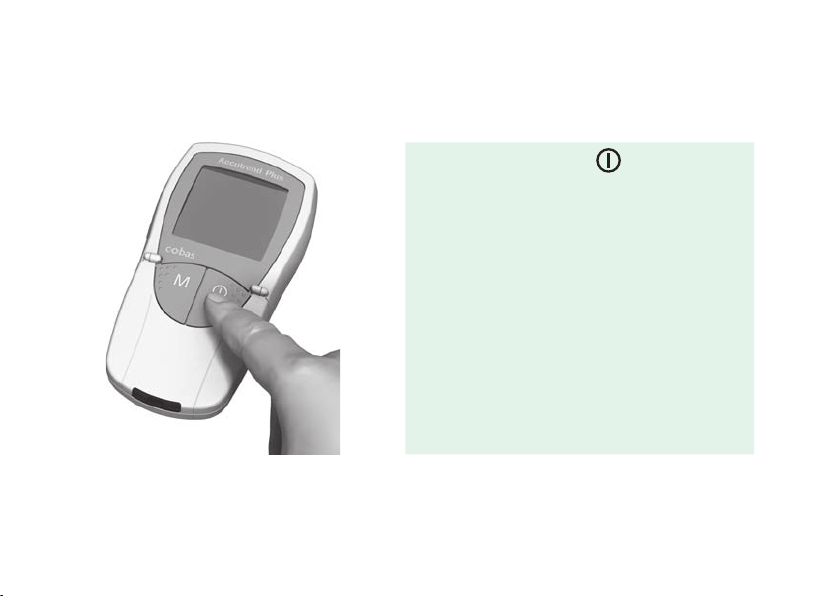
Example of an instruction:
The left column contains an illustration of the
instrument.
18
The right column states what you should do at this
point, for example:
1 Press the On/Off button , to power the
instrument on for measurement.
Page 19
About this manual
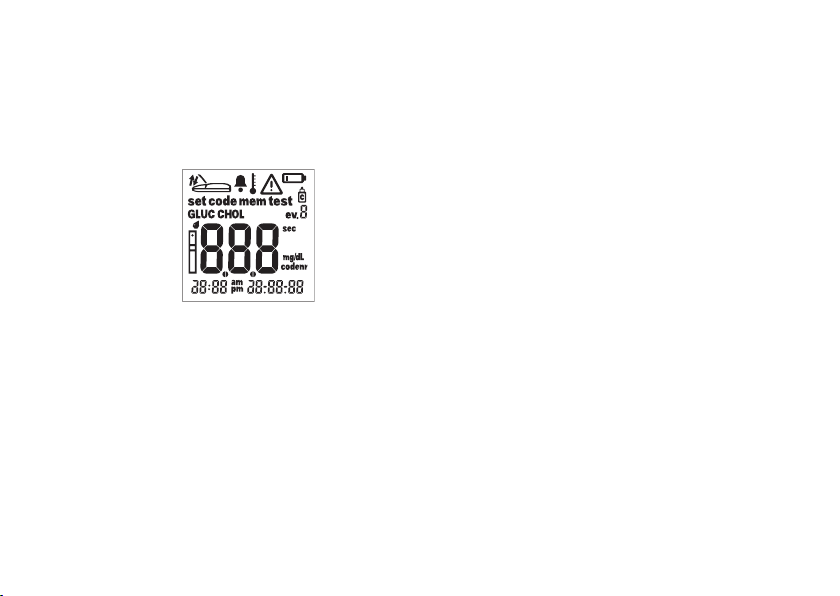
Example of a display screen:
This column contains the illustration of a display
screen.
19
This column contains information relating to the
display screen, for example:
Every time the instrument is powered on, you can
check the display. The instrument temporarily shows
all symbols that may appear in the display.
Regularly check that all display elements are
functioning correctly to prevent misinterpretations
due to a defective display.
Page 20
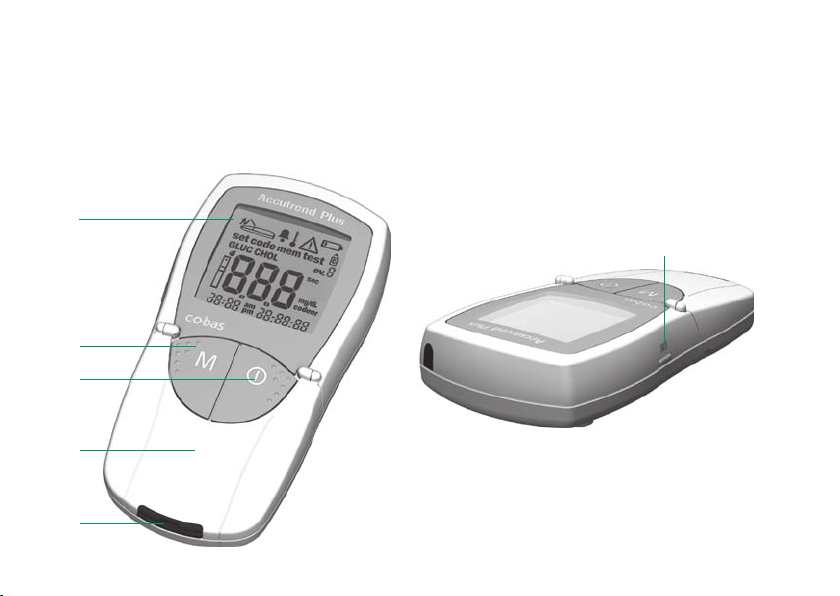
The Accutrend Plus instrument
The Accutrend Plus instrument
Overview of instrument elements
A
B
C
D
E
20
F
Page 21

The Accutrend Plus instrument
A
Display
Shows measurement results, information,
symbols and all stored measured results.
B
M button (memory)
By pressing this button, you can retrieve all
stored values and (together with the Set button)
you can change the instrument settings.
C
On/Off button
By pressing this button, you power the
instrument on and off.
D
Measurement chamber flap
To apply the sample, open this flap. To start the
measurement, close the flap.
21
E
Test strip guide
Insert the test strip here.
F
Set button
By pressing this button, you access the various
instrument settings which are changed using
the M button. You also use this button to switch
between the different test parameters to show
the currently stored code numbers (before
measurement), or to review results (when in
memory mode).
Page 22
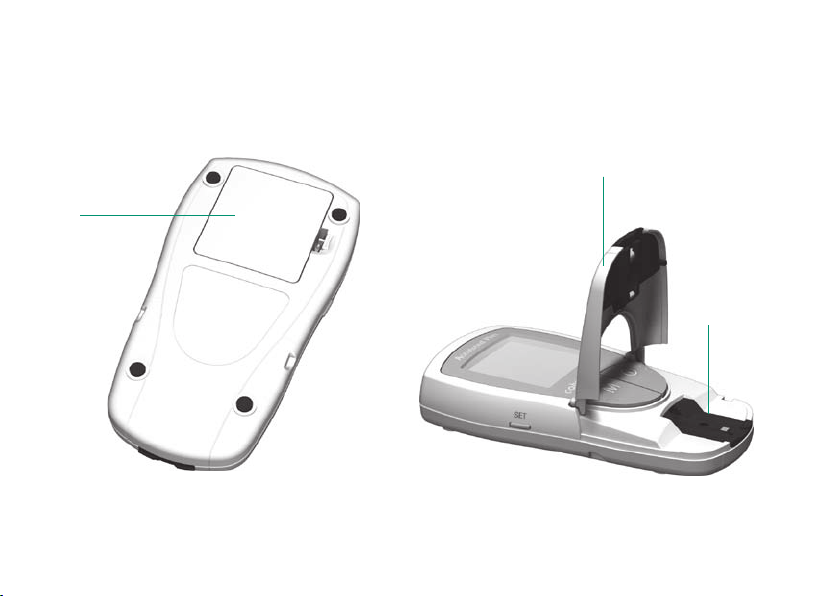
The Accutrend Plus instrument
G
22
D
H
Page 23

The Accutrend Plus instrument
G
Battery compartment lid
Provides access to the battery compartment
(4 AAA 1.5 alkaline batteries).
H
Measurement chamber cover (with test
strip guide)
You can remove this cover to clean the test strip
guide and optics cover.
23
Page 24
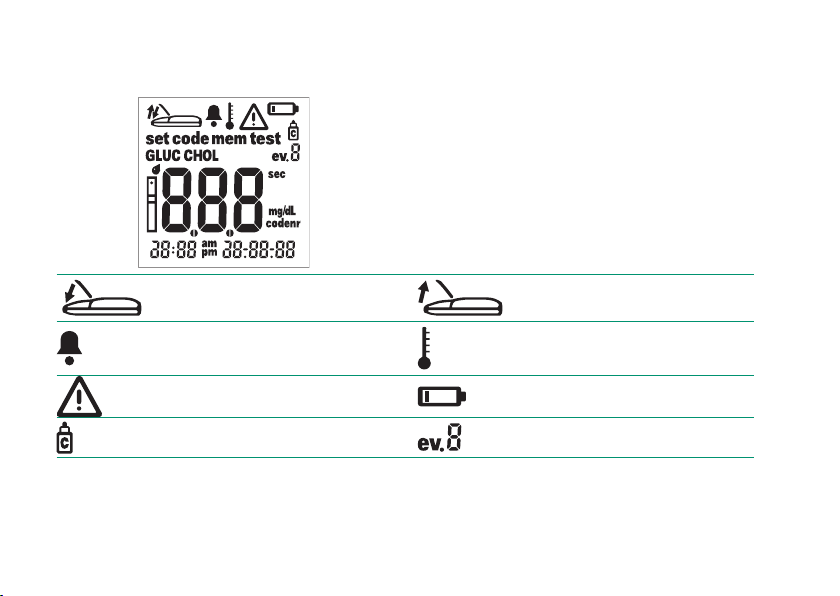
The Accutrend Plus instrument
Display and symbols
Close measurement chamber flap Open measurement chamber flap
Beeper turned on Temperature warning
Error Battery warning (batteries almost dead)
Flagged as a function check with
control solution
24
Every time the instrument is powered on, you should
check the display. The instrument temporarily shows
all symbols that may appear in the display.
Regularly check that all display elements are
functioning correctly to prevent misinterpretations
due to a defective display. The symbols in the display
have the following meaning:
Flag for specific events (event 0-9)
Page 25
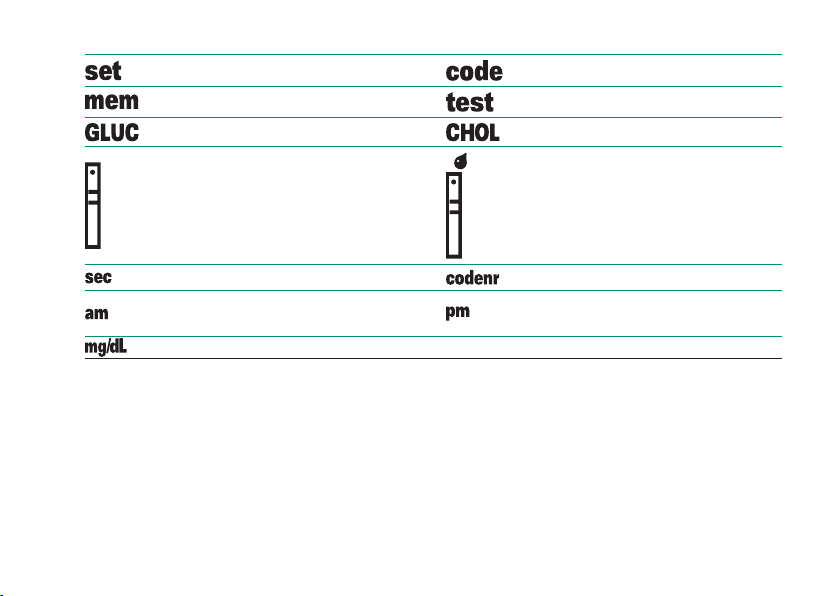
The Accutrend Plus instrument
Set mode Code display
Memory mode Test mode (measurement)
Test parameter: glucose Test parameter: cholesterol
Test strip flashes: insert Test strip and blood drop: apply blood
Measurement time in seconds Display of the code number
In the morning
(with 12h time format set)
Unit for glucose and cholesterol
25
In the afternoon
(with 12h time format set)
Page 26

The Accutrend Plus instrument
Power
To save power, the instrument powers itself off after 2 minutes unless a button is pressed or a new test strip is
inserted. When the instrument turns itself off, all test results obtained so far remain in the memory. With a set of
fresh batteries, you will normally be able to perform approximately 1,000 measurements. When the battery warning
is displayed for the first time, approximately 50 measurements can still be performed, but replace the batteries as
soon as possible.
When replacing batteries, you must insert new batteries within 2 minutes to keep the set date and time. If this time
period is exceeded, you must re-eneter the date and time. Use only AAA alkaline batteries.
Measurement results, including the related measurement date and time, as well as all over instrument settings,
remain stored even when no batteries are inserted.
Please respect the environment and discard used batteries according to your local regulations and laws.
Do not throw batteries onto an open fire. There is a risk of explosion.
26
Page 27

Operating the instrument
Operating the instrument
Before using the instrument for the first time, perform the following steps:
1 Insert batteries.
2 Set date, time and beeper.
3 Insert code strip (can also be done directly before performing the measurement).
27
Page 28
Operating the instrument
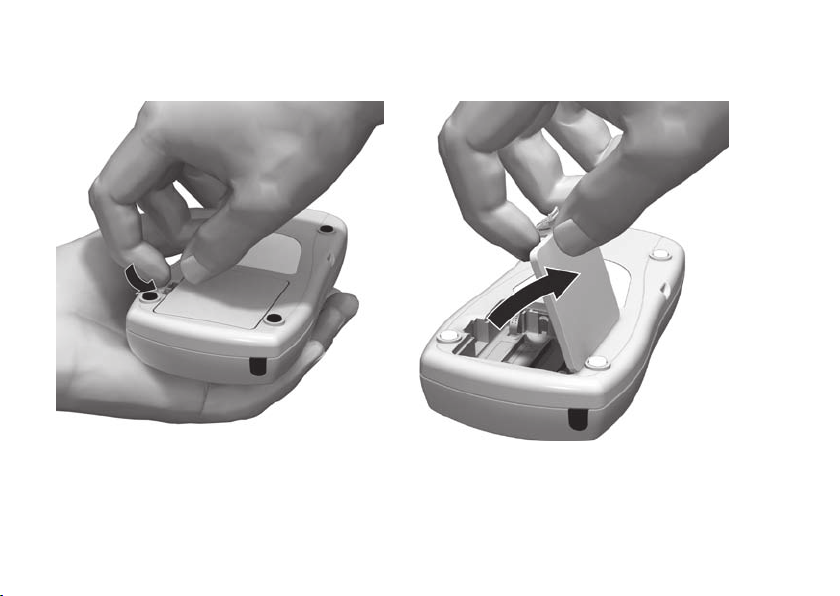
Inserting batteries
28
Page 29
Operating the instrument
1 Ensure the instrument is switched off and turn it
over.
2 Open the battery compartment by slightly
pressing the tab towards the center of the
instrument.
3 Lift the lid upwards to remove it from the
instrument.
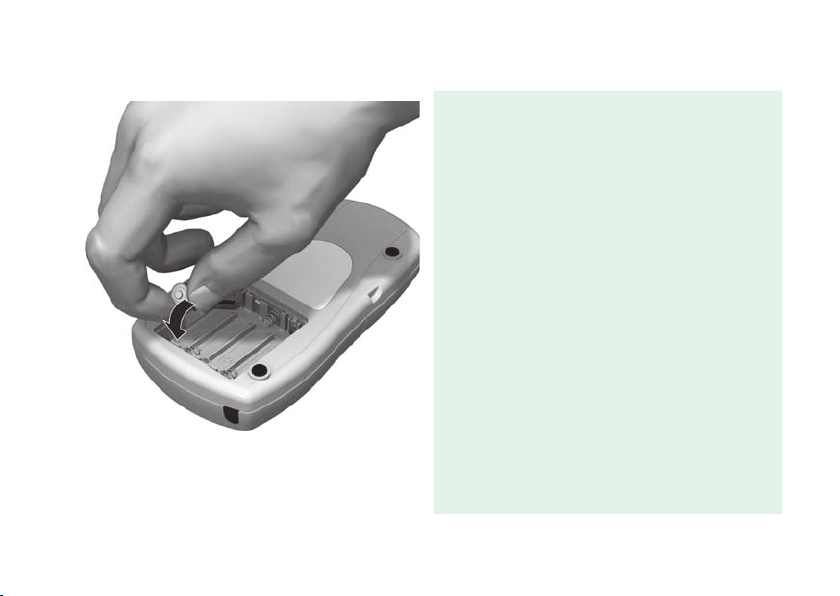
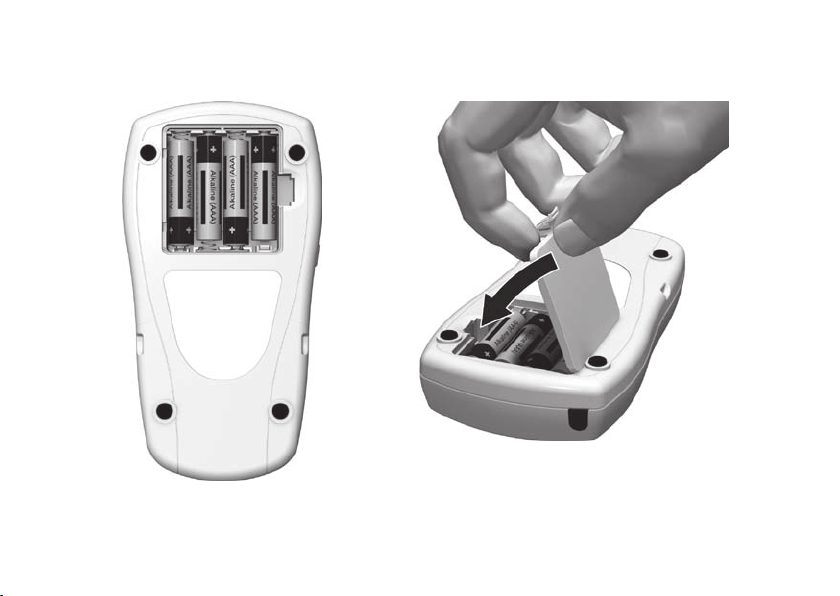
4 Insert four batteries into the compartment
according to the illustrations. Please note the
orientation of the “+” (battery head) and “–”
terminals (flat end). Use only alkaline batteries
(1.5 V, AAA).
Always replace all four batteries at the same time
because batteries with different capacities may
impair the function of the instrument. Do not use
rechargeable batteries.
29
Page 30
Operating the instrument
30
Page 31
Operating the instrument
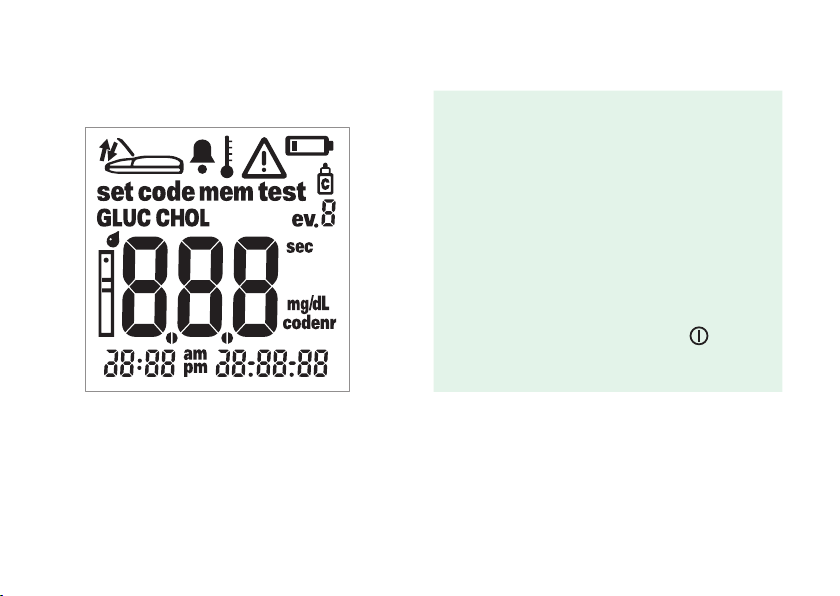
5 Replace and close the battery compartment lid.
6 Power the instrument on to test the function of
the new batteries.
7 Check that the display functions correctly by
comparing it to the diagram on the left to prevent
misinterpretations due to defective display
elements.
Tip:
To make the display screen appear for a longer
time, hold down the On/Off button
powering on. The display screen is then shown
for the time the button is pressed.
31
when
Page 32
Operating the instrument
Instrument settings
Brief overview of the instrument settings
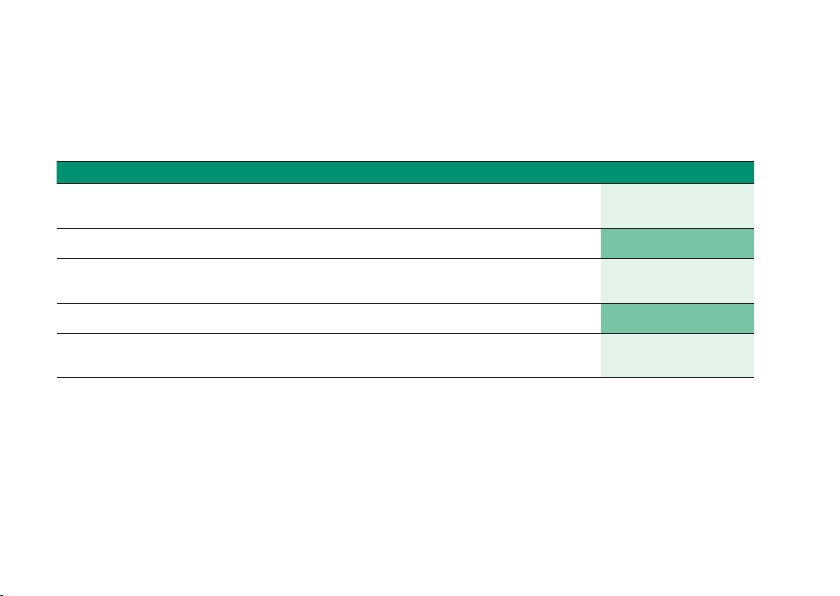
The following table provides an overview of the available settings.
Setting Options Default setting *
Date format Day.Month.Year (31.12.00)
Month-Day-Year (12-31-00)
Date 12-31-00
Time format 24-hour time format (24h)
12-hour time format (12h), with am/pm
Time 12:01 a.m.
Beeper On
Off
* “Default setting” describes the instrument setting at the time of shipping.
32
Month-Day-Year
12h
On
Page 33
Instrument settings
General procedure for setting up the instrument (set mode)
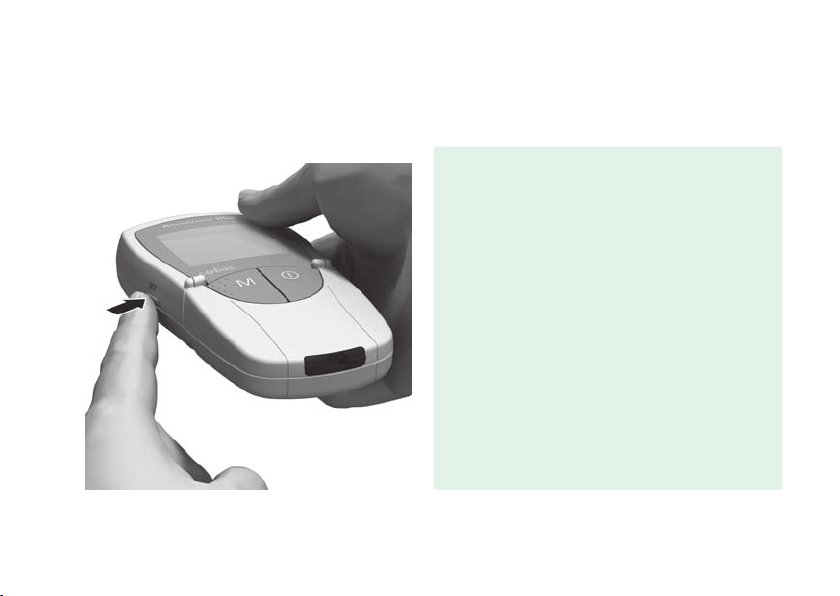
You make all settings using the Set and M buttons as described below. The instrument must be powered off
before you can activate the set mode.
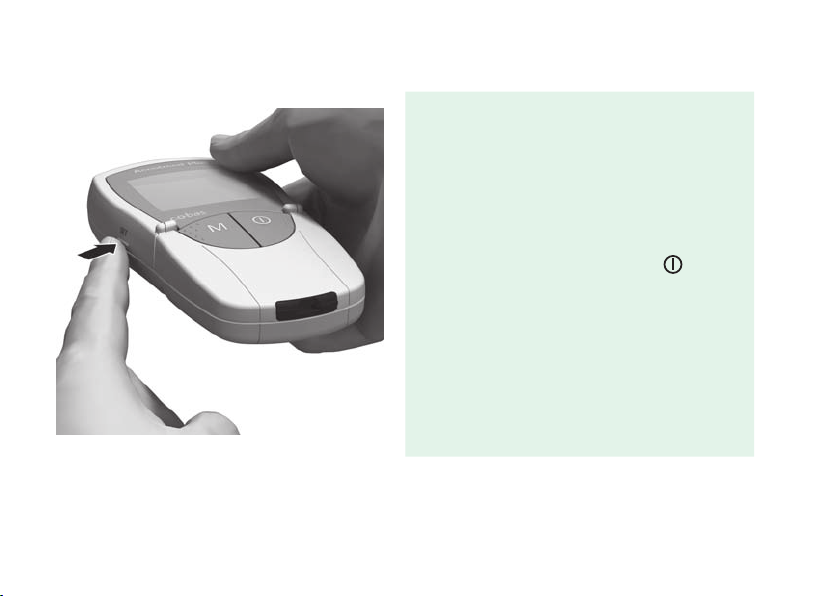
1 Press the Set button (on the left side of the
instrument) to power the instrument on in set
mode.
33
Page 34
Instrument settings
34
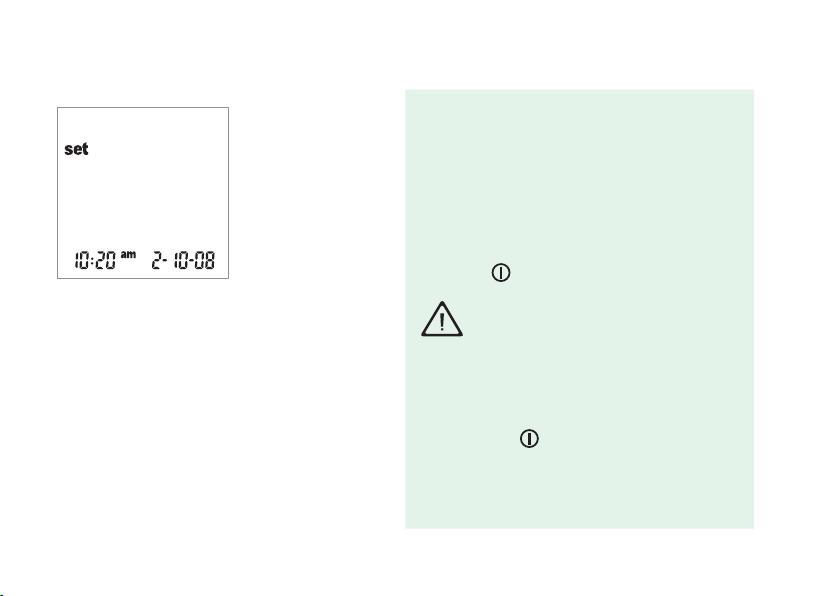
2 The date and time as well as the set symbol
now appear on the display. To actually make or
change settings, press the Set button again,
located on the left side of the instrument
To leave the set mode (this is only possible if a
date and time setting is made), press the On/Off
button
.
Note: If the meter display reads dEL
you have entered the set mode incorrectly
and reached a mode we do not recommend.
To exit this mode and enter the set mode
correctly, immediately turn off the meter by
pressing and holding down the On/Off
button
. After the meter is powered off,
press the Set button twice to enter the set
mode and then continue to the next step.
LASt
Page 35
Instrument settings
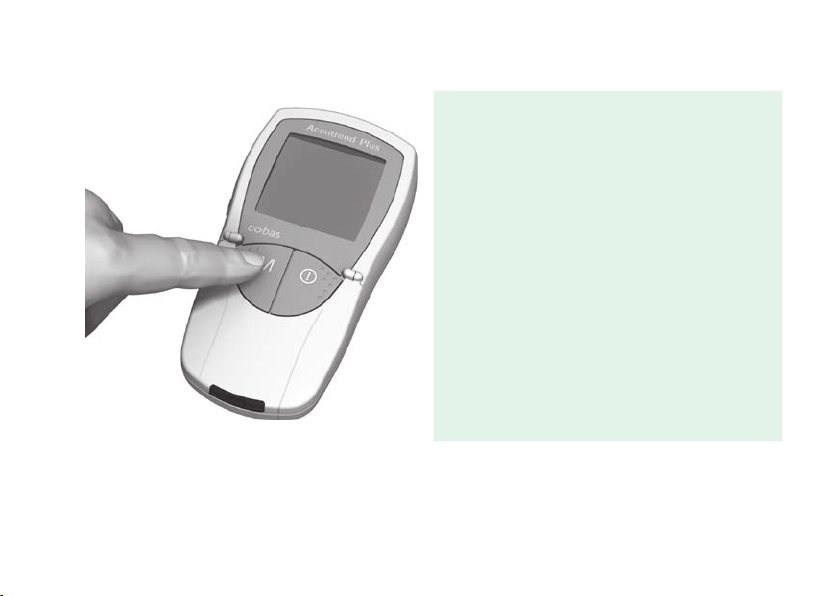
3 If the displayed setting is correct (e.g., the date
is correct and you want to change the time only),
you can continue directly to the next setting by
pressing the Set button or:
4 Press the M button to change the currently
flashing setting. You can press the M button as
many times as needed (or keep it pressed) until
the desired setting (value) is reached.
Settings with only two options (date or time
format, and beeper) are turned on/off or
switched with the M button.
35
Page 36
Instrument settings
36
5 Press the Set button again to save the current
setting and go to the next setting.
You can only move forward through the settings.
Moving backwards is not possible. Corrections
can only be made by repeating the settings.
The setting procedure can be terminated at any
time by pressing the On/Off button
The settings made up to that point are saved.
.
Page 37
Instrument settings
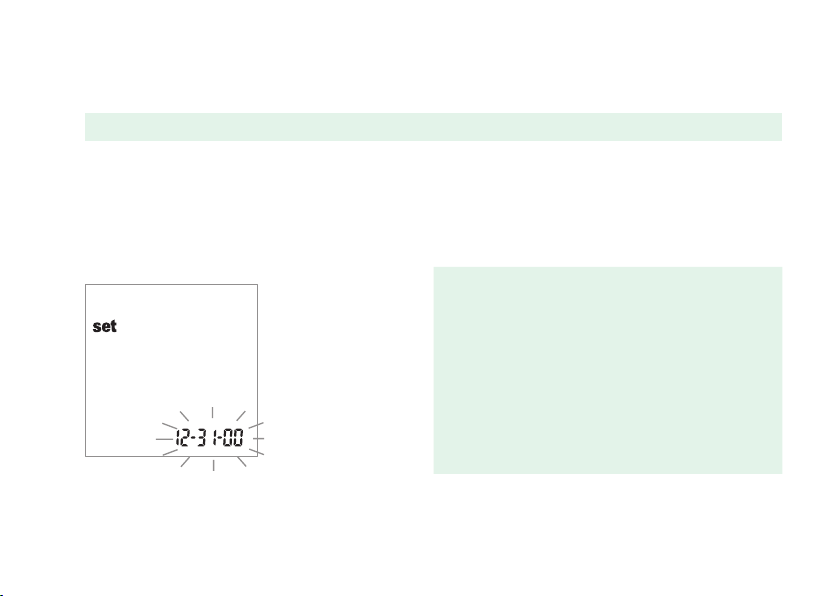
Setting the date format
In the first step, you set the date format (the entire date flashes).
In the following illustrations, flashing display elements are represented by a “beam circle.”
The following date formats are available:
• 31.12.00 Day.Month.Year
• 12-31-00 (= default setting) Month-Day-Year
1 Press the M button to select the date format.
Each time you press the button, the (flashing)
formats 31.12.00 and 12-31-00 appear in
alternation. When the desired format is displayed,
do the following:
2 Press the Set button to save this setting. The
display then automatically switches to the mode
for setting the current date.
37
Page 38
Instrument settings
Setting the date
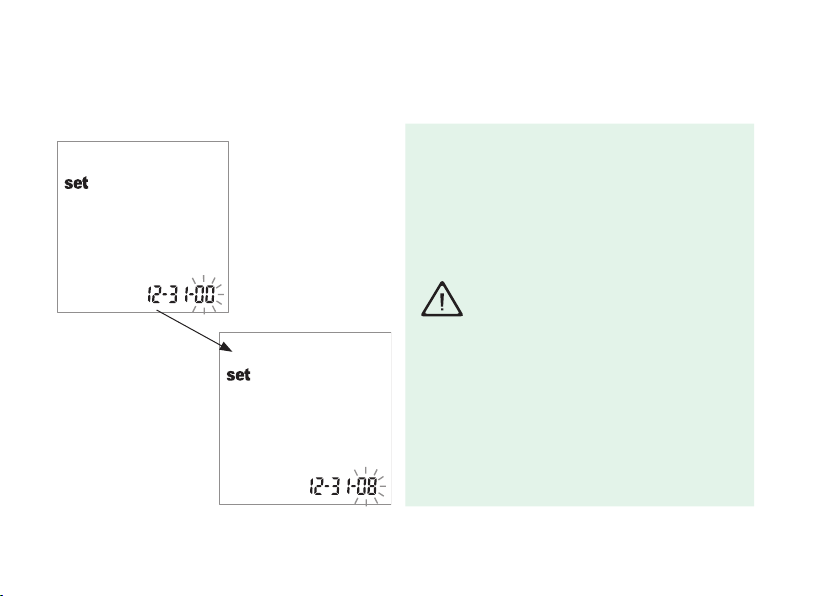
With the next three settings, you first enter the year, then the month and finally the day.
1 Press the M button to change the currently
flashing figure and to set the current year.
2 Press the Set button to save the displayed year.
The display then automatically switches to the
mode for setting the current month.
If you use the instrument without any date
set, all measured values will be stored
without date information.
38
Page 39
Instrument settings
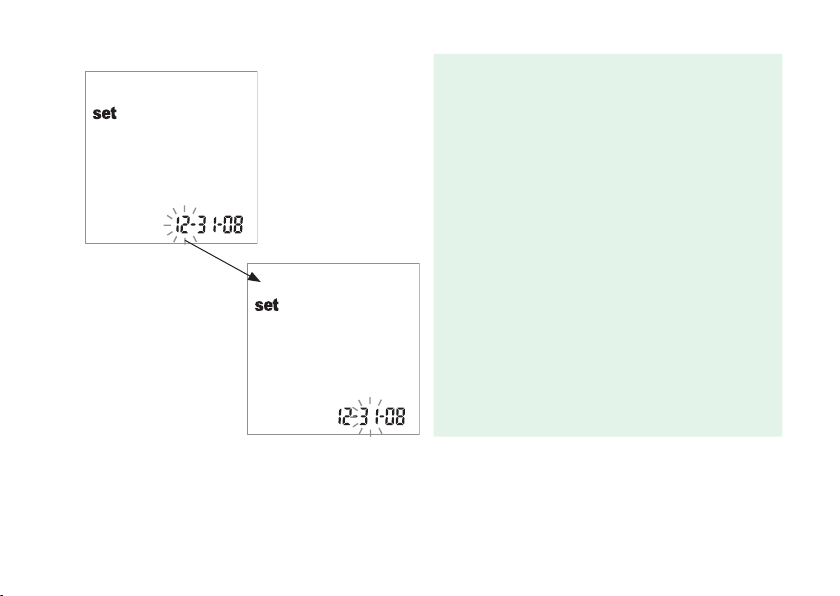
3 The default month flashes. Press the M button
until the desired month is displayed.
4 Press the Set button to save the setting. The
display then automatically switches to the mode
for setting the current day.
39
Page 40
Instrument settings
40
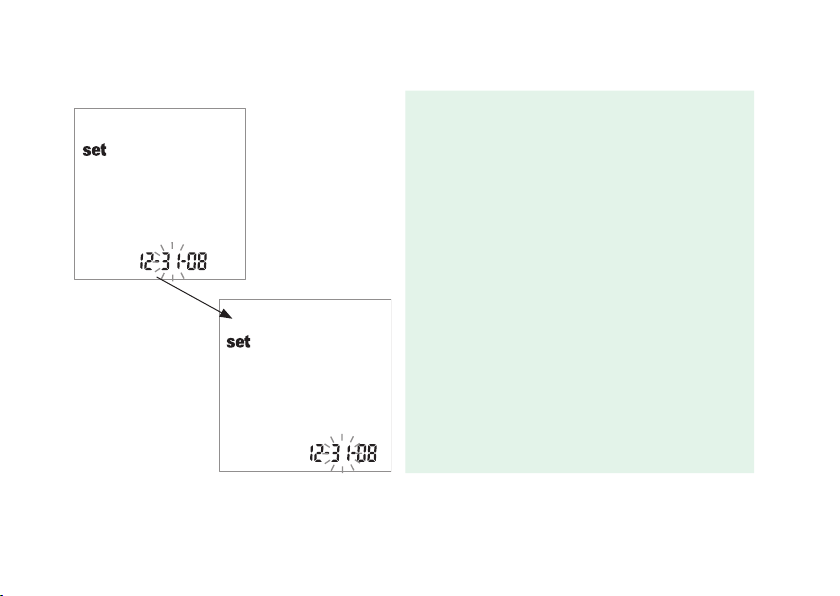
5 The default day flashes. Press the M button until
the desired day is displayed.
6 Press the Set button to save the selected setting
and to continue setting the time format. The
display then automatically switches to the mode
for setting the time format.
Page 41
Instrument settings
Setting the time format
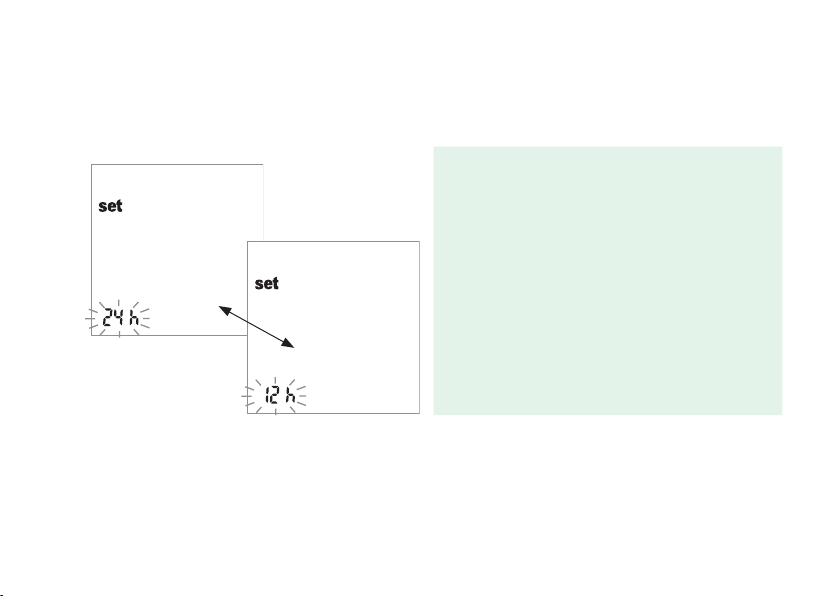
Now select the time format to be used: either the international format (24h display) or the
Anglo-American format (12h display with am or pm = default setting).
7 Press the M button to switch between the 24h
and 12h displays.
8 Press the Set button to save the desired setting
and to continue setting the time. The display then
automatically switches to the mode for setting the
current time.
41
Page 42
Instrument settings
Setting the time
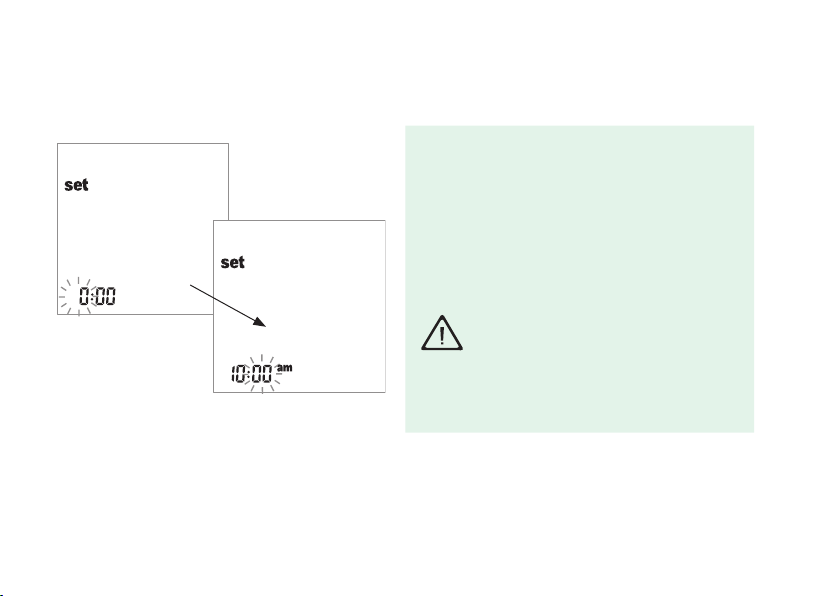
First enter the current hour and then the minutes.
42
9 Press the M button to change the currently
flashing figure. The next time the Set button is
pressed, the minutes can be set (again with the
M button).
If you have selected the 12h time format and
the time “12:xx” is reached, the display switches
between am and pm or vice versa.
If you use the instrument without any time
set, all measured values will be stored
without time information.
10 Press the Set button to save the desired setting
and to continue setting the beeper.
Page 43
Instrument settings
Setting the beeper
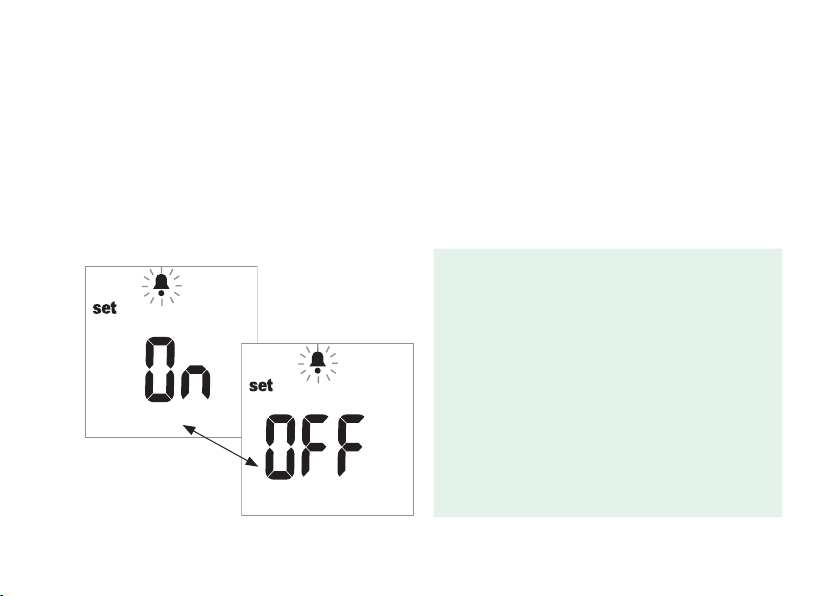
After setting the time, you can set the beeper by choosing On or OFF. We recommend that you always leave the
beeper enabled. If the beeper is enabled, you will hear a beep in the following situations:
• When the instrument detects that the test strip is inserted.
• When the result appears.
• When an error occurs.
11 Press the M button to switch between OFF and
On (default setting).
12 Press the Set button to save the selected
setting. The display briefly displays “End” and
automatically goes to test mode.
43
Page 44

Performing a measurement
Performing a measurement
What you need:
• Your Accutrend Plus instrument
• Test strips for the desired measurements with the related code strip:
– Accutrend Glucose
– Accutrend Cholesterol
• Lancing device (For healthcare professionals, a device suitable for use in a professional multipatient setting
must be used, e.g., Accu-Chek Safe-T-Pro or Accu-Chek Safe-T-Pro Plus)
• Alcohol wipe or pad, if required.
44
Page 45
Performing a measurement
12345
Brief overview of the steps to be carried out
Code the instrument (once
per test strip lot)
45
Insert the test strip Apply blood
Page 46
Performing a measurement
46
Start measurement by closing the
measurement chamber flap
Display of measurement results
Page 47

Performing a measurement
Important notes
Always …
• operate the instrument at the acceptable test-specific temperatures (see also the test strip inserts):
– For cholesterol: 18–30°C (64-86ºF)
– For glucose: 18–32°C (64-90ºF)
• place the instrument on a level surface or hold it steady in your hand
• make sure that all display elements are displayed during the self-test
• read the test strip inserts
• keep the test strip guide and housing clean (see the Cleaning chapter of this manual).
Note: If you would like to do a total cholesterol test after you finish your glucose test (or vice versa), get a blood
drop from a different finger.
47
Page 48
Performing a measurement
Never …
• touch or remove the test strip during actual measurement (this is possible before starting the measurement
when blood is applied outside the instrument)
• delay starting the measurement after blood application
• subject the instrument to sudden movements during a measurement
• store the instrument and strips at extreme temperatures (see the Product specifications chapter of this
manual and test strip inserts)
• store the instrument and test strips under humid or damp conditions without suitable protection (see the
Product specifications chapter of this manual and test strip inserts).
Failure to comply with the above may lead to false results.
48
Page 49
Performing a measurement
Test strips Code strips
F
E
C
A
D
B
49
Page 50

Performing a measurement
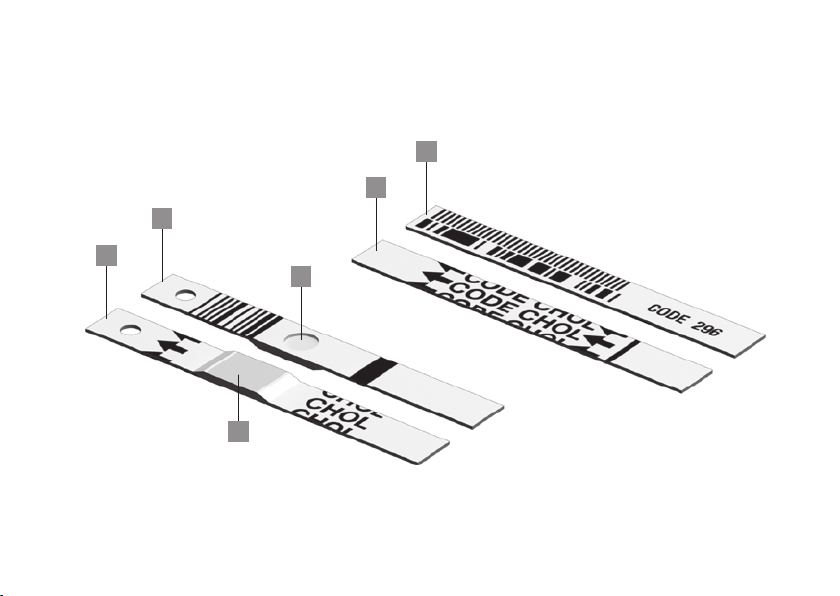
A Test strip (top side, CHOL in the example)
Contains the application area.
B Application area
Apply the sample here.
C Test strip (bottom side)
The imprinted barcode is used to identify the type
and lot of the test strip.
D Reaction area
Used to visually check whether blood was
applied correctly.
50
E Code strip (top side, CHOL in the example)
Supplied with each test strip container.
F Code strip (bottom side)
The imprinted barcode contains lot-specific
information which is read and stored in the instrument.
Page 51
Performing a measurement
Code strips
The code strip provides the instrument with important information on the specific properties of the respective test
strip. The code strip is required at least when a new test strip container is opened and before the strips are used.
The properties of these test strips are then stored in the instrument. The instrument stores the data of only one
code strip per test parameter (i.e., a total of two codes at a time).
• Do not forget to have the code strip, which is supplied with each new test strip container, at hand before
performing the first measurement. Once the code strip data is stored in the instrument (before a new test strip
is used), you normally do not need it any more, but we recommend that you keep it until the container of strips
has been used completely.
Store the code strip in the external packaging and not in the test strip container. The imprint on the
code strip may impair the test strip quality, leading to incorrect measurement results.
• Each code strip belongs to one particular test strip container or lot. If possible, store the test strip container
together with the code strip in the external packaging in order to have the latter at hand for recoding the
instrument if needed (e.g., after battery replacement due to completely dead batteries).
51
Page 52
Performing a measurement
Switching on the instrument
52
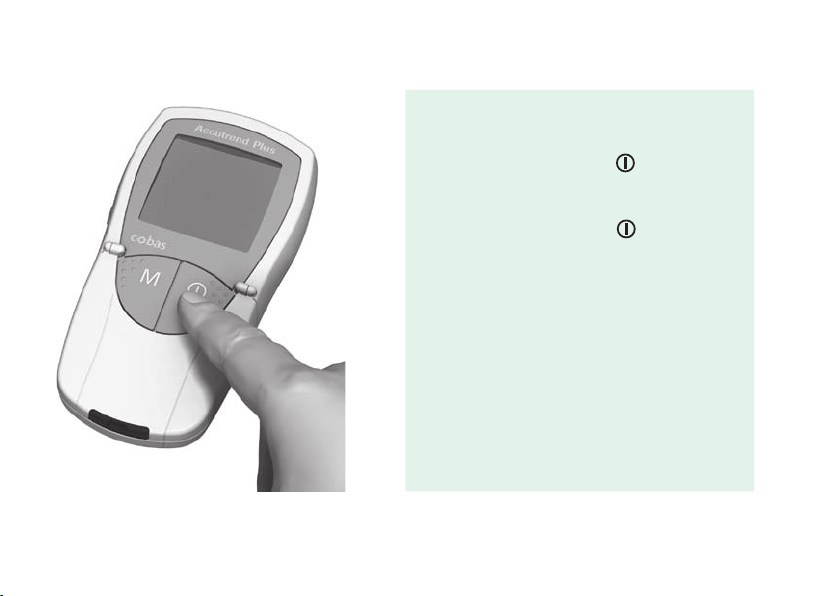
1 Place the instrument on a level surface or hold it
in your hand. Power on the instrument by
pressing the On/Off button
Note: To power the instrument off again, press
and hold the On/Off button
shuts off
.
until the meter
Page 53
Performing a measurement
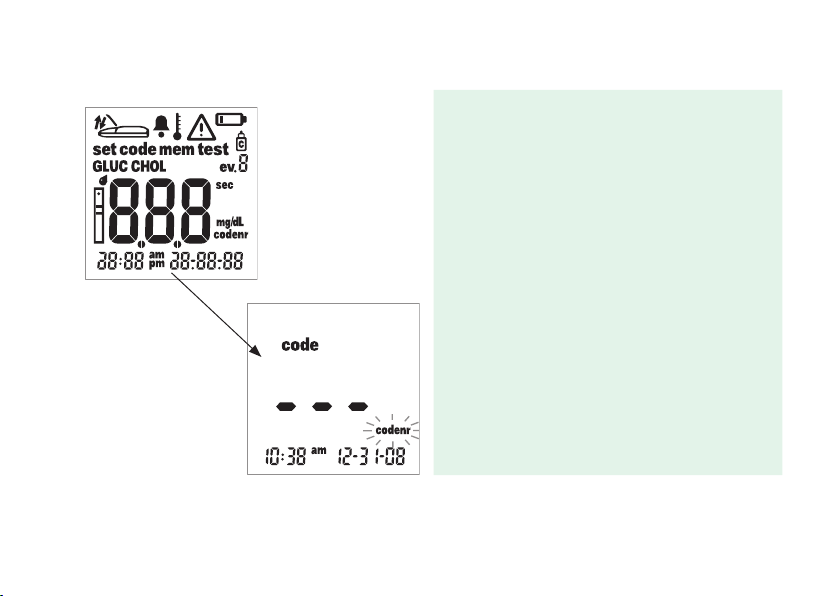
2 Check that the whole display is functioning
correctly to prevent misinterpretations due to
defective display elements.
3 Also always check the battery condition after the
display test. When the battery symbol is shown
with a measurement screen (except during the
display test), you will only be able to perform a
few more measurements.
When the display test completes, the last stored
code displays. If no code has been stored in the
instrument so far, you will see the display shown
on the left.
The flashing codenr symbol instructs you to
insert a code strip.
53
Page 54
Performing a measurement
Inserting the code strip
54
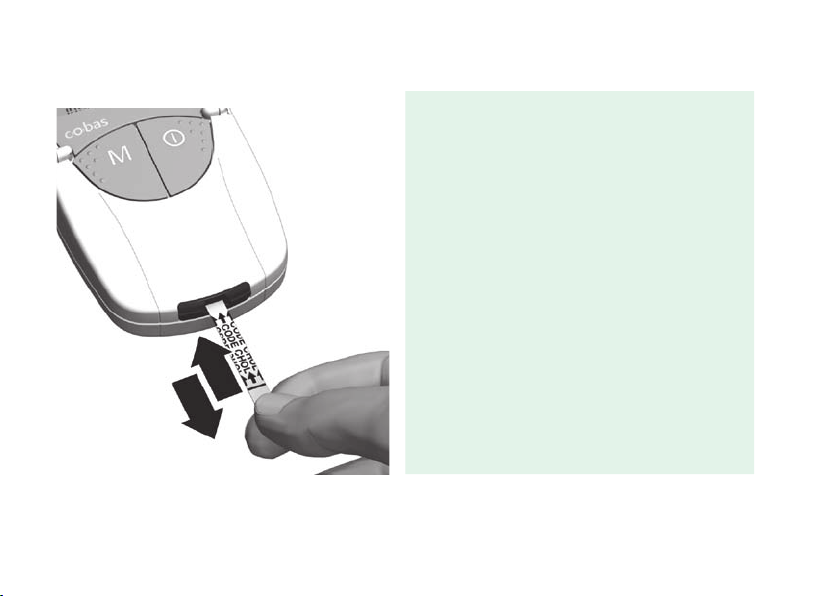
1 Hold the code strip with thumb and index
finger in the white area located at the end of the
strip. Do not touch the printed area on either
side.
2 Insert the code strip smoothly into the test strip
guide up to the stop in the direction of the printed
arrows. Withdraw it immediately afterwards. Leave
the measurement chamber flap closed during this
procedure.
If the instrument reads the barcode information
correctly, a short beep confirms successful
coding (if beeper is enabled).
Page 55
Performing a measurement
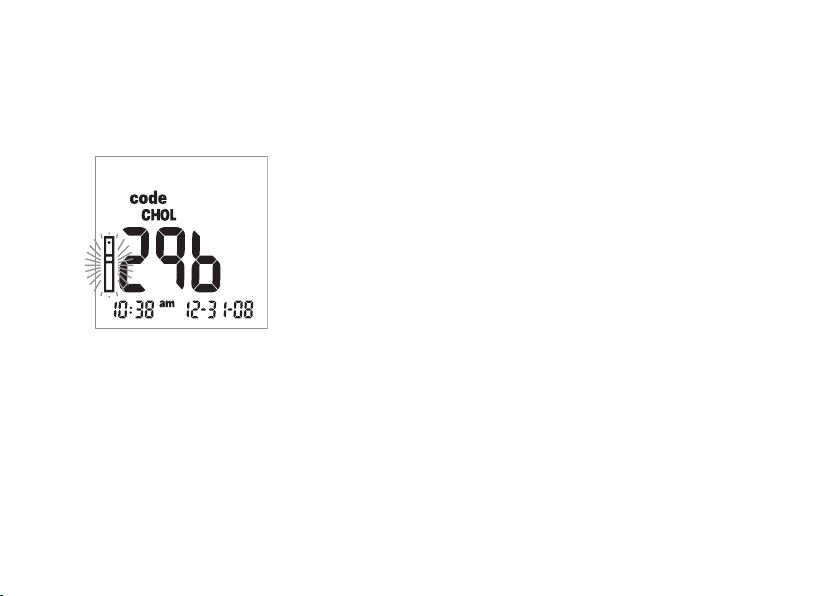
The three-digit code number (which is also printed on
the reverse side of the code strip and on the test strip
container) is shown in the display.
If any problems occur during coding, the meter
displays an error message (see Error Messages
chapter of this manual). If an error occurs, repeat
insertion of the code strip after a few seconds.
The flashing strip symbol prompts you to insert the
test strip.
55
Page 56
Performing a measurement
Switching the code display
You can switch between the display of the stored code numbers for information purposes.
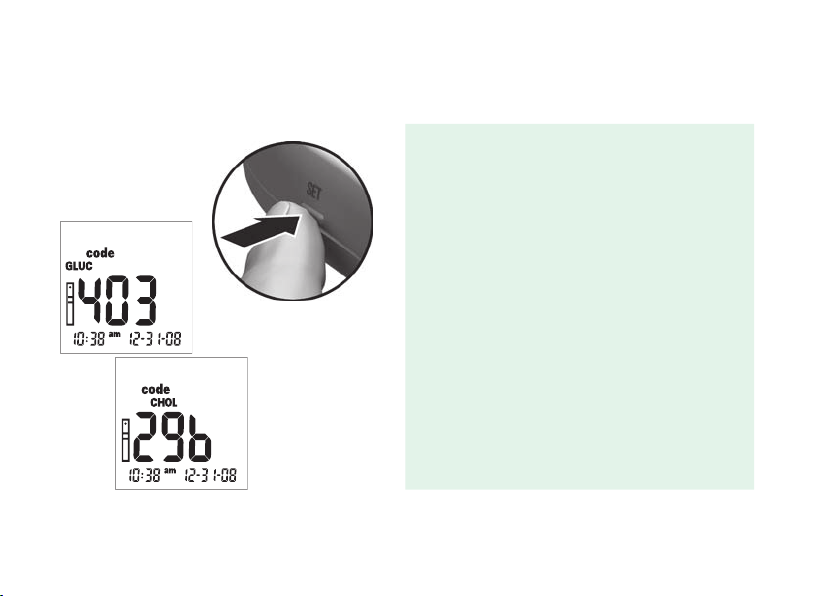
1 The code number last stored or used is displayed
after powering on the instrument. Press the Set
button to switch to the code number for the other
parameter. Each time you press the button, the
display shows the code number of the test strips
in succession.
Note: This display is for information purposes
only. You do not need to display the test
parameter to be measured.
56
Page 57
Performing a measurement
Sample material
Fresh capillary blood is used as sample material. You need a free hanging blood drop for measurement. For
more information on sample material, refer to the test strip package insert.
Note that all handling of blood samples represents a risk of infection. Therefore, take the corresponding safety measures, such as wearing disposable gloves while working.
57
Page 58
Performing a measurement
Performing measurements in the professional sector
Protection against infections: There is a potential risk of infection. Medical staff and other
people using the Accutrend Plus instrument to perform measurements for more than one patient
must be aware that any object coming into contact with human blood is a potential source of
infection.
• Use gloves.
• Apply blood outside the instrument (see the Performing a Measurement chapter of this manual).
• Dispose of used test strips in a clinical waste bin.
• Follow all other locally applicable guidelines and regulations on health and safety.
58
Page 59
Performing a measurement
Preparing to perform a measurement
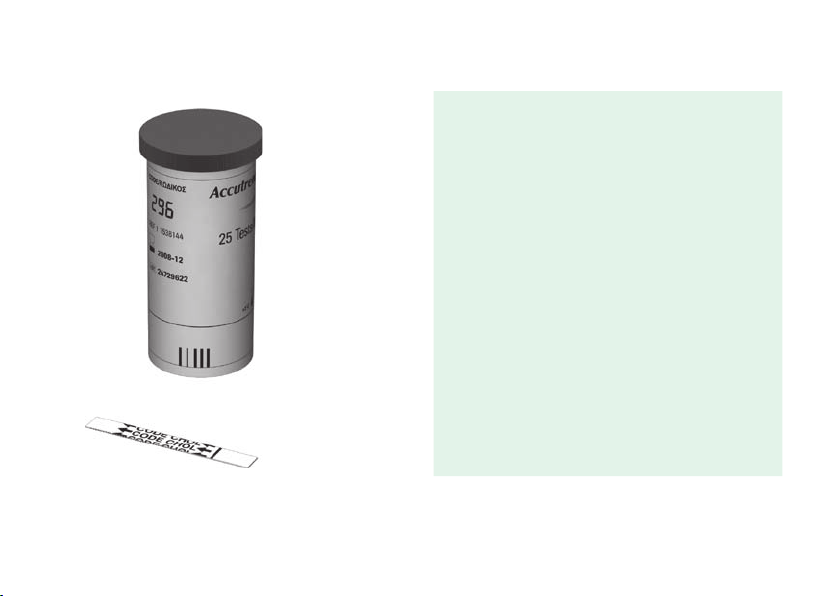
1 Get the test strip container for the required
measurement.
2 Check the expiration date of the test strip.
Always use test strips before their expiration
date has passed.
3 Make sure the code strip belonging to these
test strips is at hand (unless the instrument has
already been coded with this code strip).
Note: Environmental influences (e.g., air
humidity and light) on the test strips may damage
test strips and lead to false measurements or
error messages.
Do not remove the test strips from the strip
container until immediately before performing a
measurement.
59
Page 60
Performing a measurement
60
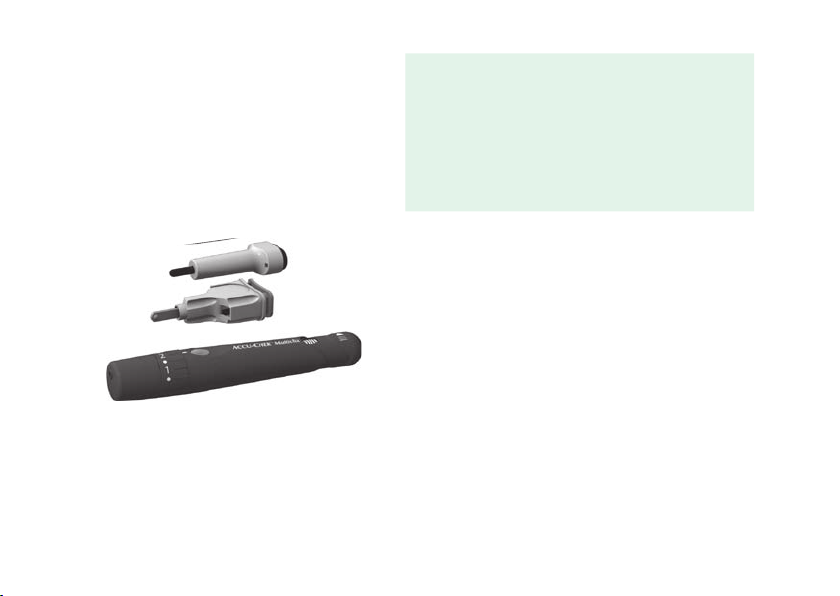
4 Prepare the lancing device by inserting a new
lancet.
Self-testers: Do not lance yourself before
being instructed to do so in the course of this
description.
In the professional, multi-patient sector you should
use a suitable single-use lancing device to prevent
cross contamination. We recommend the Accu-Chek
Safe-T-Pro or Accu-Chek Safe-T-Pro Plus single-use
lancing device.
We recommend the Accu-Chek Multiclix lancing
device for self-testers.
Page 61
Performing a measurement
Performing a measurement
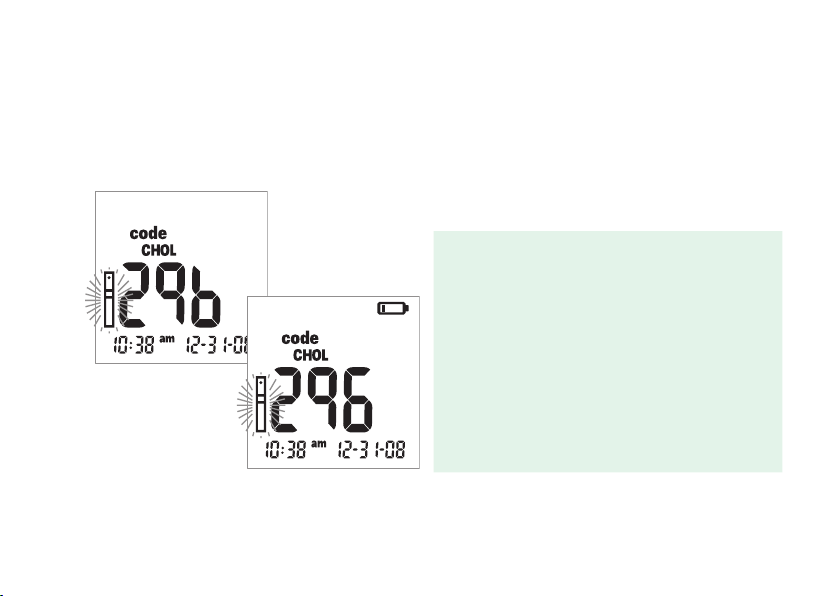
After it is switched on and coded, the instrument expects you to insert the test strip. From the barcode on the
reverse side, the instrument detects which test parameter is to be measured and which code is needed for the test
strip. If the code strip has not been read yet, an error message is displayed after inserting the test strip.
Check the following displays before performing the
measurement:
1 Are date and time correct? If the measured
values are to be stored with time information,
enter the correct settings (refer to the Instrument
Settings chapter of this manual).
2 Does the battery symbol appear? If it
appears, only few more measurements can
be performed. Replace the batteries as soon as
possible (refer to the Operating the Instrument
chapter of this manual).
61
Page 62
Performing a measurement
62
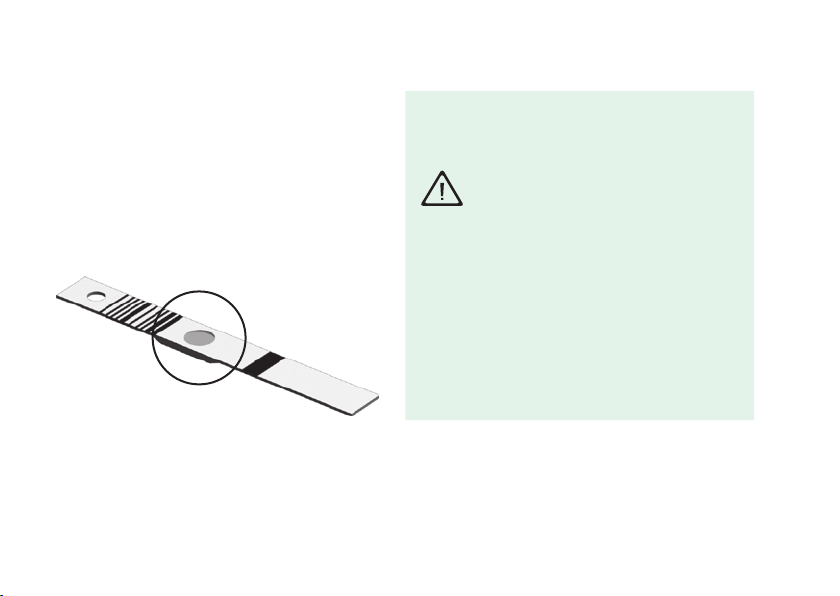
3 Now take the test strip from the test strip
container.
Close the container immediately after
removing strip to protect the desiccant and
strips, otherwise, the test strips may become
unusable before their expiration date.
Liquids must not enter the test strip
container.
4 With glucose test strips, check the reaction area
on the back of strip for discoloration before
starting measurement. If you detect discoloration,
this test strip is unusable. For detailed
information, see the test strip package insert.
Page 63
Performing a measurement
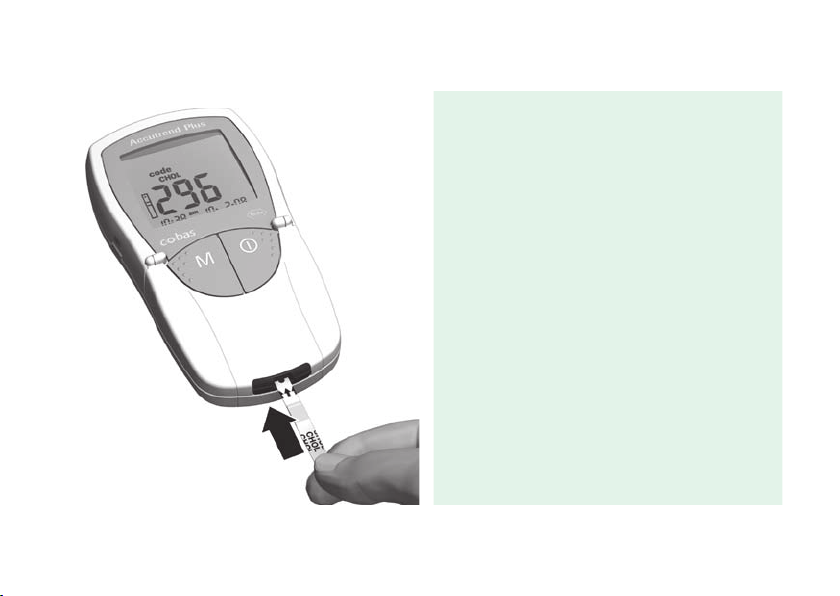
5 Hold the test strip with thumb and index finger
so that the sample application area is facing
upwards.
6 Insert the test strip into the test strip guide up to
the stop. When the test strip reaches the correct
position, you will hear two beeps (short – long; if
beeper is enabled).
63
Page 64
Performing a measurement
64
Page 65
Performing a measurement
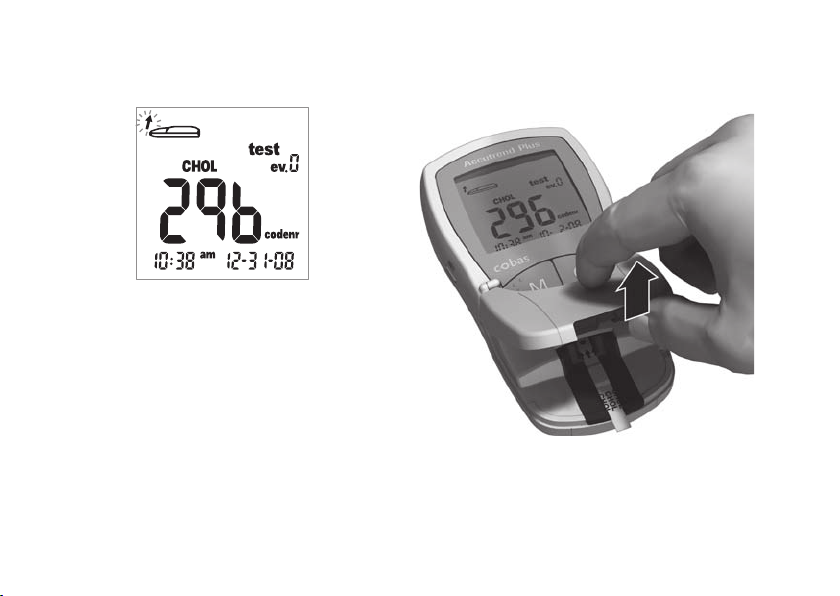
A flashing arrow now instructs you to open the
measurement chamber flap to apply the blood.
Explanations on flagging this measurement (events,
ev. 0 display or control flag) are provided later in this
chapter.
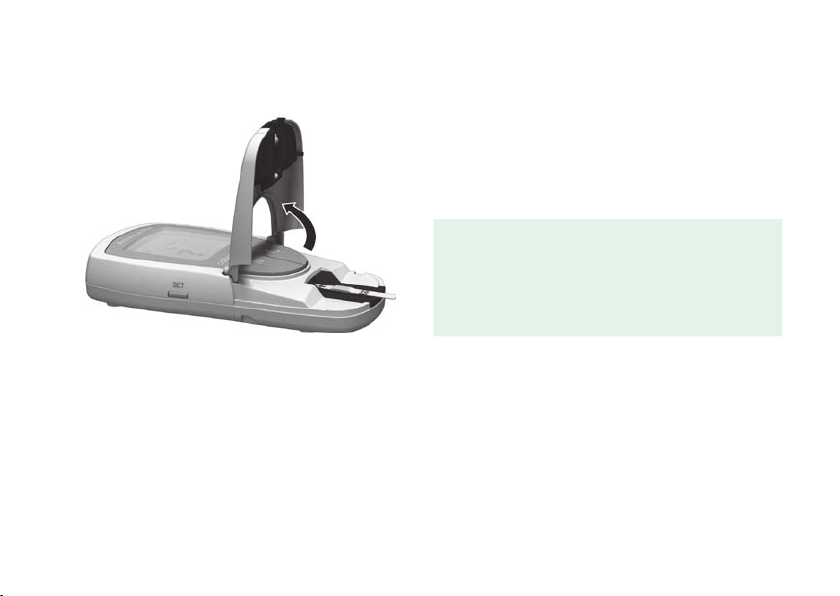
7 Open the measurement chamber flap.
The flap firmly locks into place when it reaches a
vertical position.
65
Page 66
Performing a measurement
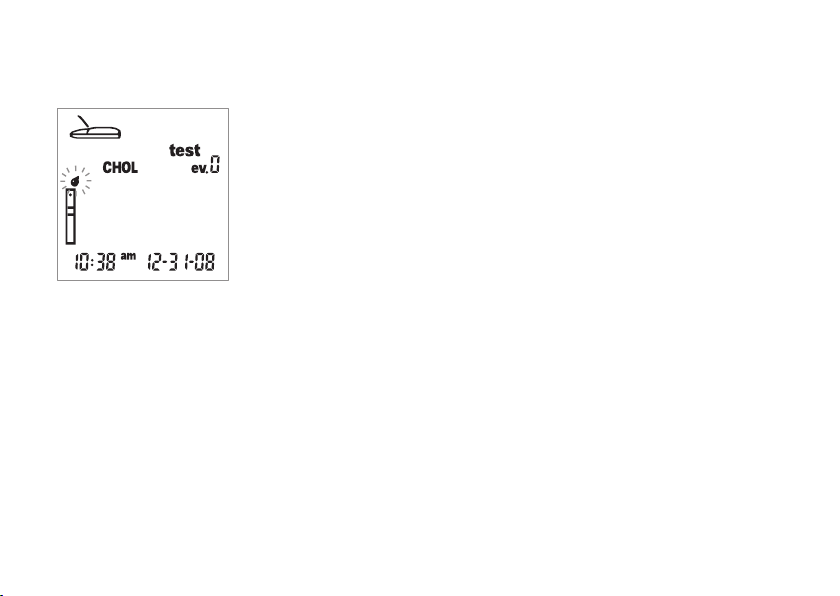
The flashing drop symbol (above the strip symbol)
now instructs you to apply the blood.
Blood can be applied either in the instrument or outside the instrument.
66
Page 67
Performing a measurement
Recommendations for the collection and measurement of capillary blood
To obtain a suitable blood drop:
• Wash your hands with warm water.
• Ensure hands are warm and dry before lancing
• If needed, massage your fingertip. After lancing yourself, try to obtain a sufficiently large free hanging drop
without excessive pressing or squeezing.
• We recommend obtaining the capillary blood from the side of the fingertip as this part is the least sensitive to
pain.
For determination of cholesterol only, wipe off the first drop of blood with a cotton ball and use the
second drop of blood for the test.
67
Page 68
Performing a measurement
Blood collection
68
8 Lance the outer side of the fingertip using the
lancing device to obtain a large hanging drop
of blood.
Page 69
Performing a measurement
Blood application in the instrument:
9 Apply a large hanging drop of blood directly
from the finger to the yellow sample application
area of the test strip. Do not touch the application
area with the finger.
The drop of blood must be applied to the test
strip immediately after lancing the fingertip.
Blood which is applied later may lead to an incorrect result.
For cholesterol testing, wipe away the first drop
and immediately apply the second drop.
69
Page 70

Performing a measurement
Alternative blood application outside the device:
70
10 Withdraw the test strip after opening the flap
(leave it open).
11 Apply the free hanging drop of blood directly
from the finger to the yellow sample
application area of the test strip. Refer to the
insert of the respective test strip.
Do not touch the application area with your skin.
12 With the measurement chamber flap open, insert
the test strip back into the instrument.
Page 71
Performing a measurement
CHOL
CHOL
CHOL
CHOL
CHOL
CHOL
CHOL
Checking the applied blood:
A
The application area must be completely
covered with blood (example A), otherwise
incorrect values may be obtained.
B
If too little blood is applied (example B), do not try to
spread it or apply a second drop as this may lead to a
false measurement. Repeat the measurement with a
new test strip.
71
Page 72
Performing a measurement
Starting the measurement
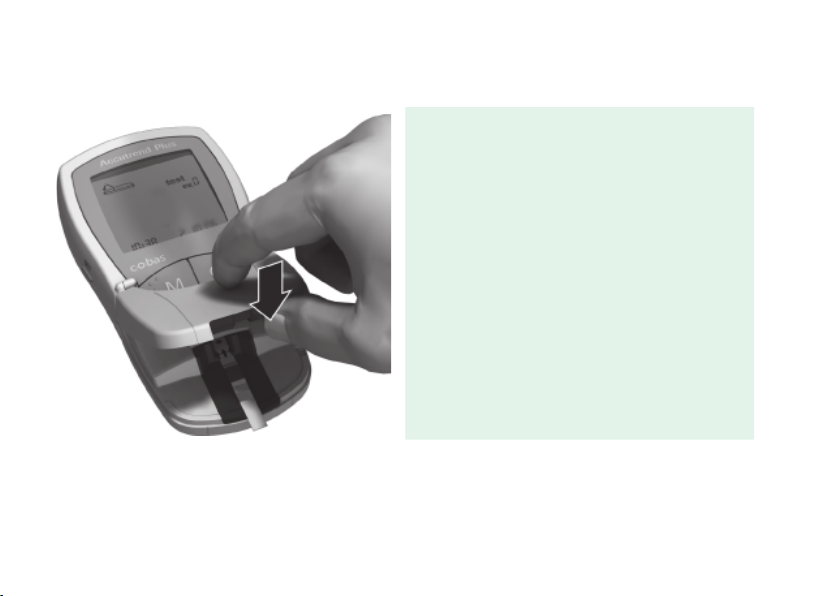
72
13 Close the measurement chamber flap. This starts
the actual measurement.
Page 73
Performing a measurement
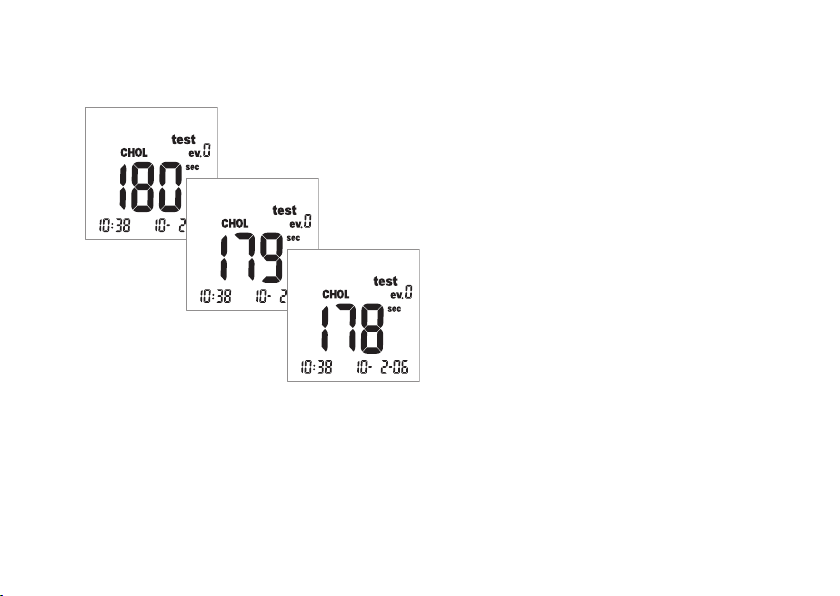
The time needed to evaluate the sample varies
depending on the test parameter. This time is shown
in the display and counted down to “0.” The
measurement times of the individual test parameters
are:
• For glucose: 12 seconds
• For cholesterol: 180 seconds
The last 4 seconds of the measurement time are
each accompanied by one short beep (if beeper
is enabled). Completion of the measurement and
the subsequent display of results are indicated by a
longer beep.
73
Page 74
Performing a measurement
Display of results
74
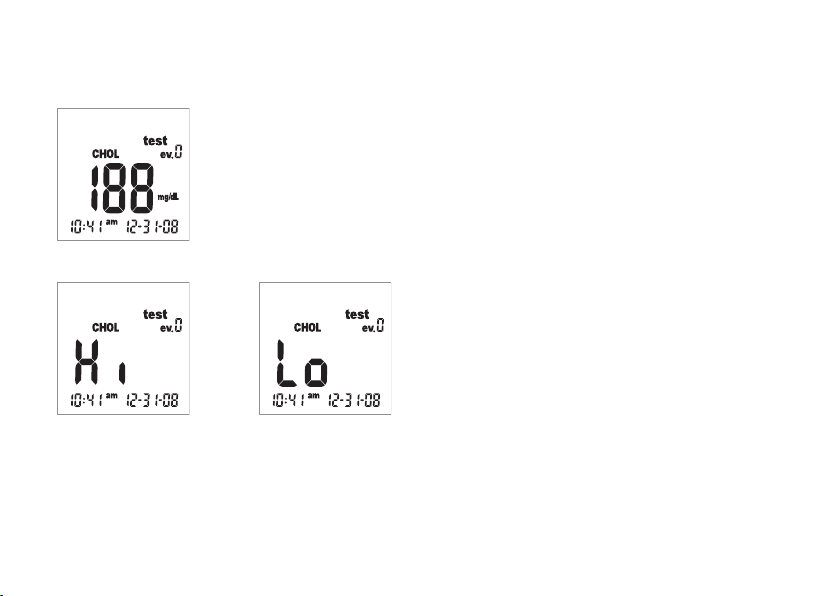
When measurement is finished, the result is displayed.
If you are measuring glucose, perform the plausibility
check described on the next page.
Measurement results which fall outside the meter
measurement range are displayed as
Hi (above the measurement range) or
Lo (below the measurement range).
When the result is displayed, the ev. 0 event
(no event) is displayed. For an explanation on how to
use the event display to apply additional information
to the result, see the next section.
Page 75
Performing a measurement
Plausibility check after glucose measurement:
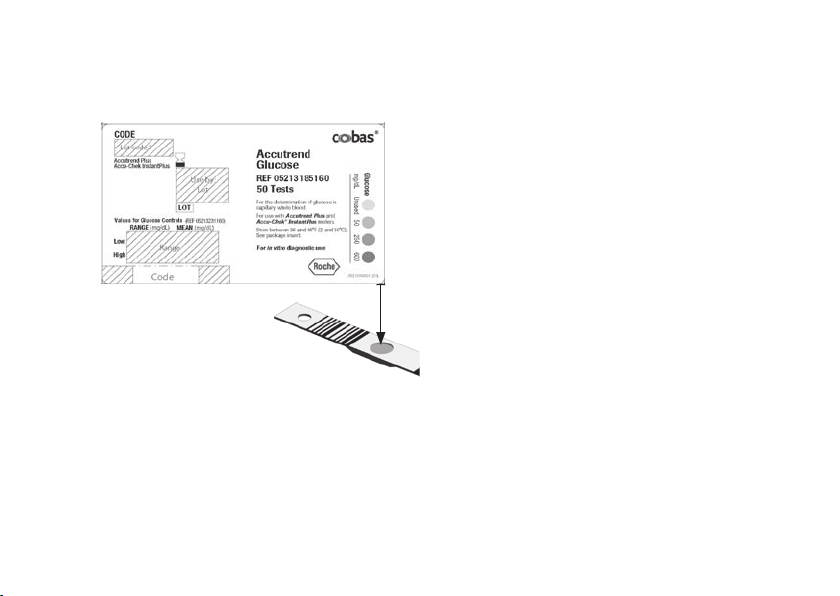
• Remove the test strip and turn it with the
bottom side upwards.
• Compare the reaction area on the bottom side of
the strip with the color field scale on the label of
the test strip container.
The color of the reaction area must approximately
match the color assigned to your measurement result.
If there is a great deviation, perform a meter function
check. Note the information provided in the test strip
insert.
75
Page 76

Performing a measurement
If the displayed result (particularly when blood glucose is measured) does not match your state of health or seems
to be unusually high or low, check the meter function using a new test strip (see the Control Check with Control
Solution chapter of this manual). If this check confirms proper functioning of the instrument, read again the
preceding instructions on performing a measurement. Perform another measurement using a new test strip.
If the new result also seems to be not plausible, consult your doctor.
If you do not want to flag the measurement result with an event or as a control, the measurement is now complete.
Open the measurement chamber flap and remove the test strip. Press the On/Off button
powers off. Properly dispose of the used lancet and test strip according to local laws and guidelines. Clean the
instrument if necessary (see the Cleaning chapter of this manual).
Doctors and nursing staff must observe the disposal guidelines of the respective hospital or doctor’s office.
76
until the instrument
Page 77

Performing a measurement
Flagging measurements
You can add additional information to measurements, for example, to characterize a particular value with regard
to special circumstances (e.g., meals or exercise). In addition, you can flag measurements carried out with control
liquids as controls. You can flag a measured value at different points in time:
• At the start of the measurement after inserting the test strip.
• When the test result is displayed.
You cannot flag a value while measurement is in process.
77
Page 78
Performing a measurement
Flagging the measurement as a control:
78
You flag measurements as controls when they
have been performed using a control solution (as
described in the following chapter).
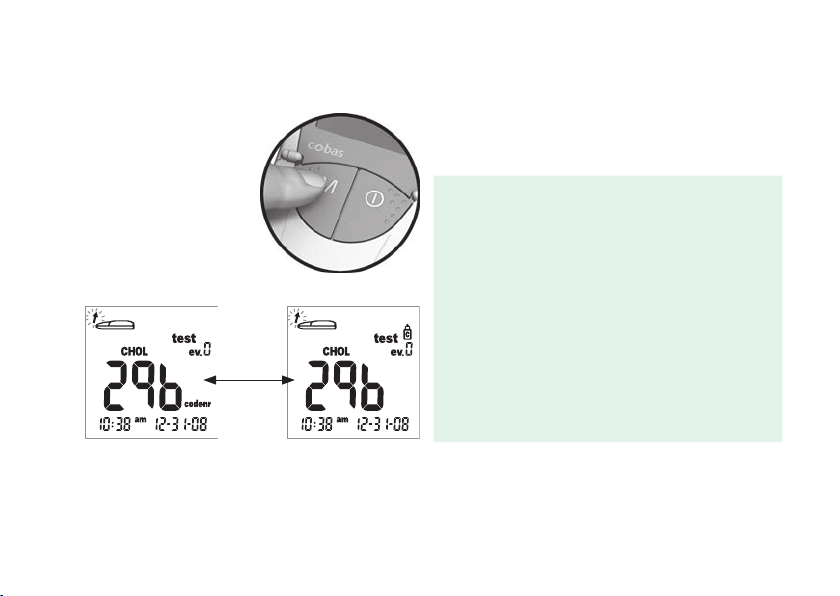
14 Press the M button (after inserting the test strip
or when the result is displayed) to flag the
measurement as a control (bottle symbol).
Pressing the M button again turns the flag off.
Page 79
Performing a measurement
Assigning additional information to a measurement:
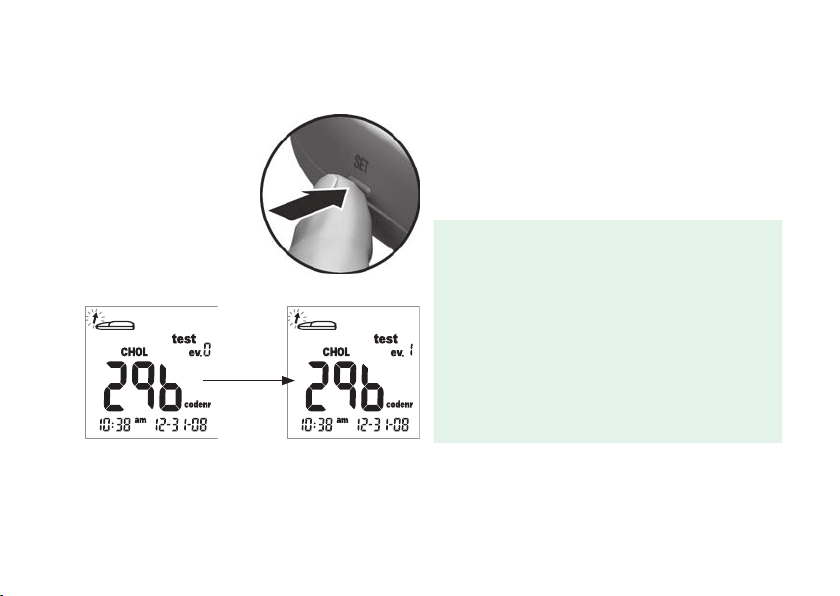
Optionally, you can assign one of nine different events
to a measurement. The event “0” represents “no
flagging.” If used, you must define the events and their
respective event numbers yourself. Make sure that
your assignments are unique and reproducible.
15 Press the Set button (after inserting the test
strip or when the result is displayed) to flag the
measurement with an event. Pressing the Set
button increases the displayed event number
in increments of one. After event “9,” the event
display is reset to “0.”
79
Page 80

Quality control recommendation
Quality control recommendation
To ensure that the instrument is functioning properly, you should regularly use two levels of control solutions for
a function check. For each test parameter, separate control solutions are available. Make a habit of carrying out a
function check in the following situations:
• If you leave the cap off the container of test strips.
• When you open a new container of test strips.
• Before using your meter for the first time.
• If you drop the meter.
• When your glucose test does not agree with the way you feel.
• When you want to check the way you are performing your blood glucose or total cholesterol test.
• When you want to check the performance of the meter and test strip.
• If you have repeated a test and the result is still higher or lower than expected.
A function check is performed in the same way as a regular measurement except that control solutions are used
instead of blood.
80
Page 81

Quality control recommendation
What you need:
• Your Accutrend Plus instrument
• Test strips for the desired measurements with the related code strip:
– Accutrend Glucose
– Accutrend Cholesterol
• Control solutions for the respective test parameter:
– Accutrend Glucose Control Low Level
– Accutrend Glucose Control High Level
– Accutrend Cholesterol Control Low Level
– Accutrend Cholesterol Control High Level
81
Page 82
Quality control recommendation
Preparing to perform a control test
82
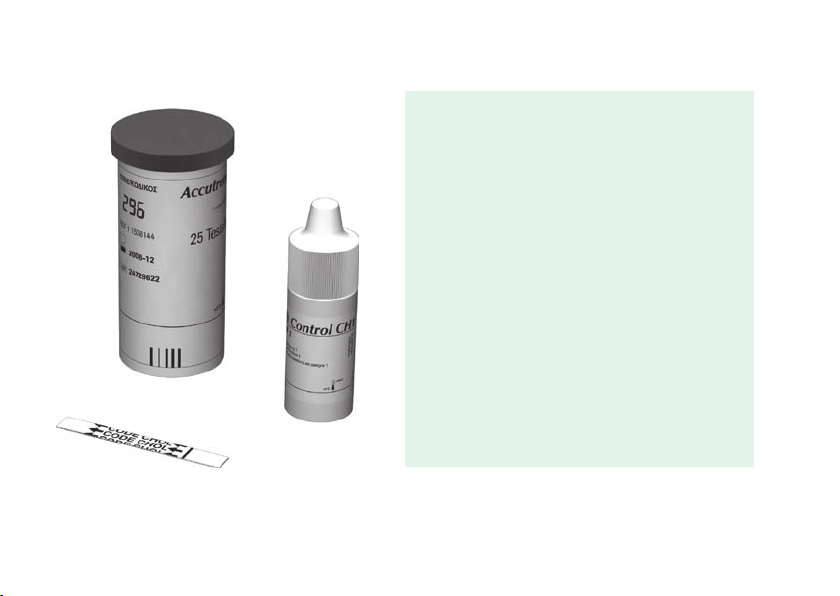
1 Get the test strip container for the required
measurement (e.g., cholesterol).
2 Make sure the code strip belonging to these test
strips is at hand (unless the instrument has already
been coded for this test strip lot).
3 Get the proper control solutions for the test strips.
The following description assumes that the
instrument has already been coded for the test
strips used here. If this is not the case, see the
Inserting the code strip section of this manual.
Page 83
Quality control recommendation
Performing a control test
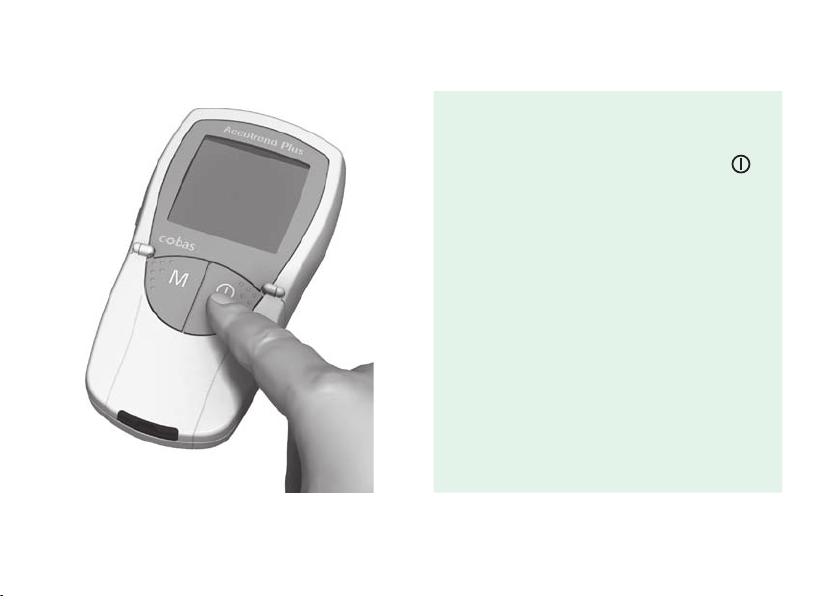
1 Place the instrument on a level surface or hold it
in your hand. If required, switch on the
instrument by pressing the On/Off button
83
.
Page 84
Quality control recommendation
84
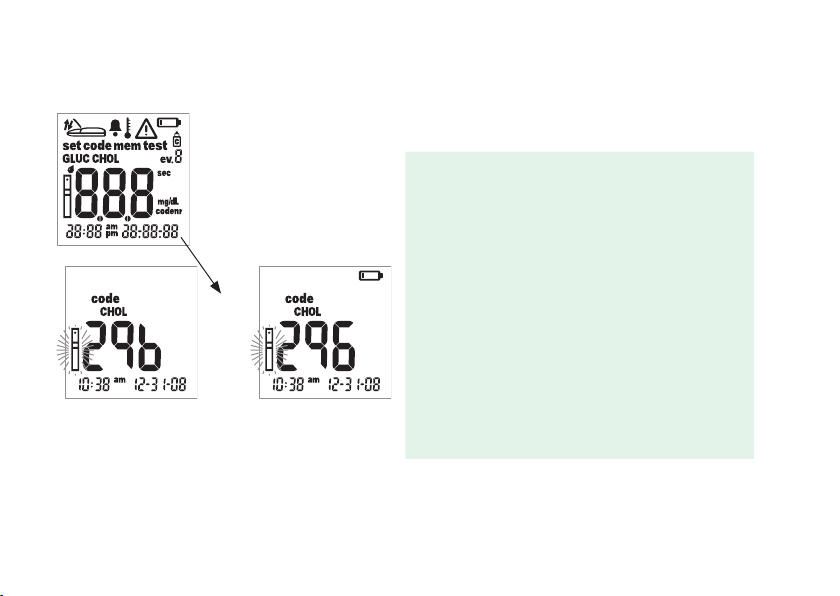
After switching on the instrument, check the following
displays:
2 Check that the whole display is functioning
correctly to prevent misinterpretations due to
defective display elements.
3 Are date and time correct? If the measured val-
ues are to be stored with time information, enter
the correct settings (see the Setting the date
section of this manual).
4 Does the battery symbol appear? If it appears
(except during the display check at start up), only
a few more measurements can be performed.
Replace the batteries as soon as possible (see
the Inserting batteries section of this manual).
Page 85
Quality control recommendation
5 Now take the test strip from the test strip
container. Close the container immediately after
removing strip to protect the desiccant and
strips, otherwise the test strips may become
unusable before their expiration date.
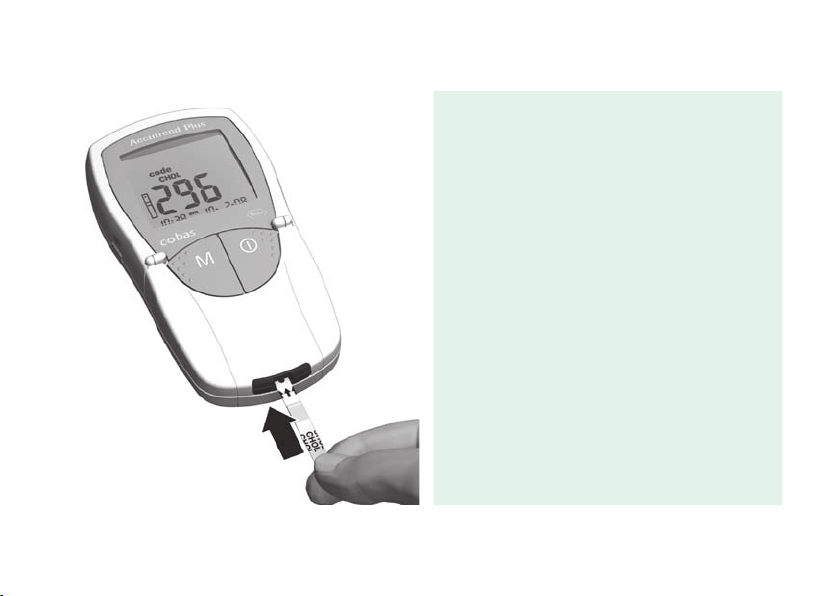
6 Hold the test strip with thumb and index finger so
that the printed measurement parameter is facing
upwards.
7 Insert the test strip into the test strip guide until
it stops. When the test strip reaches the correct
position, you will hear two beeps (short – long; if
beeper is enabled).
85
Page 86
Quality control recommendation
86
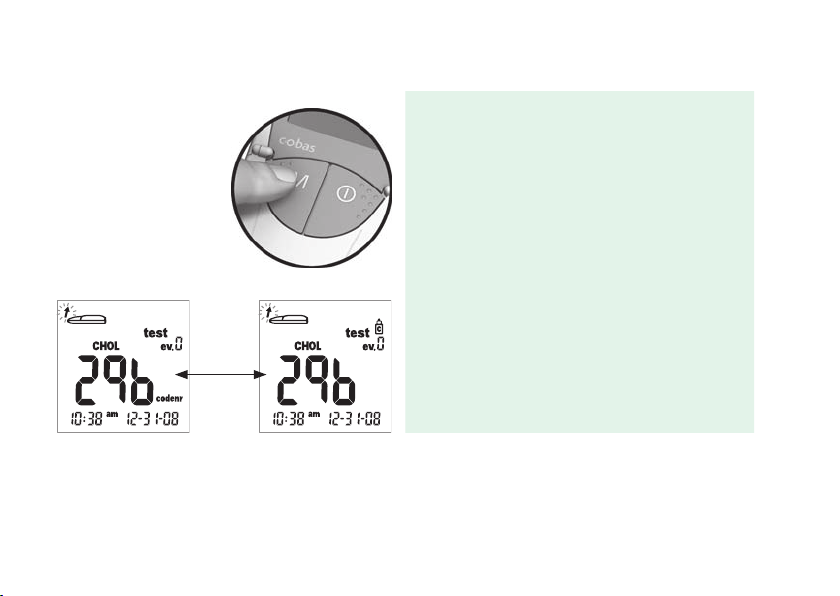
8 Press the M button to flag the measurement as a
control (bottle symbol is displayed).
Page 87
Quality control recommendation
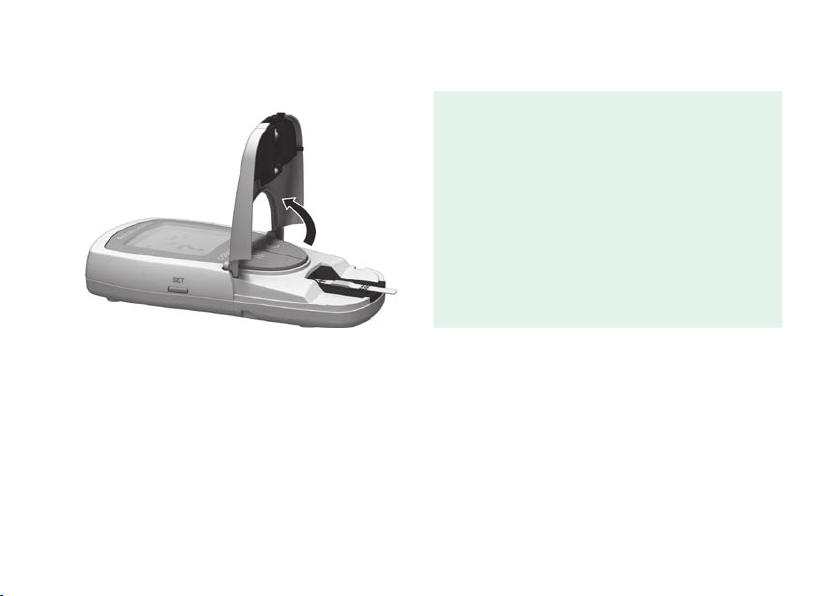
9 Open the measurement chamber flap. The flap
firmly locks into place when it reaches a vertical
position.
87
Page 88
Quality control recommendation
Applying the control solution
88
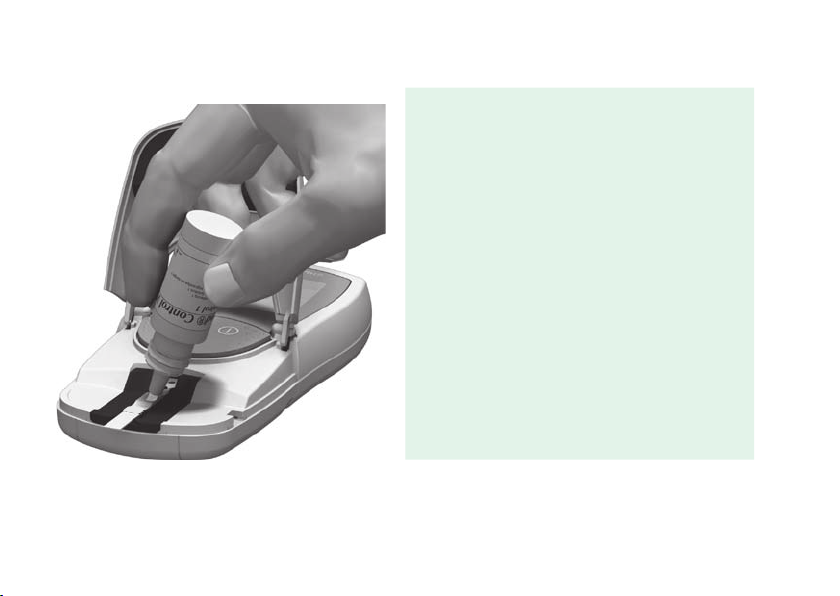
10 Apply a large free hanging drop of either the
glucose or cholesterol low level control
solution directly from the bottle to the test strip.
Ensure that neither the bottle nor your fingers
touch the application area.
The application area must be completely covered.
The sample can (as with performing a
measurement using blood) also be applied
outside the instrument as described on
page 68.
Page 89
Quality control recommendation
Starting the measurement
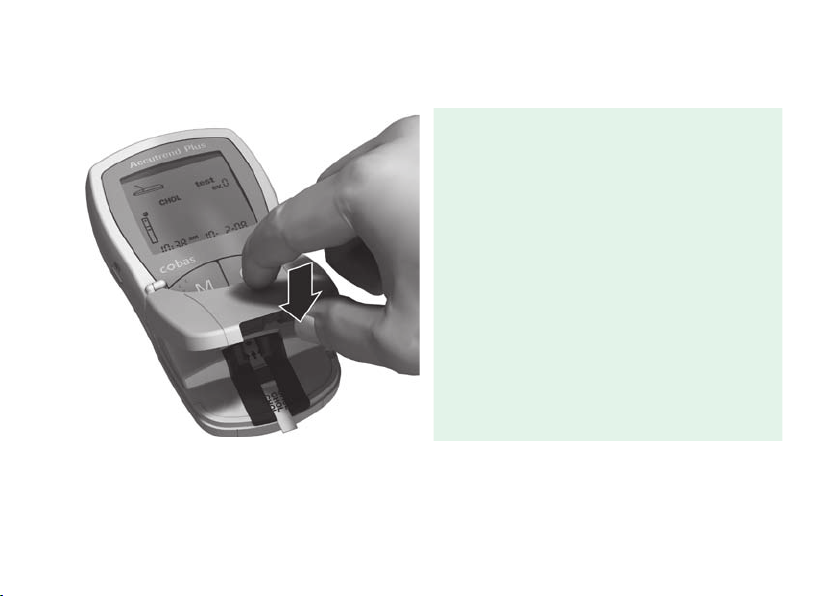
11 Close the measurement chamber flap. This starts
the actual measurement.
89
Page 90
Quality control recommendation
90
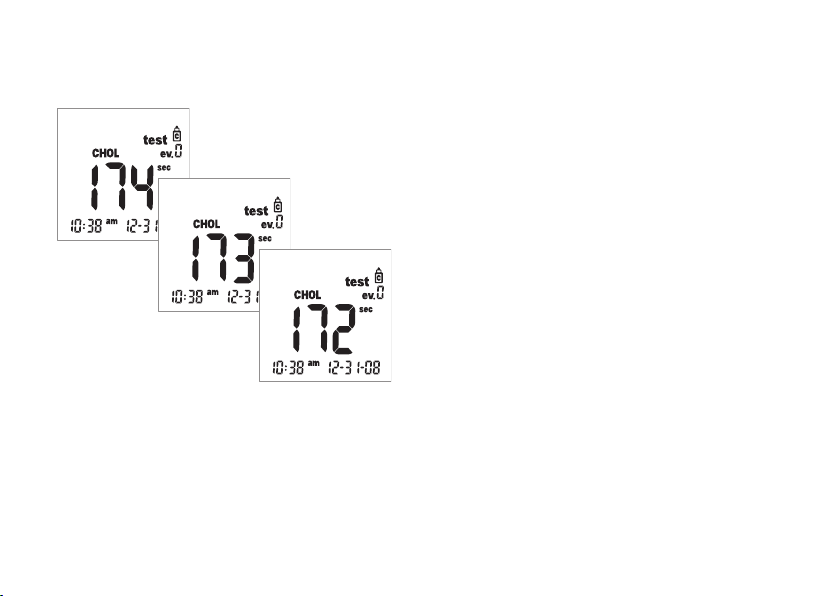
The measurement time varies depending on the
test parameter. This time is shown in the display and
counted down to “0.” The measurement times of the
individual test parameters are:
• For glucose: 12 seconds
• For cholesterol: 180 seconds
The last four seconds of the measurement
time are each accompanied by one short beep
(if beeper is enabled). Completion of the
measurement and the subsequent display of results is
indicated by a longer beep.
Page 91
Quality control recommendation
Display of results
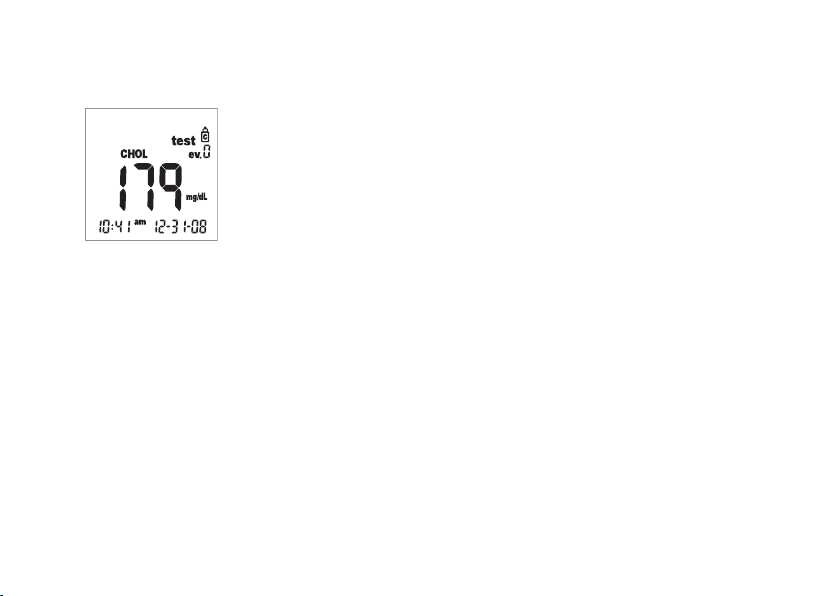
When measurement is finished, the result is displayed.
Now check whether the displayed result falls within
the acceptable range.
Target values which should be obtained can either be
found on the labels or on the package inserts for the
test strips or control solutions. If the value is outside
the range, repeat the control check. If the second
result is again outside this range, contact your local
customer support and service center.
Repeat steps 1-11 using either the glucose or
cholesterol high level control.
91
Page 92
Memory
Memory
The Accutrend Plus instrument has two memory areas, each of which can be used to store up to
100 measured values together with date, time and event flags.
If you have not set any date and time (see the Setting the date section of this manual), all measured
values will be stored without date and time information.
Displaying stored measured values
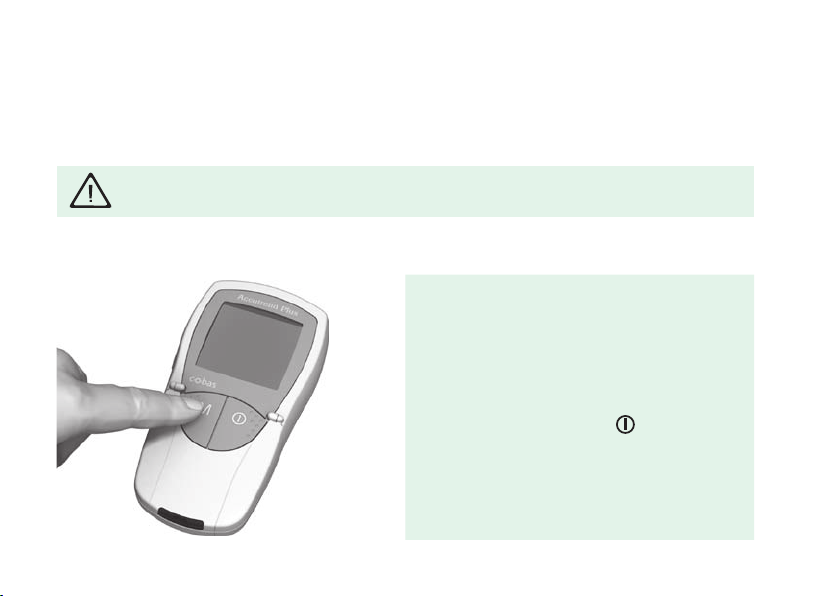
1 Switch on the instrument directly in memory
mode by pressing the M button, or by
pressing this button when the instrument is in
testing mode.
You can exit memory mode at any time by
pressing the On/Off button
92
.
Page 93
Memory
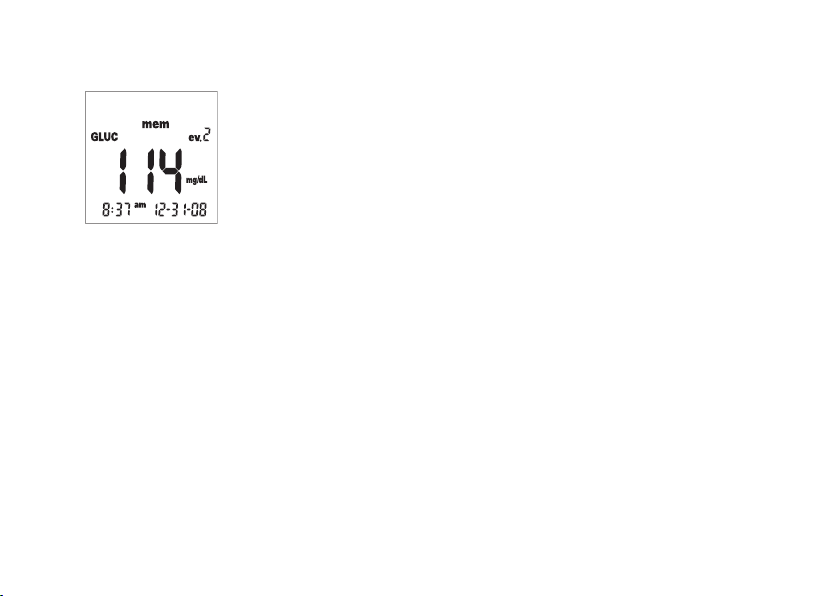
After the usual display test has been performed when
switching on the instrument, the last stored measured
value is displayed.
The mem symbol indicates that the instrument is
in memory mode. The date and time on the display
match the time at which the measurement was
performed, and not the current time. The colon in this
time display does not flash – in contrast to the current
time display when not in memory mode.
93
Page 94
Memory
94
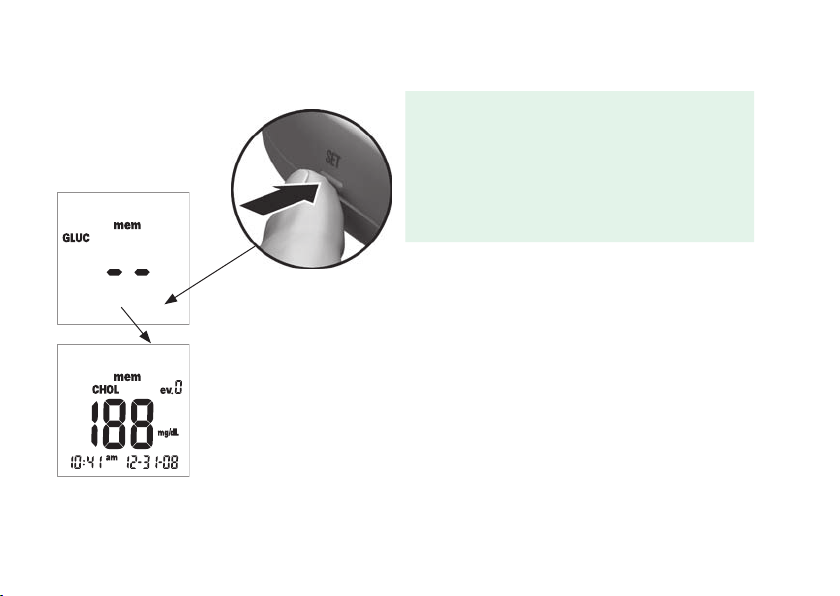
2 Press the Set button to switch between the
memory areas of the two test parameters. Each
time you press the Set button, the last stored
value of each memory area, if any, is displayed. If
the area contains no stored values, two dashes
are displayed.
Page 95
Memory
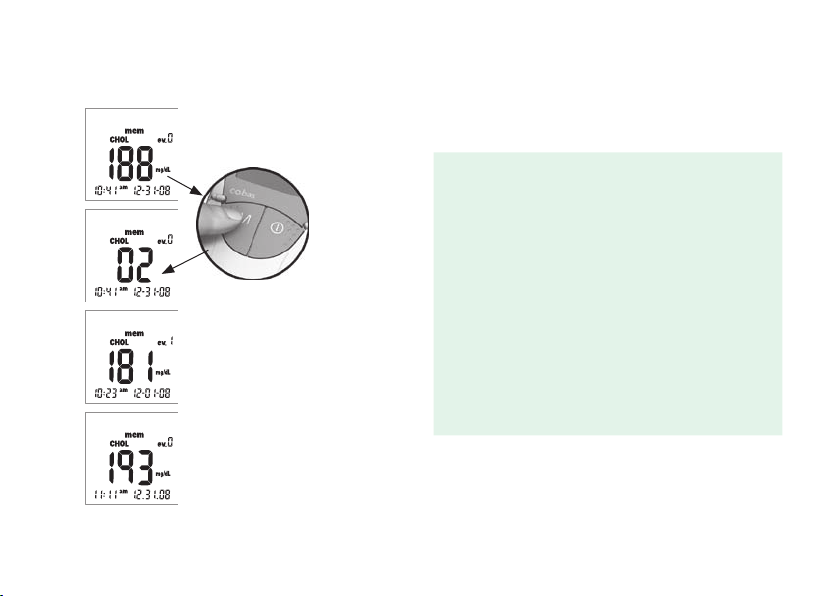
To navigate within one memory area, use the
M button.
3 Press the M button to show the next oldest
measured value within one memory area. When
you press the button, the place of the measured
value within the memory is displayed (here: 02);
the actual value is not shown until you release the
button.
When you hold down the M button, older
memory places (02 … 03 … 04 … and so on)
continually appear in the display until you release
the button. Then the measured value in the last
displayed memory place is shown.
95
Page 96
Memory
Special cases:
96
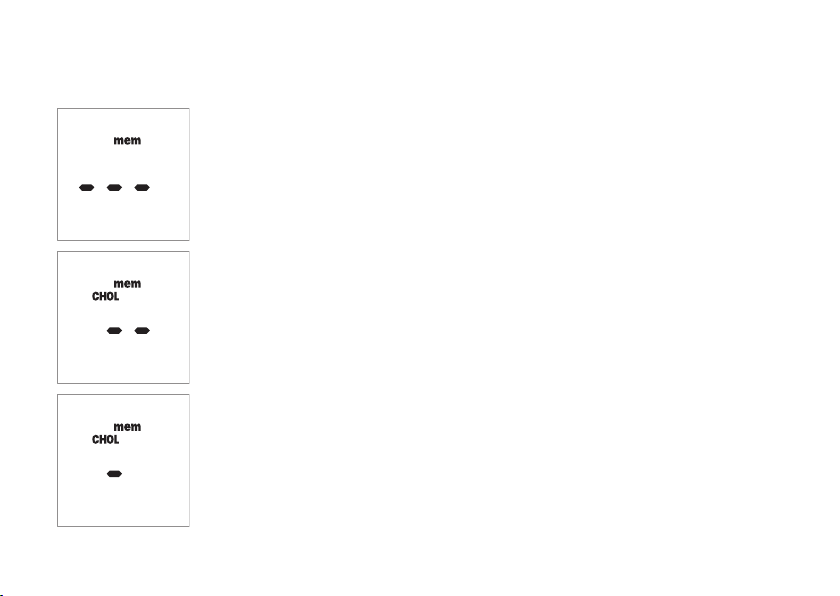
If the entire memory is empty, three dashes
(– – –) will appear in the display.
If the entire memory area of a test parameter
is empty, two dashes (– –) will appear in the
display.
If a single measured value is stored incorrectly,
one dash (–) will appear in the display.
Page 97
Cleaning
Cleaning
A clean optical measuring system is a basic prerequisite for determining precise measured values.
Therefore, clean the instrument regularly and immediately after it becomes dirty. Always power off the instrument
before cleaning it!
Use only the following items for cleaning:
• Ordinary lint-free cotton balls
• Ordinary lint-free tissues
• Ordinary disinfecting tissues
Mild soap suds as well as 70 % ethanol or isopropyl alcohol are suitable for cleaning. When used in the
professional sector (e.g., doctor’s offices), a mixture consisting of 1-propanol, 2-propanol and
glutaraldehyde (brand name “Bacillol plus”) is recommended.
Do not use any disinfectant sprays or tissues or cotton balls which are dripping wet as the liquid may
enter the instrument and damage it.
97
Page 98
Cleaning
Cleaning the outer instrument components
• Ensure the instrument is powered off.
• Wipe the outside of the instrument with a lightly moistened, lint-free cotton cloth. In the professional sector,
the outside of the instrument can be cleaned with “Bacillol plus.”
Cleaning the inner instrument components
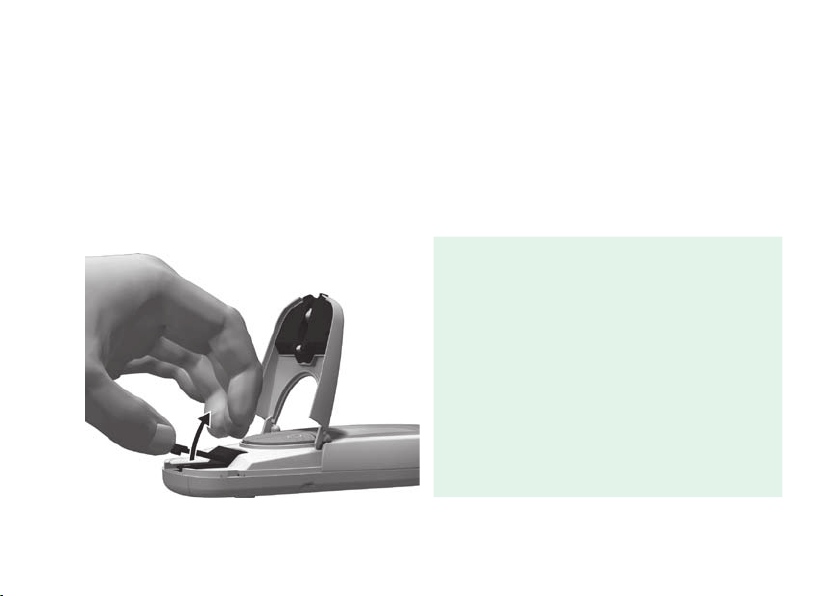
1 Open the measurement chamber flap.
2 Remove the the test strip guide by slightly
pushing it forward and then pulling it upwards.
98
Page 99
Cleaning
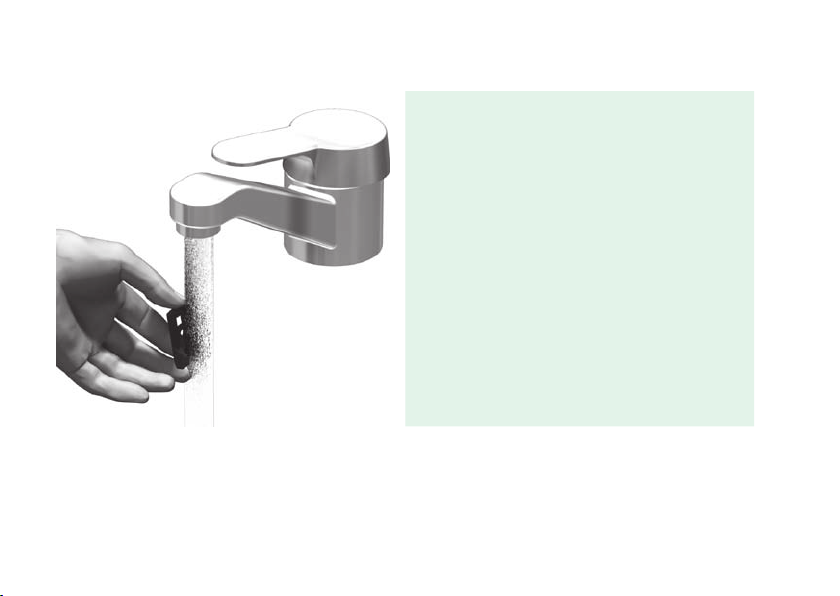
3 If needed, you can rinse the strip guide
(separately from the instrument) under warm
running water. Dry the strip guide with a clean
cloth.
99
Page 100
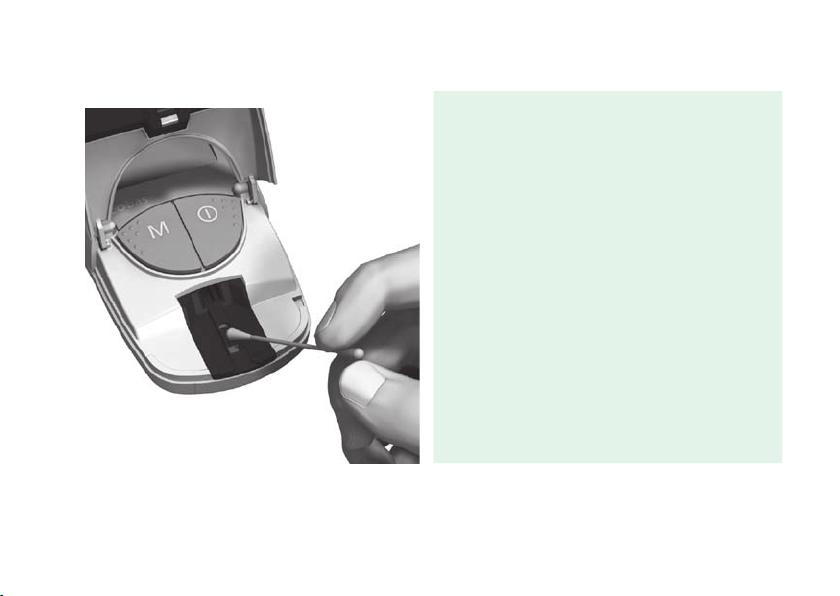
Cleaning
Cleaning the optical measuring system
100
4 Clean the easily accessible areas of the optical
measuring system under the strip guide with a
lint-free pad or a moistened cotton ball.
Make sure that no liquid enters the
instrument. Do not insert any objects into
the instrument.
5 Allow the instrument to dry thoroughly.
 Loading...