

Page 1

COBALT RaQ™ 4
User Manual
Page 2

©1998-2001 Cobalt Networks, Inc. All rights reserved.
Part Number: 070-00239-02
Date: 02-2001
The Cobalt logo, Cobalt Networks, Cube, Cobalt Qube, Qube, Cobalt RaQ, RaQ, Cobalt CacheRaQ,
Cobalt NASRaQ, Cobalt StaQware and BlueLinQ are trademarks or registered trademarks of Cobalt
Networks, Inc.
Chili!Soft and Chili!Soft ASP are trademarks or registered trademarks of Chili!Soft, Inc.
Linux is a trademark of Linus Torvalds.
The RSA software and the RSA logo are trademarks of RSA Data Security Inc.
All other company, brand and product names may be registered trademarks or trademarks of their
respective companies and are hereby recognized.
This publication and the information herein is furnished “AS IS”, subject to change without notice,
and should not be construed as a commitment by Cobalt Networks, Inc. Furthermore, Cobalt
Networks, Inc., assumes no responsibility or liability for any errors or inaccuracies, makes no
warranty of any kind (express, implied or statutory) with respect to this publication, and expressly
disclaims any and all warranties of merchantability, fitness for particular purposes and
non-infringement of third-party rights.
The majority of the software used within the Cobalt RaQ 4 can be freely distributed under the terms
of the BSD copyright and the GNU Public License. However, some applications remain the property
of their owners and require their permission to redistribute.
The Cobalt RaQ 4 includes software developed by the Apache Group for use in the Apache HTTP
server project (http://www.apache.org/).
The Cobalt RaQ 4 also includes Majordomo, a package for managing Internet mailing lists. The latest
version of Majordomo can be obtained from ftp://ftp.greatcircle.com/pub/majordomo/.
Sendmail is a trademark of Sendmail, Inc.
Cobalt Networks, Inc.
555 Ellis Street
Mountain View, CA 94043
www.cobalt.com
In the U.S.A.:
Phone (888) 70-COBALT
(650) 623-2500
Fax (650) 623-2501
Outside the U.S.A.:
Phone +1 (650) 623-2500
Fax +1 (650) 623-2501
Page 3
Important Safeguards
For your protection, please read and understand all of the safety and operating
instructions regarding your Cobalt RaQ 4 and retain for future reference.
1. Ventilation
The Cobalt RaQ 4’s bottom vents (on the front) and fan opening(s) (on the back
panel) protect the server from overheating. These openings must not be blocked
or covered. This product should not be placed in a built-in installation unless
proper ventilation is provided.
2. Lithium Battery
The lithium battery on the system board provides power for the real-time clock
and CMOS RAM. The battery has an estimated useful life expectancy of 5 to 10
years. If your system no longer keeps accurate time and date settings, it may be
time to change the battery. Contact Cobalt for service information.
Warning:
replaced or replaced with the wrong type of battery. Replace only
with the same or equivalent type recommended by the equipment
manufacturer. Dispose of used batteries according to
manufacturer’s instructions.
Avertissement :
incorrect de la pile. Remplacer uniquement avec une pile du même
type ou d’un type équivalent recommandé par le fabricant. Mettre
au rebut les piles usagées conformément aux instructions du
fabricant.
Achtung:
Polarität eingesetzt wird. Nur mit einem gleichen oder ähnlichen,
vom Hersteller empfohlenen Typ, ersetzen. Verbrauchte Batterien
müssen gemäß den Anweisungen des Herstellers verwertet werden.
There is a danger of explosion if the battery is incorrectly
Il y a danger d’explosion s’il y a remplacement
Explosionsgefahr wenn die Batterie in umgekehrter
Cobalt RaQ 4 User Manual iii
Page 4
Important Safeguards
3. Power Cord
Caution:
device. Ensure that the socket outlet is located or installed near the
!
!
!
4. Electrical Shock
To reduce the risk of electrical shock, do not disassemble this product. Take the
RaQ 4 to a qualified service person when service or repair work is required.
Opening or removing covers may expose you to dangerous voltage or other risks.
Incorrect reassembly can cause electric shock when this product is subsequently
used.
equipment and is easily accessible.
Attention :
prise de courant doit être située ou installée à proximité du matériel
et offrir un accès facile.
Achtung:
Netzstecker zu ziehen. Vergewissern Sie sich, dass die Steckdose
leicht zugänglich ist.
The power-supply cord is used as the main disconnect
Le cordon d’alimentation sert d’interrupteur général. La
Zur sicheren Trennung des Gerätes vom Netz ist der
5. Operating the unit in an equipment rack
If you plan to install the Cobalt RaQ 4 in an equipment rack, take the following
precautions:
a. Ensure the ambient temperature around the Cobalt RaQ 4 (which may
be higher than the room temperature) is within the limits specified in
Appendix B. See “Physical data” on page 159.
b. Ensure there is sufficient air flow around the unit.
c. Ensure electrical circuits are not overloaded; consider the nameplate
ratings of all the connected equipment and ensure you have overcurrent
protection.
d. Ensure the equipment is properly grounded, particularly any equipment
connected to a power strip.
e. Do not place any objects on top of the Cobalt RaQ 4.
iv Cobalt RaQ 4 User Manual
Page 5

6. Browsers
Both Netscape Navigator® and Microsoft® Internet Explorer have bugs that can
cause intermittent, unexplained failures. When using a Web browser to interact
with your Cobalt RaQ 4, you may occasionally experience a browser failure.
Released product versions of the browsers are usually more reliable than beta
versions and later versions typically work the most reliably. A browser program
failure, although annoying, does not adversely affect your Cobalt RaQ 4’s data.
To use the RaQ 4, you need a personal computer (attached to the network) that
uses a Web browser (for example, Netscape Navigator, version 4.7 or later, or
Microsoft Internet Explorer, version 5.0 or later). To manage the RaQ 4 from the
Server Desktop, you must enable cookies, cascading style sheets and Javascript
on your browser (these features are normally enabled by default).
Regulations and Information
This equipment has been tested and found to comply with the limits for a Class B
digital device, pursuant to Part 15 of the FCC Rules. These limits are designed to
provide reasonable protection against harmful interference in a residential
installation. This equipment generates, uses and can radiate radio frequency
energy and, if not installed and used in accordance with the instructions, may
cause harmful interference to radio communications. However, there is no
guarantee that interference will not occur in a particular installation. If this
equipment does cause harmful interference to radio or television reception,
which can be determined by turning the equipment off and on, the user is
encouraged to try to correct the interference by one or more of the following
measures:
• Re-orient or re-locate the receiving antenna.
• Increase the separation between the equipment and receiver.
• Connect the equipment into an outlet on a circuit different from that to which
the receiver is connected.
• Consult the dealer or an experienced radio/TV technician for help.
In order to maintain compliance with FCC regulations, shielded cables must be
used with this equipment. Operation with non-approved equipment or unshielded
cables is likely to result in interference to radio and TV reception. The user is
cautioned that changes and modifications made to the equipment without the
approval of manufacturer can void the user’s authority to operate this equipment.
This equipment is in compliance with Underwriters Laboratories (UL) and is
UL-listed.
Cobalt RaQ 4 User Manual v
Page 6

Important Safeguards
vi Cobalt RaQ 4 User Manual
Page 7

Contents
Contents
Important Safeguards iii
1 Introduction 1
General 3
Front view of the RaQ 4 4
Rear view of the RaQ 4 5
RaQ 4 requirements 6
Target audience for the RaQ 4 6
Levels of user 7
Organization of the user manual 8
List of chapters and appendices 10
Icons used on the UI and in the manual 11
Customer Service and Technical Support 13
General Cobalt information 13
Cobalt Technical Support and Service 14
Email contact 14
Technical Support telephone numbers 14
Further resources and information 14
Solutions 14
Cobalt Developer Network 14
Discussion Groups 15
The Knowledge Base 15
Online technical papers 15
Education 15
Before contacting Cobalt Networks Technical Support 16
Support tools feature 17
Cobalt logo badge 17
Cobalt RaQ 4 User Manual vii
Page 8

Contents
2 Setting up the RaQ 4 19
Phase 1: Making the connection 19
Installing the RaQ 4 19
Connecting to the network 21
Connecting the power cord 21
Powering on the RaQ 4 21
Configuring the RaQ 4 for the network 22
Using the LCD console to configure the network 22
Setting the configuration 23
Phase 2: Setting up with the Web browser 24
Configuring the RaQ 4 with the Setup Wizard 25
Entering the network settings 26
Entering the administrator settings 27
Entering the service settings 28
Entering the time settings 29
Completing configuration with the Setup Wizard 29
Registering the RaQ 4 online 29
Registering online at a later time 31
Registering the RaQ 4 32
3 RaQ 4 Server Management 33
Approaches to RaQ 4 administration 34
Definition of a virtual site 35
Support for RAID-1 (RaQ 4r configuration only) 36
Site management 37
Search and sort functions 39
Searching a list of virtual sites 40
Sorting a list of virtual sites 40
Overview of virtual sites 41
FrontPage Server Extensions 44
Active Server Pages (ASP) 45
ASP Administrative Server 45
PHP embedded scripting 45
Setting defaults for a virtual site 46
Modifying the default site settings 47
viii Cobalt RaQ 4 User Manual
Page 9

Contents
Adding a virtual site 47
Adding a name-based virtual site 48
Removing a virtual site 49
RaQ 4 Administrator 50
Changing the RaQ 4 Administrator password 51
Resetting the RaQ 4 Administrator password 51
Control panel 52
Services 52
Web server 53
Email server 53
SMTP server 53
Email relaying 56
File transfer protocol (FTP) server 58
Telnet server 58
Simple Network Management Protocol (SNMP) agent 59
Legato file backup 60
Arkeia file backup 61
ASP Administrative Server 62
Domain Name System (DNS) server 63
Network 64
Bandwidth 65
Bandwidth Limits table 66
Applying a bandwidth limit 67
Modifying a bandwidth limit 68
Deleting a bandwidth limit 69
Time 69
Maintenance 71
Backup 71
Manual backup 72
Scheduled backup 74
Backup file locations 76
Restore 77
Install software 80
Third-party software 82
InterBase 82
Cobalt RaQ 4 User Manual ix
Page 10

Contents
Storage 82
Adding a storage device 84
Suspend a virtual site 85
Hard suspension 85
Reboot 85
Shutdown 86
Support tools 86
Site Usage 88
System Status 89
System components 91
Central processing unit (CPU) 91
Memory 91
Disk 91
Network 91
Services 92
Web server 92
Email 92
File transfer protocol (FTP) 92
Telnet 92
Simple Network Management Protocol (SNMP) 92
Domain Name System 92
Active Monitor 93
4 Site Management 95
User management 97
Setting defaults for a site user 97
Modifying the default user settings 98
Adding a site user 99
Search and sort functions 100
Searching a list of site users 101
Sorting a list of site users 101
Removing a site user 102
Entering user email settings and aliases 102
Mail Forwarding and Vacation Reply 102
Email aliases 103
Adding an email alias 103
x Cobalt RaQ 4 User Manual
Page 11

Contents
Changing user settings 104
Modify settings for a site user 104
Modify email options for a site user 105
Catch-all email account 107
Remove a site user 107
Mailing list management 108
Adding a mailing list 109
Modifying a mailing list 111
Removing a mailing list 112
Site settings 112
Changing site settings 113
Suspend a virtual site 115
Soft suspension 115
Suspend a site user 116
FTP settings 116
SSL settings 118
Obtain an externally signed SSL certificate 119
Enable SSL on a virtual site 119
Generate a self-signed certificate 120
SSL certificate for the main site 123
Enable the administration server for SSL 123
Submit the information to an external certification authority 123
Receive the response from the external certification authority 124
Enter the information from the external certification authority 124
Delete an SSL certificate 126
Site Usage 126
Backup 128
Manual backup 128
Scheduled backup 130
Backup file locations 132
Restore 133
Server management 135
Publishing Web pages 135
Cobalt RaQ 4 User Manual xi
Page 12

Contents
5 Using Services on a Site 137
Managing Your Personal Profile 137
Modify site user 138
Email 138
Forward email to 139
Vacation reply 139
Usage data 140
Backup 141
Restore 143
Using email on the RaQ 4 144
Developing Web pages 145
CGI scripts 145
Server-side scripting languages 145
Publishing Web pages using FTP 146
Publishing Web pages with FrontPage for User Webs only 147
Using telnet 148
A Using the LCD Console 149
Access to the functions 149
Changing network configuration 150
Configuring an uninterruptible power supply (UPS) 151
Verifying the UPS configuration 153
Rebooting 154
Powering down 155
B Product Information 157
Technical data for the RaQ 4 157
Hardware 157
Software 158
Features 158
System management 159
Partner solutions 159
Physical data 159
Regulatory approvals 160
xii Cobalt RaQ 4 User Manual
Page 13

Contents
Upgrading your RaQ 4 161
Opening the RaQ 4 161
Adding a memory module or PCI card 162
Printed circuit board 163
Adding or replacing a hard disk drive in a RaQ 4 164
Specifications for a hard disk drive 164
Requirements 165
Overview 165
Opening the RaQ 4 166
Removing a hard disk drive 169
Installing a hard disk drive 169
Connecting the hard disk drive 170
Replacing the top cover and rebooting the RaQ 4 170
C Advanced Information 171
Serial console port 171
Initializing the RaQ 4 through the serial console port 171
Development tools 173
Configuration files 174
Directory structure 175
RaQ 4 home page 175
Virtual site home page 175
Site user home page 176
Common gateway interface (CGI) usage for users 176
Scripting languages available per site 177
Active Server Pages (ASP) 177
PHP 177
D Domain Name System 179
Basic DNS 179
Enabling the DNS server feature 180
Configuring a primary DNS server 180
Specifying a reverse lookup (PTR) record 181
Specifying a mail server (MX) record 181
Specifying an alias (CNAME) record 182
Cobalt RaQ 4 User Manual xiii
Page 14

Contents
Configuring a secondary DNS server 182
Adding a secondary domain 183
Adding a secondary network 183
Advanced DNS 184
Network Mask Notation Conversion 184
Delegating a subdomain 185
Delegating a subnet 186
Configuring server settings 186
Start of Authority (SOA) configuration 187
Name server (NS) 188
Domain administrator email address 188
Refresh interval 188
Retry interval 188
Expire interval 188
Time-to-live period (TTL) 188
Sample setup of DNS service 189
Create an Address (A) Record 191
Create a second Address (A) Record 192
Create a Mail Server (MX) Record 193
Brief history of the Domain Name System (DNS) 194
What is a DNS record? 195
Who manages your DNS records? 195
How does DNS work? 195
E Licenses 197
The BSD Copyright 197
GNU General Public License 198
SSL License 204
F Glossary 205
Index 223
xiv Cobalt RaQ 4 User Manual
Page 15

Chapter 1
Introduction
The Cobalt RaQTM 4 is a server appliance that provides a dedicated Web-hosting
platform and offers new capabilities for high-traffic, complex Web sites and
e-commerce applications.
The RaQ 4 server appliance offers a full suite of Internet services with remote
administration capabilities, pre-packaged in a single rack-unit (1RU)
industry-standard enclosure. The RaQ 4 is pre-configured with Apache Web
server, Sendmail, File Transfer Protocol (FTP) server, Domain Name System
(DNS), the Linux operating system, FrontPage Server extensions, and support for
Active Server Pages (ASP), PHP and common gateway interface (CGI) scripts.
The RaQ 4 further enhances the suite of services by offering dual hard disk drives
(RaQ 4r configuration) or room for an extra hard disk drive (RaQ 4i
configuration); support for RAID-1 disk mirroring (RaQ 4r configuration only), a
faster central processing unit (CPU), an improved Bandwidth Management
interface, pre-packaged Secure Sockets Layer (SSL), enhanced backup support
and comprehensive site usage reporting. The RaQ 4 also provides tight
integration with partner products.
The RaQ 4 is pre-loaded with InterBase 6.0, an open-source, cross-platform SQL
database from Inprise Corporation. For more information on InterBase, visit the
URL http://www.interbase.com. Also, see “InterBase” on page 82.
Cobalt RaQ 4 User Manual 1
Page 16

Chapter 1: Introduction
Table 1 lists the differences among the RaQ 4 configurations.
The only difference between the RaQ 4i and RaQ 4r configurations is that the
RaQ 4r has two hard disk drives and offers RAID-1 disk mirroring. There is room
in the RaQ 4i to add an extra hard disk drive but it does not support RAID-1. You
cannot add an extra hard disk drive to the base RaQ 4 configuration.
Table 1.
Specification
Dual hard disk drives No No
RAID-1 support No No Yes
10/100 BaseT network
connectors
PCI expansion slot No Yes Yes
SCSI connector No Yes Yes
Support for FrontPage
Server Extensions
Support for Active
Server Pages (ASP)
RaQ 4 configurations
RaQ 4 RaQ 4i RaQ 4r
(room to add
an additional
hard disk
drive)
One Two Two
Yes Yes Yes
Yes Yes Yes
Yes
Support for PHP Yes Yes Yes
Support for SSL Yes Yes Yes
Bandwidth
management
InterBase 6.0 relational
database
Yes Yes Yes
Yes Yes Yes
2 Cobalt RaQ 4 User Manual
Page 17

General
The RaQ 4 provides a complete solution for virtual site hosting, Web publishing,
file transfer, email and third-party applications:
• Access to a broad range of Web and file transfer protocol (FTP) publishing
capabilities. The RaQ 4 supports the common gateway interface (CGI) using
Perl scripting, Active Server Pages (ASP) and PHP embedded scripting for
creating interactive applications on the Web.
• Support for multiple Internet or intranet sites. You can host one or several
distinct sites for separate clients or projects. The RaQ 4 provides
comprehensive support for the three most popular Internet services—Web,
FTP and email.
• RAID-1 disk mirroring (RaQ 4r configuration only)
• Internal and external communication through email to individuals and
groups. In addition to standard individual email, the RaQ 4 email services
include automatic response to messages when a user is on vacation and
automatic forwarding to another email address.
• Flexible platform for the development of solutions, including the
development of third-party applications.
All of these services can be used within an extranet or an intranet environment, or
across the Internet.
General
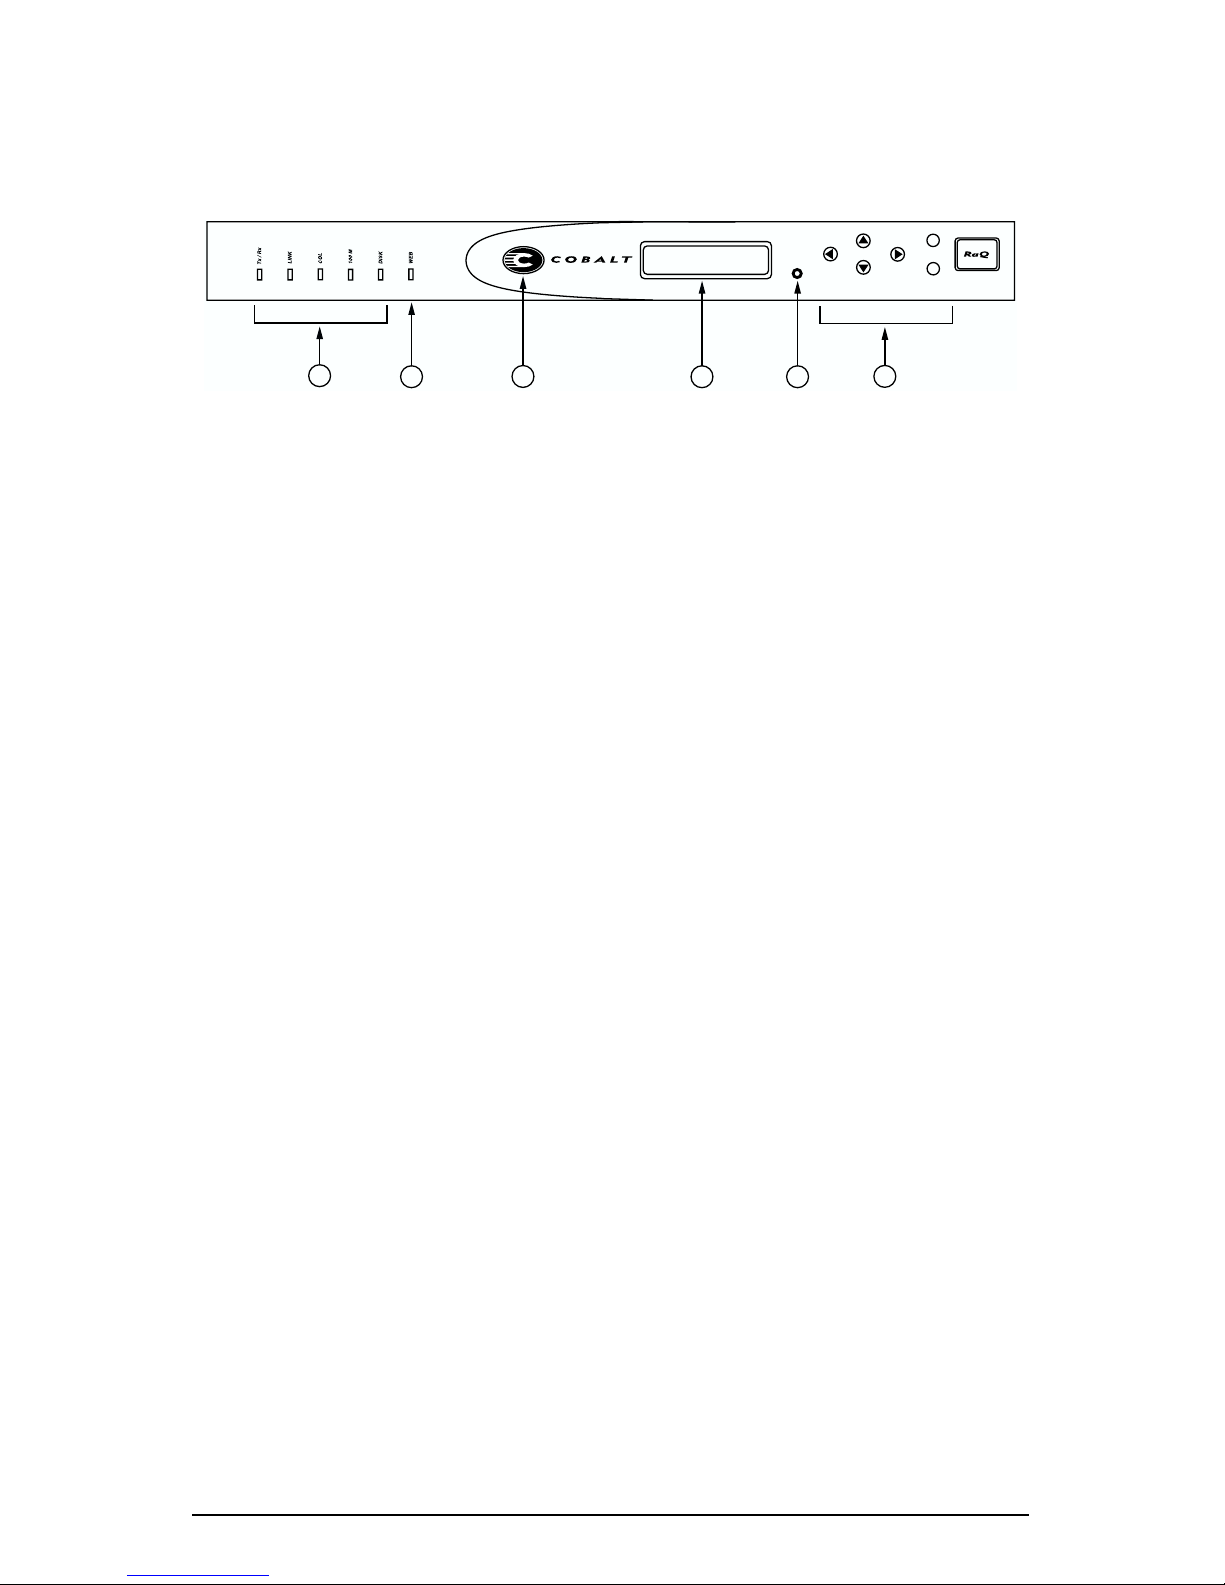
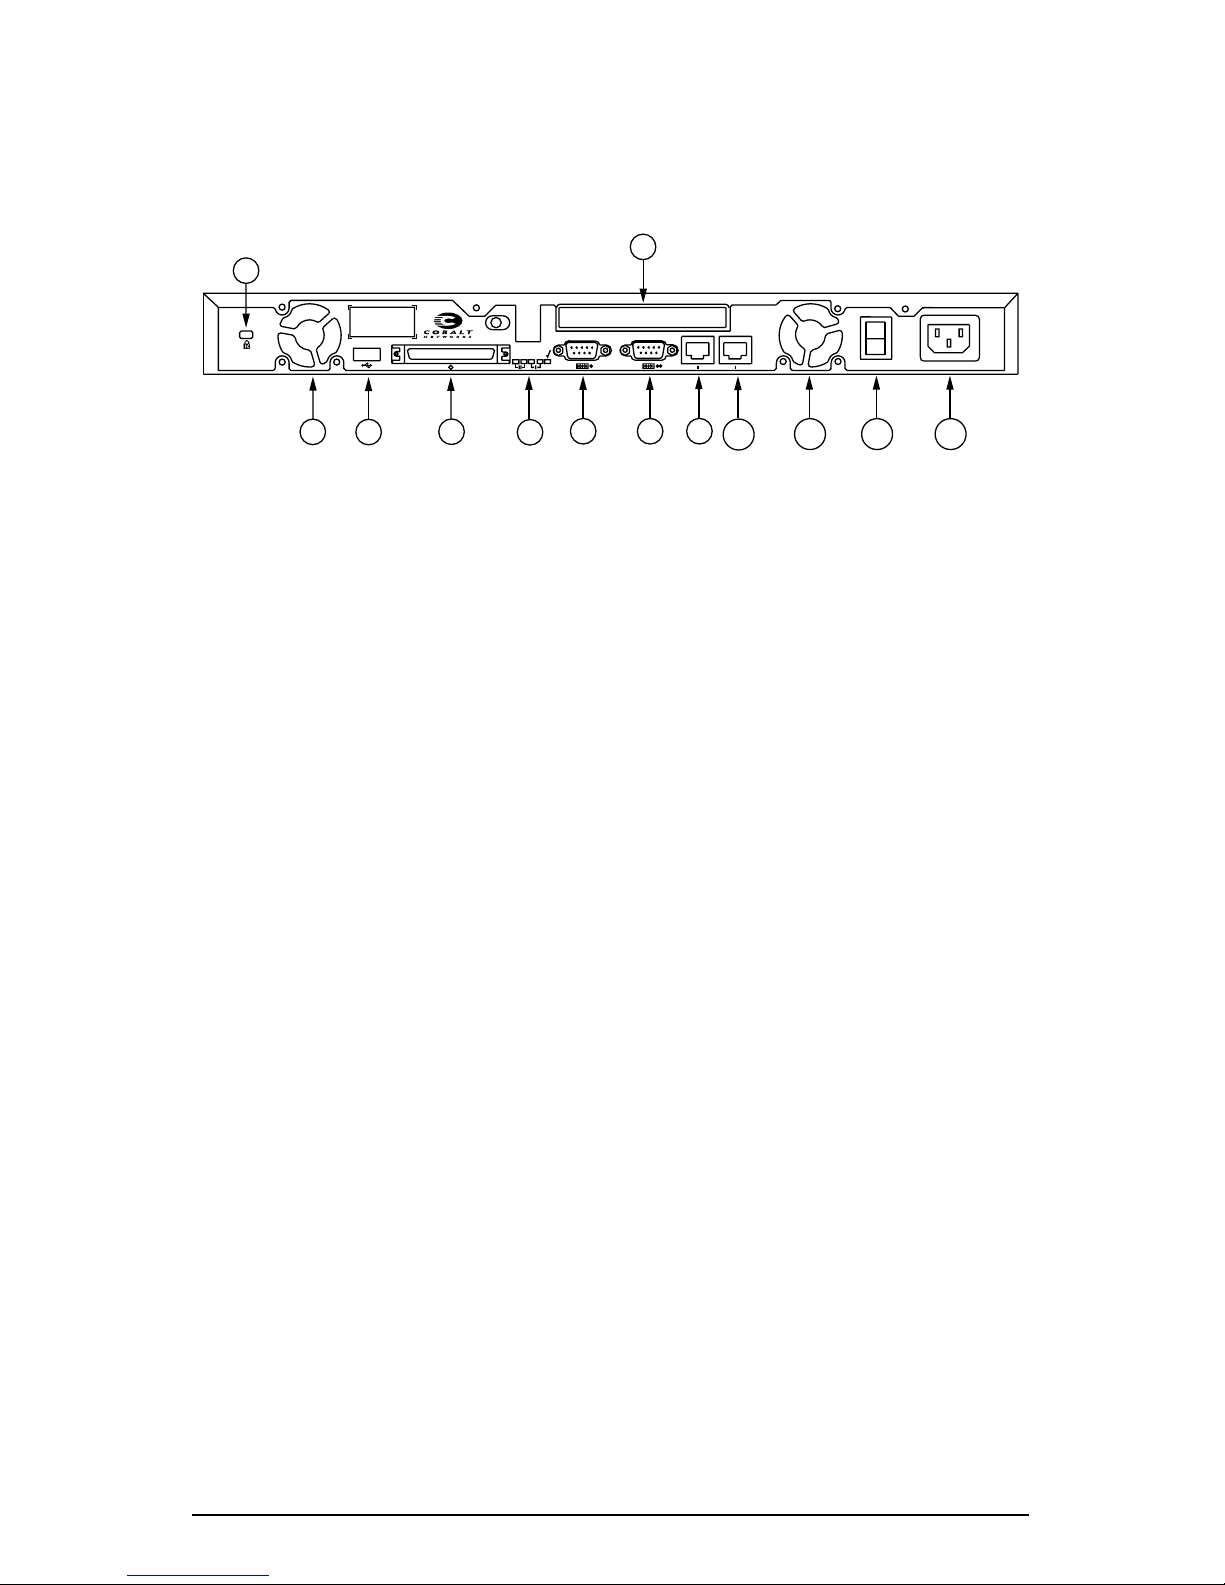
Figure 1 and Figure 2 show the RaQ 4 controls, indicators and connectors.
Note:
The base RaQ 4 server configuration does not offer all of the
✍
hardware components shown in Figure 2.
Cobalt RaQ 4 User Manual 3
Page 18
Chapter 1: Introduction
Front view of the RaQ 4
Figure 1.
1. The
Tx/Rx
RaQ 4 front view
1
Status Indicators
(Transmit/Receive) blinks when there is network traffic on the
primary interface.
Link
indicates an active network connection on the primary interface.
Col
blinks when a collision is detected on the primary interface.
100 M
indicates that 100 BaseT ethernet is being used on the primary
interface.
Disk
indicates activity on the hard disk drive.
S
E
2
3
4
5
6
signal Ethernet and hard-disk-drive activity:
2. The
3. The
4. The
Web
indicator blinks to indicate Web activity.
Logo Badge
LCD screen
glows when the RaQ 4 is powered on.
displays messages and values entered. Use the arrow
buttons to toggle between choices or to enter values. (See “Using the LCD
console to configure the network” on page 22.)
5. You can use the recessed
Reset Password
button if you forget the RaQ 4
Administrator password. (See “Resetting the RaQ 4 Administrator
password” on page 51.)
6. The
LCD arrow buttons
allow you to enter network configuration
information, configure a UPS unit, reboot the RaQ 4 and power down the
RaQ 4.
4 Cobalt RaQ 4 User Manual
Page 19
Rear view of the RaQ 4
General
Figure 2.
RaQ 4 rear view
8
1
Cobalt Networks and Cobalt RaQ are
trademarks of Cobalt Networks, Inc.
www.cobalt.com
P/N 550-00135-01
1. The
2. The
2
3
4
Security lock hole
Cooling fans
maintain proper operating temperature. Ensure that the
Link
Tx/Rx
Link
Tx/Rx
9
6
5
7
10
is used to lock the unit to a secure location.
ventilation holes are not blocked.
3. The
4. The
USB port
provides a Universal Serial Bus connection.
SCSI connector
enables a Small Computer System Interface (SCSI)
connection for connecting such devices as hard disk drives.
5. The
Network status indicators/OK to Power Off
and information. The
OK to Power Off light
flashes when it is safe to turn
the power off.
100 - 240 VAC 50/60 Hz
1.4 A 60W max
11 12 13
(optional)
signal network activity
6. The
7. The
Serial console port
Serial connector
allows you to connect a UPS to the serial port for
allows you to connect serial devices.
Smart UPS support.
8. The
PCI expansion slot
The
Network connectors
provides space for adding a PCI card.
the 10/100 BaseT network cables.
9.
Network connection 2. (optional)
10.
Network connection 1
11.
Cooling fan
12. The
13. The
Power switch
Power socket
.
.
toggles the power on or off.
receives the AC cord that is provided.
(optional)
enable ethernet network connections and accept
Cobalt RaQ 4 User Manual 5
Page 20

Chapter 1: Introduction
RaQ 4 requirements
To use the RaQ 4, you need:
• A 10BaseT, 10/100BaseTX or 100BaseTX Transmission Control Protocol/
Internet Protocol (TCP/IP) -based local area network (LAN).
• A personal computer (attached to the network) that uses a Web browser (for
example, Netscape Navigator, version 4.7 or later, or Microsoft Internet
Explorer, version 5.0 or later).
To manage the RaQ 4 from the user interface (UI), you must enable cookies,
cascading style sheets and Javascript on your browser (these features are
normally enabled by default).
• Network parameters, which you can obtain from your network
administrator; these include the IP address assigned to the RaQ 4, the subnet
mask of your network and a gateway or router address (if communicating
with other networks).
Target audience for the RaQ 4
The user manual is for RaQ 4 Administrators who use the RaQ 4 to develop and
host Web sites. RaQ 4 Administrators should be familiar with Microsoft®
WindowsTM, Macintosh® or other operating systems, and Netscape Navigator®,
Microsoft® Internet Explorer or other Web browsers.
6 Cobalt RaQ 4 User Manual
Page 21

Levels of user
Levels of user
A RaQ 4 can host multiple Internet or intranet sites, which can provide Web
content, email and FTP services. It can be used by three different kinds of users:
• The
✍
• The
RaQ 4 Administrator
This person sets up and maintains the RaQ 4, sets up virtual sites, and sets
access privileges and provides services for the Site Administrators and site
users. The RaQ 4 Administrator can also act as the Site Administrator for
any virtual site.
Note:
Whereas industry uses the term “virtual host”, Cobalt
Networks uses the term “virtual site”. In Cobalt’s definition, a
virtual site consists of a Domain Name System (DNS) domain with
Web, FTP and email services. Each virtual site contains its own list
of site user accounts. Each site user account has its own Web, email
spool and any number of email aliases. The fully qualified domain
name of a virtual site is unique to that site, while its IP address can
be shared by many sites. For more information, see “Definition of a
virtual site” on page 35.
Site Administrator
provide Web publishing, email and FTP services for the users of the site. The
Site Administrator sets up user accounts and access privileges, maintains
mailing lists, controls the settings for the virtual site and its FTP service, has
access to users’ email settings, can generate reports about the virtual site’s
disk and Web usage, and can back up and restore files residing on the site.
is the person who controls and runs the RaQ 4.
manages a virtual site, located on the RaQ 4, that can
•
Site users
files using the FTP service provided by the site, publish their own personal
Web page on the site, and back up and restore their home directories.
can send and receive email through the site, upload and download
Cobalt RaQ 4 User Manual 7
Page 22
Chapter 1: Introduction
Organization of the user manual
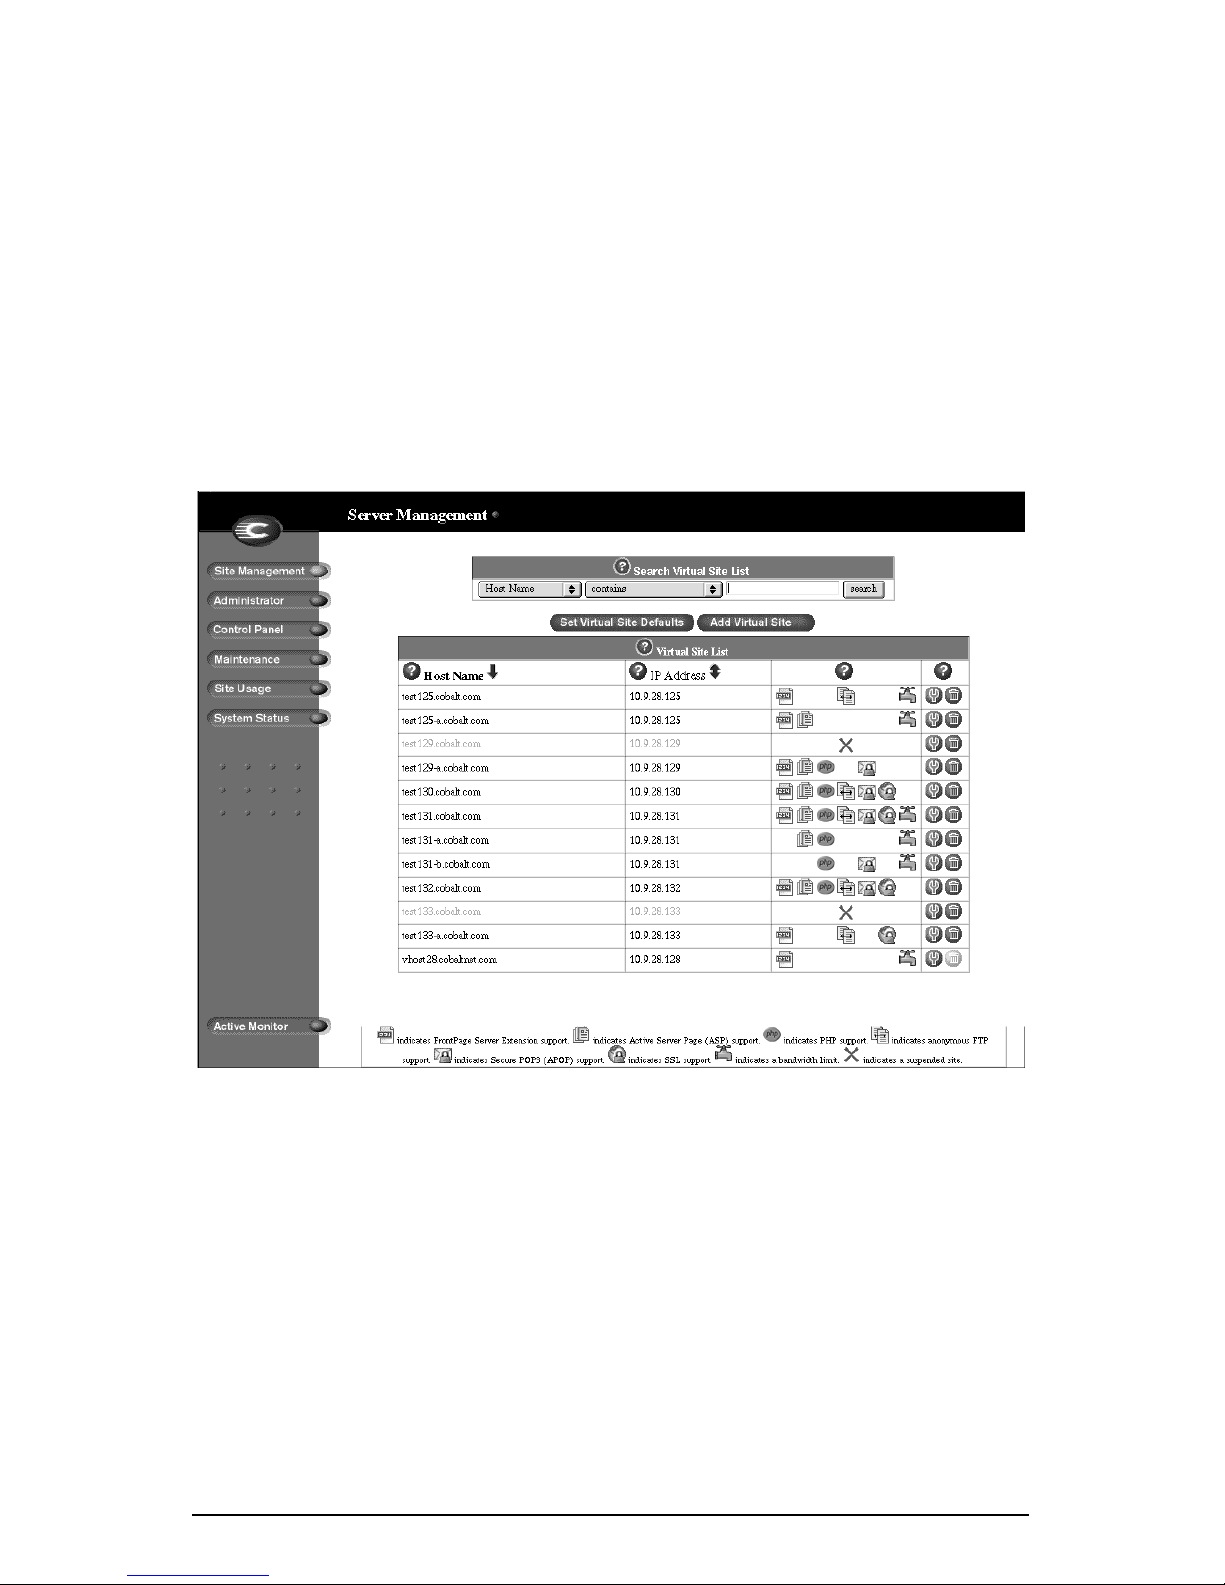
The user manual is organized according to the user interface (UI). Chapter 3,
“RaQ 4 Server Management, is based on the
the brown border on the left side. See Figure 3.
Server Management
screen with
Chapter 4, “Site Management, is based on the
green border on the left side. See Figure 4.
Chapter 5, “Using Services on a Site, is based on the Personal Profile screen
with the blue border on the left side. See Figure 5.
Figure 3. Server Management screen
Site Management screen with the
8 Cobalt RaQ 4 User Manual
Page 23
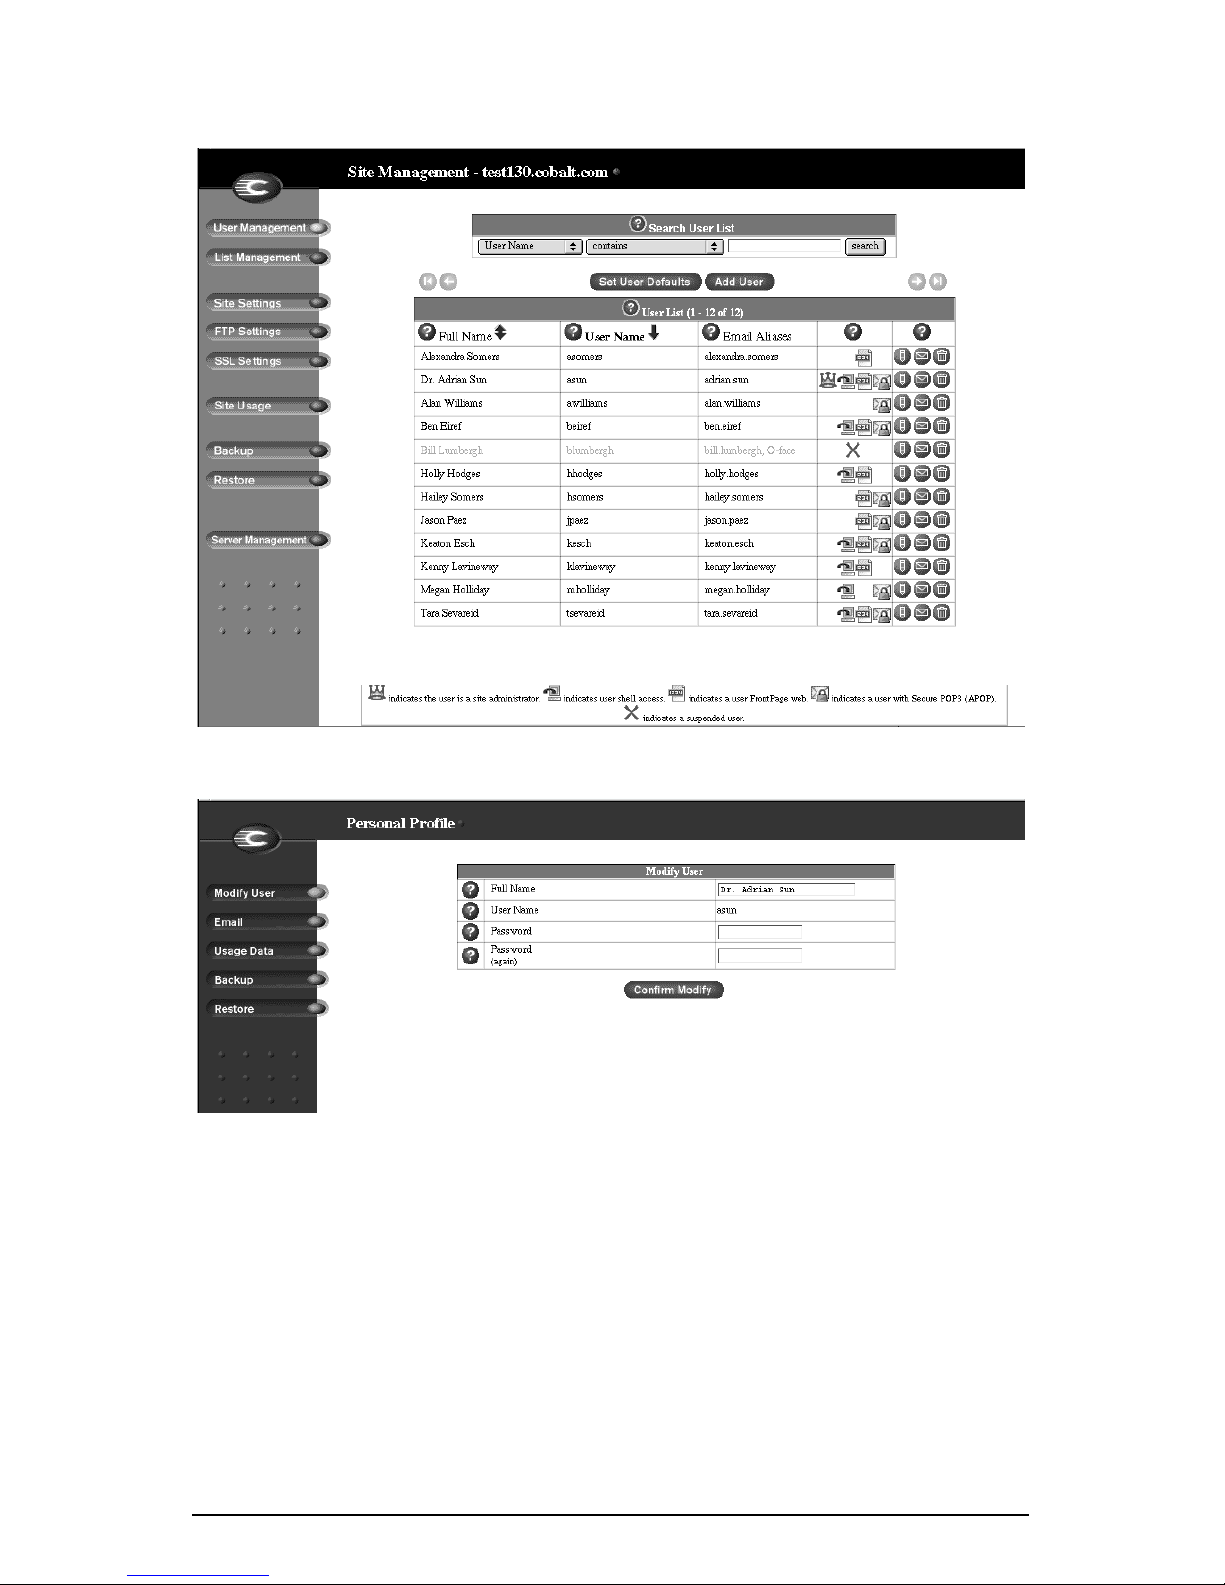
Figure 4. Site Management screen
Organization of the user manual
Figure 5. Personal Profile screen
Cobalt RaQ 4 User Manual 9
Page 24

Chapter 1: Introduction
List of chapters and appendices
The manual has the following chapters and appendices.
Chapter 1, “Introduction”, summarizes the RaQ 4 functions.
Chapter 2, “Setting up the RaQ 4”, explains RaQ 4 hardware setup and the
network integration information.
Chapter 3, “RaQ 4 Server Management”, discusses RaQ 4 Management
functions.
Chapter 4, “Site Management”, explains Site Management functions for virtual
sites.
Chapter 5, “Using Services on a Site”, shows how to use the RaQ 4 services
(email, Web publishing and FTP) and how to manage your personal directory.
Appendix A, “Using the LCD Console”, explains LCD console functions.
Appendix B, “Product Information”, provides information about the RaQ 4
hardware and software, regulatory approvals, physical data and upgrading the
server.
Appendix C, “Advanced Information”, provides information on development
tools, configuration files, and the directory structure of the RaQ 4 disk.
Appendix D, “Domain Name System”, gives an in-depth explanation of the DNS
service.
Appendix E, “Licenses”, lists licensing information.
Appendix F, “Glossary”, provides a glossary of terms used in the RaQ 4 manual.
10 Cobalt RaQ 4 User Manual
Page 25
Organization of the user manual
Icons used on the UI and in the manual
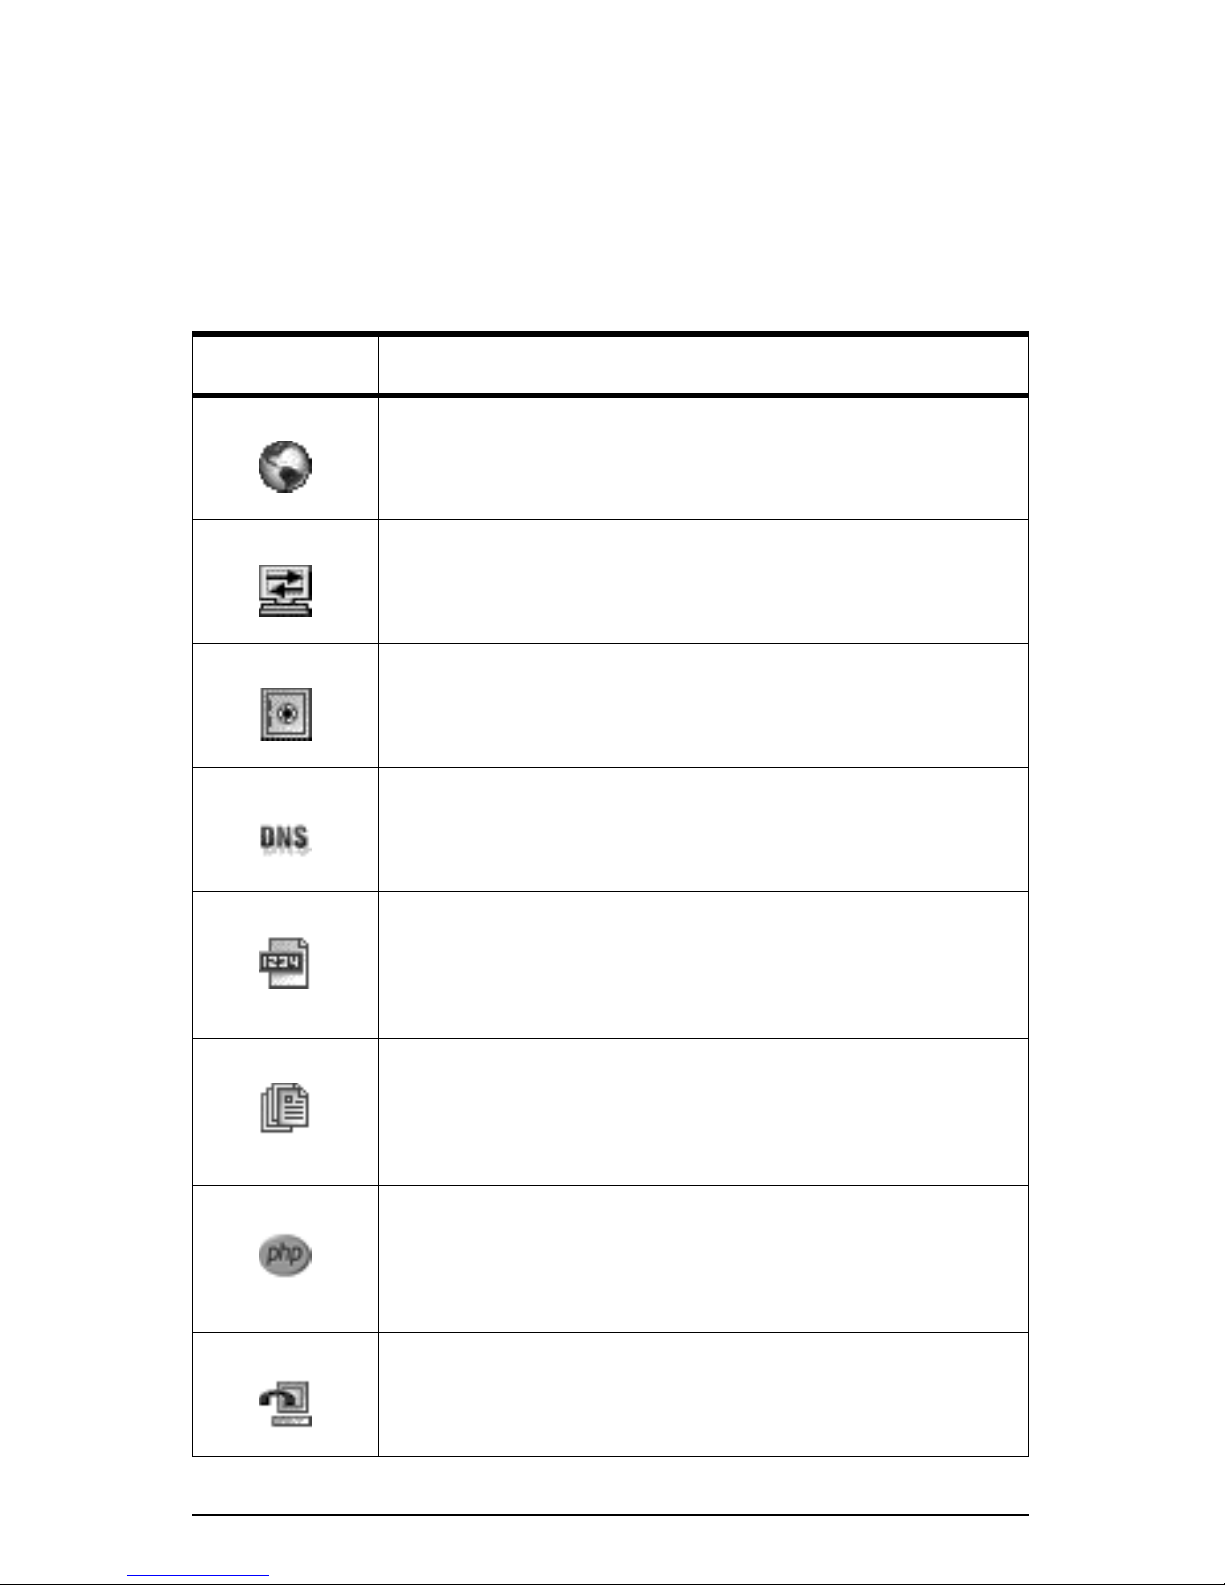
Table 2 describes the icons used on the browser-based User Interface (UI) and in
this manual. If you pass the mouse pointer over an icon, a short help message
appears.
Table 2. Icons used in the manual and UI
Icon
Description
Web Server
Only in the Service Settings table of Control Panel on the
Management Screen. Web Server is always on.
Simple Network Management Protocol (SNMP)
Only in the Service Settings table of Control Panel on the
Management Screen.
Legato/Arkeia file backup
Only in the Service Settings table of Control Panel on the
Management Screen.
Domain Name System (DNS)
Only in the Service Settings table of Control Panel on the
Management Screen.
FrontPage Server extensions
In the Virtual Sites List on the Server Management screen;
indicates that FrontPage server extensions are enabled on
the virtual site.
Active Server Page (ASP)
In the Virtual Sites List on the Server Management screen;
indicates that Active Server Pages are enabled on the virtual
site.
PHP Embedded Scripting
In the Virtual Sites List on the Server Management screen;
indicates that PHP embedded scripting is enabled on the
virtual site.
Telnet
In the Virtual Sites List on the Server Management screen;
indicates that telnet is enabled on the virtual site.
Cobalt RaQ 4 User Manual 11
Page 26
Chapter 1: Introduction
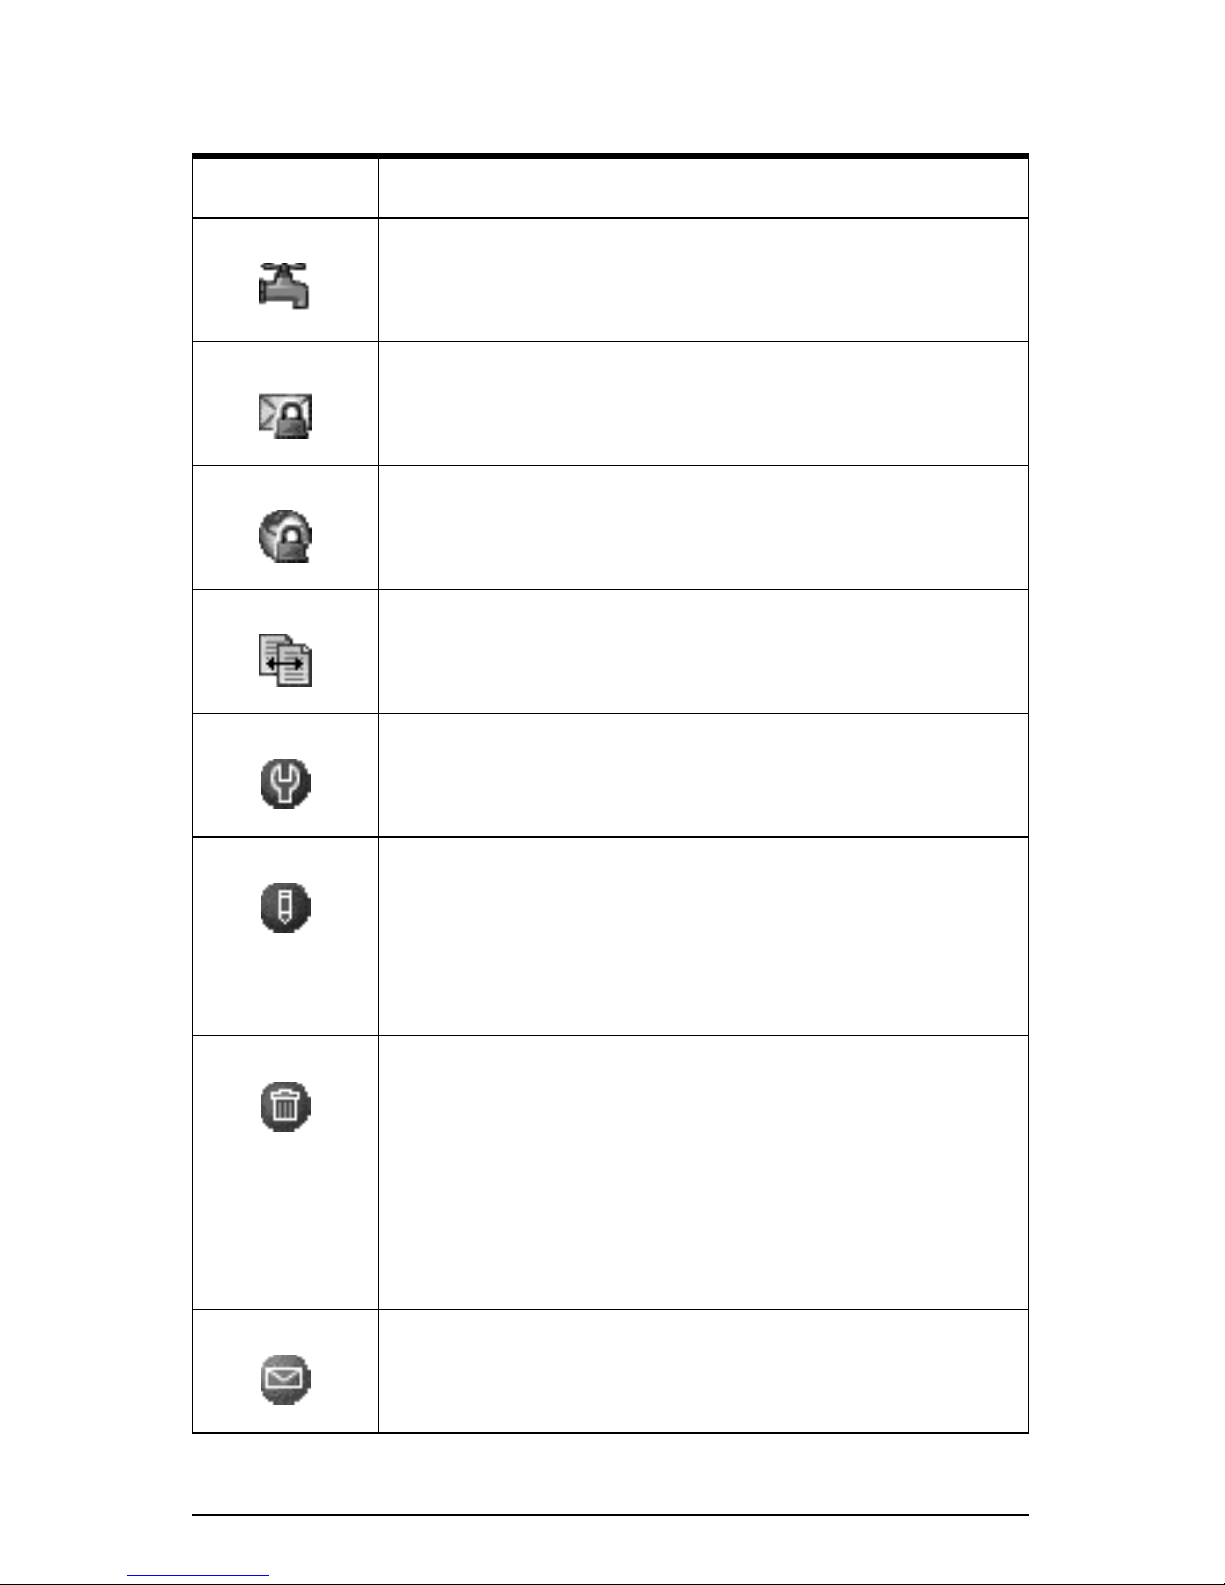
Table 2. Icons used in the manual and UI
Icon
Description
Bandwidth limit
In the Virtual Sites List on the Server Management screen;
indicates that a bandwidth limit is enabled on the virtual site.
Secure POP3 (APOP)
In the Virtual Sites List on the Server Management screen;
indicates that Secure POP3 is enabled on the virtual site.
Secure Sockets Layer (SSL)
In the Virtual Sites List on the Server Management screen;
indicates that SSL is enabled on the virtual site.
Anonymous file transfer protocol (FTP)
In the Virtual Sites List on the Server Management screen;
indicates that Anonymous FTP is enabled on the virtual site.
Modify
In the Virtual Sites List on the Server Management screen;
used to modify the settings for a virtual site.
Modify
In the Bandwidth Limits table on the Server Management
screen; used to modify a bandwidth limit for an IP address.
In the Users List on the Site Management screen; used to
modify the settings for a site user.
Delete
In the Virtual Sites List on the Server Management screen;
used to delete a virtual site from a RaQ 4.
In the Bandwidth Limits table on the Server Management
screen; used to delete a bandwidth limit for an IP address.
In the Users List on the Site Management screen; used to
delete a site user from a virtual site.
Email
In the Users List on the Site Management screen; used to
modify the email settings for a site user.
12 Cobalt RaQ 4 User Manual
Page 27
Customer Service and Technical Support
Table 2. Icons used in the manual and UI
Icon
Description
Site Administrator
In the Users List on the Site Management screen; indicates
that the user is the Site Administrator for the virtual site.
Suspension
In the Virtual Sites List on the Server Management screen;
indicates that a virtual site has been suspended by the RaQ 4
Administrator.
In the Users List on the Site Management screen; indicates
that a user has been suspended by the Site Administrator.
Customer Service and Technical
Support
For Cobalt product information, visit the support section of the Cobalt Web site at
http://www.cobalt.com/support/. The site includes a Knowledge Base that
customers can query; a list of Frequently Asked Questions (FAQs) that provide
additional information is also available through the Knowledge Base.
General Cobalt information
In the U.S.A., call (888) 70-COBALT or (888) 702-6225, or send email to
[email protected].
Outside the U.S.A., call +1 650 623-2500, or send email to [email protected].
In Europe, the Middle East and Africa, call +31 71 565 7000 (The Netherlands),
or send email to [email protected].
In Japan, send email to [email protected].
Cobalt RaQ 4 User Manual 13
Page 28

Chapter 1: Introduction
Cobalt Technical Support and Service
Email contact
You can contact Cobalt Networks Technical Support by email using the Online
Email Support Form. This form provides us all the information we need to
service your request in a timely fashion.
Go to the URL http://www.cobalt.com/support/ and click on the
Contact Support link.
Technical Support telephone numbers
In the United States, call (800) 266-4378.
In Europe, Middle East and Africa, call +31 (71) 565-7070 (The Netherlands).
Customers in Japan can send email to [email protected].
Further resources and information
Cobalt also offers the following additional resources and information.
Solutions
For business-case information concerning Cobalt products or for solutions that
extend the functionality of our products, visit the Online Solutions Directory on
Cobalt’s Web site at http://www.cobalt.com/solutions/.
Cobalt Developer Network
Cobalt provides a wide range of resources, such as technical notes and white
papers, for developers of Linux applications for Cobalt platforms. Premium
resources are also available.
To register with the Cobalt Developer Network at no cost, visit the Web site at
http://developer.cobalt.com/.
14 Cobalt RaQ 4 User Manual
Page 29

Further resources and information
Discussion Groups
Cobalt has made available a number of discussion groups through which users
can share information.
You can view the current list of Cobalt discussion groups at
http://www.cobalt.com/support/resources/usergroups.html. The names of the
discussion groups show up as hypertext links.
To subscribe to or unsubscribe from a discussion group, or to view previous
postings to a group, click on the group name. A new browser window opens,
displaying information about the discussion group.
New discussion groups are added periodically. The current groups include:
• an announcement list concerning Cobalt products
• an information list for developers working on Cobalt products
• a user list for sharing information between users of Cobalt products
• a security list for users to address network security issues on Cobalt products
The Knowledge Base
Cobalt offers access to its online database of common installation and
configuration problems and solutions. You can access the site at
http://www.cobalt.com/support/kb/.
Online technical papers
For in-depth technical information, there are a number of technical papers
available on Cobalt Networks’ Web site at http://www.cobalt.com/support/.
Education
For those who desire a premium level of technical expertise with Cobalt
Networks products, we offer a number of training courses. The intended audience
includes end users, Cobalt resellers, system and network administrators, systems
engineers, product developers, support technicians, consultants and trainers. You
can access the site at http://www.cobalt.com/support/education/index.html/.
Cobalt RaQ 4 User Manual 15
Page 30

Chapter 1: Introduction
Before contacting Cobalt Networks
Technical Support
Note: To receive Technical Support, you must first register your
✍
First, make an effort to resolve the problem on your own. Take note of all actions
you perform and any error messages so that, if necessary, you can describe them
to a member of the Technical Support team.
Refer to the user manual and to the Web-based resources such as Cobalt’s
Knowledge Base, the online technical papers and the Solutions page, as
described above.
To speed up your support call
Cobalt product.
When contacting Cobalt Networks Technical Support, the more information you
can provide, the better. Before you call or email, have the following information
ready.
• the serial number, located on the back panel, or the MAC address of the
primary network interface, accessible through the user interface, of your
RaQ 4 server.
• any additional software installed on your system
• any peripherals connected to your system
• any error messages you have received and the time when they occurred
• the process you were running or the changes you had made when the error
occurred
• the steps you have taken to resolve the problem
16 Cobalt RaQ 4 User Manual
Page 31

Cobalt logo badge
Support tools feature
The Support Tools feature is a Web page that assists Technical Support in
diagnosing problems on a RaQ 4 unit.
On the Server Diagnostics screen, the RaQ 4 Administrator can create and
download a data dump of the configuration files on the RaQ 4. This data dump
can then be emailed to [email protected]. A member of the Technical
Support team can evaluate the condition of your RaQ 4 before providing you
with corrective action, either by telephone or email.
If the RaQ 4 Administrator is familiar with Linux, he or she can look through this
file in an effort to determine the problem with the RaQ 4. The file is a standard
gzip file.
For more information on the Support Tools feature, see “Support tools” on
page 86.
Cobalt logo badge
For more information on the RaQ 4 server, click on the Cobalt
Networks logo badge in the top left corner.
• the amount of RAM
• the size of the hard disk
• the version of the Cobalt OS
• Cobalt Networks trademark information
The table also contains four hypertext links:
• About The Product displays the services available on the RaQ 4 server,
links to Cobalt Networks Technical Support and a link to the Solutions
guide.
• Cobalt Networks, Inc. Web site takes you to the
URL http://www.cobalt.com.
• Credits and Acknowledgements acknowledges the software used on the
RaQ 4.
• Diagnostic Information contains a form used generate and download a
diagnostics file which can assist Cobalt Technical Support in diagnosing
problems with a RaQ 3 server.
Cobalt RaQ 4 User Manual 17
Page 32

Chapter 1: Introduction
18 Cobalt RaQ 4 User Manual
Page 33

Chapter 2
Setting up the RaQ 4
This chapter guides you through the process of connecting and configuring the
RaQ 4 for your network. A typical setup process takes less than 15 minutes, after
which you can begin setting up Web sites and using other RaQ 4 services.
If the RaQ 4 has been previously configured for a different network, refer to
“Changing network configuration” on page 150.
The setup process consists of two phases.
• “Phase 1: Making the connection” covers the physical setup and connection
of the RaQ 4 to a power source and the network.
• “Phase 2: Setting up with the Web browser” covers the network integration
process and allows the administrator to select services and create users and
groups, using any browser-enabled computer.
Phase 1: Making the connection
Installing the RaQ 4
The RaQ 4 can either be placed on a flat surface—for example, a desk, shelf or
table top—or it can be connected to a standard 19-inch equipment rack.
Caution: If you operate the RaQ 4 in an equipment rack, see the
✍
precautions described in “5. Operating the unit in an equipment
rack” on page iv.
Cobalt RaQ 4 User Manual 19
Page 34
Chapter 2: Setting up the RaQ 4
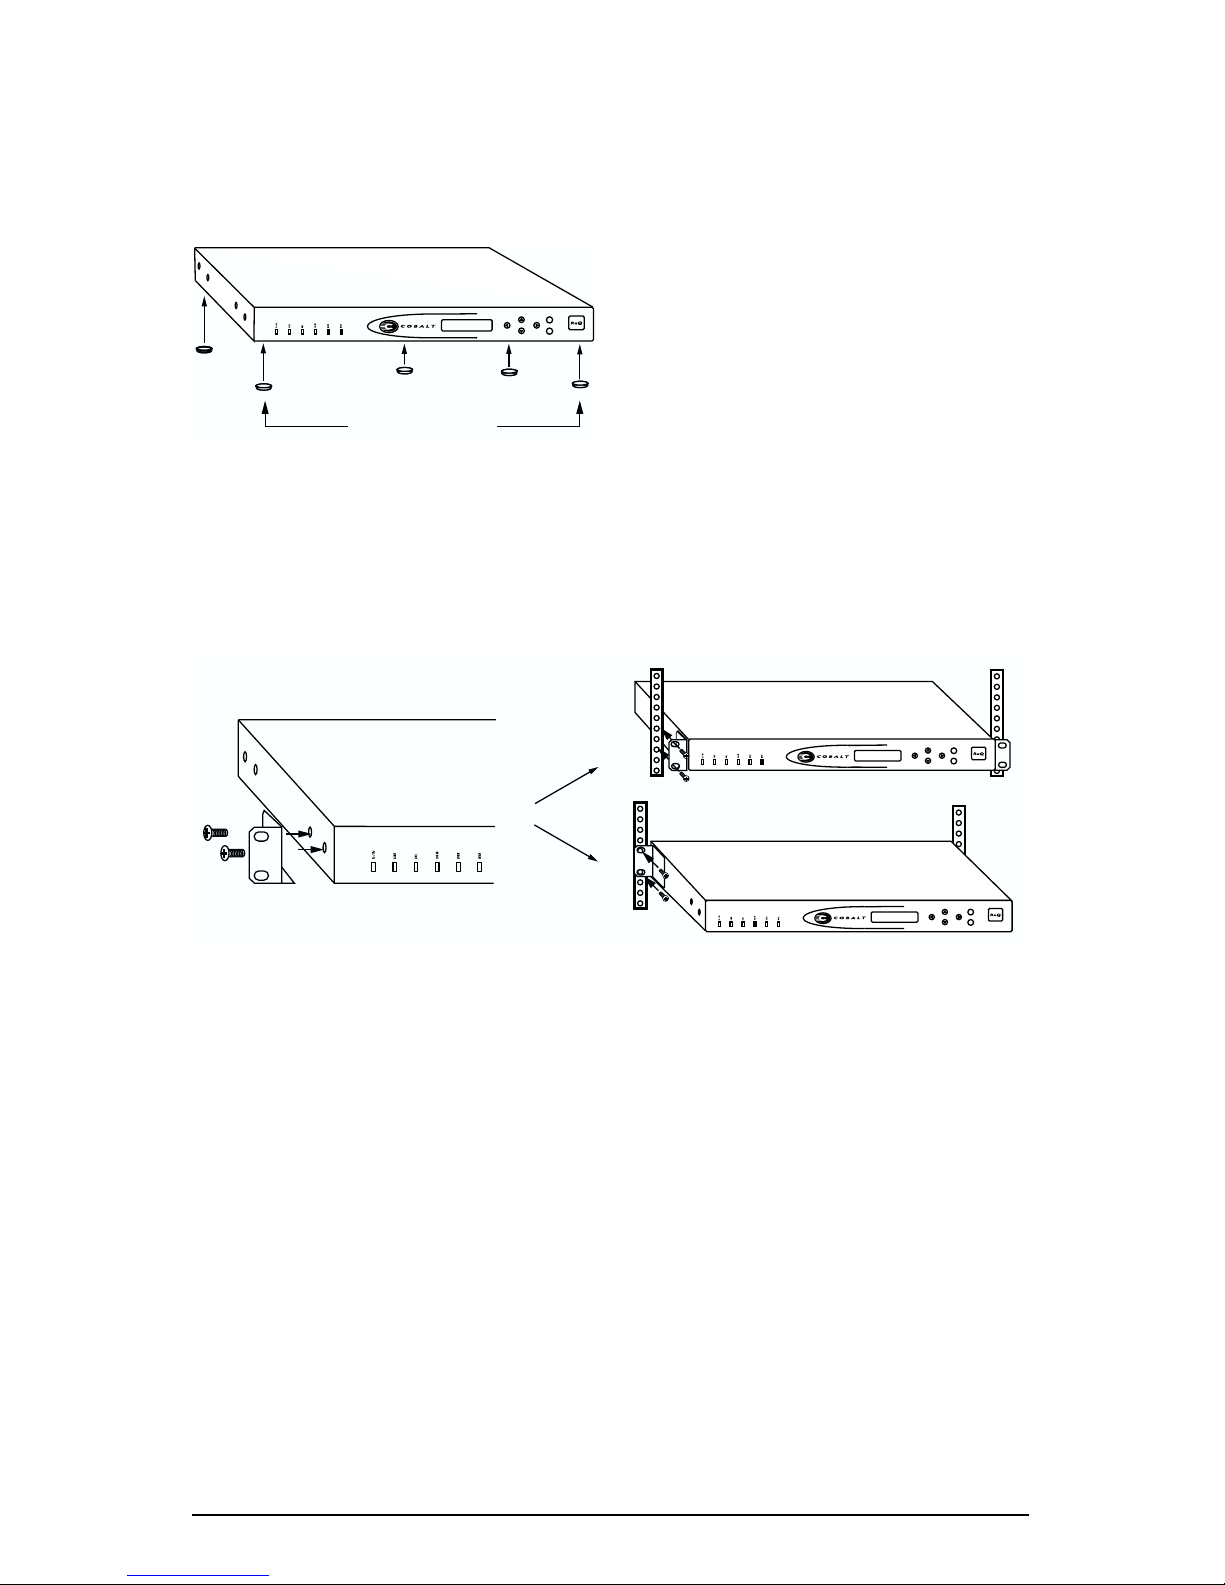
If you plan to use the RaQ 4 on a flat surface, attach the rubber feet to the five
indentations in the bottom of the case; see Figure 6.
Figure 6. Rubber feet for the RaQ 4
S
E
Rubber feet
If you plan to operate the RaQ 4 in an equipment rack, first connect the mounting
ears to the sides of the RaQ 4 (see Figure 7), near either the front or the rear of
the case. Attach the ears to the equipment rack.
Figure 7. Mounting ears for the RaQ 4
S
E
S
E
20 Cobalt RaQ 4 User Manual
Page 35
Phase 1: Making the connection
Connecting to the network
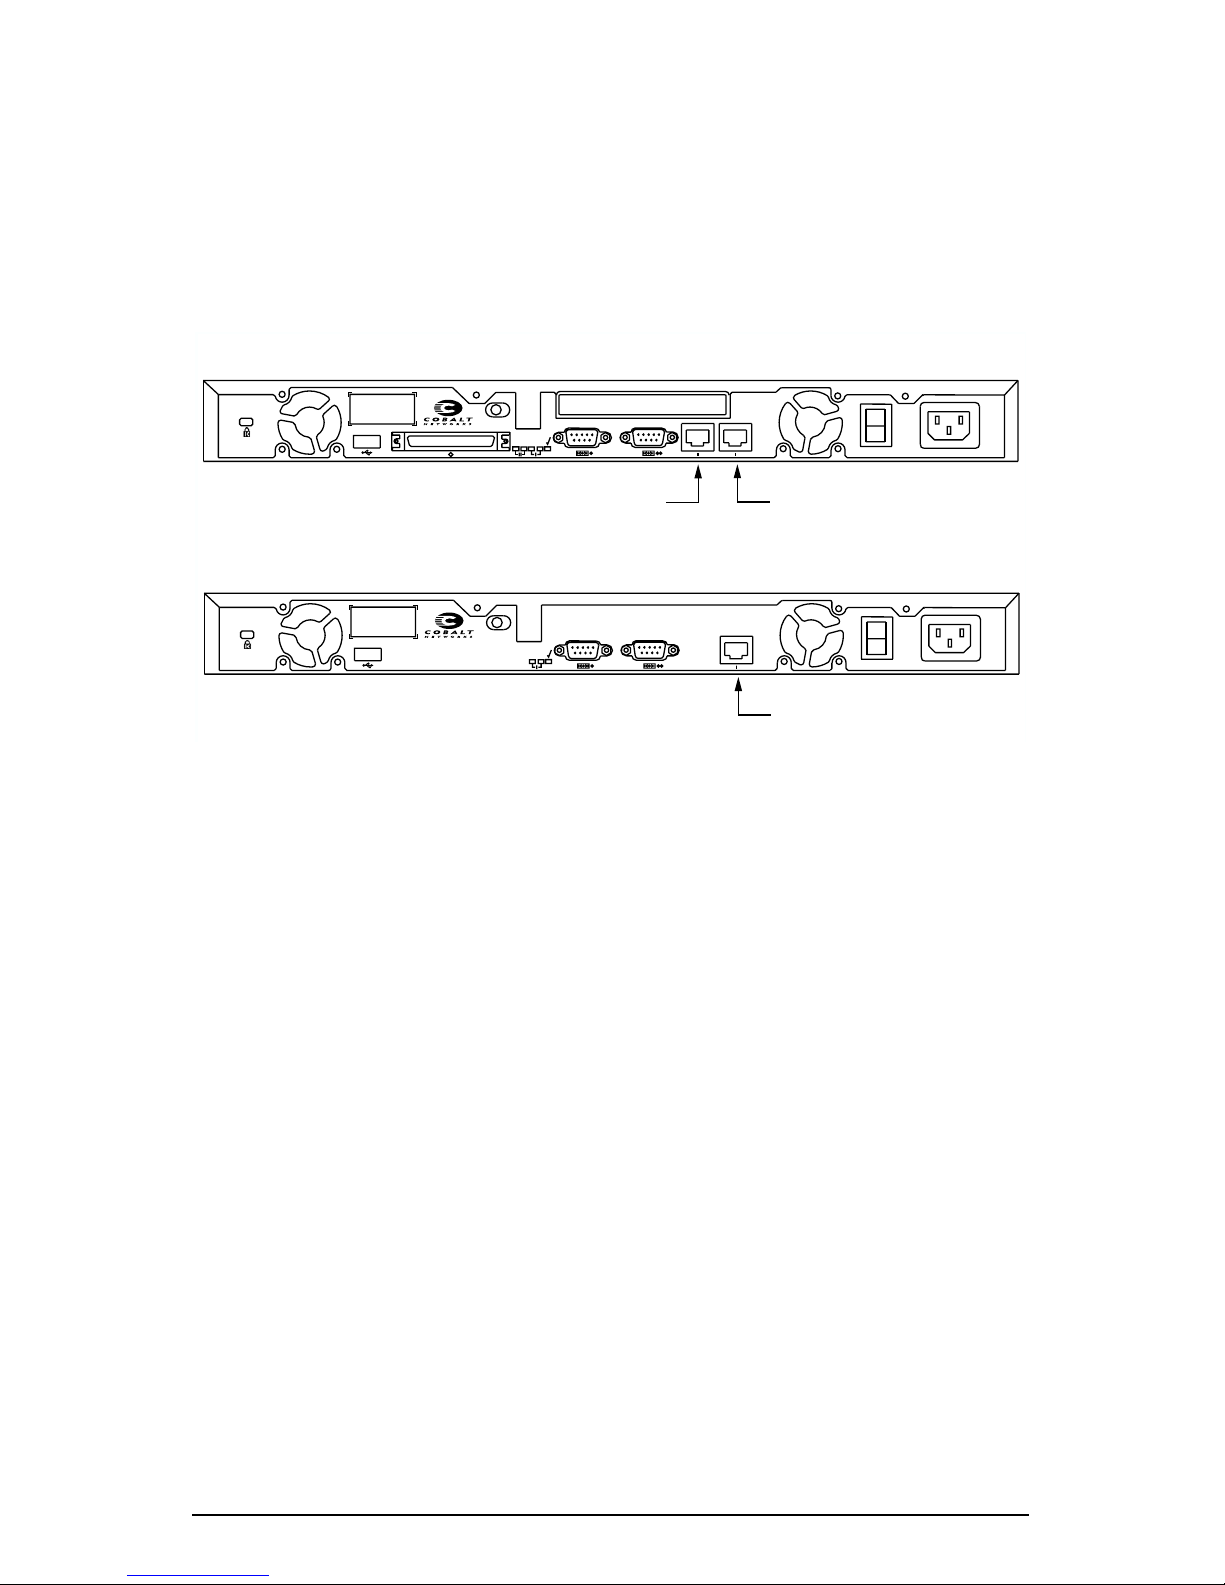
Connect one end of a Category 5 Ethernet cable to the 10/100 Base-T Network 1
connector on the RaQ 4; see Figure 8. Connect the other end of the cable to an
existing network socket.
Figure 8. Network connectors
Raq 4i / RaQ 4r configurations
Cobalt Networks and Cobalt RaQ are
trademarks of Cobalt Networks, Inc.
www.cobalt.com
P/N 550-00135-01
Raq 4 configuration
Cobalt Networks and Cobalt RaQ are
trademarks of Cobalt Networks, Inc.
www.cobalt.com
P/N 550-00135-01
Network connection 2
Link
Tx/Rx
Link
Tx/Rx
Network connection 1
Link
Tx/Rx
Network connection 1
Connecting the power cord
Connect the power supply cord to the RaQ 4 and to an electrical outlet
(100-240 volts AC, 50/60 Hz, as listed in “Physical data” on page 159).
Powering on the RaQ 4
100 - 240 VAC 50/60 Hz
1.4 A 60W max
100 - 240 VAC 50/60 Hz
1.4 A 60W max
Turn on the power by pressing the On/Off switch on the back of the RaQ 4.
The hard disk drive spins up, the fan turns on, and the LCD screen lights up. The
Cobalt logo and the Cobalt Networks name scroll across the screen.
A number of status messages are displayed on the LCD screen as the RaQ 4
completes its boot process.
Caution: It is important to follow the proper power-down
✍
procedure before turning off the RaQ 4. Refer to “Powering down”
on page 155.
Cobalt RaQ 4 User Manual 21
Page 36
Chapter 2: Setting up the RaQ 4
Configuring the RaQ 4 for the network
Now that you have made the network and power connections, you can configure
the network settings.
The RaQ 4 requires specific network information to function properly. You must
enter the necessary information using the LCD console on the front panel.
Before you proceed, make sure you have the following information:
• the IP address assigned to the RaQ 4
• the subnet mask of your network
• the gateway/router address (necessary only if communicating with other
networks)
Using the LCD console to configure the network
You can initialize a RaQ 4 through the serial console port rather than through the
LCD console. For more information, see “Initializing the RaQ 4 through the
serial console port” on page 171.
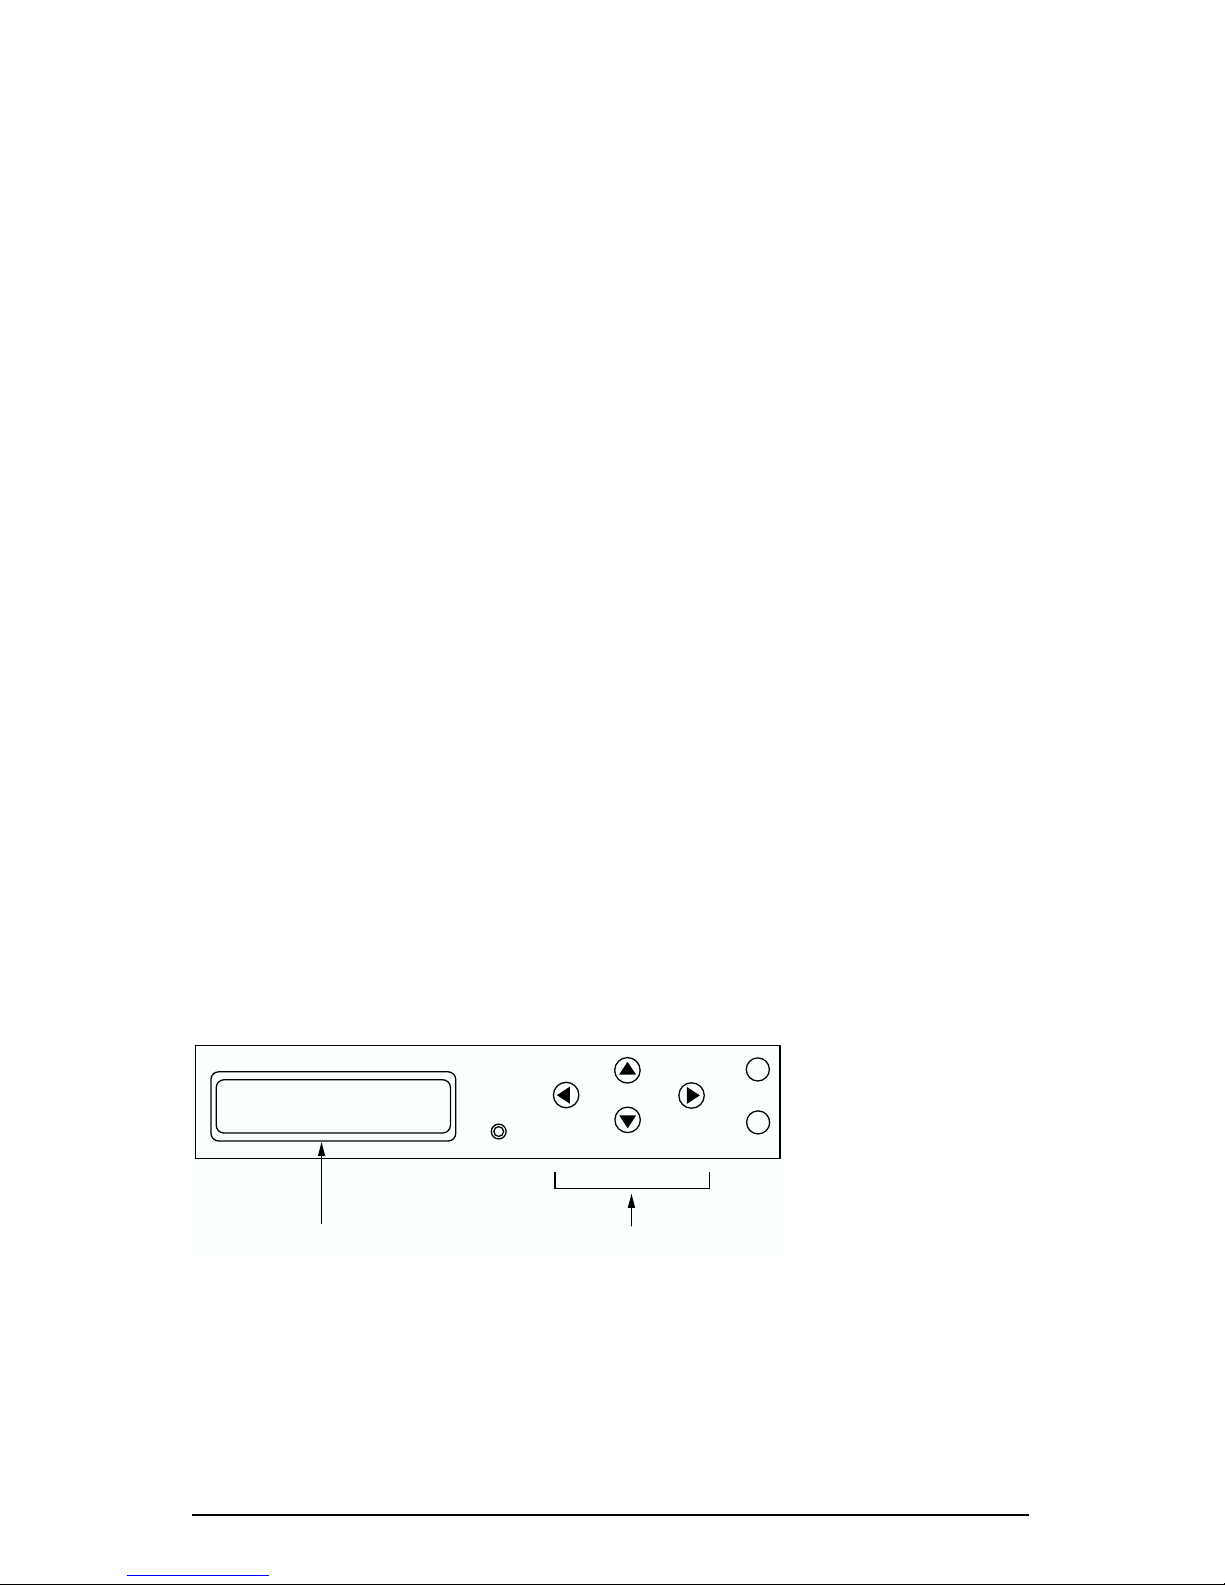
Figure 9 shows the LCD console for the RaQ 4.
The LCD screen on the front of the RaQ 4 displays two lines of text. The top line
of the LCD presents instructions on data to enter; the bottom line displays the
data already entered. Use the arrow buttons to the right of the LCD screen to
enter the required network information manually.
Appendix A, “Using the LCD Console”, provides more information about the
LCD console.
Figure 9. LCD console
S
E
LCD screen
LCD arrow buttons
22 Cobalt RaQ 4 User Manual
Page 37

The arrow buttons function as follows:
The Left arrow button moves the cursor to the left.
The Right arrow button moves the cursor to the right.
The Up arrow button increases the digit located at the cursor position.
The Down arrow button decreases the digit located at the cursor position.
The S button (“select”) displays the next option.
S
The E button (“enter”) accepts the information entered or the option
E
displayed.
Setting the configuration
Phase 1: Making the connection
During setup, the LCD console is used to enter network configuration
information on the RaQ 4.
Follow these steps to configure the network manually:
1. When you see the prompt
ENTER IP ADDR:
0
00.000.000.000
enter the IP address assigned to the RaQ 4 using the arrow buttons on the
LCD console.
2. Press .
E
If the IP address is valid, the next prompt appears:
ENTER NETMASK:
2
55.000.000.000
3. Enter the netmask of your network.
4. Press .
E
If the netmask is valid, the following prompt appears:
ENTER GATEWAY:
0
00.000.000.000
Cobalt RaQ 4 User Manual 23
Page 38

Chapter 2: Setting up the RaQ 4
5. Enter the IP address of the gateway for your network.
If your network does not have a gateway, do not enter a number—leave the
default value, “0
00.000.000.000.”
6. Press .
The LCD displays:
7. To save the configuration information, use the left and right arrow buttons to
select [S]ave, and then press . You will see:
✍
After verifying and saving, the RaQ 4 completes the boot process. The LCD
screen shows several messages before displaying the IP address assigned to the
RaQ 4.
Configuration is complete when the LCD screen displays the IP address assigned
to the RaQ 4, for example:
E
[S]AVE [C]ANCEL
E
VERIFYING AND SAVING
Note: Selecting [C]ancel cancels the configuration and the LCD
screen displays ENTER IP ADDR: again. You must go through the
entry process again.
IP ADDRESS:
192.168.25.77
Phase 2: Setting up with the Web
browser
The remainder of the setup process is performed through a Web browser on any
computer on your network. Use one of the standard browsers available (for
example, Netscape Navigator or Microsoft Internet Explorer, versions 4.0 or
later) to do this. Once the setup process is complete, the RaQ 4 can be managed
from any computer on the network that has a browser.
To use a browser to set up the RaQ 4, follow these steps:
1. Launch a standard Web browser on any computer connected to the network.
2. Enter the IP address of the RaQ 4 (shown on the LCD screen on the front
panel) into the URL field of your browser—for example:
3. Press
24 Cobalt RaQ 4 User Manual
Return (or Enter) on your keyboard.
Page 39
Phase 2: Setting up with the Web browser
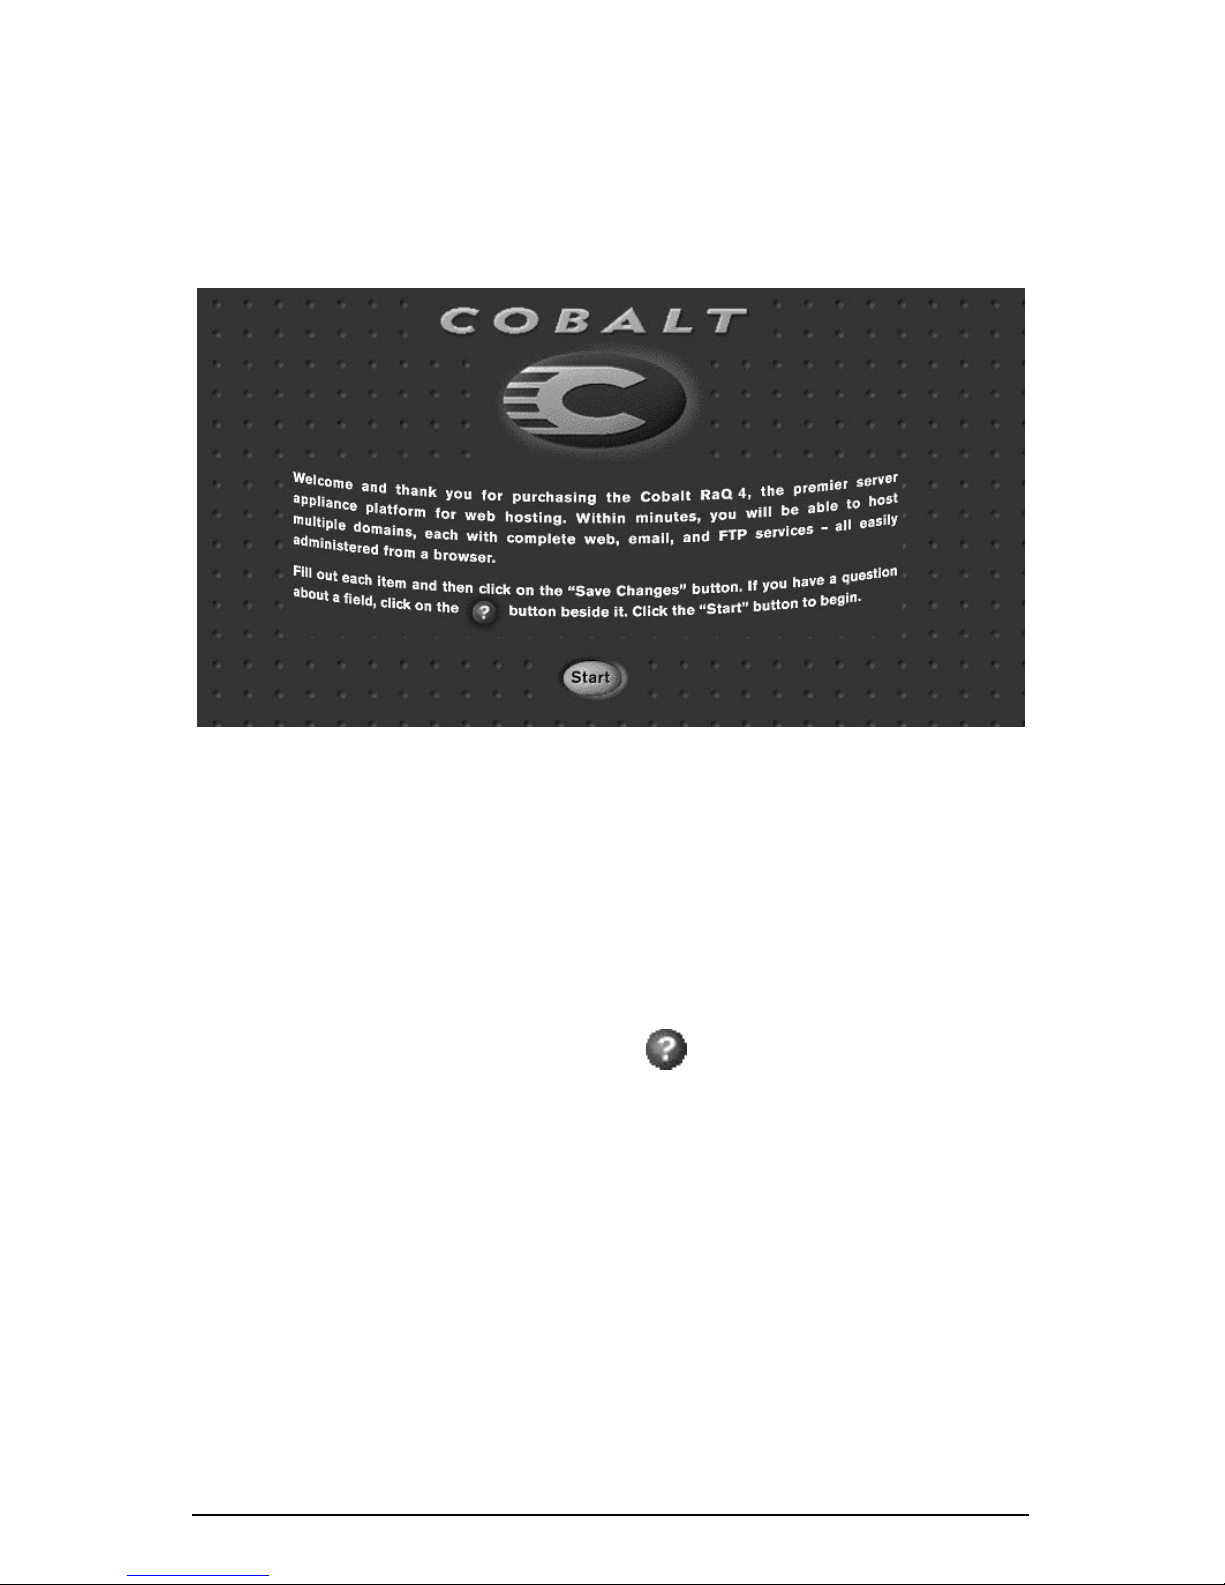
If the RaQ 4’s network settings were configured successfully, then the Cobalt
welcome screen appears; see Figure 10.
Click the Start button to begin using the Setup Wizard.
Figure 10. RaQ 4 Welcome screen
Configuring the RaQ 4 with the Setup Wizard
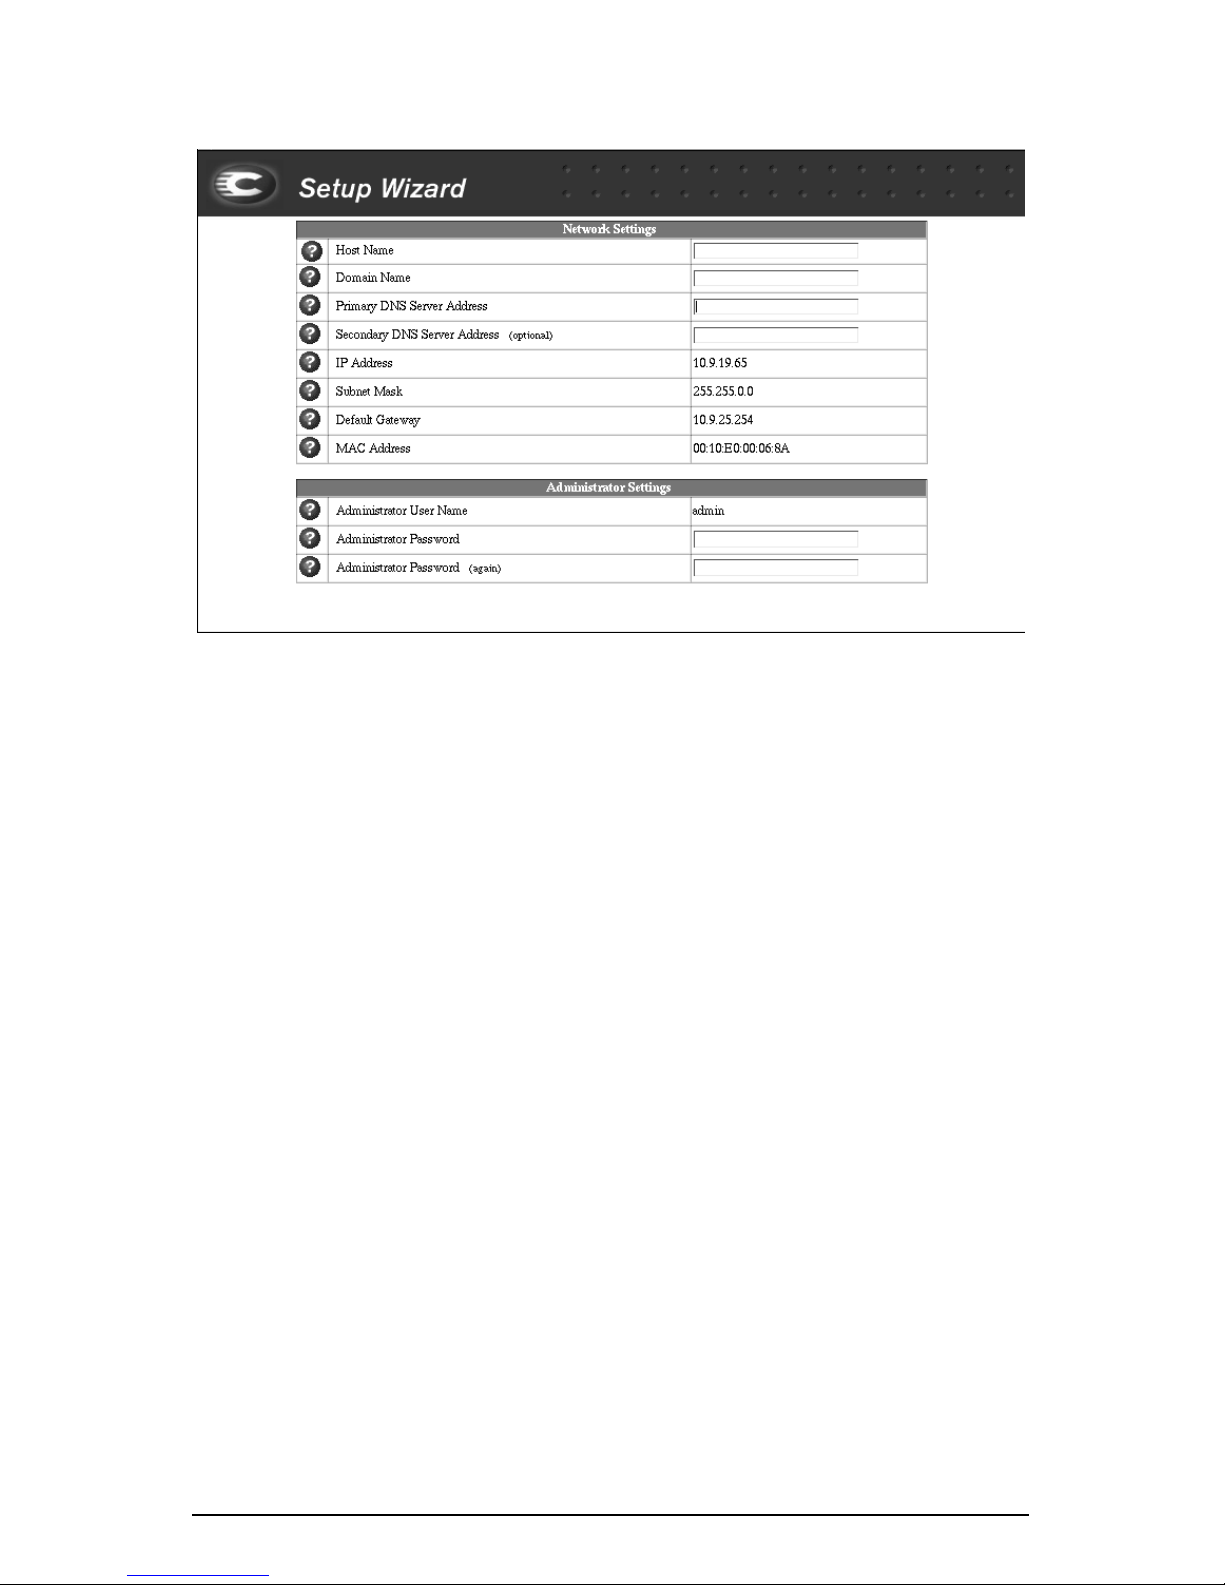
To configure the RaQ 4, enter information into the fields on the Setup Wizard
screen (see Figure 11). These fields are described in the sections that follow.
Note: For help with a particular field in the Setup Wizard, move the
✍
pointer over the Active Assist icon adjacent to the field and
help text is displayed at the bottom of the screen.
Cobalt RaQ 4 User Manual 25
Page 40
Chapter 2: Setting up the RaQ 4
Figure 11. Setup Wizard (part 1 of 2)
Entering the network settings
Host name (Cobalt server name). Assign a host name (for example, raq4) to the
RaQ 4.
Domain name. Enter your domain name. The domain name is either the official
domain name that is registered with an ICANN-accredited registrar (for example,
“mydomain.com”) or an intranet domain name specific to your network. This
allows you to access your RaQ 4 by host name and domain name, rather than by
IP address only.
Coordinate the host name and domain name with your Internet service provider
(ISP) or the person in charge of your DNS infrastructure to ensure the integrity of
your network. If your RaQ 4 is integrated into a larger network, consult with your
network administrator for this information.
As the RaQ 4 Administrator, you can change the domain name on the RaQ 4
server later on through the browser-based UI; see “Network” on page 64.
Primary DNS Server Address. Enter the IP address of your primary domain
name system (DNS) server. A primary DNS server maintains a list of computer
names and their IP addresses. The RaQ 4 needs access to this list on the primary
DNS server in order to convert between IP addresses and names. This conversion
is essential for sending and receiving email external to the RaQ 4.
Secondary DNS Server Address. This is the IP address of your secondary DNS
server. A secondary DNS server can provide redundant DNS service to your
computers. If the primary DNS server is turned off, then your RaQ 4 can use the
secondary DNS server.
26 Cobalt RaQ 4 User Manual
Page 41

Phase 2: Setting up with the Web browser
For informational purposes, this table also displays the IP address of the RaQ 4,
the subnet mask of your network, your configured gateway and the Media Access
Control (MAC) address that uniquely identifies this RaQ 4. These settings, with
the exception of the MAC address, can be changed later from the Control Panel
section of the Server Management screen.
Entering the administrator settings
In the Administrator Settings table, enter the information about the RaQ 4
Administrator. The RaQ 4 Administrator has several responsibilities:
1. Setting up and maintaining the RaQ 4, virtual sites, virtual Site
Administrators, site users and services
2. Responding to RaQ 4 email alerts to prevent potential problems
To set up the RaQ 4 Administrator, you must enter a password in the
Administrator Password field and then enter the same value again in the second
Administrator Password field.
Password guidelines
The RaQ 4 supports long passwords through the user interface (UI). Passwords
were previously limited to 8 characters.
Use the following guidelines when choosing a password:
1. The valid characters include: a-z A-Z 0-9 % ! @ $ ^ & * - _ = + \ |
. , / ? ; :
2. Use both upper- and lower-case letters.
Note: A password is case-sensitive.
✍
3. Do not use a proper name.
4. Do not use a word found in a dictionary.
5. Do not use a date.
6. Do not use a command word.
7. Do not use a string of consecutive keys on a keyboard (for example,
“qwerty”).
Be sure to remember this password to access the RaQ 4’s management
administration features in the future. If you forget or want to reset the password,
see “Resetting the RaQ 4 Administrator password” on page 51.
Cobalt RaQ 4 User Manual 27
Page 42
Chapter 2: Setting up the RaQ 4
Entering the service settings
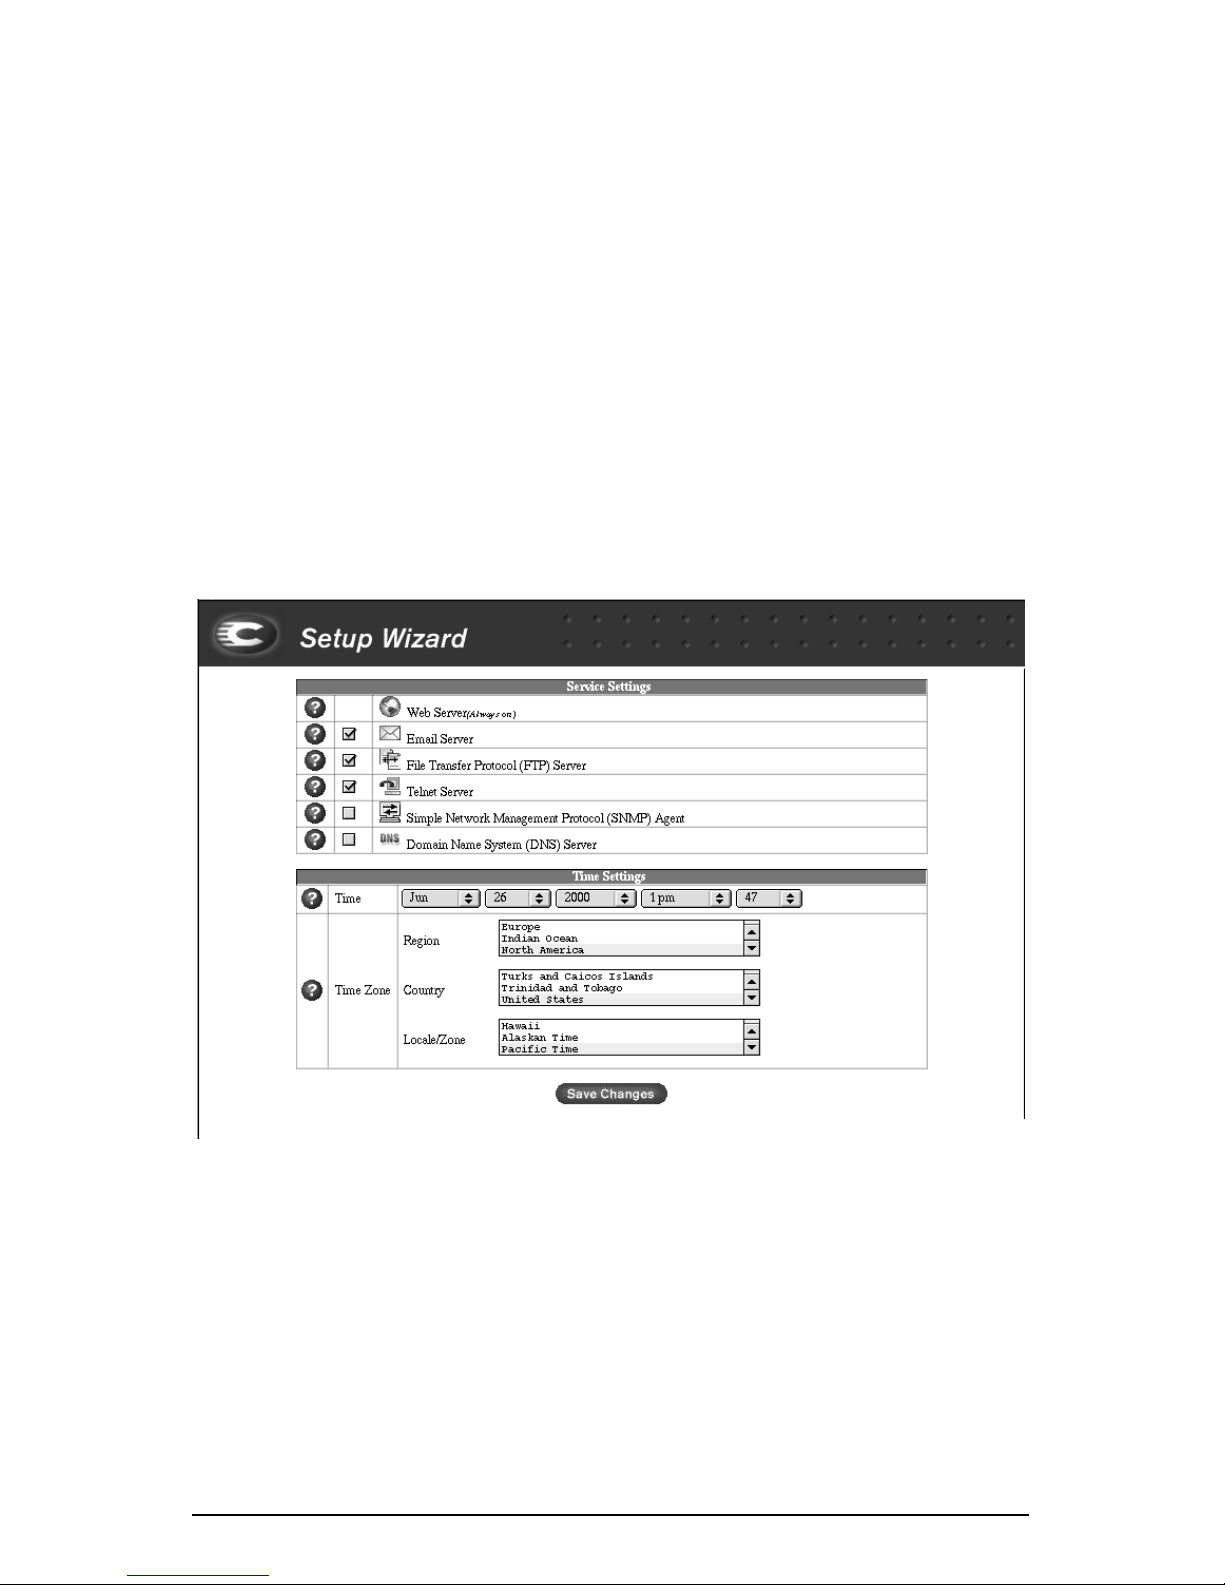
You turn the RaQ 4 services on or off through the Service Settings table. See
Figure 12. The default settings for these services are suitable for most users.
These services include:
• Email server (default is On)
• File transfer protocol (FTP) server (default is On)
• Telnet server (default is On)
• Simple Network Management Protocol (SNMP) agent (default is Off)
• Domain Name System (DNS) server (default is Off)
Figure 12. Setup Wizard (Part 2 of 2))
28 Cobalt RaQ 4 User Manual
Page 43

Phase 2: Setting up with the Web browser
After setup has been completed, the Services page in the Control Panel has a
“Parameters” column which enables further configuration. Refer to “Control
panel” on page 52 for additional information.
Entering the time settings
In the Time Settings table, select the time and date with the pull-down menus.
See Figure 12.
Select the correct time zone by clicking in the Region, Country and Locale/Zone
fields.
Completing configuration with the Setup Wizard
When you have entered the information in the Setup Wizard, click Save
Changes.
The RaQ 4 performs automatic checks on the information entered and alerts you
if an illegal value or a problem is encountered. If the information is correct, the
RaQ 4 enters the information in its configuration files.
Registering the RaQ 4 online
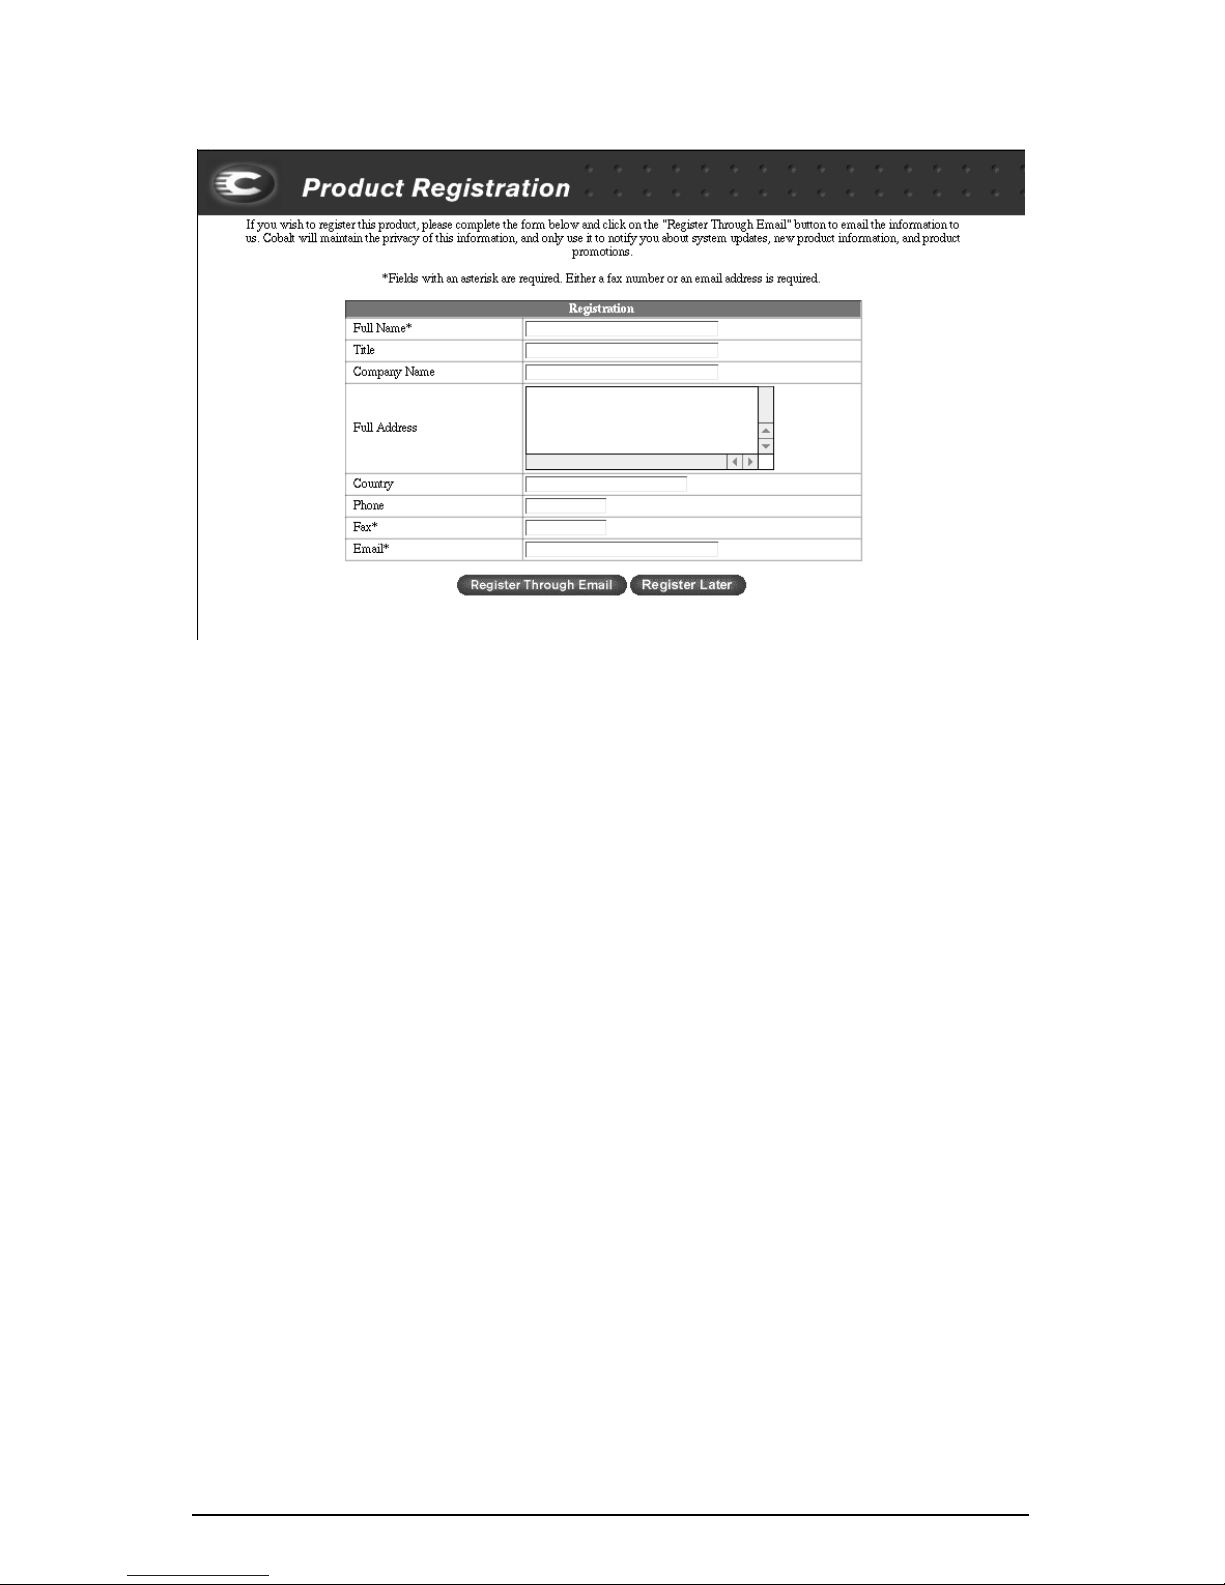
The RaQ 4 displays an online product registration page; see Figure 13.
Important: If you leave blank either the DNS or the Gateway fields
☞
✍
in the Setup Wizard, you cannot register the RaQ 4 online because
you will not be able to send email. In this case, if you attempt to
register the RaQ 4 online, you receive an error message, stating that
you cannot register online because you did not fill in the DNS and
Gateway fields.
Note: If you are not connected to the Internet, you cannot register
online.
Cobalt RaQ 4 User Manual 29
Page 44
Chapter 2: Setting up the RaQ 4
Figure 13. Online registration page
To register the RaQ 4 online:
1. Enter your Full Name. This field must be filled in.
2. As an option, you can enter your title, the company name, the company
address, the country and the phone number.
3. Enter either a Fax number or Email address. One of these two fields must be
filled in. If you choose email, enter your complete email address in the form
[email protected].
4. Click Register through Email to submit the information.
If you do not want to register online, click Register Later to proceed to the
RaQ 4 default home page.
Once you have registered the RaQ 4 online, you cannot register again. You
receive an error window stating that the RaQ 4 has already been registered.
30 Cobalt RaQ 4 User Manual
Page 45
Phase 2: Setting up with the Web browser
Registering online at a later time
If you want to register online at a later time:
1. Click the Cobalt logo in the top left corner of the screen. The Server
Configuration Information table appears.
2. Click the About The Product link. The default home page for the RaQ 4
appears.
3. In the bottom right corner, click the link under Product Registration. The
Product Registration screen appears.
4. Follow the steps in the previous procedure to register online.
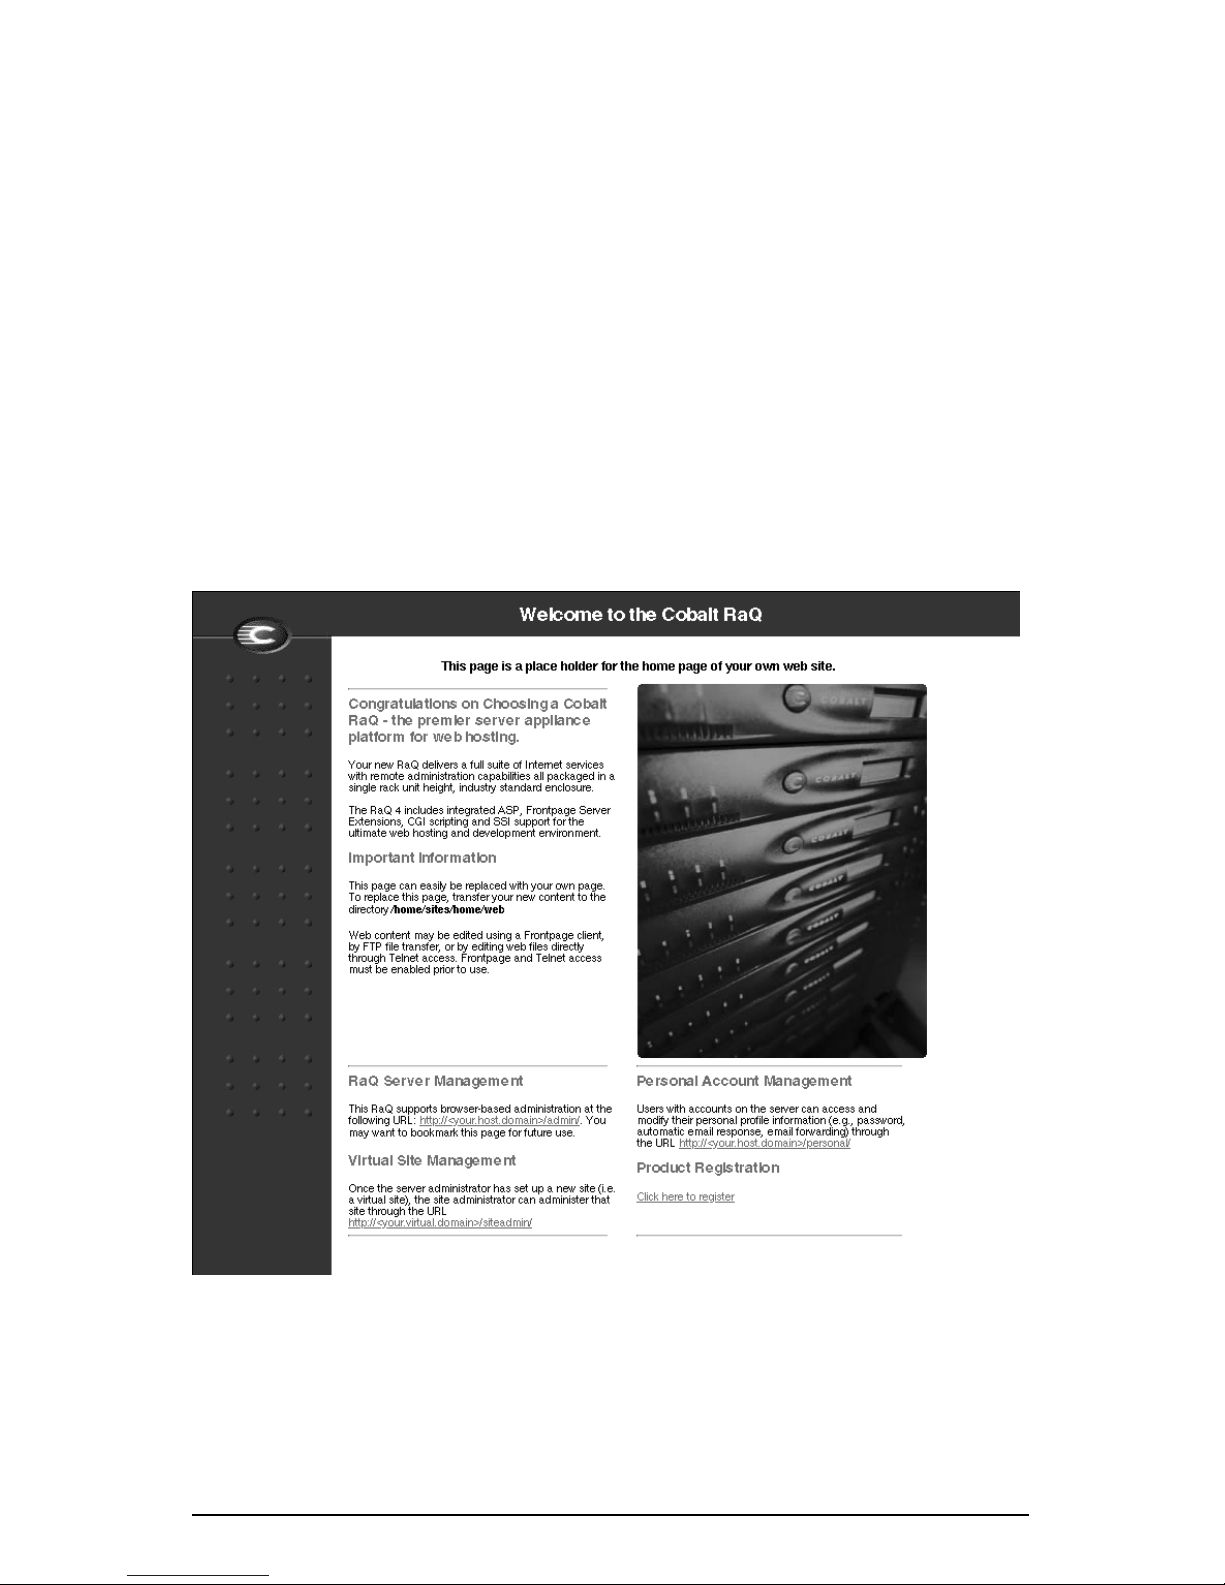
The default home page for the RaQ 4 appears; see Figure 14.
Figure 14. Default RaQ 4 home page
Cobalt RaQ 4 User Manual 31
Page 46

Chapter 2: Setting up the RaQ 4
The default RaQ 4 home page is stored internally under index.html in the Linux
directory /home/sites/home/web. This page appears when a user goes to the
URL http://<IP address>/.
When the RaQ 4 Administrator changes the index.html file to create a new home
page, the default RaQ 4 home page is replaced.
Registering the RaQ 4
If you did not register the RaQ 4 online, fill out the registration card included in
the packaging materials and return it to Cobalt Networks, Inc. By doing so, you
will receive notifications of system and security upgrades and new product
information.
If you did not register online through the Setup Wizard and would like to do so,
see “Registering online at a later time” on page 31.
32 Cobalt RaQ 4 User Manual
Page 47

Chapter 3
RaQ 4 Server Management
This chapter describes the functions that the RaQ 4 Administrator normally
performs. As the RaQ 4 Administrator, you access these functions on the
Management
screen on the RaQ 4. The
Server Management
screen has a
brown strip on the left side.
You can also perform site-related tasks and user tasks described in Chapter 4,
“Site Management” and Chapter 5, “Using Services on a Site”.
Table 3 briefly summarizes the three types of RaQ 4 users:
Server
Table 3.
User
RaQ 4
Administrator
Site
Administrator
Site User Site Users are added to a virtual site by the RaQ 4
Levels of user
Description
The RaQ 4 owner with the username
of the RaQ 4 and is a member of the main site (which uses
the IP address shown on the LCD screen of the RaQ 4). The
RaQ 4 can have several Site Administrators, but only one
RaQ 4 Administrator
The Site Administrator is designated by the RaQ 4
Administrator. The Site Administrator is a user who runs a
virtual site located on the RaQ 4; the virtual site can provide
Web publishing, email and FTP services for the users of the
site. The Site Administrator has control only over this virtual
site
Administrator or a Site Administrator. Site Users can send
and receive email through the virtual site, upload and
download files using the FTP service provided by the site,
publish their own personal Web page on the site, and back up
and restore their home directories. The Site User has control
only over the files located in his or her home directory on the
RaQ 4.
admin
has full control
Cobalt RaQ 4 User Manual 33
Page 48

Chapter 3: RaQ 4 Server Management
Approaches to RaQ 4 administration
As the RaQ 4 Administrator, you can decide how many of the server functions
you want to manage directly and how much to delegate.
•
Full control
create virtual sites without assigning any virtual Site Administrators. You are
responsible for managing the main site and all the virtual sites. (See
“Definition of a virtual site” on page 35.)
•
Hybrid control
delegate others, you can assign some of the virtual sites to virtual Site
Administrators (for the sites that have a user capable of acting as a Site
Administrator), and retain control of other virtual sites. You are responsible
for managing only the sites that do not have a Site Administrator.
•
Distributed control
sites, you can create Site Administrators for all the virtual sites. In this case,
you are responsible for managing only server settings and virtual site
services. The Site Administrators are responsible for managing the virtual
sites.
. If you want to control all the functions on the RaQ 4, you can
. If you want to control some of the RaQ 4 functions and
. If you want to delegate responsibility for all the virtual
You can manage the RaQ 4 through a Web browser. Access the
Management
http://<hostname.domainname> /admin/ into your browser. These Web pages are
password-protected—you must enter the RaQ 4 Administrator password.
When you access the RaQ 4 Administrator site for the RaQ 4, the
Management
management tasks that are performed only by the RaQ 4 Administrator:
1. Setting up and maintaining the RaQ 4.
2. Creating virtual sites.
3. Creating access privileges and providing services for the Site Administrators
and site users.
The RaQ 4 Administrator functions available on the
are described in the sections that follow.
screen by typing either http://<IP address> /admin/ or
screen appears (see Figure 15). This screen is used for the RaQ 4
Server Management
Server
Server
screen
34 Cobalt RaQ 4 User Manual
Page 49

Definition of a virtual site
Approaches to RaQ 4 administration
Whereas industry uses the term
virtual site
In Cobalt’s definition, a virtual site consists of a Domain Name System (DNS)
domain with Web, FTP and email services. Each virtual site contains its own list
of site-user accounts. Each site-user account has its own Web page,
FTP directory, email spool and any number of email aliases. The fully qualified
domain name of a virtual site is unique to that site, while its IP address can be
shared by many sites.
With the advent of name-based virtual hosting, it is no longer necessary to
dedicate an IP address to a virtual site. The Web server can now differentiate
among target virtual sites according to the name requested. Many virtual sites on
the RaQ 4 can share one IP address. Not all services are compatible with
name-based virtual hosting: SSL encryption for Web data, bandwidth
management and an anonymous FTP account can only be enabled on one
name-based virtual site per IP address hosted by the RaQ 4.
The IP address of the RaQ 4 can be shared by many virtual sites or it can be
unique to one virtual site.
.
virtual host
, Cobalt Networks uses the term
The RaQ 4 has one main site (which cannot be deleted) and virtual sites. The
main site uses the IP address assigned to the RaQ 4 using the LCD console.
On the
List table; the trashcan icon in the fourth column for the main site is grayed-out
(disabled), as this site cannot be deleted from the list of virtual sites. The options
and features available on a virtual site can also be configured for the main site.
Server Management
screen, the main site is listed in the Virtual Sites
Cobalt RaQ 4 User Manual 35
Page 50

Chapter 3: RaQ 4 Server Management
Support for RAID-1 (RaQ 4r configuration only)
A redundant array of independent disks (RAID) is a way of storing the same data
in different places (thus, redundantly) on multiple hard disk drives. A RAID
appears to the operating system to be a single virtual hard disk drive.
Redundancy means that there is protection against the failure of any single hard
disk drive. Redundant data is used by a RAID system in the event of a failure;
this redundant data can either be a mirror copy or parity data used to reconstruct
the actual data.
There are a variety of different types and implementations of RAID, each with its
own advantages and disadvantages. The RaQ 4r implements RAID Level 1
(RAID-1), also known as disk mirroring, which consists of a primary hard disk
drive and a secondary hard disk drive; the secondary hard disk drive is an exact
copy or “mirror image” of the primary hard disk drive.
Although RAID can protect your data in case of a hard-disk-drive failure, it does
not protect against operator and administrator (human) error, or against loss due
to programming bugs.
The RaQ 4 server implements RAID services through software. Each hard disk
drive has its own independent master channel to allow high performance without
extra RAID hardware.
You do not need to enable RAID-1 on the RaQ 4r; it is enabled by default. You
cannot disable RAID-1 on the RaQ 4r.
There are two possible causes for RAID failure on the RaQ 4r:
•
Hardware failure
one hard disk drive, but the server can no longer provide disk mirroring. To
restore RAID service, you must shut down the RaQ 4 and replace the failed
hard disk drive.
•
Software failure
cause is a failure of the whole kernel, in which case the RaQ 4r just reboots.
In case of a failed hard disk drive, you will have to replace the hard disk drive.
For more information on replacing a hard disk drive, see “Upgrading your
RaQ 4” on page 161.
For a failed drive, Active Monitor indicates that the Left or Right hard disk drive
has failed (“Right” and “Left” are in relation to looking at server with the front
blue panel facing you.)
. If a hard disk drive fails, the RaQ 4r can function with
. The RAID software should not fail. If it does, the likely
36 Cobalt RaQ 4 User Manual
Page 51

Site management
If RAID fails on the RaQ 4r, the system indicates the non-RAID status in three
ways:
• An email is sent to the RaQ 4 Administrator.
• Active Monitor blinks red on the
• On the
Integrity (RAID) circle changes to red.
Once you replace a failed drive on a RaQ 4r and reboot the server, the system
detects the new hard disk drive. It then automatically begins to synchronize the
new hard disk drive to the existing hard disk drive so that the server will be able
to provide disk mirroring.
✍
Server Management
Note:
During the synchronization process, the RaQ 4r cannot
provide disk mirroring but it can still serve requests.
Server Management
screen, under
System Status
screen.
, the Disk
Site management
The RaQ 4 is designed to host multiple virtual sites. A virtual site is an individual
location on the Internet, such as www.abc.com or www.xyz.com. Each virtual
site can have a unique set of users who can send and receive email, publish Web
pages, or upload and download files through FTP. A virtual site can also provide
anonymous FTP access.
Note:
A virtual site can be name-based or IP-based. If there are
✍
The RaQ 4 server can host a large number of IP-based virtual sites. The number
of sites depends on the amount of hard-disk-drive space available on the server,
the amount of hard-disk-drive space allocated for each site, the amount of traffic
generated on each site and the amount and complexity of the dynamic Web
content on each site (for example, ASP, CGI, PHP and others). Dynamic Web
content on an individual site induces a much heavier load on the server than does
static content.
In the Site Management section of the
Administrator can create and manage virtual sites hosted by the RaQ 4. A table
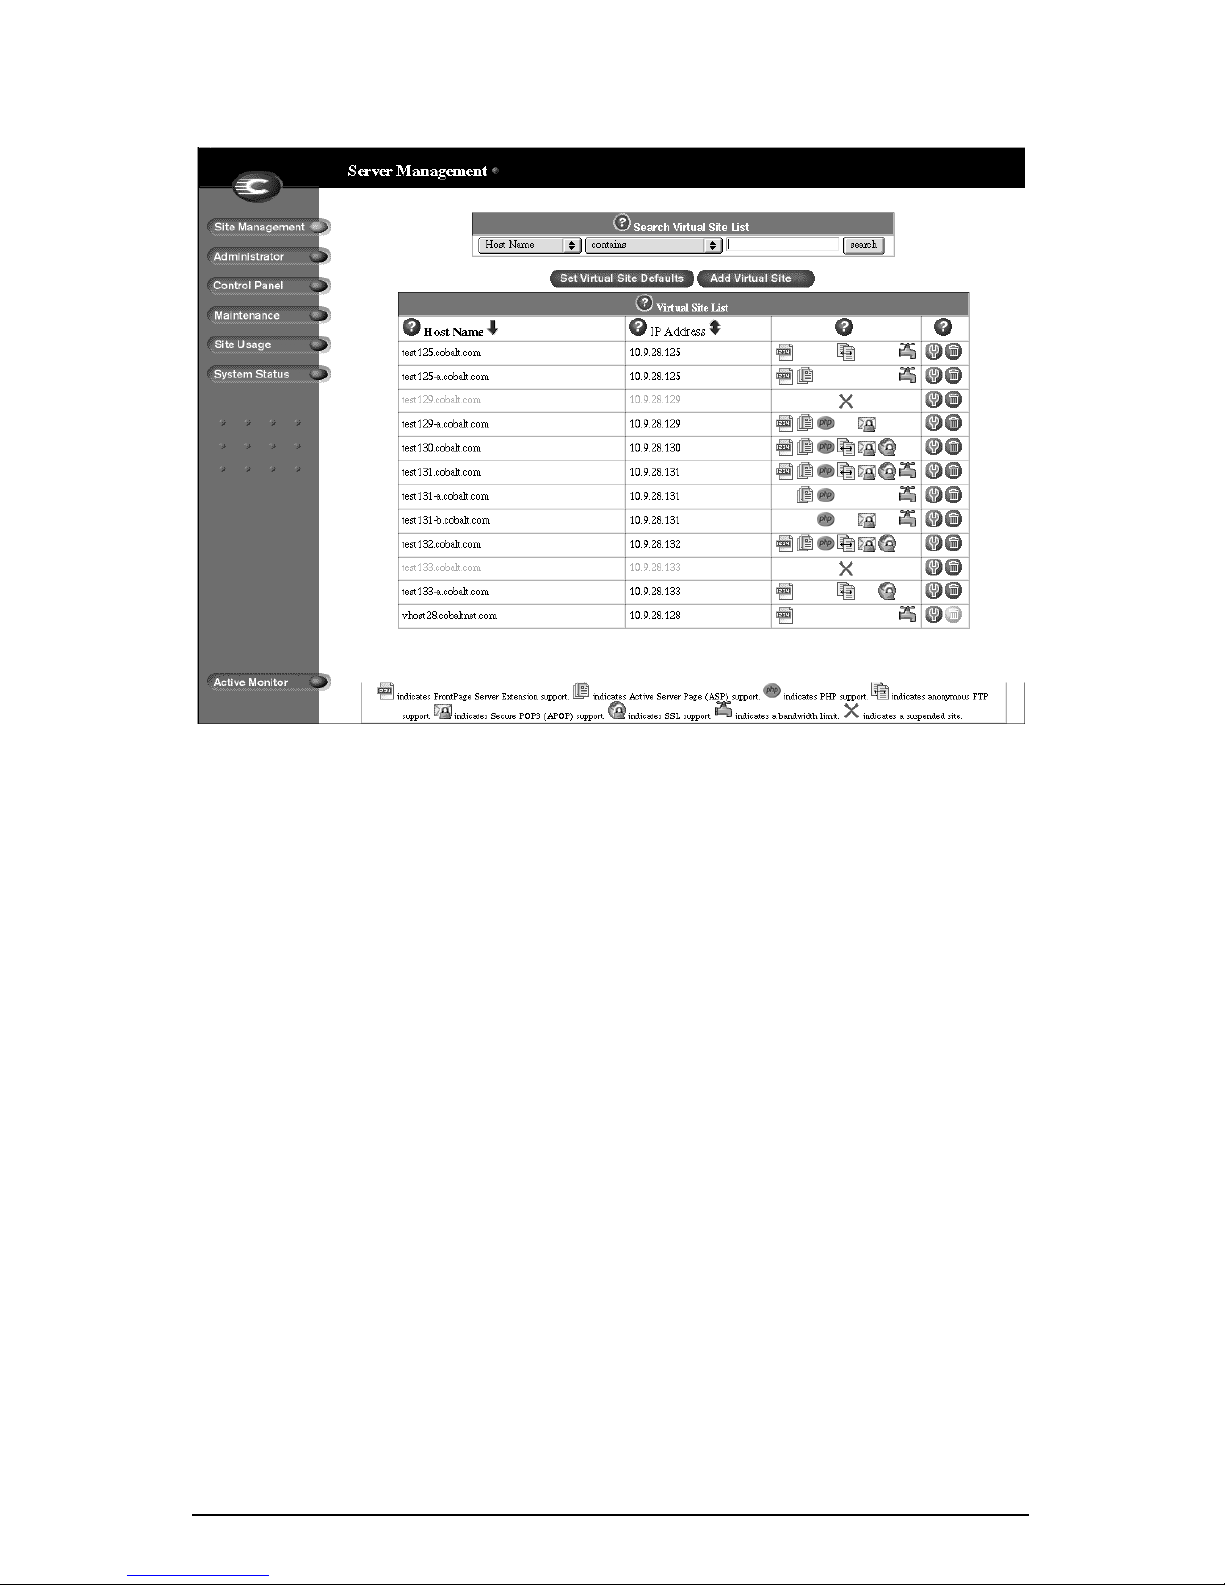
displays the virtual sites (if there are any) on the RaQ 4. See Figure 15.
several name-based virtual sites on an IP address, only one namebased virtual site can use anonymous FTP.
Server Management
screen, the RaQ 4
Cobalt RaQ 4 User Manual 37
Page 52
Chapter 3: RaQ 4 Server Management
Figure 15.
List of virtual sites in the Site Management section
In the Site Management section, the Virtual Site List displays the virtual sites by
host name in ascending order.
The Virtual Site List has four columns which display information about the site,
and allow the RaQ 4 Administrator to manage or remove a site.
• The first column displays the host name of the virtual site.
• The second column displays the IP address of the virtual site.
• The third column displays icons to indicate which services (FrontPage
Server extensions, Anonymous FTP, Secure POP3 [APOP], SSL or
Bandwidth Limit) are enabled on a site, or to indicate that a site is
suspended.
• The fourth column displays icons to manage a site or to remove a site.
✍
Note:
out (disabled), as this site cannot be deleted from the list of virtual
sites.
The trashcan icon for the main site on the RaQ 4 is grayed-
For an explanation of the icons, see “Icons used on the UI and in the manual” on
page 11.
38 Cobalt RaQ 4 User Manual
Page 53

Site management
Search and sort functions
The Virtual Site List table offers a search function and a sort function; see
Figure 15. These functions are useful if you have a large number of virtual sites
on your RaQ 4 and you want to restrict the display to certain virtual sites.
You can search the list of virtual sites according to the following criteria:
• by host name or IP address
• whether the host name or IP address is equal to the search string, is
contained in the search string or is not contained in the search string
The screen regenerates and the results of the search are displayed in a table with
the same four columns. The heading of the table now states “Search Results (<x>
Virtual Sites found). To return to the full list of virtual sites, click
Management
on the left.
Note:
Suspended sites are listed in the search results.
Site
✍
You can sort the list of virtual sites according to the following criteria:
• by host name, in ascending or descending order
• by IP address, in ascending or descending order
Ascending order means from lowest value to the highest value (a–z or 1–9).
Descending order means from highest value to the lowest value (z–a or 9–1). By
default, the Virtual Site List table is sorted by host name in ascending order.
The screen regenerates and the results are displayed in a table with the same four
columns. In the heading of the column which has been sorted, a blue arrow icon
points up (ascending order) or down (descending order). In the heading of the
column which has not been sorted, a double-ended arrow indicates that the order
for the column is random.
You can use the search and sort functions together to produce the display that you
need. For example, you can search the list for all virtual sites with “test” in the
host name, and sort the results of that search by IP address in ascending order.
Cobalt RaQ 4 User Manual 39
Page 54

Chapter 3: RaQ 4 Server Management
Searching a list of virtual sites
To search the list of virtual sites:
1. In the first field of the Search Virtual Site List window, select “Host Name”
or “IP Address” from the pull-down menu.
2. In the second field, select “is”, “contains” or “does not contain” from the
pull-down menu.
3. In the third field, enter the string of characters for which you want to search.
4. Click
the same four columns.
Search
. The screen regenerates and displays the results in a table with
Sorting a list of virtual sites
To sort the list of virtual sites:
1. To sort according to Host Name, click on the blue arrow icon in the heading
of the Host Name column. To sort according to IP Address, click on the blue
arrow icon in the heading of the IP Address column.
2. To sort in ascending (up arrow icon) or descending order (down arrow icon),
click on the blue arrow icon so that it points in the correct direction.
3. The screen regenerates and displays the results in a table with the same four
columns.
40 Cobalt RaQ 4 User Manual
Page 55

Site management
Overview of virtual sites
The RaQ 4 supports both name-based and IP-based virtual hosting.
The RaQ 4 Administrator sets up the virtual sites, as described in “Adding a
virtual site” on page 47. The following list of information is helpful when
creating a site.
•
IP Address
IP addresses.
✍
To use the RaQ 4, you require an IP address or range of
Note:
The RaQ 4 supports name-based virtual sites allowing many
sites to share a single IP address. The RaQ 4 Administrator can
create many virtual sites using the same IP address (for example,
192.168.25.77) with a different host name for each site (for
example, both www.abc.com and www.xyz.com can use
192.168.25.77 as their IP address).
•
Host name
If the site is connected to the Internet, you must know which IP address the
host name uses.
•
Domain name
abc.com or xyz.com).
You must also register the domain name. Visit the Internet Corporation for
Assigned Names and Numbers (ICANN) at http://www.icann.org. for a list
of accredited domain-name registrars.
✍
•
Web server aliases
restricted to receiving Web requests only on the domain entered in the site
settings.
For the virtual site, enter additional host names or domain names for which
to accept Web requests. For example, enter the aliases domain.com and
www.domain.com.
Each virtual site requires a host name (for example, www or ftp).
Each virtual site also requires a domain name (for example,
Note:
The RaQ 4 can serve as the DNS server and provide the host
name.
You can add aliases for Web servers; you are not
Separate multiple entries with a comma.
Note:
✍
to resolve the alias addresses in addition to the virtual site name.
You must configure the Domain Name System (DNS) records
Cobalt RaQ 4 User Manual 41
Page 56

Chapter 3: RaQ 4 Server Management
•
Email server aliases
restricted to receiving email messages only on the domain entered in the site
settings.
For the virtual site, enter additional host names or domain names for which
to accept email connections (on SMTP port 25). For example, enter the
aliases domain.com and mail.domain.com.
Separate multiple entries with a comma.
•
Maximum allowed disk space (MB)
site can use, and can change this value at any time. The value is in megabytes
and must be a whole number greater than zero.
You can choose where to store a new virtual site. In the Add New Virtual Site
table, in the Maximum allowed disk space (MB) parameter, a pull-down
menu lists in alphabetical order the available disk storage devices. The
storage device with the most available space is chosen by default. For more
information, see “Storage” on page 82.
You can add aliases for email servers; you are not
You can set the amount of disk space a
Once you have created a virtual site, you cannot change its location.
•
Maximum Number of Users
Administrator can create; you can change this value at any time.
•
Enable FrontPage Server Extensions
FrontPage
site. Site Administrators can create and delete user FrontPage webs
individually.
When FrontPage Server Extensions are enabled on a virtual site, you must
enter a password for the FrontPage client
information, see “FrontPage Server Extensions” on page 44.
•
Enable Anonymous FTP
upload files through FTP up to the specified disk-space limit. You can enable
the anonymous FTP server for any virtual site. You can also limit the amount
of data that can be uploaded anonymously and the total number of
anonymous users who can access the virtual site simultaneously.
✍
TM
Server Extensions for Web page development on each virtual
Note:
A virtual site can be name-based or IP-based. If there are
several name-based virtual sites on an IP address, only one namebased virtual site can use anonymous FTP.
You can limit the number of users that a Site
You can enable Microsoft
webmaster
Users without passwords can download and
account. For more
42 Cobalt RaQ 4 User Manual
Page 57

Site management
•
Enable SSL
Web access. See “SSL settings” on page 118.
•
Enable Active Server Pages (ASP)
language. For more information, see “Active Server Pages (ASP)” on
page 45.
•
Enable PHP Embedded Scripting
scripting. For more information, see “PHP embedded scripting” on page 45.
•
Enable Shell Accounts
to the RaQ 4 and run commands from a Linux shell. If this feature is
enabled, Site Administrators can grant shell access on a user-by-user basis.
✍
The RaQ 4 provides an optional secure sockets layer (SSL) for
The RaQ 4 supports ASP scripting
The RaQ 4 supports PHP embedded
The users of the virtual site being created can telnet
Note:
Granting shell access can greatly compromise the security of
your RaQ 4.
•
Enable Secure POP3 (APOP)
Office Protocol (APOP) for a virtual site. APOP is a challenge-response
authentication scheme built on top of the standard POP protocol. APOP is
designed in a way that protects your password when being sent across the
network.
Note:
If you enable APOP for a user, that user can check his or her
✍
•
Enable common gateway interface (CGI) scripts
virtual site and all the site users to have CGI-based dynamic Web content on
the RaQ 4. CGI allows a user to have a Web site run programs that
dynamically generate hypertext markup language (HTML) pages in response
to specific user inputs. CGI scripts can be created on a user’s desktop
computer and then transferred to the RaQ 4 with a file transfer protocol
(FTP) application. See “Publishing Web pages using FTP” on page 146.
•
Enable Server Side Includes
Web pages (.shtml).
email only through an APOP client; a regular POP3 client will not
work unless APOP is disabled for that user.
You can enable the Authentication Post
You can enable this
The RaQ 4 can correctly display server-parsed
Cobalt RaQ 4 User Manual 43
Page 58

Chapter 3: RaQ 4 Server Management
FrontPage Server Extensions
When you enable FrontPage Server Extensions on a virtual site, a FrontPage
client
webmaster
webmaster
account.
account is created and you must provide a password for the
Note:
✍
If FrontPage Server Extensions are enabled on a virtual site, the Site Settings
table on the
feature is enabled. If you disable FrontPage Server Extensions on a virtual site
and save the changes, the Site Settings table refreshes to show the feature as
disabled and a
re-enable FrontPage Server Extensions on that virtual site, you must provide a
password again for the
If you do not enter a password after you enable FrontPage Server Extensions and
then try to save changes, the UI will not accept the changes. An error message
appears at the bottom of the screen informing you that you must enter a password
for the
Each virtual site has a separate
password.
webmaster
Server Extension software and is not a true Linux site-user account.
As such, it does NOT have Web, email or FTP service. It is simply
an account to use in the FrontPage client.
Site Management
The FrontPage user
webmaster
account.
password field is now displayed in the table. If you
webmaster
webmaster
screen shows a check box indicating that the
account.
webmaster
account and a unique
is a part of the FrontPage
webmaster
Once the
can:
• modify Web content
• manage FrontPage site Root Web subwebs
• add, modify or remove additional FrontPage user accounts
• change the
✍
For more information on the FrontPage features, refer to the user documentation
for the FrontPage client software.
webmaster
webmaster
Note:
accounts.
has authenticated through the FrontPage client, he or she
password
User webs cannot manage subwebs or FrontPage user
44 Cobalt RaQ 4 User Manual
Page 59

Site management
Active Server Pages (ASP)
The RaQ 4 uses Chili!Soft™ Active Server Pages (ASP) software.
ASP is an HTML-embedded scripting language that includes one or more small
embedded programs, or scripts, that are processed on a Web server before the
Web page is sent to the user. An ASP is somewhat similar to a server-side include
or a common gateway interface (CGI) application in that all three involve
programs that run on the server, usually tailoring a page for the user.
For example, an ASP script can use the input from the user’s request for the page
to access data from a database. The script then builds or customizes the page on
the fly and returns it to the requestor. The Web server does all of the processing,
and a standard HTML page is generated and sent to the browser.
It is not necessary to enable the ASP Administrative Server on the Server
Management screen in order to enable ASP on an individual virtual site.
ASP Administrative Server
The ASP Administrative Server allows you to configure your ASP service
through a separate browser-based UI. It does not need to be turned on to allow
site users to serve ASP pages; this interface runs on port 5100.
You can access the ASP Administrative Server screen from the Server
Management screen. The ASP Administrative Server user interface includes a
link to the ASP HTML documentation files.
For more information, see “ASP Administrative Server” on page 62.
PHP embedded scripting
The RaQ 4 supports PHP Version 4.0 embedded scripting.
As with ASP, PHP is an HTML-embedded scripting language that includes one
or more small embedded programs, or scripts, that are processed on a Web server
before the Web page is sent to the user.
Much of the PHP syntax is borrowed from C, Java and Perl with a few unique
PHP-specific features thrown in. The goal of the language is to allow Web
developers to write dynamically generated pages quickly.
For more information on PHP, visit the URL http://www.php.net.
Cobalt RaQ 4 User Manual 45
Page 60
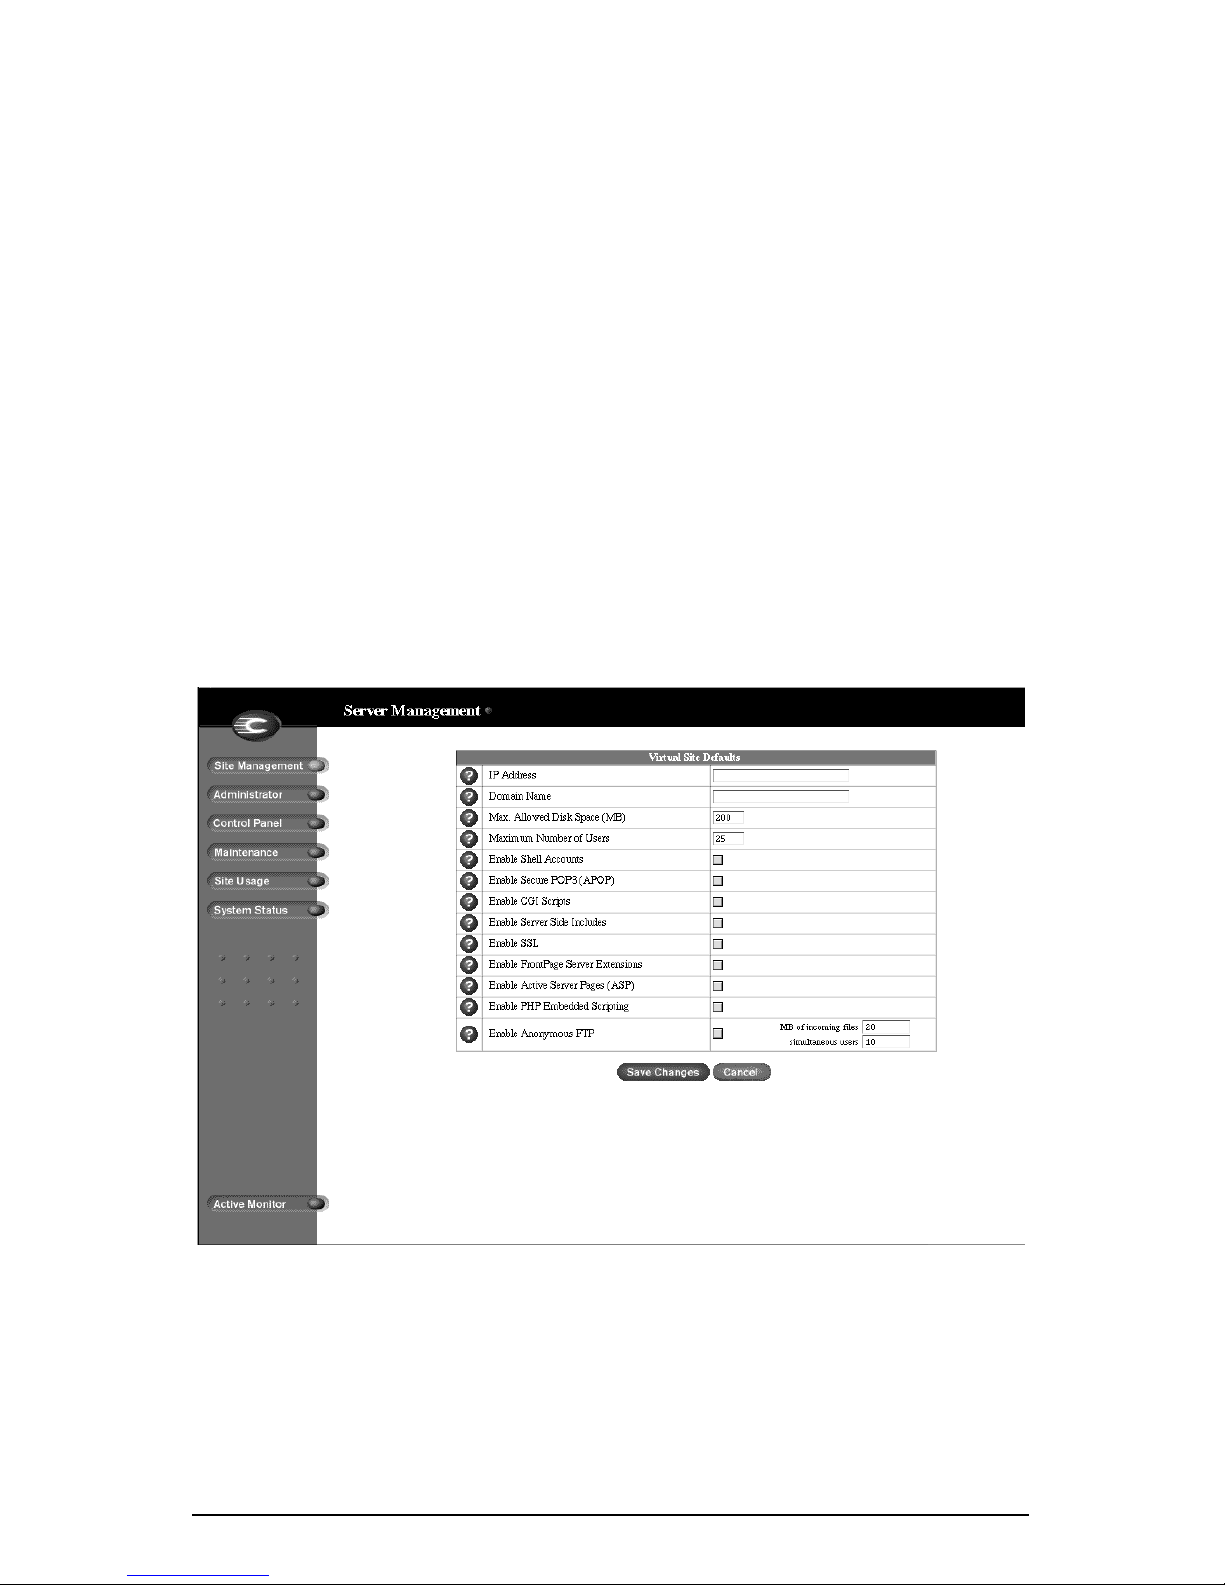
Chapter 3: RaQ 4 Server Management
Setting defaults for a virtual site
There are many advantages for setting defaults for the virtual sites. For example,
since multiple sites can now share an IP address, a default IP address can be set
for all new virtual sites added. Also, since it is common for many sites to share a
common domain name, it can be desirable to set a default domain name for your
virtual sites.
The same is true of all the options for a virtual site; it is best for you to decide the
needs of your typical virtual site before assigning these values.
Site defaults and site settings can only be configured by the RaQ 4 Administrator.
If you (as the RaQ 4 Administrator) enable either the FrontPage Server
Extensions service or the Shell Accounts service, the Site Administrators can
enable or disable FrontPage user webs, and enable or disable individual
(per-user) shell access.
Figure 16 shows the screen for configuring the default settings of a virtual site.
Figure 16. Default settings for a virtual site
46 Cobalt RaQ 4 User Manual
Page 61

Site management
Modifying the default site settings
To modify the default settings for a virtual site:
1. On the Server Management screen, click Site Management. The Virtual
Site List table appears.
2. Click Set Virtual Site Defaults. The Virtual Site Defaults table appears.
3. Enter the information for the site.
4. See the descriptions in “Overview of virtual sites” on page 41.
5. Click Save Changes.
Once you have configured the default settings, you can modify the settings for
each virtual site that you add.
Adding a virtual site
To add a virtual site:
1. On the Server Management screen, click Site Management. The Virtual
Site List table appears.
2. Click Add Virtual Site. The Add New Virtual Site table appears. See
Figure 17.
3. Enter the information for the site (information from the virtual site default
settings is displayed here).
4. Make changes to the information or complete the necessary information.
5. Verify the settings and click Confirm New Site.
Figure 17 shows the screen for adding a virtual site.
Cobalt RaQ 4 User Manual 47
Page 62
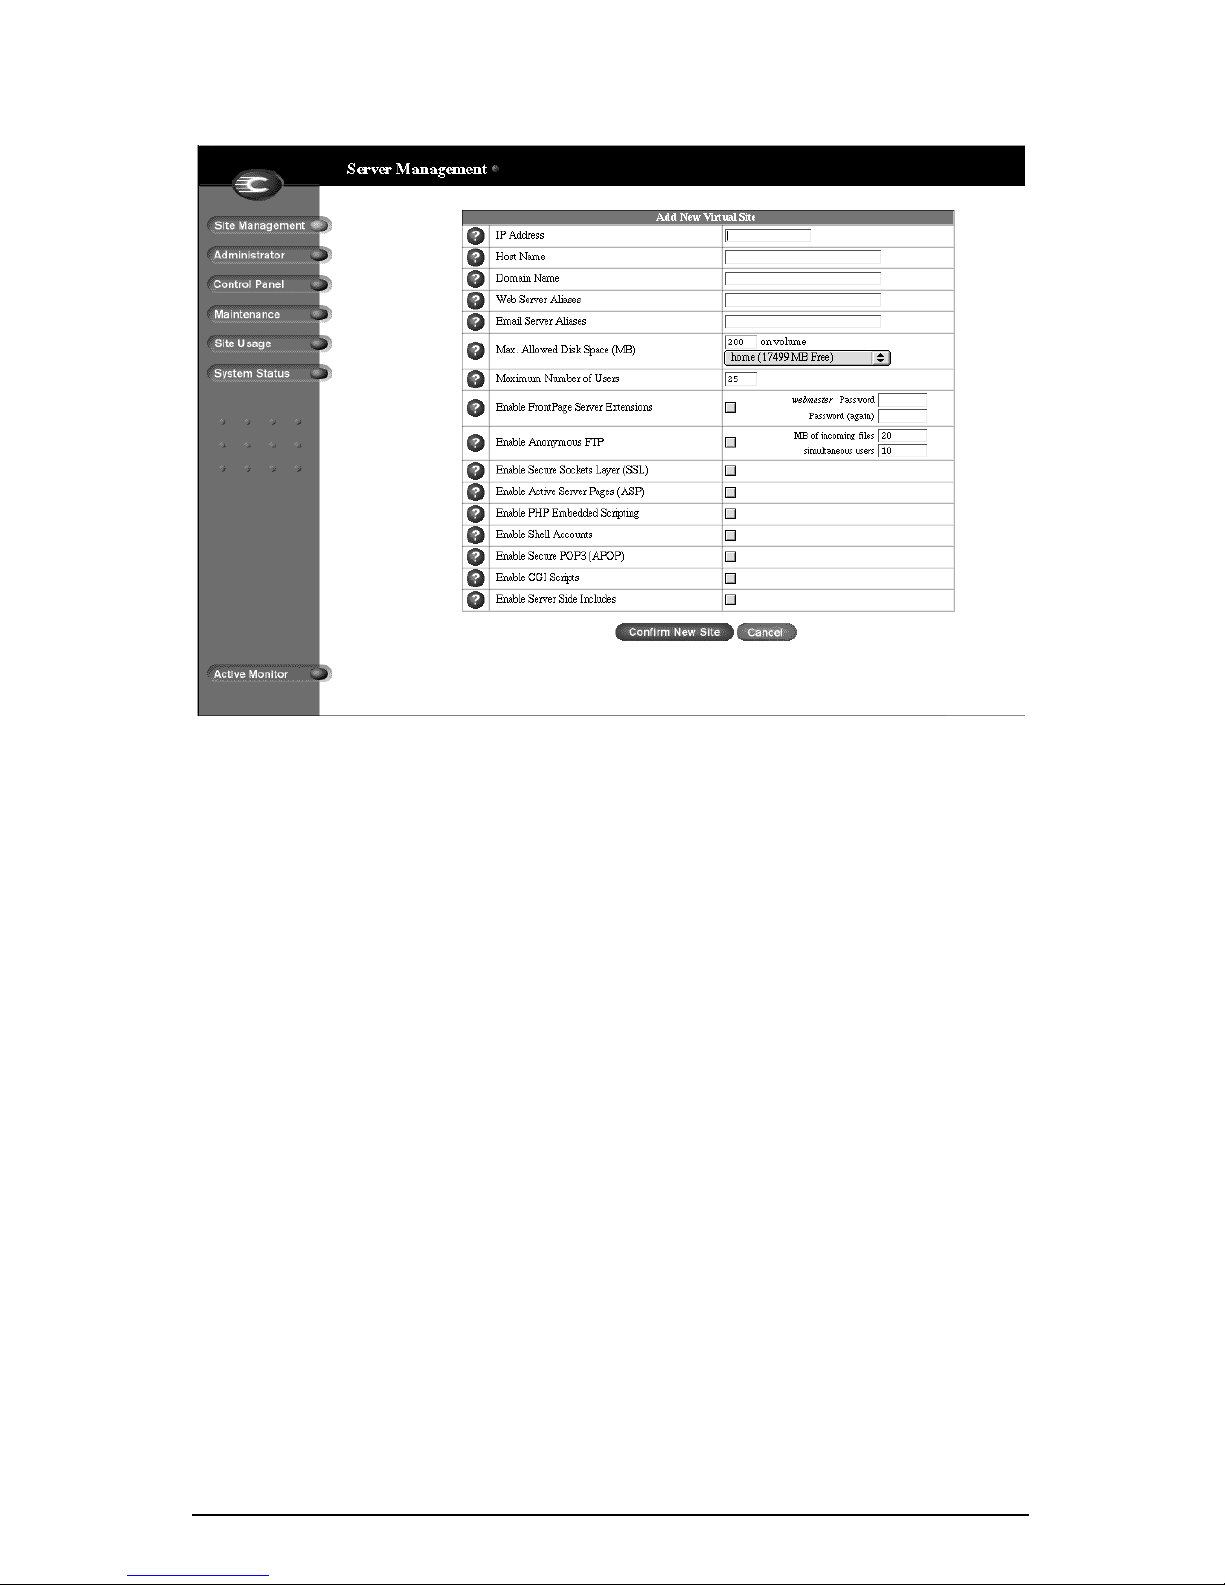
Chapter 3: RaQ 4 Server Management
Figure 17. Adding a virtual site
Adding a name-based virtual site
If you are adding a name-based virtual site, you must have DNS records for that
site before you can access the site. For more information, see “Definition of a
virtual site” on page 35.
Note: To preview a name-based virtual site, you must first configure
✍
If you administer your DNS records on the RaQ 4, refer to Appendix D, “Domain
Name System”, for more information about creating DNS records. If your
Internet service provider (ISP) administers your DNS records, ask your ISP to
create the DNS records for the new name-based virtual site.
Once the virtual site has been created, you can manage it by clicking the green
pencil icon for the site. See “Changing site settings” on page 113.
its DNS records and make those DNS records available to your
workstation and the RaQ 4 server.
Requests to the IP address are directed to the first name-based site
created on that IP address.
To assign a Site Administrator to the new virtual site, see “Adding a site user” on
page 99.
48 Cobalt RaQ 4 User Manual
Page 63

Site management
Removing a virtual site
To remove a virtual site:
1. On the Server Management screen, click Site Management. The Virtual
Site List table appears.
2. In the Virtual Site List table, click the trashcan icon for the virtual site you
want to remove.
3. In the confirmation dialog box that appears, click OK to delete all the virtual
site accounts, site users and contents.
4. The screen refreshes and the virtual site is no longer listed.
Both the Site Administrator and the RaQ 4 Administrator can configure the site
user default settings. See “Setting defaults for a site user” on page 97.
After creating a virtual site, you can add or remove users for that site, and assign
a Site Administrator. See “Adding a site user” on page 99.
For information on changing the settings for a particular virtual site, see
“Changing site settings” on page 113.
For information on removing a site user from a particular virtual site, see
“Removing a site user” on page 102.
Cobalt RaQ 4 User Manual 49
Page 64
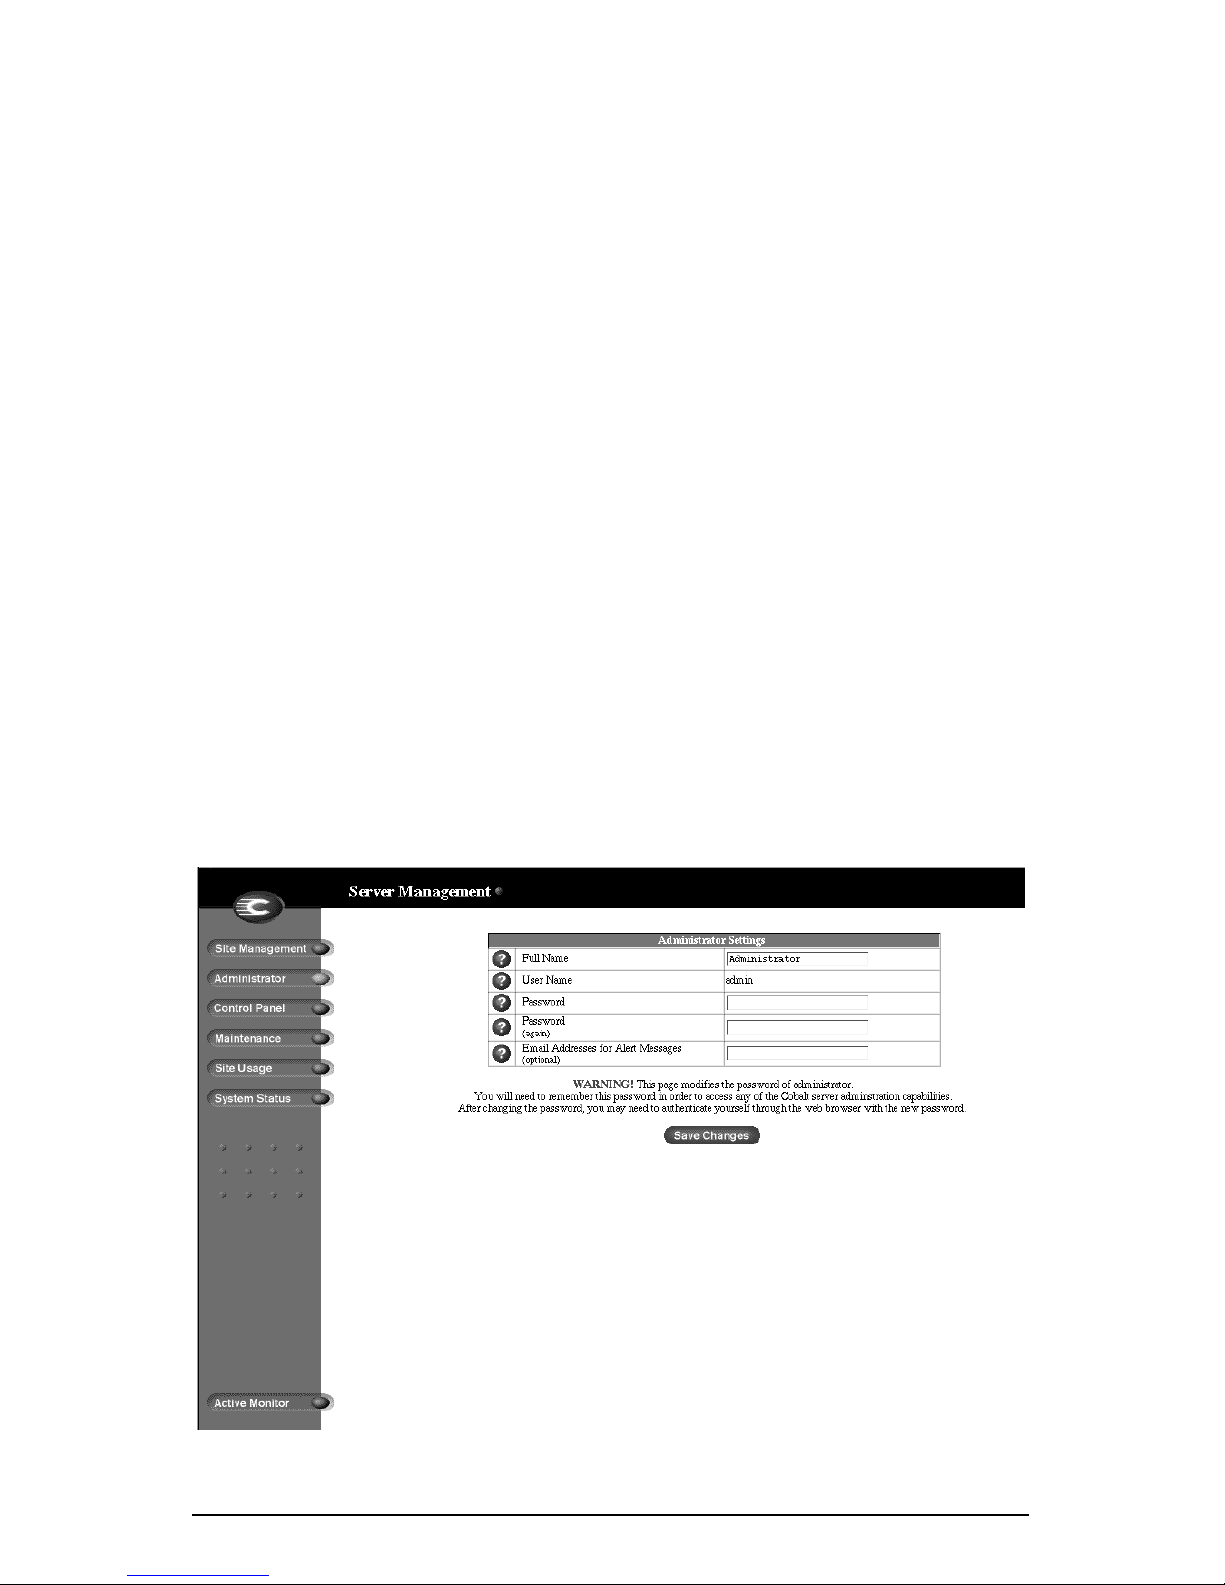
Chapter 3: RaQ 4 Server Management
RaQ 4 Administrator
Important: Be sure to remember the password you enter here—
☞
In the Administrator section of the Server Management screen, you enter
information about the RaQ 4 Administrator—including user name, password
and, optionally, an email address where system alerts for failed services are sent.
To enter the information for the RaQ 4 Administrator:
1. On the Server Management screen, click Administrator on the left. The
Administrator Settings table appears. See Figure 18.
2. Enter the first name and last name of the administrator.
3. Enter the password twice to ensure that you have entered it as intended. For
guidelines on choosing a password, see “Password guidelines” on page 27.
otherwise, you will need to reset it (See “Resetting the RaQ 4
Administrator password” on page 51).
4. As an option, enter an email address that will receive system alerts for failed
services.
5. Click Save Changes.
Figure 18. Administrator Settings table
50 Cobalt RaQ 4 User Manual
Page 65

RaQ 4 Administrator
Changing the RaQ 4 Administrator password
To change the password for the RaQ 4 Administrator:
1. On the Server Management screen, click Administrator on the left. The
Administrator Settings table appears.
2. Enter the password twice to ensure that you have entered it as intended. The
RaQ 4 supports long passwords through the UI.
For guidelines on choosing a password, see “Password guidelines” on
page 27.
3. Click Save Changes.
Resetting the RaQ 4 Administrator password
When the RaQ 4 Administrator password is cleared, the root account is not
accessible until a new administrator password has been assigned.
Caution: After you clear the password, enter a new one as soon as
possible to protect the security of the RaQ 4. At this point, anyone
!
If you forget the RaQ 4 Administrator password, you can clear it by following
these steps.
1. Push and hold the end of a paper clip in the recessed Reset Password button
(located between the LCD screen and the LCD arrow buttons, on the front of
the RaQ 4). Hold the button in for approximately 2 seconds.
The LCD screen displays
2. Release the button.
3. In your Web browser, enter the URL http://<IP address>/admin/ or
http://<host name>/admin/ to access the Server Management screen.
on the network can assign the RaQ 4 Administrator password until
you assign a new one.
Resetting admin
password...
4. If a prompt appears asking for a username or password, enter admin as the
username. DO NOT enter a password. Click OK.
Cobalt RaQ 4 User Manual 51
Page 66
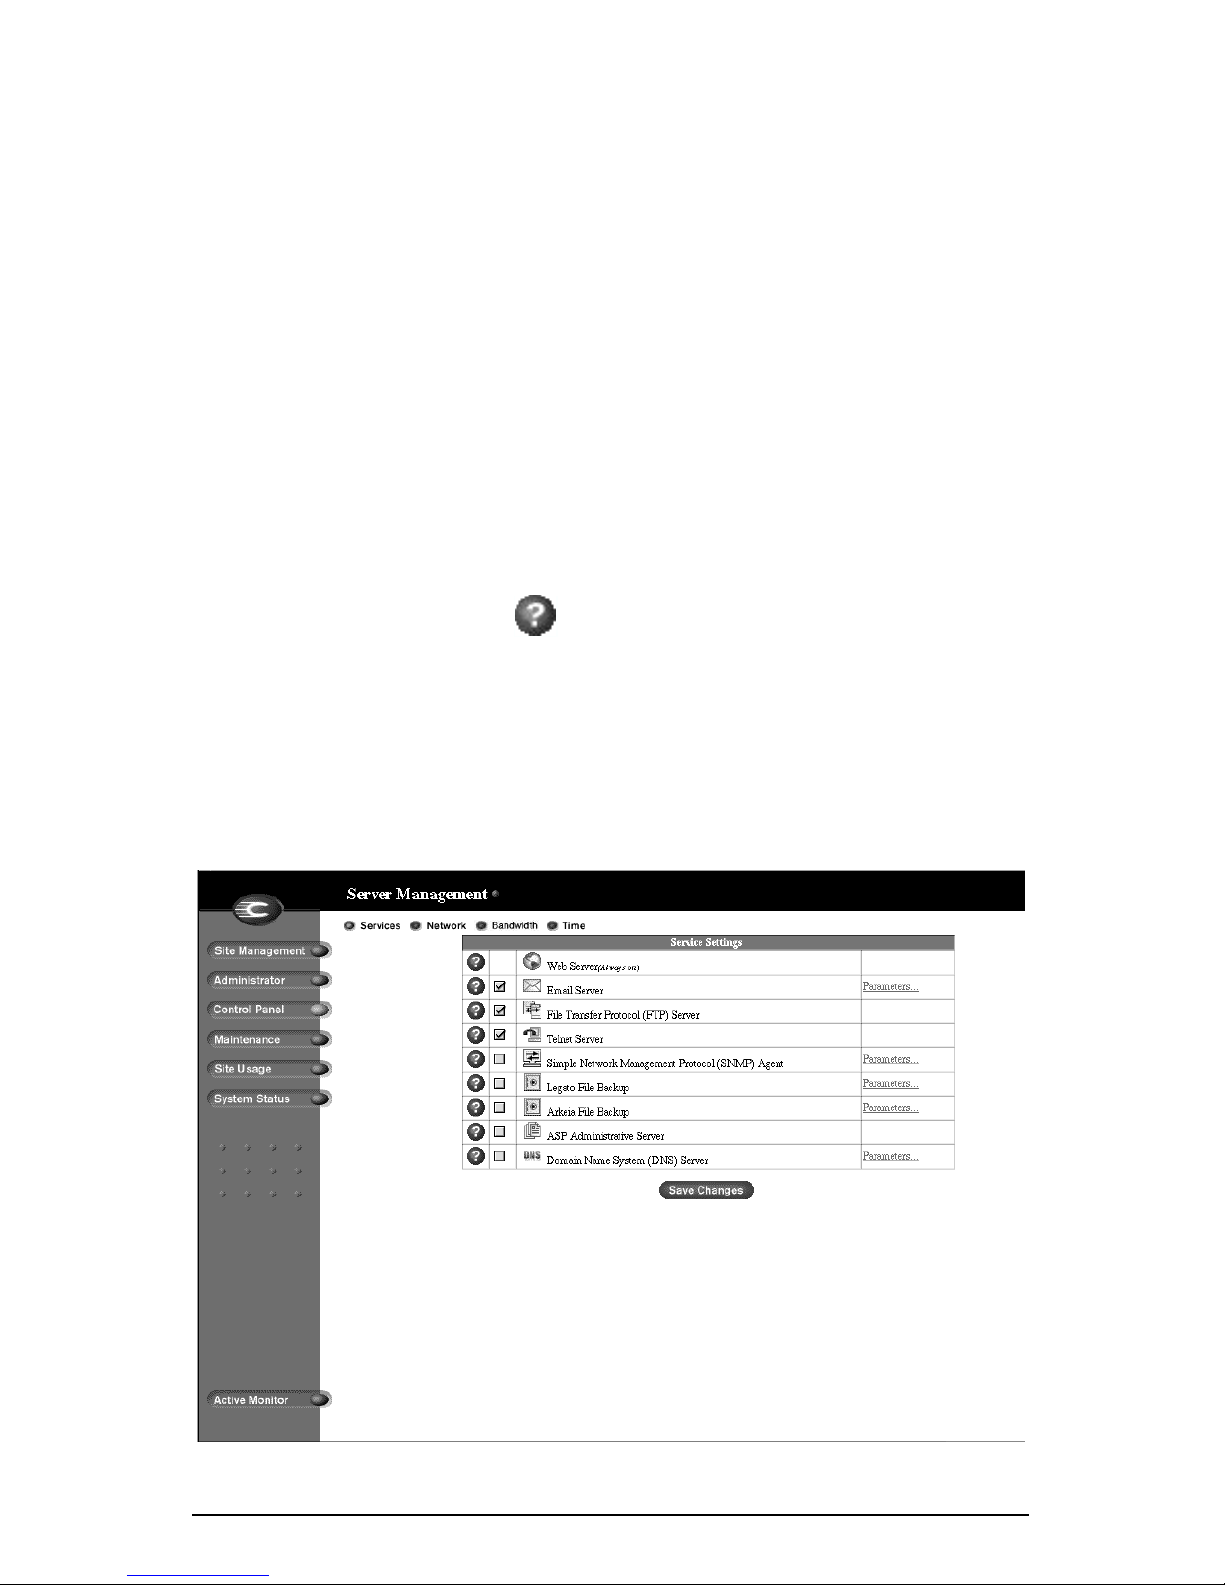
Chapter 3: RaQ 4 Server Management
5. Click Administrator on the left. The Administrator Settings table appears.
6. Enter the password twice to ensure that you have entered it as intended. The
RaQ 4 supports long passwords through the UI.
For guidelines on choosing a password, see “Password guidelines” on
page 27.
7. Click Save Changes.
Control panel
You can configure the services, network and time settings through the Control
Panel section of the Server Management screen.
Note: For help with a particular field, move the mouse pointer over
✍
the Active Assist icon adjacent to the field. Help text appears
in a window at the bottom of the screen.
Services
Figure 19 shows the Service Settings table of the Services section.
Figure 19. Service Settings table
52 Cobalt RaQ 4 User Manual
Page 67

Control panel
To manage the settings for the RaQ 4 services:
1. On the Server Management screen, click Control Panel on the left. The
Service Settings table appears.
2. To turn on any of the services listed in the Service Settings table (except Web
server, which is always on), click the check box next to that service. The
services are described in the sections that follow.
3. Click Save Changes.
Note: Chapter 5 provides instructions for site users on how to use
✍
the RaQ 4 services.
Web server
This service is always on. It allows site users to access Web content, as described
in Chapter 5.
Email server
The RaQ 4 supports email for each virtual site on the host. It also supports email
for entire domains (for example, www.mydomain.com). By default, each
registered user has an email account created on the RaQ 4.
The RaQ 4 supports multiple client and server email protocols but does not
implement virtual email users. This means that for the entire RaQ 4, each user
must have a unique username, even if the users are on different virtual sites. For
more information, see “Email relaying” on page 56.
SMTP server
The RaQ 4 can act as a Simple Mail Transfer Protocol (SMTP) server for sending
and receiving Internet email. As the RaQ 4 Administrator, you can configure
several parameters that can affect the performance of the SMTP server.
Users created on any virtual site can retrieve their email using the Post Office
Protocol 3 (POP3) or the Authentication Post Office Protocol (APOP), in
addition to the Internet Message Access Protocol 4 (IMAP4). Users can send
mail using the Simple Mail Transfer Protocol (SMTP).
Cobalt RaQ 4 User Manual 53
Page 68
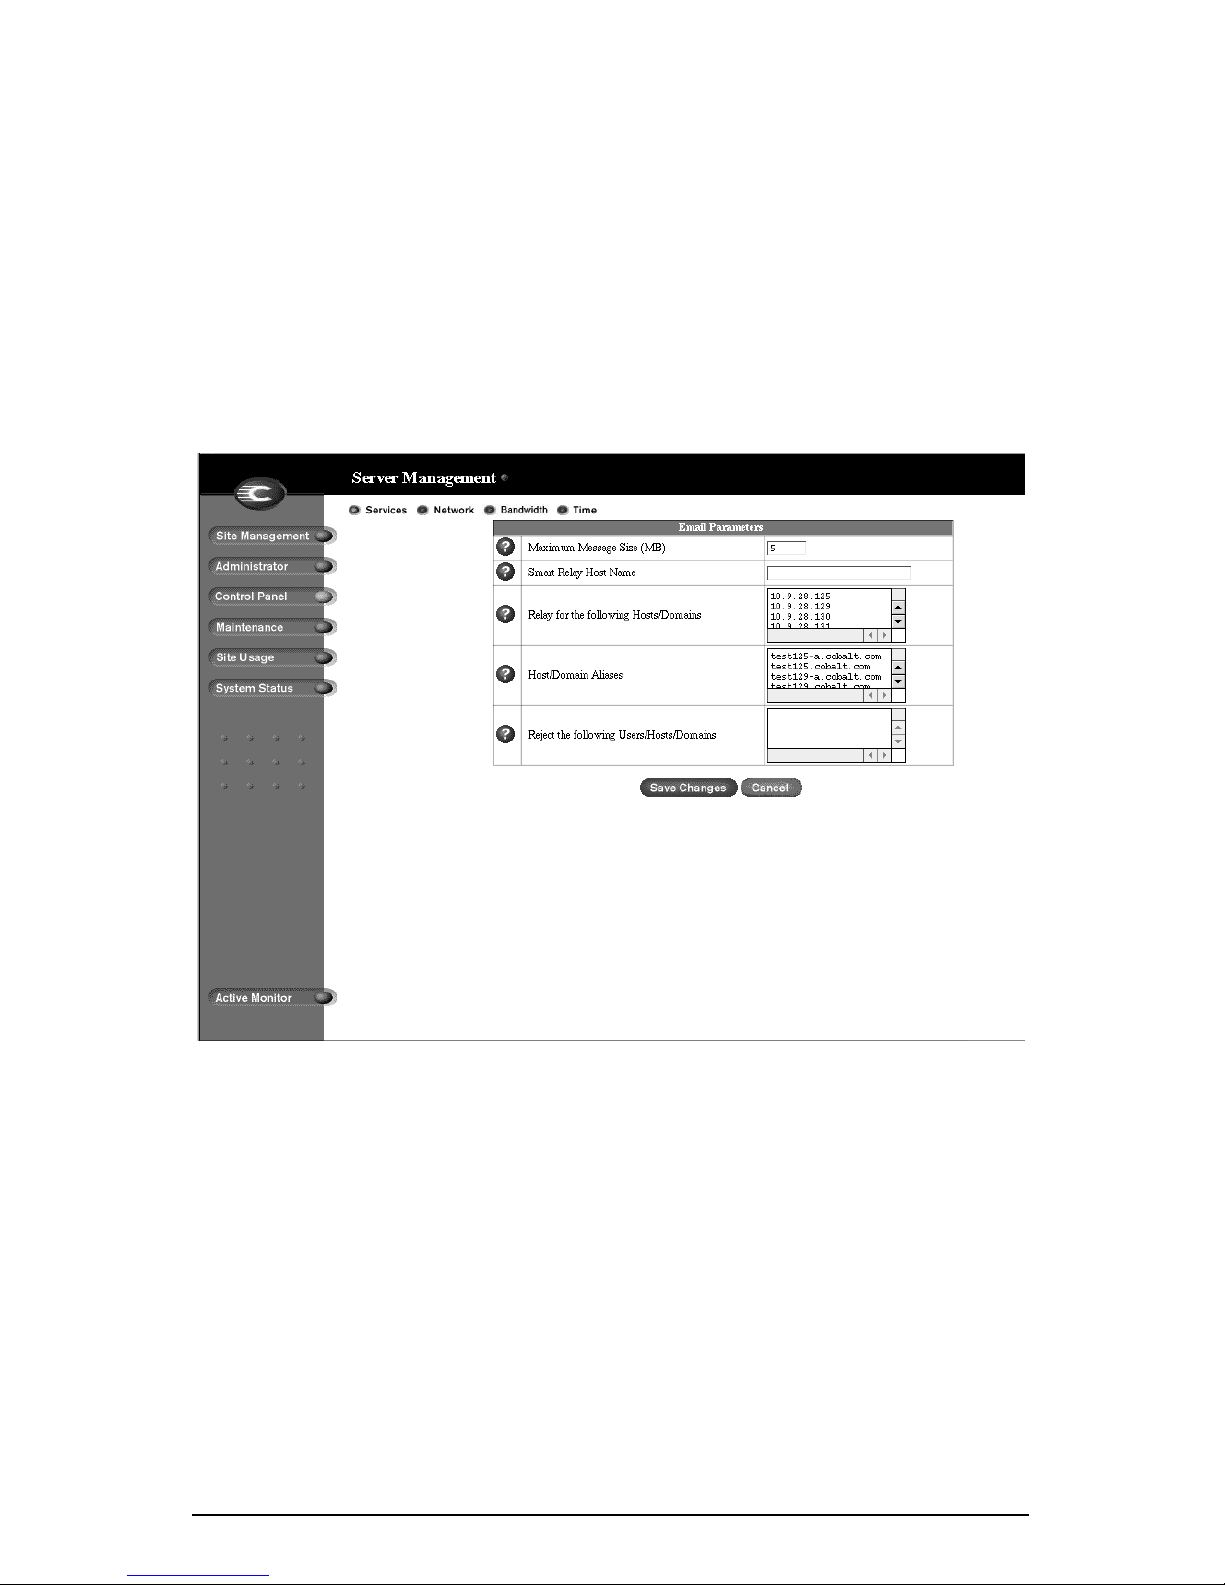
Chapter 3: RaQ 4 Server Management
For the RaQ 4 to receive email, you or your network administrator must enter a
mail server host name in your organization’s DNS server to designate the RaQ 4
as the mail server for a domain. Email service depends on DNS. so the IP address
of a DNS server must be entered in the network settings for the RaQ 4; if not, the
SMTP protocol will not work. If you did not enter this IP address in the Setup
Wizard, see “Network” on page 64.
For more information on DNS, see Appendix D, “Domain Name System”.
Figure 20 shows the Email Parameters table.
Figure 20. Email Parameters table
Configuring the email parameters
To configure the email parameters:
1. In the Service Settings table, click the Parameters link next to Email Server.
The Email Parameters table appears.
2. Fill in the fields in the Email Parameters table. The following paragraphs
explain these fields.
3. Click Save Changes in the Email Parameters table.
4. Click Save Changes in the Service Settings table
54 Cobalt RaQ 4 User Manual
Page 69

Control panel
You can modify the following parameters:
• Maximum message size (MB) It is important to enter a value here to limit
the size of incoming email messages. If this field is blank, the server will not
limit the size of incoming messages, which may allow a single message to
fill up your available space on the hard disk drive. A message that exceeds
the specified quota of space on the hard disk drive is returned to the sender as
“undeliverable”. The default value is 5 MB; the value must be a whole
number greater than zero.
• Smart Relay Host Name You can enter an optional host name in this field.
With this feature, you can configure the RaQ 4 to send Internet email to a
specific email server. Enter the host name of the email server through which
you want to relay your email.
This feature is useful if the RaQ 4 does not have direct Internet access (for
example, the RaQ 4 is subject to a restrictive firewall), but can communicate
with an email server that has direct Internet access.
• Relay for the following hosts/domains You can specify a list of hosts for
which the SMTP server will relay email messages. For more information,
see “Email relaying” on page 56.
• Hosts/domains aliases In this field, enter all the IP addresses or domain
names of sites on which you receive email. You can only receive email that is
addressed to you on the domains specified here. For example, if you want to
receive email addressed to you at [email protected], type
domain.com in this field.
You can also add email server aliases when creating a virtual site. For more
information, see “Overview of virtual sites” on page 41.
• Reject the following users/hosts/domains In this field, enter email
addresses or domains from which you want to block any email. Anyone
trying to send you messages from one of these addresses or domains will
receive an error message in return.
Cobalt RaQ 4 User Manual 55
Page 70

Chapter 3: RaQ 4 Server Management
Email relaying
Simple Mail Transfer Protocol (SMTP) service is different from Post Office
Protocol (POP), telnet and file transfer protocol (FTP) services in that SMTP
does not try to authenticate a user when an SMTP connection is made.
Every email server on the Internet has to be able to deliver email to you, so the
email servers must be able to connect freely to send the email. The RaQ 4 accepts
email for processing if the recipient has a user account or an alias email account,
or if the sending host (your client PC) is trusted to relay outgoing email messages
to another domain. These trusts are defined by host or domain names, as well as
by IP addresses and networks.
Caution: Some users advise you to open relay to all com, edu, net
and other top-level domain addresses. However, doing so allows
!
hosts belonging to com, edu, net and others to relay email through
your server; this relayed mail is known as spam mail.
Spam mail can appear as though it originated from your server and
as a result, others may blacklist your server as a known spam site. If
your server is blacklisted, many mail servers will not relay your
email and your customers will not receive a large amount of their
email messages.
If you have users who access your server through the Internet, ask your Internet
service provider (ISP) which networks are used by their remote access (dial-up)
equipment.
For example, if the ISP says the network 192.168.10.5 through 192.168.10.24,
then enter “192.168.10” in the “Relay email from these hosts/domains” field of
the Email Parameters table. If your ISP gives you a list of 30 networks used by 30
points-of-presence (POPs) (which are regional ISP offices) across the country
and your clients can dial in from any of them, then you must trust all 30 networks
or these users cannot send email through your RaQ 4.
56 Cobalt RaQ 4 User Manual
Page 71
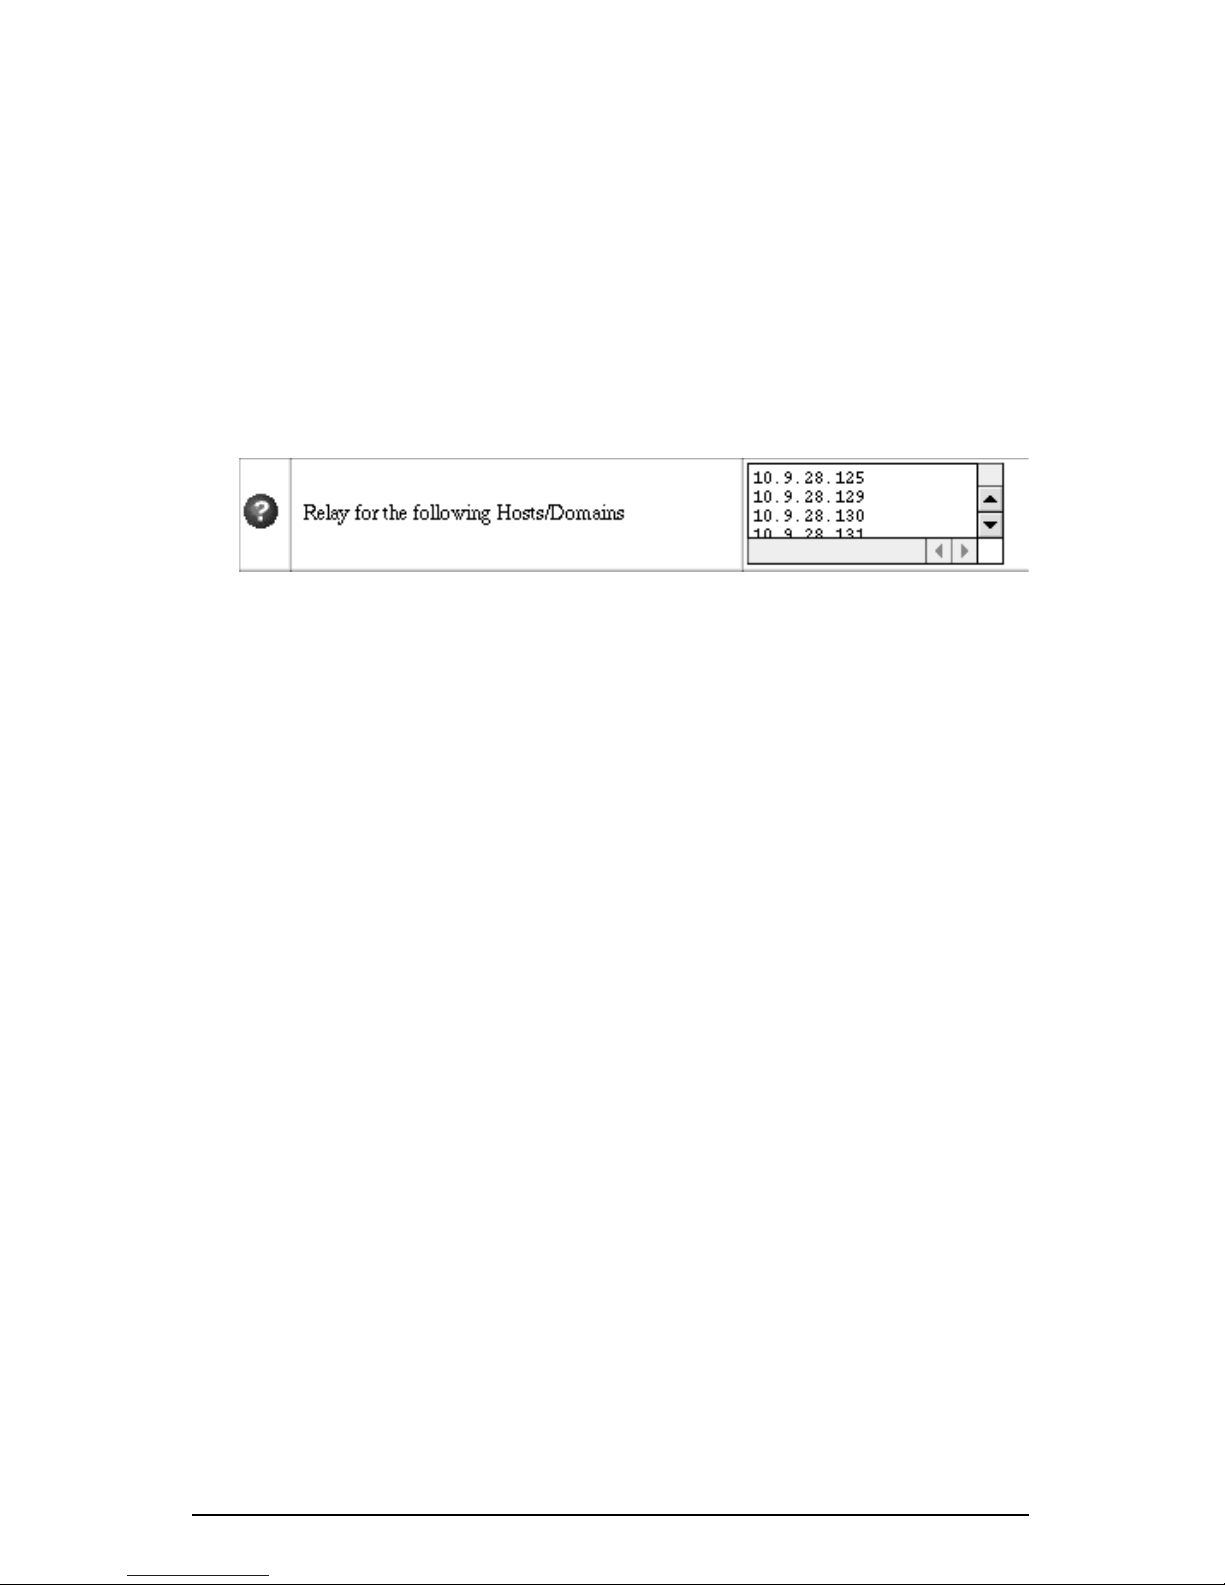
Control panel
Enabling email relaying
To enable email relaying, add the IP addresses (or domain names, or both) of the
machines which use your RaQ 4 as the SMTP server.
1. On the Server Management screen, click Control Panel. The Service
Settings table appears.
2. Click the Parameters link next to Email Server. The Email Parameters table
appears.
One field is labeled “Relay for the following hosts/domains”. The following
paragraphs explain how to fill in this field.
3. Click Save Changes in the Email Parameters table.
4. Click Save Changes in the Service Settings table.
The entries you add to this field serve as part of a pattern match against the email
that the client is sending. As a result, some handy shortcuts are possible. If you
have a number of hosts in the same network block, you can, as a shortcut, simply
enter the number of the network block.
For example, specifying a network such as 192.168.1 in the “Relay email from
these hosts/domains” field trusts all IP addresses from 192.168.1.1 through
192.168.1.254.
Note: There is no trailing period on the number of the network
✍
If you want to allow connections from a host that ends, for example, in
mydomain.com, add the string “mydomain.com” in the text area.
block and there are only three octets entered in the field. It is
important that you do not include a trailing dot after the part of the
IP address that you want to match.
Note: If you entering a domain name or part of a domain name in
✍
the text box, you must have reverse DNS working on your clients.
Cobalt RaQ 4 User Manual 57
Page 72

Chapter 3: RaQ 4 Server Management
File transfer protocol (FTP) server
Using the file transfer protocol, site users can upload and download files on the
RaQ 4. Users can transfer files with FTP client software such as Fetch or
WS-FTP.
You can enable or disable the FTP server.
1. On the Server Management screen, click Control Panel. The Service
Settings table appears.
2. Click the check box next to File Transfer Protocol (FTP) Server to on or off.
3. Click Save Changes.
Telnet server
Caution: You can adversely affect the operation of your RaQ 4 if
you modify system configuration files. Check your warranty card
!
for details.
Granting shell access can greatly compromise the security of your
RaQ 4.
Note: Disabling the telnet server in the Service Settings table
✍
Telnet access is available but only advanced users should use telnet. An advanced
user is someone who is proficient in the workings of a Unix operating system.
You can enable or disable the telnet server:
1. On the Server Management screen, click Control Panel. The Service
Settings table appears.
2. Click the check box next to Telnet Server to on or off.
3. Click Save Changes.
denies telnet access to all users, even if they have been granted shell
access.
58 Cobalt RaQ 4 User Manual
Page 73
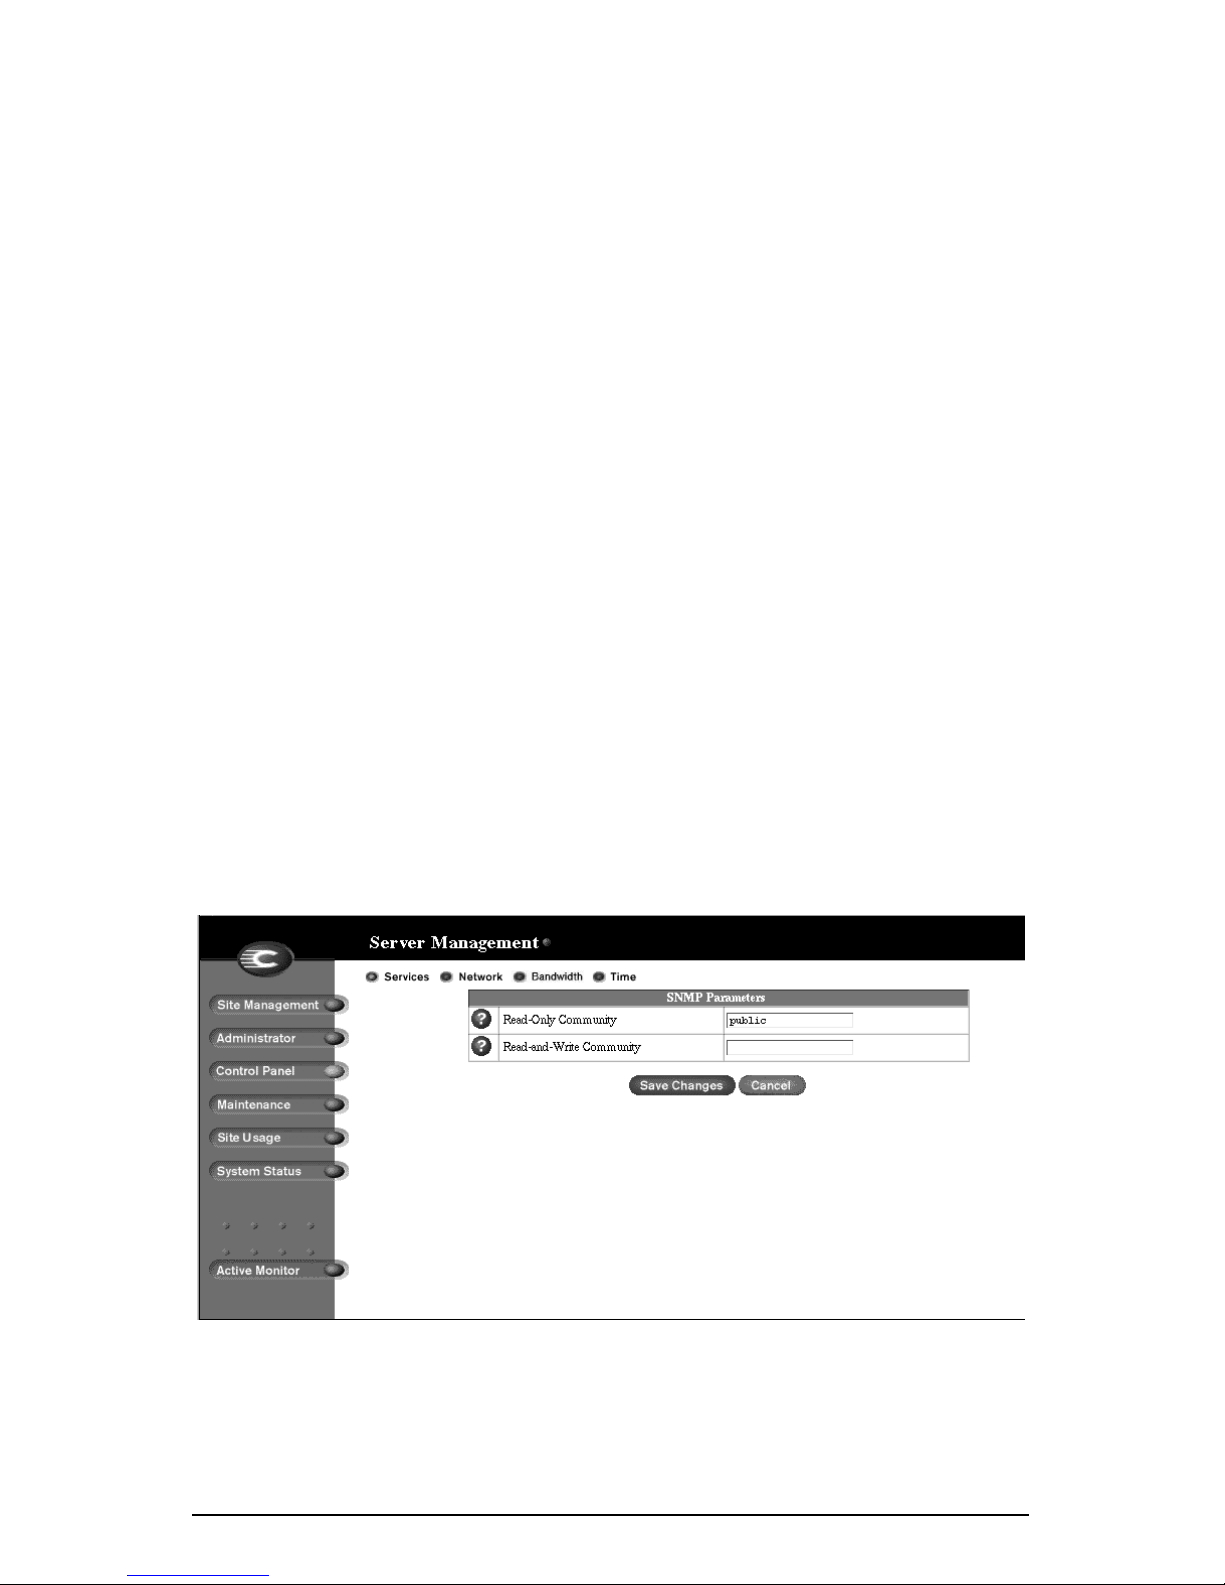
Control panel
Simple Network Management Protocol (SNMP) agent
If the SNMP agent is enabled, you can use SNMP software to remotely monitor
server information such as CPU utilization and network traffic.
You can enable or disable the Simple Network Management Protocol (SNMP)
agent:
1. On the Server Management screen, click Control Panel. The Service
Settings table appears.
2. Click the check box next to Simple Network Management Protocol (SNMP)
agent to on or off.
3. If you are disabling the SNMP agent, click Save Changes.
If you are enabling the SNMP agent, click on the Parameters link next to
the option in the Service Settings table. The SNMP Parameters table appears.
4. Enter the SNMP communities that can have read-only and read-and-write
access to this SNMP agent. The default read-access community is “public”.
5. Click Save Changes in the SNMP Parameters table.
6. Click Save Changes in the Service Settings table.
Figure 21 shows the SNMP Parameters table.
Figure 21. SNMP Parameters table
Cobalt RaQ 4 User Manual 59
Page 74
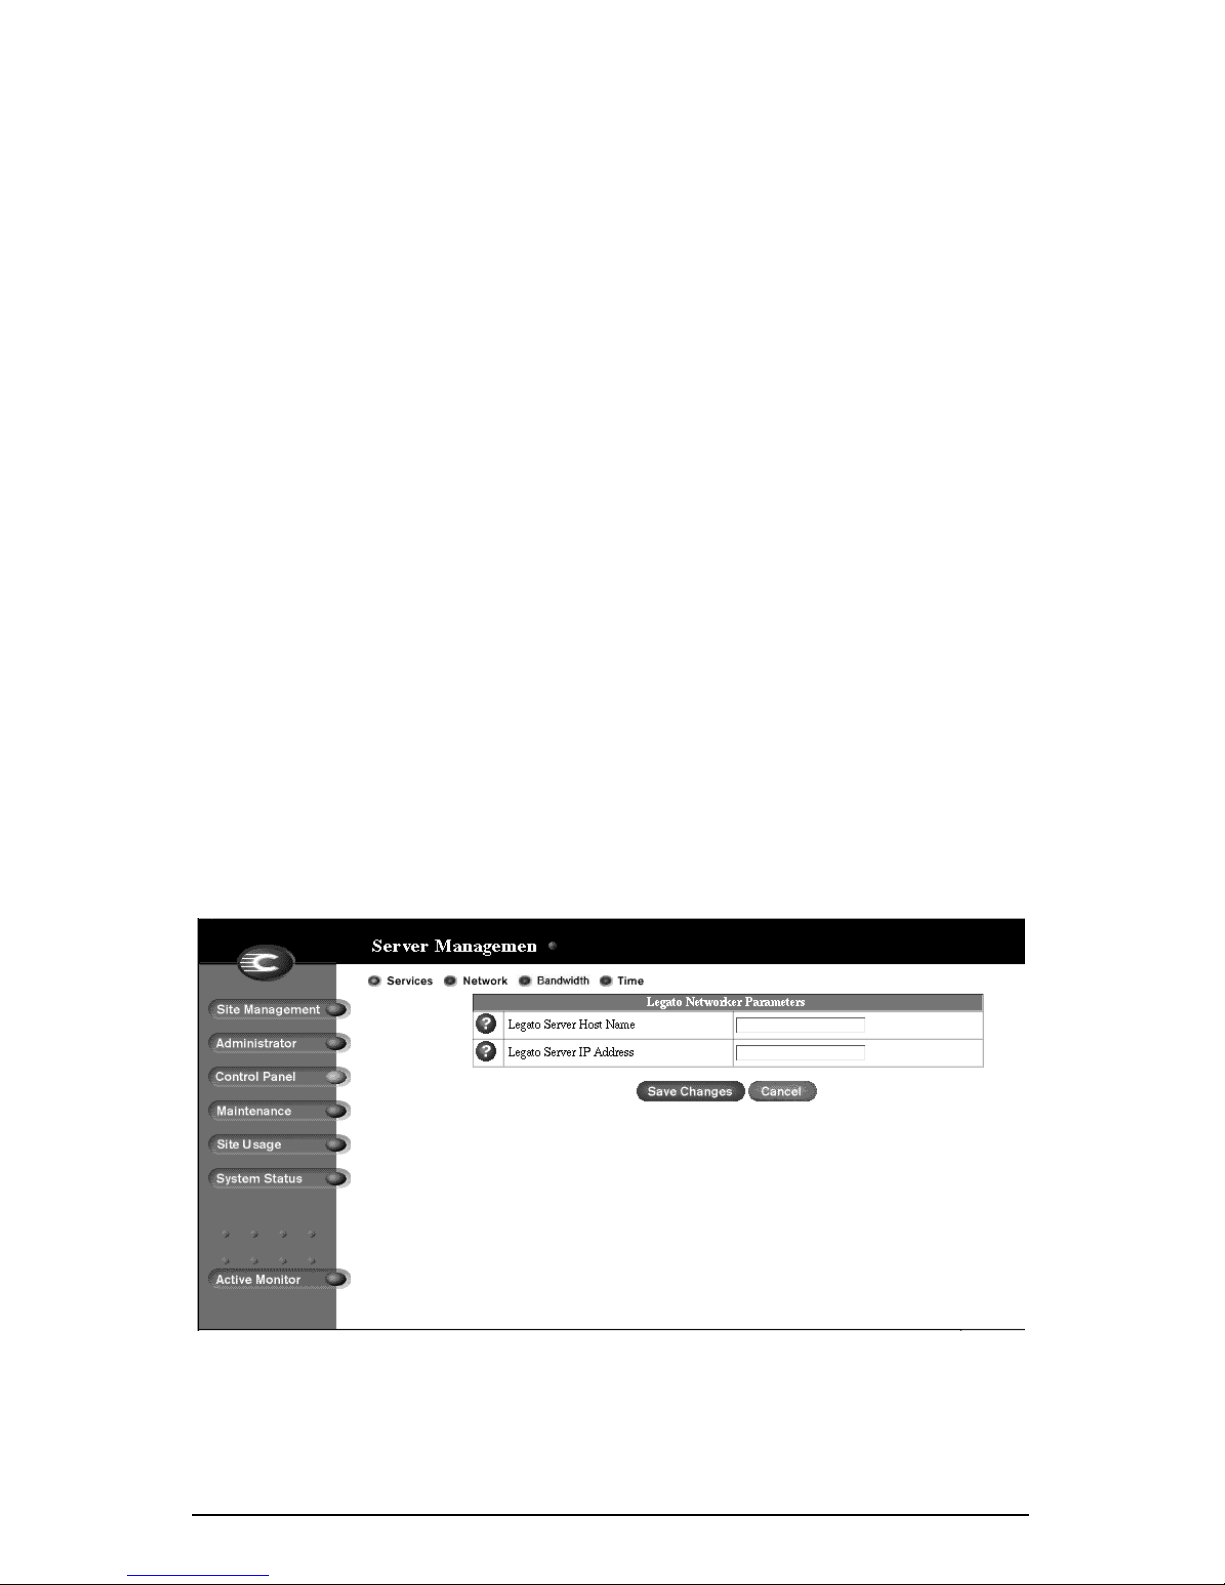
Chapter 3: RaQ 4 Server Management
Legato file backup
You can use the Legato NetWorker® client software to support backup and
restore needs on the RaQ 4. To use this feature, you must install the Legato
Networker Server software. The software is available at www.legato.com.
To enable or disable the Legato file backup option:
1. On the Server Management screen, click Control Panel. The Service
Settings table appears.
2. Click the check box next to Legato File Backup to on or off.
3. If you are disabling the Legato File Backup option, click Save Changes.
If you are enabling the Legato File Backup option, click on the Parameters
link next to the option in the Service Settings table. The Legato Networker
Parameters table appears.
4. In the Legato Networker Parameters table, enter the host name and the
IP address of the Legato Server in the fields.
5. Click Save Changes in the Legato Networker Parameters table.
6. Click Save Changes in the Service Settings table.
Figure 22 shows the Legato Networker Parameters table.
Figure 22. Legato Networker Parameters table
60 Cobalt RaQ 4 User Manual
Page 75
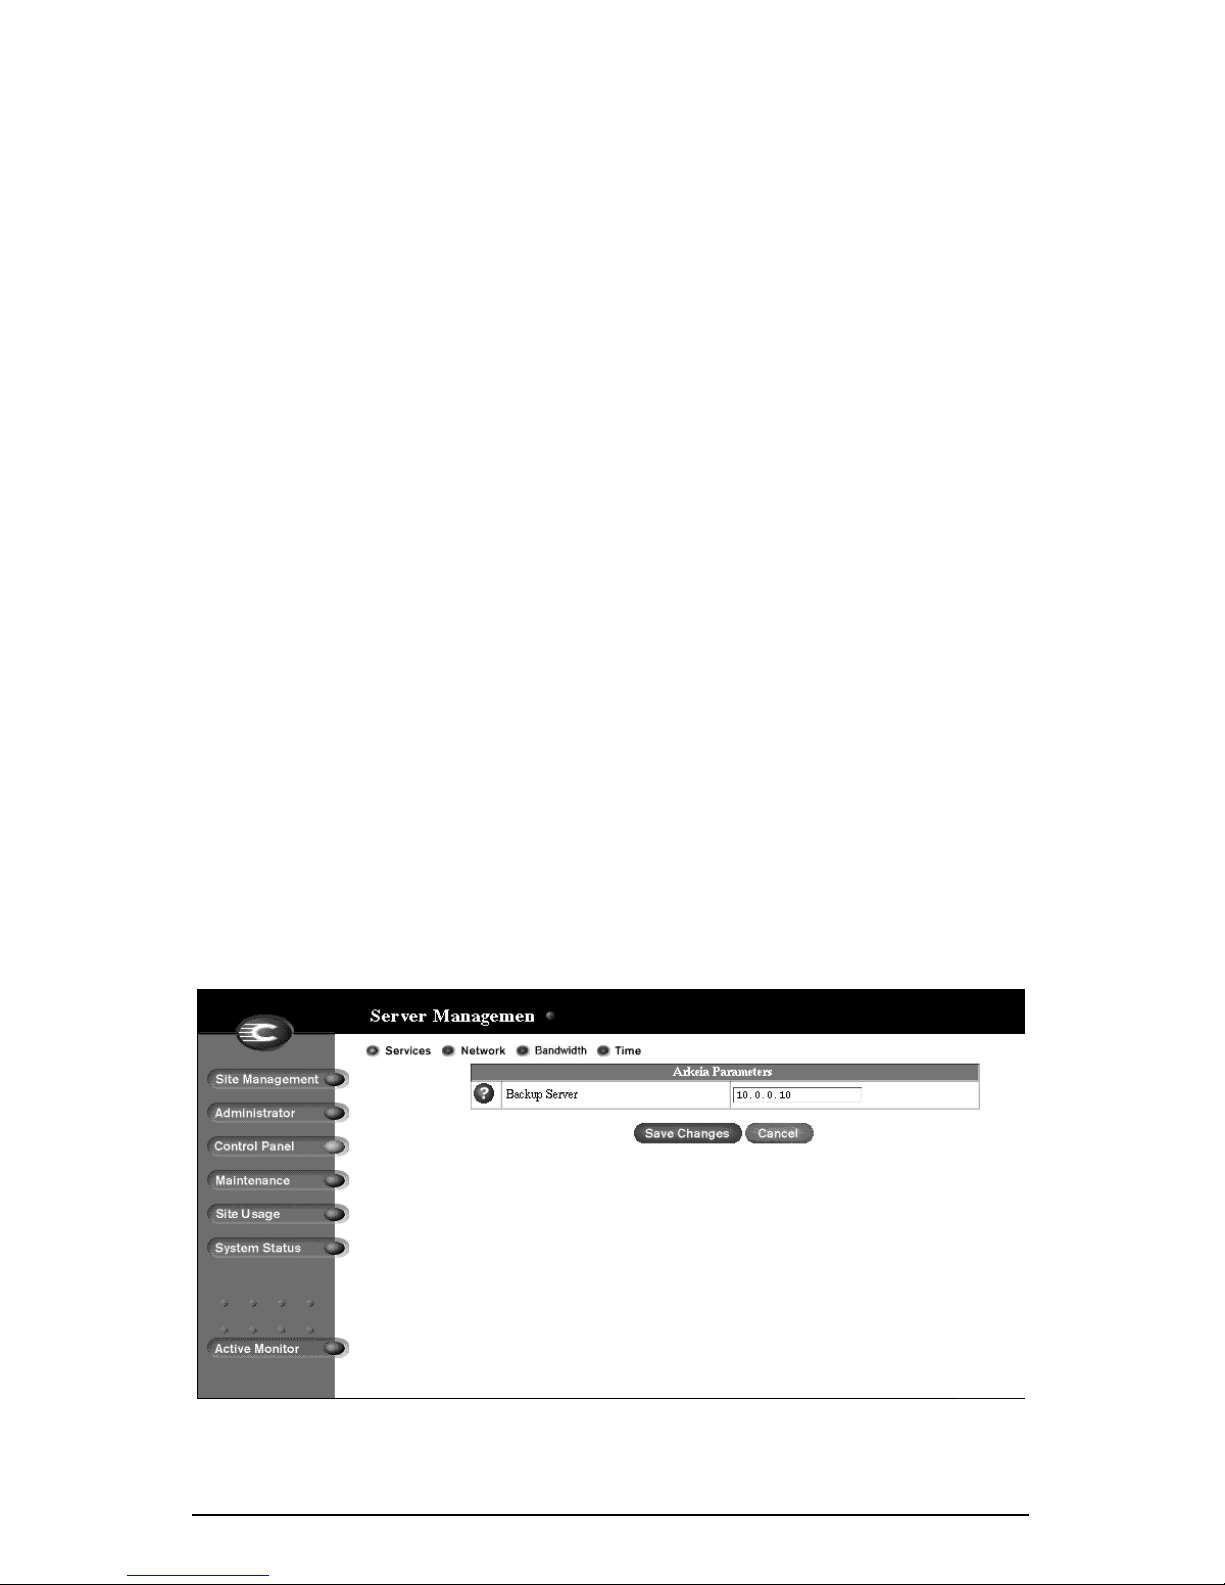
Control panel
Arkeia file backup
You can use the Arkeia backup software from Knox Software to support backup
and restore needs on the RaQ 4.
There is a client component and a server component to the Arkeia backup
software. The client-side software is pre-installed on the RaQ 4. The server-side
software can be obtained from the Arkeia Web site at http://www.arkeia.com.
To enable or disable the Arkeia client-side backup software:
1. On the Server Management screen, click Control Panel. The Service
Settings table appears.
2. Click the check box next to Arkeia File Backup to on or off.
3. If you are disabling the Arkeia File Backup option, click Save Changes.
If you are enabling the Arkeia File Backup option, click on the Parameters
link next to the option in the Service Settings table. The Arkeia Parameters
table appears.
4. In the Arkeia Parameters table, enter the host name of the server that will
back up the RaQ 4.
5. Click Save Changes in the Arkeia Parameters table.
6. Click Save Changes in the Service Settings table.
Figure 23 shows the Arkeia Parameters table.
Figure 23. Arkeia Parameters table
Cobalt RaQ 4 User Manual 61
Page 76

Chapter 3: RaQ 4 Server Management
RaQ 4i or RaQ 4r server
If you have a RaQ 4i or RaQ 4r server, you can attach an external tape device to
the SCSI connector on the back panel and load the Arkeia server-side software on
to the tape device.
This allows you to back up your RaQ 4i or RaQ 4r server directly to the external
tape device and also to function as a backup server for other devices on the
network.
Base RaQ 4 server
If you have a base RaQ 4 server, you can back up the server over the local
network connection to another device that has the Arkeia server-side software
installed on a local tape drive.
Managing the server-side software
The server-side software is managed through a separate utility; this utility has a
Java interface on Windows 95/98 and NT, and an X11 interface on Unix. You can
download this utility from Arkeia’s Web site at http://www.arkeia.com.
ASP Administrative Server
To access the ASP Administrative Server UI:
1. In the Server Management screen, click Control Panel on the left. The
Service Settings table appears.
2. Click the check box next to ASP Administrative Server.
3. Click Save Changes. The screen refreshes and there is now a link to
Parameters in the right column next to ASP Administrative Server.
4. Click Parameters in the row for ASP Administrative Server. A confirmation
dialog appears, asking for the user name and password for the ASP
Management server at <hostname.domainname:5100>.
5. Enter the user name and password of the RaQ 4 Administrator.
6. Click OK. A separate browser window opens with the UI for the ASP Server
Administration screen. The link for Documentation on the left guides you
through the functionality of Chili!Soft ASP.
62 Cobalt RaQ 4 User Manual
Page 77
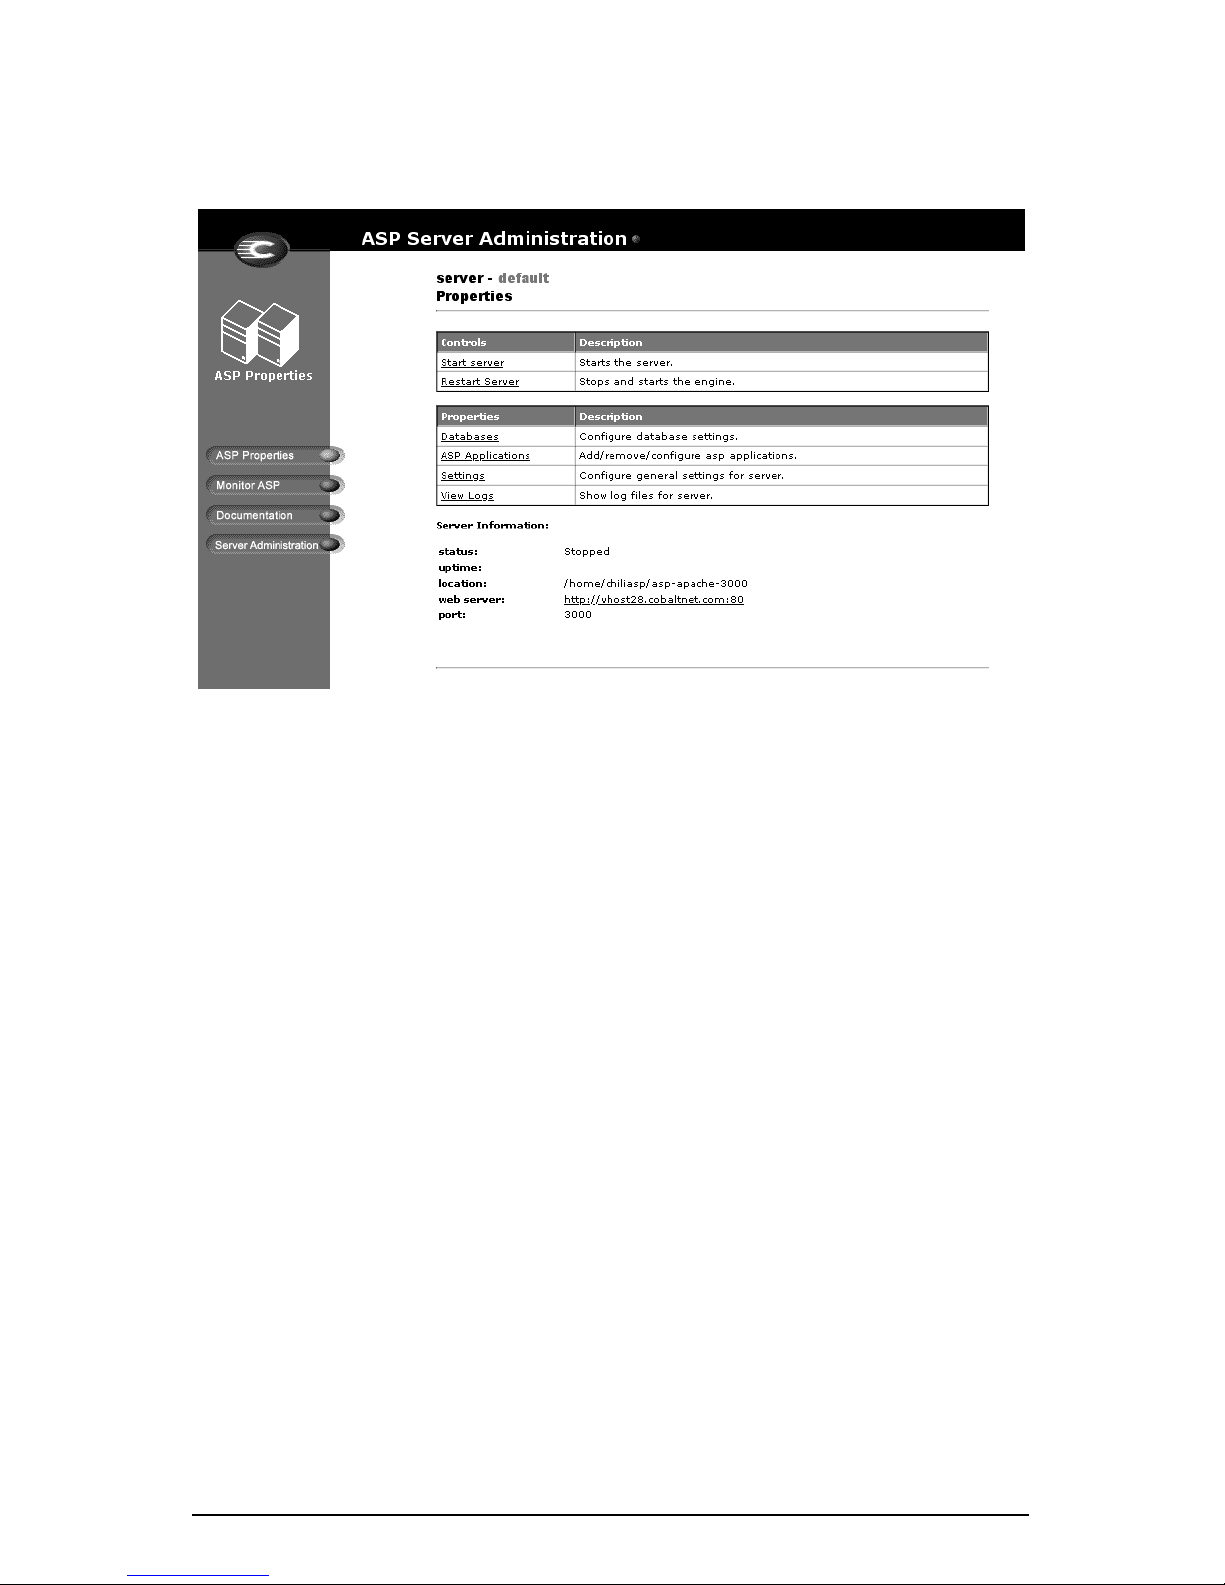
Figure 24 shows the UI for the ASP Administrative Server.
Figure 24. ASP Administrative Server UI
Control panel
Domain Name System (DNS) server
Domain Name System (DNS) is a vital and integral part of the Internet. Setting
up DNS correctly on your RaQ 4 is very important. For this reason, we have
created an appendix solely for explaining DNS. See Appendix D, “Domain Name
System”.
The appendix covers the following items:
• basic DNS issues
• advanced DNS issues
• a sample setup of DNS records for a RaQ 4 server
• a brief history of the DNS service
Cobalt RaQ 4 User Manual 63
Page 78

Chapter 3: RaQ 4 Server Management
Network
The network settings make the RaQ 4 visible to other computers. If you change
the IP address, the RaQ 4 reboots.
Important: Coordinate the network configuration information with
☞
To enter or change the network configuration for the RaQ 4:
1. On the Server Management screen, click Control Panel on the left. The
Service Settings table appears.
2. Click Network at the top. The settings tables for the network configuration
appear.
3. Enter configuration information for the General Settings, the Interface
Settings for Network 1 or the Interface Settings for Network 2.
your network administrator to ensure the integrity of your network.
Incorrect network settings can result in a loss of connectivity.
Note: For help with a particular field, move the mouse pointer over
✍
4. Click Save Changes.
Figure 25 shows the Settings tables of the Network section.
the Active Assist icon adjacent to the field. Help text appears in
a window at the bottom of the screen.
64 Cobalt RaQ 4 User Manual
Page 79
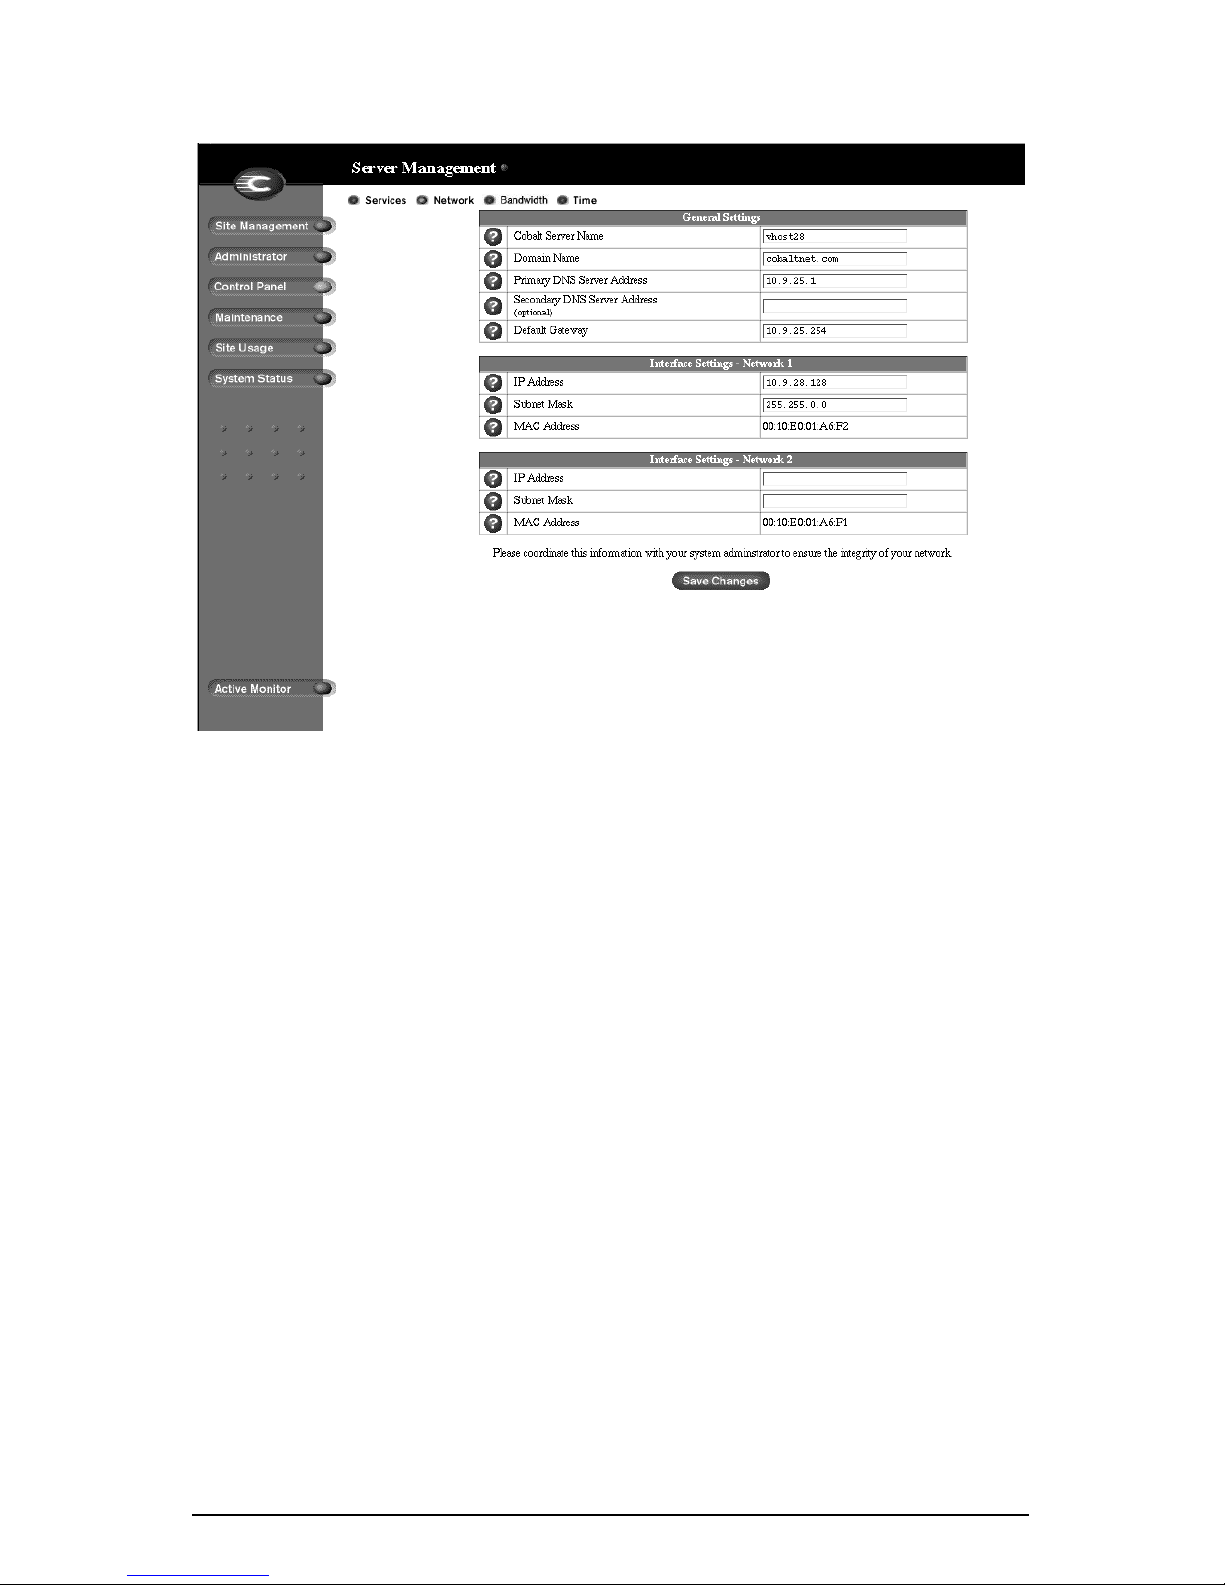
Figure 25. Settings tables in the Network section
Control panel
Bandwidth
The RaQ 4 allows you to set an output bandwidth limit for each IP address that
you assign on a RaQ 4. The bandwidth limit applies to all of the name-based
virtual sites associated with an IP address.
The limit is specified in kilobits per second (Kb/s), and the RaQ 4 enforces a
minimum bandwidth limit of 10 Kb/s.
The bandwidth limit applies to all outgoing Transmission Control Protocol (TCP)
traffic on a particular IP address. This includes Web, FTP, POP and telnet traffic,
as well any other TCP-based application.
If multiple users are accessing a bandwidth-limited IP address, the system
divides the bandwidth evenly among the users.
If multiple named-based virtual sites belong to one IP address, the bandwidth
assigned to the IP address is divided evenly among the total number of users on
those name-based virtual sites.
This feature does not regulate input traffic.
You can apply a bandwidth limit to an IP address that did not previously have
one, modify an existing bandwidth limit or delete a bandwidth limit.
Cobalt RaQ 4 User Manual 65
Page 80
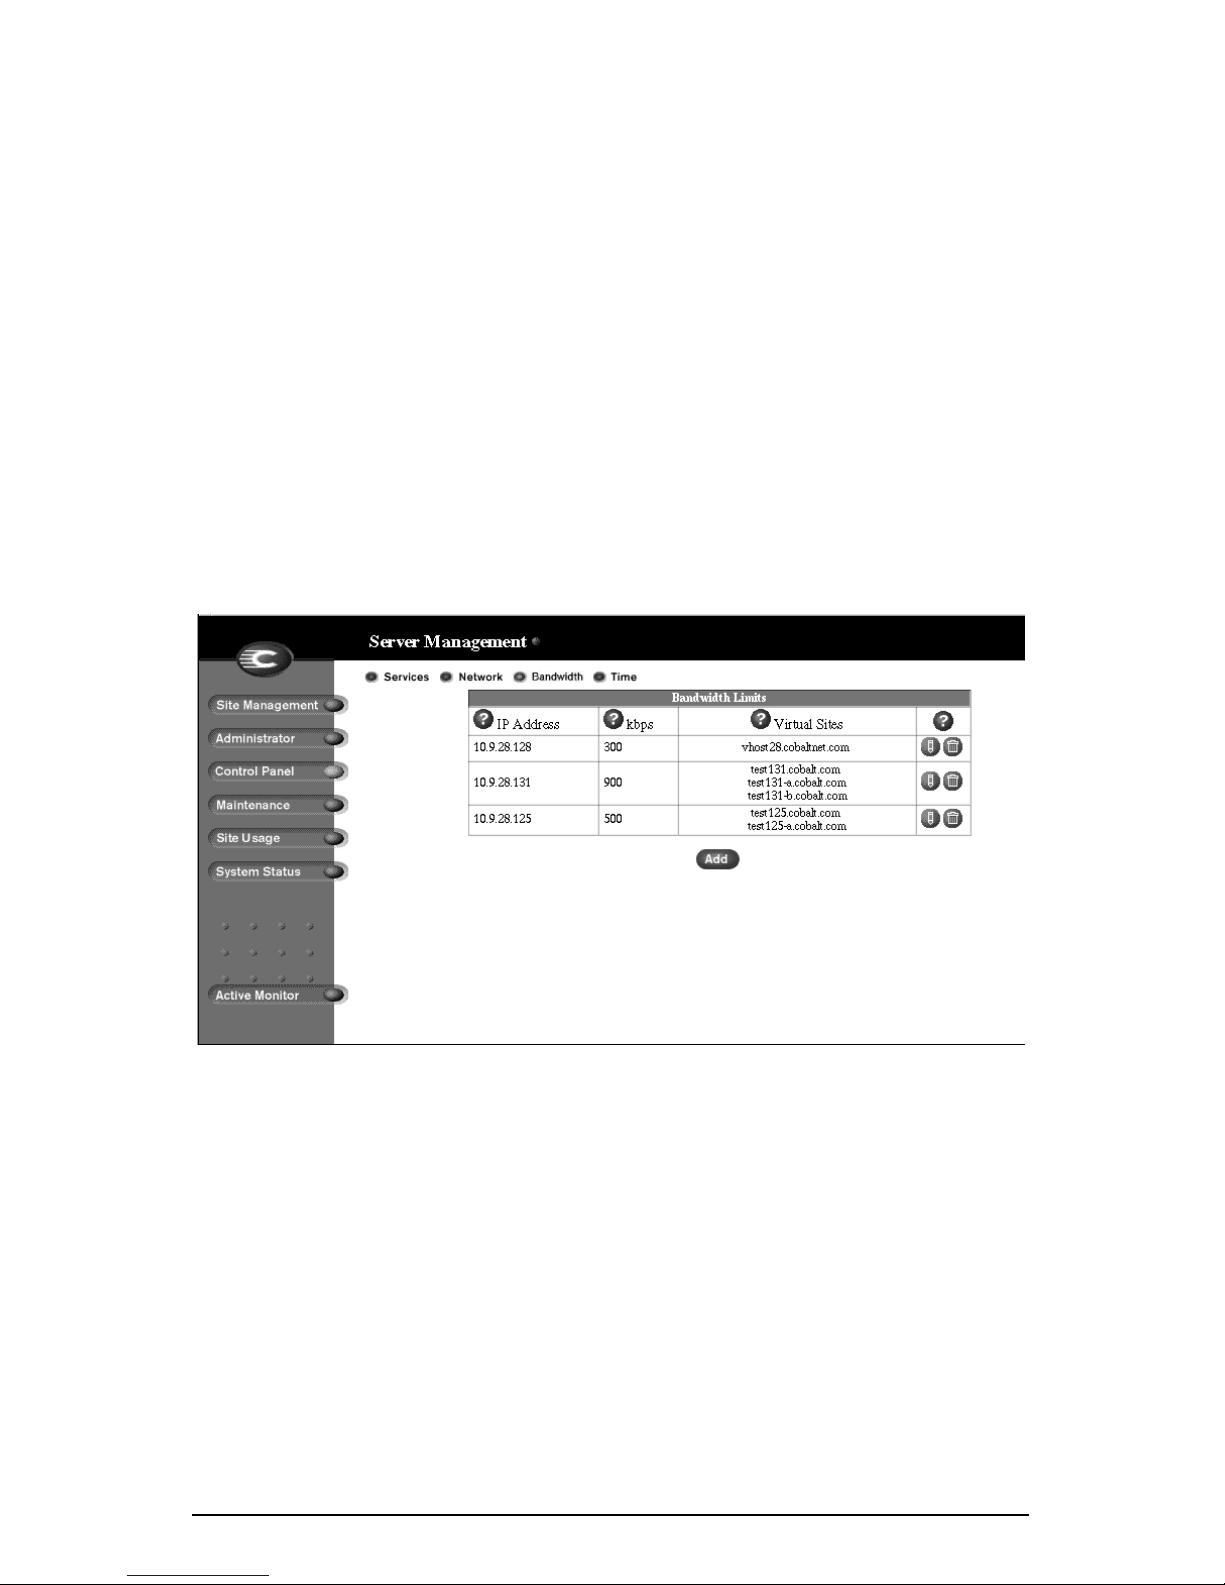
Chapter 3: RaQ 4 Server Management
Bandwidth Limits table
When you select the bandwidth-limit option, the Bandwidth Limits table appears;
see Figure 26. If you have not applied a bandwidth limit to any IP addresses, the
table is blank. If you have applied a bandwidth limit to an IP address, the table
displays four columns:
• the IP address to which the limit is applied
• the bandwidth limit (in Kb/s)
• the fully qualified domain names of the sites associated with the IP address
• the icons to modify the bandwidth limit (green pencil) or delete the
bandwidth limit (brown trashcan)
Figure 26 shows the Bandwidth Limits table.
Figure 26. Bandwidth Limits table
66 Cobalt RaQ 4 User Manual
Page 81

Control panel
Applying a bandwidth limit
To apply a bandwidth limit to an IP address:
1. On the Server Management screen, click Control Panel on the left. The
Service Settings table appears.
2. Click Bandwidth at the top. The Bandwidth Limits table appears.
3. Click Add. The Add Bandwidth Limit table appears. See Figure 27.
Note: If each of the IP addresses on the RaQ 4 already has a
✍
bandwidth limit assigned to it, an error message at the bottom of the
screen alerts you to this fact.
To modify a bandwidth limit, see “Modifying a bandwidth limit” on
page 68. To delete a bandwidth limit, see “Deleting a bandwidth
limit” on page 69.
4. In the first row of the table, select from the pull-down menu the IP address to
which you want to apply the bandwidth limit. The pull-down menu lists all
the IP addresses that do not currently have a bandwidth limit.
5. In the second row, enter the value of the bandwidth limit in Kb/s. The
minimum value is 10 Kb/s.
6. Click Save Changes. The screen refreshes and the Bandwidth Limits table is
displayed with the IP address and the bandwidth limit.
Cobalt RaQ 4 User Manual 67
Page 82
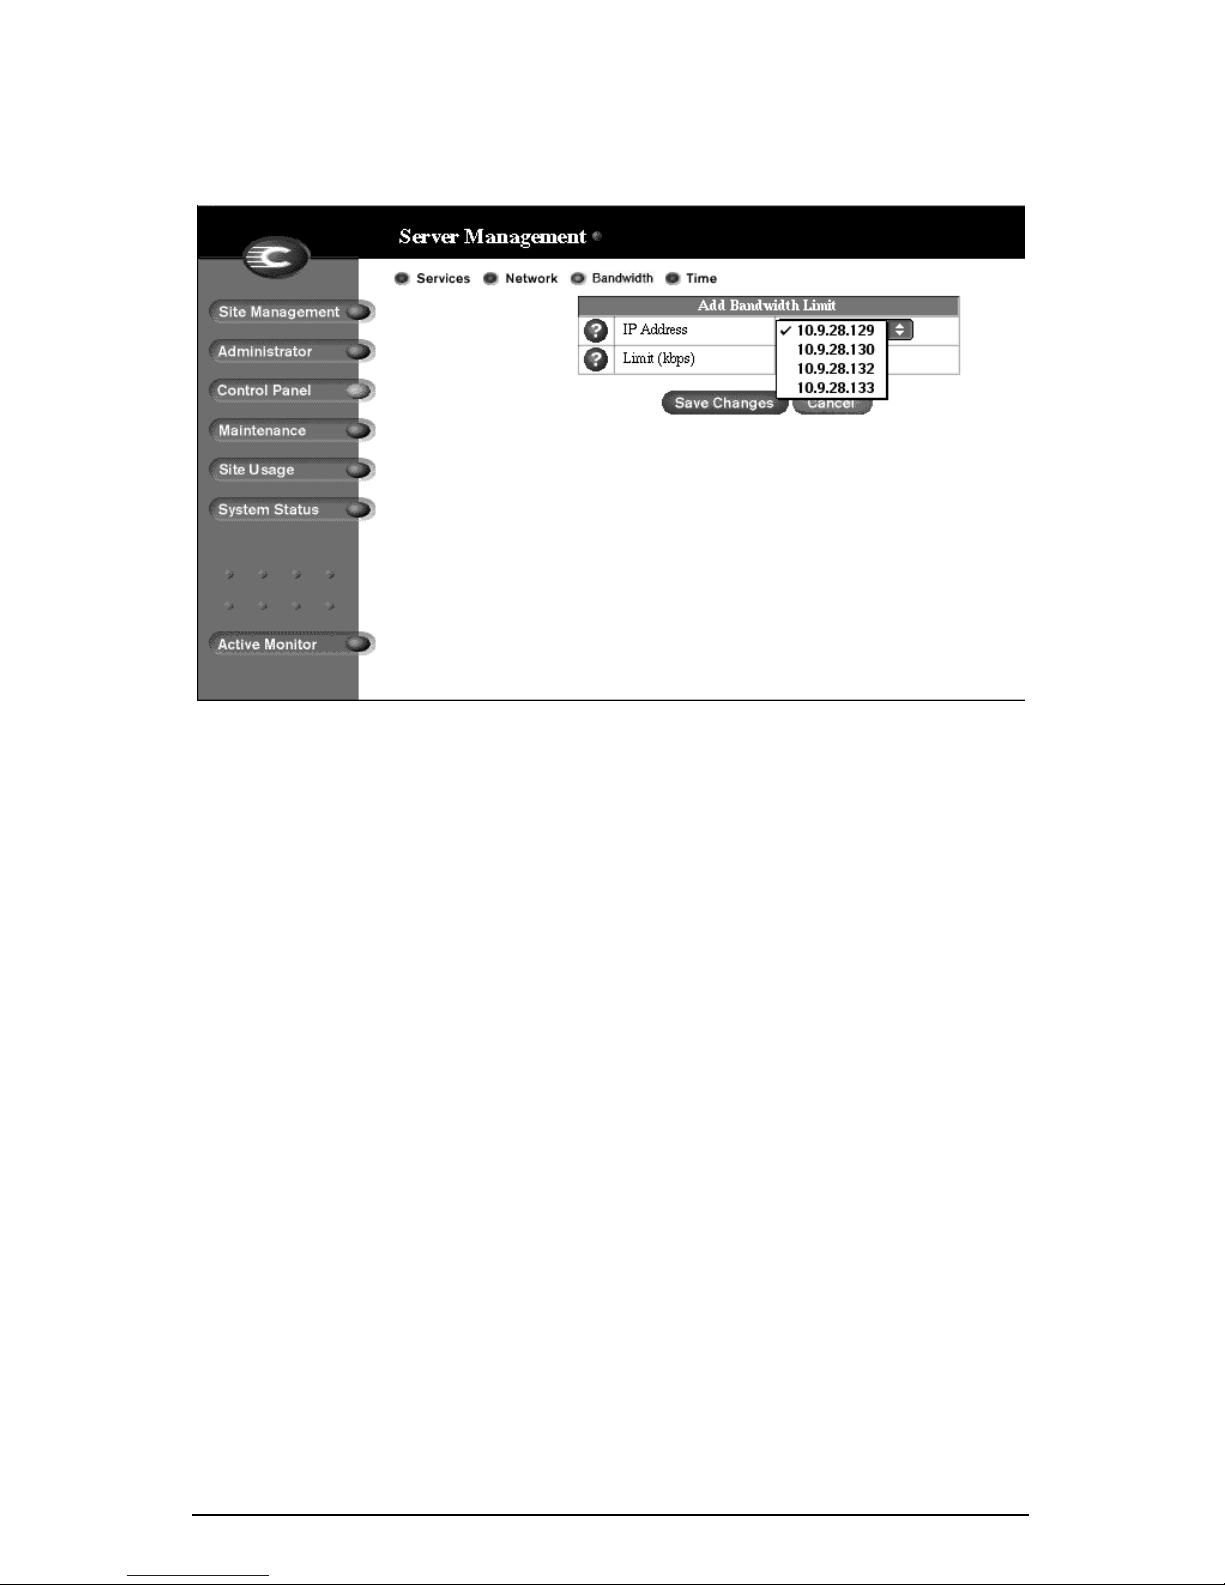
Chapter 3: RaQ 4 Server Management
Figure 27 shows the Add Bandwidth Limit table.
Figure 27. Add Bandwidth Limit table
Modifying a bandwidth limit
To modify a bandwidth limit to an IP address:
1. On the Server Management screen, click Control Panel on the left. The
Service Settings table appears.
2. Click Bandwidth at the top. The Bandwidth Limits table appears.
3. In the table, locate the IP address for which you want to modify the
bandwidth limit.
4. Click the green pencil icon next to that IP address. The Modify Bandwidth
Limit table appears. The first row of the table displays the IP address.
5. In the second row, enter the new value of the bandwidth limit in Kb/s. The
minimum value is 10 Kb/s.
6. Click Save Changes. The screen refreshes and the Bandwidth Limits table is
displayed with the new bandwidth limit for that IP address.
68 Cobalt RaQ 4 User Manual
Page 83

Control panel
Deleting a bandwidth limit
To delete a bandwidth limit to an IP address:
1. On the Server Management screen, click Control Panel on the left. The
Service Settings table appears.
2. Click Bandwidth at the top. The Bandwidth Limits table appears.
3. In the table, locate the IP address for which you want to delete the bandwidth
limit.
4. Click the brown trashcan icon next to that IP address. A confirmation dialog
appears.
5. Click OK. The screen refreshes and the Bandwidth Limits table is displayed;
bandwidth limit for that IP address is removed.
Time
The RaQ 4 Administrator can configure the correct time and date and the time
zone for the RaQ 4.
1. On the Server Management screen, click Control Panel on the left. The
Service Settings table appears.
2. Click Time at the top. The Time Settings table appears. See Figure 28.
3. Select the time and date with the pull-down menus.
4. Select the correct time zone by clicking in the Region, Country and Locale/
Zone fields.
5. As an option, you can also specify the name of a Network Time Protocol
(NTP) server with which the RaQ 4 will synchronize its internal clock every
night. Enter the host name or IP address of the NTP server.
You can find a list of publicly available NTP servers at:
http://www.eecis.udel.edu/~mills/ntp/servers.html.
6. Click Save Changes.
Cobalt RaQ 4 User Manual 69
Page 84
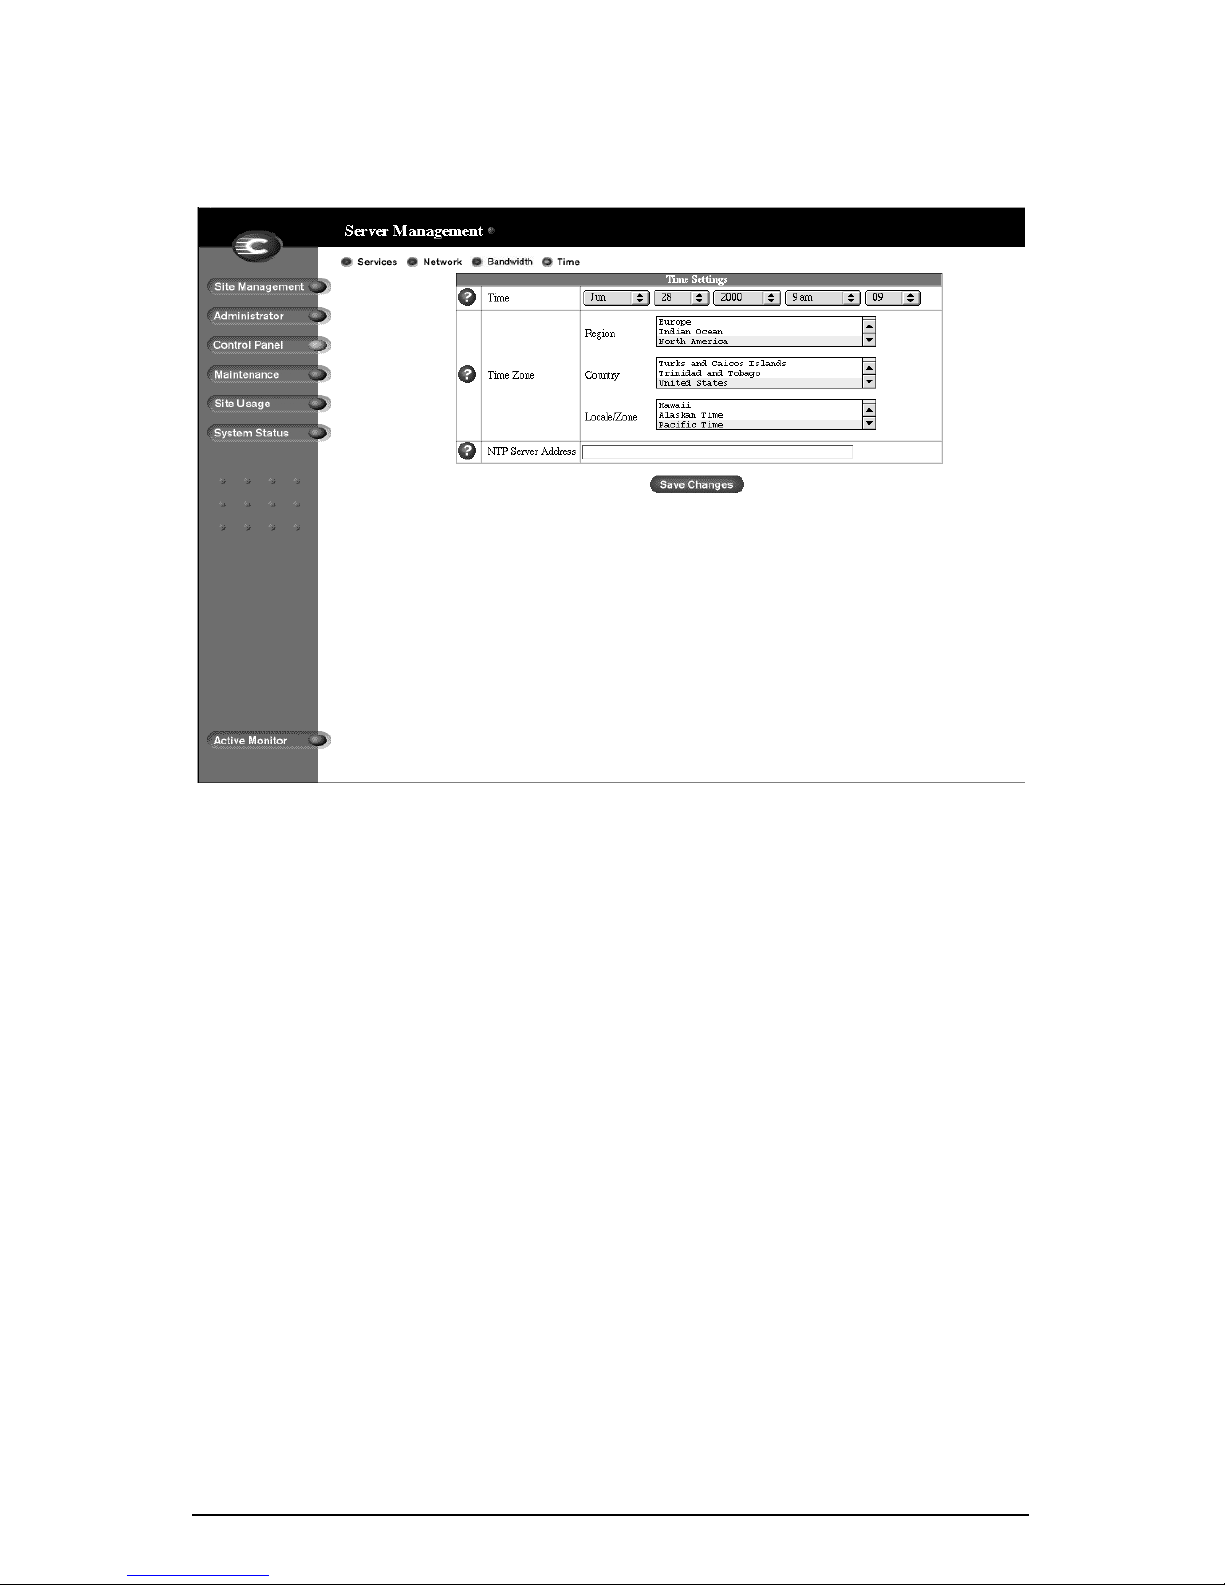
Chapter 3: RaQ 4 Server Management
Figure 28 shows the Time Settings table.
Figure 28. Time Settings table
70 Cobalt RaQ 4 User Manual
Page 85

Maintenance
Maintenance
The Maintenance section of the Server Management screen provides several
Web-based utilities that facilitate day-to-day operations on the RaQ 4.
To access these utilities:
1. On the Server Management screen, click Maintenance on the left. The File
Backup table appears.
2. Choose a utility at the top. The utilities are described in the following
sections.
Backup
Caution: A backup captures data only (for example, email
messages stored on the server or Web files). It does NOT back up
!
the settings for virtual sites or users.
This feature should not be used for disaster recovery.
As the RaQ 4 Administrator, you can perform different types of backups
in the user interface. This is a separate function from the Legato and
Arkeia backup support features.
Caution: You can use Microsoft Internet Explorer 3.0 to back up a
Cobalt server but not to restore a backup file. Upgrade to a later
!
version of Internet Explorer or use a different browser software to
restore the backup file.
Cobalt RaQ 4 User Manual 71
Page 86
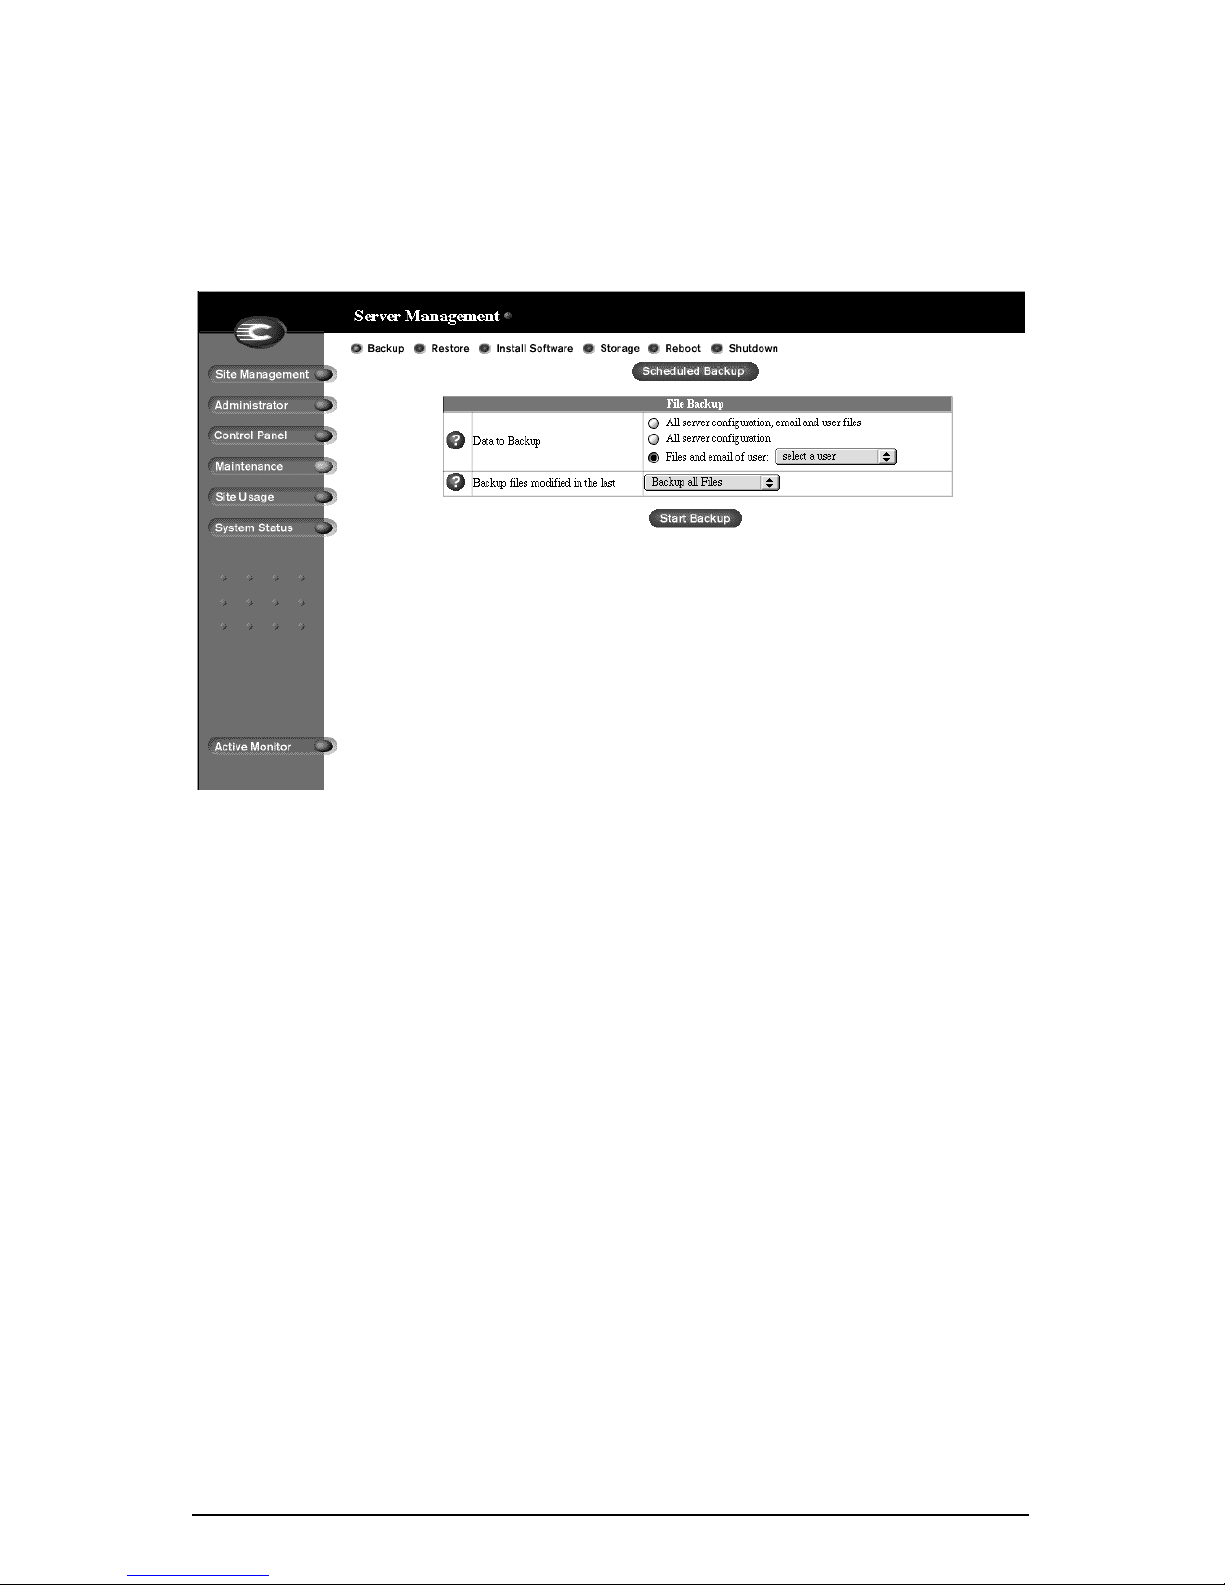
Chapter 3: RaQ 4 Server Management
Manual backup
This feature allows administrators to manually back up data stored on the RaQ 4.
Figure 29 shows the File Backup table.
Figure 29. File Backup table
72 Cobalt RaQ 4 User Manual
Page 87

Maintenance
To manually back up data stored on the RaQ 4:
1. On the Maintenance screen, click Backup at the top.
2. In “Data to Backup,” select the type of backup:
• All server configuration, email and user files. This option backs up all
the server configuration files for the users and the system setup, all users’
files, all group files and all email in-boxes.
• All server configuration. This option backs up all the server
configuration files for the users and the administrator, as well as all the
system setup information.
• Files and email of user. This option backs up the files and email in-box
for a specific user.
3. To back up all files or to back up files changed within a certain time frame,
choose from the pull-down menu adjacent to “Backup files modified in the
last.”
You can choose “Backup all Files,” 31 days, 14 days, 7 days, 2 days or 1 day.
4. Click Start Backup.
5. Assign a path and a file name on your computer for storing the backup data.
Click Save.
The file transfer takes several seconds to several minutes. Do not interrupt or
cancel the file transfer. If the file transfer fails, delete the partial back up file from
your computer. If you try to restore a partial back up file, you can corrupt the data
on your RaQ 4.
Cobalt RaQ 4 User Manual 73
Page 88
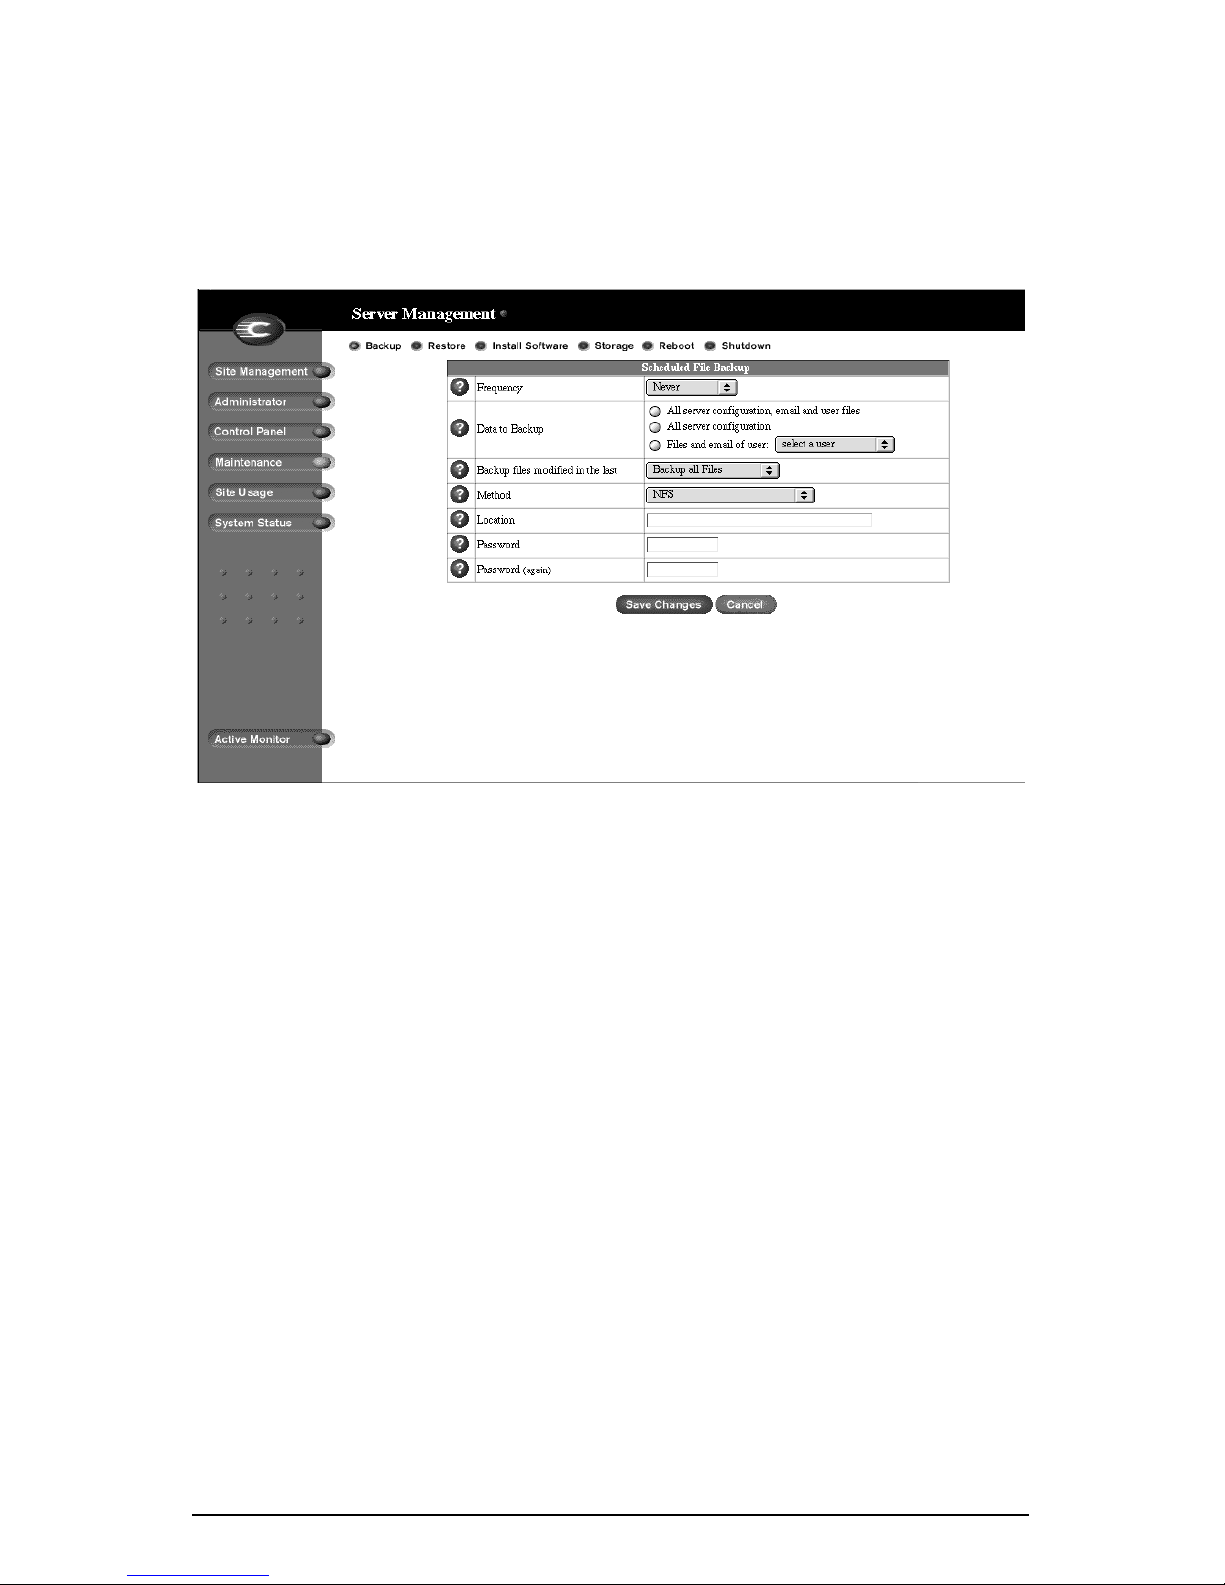
Chapter 3: RaQ 4 Server Management
Scheduled backup
This feature allows administrators to schedule regular automatic backups.
Figure 30 shows the Scheduled File Backup table.
Figure 30. Scheduled File Backup table
74 Cobalt RaQ 4 User Manual
Page 89

Maintenance
To schedule regular, automatic backups:
1. On the Maintenance screen, click Backup at the top. The File Backup table
appears.
2. Click Scheduled Backup. The Scheduled File Backup table appears. See
Figure 30.
3. Choose the frequency of the automatic backup.
• Daily means each day at 1 a.m.
• Weekly means every Sunday morning at 1 a.m. (Saturday night going
into Sunday morning)
• Monthly means on the first of every month at 1 a.m.
4. In “Data to Backup,” select the type of Backup, as described in step 2 in
“Manual backup” on page 72.
5. To back up all files or to back up files changed within a certain time frame,
choose from the pull-down menu adjacent to “Backup files modified in the
last.”
6. Choose a backup method.
• FTP Server writes the backup file to an FTP server.
• NFS places the backup file on a mountable NFS resource.
• SMB Server (Windows File Sharing) places the backup file onto a
directory shared from a Windows machine.
7. Enter a location for storing the backup data.
The location you specify depends in part on the backup method you select in
step 6. See “Backup File Locations” below for an explanation of locations
you can enter here.
8. If the backup destination associated with your method of backup requires a
password for access, enter the password in this field. This field is ignored for
the NFS and anonymous FTP methods. See “Backup file locations” on
page 76.
9. Click Save Changes.
Cobalt RaQ 4 User Manual 75
Page 90

Chapter 3: RaQ 4 Server Management
Backup file locations
For a backup by FTP Server:
• A location of <username>@ftp.server.com puts the backup file in the
initial login directory.
• A location of <username>@ftp.server.com/path/to/backups/ puts the
backup file in the specified path on the server, using <username> to login.
For a backup by Anonymous FTP:
• For an anonymous FTP connection, the file must be put in a directory where
anonymous FTP users have write access. This is generally the
directory.
• A location of ftp.server.com/incoming places the backup file on
ftp.server.com under the /incoming/ directory.
/incoming/
• The “Password” field should contain the password for the specified user or
be left blank for anonymous logins.
For a backup by NFS Server:
• The location should be <server>:/<share>, where <server> is the NFS
server and <share> is the NFS volume to mount and write to. You must have
write privileges to this directory.
• The “Password” is ignored for NFS server backups.
For a backup by SMB Server (Windows File Sharing):
• The location should be <user>@\\windowspc\<share>. This mounts the
volume share on the Windows server, using <user> as the login. The
“Password” field must contain the password for <user>.
• For volumes that do not require a user, the location should be
\\windowspc\share.
For All Scheduled backups:
• Ensure the target location is available and has enough disk space to hold the
backup archive. Failure to do this may result in zero-length or truncated
archives.
76 Cobalt RaQ 4 User Manual
Page 91

Maintenance
Restore
You must restore data from the same machine on which the data was backed up.
Users can restore their own personal directory.
Caution: The system restores data only (for example, email
messages stored on the server or Web files). It does NOT restore
!
!
!
virtual sites or site users to a RaQ 4.
Caution: You can use Microsoft Internet Explorer 3.0 to back up a
Cobalt server but not to restore a backup file. Upgrade to a later
version of Internet Explorer or use a different browser software to
restore the backup file.
Caution: The system does not merge the current and backed-up
data. When data is restored, any changes made to files on the RaQ 4
since the last backup are lost.
Cobalt RaQ 4 User Manual 77
Page 92
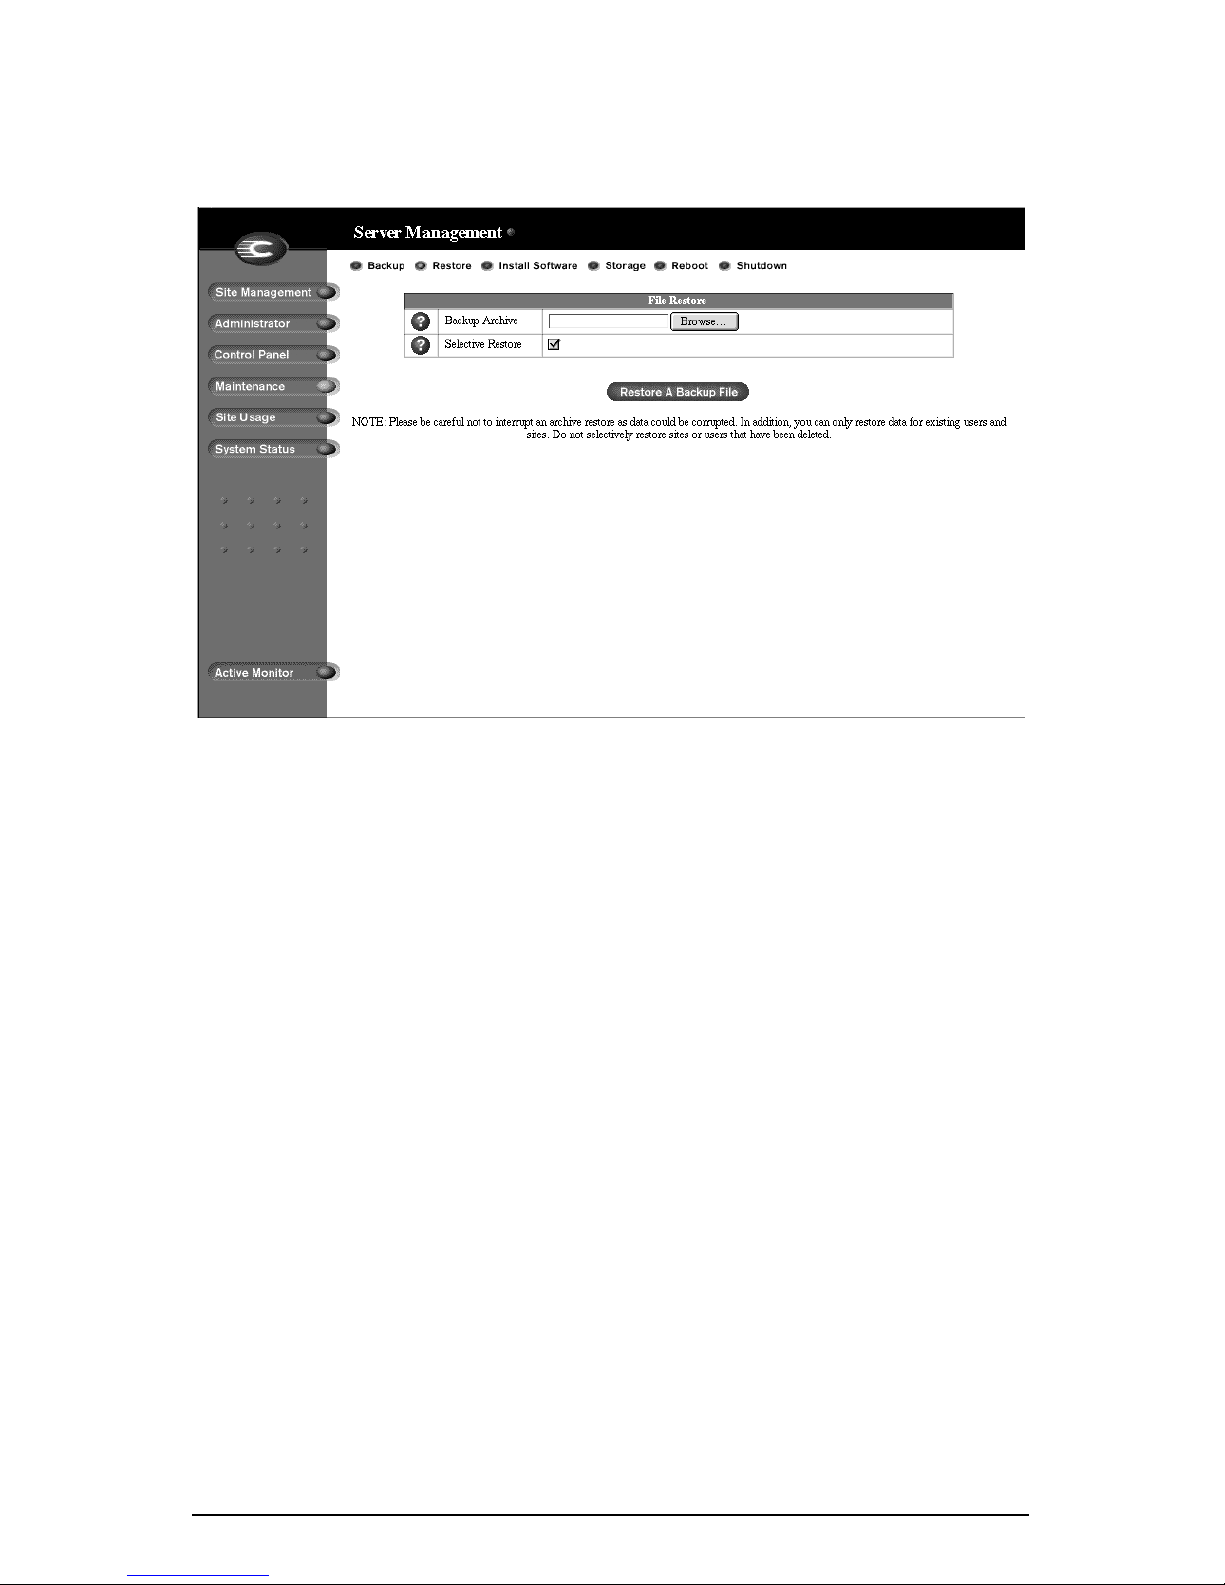
Chapter 3: RaQ 4 Server Management
Figure 31 shows the File Restore table.
Figure 31. File Restore table
78 Cobalt RaQ 4 User Manual
Page 93

Maintenance
To restore a backup file:
1. On the Maintenance screen, click Restore at the top. The File Restore table
appears. See Figure 31.
2. The RaQ 4 saves backed-up data in .raq files. Enter the path and filename of
the backup file, or click Browse to select the .raq file archived on your
computer which you wish to restore to the server.
Restore times can vary widely. Be careful not to interrupt an archive restore
as data could be corrupted.
Note: If the file does not appear in the list and you are using
✍
3. If you want to restore only some of the files, click Selective Restore and
select those files.
Netscape 4.x or Internet Explorer 4.x, you may need to change
“File Type” in the desktop to “All Files.”
4. Click Restore A Backup File below the File Restore table.
Note: Restoring large backup archives can cause your Web browser
✍
Do not interrupt an archive restore because this can corrupt data. If the restore
process is interrupted, the user can try to restore again.
To restore a user home directory or a virtual site directory, make sure the user or
virtual site already exists before restoring the files.
When data is restored, the RaQ 4 and its corresponding parts (virtual site, user,
email) are returned to the exact state they were in prior to backup.
to time out. If you upload the .raq archive through an FTP-based
application to the home directory of RaQ 4 Administrator, you can
select the archive from a menu on the Restore screen.
Cobalt RaQ 4 User Manual 79
Page 94
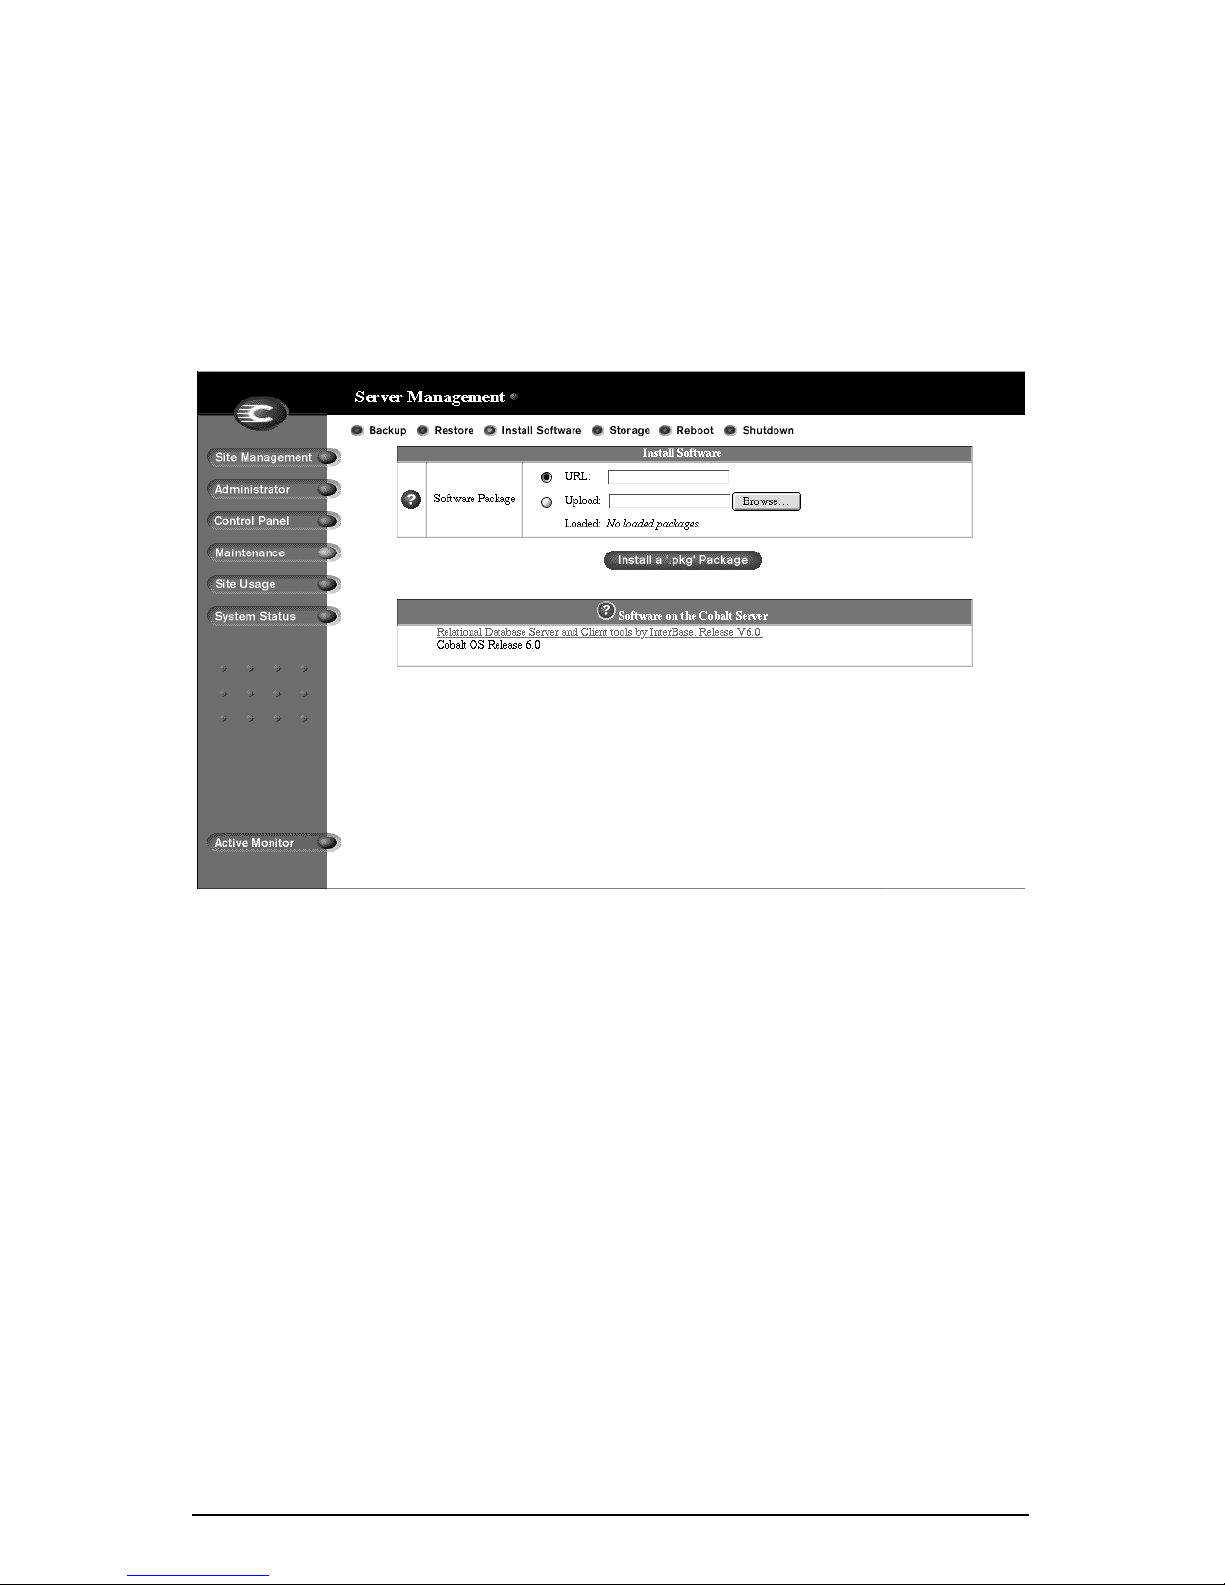
Chapter 3: RaQ 4 Server Management
Install software
You can add new software to the RaQ 4 from the browser. You can install new
software obtained either from the Cobalt Networks Web site or from a CD
supplied by Cobalt Networks.
Figure 32 shows the Install Software table.
Figure 32. Install Software table
80 Cobalt RaQ 4 User Manual
Page 95

Maintenance
To install or upgrade software from Cobalt’s Web site:
1. Through your Web browser, go to http://www.cobalt.com/support/.
2. Download the new software to your desktop computer.
3. On the Server Management screen, click Maintenance on the left. The File
Backup table appears.
4. Click Install Software at the top. The Install Software table appears. See
Figure 32.
5. Click Browse to locate the package that you downloaded to your computer.
Click Open to select the package.
6. Click Install a .pkg package to automatically install or upgrade the new
software on the RaQ 4.
To install software remotely:
1. On the Server Management screen, click Maintenance on the left. The File
Backup table appears.
2. Click Install Software at the top. The Install Software table appears. See
Figure 32.
3. In the URL field, enter the URL for the package file. This URL directs the
browser to the package file on the Cobalt Networks Web site.
4. Click Install a .pkg package to automatically install or upgrade the new
software on the RaQ 4.
To install software from a CD:
1. Insert the CD into a computer on the same network as the RaQ 4.
2. On the computer that has the CD, go to the Server Management screen.
Click Maintenance on the left. The File Backup table appears.
3. Click Install Software at the top. The Install Software table appears. See
Figure 32.
4. Click Browse to locate the package file on the CD. Click Open to select the
package file.
5. Click Install a .pkg package to automatically install or upgrade the new
software on the RaQ 4.
Cobalt RaQ 4 User Manual 81
Page 96

Chapter 3: RaQ 4 Server Management
Third-party software
Figure 32 shows the various software packages that have been installed on the
RaQ 4, including the version of the Cobalt OS and any third-party software. To
see more information about the software, click the name (shown as a hypertext
link).
InterBase
The RaQ 4 is pre-loaded with InterBase 6.0, an open-source, cross-platform SQL
database from Inprise Corporation. InterBase is not enabled by default.
For more information on InterBase, go to http://www.interbase.com.
InterBase offers free development and distribution rights. Interbase offers
developers a sophisticated database with a small footprint, low maintenance cost
and high reliability.
InterBase offers a number of database features—triggers, stored procedures,
blobs, event alerters, user-defined functions, multi-dimensional arrays, two-phase
commit, referential integrity, constraints and a flexible set of transaction options.
Storage
The browser-based UI allows external disk storage devices on the SCSI bus to be
used as additional storage for virtual sites. The external disk storage device must
remain connected to the RaQ 4 for proper operation of the virtual sites stored on
the disk.
You can also add a second internal hard disk drive on a RaQ 4i server. See
“Adding or replacing a hard disk drive in a RaQ 4” on page 164 for installing an
internal hard disk drive. Once you have added a second drive, you have to add
(through the RaQ 4 UI) the drive to the list of available storage devices.
Note: You cannot add extra internal or external storage to the base
✍
RaQ 4 server configuration.
82 Cobalt RaQ 4 User Manual
Page 97
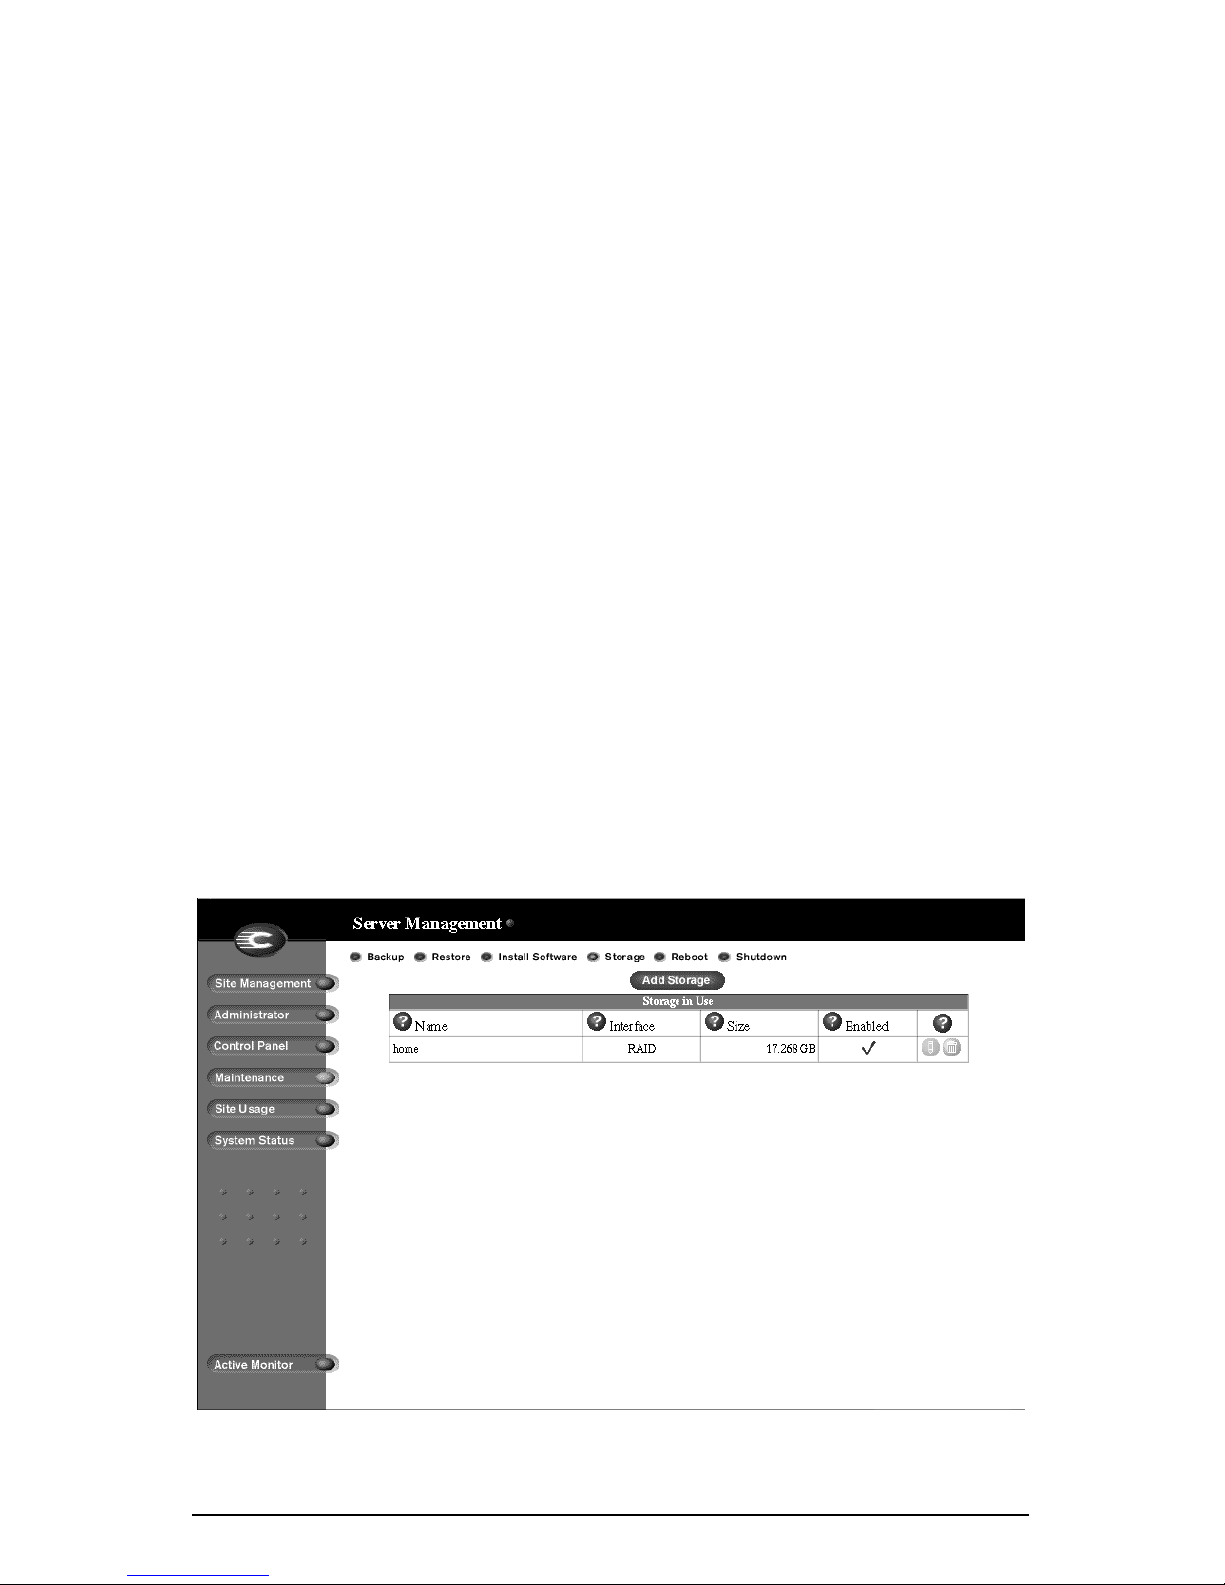
Maintenance
A virtual site cannot span multiple disks and the RaQ 4 does not automatically
recognize virtual sites on an external disk storage device transferred from another
RaQ 4.
Note: If you have replaced a failed hard disk drive in a RaQ 4r
✍
In the Maintenance section of the Server Management screen, the administrator
can add and format an internal hard disk drive (RaQ 4i) or a non-removable disk
storage device to the RaQ 4.
server, you do not need to add the new hard disk drive through the
Add Storage feature. When rebooting, the system automatically
detects the new hard disk drive.
The RaQ 4r automatically synchronizes the new hard disk drive to
the existing hard disk drive so that the server is in RAID mode.
During the synchronization process, the RaQ 4r cannot provide disk
mirroring but it can still serve requests.
Note: You must power down the RaQ 4 before adding or removing
✍
Figure 33 shows the Storage in Use table.
Figure 33. Storage in Use table
an external disk storage device.
Cobalt RaQ 4 User Manual 83
Page 98

Chapter 3: RaQ 4 Server Management
Adding a storage device
To add a second hard disk drive or external disk storage device through the UI:
1. On the Server Management screen, click Maintenance on the left. The File
Backup table appears.
2. Click Storage at the top. The Storage in Use table appears. See Figure 33.
3. Click Add Storage.
A list of available disk storage devices appears; see Figure 33. By default, if
more than one device is available, all of the devices are selected to be added.
To de-select a disk storage device, click the box beside that device.
4. To add a disk, give the device a unique name. You can use only alphanumeric
characters for the name. You cannot use the name “home” as that is the name
of the primary hard disk of the RaQ 4.
Note: If you try to assign the name home to the second hard disk
✍
drive, you receive an error message stating “the name home is in
use”.
Note: You can choose to check the integrity of the disk when adding
✍
5. Click Confirm New Storage to add the storage to the RaQ 4.
When adding a new virtual site to the RaQ 4, the RaQ 4 Administrator can
choose where to store the new site. In the Add New Virtual Site table, next to the
Maximum allowed disk space (MB) parameter, a pull-down menu lists in
alphabetical order the available storage devices. The storage device with the most
available space is chosen by default.
For more information, see “Adding a virtual site” on page 47.
the second hard disk drive. However, this option significantly
increases the time it takes to format a drive. To enable this option,
click the box in the Check column beside the hard disk drive.
84 Cobalt RaQ 4 User Manual
Page 99

Maintenance
Suspend a virtual site
There are two ways to suspend a virtual site on the RaQ 4: a hard suspension and
a soft suspension.
For more information on soft suspensions, see “Suspend a virtual site” on
page 115.
Hard suspension
A hard suspension occurs when a storage device is disabled through the UI or is
disconnected from the RaQ 4. In this case, all virtual sites on that storage device
are inaccessible. You cannot administer these sites, and users cannot receive
email.
To disable an attached storage device:
1. On the Server Management screen, click Maintenance on the left. The File
Backup table appears.
2. Click Storage at the top. The Storage in Use table appears.
3. Click the green pencil icon next to the disk you want to disable.
4. Click the Enable disk check box so that it is de-selected.
5. Click Confirm Modify. The browser returns to the previous screen.
Reboot
Rebooting the RaQ 4 sometimes cures problems with certain services. The
Active Monitor software recommends when a reboot is necessary.
To reboot the RaQ 4 through your browser:
1. On the Server Management screen, click Maintenance on the left. The File
Backup table appears.
2. Click Reboot at the top. The Reboot Cobalt Server table appears.
3. A warning appears that rebooting the Cobalt server will make it unavailable
to the network for a while.
Click Reboot.
You can also reboot the RaQ 4 through its LCD console; refer to “Rebooting” on
page 154.
The reboot process can take a few minutes.
Cobalt RaQ 4 User Manual 85
Page 100

Chapter 3: RaQ 4 Server Management
Shutdown
Caution: Turning off the power switch before the RaQ 4 tells you
to do so can result in lost or corrupted data.
!
The RaQ 4 can only be shut down from the LCD console located on the front of
the unit. Refer to “Powering down” on page 155. Shutting down may take as long
as a few minutes.
Support tools
The Support Tools feature is a Web page that assists Technical Support in
diagnosing problems on a RaQ 4 unit.
On the Server Diagnostics screen, the RaQ 4 Administrator can create and
download a data dump of the configuration files on the RaQ 4. This data dump
can then be emailed to [email protected]. A member of the Technical
Support team can then evaluate the condition of your RaQ 4 before providing you
with corrective action, either by telephone or email.
If the RaQ 4 Administrator is familiar with Linux, he or she can look through this
file in an effort to determine the problem with the RaQ 4. The file is a standard
gzip file.
To access the Server Diagnostics screen:
1. From any screen, click the Cobalt logo in the top left corner.
A table listing Server Configuration Information appears. The table lists the
amount of random access memory (RAM) and the size of the hard disk
drive.
The table also lists trademark information for Cobalt Networks and for all
other products and companies referred to in the UI.
2. In the list of links, click Server Diagnostics. The Diagnostic Header Data
table appears.
86 Cobalt RaQ 4 User Manual
 Loading...