

Page 1
100135
BAR TABLE
COASTER FINE FURNITURE
2013/06/04
PAGE 1 OF 6
ASSEMBLY INSTRUCTION
Page 1 of 7
Page 2
ASSEMBLY TIPS
ASSEMBLY INSTRUCTION
ITEM:100135
ASSEMBLY INSTRUCTION
PAGE 2 OF 6
1. Remove hardware from box and sort by size.
2. Please check to see that all hardware and parts are present prior to start of assembly.
3. Please follow attached instructions in the same sequence as numbered to assure fast & easy assembly
Warning !
1. Don't attempt to repair or modify parts that are broken or defective. Please contact
the store immediately
2. This product is for home use only and not intended for commerecial establishment.
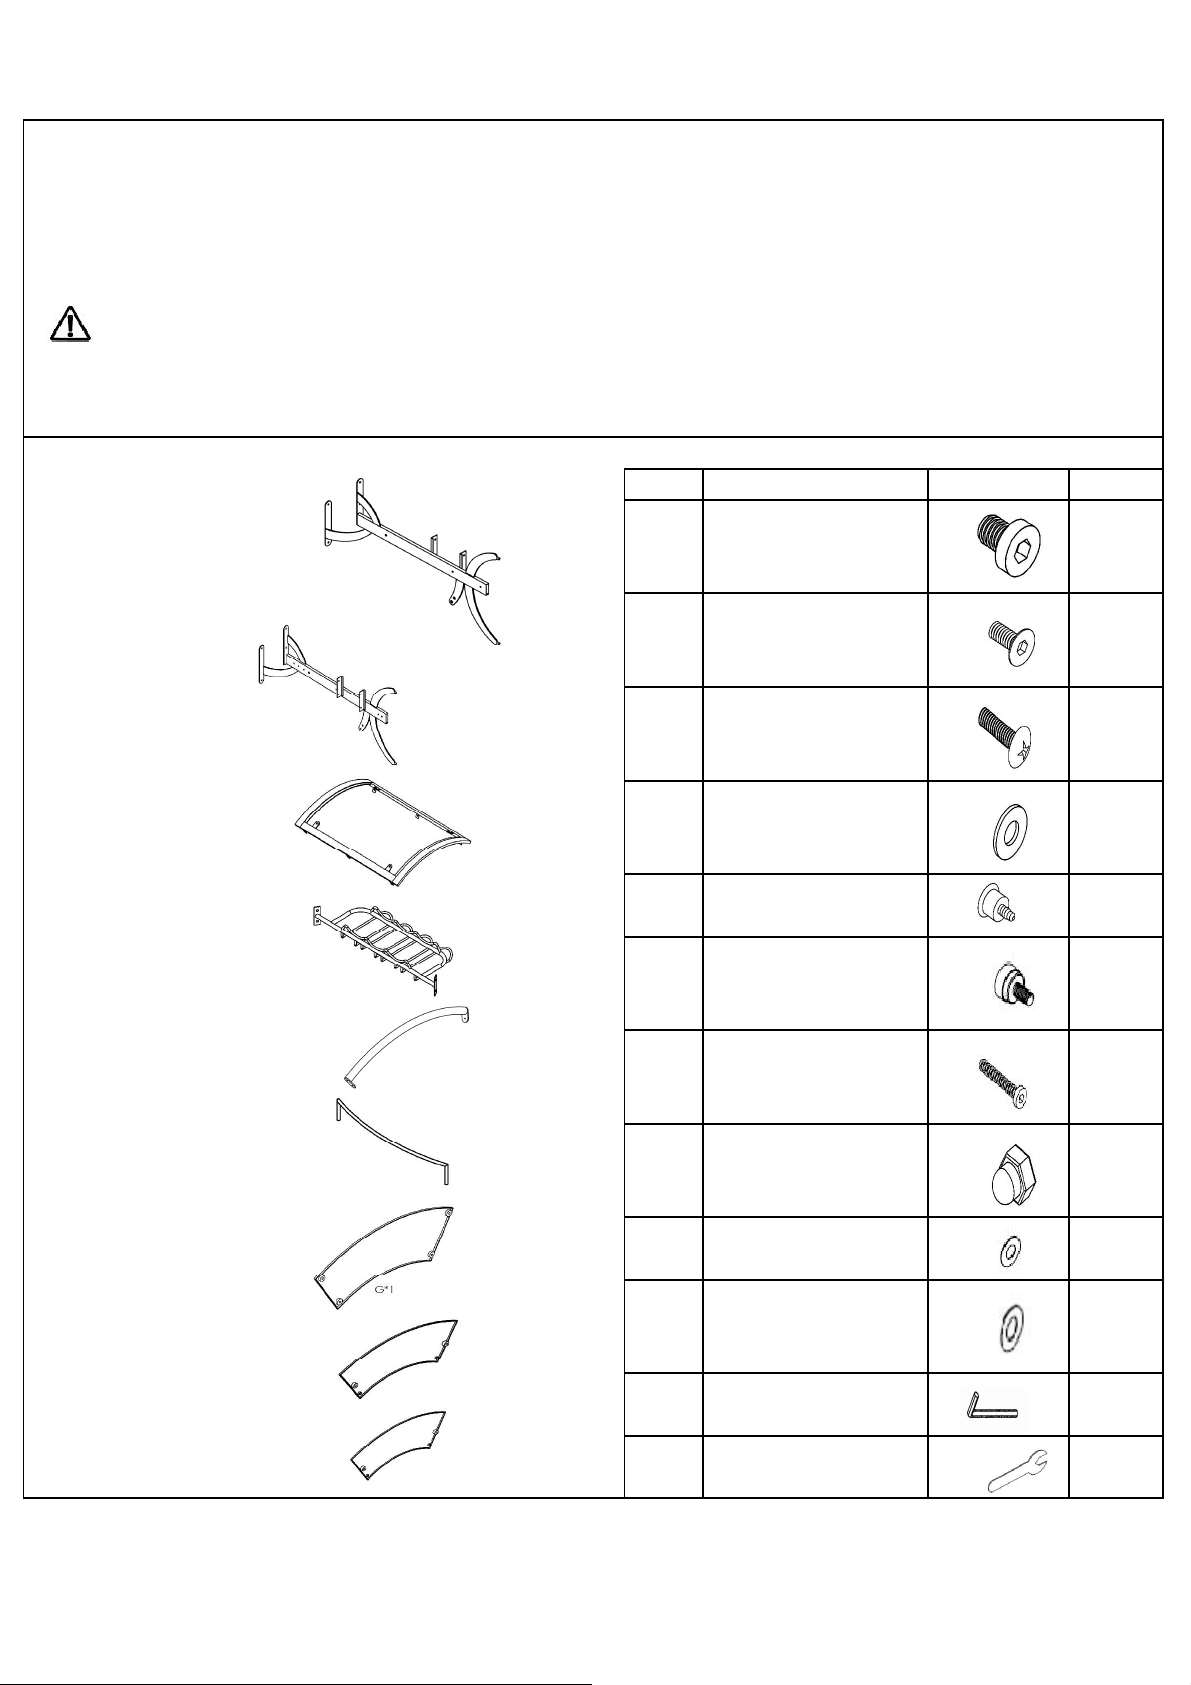
PARTS IDENTIFICATION:
NO
LEFT LEG
A
1PC
1
ALLEN
2 BOLT-SMALL 4PCS
HARDWARE PACKAGE:
DESCRIPTION FIGURE Q'TY
ALLEN
BOLT-MEDIUM 22PCS
RIGHT LEG
B
FRONT FRAME
C
HANGER BACKET
D
BOTTOM SUPPORT
E
BOTTOM GLASS
F
SUPPORT
TOP GLASS
G
1PC
BOLT 4PCS
3
1PC
1PC
1PC
2PCS
1PC
THICKNESS WASHER 4PCS
4
5 SUCTION CUP
6
FLOOR LEVELER 4PCS
ALLEN
BOLT-LARGE 3PCS
7
NUT 3PCS
8
WASHER
9
4PCS
3PCS
BOTTOM GLASS
H
1PC
SHELF GLASS
I
2PCS
1PC
PLASTIC WASHER 3PCS
10
ALLEN KEY
11
HEXAGONAL KAY
12
1PC
Page 3

STEP1: Please take out FRONT FRAME(C).
STEP2: Attach FLOOR LEVELERS (6) onto LEFT LEG (A) and RIGHT LEG (B).
Assemble the LEFT LEG (A) and RIGHT LEG (B) onto the FRONT FRAME (C)
using ALLEN BOLT - MEDIUM (1). Next, assemble the HANGER BRACKET (D)
using ALLEN BOLT - MEDIUM (1). And finally attach the BOTTOM SUPPORT (E)
using the ALLEN BOLT - SMALL (2).
STEP2
STEP1
ITEM:100135
ASSEMBLY INSTRUCTION
PAGE 3 OF 6
Page 4

STEP3: Insert SUCTION CUP(5) into
BOTTOM GLASS(H) using BOLT-MEDIUM(1).
STEP3
STEP4: Assemble the BOTTOM GLASS SUPPORT(F)
using THICKNESS WASHER(4) and BOLT(3).
STEP4
ITEM:100135
ASSEMBLY INSTRUCTION
PAGE 4 OF 6
Page 5

STEP5
STEP5: Attach TOP GLASS (G) and SHELF GLASS(I) using
ALLEN BOLT - MEDIUM (1). Fully tighten all screws.
FINISH
ITEM:100135
ASSEMBLY INSTRUCTION
PAGE 5 OF 6
Page 6

To attach two pieces together, insert PLASTIC WASHER (10) to the NUT (8) as well as the WASHER (9) and tighten
using ALLEN BOLT - LARGE (7).
ITEM:100135
ASSEMBLY INSTRUCTION
PAGE 6 OF 6
 Loading...