


Coag-Sense®
Prothrombin Time (PT)/INR
Monitoring System
Self-Test User’s Manual

Page 2 For In Vitro Diagnostic Use CoaguSense, Inc.
Caution: Federal law restricts this device to sale by or on the
order of a physician.
© Copyright 2013, CoaguSense, Inc. All rights reserved.
No part of this publication may be reproduced, transmitted, transcribed, stored in
a retrieval system or translated into any language or computer language, in any
form or by any means, including, but not limited to, electronic, magnetic, optical,
chemical, manual, or otherwise without written permission of CoaguSense.
Coag-Sense is a registered trademark of CoaguSense, Inc.
CoaguSense, Inc. For In Vitro Diagnostic Use Page 3
Coag-Sense® PT/INR Monitoring System
The Coag-Sense PT/INR Monitoring System is a medical device
for quantitative Prothrombin Time (PT) and International
Normalized Ratio (INR) testing using Coag-Sense Test Strips.
The Coag-Sense system can be used for self-testing of clotting
times by patients at home. However, results obtained should not
be used to adjust your medication without talking with your
doctor or health care professional.
Contacting CoaguSense
If you have any questions or concerns with the Coag-Sense
system, please contact CoaguSense Technical Support at:
CoaguSense, Inc.
48377 Fremont Blvd., STE 113
Fremont, CA 94538
Toll Free: 1-866-903-0890
E-Mail: techsupport@coagusense.com
WARNING: Contact your health care provider if
you have any questions about your test results and any
actions you should take.
Note ◙: The Coag-Sense PT/INR Monitoring System meter is
packaged in a special box. Do not discard this box. Reuse the package to transport the meter or, if directed by
Customer Service to return it for testing.

Coag-Sense® Prothrombin Time (PT)/INR Monitoring System Self-Test User’s Manual
Page 4 For In Vitro Diagnostic Use CoaguSense, Inc.
Table of Contents
Contacting CoaguSense ...................................................................... 3
Table of Contents ................................................................................. 4
1. About This Manual ..................................................................... 5
2. System Description .................................................................... 6
3. Reordering Information ............................................................ 10
4. Warnings and Precautions ....................................................... 10
5. Hazards and Symbols .............................................................. 15
Directions for Use .............................................................................. 16
6. Operating Conditions ............................................................... 16
7. Power On and Off .................................................................... 17
8. Setting the Time and Date ....................................................... 17
9. Performing a Control Test ........................................................ 19
10. Performing a PT Test ............................................................... 24
11. Collecting a Fingerstick Sample ............................................... 29
Sample Collection and Transfer Methods ............ Error! Bookmark not
defined.
12. Reviewing the Memory ............................................................. 34
13. Control Strips ........................................................................... 35
14. Replacing the Batteries ............................................................ 35
15. Cleaning the Meter ................................................................... 38
16. Troubleshooting ....................................................................... 39
17. Performance Characteristics .................................................... 46
18. Meter Specifications ................................................................. 47
19. Warranty .................................................................................. 48
20. Index ........................................................................................ 50
About This Manual
CoaguSense, Inc. For In Vitro Diagnostic Use Page 5
1. About This Manual
The purpose of the Coag-Sense PT/INR Monitoring System
User’s Manual is to help you understand your Coag-Sense
system, its parts, and its intended function. It provides you with
the information you need to perform PT/INR testing with the
Coag-Sense system.
It is important to read this entire User Manual and inserts that
came with the disposable Coag-Sense test strips. You must
complete proper training on the Coag-Sense system and
practice the test with a health care provider before attempting to
use this device. The Coag-Sense system should only be used
with a doctor’s prescription.
This User Manual has different formats and symbols to
distinguish warnings, notes, and meter buttons.
WARNING: This indicates a warning or precaution.
Please read and understand all warnings and precautions.
They tell you about potential safety hazards and situations
that may cause injury. If you have any questions, please
ask your doctor or contact Technical Support (USA) at
1-866-903-0890.
Note ◙: Notes provide additional information that is useful or
important. All notes are italicized. Words in BOLD ALL-
CAPITALS refer to buttons on the Coag-Sense meter.

Coag-Sense® Prothrombin Time (PT)/INR Monitoring System Self-Test User’s Manual
Page 6 For In Vitro Diagnostic Use CoaguSense, Inc.
2. System Description
The Coag-Sense Self-Test PT/INR Monitoring System is used
for measurement of Prothrombin Time (PT) in fresh, capillary
whole blood. The Coag-Sense system is intended for use
outside the body by people taking warfarin or other oral
anticoagulant (blood thinning) therapy who need to monitor
clotting time.
The meter performs a self-test when it is first turned on. If there
are any problems with the meter, an error message is shown on
the display. Refer to the “Troubleshooting” section of this manual
or contact Tech Support. A test strip is inserted and heated in the
meter prior to sample application.
The strip contains a tiny wheel with spokes that pull the sample
into the reaction well. The spokes quickly and completely mix the
sample with the clot initiating component of the test strip.
The PT time is determined from when (a) the sample is drawn
into the reaction well of the test strip and detected by a beam of
light until (b) a clot forms and interrupts a beam of light. The PT
result is converted to an INR (International Normalized Ratio)
using the calibration data stored in the meter. INR is a
mathematical correction of the PT result that adjusts for
sensitivity differences among different PT systems.
The meter continues to check every feature of its operation
through a system of self-checks.

System Description
CoaguSense, Inc. For In Vitro Diagnostic Use Page 7
Your Coag-Sense Self-Test PT/INR Monitoring System (Catalog
number 03P50-01) comes supplied with:
Coag-Sense PT/INR Meter
Coag-Sense Self-Test User’s Manual
Coag-Sense Self-Test Quick Reference Guide
Sample Transfer Tubes
Sample package of Single-use, Auto Sterile Lancets
Four AA 1.5 V Alkaline Batteries (not installed)
You will also need:
Coag-Sense Test Strip (catalog number 03P56-50),
which includes:
50 Patient Test Strips
2 Low Control Strips
2 High Control Strips
1 Control Strip Activation Solution
Gauze or cotton balls
Lancets, 21 gauge
An optional AC Power Adapter can be ordered
(catalog number 03P64-01).
Coag-Sense® Prothrombin Time (PT)/INR Monitoring System Self-Test User’s Manual
Page 8 For In Vitro Diagnostic Use CoaguSense, Inc.
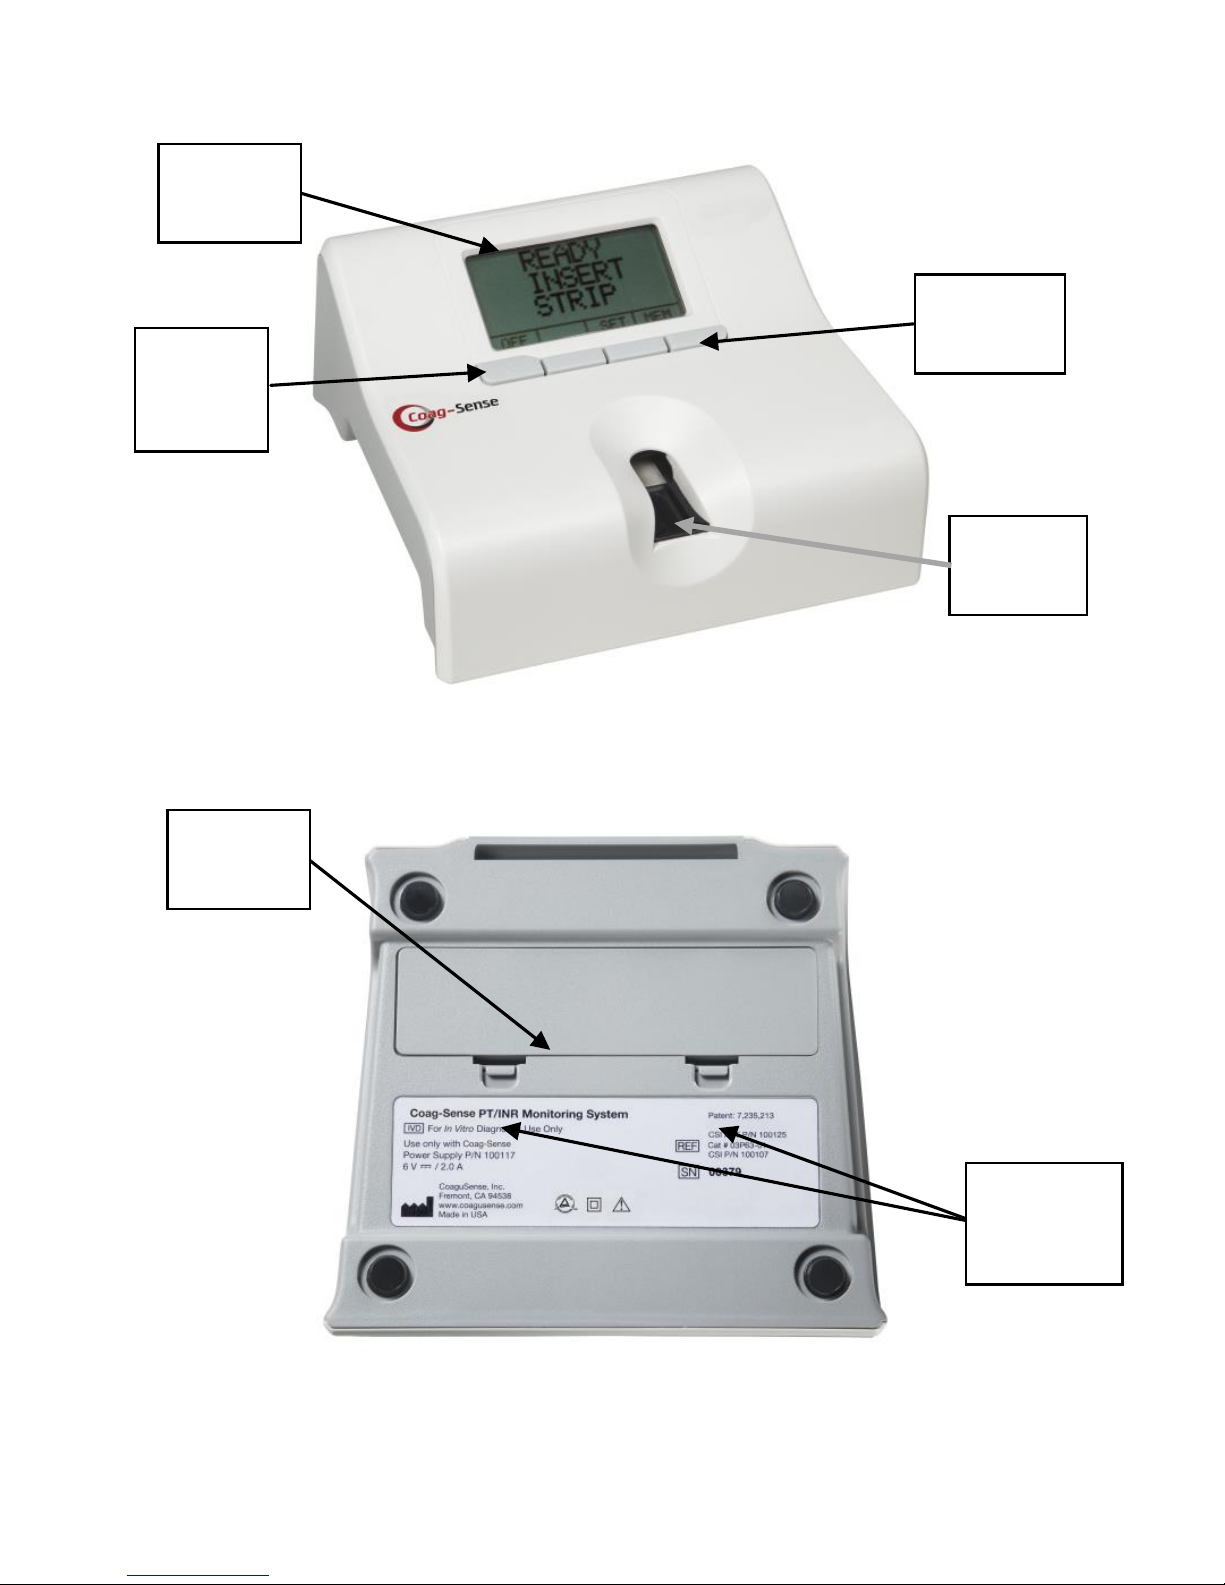
The Coag-Sense Meter: Top View
The Coag-Sense Meter: Bottom View
Meter
Display
Power
On/Off
Button
Menu
Buttons
Strip
Holder
Battery
Door
Battery
Door
Release
System Description
CoaguSense, Inc. For In Vitro Diagnostic Use Page 9
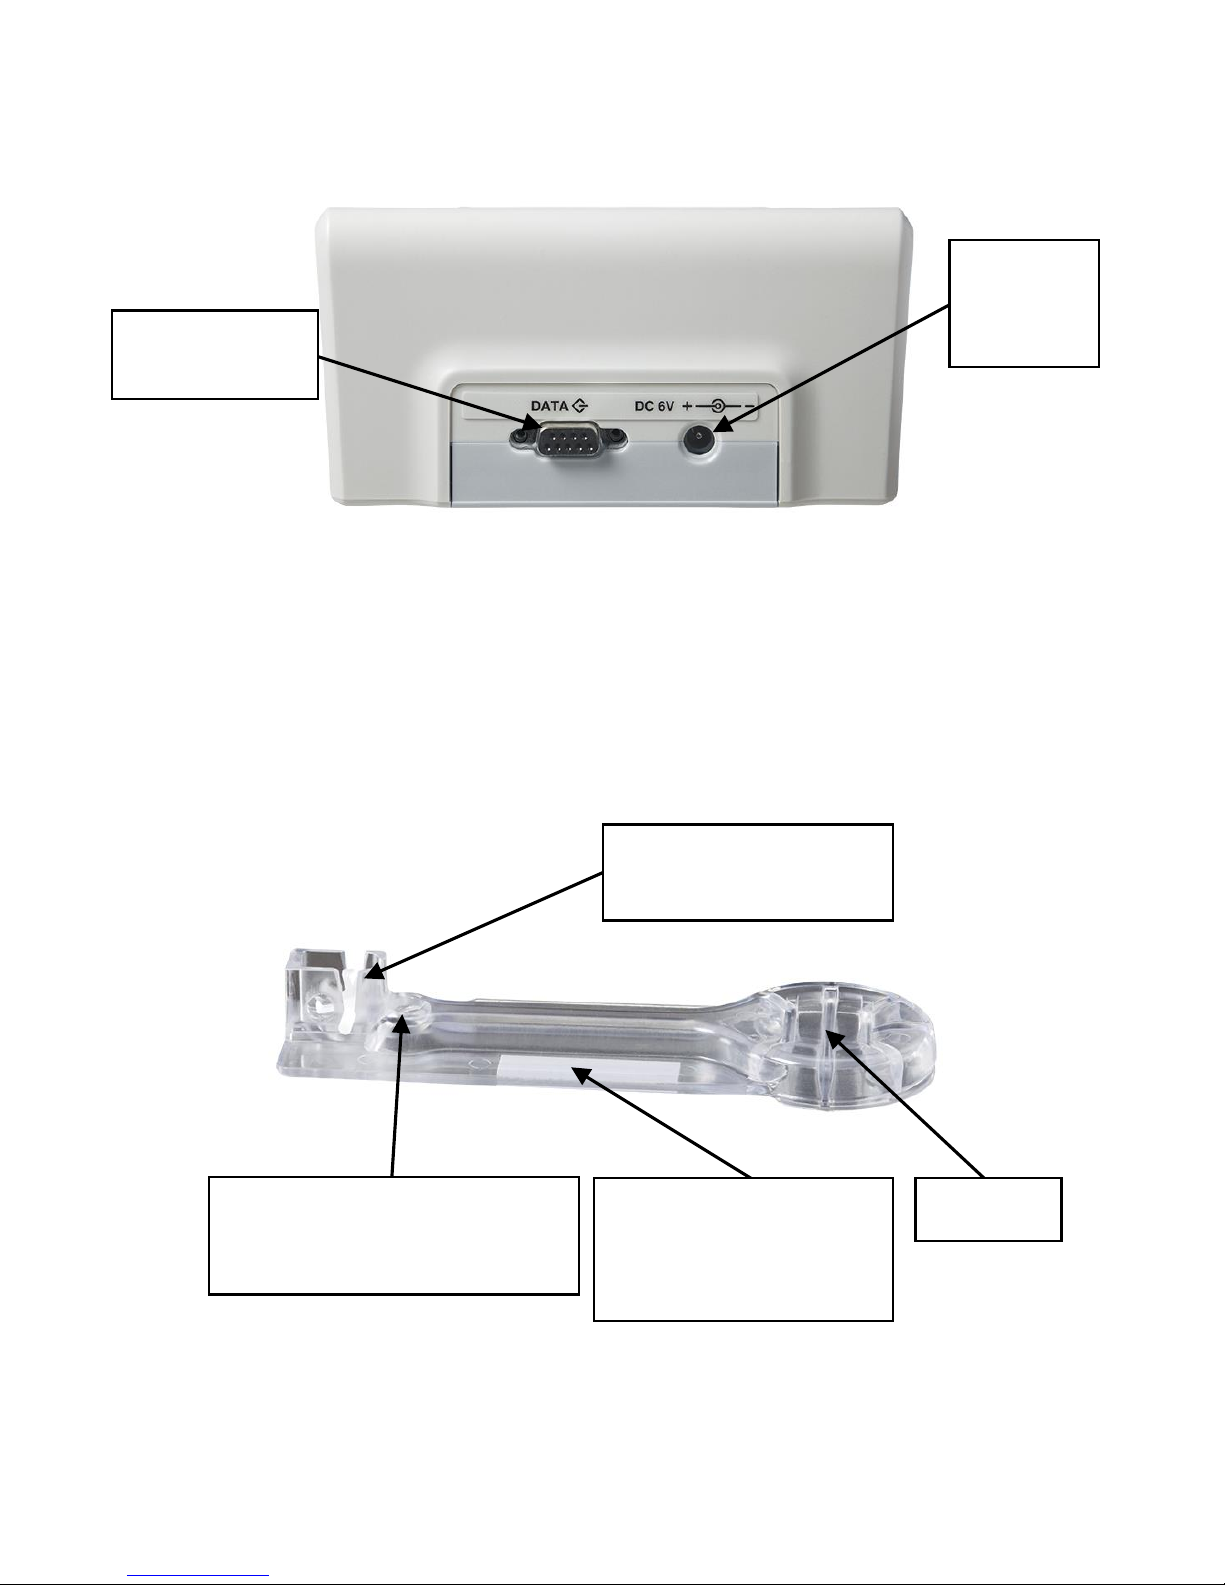
The Coag-Sense Meter: Rear View
The Coag-Sense Test Strip
AC
Adapter
Jack
Data/Printer
Port
Handle
Mixing Wheel and
Reaction Well
Bar Code
(Faces down when
inserted into meter)
Sample Application Area
(Green light flashing
when ready for sample)
Coag-Sense® Prothrombin Time (PT)/INR Monitoring System Self-Test User’s Manual
Page 10 For In Vitro Diagnostic Use CoaguSense, Inc.
3. Reordering Information
Product
Catalog #
Coag-Sense Self-Test PT/INR System
03P50-01
Test Strip Kit (Qty 50)
03P56-50
Sample Transfer Tubes (Pack of 54)
03P53-54
Lancets (Box of 100)
03P58-02
AC Power Adapter (optional item)
03P64-01
Control Strip Kit -4
03P72-04
4. Warnings and Precautions
General
Patients taking Warfarin (Coumadin) and other oral
blood thinners should consult with their healthcare
provider before adjusting their dosage.
Patients should consult with their doctor for the
appropriate INR therapeutic range for them.
Patients who have recently taken or are currently taking
any type of Heparin or Low Molecular Weight Heparin
anticoagulant should not use this test system and should
consult their doctor.
Test Site and Blood Sample
The quality of the blood sample can become the
weakest link in any PT test. A blood sample of poor
quality can produce results of poor quality. Read the

Warnings and Precautions
CoaguSense, Inc. For In Vitro Diagnostic Use Page 11
section on “Collecting a Fingerstick Sample” for more
information.
Use only fresh fingerstick capillary blood for testing. The
blood should only come in contact with the products
provided with the Coag-Sense System. Other products
may have anti-coagulant agents on their surfaces and
result in unreliable test results.
The Coag-Sense PT/INR System is for in vitro diagnostic
use only.
Blood samples must be applied to the test strip
immediately after collection or the blood begins to
clot, causing unreliable results.
Squeezing the fingerstick site excessively (milking)
releases “tissue layer” fluid and tissue factors that can
cause unreliable results.
The fingerstick site should be washed with warm water
and soap, and then completely dried. The site must be
clean of all hand oils/lotions and foreign matter, which
may cause unreliable results.
If Alcohol wipes are used, wipe the fingerstick site with a
gauze pad and make sure the site is completely dry. If
any alcohol remains (or is re-introduced) on the finger, it
may cause unreliable results.
The quality of fingerstick and the sample delivered are
important to the test results. If there is a question
about the sample or sample collection, obtain a new
strip, repeat the fingerstick on a different finger, and
test again.
If a test requires a repeat, use a different finger for the
fingerstick, since blood may have started to clot on the
first finger, which may cause unreliable results.

Coag-Sense® Prothrombin Time (PT)/INR Monitoring System Self-Test User’s Manual
Page 12 For In Vitro Diagnostic Use CoaguSense, Inc.
If there is a bubble or an air pocket showing in the blood
sample in the transfer tube, start the test over. Use a
new strip and fingerstick (using a different finger and
transfer tube) or results may be unreliable.
Note ◙: If you are unable to get a PT/ INR test result contact
Technical Support at 1-866-903-0890, your home testing
service provider or your healthcare provider.
Meter
Use only AA 1.5 V alkaline batteries in the Coag-Sense
meter. Rechargeable batteries cannot be used because
damage to the meter may result. Do not throw used
batteries in the trash. Dispose of properly.
The meter is a delicate instrument, and should be
handled with care. Dropping or other mishandling may
cause damage to the meter. If this should occur, call
Tech Support.
Do not allow any liquids to spill on the meter. If this
should occur, call Tech Support.
Do not put the meter in liquid. Do not allow liquids to get
into any of the connectors or plugs on the meter.
Only use the method provided in this User’s Manual to
clean the Coag-Sense meter.
Do not move or touch the meter while it is running a test.
Unreliable results may occur.
Store and use the Coag-Sense PT/INR Test System
following the instructions in this manual.
Use only the optional Coag-Sense AC power adapter
with the meter or damage to the meter may result.

Warnings and Precautions
CoaguSense, Inc. For In Vitro Diagnostic Use Page 13
The Coag-Sense PT/INR Test System is designed for
indoor use only.
This equipment generates, uses, and can radiate
radiofrequency (RF) energy. If your meter is not set up
and used according to this User Manual, the RF energy
may interfere with other devices in the area.
This equipment is tested to meet the limits for medical
devices, which is designed to provide a reasonable
protection against harmful interference when the
equipment is operated in a home environment. If not
installed and used in accordance with these instructions,
it may cause harmful interference to other devices in the
vicinity. If this equipment does cause harmful
interference to other devices, which can be determined
by turning the equipment on and off, the user is
encouraged to try to correct the interference by one or
more of the following measures:
Reorient or relocate the receiving device.
Increase the separation between the equipment.
Connect the equipment to an outlet on a circuit
different from that to which the other devices are
connected.
In the unlikely event of an electric power surge (i.e.,
severe static discharge during a thunderstorm), when
using the optional AC power adapter, the display screen
may go blank. If this occurs, unplug the power supply
from the back of your meter, wait 5 seconds and plug it
back in. Normal operation should return, but you may
have to reset the time and date.
DO NOT OPEN THE METER. Do not attempt to repair
or modify this meter. The Coag-Sense Self-Test
PT Meter does not require any periodic maintenance

Coag-Sense® Prothrombin Time (PT)/INR Monitoring System Self-Test User’s Manual
Page 14 For In Vitro Diagnostic Use CoaguSense, Inc.
and there are no user serviceable parts inside. If you
have problems, please contact technical support or your
health care provider to arrange for service.
Test Strips/Control Strips/Control Strip Activating Solution
The test strips are designed for single use only. Do not
reuse the test strips.
Discard used strips in a puncture resistant, biohazard
waste (SHARPS) container.
PT Test Strips, Control Strips, and Control Strip
Activating Solution are perishable goods with a limited
shelf life. Do not use any of these items if the expiration
date has passed.
Refer to the package insert that is supplied with each
box of test strips for more information.

Hazards and Symbols
CoaguSense, Inc. For In Vitro Diagnostic Use Page 15
5. Hazards and Symbols
Warning. This indicates a warning or precaution,
requiring special attention
Class II Equipment. The AC Adapter is double
insulated
Biological Risks: Disposable items pose biological
risks. The strips and fingerstick materials should be
disposed in appropriate biohazard waste containers
Electronic device. Dispose of unit and batteries
properly
Use by/Expiration Date
Lot number
For In vitro diagnostic use
Storage temperature range
Manufacturer
Single Use Only – Do Not Reuse

Coag-Sense® Prothrombin Time (PT)/INR Monitoring System Self-Test User’s Manual
Page 16 For In Vitro Diagnostic Use CoaguSense, Inc.
Directions for Use
Patients taking Warfarin (Coumadin) and/or other oral blood
thinners should consult with their doctor before adjusting their
dosage. Consult your doctor for the appropriate PT and INR
values for you.
Note ◙: The Coag-Sense PT Test System meter is packaged in
a special box. Do not discard this box. Re-use the
package to transport the meter or, if directed by
Customer Service to return it for testing.
6. Operating Conditions
To ensure that your Coag-Sense System is working correctly, be
sure the following conditions are met:
Be sure that the meter and strip are at room temperature
before use. Room temperature is between 65ºF and
90ºF (18ºC and 32ºC).
Relative humidity should be between 10% and 85%,
without condensation, for testing.
Avoid dropping the meter or treating it roughly.
Use the meter only on a level, stable surface.
Do not move or touch the meter during testing.
Do not place the meter in direct sunlight or high intensity
light.

Setting the Time and Date
CoaguSense, Inc. For In Vitro Diagnostic Use Page 17
7. Power On and Off
Install the AA 1.5 V batteries, which are needed to
maintain the time and date settings. (See “Replacing the
Batteries” for more information). The optional AC power
adapter can be connected at this time.
Place the meter on a flat, stable surface. To turn the
meter on. Press the POWER button, which is on the
topside of the meter, beneath the display. To turn the
meter off, press the same POWER button again.
8. Setting the Time and Date
Action
Meter Display
1. If the date and time have
not been set before on the
meter or the setting has
been lost, the display
looks like this with blinking
characters.
2. The blinking characters
may be changed by
pressing + to increase or
– to decrease. When
correct, press NEXT to
advance to the next
character.
Press NEXT to advance
to next character.
12:00PM
1/01/13
+
-
DONE
NEXT

Coag-Sense® Prothrombin Time (PT)/INR Monitoring System Self-Test User’s Manual
Page 18 For In Vitro Diagnostic Use CoaguSense, Inc.
Action
Meter Display
3. Once you have entered
the correct date and time,
press DONE to exit this
function.
4. Once the date and time
are set, the display looks
like this.
5. If you need to change the
date or time in the future,
press SET. The meter
display shows the set time
and date.
6. Adjust the time and date
by pressing + to increase
or – to decrease. When
the time and date are
correct, press DONE
when finished.
Note ◙: The clock time does not adjust for daylight savings time.
Press DONE when date and
time are correct
8:00AM
3/07/13
+
-
DONE
NEXT
Press SET to adjust date and
time again (if necessary)
READY
INSERT
STRIP
SET
MEM
OFF
Press DONE when date and
time are correct
12:00PM
1/01/013
+
-
DONE
NEXT

Setting the Time and Date
CoaguSense, Inc. For In Vitro Diagnostic Use Page 19
9. Performing a Control Test
Control testing confirms the performance of both the meter and
the test strips and should be completed for each new lot of test
strips and any other time as indicated by your testing service
provider or doctor. Control testing can also be run whenever the
PT results are unexpected to make sure that the system is
working properly. There are 2 low control strips, 2 high control
strips and a control strip activation solution shipped with each
test strip kit. Extra controls may be ordered separately.
Follow these steps to perform a test on a low or high control.
Note ◙: The following directions are for running a low control
strip. When this procedure is complete, run a high
control strip. The controls may be run in any order. The
meter will display and store the results in PT seconds
only. The meter does not use or require results from the
control strips prior to running a patient test strip.
WARNING: Do not move or touch the meter while it
is running a test. Unreliable results may occur.
Note ◙: If an error message appears, consult the
“Troubleshooting” section of this manual.

Coag-Sense® Prothrombin Time (PT)/INR Monitoring System Self-Test User’s Manual
Page 20 For In Vitro Diagnostic Use CoaguSense, Inc.
Action
Meter Display
1. Make sure that the meter is
on by pressing the POWER
button on the top of the
meter.
2. Open a low control package,
tearing at the notched end.
Remove the strip. Set the
package aside.
Note ◙: Make sure that the
expiration date has not
passed by checking the
date on the front of the
control package.
3. Holding the round end, gently push the strip completely into the
meter. The strip fits snuggly when pushed all the way toward the
back wall of the strip holder.
4. When the strip is correctly
inserted, the display looks
like this.
Note ◙: If anything other than
READY
INSERT
STRIP
SET
MEM
OFF
LOW CONTROL
DETECTED

Performing a Control Test
CoaguSense, Inc. For In Vitro Diagnostic Use Page 21
Action
Meter Display
this is displayed, refer to
the “Troubleshooting”
section.
5. The meter warms the strip.
The display looks like this.
It shows a countdown of the
time remaining during the
warm-up cycle.
Note ◙: Do not apply the control
activation solution until
the warm-up is
complete and the meter
tells you to do so.
6. The meter beeps once when
it is ready for the control
strip activation solution. The
screen looks like this.
Note ◙: You now have 2 minutes to apply the activation solution to
the control strip.
7. Open the control activation
solution and hold at an angle
to allow insertion of the
transfer tube
8. Holding the transfer tube
below bulb insert into control
activation solution.
Note ◙: DO NOT SQEEZE THE BULB. Be careful to avoid getting
APPLY
CONTROL
SOLUTION
WARMING
PLEASE WAIT
24
Warming count
down in seconds

Coag-Sense® Prothrombin Time (PT)/INR Monitoring System Self-Test User’s Manual
Page 22 For In Vitro Diagnostic Use CoaguSense, Inc.
Action
Meter Display
bubbles in the transfer tube.
9. Rest hand on instrument to
steady. Move fingers to flat
sides of bulb being sure to
cover air hole. Insert tip into
sample application well of
test strip, touching tip down
on strip at flashing green
light. Squeeze bulb until
solution leaves tube.
Note ◙: Keep pressure on
bulb and pull away from strip
(avoids back suction)
10. When the control strip
activation solution is
properly applied and
detected the flashing green
light will turn off, and the
meter display looks like this.
Note ◙: If this screen is not displayed, either not enough solution
was applied or the solution had bubbles in it. Remove the
strip. Retest with a new control strip. Do NOT attempt to add
more solution to the control strip.
11. When the low control testing
is complete, the display
shows “OK” and looks
similar to this.
TESTING
PLEASE
WAIT
LO CONTL OK
PT 12.8
12/18/13 4:01 PM
REMOVE STRIP

Performing a Control Test
CoaguSense, Inc. For In Vitro Diagnostic Use Page 23
Action
Meter Display
Note ◙: To avoid confusing control strip INR results with patient test
strip INR results, the high control test will display the control
result in PT seconds only.
Note ◙: If anything other than this is displayed, refer to the
“Troubleshooting” section.
Note ◙: The date and time shown in the display are examples only.
The date and time shown after actual testing is the current
date and time.
Note ◙: Remember to repeat this entire procedure with a high
control strip.
12. When high control testing is
complete, the display
shows “OK” and looks
similar to this.
Note ◙: If an error message appears, refer to the “Troubleshooting”
section.
13. Once the controls have been successfully tested, remember to
throw the control strips into a biohazard (SHARPS) container. You
can now proceed to test your blood. If you are not going to test, turn
off the meter by pressing the POWER button.
HI CONTL OK
PT 42.1
12/18/13 4:05 PM
REMOVE STRIP

Coag-Sense® Prothrombin Time (PT)/INR Monitoring System Self-Test User’s Manual
Page 24 For In Vitro Diagnostic Use CoaguSense, Inc.
10. Performing a PT Test
WARNING: Place the meter on a stationary, level
surface for testing. Do not move the meter or allow it to
vibrate during a test. Unreliable results may occur.
Action
Meter Display
1. Make sure that the meter is
on by pressing the POWER
button on the top of the
meter.
Note ◙: If an error message
appears, refer to the
“Troubleshooting”
section.
2. Open a PT test strip package, tearing at the notched end.
Remove the strip. Set the package aside.
Note ◙: Make sure that the expiration date has not passed.
3. Holding the round end, gently push the strip completely into the
meter in one smooth motion. The strip fits snuggly when pushed
all the way toward the back wall of the strip holder.
READY
INSERT
STRIP
SET
MEM
OFF

Reviewing the Memory
CoaguSense, Inc. For In Vitro Diagnostic Use Page 25
Action
Meter Display
4. When the test strip is
correctly inserted, the
display looks like this.
5. The meter warms the strip.
The display looks like this.
The meter counts down the
time remaining during the
warm-up cycle.
Note ◙: Do not apply any test
sample until the warmup completes and the
meter tells you do so.
While the meter is warming up, get ready to perform a
fingerstick. See “Collecting a Fingerstick Sample” in this
manual.
6. When the warm-up
completes, the meter
beeps once. The screen
looks like this.
Note ◙: You now have 2 ½
minutes to apply the
sample to the test
strip.
PAT.
STRIP
DETECTED
SET
MEM
OFF
APPLY
SAMPLE
SET
MEM
OFF
WARMING
PLEASE WAIT
24
Warming count down
in seconds

Coag-Sense® Prothrombin Time (PT)/INR Monitoring System Self-Test User’s Manual
Page 26 For In Vitro Diagnostic Use CoaguSense, Inc.
Action
Meter Display
7. Immediately after collecting
the patient sample, place
the tip of the sample
transfer tube at a 45º angle
into the sample well on the
test strip where you see the
flashing green light. Gently
touch the tip down onto the
sample well.
8. Slowly squeeze the bulb
until the blood leaves the
tube being careful not to
introduce air bubbles into
the sample. Keep pressure
on bulb while you pull your
hand away to avoid back
suction of sample.
9. Discard the sample transfer
tube in a biohazard waste
container.
10. When the sample is
detected, the meter display
looks like this.
Note ◙: If this screen is not displayed, either not enough blood
sample was applied or the sample had bubbles in it.
Remove the strip and retest with a new strip.
TESTING
PLEASE
WAIT

Reviewing the Memory
CoaguSense, Inc. For In Vitro Diagnostic Use Page 27
Action
Meter Display
11. When testing is complete,
the meter beeps once. The
results (INR and PT in
seconds) are shown on the
screen.
Note ◙: If any display other than the one shown is visible (such as
CLOT TIME TOO SHORT or NO CLOT DETECTED), refer
to the “Troubleshooting” section.
12. Record the results. Then remove the test strip. Throw it away in
the biohazard container.
Note ◙: Repeat the test if the results seem unusually low or high. If
the results still seem unusual after a second test, contact
your doctor or CoaguSense Tech Support.
Turn the meter off by pressing the POWER button when you are
finished testing. If left unattended, the meter automatically turns
off in a few minutes.
The last 100 test results are stored in memory with the time and
date. Refer to “Reviewing the Memory” in this manual for more
information.
INR 2.2
PT 22.2
1/18/13 5:50 PM
REMOVE STRIP

Coag-Sense® Prothrombin Time (PT)/INR Monitoring System Self-Test User’s Manual
Page 28 For In Vitro Diagnostic Use CoaguSense, Inc.
WARNING: Unexpected results
An unexpected result may include any result that falls
outside the therapeutic target range, or a result that falls
inside the target range but is not consistent with your current
health status (e.g., you have bleeding or bruising).
What can cause unexpected results:
1. Certain prescription drugs (for example, heparin) and certain
over-the-counter medications (for example, antibiotics) can
affect the action of oral blood thinners and the INR value.
2. Changes in diet, lifestyle, or taking nutritional supplements such
as ginkgo biloba can affect the action of oral blood thinners and
the INR value.
3. Liver diseases, congestive heart failure, thyroid dysfunction,
Lupus, antiphospholipid antibody syndrome (APS) and other
diseases or conditions can affect the action of oral blood
thinners and the INR value.
Be sure your doctor is aware of any of these conditions
before you begin testing, and any time there are changes in
health status or medications after you have begun testing.
What to do when you get an unexpected result:
Follow instructions for re-testing on the Coag-Sense PT/INR
meter. For unexpected results, contact Technical support at
1-866-903-0890. Always follow your doctor’s instructions for
adjusting your dose of anticoagulant medication, or any
other corrective actions.

Reviewing the Memory
CoaguSense, Inc. For In Vitro Diagnostic Use Page 29
11. Collecting a Fingerstick Sample
Tips for a Successful Fingerstick
Make sure that you have all the supplies needed before
you start.
Lancet device
Sample Transfer Tubes
Sterile alcohol prep pad
Gauze square or cotton ball
Band-Aid (optional)
Puncture resistant biohazard container (SHARPS)
Do not use fingers with tight rings, scars, calluses, or
other features that prevent getting good access to the
blood.
Thoroughly clean your hands by washing with soap and
warm water first. The warm water also helps blood
circulation. Completely dry your hands. Instead, you may
use Isopropyl alcohol wipes and then dry the area with
gauze.
For better blood flow, keep your hand below your heart.
One of the middle or index fingers on either hand is
recommended.
Gently squeeze or massage the finger to be lanced, near
the tip. Good circulation can be seen if your fingertip
changes to a pinkish shade.
Gently squeeze or massage the finger to be lanced, near
the tip. Good circulation can be seen if your fingertip
changes to a pinkish shade.

Coag-Sense® Prothrombin Time (PT)/INR Monitoring System Self-Test User’s Manual
Page 30 For In Vitro Diagnostic Use CoaguSense, Inc.
Note ◙: If the fingertip color is not changing, then warm the
fingers carefully by running them under warm water or
rubbing them vigorously. Remember to dry them
completely or your results may be unreliable.
Always use new unused materials (such as lancet,
gauze, etc.).
If you are being helped when getting a test sample, your
helper should wash their hands with soap and warm
water. They should also put on gloves before doing the
fingerstick.
Use a 21g 1.8 mm depth single-use auto-disabling
lancet. Smaller gauge/shallow depth lancets (i.e.
diabetes 23g lancets) should not be used. Refer to the
Lancet device instructions for more information on use.
Lance the fleshy part of the fingertip just slightly left or
right of the center. Press lancet firmly against finger.
Refer to the package inserts for the Lancet device for
more information.
The best test sample is when:
The blood is collected right after the fingerstick and put
into the test strip sample well without delay. If the blood
is not collected or tested quickly (within 15 seconds),
repeat with a fresh fingerstick and a new strip.
There are no bubbles or air pockets in the tube or
sample.

Reviewing the Memory
CoaguSense, Inc. For In Vitro Diagnostic Use Page 31
Action
Meter Display
1. Wash hands with soap and
warm water. Dry completely.
2. Choose a site toward the
center of one of the middle
fingers to lance.
Note ◙: Avoid the more
sensitive area in the
center. Stay away from
any calluses or scars.
3. If desired, clean the fingertip
with an alcohol wipe using
one side for the first
cleaning. Use the second
side for a final wipe.
4. Dry the fingertip with gauze
to remove any excess
alcohol.
Note ◙: Residual alcohol will
affect results. Be certain that
finger is completely dry.
5. Hold the finger tightly between your thumb and index finger,
or place hand on a table with the palm facing up. Keep your
fingertip from touching anything so that it remains clean and
ready.

Coag-Sense® Prothrombin Time (PT)/INR Monitoring System Self-Test User’s Manual
Page 32 For In Vitro Diagnostic Use CoaguSense, Inc.
Action
Meter Display
6. Remove the cap from the
single use lancet. Place it
against the skin. Holding the
body of the lancet, push
down firmly against the
finger to lance the surface of
skin.
Note ◙: The blood should flow
freely. If it doesn’t,
gently squeeze the
finger to get it started.
Lowering your hand and
arm to your lap so that
the fingertip is below the
heart helps the blood
drop form.
WARNING:
Squeezing the
fingerstick site
excessively (milking)
releases “tissue layer”
fluid that can cause
unreliable results.

Reviewing the Memory
CoaguSense, Inc. For In Vitro Diagnostic Use Page 33
Action
Meter Display
7. When ready to collect the
drop of blood, hold the
Sample Transfer Tube
between your thumb and
forefinger below the bulb,
being sure not to cover the
air hole in bulb. DO NOT
SQUEEZE THE BULB.
8. With tube horizontal touch
tip to bead of blood. Let
capillary action fill capillary
portion of tube until blood
flow stops. Squeeze finger
to produce additional blood
if require to completely fill
capillary portion of tube.
9. Once you have collected the
sample, immediately put it
into the sample well on the
test strip. See “Performing
a PT Test” section of this
manual.
10. Apply gauze to your
fingerstick site with firm
pressure until the bleeding
stops. Apply a bandage if
desired.
11. Throw the lancet and the
strip into a biohazard
container.
WARNING: If
there is a bubble or an
air pocket showing in
the blood sample in the
sample transfer tube,
start the test over with
a new fingerstick on a
different finger.
Note ◙: The minimum amount
must be collected before
adding it to the test strip.
Never add more blood to the
test strip.
Capillary portion of
tube ends here

Coag-Sense® Prothrombin Time (PT)/INR Monitoring System Self-Test User’s Manual
Page 34 For In Vitro Diagnostic Use CoaguSense, Inc.
12. Reviewing the Memory
The Coag-Sense meter stores up to 100 results along with the
date and time, in its memory. When the 100th result is reached,
the first result 1 is replaced (written over) with test results for test
number 101. This continues with the oldest result being replaced
with the most recent. Memory is not lost if there is a break in
power for any length of time. Memory cannot be erased.
Action
Meter Display
The memory can be accessed
from any mode that displays a
MEM button.
1. Press MEM. The meter
displays the last two
records.Press PREV or
NEXT to scroll through the
result records.
3. Press DONE when finished.
Note ◙: If any messages are
displayed, such as
CLOT TIME TOO
SHORT, or NO CLOT
DETECTED refer to the
“Troubleshooting”
section of this manual.
Example of display with two
most recent records:
2/07/13 12:56 PM
INR 5.2 PT 49.1
4/07/13 12:56 PM
INR 2.9 PT 28.8
NEXT
PREV
DONE

Replacing the Batteries
CoaguSense, Inc. For In Vitro Diagnostic Use Page 35
13. Control Strips
Quality control is an important part of PT time testing. Using
control strips make sure that you are carrying out the steps of the
test correctly. It also ensures that your Coag-Sense System is
working properly and that test strip integrity has been
maintained. Both a high and low control should be tested before
running the first PT test strip from a new box. A control can also
be tested if you have unexpected results. There are 2 low control
strips, 2 high control strips and control activation solution
shipped with each box of test strips. Additional controls may be
ordered separately. See “Performing a Control Test” in this
manual.
14. Replacing the Batteries
It is not necessary to install batteries in the meter if the optional
AC adapter is plugged into a wall socket. However, if no
batteries are installed and the meter is unplugged or there is a
power outage, the time and date settings go back to the factory
settings.
The meter is designed for AA 1.5 V alkaline batteries only. It
does not re-charge these alkaline batteries when connected to
AC power.
WARNING: Use only AA 1.5 V alkaline batteries in
the Coag-Sense meter. Rechargeable batteries should not
be used as they can result in damage to the meter.
The AA 1.5 V batteries can last for approximately 300 tests if the
meter is operating only on batteries. The batteries can last

Coag-Sense® Prothrombin Time (PT)/INR Monitoring System Self-Test User’s Manual
Page 36 For In Vitro Diagnostic Use CoaguSense, Inc.
through their shelf life if the optional AC power adapter is
plugged in.
If the batteries are running low, the meter displays a BATTERY
LOW message. The meter can run another one or two additional
PT tests, but the batteries should be replaced as soon as
possible. You can plug the optional AC power adapter into a wall
socket and replace the batteries later.
When the message BATTERY TOO LOW SEE MANUAL
appears on the meter display, the meter shuts off after a brief
delay. The batteries must be replaced or the meter must be
connected to a wall socket with the optional AC power adapter to
continue testing. The meter time and date settings are lost and
the meter will need to have the date and time reset. See “Setting
the Time and Date” in this manual.
Complete the following steps to replace the AA 1.5 V
alkaline batteries.
1. Turn the meter upside down.
2. Remove the battery door by
pressing on the battery door
release.

Replacing the Batteries
CoaguSense, Inc. For In Vitro Diagnostic Use Page 37
3. Remove the old batteries and
replace with 4 new standard
1.5V AA alkaline batteries.
(The proper direction for battery
placement is shown on a figure
inside the battery compartment).
4. Replace the battery door.
5. Properly dispose of old
batteries.

Coag-Sense® Prothrombin Time (PT)/INR Monitoring System Self-Test User’s Manual
Page 38 For In Vitro Diagnostic Use CoaguSense, Inc.
15. Cleaning the Meter
No maintenance is required other than routine cleaning.
Clean the outside of the
Coag-Sense meter with a
clean damp non-abrasive
cloth. If required, a mild
disinfectant (such as a 10%
bleach solution or 70%
isopropyl alcohol) may be
used. Apply the cleaning
solution to the cloth to
dampen. Then put cloth on
the meter. Alcohol prep pads
may also be used.
WARNING: Do not put the meter in liquid. Do not
allow liquids to get into any of the connectors or plugs on
the meter.
WARNING: Do not allow any liquids to spill on the
meter. If this should occur, unplug the meter (if plugged in)
and call Tech Support.

Troubleshooting
CoaguSense, Inc. For In Vitro Diagnostic Use Page 39
16. Troubleshooting
You may see the following error messages while using the CoagSense meter. This section discusses how to resolve most
problems that you might encounter. If you have any questions or
problems during the troubleshooting process, note the display
wording and contact Tech Support at 866-903-0890 or email
support@coagusense.com.
Meter Display
Possible Cause
Solution
REMOVE
STRIP
Meter turned off with
used strip in it.
If no strip present
possible shipment
damage.
Remove the strip and
begin again.
Call Tech Support
NO SAMPLE
DETECTED
Either no sample or
not enough sample
was applied to the strip
within 2 1/2 minutes
after the “Apply
Sample” message was
displayed. This can
also happen if sample
is applied on the strip
but outside of the
sample application
well.
Repeat the entire
procedure (including
fingerstick on a different
finger) with a new strip.
Apply the sample
within 2 1/2 minutes
after display of the
“Apply Sample”
message.
Ensure that the
pipette tip/transfer
tube touches the
sample well before
dispensing sample.

Coag-Sense® Prothrombin Time (PT)/INR Monitoring System Self-Test User’s Manual
Page 40 For In Vitro Diagnostic Use CoaguSense, Inc.
Meter Display
Possible Cause
Solution
CLOT TIME
TOO SHORT
The clotting time was
very short and out of
testing range (<8
seconds).
An air bubble was
detected in the
sample.
Repeat the entire
procedure (including
fingerstick on a different
finger) with a new strip.
Visually confirm that no
air bubbles are in the
sample before applying
to test strip.
Gently squeeze the
transfer tube bulb until
the blood exits being
sure not to introduce air
bubbles.
If the same message
repeats, contact
Technical Support.

Troubleshooting
CoaguSense, Inc. For In Vitro Diagnostic Use Page 41
Meter Display
Possible Cause
Solution
NO CLOT
DETECTED
The sample clotting
time was very long and
out of testing range.
There was insufficient
sample transferred to
the test strip. Possible
causes include;
improper lancing (21g
lancet required), an air
bubble in the sample,
not allowing sample to
completely fill glass
portion of transfer
tube, or the sample
was drawn back into
the transfer tube
before removing tip
from the test strip well..
Visually confirm that no
air bubbles are in the
sample and that the
glass portion of the
transfer tube is full
before applying to test
strip.
Release pressure on
the transfer tube bulb
only after removing
transfer tube from
sample application well.
Repeat the entire
procedure (including
fingerstick) with a new
strip. If the same
message displays, use
an alternative testing
method and contact
Tech Support.
TEST STRIP
EXPIRED SEE
MANUAL
The lot of strips has
expired.
Date is incorrect.
Use a different lot of
strips that has not
expired.
Verify the date setting
on the meter is current.

Coag-Sense® Prothrombin Time (PT)/INR Monitoring System Self-Test User’s Manual
Page 42 For In Vitro Diagnostic Use CoaguSense, Inc.
Meter Display
Possible Cause
Solution
CONTROL
OUT OF
RANGE
The control strip result
is outside of its
acceptable range. This
may be due to a
problem with the
shipment/storage of
the control strips or the
control activation
solution. Plasma on
control strips have a
limited shelf life and
the clotting time will
change when exposed
to temperatures
outside the storage
range.
Repeat test with
another control strip. If
the second test is out of
range, contact Tech
Support.
Control strips should be
tested immediately
upon receipt of your
shipment of new test
strips as they have a
limited shelf life.
ROOM TEMP
INCORRECT
SEE
MANUAL
The temperature of the
room is either below or
above the operating
temperature range of
the meter.
Move the meter to a
place that is within the
operating temperature
range of the meter
(55ºF to 95ºF, 13ºC to
35ºC) and allow meter
time to adjust to correct
temperature. Repeat
testing.
WHEEL
PROBLEM
The test strip was
inserted at an incorrect
angle or speed.
There may be a
problem with the wheel
on the strip or with the
meter
A used strip was
inserted.
Reinsert the strip
holding the back of the
meter steady with one
hand while inserting the
strip completely using a
quick smooth motion
with the other hand. If
display persists try
again with another strip.
If the message displays
again, contact Tech
Support.

Troubleshooting
CoaguSense, Inc. For In Vitro Diagnostic Use Page 43
Meter Display
Possible Cause
Solution
BAR CODE
READ
FAILURE
The strip was inserted
at an incorrect angle or
speed.
There may be a
problem with the bar
code on the strip or
with the meter.
The meter is in direct
sunlight or near a highintensity light source.
Take the strip out and
reinsert holding the
back of the instrument
steady with one hand
while inserting the strip
completely with the
other hand. Insert the
strip using a quick
smooth motion.
Move the meter indoors
into room lighting or
away from light source.
If error persists try again
with another strip. If the
message displays
again, contact Tech
Support.
HEATER
PROBLEM
The meter is too warm
or too cold, or there
may be a problem with
the meter.
Move the meter to a
place that is within the
operating temperature
range of the meter
(55ºF to 95ºF, 13ºC to
35ºC) and allow meter
time to adjust to correct
temperature. Repeat
testing.
Turn meter off then on
again.
Try again with another
strip.
If the display persists
contact Tech Support.

Coag-Sense® Prothrombin Time (PT)/INR Monitoring System Self-Test User’s Manual
Page 44 For In Vitro Diagnostic Use CoaguSense, Inc.
Meter Display
Possible Cause
Solution
DETECT
PROBLEM
There may be a
problem with the strip
or with the meter.
Take the strip out and
reinsert holding the
back of the instrument
steady with one hand
while inserting the strip
completely with the
other hand. Insert the
strip using a quick
smooth motion.
Try again with another
strip.
If the message persists
contact Technical
Support.
LIQUID
PROBLEM
There may be a
problem with the strip
or with the meter.
Take the strip out and
reinsert holding the
back of the instrument
steady with one hand
while inserting the strip
completely with the
other hand. Insert the
strip using a quick
smooth motion.
Try again with another
strip.
If the message persists
contact Technical
Support.
MOTOR
PROBLEM
There may be a
problem with the strip
or with the meter.
Try again with another
strip or contact Tech
Support.

Troubleshooting
CoaguSense, Inc. For In Vitro Diagnostic Use Page 45
Meter Display
Possible Cause
Solution
BATTERY
LOW
The meter batteries
need to be replaced.
The meter can complete
the current test, as well
as one or two more
tests. However, the
batteries should be
replaced as soon as
possible.
BATTERY TOO
LOW
The meter batteries
must be replaced.
Replace batteries to
continue with testing.

Coag-Sense® Prothrombin Time (PT)/INR Monitoring System Self-Test User’s Manual
Page 46 For In Vitro Diagnostic Use CoaguSense, Inc.
17. Performance Characteristics
Expected Values: Fingerstick whole blood results are reported
in units equivalent to a reference method.
Measuring Range: INR 0.8 to 8.0
Normal Range: The following example represents a common
normal range for the Coag-Sense System.
INR: 0.7 to 1.2
PT: 8.0 to 15.0

Warranty
CoaguSense, Inc. For In Vitro Diagnostic Use Page 47
18. Meter Specifications
Operating Temperature
55°F to 95°F (13°C to 35°C)
Operating Humidity
10% to 85% (without condensation)
Storage Temperature
-4°F to 122°F (-20°C to 50°C)
Storage Humidity
10% to 95% (without condensation)
Memory
Capable of storing 100 tests with time
and date
Battery
Quantity 4 of 1.5V (AA) alkaline
batteries.
AC Input
120 VAC (Use Coag-Sense Adapter
Only)
Power Output
6.0V, 2.0A
Blood Sample Size
10-12 µL
Data Port
RS232
Size
3” (7.6 cm) x 6.5” (16.5 cm) x 5.75”
(14.5 cm)
Weight
With 4 AA 1.5 V alkaline batteries:
1.2 lb (0.5 kg)
Equipment Classification
Class II with external power supply.
Internally powered when operated with
batteries. IPXO rating.
WARNING: Use only the Coag-Sense AC power
adapter or damage to the meter may result.

Coag-Sense® Prothrombin Time (PT)/INR Monitoring System Self-Test User’s Manual
Page 48 For In Vitro Diagnostic Use CoaguSense, Inc.
19. Warranty
Limited One (1) Year Warranty
Use of the Coag-Sense PT/INR Monitoring System
The Coag-Sense PT/INR Monitoring System is designed for use
in monitoring patients on oral anticoagulant therapy. Proper
adherence to the instructions in this User Manual and package
insert are critical to proper operation. WARNING: Failure to
comply with the User Manual could lead to inaccurate
PT/INR results which could lead to incorrect medication
dosing which could lead to injury or death.
Limited Warranty
CoaguSense warrants that the Coag-Sense meter is free from all
defects in material and workmanship for a period of one (1) year
from date of purchase. When the meter is used for the intended
purpose and in the appropriate manner, the remedy is repair or
replacement at CoaguSense's option. The warranty does not
apply to a meter damaged by misuse, alteration or tampering to
either the hardware or software. Contact CoaguSense Tech
Support at 886-903-0890 for instructions.
THIS WARRANTY APPLIES ONLY TO THE METER.
COAGUSENSE'S ENTIRE LIABILITY IN CONNECTION WITH
THE METER, REGARDLES OF THE LEGAL OR EQUITABLE
BASIS OF ANY CLAIM, IS LIMITED TO THE PURCHASE
PRICE OF THE METER. IN NO EVENT SHALL COAGUSENSE,
INC. BE LIABLE TO THE PURCHASER FOR ANY
INCIDENTAL, CONSEQUEN-TIAL (INCLUDING BUT NOT
LIMITED TO LOSS OF INCOME OR PROFITS) SPECIAL,
INDIRECT, OR PUNITIVE DAMAGES ARISING FROM OR IN

Warranty
CoaguSense, Inc. For In Vitro Diagnostic Use Page 49
ANY WAY CONNECTED WITH THE PURCHASE OR
OPERATION OF THE METER OR ITS PARTS. NO
WARRANTY OF MERCHANTABILITY OR FITNESS FOR A
PARTICULAR PURPOSE IS IMPLIED FROM THE SALE OF
THE COAG-SENSE PT/INR TEST SYSTEM. NO WARRANTY,
EXPRESS OR IMPLIED (IF ANY) SHALL EXTEND FOR A
LONGER DURATION THAN THE DURATION OF THE
EXPRESS WARRANTY STATED ABOVE.
Instructions for Meter or Product Return
Upon review and agreement with CoaguSense Customer
Service, you may be directed to return the unit. Should this
occur, clean the outside surface using 5% bleach solution or
70% isopropyl alcohol as described in the Maintenance” section.
The original packaging may be required for this purpose. If this is
not available, a cushioned shipping box must be used to return
the meter.

Coag-Sense® Prothrombin Time (PT)/INR Monitoring System Self-Test User’s Manual
Page 50 For In Vitro Diagnostic Use CoaguSense, Inc.
20. Index
A
AC Adapter, 18
AC Power, 36
Air Bubble, 34
Alcohol Wipe, 30
B
Bar Code Read Failure, 44
Batteries, 18, 36
Battery Low, 46
Battery Too Low, 46
Blood Flow, 30
Blood- Minimum Amount, 34
C
Calibration, 14
Class II Equipment, 15
Cleaning the Meter, 39
Clock, 19
Clot Time Too Long, 42
Clot Time Too Short, 41
Collecting a Fingerstick
Sample, 30
Control Out of Range, 43
Control Strip, 36
Control Strip Activation
Solution, 23
Customer Service, 3, 17, 54
D
Date, 18, 19, 28, 35, 36, 37
Detect Problem, 45
E
E-Mail Support, 3, 54
Expected Values, 47
H
Hazards and Symbols, 15
Heater Problem, 44
I
IEC 60601-1, 15
INR, 3, 28
Install Batteries, 36
L
Lancet, 33
Liquid Problem, 45
Low Control Strip, 20
M
Measuring Range, 47
Memory, 28, 35
Meter, 9
Motor Problem, 45
N
No Sample Detected, 40
Normal Range, 47
P
Performing a Control Test, 20
Performing a Patient Test, 25
Prothrombin Time, 3
PT, 3, 28
PT Test Strip Package, 25
R
Remove Strip, 40

CoaguSense, Inc. For In Vitro Diagnostic Use Page 51
Room Temp Incorrect, 43
S
Squeezing the Fingerstick Site,
33
System Description, 6
T
Test Strip, 9
Troubleshooting, 40
U
Unexpected Results, 29
W
Warnings and Precautions, 10
Warranty, 49
Wheel Problem, 43, 44

Technical Support
CoaguSense, Inc.
48377 Fremont Blvd., STE 113
Fremont, CA 94538
Toll Free: 1-866-903-0890
E-Mail: techsupport@coagusense.com
CoaguSense, Inc.
48377 Fremont Blvd, STE 113
Fremont, CA 94538 USA
Tel: (510) 270-5442
Fax: (510-226-6540
EMERGO EUROPE
Molenstraat 15
2513 BH, The Hague
The Netherlands
Product Made in U.S.A.
REF Part No. 03P51-01
CSI P/N 100219 Rev D
 Loading...