

Page 1
GETTING STARTED
MAIN MENU
06/12/2007
MAIN MENU
06/12/2007
MEMORY
QC TEST
PATIENT TEST
Setup
06/12/2007
Setup
06/12/2007
Screen
06/12/2007
Screen
06/12/2007
Units
Contrast
Language
QC
0DLQ0HQX DP
t
CoaguChek® XS Pro
System
Getting Started
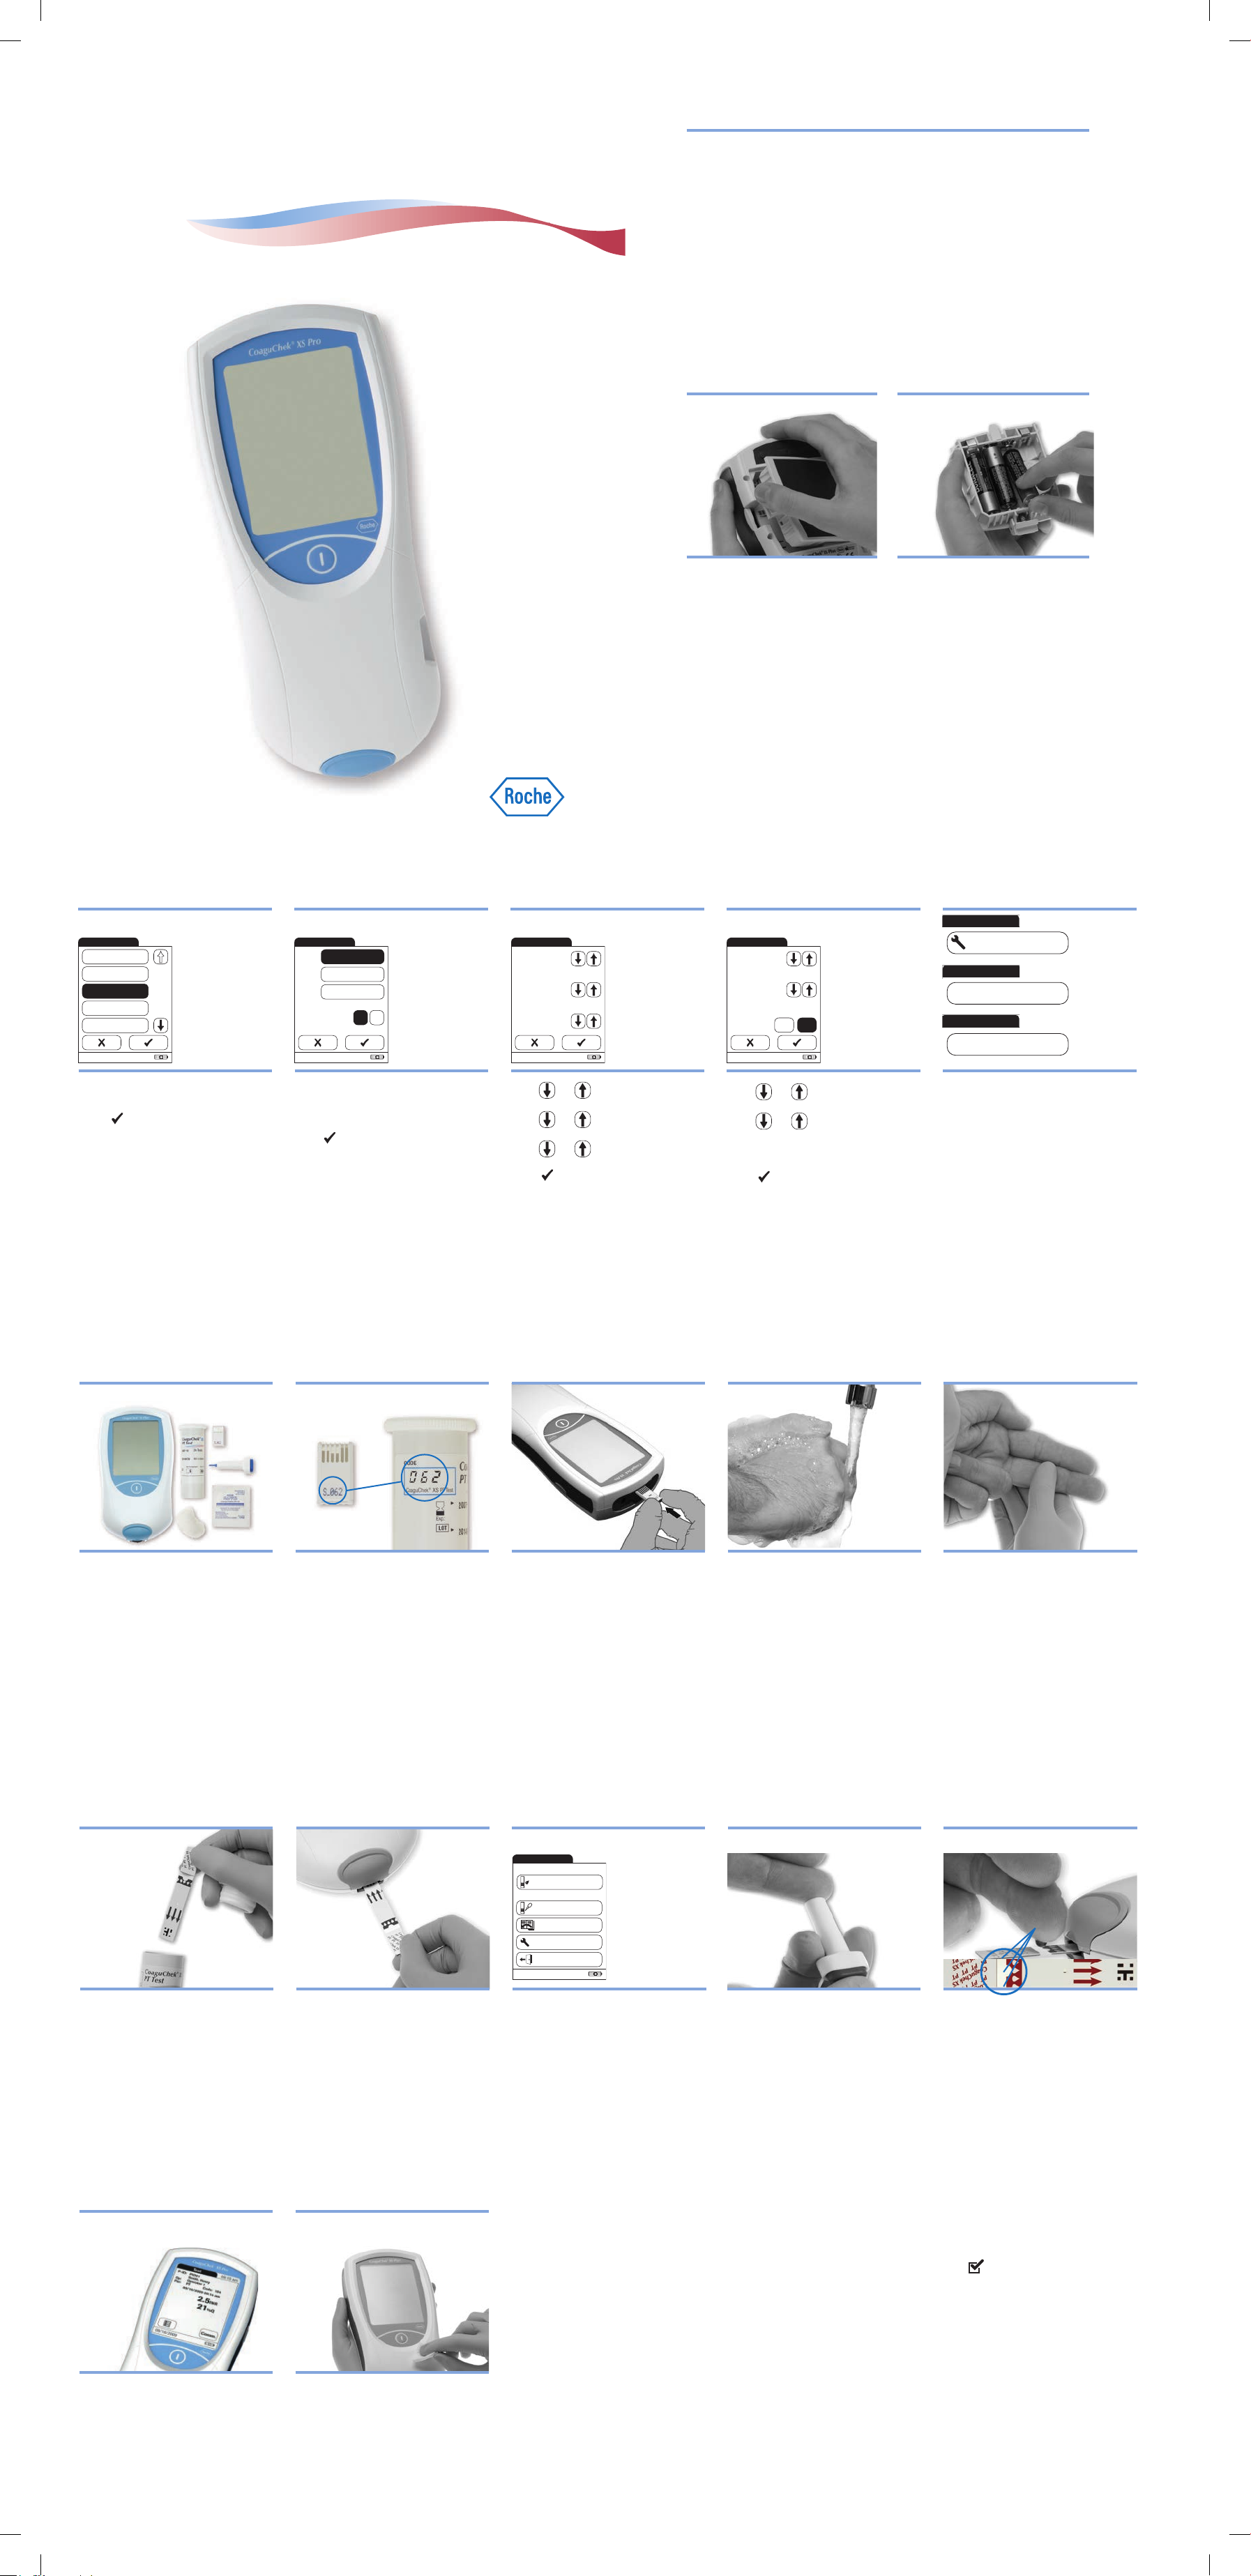
Follow these steps to get started using the meter:
1. Watch the CoaguChek XS Pro System DVD. It will help you get comfortable with the
CoaguChek XS Pro Meter and the testing procedures.
2. Read this Getting Started guide. You will learn how to set up and perform your first blood
and optional liquid quality control tests on the CoaguChek XS Pro Meter.
3. With this Getting Started guide by the meter, follow the steps to perform your first test.
Then, as necessary, refer to the user manual:
The CoaguChek XS Pro System User Manual is a comprehensive guide to the meter and
test strips. It is designed to provide answers to your questions about the meter’s operation
and use.
INSTALLING BATTERIES
t
1. Open Compartment 2. Insert Batteries
Press the release tab on the battery
cover on the back of the meter.
Slide the battery cover off.
After you insert the batteries, the meter powers on and the display changes to the
language menu.
You’ll need to set several parameters before using the meter for the first time.
SETUP
t
3. Set the Language 4. Set the Date and Time Format 5. Set the Date 6. Set the Time
2010
09:15 am
1
1
Time
Hour:
Minute:
03/16/2010
09:15 am
9
59
AM PM
Language
03/16/2010
Dansk
Deutsch
English
Español
Français
09:15 am
Format
Date:
Time:
03/16/2010
09:15 am
DD.MM.YYYY
MM/DD/YYYY
YYYY-MM-DD
24H 12H
Date
Year:
Month:
Day:
03/16/2010
Insert 4 AA batteries according to
the diagram inside the battery cover.
Replace the cover.
SETUP
Screen
Date/Time
ENGLISH is the default selection. It is
highlighted in black.
to save your language setting.
Press
The display changes to the Date and Time
Format screen.
MM/DD/YYYY is the default date
selection.
Press or to select the year, then
12H is the default time selection
Press to save your date and time format
settings.
The display changes to the Date screen.
Press to save the current date.
The display changes to the time screen.
or to select the month, then
or to select the day.
Press or to select the hour, then
or to select the minutes,
then AM or PM.
to save the current time.
Press
The display returns to the Main Menu.
The date settings are important. Each time
you run a test, the meter compares its date
with the test strip’s expiration date. An
incorrect date may cause an expired strip
error on in-date strips preventing you from
running a test.
If the test strips are expired, the meter
displays an error message and prevents you
from running a test.
PREPARING FOR A TEST
t
1. Gather the Following Items 2. Match Code 3. Insert Test Strip Code Chip 4. Wash Hands
You may change or re-enter the date,
time or format at any time. Always access these
options by:
Pressing
Setup on the main menu, then
Screen on the setup menu, then
Date/Time on the Screen menu
…which brings you to the SET DATE,
SET TIME, and FORMAT options.
• CoaguChek XS Pro Meter
• Container of test strips
• Test Strip Code Chip
• CoaguChek Lancet
• Alcohol wipe
• Cotton ball
The code number on the test strip
container and the test strip code chip
must match.
Each box of test strips comes with a
matching code chip. Test strip code
chips are identified with an “S.”
Every time you open a new box of test
strips, you will replace the test strip
code chip.
With the code number facing up, insert
the code chip into the code chip slot
until it snaps into place.
Have the patient wash his or her hands
in warm, soapy water. Or, clean the
fingertip with an alcohol wipe.
Make sure the fingertip and your
gloved hands are thoroughly dry.
Before continuing, review these
tips for getting a good blood drop.
Increasing the blood flow in the finger
will help you get a good drop of blood,
so keep in mind these tips:
Warm the hand. Have the patient hold
•
it under his or her arm, use a hand
warmer, and/or wash with warm water.
• Have the patient let that arm hang by
his or her side.
• Massage the finger from its base.
Use these techniques until the fingertip
has increased color.
t
TESTING
1. Remove a Test Strip 2. Insert Test Strip 3. Select PATIENT TEST 4. Collect the Sample 5. Apply the Sample
3DWLHQW7HVW
&RQWURO7HVW
5HYLHZ5HVXOWV
6HWXS
/RJRXW
CCXS_Pro_GSG_05914647001_03_USA.indd 1 06.05.2016 11:56:10
Take a test strip out of the container.
Close the container tightly.
You have 10 minutes to use a test strip
once you remove it from the container.
Slide the test strip into the test strip
guide in the direction of the arrows until
it stops.
The meter powers on, and the main
menu appears.
If you insert a strip from a new lot
number for the first time, the meter
will display the number of the test strip
code chip required. Remove the old
code chip and insert the new one.
6. Record Result 7. Clean Up
Record your result as instructed by your
facility.
Note: If during testing the meter
displays an error message, refer to the
Place the used strip and lancet in an
approved biohazard container.
Power the meter off.
If the meter is dirty, wipe it clean.
Error Messages section of the user
manual for an explanation and steps on
how to proceed.
Press PATIENT TEST
on the main menu
screen.
Enter the Patient ID.
An hourglass symbol appears.
A test strip symbol appears with a
flashing blood drop. You have 180
seconds to apply the sample.
Twist the protective cap off the lancet.
Massage the finger until you see
increased color in the fingertip.
Keeping the hand down, press the
tip of the lancet firmly against the
side of the fingertip. Press the blue
trigger button.
Gently squeeze from the base of the
finger to develop a drop of blood.
Within 15 seconds of sticking the
fingertip, apply the blood to the
target area on the test strip.
Find the clear target area on the test strip.
You can dose from the side or top.
Hold the blood drop to the test strip
until you hear a beep. The flashing
blood drop symbol will disappear and an
hourglass symbol appears and the test
begins.
Do not add more blood to the test
strip. Do not touch the test strip
while the test is in progress.
The meter performs an automatic quality
control check on the strip before it
displays the test result.
appears in the display briefly
following a successful QC check.
The result appears in less than a minute.
Page 2
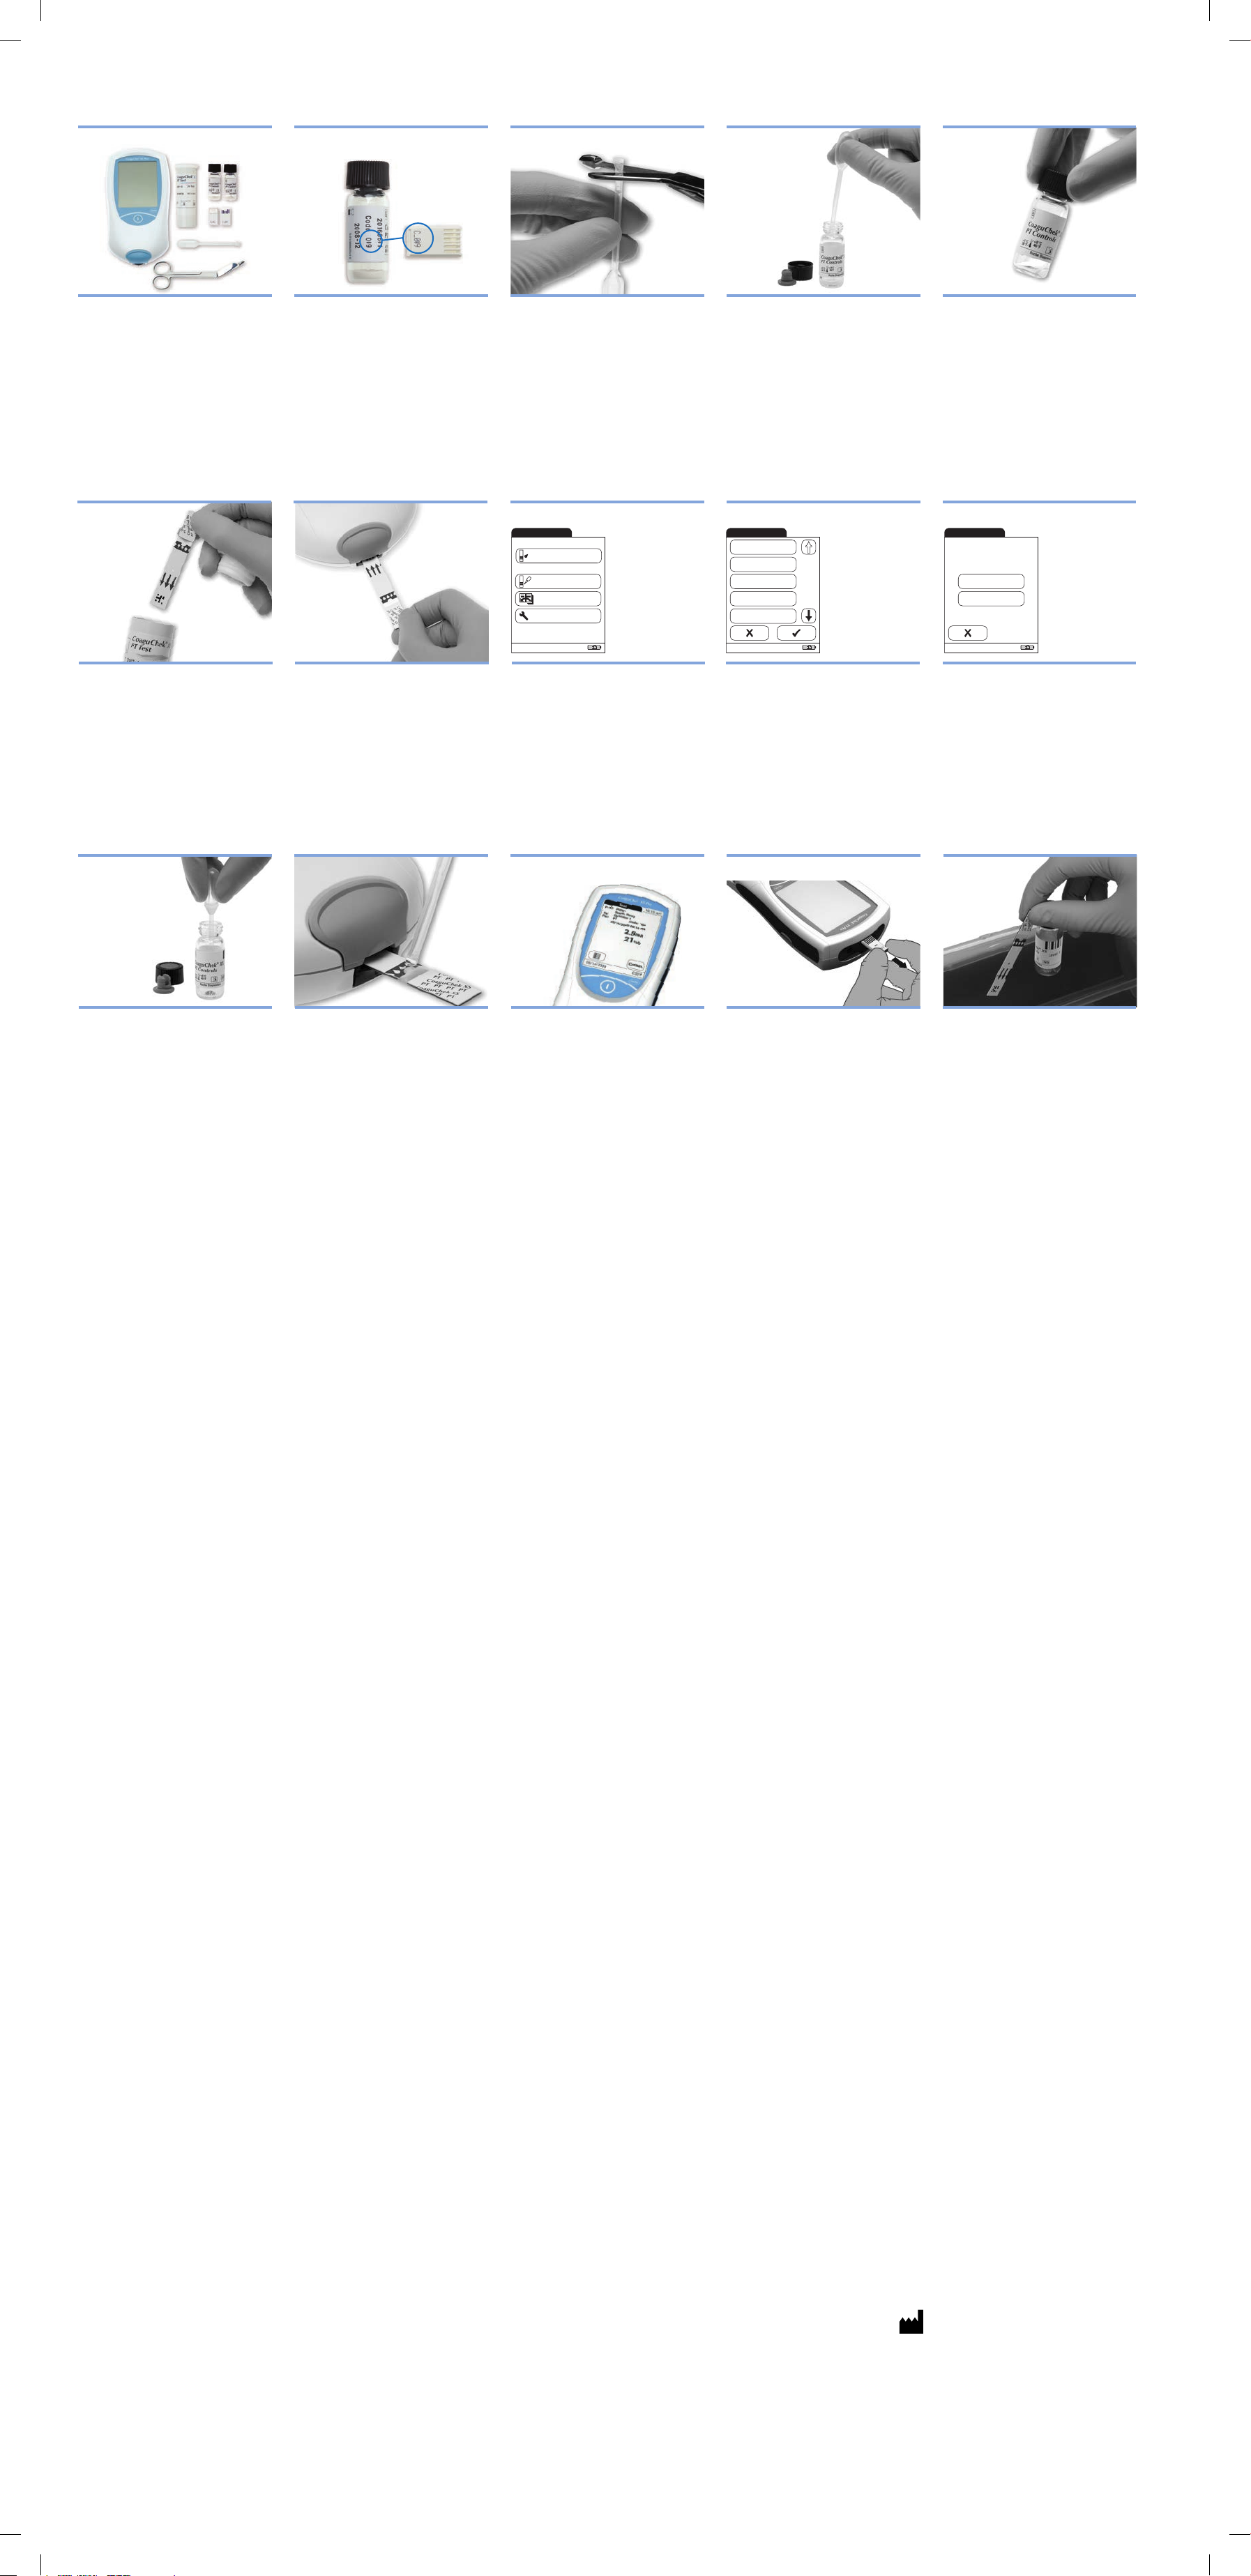
PREPARING TO RUN AN OPTIONAL LIQUID QUALITY CONTROL
TEST
1. Gather the Following Items 2. Match Code 3. Reconstitute Control Solution
t
• CoaguChek XS Pro Meter
• Container of test strips
• Test Strip Code Chip
• CoaguChek XS Pro PT Control
Solutions
• Diluent Dropper (2)
• Quality Control Code Chip
The code number on the control solution
and the Quality Control Code Chip must
match.
Each box of controls comes with a
matching code chip. Control code chips
are identified with a “C” in the number.
Open a bottle of lyophilized control.
Cut off the flared tip of the dropper at
the end of the stem.
Hold the diluent dropper vertically by
the stem, not the bulb, to avoid loss of
diluent.
Do not hold the pipette close to
your face.
Transfer the entire contents of the
dropper to the bottle. Do not touch the
dropper to the dried material or to the
sides of the bottle.
Do not discard the dropper. You will
need it to apply a drop of control to the
test strip later in the test.
Close the bottle.
Gently swirl the bottle using a circular
motion to dissolve the dried material.
Do not shake or turn the bottle on its
side or upside down. Avoid creating
bubbles.
Let the bottle sit undisturbed for at least
a minute to ensure that the dry material
dissolves completely.
t
RUNNING AN OPTIONAL LIQUID QUALITY CONTROL TEST
1. Remove a Test Strip 2. Insert Test Strip 3. Select Control Test 4. Insert QC Code Chip 5. Select the Level
Take a test strip out of the container.
Close the container tightly.
You have 10 minutes to use a test strip
once you remove it from the container.
Slide the test strip into the test strip
guide in the direction of the arrows until
it stops.
The meter powers on, and the main
menu appears.
Main Menu
03/16/2010
Press Control Test
09:15 am
Patient Test
Control Test
Review Results
Setup
on the main menu
screen.
An hourglass symbol appears.
The QC TEST menu appears.
QC Test
*
03/16/2010
Press NEW on the QC Menu.
A code chip symbol with a flashing
arrow appears on the screen.
Remove the Test Strip Code Chip and
insert the Quality Control Code Chip with
the number facing up until it snaps into
place.
New
QC 248
QC 379
QC 462
QC 332
09:15 am
QC Test
QC: 999
Code: 184
Op: Operator 1
03/16/2010
09:15 am
Par: PT
Level 1
Level 2
Select Level 1 for running a level one
control.
An hourglass symbol appears.
A test strip symbol appears with a
flashing dropper symbol. You have
180 seconds to apply the quality control
solution.
The meter stores the code chip
information in memory for future use.
6. Collect Control 7. Apply the Control 8. Record Result 9. Remove Control Code Chip 10. Clean Up
Using the dropper, gently squeeze
and hold the bulb. Insert the tip of the
dropper into the control solution. Slowly
release the bulb to draw the control up
to the bulb. Avoid creating bubbles in the
control.
Apply a drop of control to the target area.
Hold the control drop to the test strip until
you hear a beep. The flashing dropper
symbol will disappear. An hourglass will
appear, indicating the test is in progress.
Return any unused control to the bottle for
additional tests. Reconstituted controls are
good for 30 minutes.
The result appears in less than one
Record your result as instructed by
your facility.
Note: If during testing the meter displays
an error message, refer to the Error
Messages section of the user manual
for an explanation and steps on how to
proceed.
Run a level 2 control test with a new test
strip following the same steps.
Remove the Quality Control Code Chip
and store it with the remaining controls.
Replace the Test Strip Code Chip.
Roche Diagnostics recommends that you
Place the used strip and control bottles in
an approved biohazard container.
Power the meter off.
If the meter is dirty, wipe it clean.
keep a code chip in the slot to keep the
electrical contacts free of dirt.
minute.
COAGUCHEK is a trademark of Roche.
©2007-2016 Roche Diagnostics.
All rights reserved.
Roche Diagnostics GmbH
Sandhofer Strasse 116
68305 Mannheim, Germany
Made in Germany
Manufactured for and distributed in the USA by:
Roche Diagnostics
9115 Hague Road
Indianapolis, IN 46250-0457
Rx Only
www.coaguchek-usa.com
www.usdiagnostics.roche.com
CCXS_Pro_GSG_05914647001_03_USA.indd 2 06.05.2016 11:56:13
0 5914647001 (03) 2016-04 USA
 Loading...