

CoachComm X2, XCU-44, X2 WI, XRT-ANT-900, XRP-13 Operating Manual
Operating Manual
X2 Package

OPERATING MANUAL
Thank you from CoachComm!
We at CoachComm want to thank you for purchasing an X-System Sideline Communications System. We have made every
effort to build a reliable, intuitive communication system that provides the functionality that you can count on come game
day.
One of our goals in the design of X-System was to build on the advances set forth by the previous Tempest® NG System and
to provide users with unmatched RF performance. You will be able to begin using your new X-System with nothing more
than the Game Day Guide. However, to fully benet from the available features, please read this manual carefully.
We want X-System to make your job easier and your game day experience positive. To successfully familiarize yourself with
the many diverse and powerful features X-System offers, it is crucial that you acquaint yourself with the manual. Your time
spent will help you get the most from your X-System by making setup quick and easy.
We are committed to providing you with a high quality product that will deliver years of trouble-free service. Should you
experience any problem with your X-System equipment, whether it is under warranty or not, we will be there to take care of
your needs.
Thank you for choosing CoachComm for your sideline communication needs.
CoachComm LLC
205 Technology Parkway
Auburn, AL 36830
Phone: 334-321-2300
Fax: 888-329-2658
www.coachcomm.com
© 2018 CoachComm LLC. All rights reserved.
Document Reference: 2018.03 D0000383_A
© Telex is a registered trademark of Telex Communications, Inc.
800.749.2761 www.coachcomm.com
ii

OPERATING MANUAL
Table of Contents
Safety Information ................................................................................................................................................1
Electrical Safety ..............................................................................................................................................1
Battery Safety .................................................................................................................................................2
Protecting Yourself and Those Around You .......................................................................................................2
X2 Block Diagram .................................................................................................................................................3
Introduction ..........................................................................................................................................................4
What makes X-System so different? ...............................................................................................................4
Frequency Considerations ...............................................................................................................................4
Game Day Setup ...................................................................................................................................................5
X-System Components .........................................................................................................................................9
X2 Package Overview .....................................................................................................................................9
Press Box Rack Unit Overview ......................................................................................................................10
Wired Interface (WI) ......................................................................................................................................11
Control Unit (XCU-44)....................................................................................................................................13
Radio Transceiver/Antenna (XRT-ANT-900) ...................................................................................................17
Radio Packs (XRP-13) ..................................................................................................................................19
System Accessories ............................................................................................................................................25
Press Box Cables ..........................................................................................................................................25
Headsets ......................................................................................................................................................25
System Setup and Operation ...............................................................................................................................26
Mounting Antennas .......................................................................................................................................26
Covering Your Antennas ................................................................................................................................28
Setting Home/Away Status ...........................................................................................................................28
Walk Testing Your System .............................................................................................................................29
Understanding Link Quality ..........................................................................................................................29
X-Ware Setup and Installation .............................................................................................................................30
System Requirements...................................................................................................................................30
Installing X-Ware ..........................................................................................................................................30
Connecting X-Ware to Your CU ......................................................................................................................32
X-Ware Operation ...............................................................................................................................................34
Home Screen ................................................................................................................................................34
Prole Screen ...............................................................................................................................................35
Additional System Views ...............................................................................................................................38
X-Ware Advanced Settings ............................................................................................................................40
System Conguration File ...................................................................................................................................41
Saving a Conguration File ...........................................................................................................................41
Loading a Conguration File .........................................................................................................................41
System Maintenance ..........................................................................................................................................43
Basic Maintenance .......................................................................................................................................43
Lithium-Polymer Battery Maintenance ..........................................................................................................43
Storage of your Lithium-Polymer Batteries ...................................................................................................43
Updating X-Ware ..........................................................................................................................................44
Updating Device Firmware ............................................................................................................................45
Troubleshooting Common Issues .........................................................................................................................48
Returning Equipment for Repair or Maintenance ..........................................................................................49
License Information ............................................................................................................................................50
Radio Device License Information .................................................................................................................50
800.749.2761 www.coachcomm.com
iii

OPERATING MANUAL
Non-Radio-Device License Information .........................................................................................................51
Warranty Information ..........................................................................................................................................52
Limited Warranty ..........................................................................................................................................52
Parts Limited Warranty .................................................................................................................................52
Specications .....................................................................................................................................................54
Control Unit Specications ...........................................................................................................................54
Radio Transceiver/Antenna Specications ....................................................................................................55
Radio Pack Specications .............................................................................................................................56
800.749.2761 www.coachcomm.com
iv

OPERATING MANUAL
Safety Information
The following pages detail important safety information related to the ownership and operation of CoachComm’s X-System.
Please ensure all personnel review the warnings and safety recommendations included in this document before operating
X-System in order to prevent equipment damage and/or serious personal injury.
Throughout this document you will see the following indicators for important safety information and alerts:
WARNING: Ignoring these warnings may cause permanent or serious injury or death as a result of
incorrect operation.
CAUTION: Ignoring these cautions may cause moderate injury or property damage as a result of
incorrect operation.
Electrical Safety
WARNING: ELECTRIC SHOCK RISK
» Do not submerge any part of X-System in water.
» Refer all servicing to qualied service personnel. Do not attempt to modify, disassemble, or open any
X-System components. Exposing the electrical system may result in equipment damage and serious
personal injury, including electric shock. Equipment damage caused by unqualied personnel may void the
product warranty associated with your X-System.
CAUTION: SYSTEM DAMAGE RISK
» Protect the power cords from foot trafc. Do not allow cords to be crimped or pinched, particularly at plugs,
electrical outlets, and the point they exit from the apparatus. Routinely inspect power cords for any signs of
fray or extensive wear. Immediately replace any damaged cords.
» Keep all ventilation openings clean and unobstructed. Failure to do so could cause the system to overheat,
which could cause personal injury or property damage.
» Unplug X-System during lightning storms to prevent power surges that could damage electrical
components or cause re.
800.749.2761 www.coachcomm.com
1
OPERATING MANUAL
Battery Safety
Radio Pack (RP) Battery Safety
WARNING: EXPLOSION AND FIRE RISK
» Battery explosion is possible if incorrect type is used. Use only batteries approved for use with X-System
Radio Packs. If powering the Radio Pack with AA batteries, use only alkaline or carbon-zinc batteries.
» Do not leave the battery unattended while charging. Immediately unplug unit if battery begins to swell
or emit smoke while charging. If battery bursts or chemicals begin to leak out of battery housing, the
chemicals will react with the air and cause a re.
» CoachComm recommends keeping a Class-D re extinguisher available when charging lithium-polymer
batteries. The chemicals inside lithium-polymer batteries are highly ammable.
» Do not allow batteries to overheat (reach temperatures of above 140 degrees Fahrenheit).
» Batteries that appear swollen, deformed, or damaged, or that do not t properly should never be used.
Properly dispose of any batteries in this condition in accordance with the instructions provided by your local
authorities. For more information and local drop-off sites, visit http://www.call2recycle.org/.
Protecting Yourself and Those Around You
Allow only responsible individuals who are familiar with these general safety rules and operating instructions to use your
X-System. Never allow people unfamiliar with these rules and instructions to set up or operate your system.
CAUTION: SYSTEM DAMAGE AND INJURY RISK
» Never, under any conditions, remove, bend, cut, t, weld, or otherwise alter standard parts of the X-System.
Modications to your system could cause personal injuries and property damage and will void your
warranty.
» Only use attachments/accessories/cables/antennas/hardware provided by the manufacturer.
» Do not remove or cover any safety labels. If a label is damaged or removed, contact a CoachComm support
technician for a replacement.
» Do not mount the Radio Transceiver/Antenna suction cup directly over heads, if possible. If unavoidable, it
is imperative that you use the included safety lanyard to secure the suction cup to a xed anchor point to
prevent damage or injury from falling objects.
800.749.2761 www.coachcomm.com
2
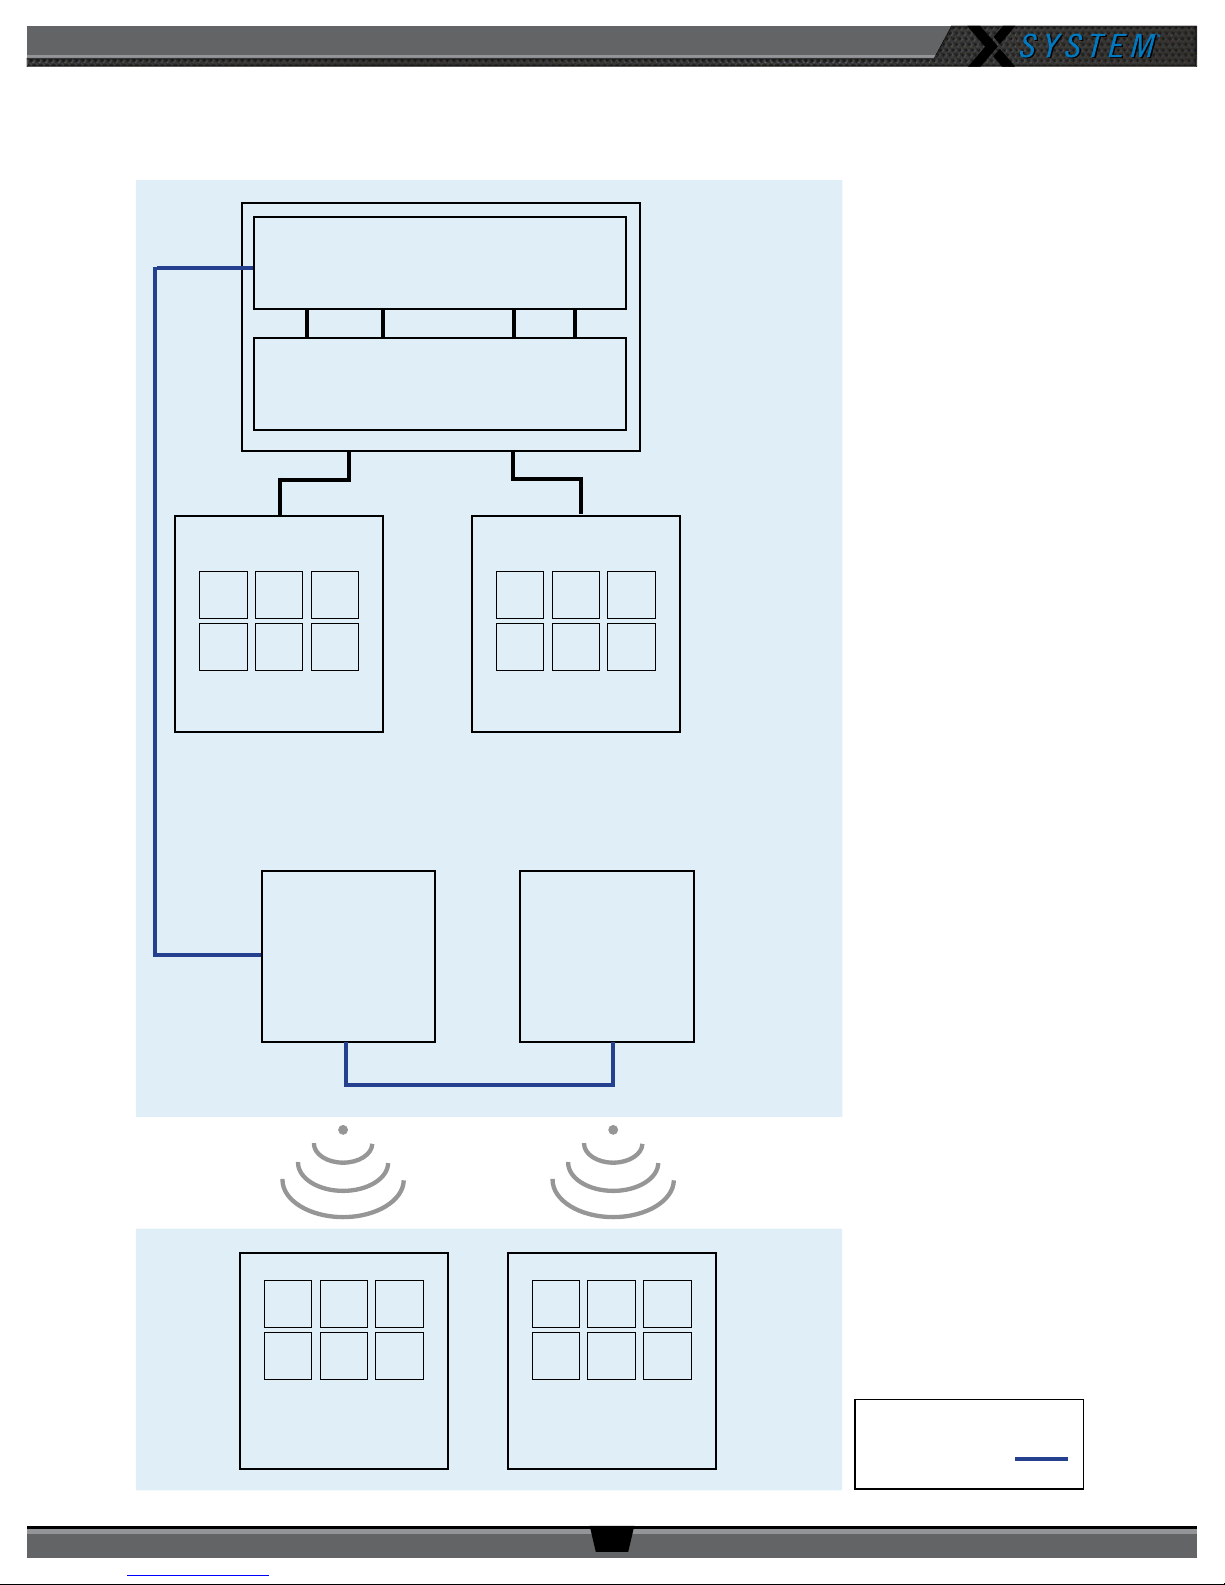
X2 Block Diagram
Control Unit
Wired Interface
OPERATING MANUAL
Press Box
Rack Unit
A/B
Wired Users (x6)
Antenna
C/D
Wired Users (x6)
Antenna
Wireless Users
(x6)
800.749.2761 www.coachcomm.com
Wireless Users
(x6)
3
Legend
Cat 5e (max of 330 ft)

OPERATING MANUAL
Introduction
What makes X-System so different?
CoachComm has been building and providing wired and wireless systems for over 25 years to supply quality
communications and practice equipment to every level of football nationwide. Championship-winning teams have found
condence in our Tempest FX system, Connex system, and most recently our X-System. Our latest solution combines the
mobility and functions you’re familiar with from Tempest FX and pairs it with our latest development in design and agility
from the X-System.
X-System makes use of the newest available communications technology and meets our customers’ demands for more
users, better audio, and future-based features.
X-System is the rst wireless communications system to innovate the following unique features:
• Better Frequency-Hopping Spread Spectrum performance in dome venues
• Enhanced 900MHz wireless performance
• Better 7k audio quality
• High Density mode provides ability to add as many coaches as you need
• X-Ware software user interface for monitoring and customizing the X-System
These features come together to form a powerful product called X-System. X-System, together with enhanced tools for the
wired portion of the system, makes for an incredibly robust, easy-to-operate system.
Frequency Considerations
900MHz
CoachComm designed the new X-System to operate seamlessly in the 900MHz frequency band. This allows multiple
devices to operate within the band with minimal interference or reduction of range and performance.
The 900MHz ISM frequency band is a portion of the RF spectrum available for unlicensed use in North America and other
various locations with no frequency coordination. In North America the 900MHz band is 902–928 MHz. X-System utilizes up
to 26 MHz of this spectrum.
Frequency-Hopping Spread Spectrum
Frequency-Hopping Spread Spectrum (FHSS) is a means of RF transmission. In FHSS, the signal hops to various
frequencies—hence the name. In doing so, it spreads the data (voice in our case) across a wide area of the RF spectrum.
Devices such as those in X-System collide constantly with other devices in that frequency spectrum and must have
mechanisms built into their protocol to allow for data redundancy to provide acceptable user performance.
800.749.2761 www.coachcomm.com
4
OPERATING MANUAL
50 4040
5040 40
50 4040
5040 40
Your Sideline
Your Sideline
OR
Game Day Setup
The procedures in this section serve as a reference for a typical game day setup. You can nd more in-depth information
about the devices and processes mentioned here in later sections of this Operating Manual.
CAUTION: Allow only responsible, authorized individuals who have read all of the instructions and
warnings to set up and operate your X-System.
1. Set up Press Box Rack Unit.
1a. Unpack the press box and accessory cases.
1b. Position the Press Box Rack Unit out of the way to avoid coaches and other trafc.
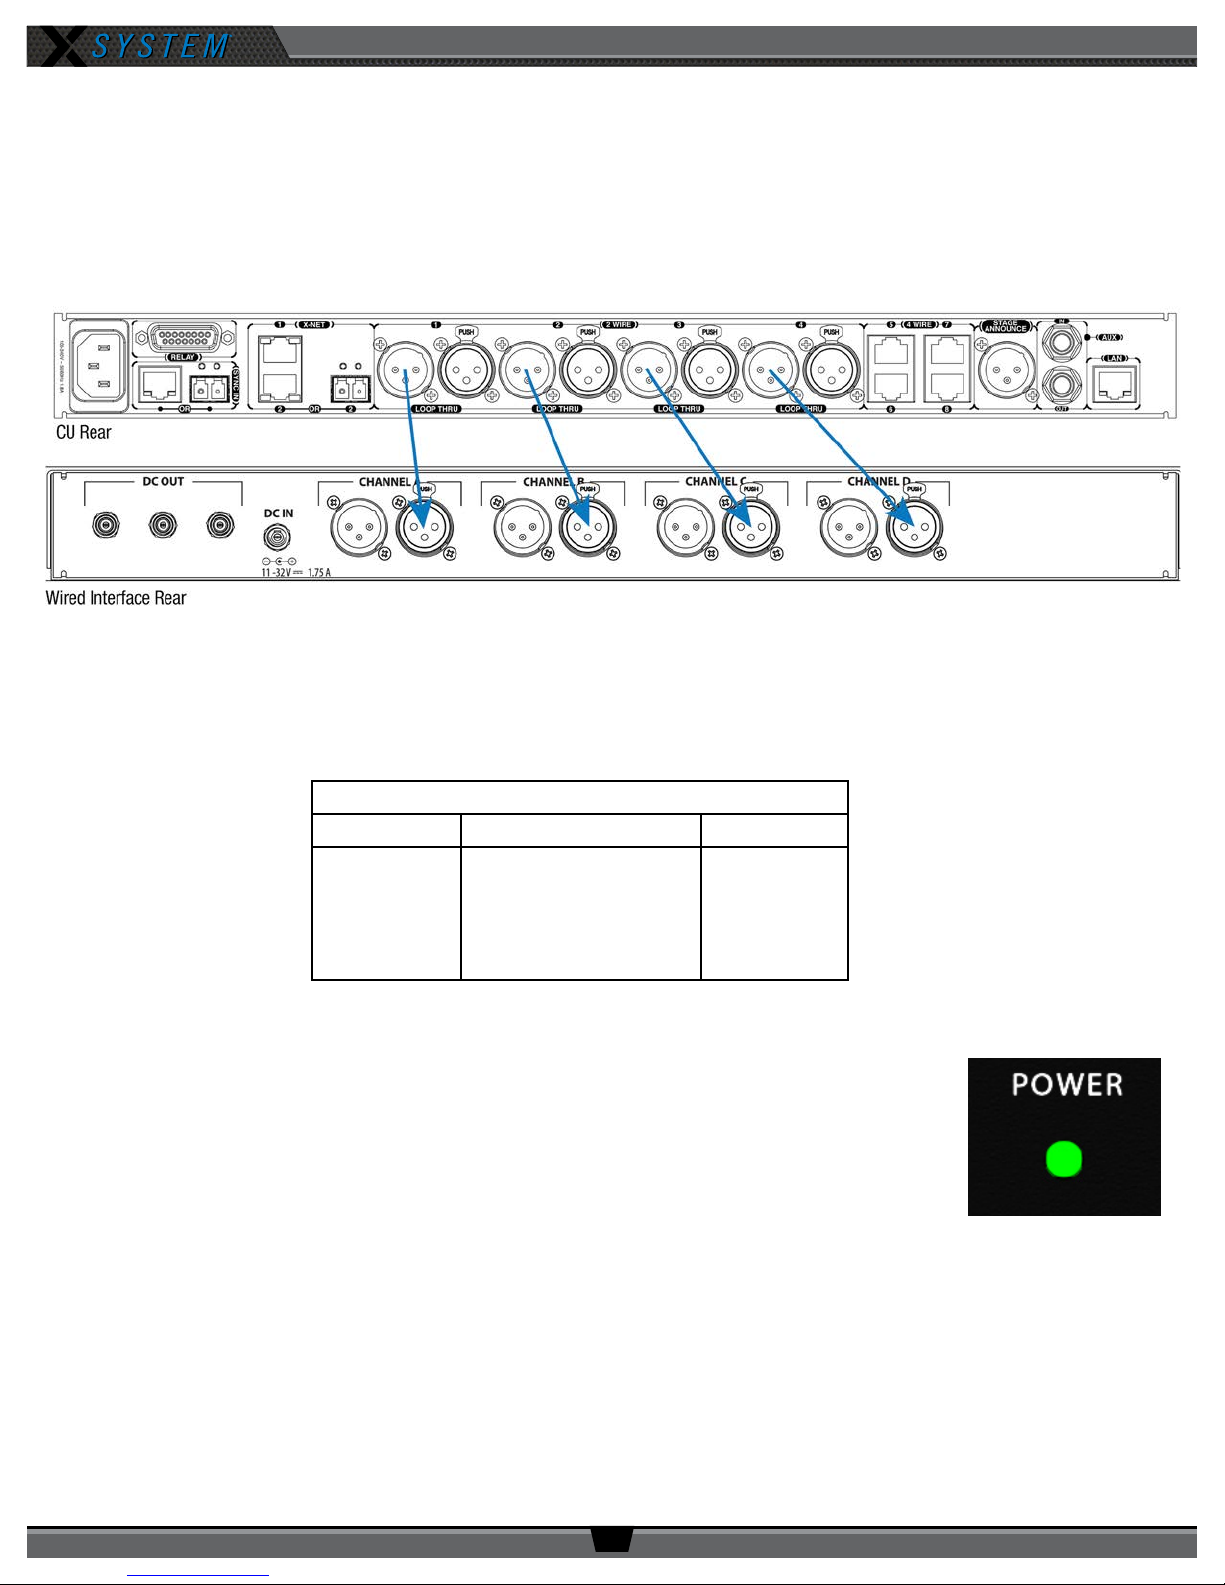
1c. Connect power to the Press Box Rack Unit, but do NOT turn on the Control Unit (CU) yet. The
“Power” LED on the front of the Wired Interface should be lit green.
Important: X-System requires a minimum of one dedicated 15 amp 120V circuit.
Figure 1: Power LED
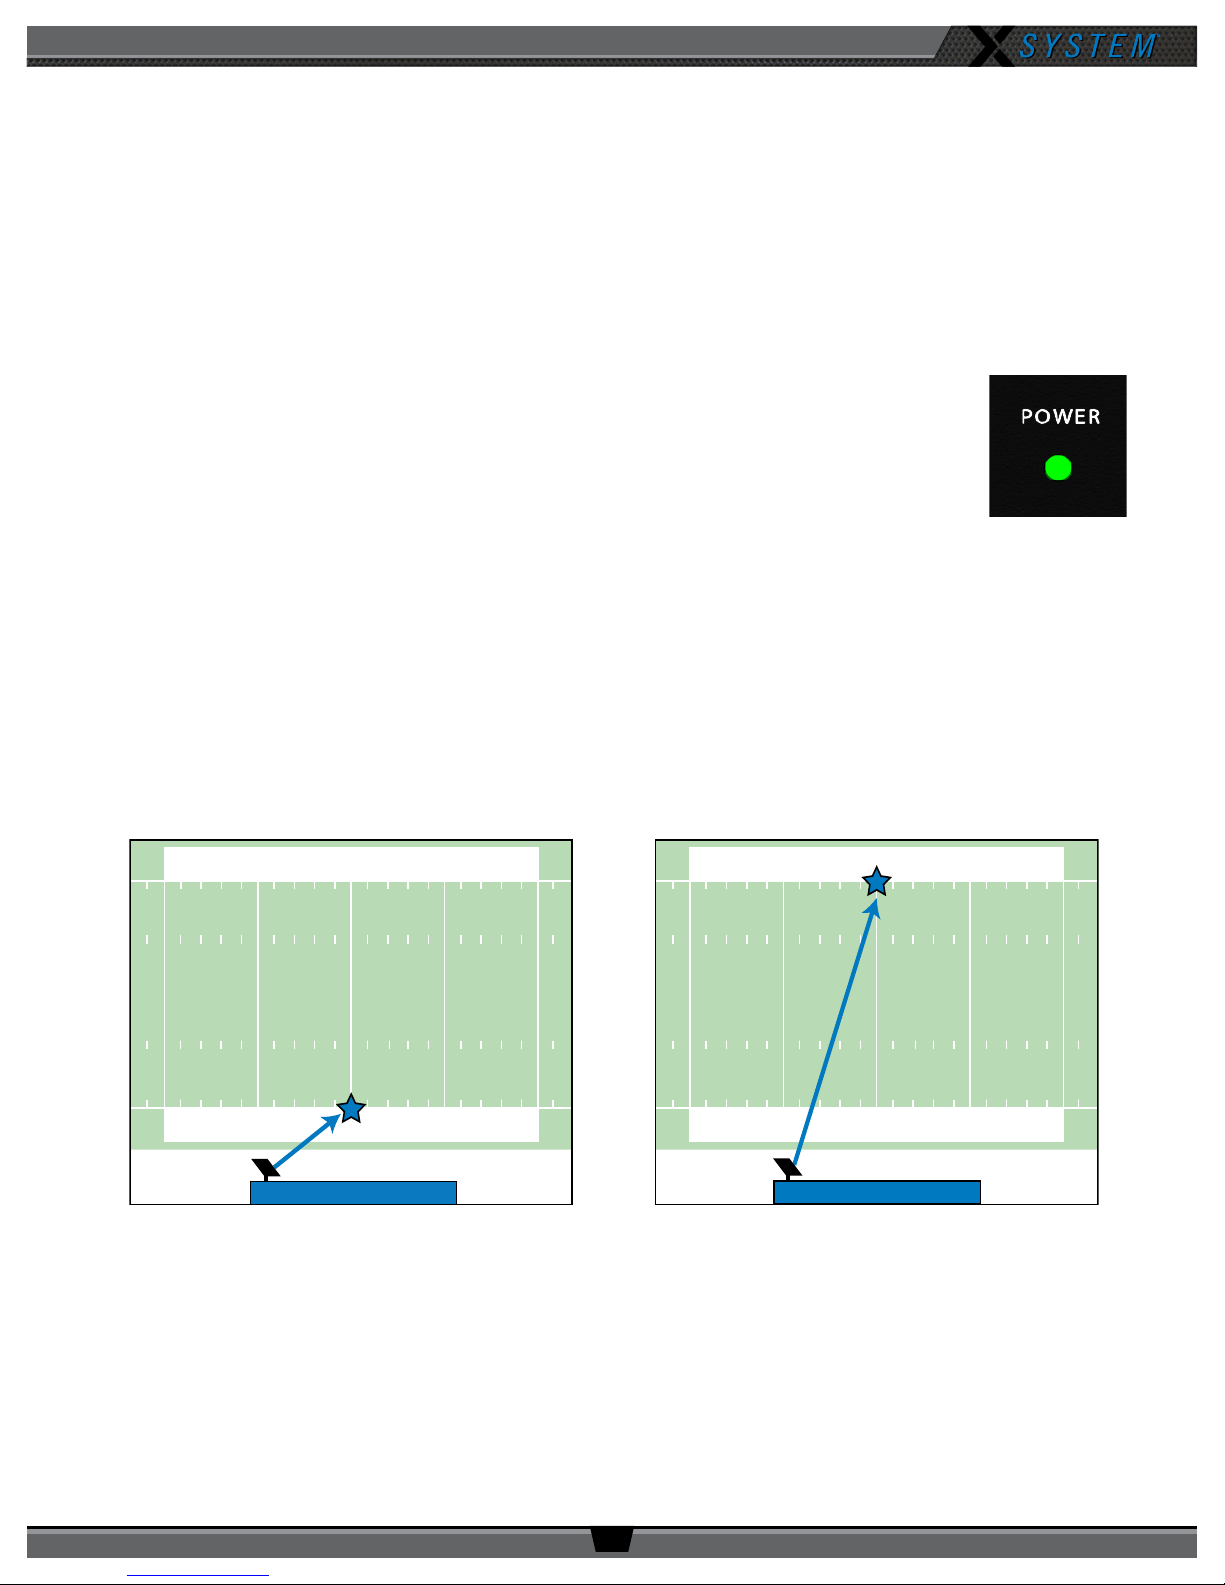
2. Mount and connect the Antenna.
2a. Using either the clamp or suction cup mounting hardware, secure the Antenna bracket so that the Antenna’s
logo points toward the center of your team’s coaches’ box. See page 26 of this manual for more instructions if
needed.
Note: Any obstructions between the Antenna and eld (like window tinting) can negatively impact
performance. CoachComm recommends opening windows or mounting the Antenna externally to
the press box. We also recommend covering Antennas with a clear plastic bag or a rain cover in
the event that rain is expected.
Figure 2: Antenna Pointed Toward Center of Your Team’s Coaches’ Box
800.749.2761 www.coachcomm.com
5

OPERATING MANUAL
2b. Connect a Cat 5 cable to the X-NET IN port on the Antenna.
2c. Connect the other end of the Cat 5 cable to the FIELD ANTENNA port on the Press Box Rack Unit’s rear panel.
2d. If using a second eld Antenna, conrm the short Cat 5 cable is properly connected between the rst Antenna’s RT
LOOP port and the second Antenna’s X-NET IN port.
Note: If applicable, a third Antenna for booth wireless can be connected as outlined in the diagram below.
CAUTION: Secure and protect any cords to prevent walkway hazards and potential contact with moisture.
First Field Antenna Second Field Antenna
Pressbox
Rack Unit
Figure 3: Press Box Rack Unit Connections to Antennas
3. Power on the Control Unit.
3a. Power ON the CU via the power switch on its front panel.
3b Use CU navigational controls to select
Home
or
Away
and press the Enter button.
Optional Booth Antenna
Important: No RF transmission will occur until the Home/Away status is selected. Failure to set
this status properly may result in RF interference if and when the opposing team
is also using an X-System. It is important to coordinate with opponents to ensure
optimal performance for both teams.
Figure 4: CU Navigation Buttons
3c. Wait until the CU displays the following message: “CCF Loaded” along with a conguration le summary. Once the
message times out, the home screen will display on the front of the CU.
Figure 5: Sample CCF Loaded Screen
800.749.2761 www.coachcomm.com
6
OPERATING MANUAL
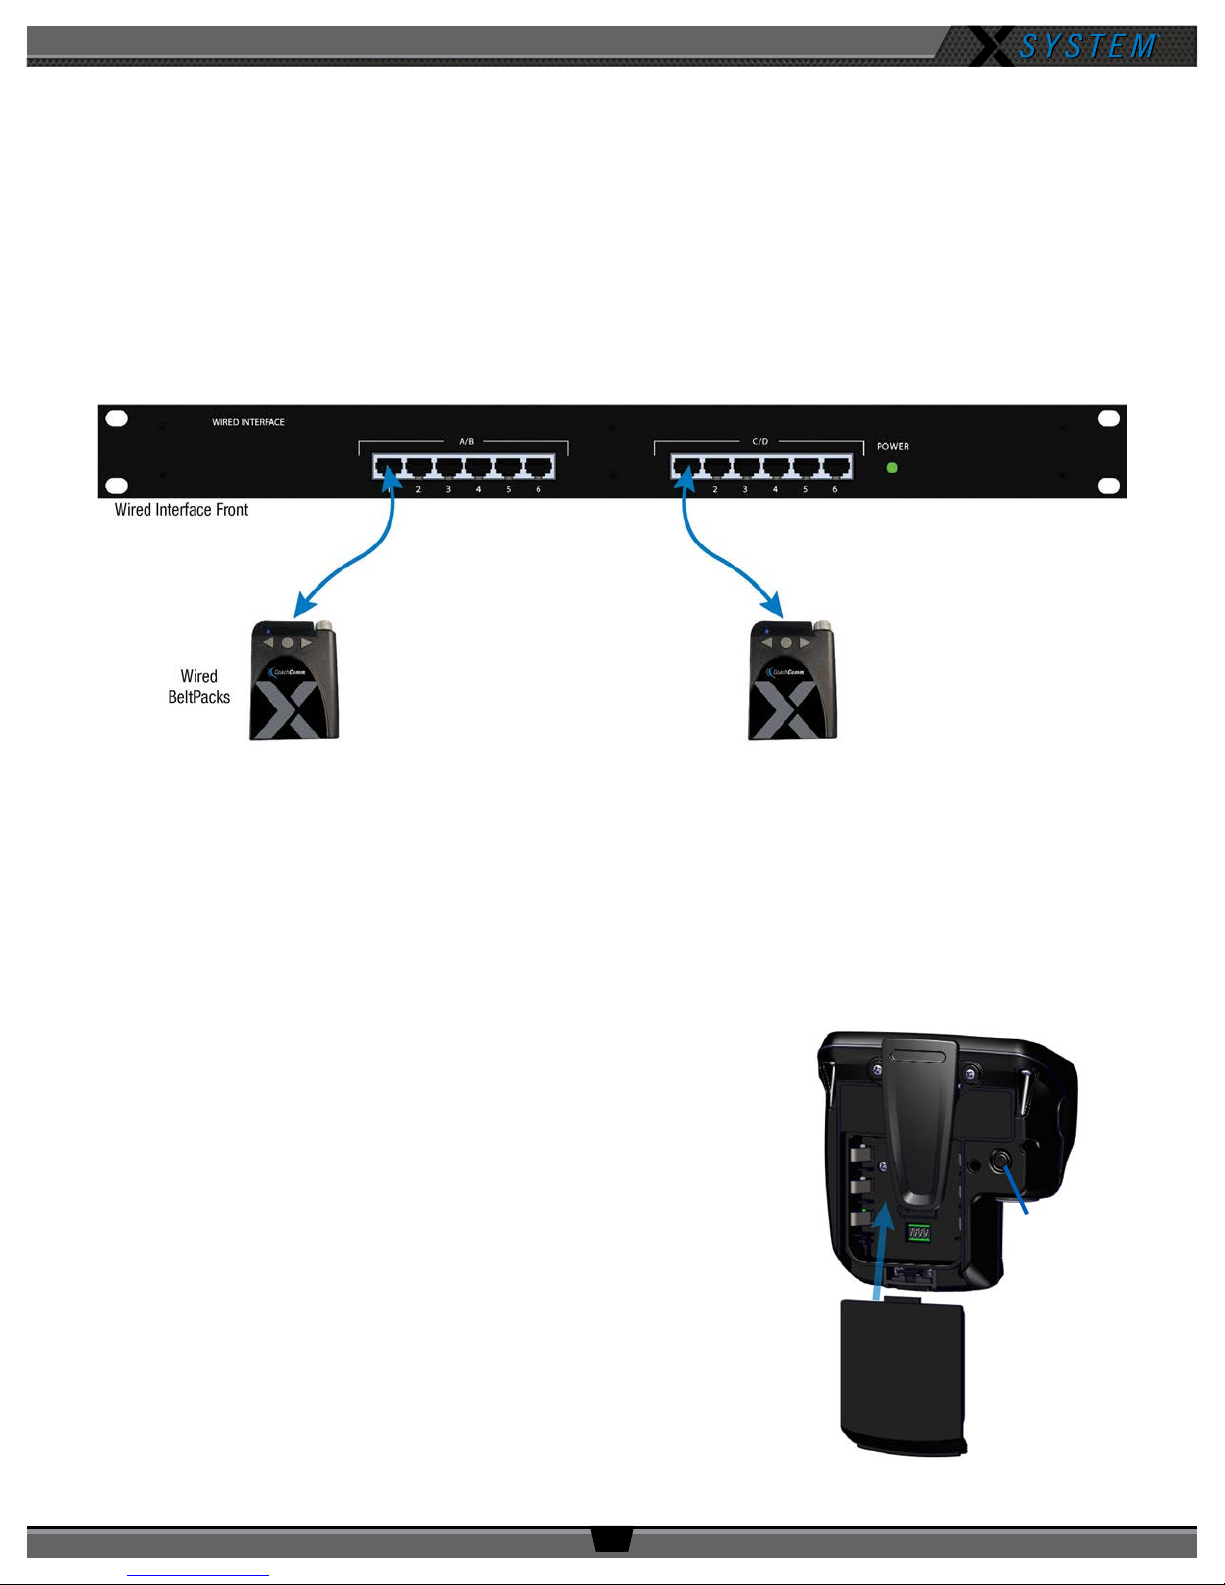
4. Set up the Wired Interface and Wired BeltPacks.
The procedures in this step should be performed with at least two people.
4a Place a Wired BeltPack at each coach’s position in the press box.
4b Connect the short end of the Cat 5 cable bundle to the desired channels on front of the Wired Interface (A/B or
C/D).
4c. Connect the opposite ends of the bundled cables to each Wired BeltPack.
Important: Keep cables out of the way of coaches and heavy foot trafc. Cables that are pinched,
snagged, or damaged will cause disrupted communication.
Figure 6: Wired Interface Connection to Wired BeltPacks
4d. Connect a headset to each Wired BeltPack.
4e. Power on each Wired BeltPack by turning the volume knob clockwise. The lights on the front of the BeltPack will
illuminate when powered on. Conrm that each Talk button is off.
4f. Put on one headset and press the Talk button on the Wired BeltPack and conrm that you can communicate with a
second Wired BeltPack on both channels with no crosstalk. Repeat the test for each Wired BeltPack.
5. Power on and walk test Radio Packs.
The procedures in this step should be performed with at least two people.
5a. On the sideline, unpack the sideline case and install one of the
provided, fully charged Lithium-Polymer rechargeable batteries or
three AA batteries in each Radio Pack (RP).
5b. Power on the rst two RPs by pressing and holding the Power
button on the back of the RP for 3 seconds.
Figure 7: Turn on by
holding Power button for 3
seconds.
Figure 8: RP Battery Installation and Power On
800.749.2761 www.coachcomm.com
7
OPERATING MANUAL
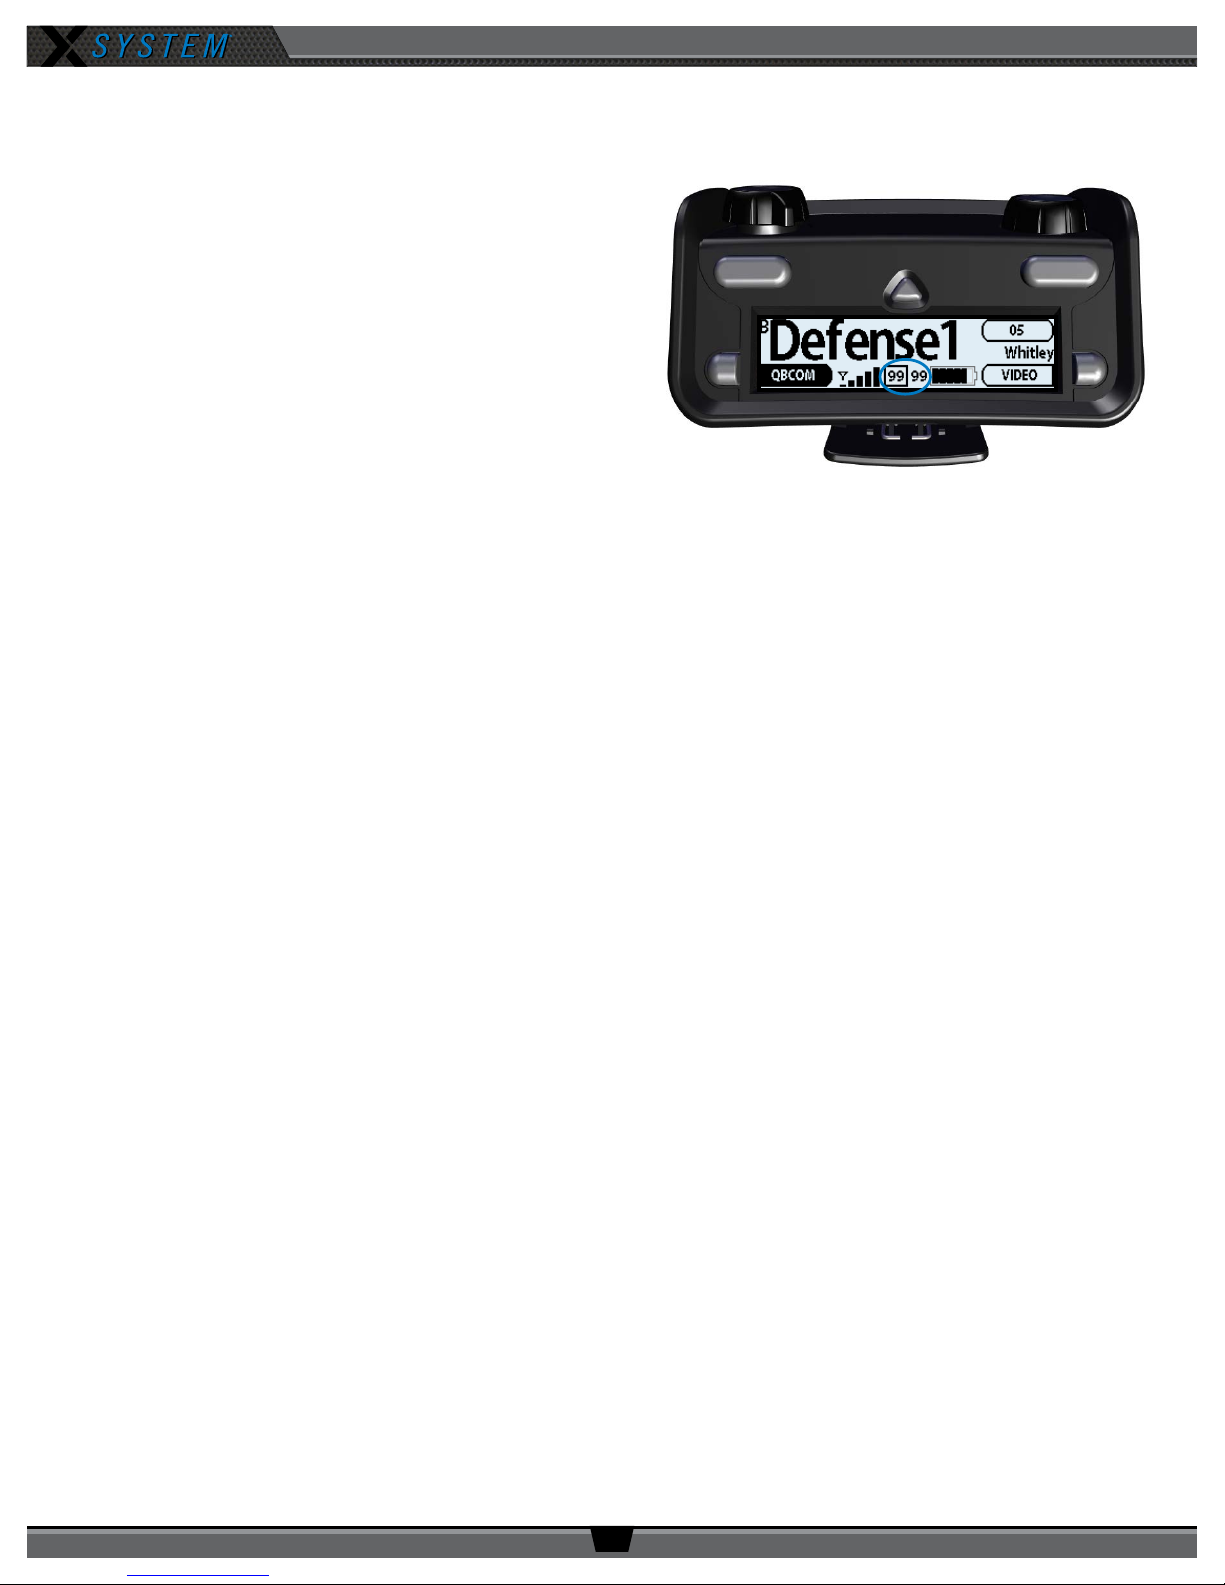
5c. Conrm each RP is on the same conference, connect a headset to each RP, and conduct a walk test to conrm
their operation. The RP’s LQ value can be used to gauge performance. See page 29 for more information about
LQ values.
Important: Each tester should walk their RPs to
opposite goal lines and back, ensuring
clear communication between all RPs.
Always place the RP on the hip opposite
from the press box when walk testing.
5d. After walk testing is complete, place the RP down on
a table or bench. Be sure to place each RP a foot or so
apart; bunching RPs together could impact wireless
performance. Repeat steps 5b-5c for each of the
remaining RPs.
Figure 9: Check LQ Values
Important: If raining, cover the RPs or return them to
their cases.
5e. Conrm communication between wireless and wired coaches.
6. Power off and stow away.
Once your game has ended, power off and properly stow away all components:
6a. Power off all RPs and stow them with the eld headsets in the sideline case.
6b. Power off and disconnect all Wired BeltPacks and stow them in the press box case.
6c. Power off the CU and disconnect the Cat 5 cable between the Press Box Rack Unit and the Antennas. Carefully
disassemble and stow the Antennas and mounting hardware in the appropriate case.
6d. Coil all cables and stow them with the press box headsets in the accessory case.
6e. Disconnect power from the Press Box Rack Unit and stow it in the press box case.
Important: Thoroughly dry off any moisture prior to storage. Failure to do so can cause components to
corrode and damage.
800.749.2761 www.coachcomm.com
8
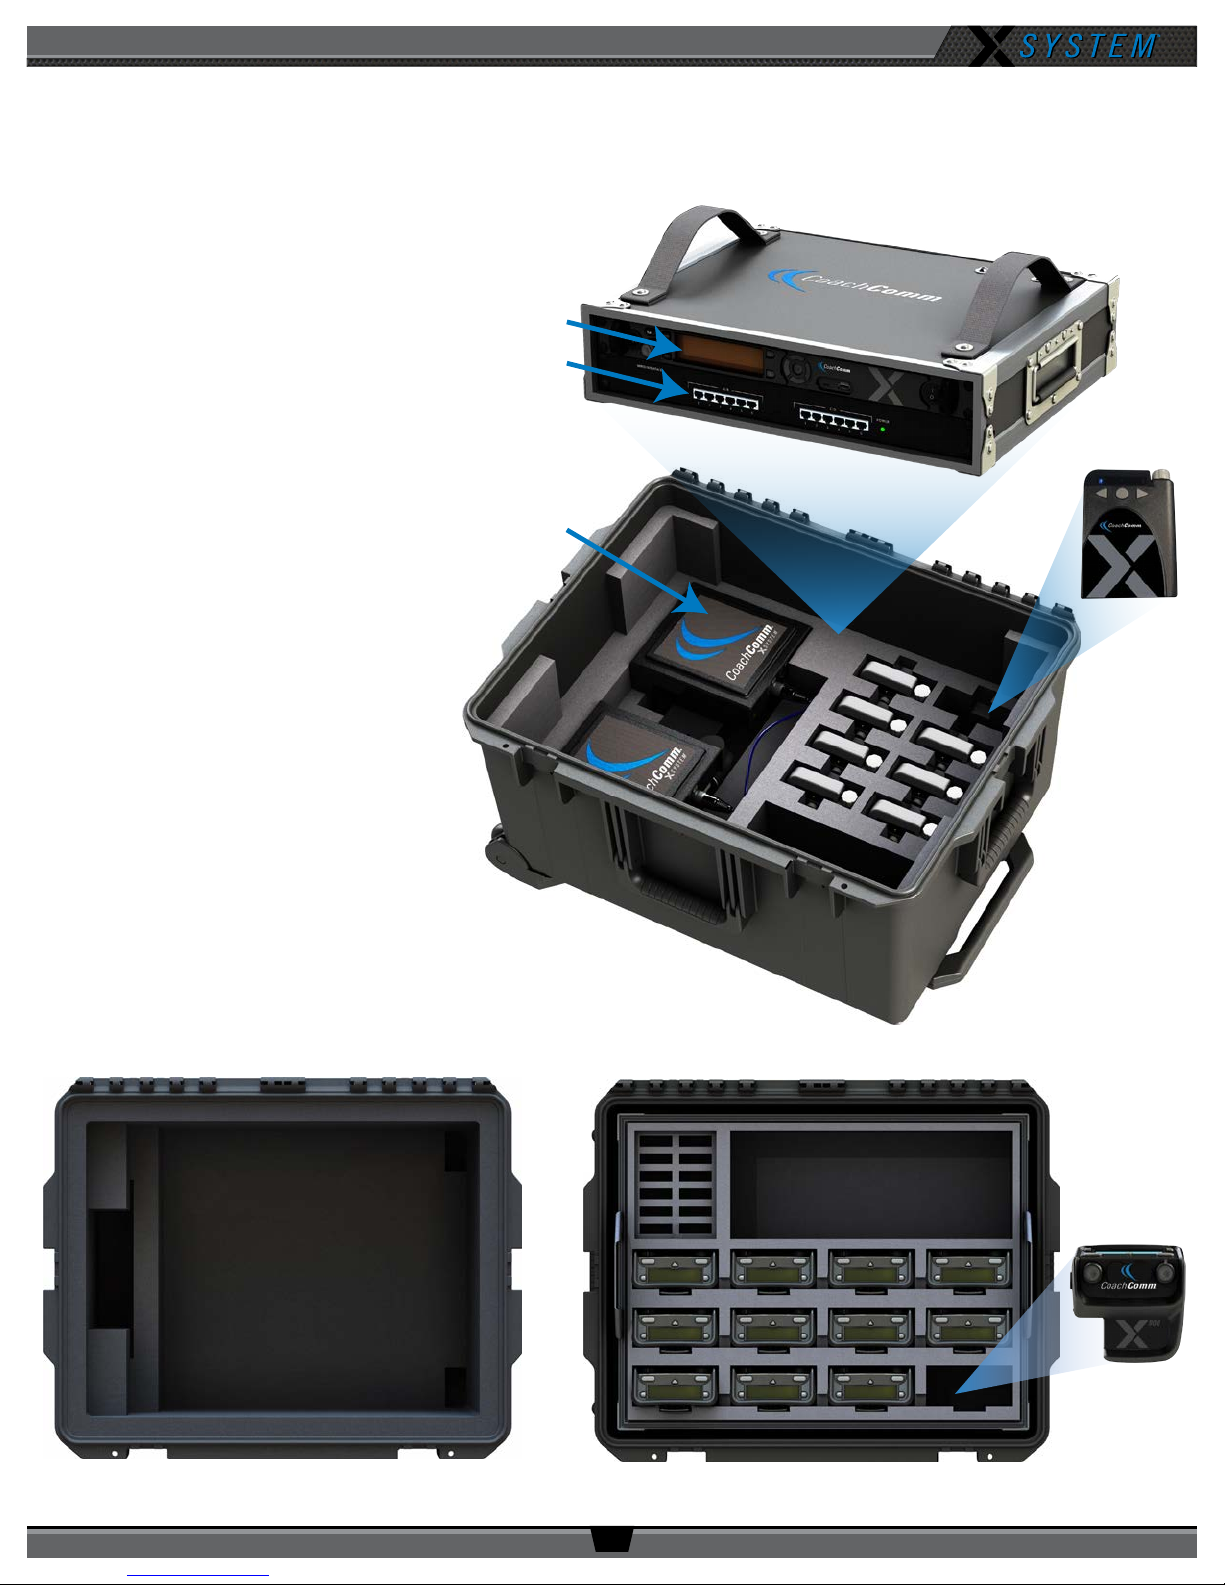
X-System Components
Press Box Rack Unit
Wired Interface
Accessory Case
Radio Pack
Sideline Case
Storage for Batteries*,
Chargers, and Power Cords
(Sideline headset storage in bottom)
X2 Package Overview
The X2 package for X-System consists
of three cases that provide storage for
the sideline and press box components
of the system. The press box case and
accessory case should be placed in the
applicable press box for your team. The
sideline case should be placed on your
team’s sideline. Further instructions
about setting up your system are
provided in the Game Day Setup section
of this manual on page 5.
*Spare lithium batteries are not allowed in
checked airline baggage. Be sure to follow
all air travel rules and regulations when
traveling with your X-System.
Control Unit
Field Antennas
with Mounting
Hardware
OPERATING MANUAL
Wired BeltPack
Storage for the following:
• 15 ft. Duracat 5 Cable
• 50 ft. Duracat 5 Cable
• 100 ft. Cat 5 Cable
• 25 ft. Bundled Cat 5 Wired
BeltPack Cable
• Booth Coaches’ Headsets
• Booth Antenna and Accessories
(if applicable)
Press Box Case
800.749.2761 www.coachcomm.com
9

OPERATING MANUAL
B C
Press Box Rack Unit Overview
The Press Box Rack Unit houses the system’s Wired Interface, Control Unit, and antenna connection panel. See page 11
of this manual for more information about the Wired Interface, and see page 13 for more information about the Control
Unit.
Press Box Rack Unit Rear
A
Cables not shown.
Figure 10: Press Box Rack Unit Rear View
A. FIELD ANTENNA Port – Connection for the Cat 5 cable from the eld antenna(s).
B. SYNC IN Port – Allows the system to be synchronized with another X-System. Sync is recommended when more
than two unsynchronized X-System Antennas are operating in close proximity to one another.
C. BOOTH ANTENNA Port – Connection for the Cat 5 cable from a booth antenna.
Note: Audio and power cables are not pictured in Figure 10.
Find more information about connecting antennas to the system on pages 5 and 26 of this manual.
800.749.2761 www.coachcomm.com
10
OPERATING MANUAL
B
C
A
A CB D E F
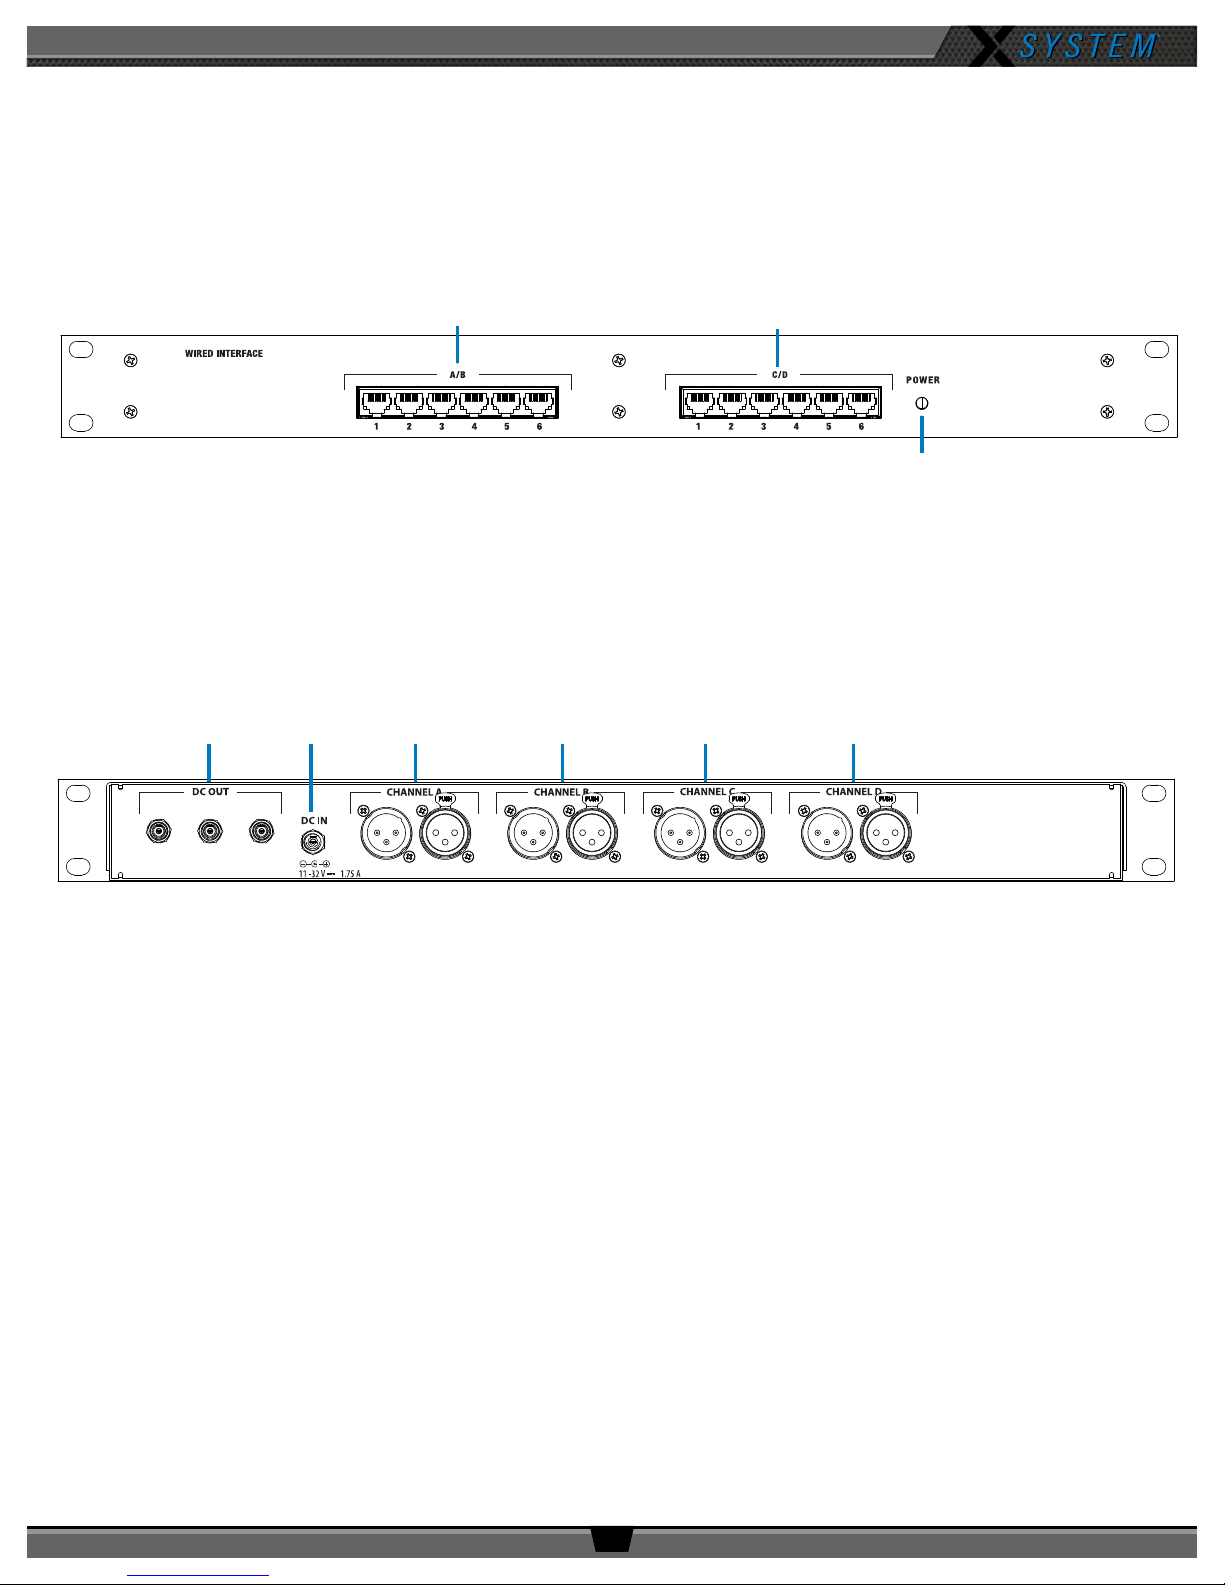
Wired Interface (WI)
The Wired Interface (WI) is located in the main rack unit in the press box with the Control Unit (CU). The interconnectivity
between the WI and the CU is pre-wired at CoachComm.
Wired Interface Front
Figure 11: Wired Interface Front View
A. Power LED
B. Channel A/B Ports
C. Channel C/D Ports
Wired Interface Rear
Figure 12: Wired Interface Rear View
A. DC Power Out – Not currently used with X-System operation
B. DC Power In
C. Channel A XLRs – Connects Wired Interface Port A to Port 2-Wire 1 of the Control Unit
D. Channel B XLRs – Connects Wired Interface Port B to Port 2-Wire 2 of the Control Unit
E. Channel C XLRs – Connects Wired Interface Port C to Port 2-Wire 3 of the Control Unit
F. Channel D XLRs – Connects Wired Interface Port D to Port 2-Wire 4 of the Control Unit
Note: See the diagram on the next page for more information about these channel ports.
800.749.2761 www.coachcomm.com
11
OPERATING MANUAL
A/B and C/D Channel Ports
There are six (6) access ports for channels A/B and C/D on the front of the WI. These ports are for connecting Wired
BeltPacks via a Cat 5 (RJ-45) connection. When connected to these ports, Wired BeltPack can communicate with any
wireless user subscribed to the same channel (also referred to as a conference within X-Ware).
The WI is connected to the Control Unit within the 2RU press box case via four short XLR cables. Figure 13 below shows a
diagram of this connection.
Figure 13: Control Unit and Wired Interface Connection
Default Conferences
An X-System conference is a conversation between a set group of coaches. By default, each X-System will include four
conferences. These four conferences are the only ones accessible to coaches using Wired BeltPacks in the booth.
Table 1: Default Conferences
Wired Port X-System Default Short Name
A Primary Offense Pri O
B Secondary Offense Sec O
C Primary Defense Pri DEF
D Secondary Defense Sec DEF
Wired Interface (WI) Power
There is no power switch on the WI. The power to the WI comes on when it is plugged into an AC
wall outlet. The green “Power” LED on the front of the WI indicates whether power is on or off. The
AC power goes through a DC power supply and then into the “DC IN” of the WI.
Figure 14: Wired Interface Power LED
800.749.2761 www.coachcomm.com
12
OPERATING MANUAL
Control Unit (XCU-44)
The X-System Control Unit (CU) is located in the main rack unit in the press box. It serves as the foundation of the wireless
communication system.
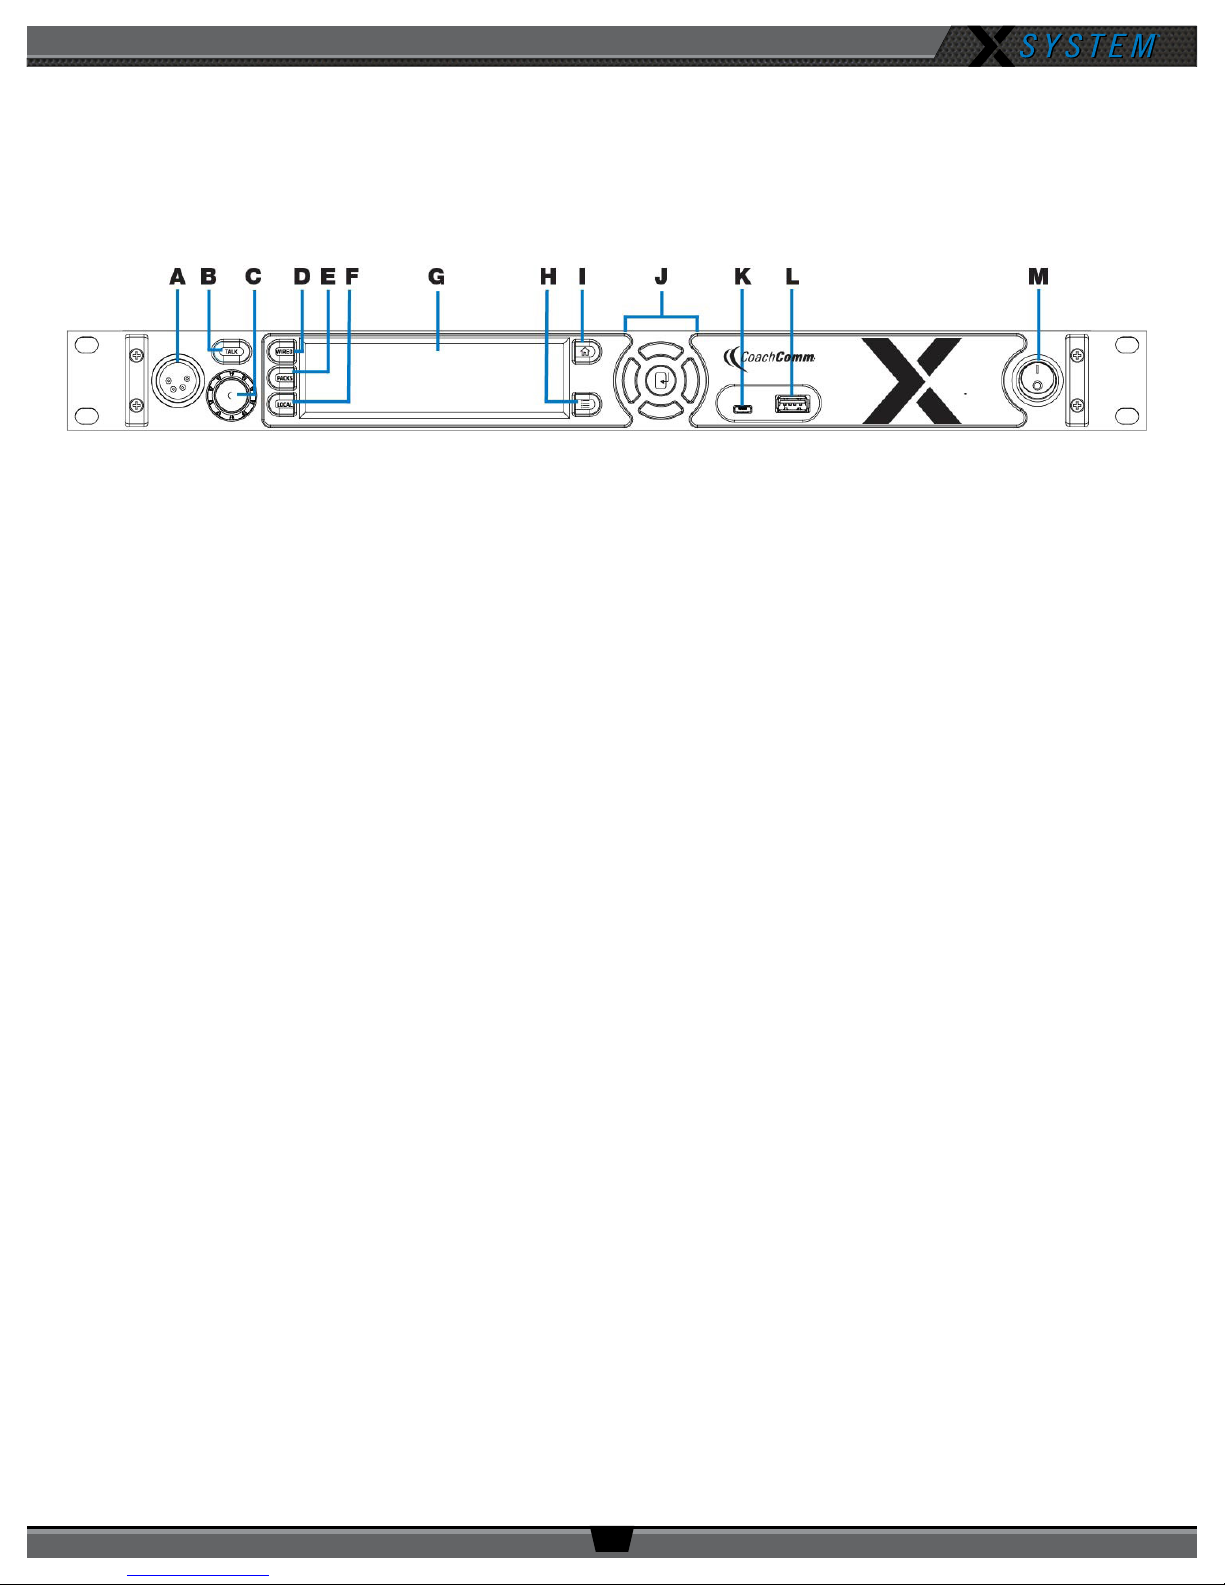
Control Unit Front
Figure 15: Control Unit Front View
A. Local Headset Connection – 4-pin XLR male headset connector on the CU’s front panel.
B. Talk Button for Local Headset – The Talk button works in conjunction with the Local Headset Connection. The
Talk button enables or disables the microphone for the local headset. A white “TALK” LED will illuminate when the
mic is enabled.
C. Headset Volume Knob – Turning the Volume control adjusts the listening volume of the local headset. Clockwise
increases the audio level; Counterclockwise decreases the audio level.
D. Wired Intercom Access Button – When pressed, the Control Unit menu jumps directly to the Wired Settings
screen.
E. Radio Packs Button – Shortcut to open the CU’s Radio Packs menu, which allows sorting and selection of Radio
Packs to edit settings (via the CU navigational controls).
F. Local Button – Opens the local headset settings on top of the current screen display, allowing for adjustments to
the local headset settings.
G. LCD Screen – Display for viewing real-time status of system, navigating menus, and making subsequent setting
adjustments. The LCD screen is the focal point of the Control Unit’s functionality. On the Home screen, the LCD
displays the status of all Normal mode Radio Packs that are currently paired to the Control Unit. In the Menu, the
LCD shows the menu items or information.
H. Menu Button – Accesses the main menu system of the CU. The default pass code to access the CU menu is
“0000.” While in the menu system, one short press acts as “Escape” to return to the previous menu without
saving any changes.
I. Home Button – Returns to the Home view when pressed. This also serves as an escape button. (Changes that
may have been in process are not saved if Home is pressed before save is complete.)
J. Navigational Controls – Up, Down, Left, and Right move the cursor or marker on the LCD to make adjustments in
edit mode. Enter (Center) selects the current cursor position or saves the current setting adjustment.
K. USB Micro B – For connectivity to a computer when performing device rmware updates.
L. USB A – For Radio Pack pairing and external USB ash drives.
Note: The CU is currently compatible with FAT and FAT32 formatted USB drives (up to 16 TB drive
size). Some operating systems (e.g., Windows 10) promote NTFS format, but only allow FAT32
formatting up to 32 GB. For hep with formatting larger USB drives, contact CoachComm Customer
Support at 1-800-729-2761.
M. On/Off Switch – Turns the power to the Control Unit on and off.
800.749.2761 www.coachcomm.com
13

OPERATING MANUAL
Control Unit Rear
Figure 16: XCU-44 Rear View
A. AC Power Connection – 100–240V, 50/60 Hz 0.8A
B. SYNC IN Port (RJ-45 or Fiber) – Allows the system to be synchronized with another X-System. Sync is
recommended when more than two unsynchronized X-System Antennas are operating in close proximity to one
another.
C. RELAY Connection – Not currently used with X-System operation
D. X-Net Ports (RJ-45 or Fiber) – The X-Net ports allow the Control Unit to connect to other X-System devices,
such as Antennas, forming a proprietary network design where all devices are part of a system conguration that
shares data, timing synchronization, and audio.
E. 2 WIRE Intercom Port (x 4) –The Intercom conference ports (1, 2, 3, and 4) connect the Control Unit to channels
A/B and C/D of the Wired Interface.
F. 4 WIRE Intercom Port (x 4) – Not currently used with X-System operation
G. STAGE ANNOUNCE (SA) – Not currently used with X-System operation
H. Auxiliary Audio Input (AUX IN) – Not currently used with X-System operation
I. Auxiliary Audio Output (AUX OUT) – Not currently used with X-System operation
J. Local Area Network (LAN) Port – The LAN port allows the Control Unit to be connected to a PC and X-Ware. See
the “Connecting X-Ware to Your CU” section on page 32 of this manual for more LAN connection information.
800.749.2761 www.coachcomm.com
14
OPERATING MANUAL
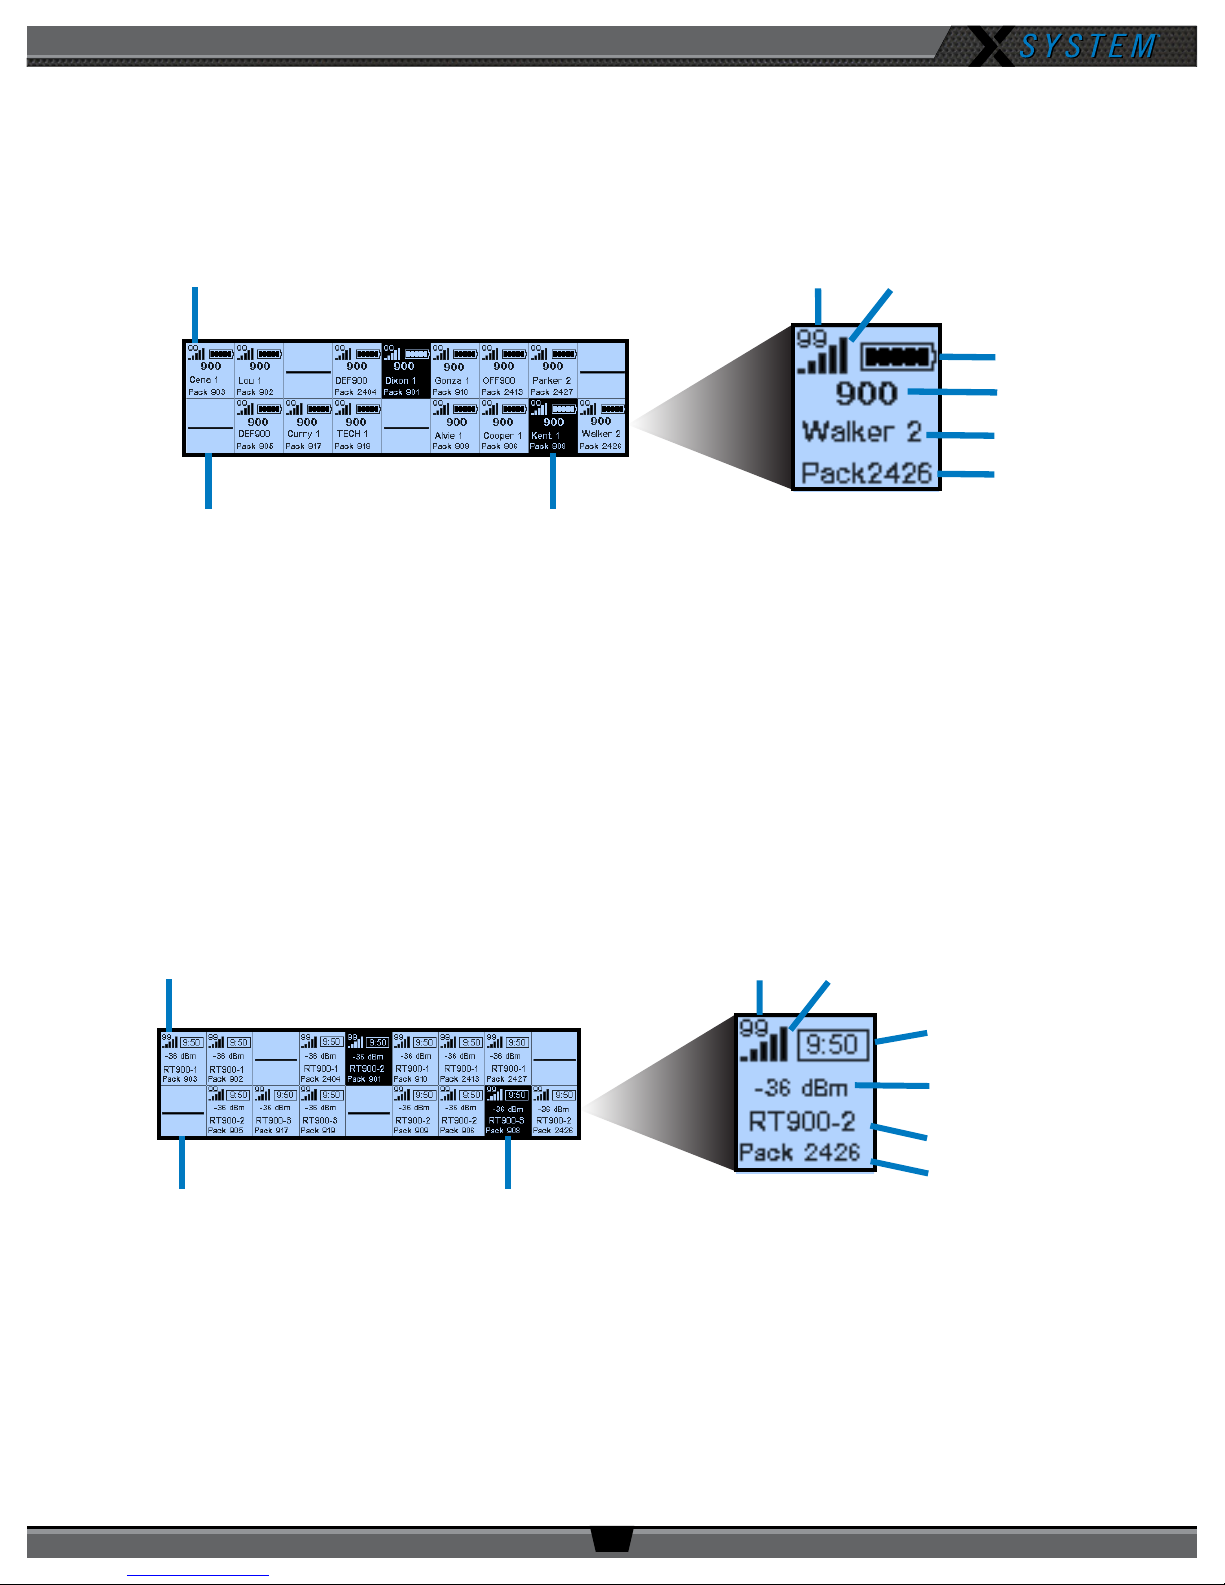
Control Unit LCD
Home Operating Screen
Serves as the primary operating screen and displays the status of the Radio Packs (RPs) connected to the Control Unit.
Active RP
Link Quality
Strength Indicator
Battery Level
Frequency
Prole Name
Pack Name
Radio Signal
No RP Logged In
Note: The Link Quality Indicator (LQ) provides a diagnostic measurement of actual packet transmission from
RP to Antenna and vice versa. The LQ value on the Control Unit LCD represents the lowest LQ value of
the two possibilities. To discover more about which value is displaying on your device, you would need
to consult the individual Radio Pack or X-Ware, if being used. (See Understanding Link Quality on page
29 of this manual for more information.)
Secondary Operating Screen
Displays additional information about the status of the Radio Packs connected to the Control Unit. Short press the Home
button once to toggle between the Primary and Secondary screens. After 60 seconds, the screen will time out and revert
back to the Home screen.
Talk Button is Active
Figure 17: Control Unit Primary Operating Screen
Active RP
No RP Logged In
Note: Radio Signal Strength Value displays the actual value of the radio signal in dBm.
Talk Button is Active
Figure 18: Control Unit Secondary Operating Screen
Link Quality
Strength Indicator
Radio Signal
Remaining Battery
Time
Radio Signal
Strength Value
Antenna Name
Pack Name
800.749.2761 www.coachcomm.com
15
 Loading...