

Page 1
www.CO2Meter.com
Table of Contents
Introduction ............................................................................ 1
Before you Start .................................................................... 1
Button Functions ................................................................... 2
Reading the Display .............................................................. 3
Using the Monitor .................................................................. 5
Carbon Dioxide Levels and Guidelines ................................. 7
Specifications ........................................................................ 8
Software Installation .............................................................. 9
Software Application ............................................................ 12
Data Logging ....................................................................... 13
Automatic Baseline Calibration ........................................... 18
Manual Calibration .............................................................. 19
Contact Us ........................................................................... 20
Carbon Dioxide Monitor
Instruction Manual
Page 2

1 www.CO2Meter.com www.CO2Meter.com 1
Introduction
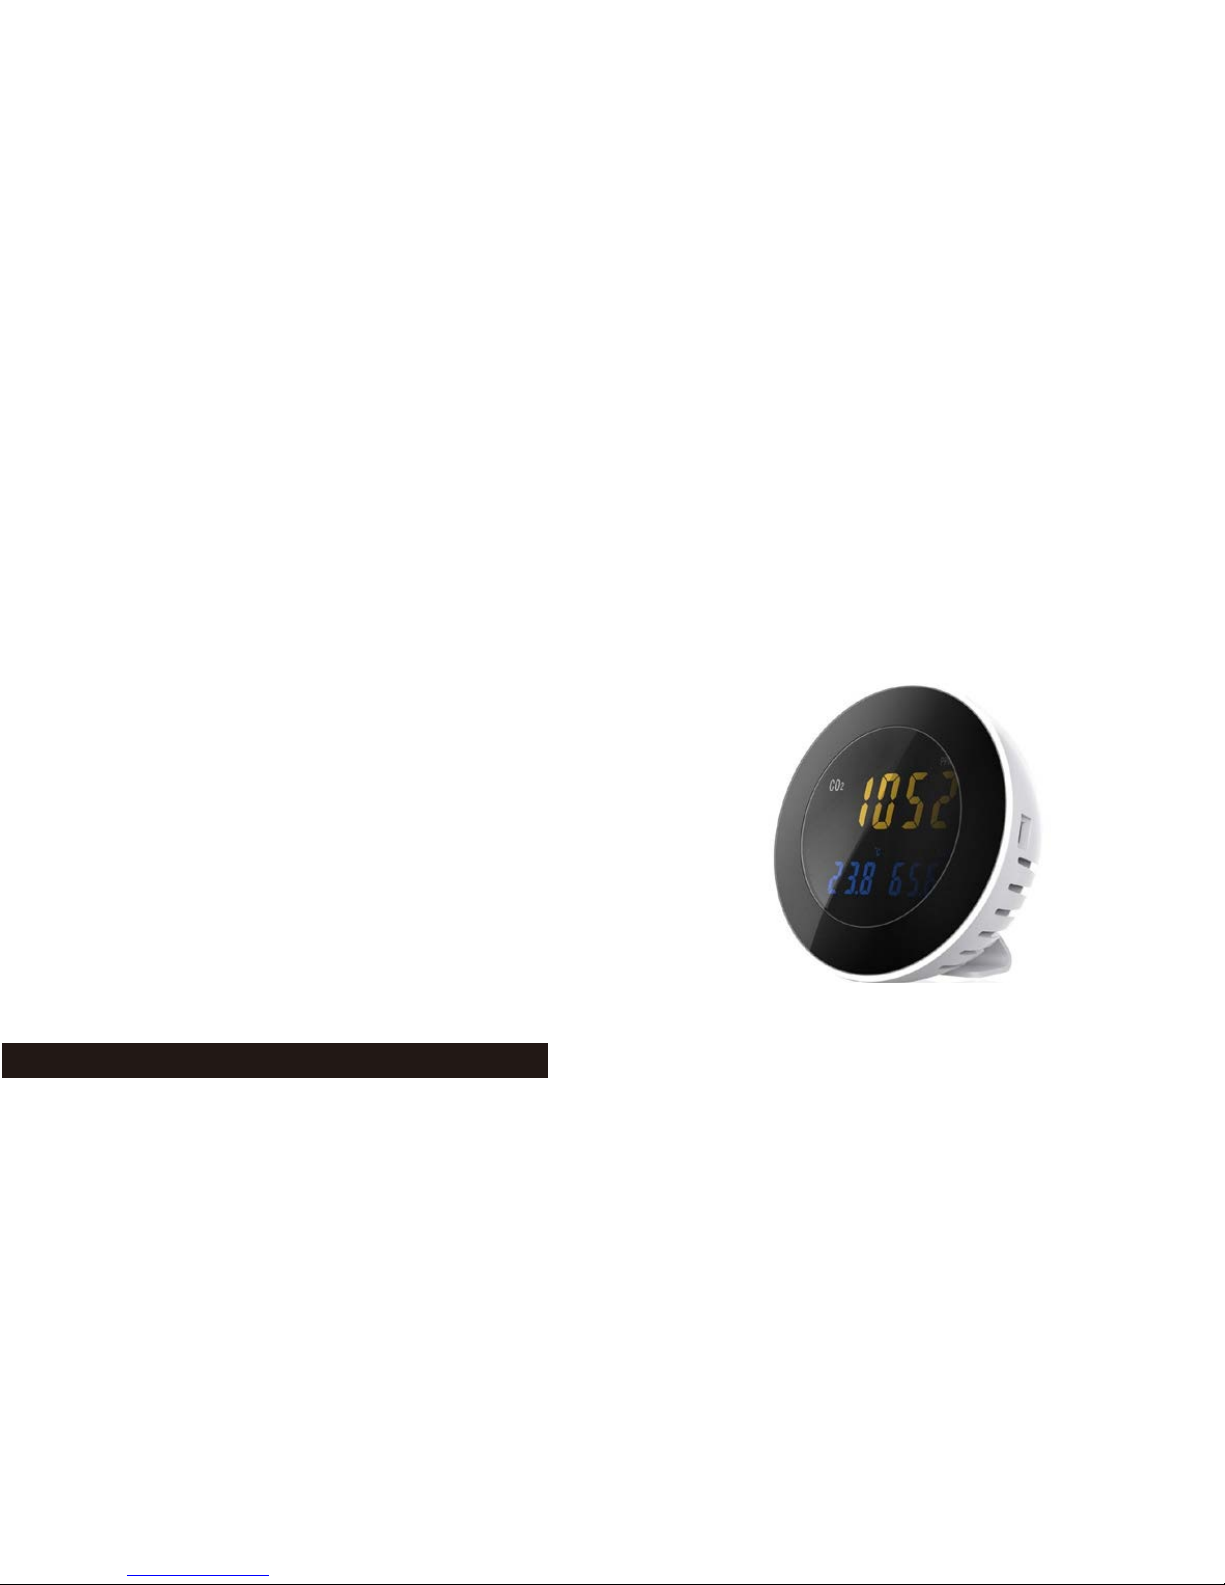
This rechargeable desktop CO2 monitor and data logger is
designed to measure carbon dioxide, temperature, and humidity
making it ideal for measuring indoor air quality in homes,
businesses, offices, and classrooms. Poor air indoor air quality
can lead to drowsiness, inability to concentrate, and even illness
(see “Sick Building Syndrome”).
Features
• Large display shows CO2, Temp & %RH levels in real time.
• NDIR CO2 sensor for fast, accurate, and stable readings.
• Visual and audible alarm functions.
• Built-in data logger with free software (Windows only).
• Fresh air or automatic baseline calibration.
Package Contents
• Monitor
• 110-220VAC to 5V DC Power Adapter
• USB Cable
• Instruction Manual
Before You Start
1. This monitor contains sensors and microprocessors
that use precision electronics. It must be kept away
from water, heat, fire, combustible liquids and strong
electromagnetic interference to prevent damage.
2. For accurate results do not block the air sampling
inlets. Avoid strong or hot winds blowing towards the
air sampling inlets.
3. Wet cotton cloth or 95% alcohol should be used to
clean the monitor. Do not use abrasive agents or
corrosive liquid for cleaning to avoid damage or
scratching the surface.
4. Do not dismantle or modify the monitor.
5. This device can be powered and charged
simultaneously using either a PC USB port or the
supplied 5.0V DC power adapter. Only use the power
adapter that comes with the monitor.
Page 3
Button Functions
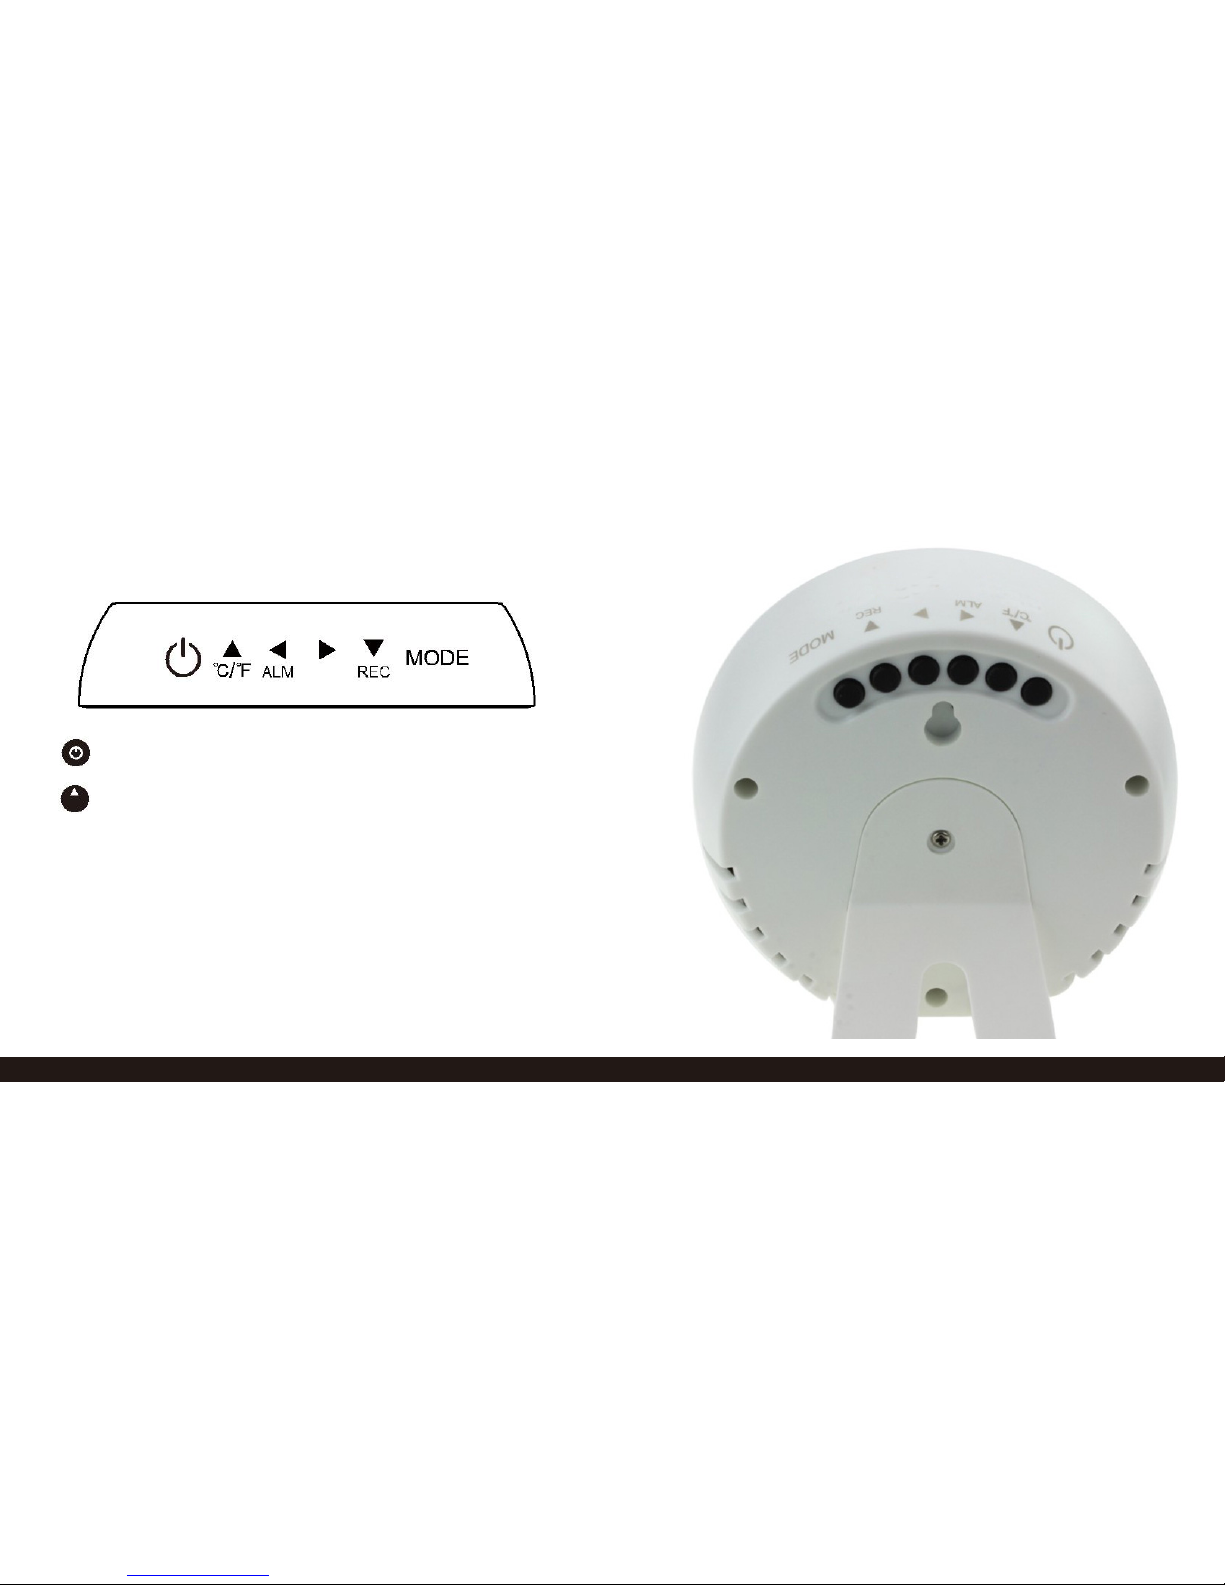
Power Button – turns the power ON / OFF
°C/°F Up Arrow Button – change between degrees Fahrenheit and
Centigrade. When MODE pressed, used as up arrow or to
increase the value.
2 www.CO2Meter.com www.CO2Meter.com 2
Page 4
ALM
Left Arrow Button - turns alarm ON / OFF. When
MODE pressed used as left arrow.
DAY: day
MIN: minute
SEC: seconds
REC: record starts
CO2
1
PPM
Right Arrow Button - when MODE pressed,
used as right arrow.
REC Down Arrow Button - starts manual data
logging. When MODE pressed, used as down
arrow or to decrease the value.
MODE MODE Button - hold down for 2 seconds to enter SETTINGS.
Reading the Display
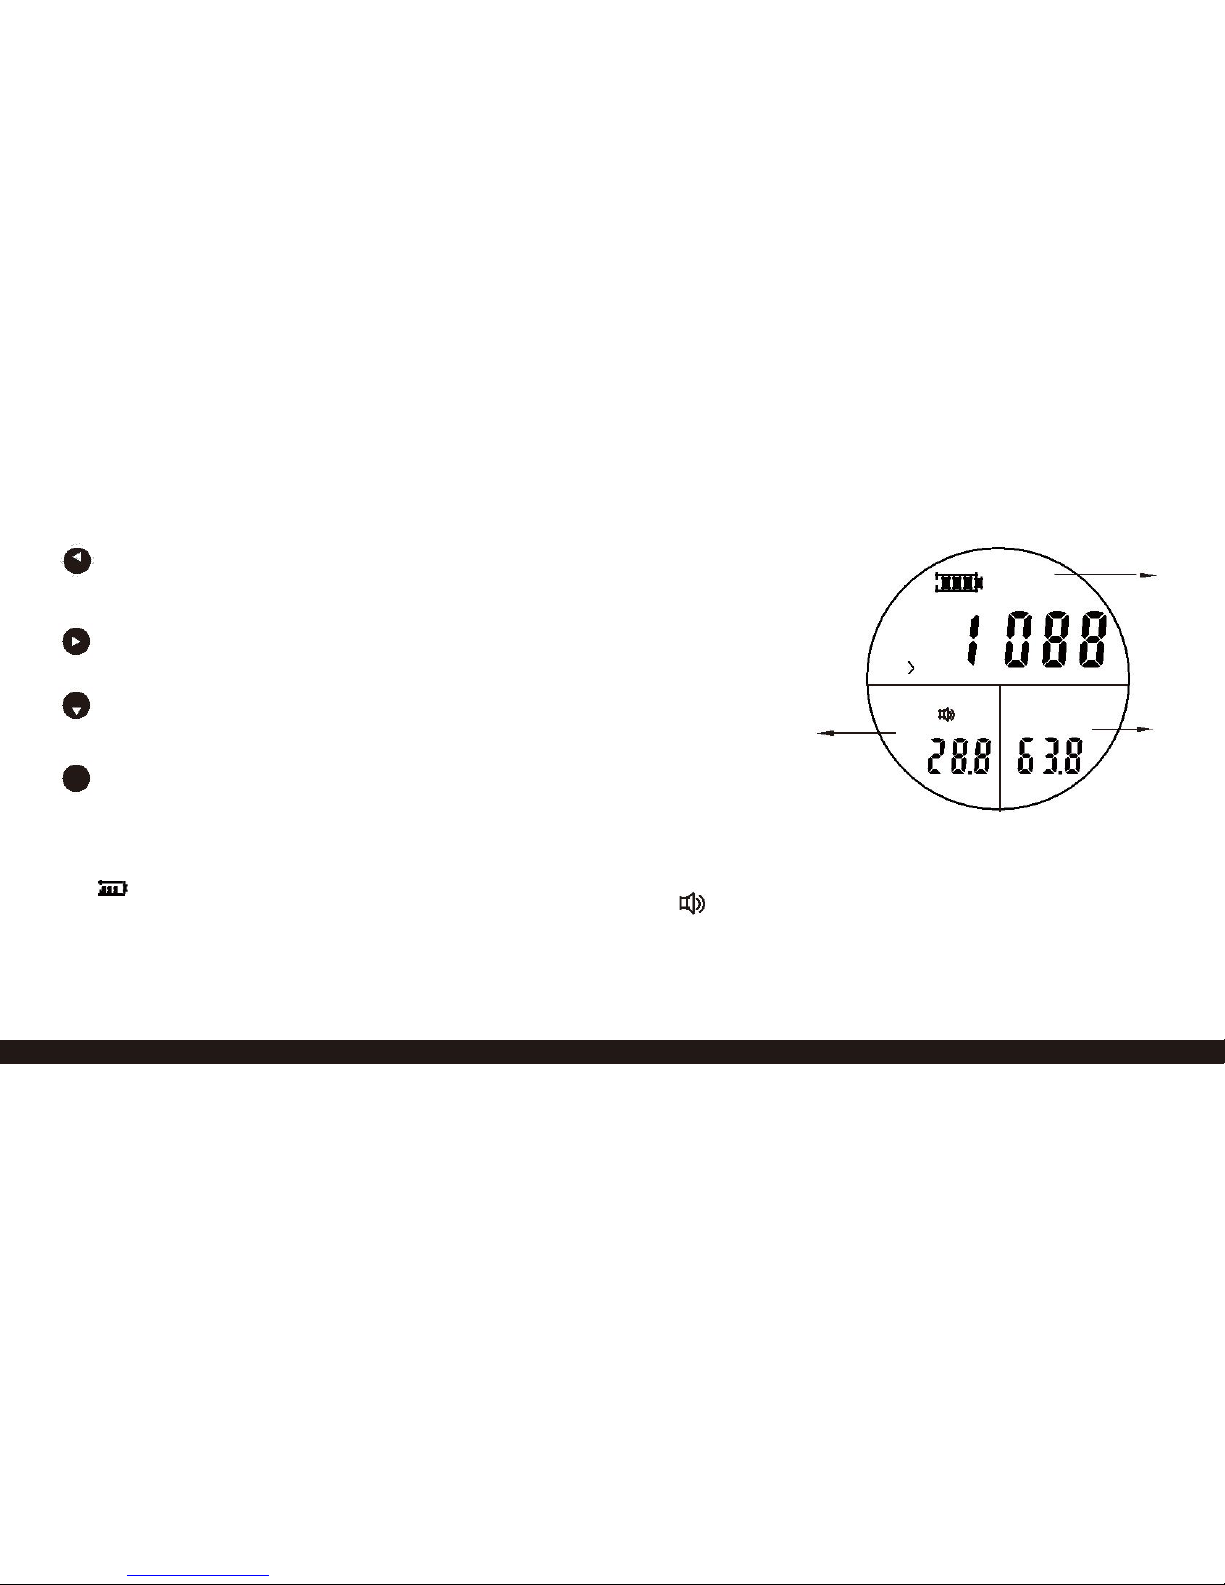
1. Carbon dioxide display area
: Battery level indicator
PPM: Concentration units (parts per million)
CO2: Chemical symbol for carbon dioxide
MON: month
MON-DAY
MIN-SEC
REC
YEAR
℃ ℉
%RH
HOUR
2
3
2. Temperature display area
℃/℉ : degree Centigrade, degree Fahrenheit
YEAR : year
HOUR: hour
:Sound alarm enabled
3. Humidity display area
%RH: humidity unit
3 www.CO2Meter.com www.CO2Meter.com 4
Page 5

Using the Monitor
Power and Charging
The first time you use the monitor, use the wall adapter or a
powered PC port and the USB cable to plug it in.
The monitor has a built-in rechargeable battery. When the screen
displays low battery, it should be recharged. The monitor can be
used while charging.
Turning the Monitor ON / OFF
Press the power button to turn the power on or off. When
powered on, the display will show a 30 second count down.
After the countdown is complete, you can change settings.
Setting the CO2 Alarm Level, Date and Clock
Press the MODE button for two seconds to begin. The first
setting is the CO2 alarm level. Press the left and right arrow
buttons to select the digit to change. The selected digit will
flash. Press the up and down arrows to change it.
Press the MODE button again for 2 seconds to move to the
date and clock values. Again, use the MODE button to
change between values and the up and down arrows to
change them.
When complete, press the MODE button to save
your changes and return to the normal display. The CO2 Alarm
Level, Date and Clock can also be set using the software. See
instructions at the end of this manual.
Using the CO2 Alarm
The CO2 alarm can warn you if carbon dioxide levels are too
high. If the CO2 level goes over the level you set, a buzzer
will sound. Press the left arrow button to turn the buzzer on
or off.
The factory default carbon dioxide concentration alarm value
is 2,000ppm. See below for recommended CO2 levels
5 www.CO2Meter.com www.CO2Meter.com 6
Page 6
Carbon Dioxide Levels and Guidelines
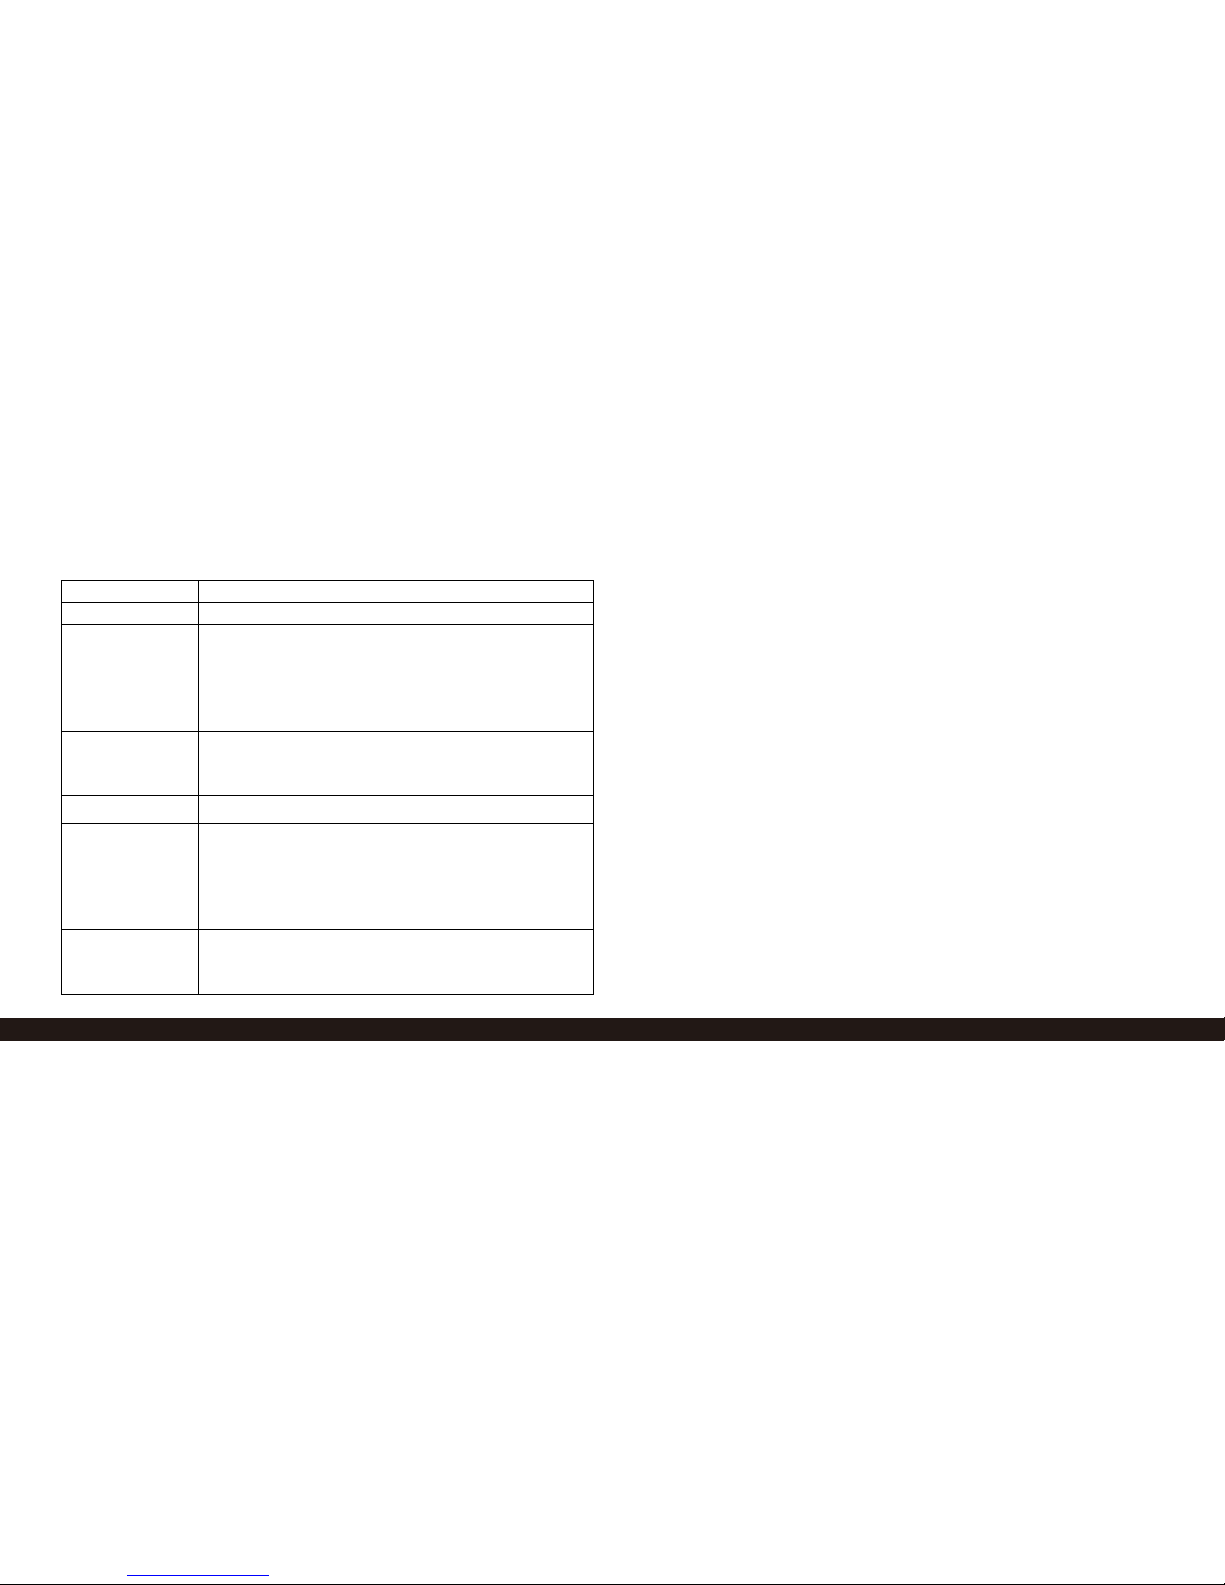
CO2 Level
Description
400ppm
Normal outdoor air level.
400-1000ppm
Typical level indoors with good ventilation.
NOTE: If CO2 levels are low when building is
sealed and occupied, check for overventilation (too much fresh air = energy
wasted).
1,000ppm
ASHRAE and OSHA recommended
maximum level in a closed room. Considered
maximum comfort level in many countries.
> 1,200ppm
Poor air quality - requires ventilation
2,000ppm
According to many studies this level of CO2
produces a significant increase in
drowsiness, tiredness, headache lower levels
of concentration and increased likelihood of
spreading respiratory viruses like colds, etc.
>5,000ppm
OSHA and NIOSH first threshold for safety.
maximum allowed concentration within a 8
hour working period
Specifications
Carbon Dioxide Range: 0~9999PPM
Accuracy: ± 70ppm ± 3% of reading (0~5,000ppm
Resolution: 1ppm
Response time: 1 second
Temperature Measurement: -10 to 70℃ (14~158℉)
Temperature Resolution: 0.1℃/℉
Temperature measurement Accuracy: ± 0.3℃ (10~55℃)
Humidity measurement: 0~99.9%RH
Humidity Resolution: 0.1%
Humidity Accuracy: ±3% (from 10~90% RH)
Power: 3.7V Lithium Battery
Data Log Memory: 12,700 Data Points
Working Conditions: 0~50℃, 0~85%RH (no condensation)
Storage Conditions: -20~60℃, 0~90%RH (no condensation)
Guidelines are average CO2 levels over time.
7 www.CO2Meter.com www.CO2Meter.com 8
Page 7
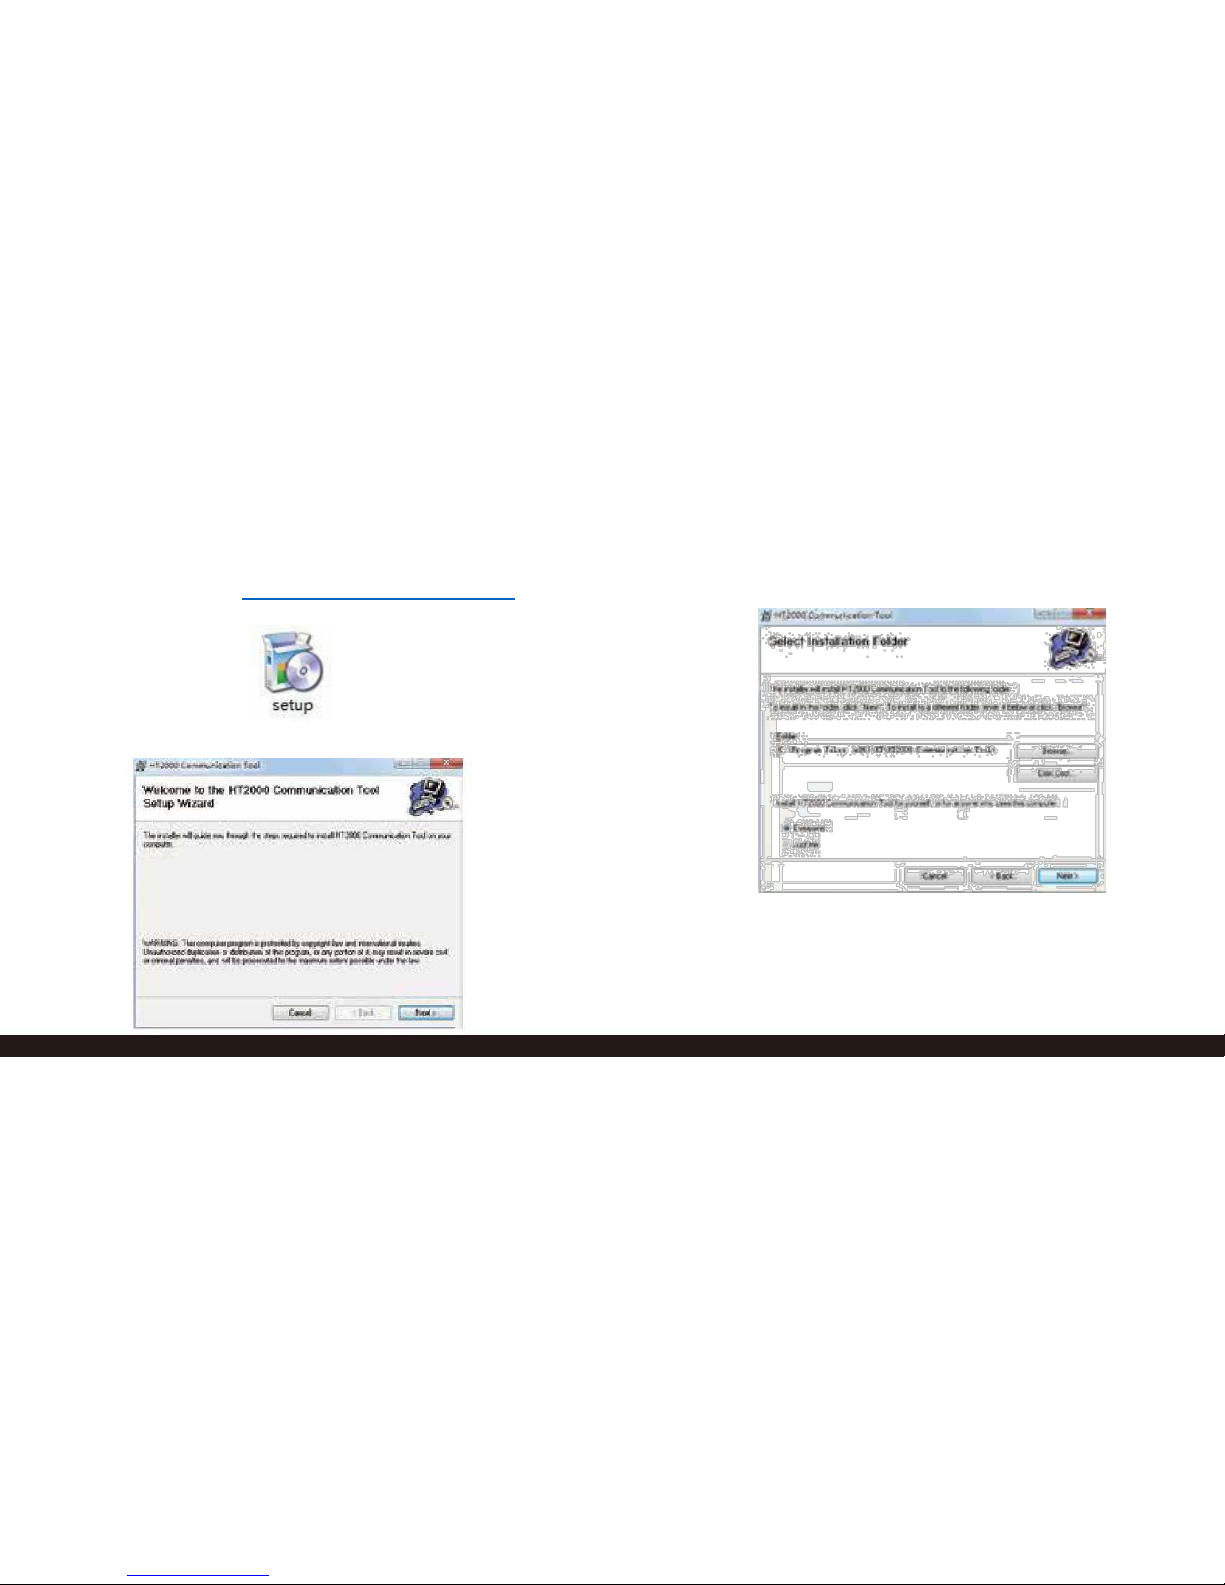
Software Installation
Download software at CO2Meter.com/pages/downloads
Download the XT-10 Setup file to your Windows PC.
Double-click the file to start the installation. Click “Next” to
begin:
Accept the default installation folder on your hard drive or
click “Browse” to create a new one.
Click “Next” after confirmation and click “Next” again to start
the installation.
9 www.CO2Meter.com www.CO2Meter.com 10
Page 8
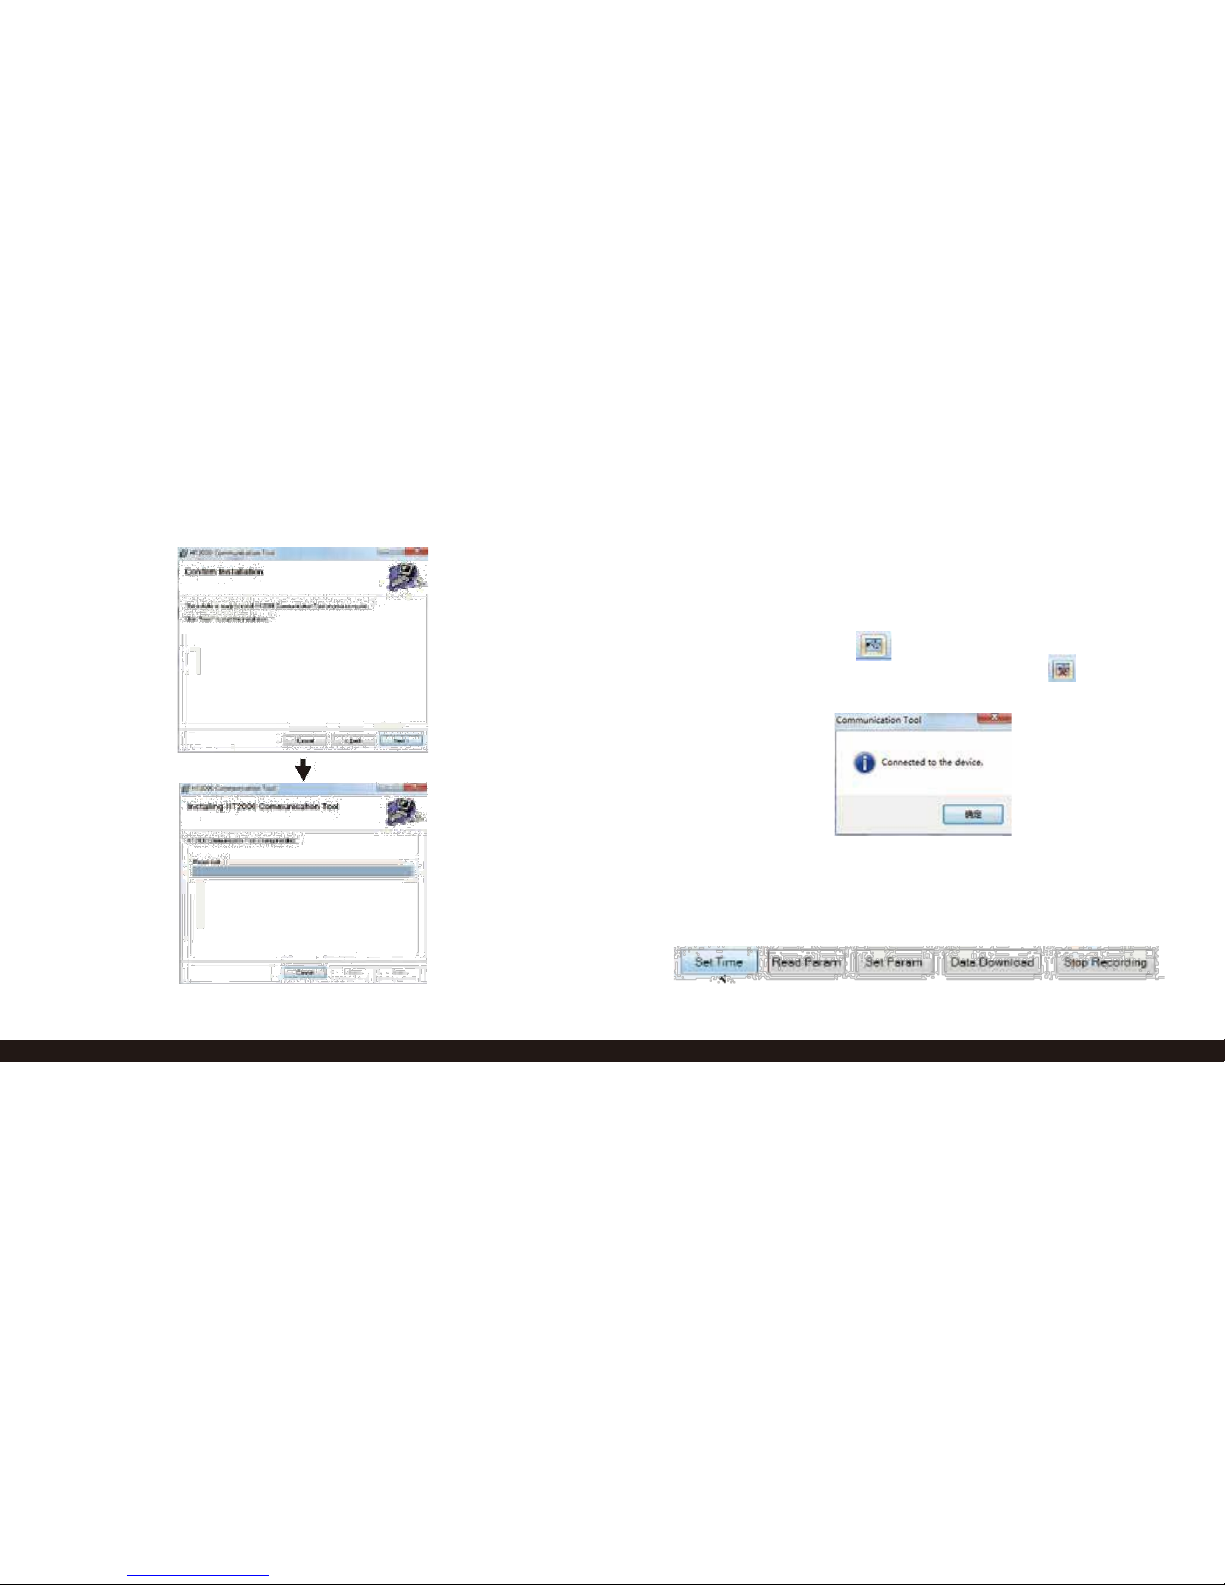
After installation is complete click “Close”. The software is
now installed.
Software Application
Connect / Disconnect Monitor
Use the Micro USB cable to connect the computer and
the CO2 monitor. Click to connect. The following
prompt indicates successful connection. Click to
disconnect.
Setting the Date / Clock
After connecting to the computer, click “Set Time” to
automatically set the clock. The monitor will sync with the
computer’s built-in clock.
11 www.CO2Meter.com www.CO2Meter.com 12
Page 9
Data Logging
Option 1: Tethered Data Logging
Tethered data logging lets you record CO2 levels while
connected to the PC. This option is useful for testing the logging
functions or to creating several data logs at one time.
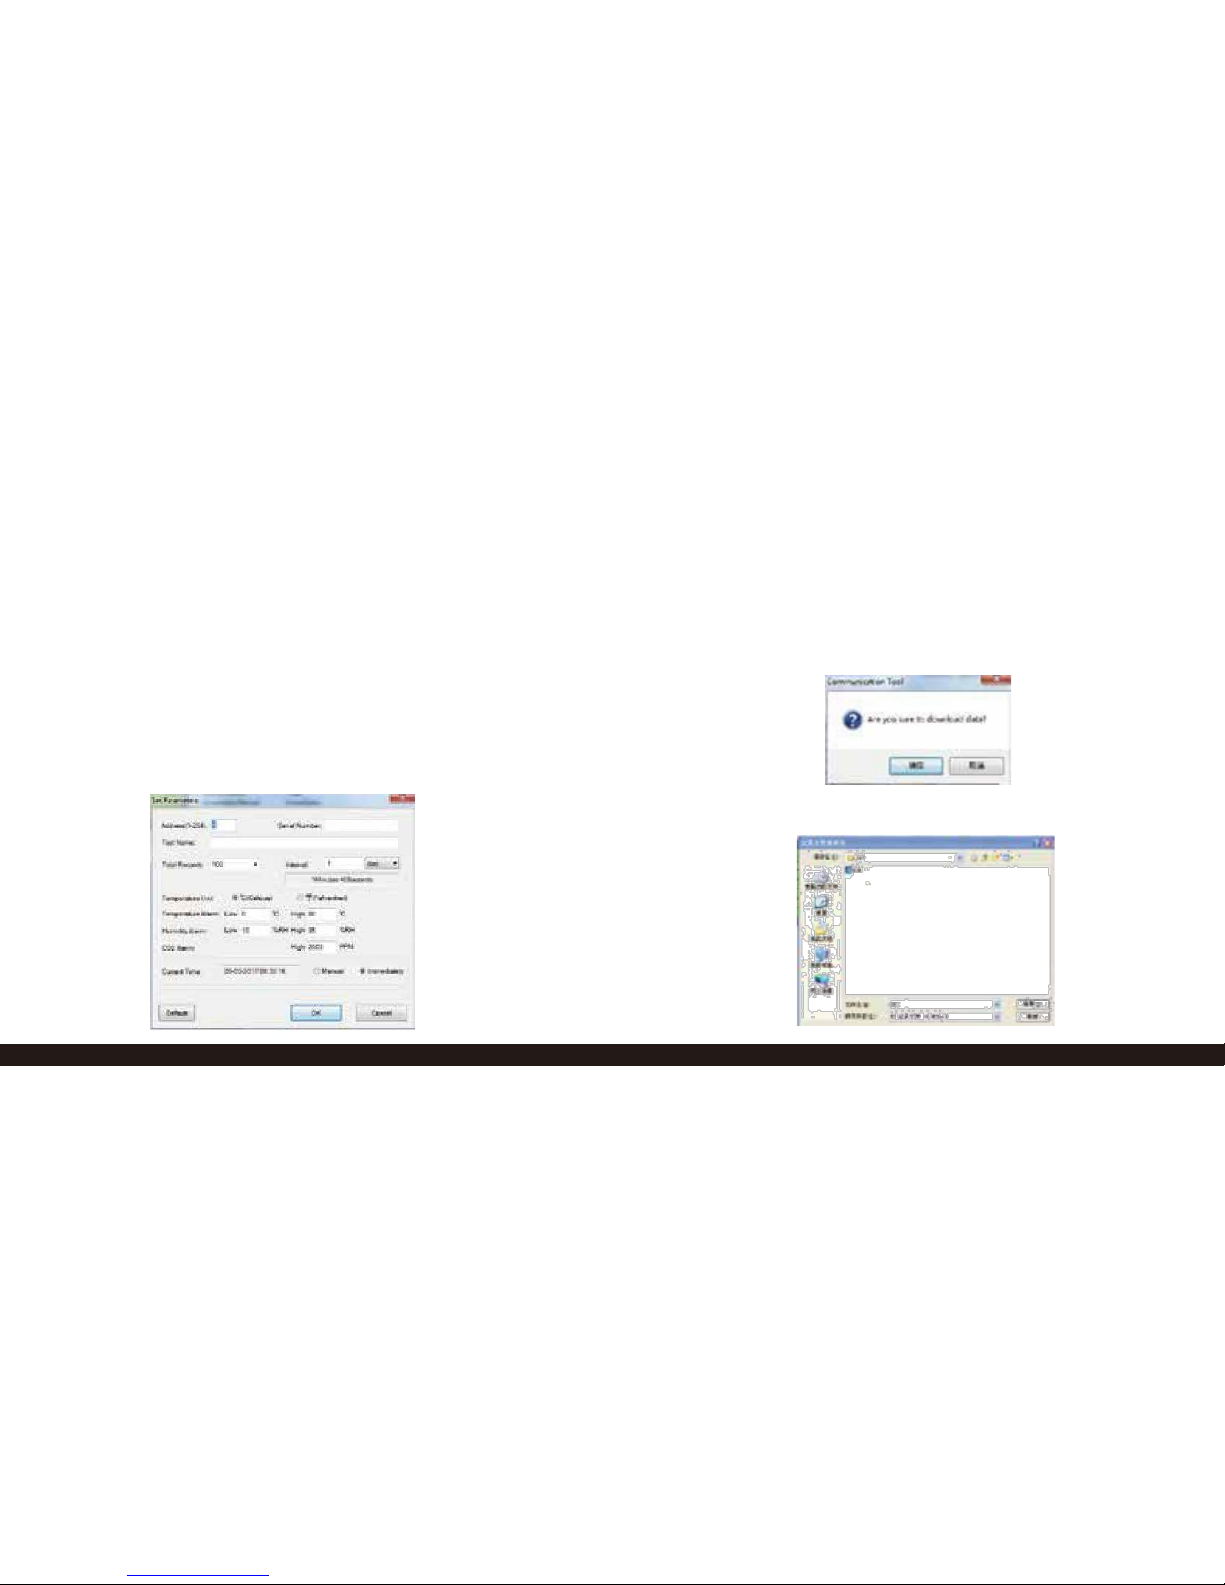
Click “Set Param” to setup the data logging parameters. Set the
parameters as appropriate for your application. Click the
“Immediately” button to tell the software you want to log data from
the software, then click “OK” to begin data logging.
While logging, “REC” will flash on the display. The flashing
frequency is the same as the recording interval you set in the
“Param” screen. When you are done data logging, click “Stop
Recording”. The data log cannot be observed until it is
downloaded to your PC. To download, click “Data Download”
and the following window pops up.
Save the data as a file to your PC as shown here:
13 www.CO2Meter.com www.CO2Meter.com 14
Page 10
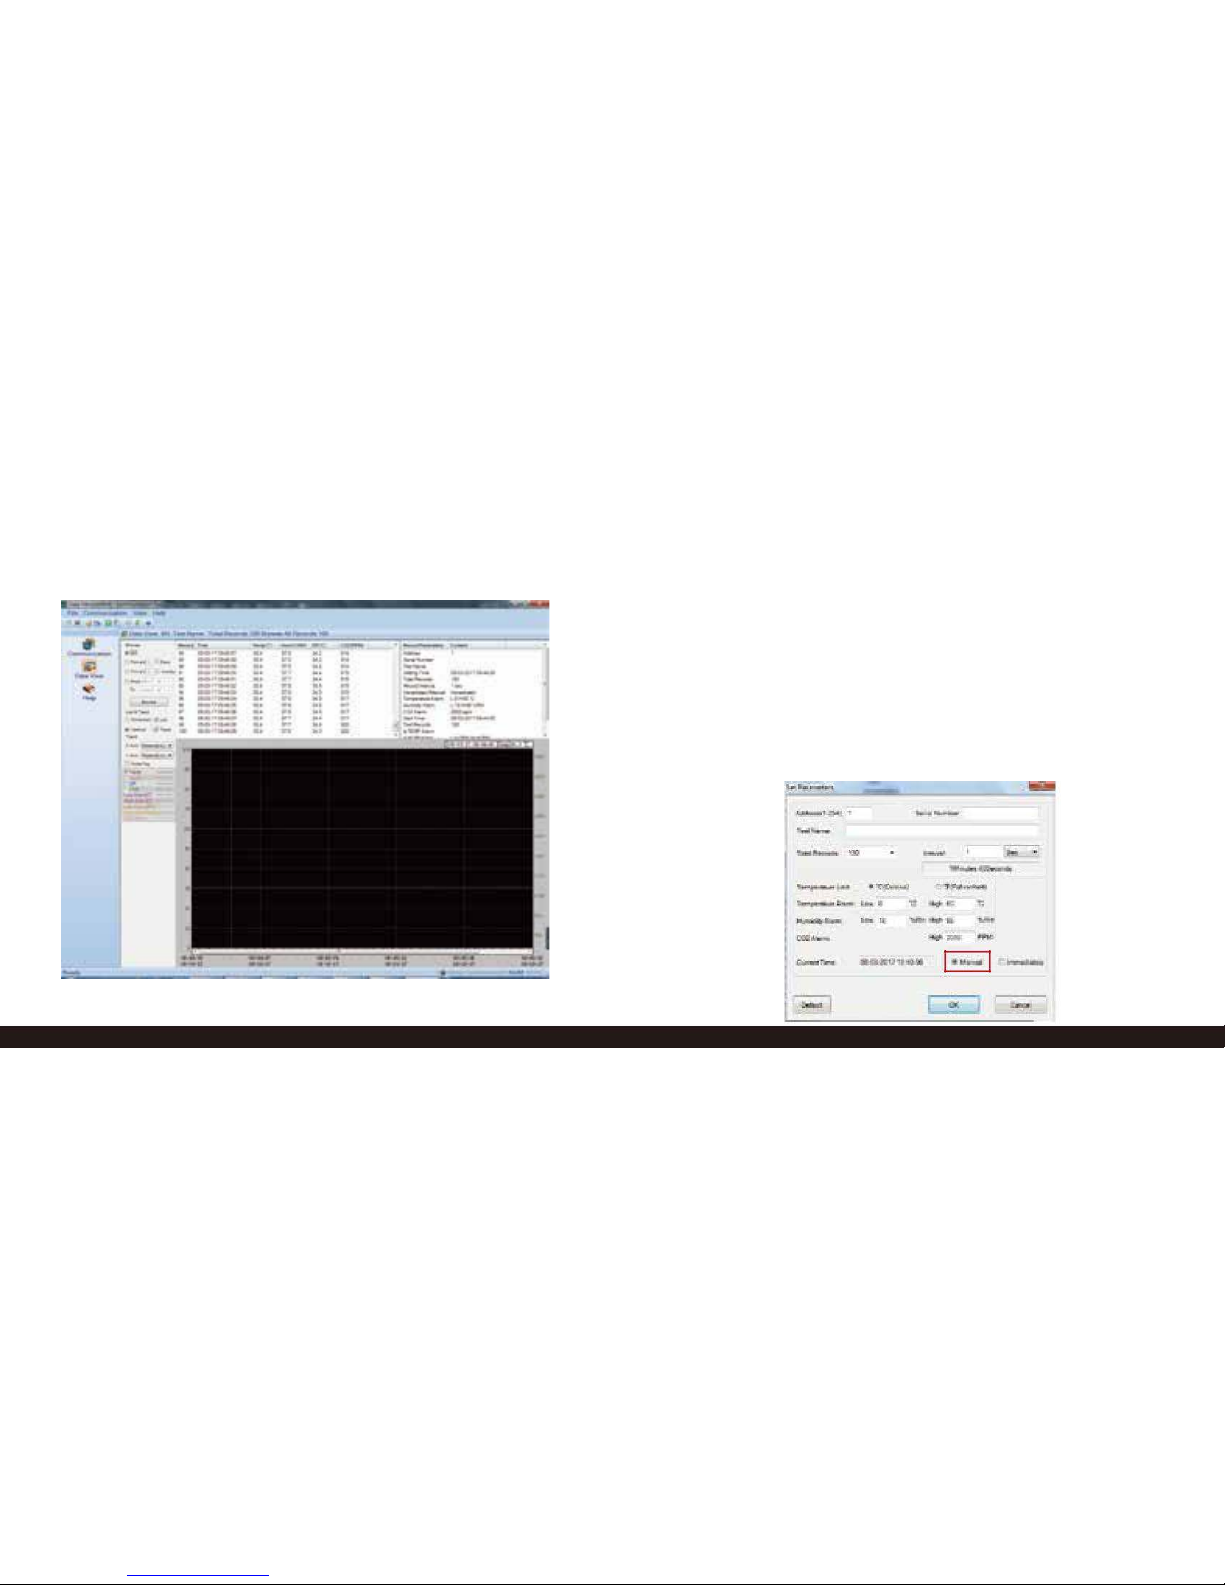
After the data log is saved, it can be reviewed using the
graphing function as shown here:
Option 2: Remote Data Logging
Remote data logging lets you place the monitor in a room,
start recording, then come back later and retrieve the
monitor and download the data. This is useful for measuring
air quality in a room over time.
Start by connecting the monitor to a PC and running the
software. After connecting click the “Set Param” button to
enter the parameter setting interface as shown in the figure
below:
15 www.CO2Meter.com www.CO2Meter.com 16
Page 11
Click “Set Param” to setup the data logging parameters. Set the
parameters as appropriate for your application. Click the “Manual”
button to tell the software you want to log data later by pressing the
REC button on the monitor. Click “OK” to save your settings, then
disconnect the monitor from your PC.
When you are ready to record, press the REC button on the
monitor. It will log CO2 levels according to the parameters
you set in the software. “REC” will flash on the display. The
flashing frequency is the same as the recording interval you
set in the “Param” screen.
To save your data log, connect the monitor to your PC, start
the software and click “Data Download”. You can then view
the data log as a graph on your PC
NOTE: Every time you click “Set Param” the previously
logged data in the monitor’s memory is cleared. Therefore,
you should get in the habit of saving your data files every
time you create one.
Automatic Baseline Calibration
Automatic baseline calibration is useful in areas that are
regularly unoccupied and CO2 level return to 400ppm every
few days. ABC is turned off by default. To enable ABC:
Step 1: Turn the power off.
Step 2: While pressing the and buttons at the same
time, press the “Power” button.
Step 3: Release the power button, then release and
. The screen will show 0PPM (ABC off) or 1PPM (ABC
on).
Step 4: Use the or buttons to change between ABC
off (0PPM) and ABC on (1PPM).
Step 5: Press the MODE button to confirm. The display
will flash 30 if ABC is turned off or 31 if ABC is turned on.
Step 6: If the next screen shows 1PPM, this indicates
the change was successful. If it shows 0PPM, the
change failed.
Step 7: Press MODE again to restart the monitor normally.
17 www.CO2Meter.com www.CO2Meter.com 18
Page 12
Manual Calibration
Manual calibration uses fresh, outdoor air to calibrate the monitor
to 400ppm.
Step 1: Turn the power off. Put the monitor in fresh air for 5-10
minutes so the interior of the monitor is filled with fresh air.
Step 2: While pressing the and buttons at the same time,
press the Power button.
Step 3: Release the Power button first, and then release the
and buttons. The screen will show 400ppm.
Step 4: Press the MODE button to start the manual calibration
process. The screen should show approximately 400ppm.
Step 5: Walk away from the monitor so that your breath does not
influence the manual calibration. Manual calibration will take
between 5-10 minutes to complete.
Step 6: After calibration is complete, read the display. “1” means
manual calibration was a success. “0” means it failed – usually
because the CO2 level was not stable during calibration. If it fails,
retry the manual calibration again. If it fails repeatedly, contact us
for support.
Step 7: Press the MODE button to return to normal operation.
Contact Us
We are here to help!
For information or technical support, please contact us.
[email protected]
(386) 256-4910 (Technical Support)
(386) 872-7665 (Sales)
www.co2meter.com
Address:
CO2Meter, Inc.
131 Business Center, A3
Ormond Beach, FL 32174
USA
19 www.CO2Meter.com www.CO2Meter.com 20
 Loading...