

CMT ORANGE TOOLS POCKET-PRO PPJ-002 Instruction Manual

PPJ-002
POCKET-PRO™ JOINERY SYSTEM
EQUIPO DE EBANÍSTERIA POCKET-PRO
SYSTÈME D’ASSEMBLAGE POCKET-PRO
SISTEMA DI GIUNZIONE POCKET-PRO
BOHRHILFE POCKET-PRO
EN Instruction Manual for PPJ-002 p. 2
ES Manual de instrucciones para el sistema PPJ-002 p. 8
FR Manuel d’instructions pour le système PPJ-002 p. 14
IT Manuale di istruzioni per il sistema PPJ-002 p. 20
DE Gebrauchsanleitung für die Artikel PPJ-002 S. 26
™
™
™
™

EN
541.095.00 + 515.001.51
999.505.05
990.101X30
DESCRIPTION
POCKET-PRO™ JOINERY SYSTEM SET PPJ-002
SET CONTAINS:
POCKET-PRO™ MAIN PARTS
TOGGLE CLAMP 999.505.05
Ø9,5MM (3/8”) STEP DRILL BIT 515.001.51
Ø9,5MM (3/8”) DEPTH COLLAR FOR STEP DRILL BIT 541.095.00
L=152MM (6”) SQUARE DRIVE SCREW DRIVER BIT 999.505.08
MASTERPACK 30 FINE SCREWS L=31,7MM (1-1/4”) 990.101X30
OPTIONAL
500 FINE SCREWS L=31,7MM (1-1/4”) 990.101X500
500 COARSE SCREWS L=31,7MM (1-1/4”) 990.102X500
500 FINE SCREWS L=38,1MM (1-1/2”) 990.103X500
500 COARSE SCREWS L=38,1MM (1-1/2”) 990.104X500
FACE CLAMP SWIVEL PAD 999.505.06
999.505.08
999.505.10
ORDER NO.
ORDER NO.
L=76MM (3”) SQUARE DRIVE SCREWDRIVER BIT 999.505.07
To order replacement parts, contact your CMT Distributor
2
www.cmtorangetools.com

EN
1/2”
5/8”
3/4”
7/8”
1”
1-1/8”
1/2”
5/8”
3/4”
7/8”
1”
1-1/8”
1-1/4”
1-3/8”
1-1/2”
1-5/8”
1/2”
5/8”
3/4”
7/8”
1”
1-1/8”
1-1/4”
1-3/8”
1-1/2”
1-5/8”
Assembling your Pocket-Pro™
1) Attach the jig to a flat piece of plywood or your workbench.
See illustrations below for suggested dimensions. Screws
should be tight enough to keep the jig from moving on the
plate, but do not overtighten and damage your jig.
2) Assemble the molded Upper Jig to the Jig Base using the
two screws and knobs provided.
3 Attach the Toggle Clamp to the base you constructed in
Step One using four screws. Thread the shaft of the Clamp
Tip into the body of the Toggle Clamp.
M4 screw
M4 screw
Fig. 1
M8 screw
Fig. 2
1-5/8”
1-1/2”
1-3/8”
1-1/4”
1-1/8”
1”
7/8”
3/4”
5/8”
1/2”
Base Plate
1-5/8”
1-1/2”
1-3/8”
1-1/4”
1-1/8”
1”
7/8”
3/4”
5/8”
1/2”
Knob
Fig. 3
Mounting Holes for
Molded Jig
11-3/4”
www.cmtorangetools.com
300mm
4-1/16”
103,2mm
14-3/4”
375mm
Tip
1-5/8”
1-1/2”
1-3/8”
1-1/4”
1-1/8”
1”
7/8”
3/4”
5/8”
1/2”
Mounting Holes
for Molded Jig
3
EN
Characteristics of Pocket-Pro™ Joinery
Now that your Pocket-Pro™ Joinery System is assembled, you’re ready for wood joinery. If you have used
other pocket hole systems before, then you’re probably familiar with joints, as well as some of the
basics of using this jig. But, you’ll find some major advantages to the Pocket-Pro™.
For example:
• Some jigs require that you add or remove various portions of the jig to join different stock thicknesses.
Not with the Pocket-Pro™ - you simply adjust the interlocking jig up or down to choose from a full
range of joints, from 1/2” (12,7mm) to 1-5/8” (41,3mm) thick!
• Other jigs require frequent repositioning of the Depth Stop Collar for different styles of joint. Not with
the Pocket-Pro™ - the vast majority of adjustments allow you to leave the Stop in the same position!
• With the Pocket-Pro™, you can quickly adjust the location of the pocket in relation to the end of your
workpiece to use longer screws or to leave more “meat” in the joint.
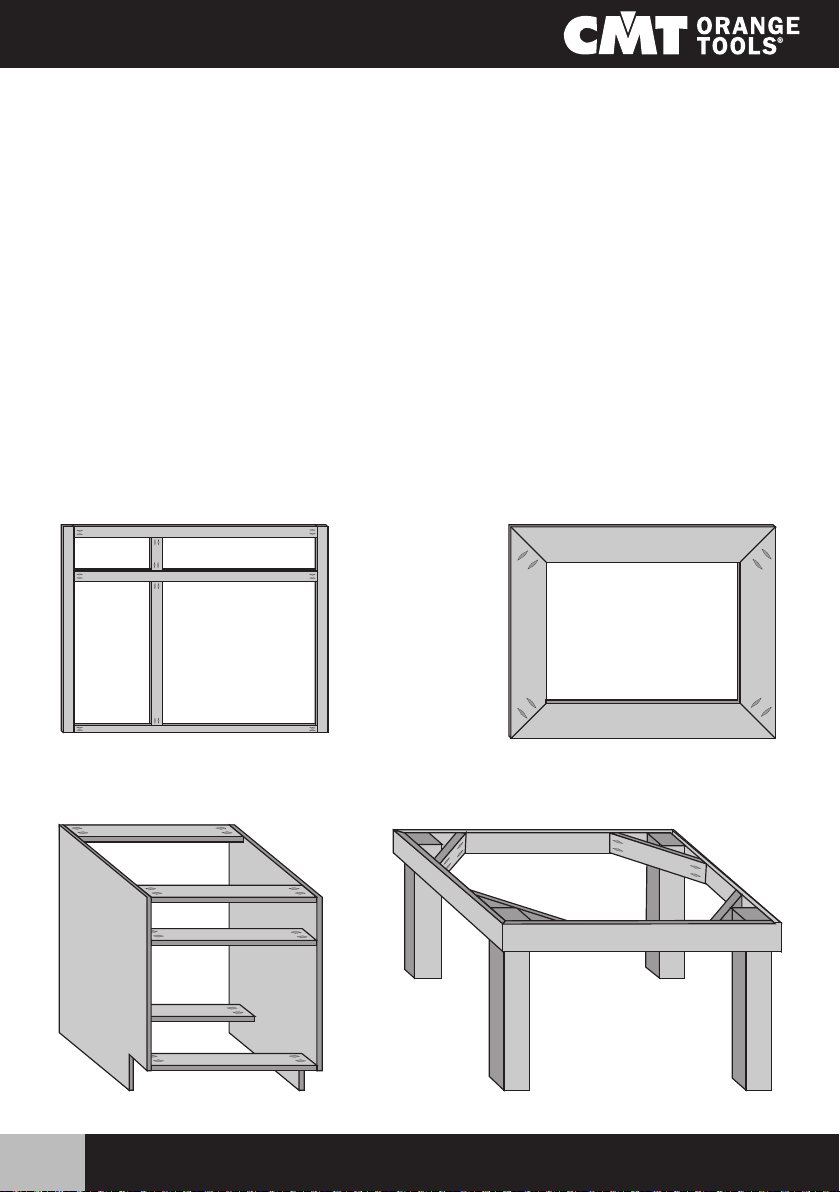
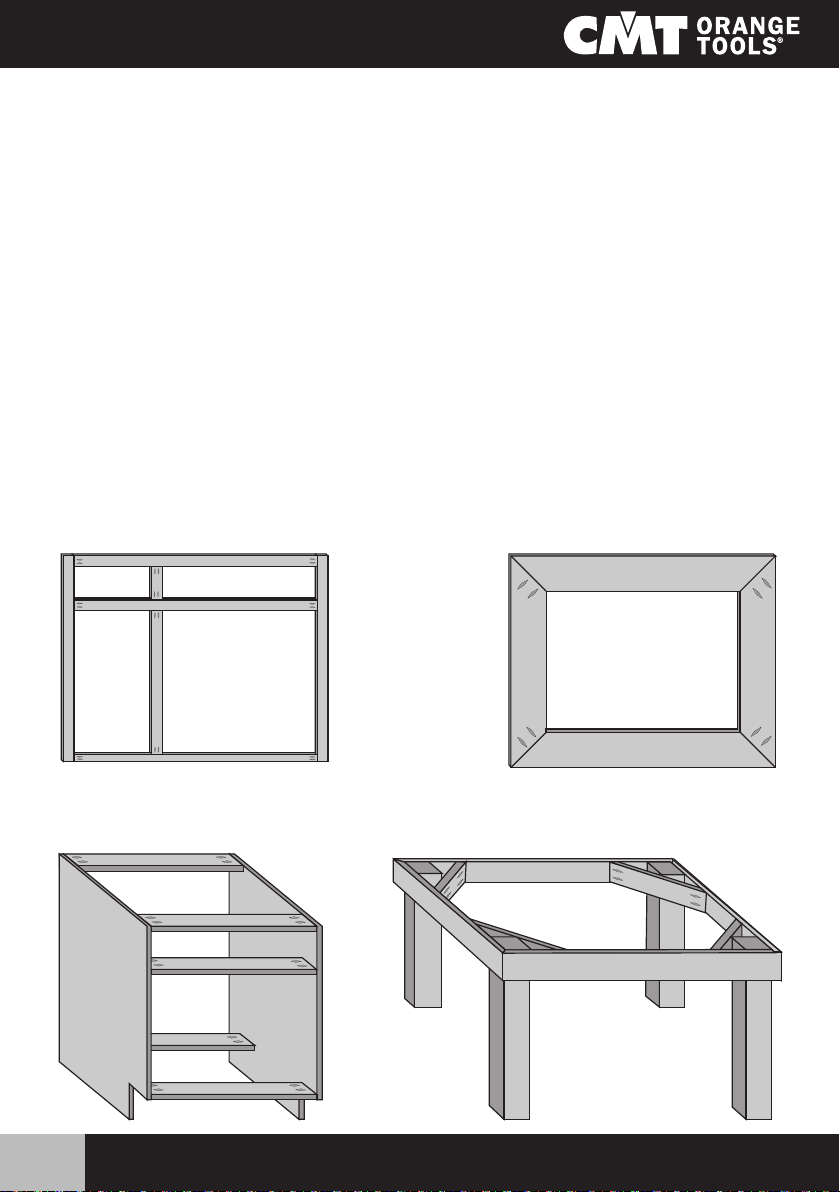
Here are just a few examples of joints you can build with your Pocket-Pro™:
– Leg and Rail Joints
– Cabinets Construction
Face Frames Picture Frames
Cabinets
Leg & Rail
and other furniture jobs
4
www.cmtorangetools.com
1/2”
5/8”
3/4”
7/8”
1”
1-1/8”
1/2”
5/8”
3/4”
7/8”
1”
1-1/8”
1-1/4”
1-3/8”
1-1/2”
1-5/8”
25,4mm (1”)
1/2”
5/8”
3/4”
7/8”
1”
1-1/8”
1-1/4”
1-3/8”
1-1/2”
1-5/8”
Face Frame Joints:
Face Frame joints are among the most common applications of the pocket hole joint, and they are an excellent way
to get accustomed to your Pocket-Pro™. If this is your first
experience with pocket holes, this is an ideal place to start.
We’ll start with a joint in common 3/4” (19mm) stock. Be
sure to make a joint in scrap material first to be certain that
you understand the system.
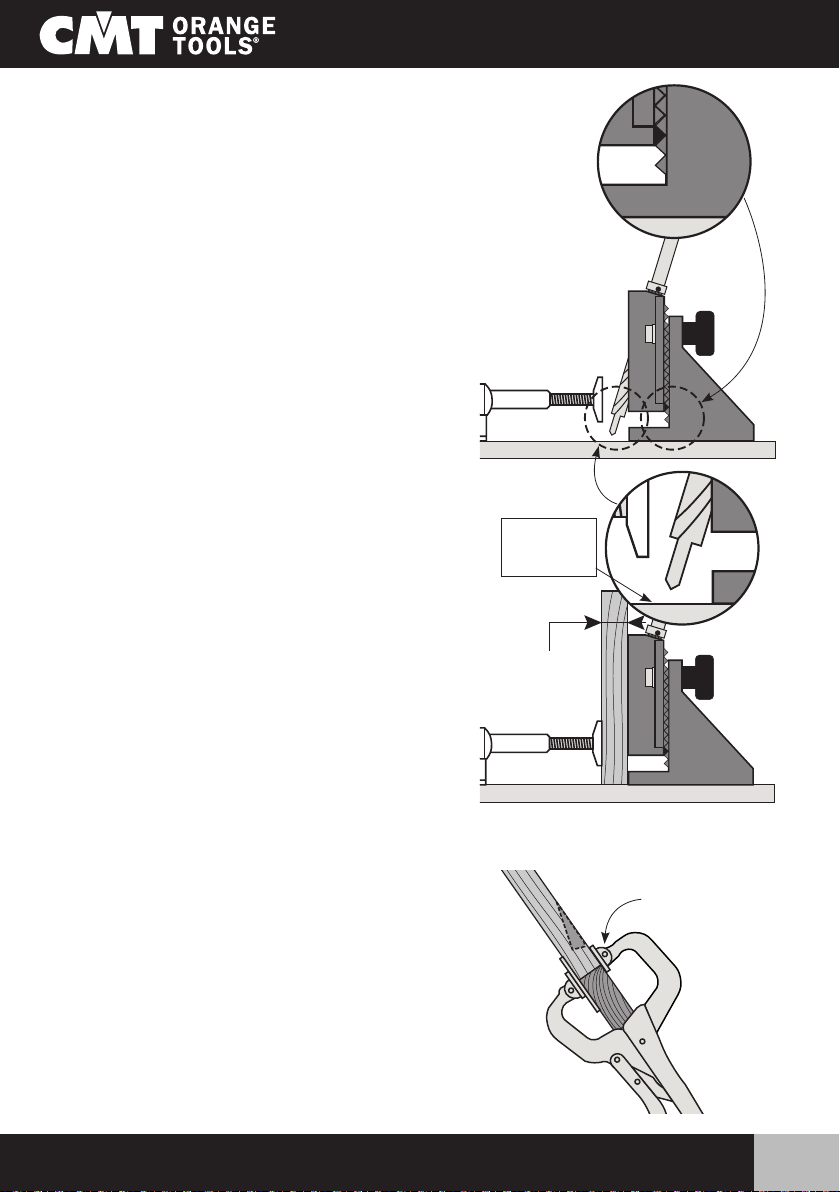
1) Set the height of the jig for 3/4” (19mm) material. The
“tooth” on the upper jig marked with a black triangle
should fit into the slot marked 3/4” (19mm).
2) Insert the Step Drill Bit into one of the drill guides and
set the Depth Stop Collar so that the tip of the bit will
stop about 1/8” (3,2mm) above the Base. Remove the
bit from the jig.
3) Clamp your workpiece vertically in the jig, so the two
drill guides are centered on the stock. The threaded
tip of the Toggle Clamp should be adjusted so that the
clamp holds your workpiece firmly, but you should not
need to force the clamp closed, as extreme pressure
could damage your jig. Take some time to get familiar
with the correct clamping pressure while working with
scrap.
4) Drill both holes. For best results, allow the bit to come
to full speed within the drill guide before drilling the
workpiece. Drill the hole until the Depth Stop reaches
the top of the drill guide, then keep the bit spinning
while you withdraw it from the wood.
5) Remove the stock from the jig, and position it at right
angles to the other workpiece. Use the Face Clamp
(Optional 999.505.06) or your own C-Clamp or Bar
Clamp to hold the two pieces together. Place the larger
plate of the clamp against the front face of your joint this will keep the faces perfectly flush.
6) Drive self-tapping pocket hole screws into each hole,
using the Driver Bit and your adjustable- clutch driver.
Adjust the torque so you can drive screws without stripping the heads. The workpieces may separate slightly
as you drive the screws, but they should pull tight as
you set the screws. If they separate by more than about
1/8” (3,2mm), you may wish to apply greater pressure
with the clamp.
www.cmtorangetools.com
1/8”
(3,2mm)
Space
MIN 12,7mm - 1/2”
MAX 41,3mm - 1-5/8”
EN
1-5/8”
1-1/2”
1-3/8”
1-1/4”
1-1/8”
1”
7/8”
3/4”
5/8”
1/2”
1)
1-5/8”
1-1/2”
1-3/8”
1-1/4”
1-1/8”
1”
7/8”
3/4”
5/8”
1/2”
2)
CMT Face Clamp
(Optional 999.505.06)
or your own clamp
5)
5

EN
1/2”
5/8”
3/4”
7/8”
1”
1-1/8”
1-1/4”
1-3/8”
1-1/2”
1-5/8”
Angled and Beveled Joints
The Pocket-Pro™ can be used to create a
wide variety of angled and beveled joints. The
unique incremental height adjustment of the
Pocket-Pro™ lets you put the pocket in the
best possible position for your application. As
you become more experienced with the jig you
will find many more applications than we can
possibly illustrate, but this 45° angled joint is
a good illustration of the technique:
1) This joint connects two pieces of 3/4”
(19mm) stock, but we recommend that
you set the jig at the 1” (25,4mm) height.
This has the effect of moving the pocket
farther back from the end of the miter cut,
creating a stronger joint.
2) Drill the holes. If you are joining wide material, you will probably need more than
two holes, so shift the stock in the jig as
needed.
3) In order to assemble the joint, it will help
to create a stop block as shown to hold
the work in position. This technique is useful in many other pocket hole applications.
1)
2)
Block clamped to workpiece
3)
holds stock in position
25,4mm (1”)
The 1” setting is ideal for many
mitered or angled joints. Try other
settings for various thicknesses.
Tongue & Groove and Rabbeted
Joints
The Pocket-Pro™’s incremental adjustment
comes in handy for these common joints. Other pocket hole jigs are positioned so that your
screw would cut through the tongue portion of
the tongue and groove joint.
By adjusting the height of the Pocket-Pro™,
however, you can control precisely where the
screw is positioned. For example, in this illustration, we used 3/4” (19mm) material, then
showed where the screw would be positioned
at the commonly-used 3/4” (19mm) position
in the upper illustration. In the lower drawing,
we show the advantage of the 7/8” (22,2mm)
position with the Pocket-Pro™.
6
Other pocket hole
jig set at 3/4”
(19mm) position
runs the screw
through
the tongue
Pocket-Pro™ set
at 7/8” (22,2mm)
position yields
a stronger joint
www.cmtorangetools.com
EN
1/2”
5/8”
3/4”
7/8”
1”
1-1/8”
1-1/4”
1-3/8”
1-1/2”
1-5/8”
Face Frame joints in other stock thickness
• For thinner stock, adjust your jig to the 1/2” (12,7mm) or 5/8” (15,87mm) setting, then adjust your
depth stop so the tip of the bits stops 1/8” (3,2mm) above the base.
• For thicker stock, adjust the jig to the appropriate stop. You do not need to adjust the Stop Collar,
unless your screws will not otherwise be long enough for a solid joint.
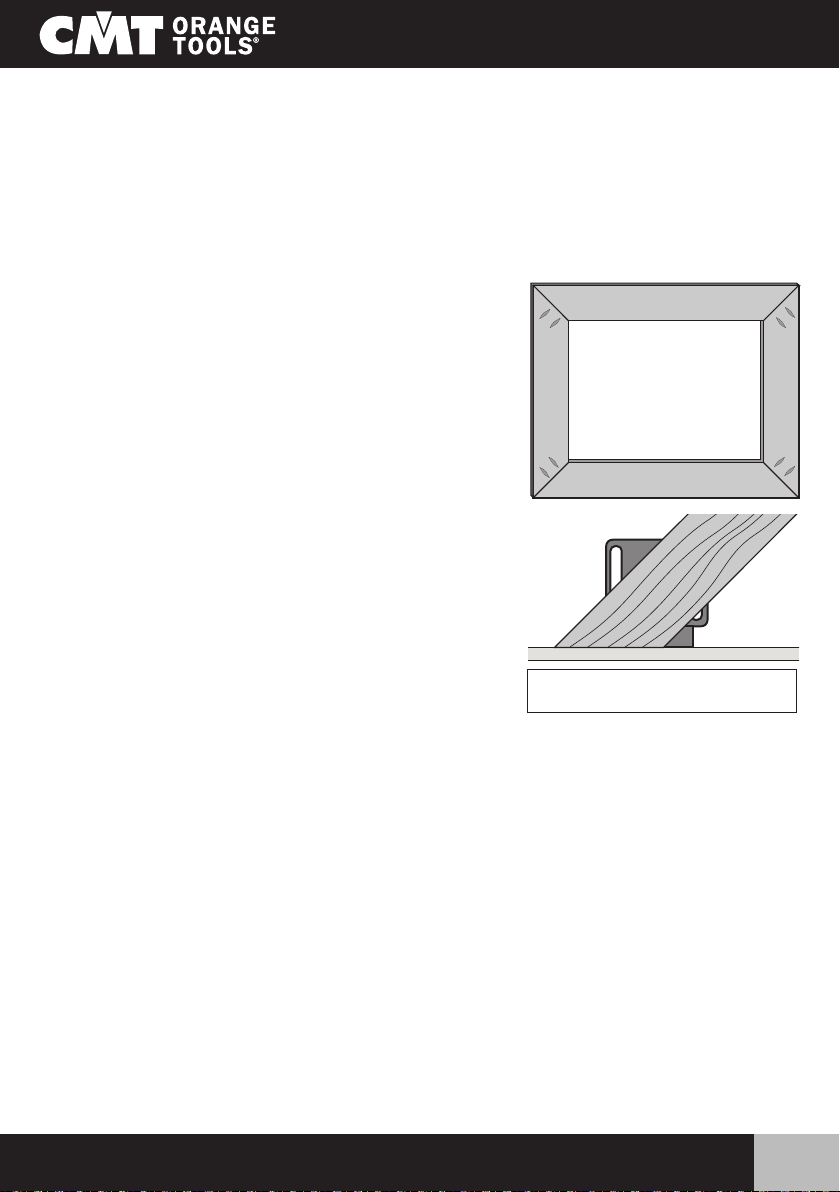
Mitered Joints
Pocket hole joints are an ideal way to assemble picture frames
and other mitered projects.
These instructions assume you will use 3/4” (19mm) thick stock.
Adjust your Jig for thicker or thinner material.
1) Set the height of the jig and the Depth Stop Collar for 3/4”
(19mm) material.
2) Cut the miters on all workpieces.
3) Clamp your workpiece in the jig as shown at right. If the stock
is more than 2-1/2” (63,5mm) wide, you can use the two drill
guides just as you would for a face frame joint. For narrower
material, you can still drill two holes, but you will need to shift
the stock between drilling the first and second holes, so that
neither pocket will be exposed on the edge of your frame.
4) Drill both holes.
5) Clamp each joint with your Face Clamp or C-Clamp and drive
the screws.
Note: Toggle clamp omitted for clarity
Screw Selection
For best results use only self tapping pocket hole screws with fillister or washer heads. We have a variety
of screws available for various applications. In general, use 1” (25,4mm) screws for 1/2” (12,7mm)
stock, 1-1/4” (31,75mm) or 1-1/2” (38,1mm) screws for 3/4” (19mm) stock, and 2-1/2” (61,5mm)
or 3” (76,2mm) screws for 1-1/2” (38,1mm) material. Coarse thread screws are best for softwoods, fine
thread for hardwood.
Maintenance
Your Pocket-Pro™ Jig is molded from high impact plastic. The jig and all other components of the Joining
System are designed for years of trouble free service. Keep the jig and clamps free of dust build-up, and
store them safely when not in use. Lightly oil the drill guides when they begin to seem dry. The only other
maintenance required is occasional sharpening of the Step Drill Bit. Take your bit to a qualified sharpening service for best results.
www.cmtorangetools.com
7

ES
541.095.00 + 515.001.51
999.505.05
990.101X30
990.101X30
LISTA DE REPUESTOS
SISTEMA DE EMPALME POCKET-PRO™ PPJ-002
EL JUEGO INCLUYE:
EQUIPO GRADUADO DE DOS PIEZAS POCKET-PRO™
ABRAZADERA DE PALANCA 999.505.05
BROCAS HELICOIDALES DE Ø9,5MM (3/8”) 515.001.51
ANILLOS DE TOPE DE Ø9,5MM (3/8”) 541.095.00
INSERTO HEXAGONAL L=152MM (6”) 999.505.08
SET 30 TORNILLOS PASO FINO L=31,7MM (1-1/4”) 990.101X30
OPCIONALES
500 TORNILLOS PASO FINO L=31,7MM (1-1/4”) 990.101X500
500 TORNILLOS PASO GRUESO L=31,7MM (1-1/4”) 990.102X500
500 TORNILLOS PASO FINO L=38,1MM (1-1/2”) 990.103X500
500 TORNILLOS PASO GRUESO L=38,1MM (1-1/2”) 990.104X500
PRENSOR DE PINZA AJUSTABLE 999.505.06
999.505.08
999.505.10
CÓDIGO
CÓDIGO
PIEZA CUADRADA PARA DESTORNILLADOR L=76MM (3”) 999.505.07
Para encargar las piezas de repuesto, contacte con nuestro Distribuidor local CMT
8
www.cmtorangetools.com

1/2”
5/8”
3/4”
7/8”
1”
1-1/8”
1/2”
5/8”
3/4”
7/8”
1”
1-1/8”
1-1/4”
1-3/8”
1-1/2”
1-5/8”
1/2”
5/8”
3/4”
7/8”
1”
1-1/8”
1-1/4”
1-3/8”
1-1/2”
1-5/8”
MONTAJE DEL SISTEMA Pocket-Pro™
ES
Montaje del sistema Pocket-Pro™
1) Monte el equipo PPJ-002 sobre un pedazo llano de madera contrachapada sobre el banco de trabajo. Consultar las
ilustraciones debajo para las dimensiones aconsejadas.
Los tornillos tienen que apretarse de manera suficiente
para impedir que el equipo se desplace sobre la placa,
pero no apriete excesivamente ya que el equipo podría
dañarse.
2) Monte la parte superior del equipo sobre la base utilizando
los dos tornillos y los mangos esféricos suministrados.
3) Monte el prensor sobre la base fabricada en el punto 1)
utilizando cuatro tornillos. Enrosque el eje enroscado de la
punta del prensor dentro del cuerpo del prensor mismo.
Tornillo M4
Tornillo M4
Fig. 1
Tornillo M8
Fig. 2
1-5/8”
1-1/2”
1-3/8”
1-1/4”
1-1/8”
1”
7/8”
3/4”
5/8”
1/2”
Placa de la base
Mango esférico
1-5/8”
1-1/2”
1-3/8”
1-1/4”
1-1/8”
1”
7/8”
3/4”
5/8”
1/2”
Fig. 3
Agujeros de montaje
para prensor
11-3/4”
www.cmtorangetools.com
300mm
4-1/16”
103,2mm
14-3/4”
375mm
Punta
Agujeros de montaje para
sistema PPJ
1-5/8”
1-1/2”
1-3/8”
1-1/4”
1-1/8”
1”
7/8”
3/4”
5/8”
1/2”
9
ES
Características de Pocket-Pro™ Joinery
Después de haber montado el sistema de Empalme Pocket-Pro™, Ud. estará listo para entrar en nuevo
mundo de los empalmes de madera. Si ya ha utilizado herramientas de este tipo, ya conocerá muchas
de las aplicaciones que se pueden realizar y las indicaciones de base para su empleo.
Sin embargo, descubrirá que Pocket-Pro™ presenta algunas ventajas importantes. Por ejemplo:
• Algunos productos necesitan que se agreguen o sustituyan algunas partes del equipo para la elaboración de los varios espesores.
No es así para Pocket-Pro™, el cual permite conseguir la realización de encajes con espesor de 12,7
hasta 41,3mm (1/2” hasta 1-5/8”) mediante una simple regulación vertical de la herramienta.
• Algunos equipos necesitan frecuentes desplazamientos de la posición del anillo de tope para los
distintos tipos de empalmes.
¡No es así para Pocket-Pro™, con el cual la mayoría de los ajustes pueden conseguirse dejando el
anillo de profundidad en la misma posición!
• Con Pocket-Pro™ es posible ajustar rápidamente la posición del equipo respecto a la extremidad
de la pieza que trabajar, también utilizando tornillos más largos o dejando un grosor mayor en los
empalmes.
Aquí debajo algunos tipos de empalmes que es posible realizar con el sistema Pocket-Pro™:
– Empalmes de espiga
– Fabricación de pequeños muebles
10
Pequeños
muebles
Bastidores
frontales
Marcos
Patas y travesaños
y más aplicaciones
para muebles
www.cmtorangetools.com
 Loading...