

Page 1

THIS DEVICE COMPLIES WITH PART 15 OF THE FCC RULES. OPERATION IS
SUBJECT TO THE FOLLOWING TWO CONDITIONS: (1) THIS DEVICES MAY NOT
CAUSE HARMFUL INTERFERENCE, AND (2) THIS DEVICE MUST ACCEPT ANY
INTERFERENCE, RECEIVED, INCLUDING INTERFERENCE THAT MAY CAUSE
UNDERSIRED OPERATION.
Note : This equipment has been tested and found to comply with the
limits for a Class B digital device, pursuant to part 15 of the FCC Rules.
These limits are designed to provide reasonable protection against
harmful interference in a residential installation. This equipment
generates, uses and can radiate radio frequency energy and, if not
installed and used in accordance with the instructions, may cause
harmful interference to radio communications. However, there is no
guarantee that interference will not occur in a particular installation. If
this equipment does cause harmful interference to radio or television
reception, which can be determined by turning the equipment off and
on, the user is encouraged to try to correct the interference by one or
more of the following measures :
- Reorient or relocate the receiving antenna.
- Increase the separation between the equipment and receiver.
- Connect the equipment into an outlet on a circuit different from that
to which the receiver is connected.
- Consult the dealer or an experienced radio/TV technician for help.
NOTE: THE MANUFACTURER IS NOT RESPONSIBLE FOR ANY RADIO OR TV
INTERFERENCE CAUSED BY UNAUTHORIZED MODIFICATIONS TO THIS EQUIPMENT.
SUCH MODIFICATIONS COULD VOID THE USER'S AUTHORITY TO OPERATE THE
EQUIPMENT.
Page 2

CONTENTS
SYSTEM RECOMMENDATION 2
THE DESCRIPTION OF THE PRODUCT 2
ACCESSORIES 2
INSTALLING THE PROGRAM 3
UNINSTALL THE PROGRAM 6
HOW TO USE THE PROGRAM 7
INSERTING A BATTERY 11
POWER 11
CHANGING THE MODE (MP3 ↔ Voice ) 11
PLAY 11
SEARCH 12
REPEAT A-B 12
EQUALIZER 12
REPEAT 13
CONTRAST 13
AUTO-INTELLIGENT POWER-OFF(AI-OFF) 13
VOICE RECORDING 14
DELETING VOICE MESSAGE 14
HOLD 14
FAQ 15
SPECIFICATION 17
GUARANTEE 18
■ In order to improve the product quality, the design or specification of the
product can be changed without any notice.
ENGLISH
1
Page 3
SYSTEM RECOMMENDA TION
INST ALLING THE PROGRAM
■ Processor : Pentium 233MHz or Better
■ Windows98 / 98SE / ME / 2000Pro
■ 1GB Hard Disc or Higher(4GB Recommended)
■ 64MB DRAM or Better
■ USB Port
■ Monitor Resolution : 1024
■ CD-ROM Drive to Install Software
✕
768, 16Bit Color or Better
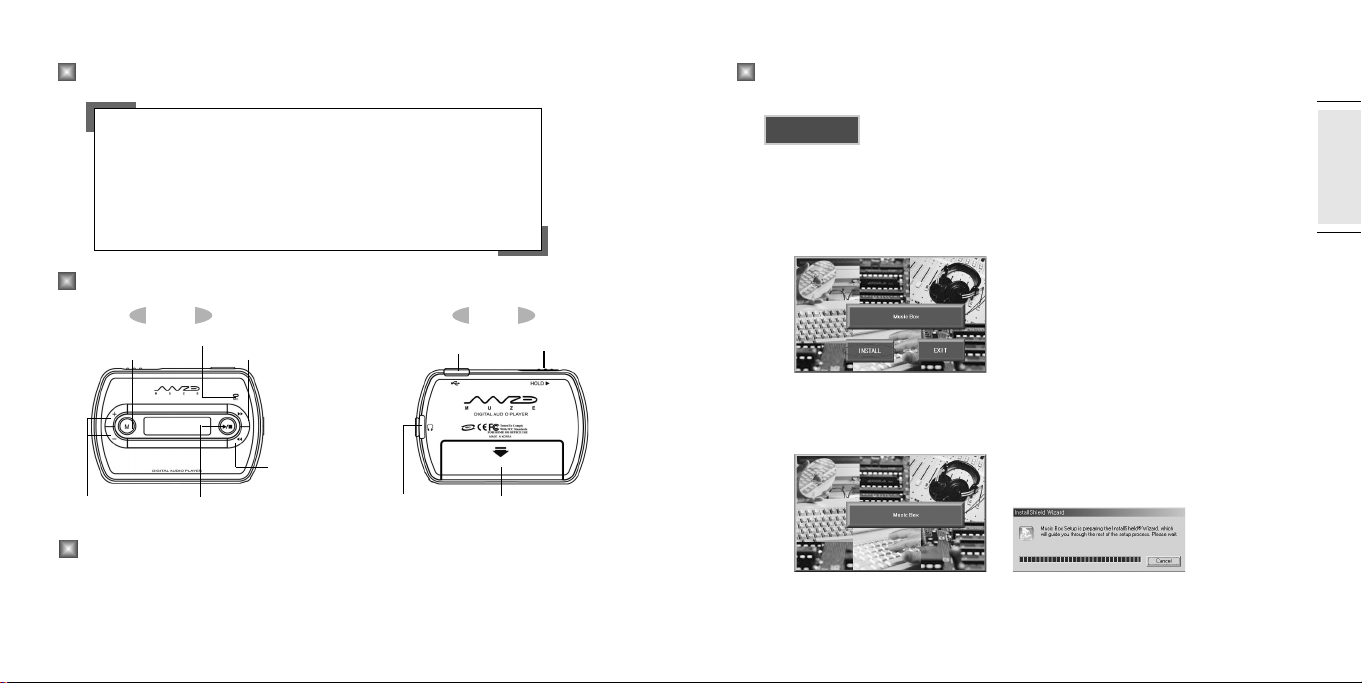
THE DESCRIPTION OF THE PRODUCT
Front Back
Mode Button
Volume
Control Button
Microphone
FF Button
REW Button
Play/Stop Button
Earphone
Jack
USB Jack
Battery Cover
ACCESSORIES
■ Install CD ■ USB Cable ■ Battery (1.5V, AAA)
■ Earphone ■ Manual
2
Hold Switch
CAUTION
If you insert the Install CD into your CD-ROM drive, the program starts
1.
automatically and the following screen appears. If the program does not run,
double-click "INSTALL" icon on the Install CD.
Click "INSTALL" button to start your installation on the above figure.
2.
The installation will proceed in the figures shown below. Follow the
instructions displayed on the screen.
Do not connect the player to your computer before completing
program installation.If the player is connected, unplug it from
your computer.
ENGLISH
3
Page 4
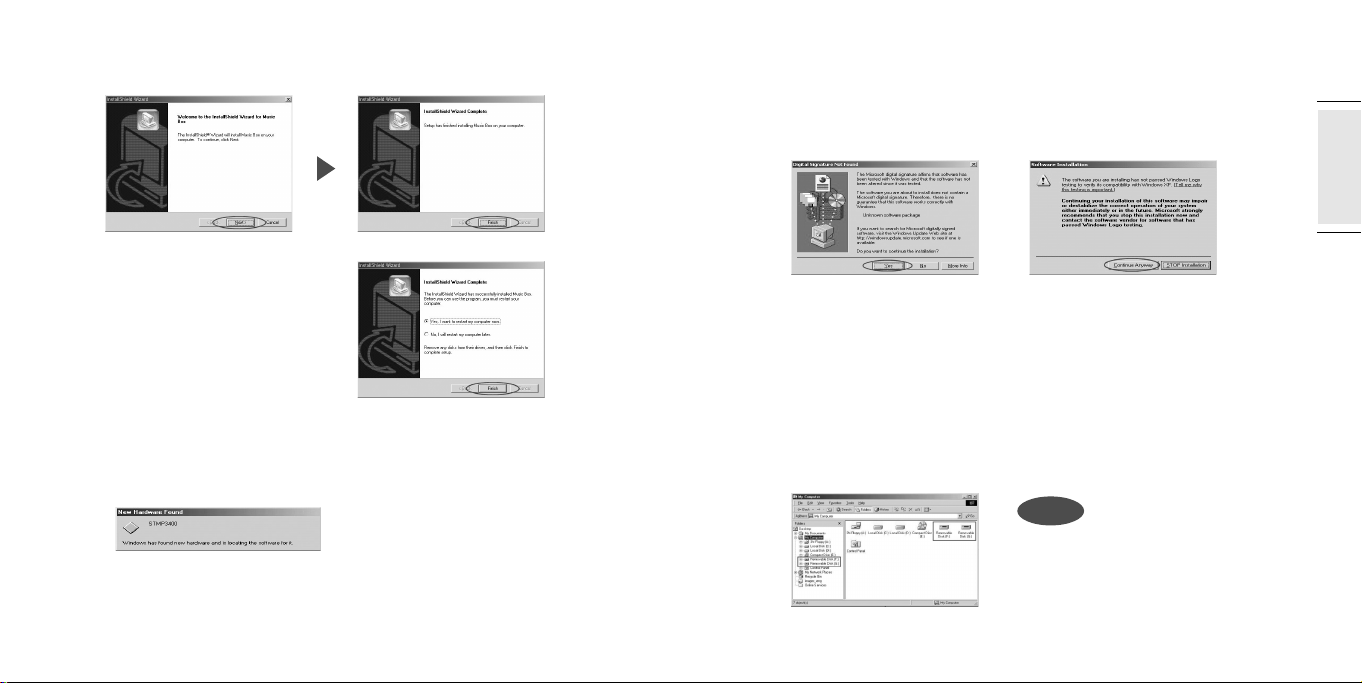
Click "NEXT", then "FINISH" button on the below window.
3.
Click "FINISH" button on
4.
the right window to finish
installingthe program and
reboot your PC automatically.
After rebooting PC, connect the player to the USB port of your PC and
5.
turn on the player by pressing "▶/■" buttons.
If you turn on the player, "READY" is displayed on the LCD and the
6.
"New Hardware Found" window appears as shown below.
(The window may be slightly different from Windows versions.)
If you continue with your installation after the "New Hardware Found" window
7.
displayed in the previous step, the following message windows appear on
Windows 2000 and Windows XP.
In Windows 2000
Click "Yes" or "Continue” button to continue with your installation when the
above windows appear.
If you click "Stop Installing", your installation will not be completed.
[The above windows will be also displayed when installing other programs.
Continue with your installation. The installation procedure has been tested
and verified.]
If the above steps are completed normally, the player has been installed
8.
properly.Now, run Windows Explorer, there are two removable disks in
Windows Explorer.
In Windows XP
NOTE
No shortcut icon will be created on Windows
desktop after installing the program.
ENGLISH
54
Page 5
UNINST ALL THE PROGRAM
●
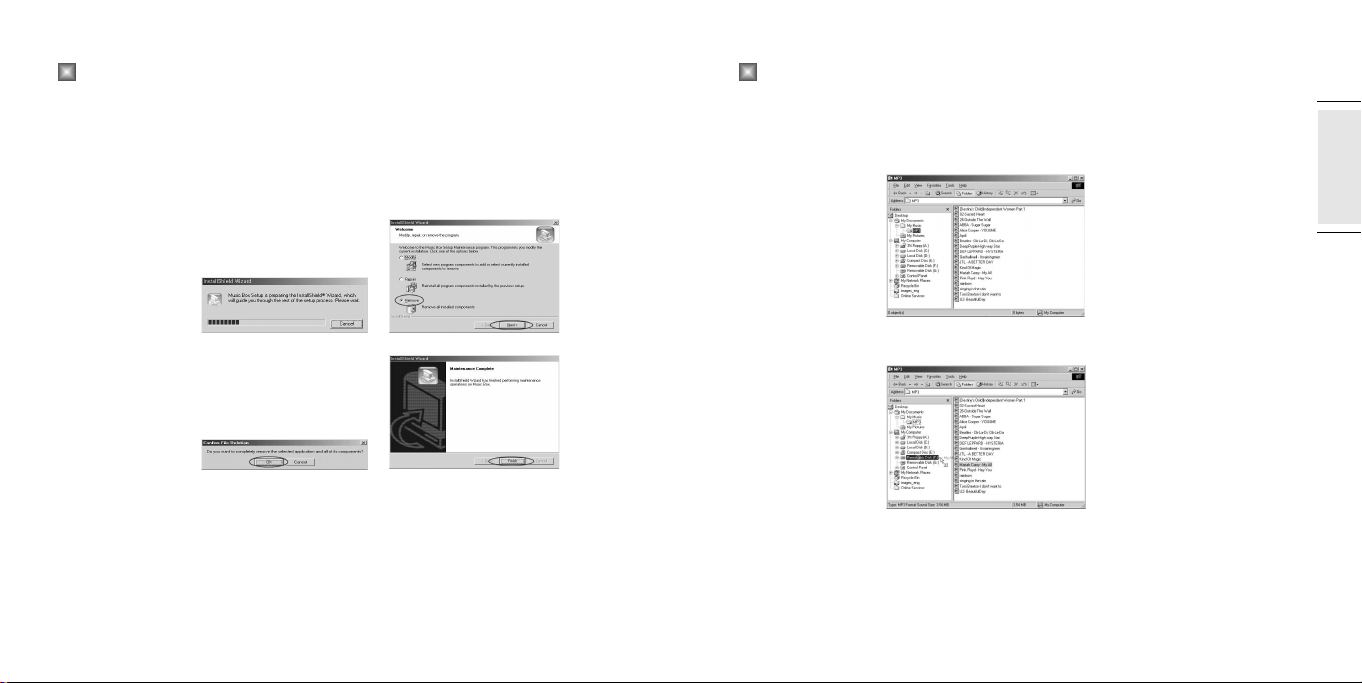
To uninstall your MP3 program (driver)
If the player is connected to PC, unplug it from your computer.
1.
Run Add/Remove Programs from the Control Panel to display the list of
2.
installed programs.
Find "MUSIC BOX" in the list and
3.
double-click it to perform deleting
process as follows;
Check "REMOVE" check-box and
4.
click "NEXT" on the second
window shown above.
Finally, click "FINISH" to complete the program deleting process.
5.
HOW TO USE THE PROGRAM
■
To download MP3 files to the player
After installing the program, connect the player to PC with the USB cable.
1.
Open Windows Explorer and search for MP3 files to download to the player.
Drag and drop MP3 files to the removable disks.
2.
ENGLISH
If you want to reinstall the player program, make sure to turn off and then
6.
back on PC before starting new installation process.
If the player program has not been installed properly or you need to reinstall it,
7.
uninstall the program as shown above steps, and then insert the Install CD into
your CD-ROM drive and continue with installation.
While MP3 files are downloaded to the player, 'WRITING' is blinking the LCD
3.
display of the player. If USB cable is plugged out while 'WRITING' is blinking,
the player is not operating properly.
76
Page 6
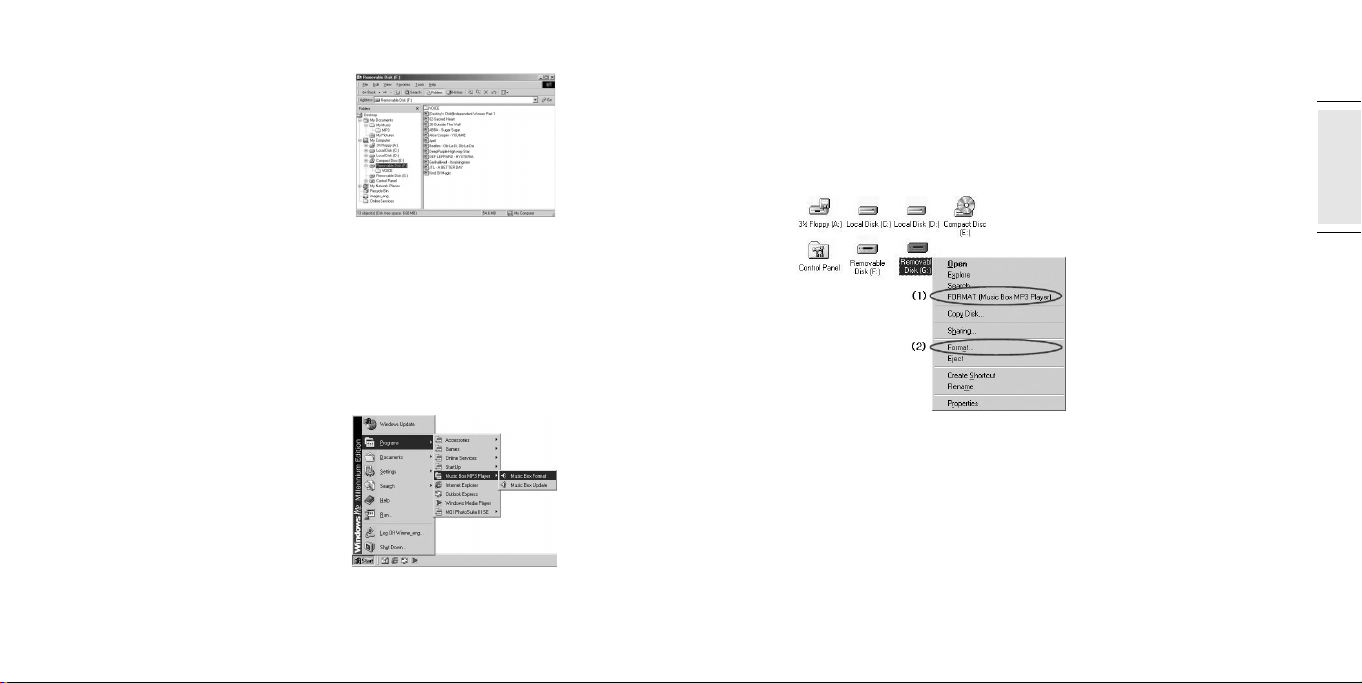
After the download is finished,
4.
there are MP3 files in the removable
disk as shown in the right figure.
If USB cable is disconnected, the power of the player is automatically on
5.
and press "▶/■" cutton to listen to the songs.
■
How to format removable disk
You can format the removable disks of the player.
If you format a removable disk, all the files saved in it are
deleted and the drive is initialized.
■
To run with Windows Start Menu
Click Start menu and point at
designated menus as shown
in the right figure.
■
To run with Windows Explorer
Open Windows Explorer and select the removable disk you want to format.
1.
Right-click the mouse to display the Format menu as shown in the following
2.
figure.
Click (1) "Format (Music box MP3 Player)" in the Format menu to display
the window shown in step 3.
Or, you can click (2) "Format".
However, the menu item (2) is not supported on Windows 98.
If you are using Windows 98, use the menu item (1) to format a removable disk
of the player.
If you use the menu item (2) on Windows 98, a window different from the one
shown in step 3 will be displayed. If you format a removable disk with this different
window, the player may not turn on, or removable disk may not be created,
or file downloads may not proceed properly.
ENGLISH
98
Page 7
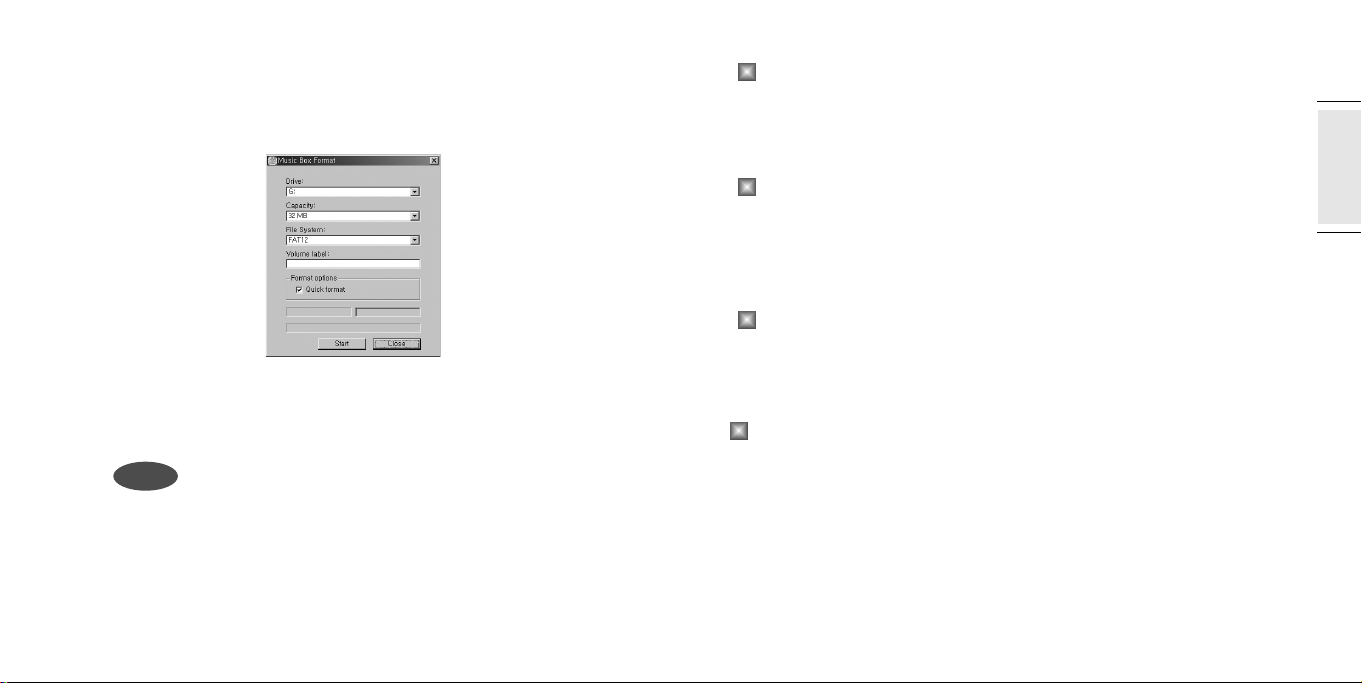
If you click the menu item (2) from the Start menu or Windows Explorer,
3.
the following Formatting window appears.
INSERTING A BA TTERY
Open the cover on the back of the player.
1.
Insert the battery, according to the direction inscribed in the bottom.
2.
Select the removable disk you want to format from the "Drive" box and click
4.
"Start" to format the selected drive.
NOTE
If no removable disk drive is listed in the "Drive" box, remove the battery from
the player and reinsert it, and then try formatting again.
10
POWER
Press "▶/■" button to turn on the player.
1.
Press "▶/■" button over 3 seconds to turn off the player or press it shortly
2.
to change the mode. (Play mode
↔ Stop mode)
CHANGING THE MODE (MP3↔Voice )
Press 'M' button to change to Voice Recording Mode in 'Stop' mode.
1.
Press 'M' button to change to MP3 Mode in 'Stop' mode of Voice.
2.
PLAY
Press "▶/■" button to play a song. And press once again to stop it.
1.
Press '+' or '-' button to volume up or down.
2.
There are 27 volume steps.
3.
ENGLISH
11
Page 8

SEARCH
'
'
Press '' or
1.
Press '' or
2.
is playing.
button to search a song in play or Stop Mode.
'
'
button longer to fast forward or rewind while a song
REPEA T A-B
Press 'M' button to select a repeat section while a song or voice message
1.
is playing.
Press 'M' button to select the first and the last point of the file to repeat
2.
the section.
EQUALIZER
Press 'M' button over 3 seconds to change to Equalizer Mode.
1.
EQ is displayed in LCD. And Press '' to select a mode after pressing ‘M’
2.
button. (NORMAL ➜ ROCK ➜ POP ➜ CLASSIC ➜ JAZZ)
REPEA T
Press 'M' button over 3 seconds to change to Equalizer Mode.
1.
Press '' to select Repeat Mode.
2.
RPT(REPEAT) is displayed. Press '' button to change a mode after pressing
3.
'M' button. (NORMAL ➜ RANDOM ➜ RPT-1 ➜ RPT-ALL)
CONTRAST
Press 'M' button over 3 seconds to change to Equalizer Mode to adjust the
1.
brightness of LCD.
Press '' button 2 times to select LCD Contrast Mode.
2.
'
CONTRAST is displayed in LCD. Press '' or
3.
brightness after pressing 'M'.
'
to adjust the
AUTO-INTELLIGENT POWER-OFF(AI-OFF)
Press 'M' button over 3 seconds to change to Equalizer Mode.
1.
Press '' button 3 times to select AI-OFF Mode.
2.
AI-OFF is displayed in LCD. Press '' to change a mode after pressing
3.
'M' button (1min ‹ 2min ‹ 5min).
AI-OFF is activated only in Stop Mode.
4.
ENGLISH
12
13
Page 9
VOICE RECORDING
Press 'M' button over 3 seconds in Voice Mode to 'Stop' or 'PLAY' Mode.
1.
REC is displayed in LCD. Press 'M' button to start voice recording. Press
2.
'▶/■' button to stop it.
FAQ
●
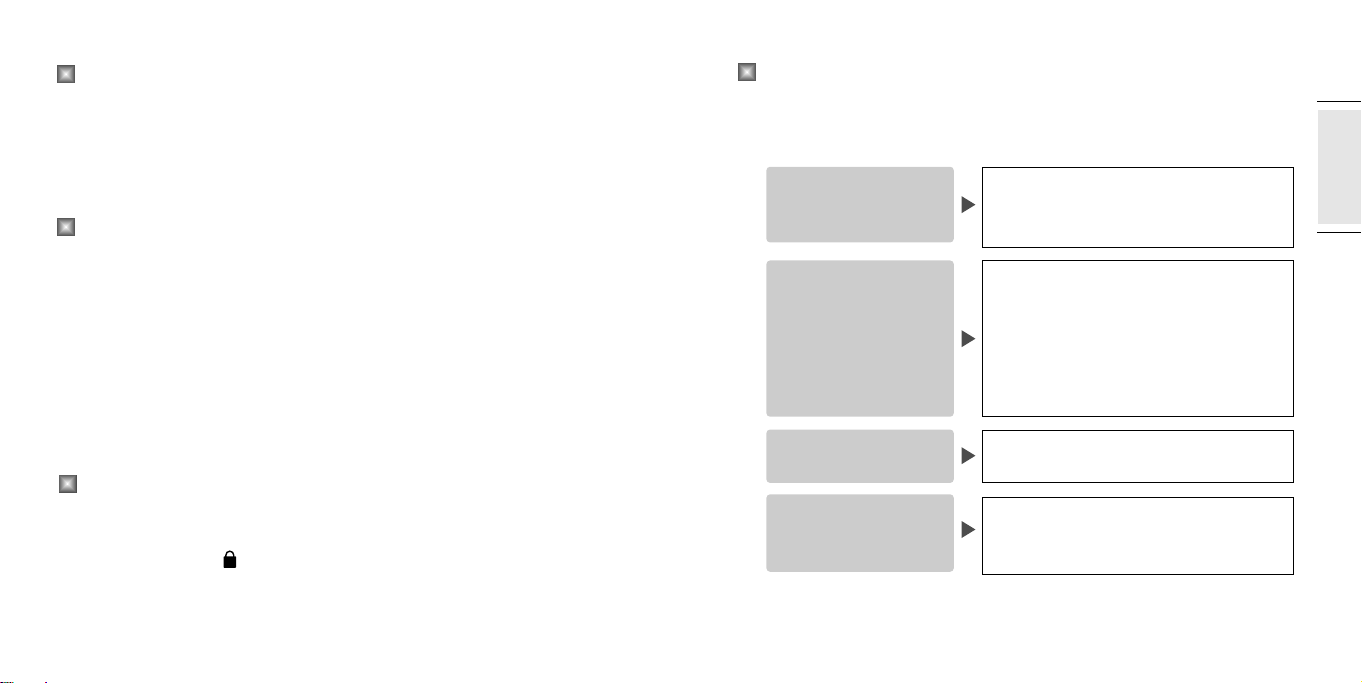
Please check the followings first if the product does not work properly.
DELETING VOICE MESSAGE
Press 'M' button over 3 seconds to change to Equalizer Mode.
1.
Press '' button 4 times to change to Delete Mode.
2.
DEL is displayed in LCD. VOICE is displayed in LCD if pressing ‘M’ button.
3.
Press 'M' button again to display a voice file list. Select a file and press ‘M’ button.
4.
After that, “YES NO EXIT” is displayed.
5.
Select ‘YES’ to delete a file, otherwise select ‘NO’. Select ‘EXIT’ to change the mode.
6.
HOLD
If HOLD switch slided to the 'HOLD' direction, then the other key function will
1.
not work
.
At this state, the
2.
the HOLD switch to the other side.
14
''
will displayed at LCD panel. To escape, return
Power is not on.
Noises are generated
in downloaded file or
power is not on.
The buttons of the
player do not work.
The removable disk is
not generated though
connected to PC.
● Check the polarity of the battery.
● Check the remained capacity of the battery.
● Check USB cable connection.
● This problem occurs due to the incorrect formatting.
● Remove the battery from the player and reinsert it.
● Turn on the player after connecting to PC.
● If you turn on the player, "READY" is displayed on
the LCD.
● In this status, refer to page 8, HOW TO FORMAT
THE REMOVABLE DISK.
● Check if the HOLD mode is on.
● Check if the power is on.
● If you turn on the player, "READY" is displayed on
the LCD.
15
ENGLISH
Page 10
SPECIFICA TION
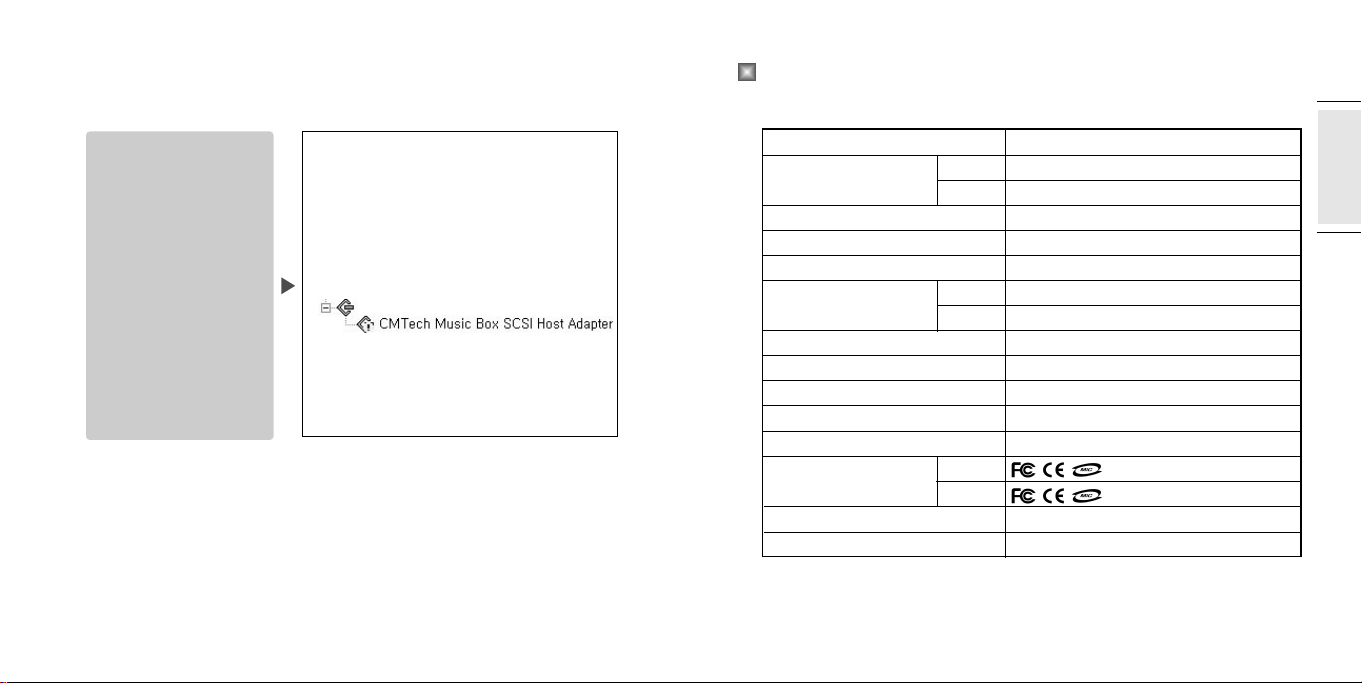
No removable disk
drive is listed in the
"Drive" box on the
Formatting window.
16
● Remove the battery from the player and reinsert it.
● Check if SCSI Host Controller is listed in the
Device Manager window.
(To display Device Manager window, click Start ->
Settings -> Control Panel -> System Properties.)
● If SCSI Host Controller is configured abnormally
as shown in the following figure, remove it by
right-clicking the mouse button.
SCSIandRAID Controller
● After removing it, click Refresh to reinstall the
device driver.
● If the device driver has been installed normally,
the yellow exclamation mark at the front of the
device name disappears.
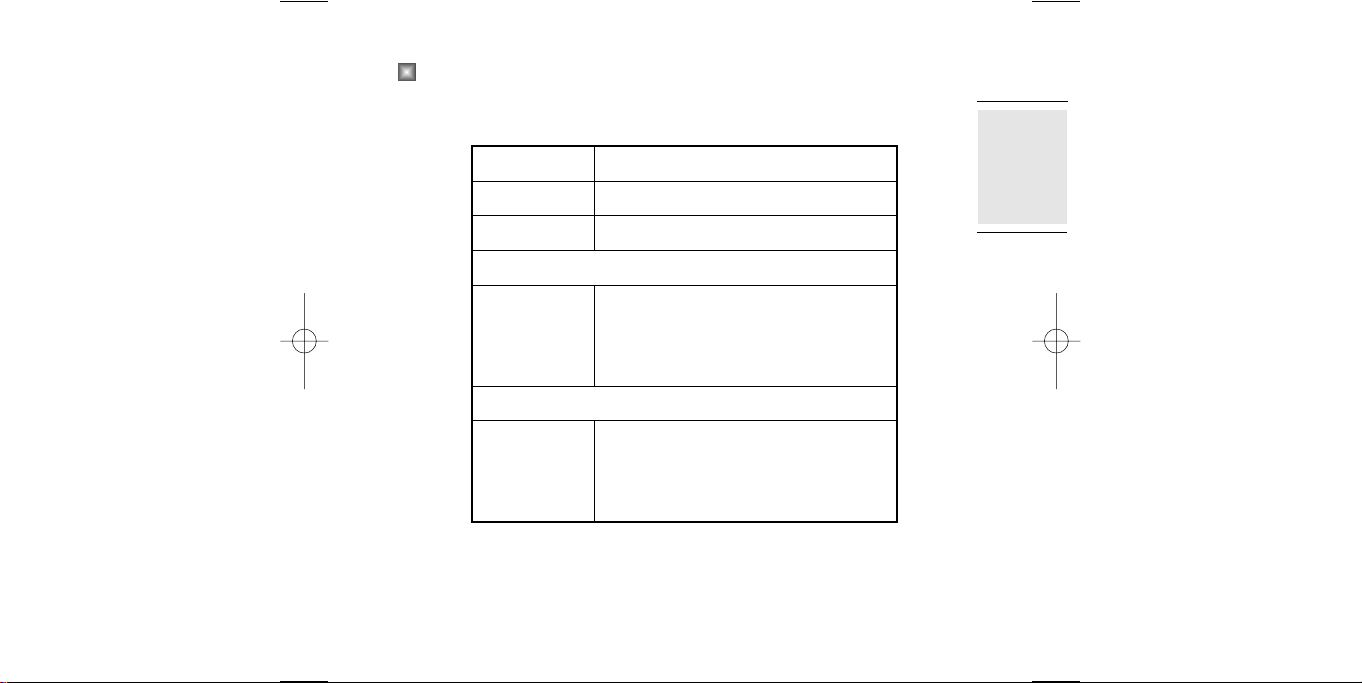
Main Function
Interface
File Transmission Speed
Display
Voice Recording Time
Battery
Battery Life
Output Power
S/N (Noise Ratio)
Case
EMI
Dimension (W x H x D)
Net Weight (without Battery)
MP3 Player / Voice Recorder / Removable Disc
USB Port
2.7Mbps
STN LCD
64M 2Hours (64MB Flash Memory)
128M 4Hours (128MB Flash Memory)
AAA Type 1EA
6Hours
4.5mW
2 (16Ω)
✕
90dB (with 20KHz LPF)
Aluminum / Plastic
86* 13.8* 30(mm)
30g
ENGLISH
17
Page 11
GUARANTEE
Product MP3 Player
Assurance
period
Sales date yy mm dd
Address
Name
Address
Name
• In occuning of trouble, contact to sales agency please.
1 YEAR
Customer
Sales agency
ENGLISH
tel
tel
18
 Loading...