

Page 1

FCC STATEMENT
This equipment has been tested and found to comply with the limits for a
Class B digital device pursuant to part 15 of the FCC Rules. These limits are
designed to provide reasonable protection against harmful interference in a
residential installation. This equipment generates, uses and can radiate radio
frequency energy and, if not installed and used in accordance with the
instructions, may cause harmful interference to radio communications.
However, there is no guarantee that interference will not occur in a particular
installation. If this equipment does cause harmful interference to radio or television reception, with can be determined by turning the equipment off and on,
the user is encouraged to try to correct the interference by one more of the
following measures:
- Reorient or relocate the receiving antenna.
- Increase the separation between the equipment and receiver.
- Connect the equipment into an outlet on a circuit different from that to which
the receiver is connected.
- Consult the dealer or an experienced radio/TV technician for help.
- Only shielded interface cable should be used.
Finally, any changes or modifications to the equipment by the user not
expressly approved by the grantee or manufacturer could void the users
authority to operate such equipment.
Page 2

▣ CONTENTS
SYSTEM RECOMMENDATION
DESCRIPTIONS OF THE PRODUCT
ACCESSORIES
INSTALLNG THE PROGR AM AND DRIVER
UNINSTALLING THE PROGRAM AND DRIVER
HOW TO USE THE PROGRAM
HOW TO FORMAT THE DEVICE
HOW TO UPDATE THE FIRMWARE
INSERTING A BATTERY
POWER ON / OFF
CHANGING THE MODE (MP3 ↔ Voice)
PLAY
SKIP OR SEARCH
REPEAT (A-B)
USING THE OPTIONS MENU
SETTING THE EQUALIZER (MP3 MODE)
REPEAT (MP3 MODE)
ADJUSTING THE CONTRAST
AUTO-INTELLIGENT POWER-OFF (AI-OFF)
RECORDING A VOICE MESSAGE
PLAYING A VOICE MESSAGE
DELETE A VOICE MESSAGE (From the device)
DELETE A VOICE MESSAGE (From the PC)
KEY-GUARD LOCK (Slide Switch)
TROUBLESHOOTING
SPECIFICATIONS
W ARRANTY
■ In order to improve the product; quality, design and/or specifications may change
without notice.
The MUSIC BOX is a fun device filled with 3 main, powerful functions.
• 64MB / 128MB high quality MP3 Music Player.
• Digital Voice Recorder
• Removable Flash Hard Drive for (PC) data storage
Page 3

▣ SYSTEM RECOMMENDATION
■ Processor : Pentium 233MHz or Better
■ OS: Windows 98 / 98SE / ME / 2000 / XP(Home Edition)
■ 1GB Hard Disc or Higher (4GB Recommended)
■ 64MB RAM or Better
■ USB Port
■ Monitor Resolution : 1024 × 768 , 16Bit Color or Better
■ CD- ROM Drive to Install Software
▣ DESCRIPTIONS OF THE PRODUCT
▣ ACCESSORIES
Please check to make sure all contents of the box were received.
■ Installation CD ■ USB Cable ■ Battery (1.5V, AAA)
■ Earphones ■ Manual ■ Neck Strap
▣ INSTALLING THE PROGRAM AND DRIVER
CAUTION
1. Insert the Installation CD into your CD-ROM drive. The installation will start
automatically and the following screen appears. If the program does not auto-start,
double-click the “INSTALL” icon from the CD.
Do not connect the player to your computer before completing the
program installation. If the player is connected, unplug it from
your computer.
Page 4
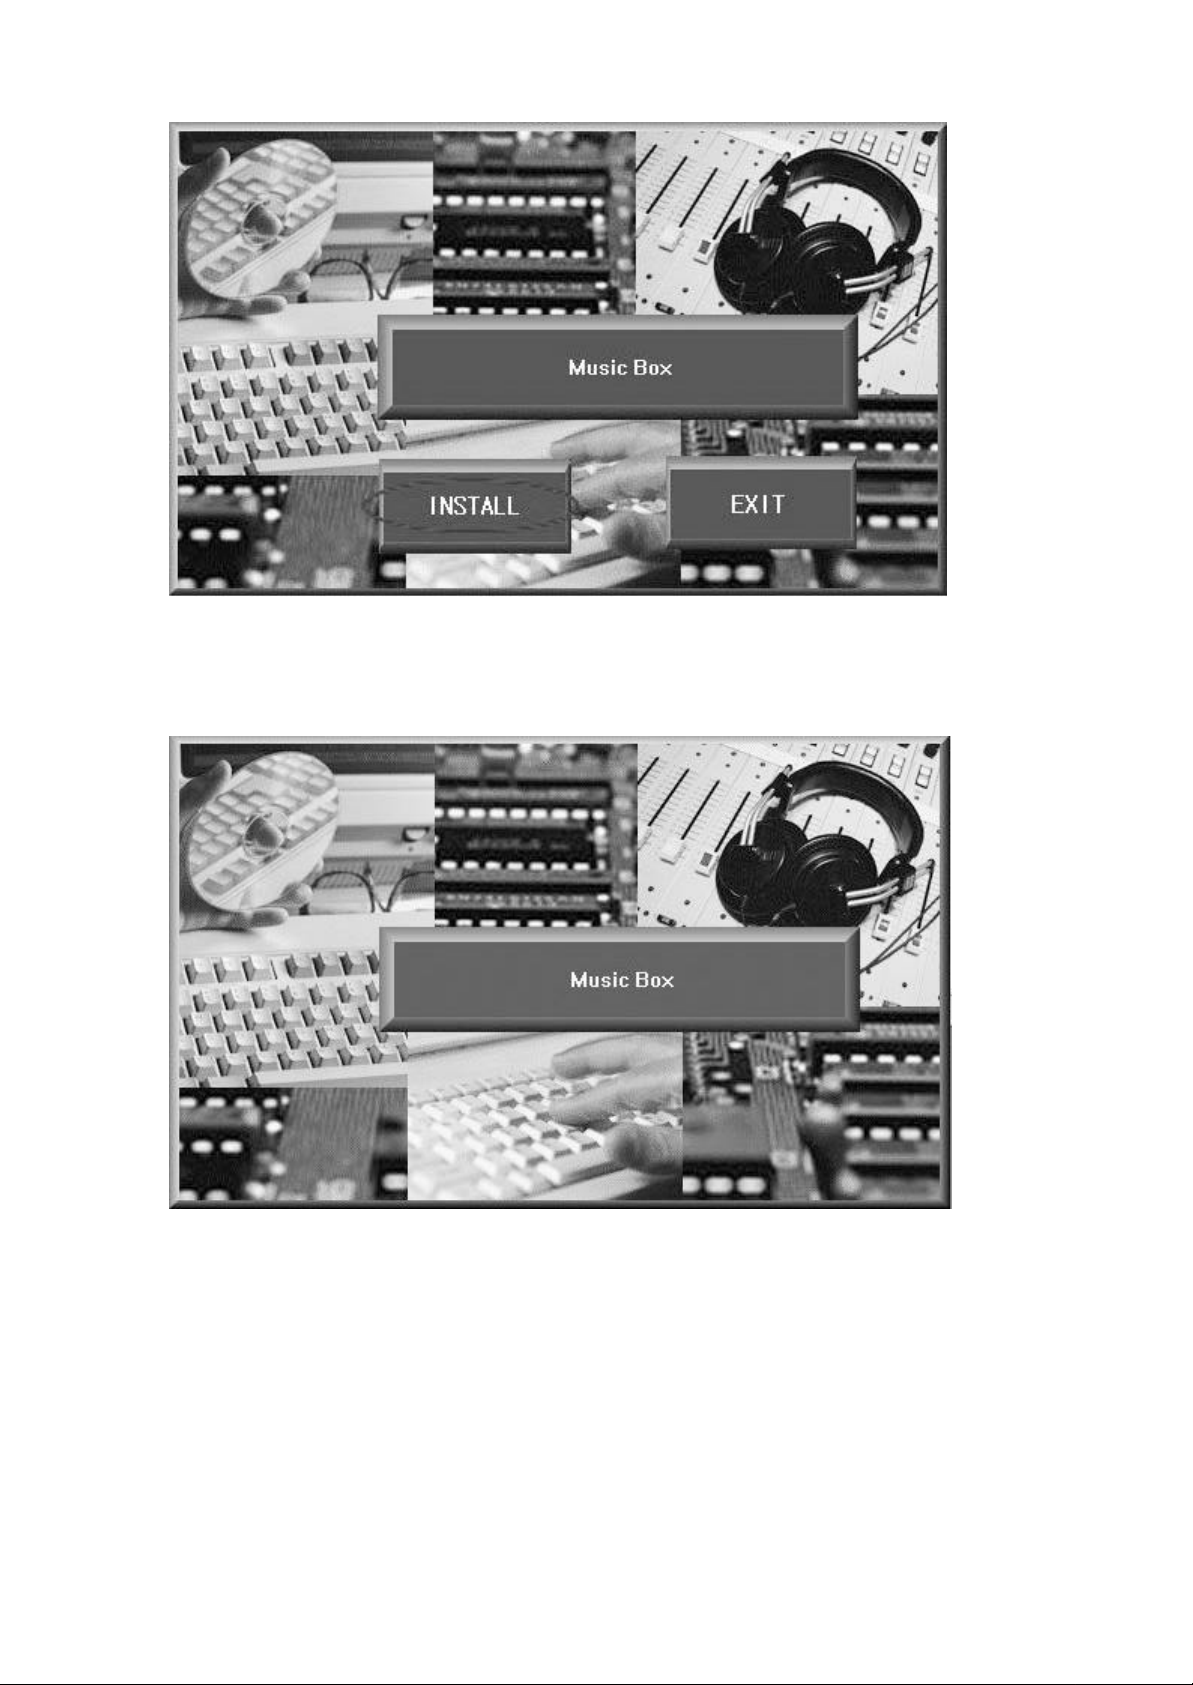
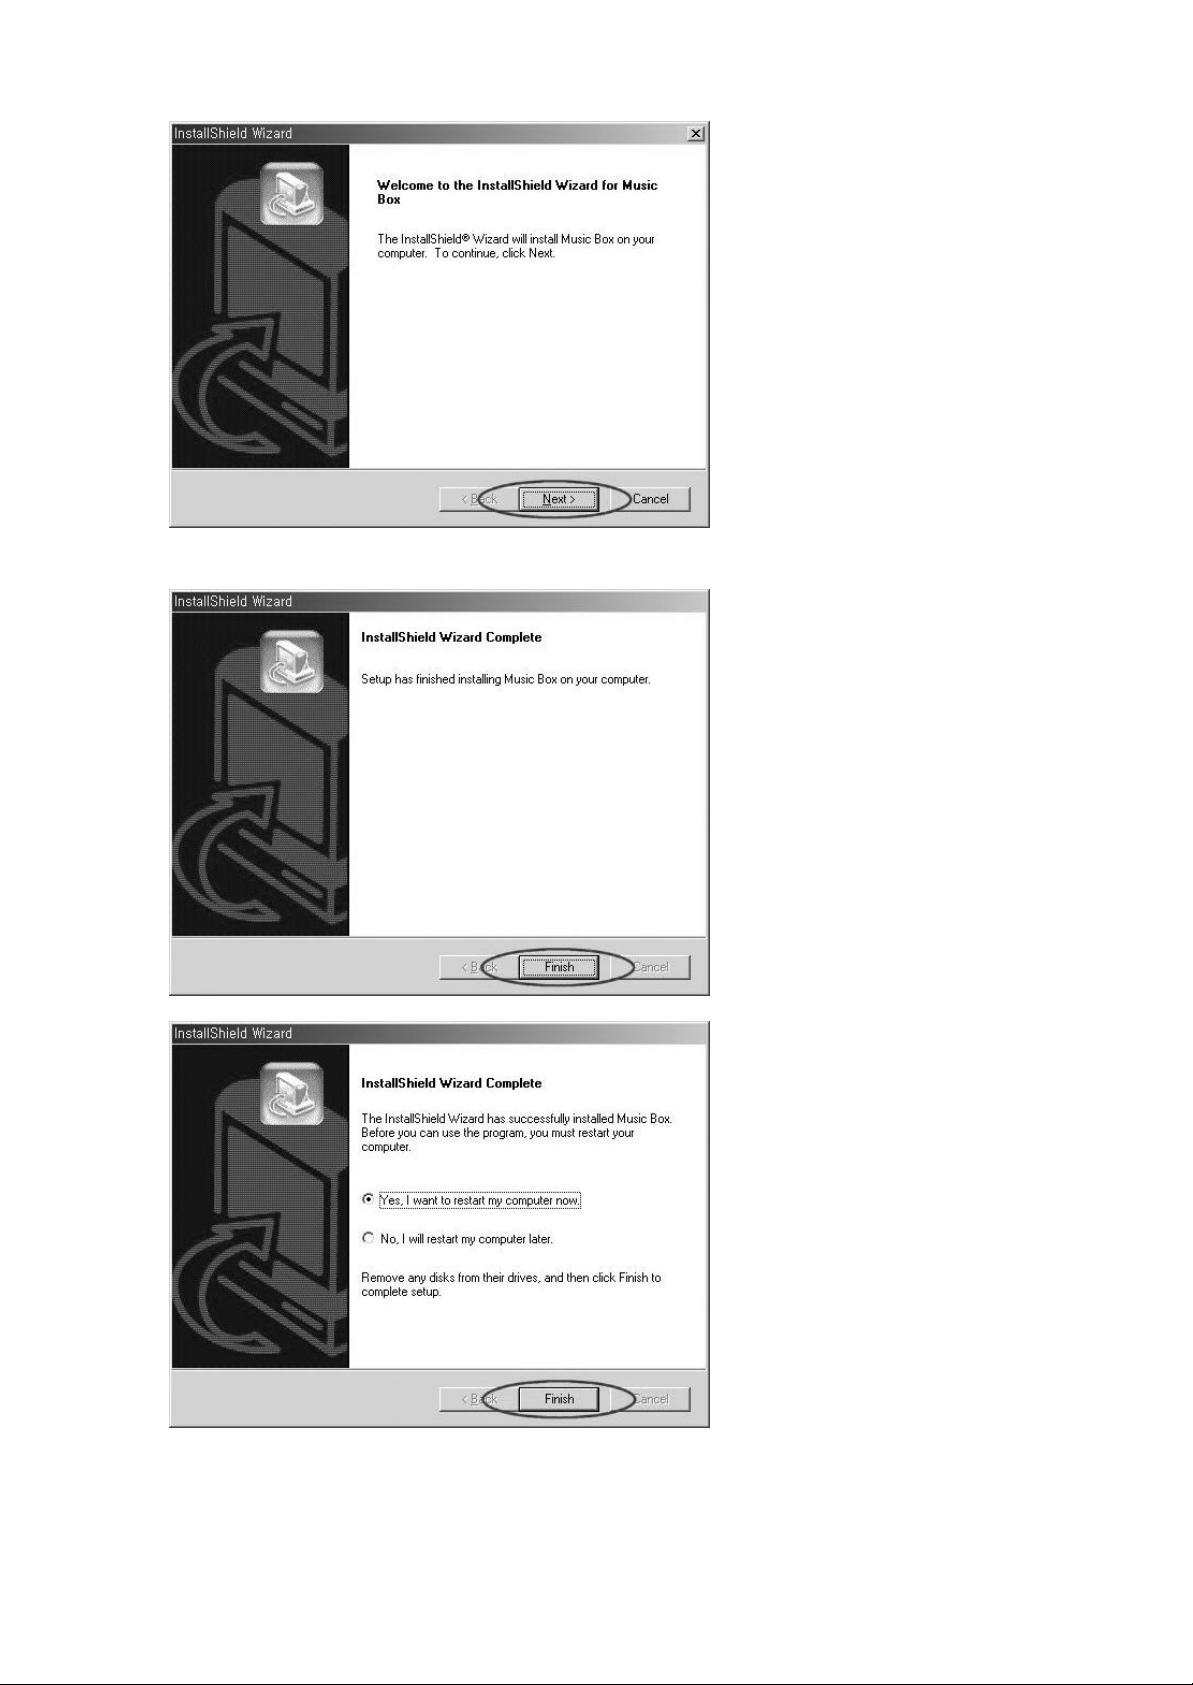
2. In the installation menu, click the “INSTALL” button to start the installation. The
installation will proceed as the figures shown below. Follow the Instructions displayed
on the screen.
3. Click the “FINISH ” button to reboot your PC. This will complete your installation
process.
Page 5
4. After rebooting PC, connect the player to the USB port of your PC and
turn the power on by pressing the “▶/■” button.
Page 6
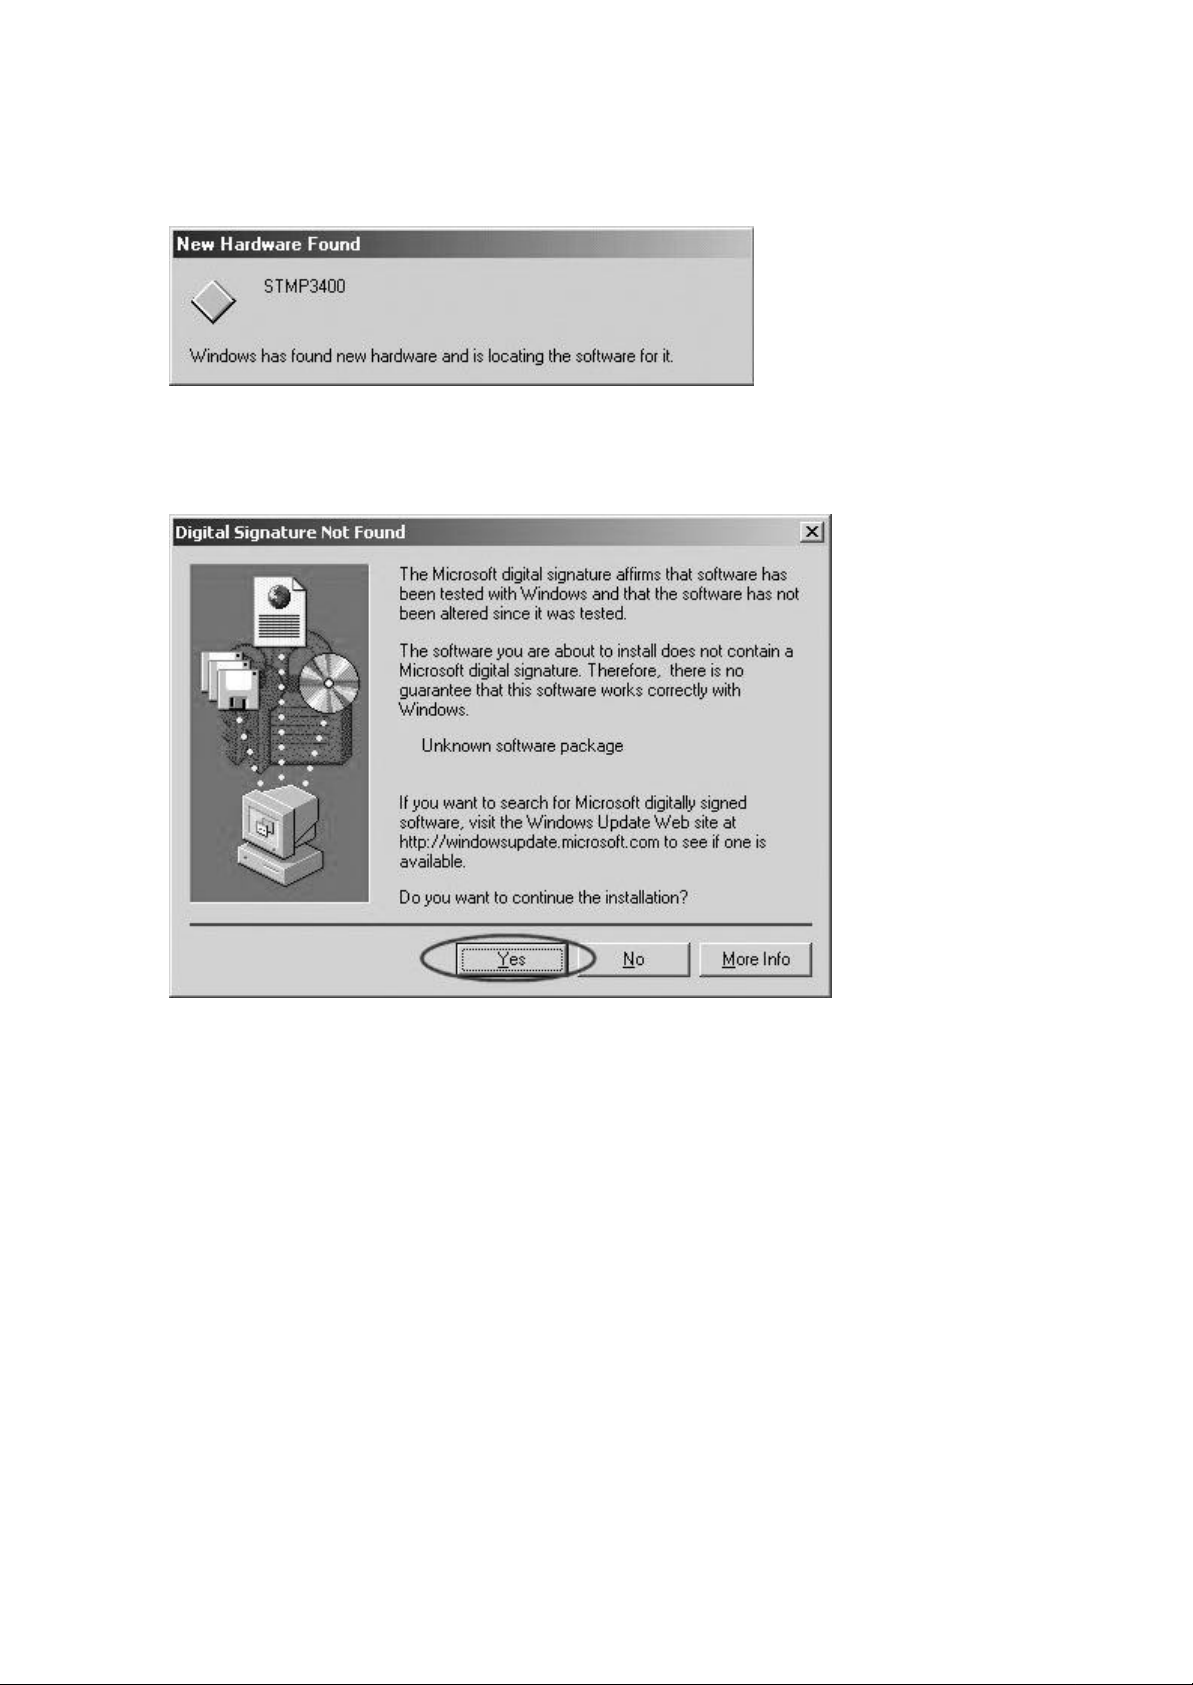
5. When the power is on, the player will display “READY” on the LCD. “New Hardware
Found” window will immediately appear as shown below.
(This window may slightly vary from the different Windows versions.)
6. During your installation of “New Hardware Found”, Windows 2000 and Windows XP
will display the following message:
Click “Yes ” or “Continue Anyways” button to continue with your installation
If you click “STOP Installation”, your installation will not be complete and the computer
will not recognize the Music Box Player.
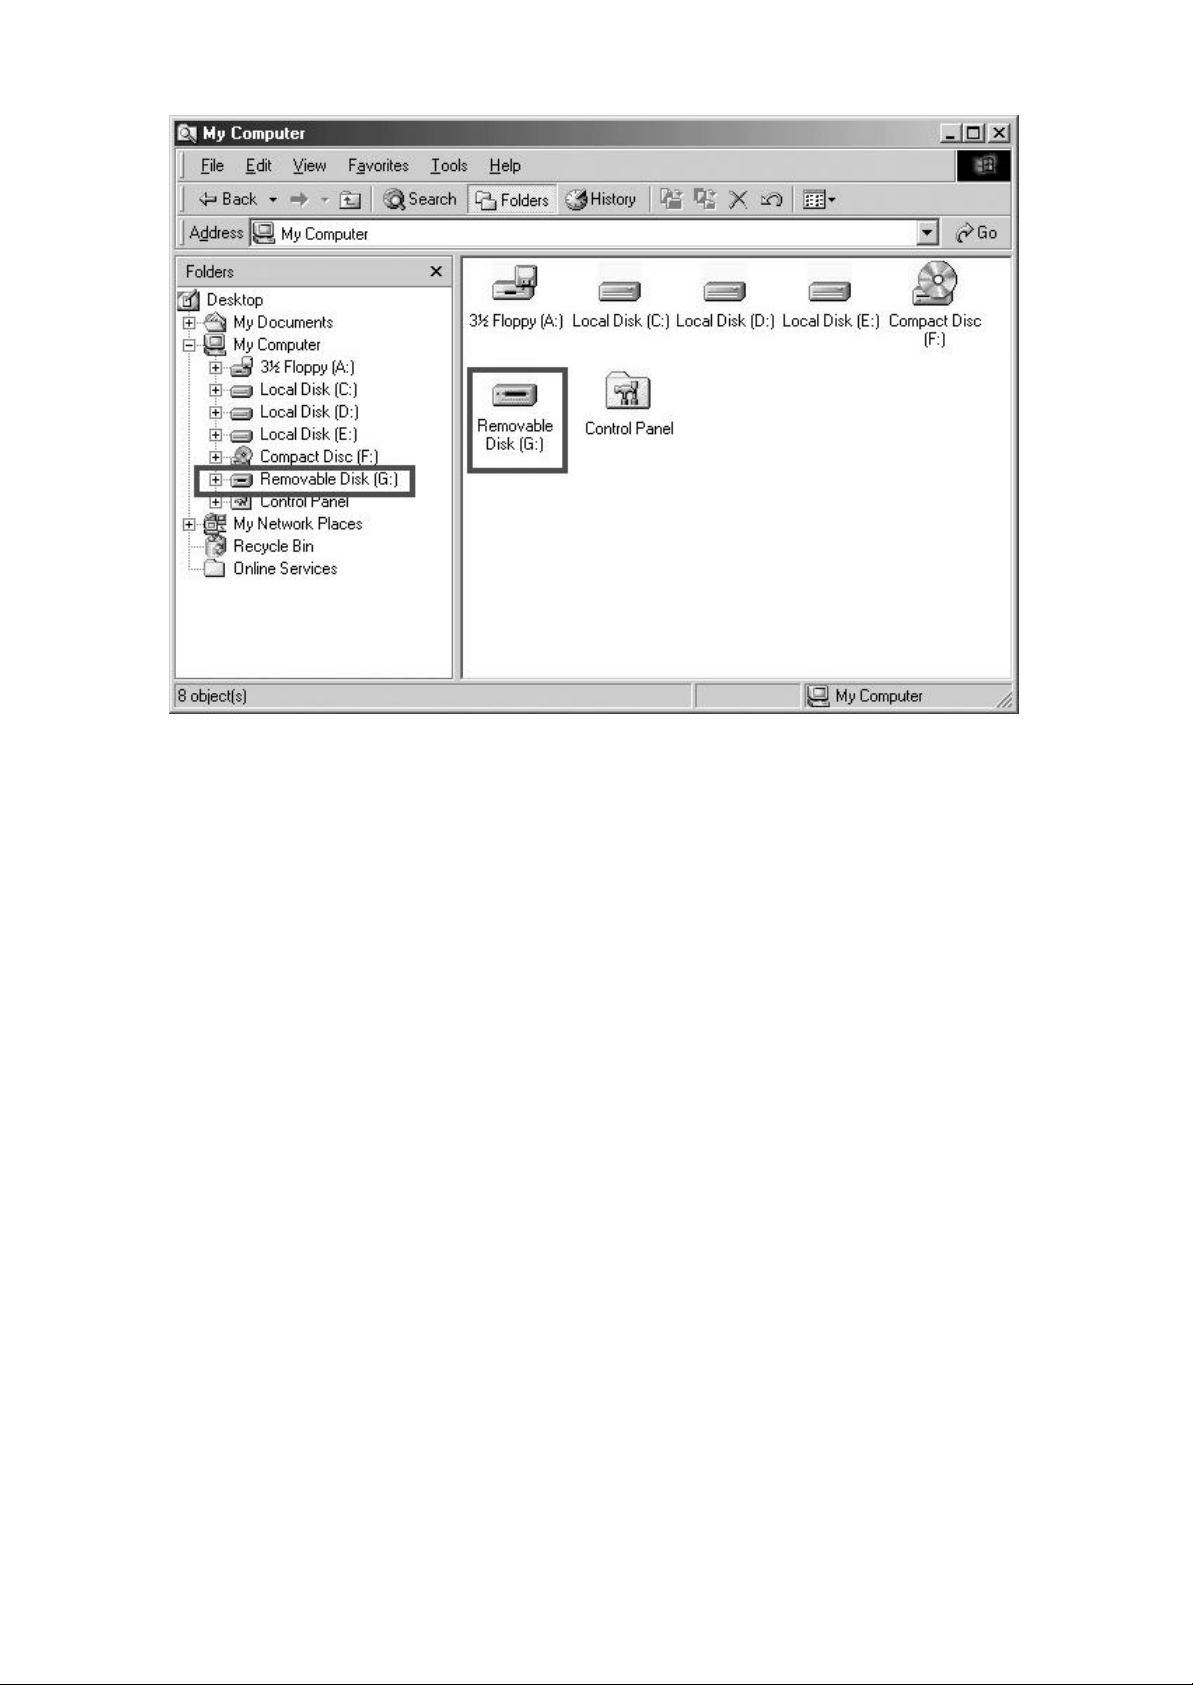
7. If the above steps have been completed, the player has been installed properly.
Now, run Windows Explorer or My Computer and there should be a new Removable
Disk on your system. The drive letter will vary upon the number of different drive
already present on your system.
This drive can be used like any other removable hard drive. Drag- and-drop and store
any types of PC files (up to the memory capacity).
Page 7
NOTE
No shortcut icon will be created on Windows desktop after installing the CD. The
installation CD installs two programs on your PC: Music Box Format and Music Box
Update. These icons are found in Start Menu > (All) Programs > Music Box MP3
Player.
▣ UNINSTALLING THE PROGRAM AND DRIVER
1. If the player is connected to PC, unplug it from your computer before starting.
2. Run Add/Remove Programs from the Control Panel to display the list of installed
programs.
3. Locate “MUSIC BOX” in the list and double-click it to completely remove the
programs and drivers.
4. Click the “REMOVE” check-box and click “NEXT”.
Page 8
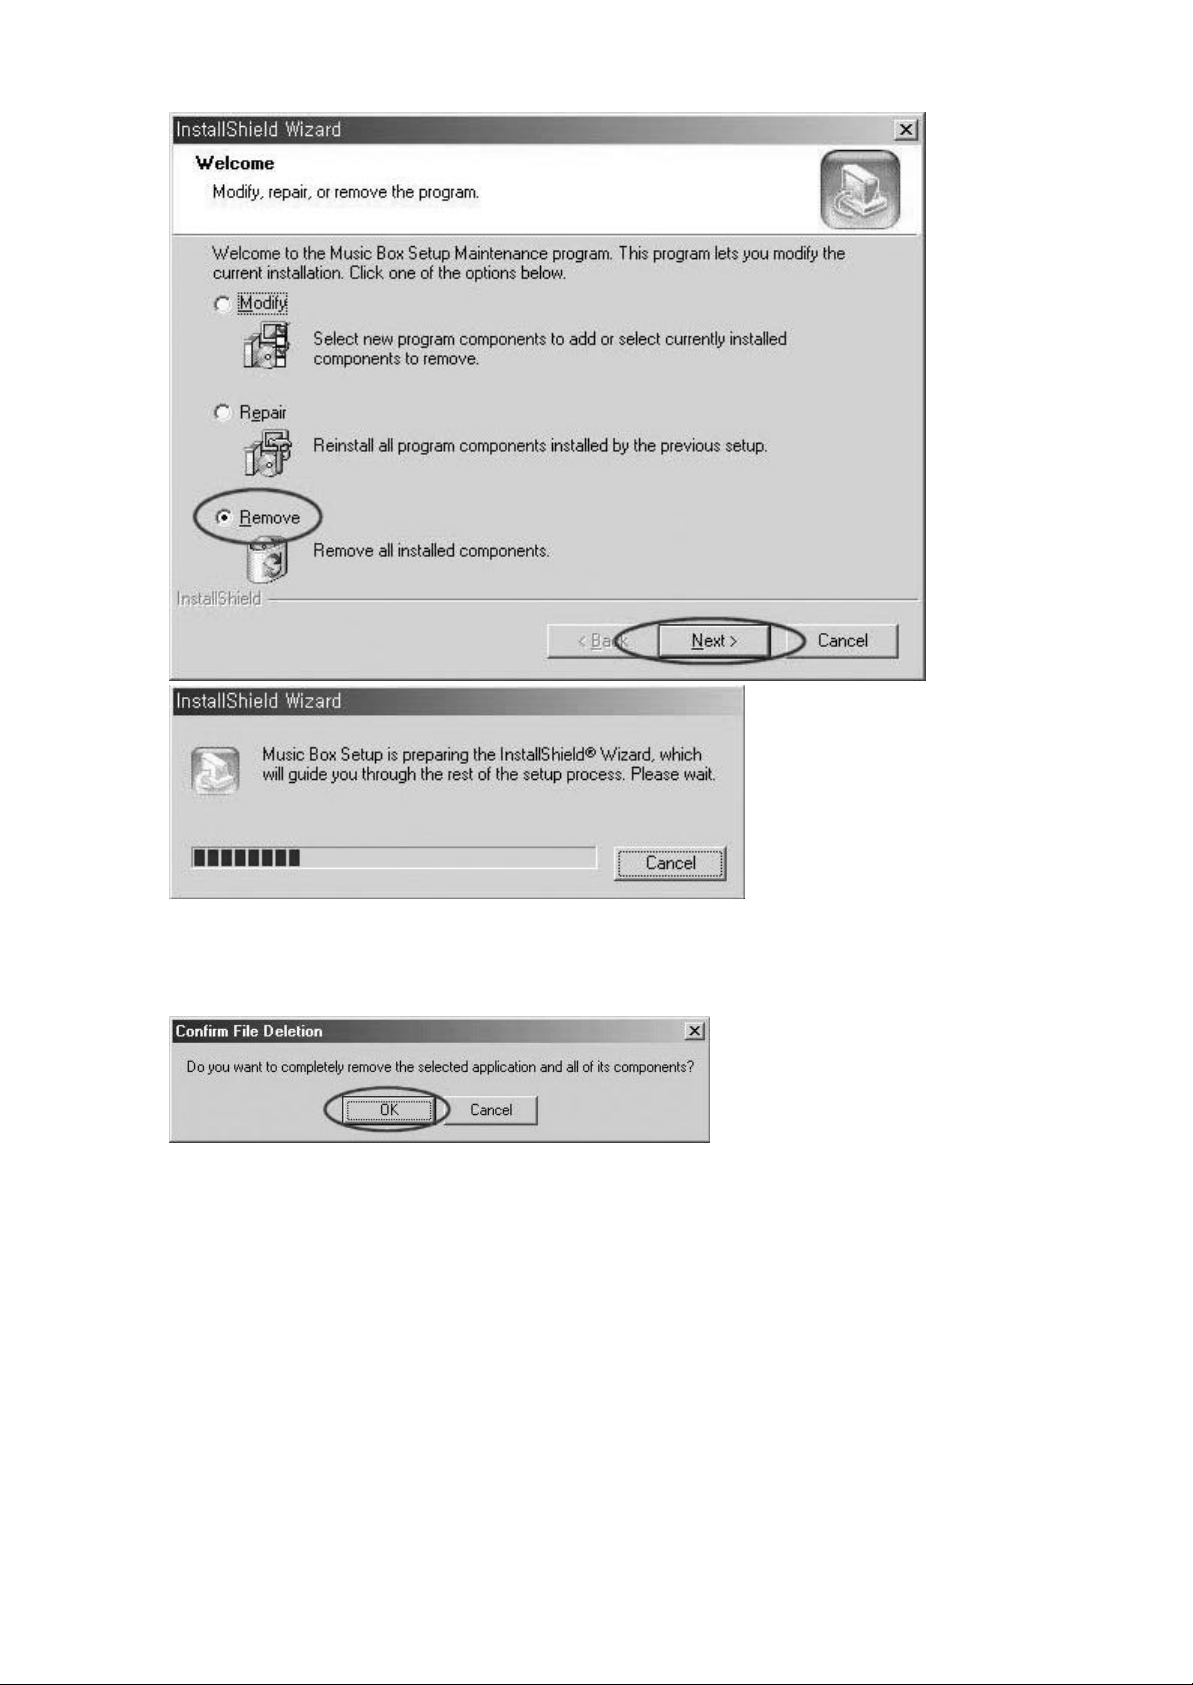
5. Finally, click “FINISH ” to complete the uninstallation process.
Page 9
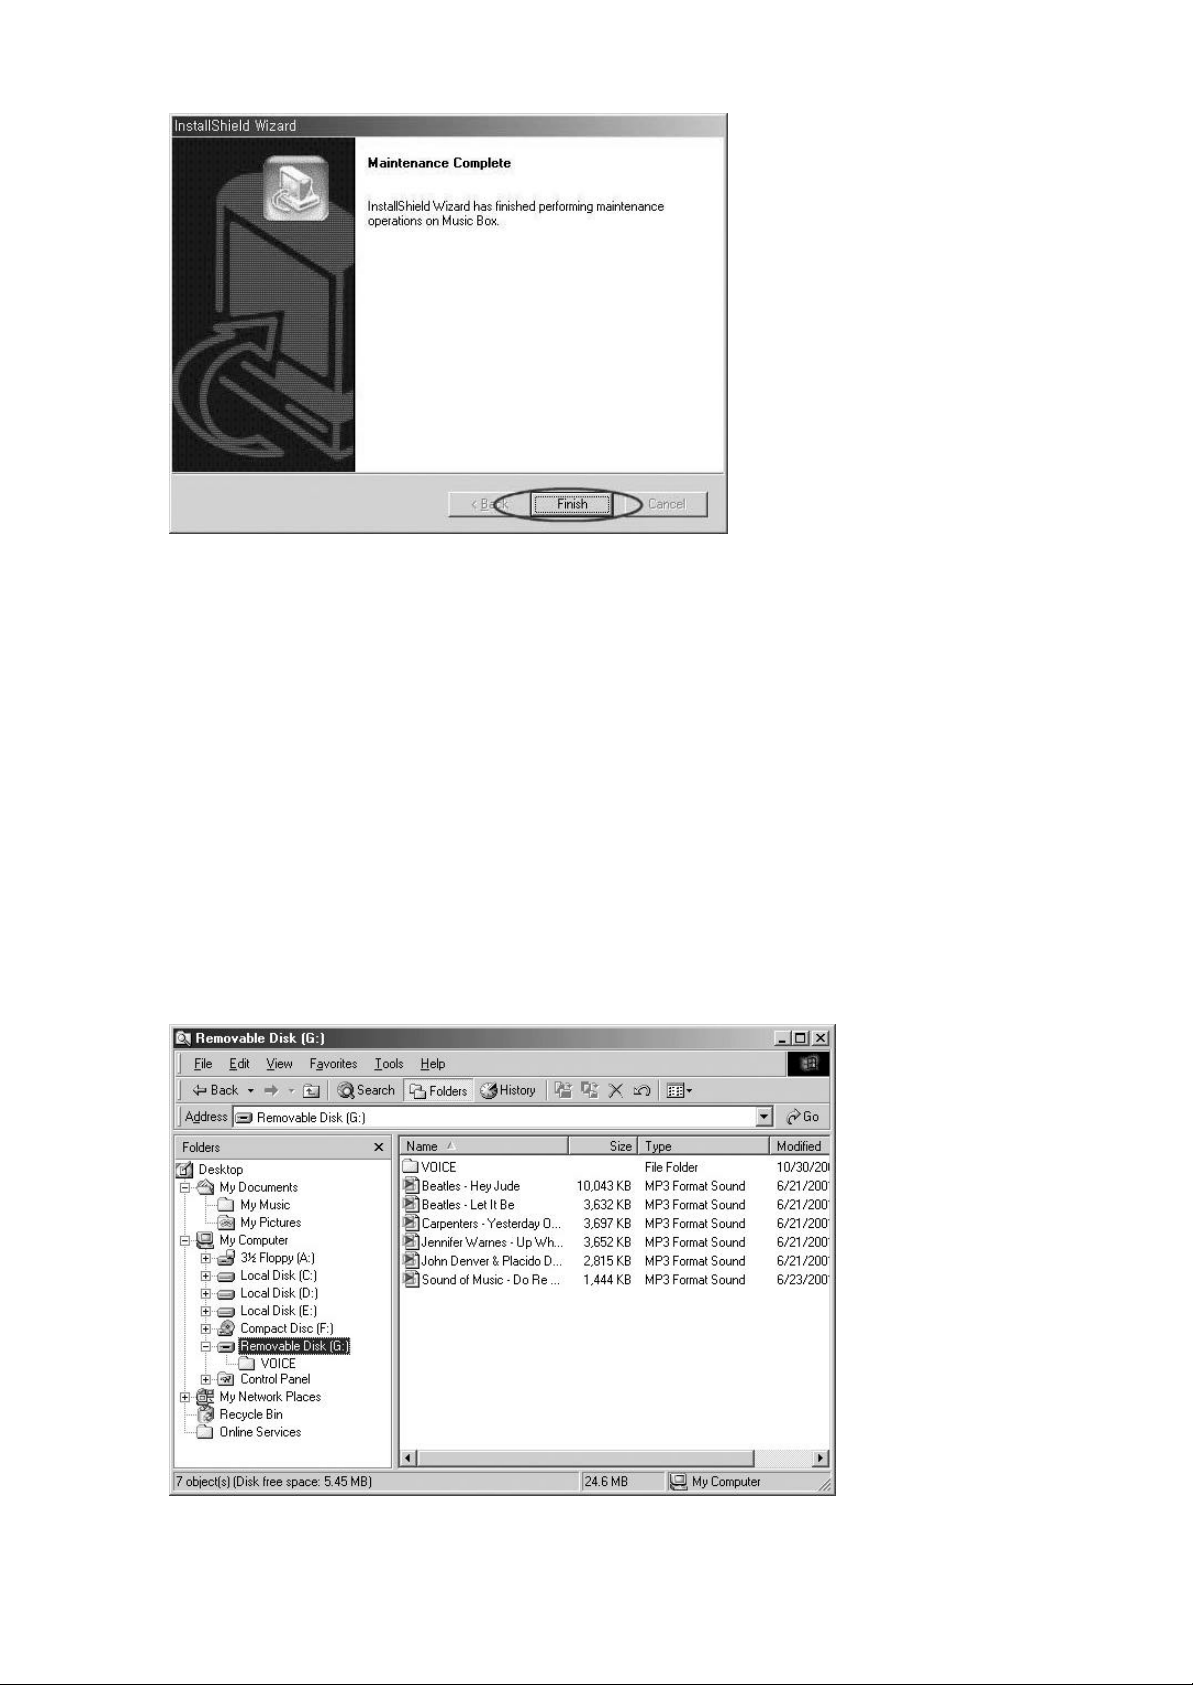
NOTE
If you want to reinstall the programs , please restart your PC before starting a new
installation process.
If the player program has not installed properly or if you need to reinstall it, it is
recommended to first uninstall the program as shown in the above steps.
▣ HOW TO USE THE PROGRAM
■ To download MP3 or data files to the player using Windows Explorer
1. After installing the drivers, connect the player to the PC with the supplied USB cable.
2. Open Windows Explorer and make sure the Music Box “Removable Disk” is present.
Page 10
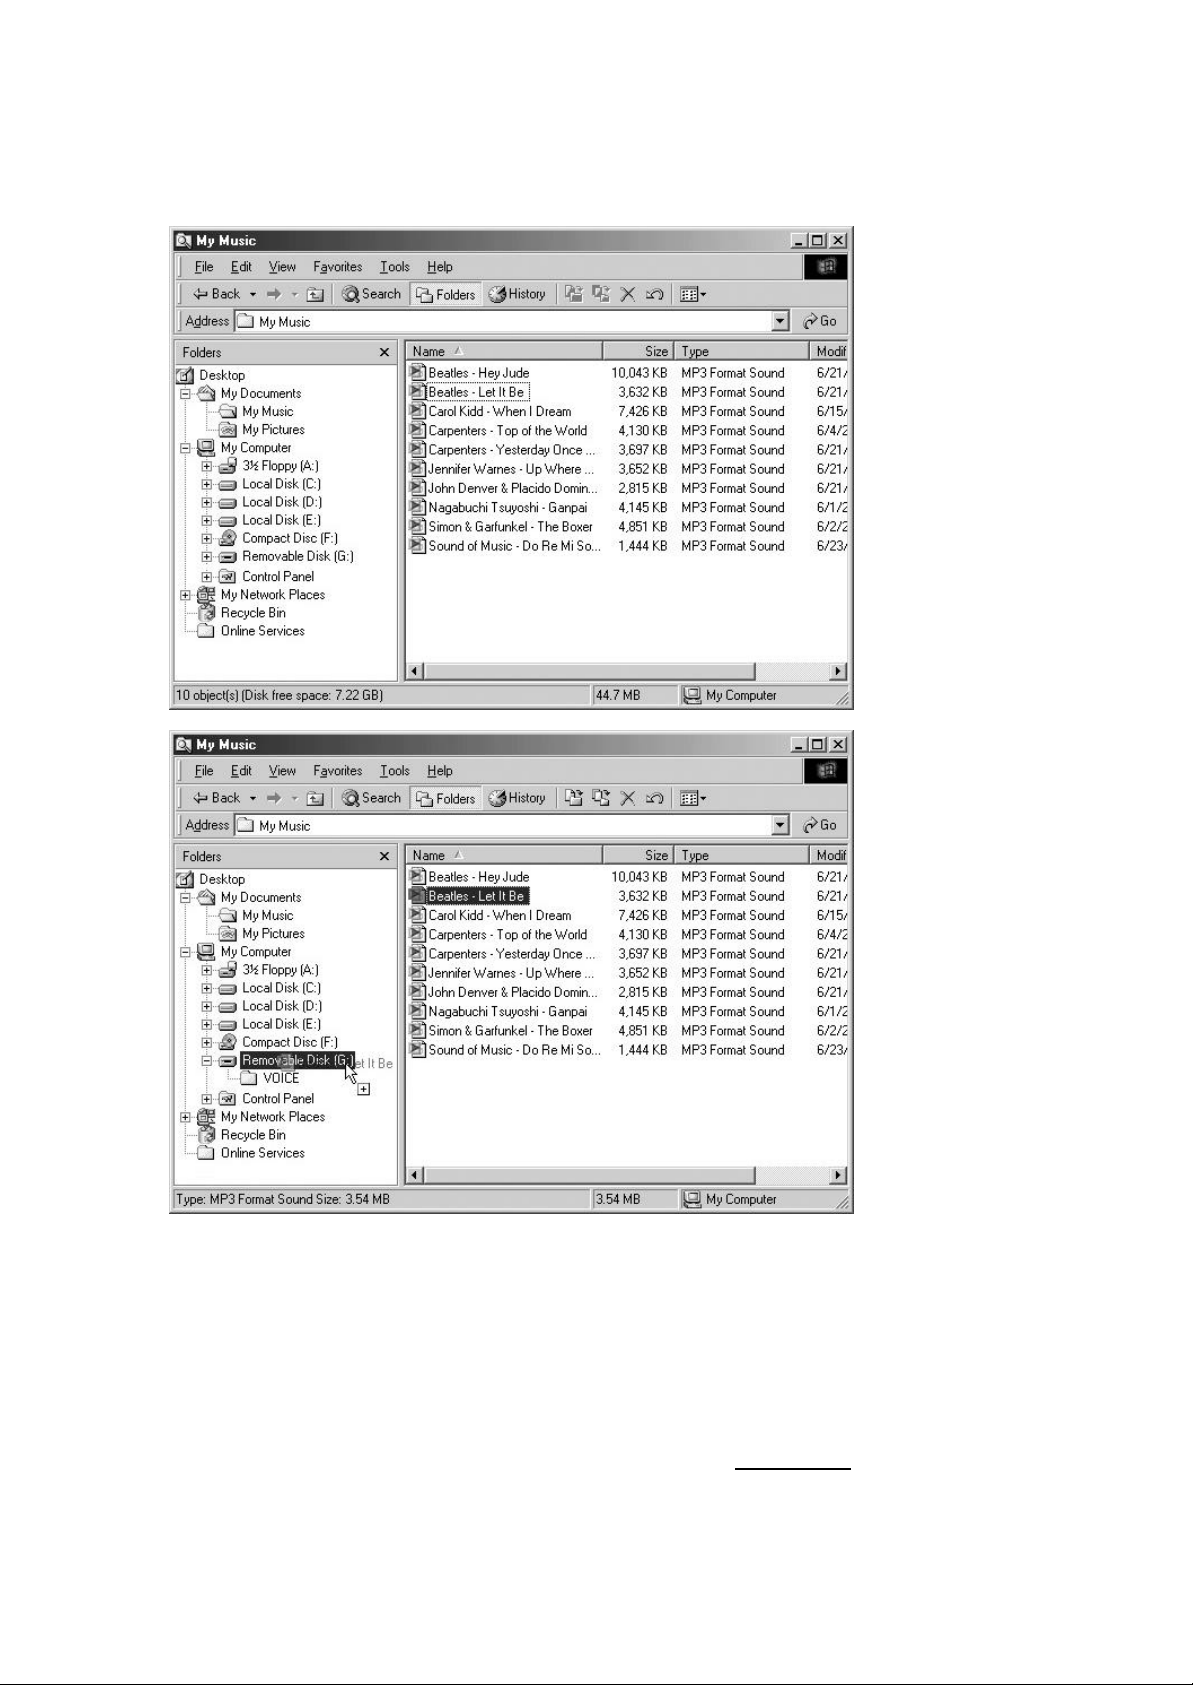
3. Locate the file(s) you wish to copy to the Music Box. Highlight the files and Dragand-drop the files to the Removable Disk. MP3 music track numbers will be respective
to the order in which it is copied to the Music Box.
4. While MP3 files are downloading to the player, “WRITING” will be blinking on the
LCD of the player.
NOTE
If the USB cable is unplugged during “WRITING” mode, all memory will be lost. In this
case, Format the drive then Update the firmware. Firmware must always be updated
after Formatting the drive.
not power on.
If the firmware is not updated after format, the drive will
Page 11
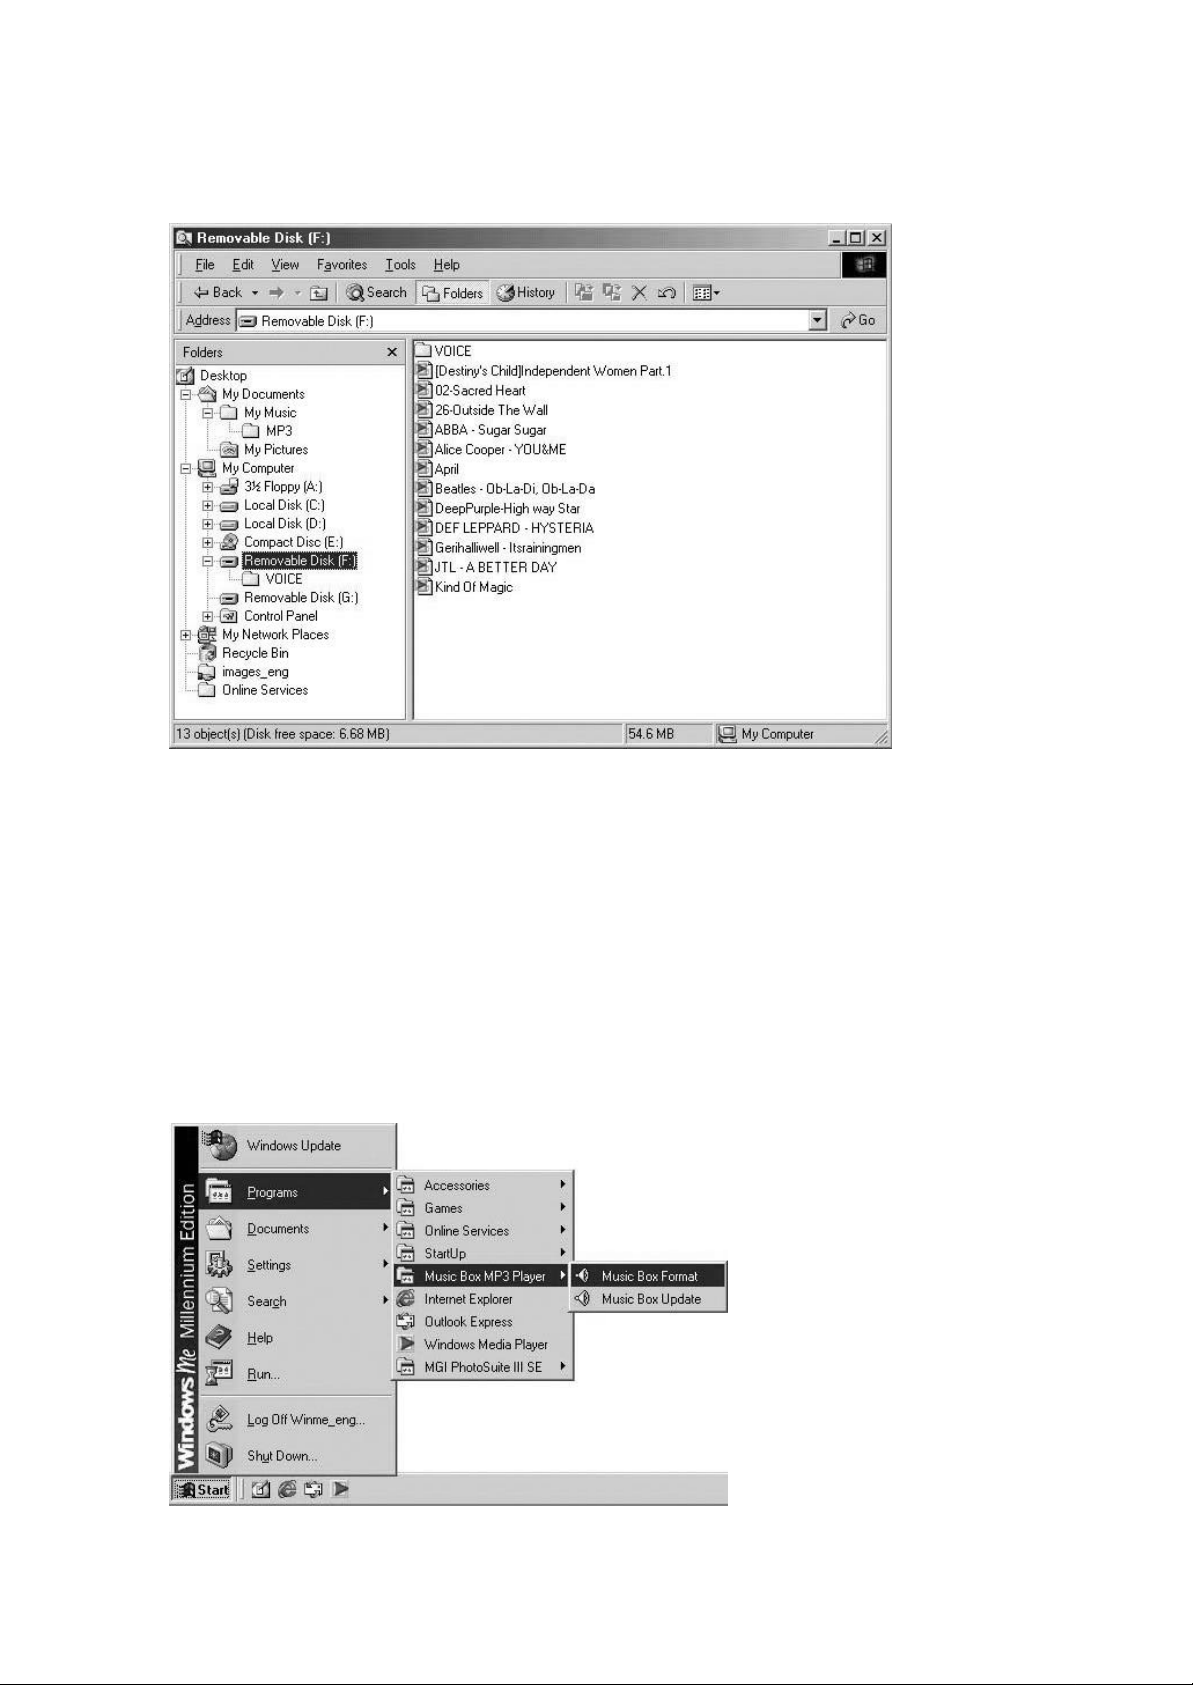
5. After the download process is complete, verify there are (MP3) files in the
Removable Disk.
6. The player will automatically power on when the USB cable is removed. Press the
“▶/ ■” button to play to the songs.
▣ HOW TO FORMAT THE DEVICE
You can format the Music Box like a Removable Disk. If you format the device, all the
saved files will be deleted – MP3, data, voice, etc.
■ To run Format with MUSIC BOX FORMAT program (Windows Start Menu):
A. Click Start Menu > (All) Programs > Music Box MP3 Player > Music Box Format.
Page 12
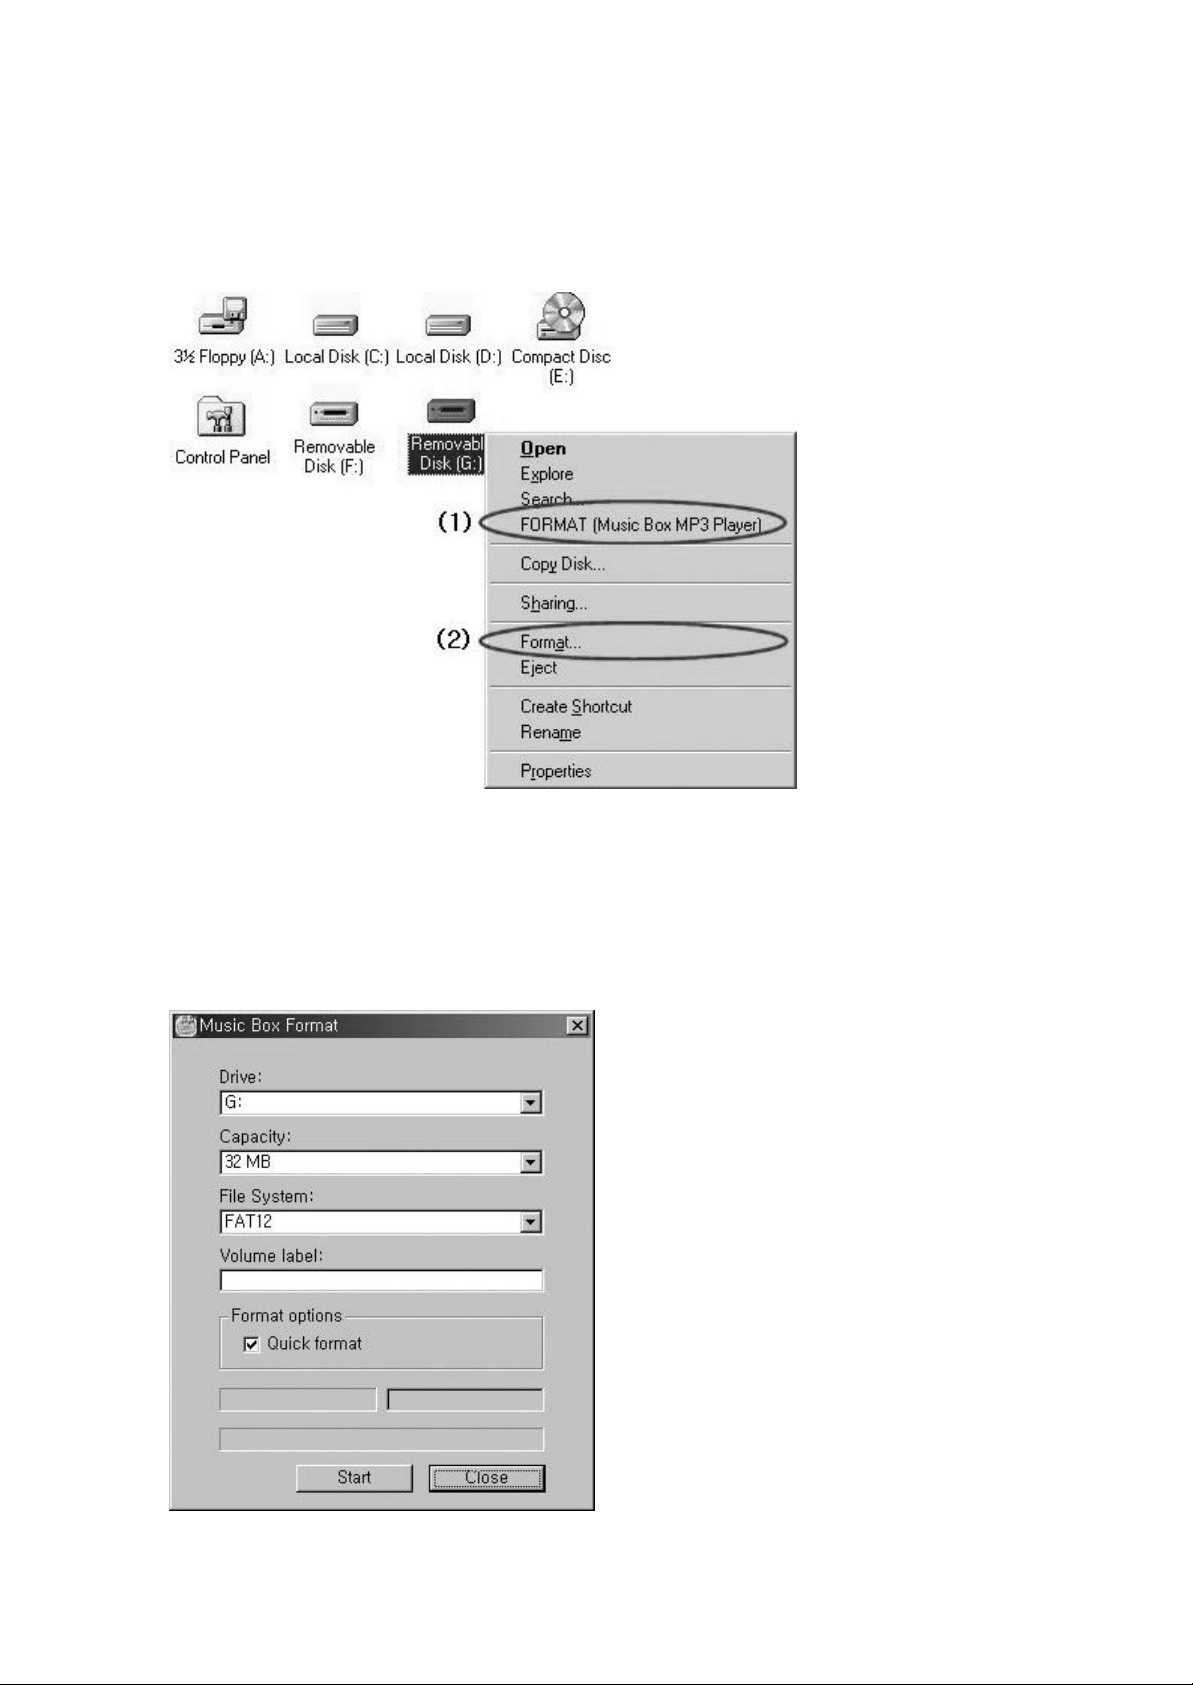
■ To Format through Windows Explorer:
A. Open windows Explorer and select the Removable Disk you want to format.
B. Right- click the mouse on the Removable Disk to display the call-up menu.
C. Click either “Format…” or “FORMAT (Music Box MP3 Player)” from the call-up
menu. (The call- up menu will vary with the different Windows versions.)
1. Select the Drive you wish to format by selecting from the “Drive” drop-down menu.
2. “Capacity” and “File System” cannot be changed.
3. Enter a “Volume Label” (optional – can be blank).
4. Select “Quick Format” to remove all files and firmware. Deselect “Quick Format” to
completely refresh the memory.
Page 13
NOTE
Quick format process is much shorter and faster than normal format. Normal format is
recommended if an error occurs during a writing process.
If no removable disk drive is listed in the “Drive” box, remove the battery from the
player to reset then retry formatting again.
CAUTION
▣ HOW TO UPDATE THE FIRMWARE
You must update the firmware after every time the Music Box memory is formatted.
The firmware is updated so the Music Box can always stay up-to-date with new
versions of operating software that come available in the market.
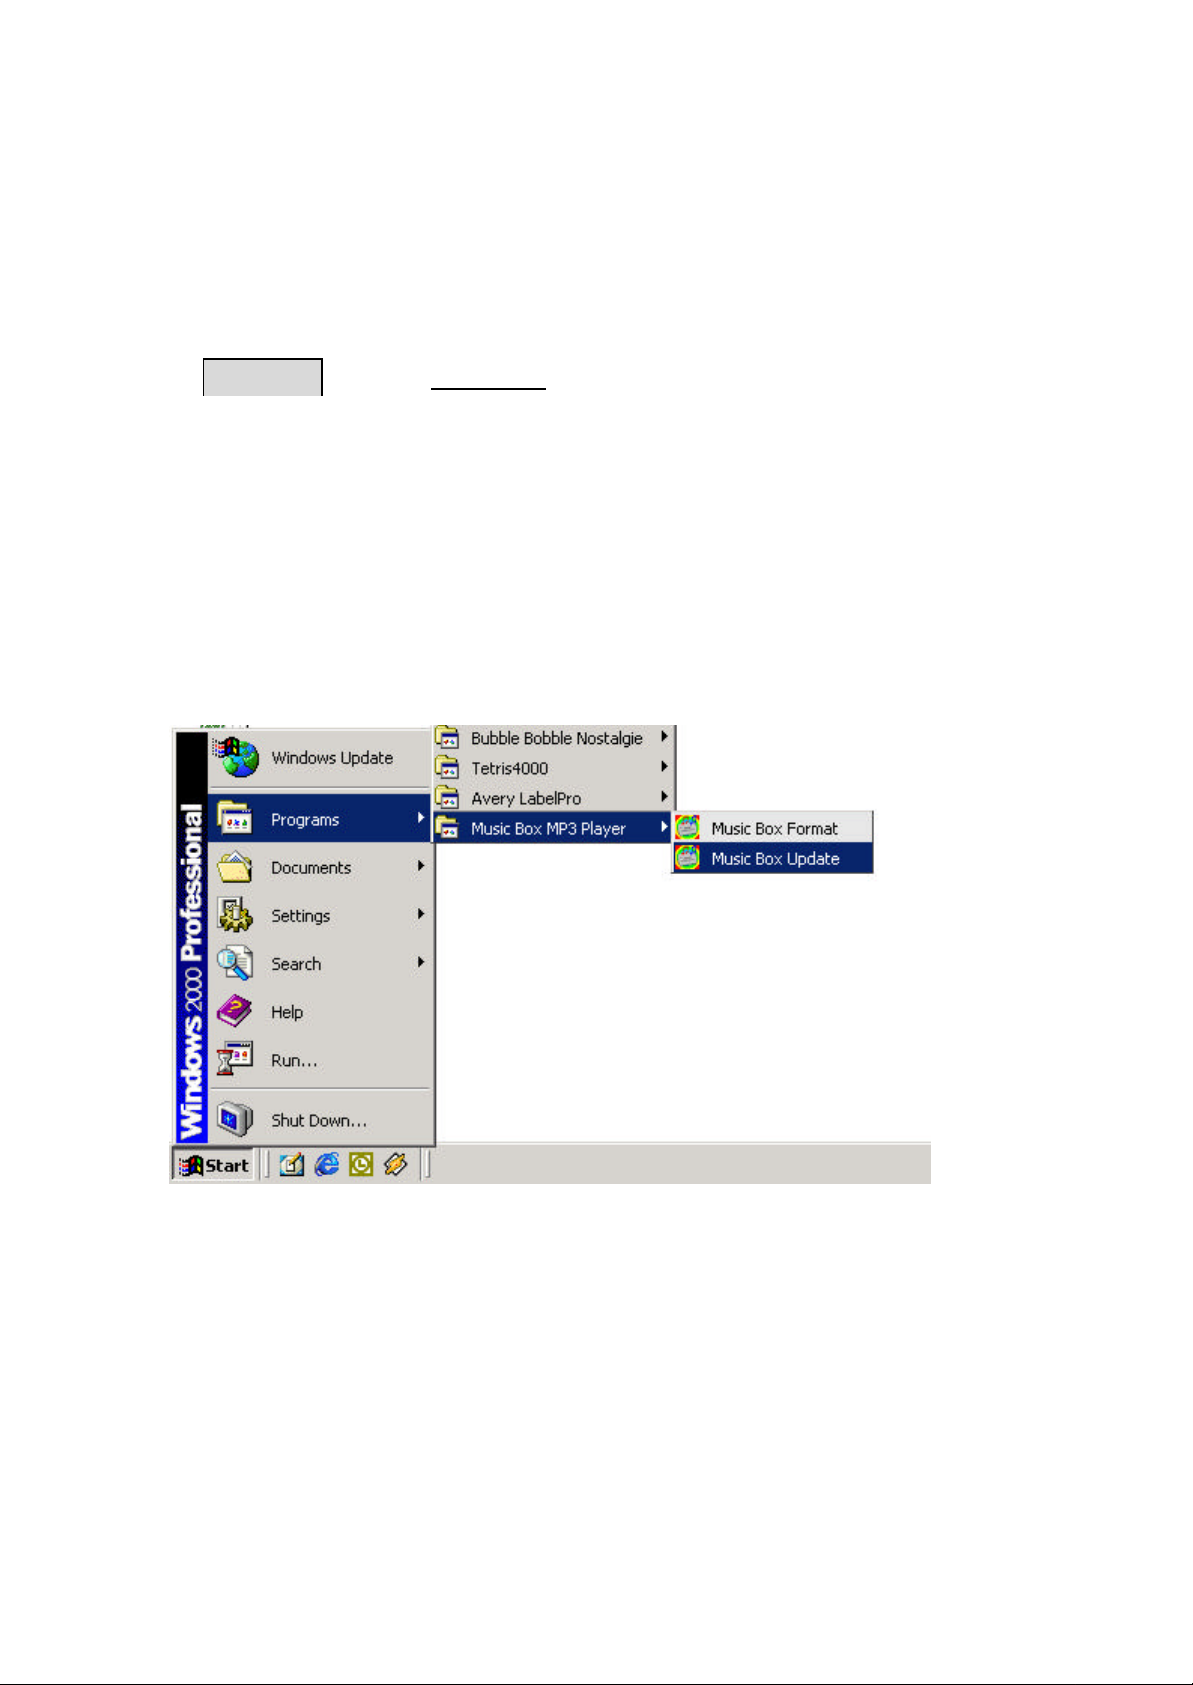
1. Click Start Menu > (All) Programs > Music Box MP3 Player > Music Box
Update
Firmware must always be updated after formatting the drive.
firmware is not updated after format, the drive will not power on.
If the
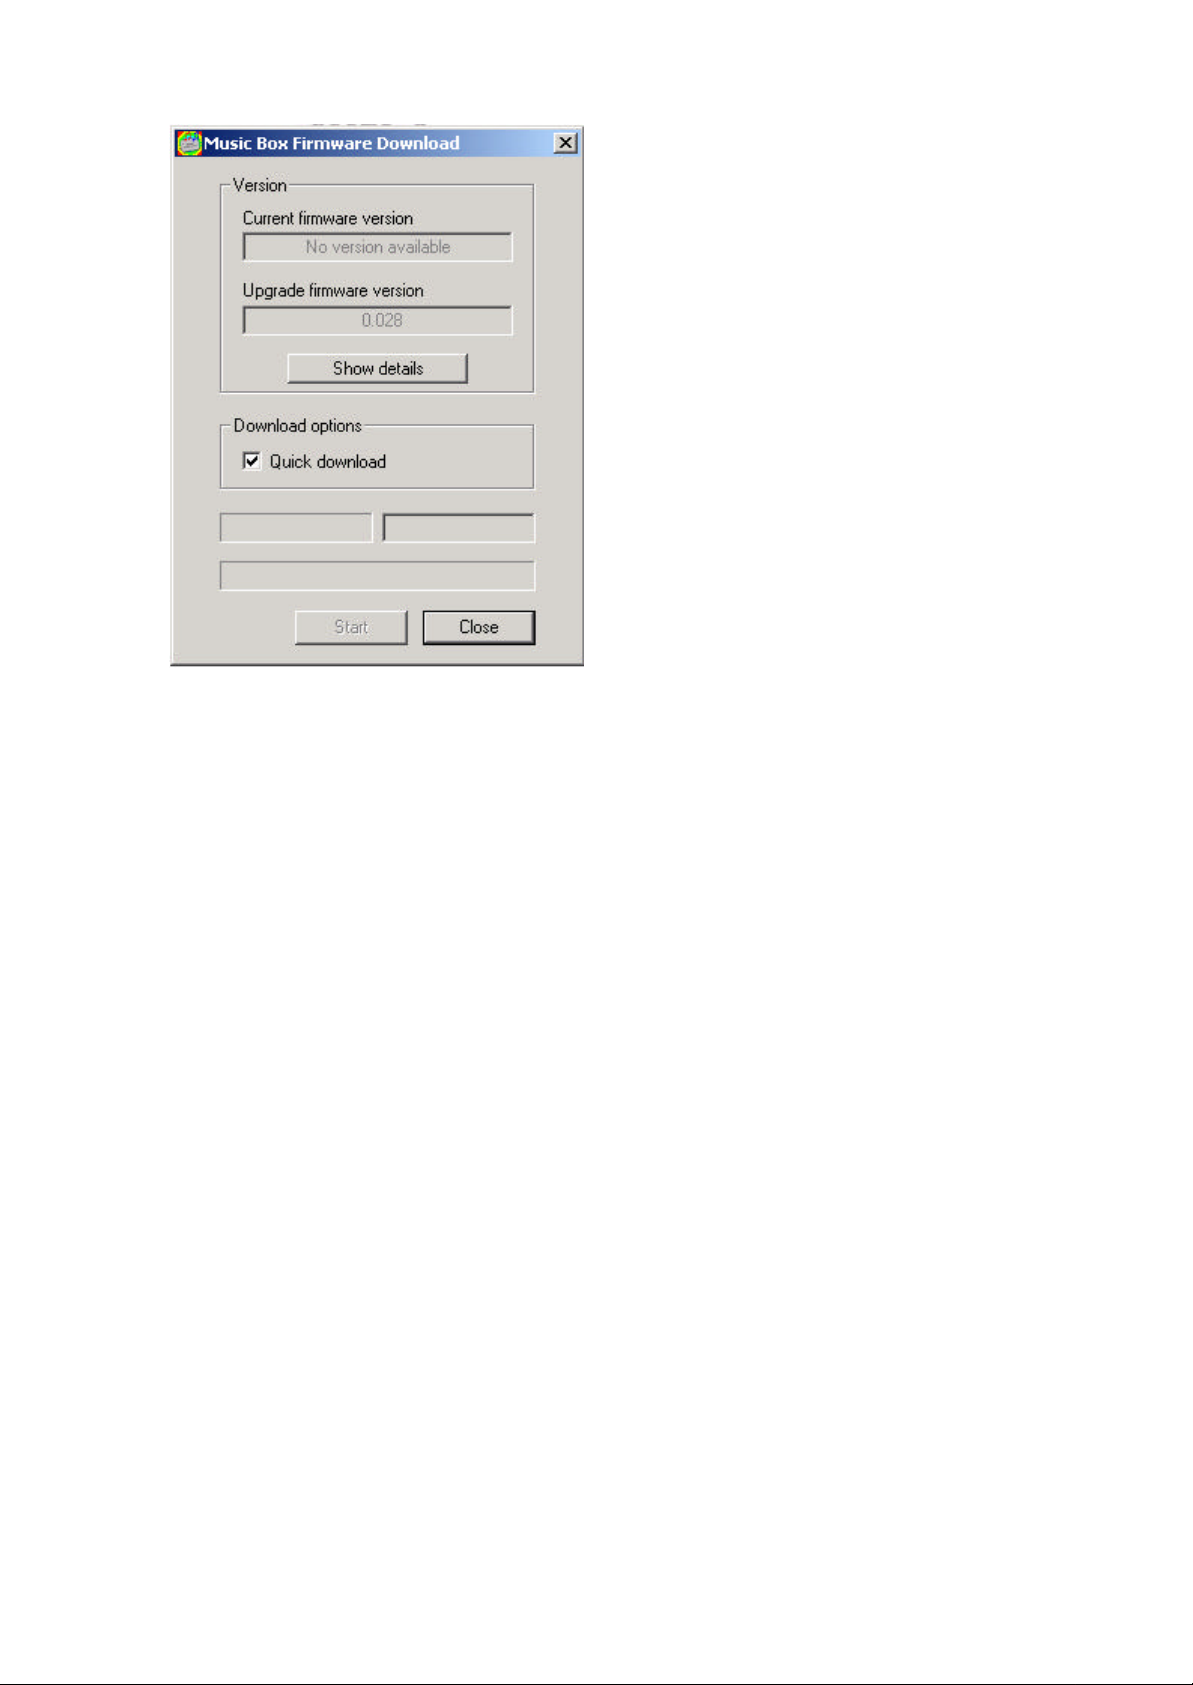
2. In the “Music Box Firmware Download” window, verify that the “Upgrade
Firmware Version” is 0.028 or later.
3. Click Start to initiate download.
Page 14
▣ INSERTING A BATTERY
1. Open the cover on the back of the player.
2. Insert 1 x AAA battery matching the polarities inscribed in the battery
compartment.
3. Close the cover securely on the unit. The device will not power on if the battery
cover is not properly placed.
▣ POWER ON / OFF
1. In the off position, press the “▶/■” button to turn the player on.
2. In the on position, press the “▶/■” button for 3 seconds to turn the player off.
▣ CHANGING MODES (MP3 ↔ Voice )
1. In the STOP position, press the “M” button to change from MP3 Player Mode to
Voice Recording Mode. When in Voice Recording mode, “Voice” will be
displayed on the LCD.
2. Press ‘M’ button again to change from Voice Recording Mode to MP3 Player Mode.
When in MP3 Mode a music note will be displayed on the LCD.
▣ PLAY
1. Press the “▶/■” button to play a song. Press it once again to stop.
2. Press “+” or “-“ button to change the volume level up or down. There are 27
volume levels.
Page 15

▣ SKIP OR SEARCH
1. Press “▶▶” or “◀◀” button to s kip tracks. Skipping tracks can be done in Play
or Stop position.
2. Press and Hold “▶▶” or “◀◀” button to fast forward or rewind while a song is
playing. The song will not be heard while in search mode. The song will
continue to play once “▶▶” or “◀◀” button is released.
▣ REPEAT A-B
You can select the section you wish to repeat with this function. It’s great for language
studying students. It allows you repeat a desired portion of a voice recording or music
without repeating the whole file.
1. Press the “M” button to mark the beginning of the repeat section while a song or
voice message is playing.
2. Press the “M” button again to mark the ending position of the section you wish to
repeat.
3. The player will only play the marked section.
4. To release the repeat, press the “M” button.
■ USING THE OPTIONS MENU
▣ SETTING THE EQUALIZER (MP3 MODE)
1. Press the “M” button for 3 seconds to call the Options Menu.
2. The equalizer settings are represented with “EQ” on the LCD. Select “EQ” by
pressing the “M” button.
3. Press the “▶▶” or “◀◀” button to select an equalizer setting (NORMAL →
ROCK → POP → CLASSIC → JAZZ). Press the “M” button to confirm selection.
4. To Exit from the Options Menu, press the “▶▶” or “◀◀” button to highlight
“Exit” and press the “M” button to confirm.
▣ REPEAT (MP3 MODE)
1. Press the “M” button for 3 seconds to call the Options Menu.
2. The repeat settings are represented with “RPT” on the LCD. Select “RPT” by
pressing the “M” button.
3. Press the “▶▶” or “◀◀” button to select a repeat setting (NORMAL →
RANDOM → RPT-1 → RPT-ALL). Press the “M” button to confirm selection.
A. RANDOM: Tracks will be played in random order
B. RPT-1: The current track will be repeated without skipping to the next track.
C. RPT-ALL: All tracks in the player will be repeated continuously.
▣ ADJUSTING THE CONTRAST
1. Press the “M” button for 3 seconds to call the Options Menu.
Page 16

2. Highlight “CONTRAST ” using the “▶▶” or “◀◀” button. Press the “M” button to
confirm selection.
3. Adjust the contrast level by pressing the “▶▶” or “◀◀” button.
4. Press the “M” button to confirm selection.
▣ AUTO-INTELLIGENCE POWER-OFF (AI-OFF)
“Auto-intelligence Power-off” is designed to automatically shut down the player if the
device is not in use for an extend period of time. The user can manually set the timer
to shut down in 1 min, 2 min, or 5 min.
1. Press the “M” button for 3 seconds to call the Options Menu.
2. Highlight “AI -OFF” using the “▶▶” or “◀◀” button. Press the “M” button to
confirm selection.
3. Press the “▶▶” or “◀◀” button to select the desired time (1min → 2min →
5min).
4. Press the “M” button to confirm selection. AI-OFF is activated only in the Stop
position.
▣ RECORDING A VOICE MESSAGE
The Digital Voice Recording function is a helpful option integrated in the Music Box. It
can be used to record any audio within a 7- feet radius of the device. You can store up
to 99 individual messages. The recorded WAV file can then be archived on the PC or
shared as an email attachment.
1. Select “Voice” mode. See “CHANGING MODES (MP3 ↔ Voice )”
2. I n Voice Mode, press the “M” button for 3 seconds to call the Recording Menu.
3. Highlight “REC” and press the “M” button to start recording.
4. Press the “▶/■” button to stop recording.
NOTE
Voice Recordings are stored in WAV format. The files are stored in the “Voice”
folder in the Removable Disk.
▣ PLAYING A VOICE MESSAGE
1. In Voice Mode, press the “▶/■” button to start playing the message. Press it
once again to stop.
2. Press “+” or “-“ button to change the volume level up or down. There are 27
volume levels.
▣ DELETING A VOICE MESSAGE (From the device)
1. Select “MP3” mode. See “CHANGING MODES (MP3 ↔ Voice )”
2. In MP3 Mode, press the “M” button for 3 seconds to call the Options Menu.
3. Highlight “DEL” using the “▶▶” or “◀◀” button. Press the “M” button to
Page 17

confirm selection.
4. Highlight “VOICE ” using the “▶▶” or “◀◀” button. Press the “M” button to
confirm selection.
5. Select the file you wish to delete using the “▶▶” or “◀◀” button. Voice files
are represented as /VOICE/V001.WAV on the LCD. Press the “M” button to
confirm selection.
6. Highlight “YES” and press the “M” button to delete the file.
7. After you have deleted the file(s), select “Exit” from all the menus by pressing the
“M” button.
NOTE
You can also delete the recorded files on the device through the PC.
▣ DELETING A VOICE MESSAGE (From the PC)
1. Connect the player to the PC with the supplied USB cable and turn the device
power on.
2. Open “My Computer” and double-click the “Removable Disk” icon.
3. Open the “Voice” folder and manually delete the file you wish to remove.
▣ KEY-GUARD LOCK (Slide Switch)
Key -Guard Lock switch is located on the top of the device. It’s designed to prevent
the buttons from being pushed in a pocket or purse.
1. To activate the “Key-Guard Lock” slide the switch to the Left side. A small padlock icon (Ï) will appear on the LCD.
2. To deactivate the “Key-Guard Lock”, slide the switch to the Right side. The icon
should have disappeared.
NOTE
The device will still power on even with the Key -guard lock, but no buttons will
function with the Key -guard lock activated. Unless the Key-guard lock is
deactivated, the device will power down shortly using AI-OFF.
▣ TROUBLESHOOTING
• Please check the followings first if the product does not work properly.
The device does not
power on.
• Check the polarities of the battery.
• Check the battery level
• Make sure the battery compartment cover is
securely closed.
• Format disk and Update the firmware
Page 18

This problem occurs due to the incorrect formatting.
1. The downloaded
files are corrupt.
2. The device reads
“READY” when not
connected to PC.
The buttons of the
Player does not work.
I don’t see the device
on my PC as a
Removable Disk.
• Remove the battery from the player and reinsert it
to reset the device.
• Format disk and Update the firmware
• Check to see if the Key-Guard Lock is activated.
• Uninstall and reinstall the installation CD
• “Update the driver ” from the Device Manager in
the Control Panel with the installation CD. Make
sure you click “Continue Anyways” during
installation. See #6 in “INSTALLING THE
PROGRAM AND DRIVER”
No removable disk
is listed in the “Drive”
box in the Formatting
window.
• Check the USB cable connection
• Check the battery level
• Make sure the device power is on
• Check if SCSI Host Controller is listed in the
Device Manager. “Update the driver” from the Device
Manager in the Control Panel with the installation CD.
Make sure you click “Continue Anyways” during
installation. See #6 in “INSTALLING THE PROGRAM
AND DRIVER”
• Uninstall and reinstall the installation CD
Page 19
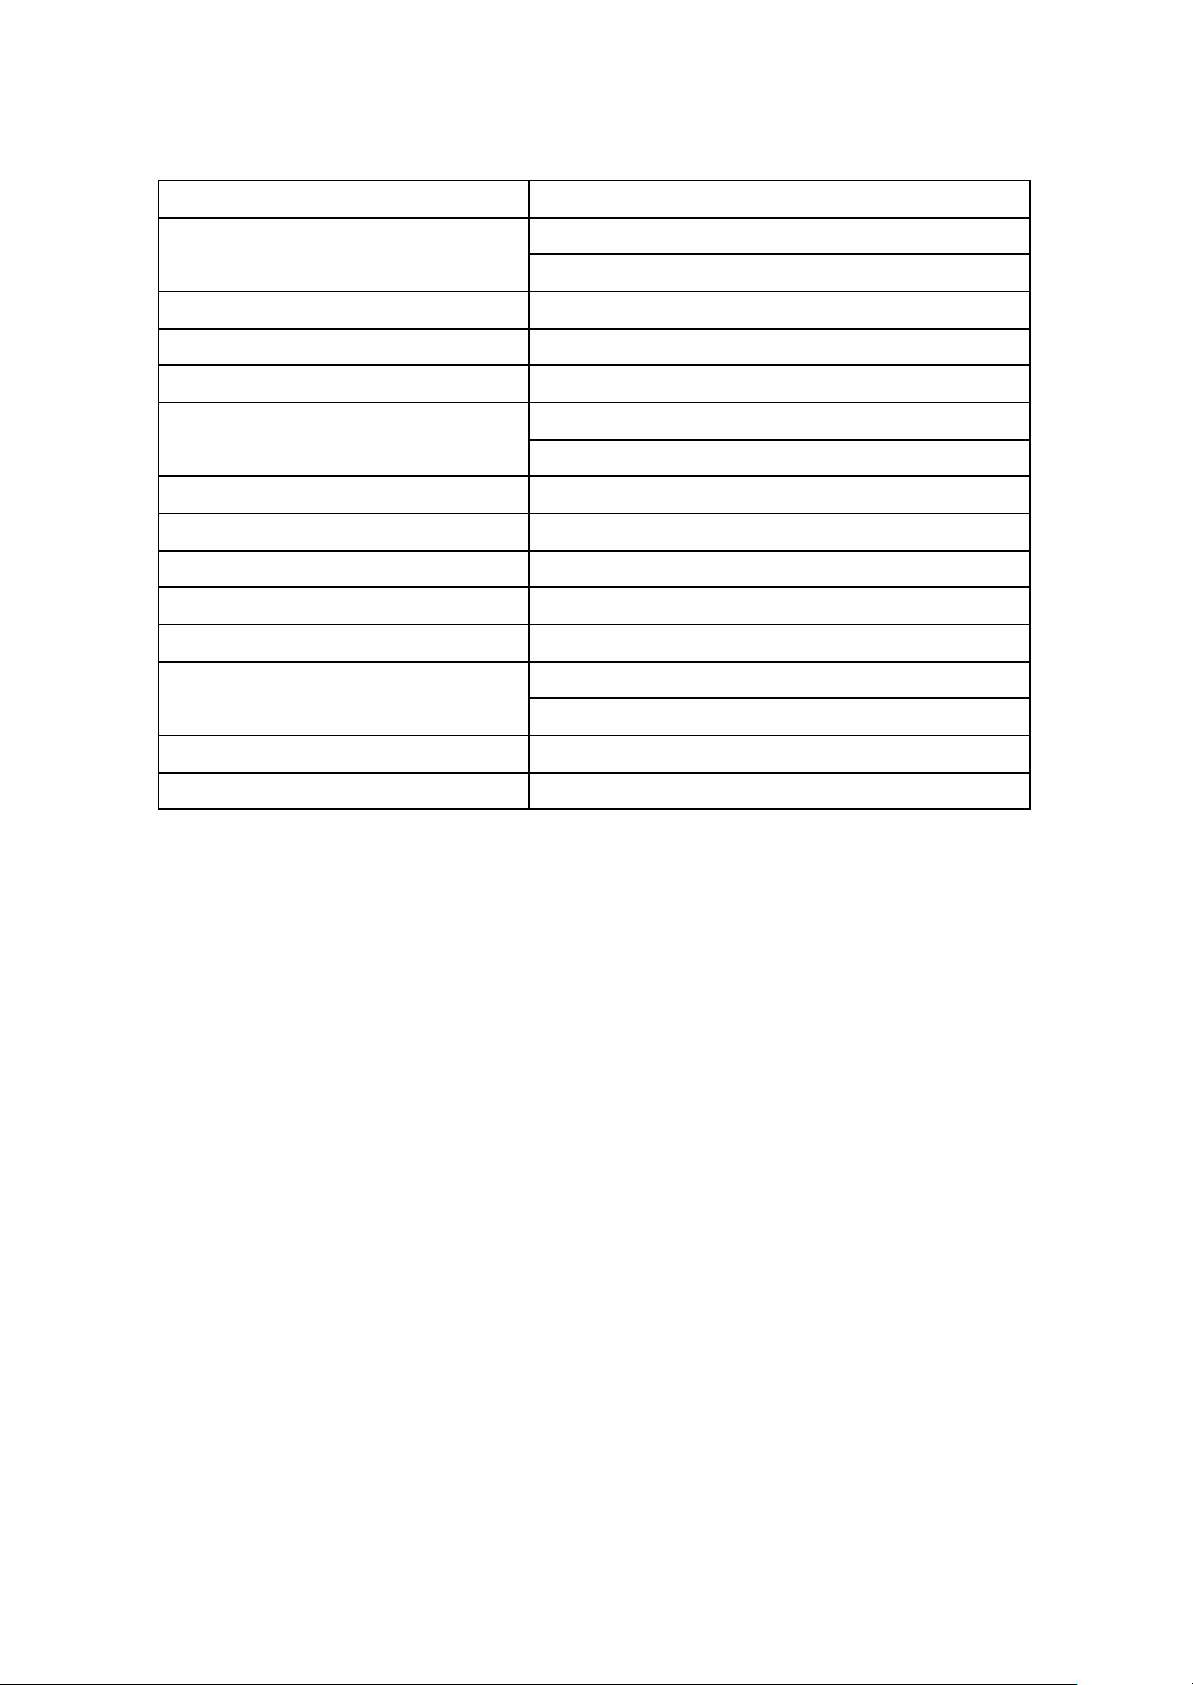
▣ SPECIFICATION
Main Function MP3 Player / Voice Recorder / Removable Disk
Memory
Interface USB
File Transmission Speed 2.7 Mbps
Display FSTN LCD
Capacity
Battery AAA
Battery Life 6 Hours (Play / Record)
Output Power 4.5mW × 2 (16Ω)
S/N (Noise Ratio) 90dB (with 20KHz LPF)
Case Aluminum / Plastic
EMI
Dimension (W × H × D) 52 × 60 × 14(mm)
Net Weight (without Battery) 37g
64MB Flash Memory
128MB Flash Memory
4 Hours (64MB Flash Memory) Voice Recording
8 Hours (128MB Flash Memory)
Page 20
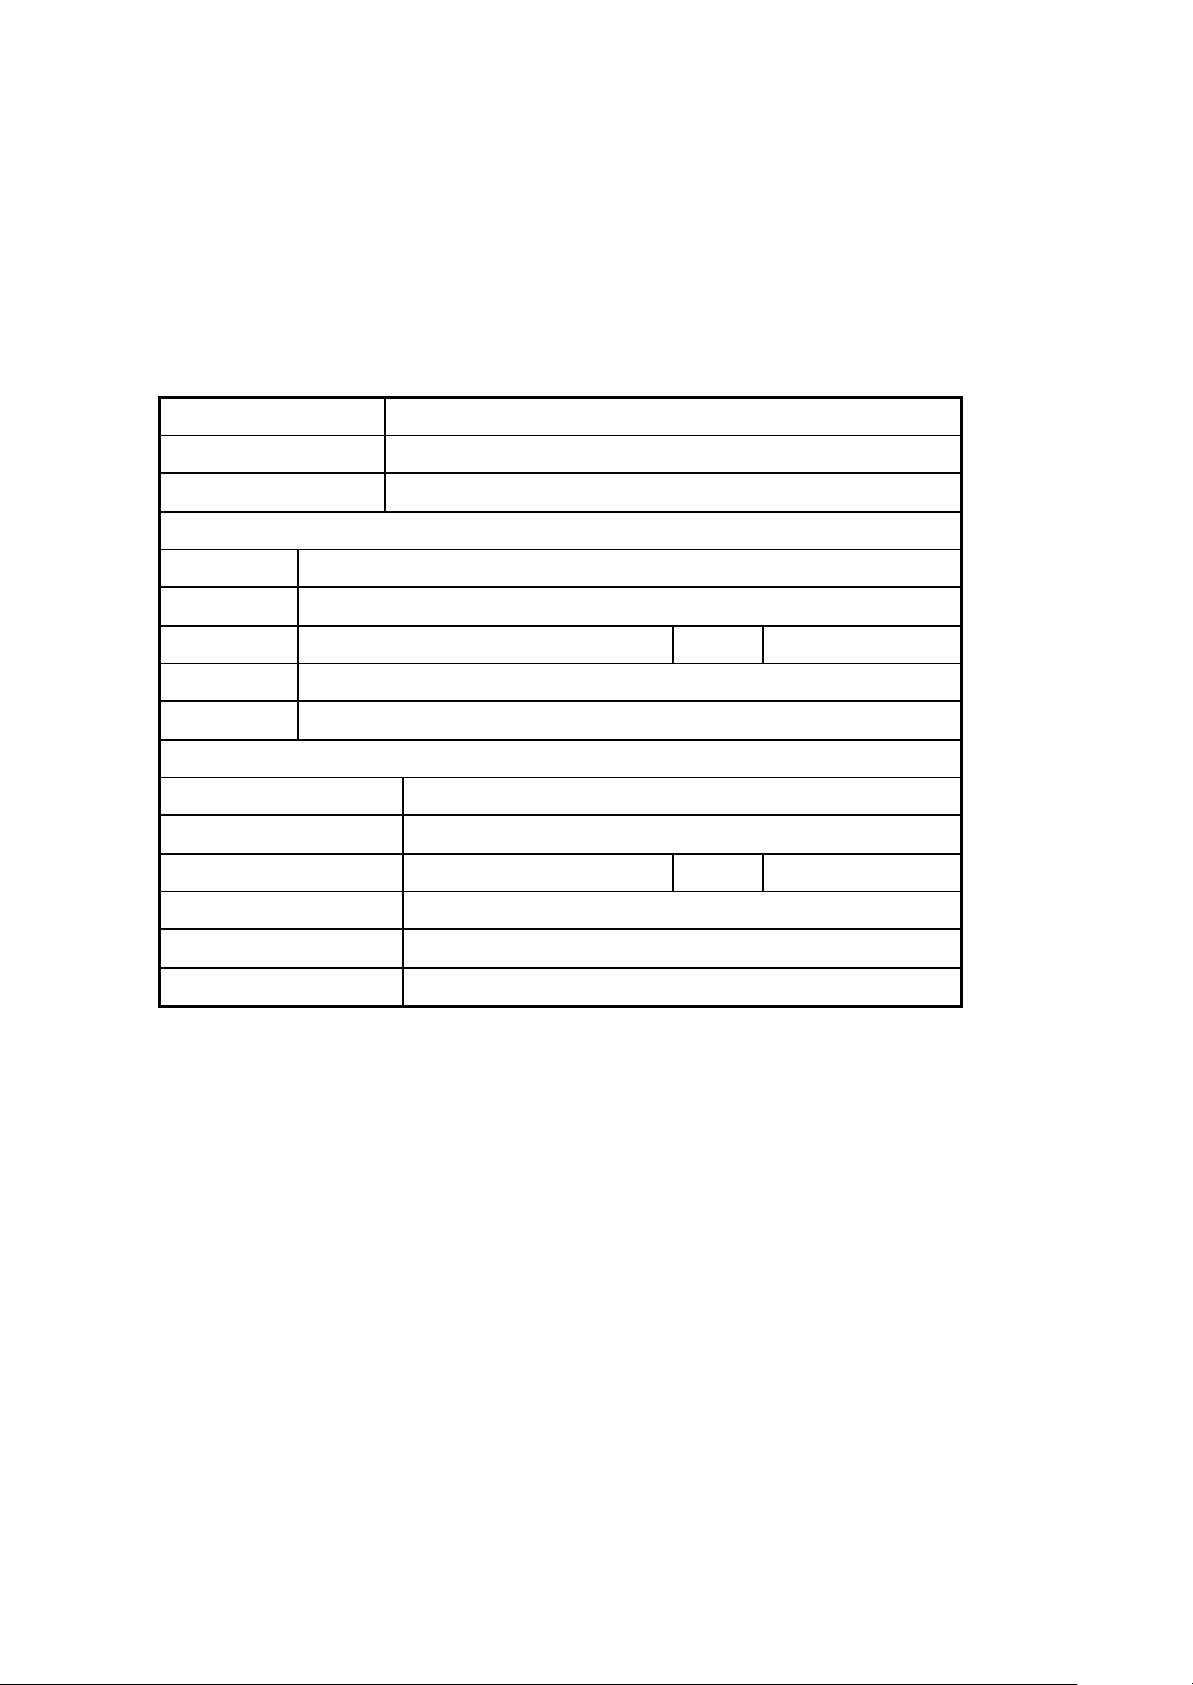
▣ WARRANTY REGISTRATION CARD
Thank you for your purchase. Please fill out the registration card to receive technical
assistance and warranty services. This information that you provide will be kept
confidential. Thank you.
MODEL NO
WARRANTY PERIOD 1-Year Limited (Parts & Labor)
PURCHASE DATE
VALUED CUSTOMER INFORMATION
NAME
ADDRESS
CITY STATE
ZIP CODE
EMAIL
PURCHASE INFORMATION
PLACE OF PURCHASE
ADDRESS
CITY STATE
ZIP CODE
PRICE OF PURCHASE
NOTES
 Loading...