

Page 1
Dashboard User Guide
Version 1.7
Page 2
2
Footprint Dashboard
Help Guide
Contents
Step by Step Hardware Installation Page 3
Gateway Status LED’s Page 4
Mobile Application Page 4
Login/Registration Page 5
Initial Access
Gateway Address & Pin
Toolbar Page 6
Control Centre Page 7
Unassigned Units
Conrm Unit Names
Mobile App
Total Usage
Overview Page 13
Trafc Lights
Zones
Groups
Unit
Priority of Settings
Reporting Page 15
Comparing
Period Selection
PDF and CSV
Users Page 16
Add single user
Add multiple users
Scheduling Page 19
Options Page 20
Register new Gateway
Locking and Unlocking
Adding new units
Curreny and Energy Rates
Licensing
Adding to Footprint Page 22
Zone/Groups/Units
Unit Settings Page 23
Setting Threshold Page 24
Setting Schedules Page 25
Flash ID Page 26
Commissioning Page 27
Override Page 28
FAQ Pages Page 29
Host Server FAQ Page 33
For tech support contact:
+44 01332 604010
support@cmdfootprint.co.uk
Page 3

3
Footprint Dashboard
Help Guide
Step by Step Guide
Hardware Installation
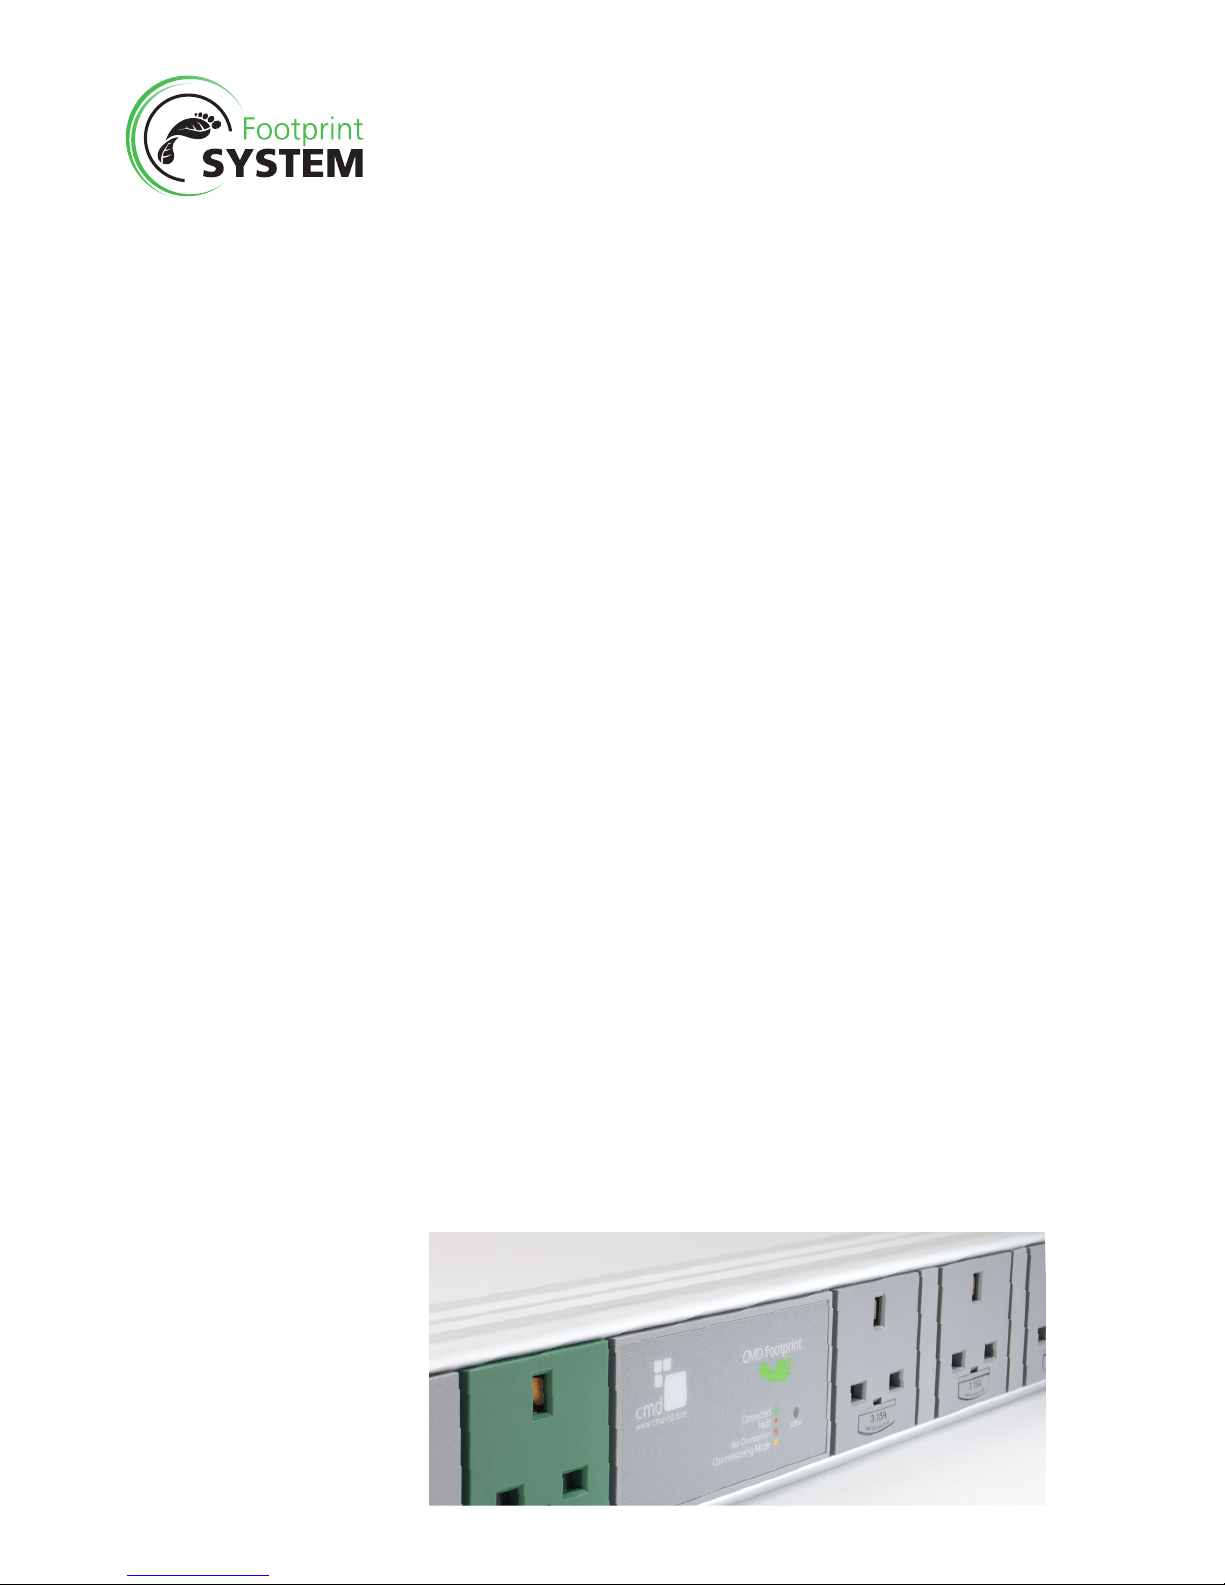
Step 1
Take note of the Module ID next to the
input cable, and the desk location /
Friendly name of the unit.
Step 2
Fix the power modules in place and
power up. If the Gateway is not yet
connected then the LED on the module
will ash RED. This will resolve itself in
the next step.
Step 3
Connect Gateways to a network with
internet connection and connect power
supply. Make a note of the Gateway
Mac Address and PIN for use in Step 4.
Step 4
Register the Gateway online at https://
dashboard.cmdfootprint.co.uk
Click register Gateway and complete
the form.
Step 5
Once completed, access the Dashboard
by logging in and the Gateway will have
appeared. The modules may take up to
2 minutes to appear on the Dashboard,
wait until all are visable.
Step 6
Access Options on the Dashboard (Page
18) and on the Dashboard LOCK the
Gateways. This will lock down all the
modules to this Gateway and will not
be accessible by others.
Start up Hints
• When logged in, be sure to check/
update the currency settings for
correct measurements on new
data collected.
• Setting zones and groups up early
will help applying schedules and
reporting on units.
• Be sure to note what MAC
addresses for units are where to
help give units friendly names.
Module LED
Flashing Green
Module connected to gateway
Static Red
Module Fault
Flashing Red
Module not connected to gateway
Static Orange
Module in commissioning mode
Flashing Green/Red
Module not connected to gateway
Rapid Green
Module ID is being identied (page 26)
Page 4

4
Footprint Dashboard
Help Guide
Gateway
Installation
Power
Indicates that the Gateway is receiving
power.
Link
Indicates that there is an active ethernet
connection.
Act
Indicates that there is network
activity.
Ok
Periodic ash signals radio communications are active to the server
Fail
The gateway has failed to connect to the
server.
Page 5
5
Footprint Dashboard
Help Guide
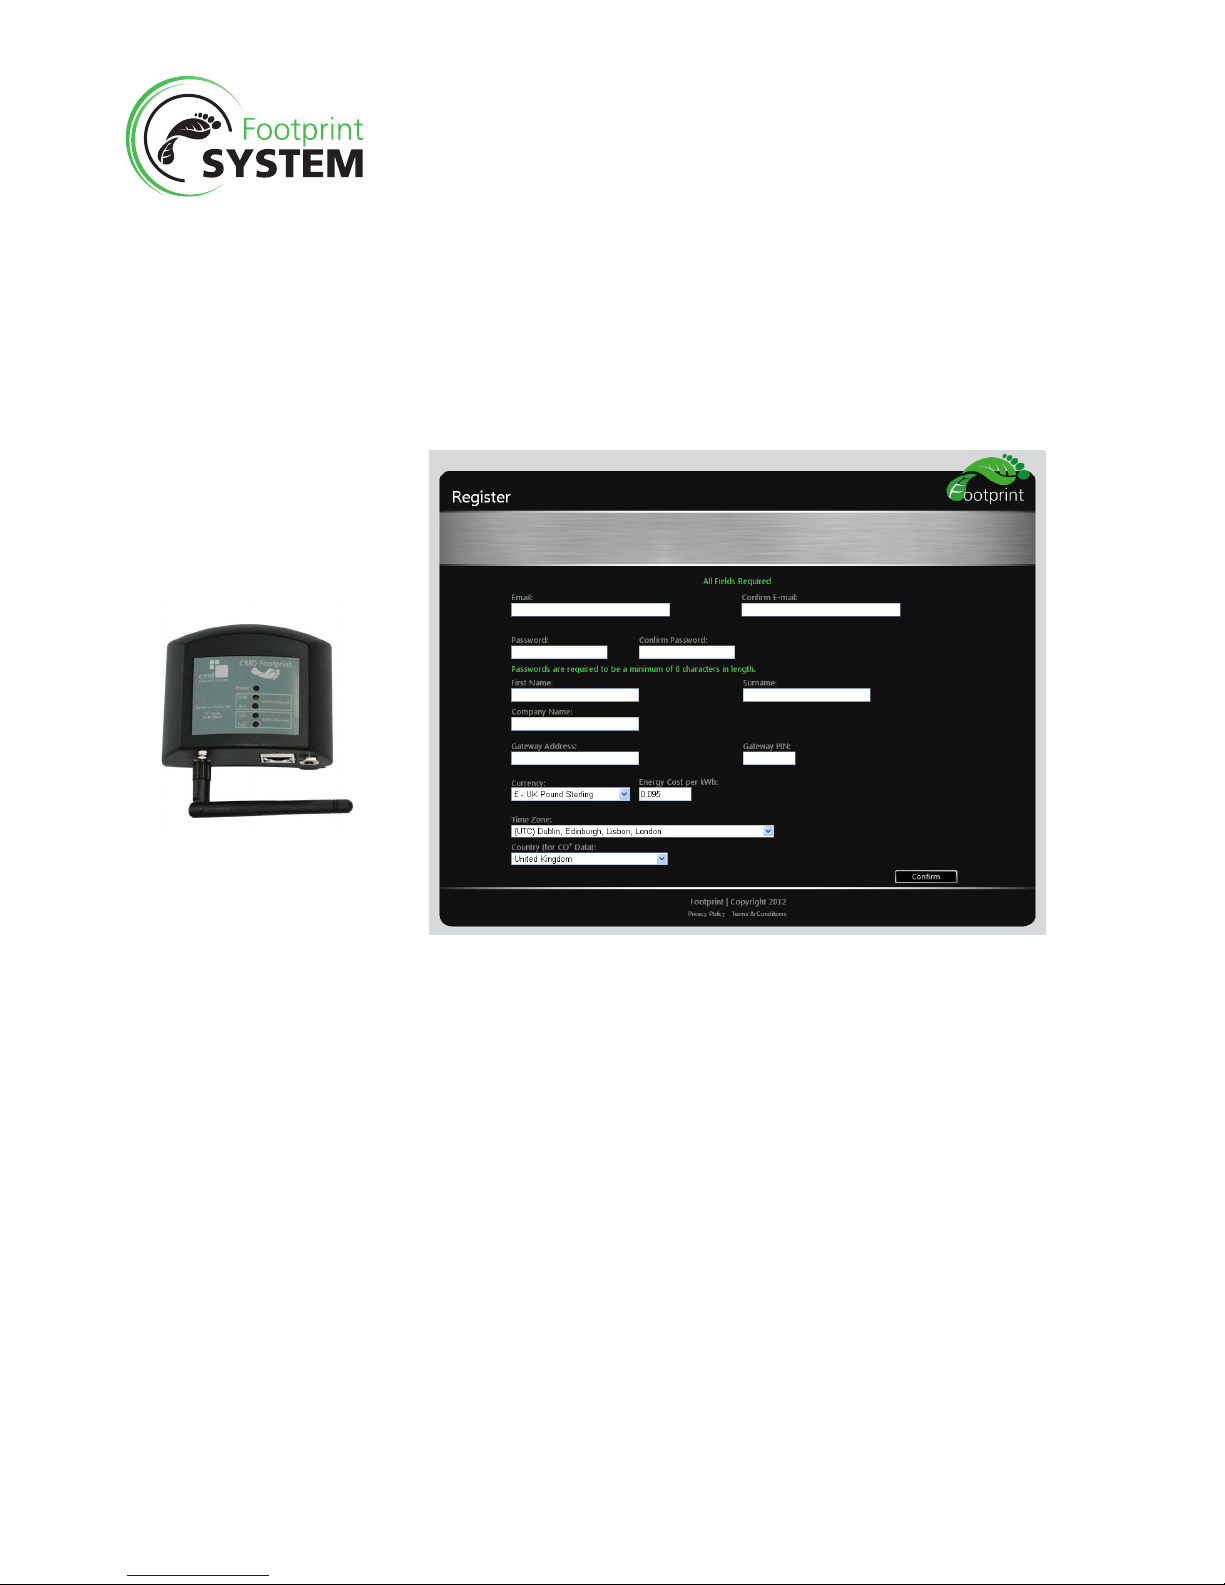
Login/Registration Screen
On the Dashboard login screen you are able to either login to your personalised Dashboard, or if
this is the rst time accessing, the Gateway(s) will need to be registered.
Click on the ‘Register Gateway’ link to move to the registration page.
Once the details have been completed the user will be greeted by the following message:
Congratulations your account has now been created.
If you have not yet plugged in your Gateway please do so now.
As you begin to plug in your Footprint power modules, they will appear on the
dashboard.
To start with, the power modules will be placed in the Unassigned Zone and Group.
Please assign your power modules into an appropriate Zone and Group.
For example, your Zone may be ground oor, rst oor, or second oor.
Groups could be Help Desk, I.T Department, Sales, or Support.
Once completed, the Gateway will appear (once connected) on the Dashboard after you log in.
If the mobile app is used (page 11) then new modules will be listed in the ‘Conrm Unit Names’
section.
Gateway Address & Pin
These details can be found on the
Gateway unit.
Registration Page
Page 6
6
Footprint Dashboard
Help Guide
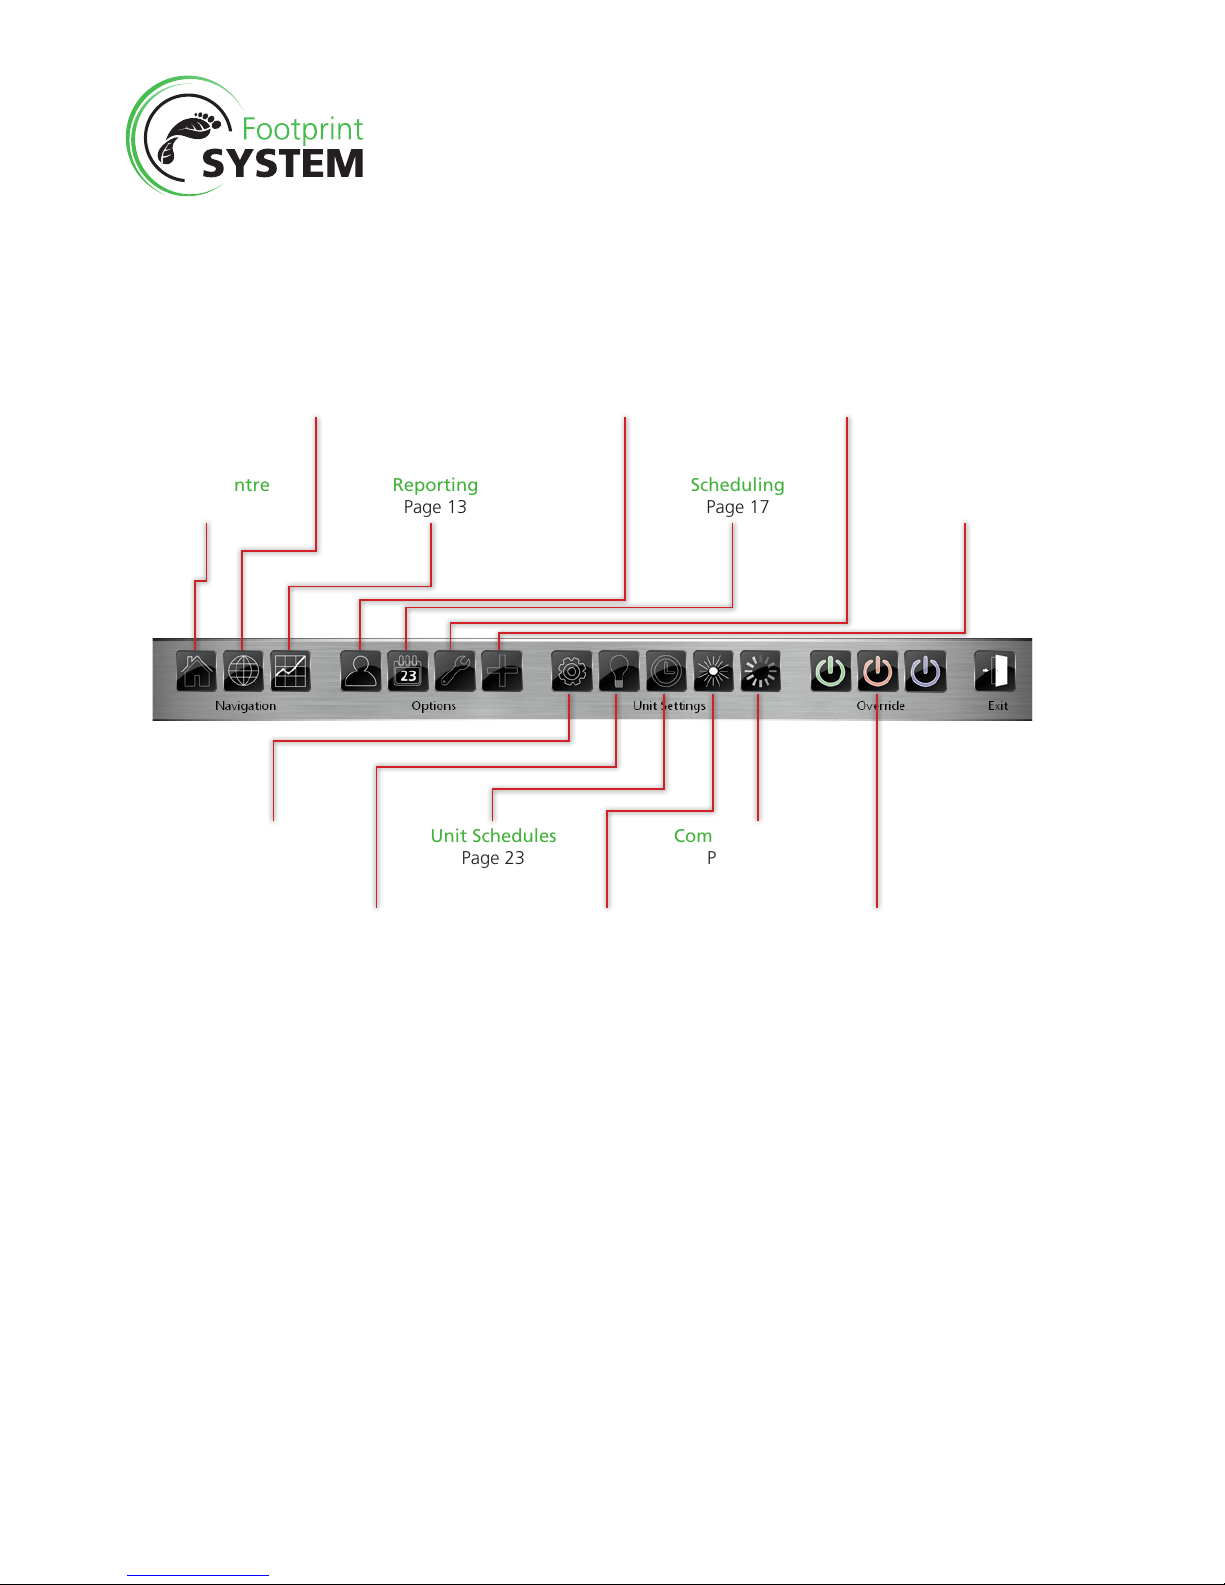
Toolbar
Control Centre
Page 5
Overview
Page 11
Reporting
Page 13
Unit Settings
Page 21
Unit Threshold
Page 22
Unit Schedules
Page 23
Flash ID
Page 24
Commissioning
Page 25
Users
Page 14
Scheduling
Page 17
Options
Page 18
Add to Footprint
Page 20
Override
Page 26
Page 7
7
Footprint Dashboard
Help Guide
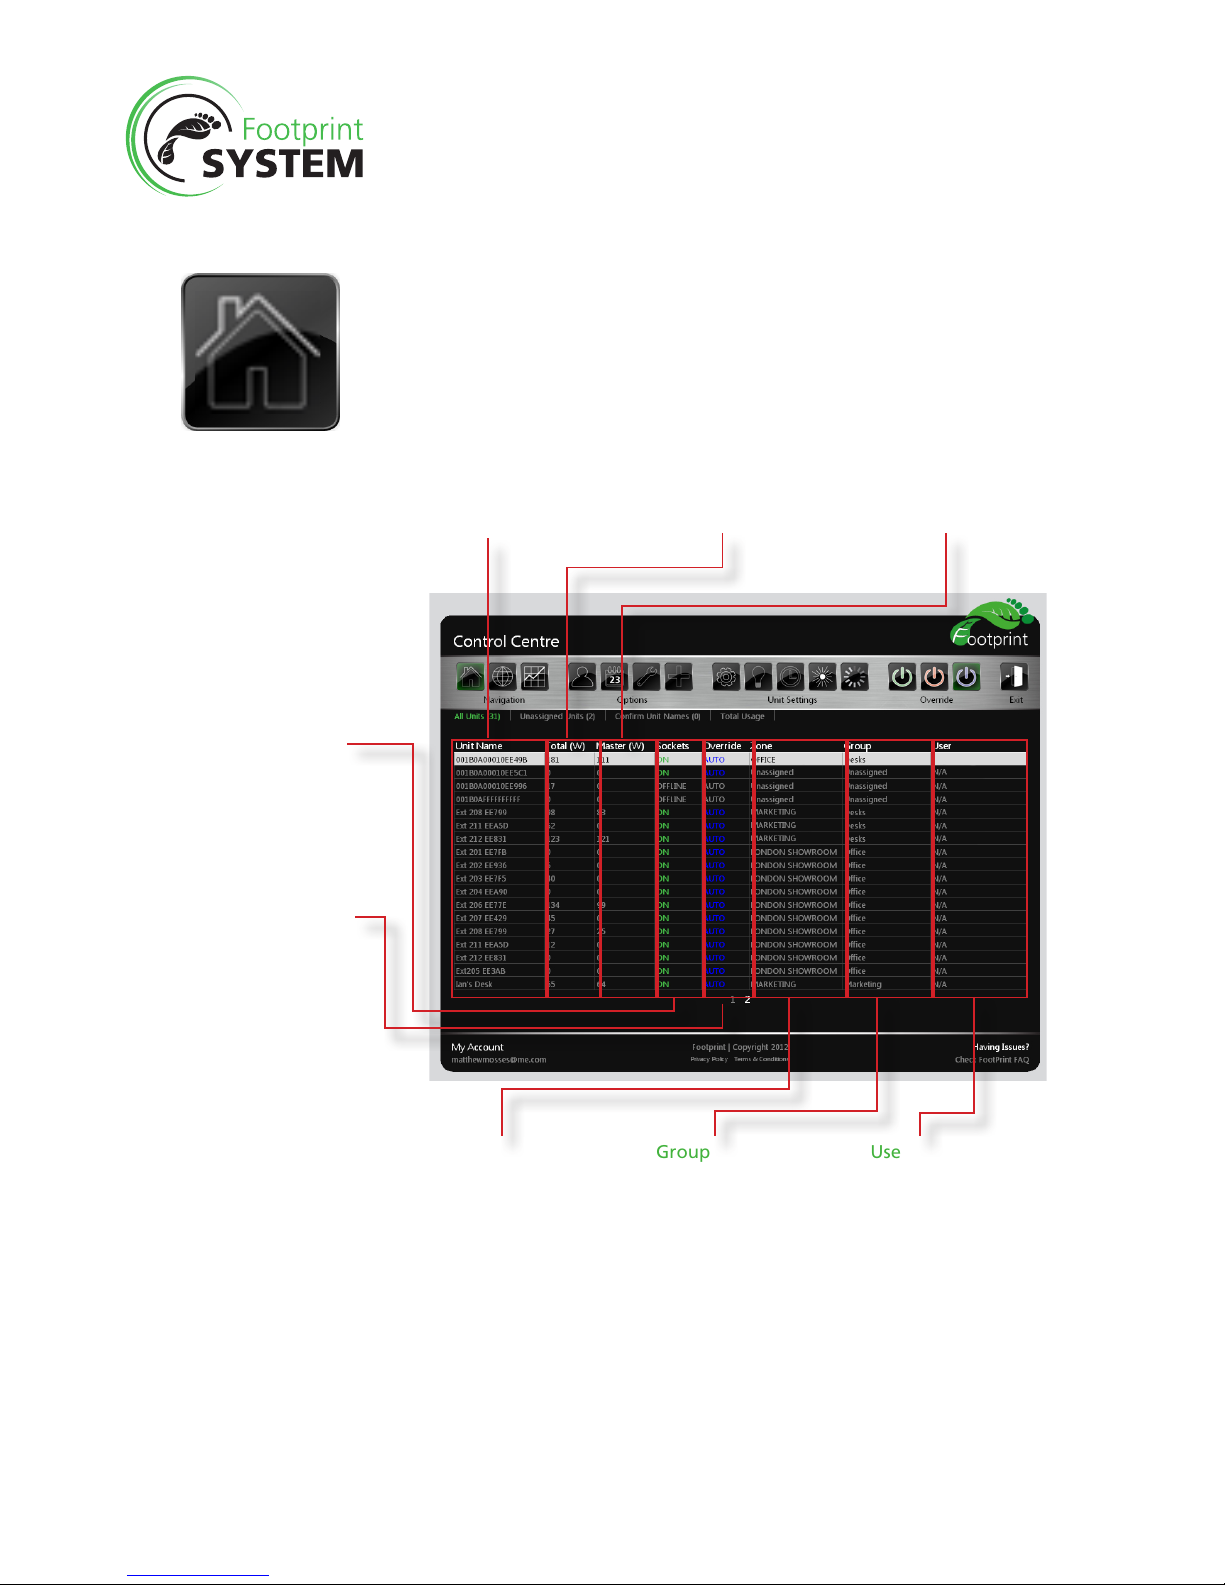
Control Centre
All units
Administrator Level
Unit Name
Displays Mac Address of
unit, or friendly name
input.
Total (W)
The complete wattage
used by the module.
Master (W)
Wattage used by the
Master socket only.
Sockets
Displays whether the
auxiliary sockets are:
On
Off
Ofine
Override
Displays the override
status of the unit:
On
Off
Auto
Zone
Displays the Zone that the
unit is assigned to.
Group
Displays the Group that
the unit is assigned to.
User
Shows the user that is
assigned to the unit.
The Control Centre allows the administrator to clearly see all units on the system and their details.
From here the administrator can clearly control all units, while also allow the Gateway(s) to search
for additional units when the system is unlocked.
Page 8
8
Footprint Dashboard
Help Guide
All Units
This column displays the unit(s) that are locked down to the Gateway. The names will appear as the
Mac Address of the unit, unless a friendly name has been set.
Total (W)
The Total (W) is the complete wattage of the module, including the master, and auxiliary sockets.
Master (W)
The Master (W) column is the complete wattage of the Master socket(s) only.
This will help the user to determine a level to set a threshold to e.g: if a pc takes 80W when running
normally and 30W when in standby then the threshold could be set at 40W. This would mean the
auxiliary sockets would only come on when the PC is drawing over 40W.
Sockets
This displays the status of the auxiliary sockets. Which will be ON, OFF, or OFFLINE. If Ofine the
dashboard is indicating that the unit is not connected to the server.
Override
This indicates that the units override controls are set to ON or OFF. If set to AUTO this means the
unit will follow it’s set schedule or threshold.
Zone
This displays the Zone that the unit is assigned to, and can be changed through the unit settings.
Group
Displays the Group that the unit is assigned to and can be changed in the unit settings. The Group
the unit is assigned to must itself be assigned to the correct zone.
User
This is the name of the user that the unit has been assigned to. This allows the user to view their
own unit when they sign in and can be changed in the unit settings.
Control Centre
All units
Administrator Level
Page 9
9
Footprint Dashboard
Help Guide
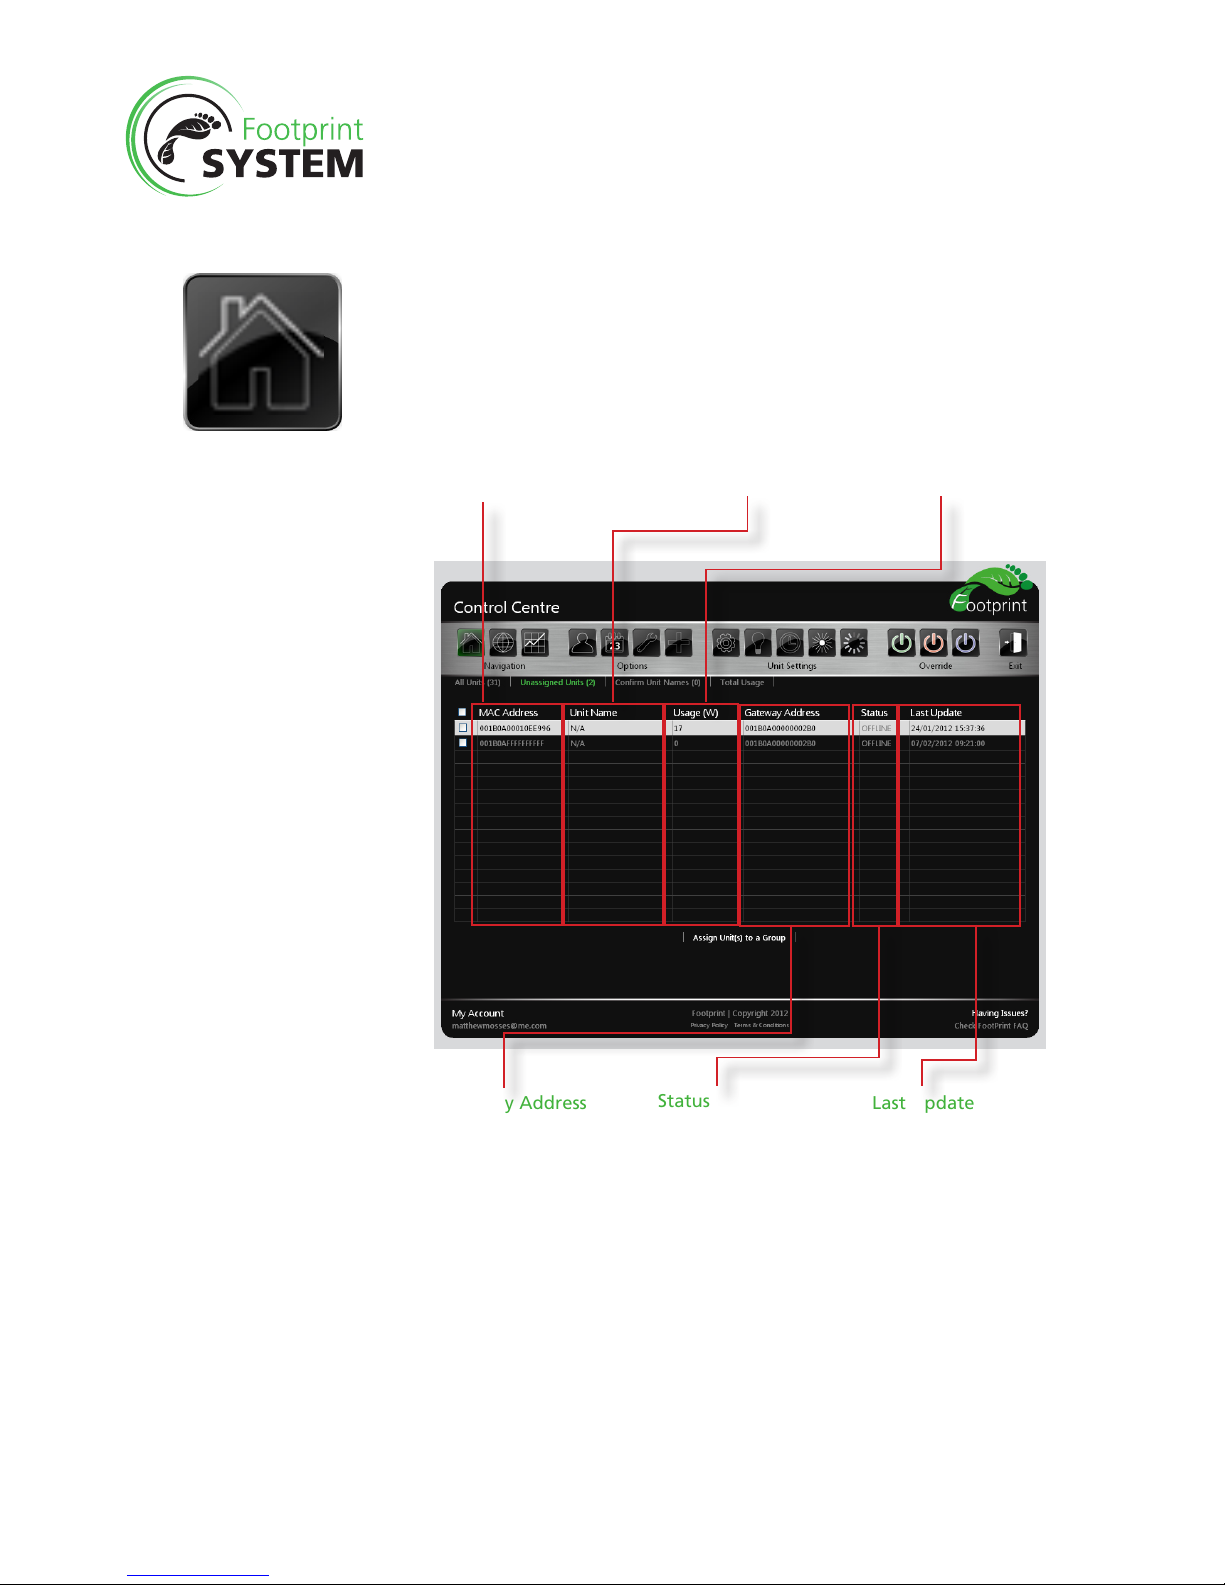
Control Centre
Unassigned units
Administrator Level
This section displays all the units that the Gateway(s) have found but not assigned currently.
MAC Address
Displays Mac Address of
unit.
Unit Name
The friendly name that has
been assigned to the unit.
Usage (W)
Displays the total current
usage of the unit.
Gateway Address
The address of the
Gateway that is
connecting the unit to the
server.
Status
Displays whether the unit
is Ofine or Online.
Last Update
Displays the last time the
unit was connected to the
server.
Assign Units To Group
While on this screen, the units can be assigned to a group by simply selecting one or multiple
units.
Page 10

10
Footprint Dashboard
Help Guide
MAC Address
This is the unit’s MAC Address and can be found on the unit.
Unit Name
A friendly name can be set for the unit either through unit settings on the Dashboard, or by the
footprint mobile app when setting up the modules.
Total (W)
This displays the current usage total usage of the unit.
Gateway Address
When units are connected to the Dashboard they do so through the Gateways, this allows
information on the units to be relayed to the server, and presented on the Dashboard.
Status
The status of the unit in this column will be either:
Online - indicating that the unit is connecting to the Gateway(s).
Ofine - Indicating that the unit is not connected to the Gateway(s).
If units are present in this section, the Administrator needs to lock them down to the Gateway(s).
Last Update
This indicates when the unit was last connected to the Gateway(s).
NOTE:
If the Footprint system is already locked, then new units will not appear in this section
until the gateways are unlocked via the Options; Gateway screen. (See Page 20 for
Details)
Control Centre
Unassigned units
Administrator Level
Page 11
11
Footprint Dashboard
Help Guide
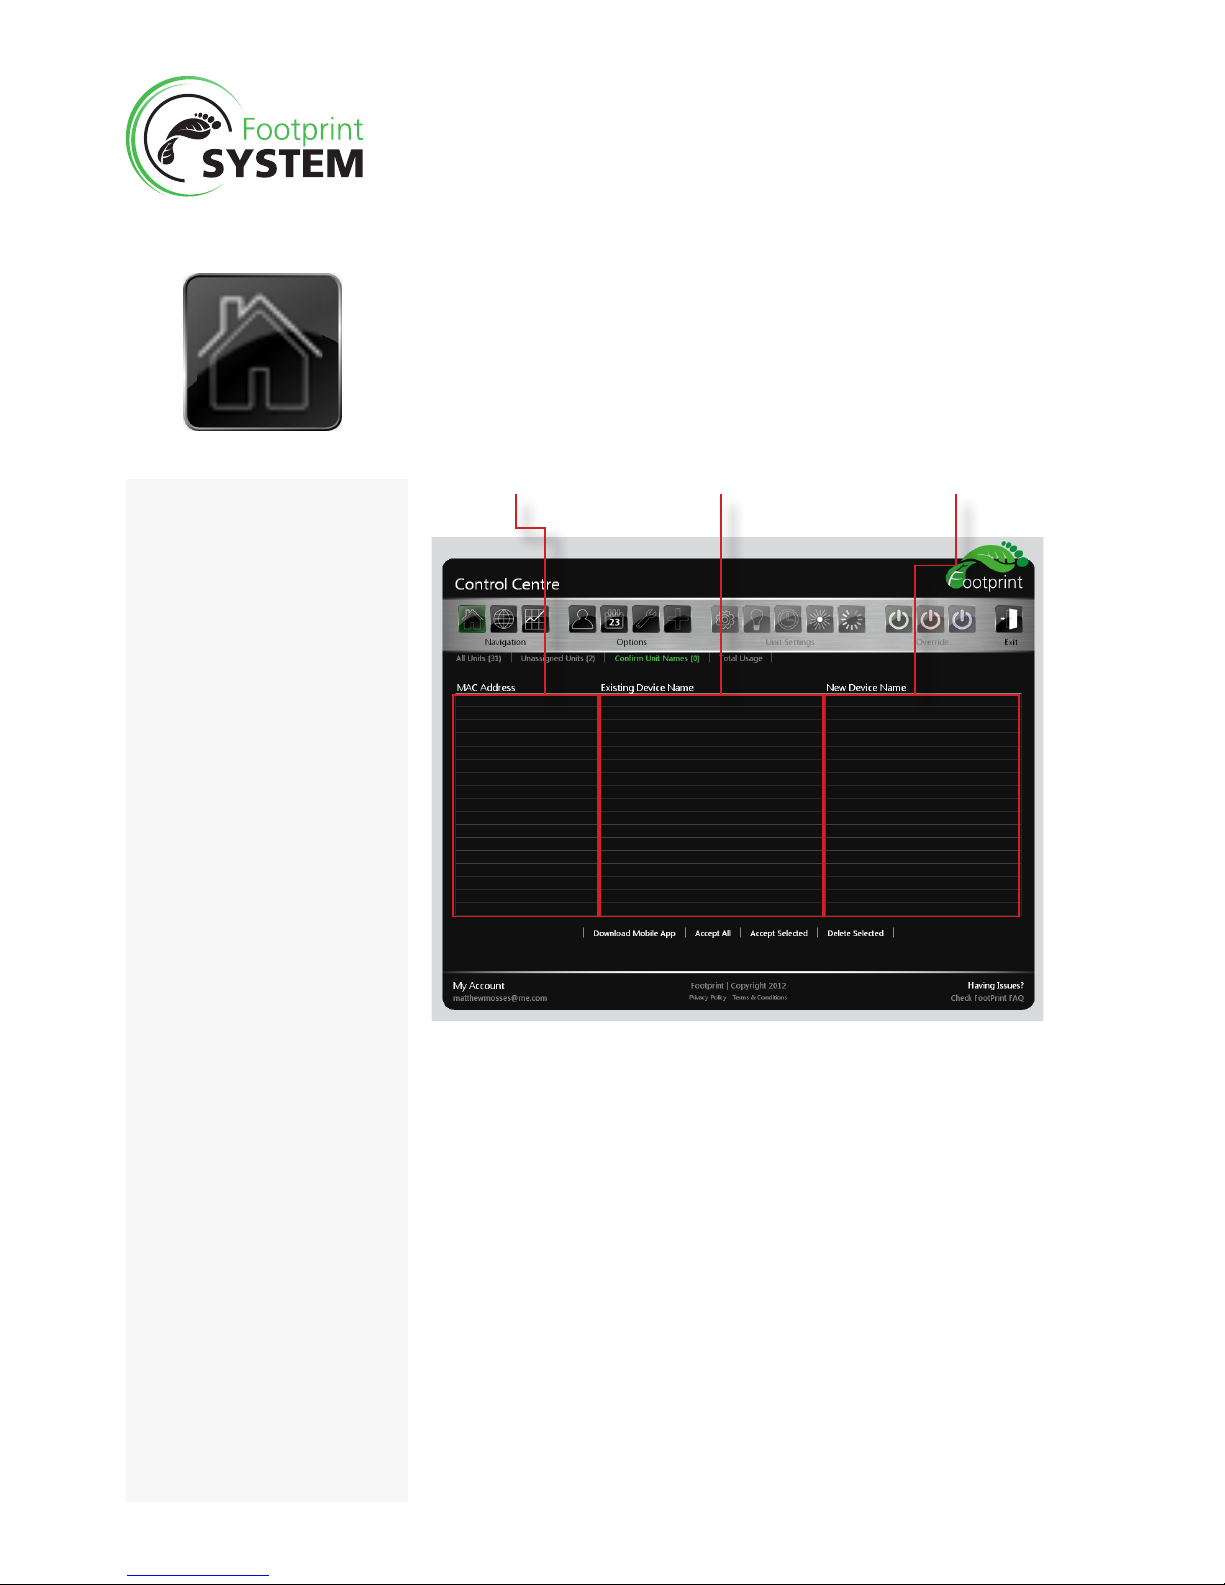
Control Centre
Conrm Unit Names
Administrator Level
This page lists all of the friendly names that have been assigned to units through the use of the
mobile app. The administrator is able to conrm those friendly names, or delete them from the
system.
MAC Address Existing Device Name New Device Name
Download Mobile App (Android
Only)
Download the mobile app by
selecting “Download Mobile
App” from below the table in
“Conrm Unit Names”, this will
download an .apk le that can
be installed to most modern
Android mobile phones.
The application Barcode Scanner
can then be opened on the
phone and the MAC address
of the module can be entered
either by scanning the QR code
or entering via the phones
keyboard.
The device name can then either
be scanned, if the modules
location has a barcode, or
entered manually using the
phones keyboard.
The information can then be
sent via the phone to our secure
server (the phone must have
internet access) and the MAC
address of the unit will appear
with it’s friendly name on the
dashboard.
Once this information has
been completed, the friendly
names can be conrmed via the
dashboard ‘Conrm Unit Names’
page.
Page 12

12
Footprint Dashboard
Help Guide
Control Centre
Total Usage
Administrator Level
This section displays the total usage of all units included in the Footprint system. It shows the
previous 30 days of energy used and the daily highest using zones and groups.
Total Usage Graph
Displays the last 30 days energy usage of
the entire Footprint system.
Total Usage League Tables
Displays the daily highest using Zones
and Groups.
Page 13

13
Footprint Dashboard
Help Guide
Overview
Administrator Level
The overview gives the administrator total control over all unit(s) conrmed on the system.
Unit Name
The friendly name that has
been assigned to the unit.
Total (W)
The complete wattage
used by the module.
Master (W)
Wattage used by the
Master socket only.
Override
Displays the override
status of the unit:
On
Off
Auto
Schedule
Displays the schedule that
is set for the unit.
Threshold
Displays the threshold that
is set for the unit.
Zone
List of the Zones and
ability to set Zone settings.
Group
List of the Group and
ability to set Group
settings.
Sockets
Displays whether the
auxiliary sockets are:
On
Off
Ofine
Trafc Lights
The overview employs trafc lights that simply allows the user to understand what units are on or
off in all Zones/Groups, making it easier for mass management.
Green Light
Indicates all units within
the Zone/Group are ON.
Amber Light
Indicates that units within
the Zone/Group are split
between ON and OFF.
Red Light
Indicates that units within
the Zone/Group are OFF.
Page 14

14
Footprint Dashboard
Help Guide
Zone (See page 22 for Adding a new Zone)
All zones that are created on the Dashboard will appear in this section. When selected all groups
and units in that zone are displayed under the relevant headings.
Group (See page 22 for Adding a new Group)
All Groups under the selected Zone will appear in this section. When selected all units in that Group
are displayed under the relevant headings.
Unit
This section displays all the information regarding the units including:
Name This is the friendly name of the unit
Total (W) Total wattage used by the unit
Master (W) Wattage being used by the master only.
Sockets This displays the status of the auxiliary sockets.
Which will be ON, OFF, or OFFLINE. If Ofine the dashboard is indicating that
the unit is not connected to the Gateway.
Override This indicates that the units override controls are set to On or OFF. If set to
auto this means the unit will follow it’s set schedule or threshold.
Schedule Indicates the schedule that is set for the unit. This may be an individual
schedule or parent schedule
Threshold Indicates the THRESHOLD that is set for the unit. This may be an individual
schedule or parent schedule.
Overview
Administrator Level
Priority of Settings
Units
Unit can have their own individual
threshold and schedules applied.
If the status is ‘N/A’ then no settings
are applied and the unit will just
remain on or off.
If the unit is set to ‘Parent’ then they
will look towards the Group settings
for the information.
Group
If thresholds and schedules are in
place at this level then they will
distribute these settings to any unit
that are set to ‘Parent’
If no settings are found at this level
then unit set to parent will look
towards the Zone settings for the
information.
Zone
If thresholds and schedules are in
place at this level then they will
distribute these settings to any unit
that are set to ‘Parent’
For Zone settings to take affect then
no settings must be set at Group
level.
NOTE: For any threshold or
schedule settings to take affect,
then the units override must be
set to AUTO.
Parents Settings At this point the user has the ability to create parent settings (threshold or
schedule) for all the groups/units assigned to that specic Zone.
Override The override buttons will allow all units to either be turned on, off, or set back
to auto.
Units On or Off The total units that are ON or OFF are displayed.
Re-name Zone The administrator can rename the Zone from this point.
Parents Settings At this point the user has the ability to create parent settings (threshold or
schedule) for all the units assigned to that specic Group.
Override The override buttons will allow all units to either be turned on, off, or set back
to auto.
Units On or Off The total units that are ON or OFF are displayed.
Re-name Zone The administrator can rename the Group from this point.
Zone
Group Group
Unit Unit UnitUnit
Unit Unit UnitUnit
Page 15

15
Footprint Dashboard
Help Guide
Reporting
Administrator/Supervisor Level
Statistics Covers the total usage of all energy that day including kWh, cost, and Co2.
These same statistics are then showing for the three highest using Zones,
and the three highest using Groups.
Graph Displays the energy used (kWh) in the current day. This allows the user to
understand when units are being turned on and see at what time possible
peaks are occurring,
Unit Selection Unit selection allows the Admin/Supervisor to select 3 Zones, 3 Groups, or
3 Units to compare. This information is then presented in the statistics
showing the highest to lowest performers while also being illustrated on the
Graph.
Period To have the information presented for different time scales, the user can
select to have this as a single day, a week, a month, or a year.
Selection
Select from Zones, Groups
or Units.
Graph
Displays the selected
information for energy
used.
Period Selection
Select what period to
generate on the graph.
Comparison
Choose up to three
selections to compare
statistics.
Statistics
Lists the statistics for the
selected factors.
The reporting page allows Administrators and Supervisors to report on Zones/Groups/Units for
any given time period up to a year. This can be set to compare up to 3 different zones/groups/
units to analyse their performance and export as PDF or CSV if necessary.
The reporting page initially lays out the current day’s total usage of all zones.
Page 16

16
Footprint Dashboard
Help Guide
Users
Users section
Administrator Level
On the initial page the Administrator is presented with a list of users already on the system.
Highlighting a user will bring up further information dependant on their access levels:
Administrators - Have complete control and access of the dashboard system.
Supervisors - Are able to edit Viewable Groups and grant access to make changes to
scheduling, thresholds, overriding, and renaming for these specic groups.
Users - Can sign into the dashboard and only able to view their own assigned unit.
Standard edits across all users allow the Admin to change their access level or send a password
re-set.
Users
A list of all users currently
able to access the
dashboard system.
Add Single User
Allows a single user to be
added to the dashboard.
Add Multiple Users
Allows multiple users to be
added to the dashboard.
The Users page allows administrators to add new users and edit existing users.
Access
Shows the access level of
the user.
Page 17

17
Footprint Dashboard
Help Guide
Users
Add Single User
Administrator Level
Add Single User
On this screen, a single user can be added by simply completing the form and typing in the users
email address and setting their access level.
Administrators - Have complete control and access of the dashboard system.
Supervisors - Are able to edit Viewable Groups and grant access to make changes to
scheduling, thresholds, overriding, and renaming for these specic groups.
Users - Can sign into the dashboard and only able to view their own assigned unit.
If the supervisor level is chosen then the administrator is presented with a further choice to grant
them access to changing the settings for their set group.
Once the register user screen has been completed, the recipients of the email address will receive
an acknowledgement and be asked to nish of the registration process by creating their own
password.
Page 18

18
Footprint Dashboard
Help Guide
Add Multiple Users
The dashboard allows you to enter multiple users by simply entering their email or copy and
paste, into the text box. For ease, the administrator can select how this information is entered, by
identifying the formatting style, e.g. new lines, semicolons, or comma’s.
NOTE: When adding multiple users, they must all be assigned to the same access level by
selecting the correct option. Users can later be edited to have their access level change.
Users
Add Multiple Users
Administrator Level
Once the register user screen has been completed, the recipients of the email address will receive
an acknowledgement and be asked to nish of the registration process by creating their own
password.
Page 19

19
Footprint Dashboard
Help Guide
Scheduling
Administrator Level
The schedule page allows schedules to be created or modied. These schedules can then be
assigned to units to instruct them when to turn sockets ON and when to turn sockets OFF.
Prole
Proles are the schedules that have already been created. From this section they can be edited
or deleted, or a fresh prole can be created. When a prole is selected it’s detailed schedule is
displayed.
Events
This table presents the Day, Event Date/Time, Action, Frequency, and Event Name:
When the Administrator adds an event they rst have to select the Event Start, which is selected
by clicking on the date box. This brings up a calendar allowing the Administrator to select a date.
Once selected, the drop down menus allow a time to be assigned,set the unit on/off, and the
frequency of this event to occur.
Frequency
This is how often the set event is to be repeated and can be selected from Hourly, Daily, Weekly,
Monthly, or Yearly. Before adding an event, the Administrator may give an unique name for
reference.
NOTE: The server time is displayed on this page and may differ from your computer time slightly.
Please take this into account when settings schedules.
See also: Unit Settings; Schedules
Proles
Lists the prole of
schedules that have been
created.
Events
Shows the events assigned
to the selected prole.
Server Time
This is the server time,
take note when creating
events.
Page 20

20
Footprint Dashboard
Help Guide
The options allow the Administrator to alter general settings, edit, or register and add new
gateways, or unlock and lock the system.
Options
Administrator Level
Name
The name assigned to the
Gateway unit.
Gateway Address
The address that is found
on the gateway.
Online Status
Indicating that the unit is
connected to the server
or not.
Gateway Locked
Indicates that the Gateway
is locked or unlocked.
Units Online
Shows the units that are
online and connected to
the Gateway.
Gateway Address & Pin
These details can be found on
the Gateway unit itself.
Locking and Unlocking
In order to add new modules to the system the Gateway must be unlocked. When unlocked the
Gateway will allow new modules to connect to it.
Once the administrator is satised all new modules are connected, then they must lock the system
to assign these modules to that specic Gateway.
If modules in the vicinity are already locked down to another Gateway, then these modules will not
be displayed.
By default, Gateways are shipped unlocked.
Adding New Units
Locking and Unlocking the Gateway
may take several minutes to update and
access new units.
Page 21

21
Footprint Dashboard
Help Guide
The general settings are important to ensure that any reports generated by the dashboard uses
the correct variables.
Options
Administrator Level
Currency
Input the currency.
Energy Rate
Input the energy rate.
Energy Rate
The energy rate is per kwh is entered per decimal point. e.g. 10p would be entered as 0.10.
Once the currency is entered, all data generated from that point will be worked out to the set
currency rate.
Timezone
Select the timezone to ensure schedules operate at the correct times.
Country
Choose your country where the Footprint system is located, to aid with calculating the CO2 values.
Licensing
On the settings page, the remaining term of the Dashboard licence is displayed. When the expiry
date is met, and the licence has not been renewed, access to the Dashboard will no longer be
possible.
In this event the Footprint units will continue to operate as standard power modules.
Timezone
Select the timezone.
Country
Select country
Licensing
Time left on Dashboard
license.
Page 22

22
Footprint Dashboard
Help Guide
Adding to Footprint
Administrator Level
Adding A New Zone
The rst step towards segregating units is to create a new Zone. Once a Zone has been created,
Groups can be added to the Zone.
In some cases there may be no need for multiple Zones, although larger organisations may wish
to use this feature to help manage all their units. For example:
• GroundFloor
• FirstFloor
• NorthBuilding
• HeadOfce
A new Group is generated automatically when a Zone is created. The name and settings of this
Group can be changed from the Overview page. (See page 14)
At this stage the admin can give the Zone a unique name, and choose to either set a Threshold or
Schedule.
Adding A New Group
Once a Zone is setup, the Administrator can look to create and edit groups. For example:
• Reception
• Accounts
• ITHelpdesk
• Sales
Select the Zone you wish to add your group to and choose whether you want to inherit the Zones
settings or set your own.
At this stage the Administrator can give the Group a unique name, and choose to either set a
Threshold or Schedule or inherit this from the parent Zone.
Adding A New User
Setting new users can be done at any time. For more information on this process see page 14.
Here, the admin is able to add a new zone, group or user to the Footprint set up.
Page 23

23
Footprint Dashboard
Help Guide
Unit Settings
Administrator/Supervisor Level
Settings
From here the Admin/Supervisor can give the selected unit a friendly name or rename it. Settings
can also change the zone/group that the unit belongs to and the associated user.
The unit setting buttons are functional when a unit is highlighted in either the control centre or
overview menu.
Page 24

24
Footprint Dashboard
Help Guide
Setting Threshold
Administrator/Supervisor Level
When editing the unit’s threshold, the Admin/supervisor can also choose to inherit the Threshold
(along with Schedule) from the Group it is in. If the group settings are set to default, then the Zone
settings will take effect.
For threshold to function once it has been set, the units override status must be set to AUTO.
If threshold is set alongside a schedule, they will work in tandem with each other.
Threshold is the set-point (in watts), above which the auxiliary sockets will be switched on and
below which the auxiliary sockets will be switched off.
Page 25

25
Footprint Dashboard
Help Guide
Setting Schedules
Administrator/Supervisor Level
When editing the modules Schedule, the Admin/supervisor can also choose to inherit the Schedule
(along with Threshold) from the Group it is in. If the group settings are set to default, then the Zone
settings will take effect.
For schedule to function once it has been set, the modules override status must be set to AUTO.
If schedule is set alongside a threshold, they will work in tandem with each other.
Choosing schedule allows the Administrator/Supervisor to select what schedule prole to assign
to the unit.
Page 26

26
Footprint Dashboard
Help Guide
Flash ID
Administrator/Supervisor Level
Flash for ID aids with nding which power module is selected.
When ‘On’ is highlighted, the Unit’s Green LED will ash rapidly to aid in module identication.
After 15 minutes the modules LED will return to normal operation.
LED
Page 27

27
Footprint Dashboard
Help Guide
Commissioning
Administrator/Supervisor Level
When this icon is selected power readings are taken which aids selecting a suitable threshold
setting. By being able to see the different power consumption when the PC is in normal operation
or off/standby a threshold can be ascertained.
Due to the amount of data, only 1 module may be commissioned at a time. As soon as you exit this
window the commissioning mode stops.
Page 28

28
Footprint Dashboard
Help Guide
Override Buttons
Administrator/Supervisor Level
The override buttons are available to give the administraot and supervisor manual control of the
units at all time.
ON – This icon will immediately set the unit auxiliary sockets to power on, ignoring any set threshold
or schedules.
OFF - The icon will immediately set the unit auxiliary sockets to power off, ignoring any set threshold
or schedules.
AUTO – The icon will immediately set the unit as AUTO. This will return the unit to its set schedule
or threshold routine.
On the Overview, the Zone and Group can be overridden through the use of their own override
icons. Switching these icons will override all units in this zone or group. For added security, the
admin/supervisor will have to enter their password for conrmation.
Page 29

29
Footprint Dashboard
Help Guide
FAQ
What is the likely Payback? & CO2 Savings?
Smart metering is an effective way to save energy and cut costs but every
situation is different so there are no set answers to this question all we can
offer is typically scenarios. Our built in smart meter is extremely effective for
remotely monitoring & scheduling desk power energy, therefore an essential
tool for Facility Managers, Energy Managers, IT Managers & energy conscious
individuals to actively encourage an energy saving culture.
With regards to CO2 savings – the graphical information which can be displayed
on the online dashboard can be changed to display CO2 savings.
How does smart metering work?
The smart meter accurately measures the amount of energy used by the module
and the data is sent back to our servers via the internet from our gateway and
our zigbee network.
Who can benet from smart meters?
Smart metering can benet any business or organisation that is looking to
reduce energy usage and thereby reduce their carbon footprint and need the
tools to be able to do this.
Is CMD Footprint BS6396 compliant?
BS6396:2008 Electrical systems in ofce furniture and educational furniture is
a specication which states the maximum conguration of sockets, how the
cable is run, supported and how the installation should be tested. Our modules
are built so they can be tted as part of a BS6396 installation.
What is the typical cost of Footprint?
The exibility of the Footprint System design is that you can make it your own
by selecting the angle of sockets, number of sockets (you can have more than
1 master socket if required), whether you require data, etc. However, there
are other costs to consider as this is a complete system rather than a ‘one-off’
power unit. Get in touch to design and cost a footprint system that meets your
requirements.
Any additional equipment required?
Gateways must be plugged into your network allowing access to the web and
the CMD Footprint Dashboard. The Footprint system is exible for future use
and can be added to at anytime.
Can units be grouped into logical groups?
Any units that are detected on the network but which have not been added
to a logical group or zone are displayed in an an unassigned group. From here,
units can be organised into groups via the unit settings function.
Page 30

30
Footprint Dashboard
Help Guide
FAQ
What is ZigBee?
Zigbee is another name for the IEEE 802.15.4 standard for an extremely low
power, and low bit rate wireless personal area network technology, it is designed
for wireless automation and other lower data tasks, such as smart metering.
Is software required on local computers?
No dedicated software is required but a web browser and internet connection
is required to view the online Dashboard.
Can modules be given Friendly Names?
Units can be given friendly names on set up through our QR Code App. The
QR Code App scans the code on the module, allows the user to enter a friendly
name, and then save. When the user logs into the dashboard, the unit will be
displayed as the friendly name, rather than the Mac address.
The QR Code App is only available for Andriod.
Alternatively, admin will be able to give units friendly names via editing the
settings of a unit on the dashboard.
What information does the user see?
Administrators have the ability to see all information that is being monitored by
the Footprint setup. The access to this information will vary dependant on the
access level a user is given.
Are league tables of users and groups available?
The Dashboard has league tables of the highest zones and groups, allowing the
Administrator to focus and understand the highest energy users. Users will be
able to see how they compare to other users on the system.
What happens if network connection lost?
If network connection is lost, the module continues to measure power
consumption and will update the Dashboard accordingly once connection is
restored.
However, during downtime the modules will default to ON.
What is the commissioning mode?
In commissioning mode power readings are taken more frequently to allow the
user to determine a suitable threshold.
What is the range of the module?
This may vary on the structure of the building and how easy a wireless
transmission can pass. However, typically the range is approximately 20metres
Page 31

31
Footprint Dashboard
Help Guide
between modules, and due to Zigbee mesh technology the units are not limited
to only one path, and will nd the best path to connect to the Gateway.
Is the information real time?
The information is recorded in real time; and will update on the Dashboard
every 2 minutes.
What reports are available?
The Footprint Dashboard allows the Administrator to generate reports on all
zones, groups and units. Reports can then be downloaded and printed as PDF
or CSV format.
Can the Master socket be switched off?
The module could be congured with a Manual switch before the master socket
but the Master Socket cannot be switched off by the dashboard.
How long is data stored for?
Data is stored for is at 1 year unless the optional data extra is purchased, and
then data is stored for up to 3 years maximum.
Who to contact for Tech Support?
If you have any difculaties we recommend you rst check the Help Guide. If
you are unable to nd a solution then please contact our dedicated support line
on: +44 01332 604010 or email support@cmdfootprint.co.uk.
What is warranty period?
All Gateway and Units are covered by our standard 1 year warranty policy.
Can units be conned to communicating with a specic Gateway?
Units can be locked down to a specic gateway, but will still use all gateways
available to nd the best connection route.
Can units use a backup / redundant Gateway?
Yes if required. Modules will jump to use any available Gateway which has the
same PAN ID.
Can a Gateway communicate via GPRS?
Yes, with a GPRS modem with Ethernet connection. However, we do not
recommend using this method.
Can I override the module manually?
The Dashboard grants the administrator the ability to override any module by
FAQ
Page 32

32
Footprint Dashboard
Help Guide
either turning it on or off. The module can be returned to its default schedule
at the click of a button.
Can I tell who / when settings were changed?
There is no log that the Administrator can access to see who has made the
changes. Please be responsible with who you give access to the Dashboard,
and at what level.
How do I renew my subscription?
You can renew your system via the Dashboard on the accounts setting page.
This is available to Administrators of the Dashboard when their license is due
to expire.
What happens to my module / data if I don't renew my subscription?
The power modules will default to ON. However, the user will no longer be able
to control, monitor, or schedule energy usage and will have no access to the
online Dashboard.
FAQ
Page 33

33
Footprint Dashboard
Help Guide
Hosted Systems - CMD
The CMD hosted system provides a secure and reliable platform for a wide
range of business applications. The systems are hosted in a UK based data
centre which offers the security and environment needed to offer this level of
service.
• UKbaseddatacentres
• Fullyresilienthighspeedinternetlinksand99.99%networkuptime
• UPSandgeneratorpowerbackupinthecaseofpowerfailure
providing99.99%poweravailability.
• Firesuppressionsystem
• Fullyclimatecontrolledenvironment
• Restrictedandcontrolledphysicalaccess
• 24*7securityandCCTV
Adding to the features already available within the Data Centre, CMD provides
an additional level of service on top including:
• 24*7serverhealthmonitoringforhostingplatform
• Offsitebackupofalldataataminimumof4hourintervals
• Antivirusandrewallpoliciesinplace
• Restrictedaccessforservermanagement
• SSLbasedsecurelinksfornetworktrafc
• Ofcehoursbasedsystemsupport
For applications where data is sent to and from the server, for either data
collection or browsing the customised webpages, SSL (secure socket layer)
security is implemented as standard. This uses the same encryption and security
methods as you nd with online shopping.
Page 34

34
Footprint Dashboard
Help Guide
Monitoring
All aspects of the hosted server platform are monitoring from the hardware to
the server applications. This allows quick notication and resolutions in the
unlikely event of a problem occurring.
For critical systems the monitoring can be extended to cover onsite aspects of
the system to provide a complete monitoring package.
Advantages of Hosted System
Hosted systems offer a range of benets including:
• Allservermanagementhandled
• Servermaintainedinasecureandsuitableenvironment
• Nolargeinitialexpensetopurchaseserverhardwareandlicenses
• Accessyourwebsystemfromanyinternetconnection.
• Dataredundancy–alldatabackedupoffsiteatregularintervals.
Page 35

35
Footprint Dashboard
Help Guide
Are the connections secure?
Yes. All messages from devices, equipment or web browsers use SSL certicates
to encrypt the information that is passed.
The SSL certicate provides encryption between the web browser or device
and the host server platform and implements 128 bit AES/TLS encryption for
all trafc.
What security is available within the web applications?
All web based applications require an individual username and password
to access your systems. Each system that is implemented provides an
administration account, which allows you to be in control of who has access.
As the administrator for your account, you add and remove people plus control
their access levels as needed. This management is available through the web
interface.
Can I connect equipment if I do not want it on our main corporate
network?
Devices like the Gateway and other equipment can be connected to standard
ADSL line to provide additional segregation. Users can then access the
information using a web browser from your normal network.
What support is available?
Email based support is available through support@cmdfootprint.co.uk
How often is the data backed up?
The normal backup on our standard hosting platform is every 4 hours and
backups are made to an offsite location.
What equipment is used for the hosting?
The server solution we use is based on dedicated physical servers. The day to
day management and conguration is handled by CMD appointment agents
and management access is restricted to their engineers. The platform in use is
reviewed on a regular basis to make sure is always suitable for systems we are
running.
Frequently Asked Questions
Page 36

36
Footprint Dashboard
Help Guide
Equipment can be connected in different ways to the internet, either through
the corporate network or separated. By using the hosted platform you can
access the applications from any web browser or mobile device.
Gateways can be connected to the hosted system by using either a direction
connection or through a special proxy service. The proxy server will connect
to all of the gateways on your network and then pass the network trafc to
the hosted server using https. The service can be installed onto any Windows
computer on your network.
Some customers prefer to separate equipment and the following identies
different ways his can be achieved.
Single Network
Both equipment and users are connected to the main corporate network
Network Options
Page 37

37
Footprint Dashboard
Help Guide
Separate network
In some cases a separate network is used to isolate the equipment, with the user
accessing the web client through the web browsers on the normal computers.
This 2nd network would then be connected to the internet using a standard
ADSL or similar connection.
Network Options
VLAN
In a similar way to the isolated network, a VLAN or DMZ could be used to
provide separation. This allows the main corporate internet connection to be
used, but provided the separation that some customer may prefer.
Page 38

38
Footprint Dashboard
Help Guide
HEAD OFFICE PRESTON OFFICE LONDON SHOWROOM
CMD Ltd
Sycamore Road
Eastwood Trading
Estate
Rotherham S65 1EN
CMD Ltd
Brockholes Way
Claughton-On-Brock
Preston
PR3 0PZ
CMD Ltd
99 Charterhouse Street
Clerkenwell
London
EC1M 6HR
T: 01709 829 511 T: 01995 640 844 T: 020 7251 7080
F: 01709 378 380 F: 01995 640 798 F: 020 7251 7088
E: enquiries@cmd-ltd.com
for tech support contact:
+44 01332 604010
support@cmdfootprint.co.uk
 Loading...