

CM3-Computer Car Key Ring HD Spy Camera, 808, CK201, CK202, CK203 Operating Instructions Manual
...Page 1

1
CM3−Computer oHG
Schinderstr. 7
84030 Ergolding
Operating Instructions
Car Key Ring HD Spy Camera
Intended Use
This device is intended to make video recordings with sound, take
photographs and exchange data via microSD cards.
Customers are obliged to inform themselves of any applicable, legally
binding regulations and requirements in respect of the device before
actually using the device. Any unintended use of the device or unauthorised modifications to it absolves CM3−Computer oHG from all obligations in the event of damage.
Package Contents
− Car key ring HD spy camera − microSD card (option)
− USB cable − Operating instructions
− Driver CD
Please check the package contents are complete. If anything is
missing or has been damaged during transport, DO NOT put the
device to use! Contact your sales outlet with the purchase receipt to
hand.
Important Information
To ensure trouble−free operation, a microSD card must be plugged in.
Page 2
2
Operating Elements
8
9
2
3
1
4
6
5
7
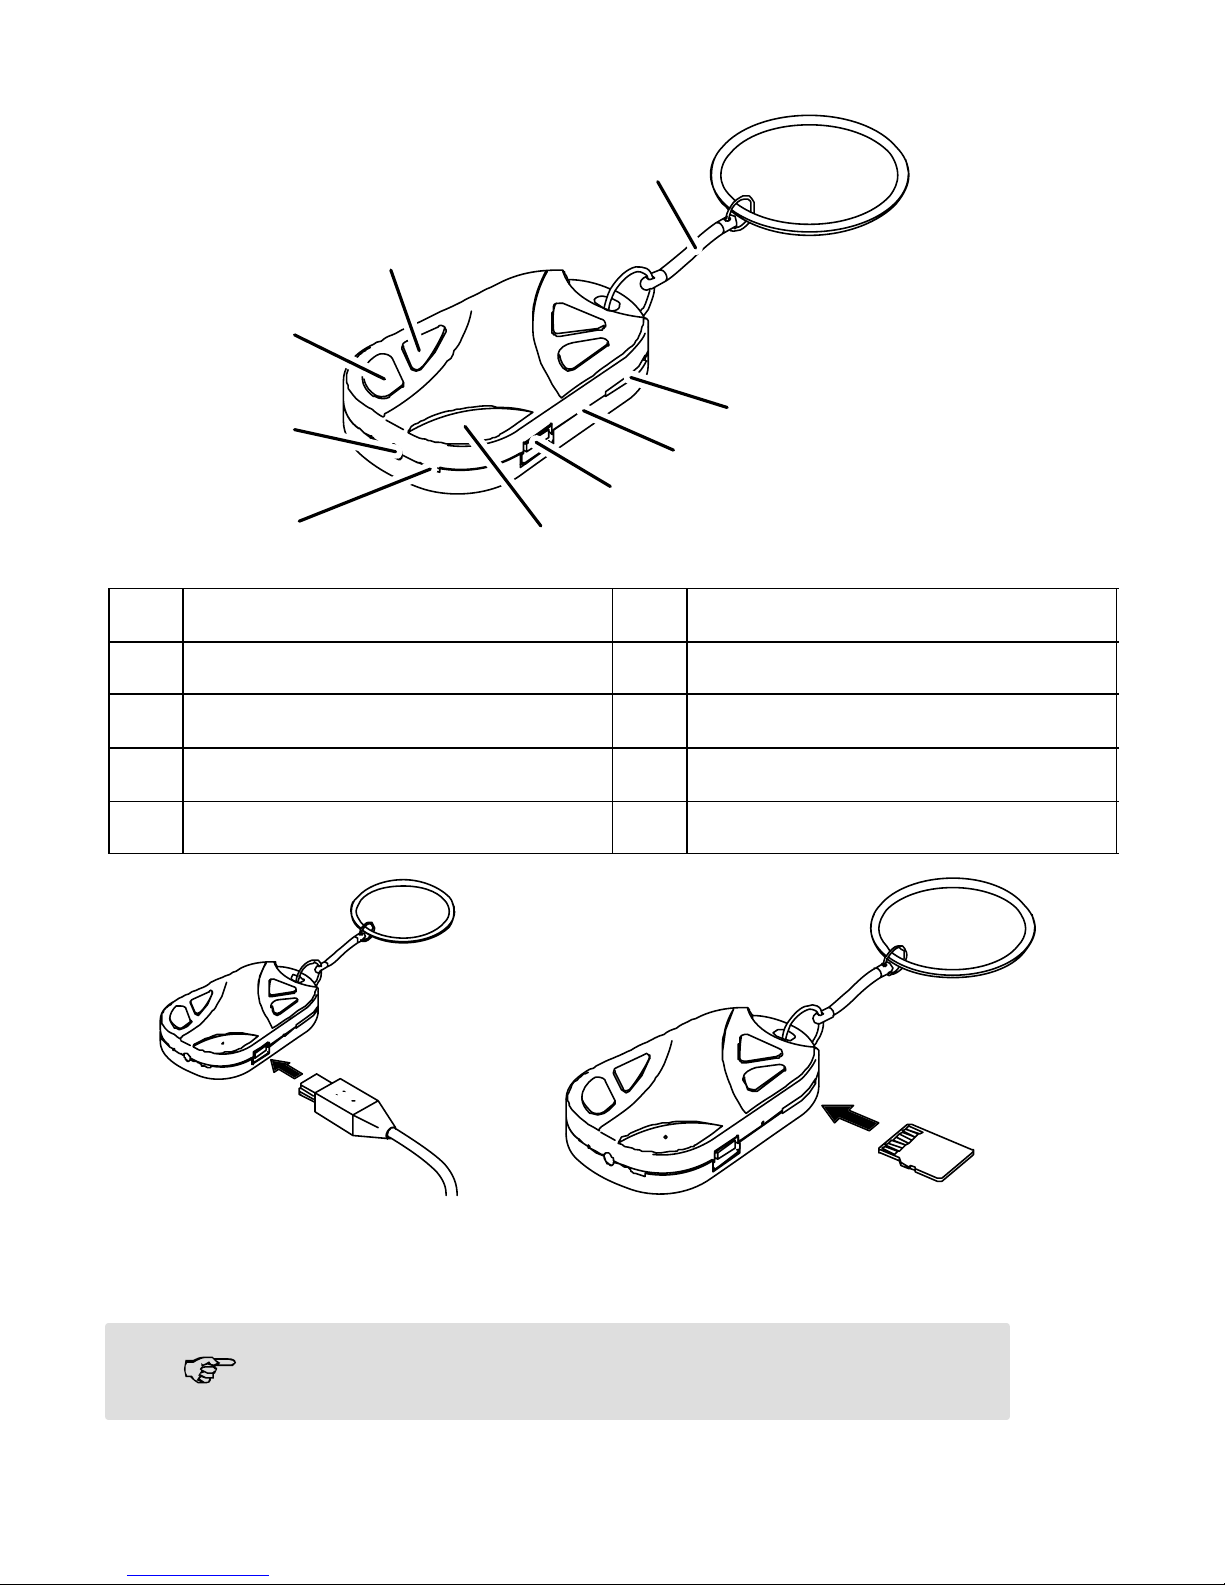
1 Function button 6 USB port
2 On/Off button 7 Status LED
3 Ring chain 8 Microphone
4 microSD card slot 9 Camera lens
5 Reset button
Fig. 1
Fig. 2
Charging the Battery
Always charge the battery fully before using the
device for the first time.
1. Connect the computer to the device by means of the USB cable
(Fig. 1) and charge the device for max. 4 hours.
Page 3

3
The yellow Status LED lights up continually during the charging process. The Status LED goes out as soon as the battery is fully charged.
The device is automatically detected by the com-
puter, installed as a removable medium and appears as a drive in the My Computer" folder.
Inserting the SD Card
1. Insert a suitable microSD card in the card slot provided (Fig. 2).
Press the card in until it audibly clicks in place (microSD cards,
refer to Technical Data).
Switching the Device On
1. Press the On/Off button for approx. 2 − 3 seconds until the Status
LED lights up. The device is switched on and ready to operate.
Taking Photos and Recording Videos
Before taking any photos or recording videos,
set the date and time on the device because they
are then displayed as a time stamp (refer to Set-
ting the Date and Time).
Taking Photos
1. Point the Spy Camera towards the subject. Press the Function
button briefly when the device is ready to operate. The Status
LED goes out. When the Status LED lights up again continuously,
the photo has been saved. The device is ready to take the next
photo or record a video.
Recording a Video
1. Point the Spy Camera towards the subject. Press the Function
button for approx. 3 seconds when the device is ready to operate.
The Status LED goes out. Video recording begins immediately.
2. Press the Function button briefly. When the Status LED lights up
again continuously, video recording has stopped and the video
Page 4

4
has been saved. The device is ready to take the next photo or
record a video.
Switching the Device Off
1. When the device is ready to operate, press the On/Off button for
approx. 4 − 5 seconds until the Status LED goes out.
Viewing Photos and Video Recordings
- connect the device, with microSD card plugged in, to a computer
using the USB cable,
or
- remove the microSD card from the device and use another card
reader to read out the data on the microSD card.
Then proceed as with any other removable media in order to view,
copy or delete your recordings.
Status LED
Status
Status
Description
Off
- Device is not ready to operate
- Battery is fully charged
- Video recording in progress
On
- Device is ready to operate
- USB connection exists, battery is being charged
- microSD card is full
Flashing
- Battery must be charged
- Data transfer between computer and device
Automatic Deactivation
When the device is ready to operate but it is not operated for one minute, it switches off automatically to save the battery.
Page 5

5
Reset
If the device does not work properly, press the Reset button (e.g using
a paper clip).
Setting the Date and Time
You need special software to set the date and time. The software and
further information is provided on the Driver CD enclosed with the device or download the driver and information from our web site:
http://www.cm3−computer.com/support−treiber.html
1. Connect the device to a computer with the microSD card plugged
in.
2. Start the software and enter the necessary data. Transfer the
data to the device using the software.
3. Disconnect the device from the computer and then switch the
device on.
The date and time are updated and are subsequently displayed on all
photos and video recordings.
Technical Data
USB port B
Photos with 1280 x 1024 pixel (interpolated from 640 x 480)
Video recordings with 1280 x 960 pixel and 30 frames per second
(interpolated from 640 x 480), incl. audio recordings.
Card reader for microSD cards
Supports microSD cards up to 16 GB
Battery: 3.7 V / 280 mAh
Charging via USB cable
Page 6

6
Disposal
In order to dispose of your device, take it to a collection
point provided by your local public waste authorities (e.g. re-
cycling centre). According to laws on the disposal of electronic and electrical devices, owners are obliged to dispose
of old electronic and electrical devices in a separate
waste container. The adjacent symbol indicates that the
device must not be disposed of in normal domestic waste!
Risks to health and the environment from batteries!
Never open, damage or swallow batteries or
allow them to pollute the environment. They
could contain toxic and ecologically harmful
heavy metals. You are legally obliged to dispose
of power packs and batteries at the point of sale
or in the corresponding containers provided at
collection points by local public waste authorities.
Disposal is free of charge. The above symbols
indicate that the batteries must not be disposed
of in domestic waste and that they must be disposed of at an authorised collection point.
Packaging materials must be disposed of according to
local regulations.
Page 7

7
Guarantee
The terms of guarantee comply with the legal stipulations. The period
for claims under the terms of guarantee is two years. It begins on the
date of supply, i.e. the date on which it was handed over to the customer. In the case of a deficiency in respect of the product, the customer has a right to supplementary performance. If the customer is the
consumer, he can choose between repair of the defect or supply of a
flawless product. We are permitted to refuse the type of supplementary performance selected if it would lead to unreasonable costs and
the other type of supplementary performance would be of no significant disadvantage to the customer. If the customer is a contractor, we
can choose between repair of the defect or supply of a flawless product. Assuming all legal requirements have been fulfilled, the customer
is also entitled to rights of reduction and withdrawal as well as compensation. A manufacturer’s guarantee provided by a manufacturer of
our products remains unaffected.
Page 8

8
 Loading...