


MAINTENANCE AND
c
Dimensions
SERVICE GUIDE
System II Plus 80 and 100
Central Heating
Fanned Flue Boiler
Sizes in mm
Flue types:
C 12 or 42: horizontal
C 32 xx: vertical concentric
C 32 xy: Twin flue
Boiler outer case dimensions :
- Height : 850
- Boiler width : 440 (minimum space required 450)
- Depth : 380
I Safety valve outlet
J Heating flow
K H.W. flow
L Gas supply
N Heating return
Technical data
Heat input C/H & HW System 80 : 11.73 to 28,70 kW
System 100 : 15.43 to 34.50 kW
Heat output C/H & HW System 80 :
System 100 : 12.50 to 28 kW
Max. operating pressure C/H circuit : 2.5 bar
Expansion vessel net capacity :
Expansion vessel initial pressure : 0.7 bar
Nominal gas flow rate at 15°C and 1013 mbar BRITONY System II Plus 80 BRITONY System II Plus 100
-Natural gas ( G 20) at 20 mbar 2.74 m
-Butane gas ( G 30 ) at 28 mbar 2.04 kg/h 0.91 kg/h 2.45 kg/h 1.17 kg/h
-Propane gas ( G 31 ) at 37 mbar 2.00 kg/h 0.89 kg/h 2.42 kg/h 1.15 kg/h
Injectors and gas valves seat diameter
-Blue solenoid restrictor diameter 2.60 mm 1.75 mm 2.90 mm 2.00 mm
-Gas valve restrictor diameter 6.70 mm 4.90 mm
-Manifold injectors (16) 1.23 mm 0.70 mm 1.26 mm 0.76 mm
9.50 to 24 kW
5.4 l
Maximum Minimum Maximum Minimum
power kW power kW power kW power kW
Natural gas
3
/h 1.22 m3/h 3.34 m3/h 1.57 m3/h
BRITONY System II Plus 80
Electrical consumption : 150 w
Voltage : 230 v
Electrical protection index :
Fuses : 2 A and 1.25 A
Gas category : II 2E+ 3+
BRITONY System II Plus 100
Butane or Propane
Natural gas
no restrictor required 6.70 mm
IP24
Butane or Propane

Pump and expanssion vessel characteristics
P
ression disponible
Débit mini (robinets thermostatiques fermés)
Débit
1100
100 200 300
400
500
600
700 800
900
1000
0
1
2
3
4
5
l
/h
2
1
m
CE
bar
0
1
3
4
PUMP HEAD AVAILABLE
Minimum flow rate (with all heating thermostatic valves closed)
mCE
F
low
1 = by-pass closed
2 = by-pass open
Head available / flow
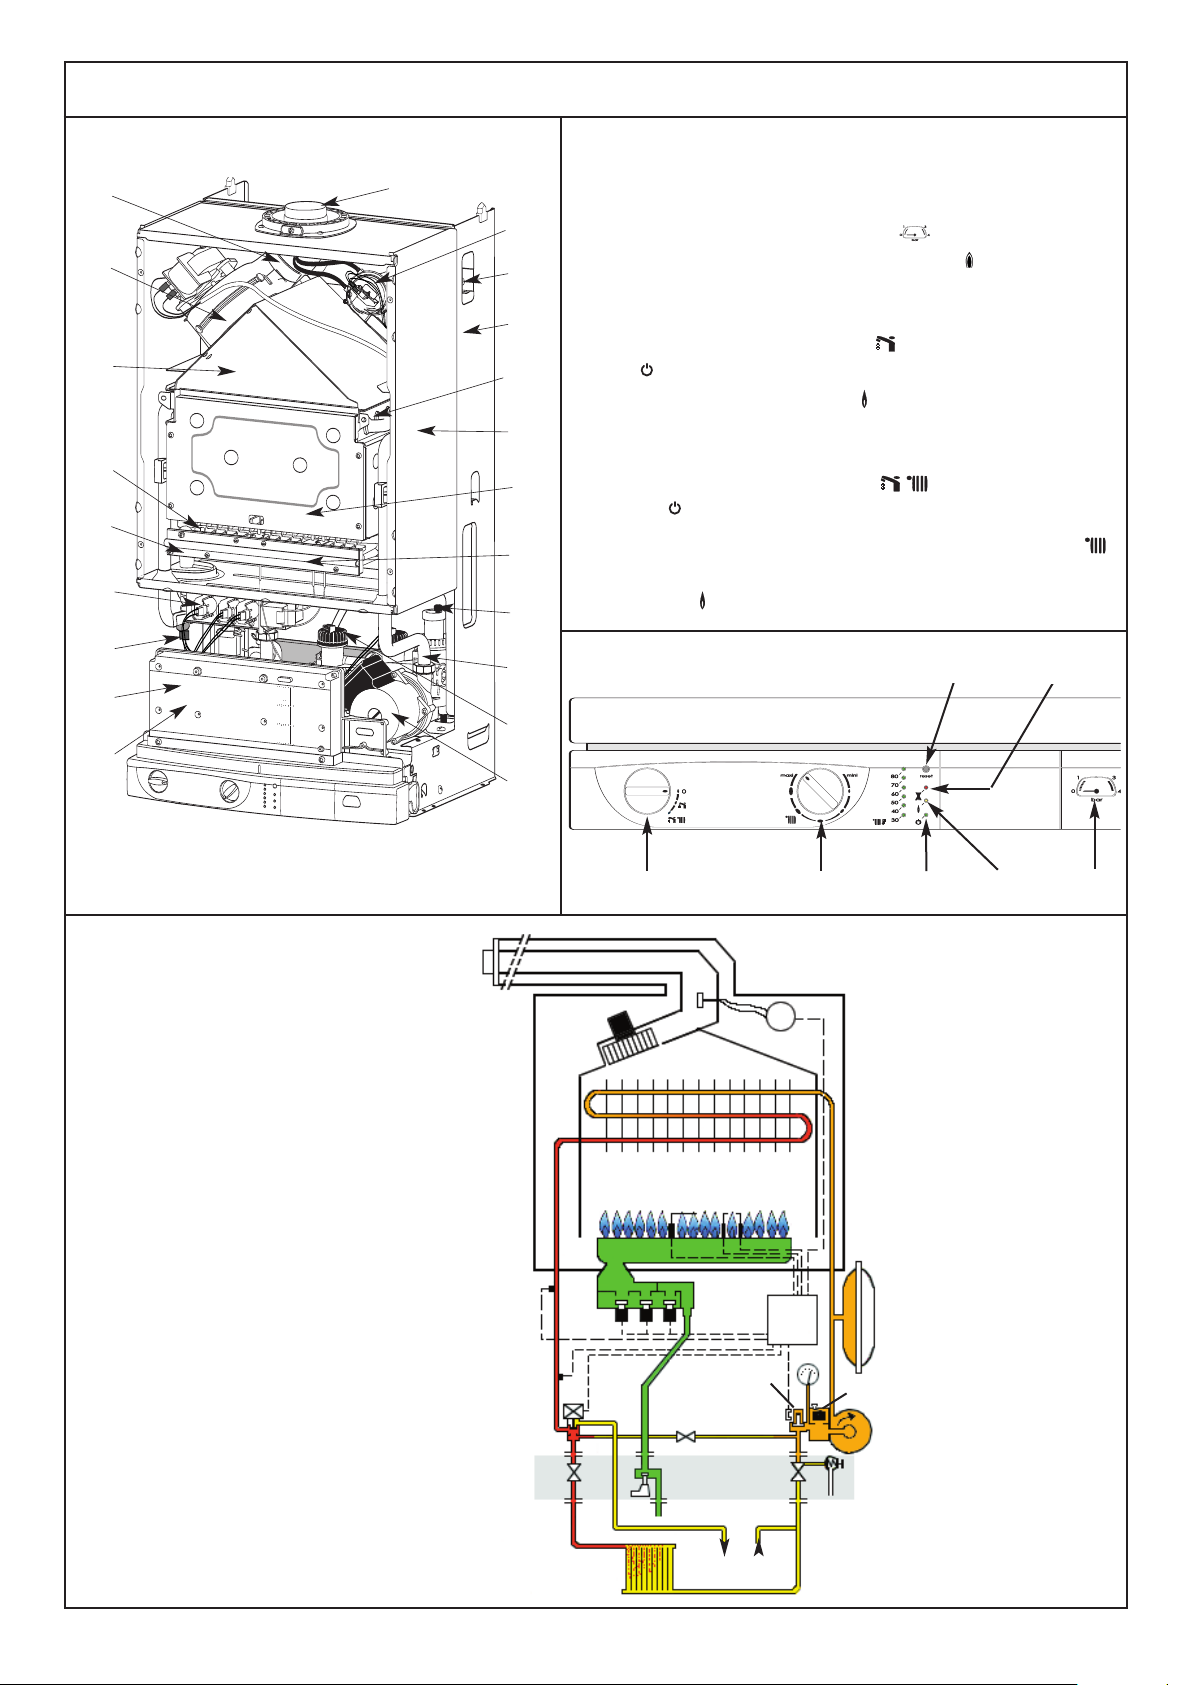
Components location
N
ote : The system initial pressure should be over the following value :
System static height (in metre) + 0.7 = Initial pressure (in bar)
0
1
1. CH Flow isolating valve
2. HW Flow isolating valve
3. Gas service tap
5. CH Return isolating valve
1
7. Pressure relief valve
8. Chassis
9. Connecting tails (x 5)
8
32
9
5
7
10. Steel chassis complete with
expansion vessel
11. Sealed chamber
12. Expansion vessel (not visible)
13. Overheat thermostat
14. Electrical box
15. Two position selector switch
17. Heating flow temperature
adjustment
18. CH pressure gauge
20. Green indicator - Power ON
21. Orange indicator - Burner ON
22. Red indicator - Lock out / fl
failure
23. Reset button
2
ame
24. Multigas burner comprising:
-25. 16 burner head
-26. Manifold
-27. 2 Ignition electrode
-28. Ionization electrode
29. Gas section comprising:
-30. Security valve (grey)
-31. 1/3 gas stage (blue)
-32. 2/3 gas stage (black)
33. Right hydraulic assy
34. Left hydraulic assy
35. Pump
36. Air separator
37. Heating thermistor
39. Combustion chamber made of
aluminium coated steel with 4
ceramic fi
bre panels to insure
heat insulation
40. Copper main exchanger
42. Three way valve
43. Connecting bracket
45. Heating flowstat
46. Flue hood
47. Adjustable by-pass
49. Air Pressure switch
elbow including venturi
°
50. 45
51. Fan
K. Flue kit fixing point (refer to kit
manual)
FUNCTIONING
C
COMPONENTS LOCATION
50
51
46
25
26
29
13
34
14
Switching on
1) Check that the gas service tap is opened at the gasmeter and main
K
power is on.
2) Check that pressure in central heating system is above 0.7 bar and
9
4
12
10
below 2.5 bar with the pressure gauge
y turning from right to left.
) Open the gas tap
3
3 b
4) The boiler is now ready to use.
Hot Water
18.
1) Turn selector switch 15 to position The green "power on" indi-
40
11
3
24
36
33
45
35
9
cator (20) will light.
) The orange "burner on" indicator (21) will light and the cylinder-
2
will be heated.
Heating and Hot Water
1) Turn selector switch 15 to position
The green "power on"
.
indicator will light.(20)
2) If the room thermostat (if fitted), the boiler temperature control
and the clock (if fitted) are all calling for heat, the orange "burner
on" indicator will light and the heating will be on.
Control panel
23
22
BRITONY System II plus
FUNCTIONAL DIAGRAM
15
51
24
13
32 30
31
37
42
1
3
2
50
49
40
39
28
27
29
14
45
47
5
36
7
43
2017
12
35
21
18
Heating mode
storage
tank
3

When there is a need for hot water tank
eheating while the heating is on. The
r
heating will be interrupted momentarily
hile tank is reheated. The boiler will
w
switch back automatically to heating
hen the tank is at temperature.
w
Note: If the boiler has been turned off for
some time the first attempt to light it may
esult in a lockout .
r
press the reset button 23 and the boiler
will light.
Domestic Hot Water Mode
To be able to supply hot water, the selector switch 15 must be in either on or
position. This will be confirmed
by the green indicator light
hen the aquastat of the tank is on, it
W
activates the DHW flow switch
allow the 3 way valve
HW position. The pump can now circulate primary water heated by the main
heat exchanger through the tank heat
exchanger.
The first stage solenoid
security solenoid
to allow gas to the burner. The ignition
sequence begins and a continuous high
speed spark ignites the gas. As soon as
a flame is detected the orange indicator
bulb
solenoid
gas rate. If a flame is not detected, after
8 seconds, the security solenoid closes
and shuts off the gas. The red lockout
indicator bulb
flow temperature is controlled by the
central heating control thermistor
When the tank is at temperature, the
21 will light and the second stage
32 (black) opens to allow the full
30 (grey) open together
22 will light. The water
If this happens
22.
20
44 and
42 to move to the
31 (blue) and
37.
burner is extinguished and the pump
stops. The boiler will now stay in the hot
ater mode for three minutes.
w
riority will be given to a demand for hot
P
water tank reheating. This will interrupt
the central heating for the duration of hot
water tank reheating.
Central Heating Mode
o be able to supply heating, the selector
T
switch
15 must be on position.
This will be confirmed by the green indicator light
hen there is a demand for heating
W
(either from the room thermostat or the
lock) the pump starts. If the boiler tem-
c
perature control is calling for heat and
primary flow rate over 4 ltr/min, the central heating flow switch operates allowing
the ignition sequence to begin. The first
stage solenoid
solenoid
gas to the burner. The ignition sequence
begins and a continuous high speed
spark ignites the gas. As soon as a fl
is detected the orange indicator bulb
21 will light. After 45 seconds the second
stage solenoid
the full gas rate. If a flame is not detected, after 8 seconds, the security solenoid
closes and shuts off the gas. The red
lockout indicator bulb
The central heating flow temperature is
controlled by the central heating control
thermistor 37. The boiler has been
designed to minimise cycling and will not
attempt to relight for at least 3 minutes
20.
31 (blue) and security
30 (grey) open together to allow
ame
32 (black) opens to allow
22 will light.
after the boiler thermostat has been satisfied. When the room thermostat is sat-
sfied the burner will switch off and the
i
pump will remain running for a further 3
minutes before it too stops.
NB
It is possible to override the 3 minute
elay by pressing the RESET button
d
23.
Lock out procedure
Flame disappearance :
hen the ionisation electrode 28does
W
not detect flame presence. The orange
indicator lamp
ycle starts. If a flame is not detected
c
before 8 seconds, the grey security solenoid
30 and the blue 1/3 solenoid 31will
lose. The lock out red indicator
c
lights, the pump 35 runs and the 3 way
valve
42 stays in its position.
After a few seconds, it will become possible to reset the boiler by pressing the
reset button 23.
Overheat detection :
If an overheat is detected by the sensor
13, the grey security solenoid 30 and the
blue 1/3
21 extinguishes. The ignitor is
lamp
energised for 8 seconds and the red
lockout indicator
cannot relight the boiler will go to lockout.
21 extinguishes. A lighting
2
31 closes, the orange indicator
22 ligths. If the burner
2
WIRING
DIAGRAM
4
Plug for main power and Room
thermostat connection
2 3
1
1. Neutral
2. Phase
3. Room thermostat live
4. Accelerator resistor
5. Common for Accelerator and room
thermostat.
4
5
 Loading...