

Club 3D CSV-3242HD operation manual
!
USB 3.0 Dual Display Docking Station
CSV-3242HD

Table of Contents
SAFETY INSTRUCTIONS 1
COPYRIGHT 1
TRADEMARKS 1
INTRODUCTION 2
FEATURES 3
PACKAGE CONTENTS 3
SYSTEM REQUIREMENTS 4
PRODUCT OVERVIEW 5
FRONT 5
REAR 8
INSTALLATION 10
DISPLAY CONFIGURATION 19
DESCRIPTION OF THE SETTINGS 20
EXTENDED MODE 25
CURSOR DISAPPEARED 25
VIDEO PLAYBACK IN EXTENDED MODE 26
MIRROR MODE 26
BE THE PRIMARY MONITOR 27
WINDOWS SHORTCUT 27
AUDIO CONFIGURATION 29
"

UNINSTALL THE DRIVER 30
SPECIFICATION 32
REGULATORY COMPLIANCE 34
FCC CONDITIONS 34
CE 34
WEEE INFORMATION 34!

Before attempting to connect, operate or adjust this product,
please save and read the User's Manual completely. The style
of the product shown in this User's Manual may be different
from the actual unit due to various models.
Safety Instructions
Always read the safety instructions carefully:
■ Keep this User’s Manual for future reference
■ Keep this equipment away from humidity
■ If any of the following situation arises, get the equipment
checked by a service technician:
• The equipment has been exposed to moisture.
• The equipment has been dropped and damaged.
• The equipment has obvious sign of breakage.
• The equipment has not been working well or cannot get it
to work according to the User’s Manual.
Copyright
This document contains proprietary information protected by
copyright. All right are reserved. No part of this manual may be
reproduced by any mechanical, electronic or other means, in
any form, without prior written permission of the manufacturer.
Trademarks
All trademarks and registered trademarks are the property of
their respective owners or companies.!
Page of 1 5

Introduction
The USB 3.0 Dual Display Docking Station is designed
for extra connectivity demands. With the docking station,
you can extend the connection of a computer to more USB
peripherals, Ethernet network, the speaker and the
microphone through one single USB cable.
"
With the built-in USB 3.0 ports, the docking station enables
you to enjoy the super speed data transmission between
USB peripherals. Aside from USB 3.0, this product is
compliant with USB 1.1/2.0 specification. You will be able to
keep and use your USB 1.1/2.0 devices as usual.
In addition, the docking station is equipped with video
output.
"
With the DVI and HDMI ports (HDMI only available
for Dual Display Model), you can mirror your primary screen,
or extend the Window desktop allowing visibility of more
applications at the same time. Enhanced expansion
capability plus the stylish appearance, this docking station
with video is the most versatile accessory that also
complements your home or office space.
"
Incorporates HDMI® technology.!
Page of 2 5

Features
■ Compatible with USB 3.0/2.0 specification
■ Resolution up to 2048x1152
■ Support audio 2.1 channel
■ Support Gigabit Ethernet
■ Support HDMI (Dual Display Model only)
■ Support BC1.2 charging (Front x1)
Package Contents
■ Docking Station x1
■ USB 3.0 Cable x1
■ Power Adapter x1
■ CD (Driver and User’s Manual) x1!
Page of 3 5

System Requirements
The minimum requirements for the PC are:
■ CPU: 1.6GHz single core or higher processor clock.
- Intel Pentium/Celeron family
- AMD K6/Athlon/Duron family, or compatible
processor
■ RAM: 1GB or above
■ USB port: 2.0/3.0
■ 30MB of available disk space
■ Operating Systems:
- Microsoft: Windows®7/ Windows®8/ Windows®8.1
- Apple: Mac® OS 10.9
To play DVD on the extra connected monitor through
docking station, in addition to the requirements above,
the following requirements should also be met:
■ With dual core CPU at 2.0 GHz processor clock!
Page of 4 5
Product Overview
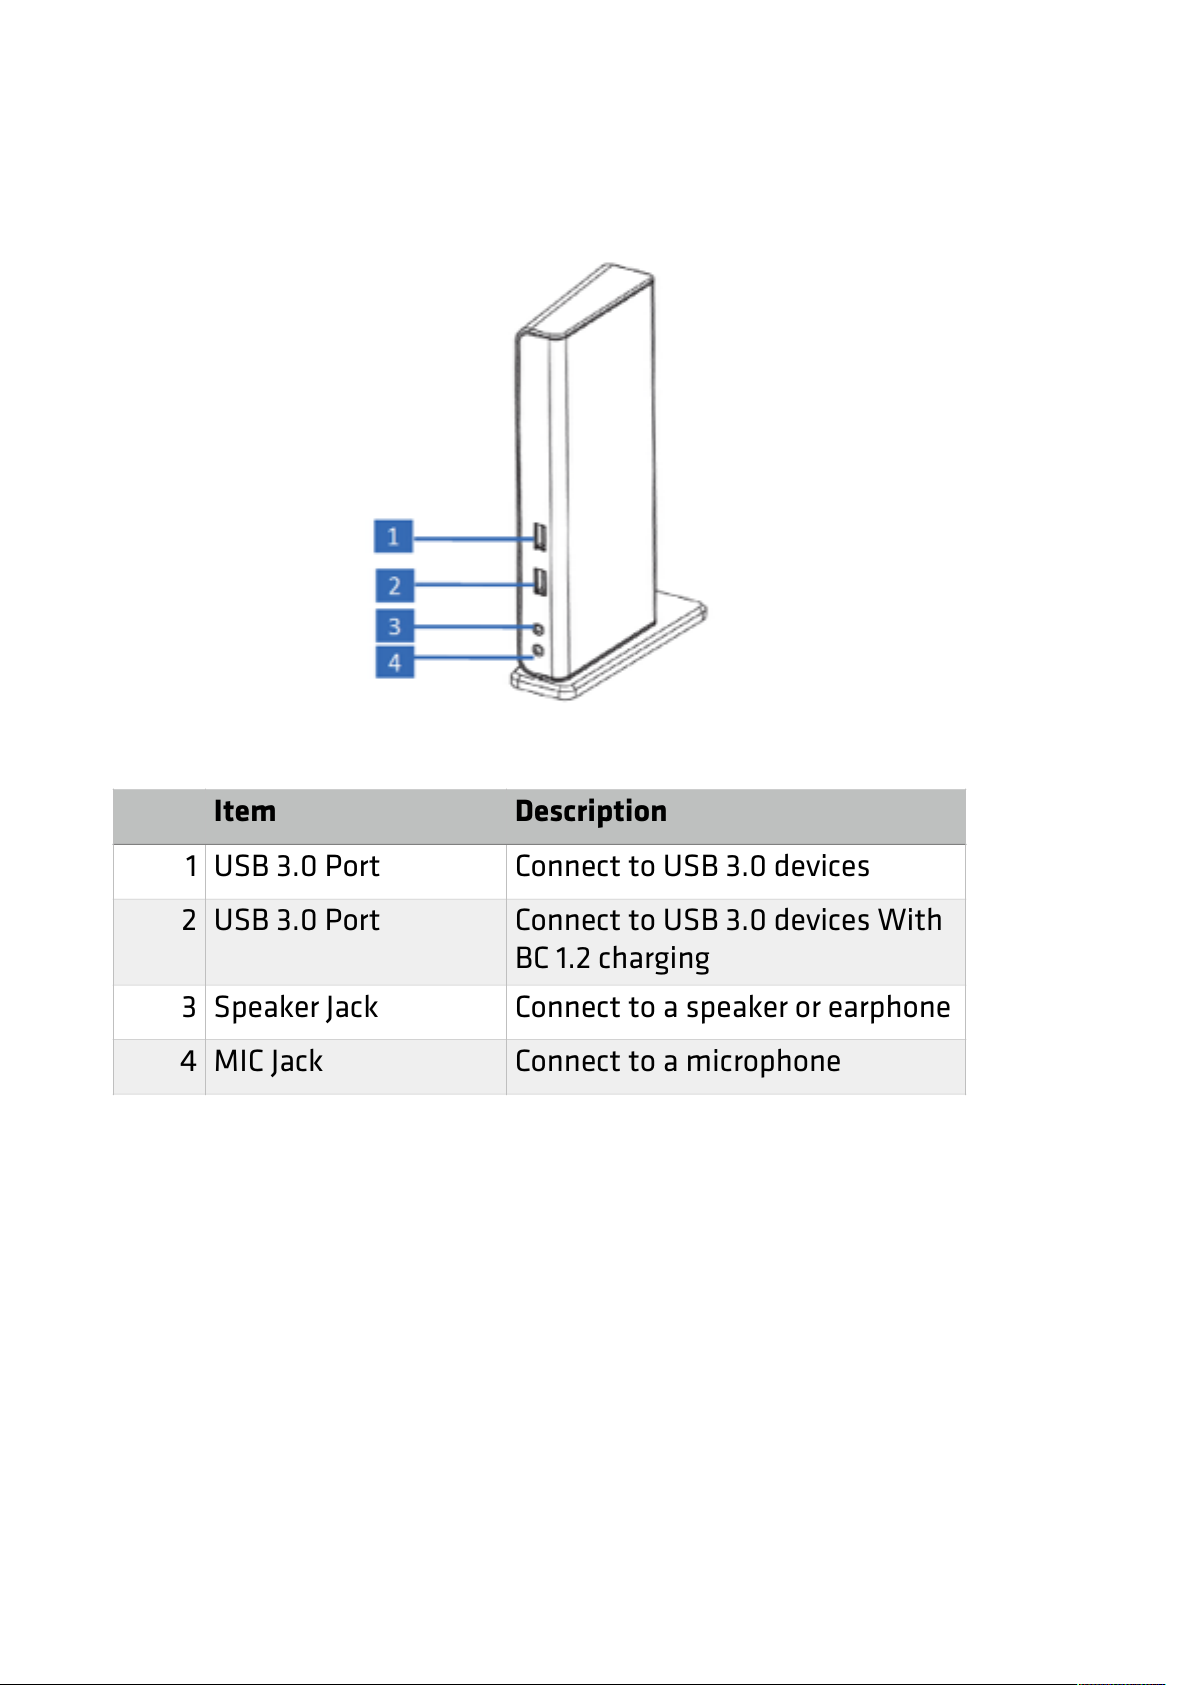
Front
"
Item
Description
1
USB 3.0 Port
Connect to USB 3.0 devices
2
USB 3.0 Port
Connect to USB 3.0 devices With
BC 1.2 charging
3
Speaker Jack
Connect to a speaker or earphone
4
MIC Jack
Connect to a microphone
Page of 5 5
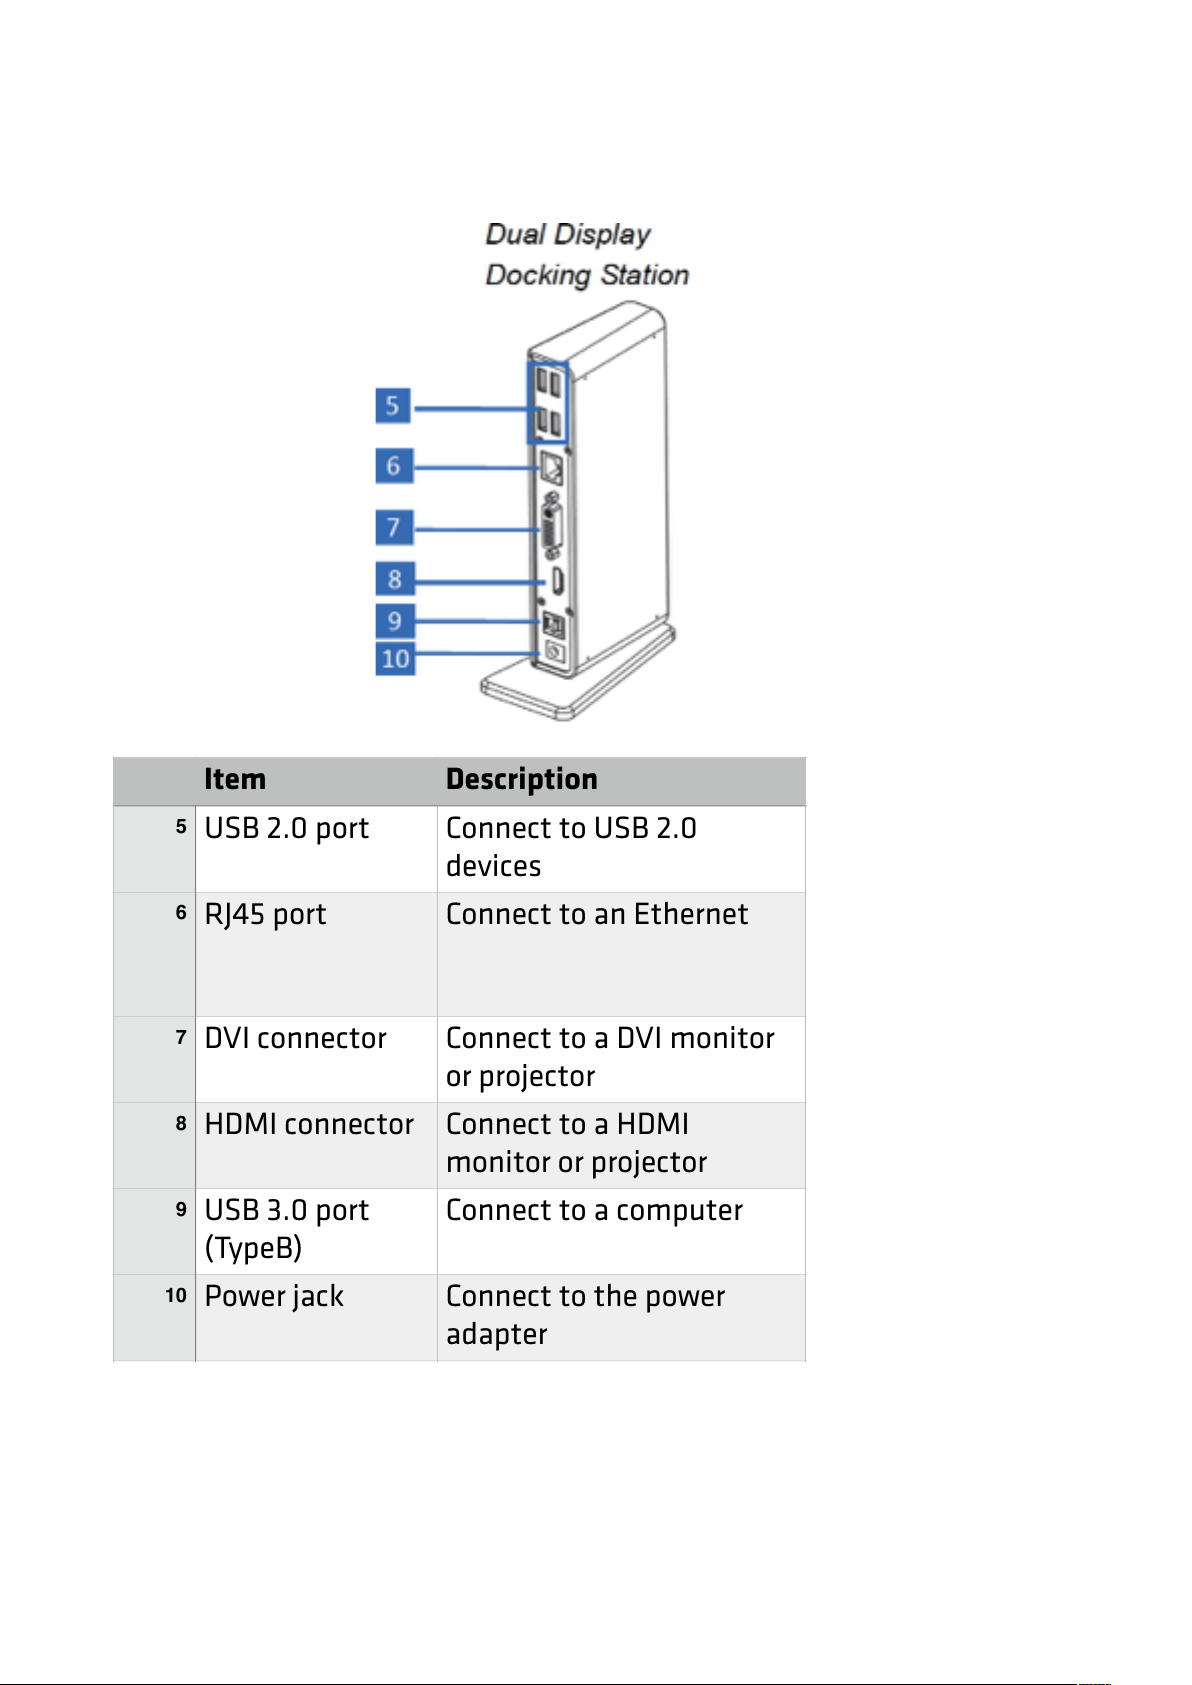
Rear
Item
Description
5
USB 2.0 port
Connect to USB 2.0
devices
6
RJ45 port
Connect to an Ethernet
7
DVI connector
Connect to a DVI monitor
or projector
8
HDMI connector
Connect to a HDMI
monitor or projector
9
USB 3.0 port
(TypeB)
Connect to a computer
10
Power jack
Connect to the power
adapter
Page of 8 33
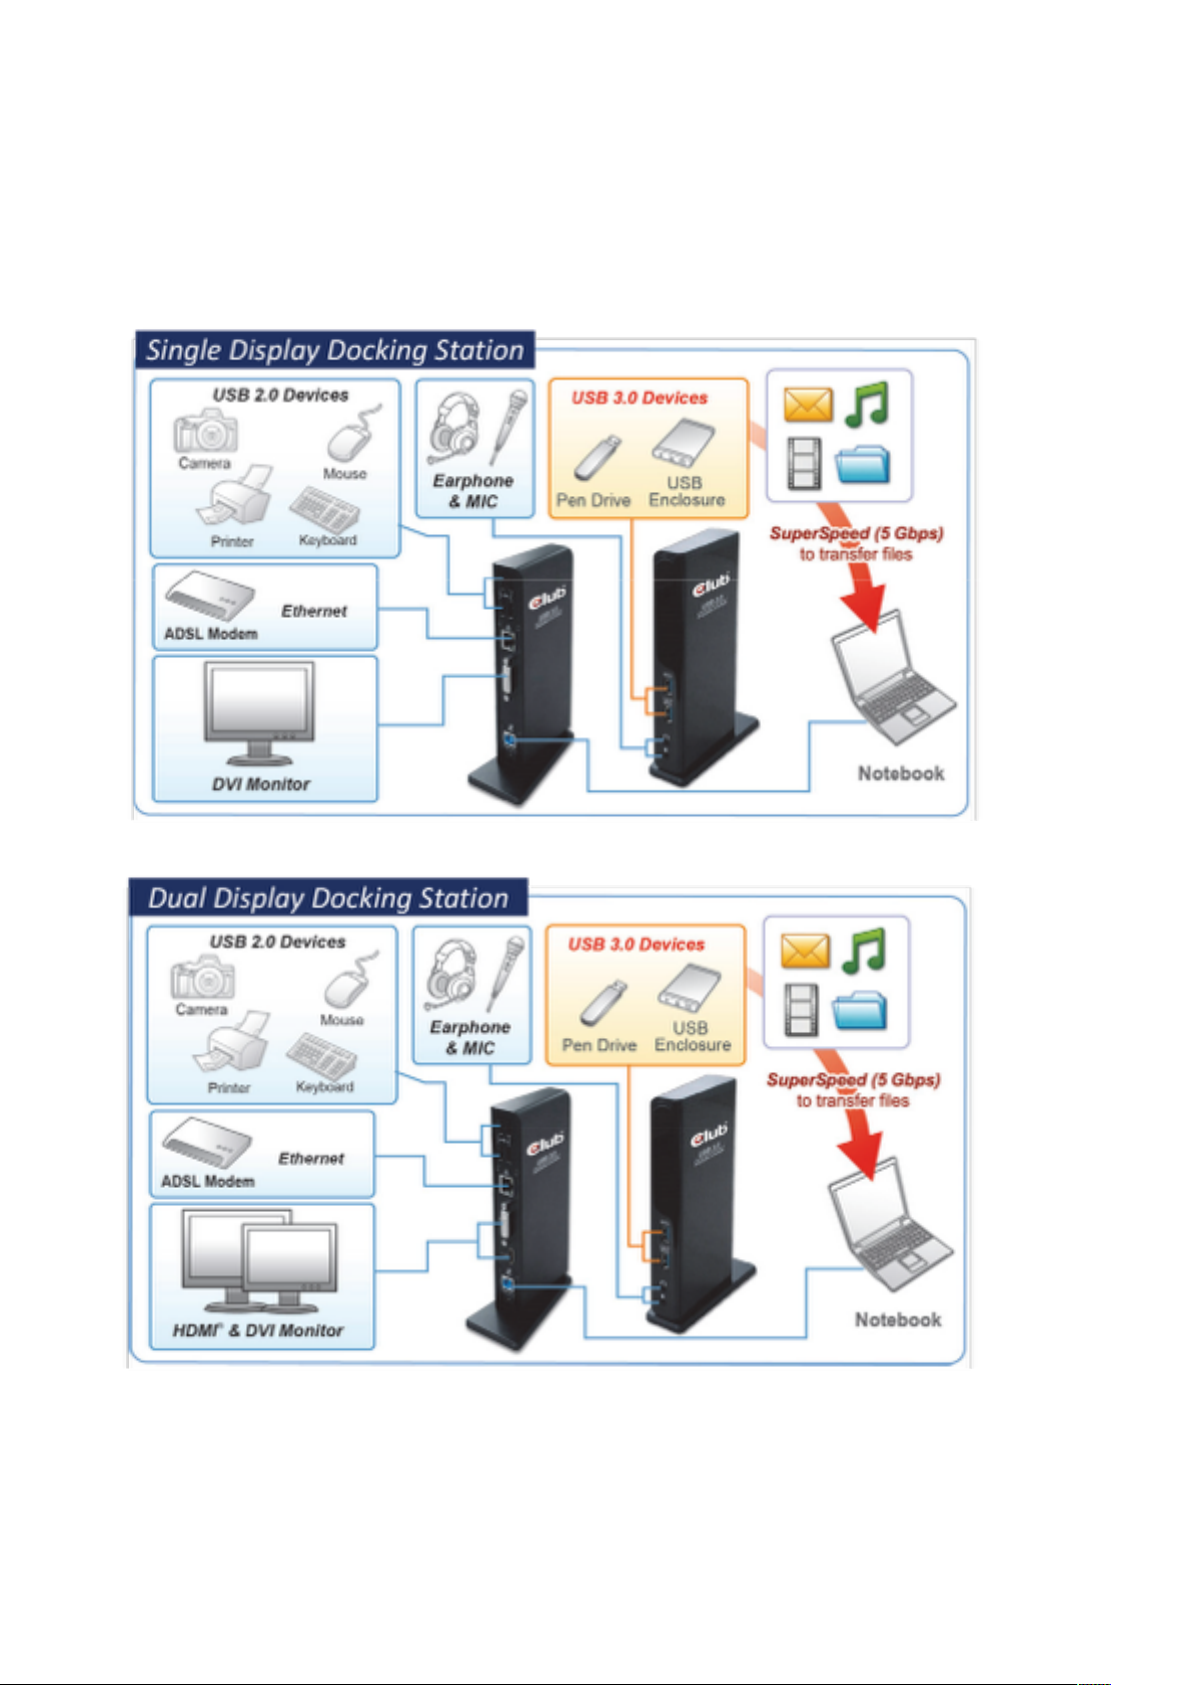
Connection
To connect the USB peripherals, Ethernet, speaker and
microphone, follow the illustrations below to connect the
corresponding connectors.
"
"
"
"
"
"
"
"
"
"
"
"
"
"
"
"
Page of 9 33

Installation
"
Caution: DO NOT connect the docking to a
computer before installing the provided driver.
"
"
Note that the following strings and screen shots shown
on this user's manual may vary slightly from each
operation.
Windows®7/ Windows®8/ Windows®8.1
1. Insert the supplied driver CD into a computer’s
CD/DVD- ROM.
2. Click Run Setup.exe to start the installation.
"
Page of 10 33
 Loading...