

MONITOR
10
8
9
4
3 112
5 7
DC-IN
CH1
VIDEO-IN
A
UDIO-IN
CH2 CH3 CH4
VIDEO OU T
AUDIO OU T
17
18
20
15
19
16
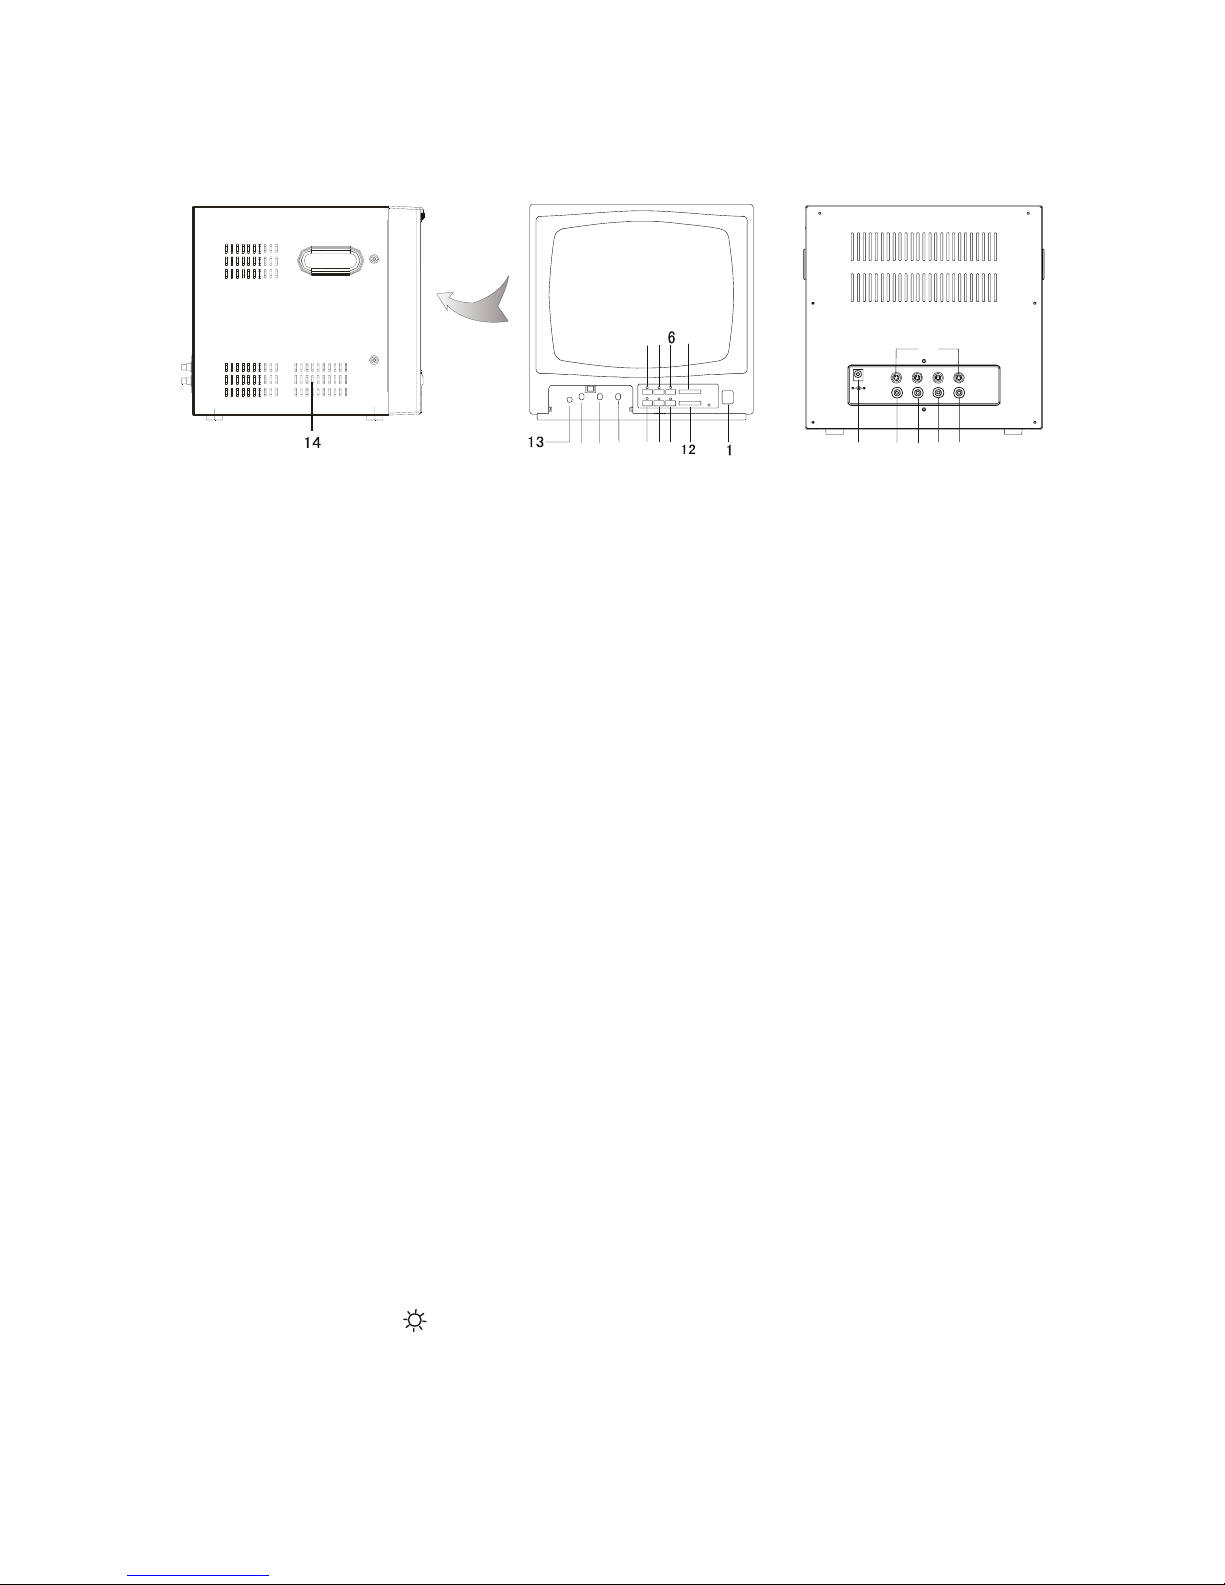
1. POWER
ON/OFF switch. If you press this switch, the monitor is turned on and the LED of power indicator is lit.
2. CH1 button
Pressing this button enables the conversion to CAMERA 1 in MANUAL mode and the corresponding
LED is lit.
3. CH2 button
Pressing this button enables the conversion to CAMERA 2 in MANUAL mode and the corresponding
LED is lit.
4. CH3 button
Pressing this button enables the conversion to CAMERA 3 in MANUAL
mode and the corresponding LED is lit.
5. CH4 button
Pressing this button enables the conversion to CAMERA 4 in MANUAL
mode and the corresponding LED is lit.
6. AUTO button
When pressing this button, the unit is in auto mode and the corresponding
LED is lit.
7. VCR button
Pressing this button, sets the unit in play back mode and the corresponding LED is lit.
8. Brightness control ( )
Adjusts the picture brightness. Turn this control clockwise to increase the brightness, and turn it
counterclockwise to reduce the brightness.

9. Contrast control ( )
Adjusts the picture contrast. Turn this control clockwise to increase the contrast, and turn it
counterclockwise to reduce the contrast.
10. Vertical Hold control ( )
This control is used to lock the vertical position of the picture.
11.Auto dwell time control ( )
Adjusts the auto dwell time. Turn this control right to reduce the time length and turn it left to increase the
time length.
12.Volume control ( )
Adjusts the audio level. Turn this control right to increase the audio level and turn it left to reduce the
audio level.
13. SYSTEM
This is switch for selecting CCIR or EIA TV system.
14. Speaker
Audio out.
15. CAMERA IN (CH1~CH4)
This is CAMERA input connector, Four(4) CAMERAS at a maximum can be connected through
this.
16. AUDIO IN
This is VCR audio input connector
17. VIDEO IN
This is VCR video input connector
18. AUDIO OUT
This is connector for outputting selected audio signals.

PIN CONFIGURATION FOR 4-PIN DIN JA CK
19. VIDEO OUT
This is connector for outputting selected image signals.
20. DC inlet socket
Plug the DC plug of the power adapter (supplied as a standard accessory) into
this socket and connect it to an AC outlet.
CAMERA
4
1
2
3
6
6
5
1. Lens
Turn it clockwise or counter-clockwise to get the best picture.
2. Infrared LEDs
10 Infrared LEDs let you see objects in the darkness.
3. CDS sensor
Turn the Infrared LEDs off during daytime, and turn it on at night automatically.

4. C-mic
High sensitivity condenser microphone.
5. 4-pin Din jack
Connect the one end of cable to this jack.
6. Tri pod screws
There are two tripod screws on the top and bottom of the camera (Refer to installation).
INSTALLATION
1. Attach the mounting bracket to the wall or ceiling, wherever you want to install the
camera. Locate a wall stud or ceiling joist and secure the mounting bracket using the
supplied screws.
2. Install the camera to the mounting bracket and firmly tighten the swivel.
3. Connect the one end of cable (supplied) to the Din jack on the rear of the camera and the other end
of cable to the monitor. Make sure that two arrows on the top of them should be aimed at each
other
Wall
(CAMERA)
(MONITOR)
MOUNTING
BRACKET
60’ cable
Wall Mount

CEILING
(CAMERA)
MOUNTING
BRACKET
60’ cable
(MONITOR)
Ceiling Mount
 Loading...