


INSTRUCTION MANUAL
STANDALONE 4CH DVR
DIGITAL VIDEO RECORDER
MODEL: CDR 4170
CH1 CH2 CH4CH3
QUAD
POP PIP
AUTO
ENTER
SYS LOG
BACKUP
WTMK
STOPSEARCH
PAUSEESC
SETUP
OSD
PTZALRST
PLAY FFREW
FULL
POWER
ALARMTIMERPLAYREC
REC
Copyright © 2006 Clover Electronics U.S.A. All Rights Reserved.
CAUTION! TO REDUCE THE RISK OF ELECTRIC SHOCK, DO NOT
REMOVE COVER (OR BACK). NO USER-SERVICEABLE PARTS INSIDE.
REFER SERVICING TO QUALIFIED SERVICE PERSONNEL.
!
RISK OF ELECTRIC SHOCK. DO NOT OPEN.
Explanation of two Symbols
The lightning flash with arrowhead symbol, within an equilateral
triangle, is intended to alert the user to the presence of un-insulated
"dangerous voltage" within the product's enclosure that may be of
sufficient magnitude to constitute a risk of electric shock to persons.
The exclamation point within an equilateral triangle is
Intended to alert the user to the presence of important
operating and maintenance (servicing) instructions in the
literature accompanying the appliance.
THE GRAPHIC SYMBOLS WITH SUPPLEMENTAL
MARKING ARE ON THE BOTTOM OF THE SYSTEM.
“WARNING – TO PREVENT FIRE OR SHOCK HAZARD,
DO NOT EXPOSETHE UNIT TO RAIN OR MOISTURE”
CAUTION
!

NOTE :
This equipment has been certified and found to comply with the limits regulated by FCC, EMC
and LVD. Therefore, it is designed to provide reasonable protection against interference and will
not cause interference with other appliance usage.
However, it is imperative that user follows this manual's guidelines to avoid improper usage which
may result in damage to the unit, electrical shock and fire hazard or injury.
In order to improve the feature functions and quality of this product, the specifications are subject
to change without notice from time to time.
FCC CLASS B NOTICE
NOTE:
This equipment has been tested and found to comply with the limits for a Class B
digital device, pursuant to Part 15 of the FCC Rules. These limits are designed to
provide reasonable protection against harmful interference in a residential installation.
This equipment generates, uses and can radiate radio frequency energy and, if not
installed and used in accordance with the instruction, may cause harmful interference
to radio communications. However, there is no guarantee that interference will not
occur in a particular installation. If this equipment does cause harmful interference to
radio or television reception, (which can be determined by turning the equipment off
and on), the user is encouraged to try to correct the interference by one or more of
the following measures:
Increase the separation between the equipment and the camera and/or monitor.
Connect the equipment into an outlet on a circuit different from that to which the other
electrical devices are connected.
Consult the dealer or an experienced radio or television technician for help.

CONTENTS
1. GENERAL PRECAUTIONS 1
2. SPECIFICATIONS 3
3. OPERATION 5
3.1 FRONT PANEL 5
3.2 BACK PANEL 9
4. BASIC CONFIGURATION OF THE MONITOR SCREEN 10
4.1 START UP 10
4.2 LIVE SCREEN 11
4.3 RECORDING SCREEN 12
4.4 PLAYBACK SCREEN 13
4.5 RECORD AND PLAYBACK SCREEN 14
4.6 LIVE 15
4.7 RECORDING 16
4.8 PLAY 17
5. SETUP 20
5.1 SETUP DISPLAY TREE 20
5.2 HOW TO SETUP 23
5.3 ALARM 23
5.4 MOTION 24
5.5 SYSTEM 26
5.6 VIDEO 30
5.7 RECORD 31
5.8 DISPLAY 32
5.9 BUZZER 33
5.10 ACCOUNT 33
5.11 DDNS 35
6. INSTALL THE HDD 37
6.1 INSTALL THE HDD1 37
6.2 INSTALL THE HDD2 38
7. PTZ CONTROL 40

8. INSTALLATION 41
8.1 SYSTEM CONFIGURATION DIAGRAM 41
8.2 CAMERA 42
8.3 AUDIO 43
8.4 MONITOR 44
9. NETWORKING 44
9.1 REQUIREMENTS 44
9.2 INSTALLING THE PROGRAM TO THE PC 45
9.3 CONNECTING THE DVR THROUGH GUI (CLDVR) 45
9.4 CLDVR SCREEN 47
9.5 EXPLANATION OF CLDVR FUNCTION 47
9.6 LOCAL VIEWER 55
APPENDIX
1. RECORDING TIME TABLE (DAYS) 56
2. FACTORY DEFAULT TABLE 58
3. FAQ 60
4. LIMITED 2 YEAR WARRANTY 62
5. HOW TO OBTAIN FACTORY SERVICE 62

1. GENERAL PRECAUTIONS
1. Read Instructions: All of the safety and operating instructions should be read and
understood before the product is used.
2. Retain Instructions: The safety and operating instructions should be retained for future
reference.
3. Heed Warnings: All warnings on the product and the instruction manual should be followed.
4. Follow Instructions: All operating and use instructions should be followed for optimal
performance
5. Cleaning: Disconnect this video product from the power supply before cleaning. Do not
use liquid cleaners or aerosol cleaners. Use a damp cloth for cleaning.
6. Attachments: Do not use attachments not recommended by the video product manufacturer
as they may cause hazards.
7. Water and Moisture: Do not use this product near water - for example, near a bathtub, wash
bowl, kitchen sink, wet basement, or near a swimming pool.
8. Accessories: Use this product only with a stand, tripod, bracket or table recommended by
the manufacturer or sold with the product. Any mounting of the product should follow the
manufacturer’s instructions.
9. Ventilation: This product should never be placed near or over a Radiator or heat register.
This product should not be placed in a built-in installation, such as a bookcase or rack,
unless proper ventilation is provided or the Manufacturer’s instructions have been adhered to.
10. Power Source: This product should be operated from the type of Power source indicated by
the marking label. If you are not sure of the type of power supply provided to your location,
consult your product dealer or your local Power Company.
11. Power Cord Protection: Power supply cords should not be routed so that they are likely to
be walked on or pinched by items placed on or near them
12. Lightning: For added protection, unplug this product from its outlet during a lightning storm.
This will prevent damage to the video product due to lightning and power surges.
13. Overloading: To avoid the risk of fire and electric shock, do not plug this product into an
over-loaded power supply.
14. Object and Liquid Entry: Never push objects into the openings of this product as they may
touch dangerous voltage points that may result in fire or electric shock. Never spill a liquid of
any kind on this product.
15. Servicing: Do not attempt to service this product yourself as opening or removing covers
may expose you to voltage or other hazards. Refer all servicing to qualified service personnel.
16. Damage Requiring Service: Disconnect this product from the power supply and refer
servicing to qualified service personnel under the following conditions:
a. When the power supply cord or plug is damaged
b. If objects have fallen into the product
c. If the product has been exposed to rain or liquids
d. If the product does not operate normally by following the instruction manual. Adjust only
the controls that are covered in the instruction manual as an improper adjustment may
- 01 -

result in damage and will often require extensive work by a qualified service technician
to restore the product to its normal operation
e. If the product has been dropped or the cabinet has been damaged
f. When the product displays a distinct change in performance - this indicates a need for
service
17. Replacement Parts: When replacement parts are required, be sure the technician uses
replacement parts specified by the manufacturer. Unauthorized substitutions may result in
fire, electric shock, or other hazards.
18. Safety Check: Upon completion of any service to this product ask the service technician to
perform safety checks to determine that the product is in proper working condition.
19. Grounding or Polarization: This product is equipped with a three-wire grounding-type plug,
a plug having a third (grounding) pin and will only fit into a grounding-type power outlet.
This is a safety feature. If you are unable to insert the plug into the outlet, contact your
electrician to replace your obsolete outlet. Do not defeat the safety purpose of the
grounding-type plug.
20. Power Lines: An outside antenna system should not be located in the vicinity of overhead
power lines or other electric light or power circuits, or where it can fall into such power lines
or circuits. When installing an outside antenna system, extreme care should be taken to
keep from touching such power lines or circuits as contact with them might be fatal.
21. Wall or Ceiling Mounting: The product should be mounted to a wall or ceiling only as
recommended by the manufacturer.
22. Heat: The product should be situated away from heat such as radiators, heat registers,
stoves, or other products (including amplifiers) that produce heat.
- 02 -

2. SPECIFICATIONS
DVR SPECIFICATIONS
System NTSC or PAL (Auto Detection)
Video Input 4 Inputs (BNC): 1Vp-p composite, 75ohms
Video Output 2 Outputs (BNC), 4 Looping output (BNC): 1Vp-p composite, 75
ohms
Audio Input 1 Channel (RCA)
Audio Output 1 Channel (RCA)
Alarm Input 4 Ch alarm Inputs: Normally Open (N.O)
Alarm Output 1 Ch alarm Output: Normally Open (N.O) or Normally Close (N.C)
Video Loss Detection YES
Display Size NTSC - 720 X 480
PAL - 720 X 576
Video Display Full, Quad for Playback.
Full, Quad, PIP, POP for Live.
Sequencing YES (Live and Recording mode)
Triplex Mode Live, Playback, Recording and Networking simultaneously
Recording Resolution NTSC - 720 X 224
PAL - 720 X 288
Recording Speed NTSC - 120 IPS
PAL - 100 IPS
Video Compression High quality picture with M-JPEG
Recording Mode Continuous Recording, Alarm Recording. Motion Recording,
Schedule Recording
Playback Format 1 Channel or Quad
Playback NTSC – 120 IPS
PAL - 100 IPS
Search (Playback) By Time/Date, Event, Recording lists (the whole/the last) and Play
button
Play Speed (FF, Rew) x1, x2, x4, x8, x16
Motion Detection YES
Multiplex Recording YES
Hard Disk Storage IDE Type, Up to 400 GB, 2 Bays (Master: 160GB installed, Slave
N/C)
- 03 -
Backup JPEG & AVI File format through GUI, DVR File format at USB.
Ethernet RJ-45 Connector for network communication
PAN / TILT RS-485 Control (Pelco D Protocol)
USB Port Data Backup, Firmware Update
Jog-Shuttle YES
Setup On screen Display setup
User Interface Menu driven
User Input Device Front Panel keypad
Timer Built-in real time clock
Design and specifications are subject to change without notice.
NOTE ■ This product is TRIPLEX (LIVE, PLAY, RECORD) system.
While recording, you can Playback and see the Live screen
simultaneously.
■ ZOOM function will apply on firmware version #CL042706(S)
or later version.
- 04 -
3. OPERATION
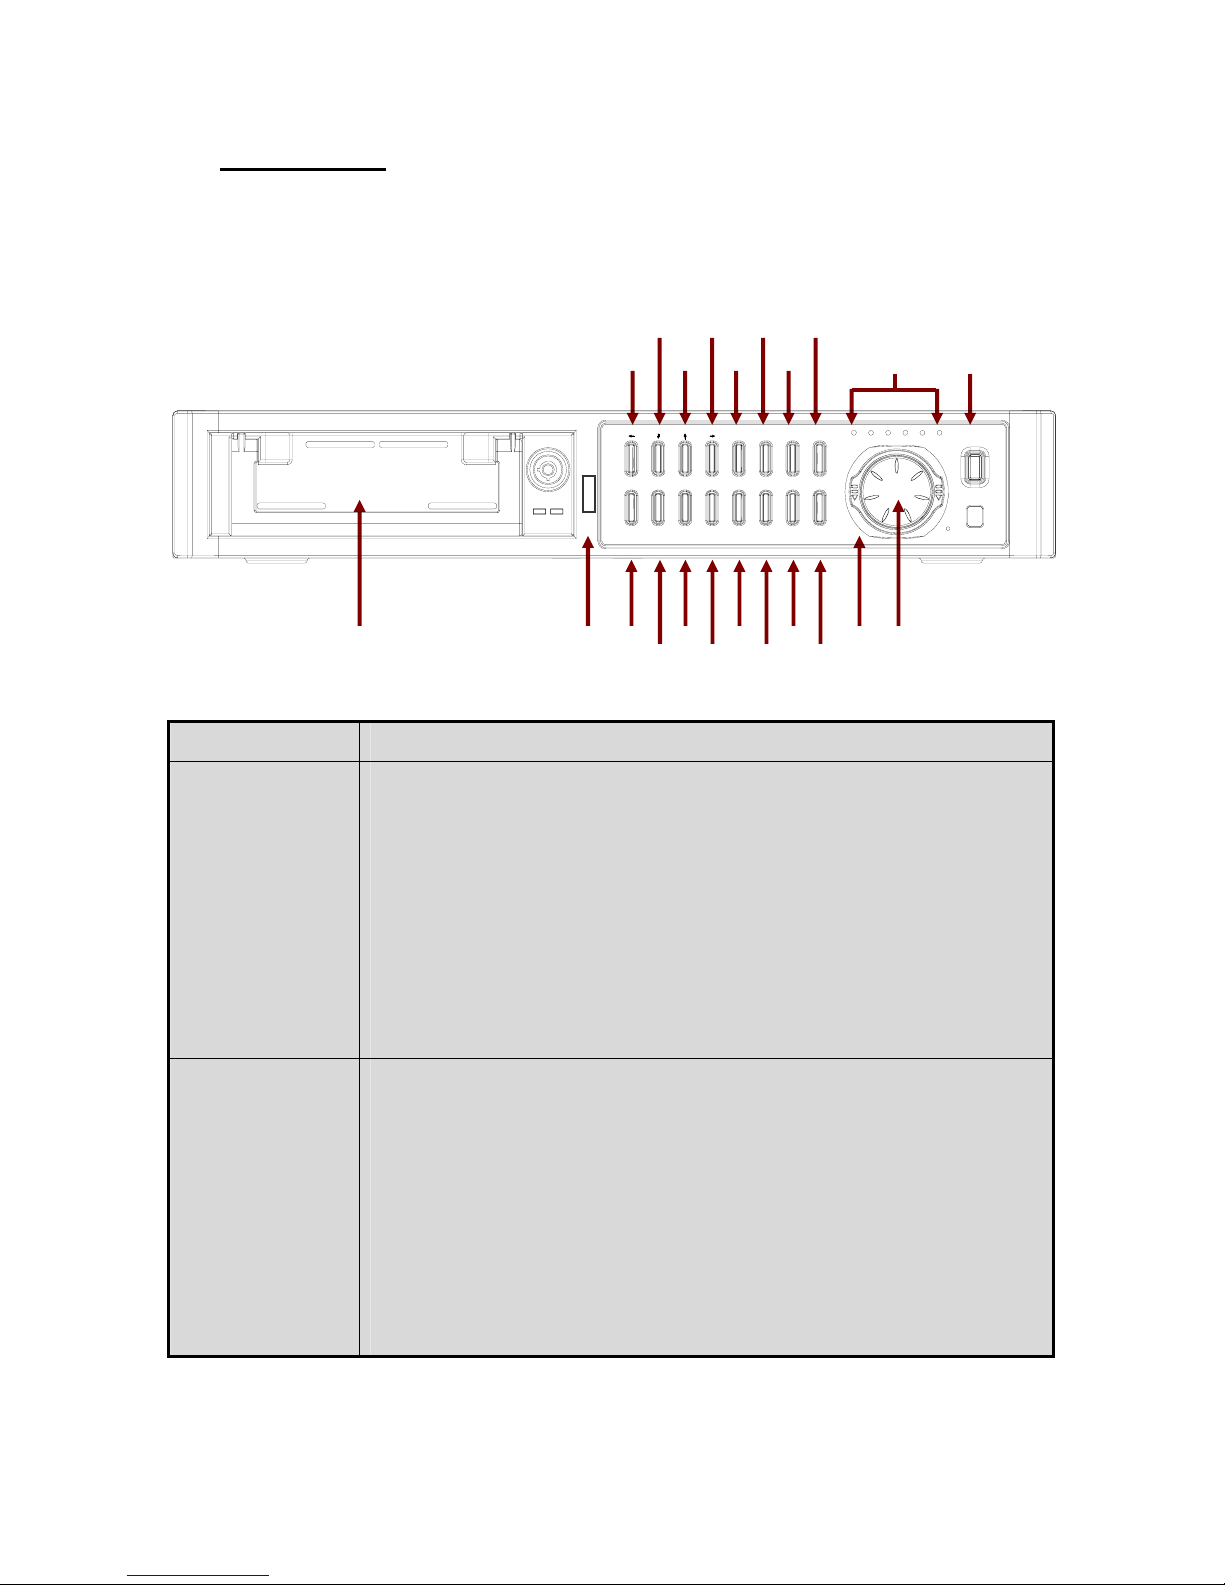
3.1 FRONT PANEL
1 12 13141516171819
3
2
CH1 CH2 CH4CH3
SETUP
OSD
PTZ
ALRST
456
BACKUP
WTMK
SYS LOG
ENTER
7
9
8
QUAD
AUTO
POP PIP
ZOOM
PLAY FFREWSTOPSEARCH
PAUSEESC
10 11
POWERFULLALARMTIME RPLAYREC
REC
21 22
20
1. HDD RACK Master HDD: Installed 160GB
2. CH 1 / LEFT - While in Quad mode, press this button momentarily (at least 3 seconds)
and channel 1 will appear in full screen.
- In full screen mode, channel 1 single screen or on PIP / POP / QUAD
screen, press this button once and the screen will freeze. Press this
button again to release the frozen picture.
- On Playback mode, pressing this button will show the channel 1 single
screen.
- On SETUP / SEARCH / PTZ / RECORD LISTS mode, this button can be
used as ARROW ( LEFT ) button.
- On PASSWORD input mode, pressing this works as number 1.
3.CH 2 / UP - While in Quad mode, press this button momentarily (at least 3 seconds)
and channel 2 will appear in full screen.
- In full screen mode, channel 2 or on PIP / POP / QUAD screen, press this
button once to freeze screen. Press this button again to release the frozen
picture.
- On Playback mode, pressing this button will show the channel 2 full
screen.
- On SETUP / SEARCH / PTZ / RECORD LISTS screen, this button can be
used as ARROW ( UP) button.
- On PASSWORD input mode, pressing this works as number 2.
- 05 -

4. CH 3 /DOWN - While in Quad mode, press this button momentarily (at least 3 seconds)
and channel 3 will appear in full screen.
- In full screen mode, channel 3 single screen or on PIP / POP / QUAD
screen, press this button once and the screen will freeze. Press this
button again to release the frozen picture.
- On Playback mode, pressing this button will show the channel 3 single
screen.
- On SETUP / SEARCH / PTZ / RECORD LISTS mode, this button can be
used as ARROW ( LEFT ) button.
- On PASSWORD input mode, pressing this works as number 3.
5. CH 4 /RIGHT - While in Quad mode, press this button momentarily (at least 3 seconds)
and channel 4 will appear in full screen.
- In full screen mode channel 4 single screen or on PIP / POP / QUAD
screen, press this button once and the screen will freeze. Press this
button again to release the frozen picture.
- On Playback mode, pressing this button will show the channel 4 single
screen.
- On SETUP / SEARCH / PTZ / RECORD LISTS mode, this button can be
used as ARROW ( LEFT ) button.
- On PASSWORD input mode, pressing this works as number 4.
6. QUAD /ENTER - Press this button in LIVE mode, the monitor should display QUAD screen.
- On SETUP / PTZ mode, pressing this button can select item or change
the values.
- On SEARCH / RECORD LISTS mode, pressing this button will playback
the selected data.
- Press this button on Playback Zoom mode and channel will change in
sequence whenever the button is pressed.
7. AUTO / ZOOM - Press this button in LIVE mode, the monitor displays QUAD screen and a
full screen at a time in a continuous sequence – one camera after another.
- If the channel (s) has no video signal or channel that is set up dwell time
to 0 second, the corresponding channel (s) will be skipped in sequential
mode.
- The image on the screen will be zoomed up to 2 times when this button is
pressed in the Playack mode(Full screen or Quad screen).
While replaying, press Auto/Zoom button (available on firmware ver.#
CL042706(S) or later version) to zoom in, and the Zoom OSD will be
shown on the screen.
- Repeatedly pressing the ENTER button, the corresponding channel will be
displayed.
- Press Auto/Zoom button again to exit Zoom mode.
8. POP - Displays one main screen and 3 sub screens.
9. PIP - Displays one full screen and one or two sub screens on the full screen.
- 06 -

10. LED
FUNCTION
- REC : The LED will blink when the system is in the recording mode.
- PLAY : The LED will blink when the system is in the replaying mode.
- TIMER : When the SCHEDULE RECORD is set, the LED will blink
before it starts RECORDING.
- ALARM : The LED is lit when ALARM is set.
- HDD FULL : The LED is lit when the space of HDD is less than 1GB. If
HDD OVERWRITE is set, the LED won’t be lit even though
the space of HDD is less than 1GB.
- POWER : The LED is lit when the POWER switch is on.
11. REC - Press this button to starts Continuous Recording.
- Press and hold this button for about 3 seconds to stop Recording.
12. USB PORT - Save playback data or connect an USB Memory for updating Firmware.
13. OSD /
ALRST
14. SETUP /
PTZ
15. SEARCH /
SYS-LOG
- Press this button to turn the OSD (On Screen Display) on. Press this
button again to turn the OSD off (Except “PLAY” and “REC” sign).
- Press this button to reset the system when Alarm or Motion event occurs.
- Press this button in the LIVE mode, the SETUP menu will be displayed.
- Press and hold this button for about 3 seconds, the PAN/TILT menu will
be displayed. Press the STOP/ESC button to return to the QUAD mode.
- Press this button in the LIVE mode, the SEARCH/HDD SET menu will
display on the screen.
- Press and hold this button for about 3 seconds in the LIVE mode, the
SYSTEM LOG menu will display on the screen.
- SYSTEM LOG Information.
R-S : It stands for Recording Start.
R-E : It stands for Recording End.
P-S : It stands for Playback Start.
P-E : It stands for Playback End.
S-S : It stands for Setup Start.
S-E : It stands for Setup End.
PWR : It indicates when the system was powered on.
USB : It indicates when the system saved data on the USB memory.
- It will create upto 300 log lists.
16. BACKUP /
WTMK
This button is used to backup data on USB memory.
HOW TO BACKUP DATA ON USB
- Format the USB with your computer and plug it on USB PORT (See #12).
- Press this button when the system is in the playback mode.
- It will start to copy recorded data from your DVR right after displaying
“ PLEASE WAIT…”.
- Press this button again to stop copy.
- It will stop to copy after displaying “ PLEASE WAIT…, COPY OK”.
- 07 -

WATERMARK CHECK
- Press and hold this button for about 3 seconds in the playback mode, the
Water Mark OSD will be shown on the screen. To exit, press and hold this
button again for about 3 seconds.
- The WTMK function : Watermarking is an identification code or bit pattern
integrated into the multimedia data to aid copyright owners to identify
illegally distributed video, or image data. The Watermark proves
preservation of integrity (as well as the chance of being manipulated) for
recorded images generated by DVR in terms of the legal purpose or
confidential use. The Watermark is usually visible by a detector chip or by
special software.
17. STOP / ESC
- Pressing the button in the playback mode, it stops replaying and returns to
the LIVE mode.
- To exit or return to the LIVE or RECORD mode, press this button on PTZ
mode, SEARCH/HDD mode, RECORD LISTS, EVENT LISTS,
PASSWORD input mode.
18. REW - Activates Rewind feature. Repeatedly pressing this button enables you
change speed up to 16 times (x1,x2,x4,x8 &x16 speeds).
19. PLAY /
PAUSE
- Pressing this button in the LIVE mode, it will replay the first list that is
saved on HDD. Press it again to pause.
- Pressing Play/ Pause button will continue replay.
20. FF - Fast forwards recorded images at x1, x2, x4,x8 &x16 speeds.
21. SHUTTLE - You can select the playback speed for both forward and reverse by turning
the shuttle to the left or right.
22. JOG - Jog dial to the right for forward frame-by-frame playback, or to the left for
reverse frame-by-frame playback.
Directions for using USB Flash Memory Connection.
When copying the recorded images to USB Flash Memory, the system must be
in PLAYBACK Mode.
NOTE
- Press PLAY to view the recorded data.
- Connect USB flash memory unit to the USB connector
- Press the BACKUP/WTMK button on the Front Panel.
- When you want to stop press STOP button or else it will stop when memory
is in full or data stop played.
NOTE
Recommended USB Memory
- SanDisk USB Memory
- 08 -
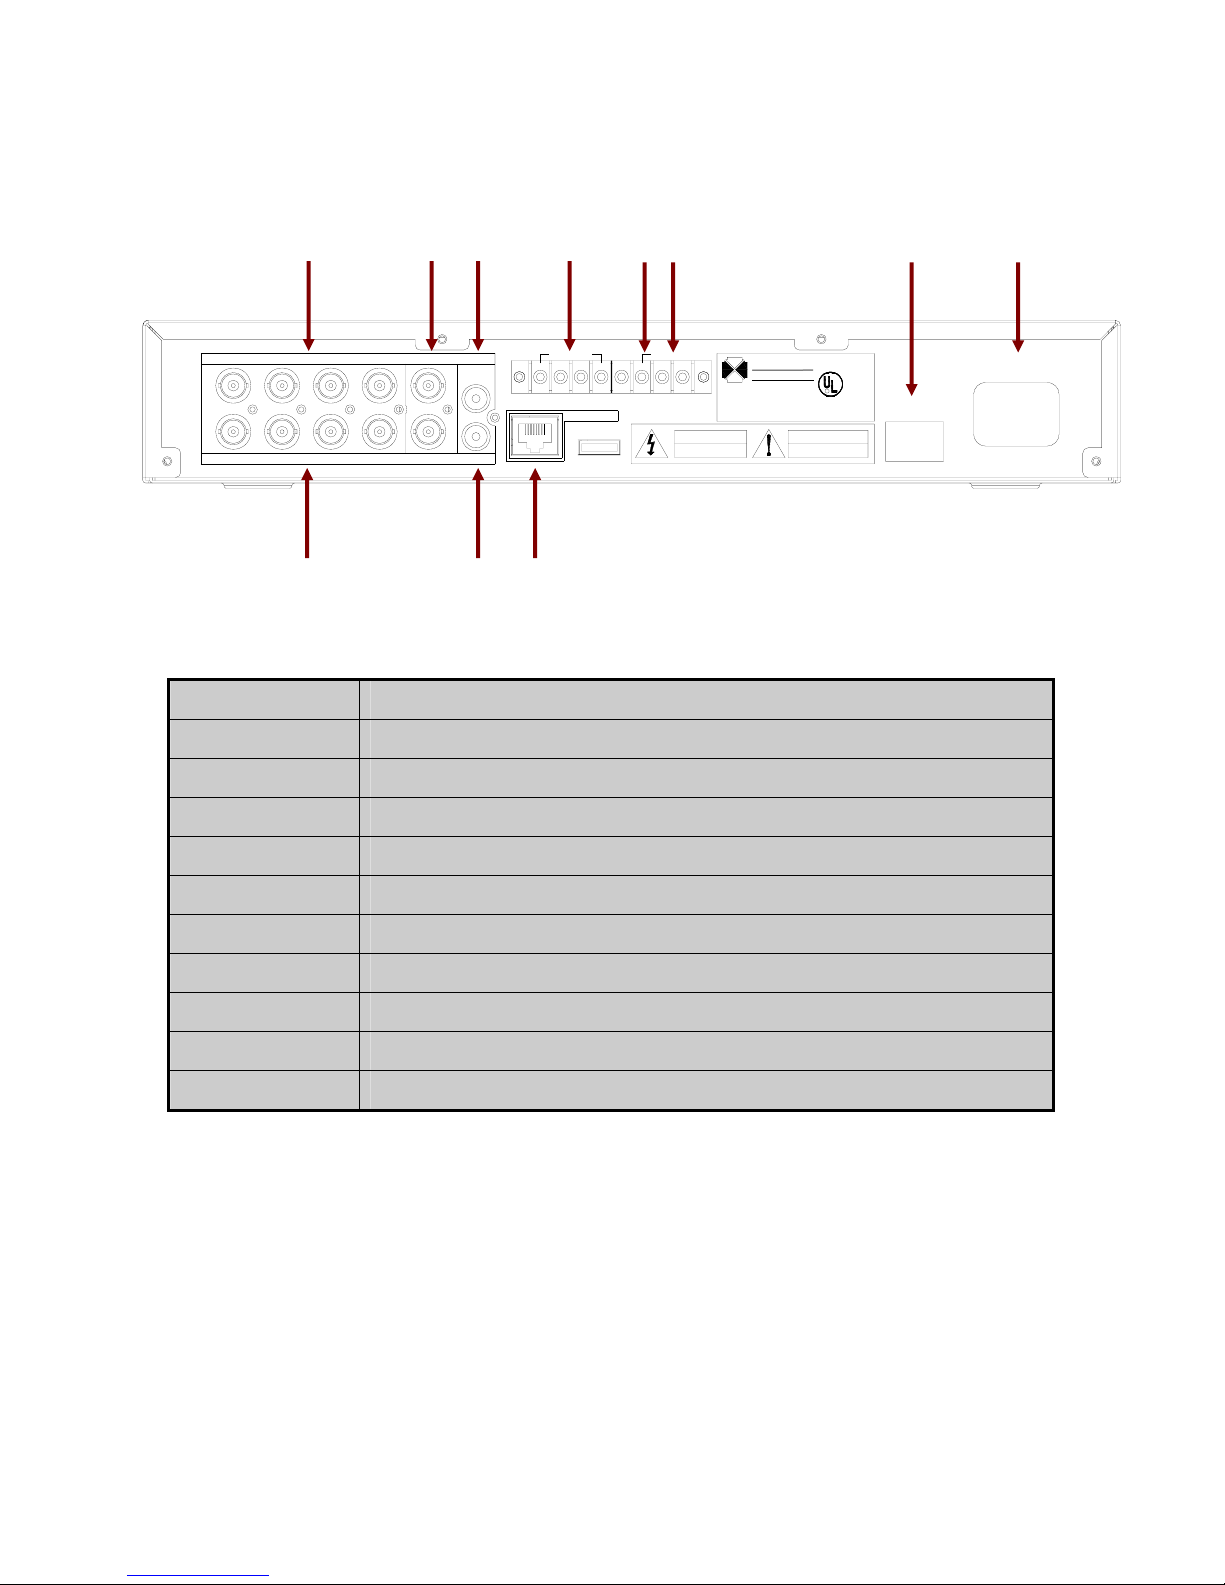
3.2 BACK PANEL
CH1 CH2 CH3 CH4
1. VIDEO IN 4- Video Inputs (BNC)
1 2 4
VIDEO IN
LOOP OUT
V - OUT1
V - OUT2
A - IN
A - OUT
9 10 3 11
ALARM IN
1234
ETHERNET
5 6 7 8
GND
ALARM OUT
_
+
RS485
RISK OF ELECTRONIC SHOCK
&/2=(5
ELECTRONICS U.S.A
MODEL NO : CDR4170
AC100-240V,50/60Hz, 25W
CLOVER ELECTRONICS
13073 EAST 166TH STREET, CERRITOS, CA 90703
Factory ID/DHHS CODE : BC
DO NOT OPEN
R
C US LITED
E233232
AUDIO/VIDEO EQUIPMENT 2UW2
ATTENTIONCAUTION
RISQUE DE CHOC ELECTROIQUE
NE PAS ENLEVER
POWER
AC INPUT
AC100-240V,50/60Hz
2. VIDEO OUT 2- Video Outputs (BNC)
3. AUDIO IN Audio Input (RCA)
4. ALARM IN 4- Alarm sensor Input terminal. Connect Normally Open (N.O.) type only.
5. ALARM OUT Alarm output when Alarm or Motion activates. N.O or N.C available.
6. RS-485 RS-485 terminal for P/T/Z control.
7. POWER Power on or off.
8. AC INPUT Socket for AC 100 – 240V Power cord.
9. LOOP OUT 4- Looping outputs (BNC)
10. AUDIO OUT Audio output (RCA)
11. ETHERNET RJ-45 jack to connect LAN.
- 09 -
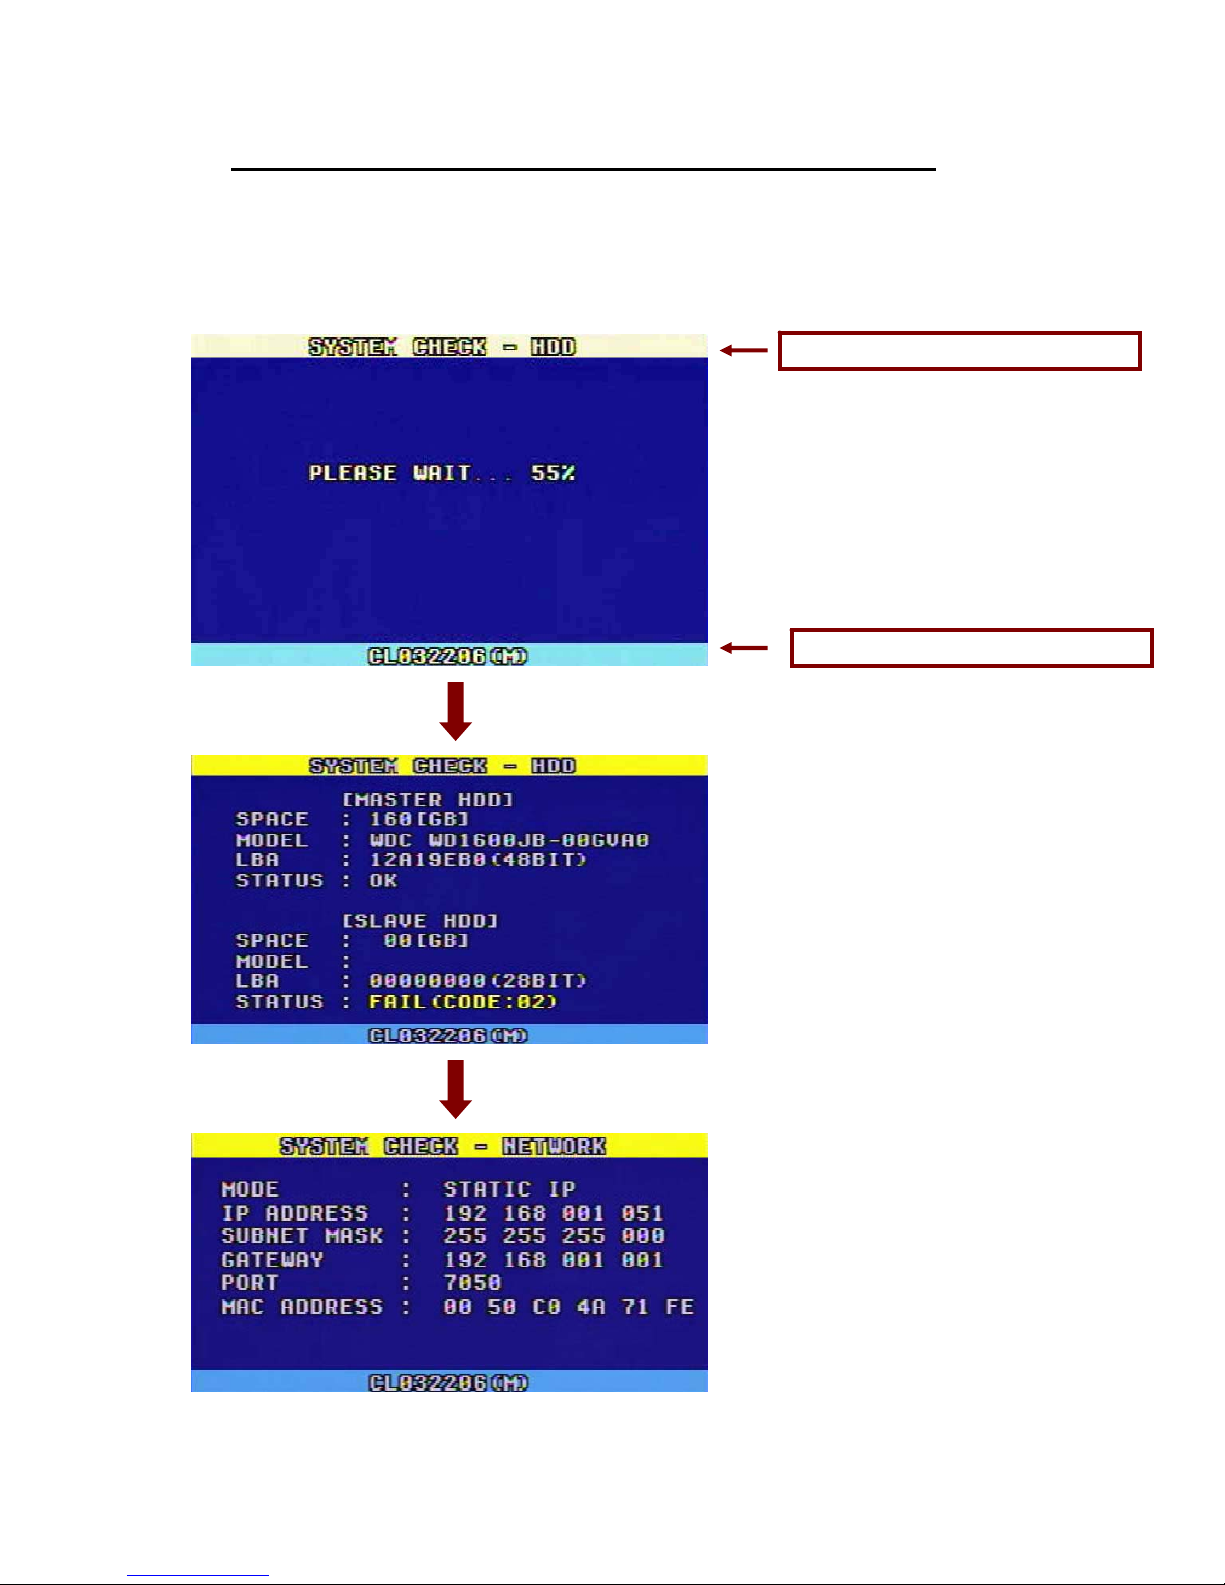
4. BASIC CONFIGURATION OF THE MONITOR SCREEN
4.1 START UP
When the system starts up, the following pictures will be displayed in sequence.
Function Title
Operational information
Firmware version #
Hard Drive information.
Network Configuration
- 10 -
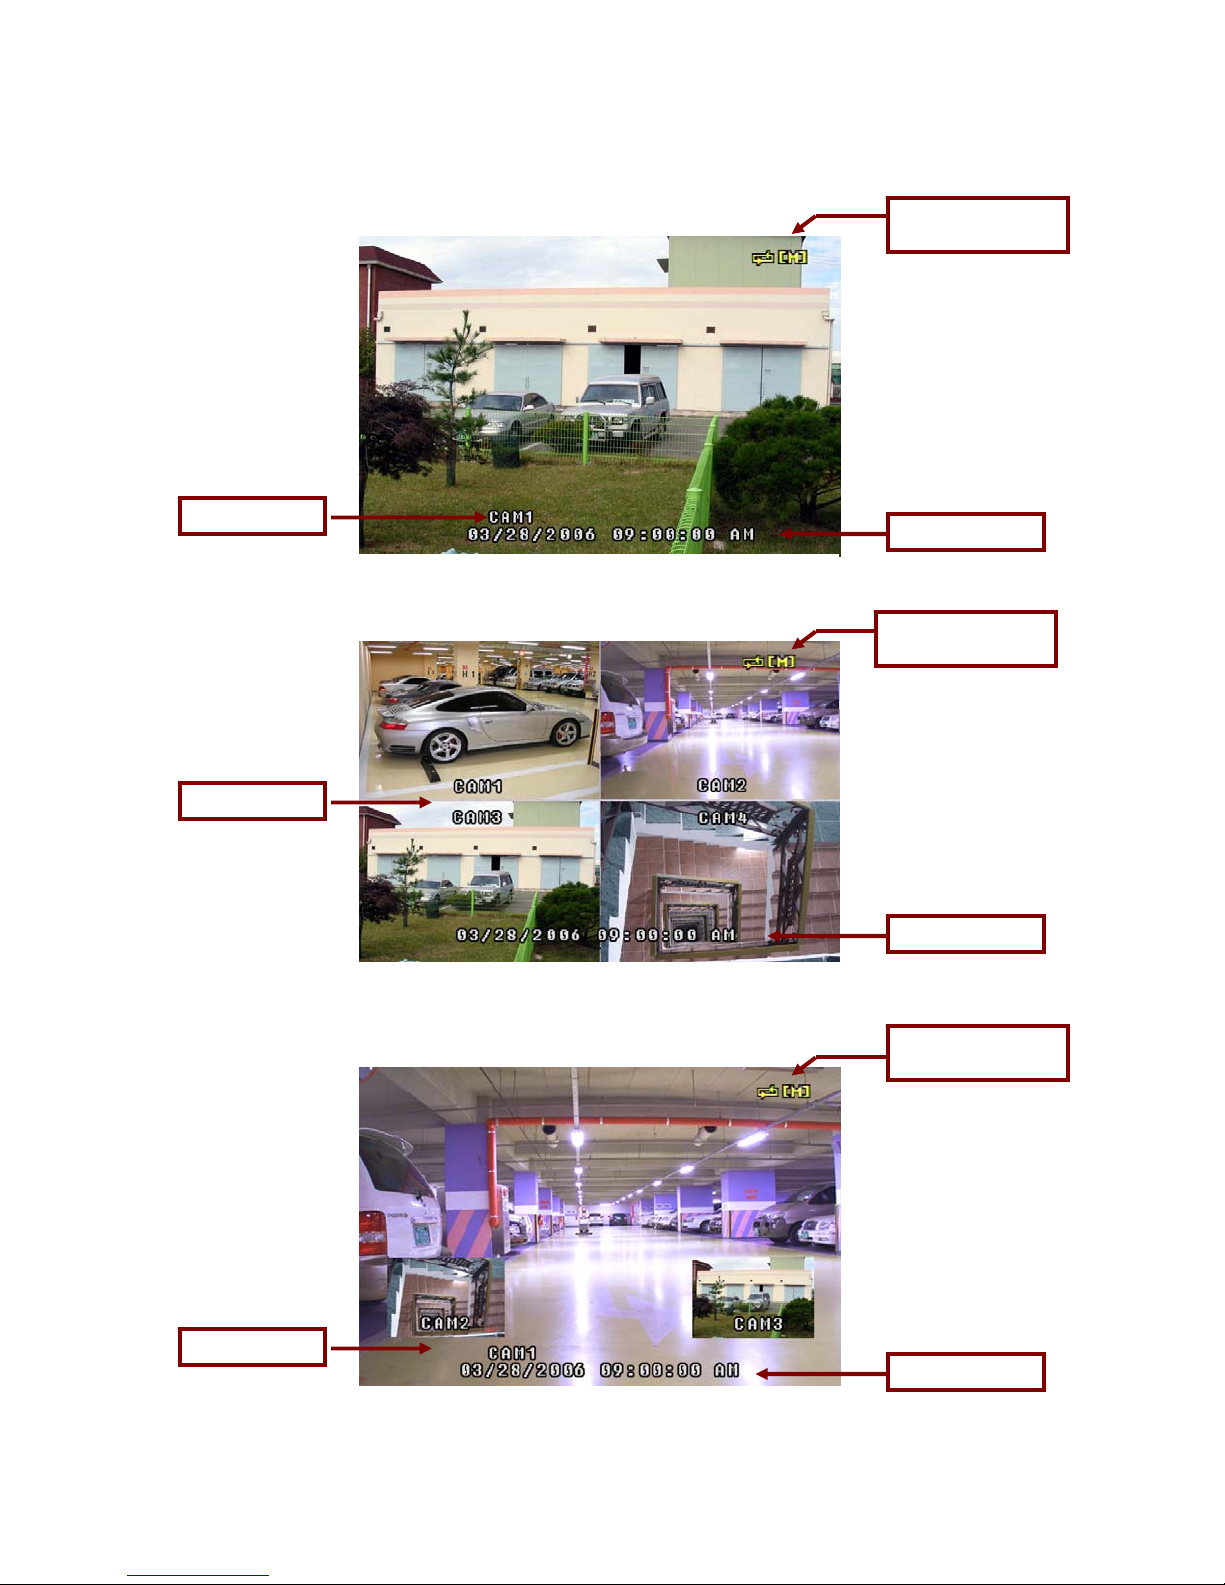
4.2 LIVE SCREEN
g
g
g
Camera Title
Camera Title
Camera Title
Full Screen in Live Mode
Quad Screen in Live Mode
PIP Screen in Live Mode
Indicates
recordin
HDD
Time and Date
Indicates
recordin
HDD
Time and Date
Indicates
recordin
HDD
Time and Date
- 11 -
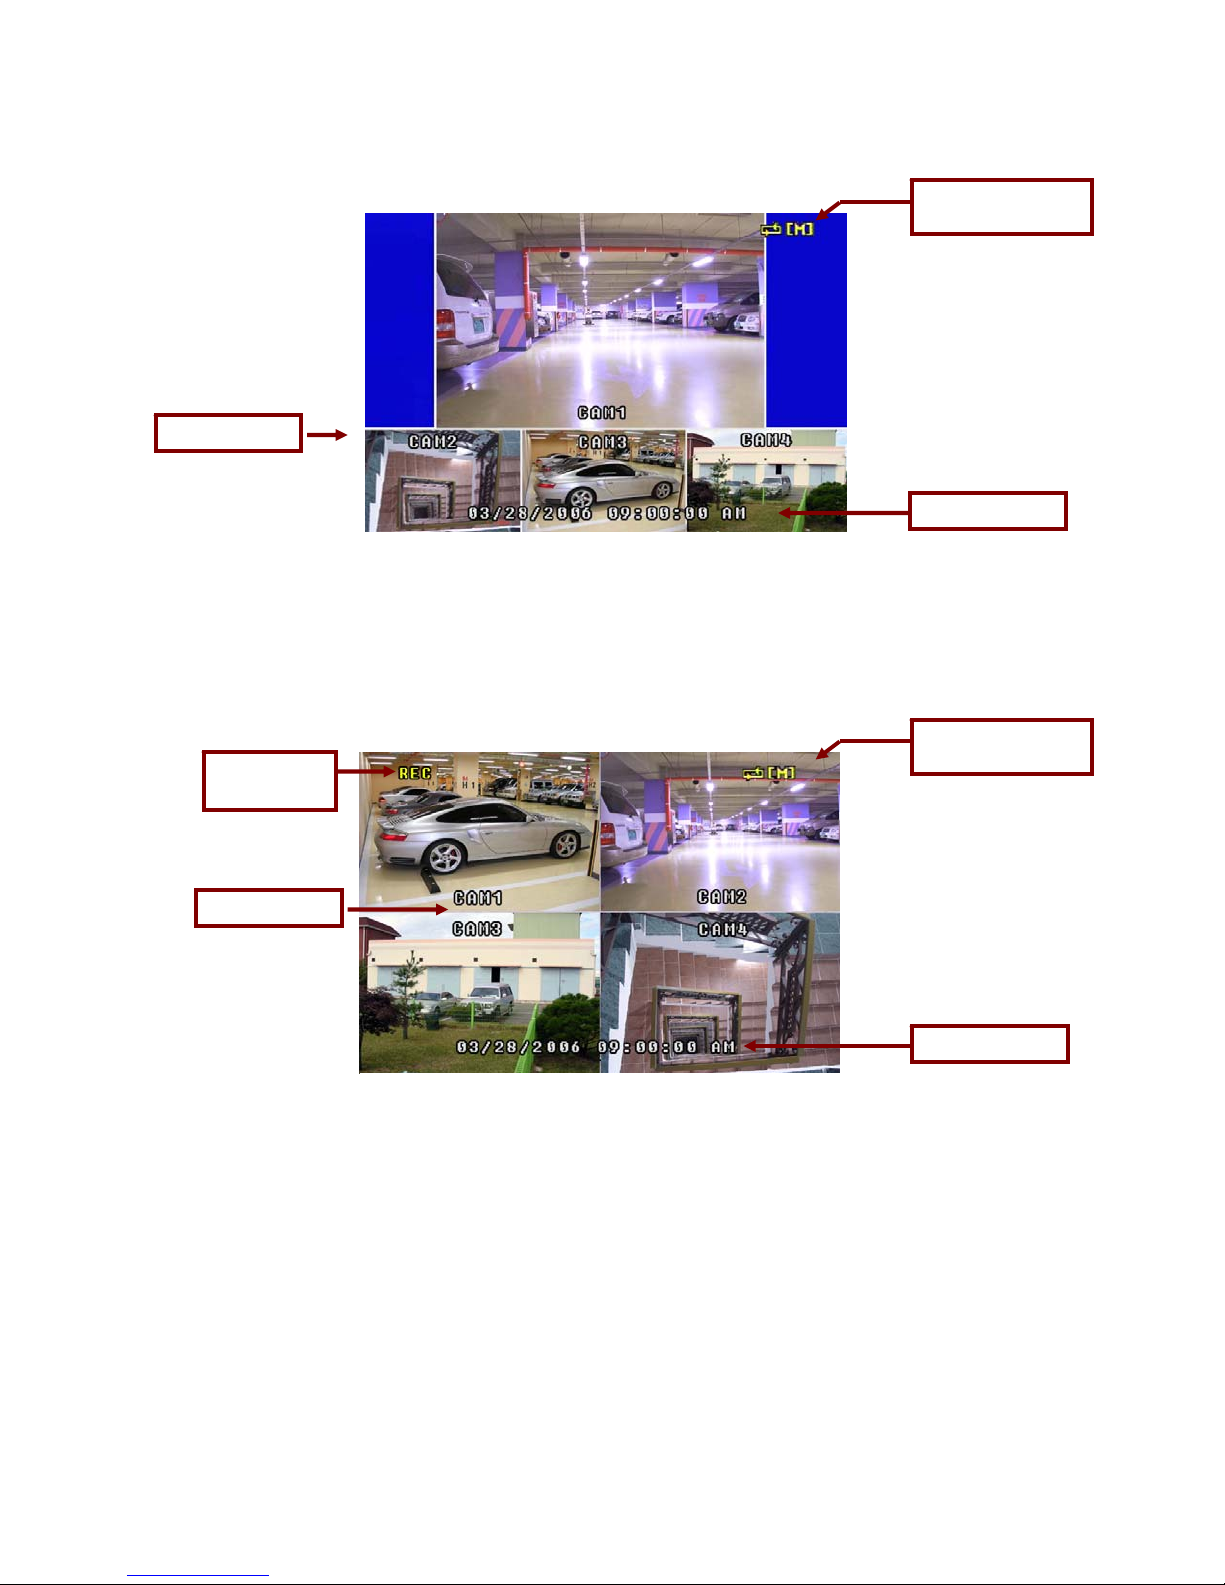
g
g
Camera Title
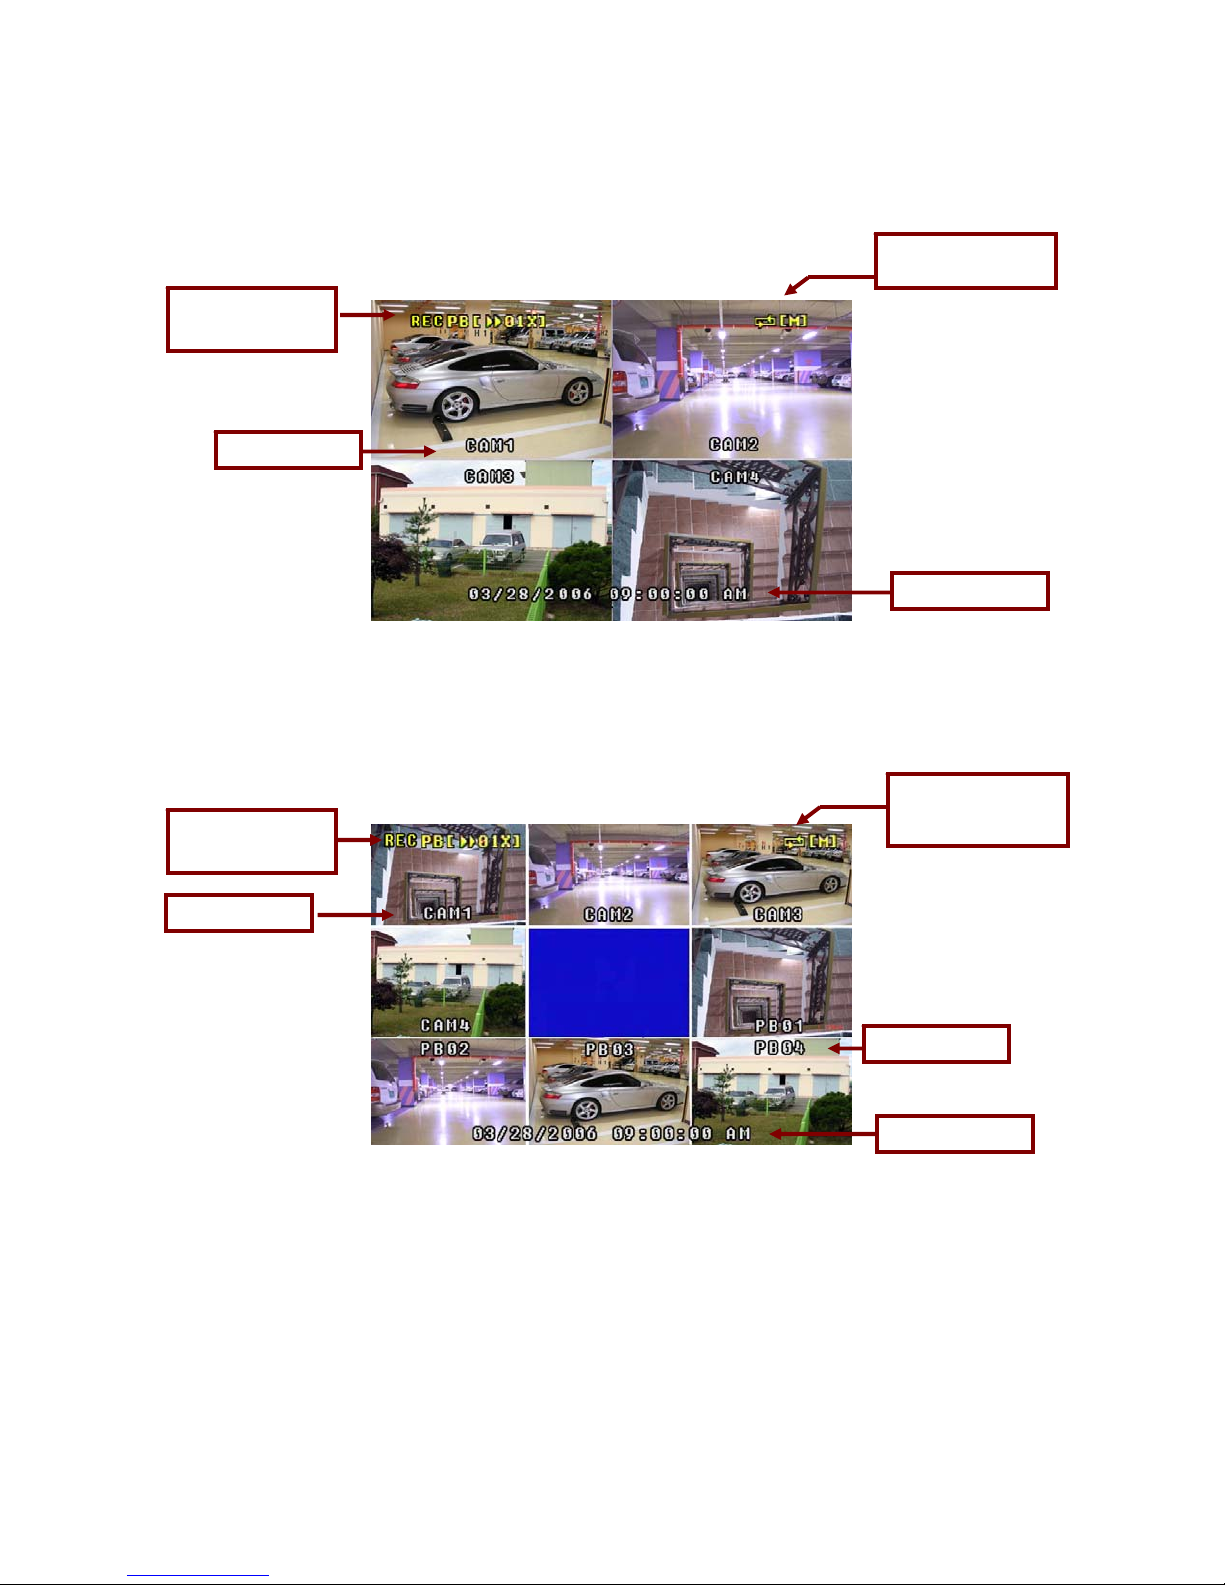
4.3 RECORDING SCREEN
Recording
OSD
Camera Title
POP Screen in Live Mode
Quad Screen in Record Mode
Indicates
recordin
HDD
Time and Date
Indicates
recordin
HDD
Time and Date
- 12 -
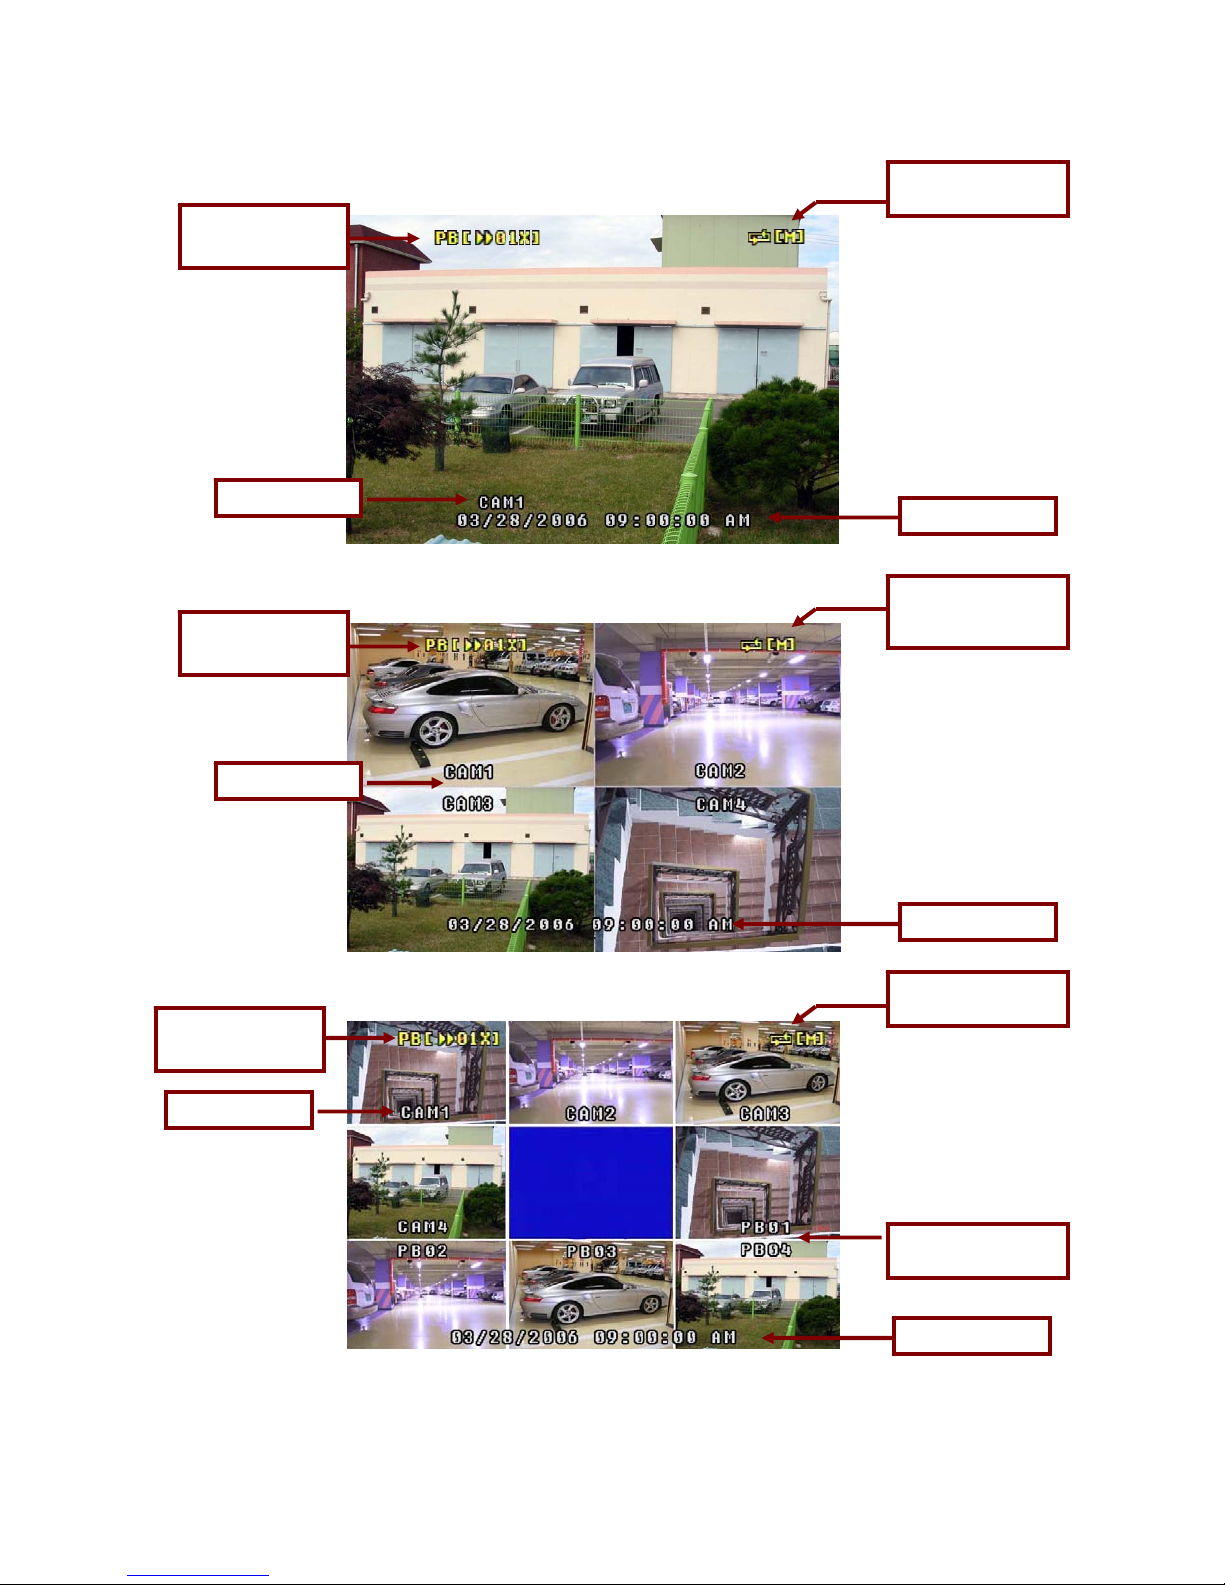
4.4 PLAYBACK SCREEN
g
g
y
Playback OSD
& Speed
Camera Title
Playback OSD
& Speed
Camera Title
Playback OSD
& Speed
Camera Title
Full Screen in Playback Mode
Quad Screen in Playback Mode
Nine Screens in Playback Mode
Indicates
recordin
HDD
Time and Date
Indicates
recording HDD
Time and Date
Indicates
recordin
HDD
Camera Title in
back mode
Pla
Time and Date
- 13 -
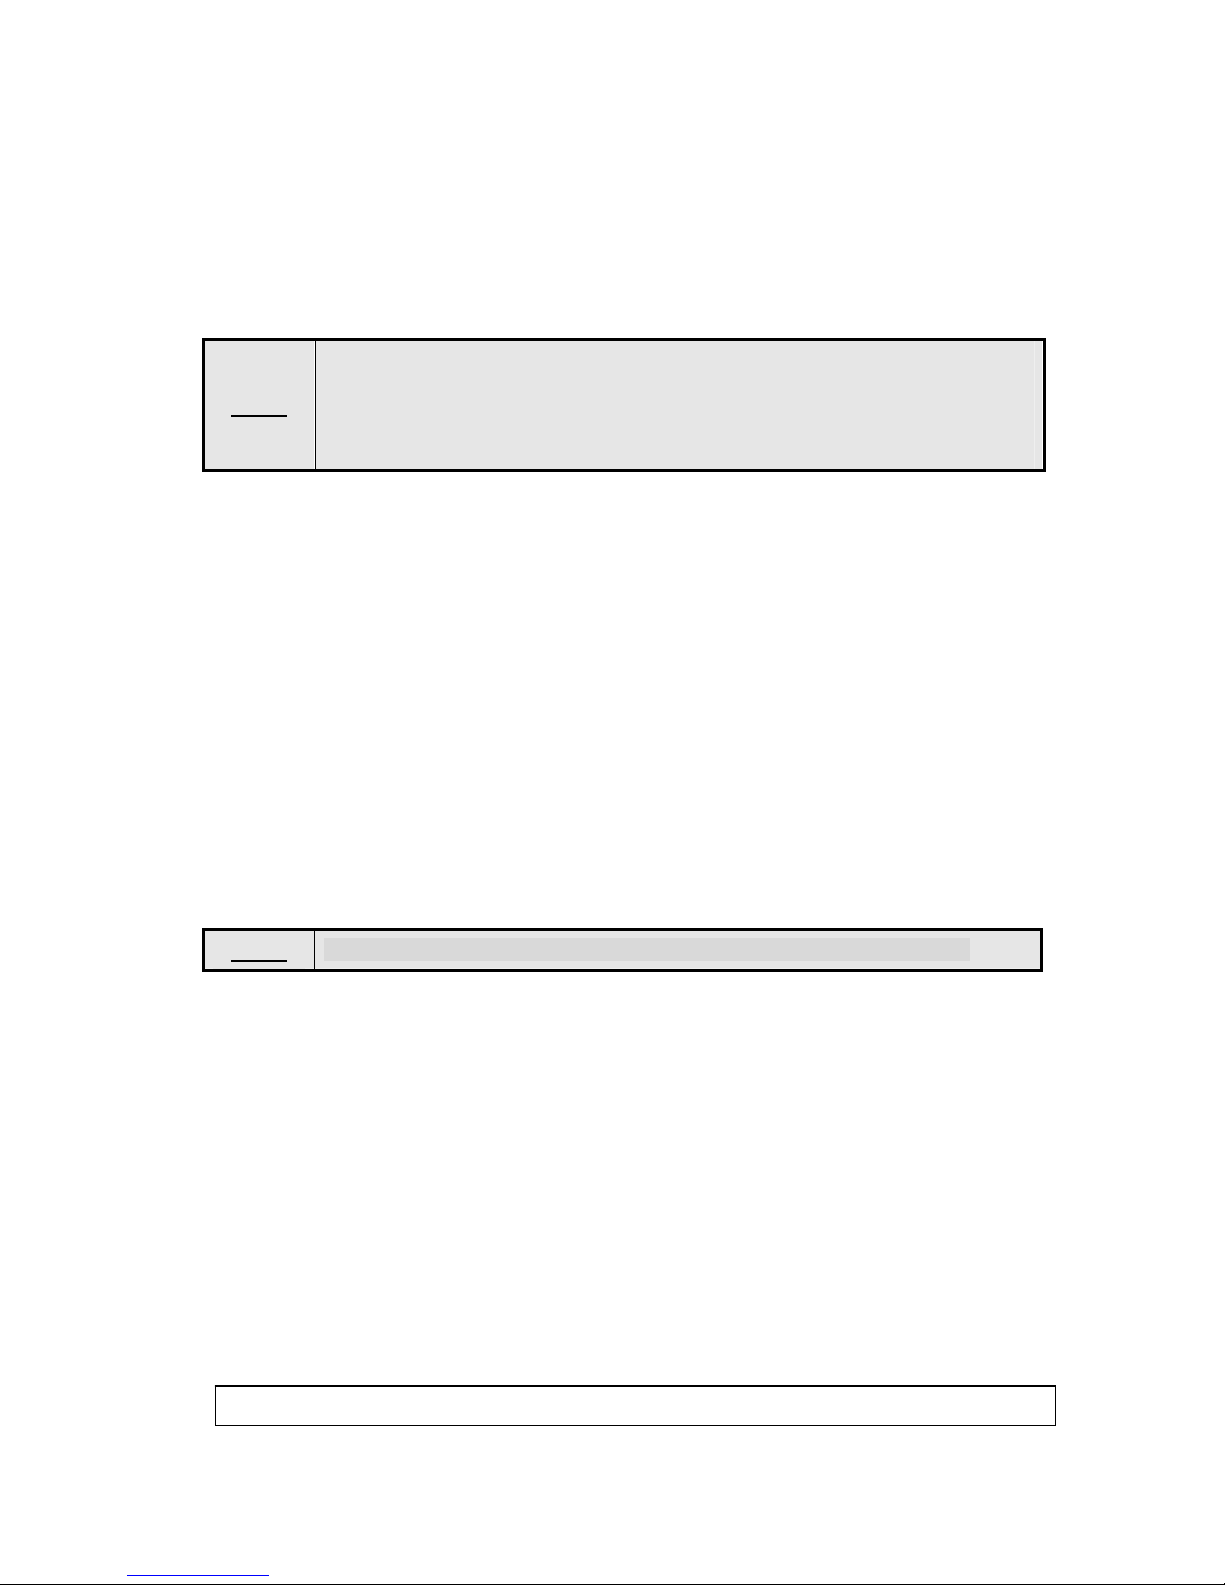
4.5 RECORD AND PLAYBACK SCREEN
g
REC, Playback
OSD & Speed
Camera Title
REC, Playback
OSD & Speed
Camera Title
Quad Screen in Record and Playback Mode
Nine Screens in Record and Playback Mode
Indicates
recordin
HDD
Time and Date
Indicates
recording HDD
Camera Title
Time and Date
- 14 -

4.6 LIVE
Live means viewing the present video images from the cameras on the monitor.
4.6.1 Full Screen display
Full screen display is possible in the Live mode or Record mode.
Use channel selection button to choose a corresponding video input.
Refer to 4.2 “Full Screen in LIVE Mode”
4.6.2 Quad Screen
All 4 cameras are viewed on the monitor at the same time in reduced size.
Quad screen is available in the Live mode or Record mode.
Refer to 4.2 “Quad Screen in LIVE Mode”
4.6.3 Sequential Mode Operation
The system will be viewed a full screen at a time in a continuous sequence (one camera after
another) by pressing the AUTO button. It will available in the LIVE and RECORD mode.
The dwell time can be adjusted from 0 to 10 seconds (See section 5.6.2 for more details).
Press the QUAD button to return to the QUAD mode.
4.6.4 PIP screen
The PIP (Picture In Picture) allows you to view two viewing areas simultaneously, one being
the main channel, the other being viewed as a sub-picture in the main screen. To change
between Single PIP and Dual PIP, repeatedly press the PIP button.
PIP screen is available in the LIVE mode and RECORD mode.
Refer to 4.2 “PIP Screen in the LIVE Mode”
4.6.5 POP screen
The POP divides the screen into 4 screens, with the main channel occupying two-thirds of the
screen. Press the POP button to swap the positions of cameras appearing in the POP
(Between the Main and Sub screen). To exit the POP mode, press another button.
POP screen is available in the LIVE mode and RECORD mode.
Refer to 4.2 “POP Screen in LIVE Mode”
4.6.6 Freeze screen
Freeze is available in the Live or Quad mode.
In the Full screen mode
- Press the channel button to freeze the current display.
- Press the channel button again or press another channel selection button to release the
Freeze function.
- When the FREEZE button is pressed, the FRZ symbol will be shown on the screen.
In the Quad mode
- Press any channel selection button to get a frozen display of corresponding part on the
screen.
- 15 -

- Press the same channel selection button to release the freeze function.
Freeze symbol
4.6.7 OSD On / Off
Available in the LIVE, RECORD or PLAYBACK mode.
When the OSD button is pressed, all the texts except the REC and PB (PLAYBACK) OSD are
cleared temporarily.
When the button is pressed again while OSD is in OFF position, the system status will be
displayed.
Pressing the OSD button again will bring the system to normal condition.
4.7 RECORDING
4.7.1 Recording Option
- Continuous recording
- Timer recording
- Alarm recording
- Motion recording
This system provides Watchdog function.
NOTE
When power goes off during recording and power comes up, it automatically
starts to record.
4.7.2 Continuous recording
Recording will start when the REC button is pressed. The REC indicator will be lit and ‘REC’
will blink on the screen while the unit is recording.
Press and hold the REC button for 3 seconds to stop recording, and it returns to the LIVE
mode.
When the system is in the continuous recording mode, the recording will continue until stop
recording.
- 16 -

The whole recording lists are updated hourly up to 1,000 lists on both Master and Slave.
4.7.3 Schedule recording
Recording by scheduled time
The time of record start and finish can be set to hour: minute.
Refer to section 5.7.6 for more information.
4.7.4 ALARM recording
When an alarm signal is received, the system begins to record automatically. The REC button
must be pressed to make the recording lists. If not, it does not make any lists.
When the alarm signal is stopped, the system continues recording for the ALARM HOLD TIME
and finishes the recording.
The Event REC lists by PIR sensor and MOTION detection can be made up to 300 lists on
both Master and Slave HDD.
4.7.5 Motion recording
When the menu of motion properly setup (See section 5.4 for more details) and motion detects,
the system begins to record automatically. The REC button must be pressed to make the
recording lists. If not, it does not make any lists.
The system continues recording for the MOTION HOLD TIME and finishes the recording.
The Event REC lists by PIR sensor and MOTION detection can be made up to 300 lists on
both Master and Slave HDD.
4.8 PLAYBACK
4.8.1 Playback Mode
- Playback from the first recording time by PLAY button.
- Playback by the last record list in SEARCH/HDD SET menu.
- Playback by the whole record lists in SEARCH/HDD SET menu.
- Playback by event record lists in SEARCH/HDD SET menu.
- Playback by Time/Date in SEARCH/HDD SET menu.
4.8.2 Playback from the first recording time
When the PLAY button is pressed, it will play from the beginning of the first list. In order to
pause during playing, press PLAY button. And to keep playing, press PLAY button once more.
SEARCH/HDD SET
- 17 -

4.8.3 Playback by the last recording list
When the SEARCH button is pressed, the SEARCH/HDD SET menu appears on the screen.
Select THE LAST RECORD LIST and press the ENTER button. It will replay from the
beginning of the last recorded list.
Press the ESC button to return to the SEARCH/HDD SET menu.
In order to pause during playing, press the PLAY button. And to keep playing, press the PLAY
button once more.
4.8.4 Playback by the whole Rec lists
When the SEARCH button is pressed, the SEARCH/HDD SET menu appears on the screen.
Select THE WHOLE REC LISTS menu by using UP/DOWN button and Press the ENTER
button. THE WHOLE REC LISTS appear on the screen.
Choose one list among them and press the ENTER button to playback.
If the system is in the continuous recording mode, the recording lists are updated hourly up to
1,000 lists on both Master and Slave HDD.
The Event REC lists by PIR sensor and MOTION detection can be made up to 300 lists as
well, and “A” or “M” on the end of lists represents ALARM or MOTION respectively.
In order to pause during playing, press the PLAY button. And to keep playing, press the PLAY
button once more.
4.8.4 Playback by the Event Rec Lists
When the SEARCH button is pressed, the SEARCH/HDD SET menu appears on the screen.
Select the EVENT REC LISTS menu by using UP/DOWN button. Press ENTER button, and
the EVENT REC LISTS appear on the screen.
Choose one list among them and press the ENTER button to playback.
The Event REC lists by PIR sensor and MOTION detection can be made up to 300 lists, and
“A” or “M” on the end of lists represents ALARM or MOTION respectively.
In order to pause during playing, press the PLAY button. And to keep playing, press the
PLAY
button once more.
4.8.5 Playback by the TME/DATE
When the SEARCH button is pressed, the SEARCH/HDD SET menu appears on the screen.
Select the TIME/DATE menu by using UP/DOWN button. Press the ENTER button, and the
following window will be displayed.
\
- 18 -

Set the TIME/DATE by using the UP/DOWN buttons for changing the values and use the
LEFT/RIGHT buttons to move to next field.
Press the ENTER button to search the recorded image. If the recorded image exists, it
automatically plays data and if not, it returns to the LIVE mode.
In order to pause during playing, press the PLAY button. And to keep playing, press the PLAY
button once more.
4.8.6 Playback Screen
During playback press the 1, 2, 3 or 4 button (channel selection button) to view the
corresponding full screen.
Press the QUAD button to view quadrant pictures in the quad mode.
The OSD ON/OFF button functions during replaying.
NOTE:
■ If the system has two HDDs which are for Master and Slave, select the PB item in the
SEARCH/HDD SET menu and select between MASTER and SLAVE by using the
ENTER button for selecting the HDD which contains the recording data you wish to
search.
■ If you select one of the recording lists that does not contain the recorded data,
the system will playback from the beginning of the first recording list that
contains the recorded data (available on firmware ver. #CL060206 or later
version).
■ When the system is in the Recording or Playback mode, user can’t select the PB
item.
■ It will automatically search the recording data on both HDDs with TIME/DATE search
function. We recommend you to use this function, if other searching functions are not
useful for you.
- 19 -

5. SETUP
5.1 SETUP SCREEN TREE
- 20 -

- 21 -

- 22 -

5.2 HOW TO SET UP
- Setup is possible in the LIVE mode and partly in the recording mode, not in the playback mode.
- Press the SETUP button.
- Choose a setup item by using the UP/DOWN buttons and press the ENTER button.
- Choose the desired values with the ENTER button.
- Press the ESC button to exit.
5.3 ALARM
- Choose the ALARM in the MAIN SETUP menu by using UP/DOWN buttons.
- Press the ENTER button and the ALARM menu will be displayed.
- Press the ESC button to exit.
5.3.1 ALARM
• Choose the ALARM in the ALARM menu with the UP/DOWN buttons.
• Select ON or OFF by pressing the ENTER button.
• ON should be selected for alarm recording.
5.3.2 ALARM HOLD / INPUT
• Choose the channel by using the UP/DOWN buttons.
• Press the ENTER button to change the alarm hold time (1 to 15 seconds) by using the
UP/DOWN buttons.
• Select the ALARM INPUT using the LEFT/RIGHT buttons and choose ON or OFF by
using the ENTER button. N/O should be selected, and connected the N.O (Normally
Open) PIR sensor for alarm recording.
• Press the ESC button to exit.
5.3.3 ALARM OPTION
• Choose the ALARM OPTION in the ALARM menu with the UP/DOWN buttons.
• Press the ENTER button and the ALARM OPTION menu will be displayed.
5.3.4 ALARM REC
• Choose the ALARM REC in the ALARM OPTION menu by using the UP/DOWN
• Select ON or OFF by pressing the ENTER button.
• ON should be selected for alarm recording.
5.3.5 REC QUALITY
• Choose the REC QUALITY in the ALARM OPTION menu by using the UP/DOWN
buttons.
• Choose one quality among LOW, NORMAL, HIGH and VERY HIGH by repeatedly
pressing the ENTER button.
buttons.
- 23 -

5.3.6 REC SPEED
• Choose the REC SPEED in the ALARM OPTION menu by using the UP/DOWN buttons.
• Choose one REC SPEED among 01, 02, 03, 05, 10, 15, 30 and 60 IPS by repeatedly
pressing the ENTER button, if the REC RESOLUTION in the RECORD menu set to 720H
or 360H. It will be fixed to 120 IPS if the REC RESOLUTION in the RECORD menu set to
CIF.
5.3.7 ALARM OUTPUT
• Choose the ALARM OUTPUT in the ALARM OPTION menu by using the UP/DOWN
buttons.
• Select N/O (Normally Open) or N/C (Normally Close) by pressing the ENTER button.
5.3.8 ALARM BUZZER
• Choose the ALARM BUZZER in the ALARM OPTION menu by using the UP/DOWN
buttons.
• Select ON or OFF by pressing the ENTER button.
5.4 MOTION
- Choose the MOTION in the MAIN SETUP menu by using UP/DOWN buttons.
- Press the ENTER button and the MOTION menu will be displayed.
- Press the ESC button to exit.
5.4.1 MOTION
• Choose the MOTION in the MOTION menu with the UP/DOWN buttons.
• Choose one among OFF, OSD and OSD+BUZZER by pressing the ENTER button.
• OSD or OSD+BUZZER should be selected for motion recording.
5.4.2 CHANNEL
• Choose the CHANNEL in the MOTION menu with the UP/DOWN buttons
• Choose a channel among CH1, CH2, CH3 and CH4 by repeatedly pressing the ENTER
button.
NOTE
The channels should be changed along with the SENSITIVITY and motion
AREA.
5.4.3 SENSITIVITY
• Choose the SENSITIVITY in the MOTION menu with the UP/DOWN buttons.
• Choose a SENSITIVITY among 0, 1, 2, 3, 4 and 5 by using the LEFT/RIGHT button. “0”
is lowest value and “5” is the highest value.
- 24 -

5.4.4 MOTION HOLD
• Choose the MOTION HOLD in the MOTION menu with the UP/DOWN buttons
• Press the ENTER Key button to set up the MOTION HOLD..
• Choose the time duration (1sec. ~ 15sec.) with UP / DOWN key buttons
• After set-up the time duration, press the ENTER Key.
• Press the ESC button to exit.
5.4.5 AREA
• Choose the AREA in the MOTION menu with the UP/DOWN buttons
• Press the ENTER button to create the motion detection AREA.
• Move the symbol “O” by using the UP / DOWN / LEFT / RIGHT buttons and select the
area where you would like to create, and press the ENTER button.
• To release the motion detection area, press the ENTER button after moving the symbol
“O” to the same area where you created.
• Press the ESC button to exit.
Created Motion
detection area
NOTE
The OSD or OSD+BUZZER and the motion detection AREA should be selected
for motion recording.
The system will not save recorded data to the Hard Disk Drive (HDD) when the unit is set to the
improper recording mode (endless motion detection). To correct this, change the recording mode
to the Continuous Recording mode for most applications.
Please pay attention to the following directions in order to use the Motion Detection function
properly:
• Adjust the sensitivity level and motion area to fit your requirements.
• Do not use this function in an area where many objects are continuously moving. In case
of this, change the recording mode to the Continuous Recording mode.
• Use a high quality camera that does not generate video static or “noise”. The motion
detection algorithm recognizes this “noise” as a motion and records the noise even if
there was no actual motion.
• Do not point the camera toward a strong and changing lighting source; it can activate a
false motion detection.
- 25 -

5.4.6 How to set up the Continuous Recording in the Motion Recording mode
(For Continuous Recording + Motion Recording)
If you wish to record by Motion Detection function along with the Continuous Recording on a
couple of channels out of four channels, the following directions will help you out.
• Choose the CHANNEL in the MOTION menu with the UP/DOWN buttons.
• Choose a channel among CH1, CH2, CH3 and CH4 by repeatedly pressing the ENTER
button.
• Choose the SENSITIVITY in the MOTION menu with the UP/DOWN buttons.
• Set the SENSITIVITY to ZERO (“0”) value by using the LEFT/RIGHT button.
• Or, do not create Motion Detection area.
• Press the “REC” button on the front panel.
5.4.6.1 For Motion Recording only (four channels)
• Choose the MOTION in the MOTION menu with the UP/DOWN buttons.
• Select one between OSD and OSD+BUZZER by pressing the ENTER button.
• Choose a SENSITIVITY among 1,2,3,4 and 5 by using the LEFT/RIGHT button.
• Create the Motion Detection area (Refer to the manual for further details).
• Press the “REC” button on the front panel.
5.4.6.2 For Continuous Recording only (four channels)
• Choose the MOTION in the MOTION menu with the UP/DOWN buttons.
• Select OFF among OFF, OSD and OSD+BUZZER by pressing the ENTER button.
• Press the “REC” button on the front panel.
For more details, please read the instruction manual thoroughly.
5.5 SYSTEM
- Choose the SYSTEM in the MAIN SETUP menu by using UP/DOWN buttons.
- Press the ENTER button and the SYSTEM menu will be displayed.
- Press the ESC button to exit.
5.5.1 TIME / DATE
• Choose the TIME/ DATE in the SYSTEM menu with the UP/DOWN buttons.
• Press the ENTER button, and the TIME /DATE SET menu will be displayed.
5.5.1.1 TIME FORMAT
• Choose the TIME FORMAT in the TIME /DATE SET menu with the UP/DOWN buttons.
• Select the 12 HOURS or 24 HOURS mode by using the ENTER button.
5.5.1.2 TIME
• Choose the TIME in the TIME /DATE SET menu with the UP/DOWN buttons.
• Press the ENTER button to make TIME changes.
• Select Hour/Min/Sec by using the LEFT/RIGHT buttons and change the values by using
the UP/DOWN buttons.
- 26 -

• To apply the setting, press the ENTER button.
5.5.1.3 DATE FORMAT
• Choose the DATE FORMAT in the TIME /DATE SET menu with the UP/DOWN buttons.
• Select the DATE FORMAT by pressing the ENTER button.
There are three formats to display the time and date as follows.
MM / DD / YYYY: For U.S.A.
YYYY / MM / DD: For Asian Countries.
DD / MM / YYYY: For European Countries.
5.5.1.4 DATE
• Choose the DATE in the TIME /DATE SET menu with the UP/DOWN buttons.
• Press the ENTER button to make DATE changes.
• Select Month/Day/Year by using the LEFT/RIGHT buttons and change the values by
using the UP/DOWN buttons.
• To apply the setting, press the ENTER button.
• Press the ESC button to exit.
5.5.2 HARD DISK
■ When you install the new Hard Disk Drive (HDD), it should be formatted
before recording. Formatting is possible only when the system is in the
LIVE mode.
■ Factory installed a 160GB of HDD as Master (jumper setting) in the
• Maximum 2 HDDs can be connected to the system
• Choose the HARD DISK in the SYSTEM menu with the UP/DOWN buttons.
• Press the ENTER button, and the HARD DISK menu will be displayed.
• Refer to section 6.1 in regards to HDD installation.
5.5.2.1 HDD1
• Shows the available space and the used space of HDD1.
• Select the HDD1 in HDD DISK menu to format by using the UP/DOWN buttons and press
the ENTER button, and the HDD FORMAT: YES, NO will be displayed. If YES is selected
by using the LEFT/RIGHT/ENTER button, it starts to formatting or select NO for going
back to the previous mode.
5.5.2.2 HDD2
• Shows the available space and the used space of HDD2.
• Select the HDD2 in HDD DISK menu to format by using the UP/DOWN buttons and press
the ENTER button, and the HDD FORMAT: YES, NO will be displayed. If YES is selected
- 27 -

by using the LEFT/RIGHT/ENTER button, it starts to formatting or select NO for going
back to the previous mode.
5.5.2.3 HDD INFO
• Choose the HDD INFO in the HARD DISK menu by using UP/DOWN buttons.
• Select BYTE, PERCENTAGE or OFF by pressing the ENTER button.
• Press the ESC button to exit.
BYTE: Indicates the remaining space of HDD in byte.
PERCENTAGE: Indicates the remaining space of HDD in percentage.
OFF: Will not display HDD information.
5.5.3 FACTORY DEFAULT SETTING
• Choose the FACTORY DEFAULT SETTING in the SYSTEM menu with the UP/DOWN
buttons.
• Press the ENTER button, and the FACTORY DEFAULT: YES, NO will be displayed. If
YES is selected by using the LEFT/RIGHT/ENTER button, the system will replace the
existing values with the factory default values, or select NO for going back to the previous
mode.
• Press the ESC button to exit.
TIME/DATE information does not change.
NOTE
All the DDNS information will be lost.
All the SCHEDULE REC setup values will be lost.
5.5.4 SYSTEM INFORMATION
• Choose the SYSTEM INFORMATION in the SYSTEM menu with the UP/DOWN buttons.
• Press the ENTER button to view the SYSTEM INFORMATION screen which shows the
current Firmware Version number.
• Press the ESC button to exit.
5.5.5 FIRMWARE UPDATE
• Choose the FIRMWARE UPDATE in the SYSTEM menu with the UP/DOWN buttons.
• Press the
There are two ways to update the FIRMWARE through USB memory and the GUI. We,
manufacturer recommend you not to update the system without our permission.
ENTER button and the FIRMWARE UPDATE menu will be displayed.
This section is not for users, only for manufacturer and distribution
center.
5.5.6 IP CONFIGURATION
• Choose the IP CONFIGURATION in the SYSTEM menu with the UP/DOWN buttons.
• Press the ENTER button and the IP CONFIGURATION menu will be displayed.
• Press the ESC button to exit.
- 28 -

5.5.6.1 IP MODE
• Choose the IP MODE in the IP CONFIGURATION menu with the UP/DOWN buttons.
• Choose DYNAMIC IP or STATIC IP by pressing the ENTER button.
DYNAMIC IP: The IP is automatically allocated via router. Therefore the IP address, subnet
mask and gateway address will be automatically allocated.
STATIC IP: This has to be set when the STATIC IP is used. The subnet mask and gateway
address has to be set as well.
5.5.6.2 IP ADDRESS
• Choose the IP ADDRESS in the IP CONFIGURATION menu with the UP/DOWN buttons
and press the ENTER button.
• Select the digits by using the LEFT/RIGHT buttons and change the values with the
UP/DOWN buttons.
• After completing, press the ENTER button to apply the IP ADDRESS setting to the
system.
5.5.6.3 SUBNET
• Choose the SUBNET in the IP CONFIGURATION menu with the UP/DOWN buttons and
press the ENTER button.
• Select the digits by using the LEFT/RIGHT buttons and change the values with the
UP/DOWN buttons.
• After completing, press the ENTER button to apply the SUBNETMASK setting to the
system.
5.5.6.4 GATEWAY
• Choose the GATEWAY in the IP CONFIGURATION menu with the UP/DOWN buttons
and press the ENTER button.
• Select the digits by using the LEFT/RIGHT buttons and change the values with the
UP/DOWN buttons.
• After completing, press the ENTER button to apply the GATEWAY
setting to the system.
5.5.6.5 PORT
• The PORT is the TCP address of the program, which is used to connect to the network
viewer and has a range of 0000 to 9999.
• Choose the PORT in the IP CONFIGURATION menu with the UP/DOWN buttons and
press the ENTER button.
• Select the digits by using the LEFT/RIGHT buttons and change the values with the
UP/DOWN buttons.
• After completing, press the ENTER button to apply the PORT setting to the system.
- 29 -

NOTE:
- Router has to be set as a virtual server (or port forwarding) in order to utilize
5.5.6.6 MAC ID
The MAC ADDRESS was consigned to each DVR at the factory.
5.5.7 NETWORK PERFORMANCE
• Choose the NETWORK PERFORMANCE in the SYSTEM menu with the UP/DOWN
• Press the ENTER button and the NETWORK PERFORMANCE window will be displayed.
• Choose a bandwidth among 0.4, 1, 2, 4, 8 mbps (Mega Bit Per Second) and MAX by
the DDNS service (See section 5.11 for more details).
- Do not use the public port numbers.
- Four Port numbers (in sequence) including the default port number should
be forwarded.
- Ex: Default port number: 5700.
Forwarding ports: 5700 / 5701 / 5702 / 5703.
buttons.
repeatedly pressing the ENTER button.
NOTE:
The connection speed can vary depending on the circumstances and conditions
of your Internet and computer. If your system starts to slow down, please adjust
the speed to one setting up or down until the best result.
5.6 VIDEO
- Choose the VIDEO in the MAIN SETUP menu by using UP/DOWN buttons.
- Press the ENTER button and the
- Press the ESC button to exit.
5.6.1 CAMERA TITLE
• Choose the CAMERA TITLE in the
• Press the ENTER button, and the CAMERA TITLE menu will be displayed.
• Select the desired channel by using UP/DOWN buttons and press the ENTER button to
change the title of the desired channel.
• Select the digits by using the LEFT/RIGHT buttons and change the values with the
UP/DOWN buttons.
• After changing the values, press the ENTER button.
VIDEO menu will be displayed.
VIDEO menu with the UP/DOWN buttons.
NOTE Maximum 8 letters can be set.
- 30 -
5.6.2 DWELL TIME
• Choose the DWELL TIME in the
• Press the ENTER button, and the DWELL TIME menu will be displayed.
• Select the desired channel by using UP/DOWN buttons and press the ENTER button to
change the dwell time of the desired channel.
• After changing the values, press the ENTER button.
- Dwell Time can be setup from 0 sec to 10 sec.
NOTE
- If selecting “0”, the corresponding channel will automatically be skipped in the
sequential mode.
VIDEO menu with the UP/DOWN buttons.
5.7 RECORD
- Choose the RECORD in the MAIN SETUP menu by using UP/DOWN buttons.
- Press the ENTER button and the
- Press and hold the RECORD button for about 3 seconds to exit.
5.7.1 REC QUALITY
• Choose the REC QUALITY in the RECORD menu by using UP/DOWN buttons.
• Choose one among LOW, NORMAL, HIGH and VERY HIGH by pressing the ENTER
button.
5.7.1 REC RESOLUTION
• Choose the REC RESOLUTION in the RECORD menu by using UP/DOWN buttons.
• Choose one among 720H, 360H and CIF by pressing the ENTER button.
RECORD menu will be displayed.
NOTE
5.7.3 REC SPEED
• Choose the REC SPEED in the RECORD menu by using UP/DOWN buttons.
• Choose one among 01, 02, 03, 05, 10, 15, 30 and 60 IPS (when 720H or 360H in the
REC RESOLUTION is selected) by repeatedly pressing the ENTER button. It will be fixed
to 120 IPS if CIF is selected.
5.7.4 HDD OVERWRITE
• Choose the HDD OVERWRITE in the RECORD menu by using UP/DOWN buttons.
Select ON or OFF by pressing the ENTER button.
•
During “OFF” mode, the system stops recording when the space of HDD is in full. At “ON”
mode, the system continues recording by overwriting start from the first index of the recorded
file when the space of HDD is in full.
NOTE: If the recording speed or quality is too low, the existing lists can be overwritten.
If 360H is selected, the volume of saved data will amount to half of 720H.
- 31 -

5.7.5 AUDIO REC
• Choose the AUDIO REC in the RECORD menu by using UP/DOWN buttons.
• Select ON or OFF by pressing the ENTER button.
NOTE: The system does not record when the recording speed is set to less than 4 IPS.
5.7.6 SCHEDULE REC
• Choose the SCHEDULE REC in the RECORD menu by using UP/DOWN buttons.
• Press the ENTER button and the SCHEDULE RECORD SET menu will be displayed.
5.7.6.1 SCHEDULE REC
• Choose the SCHEDULE REC in the SCHEDULE RECORD SET menu by using
UP/DOWN buttons.
• Choose one among ONCE, DAILY and OFF by pressing the ENTER button.
5.7.6.2 SCHEDULE REC TIME SETUP
• Select a line where you wish to setup the start and time with the UP/DOWN buttons and
press the ENTER button.
• Select the START TIME and END TIME by using the LEFT/RIGHT buttons and change
the values with the UP/DOWN buttons.
• After completing, press the ENTER button to apply the values to the system.
• To delete, select a scheduled recording line with the UP/DOWN buttons and press the
LEFT or RIGHT button. You will be asked whether the scheduled recording line clear or
not. Select YES or NO with the LEFT/RIGHT buttons and press the ENTER button.
NOTE: The recording schedule time can be set in military hour mode (24 hour)
5.8 DISPLAY
- Choose the DISPLAY in the MAIN SETUP menu by using UP/DOWN buttons.
- Press the ENTER button and the
- Press the ESC button to exit.
5.8.1 TITLE DISPLAY
• Choose the TITLE DISPLAY in the DISPLAY menu by using UP/DOWN buttons.
• Select ON or OFF by pressing the ENTER button.
At “ON” mode, the camera title will be shown on the screen.
5.8.2 BORDER LINE
• Choose the BORDER LINE in the DISPLAY menu by using UP/DOWN buttons.
• Select ON or OFF by pressing the ENTER button.
DISPLAY menu will be displayed.
- 32 -

At “ON” mode, the borderline will be shown on the screen.
5.8.3 TIME/DATE
• Choose the TIME/DATE in the DISPLAY menu by using UP/DOWN buttons.
• Select ON or OFF by pressing the ENTER button.
At “ON” mode, the time/date will be shown on the screen.
5.8.4 POSITION
• Choose the POSITION in the DISPLAY menu by using UP/DOWN buttons.
• Select TOP or BOTTOM by pressing the ENTER button.
The time and date will be shown on the top or bottom of the screen depending on selecting
TOP or BOTTOM.
5.9 BUZZER
- Choose the BUZZER in the MAIN SETUP menu by using UP/DOWN buttons.
- Press the ENTER button and the
- Press the ESC button to exit.
5.9.1 KEY BUZZER
• Choose the KEY BUZZER in the BUZZER menu by using UP/DOWN buttons.
• Select ON or OFF by pressing the ENTER button.
Whenever the buttons are pressed in “ON” mode, the BUZZER will sound.
5.9.2 VIDEO LOSS
• Choose the VIDEO LOSS in the BUZZER menu by using UP/DOWN buttons.
• Select ON or OFF by pressing the ENTER button.
At “ON” mode, the buzzer will sound when the video Input signal is interrupted.
BUZZER menu will be displayed.
5.10 ACCOUNT
- Choose the ACCOUNT in the MAIN SETUP menu by using UP/DOWN buttons.
- Press the ENTER button and the
- Press the ESC button to exit.
5.10.1 DVR ACCOUNT SET
ACCOUNT menu will be displayed.
NOTE
• Choose the DVR ACCOUNT SET in the ACCOUNT menu by using UP/DOWN buttons.
• Press the ENTER button and the DVR
If you execute the factory default setting, the existing password will be changed
to 11111111.
ACCOUNT menu will be displayed.
- 33 -

5.10.1.1 PASSWORD
• Select the PASSWORD in the DVR ACCOUNT menu by using UP/DOWN buttons.
• Select ON or OFF by using the ENTER button.
• If ON is selected, the password has to be entered to get into the following mode.
Setup mode, Search mode, Record mode, Record stop mode, PTZ mode and System
Log mode.
• The password must be 8 digits.
5.10.1.2 PASSWORD CHANGE
• Select the PASSWORD CHANGE in the DVR ACCOUNT menu by using UP/DOWN
buttons.
• Press the ENTER button and you will be requested to enter the current password as
below.
• Enter the current password by using CH1 (number 1), CH2 (number 2), CH3 (number 3)
and CH4 (number 4) buttons. If the entered password is incorrect, user cannot create a
new password. If the password is correct, you will be requested to enter a new password
and to confirm as below.
• Press the ENTER button to save the newly created password to the system.
5.10.2 NETWORK ACCOUNT SET
• Select the NETWORK ACCOUNT SET in the ACCOUNT menu by using UP/DOWN
buttons.
- 34 -

• Press the ENTER button and the NETWORK ACCOUNT menu will be displayed.
5.10.2.1 USER ID
• Select the USER ID in the NETWORK ACCOUNT menu by using UP/DOWN buttons.
• Press the ENTER button.
• Change the values up to 5 digits with the UP/DOWN buttons and move the digits with the
LEFT/RIGHT button.
• Press the ENTER button to save the values to the system.
5.10.2.2 USER P/W
• Select the USER P/W in the NETWORK ACCOUNT menu by using UP/DOWN buttons.
• Press the ENTER button.
• Change the values up to 5 digits with the UP/DOWN buttons and move the digits with the
LEFT/RIGHT button.
• Press the ENTER button to save the values to the system.
5.10.2.3 GUEST P/W
• Select the GUEST P/W in the NETWORK ACCOUNT menu by using UP/DOWN buttons.
• Press the ENTER button.
• Change the values up to 5 digits with the UP/DOWN buttons and move the digits with the
LEFT/RIGHT button.
• Press the ENTER button to save the values to the system.
NOTE:
■ User ID & P/W (password) given as an administrator are ADMIN, and Guest ID & P/W
given as a guest are GUEST.
■ The ADMIN can change the values, controlling and monitoring through the GUI, but the
GUEST has the limited authority such as monitoring and partly changing the values on
the GUI.
5.11 DDNS
- Choose the DDNS in the MAIN SETUP menu by using UP/DOWN buttons.
- Press the ENTER button and the
- Press the ESC button to exit.
5.11.1 DDNS USE
• Select the DDNS USE in the DDNS SET menu by using UP/DOWN buttons.
• Choose one among CLOVERDDNS, DYNDNS.ORG and NO by pressing the ENTER
button.
CLOVERDNS: DDNS service provided by www.cloverdvr.com.
DYNDNS.ORG: DDNS service provided by www.dyndns.org
NO: No DDNS service
DDNS menu will be displayed.
- 35 -

5.11.2 HOST NAME
• Choose the HOST NAME in the DDNS SET menu with the UP/DOWN buttons.
• Press the ENTER button to change the values with the UP/DOWN buttons and select the
digits (up to 8 digits) by using the LEFT/RIGHT buttons.
• After changing the values, press the ENTER button.
5.11.3 USER NAME
• Choose the USER NAME in the DDNS SET menu with the UP/DOWN buttons.
• Press the ENTER button to change the values with the UP/DOWN buttons and select the
digits (up to 8 digits) by using the LEFT/RIGHT buttons.
• After changing the values, press the ENTER button.
5.11.4 PASSWORD
• Choose the PASSWORD in the DDNS SET menu with the UP/DOWN buttons.
• Press the ENTER button to change the values with the UP/DOWN buttons and select the
digits (up to 8 digits) by using the LEFT/RIGHT buttons.
• After changing the values, press the ENTER button.
5.11.5 HOW TO SETUP AND USE DDNS
5.11.5.1 Router
It has to be set as a virtual server (or port forwarding) in order to utilize the DDNS. There are a
lot of manufacturers on the market. Please read the provided manual thoroughly before setting
or visit our website at
www.cloverusa.com in regards to do it.
We, the manufacturer of DVR systems will not support the solution to your individual network
issues.
** DDNS (Dynamic Domain Name System) is a method of keeping a domain name linked to a
changing IP address. This is a useful feature since many computers do not use a static IP
address.
5.11.5.2 REGISTRATION TO THE DDNS SERVER
Visit at
www.dyndns.org or www.cloverdvr.com to register.
Registration to DYNDNS.ORG
1. Go to website www.dyndns.com
2. Sign up for new user name and password.
3. After signup new user, check your e-mail and confirm e-mail from dyndns.com
4. G back to
5. After log in on dyndns.com front page, click on my services
6. Click on Add Host Service (Next to Host Level Service)
7. Add Dynamic DNS Host.
8. Select Add Dynamic DNS Host on the Dynamic DNS.
9. Window to input Host Name will pop up. After entering, select the address to
dyndns.org.
www.dyndns.com and log in with ID and Password.
- 36 -

10. To complete, click Add Host on the bottom.
11. After registration, go to the DDNS SET menu on the DVR.
12. Refer to section 5.11 DDNS in this manual for the next step.
Registration to CLOVERDVR.COM
1. Go to website
2. Select Insert New User.
3. Enter your ID and Password (up to 8 digits), and press Submit.
4. New ID will be created.
5. Press Go Home.
6. Select View User.
7. Enter your ID and Password and press Submit.
8. Now you can see the ID, Domain and IP address.
9. After registration, go to the DDNS SET menu on the DVR.
10. Enter the registered ID to the HOST NAME and USER NAME in the DDNS SET
menu.
11. Refer to section 5.11 DDNS in this manual for the next step.
www.cloverdvr.com
6. INSTALL THE HDD
6.1 INSTALL THE HDD1
DVR manufacturer already installed a 160GB of HDD1 as MASTER in the removable HDD rack.
Just in case, refer to the following explanation on how to install HDD (Hard Disk Drive).
CAUTION The power switch must be turned off before installing.
Removable HDD Rack
USB
SETUP
PTZ
ALRST
QUAD
CH3 C H4CH2CH1
AUTO
ENTER
BACKUP
SEARCHESC STOP REW FFPLAY
WTMK
A-LIST
REC PLAY TIMER ALARM FULL POWER
PIP
POP
PAUSE
REC
1. Separate the removable HDD rack from the system.
2. Refer to the HDD manufacturer’s directions on how to set the jumper for master or slave when
assembling.
3. Make sure the power connector and the flat cable are properly connected.
4. Attach the HDD to the removable HDD rack and secure it with the supplied screws as below.
- 37 -

5. Assemble and put the removable HDD rack back in it’s place.
6. Turn the power on and see if the HDD is being recognized.
NOTE
If the HDD is not recognized after installing, please check the HDD jumper setting,
power cable and data cable connection.
6.2 INSTALL THE HDD2
TO INSTALL A HARD DISK DRIVE (HDD) FOR SLAVE, UNPLUG
CAUTION
THE AC POWER CORD AS THIS CAN RESULT IN A RISK OF
ELECTRIC SHOCK.
The HDD2 (SLAVE) can be installed inside of the system.
The power switch must be turned off and unplug the power cord to prevent an electric shock may
happen.
1. Turn the power switch off and unplug the power cord.
2. Remove the cover by using driver.
(Remove the screws on both side and back of the product.)
3. Set the jumper setting to SLAVE on the HDD.
There are four holes on the bottom of the system. Attach the HDD2 to the bottom (Refer to the
below).
HDD2 ATTACHING POINT
- 38 -

NOTE
4. Secure the HDD with the supplied screws as below.
5. Connect the power connector and the flat cable to the HDD.
Be sure that the jumper setting is correct. If not, the system will not recognize the
additional HDD (SLAVE).
FIX SCREW
NOTE
6. Reassemble the cover.
7. Turn the power on and see if the HDD is being recognized.
NOTE
Be sure that the power connector and the flat cable are properly connected.
After installing the additional HDD, formatting the new HDD should be performed.
See 5.5.2 Hard Drive for more details.
- 39 -

7. PTZ CONTROL
1. Connect Pan/Tilt/Zoom camera’s control to RS485(+) / RS485(-) port on the rear of the system.
2. The video output of Pan/Tilt/Zoom camera to the one out of channel you wish to connect.
3. Press and hold the PTZ button for about 3 seconds on the front panel and the PAN/TILT
CONTROL screen will be displayed on the monitor.
4. Can select the order for control that user wants to do whenever ENTER button is pressed.
MOVE: Change the position of screen shown on Pan/Tilt Zoom camera.
ZOOM: Change zoom in/out value of the screen shown on Pan/Tilt Zoom camera.
FOCUS: Change focus value of the screen shown on Pan/Tilt Zoom camera.
CH SEL: Select the channel that is connect to Pan/Tilt Zoom camera.
5. After finishing setup, Press the ESC button to exit.
• Connect only one Pan/Tilt/Zoom camera on the system.
NOTE
• The protocol of P/T/Z camera should be Pelco-D Protocol.
• The baud rate of P/T/Z camera must be 2,400bps (bit per second).
ORDER
CAMERA TITLE
- 40 -

8. INSTALLATION
8.1 System Configuration Diagram
The following illustration is showing the fully installed system.
CAMERA (BNC)
CH1 CH2 CH3 CH4
VIDEO IN
LOOP OUT
TIME LAPS VCR
V - OUT1 A - IN
A - OUT
V - OUT2
Audio Output
Audio Input
(Microphone)
ALARM
ALARM IN
1234
ETHERNET
GND
(Speaker)
ALARM OUT
_
+
RS485
RISK OF ELECTRONIC SHOCK
&/2=(5
ELECTRONICS U.S.A
MODEL NO : CDR4170
AC100-240V,50/60Hz, 25W
CLOVER ELECTRONICS
13073 EAST 166TH STREET, CERRITOS, CA 90703
Factory ID/DHHS CODE : BC
DO NOT OPEN
PTZ CAMERA
R
C US LITED
E233232
AUDIO/VIDEO EQUIPMENT 2UW2
ATTENTIONCAUTION
RISQUE DE CHOC ELECTROIQUE
NE PAS ENLEVER
POWER
INTERNET
COMPUTER
AC INPUT
AC100-240V,50/60Hz
- 41 -

8.2 CAMERA
This product can be installed up to 4 cameras.
Connect cameras to the VIDEO IN (BNC) on the back panel of the product.
To connect a PTZ camera, connect the PTZ camera’s control line to the RS-485 (+, -) terminal
and connect the video output to one out of VIDEO IN on the back panel of the product.
CAMERA (BNC)
CH1 CH2 CH3 CH4
VIDEO IN
LOOP OUT
V - OUT1 A - IN
A - OUT
V - OUT2
ALARM IN
1234
ETHERNET
GND
ALARM OUT
_
+
RS485
RISK OF ELECTRONIC SHOCK
&/2=(5
ELECTRONICS U.S.A
MODEL NO : CDR4170
AC100-240V,50/60Hz, 25W
CLOVER ELECTRONICS
13073 EAST 166TH STREET, CERRITOS, CA 90703
Factory ID/DHHS CODE : BC
DO NOT OPEN
PTZ CAMERA
R
C US LITED
E233232
AUDIO/VIDEO EQUIPMENT 2UW2
ATTENTIONCAUTION
RISQUE DE CHOC ELECTROIQUE
NE PAS ENLEVER
POWER
AC INPUT
AC100-240V,50/60Hz
NOTE
A LOOP OUT is a looping output trough VIDEO IN. Therefore the monitor for
looping output can be used only when there is video signal on the VIDEO IN.
- 42 -

8.3 AUDIO
The system has one channel audio input and output. If you wish to record and playback audio
signal, connect the proper audio device (microphone) to the AUDIO IN (1 Vp-p @600 ohms) and
speaker to the AUDIO OUTPUT (See illustration below).
Microphone
CAMERA (BNC)
CH1 CH2 CH3 CH4
VIDEO IN
LOOP OUT
V - OUT1 A - IN
A - OUT
V - OUT2
ALARM IN
1234
ETHERNET
GND
ALARM OUT
_
+
RS485
RISK OF ELECTRONIC SHOCK
&/2=(5
ELECTRONICS U.S.A
MODEL NO : CDR4170
AC100-240V,50/60Hz, 25W
CLOVER ELECTRONICS
13073 EAST 166TH STREET, CERRITOS, CA 90703
Factory ID/DHHS CODE : BC
DO NOT OPEN
R
C US LITED
E233232
AUDIO/VIDEO EQUIPMENT 2UW2
ATTENTIONCAUTION
RISQUE DE CHOC ELECTROIQUE
NE PAS ENLEVER
AC INPUT
POWER
AC100-240V,50/60Hz
Speaker
MONITOR
- 43 -
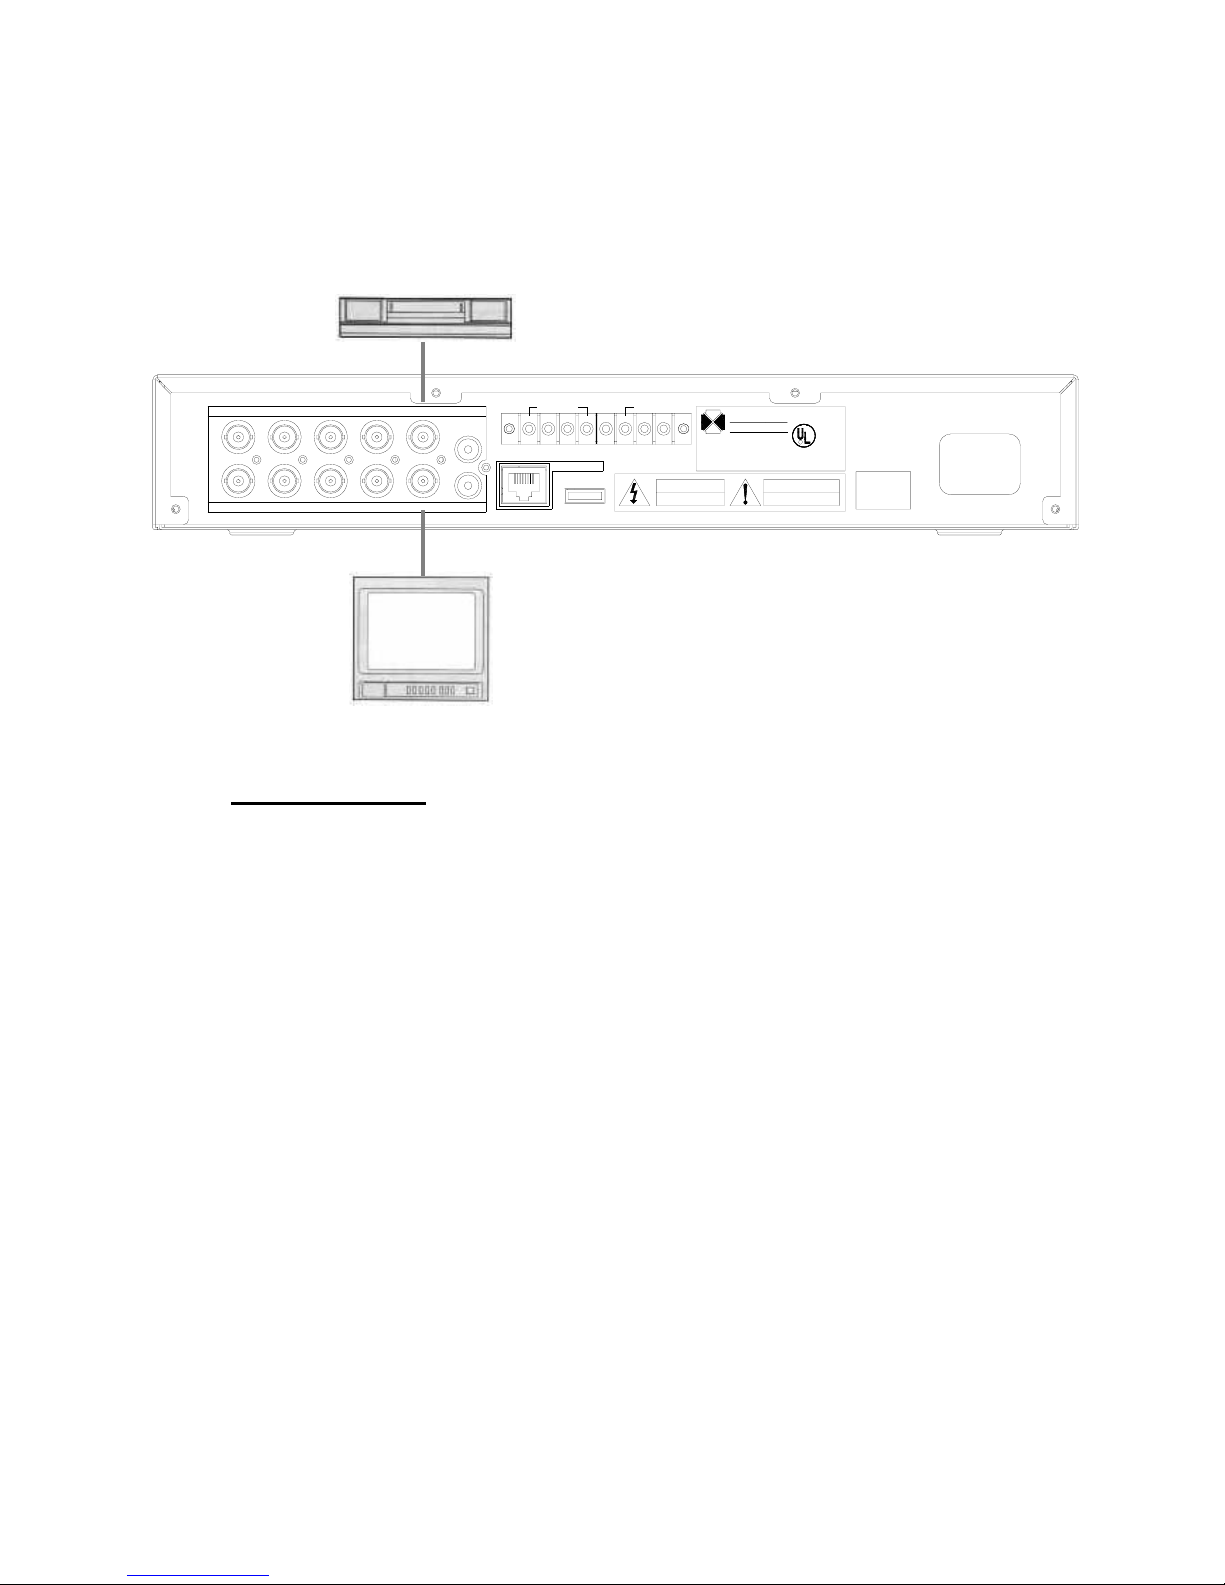
8.4 MONITOR
There are two video outputs (BNC) on the rear panel of this system. Connect monitors, Time
Lapse VCR for backup on the tape and etc. depending on your application.
TIME LAPS VCR
CH1 CH2 CH3 CH4
VIDEO IN V - OUT1 A - IN
LOOP OUT
V - OUT2
A - OUT
ALARM IN
1234
ETHERNET
GND
ALARM OUT
_
+
RS485
RISK OF ELECTRONIC SHOCK
&/2=(5
ELECTRONICS U.S.A
MODEL NO : CDR4170
AC100-240V,50/60Hz, 25W
CLOVER ELECTRONICS
13073 EAST 166TH STREET, CERRITOS, CA 90703
Factory ID/DHHS CODE : BC
DO NOT OPEN
R
C US LITED
E233232
AUDIO/VIDEO EQUIPMENT 2UW2
ATTENTIONCAUTION
RISQUE DE CHOC ELECTROIQUE
NE PAS ENLEVER
AC INPUT
POWER
AC100-240V,50/60Hz
MONITOR
9. NETWORKING
9.1 REQUIREMENTS
• DVR system
• PC
Required Specifications
1. OS: Microsoft Windows 98 / 2000 / XP
2. CPU: PENTIUM-4 1.0GB or higher
3. MEMORY: 256MB or higher
4. 1024x768 Display Resolution
32 Bit Color
5. Hard Disk Drive: 10 MB (Minimum space to install the program.)
(In order to use SAVE or BACKUP function on the GUI, needs more space of the HDD)
6. Internet or LAN connection
7. TCP/IP installed
• Cable
1. Direct connection to PC: twist cable (cross over).
2. Connection via hub or router: direct cable.
• IP address
• Client program (supplied)
- 44 -

9.2 INSTALLING THE PROGRAM TO THE PC
Install the program into the PC by using program CD (supplied) as follows.
How to install the client program (CLDVR)
1. Start the operating system (Windows 98/2000/XP).
2. Insert the program CD into CD-ROM drive.
3. Open My Computer, and then select CD-ROM drive.
4. Select the CLDVR folder, and then double click Setup.EXE. The software installation will
begin.
5. After the installation has been completed, the CLDVR icon will be created on your desktop
screen.
7. Double click the CLDVR icon and the CLDVR GUI program appears.
How to set Screen Color Resolution
1. Click Start, point to Control Panel and then click on it.
2. Double-click Display icon.
3. In Display Properties Window, select Settings.
4. Set Colors as True color (32 bit) and Screen area as 1024 by 768 pixels.
NOTE
A warning message due to a codec installation appears during installing
the program. Click “Continue Anyway button”.
9.3 CONNECTING THE DVR THROUGH GUI (CLDVR)
Double-click the CLDVR icon on your desktop to connect the DVR through GUI and the
following window will be displayed on the screen.
Click CONFIG button on the GUI (as shown below).
- 45 -
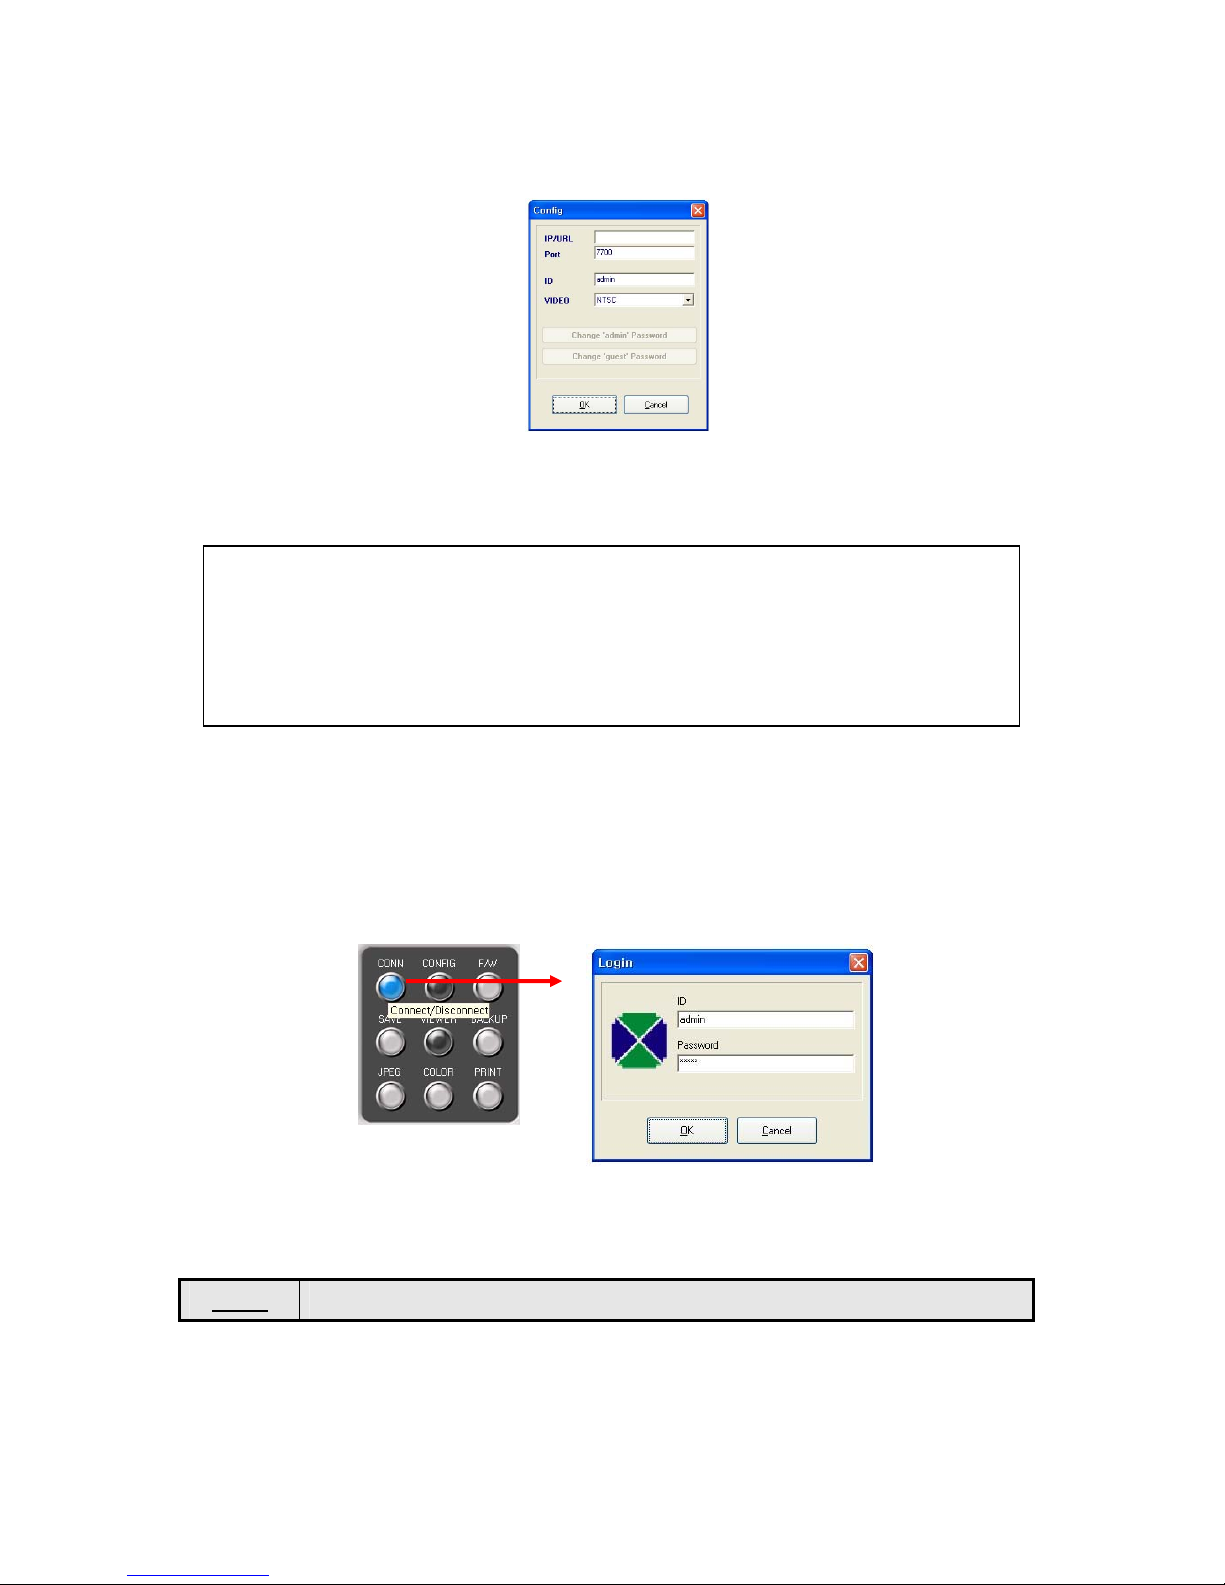
The following CONFIG screen will be shown.
• Enter the IP/URL, Port number (default: 5700) and ID (default: admin), which must be
the same as for DVR.
NOTE:
■ If the registered Host Name is CLOVER11 at
clover11.dyndns.org in IP/URL.
■ If the registered ID is CLOVER11 at
in IP/URL.
■ Please pay attention to port forwarding (refer to section 5.5.6.5 PORT).
• Select the video format depending on broadcasting system in your country (NTSC in
USA).
• Click OK button.
• Click the CONN button on the GUI and window comes up as below.
• Enter the ID (default: admin) and the Password (default: admin), which must be the
same as for DVR.
www.cloverdvr.com, enter clover11.cloverdvr.com
www.dyndns.org, enter
NOTE Maximum 2 users can connect the DVR through the GUI at the same time.
- 46 -

9.4 CLDVR SCREEN
clover.cloverdvr.com
1
2
3
4
2
1. CONNECTION STATUS INDICATOR
It indicates that is currently being connected IP address and bandwidth (transmission speed).
2. FUNCTION OF BUTTONS
Refer to next section.
3. LED DISPLAY, CLOCK
The LED is lit depends on mode such as LIVE, PLAYBACK and RECORD. And the clock
indicates the present time.
4. PTZ CONTROL
These buttons enable you to control the PTZ camera that is connected to the system.
9.5 EXPLANATION OF CLDVR FUNCTION
9.5.1 FUNCTION OF BUTTONS
1. F/W (FIRMWARE)
The FIRMWARE can be upgraded by pressing the F/W button or USB device.
- 47 -
This button is not for users, only for manufacturers and distribution center.
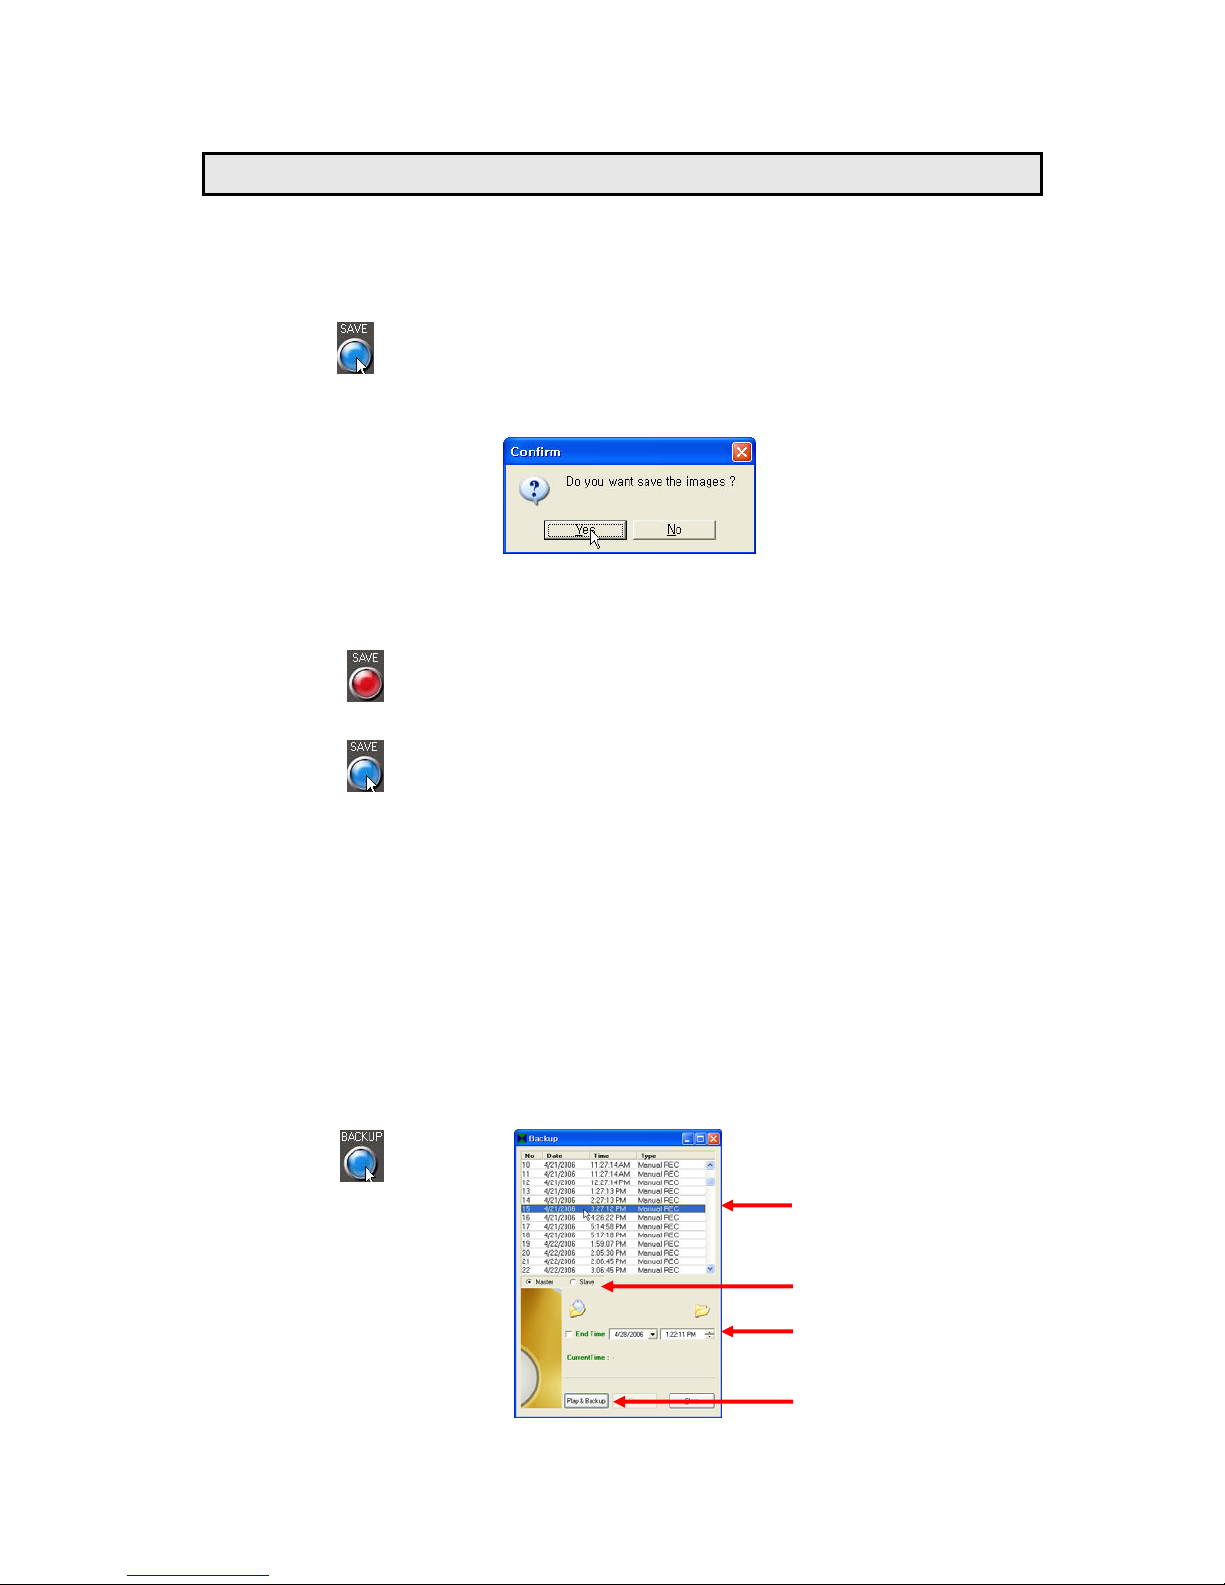
2. SAVE
• Click the SAVE button to save the video images that is currently being displayed on the
GUI.
• The following pop-up window will appear.
• Click YES.
• While saving data, this button will turn red in color.
• Click the SAVE button again to stop saving. The button will turn blue in color.
• To view the saved image file, click VIEWER>click OPEN in LOCAL VIEWER>double
click SAVE FILES in CLDVR>double click file list>click PLAY.
3. LOCAL VIEWER
• Click the VIEWER button and the LOCAL VIEWER screen will show up (See Section
9.6 for more details).
4. BACKUP
• Click the BACKUP button to save the data of DVR into PC and the following window will
be shown below.
2
1
3
4
- 48 -
1. Select the HDD (Master or Slave)
2. Select 1 out of the lists for setting up the Backup Start Time.
3. Setup the Backup End Time and click on blank box. If the End Time is not
selected, the BACKUP continues until the Playback automatically ends.
4. Click the Play&Backup button, and data will be saved on the BACKUP folder.
• If you wish to stop manually, click the STOP button.
• To view the Backup image file, click VIEWER>click OPEN in LOCAL VIEWER>double
click BACKUP FILES in CLDVR>double click file list>click PLAY.
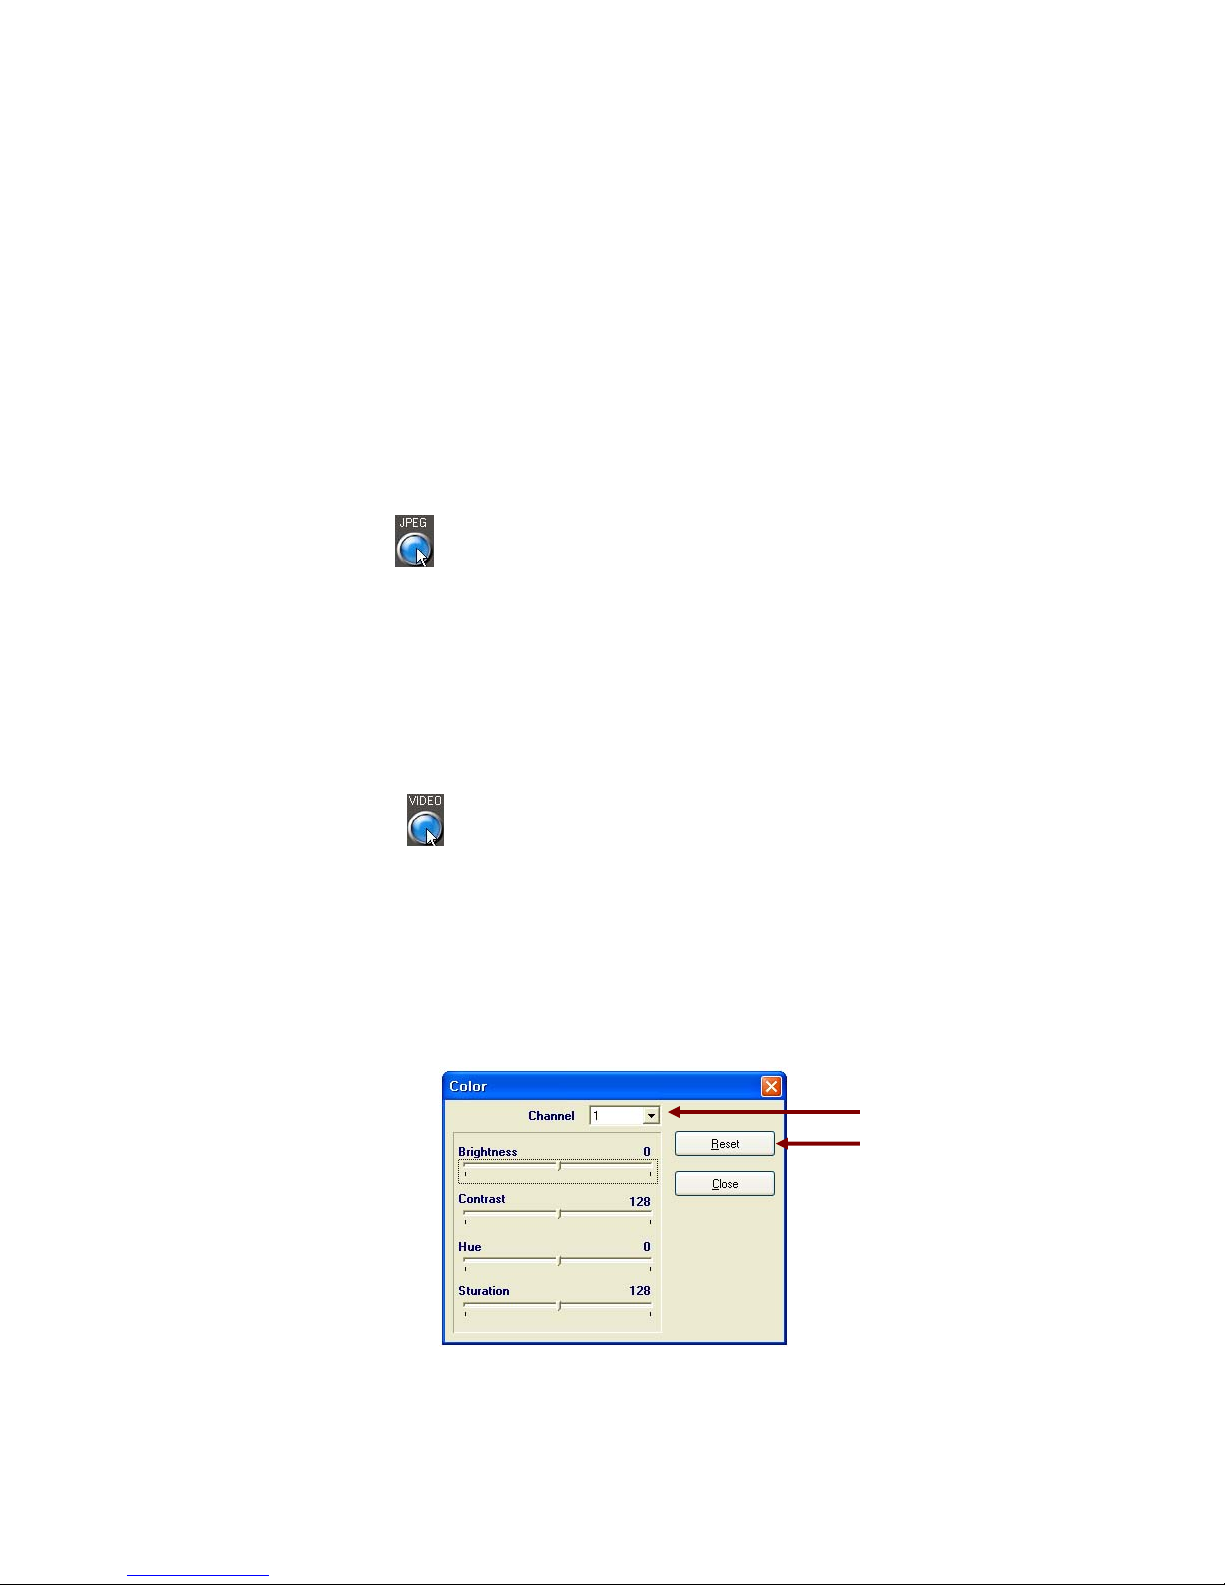
5. JPEG
• Click one out of 4 channels and then click the JPEG button to save the image in JPEG
file format. You can only save the selected channel (one channel).
• To view the saved file, go to the directory of the saved file by using Windows Explorer
and double click on it.
6. VIDEO ENHANCEMENT
• Click the VIDEO (VIDEO ENHANCEMENT) button to enhance the picture quality of each
channel such as Brightness, Contrast, Hue (Tint) and Saturation (Color) shown on the
GUI screen.
• Select channel you wish to enhance the picture quality.
• Click the RESET button to reset the values.
• To exit, click the CLOSE button.
Select Channel
Reset button
- 49 -

7. PRINT
• Click the PRINT button to print the current pictures shown on the GUI and then the
following window pops up along with “WAIT…”. Please wait a couple of seconds until the
system loads data to print.
8. REC
• Click the REC button to start or stop recording. User can switch ON or OFF recording
from a remote location through the network when the DVR is in the recording mode.
• When the system is in the recording mode, the button will turn red in color.
• If not recording, the button turns green in color.
9. CHANNEL SELECTION BUTTONS
• You can see a channel in full screen by clicking one of the channel selection buttons.
10. QUAD BUTTON
• Click the Quad button to display the quadrant pictures.
11. AUTO BUTTON
• The GUI will be viewed a full screen at a time in a continuous sequence (one camera
after another) by clicking this button.
• The dwell time can be set from 1 to 10 seconds in the SETUP menu on the GUI.
• The sequencing order: CH1->CH2->CH3->CH4->QUAD.
12. POP
• It stands for Picture of Picture.
• Click the POP button, and it will be displayed a medium screen and 3 small screens.
- 50 -

13. PIP
• It stands for Picture In picture.
• Click the PIP button, and it will be displayed 3 PIPs on a full screen.
14. SETUP
Click the SETUP button on the GUI, and it will be appeared the following window that can
change the values in regards to DVR.
• Time/Date: Shows the current time on the computer. After changing the values, press
the Update Time/Date button on the right side to save the values. This function does not
affect the DVR.
• REC. Quality: Shows the REC Quality values on the DVR. Change the values on the
window and press the Update REC.Quality button to save them. You can change the
values on the DVR related to the Continuous Recording and Alarm Recording.
• REC. Speed: Shows the REC Speed values on the DVR. Change the values on the
window and press the Update REC. Speed button to save them. You can change the
values on the DVR related to the Continuous Recording and Alarm Recording.
• REC. Resolution: Shows the REC Resolution values on the DVR. Change the values
on the window and press the Update REC.Quality button to save them.
• Installed HDD and Recording HDD: Shows currently installed HDD information such as
connection information, whole capacity and used space. It shows currently being
recorded HDD as well. Do not change the recording HDD as possible as you can.
• Water Mark (on the GUI): The WATER MARK allows you to verify if an original image
bas been altered. Click the WATER MARK ON to put the WATER MARK on the original
images. If the WATER MARK on the original images is being broken in the playback
mode, the images have been altered. If not, the images have not been altered.
This function does not affect the DVR.
• Dwell. Time: It can be adjusted from 1 to 10 seconds (See #11. AUTO BUTTON for
more details). This function does not affect the DVR.
• Firmware information: Current product’s firmware version and time when it was updated.
- 51 -
NOTE
If you connect the DVR through the GUI as a guest, you cannot change the
values. It allows a guest to monitor only.
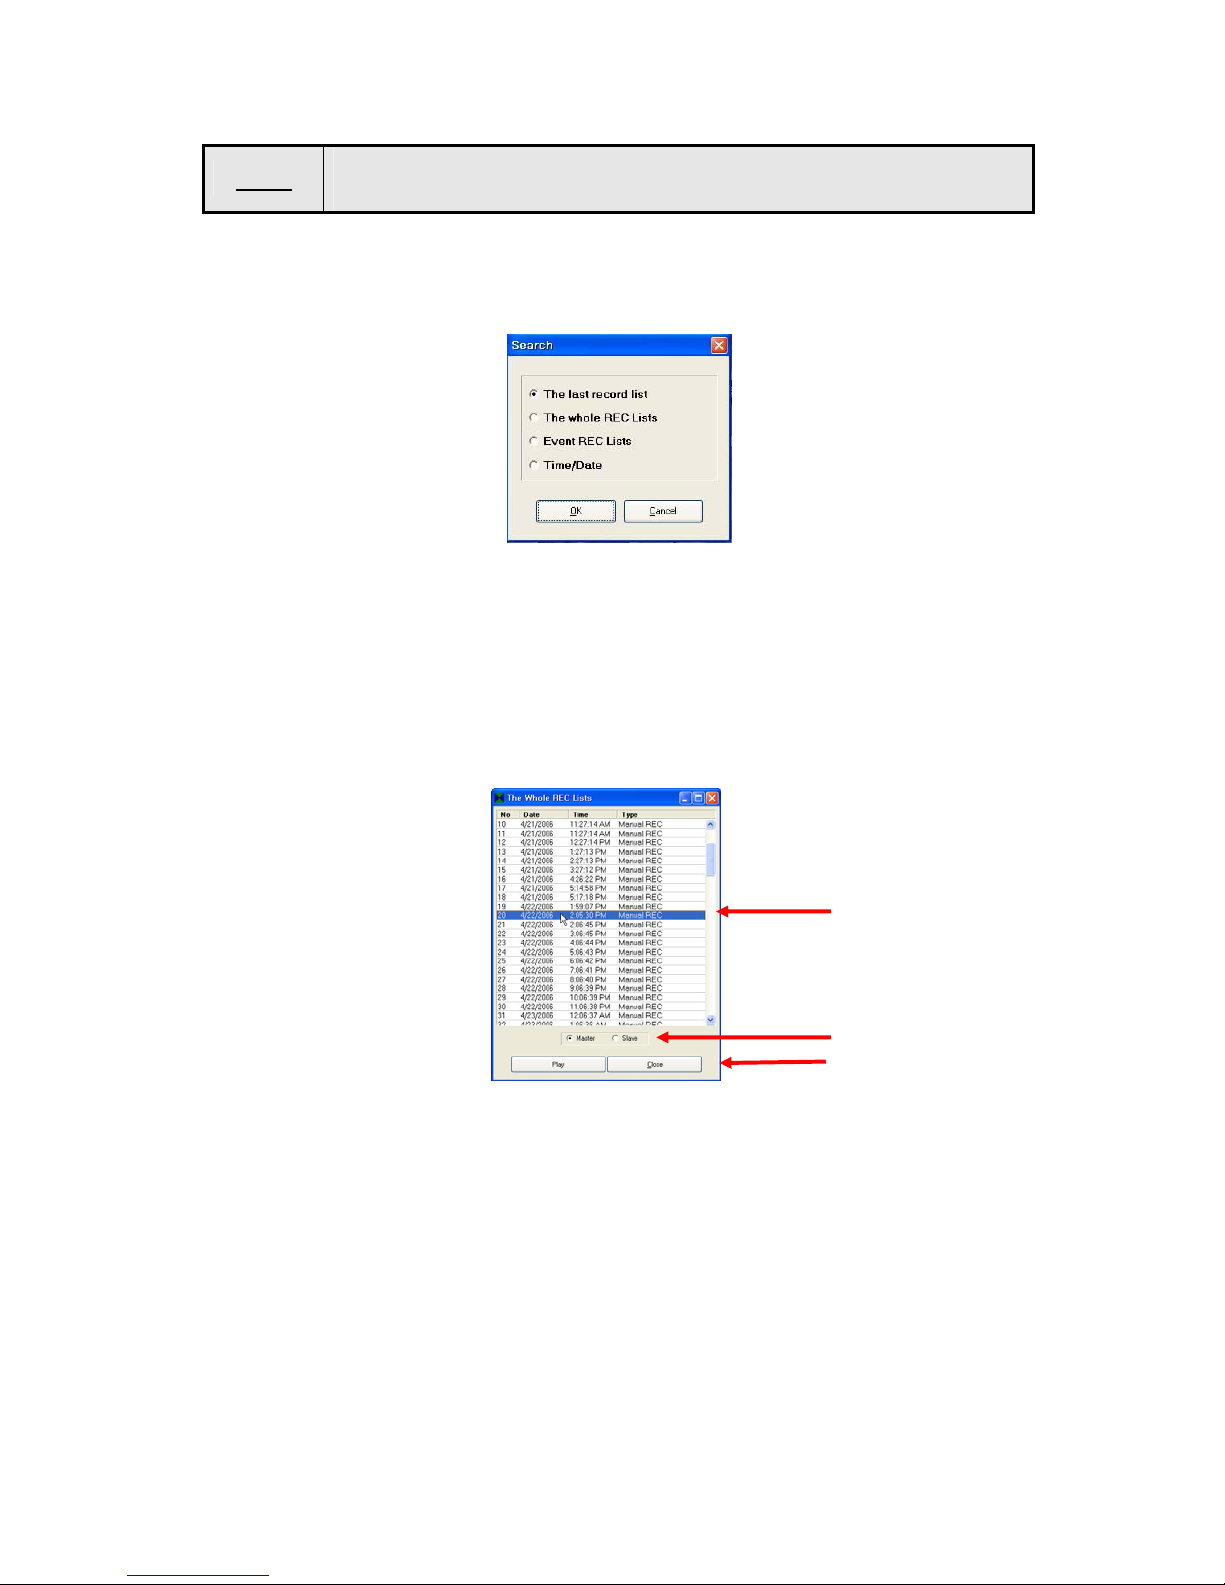
15. SEARCH
Click the SEARCH button, and it will be displayed the following window.
• The last record list
Select The last record list on the search window and press OK. It will replay from the
beginning of the last list that recorded on HDD.
• The whole REC Lists
Select The whole REC Lists on the search window and press OK. The following Window
will be displayed.
1. Select HDD (Master/Slave) you wish to search.
2. Choose one of recording lists, which are updated hourly up to 1,000 lists on both
Master and Slave.
3. Click the Play button to replay the selected list, or double click the selected list to
replay.
4. To stop replaying, press the STOP button.
• Event REC Lists
Select the Event REC Lists on the search window and press OK. The following Window
will be displayed.
1. Select HDD (Master/Slave) you wish to search.
2
1
3
- 52 -

2. Choose one of event recording lists, which are updated up to 300 lists on both
Master and Slave.
3. Click the Play button to replay the selected list, or double click the selected list to
replay.
4. To stop replaying, press the STOP button.
• Time/Date Search
Select the Time/Date Search on the search window and press OK.
The following Window will be displayed.
Select the time and date by using UP/DOWN button.
After selection, press the Search button.
After showing the following window, and it will be displayed the recorded images.
16. REW
• Press this button to rewind the recorded images.
• The speed will be increased up to x16 speed when you keep clicking this button.
• The speed is shown below the buttons.
- 53 -
17. PLAY
Press this button to replay from the beginning of the first recording list on HDD.
18. STOP
Press this button to stop replaying.
- 53 -

19. PAUSE
Press this button to pause replaying.
20. FF
• Press this button to fast forward the recorded images.
• The speed will be increased up to x16 speed when you keep clicking this button.
• The speed is shown below the buttons.
9.5.2 PTZ CONTROL
The following picture enables you to control PTZ camera connected to the system.
PAN/TILT CONTROL
Press UP key for TILT UP, DOWN key for TILT DOWN, LEFT key for PAN LEFT and RIGHT
key for PAN RIGHT.
FOCUS/ZOOM CONTROL
Press “Z+” key for ZOOM IN, “Z-“ key for ZOOM OUT, “F-” key for FOCUS NEAR and
“F+“ key for FOCUS FAR.
TILT control
FOCUS control
PAN control
ZOOM control
- 54 -

9.6 LOCAL VIEWER
Local Viewer is to play the USB Memory saved file by DVR, SAVE file saved by SAVE
button and BACKUP file saved by BACKUP button on the GUI, and to convert those
files to AVI file format.
9.6.1 Control Button
1. It indicates that the TIME /Date of recording file saved by SAVE button, BACKUP button on
the GUI and USB Memory.
2. The Bar will be moving forward when the PLAY button on the LOCAL VIEWER is pressed.
3. Click in the box of WATER MARK to put WATER MARK while replaying (See section 9.5.1
#14 setup for more details).
4. Select TV system between NTSC and PAL depending on the broadcasting system in your
country (NTSC in USA).
5. You can see a channel in full screen by choosing one among 1,2,3 and 4, and the quadrant
pictures by clicking “Q”.
6. PLAY BUTTON
Click VIEWER on the GUI – click OPEN on the LOCAL VIEWER – double click on one
folder among BACKUP, SAVE and USB folders in CLDVR (in program files) – double click
the selected file – click the PLAY button to replay. Refer to section 9.5.1 setup in regards to
STOP, PAUSE, REW and FF button.
7. This button is used to open the files you wish to play.
8. This button is used to print the current image on the LOCAL VIEWER.
8. Click the AVI Button during replaying, and the CHOOSE CAMERA window will appear.
Choose the camera(s) in CHOOSE CAMERA window to convert the file(s) to AVI file format.
The AVI button will turn RED in color and the Bar will indicate the progress status.
Click the STOP button to stop converting the files(s) to AVI file format, or it will automatically
stop after finishing and the LED will turn off.
TO PLAY THE AVI FILE FORMAT
Open Windows Explorer – click the Program Files in your computer – click CLDVR – click
AVI files – double click the file you wish to play (Before playing, see if your computer has
the software for Windows Media Player).
1 2
6 7 8 9
3
4
5
- 55 -

APPENDIX
1. RECORDING TIME TABLE (DAYS)
1.1 REC RESOLUTION (720H) / REC QUALITY (VERY HIGH)
SPEED 40G HDD 80G HDD 120G HDD 200G HDD
01 IPS 15-Days 19-Hours 31-Days 12-Hours 47-Days 07-Hours 78-Days 19-Hours
02 IPS 7-Days 22-Hours 15-Days 19-Hours 23-Days 17-Hours 39-Days 12-Hours
03 IPS 5-Days 07-Hours 10-Days 12-Hours 15-Days 19-Hours 26-Days 07-Hours
05 IPS 3-Days 05-Hours 6-Days 07-Hours 9-Days 14-Hours 15-Days 19-Hours
10 IPS 1-Days 14-Hours 3-Days 05-Hours 4-Days 19-Hours 8-Days 00-Hours
15 IPS 1-Days 02-Hours 2-Days 02-Hours 3-Days 05-Hours 5-Days 07-Hours
30 IPS 14-Hours 1-Days 02-Hours 1-Days 17-Hours 2-Days 14-Hours
60 IPS 07-Hours 12-Hours 1-Days 00-Hours 1-Days 07-Hours
1.2 REC RESOLUTION (720H) / REC QUALITY (HIGH)
SPEED 40G HDD 80G HDD 120G HDD 200G HDD
01 IPS 21-Days 09-Hours 42-Days 19-Hours 64-Days 02-Hours 106-Days 22-Hours
02 IPS 10-Days 17-Hours 21-Days 09-Hours 32-Days 02-Hours 53-Days 09-Hours
03 IPS 7-Days 05-Hours 14-Days 07-Hours 21-Days 09-Hours 35-Days 17-Hours
05 IPS 4-Days 07-Hours 8-Days 14-Hours 12-Days 22-Hours 21-Days 12-Hours
10 IPS 2-Days 02-Hours 4-Days 07-Hours 6-Days 12-Hours 10-Days 14-Hours
15 IPS 1-Days 09-Hours 2-Days 19-Hours 4-Days 07-Hours 7-Days 02-Hours
30 IPS 17-Hours 1-Days 09-Hours 2-Days 02-Hours 3-Days 12-Hours
60 IPS 09-Hours 17-Hours 1-Days 02-Hours 1-Days 19-Hours
1.3 REC RESOLUTION (720H) / REC QUALITY (NORMAL)
SPEED 40G HDD 80G HDD 120G HDD 200G HDD
01 IPS 26-Days 00-Hours 52-Days 00-Hours 78-Days 02-Hours 130-Days 05-Hours
02 IPS 13-Days 00-Hours 26-Days 00-Hours 39-Days 02-Hours 65-Days 02-Hours
03 IPS 08-Days 17-Hours 17-Days 09-Hours 26-Days 02-Hours 43-Days 09-Hours
05 IPS 5-Days 05-Hours 10-Days 09-Hours 15-Days 14-Hours 25-Days 22-Hours
10 IPS 2-Days 14-Hours 5-Days 05-Hours 7-Days 19-Hours 13-Days 00-Hours
15 IPS 1-Days 17-Hours 3-Days 12-Hours 5-Days 05-Hours 8-Days 14-Hours
30 IPS 22-Hours 1-Days 19-Hours 2-Days 14-Hours 4-Days 09-Hours
60 IPS 09-Hours 22-Hours 1-Days 07-Hours 2-Days 05-Hours
1.4 REC RESOLUTION (720H) / REC QUALITY (LOW)
SPEED 40G HDD 80G HDD 120G HDD 200G HDD
01 IPS 29-Days 19-Hours 59-Days 12-Hours 89-Days 07-Hours 148-Days 22-Hours
02 IPS 14-Days 22-Hours 29-Days 19-Hours 44-Days 14-Hours 74-Days 09-Hours
03 IPS 9-Days 22-Hours 19-Days 17-Hours 29-Days 14-Hours 49-Days 07-Hours
05 IPS 6-Days 00-Hours 11-Days 22-Hours 17-Days 22-Hours 29-Days 19-Hours
10 IPS 3-Days 00-Hours 5-Days 22-Hours 8-Days 22-Hours 14-Days 19-Hours
15 IPS
2-Days 00-Hours 4-Days 00-Hours 6-Days 00-Hours 9-Days 22-Hours
- 56 -

30 IPS 1-Days 00-Hours 2-Days 00-Hours 2-Days 22-Hours 4-Days 22-Hours
60 IPS 12-Hours 1-Days 00-Hours 1-Days 12-Hours 2-Days 12-Hours
1.5 REC RESOLUTION (360H) / REC QUALITY (VERY HIGH)
SPEED 40G HDD 80G HDD 120G HDD 200G HDD
01 IPS 24-Days 22-Hours 49-Days 19-Hours 74-Days 14-Hours 124-Days 09-Hours
02 IPS 12-Days 09-Hours 24-Days 22-Hours 37-Days 07-Hours 62-Days 05-Hours
03 IPS 8-Days 07-Hours 16-Days 17-Hours 25-Days 00-Hours 41-Days 17-Hours
05 IPS 5-Days 00-Hours 10-Days 00-Hours 15-Days 00-Hours 25-Days 00-Hours
10 IPS 2-Days 12-Hours 5-Days 00-Hours 7-Days 12-Hours 12-Days 12-Hours
15 IPS 1-Days 17-Hours 3-Days 07-Hours 5-Days 00-Hours 8-Days 07-Hours
30 IPS 19-Hours 1-Days 17-Hours 2-Days 12-Hours 4-Days 05-Hours
60 IPS 09-Hours 19-Hours 1-Days 07-Hours 2-Days 02-Hours
1.6 REC RESOLUTION (360H) / REC QUALITY (HIGH)
SPEED 40G HDD 80G HDD 120G HDD 200G HDD
01 IPS 33-Days 07-Hours 66-Days 17-Hours 100-Days 00-Hours 166-Days 17-Hours
02 IPS 16-Days 19-Hours 33-Days 17-Hours 50-Days 12-Hours 84-Days 05-Hours
03 IPS 11-Days 05-Hours 22-Days 09-Hours 33-Days 14-Hours 56-Days 00-Hours
05 IPS 6-Days 17-Hours 13-Days 12-Hours 20-Days 05-Hours 33-Days 14-Hours
10 IPS 3-Days 09-Hours 6-Days 17-Hours 10-Days 02-Hours 16-Days 19-Hours
15 IPS 2-Days 02-Hours 4-Days 12-Hours 6-Days 17-Hours 11-Days 02-Hours
30 IPS 1-Days 02-Hours 2-Days 07-Hours 3-Days 09-Hours 5-Days 14-Hours
60 IPS 14-Hours 1-Days 02-Hours 1-Days 17-Hours 2-Days 19-Hours
1.7 REC RESOLUTION (360H) / REC QUALITY (NORMAL)
SPEED 40G HDD 80G HDD 120G HDD 200G HDD
01 IPS 40-Days 14-Hours 81-Days 07-Hours 122-Days 00-Hours 203-Days 05-Hours
02 IPS 20-Days 07-Hours 40-Days 17-Hours 60-Days 22-Hours 101-Days 12-Hours
03 IPS 13-Days 12-Hours 27-Days 02-Hours 40-Days 14-Hours 67-Days 17-Hours
05 IPS 8-Days 02-Hours 16-Days 07-Hours 24-Days 09-Hours 40-Days 15-Hours
10 IPS 4-Days 02-Hours 8-Days 02-Hours 12-Days 05-Hours 20-Days 07-Hours
15 IPS 2-Days 17-Hours 5-Days 09-Hours 8-Days 02-Hours 13-Days 12-Hours
30 IPS 1-Days 09-Hours 2-Days 17-Hours 4-Days 02-Hours 6-Days 19-Hours
60 IPS 17-Hours 1-Days 09-Hours 2-Days 02-Hours 3-Days 09-Hours
1.8 REC RESOLUTION (360H) / REC QUALITY (LOW)
SPEED 40G HDD 80G HDD 120G HDD 200G HDD
01 IPS 46-Days 07-Hours 92-Days 14-Hours 138-Days 22-Hours 231-Days 12-Hours
02 IPS 23-Days 12-Hours 47-Days 00-Hours 70-Days 09-Hours 117-Days 09-Hours
03 IPS 15-Days 14-Hours 31-Days 05-Hours 46-Days 19-Hours 77-Days 22-Hours
05 IPS 9-Days 14-Hours 18-Days 17-Hours 28-Days 02-Hours 46-Days 19-Hours
- 57 -

10 IPS 4-Days 17-Hours 9-Days 09-Hours 14-Days 02-Hours 23-Days 09-Hours
15 IPS 3-Days 02-Hours 6-Days 07-Hours 9-Days 09-Hours 15-Days 14-Hours
30 IPS 1-Days 14-Hours 3-Days 02-Hours 4-Days 17-Hours 7-Days 19-Hours
60 IPS 19-Hours 1-Days 12-Hours 2-Days 07-Hours 3-Days 22-Hours
1.9 REC RESOLUTION (CIF) / REC SPEED (120 IPS)
QUALITY 40G HDD 80G HDD 120G HDD 200G HDD
VERY
HIGH
12-Hours 1-Days 02-Hours 1-Days 14-Hours 2-Days 17-Hours
HIGH 17-Hours 1-Days 09-Hours 2-Days 02-Hours 3-Days 12-Hours
NORMAL 22-Hours 1-Days 19-Hours 2-Days 14-Hours 4-Days 09-Hours
LOW 1-Days 00-Hours 2-Days 00-Hours 3-Days 00-Hours 5-Days 00-Hours
2. FACTORY DEFAULT TABLE
1] ALARM
[1] ALARM : OFF
[2] ALARM HOLD / INPUT
- CAM 1 : 05 SEC N/O
- CAM 2 : 05 SEC N/O
- CAM 3 : 05 SEC N/O
- CAM 4 : 05 SEC N/O
[3] ALARM OPTION
[3-1] ALARM REC : OFF
[3-2] REC QUALITY : HIGH
[3-3] REC SPEED : 60 IPS
[3-4] ALARM OUTPUT : N/O
[3-5] ALARM BUZZER : OFF
[3-6] ALARM REC : OFF
2] MOTION
[1] MOTION : OFF
[2] CHANNEL : CH1
[3] SENSITIVITY : 3
[4] MOTION HOLD : 05 SEC
[5 AREA : Not setup
- 58 -

3] SYSTEM
[1] TIME/DATE
[1-1] TIME FORM : 12 HOURS
[1-2] TIME : Time does not get
initialization.
[1-3] DATE FORM : MM/DD/YYYY
[1-4] DATE : Date does not get initialization.
[2] HARD DISK
[2-1] HDD1 : Shows information on HDD that is connected to HDD1.
[2-2] HDD1 : Shows information on HDD that is connected to HDD2.
[2-3] HDD INFO : BYTE
[3] FACTORY DEFAULT SETTING
[4] SYSTEM INFORMATION : SYSTEM FIRMWARE VERSION
[5] FIRMWARE UPDATE
[6] IP CONFIGURATION
[6-1] IP MODE : DYNAMIC IP
[6-2] IP ADDRESS
[6-3] SUBNET
[6-4] GATEWAY
[6-5] PORT : 5700
[6-6] MAC ID : Product’s MAC ID
[7] NETWORK PERFORMANCE
[7-1] BANDWIDTH : 2.0 MBPS
4] VIDEO
[1] CAMERA TITLES
[1-1] CAM1 : CAM1
[1-2] CAM2 : CAM2
[1-3] CAM3 : CAM3
[1-4] CAM4 : CAM4
[2] DWELL TIME
[2-1] CAM1 : 01 SEC
[2-2] CAM2 : 01 SEC
[2-3] CAM3 : 01 SEC
[2-4] CAM4 : 01 SEC
5] RECORD
[1] REC QUALITY : HIGH
[2] REC RESLOUTION : 720H
[3] REC SPEED : 60 IPS
[4] HDD OVERWRITE : ON
- 59 -

[5] AUDIO REC : ON
[6] SCHEDULE REC
[6-1] SCHEDULE REC : OFF
[6-2] SCHEDULE REC SETTING : No setup data
6] DISPLAY
[1] TITLE DISPLAY : ON
[2] BORDER LINE : ON
[3] TIME / DATE : ON
[4] POSITION : BOTTOM
7] BUZZER
[1] KEY BUZZER : ON
[2] VIDEO LOSS : ON
8] ACCOUNT
[1] DVR ACCOUNT SET
[1-1] PASSWORD : OFF
[1-2] PASSWOD CHANGE
DEFAULT PASSWORD IS 11111111
[2] NETWORK ACCOUNT SET
[2-1] USER ID : ADMIN
[2-2] USER P/W : ADMIN
[2-3] GUEST P/W : GUEST
9] DDNS
[1] DDNS USE : NO
[2] HOST NAME : Not setup
[3] USER NAME : Not setup
[4] PASSWORD : Not setup
3. FAQ
PARTIAL MALFUNCTION OF SURVEILLANCE SCREEN
1. CERTAIN CHANNEL UNAVAILABLE
- Check the camera power, connection or cleaning of connection part.
- In case of camera defect, replace the camera.
2. CERTAIN CHANNEL SHAKERING, BLURING, SPLITTING, etc.
- Check the camera power, connection or cleaning of connection part.
- Check the system Setting (NTSC or PAL).
- 60 -

- In case of camera defect, replace the camera.
3. CERTAIN CHANNEL TOO BRIGHT OR TOO DARK
- Check the brightness and contrast level of the monitor.
4. CHANNEL IS IN BLACK & WHITE MODE
- Check the cameras.
RECORDING RELATED PROBLEMS
1. CORDING UNAVAILABLE
- Adjust the camera screen.
- Check recording speed or recording schedule.
- Adjust the system.
PLAY AND SEARCH RELATED PROBLEMS
1. No Recorded Data.
- Check camera input.
- Check record setup.
2. CERTAIN CHANNEL WITH NO RECORDED DATA
- Check the record setup.
3. TOO LOW QUALITY RECORDED DATA
- Check camera input.
- Check the system Setting (NTSC or PAL).
- Check the record setup.
MISCELLANEOUS PROBLEMS
1. HDD NOT FOUND
- Check whether the removable HDD rack is locked.
And check the power LED of the removable HDD rack.
If the green LED is on, the power from the Power Board is working.
- Check the connection cable (40-PIN Flat Cable) and power connection in the removable
HDD rack.
- In case of no problem is discovered from the above checks, contact your supplier.
2. NOISE FROM THE SYSTEM
- Check the HDD.
Replace the HDD if possible.
Old HDD’s may make the noise when it is running.
- 61 -

Limited 2Year Warranty
This warranty gives the original purchaser specific legal rights and you may also have other rights, which
may vary from state to state. If our products do not function because of any defect in material or
workmanship, we will repair it for free for 2 year on parts and labor from the date of original purchase. This
warranty does not cover modification, abuse, incidental or consequential damages unless the state of
owner’s residence specially prohibits limitations on incidental or consequential damages.
How to obtain Factory Service
z Original purchaser must fill out the warranty card and mail it to the factory with the model number,
serial number and the date of purchase.
z We will repair or replace, and return the system to the owner under this limited warranty.
z Please pack the system carefully and securely using the original packing materials, and send it
prepaid and insured to: 13073 E. 166th St, Cerritos, CA 90703.
z Please include a check for $30.00 to cover the cost of return postage and handling. If the system is
returned within the warranty period, please include a proof of purchase. If the system is out of
warranty, you will receive an estimate of the repair cost for your approval before repair work will be
started
- 62 -
 Loading...