

Page 1
User Manual
CLOUD TV 65SU
LED TV
Design and Specification are subject to change without prior notice
Thank you for purchasing CloudWalker LED TV. Please free to reach out to us for any
service related query/complaints or for any feedback/suggesstions on the contact details
mentioned below for your CloudWalker LED TV. We'd like to hear from you!
feel
www .cl ou dwa lke r.tv
Head Office:
CloudWalker Streaming Technologies Pvt Ltd, A-503, Business Suite 9, S.V. Road, Santacruz West, Mumbai-400 054
Clou dWalk er Stre aming Tec hnolo gies Pv t. Ltd.
C
(We are open from 9:30 am to 6:00 pm,
Monday to Saturday)
CLOUD TV 55SU
For Installations & demo, please call on our
Toll Free No: 1800 102 3647
For any queries/suggestions,
write to us at: [email protected]
Page 2
Thank you for purchasing CloudWalker LED TV.
The instructions in this manual are described mainly with the remote control.
You can also use the buttons on the TV if they have the same names as those on the
remote control.
To obtain the best performance and safety, please read this manual carefully.
Please keep this manual for future reference.
Important Safety Instructions
Supplied Accessories
Preparation
Functional Overview
Connections
Remote Control
Remote Control & Basic Operation
TV SETUP
My Media
APPS
Settings
CDE
Specification
1
2
3
5
7
8
9
11
15
15
17
18
18
Contenes
Home
19
Page 3
2
To reduce the risk of electric shock, do not remove cover (or back). No
user serviceable parts inside. Refer servicing to qualified service
personnel. Indicates a situation which, if not avoided, could damage the
equipment or other apparatus.
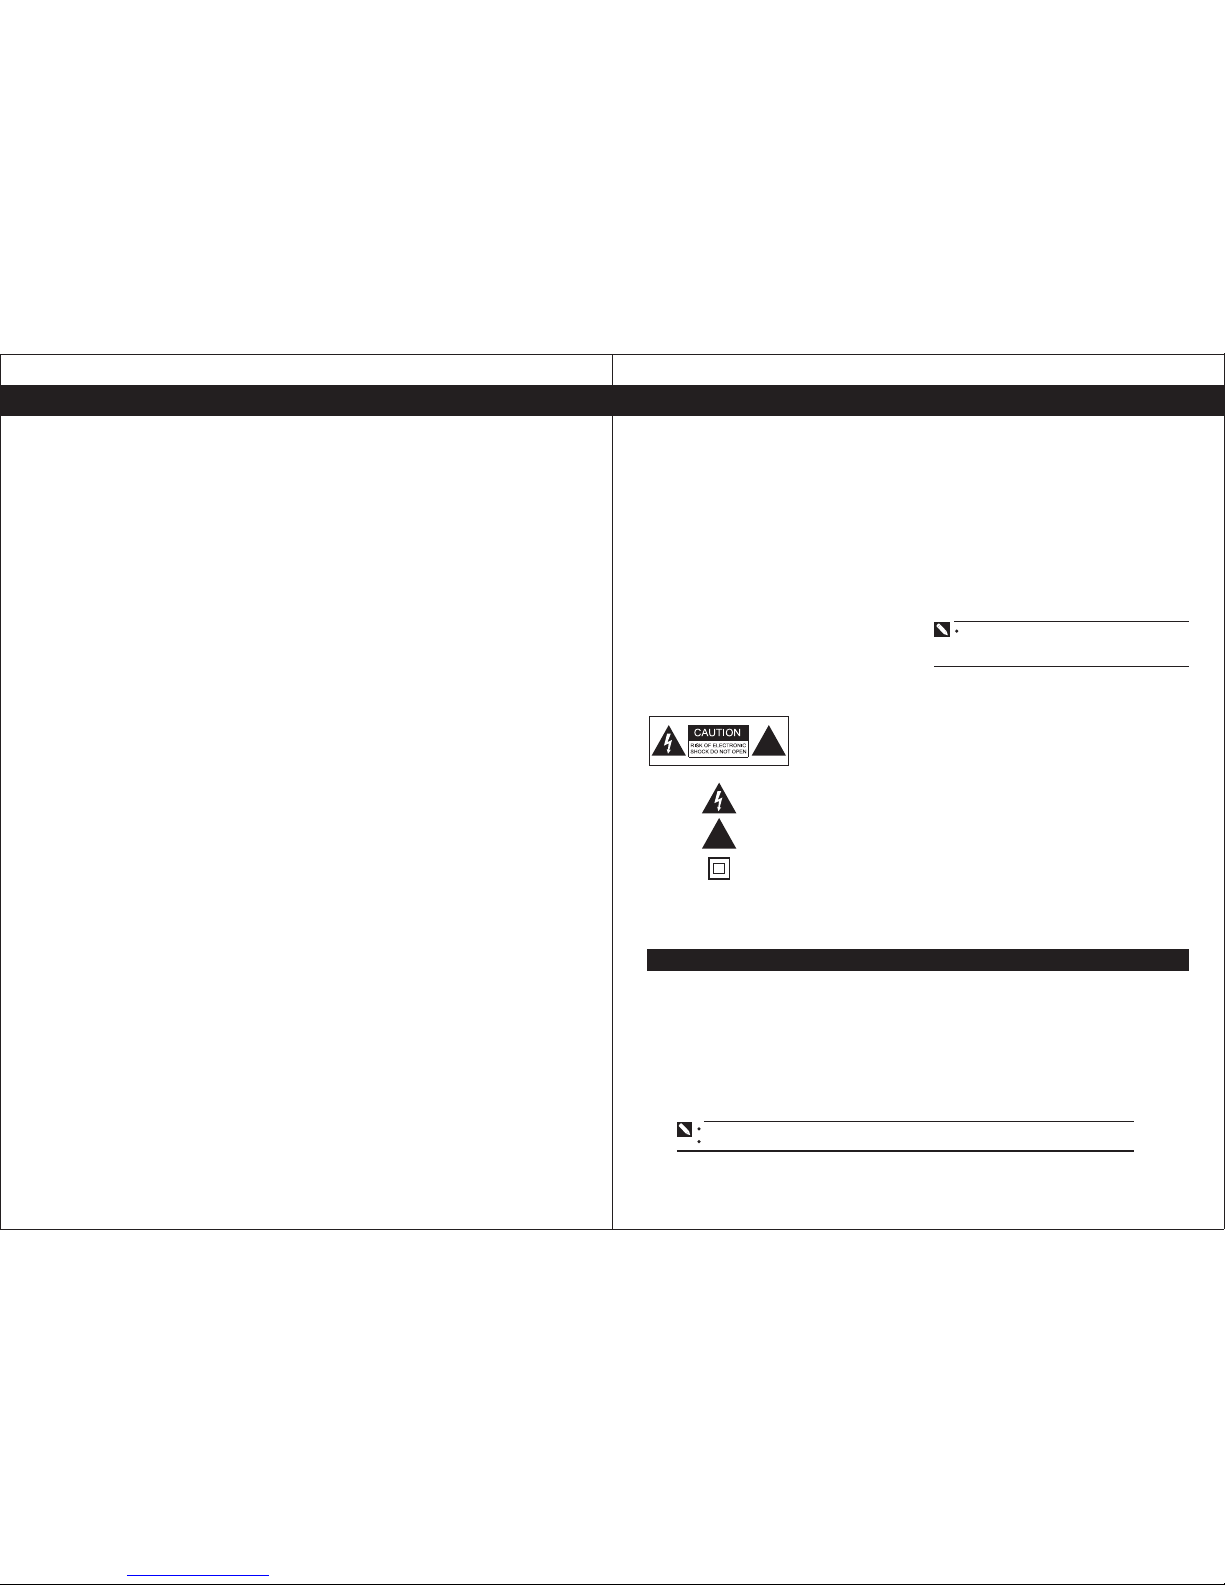
This symbol indicates dangerous voltage inside the TV that presents a risk
of electric shock or personal injury. Indicates a hazardous situation which,
if not avoided, could result in serious injury.
This symbol indicates important instructions accompanying the TV.
This equipment is a Class lI or double insulated electrical appliance. It has
been designed in such a way that it does not require a safety connection
to electrical earth.
1
1. Read Instructions - All the safety and operating
instructions should be read before the product is
operated.
2. Retain Instructions - The safety and operating
instructions should be retained for future reference.
3. Heed Warnings - All warnings on the product and in
the operating instructions should be adhered to.
4. Follow Ins truct ions - Al l op erati ng a nd use
instr uctio ns shou ld be fol lowed .
5. Cleaning - Unplug the product from the wall outlet
before cleaning. Do not use liquid cleaners or
aerosol cleaners. Use a dry cloth for cleaning.
6. Attachments - Only use attachments / accessories
specified by the manufacturer.
7. Water and Moisture - Do not use the product near
water, for example, near a bath tub, wash bowl,
kitchen sink, or laundry tub, in a wet basement, or
near a swimming pool, etc.
S. Accessories - Do not place the product on an
unstable cart, stand, tripod, bracket, or table. The
product may fall, causing serious injury to a child or
adult, and serious damage to the product. Use only
with a cart, stand, tripod, bracket, or table
recommended by the manufacturer, or sold with the
product. Any mounting of the product should follow
the manufacturer's instructions and should use a
moun ting ac ces sory rec ommende d b y th e
manufacturer. The product and cart combination
should be moved with care. Quick stops, excessive
force, and uneven surfaces may cause the product
and cart combination to overturn.
9. Ventilation - Slots and openings in the cabinet are
provided for ventilation and to ensure reliable
operation of the product and to protect it from
overheating, and these openings must not be
blocked or covered. The openings should never be
blocked by placing the product on a bed, sofa, rug,
or other similar surface. The product should not be
placed in a built-in installation such as a bookcase
or rack unless proper ventilation is provided or the
manufacturer's instructions have been adhered to.
10. Power Sources - The product should be operated
only from the type of power source indicated on the
marking label. lf you are not sure of the type of
power supply to your home, consult your appliance
dealer or local power company.
11. Power Cord Protection - Power cords should be
routed so that they are not likely to be walked on or
pinched by items placed upon or against them,
paying particular attention to cords at plugs,
convenience receptacles, and the point where they
exit from the appliance.
12. Lightning - For added protection for the product
during a lightning storm, or when it is left
unattended and unused for long periods of time,
unplug it from the wall outlet and disconnect the
antenna or cable system. This will prevent damage
to the product due to lightning and power~line
surges.
13. Power Lines - An outside antenna system should
not be located in the vicinity of overhead power
lines or other electric light or power circuits, or
where it can fall into such power lines or circuits.
When installing an outside antenna system,
extreme care should be taken to keep from
touching such power lines or circuits as contact
with them might be fatal.
14. Overloading - Do nat overload wail outlets and
extension cords as this can result in a risk of fire or
electric shock.
15. Object and Liquid Entry - Never push objects of any
kind into the product through any openings as they
may touch dangerous voltage points or short-out
parts that can result in a fire or electric shock.
Never spill liquid of any kind on the product.
16. Servicing - Do not attempt to service the product
yourself as opening or removing covers may
expose you to dangerous voltage or other hazards.
Refer all servicing to qualified service personnel.
17. Repairing - Unplug the product from the wall outlet
and refer servicing to qualified service personnel
under the following conditions:
a. When the power cord or plug is damaged.
b. If liquid has bean spilled, or objects have fallen
into the product.
c. If the product has been exposed to rain or water.
d. If the product does not operate normally by
following the operating instructions. Adjust only those
controls that are covered by the operating
instructions as an improper adjustment of other
controls may result in damage and will often require
extensive work by a service technician to restore
the product to its normal operation.
e. If the product has been dropped or damaged in
any way.
f. When the product exhibits a distinct change in
performance this indicates a need for service.
18. Replacement Parts - When replacement parts are
required, be sure the service technician has used
replacement parts specified by the manufacturer or
have the same characteristics as the original part.
Unauthorized substitutions may result in fire, electric
shock or other hazards.
19. Safety Check - Upon completion of any service or
repairs to the product, ask the service technician to
perform safety checks to determine that the product
is in proper operating condition.
Important Safety Instructions
Sometimes, the LED screen may have some tiny
red, blue, white or black spots. This is normal
and does not affect the performance.
20. Heat - Do not install the product near any heat
sources such as radiators, heat registers, stoves, or
other products (including amplifiers) that produce
heat.
21. Installation Location - Place the product on a firm
and flat surface. Avoid placing the product in areas
of direct sunlight, heating radiators, c losed
automobiles, high temperature, high humidity,
excessive dust, strong vibration, impact or strong
magnetic fields, as the internal parts may be
seriously damaged.
22. Hazards of Electrical Shock and Fire - Do not touch
the power cord with wet hands. Hold the plug when
disconnecting the power cord. Do not pull the power
cord. Unplug the power cord from the wall outlet
when the product is not used for long periods of
time.
23. Hearing Safety - Listen at a moderate volume.
Using headphones at high volume can impair your
hearing.
24. Where the Mains plug is used as the disconnect
device, the disconnect device shall remain readily
operable.
25. The batteries (battery pack of batteries installed)
shall not be exposed to excessive heat such as
sunshine. fire or the like.
26. The apparatus shall not be exposed to dripping or
splashing and that no objects filled with liquids,
such as vases, shall be placed on the apparatus.
Check the supplied accessories before installation.
In case of missing or damaged, please contact the dealer
immediately.
Remote Control x 1 Batteries x 2 User Manual x1
Stand x1 AV Cable(RCAx3) x1 Screws
!
!
Supplied Accessories
The type of power plug provided may be different from the above picture for some countries.
Please store the screws that are not used.
Page 4
3
Preparation
Stand Installation
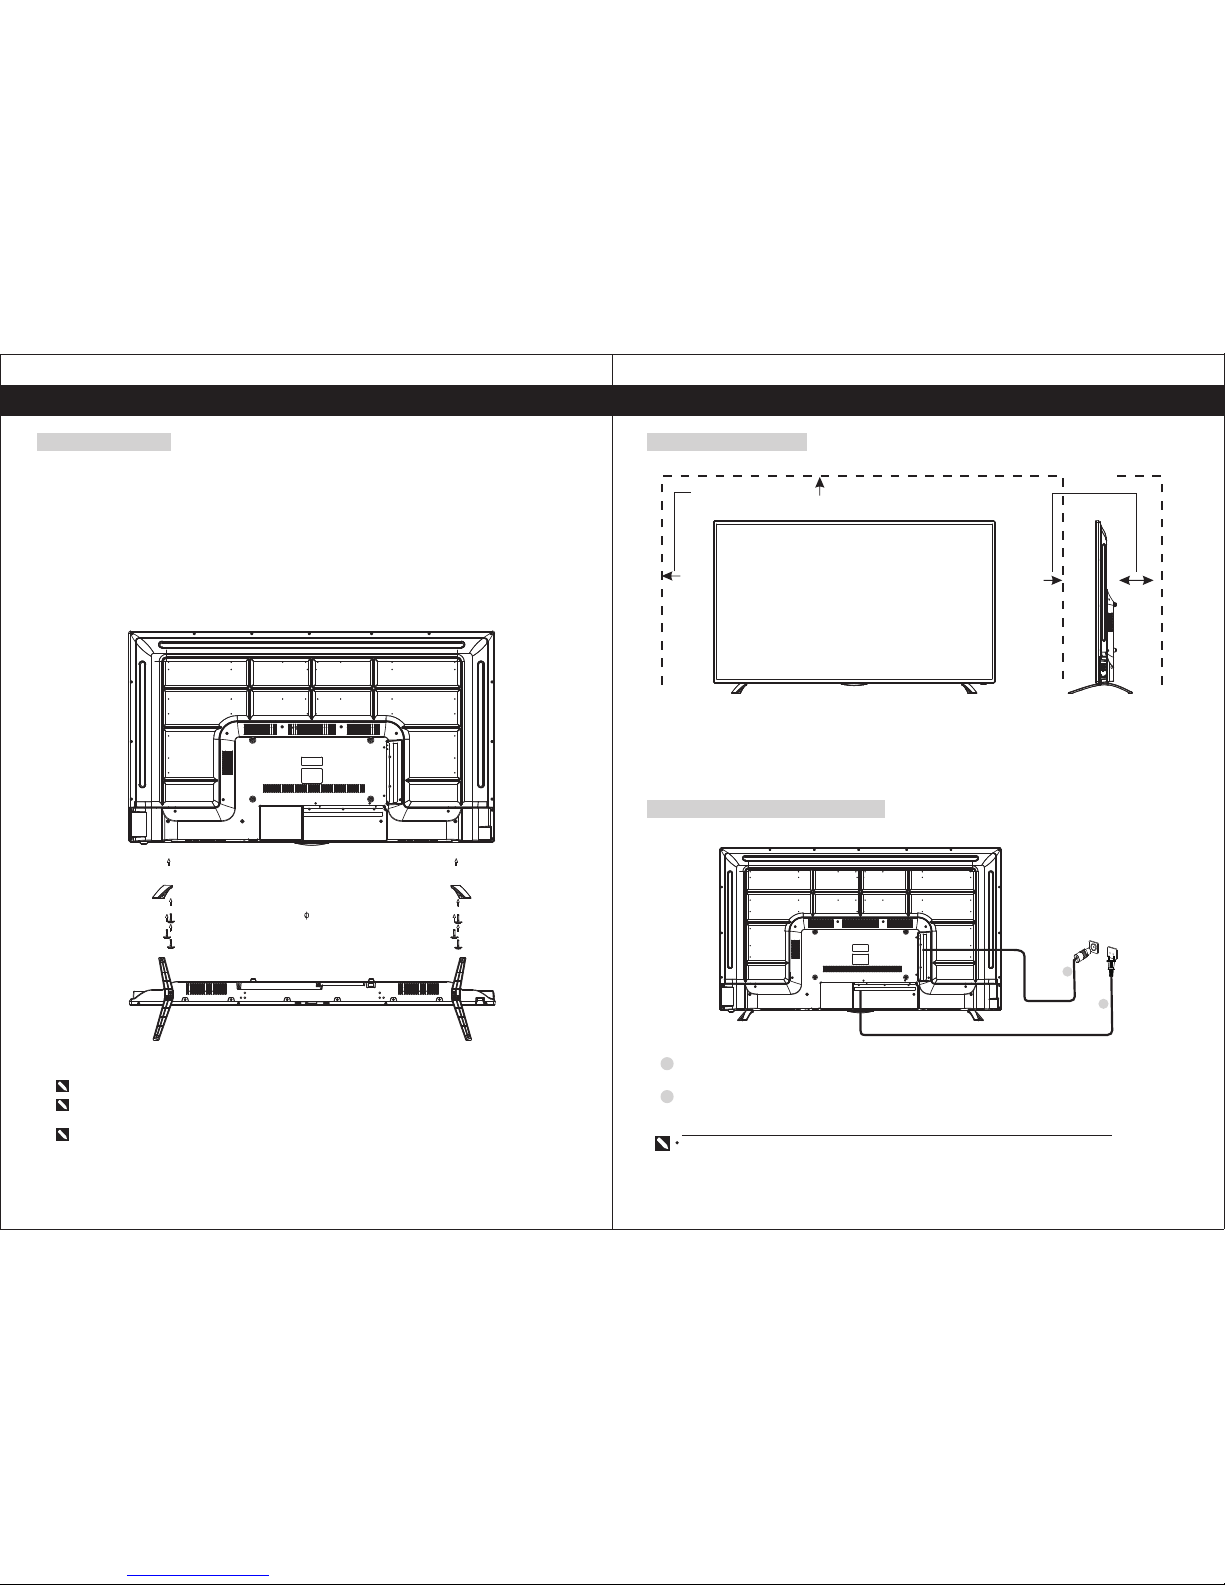
The TV base will be separated with the TV unit. You should install the base before you use the
TV unit.
1.Place the TV with its front side facing down on a cushioned flat surface.
2.Place the base on the hinge of TV unit, with the base direction shown under the base. (See
the picture)
3.Tighten the supplied screws to fix the TV stand securely in place. ( See the picture)
CLOUD TV 55SU
CLOUD TV 65SU
BM, 4X 18 6PCS
The type of power plug provided may be different from the above picture for some countries.
2
1
2
1
4
10cm
10cm
30cm
Place the TV on a firm and flat surface, leaving a space of at least 10cm around the set and
30cm from the top of the set to the wall.
Connect the antenna cable into the antenna input terminal at the rear panel wall antenna
socket.
Connect the power plug into the wall outlet.
Positioning the TV set
Antenna and Power Connections
WARNING
The TV stand may not be securely fixed in place after repeated tightening and loosening the screws.
During assembling and disassembling the TV stand, please use your hand to support it. Failing to do
so may cause the TV stand to fall and result in personal injury.
After installing the TV stand, please ensure that the screws are tightened firmly. Failure to do so may
cause the TV set to tip over or become damage.
Page 5
5
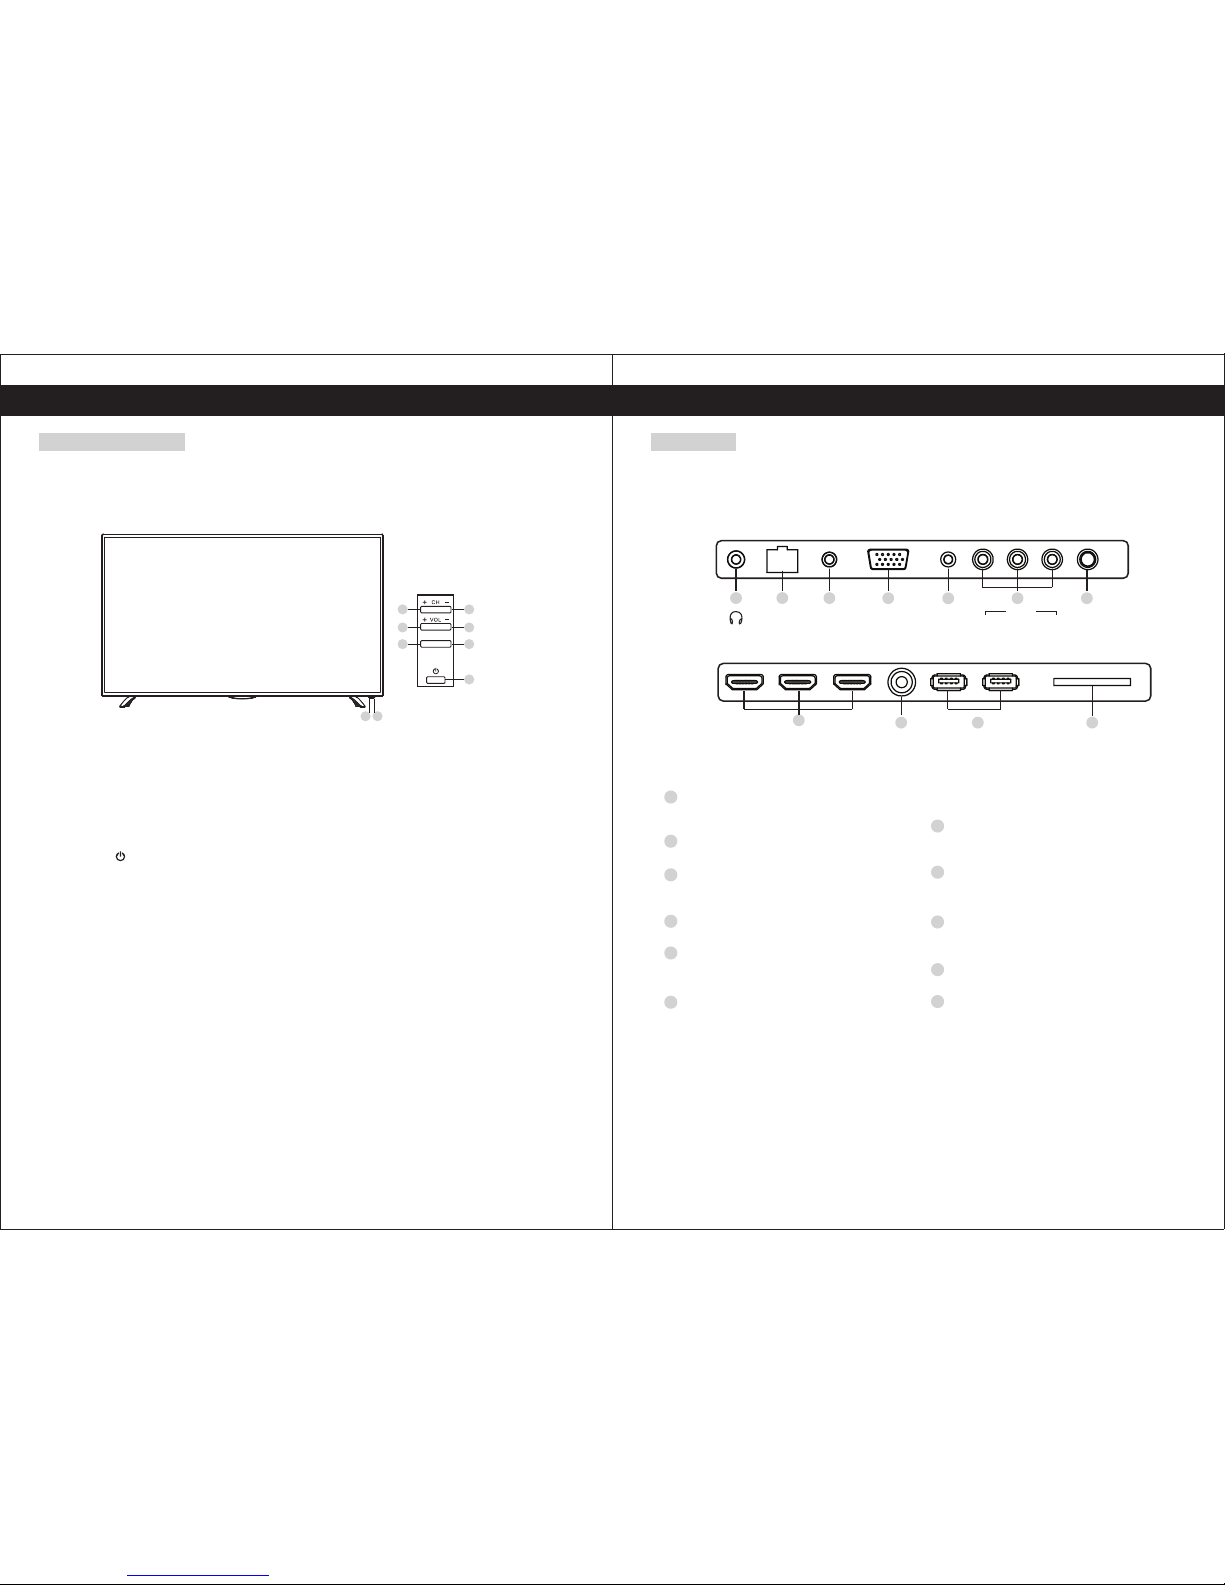
Functional Overview
Front and Side Panel
1. Power Light
On Standby Mode, the light turns red.
2. Infrared Remote Sensor
Receives the signals from the remote control.
3. POWER
Press to turn TV on or turn to standby mode.
4. MENU
Press to display the setup menu on the TV screen.
5. SOURCE
Press to select TV or all video input modes.
6-7. VOL+, VOL-
Press to adjust the volume level, or press to select or adjust a menu item.
8-9. CH+, CH-
Press to select desired channels, or press to select or adjust a menu item.
MENU
SOURCE
4
3
6
5
8 9
7
21
CLOUD TV 55SU
CLOUD TV 65SU
6
Rear Panel
Functional Overview
USB 2.0 SD
USB 3.0
RF IN
HDM I2
HDM I1
HDM I3
8
1110
9
LIN E IN YPBPR INVGA
RJ 45
CVBS L R
AV IN
COAXIAL
1
4
3
5 76
2
CLOUD TV 55SU
EARPHONE
Connects audio amplifier or other device
with that audio input.
RJ45 Ethernet
Connect to the Internet.
LINE IN Input terminal
Connect to equipment using HDMI-DVI
connection or PC with audio output.
VGA(PC IN) Input terminal
Connect to PC.
YPBPR Input terminals
Connect to equipment with component
video output.
AV IN
Video a nd A udio(L/R)inpu t Terminal
Audio(L/R)can be used as YPBPR Audio
input.
COAX
Connection for Digital Coaxial input for
Audio Amplifier.
HDMI1/HDM2/HDM3 Input terminal
Connect to equipment with HDMI output.
Antenna lnput terminal
Connect to equipment with antenna
output or wall antenna socket.
USB
Connect your external storage devices.
SD
Connect your external storage devices.
1
4
3
6
5
7
2
8
10
11
9
CLOUD TV 65SU
Page 6
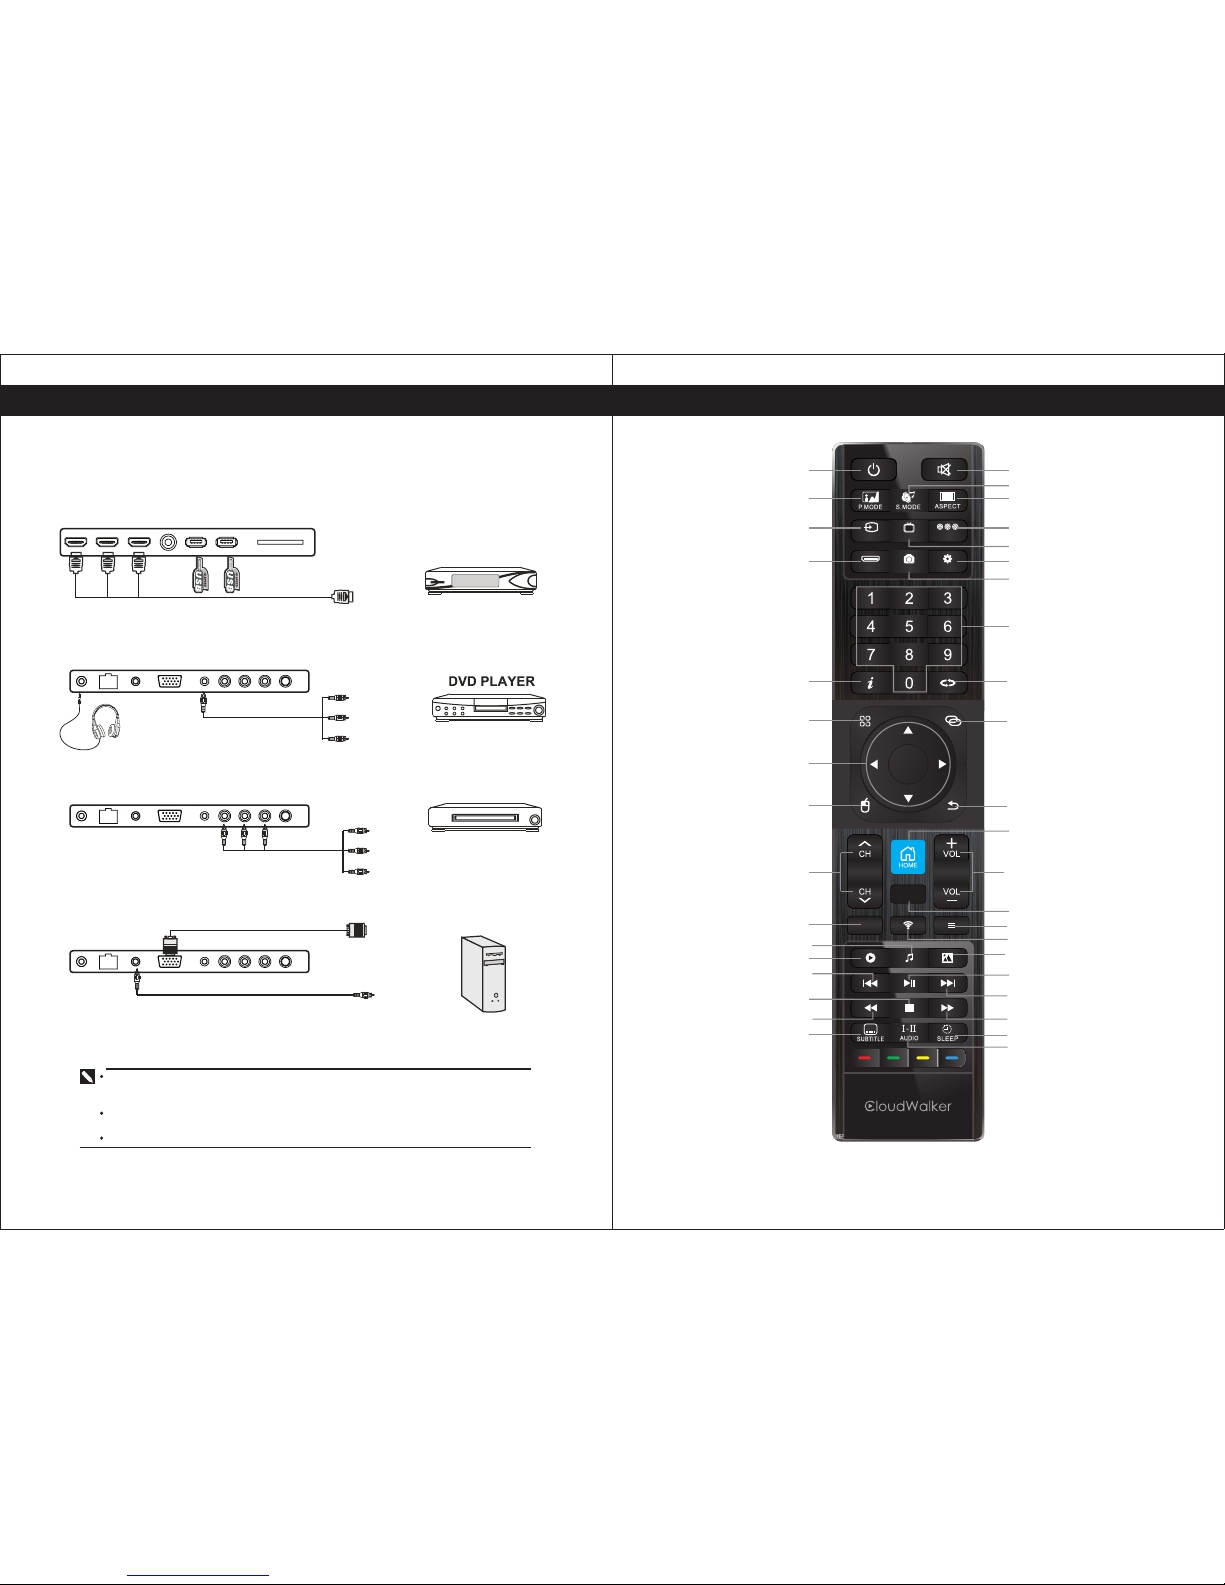
You can connect VCR, DVD player, set-top box, computer or other video equipment to the TV.
To view external source images, press to select the input source.
Connecting an AV Equipment with HDMI Connector
7
Connections
Com puter
VCR
Connecting an AV Equipment with Composite Connector
Connecting an AV Equipment with Composite(YPbPr) Connector
Connecting an AV Equipment with VGA Connector
Set-Top Box
If the external equipment has DVI output, you can connect it to the HDMI terminal using a
HDMI-DVI cable. In case of using the HDMI-DVI cable, connect analog audio signal to
RGB/HDMI Audio Input terminal.
Please refer to the user manual of t he external equipment for more information on the
connection to the TV.
Please disconnect all the power supplies to the equipment and TV before connection.
?
HDMI
OK
CDE
AV
SETTINGS
SOURCE
ATV
SCREENSHOT
TV ON/OFF
PICTURE MODE
INPUT SOURCE
HDMI SOURCE
INFORMATION
ALL APPS
AIRMOUSE ON/OFF
CHANNEL UP/DOWN
VOLUME UP/DOWN
NETWORK
IMAGE
VIDEO
SUBTITLE
MUTE
SOUND MODE
ASPECT RATIO
AV SOURCE
ATV SOURCE
SETTINGS
SCREENSHOT
PREVIOUS CHANNEL
NOT AVAILABLE
BACK/RETURN
HOME
CDE
MENU
NUMBER
MUSIC
SLEEP TIME
AUDIO
NAVIGATE ARROW
PLAY / PAUSE
NEXT
FAST REVERSE FAST FORWARD
STOP
PREVIOUS
NOT AVAILABLE
8
Remote Control
Page 7
9
It takes approximately 10 seconds for the picture to appear after the TV is turned on.
The TV will switch to standby mode automatically if there is no signal input for 10 minutes.
If the TV will not be used for a long periods of time, unplug the TV from the wall outlet.
Remote Control & Basic Operation
1. Open the battery cover.
2. Insert batteries (two size-AAA batteries).
Place batteries with their terminals observing the(+) and (-) indications.
3. Replace the cover and press down until the lock snaps closed.
If the remote control is not used for an extended period of time, remove
the batteries from the remote control as damage may result due to
electrolyte leakage from the batteries.
Installing The Remote Control Batteries
10
Basic Operation
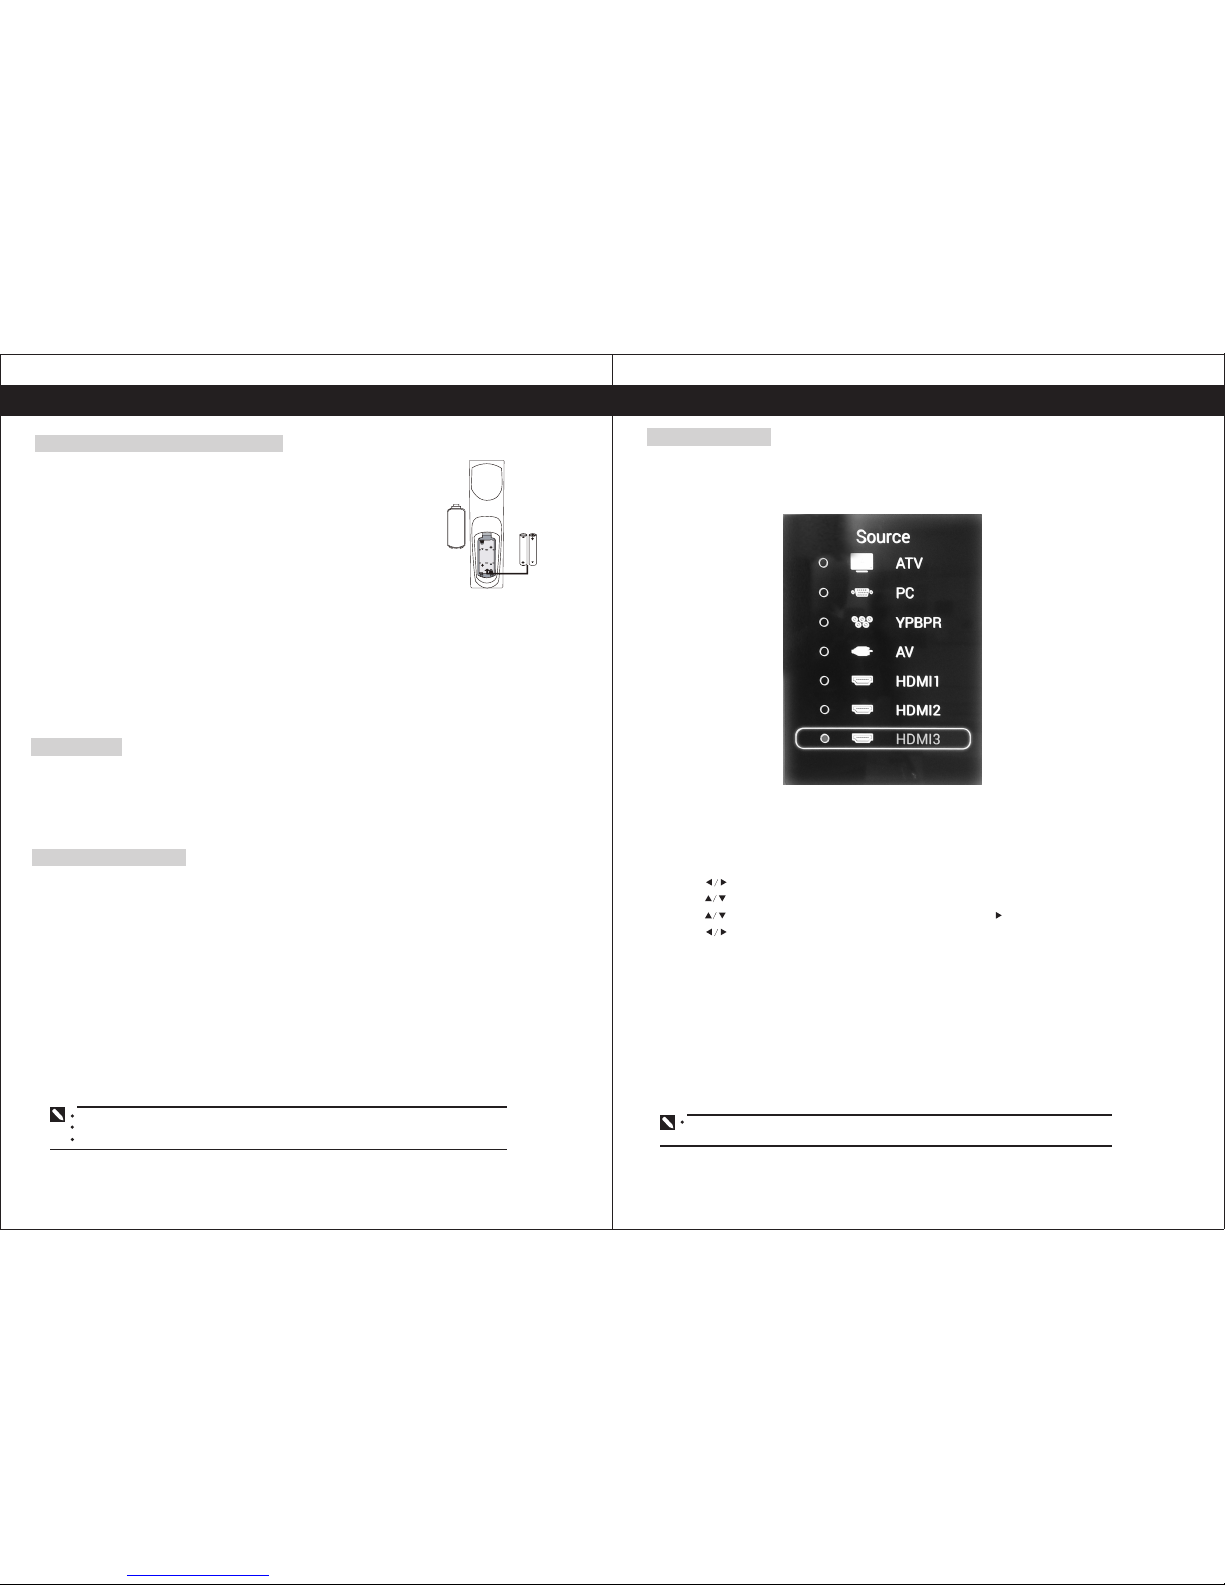
Select Input Source
You can select the source by pressing the SOURCE button on the side of the panel or
pressing the SOURCE button on the remote control. Press button to select the input source
you want to watch. Then press ENTER to confirm.
On-Screen Display (OSD) Selection and Adjustment
1. Press "MENU" to display the main menu.
2. Press to select a menu. The selected menu page displays.
3. Press to set your selection.
4. Press to choose an item on the menu page and press to set your selection.
5. Press to adjust an item value or choose options.
6.Press "MENU" to return to the menu, press "MENU" again to exit.
The OSD menu screen will be closed automatically when no operation has been made for
the set OSD menu display time.
Note: 1.The batteries shall not be exposed to excessive heat such as sunshine and fire.
2.Danger of explosion if battery is incorrectly replaced. Replace only with the same or
equivalent type.
3.Risk of explosion if battery is replaced by an incorrect type. Dispose of batteries
according to the instructions.
4.Do not dispose of batteries in a fire, danger of explosion.
Power On/Off
Turning on the TV
1. Plug the TV’s power cord into a wall outlet (after this step, the main unit will turn on and enter
standby mode automatically).
2. Press the (Power) button on the TV, or press the (Power) button on the remote control. The
TV will turn on.
Placing In Standby Mode
Your TV can be placed in Standby mode in order to reduce the power consumption,
The standby mode can be useful when you wish to interrupt viewing temporarily (during a meal,
for example).
1, Press the Power button.
2. To switch back on, simply press power button.
Remark: Do not leave your TV in Standby mode for long periods of time. (when you are away
on holiday, for example). It is the best to unplug the set from the ma/ns and aerial.
Page 8
11
(1) Power: ON/OFF
(2) Menu: If there’s no menu display, enter the menu; Press <EXIT>, return to previous
menu or exit to.
(3) Channel: When operating the menu, you can select the channel by pressing up or
down menu.
(4) Volume: When operating the menu, you can select the volume by pressing left or right.
(5) Enter: Channel-switch; when operating the menu, you can enter the next menu by
pressing <ENTER>.
TV SETUP
Key Function Description
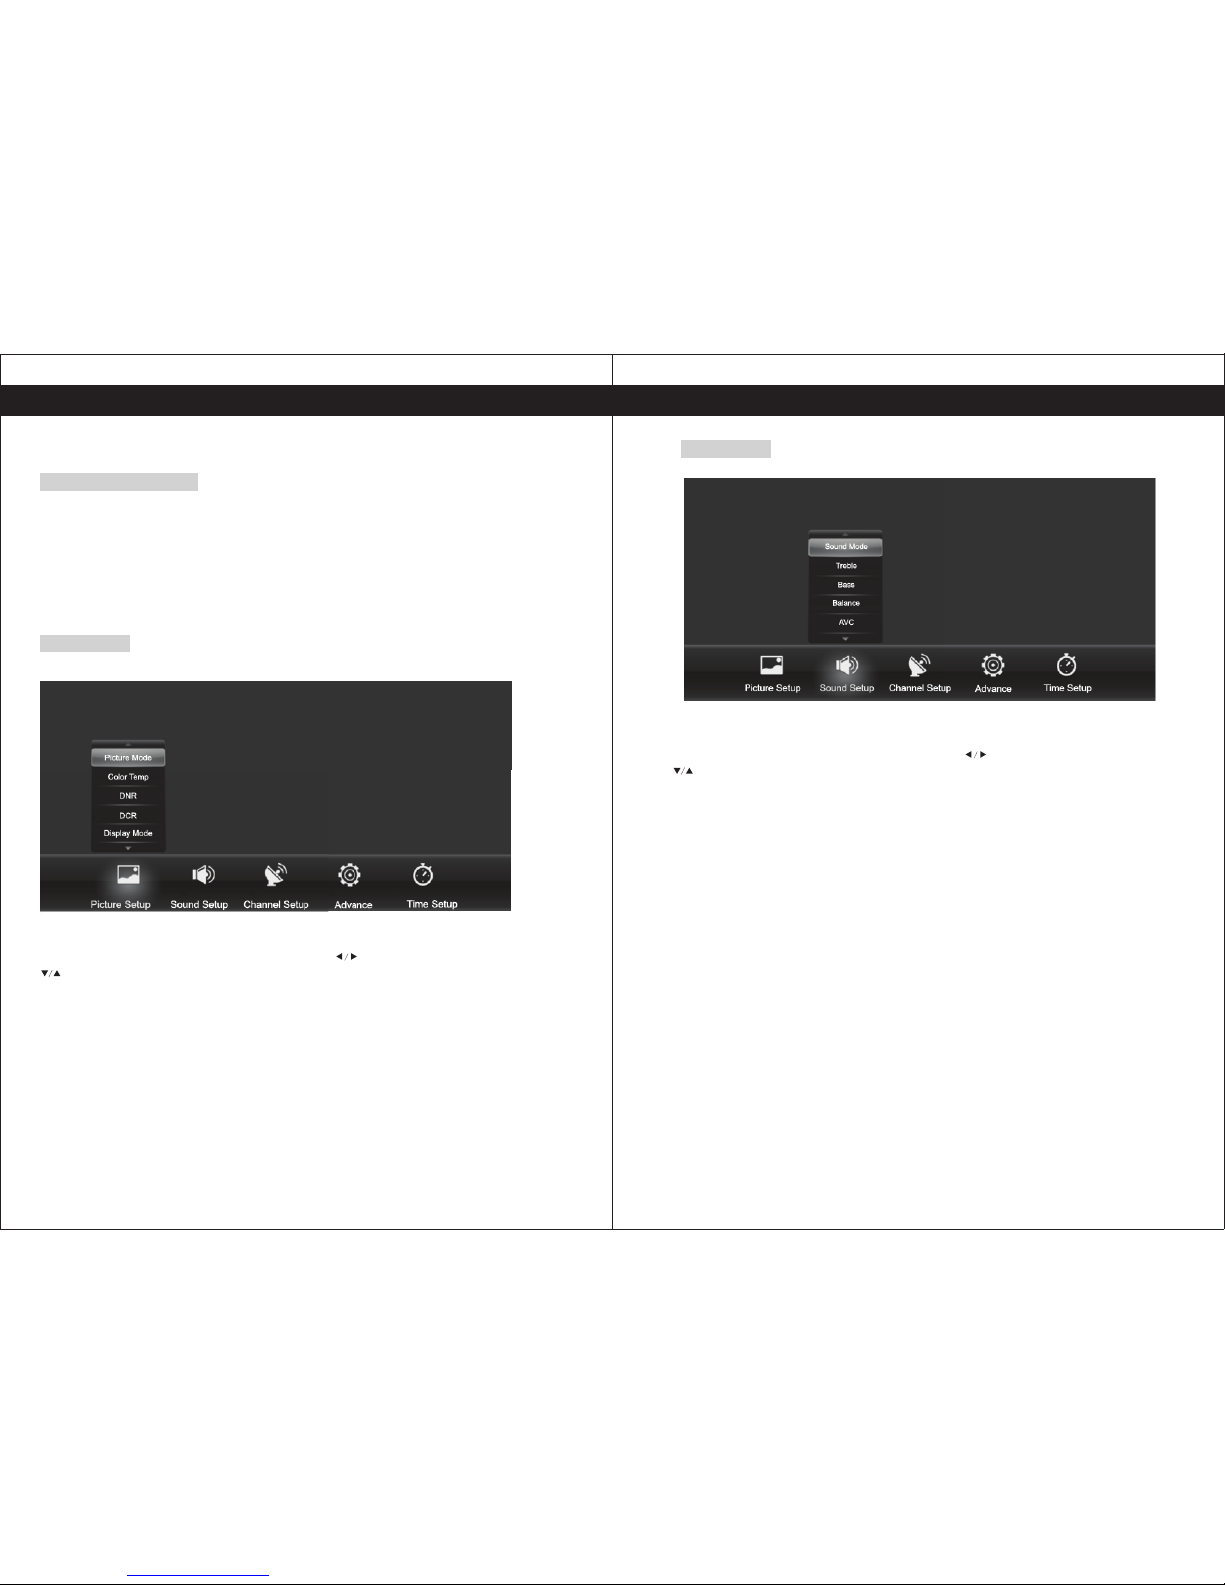
Picture Setup
Press <Menu> to display the main menu, then press to select the Picture setup, press
to select the corresponding sub-menu, press <Menu> to return or press <Exit> to exit
the menu.
Picture Mode: Includes standard, Dynamic, soft and user four modes, the parameters of
brightness, contrast, Saturation, Hue and sharpness effect can be adjusted.
Color Temp: To set the color temperature mat you feel comfortable, including standard,
cool and warm modes.
Digital Noise Reduction(DNR): To improve the quality by reducing noise, divided into low,
middle and high.
Dynamic Contrast(DCR): To improve Dynamic Contrast of the picture.
Display Mode: To select the preferential aspect ratio mode, including 16:9, 4:3, zoom 1, zoom
2 modes.
12
Sound Setup
Press <Menu> to display the main menu, then press to select the Sound setup, press
to select the corresponding sub-menu, press <Menu> to return or press <Exit> to exit
the menu.
Sound Mode: Includes standard, news, music, movie, and user mode.
Sound Mode: When the user mode is set, you can select your favorite sound by different level of
treble, bass and balance.
Auto Volume Concierge(AVC): When it is set as ON, the speaker volume will be limited
automatically.
Menu Operation
Menu Operation
Page 9
13
Menu Operation
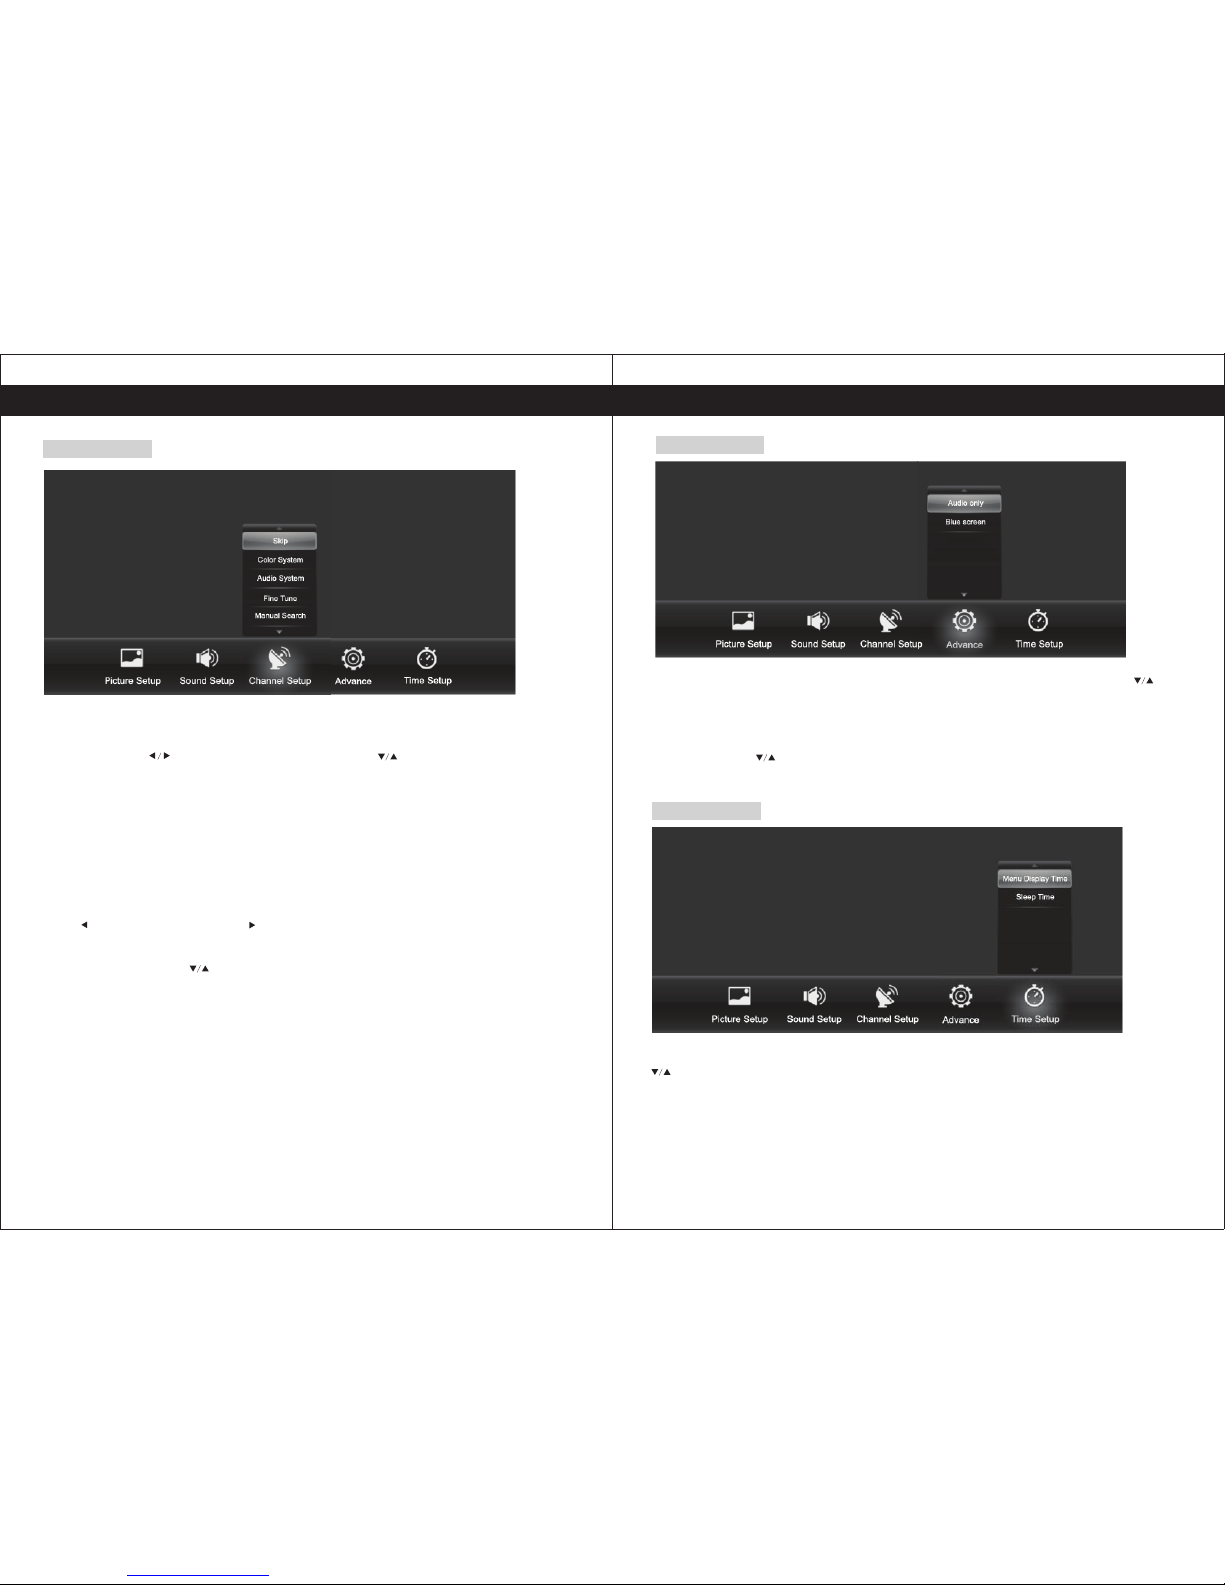
Channel Setup
Channel setting is only displayed in the analog TV channels. Press <Menu> to display the main
menu, then press to select the Channel setup, press to select the corresponding
sub-menu, press <Menu> to return or press <Exit> to exit the menu.
Skip: You can mark channel as the “skip-channel” from the channel list, and this channel will not
be displayed when switching channels if the skip function is ON.
Color system: To select the TV signal scanning system, including PAL and NTSC two systems.
Audio System: To select television signal audio system, including the I, BG, M and DK four
systems.
Fine Tune: Based on the current channel, make a small adjustment by upward or downward.
Manual search: Searching for an effective program channels automatically. If you want to stop the
search. press <ENTER> key during the search process.
AUTO search: Based on the current channel, search program channels by upward or downward.
Press searching downward, press key searching upward. If you want to stop the search,
press <return> during the search process.
Channel Edit: These four buttons (red, green, the yellow and the blue button) are shortcut keys to
edit the program. Press the to select the channel you want to operate, then you could delete,
move, skip and rename the selected channel.
14
Menu Operation
Advance
Press <Menu> to display the main menu, then press to select the Advance, press
to select the corresponding sub-menu, press <Menu> to return or press <Exit> to exit the
menu.
Audio only: When you turn on the listen alone function, you could only listen the sounds from the
TV while the screen is closed.
Blue screen: Press buttons to select the On/Off.
▲
▲
/
Time Setup
Press <Menu> to display the main menu, then press to select the Time Setup,, press
to select the corresponding sub-menu, press <Menu> to return or press <Exit> to exit
the menu.
Menu display time: includes 10s, 15s, 20s, 25s, 30s and off.
Sleep time: System Sleep Time can be adjusted.
It includes 10m, 30m, 45m, 60m, 90m, 120m, 240m and off.
▲
▲
/
Page 10
15
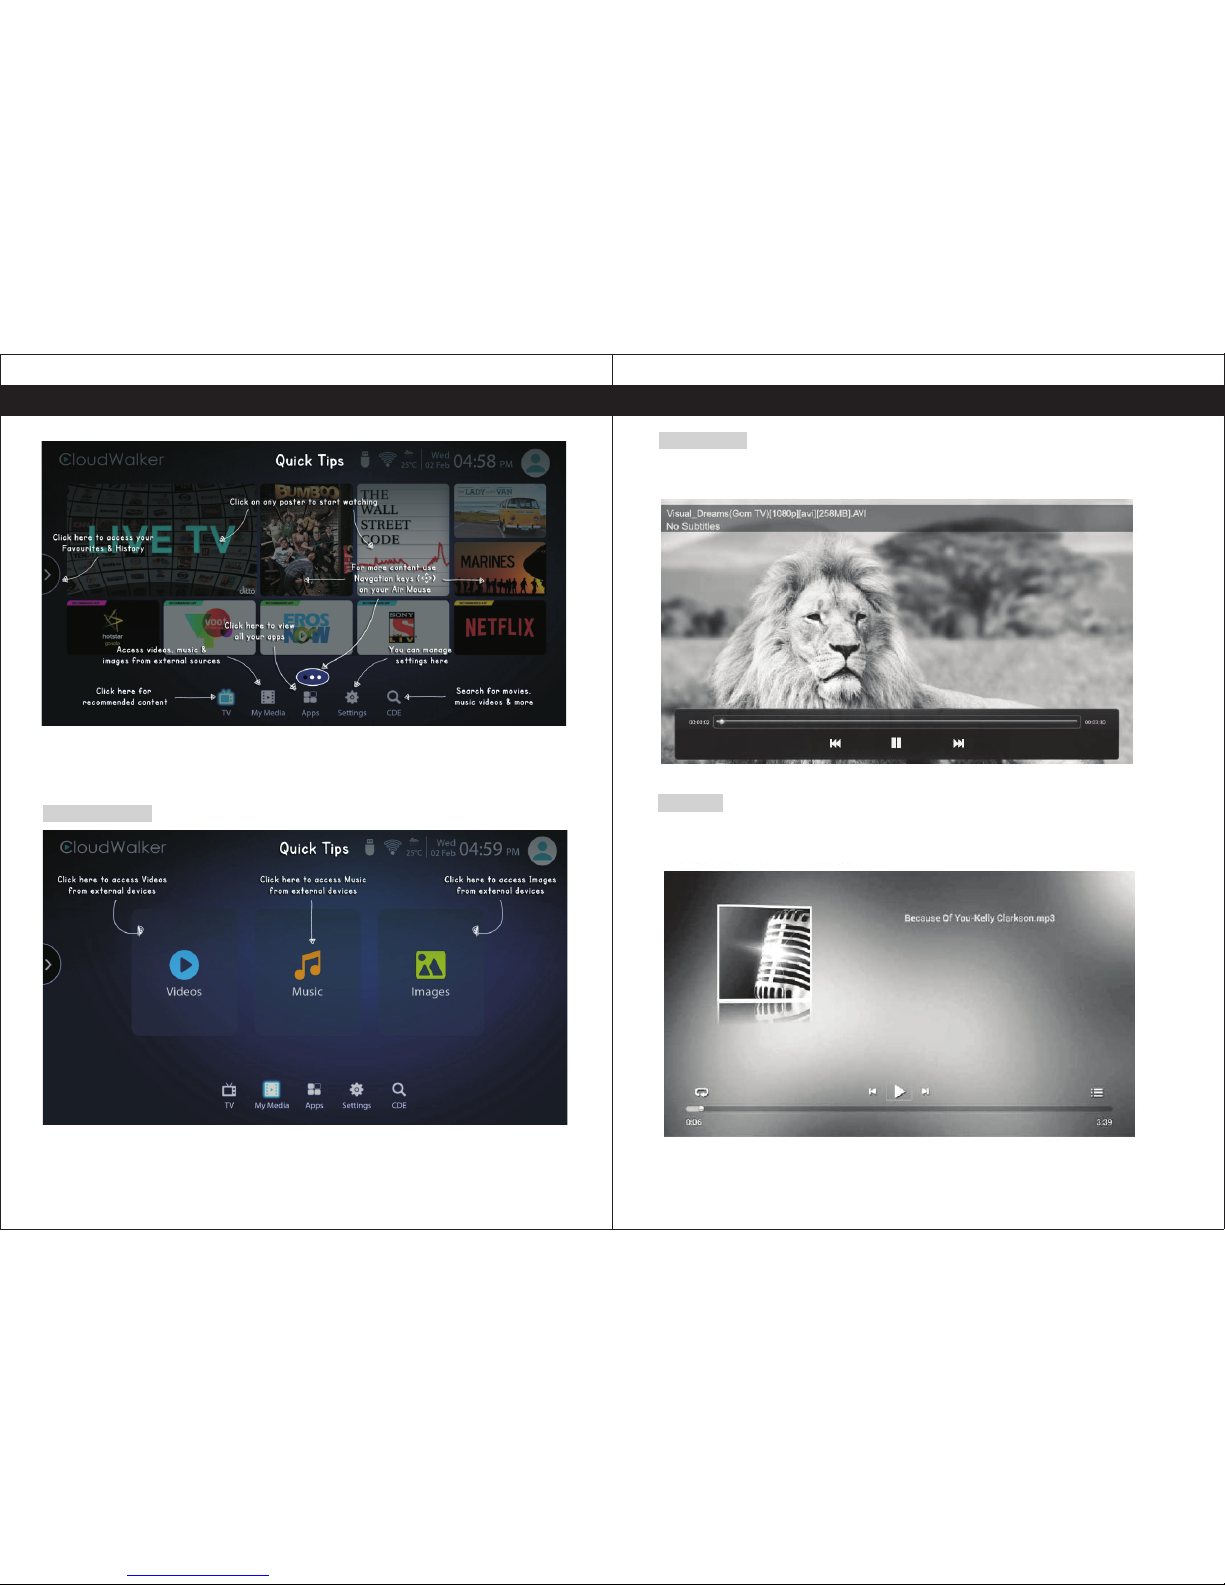
Play your movies, music and photos directly on the TV from your external storage devices.
Media center
My Media
Menu Operation
Watch Live TV (Cable/DTH), stream content from internet & access Apps
16
Menu Operation
Videos
Click “Videos” from “My Media” and use the navigation keys on your remote to select the
video file you want to play.
Click “Music” from “My Media” and use the navigation keys on your remote to select the
music/audio file you want to play.
Music
Home
Page 11
17
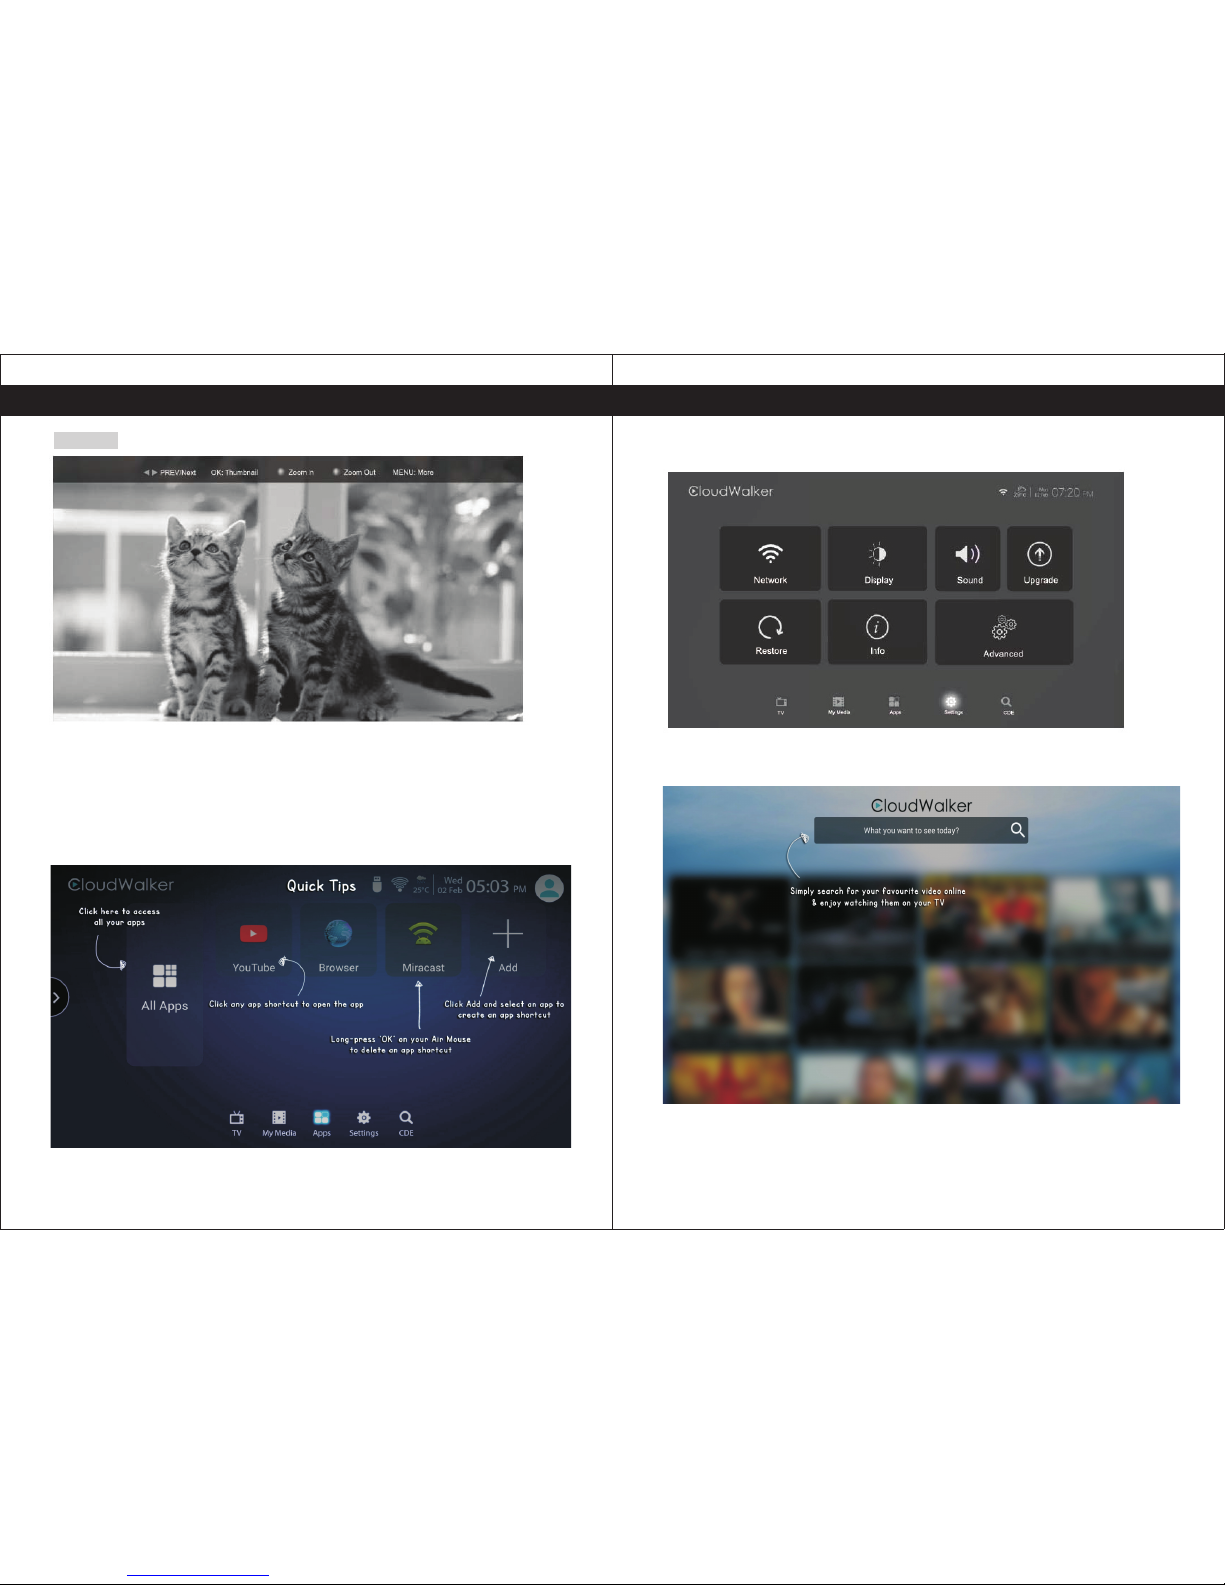
APPS
Click “All Apps” to access your apps. To make an app shortcut click on “+Add” icon.
Menu Operation
Click “Images” from “My Media” and use the navigation keys on your remote to select the
photo/image you want to view.
Images
18
Menu Operation
Settings
CDE
Simply search for your favourite videos online & enjoy watching them on your TV.
Page 12
19
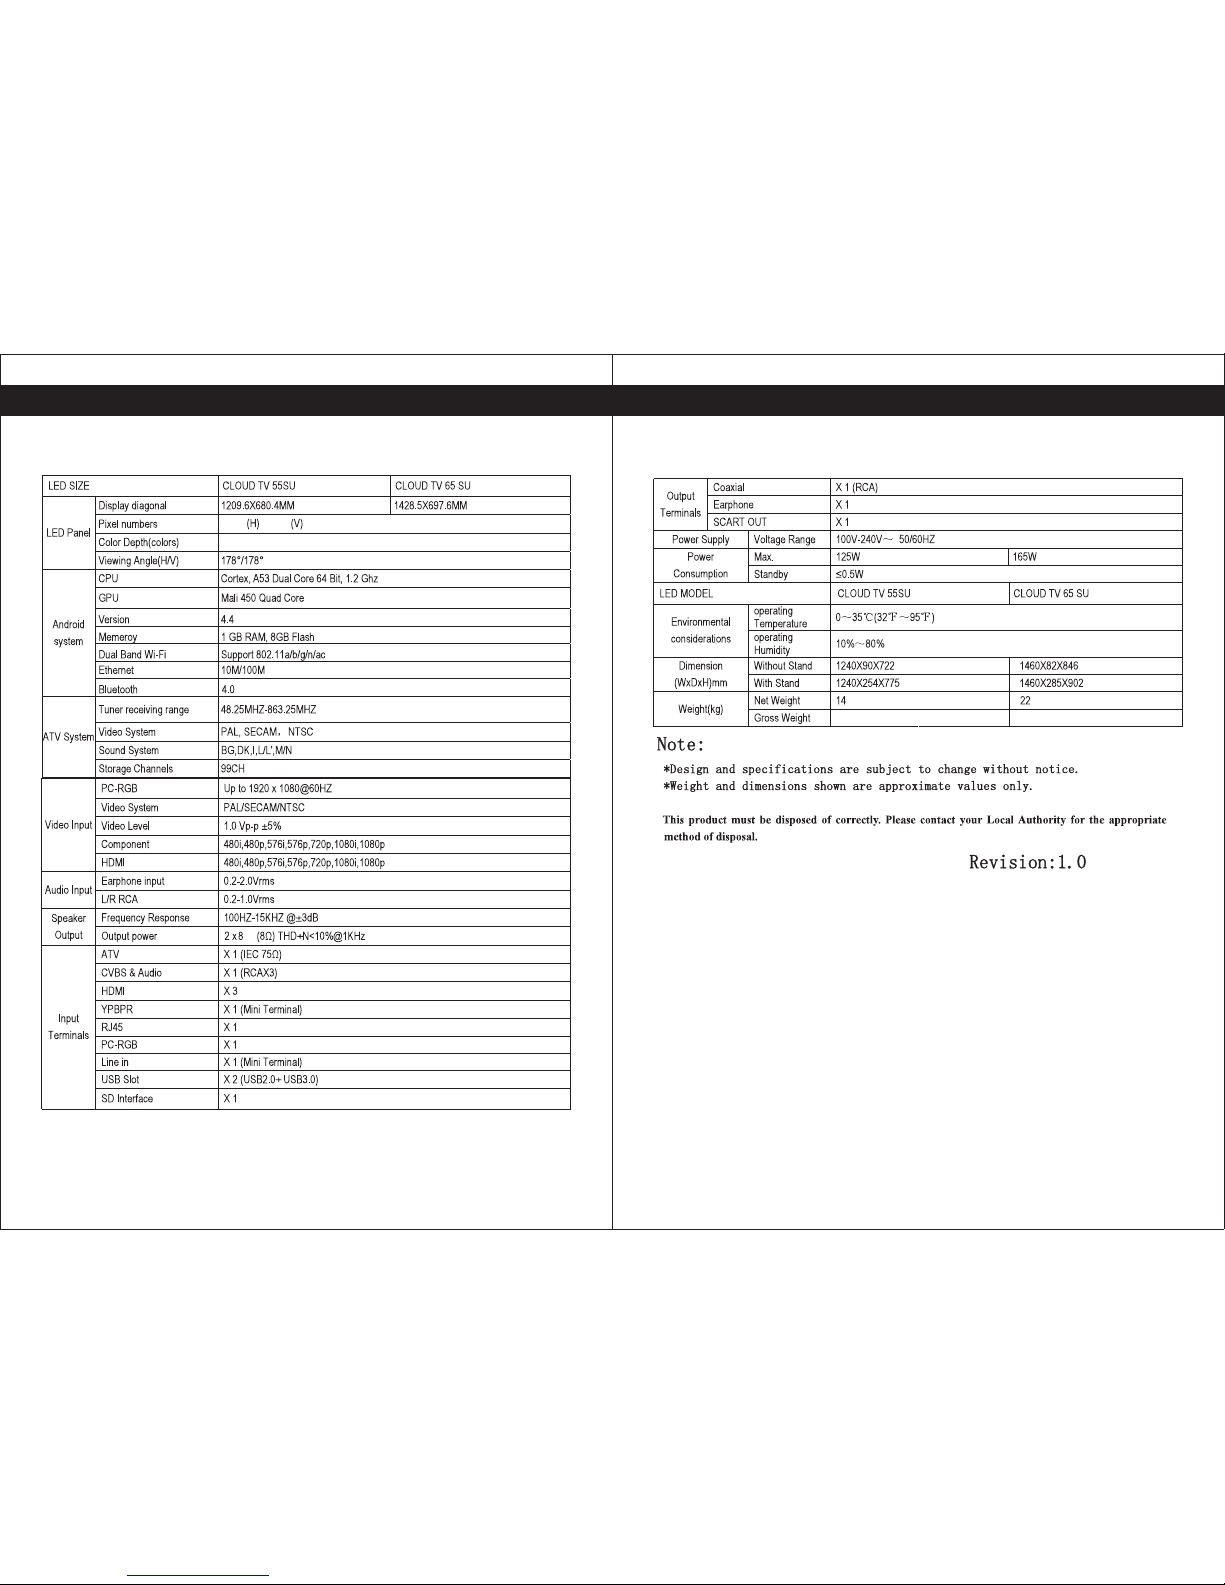
Specifications
3840 X2 160
16. 7M (True D ispla y) / 1.0 7B (Di there d 10bit s)
W
20
Specifications
20. 6 29. 6
Page 13
 Loading...