

Page 1
49AF
Page 2
1
Contents
Thanks for choosing the high-performance and
multifunctional intelligent LED TV produced by our
company. This precious thing will bring you better
audiovisual enjoyment. The design of this product has
given consideration to factors affecting personal safety,
and the product itself has gone through strict tests prior
to delivery. However, improper operation may result in
electric shock and fire disaster. To ensure safety,
prolong the service life of this product, and make sure
the best performance of this product can be given full
play to, please read the manual and marking label
carefully before using it and comply with the following
safety instructions. Please keep the user manual for
later use.
Safety Warning and Notice
Warning
Attention
Indicate the behaviors that must be
prohibited
Indicate the operations that must be
performed
May result in casualties
May result in personal injury or
property losses
Under Following Conditions
Power failure or unstable voltage.
Abnormal sound or smell from the device.
AC power cord is damaged.
TV set is damaged due to falling off, knock or
impact.
Any liquid or foreign matters enter
into the TV set.
If coal gas or other flammable gases leak, do not
unplug the power cord of the TV set or other
electric appliances; instead, close the valve of
the gas immediately and open the doors and
windows.
●
●
●
●
●
●
Turn off the TV set immediately,
unplug the power cord from the
power outlet, and contact
authorized maintenance personnel.
● 100- AC,
supply.
● All cables can be connected or pull out
only after power supply is turned off.
● Do not fix the TV set on instable position,
or else it may cause falling off, damage, or
even
● Do not put the TV set in the environment:
1. With direct sunshine, moisture,
overheating, undercooling or heavy
dust;
2. With flammable or explosive substance;
3. With flammable or corrosive gas;
4. In bathroom, kitchen, etc.
● Do not use damaged or improper power
socket, and ensure that the plug and
socket are connected properly.
● Keep the power plug and socket free of
dust and metal pieces.
● Do not damage the power cord:
1. It is prohibited to refit the power cord;
2. Do not put heavy object on the power
cord;
3. Keep the power cord away from heat
source;
4. Do not drag the power cord when
unplugging.
● Do not connect too many appliances to
one power strip, or else it may cause fire
Only use 240V 60/50Hz power
fire.
Warning
Safety Warning and Notice… ………………… ………1
Mounting and Connecting… … … … ……………… …3
Packing list…………………………… ……… ………3
Mounting the TV set… …………… … … ………… …3
Connecting peripheral equipment… … … … … … … 4
Panel Control Keys… ………………… … … … … … …5
Remote Control……… ……… ……… ……… …………5
Basic Operations……… … … ………… … … …………7
Turning on/Standby……… … … … … … … … … … …7
Signal source selection………………………………7
Menu operation description…… ………… …………7
Program scanning……… ……… ……… ……… ……7
USB multimedia function… ……… ………… ………7
Troubleshooting… … … … …… … … … … … … … … …8
Technical Specifications… … … … … … … … … … …8
Base Installation Instructions…… … … … … … … …9
Page 3
Attention
2
●
●
●
●
●
" "
● Healthy TV watching:
●
●
●
●
To adjust the position or angle of the TV set,
please disconnect all wires and move slowly
to avoid falling off.
Do not rub with hard object, knock at, bend or
squeeze the screen.
Do not use machine immediately after
transfering machine to the places with high
temperature from low temperature, which will
cause fogging inside machine and failures.
If the screen is broken and the liquid
splashes on skin, please wash with clean
water immediately for 15 minutes, and go to
see your doctor.
To carry the TV set with hands, please grasp
the corners and hold the bottom; do not apply
force on the panel.
Displaying the same image for a long time or
active image with fixed words, icons will
leave image persistence on screen which
will not disappear after powering off for a
long time. This undesirable phenomenon is
not covered by warranty.
Unplug the power cord of the device to cut off
the power supply.
If a power plug or appliance coupler is used
as disconnecting device, it should ensure
easy operation.
Power plug shall be connected reliably. Loose
power plugs may cause sparkle and fire.
All the technical specifications in the user
manual and on the packaging are subject to
changes without prior notice. If there is slight
deviation between the user manual and actual
operation, the latter shall prevail.
●
1. Watch in appropriate light; poor light or
long time watching may hurt your eyes.
2. If a headset is used, adjust the volume
appropriate to avoid hurting your hearing.
Warning
●
●
●
●
Do not let children climb onto the TV set.
Keep the small accessories away from
children's reach to avoid swallowing.
If the TV set won't be used for a long time,
please turn off the device and unplug the
power cord.
Before cleaning the TV set, unplug the power
cord and wipe with soft cloth; do not use
chemical reagents and avoid foreign
substances entering into the device. The
incorrect cleaning (such as cleaning fluid,
water, etc) may lead to damage of product's
appearance, erasing products printing
information, even flow into the machine and
damage components, cause machine can not
display.
due to high power consumption.
● Do not let open flame (e.g. lit candle)
approach the TV set, or else it may cause
electric shock or fire.
● Do not put the container filled with water
on the TV set, to avoid electric shock or
fire caused by water drop of splashing.
● Do not penetrate any sharp object, metal
or liquid into the signal connector or air
vents, to avoid short circuit and product
damage as well as electric shock.
● The slots on the case is designed to
release heat so as to assure that all inside
components will not reach an extra high
temperature and can work normally for a
long time. Please do not cover the holes
while place it.
Do not touch the plug with wet hands, or else
it may cause electric shock.
Do not turn on the TV set in thunderstorm
weather; instead, unplug the power plug and
antenna connector to avoid lightning strike.
Do not disassemble the TV set by yourself,
or else it may cause electric shock or fire.
Contact qualified personnel for maintenance.
Attention
Page 4

3
1. The TV set.
2. User Manual.
3. Remote control.
4. 2 AAA Batteries.
5. Power cord (or attached to TV set).
6. 1 Wall Mount Bracket.
Packing list
Mounting the TV set
Ventilation
Tips on Installation
The TV set should be mounted near the AC power
socket for easy plugging and unplugging.
For your safety, please select appropriate wall
mount bracket or base.
To avoid hurt, it is required to place the TV set on
stable plane, or fix on firm wall.
Ask qualified personnel to mount the TV set on the
wall. Improper mounting may result in instable TV
set.
Do not place the TV set at any place susceptible to
mechanical vibration.
Do not place the TV set at any place that insects
may enter.
Do not mount the TV set against air conditioner, or
else the internal panel of the display may condense
moisture and cause failure.
Do not place the TV set at any place with strong
magnetic field, or else it may be interfered with and
damaged by electromagnetic wave.
●
●
●
●
●
●
●
●
● Please keep this space at least around the TV, as
shown in the figure.
● Do not cover the air vents or insert any object into
the enclosure.
● Do not put the device in limited space, e.g.
bookcase or embedded closet, unless the TV set is
properly ventilated.
Mounting and Connecting
Warning
Never place a television set in an unstable location. A
television set may fall, causing serious personal
injury or death. Many injuries, particularly to children,
can be avoided by taking simple precautions such as:
Using cabinets or stands recommended by the
manufacturer of the television set.
Only using furniture that can safely support the
television set.
Ensuring the television set is not overhanging
the edge of the supporting furniture.
Not placing the television set on tall furniture (for
example, cupboards or bookcases) without
anchoring both the furniture and the television
set to a suitable support.
Not placing the television set on cloth or other
materials that may be located between the
television set and supporting furniture.
Educating children about the dangers of
climbing on furniture to reach the television set
or its controls.
If your existing television set is being retained and
relocated, the same considerations as above should
be applied.
●
●
●
●
●
●
Obstr uct t he air ci rcu latio n
Wal l
10cm
30cm
10cm
10cm
Mount on the wall
7cm
Obstr uct t he air ci rcu latio n
Wal l
Mount on the base
10cm
30cm
10cm
Page 5
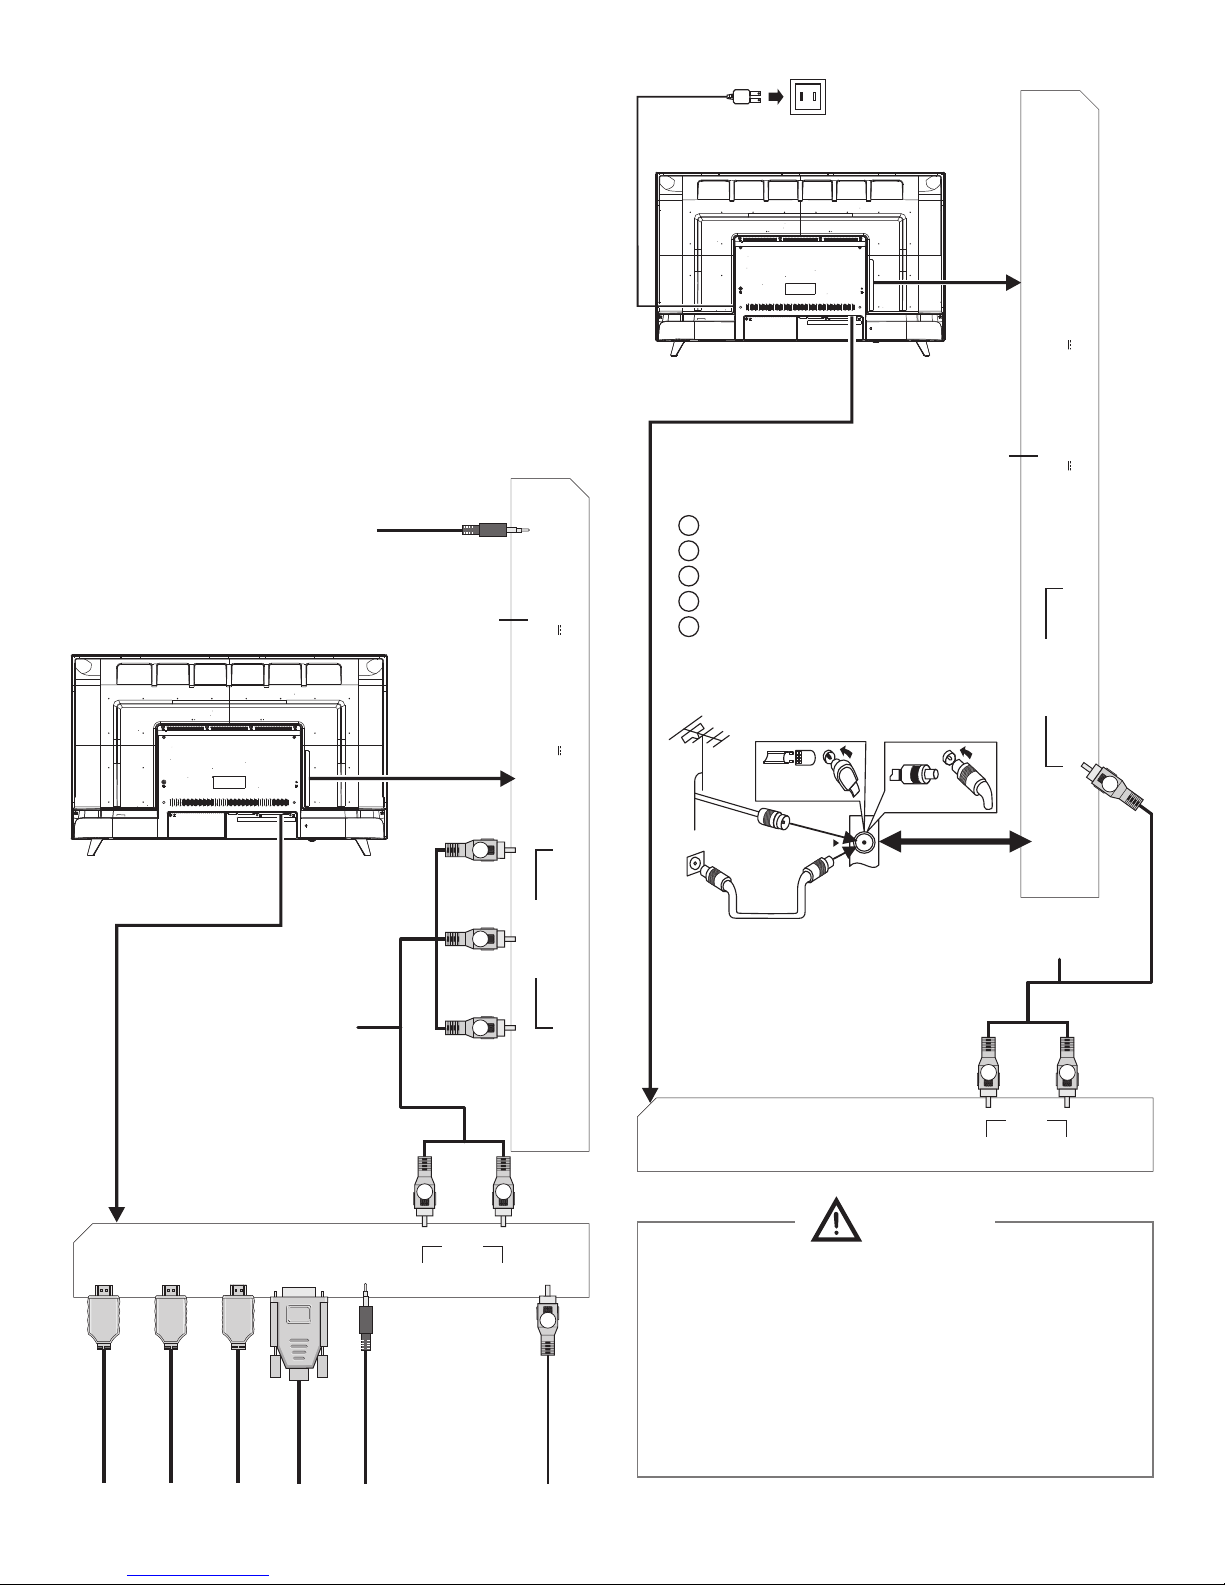
HDMI 1
HDMI 2(ARC)
HDMI 3
VGA
PC AUDIO
AV IN
L R
VIDEO OUT
To power socket
(100-240VAC, 60/50Hz)
Remark:
1.
4. The peripheral equipment and cables described in
this manual should be purchased separately.
USB interfaces support peripheral equipment,
including USB camera, USB mass storage device,
USB mouse, keyboard, etc.
2. The VIDEO and Y signal of the device share same
input interface. AV and COMPONENT share same
audio input interface.
3. When you need to connect the device which support
the ARC function, please select the HDMI-2
interface. (ARC function is optional, and please
refer to the device.)
Connecting peripheral equipment
HDMI 1 Input
PC Input
Y
HDMI 2 Input
HDMI 3 Input
PC Audio Input
Video Output
Audio Output
W
R
COMPONENT Input
USB 2 interface
USB 1 interface
W
R
AV Input
Y
R F
G Green (Y signal c able)
B Blu e (Pb/Cb si gn al cable)
Y Yellow(VI DE O signal ca ble)
W W hi te(AUDI O-L signal cab le )
R Red (AUDI O- R and Pr/Cr s ignal cab les)
Warning
When connecting outdoor antenna to signal port
of the TV set, please turn off the main power
switch of the TV set first. Do not approach the
outdoor antenna to high voltage mains power
line to avoid electric shock. The wired network
antenna connected to this TV set must be
isolated from the protective grounding, or else it
will cause fire or other hazards.
4
G
B
R
HDMI 1
HDMI 2(ARC)
HDMI 3
VGA
PC AUDIO
AV IN
L R
VIDEO OUT
LINE OUT
USB 1
(5V 500mA)
USB 2
(5V 500mA)
Y
Pb Pr
YPBPR IN
RF IN
LINE OUT
USB 1
(5V 500mA)
USB 2
(5V 500mA)
Y
Pb Pr
YPBPR IN
RF IN
Page 6
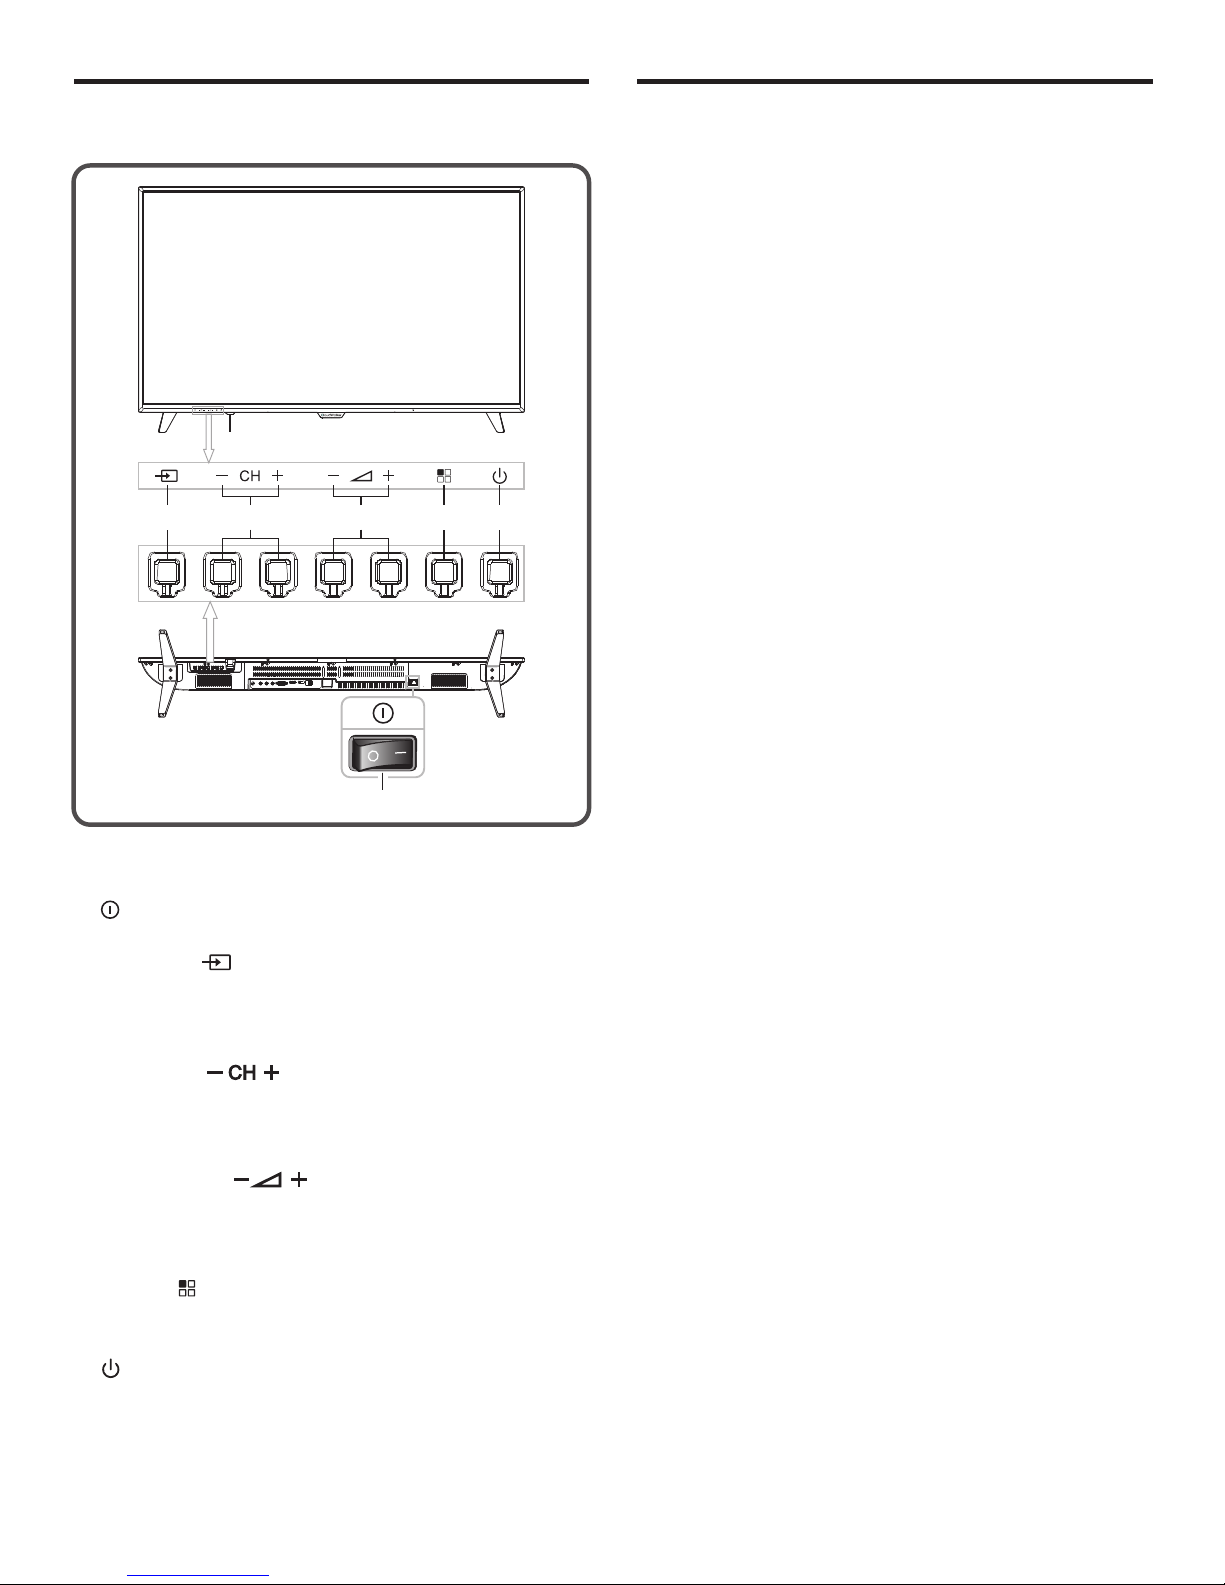
5
1) Power LED indicator and remote receiving window.
2) Power switch(optional): Press '' I '' end to turn
power on, and press ''O'' end to turn power off.
3) SOURCE ( ): Press this key to enter the menu of
signal source. During main menu operations, press
this key to confirm the operation, with the same
function as the [OK] key on the remote control.
4) CH-, CH+ ( ): Press these two keys to
select the channel. During OSD menu operation,
press the keys to select items, with the same
function as the [▼]/[▲] key on the remote control.
5) VOL-, VOL+ ( ): Press these two keys to
reduce or add volume. During OSD menu operation,
press the keys to select items, with the same
function as the [t]/[u]key on the remote control.
6) MENU ( ): Press this key to enter main menu.
During Input Source menu operation, press this key
to confirm the operation.
7) Standby: To switch the TV on or back to standby.
Note: Different models may have different
appearances; please refer to the actual device.
Panel Control Keys
Method for Installation of Remote Control
Battery
Remove the battery compartment cover and insert
two AAA (No. 7, 1.5V) batteries; make sure the polarity
of the batteries is in compliance with the polarity mark
''+'' and ''-'' in the battery compartment of the remote
control.
Precautions for using the remote control
● The remote control should be pointed at the
remote control sensor during operation. An object
placed between the remote control and the remote
control sensor may impede normal operation.
● The remote control should be prevented from
strenuous vibration. Besides, please do not set or
place the remote control under direct sunshine, as
heating power may result in deformation of the remote
control.
● Remote control failure may occur when the
remote control sensor of the main unit is under direct
sunshine or strong lighting; in this case, please
change the angle of lighting or this TV set, or operate
the remote control near the remote control sensor.
● Low battery will influence the remote control
distance, in which case, the battery should be replaced
with a new one. If the remote control is going to be idle
for a long time or the battery runs out, please take the
battery out to prevent the remote control from being
corroded by battery leakage which may result in
damage and failure of the remote control.
● Please do not use batteries of different types. It
is not allowed to use old and new batteries together;
the batteries should be replaced in pair.
● Please do not throw the batteries into fire or
charge or decompose the batteries; do not charge,
short-circuit, disassemble/assemble, heat or burn used
batteries. Please dispose the waste batteries pursuant
to relevant regulations on environmental protection.
Remote Control
6
5
4
32
1
7
Page 7
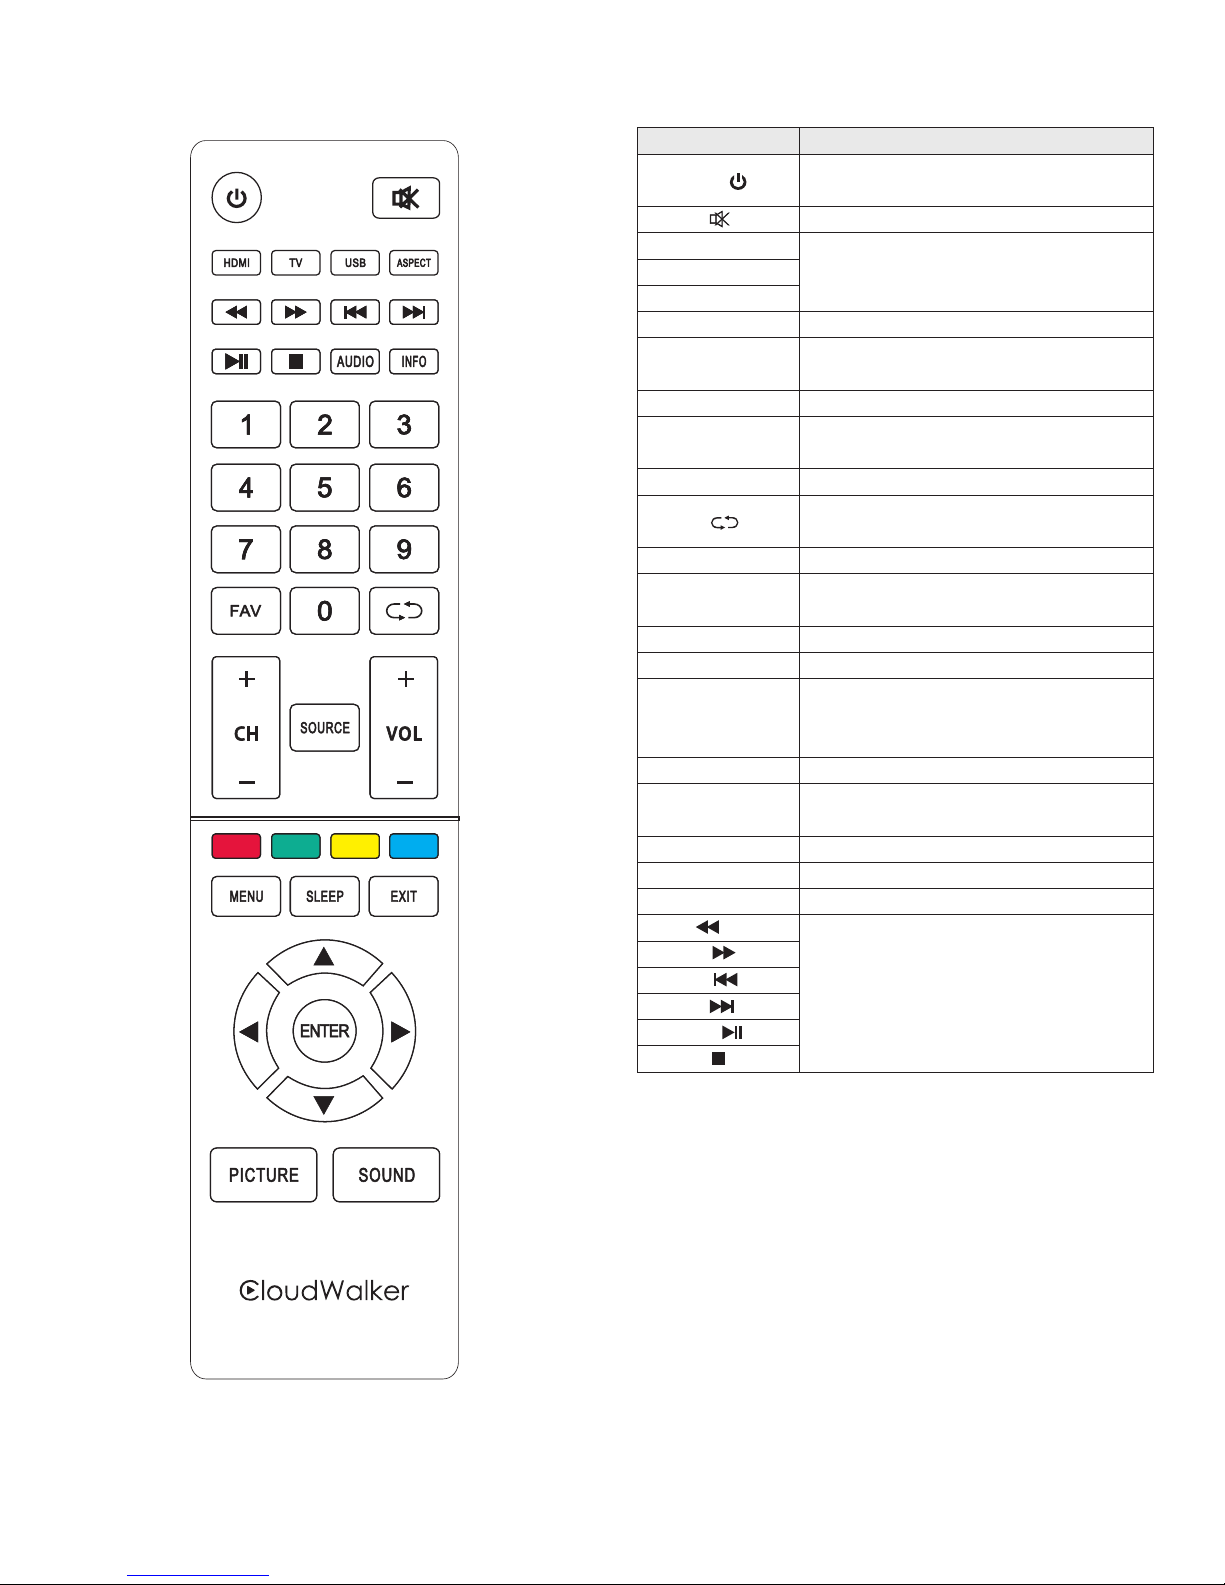
6
Keys of the Remote Control
Note: The appearance of the remote control may
be different from this diagram; please refer to the real
object as standard.
Function
Switch between normal working and
standby.
Turn off the sound.
Key
POWER ( )
MUTE ( )
HDMI
TV
USB
ASPECT
Change audio track language in USB
Mode.
Display additional program info.
Press the number keys to select
channels directly.
Press this key to return to previous
channel.
Turn up/down the volume.
Return ( )
SOURCE
Press this key to display signal source
selection menu.
Increase/decrease the channel.
Press this key to call out the main menu.
▲/▼: select functions;
t/u: adjust the analog value.
▲ ▼/ tu/ /
Confirm the operation.
Switch the image mode.
Switch the audio mode.
Used for operations in USB mode.
Select Source.
Changes the aspect ratio of the TV.
Open the Favorite List.
Set the sleep time and the device will
switch to standby automatically at
specified time.
EXIT
ENTER
PICTURE
SOUND
REV. ( )
F WD. ( )
PREV. ( )
NEXT ( )
PAUSE ( )
STOP ( )
Return to previous page.
SLEEP
INFO
Numerical key
(0~9)
FAV
VOL+/VOL-
CH+/CHMENU
AUDIO
Page 8

7
Basic Operations
Remark:
1. The following keys operation refers to remote
control operation, for panel control keys
operation please refer to "Panel Control Keys"
operation explanation.
2. The menu operation in this manual uses the
example in TV input source; the operations in
other input source are same as the TV.
Turning on/Standby
Connect the power supply. Press the [ ] button on
the TV(If it this button, you needn't
operate this step), and then press [ ] key to turn on
the TV. (Notice: Please make sure that the power
supply is stable)
In power on state, press [ ] key to switch to
standby mode.
★ Special Tips: This device adopts energy saving
technology. If there is no signal input in power on
state, it will enter standby state automatically in five
minutes; The device will enter standby state
automatically at specified sleep time;
Signal source selection
After turning on the device, press [SOURCE] key to
show the ''Input Source'' menu on the screen; press
[▲]/[▼] key to select a signal source. Press [OK] key
to switch to the selected signal source.
Menu operation description
Press [MENU] key to show the main menu on the
screen:
1. Press [t]/[u] key to select a menu from
CHANNEL, PICTURE, SOUND, OPTION.
2. Press [▲]/[▼] key to select an item in the menu.
3. Press [OK] key to enter the submenu.
4. Press [t]/[u] key to adjust the value or setting.
5. When the main menu shows on the screen,
press [MENU] key to exit the main menu.
6. During menu operation, the icons of invalid
options will change into grey.
Program scanning
Tune the programs before watching the TV for the
first time. Before tuning, please make sure that the
doesn't have
antenna has been connected properly.
Auto Tuning
Select CHANNEL > Auto Tuning, then press [OK]
key to start automatic tuning. The scanned TV
channels will be saved automatically. In the process of
tuning, you can press [MENU] key to exit Auto
Tuning. After auto tuning, the channels will be listed
by the frequency, and the original list will be covered.
ATV Manual Tuning
Select CHANNEL > ATV Manual Tuning, and
press [OK] key to enter the menu. Press [▲]/[▼] key
to select what you want to adjust, then press [t]/[u]
key to adjust, setting or scanning. In the process of
scanning, you can press [MENU] key to exit the
scanning.
USB multimedia function
Please insert USB storage device into USB
interface of TV, and select USB as signal source.
Enter the USB multimedia center, which includes 4
sorts: PHOTO, MUSIC, MOVIE and TEXT.
While playing, press [INFO] key to show the menu
options as in the picture above; press [▼] key to hide
the function bar. Select an icon, and press [OK] key to
perform the operation. Press [ ]/[ ]/[ ]/[ ]/[ ]/
[ ]/[ ] key to perform shortcut operation.
Remark:
1. Compatible USB media files: video, audio,
picture, and text. The nonstandard USB storage
devices may be incompatible; please replace
with standard devices;
2. Stream media system has limitation on every
kind of file format, and will report error if beyond
system limit;3. Do not unplug the USB device
while playing, or else it will cause system or
device error;
4. The system supports USB flash drive and
removable hard disk with standard USB1.1 and
USB2.0 interface transmission protocol. The file
format of USB device must be FAT or FAT32,
instead of NTFS.
5. The USB interface of this TV set can supply a
voltage of 5V and the maximum current is
500mA; accurate identification of the multimedia
player will be affected when a storage device
above 500mA is used, which is a normal
phenomenon.
Page 9
8
Troubleshooting
■ TV image is blurry, and has noise.
1. Check whether the antenna connector is loose,
and whether the cable is good state.
2. Check antenna type (VHF/UHF).
3. Check antenna orientation or position.
4. Use signal amplifier.
5. Enter main menu to reset the sound system.
■ No screen display, no sound, indicator is off.
Check if the power cord is connected properly.
■ TV image has point, line or stripe interference.
Do not use hair drier near the device, and adjust
the antenna orientation to reduce the interference.
■ TV image ghosting.
1. Use high positioning antenna, and "TV" tuning.
2. Adjust the antenna orientation.
■ Image has no color.
1. Enter main menu to increase the saturation.
2. Enter main menu to change the color system.
■ TV doesn't have sound.
1. Adjust the volume properly.
2. Press "MUTE" key on the remote control to turn
on the sound.
3. Enter main menu to change the sound system.
■ PC doesn't have display, no signal input,
indicator flashes.
Check whether the signal cable is loose or falls off,
and reconnect the cable.
■ Remote control distance becomes short, out of
control.
1. Move the object to avoid blocking the receiver
window.
2. Replace the battery.
■ PC display is blurry.
1. Use automatic adjustment.
2. Use recommended mode.
■ PC image offset, can't fit the screen or beyond
the screen.
1. Use automatic adjustment.
2. Enter "Geometry" to adjust the vertical or
horizontal position.
3. Use recommended mode.
■ Noise Signals at turning off.
It is normal.
Can't operate the device.
Disconnect the power supply first, and connect the
power supply after about 1-2 minutes, then turn on
the TV again.
■
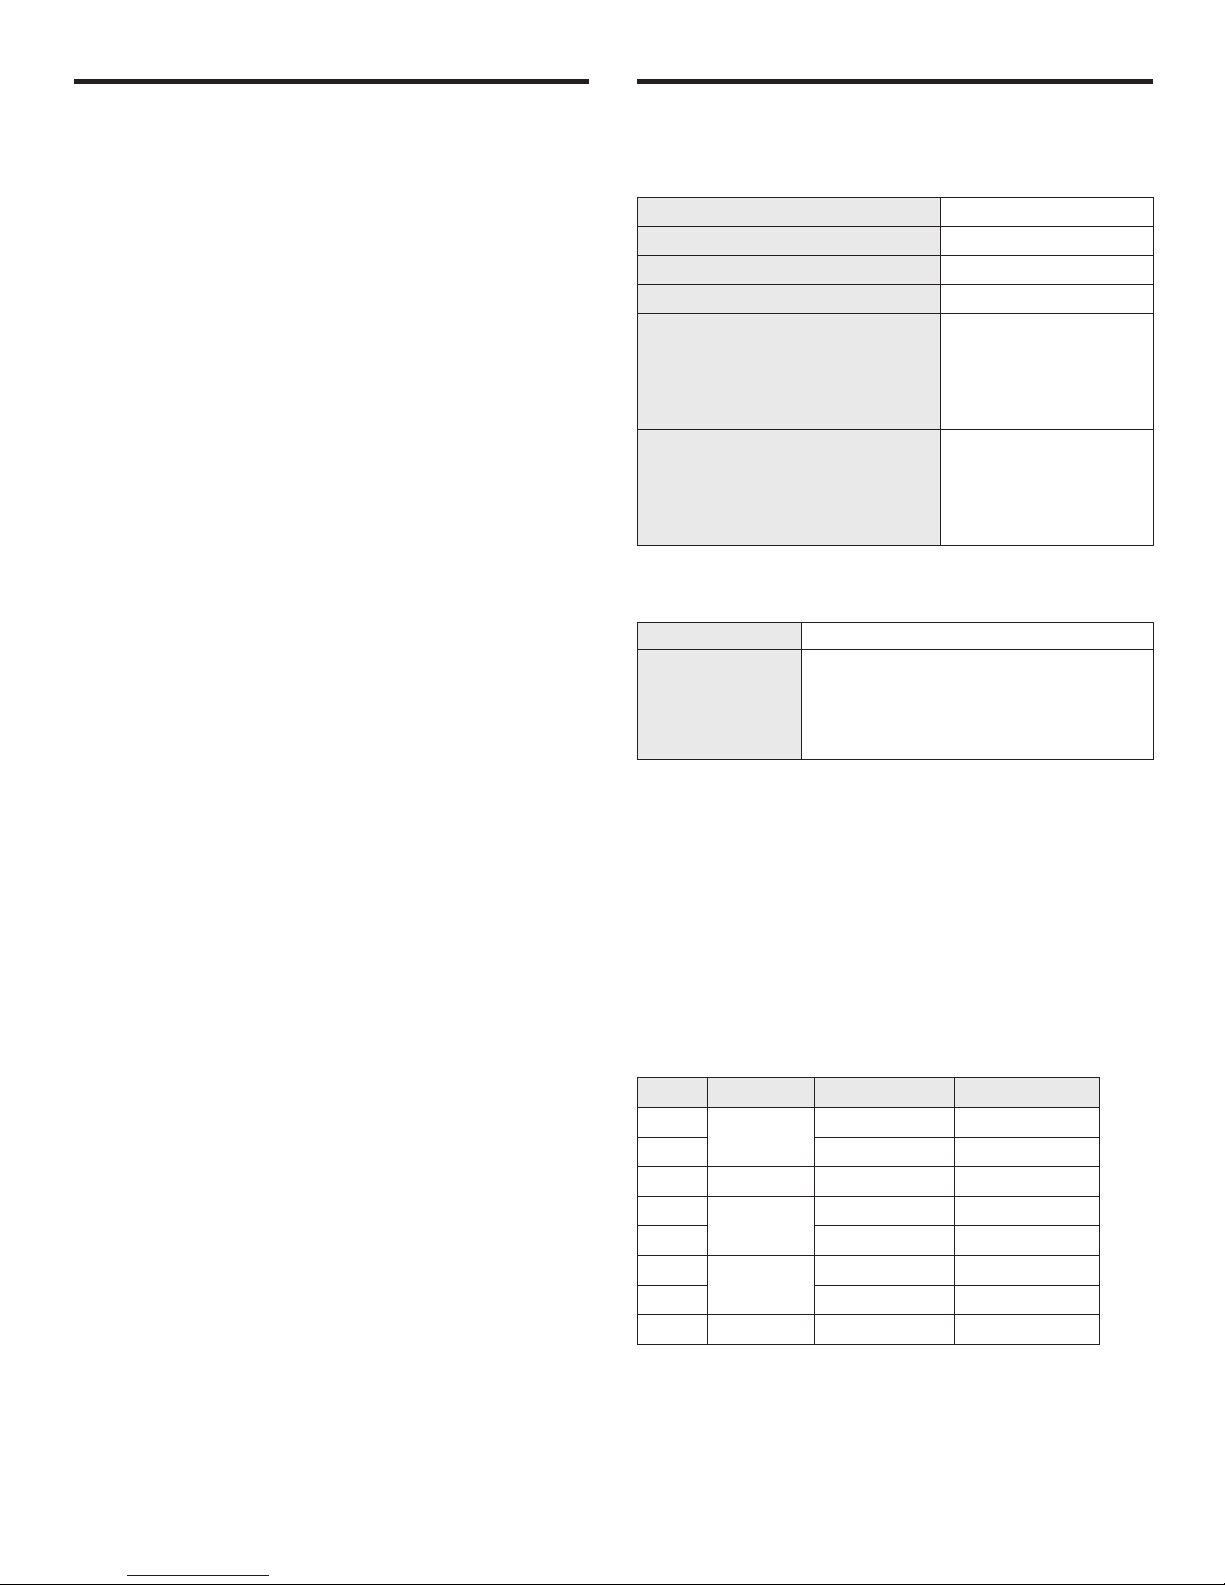
Technical Specifications
Master unit
Dimension (L H W) and Weight× ×
Excluding base
3
Unpacking: 1103×642×83(mm )
3
Unpacking: 1103×693×219(mm )
3
Packing: 1210×744×175(mm )
Net Weight: 10.0kg
Gross Weight: 12.8kg
Including base
Max. Resolution
Best Resolution
Power Supply
Power Consumption of Speaker
Operating environment:
Temperature
RH
Atmospheric pressure
Storage environment:
Temperature
RH
Atmospheric pressure
1920×1080
1920×1080@60Hz
100-240VAC 60/50Hz
8W+8W
℃ ℃
℃ ℃
5 ~40
10%~85%
86kPa~106kPa
-20 ~55
5%~95%
86kPa~106kPa
Technical specifications for TV
1. Supported standard: PAL+NTSC+SECAM.
2. Antenna input: 75Ω coax, unbalanced.
3. AV video input: 75Ω, 1±0.1Vp-p, RCA terminal.
4. AV audio input: 20KΩ, 0.2~2Vrms.
5. YPbPr / HDMI video input: 480i, 480P, 576i, 576P,
720P, 1080i, 1080P.
VGA
SVGA
720×400
640×480
800×600
1024×768
1280×720
1360×768
1600×900
1920×1080
WXGA
XGA
1
2
3
4
5
6
7
8
NO.
WUXGA
Mode Resolution
Recommended mode:1920X1080@60Hz
70Hz
60Hz
60Hz
60Hz
60Hz
60Hz
60Hz
60Hz
Refresh rate
VGA display mode
Page 10
9
Power management
Mode
Normal working
Standby
≤110W
≤0.5W
Power Consumption
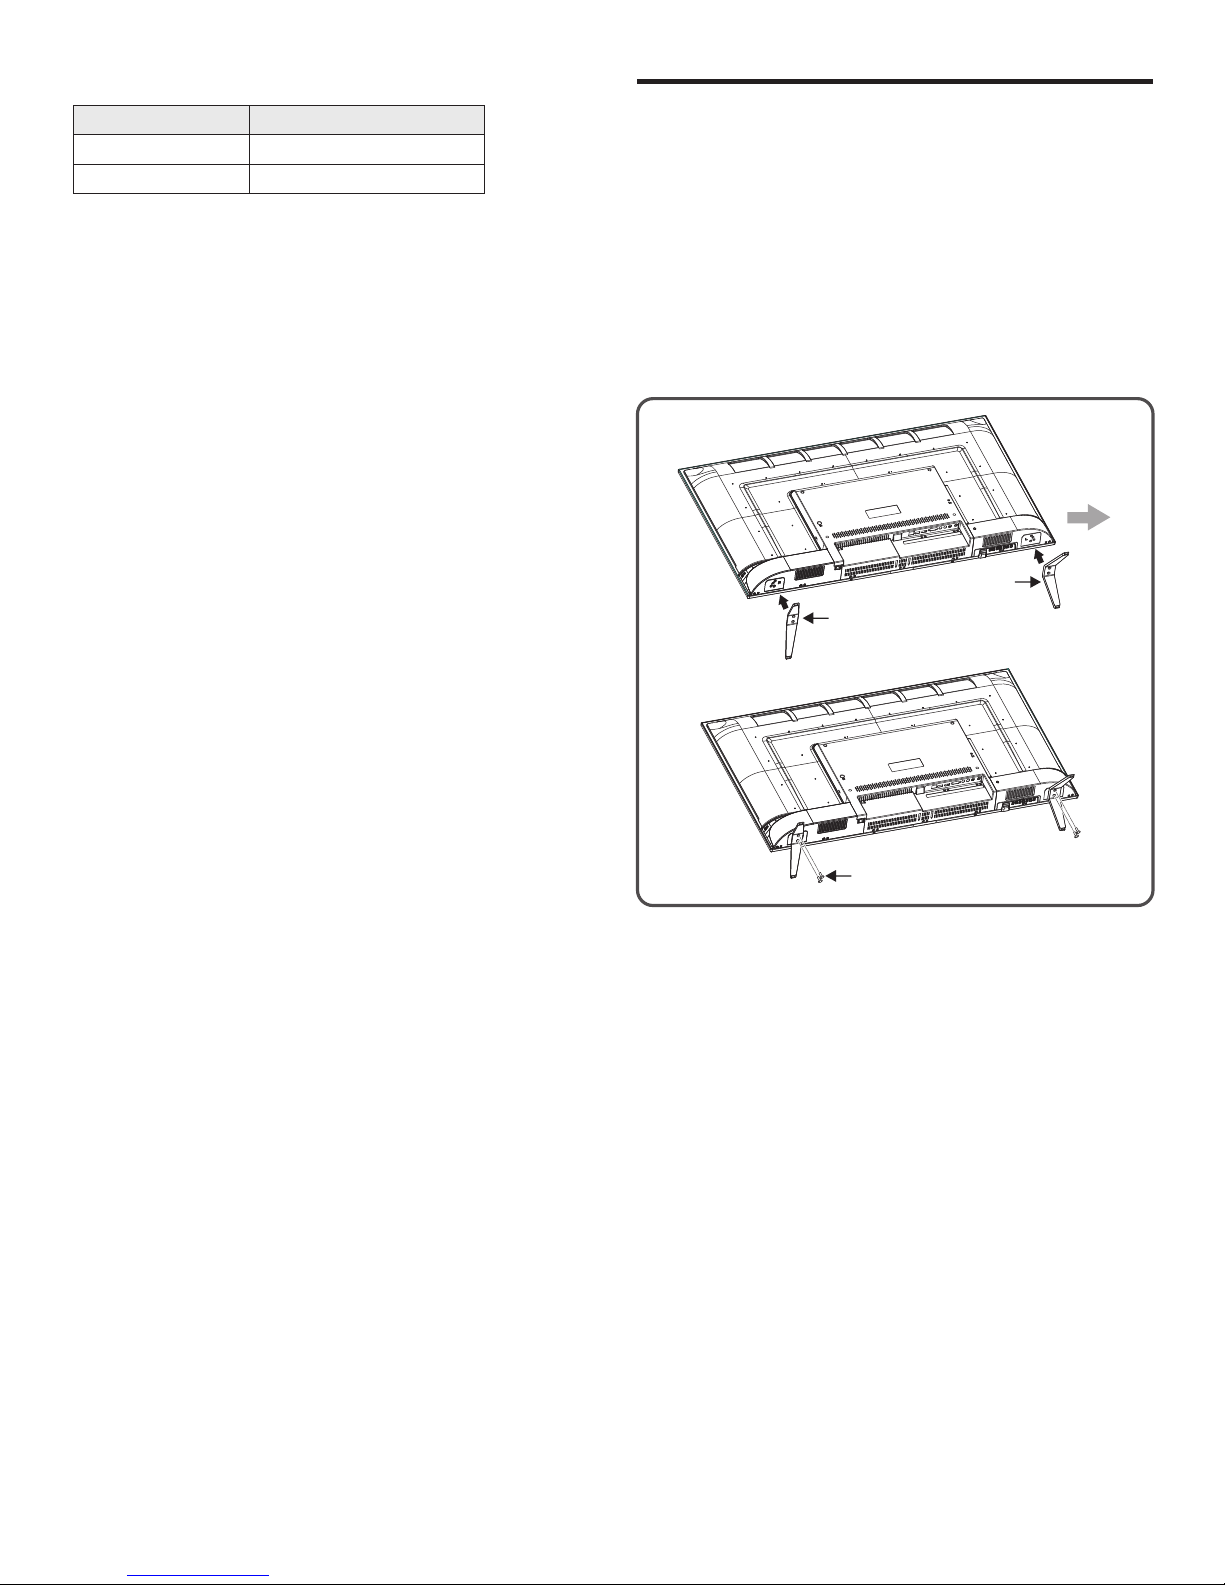
Base Installation Instructions
Remark: The actual base and machine appearance
may be different from pictures; please refer to the
actual device.
Put machine flat first, distinguish left and right base
and base installation front and back direction, then
install base in bottom of machine back cover as arrow
direction in figure, align positioning hole column of top
base and positioning column hole of bottom of
machine back cover, align screw holes, then fasten
screws (notice that base module has to be adjusted at
figure status, otherwise it cannot be installed in.)
/
/
Base-R
Base-L
Screws
Page 11
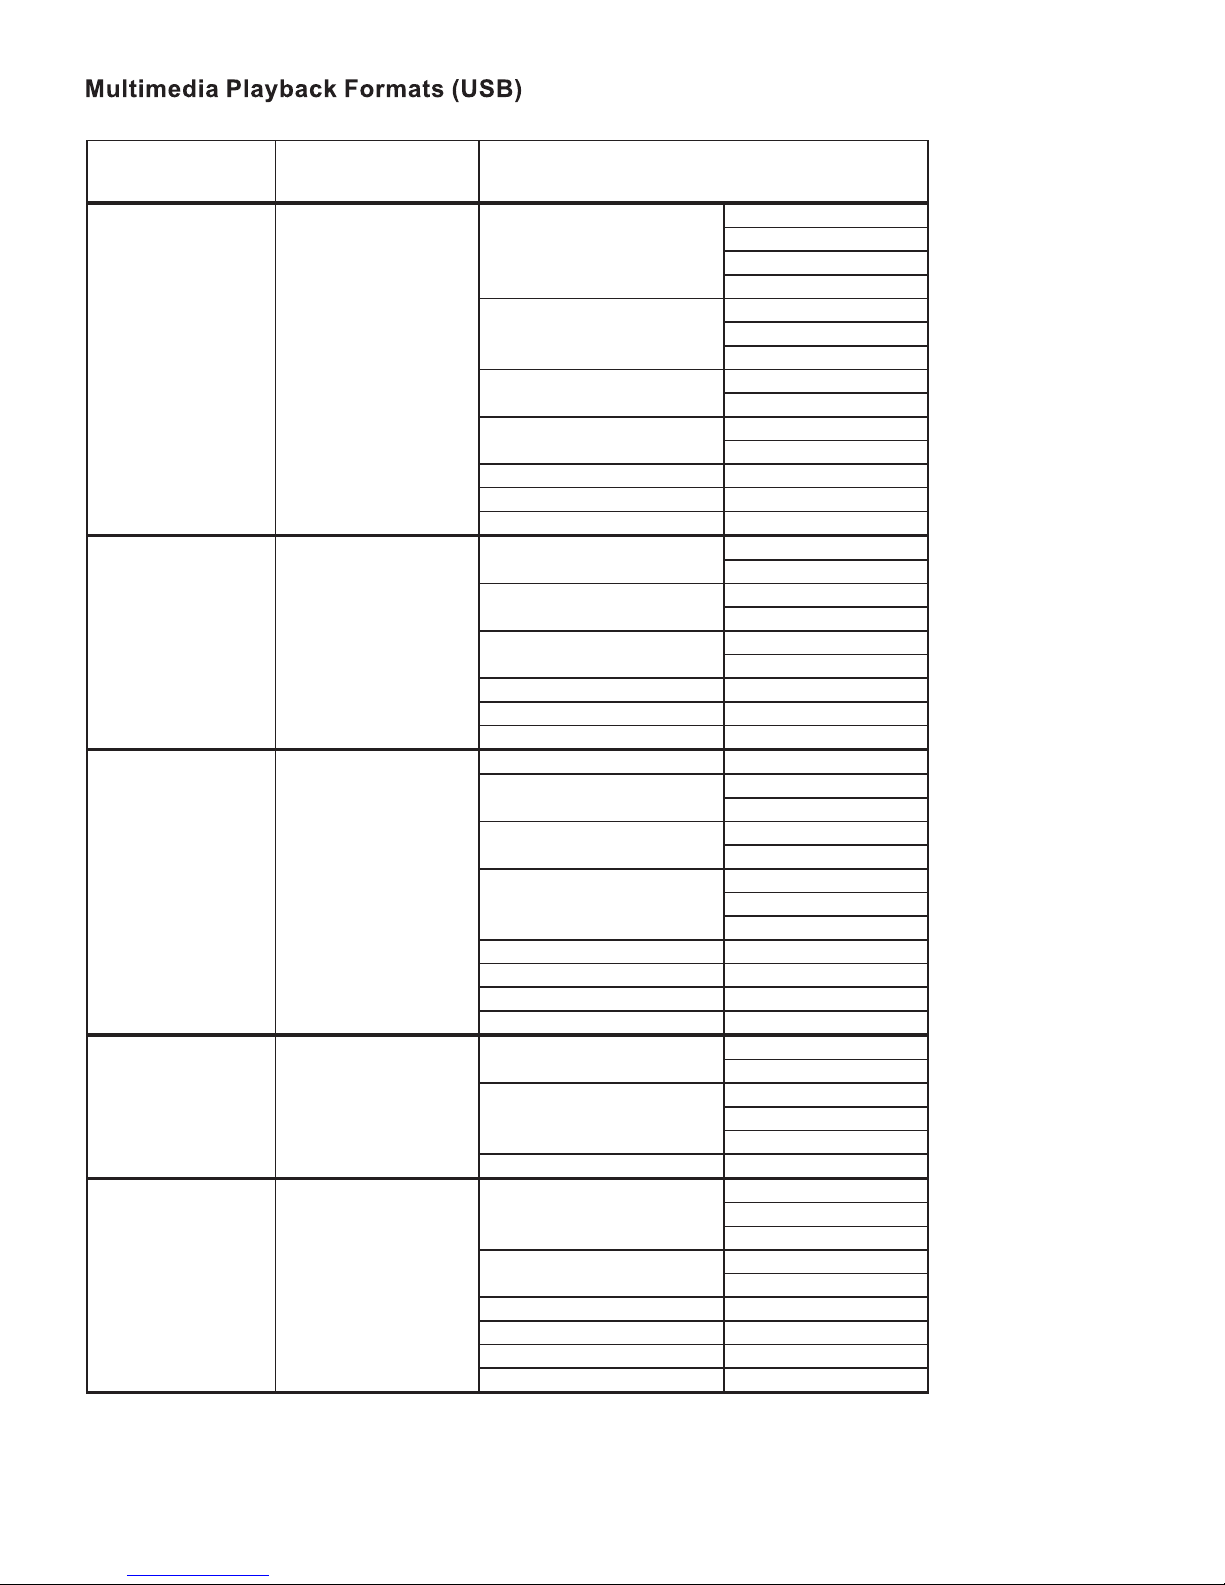
MPEG2 1920×1080
MPEG program stream
.DAT
.VOB
.MPG
.MPEG
MPEG transport stream
.TS
.TRP
.TP
MP4
.Mp4
.MOV
3GPP
.3gpp
.3gp
AVI .AVI
MKV .MKV
ASF .ASF
MPEG4 1920×1080
MP4
.Mp4
.MOV
MPEG program stream
.MPG
.MPEG
3GPP
.3gpp
.3gp
AVI .AVI
MKV .MKV
ASF .ASF
H.264 1920×1080
FLV .FLV
MP4
.Mp4
.MOV
3GPP
.3gpp
.3gp
MPEG transport stream
.TS
.TRP
.TP
ASF .ASF
WMV .WMV
AVI .AVI
MKV .MKV
1920×1080
MP4
.Mp4
.MOV
MPEG transport stream
.TS
.TRP
.TP
MKV .MKV
VC1 1920×1080
MPEG transport stream
.TS
.TRP
.TP
MPEG program stream
.MPG
.MPEG
ASF .ASF
WMV .WMV
AVI .AVI
MKV .MKV
Video Codec Resolution Container
HEVC H.265( )
Page 12
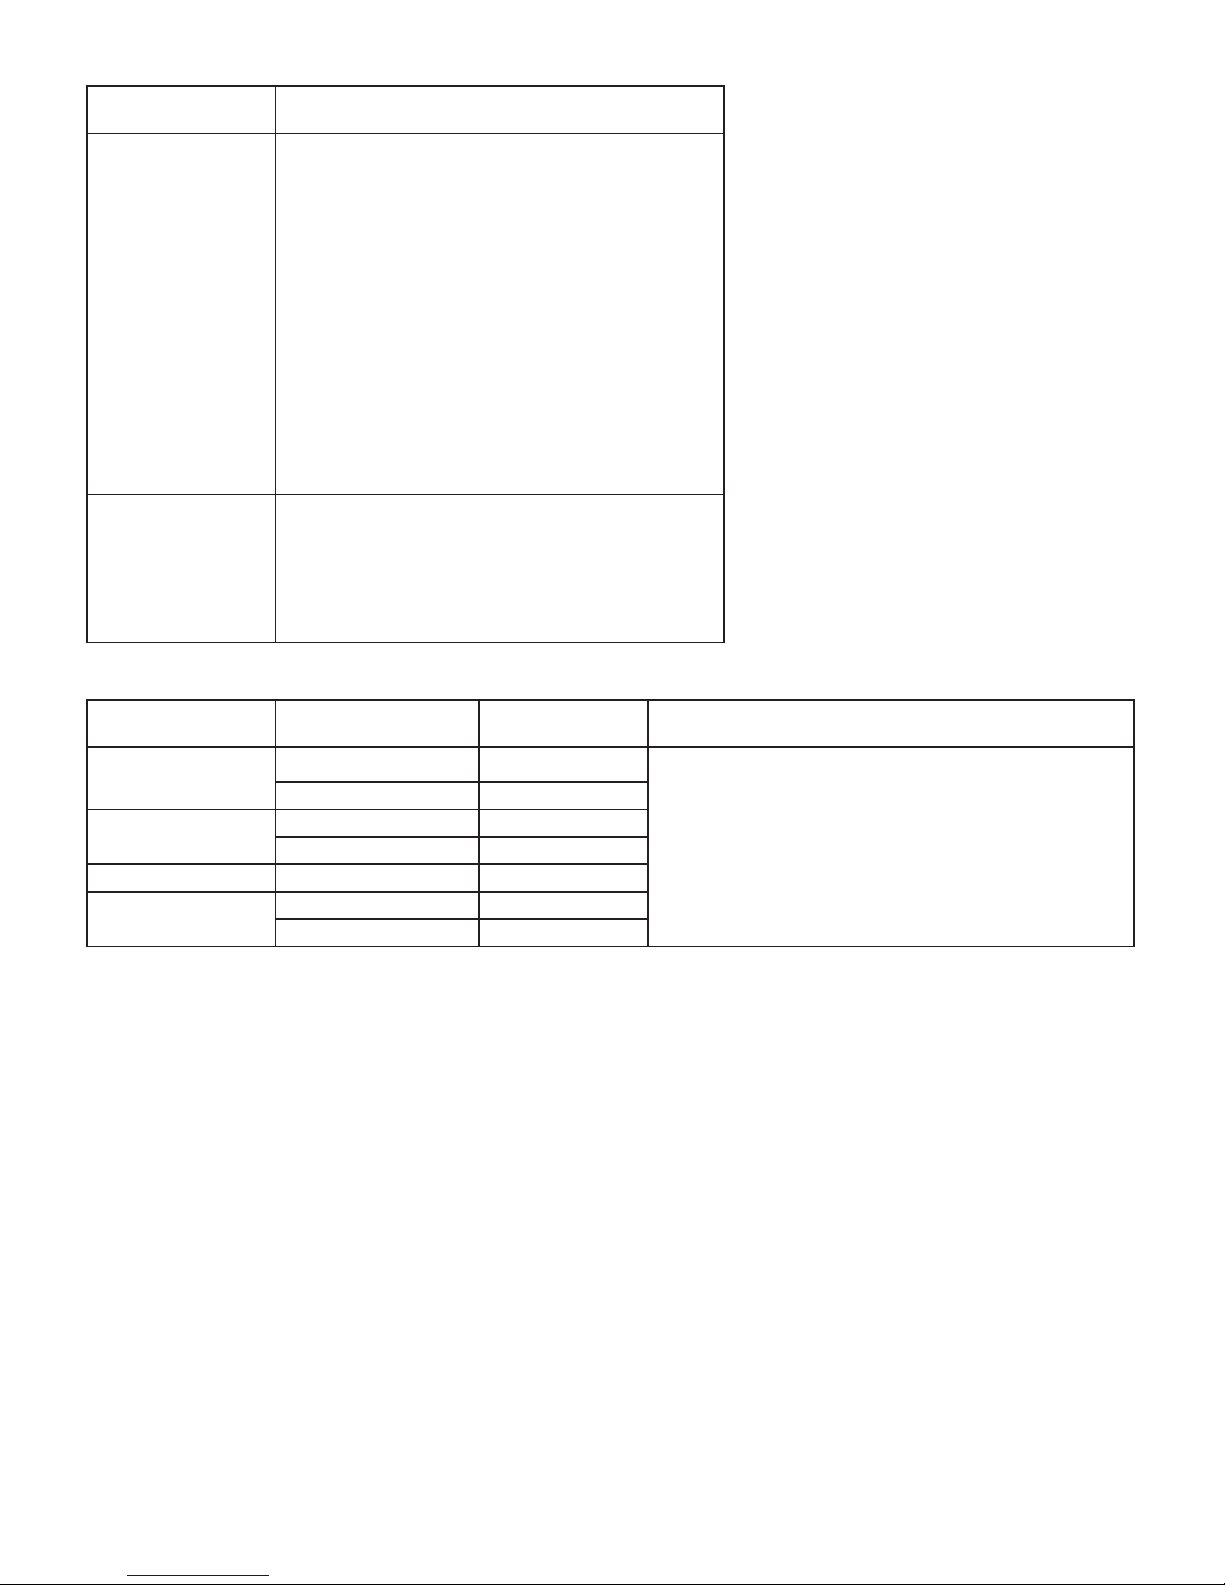
Audio Codec
Container
AAC-LC,HE AAC-
Movie:
AVI (.avi)
Matroska mkv (. )
3GPP 3gpp, 3gp (. . )
Mp4 mp4 mov (. , . )
MPEG transport stream
(. , . , . )ts trp tp
MPEG program stream
(. , . , . , . )DAT VOB MPG MPEG
FLV flv (. )
Music:
AAC aac(. )
Mp4 m4a (. )
WMA
Movie:
ASF wmv asf (. , . )
AVI avi (. )
Matroska mkv(. )
Music:
ASF wma (. )
Image
Resolution Remark
JPEG
Base-line
15360x8640
Progressive
1024x768
PNG
non-interlace
9600x6400
interlace
1200x800
BMP
9600x6400
MPO
Base-line
15360x8640
Progressive
1024x768
Container
Remark: Coding formats maybe changes due to difference in software specifications, please refer to the actual
product.
The limitation of max resolution depends on DRAM size
Page 13
YEAR
Page 14
YEAR
 Loading...