

Page 1

CXL-46T
100/70 V Transformer
Installation Instructions
Important Safety Notes
It should be recognised that 100 V-line or 70 V-line speaker systems have the
potential to deliver an electric shock. Install the CXL-46T only in accordance
with these instructions.
In all cases, the external wiring and associated speakers will need to comply
with local electrical regulations for AC voltages up to 100 Vrms (141 Vpeak).
Do not expose the transformer to rain or moisture.
The transformer module must be installed in a safe manner.
Cloud Electronics Ltd. accept no responsibility for hazardous installations.
CXL-46T Installation Instructions v1.0 1
Page 2
INTRODUCTION
The CXL-46T is an optional transformer for the 46-120 and 46-120MEDIA Multi-Zone Mixer Ampliers, to permit the Mixer
Ampliers to directly drive 100 V-line or 70 V-line loudspeaker systems. The transformer is rated at 120 W output, and is mounted
internally. Up to four CXL-46Ts (one per output channel) may be tted to a 46-120 or 46-120MEDIA. The outputs are available on
the 8-pin 5 mm-pitch screw-terminal SPEAKER OUTPUTS connector on the host unit’s rear panel.
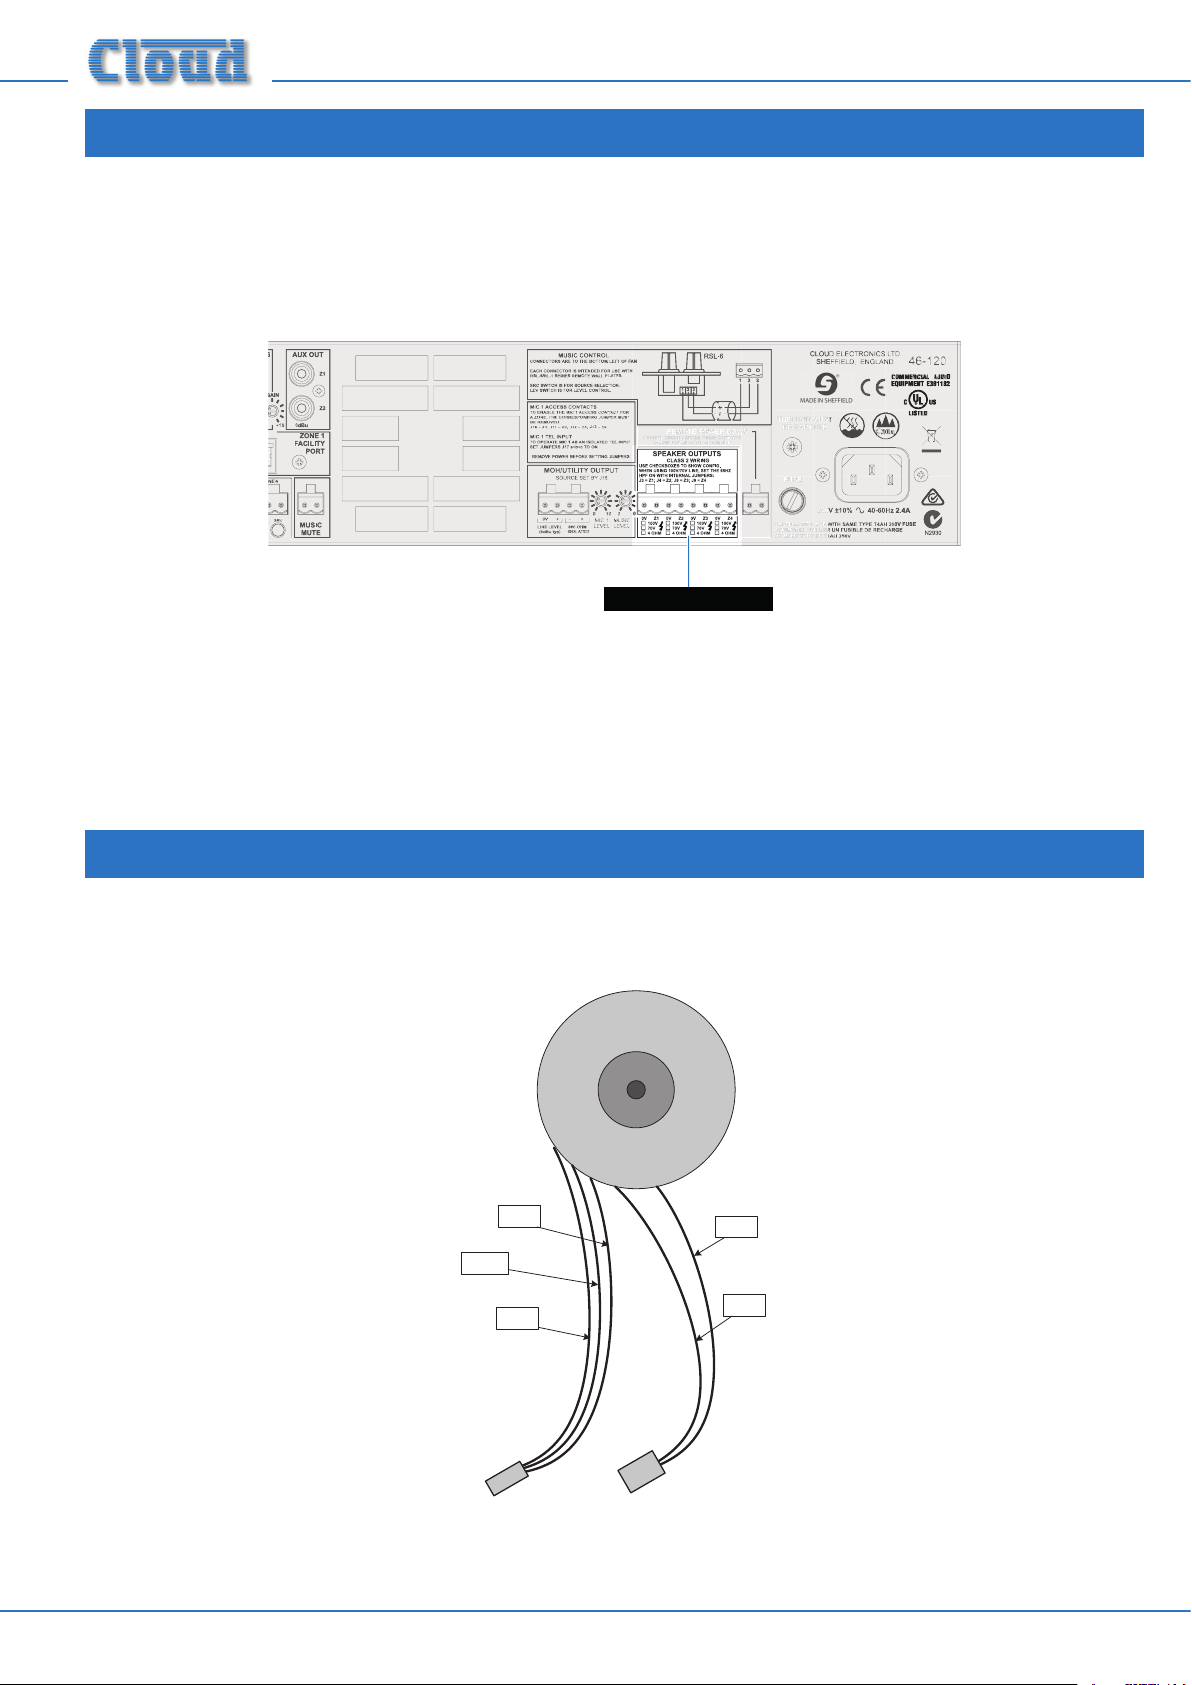
46-120 / 46-120MEDIA Rear Panel
Speaker Outputs
NOTE: unlike other Cloud multi-channel ampliers, all 46-120 models use a single output connector for both low impedance and
70/100 V-line operation. Thus it is NOT possible for any channel of a 46-120 to drive both low impedance speakers and
70/100 V-line systems simultaneously. The check boxes below the connector should be used to indicate the standard each output is
set for.
FITTING THE CXL-46T TRANSFORMER
The CXL-46T transformer is a toroidal type, and is supplied pre-terminated with 2-pin and 3-pin connectors as shown:
MAUVE
SECONDARY
WINDING
CONNECTOR
(female)
WHITE
BLUE
PRIMARY
WINDING
CONNECTOR
(male)
RED
BLACK
CXL-46T Installation Instructions v1.02
Page 3

Red
White
Purple
-
(0V)
+
100 V
To 100/70 V-line
70 V
Black
Pri. Sec.
CXL-46T
Blue
COM
speaker system
From amplifier
output (Lo-Z)
Each transformer is also supplied with an M5 hex-head screw, locknut and washer.
To t convert one channel of a 46-120 to 70/100 V-line operation, proceed as follows:
1. Disconnect the 46-120 from the mains.
2. Remove the top cover (10 screws) and orient the unit with the rear panel towards you.
3. Mount the CXL-46T transformer on the right-hand side of the 46-120 chassis, using one of the holes in the side of the chassis
and the M5 screw, washer and locknut supplied with each transformer. The bolt passes through the centre of the toroid, and
the screw head should be on the outside of the chassis. If tting fewer than four CXL-46Ts, any of the xing positions may be
used. Orient the transformers so that the ying leads face the rear of the chassis.
4. For the zone being converted to 70/100 V-line operation, unplug the relevant 4-pin female connector from its ZONE O/P
socket on the main PCB immediately behind the rear panel SPEAKER OUTPUTS connector. There are four of these (one
per zone): CON38 (Zone 1), CON39 (Zone 2), CON40 (Zone 3) and CON41 (Zone 4) - see diagram below. Note that
CON38 is orientated at 180° relative to the other three.
CON38
PLUG TRANSFORMER
SECONDARY IN HERE FOR
70 V OPERATION
PLUG TRANSFORMER
SECONDARY IN HERE FOR
100 V OPERATION
CON44CON43
SPEAKER OUTPUTS
connector
CON41CON40CON39
ZONE 1 O/P ZONE 4 O/PZONE 3 O/PZONE 2 O/P
THESE CONNECTORS ARE
ALSO USED FOR LO-Z
OPERATION
CON46CON45
REMOTE POWER DOWN
connector
CXL-46T Installation Instructions v1.0 3
Page 4

The wires on these connectors are colour-coded to aid zone identication:
ZONE OUTPUT WIRING
1
2
3
4
Red & Black
Orange & Black
Yellow & Black
Purple & Black
5. Identify the transformer’s primary winding – this is the red/black ying lead tted with a male connector. Plug the female
connector removed in Step 4 into this. Note the pin and latch orientation – the connectors will only mate one way.
6. If conguring the zone output for 100 V-line operation, plug the transformer’s secondary winding – the other ying lead
(blue/mauve/white) - into the second ZONE O/P socket; this will be the one paired with the socket unplugged in Step 4,
and closer to the SPEAKER OUTPUTS connector. These are: CON43 (Zone 1), CON44 (Zone 2), CON45 (Zone 3) and
CON46 (Zone 4). Note that CON43 is orientated at 180° relative to the other three. See diagram on previous page.
7. If conguring the zone output for 70 V-line operation, plug the transformer’s other ying lead (blue/mauve/white) into the
ZONE O/P connector vacated in Step 4.
8. For each zone being converted to 70/100 V-line operation, enable the channel’s 65 Hz hi-pass lter by moving the appropriate
jumper from OFF to ON: these are J3 (Zone 1), J4 (Zone 2), J8 (Zone 3) and J9 (Zone 4). This is important, as low frequency
signals at high level can saturate the transformer cores, causing unpleasant distortion and possibly activating the amplier’s
limiter circuitry. See diagram below for location of PCB jumpers.
9. If converting further Zone outputs to 70/100 V-line operation, repeat Steps 3 to 8 for each output.
10. Replace the cover, using the original screws.
11. Mark the checkboxes below the SPEAKER OUTPUTS connector with a felt-tip pen to indicate the mode of operation for
each channel.
J9
J4
J8
J3
LINE INPUT SUB-BOARD
CON43
46-120 MAIN PCB – REAR VIEW
SIMPIFIED VIEW – ONLY PRIMARY
COMPONENTS SHOWN
CON38
CON44
CON39
CON45
CON40
CON41
CON46
CXL-46T Installation Instructions v1.04
Page 5

Cloud Electronics Limited
140 Staniforth Road
Shefeld S9 3HF
England
Tel: +44 (0)114 244 7051
Fax: +44 (0)114 242 5462
email: info@cloud.co.uk
web: www.cloud.co.uk
Cloud Electronics USA
1200 Iron Horse Drive, Unit A
Park City
Utah 84060.
United States of America.
Toll Free: 0855 810 0161
email: sales@cloudusa.pro
web: www.cloudusa.pro
 Loading...