

Page 1
PM4/8/12/16
Digital Paging Microphone
Installation and User Guide
Page 2

Page 3

PM4/8/12/16
Digital Paging Microphone
Page 4

PM4/8/12/16 Installation and User Guide v2.2
4
Contents
Introduction ...................................................................6
Safety Information.................................................................................... 6
Conformities ............................................................................................. 6
Overview ................................................................................................... 7
Scope of this manual ............................................................................... 8
What’s in the box .................................................................................... 8
Controls and connections ..................................................................... 9
Front Panel ............................................................................................ 9
Rear Panel ............................................................................................. 9
Using the PM - User Instructions ............................. 10
General Dos and Don’ts ...................................................................... 10
Paging one or more zones ...................................................................10
Paging all zones .......................................................................................10
Zone groups ............................................................................................11
Dening a group of zones................................................................11
Paging a zone group .......................................................................... 11
Announcement Interruption (Multiple PM systems only) ............ 11
Installation .................................................................. 12
Accessing the internal PCB ................................................................. 12
Mounting Options .................................................................................12
Free-standing ......................................................................................12
Wall Mounting .................................................................................... 12
Fitting the MI100166 gooseneck microphone ........................13
Power Requirements ............................................................................ 14
Using an External PSU ......................................................................14
Powering from a Cloud host mixer ...............................................14
Current considerations ............................................................... 15
Cables and Connections ......................................................................16
Connecting the PM to a mixer via the digital interface ............16
Connecting the PM to a mixer via the analogue interface .......18
Conguring the PM ............................................................................... 20
Mic Level .............................................................................................. 20
Zone Offsets ......................................................................................20
Setting an Offset ............................................................................21
Auto-Reset of Zone Selection........................................................21
Power-On Non-Volatile Memory (NVM) Reset ......................... 22
Lock Groups .......................................................................................22
Priority settings ..................................................................................22
Contents
Page 5

PM4/8/12/16 Installation and User Guide v2.2
5
Chime settings ...................................................................................23
Enabling/Disabling Zone buttons ................................................... 23
Terminating the Digital Paging Interface .......................................24
Setting the terminations on the Cloud DCM-1 .....................25
Conguring dual purpose microphone inputs on
the Host Mixer ...................................................................................26
Systems with multiple paging microphones ..................................... 27
System Interconnection ...................................................................27
Maximum System Capability ........................................................... 28
Power supply considerations ..........................................................28
Terminations ....................................................................................... 28
Using the analogue interface with multiple PMs.........................29
Priorities .............................................................................................. 29
Using the analogue interface with third-party
paging microphones. ..........................................................................30
Appendix ..................................................................... 32
PCB layout diagram ...............................................................................32
Jumper and default settings summary ........................................... 33
Technical Specications ........................................................................ 33
Page 6

PM4/8/12/16 Installation and User Guide v2.2
6
Introduction
Safety Information
Cloud PM paging microphones operate from a low DC voltage, supplied by either an
AC adaptor or the Cloud host device to which the microphone is connected. As such,
the microphone requires few safety precautions.
However, note that both the metal base of the unit and the mic gooseneck will be
electrically connected to the chassis of the host device (e.g. Cloud zoner or mixer/
amplier) once the installation is carried out. This means that if the mains wiring of
the host device and/or the building is faulty, the microphone could present a shock
hazard. Fitting a suitable earth leakage circuit breaker (e.g. 30 mA RCD type) to the
mains supply of the host device can provide additional protection.
Conformities
This product conforms to the following European EMC Standards:
BS EN 55103-1:1997
BS EN 55103-1:1992
This product has been tested for use in commercial and light industrial environments.
If the equipment is used in controlled EMC environments, the urban outdoors, heavy
industrial environments or close to railways, transmitters, overhead power lines etc.,
the performance of the unit may be degraded.
This product conforms to the following European electrical safety Standard:
BS EN 60065:2002
Page 7

PM4/8/12/16 Installation and User Guide v2.2
7
Overview
Thank you for purchasing this Cloud PM paging microphone.
Four models of the PM are available: the PM4, PM8, PM12 and PM16. The models
differ only in the number of zone select buttons on the front panel (4, 8, 12 or 16
respectively), and consequently in the maximum of zones that can be supported.
The PM range’s basic feature set provides:
Individual and multiple zone selection•
Denable zone groups with group selection•
‘TALK’ and ‘CALL ALL’ buttons•
Pre-announcement chime with internal chime sounder•
‘BUSY’ LED•
Congurable two-layer announcement priority system•
Auto zone reset after announcement and zone disable•
Suitable for free-standing or wall mounted operation•
The PM is designed to interface directly with recent Cloud products - such as the
DCM-1 - via the Cloud Digital Paging Interface, which uses standard CAT-5 cable
and RJ45 connectors. It may also be used with any other audio system equipped with
‘short-to-ground’ paging access for selecting the zone(s) to be paged. This includes
the following current* Cloud products:
Z4ii and Z8ii Venue Mixers•
CX163 and CX263 Mixers•
36/50 and 46/50 Integrated Mixer Ampliers•
*Other, older Cloud products may also be compatible; please contact Cloud’s Technical Department for
advice.
Multiple PMs may be interconnected (via the Digital Paging Interface) to permit
paging from more than one location. A total cable run of up 1 km is permissible, with
a maximum of 32 PM units. Different models of PM may be intermixed on a single
network. It is also possible to congure a PM to address only a subset of the available
zones.
The PM is also compatible with the older Cloud CDPM range of digital paging
microphones. PM microphones and CDPM microphones may be freely intermixed on
the Digital Paging Interface.
Page 8

PM4/8/12/16 Installation and User Guide v2.2
8
Scope of this manual
The bulk of this manual is intended to guide you through the installation and
conguration of the PM. Sections of the manual cover aspects such as power
requirements, connecting the unit to various types of host mixer, and conguring
the PM to suit the particular requirements of the installation. These sections will be
adequate for situations where there is only a single PM. A separate section covers
the various additional points that need to be considered when multiple PMs are
interconnected on a network.
The procedures for mounting a PM on a wall and changing the standard gooseneck
mic for a shorter one are also described.
In addition to the installation aspects, a User Section provides a simplied description
of the PM’s operation; it is recommended that installers should photocopy this
section (or download a PDF copy of this manual from the Cloud website and print
the section off) and leave a copy for the operator.
What’s in the box
Model PM paging microphone•
Installation and User Guide (this manual)•
If any items are received in a damaged state or are missing from the packaging, please
contact your Cloud dealer/distributor at once. Wherever possible, please retain the
packaging until the microphone is satisfactorily installed and working, in case it needs
to be returned to the factory.
Page 9
PM4/8/12/16 Installation and User Guide v2.2
9
Controls and connections
5
6
7
8
9
10
4
1
2
3
12
11
14
13
159
4162 10
13
5173 11
6184 12
A
C
B
D
GROUPS
TALK
CLEAR
CALLALL
BUSY
PM16
IN OUT
N123
POWER
9
12
-
-
17VAC
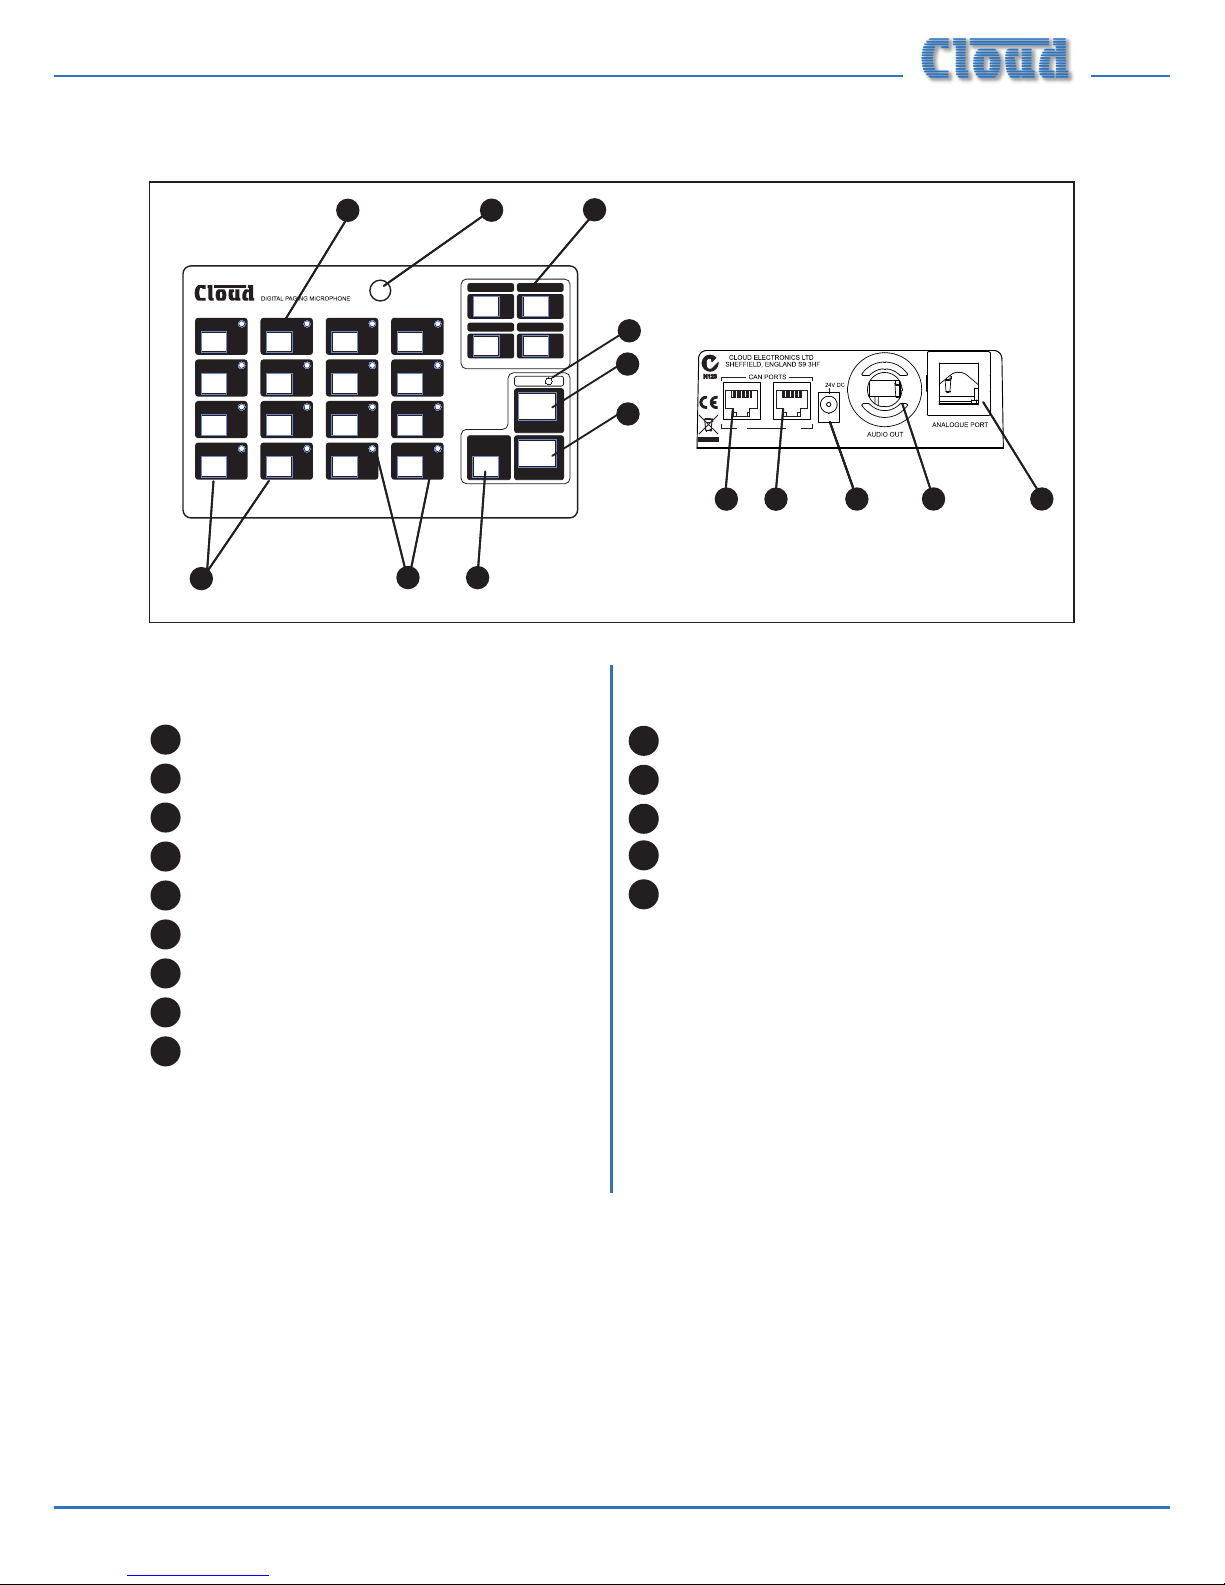
Front Panel
1
Gooseneck microphone
2
ZONE selection buttons
3
ZONE select LEDs
4
Legend areas for zone identication
5
CALL ALL button
6
TALK button
7
CLEAR button
8
GROUP select buttons
9
BUSY LED
Rear Panel
10
Digital Paging Interface IN
11
Digital Paging Interface OUT
12
External power input
13
Access gland for audio output cable
14
Access gland for analogue control
cable
Page 10

PM4/8/12/16 Installation and User Guide v2.2
10
Using the PM - User Instructions
To the installer: please photocopy this section and leave with the customer.
General Dos and Don’ts
When making an announcement:
Think what you need to say before making the announcement•
Speak slowly and clearly in a normal speaking voice•
Don’t “swallow” the microphone; unless you are in a particularly noisy •
environment your mouth need be no closer than 4 - 5 inches (10 – 12 cm) from
the mic.
Don’t start speaking before you press the TALK button, and then wait until the •
pre-announcement chime (if active) has sounded in full before starting.
Don’t release the TALK button until the announcement is nished•
Don’t twist the gooseneck into odd shapes – it isn’t a toy!•
Paging one or more zones
1. Press the ZONE button(s) for the zone(s) to which the announcement is
to be made; the LEDs corresponding to the selection will illuminate. (An
incorrect selection may be cancelled with the CLEAR button.)
2. To start announcing, press and hold down the TALK button (the BUSY LED
illuminates).
3. Make the announcement.
4. Zones may be selected/deselected while the TALK button is pressed.
5. When the announcement is nished, release the TALK button.
NOTE: Once the talk button is released, the zone selection may either clear or
remain set for further messages, depending on how the unit has been congured.
Paging all zones
1. Press and hold the CALL ALL button; all the LEDs for enabled zones and the
BUSY LED will illuminate.
2. Make the announcement.
3. Zones may be selected/deselected during the announcement.
4. When the announcement is nished, release the CALL ALL button.
Page 11

PM4/8/12/16 Installation and User Guide v2.2
11
Zone groups
Zones may be ‘grouped’ together to simplify the procedure for paging several zones
simultaneously.
Dening a group of zones
1. Select the zones for the group with the ZONE buttons; the selection will be
conrmed by the adjacent LEDs. (An incorrect selection may be cancelled
with the CLEAR button.)
2. Press and hold down one of the GROUP buttons until the zone LEDs ash.
3. Release the GROUP button.
NOTE: This feature may not be available, depending on how the unit has been
congured.
Paging a zone group
1. Press the GROUP button for the required zone group.
2. Press and hold down the TALK button.
3. Make the announcement.
4. Zones may be selected/deselected during the announcement.
5. Release the TALK button.
Announcement Interruption (Multiple PM systems only)
If the system has more than one PM microphone, it is possible that announcements
may be attempted from different microphones simultaneously. Priority assignments
made during the system installation can prevent two microphones on the network
from making an announcement at the same time. You may therefore nd that your
announcement is temporarily overridden by another announcement, from a PM with
higher priority.
If your announcement conicts with one from a higher priority microphone, yours
will be cut off and the interrupting announcement will take over. The interrupted
PM will indicate this condition by the ZONE LEDs ashing. The selection LEDs will
remain lit so that you can attempt your announcement once the system is free.
Page 12

PM4/8/12/16 Installation and User Guide v2.2
12
Accessing the internal PCB
With most installations, it will be necessary at some point to access the PM’s internal
PCB. Access is required to make connections to the analogue interface (possibly
including DC power connections) and to connect the associated audio output, to
move the various conguration jumpers and to adjust the mic or chime levels.
To gain access to the PCB, rst disconnect any source of external power (e.g. a
local external PSU or the Digital Paging Interface). Then remove the ve pozidrive
screws securing the bottom cover plate onto the moulded housing. Gently lift the
housing free, noting that the PCB to which the top panel components are mounted
is connected to the lower PCB by a ribbon cable. Take care not to stretch or snag
either this or the cable from the gooseneck mic.
Re-assembly is the reverse procedure; always use the same screws.
Mounting Options
In most cases, the PM will be used as a desk-top, free-standing unit. In situations
where desk space is at a premium, or where access to the microphone needs to be
restricted, an alternative mounting method is to x it on a vertical surface such as a
wall. In this case, it may be appropriate to t a shorter gooseneck mic, as the standard
one (300 mm) may prove awkward in use and possibly constitute a hazard.
Free-standing
No special provisions are needed to use the PM in a free-standing mode. Cable access
is via the rear glands and the unit is provided with four rubber feet to prevent slipping
on a polished surface. The standard 300 mm gooseneck microphone will be suitable
for all normal desk or counter locations.
Wall Mounting
NOTE: if the standard gooseneck mic is to be replaced with the shorter alternative
(see Fitting the M1100166 gooseneck microphone on the following page), perform the
replacement before mounting the PM on the wall.
The metal baseplate of the PM is tted with two keyhole slots which provide a simple
method of wall mounting.
The PM can be wall-mounted on two round-head or pan-head screws with heads
of between 5 and 10 mm dia. At the desired location, drill two holes in the wall 183
mm apart horizontally. Use a drill appropriate for the wall construction and type of
wall xing employed. Insert the screws and tighten until approx 4-5 mm of the screw
Installation
Page 13

PM4/8/12/16 Installation and User Guide v2.2
13
shafts are still visible. Slide the PM over the screwheads using the keyhole slots, so
that the rubber feet act as spacers between the PM baseplate and the wall. If the PM
is not tight against the wall, remove the PM, adjust the length of screw protruding and
try again. Repeat until a good tight t is obtained. Refer to the illustration below for
drilling instructions.
Fitting the MI100166 gooseneck microphone
The standard gooseneck mic supplied with the PM Series is 300 mm in length, and
this may be inconveniently long if the PM unit is wall-mounted. A 140 mm version,
Part No. MI100166, may be ordered separately from Cloud Electronics, and tted
instead.
To replace the gooseneck mic, remove the baseplate of the PM unit as detailed on
page 12. It will be seen that the thin twin-and-screen cable from the gooseneck itself
terminates in a screw terminal connector on the right-hand side of the PCB (see
page 32 for location of this connector). (Note that this connector is also used for
the internal chime speaker.) Disconnect the gooseneck by undoing the three relevant
screw terminals on the connector.
The gooseneck itself may now be removed by undoing the 14 mm nut securing it to
the casing – a box spanner is the best tool for this.
Fitting the MI100166 gooseneck assembly is the reverse procedure. Fit the gooseneck
rst and tighten the securing nut; then reconnect the twin-and-screen cable to the
connector block, observing the polarities shown on the pcb silk-screening adjacent to
the connector. Then replace the baseplate.
47 47
C
L
183
10
5
18
Wall Mounting Holes
All dimensions in mmPM baseplate drilling details Not to scale
Page 14

PM4/8/12/16 Installation and User Guide v2.2
14
Power Requirements
The PM can be powered either by an external power supply, or from a Cloud host
mixer.
Using an External PSU
An external power supply can be connected to the PM via the 2.1 mm coaxial power
socket on the rear panel. A suitable external PSU is the Cloud CPM-PSU. Other
AC or DC external supplies can be used with the PM provided they are capable of
providing 107 mA at 9-17 V AC or 12-24 V DC.
IMPORTANT: Many DC adapters have poor regulation, and some nominally 24 V
supplies can produce voltages sufciently high to cause damage to the internal
electronics. If in doubt, use a 12 V AC adapter such as the CPM-PSU.
As the PM incorporates a full-wave rectier circuit internally, the polarity of the
2.1mm jack is unimportant.
IMPORTANT: The external power supply should not have one side of its output
earthed, as this may introduce earth loops to the system. Most - but not all - plugtop adapters meet this requirement, but installers should check for earth-to-output
continuity with a test meter if there is any doubt. The integrity of the system’s mains
earth should NEVER be compromised to meet this requirement or to solve any earth
loop problem.
Powering from a Cloud host mixer
If the PM is to be connected to a Cloud host mixer, DC power may be obtained from
the mixer as long as it has a suitable power supply connection, and the spare current
capacity of the mixer is sufcient. As a general rule, a mixer cannot supply power to a
PM that has more zones than itself.
Note that no external PSU should be connected to the microphone. Connecting
an external PSU will override the current draw from the host, and it will power the
microphone instead.
There are two ways in which a PM can be supplied with DC power by a Cloud host
mixer:
1. Via the Digital Paging Interface. The CAN PORT OUT connector on
the PM is wired for power, so a PM connected to a Cloud host mixer tted
with the Digital Paging Interface can obtain power through this connection.
In systems with multiple, “daisy-chained” PMs, it is only the “last” PM on the
network - i.e. that connected directly to the host - which can be powered in
this way. See “Systems with Multiple PMs” on page 27 for more information.
Note that when using the Digital Paging Interface, the maximum
Page 15

PM4/8/12/16 Installation and User Guide v2.2
15
recommended cable length between the Cloud host mixer and the “last”
PM should not exceed 50 m. If longer cable lengths are required, then an
external PSU should be connected to the PM.
2. Via the Analogue Port. The PM’s analogue interface allows for DC power.
The ‘+V’ and ‘0V’ terminals of the internal port connector should be wired
to the ‘+V’ and ‘0V’ pins respectively of the access connector at the Cloud
host mixer. This method of powering requires an additional core in
the access cable (the ‘0V’ connection will need to be made in any case for
the zone selection to function). Only one microphone may be powered
from the mixer in this way. The wiring diagram on page 19 illustrates this
connection.
Current considerations
The table below gives the current required by the various PM models:
PM Model Required Current
PM4 72 mA
PM8 83 mA
PM12 95 mA
PM16 107 mA
The following table shows spare DC current available from various Cloud host
mixers, etc., for powering additional items:
Host Available Current
DCM-1 650 mA
Z4ii 120 mA
Z8ii 190 mA
CX163 Use ext. PSU
CX263 Use ext. PSU
36/50 Use ext. PSU
46/50 80 mA
These gures apply to the host units without any active options installed, such as
internal Bose® EQ cards or remote plates. These options all consume power, so the
available current may be insufcient to power the PM. In such cases, an external PSU
must be used.
Page 16

PM4/8/12/16 Installation and User Guide v2.2
16
The table below lists the current taken by various Cloud options which may be
installed in the host mixer:
Option Required Current
Active Remote Plates
LM-1 12 mA
DM-1 18 mA
AE-1 9 mA
BE-1 24 mA
LE-1 22 mA
ME-1 43 mA
DCM-1 Remote Control Plate
CDR-1(F) 50 mA
Bose® EQ Modules*
BEQ: M8, M32, MA12, 402, 502A, 802,
MB4, MB24, 502B, 502BEX
12 mA
BEQ: LT3202, LT4402, LT9402, LT9702 17 mA
BEQ: M16 24 mA
The installer should check what options (if any) are tted, and derate the “Available
Current” gure accordingly before checking if the host has sufcient spare current
capacity to power the PM.
* Note that in the case of the DCM-1, tting Bose® EQ modules does not reduce the current available
from the host.
Cables and Connections
Connecting the PM to a mixer via the digital interface
The rear of the PM is tted with two RJ45 sockets labelled CAN PORTS. These
constitute the Cloud Digital Paging Interface, which connect the PM to the host
mixer, and/or to other PMs on a network in a multiple-PM system. Where a mixer has
facility for both digital and access contact connection, the digital connection should
be used.
The digital interface carries the microphone audio, paging selection and DC power
on a single RJ45 connector. The audio signal is directional, and is transmitted from the
OUT connector to the IN connector on the next microphone or mixer in the chain.
To connect the PM to a Cloud host mixer via the Digital Paging Interface, connect
the OUT port of the PM to the IN port of the mixer using CAT-5 cable and RJ45
connectors. The cables should be wired pin-to-pin. The standard CAT-5/RJ45 wiring
convention is shown below:
Page 17

PM4/8/12/16 Installation and User Guide v2.2
17
The IN port will only be used if the system is to have more than one PM. To connect
the PM to another PM, connect the OUT port of one to the IN port of the next “in
the chain” using the same wiring standard as shown in the table above. See page 27
for full details.
A system using the Digital Paging Interface should have a total cable length of less
than 1 km.
IMPORTANT: The Digital Paging Interface is a data network, and thus must be
terminated at both ends. In a system comprising a single PM, this means terminations
must be set in both the PM and the host mixer. In systems with multiple PMs, it
means terminations must be set in the PM at the “end” of the chain and the host
mixer. See page 24 of this manual for details of how to set terminations.
NOTE: If the Digital Paging Interface is used as the method of connecting the PM to
the host mixer, the two access glands at the rear of the unit for the audio output and
analogue control cables (see page 9) will not be required.
1
8
1
8
1
8
PIN CAT-5 CORE
1 White + Orange
2 Orange
3 White + Green
4 Blue
5 White + Blue
6 Green
7 White + Brown
8 Brown
Page 18

PM4/8/12/16 Installation and User Guide v2.2
18
Connecting the PM to a mixer via the analogue interface
In addition to the Digital Paging Interface, the PM incorporates an analogue interface,
permitting the PM to be used with any Cloud (or other) mixer which has an industrystandard, short-to-ground access port for zone selection.
The connections for the analogue interface are on the internal PCB. Follow the
instructions on page 12 on how to access this. Two cables are required:
Audio Cable: The audio cable should be a standard two-core, screened microphone
cable. This cable should be fed through the rear cable gland labelled AUDIO OUT, and
connected to the screw-terminal block marked TERM8 on the internal PCB. Refer to
page 32 for location of TERM8.
Connect to the terminal block as follows:
Terminal Use Typical Cable
Colour
Hot Phase (+) Red
Cold Anti-phase (-) Black
Gnd Screen Screen
Control Cable: The control cable should be a multicore stranded type with an
overall screen. The number of cores required depends on the particular PM model
(PM4, PM8, etc.), and whether DC power is to be derived from the host mixer via the
control cable (see page 19). One core is required for each zone to be connected, plus
a core for the 0 V connection, plus one further core for DC power if needed.
The control cable should be fed through the rear cable gland marked ANALOGUE
PORT, and connected to TERM1, TERM2 and TERM3 as detailed below:
Function Connect To: Function Connect To:
Zone 1 Select TERM2: Z1 Zone 10 Select TERM4: Z10
Zone 2 Select TERM2: Z2 Zone 11 Select TERM4: Z11
Zone 3 Select TERM2: Z3 Zone 12 Select TERM4: Z12
Zone 4 Select TERM2: Z4 Zone 13 Select TERM4: Z13
Zone 5 Select TERM2: Z5 Zone 14 Select TERM4: Z14
Zone 6 Select TERM2: Z6 Zone 15 Select TERM4: Z15
Zone 7 Select TERM2: Z7 Zone 16 Select TERM4: Z16
Zone 8 Select TERM2: Z8 0 V TERM1: 0 V
Zone 9 Select TERM4: Z9 + V TERM1: + V
Cable core colours will depend on cable type.
Refer to page 32 for locations of TERM1, TERM2 and TERM3.
Page 19

PM4/8/12/16 Installation and User Guide v2.2
19
The screen should be connected to 0 V at the mixer end only. The analogue control
cable should have a total length of less than 100 m.
When all the connections have been correctly made, tighten the locking clamps on
the two cable glands to ensure that no strain is placed on the terminals if the external
cables are tugged or stretched.
Typical example
The diagram below shows the overall cable connections between a PM4 and a Cloud
46/50 host mixer (which has a typical 4-zone short-to-ground access port).
TERM8TERM2TERM1
HOT COLD GNDZ1 Z2 Z3
Z4
0 V
+ V
MIC 1 IN
PAGING ACCESS
HOT COLD GNDZ1 Z2 Z3
Z4
0 V
+ V
PM4 PAGING MICROPHONE
46/50 MIXER
Page 20

PM4/8/12/16 Installation and User Guide v2.2
20
Conguring the PM
The PM has a number of setup options which can be congured during installation.
These modify the operation of the unit in various ways, allowing the PM to be
optimised for the particular installation. Most of these options are set by moving
internal PCB jumpers. See page 32 for a PCB layout diagram identifying the location
of all the jumpers. See page 12 for instructions on how to gain access to the internal
PCBs.
NOTE: Jumper settings are only checked at power-up. In order for jumper
changes to be recognised, power to the PM will need to be disconnected and then
reconnected.
When removing jumpers it is recommended that the link remains connected to one
leg of the header, to prevent losing it.
Mic Level
Mic volume may be adjusted with the preset control PR2 on the main PCB. See page
32 for the location of this control. It is recommended that, if possible, the operator
who will normally make announcements from the PM makes test calls to assess the
system volume when adjusting mic level. Note that the microphone will be ‘off’ if PR2
is turned fully anticlockwise.
Zone Offsets
By default, a zone button on a PM selects paging to the same-numbered zone. Thus
the buttons on a PM4 will normally address Zones 1 to 4, and those on a PM8 Zones
1 to 8. However, there may be situations where a paging station is required to address
a different subset of available zones to the set starting at Zone 1.
It is possible to offset the zones a microphone addresses by any value between 1 and
15. With an offset applied, the zone a button addresses will be that button’s “default”
zone number PLUS the offset value. Example: the four buttons on a PM4 can be made
to address Zones 10 to 13 by applying an offset of 9.
Zone offset applies only to the whole set of zone buttons on a PM, not to individual
zone buttons. Thus the zone buttons can only ever address a numerically-consecutive
subset of the available zones. If an offset is applied which makes one or more buttons
address a zone number higher than the system maximum of 16, the numbers “wraparound” back to 1. Thus applying an offset of 13 to a PM4 would result in its four
zone buttons selecting Zones 14, 15, 16 and 1 respectively. It should be evident from
this that zone offsets need not normally be set on a PM16, as all available zones are
individually selectable in any case. Setting an offset on a PM16 simply has the effect of
shifting the numbering of all the zone buttons.
Page 21

PM4/8/12/16 Installation and User Guide v2.2
21
The zone offset applies to both the Digital Paging Interface and the analogue
interface. If the analogue interface is being used to connect the PM to the host mixer,
the access cable connections (see page 18) should be altered to match the zone
numbers to be paged, not the button numbers. Thus in the example given above, the
zone select cores of the access cable would be connected to Z10 to Z13, and not Z1
to Z4.
Setting an Offset
Zone offset is set with internal jumpers J11, J12, J13 & J14. See page 32 for a diagram
showing the jumper locations. The four jumpers are “binary-weighted”. This means
that each jumper corresponds to a different offset value as follows:
Jumper Value When ‘ON’
J11 8
J12 4
J13 2
J14 1
Example: to set a PM4 to operate on zones 10-13, the offset value needs to be 9.
To achieve this, jumpers J11 and J14 should be ON, J12 and J13 should be OFF. (J11=8,
J14=1; 8+1=9).
NOTE: Setting a zone offset only alters the button/zone relationship for that
microphone. Each microphone in a multi-PM system can operate with its own zone
offset.
Auto-Reset of Zone Selection
By default, the last zone selection remains in place after an announcement has been
made. This enables a supplementary announcement to be made to the same set of
zones without selecting them a second time. The retained zone selection is indicated
by the zone LEDs.
The PM may be congured to automatically cancel zone selection immediately after
an announcement has been made, if this method of operation is preferred by the user.
This may suit situations where the combination of selected zones varies from one
announcement to the next.
Auto-Reset is enabled by setting jumper J10 to ON. See page 32 for a diagram
showing jumper locations. When set, this feature will automatically reset all previously
selected zones when the ‘TALK’ or ‘CALL ALL’ buttons are released. If a zone
selection is made, but an announcement is not made, the zone selection will be
cancelled 30 seconds after the last key-press.
Page 22

PM4/8/12/16 Installation and User Guide v2.2
22
Power-On Non-Volatile Memory (NVM) Reset
An internal non-volatile memory (NVM) stores user settings such as Group
denitions and Zone enabling, so that these are restored automatically in the event
of power loss. The PM may be reset to the factory software defaults (group memory
empty, all zones enabled), by powering the unit on with jumper J7 set to ON. See
page 32 for a diagram showing jumper locations.
Once the reset has been performed, set J7 back to OFF, so that the factory defaults
are not recalled if there is a subsequent power interruption.
Lock Groups
It is possible to disable Zone group denition (see page 11). This feature may be
useful if groups are being dened as part of the installation and it is felt that they will
not need to be altered.
Once the groups have been dened, setting jumper J9 to ON will lock these group
settings, and it will not be possible to re-dene any groups. See page 32 for a diagram
showing jumper locations.
NOTE: J7 (NVM Reset) has priority over Lock Groups. This means that even if Lock
Groups is ON when a NVM Reset takes place, the group memories will be cleared.
Priority settings
NOTE: This conguration option is only relevant to systems with more than one PM.
A PM microphone may be set to either NORMAL or HIGH priority; the factory
default is NORMAL. Paging on a network with multiple PMs all set to NORMAL
priority will operate on a ‘rst-come-rst-served’ basis. This means that when
simultaneous paging is attempted from two (or more) PMs, whichever microphone
starts its announcement rst has command of the system and its announcement will
continue uninterrupted. The other PMs will indicate that a page is already taking place
by illumination of the BUSY LED.
Setting a PM to HIGH priority gives it precedence over PMs with NORMAL priority.
If an announcement is made from a HIGH priority microphone while one is already
in progress from a NORMAL priority microphone, that from the HIGH priority
microphone will take over. This means that microphones that are set to HIGH
priority can make an announcement even if the system is busy, as long as it is not
another HIGH priority microphone that is already in use.
A PM may be set to HIGH priority by setting J8 to ON. See page 32 for a diagram
showing jumper locations.
Note that microphone priority only applies to microphones using the Digital Paging
Page 23

PM4/8/12/16 Installation and User Guide v2.2
23
Interface. If the PMs are being used in conjunction with other (third-party) paging
microphones using short-to-ground zone selection, announcement collisions can
occur even between high priority PMs and the third-party system.
Chime settings
The PM microphone contains four pre-announcement chimes. The selection of chime
is made by setting internal jumpers. It is also possible to disable the chime.
The selected chime sounds whenever the ‘TALK’ or ‘CALL ALL’ button is depressed,
and is automatically routed to the appropriate zones as well as played through the
internal speaker. The chime volume can be set by adjusting the pre-set control PR1
inside the microphone. Jumpers J1, J2 & J3 select which of the four available chimes is
active, and J5 disables or enables the chime facility. See page 32 for a diagram showing
jumper and level adjustment locations. Chime selection is per-microphone, and setting
the chime on a PM will not affect any other PMs on the network.
The table below gives the jumper settings for each chime.
Selection J3 J2 J1 J5
No Chime OFF OFF OFF OFF
Chime 1 ANY OFF ON ON
Chime 2 ANY ON OFF ON
Chime 3 ANY ON ON ON
Chime 4 ON OFF OFF ON
Additionally, the internal speaker can be turned off, by setting jumper J6 to OFF.
Enabling/Disabling Zone buttons
It may occasionally be desired to restrict the zones which a microphone can access.
To permit this, zones may be disabled. Note that the disabling of zones is on a perunit basis, and other microphones in a multiple-PM system will still have free access.
To disable particular zones on a PM, proceed as follows:
1. Set jumper J7 to ON, and power up the unit (thus performing an NVM
reset).
2. Press and hold the CLEAR button.
3. While holding CLEAR down, select the zones to be disabled by pressing the
appropriate ZONE buttons.
4. The selected zone lights begin to ash, indicating that the microphone is
now in Disable Group Edit mode.
Page 24

PM4/8/12/16 Installation and User Guide v2.2
24
5. Continue to hold the CLEAR button and complete the selection/deselection
process with the ZONE buttons.
6. Release the CLEAR button once the selection is complete. The selected
zones will then be written to memory as the Disabled Group.
7. LEDs for the selected zones will remain illuminated to conrm the selection.
Press CLEAR again to clear the display.
8. Reset jumper J7 to OFF to prevent a second NVM reset on a subsequent
power-up. (It is better to leave the power on for this step.) Once a zone has
been disabled, it will be inaccessible to that PM, either via the ZONE and
GROUP buttons, or via CALL ALL.
NOTE: Any subsequent NVM reset will clear the Disable Group, thus zones will
need to be re-disabled.
Terminating the Digital Paging Interface
The Cloud Digital Paging Interface must be correctly terminated at its ends for error
free operation. In systems using a single PM connected to a host mixer via the digital
interface (such as the Cloud DCM-1), the terminations should be ON in both the PM
and the mixer. In systems with multiple PMs, only the mixer and the PM at the “end”
of the chain should have their terminations set ON; “intermediate” PMs should have
their terminations set to OFF.
CDPM
GAIN (dB)
IN
THRU
-10
+10
INOUT
OUT
Mixer
Mixer
OUT
Termination ON
Termination ON
Termination OFF
Termination ON
Termination
ON
CDPM
GAIN (dB)
IN
THRU
-10
+10
Page 25

PM4/8/12/16 Installation and User Guide v2.2
25
The termination is set in the PM with jumper J4. See page 32 for a diagram showing
jumper locations. The factory default setting is for the termination to be set ON. If
the PM being congured is “mid-chain”, with both its CAN PORT IN and CAN PORT
OUT connectors in use, set the termination to OFF by removing the jumper.
Setting the terminations on the Cloud DCM-1
The Digital Paging Interface is referred to in the DCM-1 documentation as the
‘CDPM bus’. The termination is set by the DCM-1’s internal jumper J2, and is ON
when J2 is in place. This is the factory default setting, and is unlikely to require
changing. The diagram below shows the jumper’s location.
J2
(UPPER PCB)
(LOWER PCB)
KEY:
Jumper with two possible positions;black
square indicates factory default setting.
Jumper with one position (i.e., present or not)
DCM-1 Jumper Locations
For details of how to set the host mixer’s Digital Paging Interface termination
correctly in other models, please refer to the documentation supplied with the mixer,
or refer to www.cloud.co.uk.
Page 26

PM4/8/12/16 Installation and User Guide v2.2
26
Conguring dual purpose microphone inputs on the Host Mixer
NOTE: This section is only applicable to systems using Cloud Integrated Mixers
Models 36/50 or 46/50, or Zone Mixers Models CX263 or CX163.
On these mixers, Mic 1 input needs to be congured for paging use with a Cloud
PM by enabling the Mic Access input on the rear panel. Without the Mic Access
input enabled, Mic 1 input acts only as a general purpose microphone input and is
permanently active.
The table below lists the jumpers within each host mixer that need to be changed.
Mixer Zone 1 Zone 2 Zone 3 Zone 4 Utility Zone
36/50 J2 J3 J4
46/50 J23 J22 J21 J20
CX263 J4 J5 J6
CX163 J1 J2 J3
Full details of how to enable the Mic Access input can be found in the installation
guide supplied with the mixer, or at www.cloud.co.uk.
Page 27

PM4/8/12/16 Installation and User Guide v2.2
27
Systems with multiple paging microphones
Connecting a single Cloud PM microphone to a host mixer is quite straightforward.
If more than one microphone is required in a system, various additional factors need
to be taken into account. As far as systems with multiple PMs are concerned, most of
these factors are already covered elsewhere in the manual. The following information
may provide some additional guidance.
NOTE: The BUSY LEDs on ALL the microphones in a system illuminate while paging
is taking place, regardless of which microphone is being used.
System Interconnection
Multiple PMs* are interconnected in “daisy-chain” fashion via the Digital Paging
Interface, using CAT-5 cable and RJ45 connectors. In the following description, note
that the “last” PM refers to that connected directly to the host mixer, and the “end”
or “rst” PM refers to that farthest from the mixer in terms of the daisy-chain
interconnection (which may not be the same thing as the microphone which is the
greatest physical distance from the host mixer).
The OUT of the PM at the “end” of the network is connected to the IN of the next,
whose OUT in turn is connected to the IN of the next, and so on. The “last” PM in
the chain is then connected to the mixer, either by a further CAT-5 connection from
its OUT connector to the Digital Paging Interface input on the host mixer, or via
the analogue interface using separate audio and access cables. The examples below
illustrate some typical situations.
IN
OUT OUT
CAT-5CAT-5
CAT-5 CAT-5 CAT-5
(with Digital Paging Interface)
IN
OUT
IN
OUT
AUDIO OUT
ZONE ACCESS CONTROL
Mixer
IN
OUT
MIC INPUT PAGING ACCESS
Mixer
+12V
Z1 Z2 Z3 Z4 Z5 Z6 Z7 Z8
0V
LF
HF
GAIN (dB)
50
123
10
+
-
-
+
(with Analogue Paging Interface)
CDPM
GAIN (dB)
IN
THRU
-10
+10
Page 28

PM4/8/12/16 Installation and User Guide v2.2
28
Note that there is no restriction as to the PM model which is the “last” in the chain
– i.e., that which connects directly to the mixer. All PM models support all 16 zones,
so in an extreme example, several PM16s could be daisy-chained with a PM4 as the
“last” microphone in the chain. All microphones on the system will have full access to
whichever zones are required.
See also Cables and Connections on page 16.
*The Digital Paging Interface also permits PMs to be intermixed with the older Cloud CDPM paging
microphones on the same network. Refer to the separate CDPM Installation manual for information
(available as a download from the Cloud website).
Maximum System Capability
Up to 32 PM microphones may be interconnected via the Digital Paging Interface.
Different models of PM may be mixed freely, and each may have a zone offset applied,
as required. The total CAT-5 cable run should be less than 1 km.
Power supply considerations
In a multiple-PM system, only the “last” microphone in the chain – that which
connects directly to the host mixer – may be powered from the host. Powering may
be either via the Digital Paging Interface, or the analogue interface. Alternatively, it
may be powered via an external PSU such as the Cloud CPM-PSU. See page 12 for
full details.
All other PMs on the network must be powered individually by external PSUs. DC
power is only connected internally at the CAN PORT OUT socket, so the “daisychain” data/audio connection cannot be used to pass power between PM units.
Terminations
PMs are shipped from the factory with the Digital Paging Interface termination ON.
This requires no alteration in single-PM systems, but in multiple-PM systems, only the
microphone at “far end” of the network may have its termination ON; all others must
have their terminations set OFF. See page 24 for details of how to set the termination.
In all systems, the Digital Paging Interface termination must be set ON in the host
mixer. Refer to the mixer documentation for details.
Page 29

PM4/8/12/16 Installation and User Guide v2.2
29
Using the analogue interface with multiple PMs
The “last” mixer in the chain – that connected to the host mixer – may be connected
to the host via the analogue interface instead of the Digital Paging Interface, if the
host mixer is not equipped with the digital interface. Connect the PM in the same
way as if it was the only PM in the system, using separate audio and control cables.
See page 18 for full details.
Communication between PMs will be via the digital interface, and between the last
PM (effectively the whole network) and the host will be via the analogue interface.
Consideration needs to be given to any zone offsets applied to the various PMs on
the network. For example, in a 12-zone system with three PM4s congured to page
Zones 1 to 4, 5 to 8 and 9 to 12 respectively, analogue port terminals Z1 to Z12
inclusive will need to be wired to the host mixers for correct operation.
Priorities
A potential problem exists in paging systems employing multiple paging microphones
in the form of announcement “collisions”. A collision will occur if an announcement
is attempted from one paging microphone while another is already in progress. As
any one microphone will probably only be in earshot of one zone’s loudspeakers,
it is possible for a microphone to be paging a zone and operators at other paging
(with Digital Paging Interface)
Mixer
MIC INPUT PAGING ACCESS
Mixer
+12V
Z1 Z2 Z3 Z4 Z5 Z6 Z7 Z8
0V
LF
HF
GAIN (dB)
50
123
10
+
-
-
+
(with Analogue Paging Interface)
IN
OUT OUT
Termination OFF
CAT-5CAT-5
CAT-5 CAT-5 CAT-5
(INCLUDING DC POWER FROM MIXER)
(INCLUDING DC POWER FROM MIXER)
Termination
OFF
Termination ON
IN
OUT
Termination
ON
IN
OUT
AUDIO OUT
ZONE ACCESS CONTROL
Termination
OFF
IN
OUT
Termination
ON
PSU PSU
PSU PSU
CDPM
GAIN (dB)
IN
THRU
-10
+10
Termination ONT
Page 30

PM4/8/12/16 Installation and User Guide v2.2
30
microphones to be unaware of it should they fail to notice the BUSY LED.
If simultaneous announcements are made, that starting rst will take priority and
the later one will be unable to proceed. However, it will often be necessary to assign
a higher priority to one paging station in the system – typically that in a security
ofce, where it may the source of emergency announcements. In such a case, an
announcement from the high priority microphone will take precedence over any
other announcements already in progress.
See page 22 for details of how to assign priorities.
Using the analogue interface with third-party paging microphones.
It may sometimes be necessary to interface a system consisting of one or more PM
microphones to a third-party paging system which uses short-to-ground contacts
for paging access. This
implies that the host
mixer has an analogue
paging access port.
It is possible to parallel
the third-party system
with the Cloud PM
analogue interface to
the paging access port.
It is not recommended
to parallel the audio
outputs, however;
these should use either
separate mic inputs if
the host mixer permits,
or otherwise a simple
external 2-into-1
microphone mixer. A suitable
arrangement is illustrated here.
HOST MIXER
CLOUD PM
3RD. PARTY
PAGING SYSTEM
Z1
Z8
Z7
Z6
Z5
Z4
Z3
Z2
GND
Z1
Z8
Z7
Z6
Z5
Z4
Z3
Z2
GND
Z1
Z8
Z7
Z6
Z5
Z4
Z3
Z2
GND
PAGING
ACCESS PORT
AUDIO IN
AUDIO OUT
AUDIO OUT
CLOUD PM
INTEGRATING PM UNITS INTO
3RD. PARTY PAGING SYSTEMS
CAN
PORT IN
CAN
PORT OUT
CAN
To Further PM Devices
PORT IN
Page 31

PM4/8/12/16 Installation and User Guide v2.2
31
Only one PM in a network will require the analogue interface for the whole network
to be connected to a short-to-ground paging system. This should be the PM “nearest”
to the host mixer, as with a system comprised of PMs alone.
The PM’s analogue interface senses whether the short-to-ground connections are in
use by another microphone. If so, it is assumed that the system is busy. If this is so,
only high priority microphones on the PM network may make an announcement. This
allows the short-to-ground interface to be used in networks which also use other
paging equipment such as the earlier Cloud CPM-4 and CPM-8 models.
Page 32

PM4/8/12/16 Installation and User Guide v2.2
32
Appendix
PCB layout diagram
REAR OF UNIT
CAN PORT
OUT IN
FLASH MEMORY IC
TERM2
TERM4
TERM1
+ V 0 V
Z1
Z8
Z7
Z6
Z5
Z4
Z3
Z2
Z9
Z16
Z15
Z14
Z13
Z12
Z11
Z10
AUDIO
(TERM8)
HOT
COLD
GND
MIC LEVEL
ADJUSTMENT
CHIME LEVEL
ADJUSTMENT
J8J7 J14
J13
J12J11J10J9
J6
J5
J2
J1
J4
J3
PR2
PR1
PM Jumper Locations
(Illustrative Purposes Only)
HOT
COLD
GND
MIC
+
-
SPKR
MIC CAPSULE &
INTERNAL CHIME
SPEAKER
CONNECTOR
When removing jumpers we recommend that the link is left connected to one leg of
the header to prevent loss of the link.
When making internal adjustments please ensure that you:
Disconnect power to the unit before accessing the PCB. If the microphone is •
powered from another unit, this will mean removing the appropriate connection.
Only reassemble the unit using the original screws.•
Page 33

PM4/8/12/16 Installation and User Guide v2.2
33
Jumper and default settings summary
Jumper Purpose Default
J1 Chime Select; +1 ON
J2 Chime Select; +2 OFF
J3 Chime Select; +4 OFF
J4 Digital Paging Interface termination ON
J5 Chime On/Off ON
J6 Internal Chime On/Off ON
J7 NVM Reset OFF
J8 High Priority OFF
J9 Lock Groups OFF
J10 Auto-reset zone selection ON
J11 Zone Offset; +1 OFF
J12 Zone Offset; +2 OFF
J13 Zone Offset; +4 OFF
J14 Zone Offset; +8 OFF
Technical Specications
Microphone
Capsule Type Condenser
Polar Pattern Cardioid
Zones Number of Zones 4, 8, 12, 16
Chime Number of Chimes 4, with Internal Speaker
Interface
Digital Cloud Digital Paging Interface (RJ45)
Analogue
Zone Access Output (Short to Ground)
Audio Output
Power input 9 - 17 VAC, 12 - 24 VDC
Current
consumption
72 mA (4 zone), 83 mA (8 zone), 95 mA (12 zone), 107 mA (16 zone)
Dimensions
(mm)
PM 245 wide x 65 high (less gooseneck mic) x 170 deep
Gooseneck length 300 (standard); 140 (alternative Part No. MI100166)
Net Weight (kg) 1.2
Page 34

PM4/8/12/16 Installation and User Guide v2.2
34
Page 35

PM4/8/12/16 Installation and User Guide v2.2
35
Page 36

Cloud Electronics Limited
140 Staniforth Road, Shefeld. S9 3HF. England
Tel: +44 (0)114 244 7051 Fax: +44 (0)114 242 5462
email: info@cloud.co.uk web: www.cloud.co.uk
 Loading...