

Page 1
DCM-1
Digitally Controlled Mixer
Installation and User Guide
Page 2

Page 3

DCM-1 User Manual v1.0 1
DCM-1
Digitally Controlled Mixer
Page 4

DCM-1 User Manual v1.02
z
Contents ......................................................... 2
Safety Information ........................................................................5
Safety Notes regarding Installation ...................................5
Conformities .................................................................................5
Safety Considerations and Information ...........................5
Mains Fuse ..............................................................................5
Caution – Servicing ..............................................................5
Introduction ................................................... 5
Welcome ........................................................................................6
Scope of this manual ............................................................6
What’s in the box ......................................................................... 6
Section 1 : Overview .................................... 7
Introduction ...................................................................................7
List of Main Features ...................................................................7
System Components ...................................................................8
DCM-1 ....................................................................................8
Optional components .................................................................8
CDR-1 .....................................................................................8
LE-1 .......................................................................................... 9
BE-1 .........................................................................................9
ME-1 ..................................................................................... 10
CDPM range ....................................................................... 10
System Capabilities ................................................................... 11
Music sources and routing............................................... 11
Microphone Inputs ............................................................ 11
Paging mic facilities ............................................................ 11
Zone Outputs .................................................................... 11
Zone Groups ...................................................................... 11
Priority and Logic .............................................................. 11
Remote Control ................................................................ 12
Misc ....................................................................................... 12
Applications and Examples ...................................................... 12
System 1 ............................................................................. 12
System 2 ............................................................................. 13
System 3 ............................................................................. 14
Section 2 : Installation ................................. 15
Description of front panel ....................................................... 15
Description of rear panel ........................................................ 16
Hardware considerations ........................................................ 17
Power Supply ...................................................................... 17
System Connections ................................................................. 17
Music Sources..................................................................... 17
Standard connection ......................................................... 17
Mono sources ..................................................................... 17
Balanced sources ............................................................... 17
Additional balanced sources ........................................... 18
Zone outputs ............................................................................. 19
Standard connection ......................................................... 19
Unbalanced inputs ............................................................. 19
CDR-1 Remote Control Panels ............................................. 19
Connections ............................................................................... 21
Network Terminations ..................................................... 21
Cable length and DC power considerations ............... 22
Mic and Line input plates ................................................. 22
Connections and wiring ................................................... 23
Connecting Paging systems ..................................................... 24
Cloud CDPM Paging Microphones ................................ 24
Connections and wiring ................................................... 24
CDPM Terminations ......................................................... 24
CDPM DC power ............................................................. 24
Adjusting paging levels ...................................................... 24
Zone paging outputs ......................................................... 25
3rd.-party Paging systems ................................................ 26
Paging microphone input ................................................. 26
Adjusting paging levels ...................................................... 26
Paging Access Connector ................................................ 26
Music Mute.......................................................................... 27
Section 3 : Conguration ........................... 28
User Mode .......................................................................... 28
Installer Mode .................................................................... 28
Navigating the menu system ................................................... 29
Context-sensitive Help messages .................................. 29
User Mode .................................................................................. 30
Music menu ............................................................................. 30
Select Input ........................................................ 30
Level .................................................................................... 30
Groups menu ......................................................................... 30
Group Enable...................................................................... 30
Installer Mode ............................................................................ 31
Music Menu ............................................................................. 31
Select Input ......................................................................... 31
Level ..................................................................................... 31
Treble .................................................................................. 31
Mid ........................................................................................ 31
Bass ...................................................................................... 31
Input Gain .......................................................................... 32
Maximum Music Level ..................................................... 32
Minimum Music Level ...................................................... 32
Routing Menu ......................................................................... 33
Enable Mic Inputs ............................................................... 33
Input Enable ....................................................................... 33
Congure Access Connector ......................................... 34
CDPM Zone Offset .......................................................... 34
CDR Zone Offset .............................................................. 34
System Menu .......................................................................... 35
CDR Zone Setup ............................................................... 35
Stereo/Mono Zone selection .......................................... 36
Rename Inputs.................................................................... 36
Rename Zones ................................................................... 37
Rename Groups ................................................................. 37
Set Key ................................................................................. 37
RS232 Baud Rate ............................................................... 37
RS232 Flow ......................................................................... 37
Power Up Mode ................................................................ 38
Save Defaults ...................................................................... 38
Update Firmware ............................................................... 38
Reset Mixer ......................................................................... 38
Contents
Page 5

DCM-1 User Manual v1.0 3
Priorities Menu ...................................................................... 39
Select Priority Line Input ................................................. 39
Line Priority Hold Time ................................................... 40
Line Priority Release Time............................................... 40
Select Mic Priority Input .................................................. 40
Mic Priority Hold Time..................................................... 40
Mic Priority Release Time ................................................ 40
Mic Priority Attenuation .................................................. 41
Page Priority Select .......................................................... 41
Page Priority Hold Time ................................................... 41
Page Priority Release Time .............................................. 41
Page Priority Attenuation ................................................ 41
Select Emergency Source ................................................ 42
Emergency Level ................................................................ 42
Congure Music Mute ...................................................... 42
Groups Menu ......................................................................... 43
Group Enable...................................................................... 43
Dene Groups ................................................................... 43
Other DCM-1 adjustments..................................................... 44
Paging mic gain ................................................................... 44
CDPM paging microphone gain ...................................... 44
Paging mic EQ .................................................................... 44
Zone Paging Levels ............................................................ 44
Setting up levels for best performance ......................... 45
Display Contrast adjustment .......................................... 45
CDR-1 Remote Control Plates.............................................. 45
User Operation ................................................................. 45
Engineer Mode ................................................................... 46
Installer Mode .................................................................... 46
To activate Installer Mode: ............................................... 46
Display adjustments .......................................................... 48
Inactivity Time .................................................................... 48
Assign Zone ........................................................................ 48
Set Key ................................................................................. 48
Combining Engineer and Installer Modes .................... 48
Larger systems – cascading DCM-1s .................................... 49
System Interconnections ................................................. 49
Line Inputs ........................................................................... 49
Extension Ports .................................................................. 50
Mic Inputs ............................................................................ 50
Zone Outputs .................................................................... 50
CDR-1s ................................................................................ 50
CDPM .................................................................................. 50
3rd.-party paging system .................................................. 50
Music Mute Input ............................................................... 50
RS232 Control ................................................................... 50
Section 4 : Appendix ................................... 51
Jumper locations and settings ................................................. 51
RS232 Serial Control ................................................................ 52
Pinout ................................................................................... 52
Port parameters ................................................................. 52
Abridged command set .................................................... 52
Examples: ............................................................................. 52
1) Input Selection .......................................................... 52
2) Zone Levels ................................................................ 52
3) Enable/Disable Groups ............................................ 53
4) Enable/Release Paging .............................................. 53
PSU capability ............................................................................. 53
RJ45 pinouts ............................................................................... 54
Fitting Bose® Series II EQ cards ............................................. 54
Firmware updates...................................................................... 54
Factory default settings .......................................................... 55
EMC considerations ................................................................. 55
Specications .............................................................................. 56
DCM‑1 Conguration Notes ................................................. 58
To change Music Source for a Zone ................................. 58
To alter Music Volume in a Zone ....................................... 58
To enable/disable a Group of Zones ................................. 58
DCM‑1 Installer Conguration Notes ................................. 60
Notes ............................................................ 62
Page 6

DCM-1 User Manual v1.04
Notes
Page 7

DCM-1 User Manual v1.0 5
Safety Information
Safety Notes regarding Installation
Do not expose the unit to water or moisture.
Do not expose the unit to naked ames.
Do not block or restrict any air vent.
Do not operate the unit in ambient temperatures above
35OC.
Do not perform any internal adjustments unless you
are qualied to do so and fully understand the hazards
associated with mains-operated equipment.
The unit has no user-serviceable parts. Refer servicing
to qualied service personnel.
If the moulded plug is cut off the mains lead for any
reason, the discarded plug is a potential hazard and
should be disposed of in a responsible manner.
•
•
•
•
•
•
•
Conformities
This product conforms to the following European EMC
Standards:
BS EN 55103-1:1997
BS EN 55103-2:1997
This product has been tested for use in commercial and
light industrial environments. If the unit is used in controlled
EMC environments, the urban outdoors, heavy industrial
environments or close to railways, transmitters, overhead
power lines, etc., the performance of the unit may be
degraded.
The product conforms to the following European electrical
safety standard:
BS EN 60065:2002
Safety Considerations and Information
The DCM-1 is powered by a separate Power Supply Unit
(PSU), which must be earthed. Ensure that the mains power
supply provides an effective earth connection using a threewire termination.
Mains Fuse
The PSU is a sealed unit and contains no user-replaceable
fuses. Mains over-current protection is provided by the fuse
in the 13A plug, which should be rated at 5A.
Caution – Servicing
The unit contains no user-serviceable parts. Refer servicing
to qualied personnel. Do not perform servicing unless
you are qualied to do so. Disconnect the power supply
from the unit before removing the top panel and do not
make any internal adjustments with the unit switched on.
Only reassemble the unit using bolts/screws identical to the
original parts.
Introduction
Page 8

DCM-1 User Manual v1.06
Welcome
Thank you for purchasing this Cloud DCM-1, which
combines the traditional simplicity of Cloud products with
far greater functionality. We are condent that you will
be pleased with its performance, features, exibility and
reliability.
The DCM‑1 is Cloud’s digitally controlled multi zoner. It
combines traditional “installer-friendly” analogue I/O and
signal path, with the exibility and adaptability of digital
control.
Scope of this manual
This manual provides a comprehensive guide to the features
and functionality of the Cloud DCM-1 Digitally Controlled
Mixer. Please read through it to become fully acquainted
with the many conguration and control functions it offers.
It is recognised that the tasks of design/set-up, physical
installation and day-to-day operation of an audio system
based on the DCM-1 are likely to be performed by at least
three different people. You will nd, therefore, that this
manual is divided into sections:
Overview – introduction to the DCM-1 and its
options. Everyone should read this.
Installation – wiring the DCM-1 in a practical
situation. This should be read by the engineer
performing the installation and wiring.
Conguration – setting the system up. This
should be read by the systems designer/engineer who
will congure the system to suit the user’s particular
requirements.
Appendix – additional technical information.
Includes notes about controlling the DCM-1 remotely
via RS232.
User Templates – User’s operating instructions. A set
of blank templates which can be completed and left with
the user when the installation is nished, “personalising”
the DCM-1’s menu system to the particular installation.
The DCM-1 manual includes full details of the optional
CDR-1 remote control panel and the various optional
remote input plates. This information is also supplied with
each item when they are purchased separately.
Thank you again for placing your condence in Cloud
products.
•
•
•
•
•
What’s in the box
Unpack the DCM-1 and its accessories with care. It is always
a good idea to store all packaging (if practical), in case you
ever need to return the unit to your Cloud dealer for any
reason.
As well as this manual, the shipping carton should contain
the items listed below. Please contact your Cloud dealer
immediately if any of them are missing or damaged.
Cloud DCM-1 Digitally Controlled Mixer
Universal DC Power Supply Unit (100-240v), with DC
cable
IEC mains lead (AC cord)
Set of mating connectors for all rear panel Phoenix-type
sockets
•
•
•
Page 9

Overview
DCM-1 User Manual v1.0 7
Introduction
The Cloud DCM-1 is an analogue audio Multi-Zone Mixer.
A digital control system, using a front-panel LCD display and
a simple, minimal set of controls replace the relatively large
number of switch and rotary controls found on conventional
units, yet provide far greater exibility of conguration than
would be possible with such units. It provides a wide range
of input and output connectivity possibilities to suit most
practical situations. It also offers simple and exible remote
control in addition to front-panel operation.
The DCM-1 has been designed to provide a simple, reliable
and elegant method of providing audio in a number of
different zones, typically the various areas of shops, bars,
hotels, schools, conference centres, ofces, factories and
even private residences. Local (per‑zone) remote control of
music source and level can be simply provided in as many
of the zones as necessary. The DCM‑1 has been designed
to allow easy integration with mic and line external inputs,
paging microphones and re alarm systems. Once set up, the
DCM‑1 allows zones to be combined (and separated) simply,
as space utilisation of the building demands.
An important aspect of the DCM-1’s design is that it is
completely self-contained, and requires no computer
interface of any kind, either to congure or control it.
The DCM-1 allows connection of up to 8 line-level sources
such as CD players, audio jukeboxes, PC sound cards, radio
or TV tuners, etc. In addition, both Cloud CDPM Series
paging microphones and third-party paging systems may
be directly connected. Each of the 8 outputs is intended to
supply audio to a separate zone. Two of the zone outputs
are available in stereo. Any one source can be routed to
any zone, and the music level in each zone can be adjusted
independently.
The exibility of the DCM‑1 is explained in greater detail in
System Capabilities on page 11.
List of Main Features
8 stereo line inputs (1 balanced)
8 balanced line outputs (2 stereo + 6 mono)
4 dedicated ports for optional remote line input
modules
4 dedicated ports for optional remote mic input
modules
Mic paging to all zones with fully programmable override
logic
Separate analogue paging mic input with contact closure
zone selection
Separate RJ45 interface for CDPM Series digital paging
microphones
Supports multiple CDR-1 Remote Controls (optional) in
any wiring conguration
CDR-1 provides local control of source, level, EQ and
group enable
2 x 16 character LCD dot-matrix display (both DCM-1
and CDR-1)
4 denable zone groups
Any line input may have priority in any zone; operation
also congurable per‑zone
Key-protected “Installer” mode (both DCM-1 and
CDR‑1) prevents user access to conguration menus
Inputs, zones and groups can be named
RS232 interface for control by third-party control
systems
Front‑panel LEDs conrm remote access
Accepts Bose® EQ cards
No PC required
Multiple DCM-1’s may be cascaded for larger systems
External Music Mute input for interfacing with
emergency systems
Any input (mic or line) may be assigned as Emergency
Input, overriding Music Mute
2U 19” rack-mounting unit
•
•
•
•
•
•
•
•
•
•
•
•
•
•
•
•
•
•
•
•
•
•
Section 1 : Overview
Page 10
DCM-1 User Manual v1.0
Overview
8
System Components
DCM-1
The DCM-1 is the system “core” and all the primary audio
input sources, zone amplier inputs, paging mics/control and
all remote controls are connected directly to it. The DCM-1
mainframe should ideally be rack-mounted along with the
audio sources and zone ampliers, in a central equipment
area.
A practical multi‑zone audio system is perfectly realisable
with just a single DCM‑1, but system exibility and ease
of operation will be greatly enhanced by the addition of
optional Cloud remote controls and/or local input plates.
Optional components
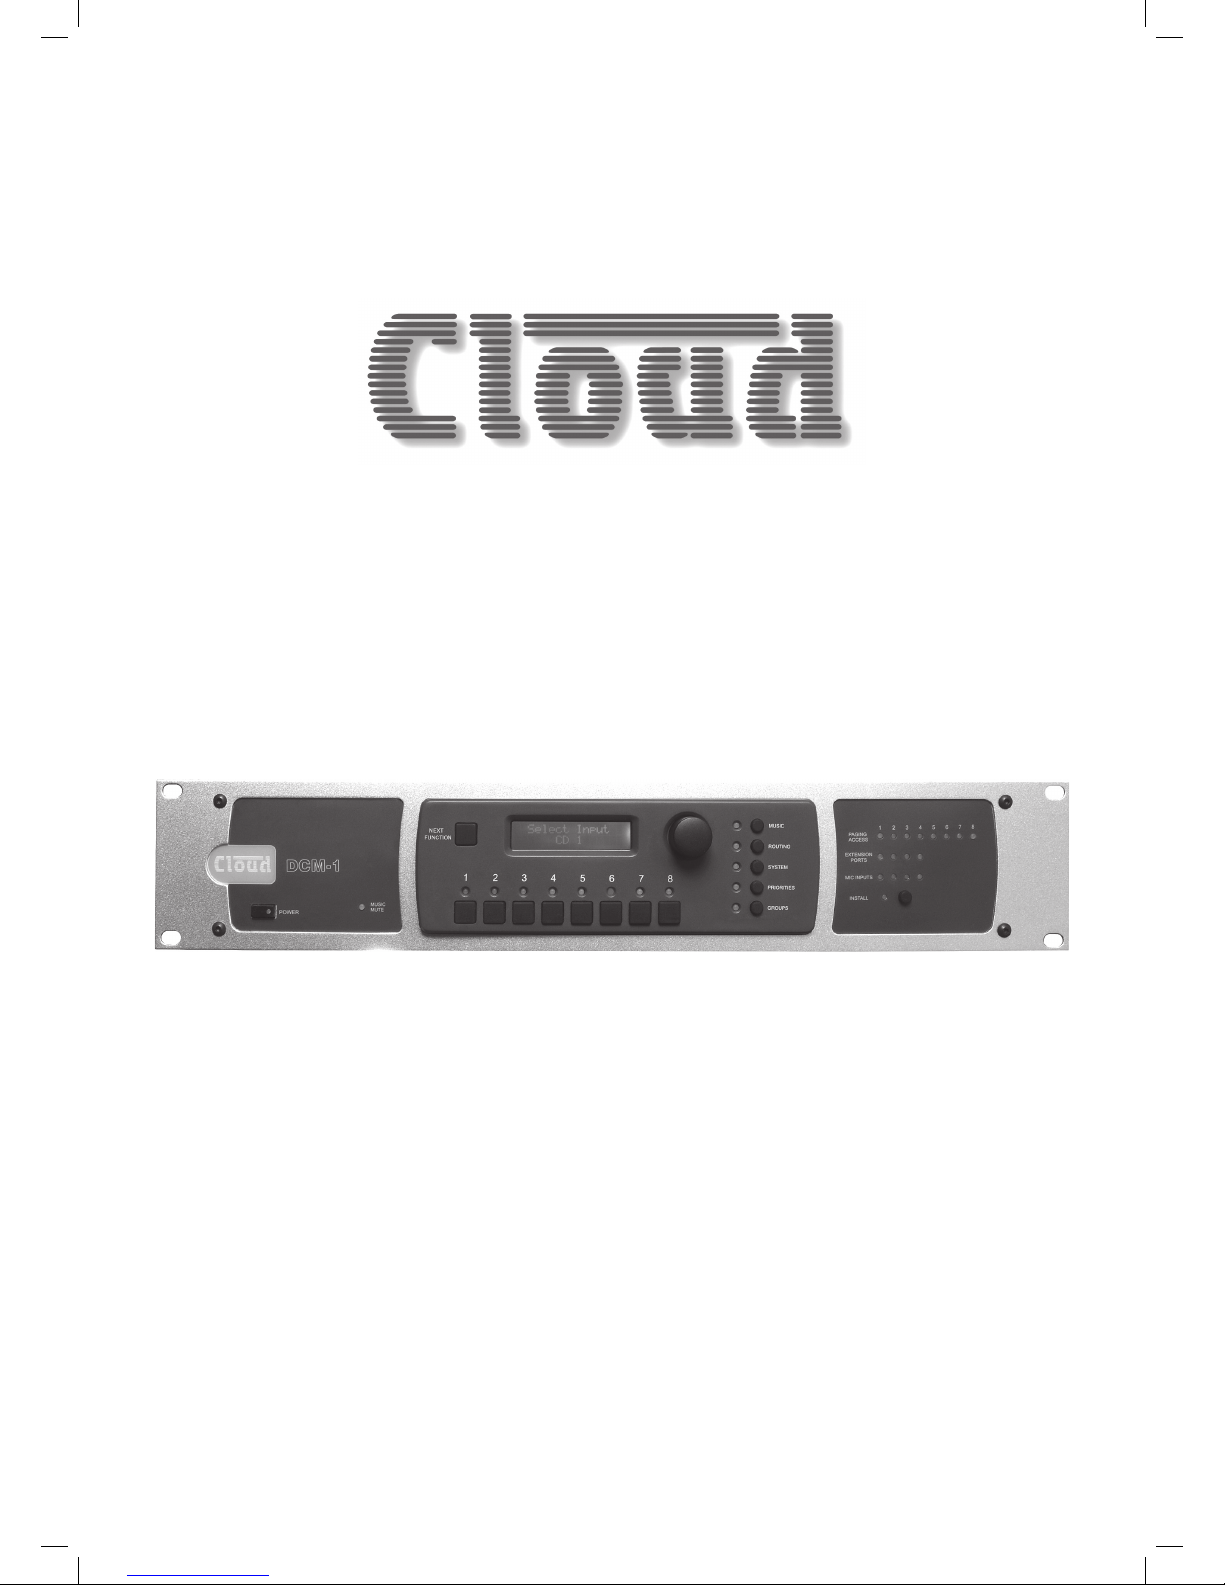
CDR-1
Zone
The CDR‑1 is a remote control unit specically designed for
use with the DCM‑1. CDR‑1s may be tted to standard
electrical back boxes in whatever location is convenient in
each zone. Any zone may have one CDR‑1, more than one,
or none at all. The DCM-1 can support up to 100 CDR-1s.
CDR-1s are interconnected with just one standard CAT-5
UTP cable; units may be daisy‑chained at will and/or
connected individually back to the DCM-1’s four CDR ports
using almost any wiring topology convenient for the
installation.
The DCM-1’s own PSU has the capacity to power up to
8 CDR-1s directly, via the CAT-5 connections. Systems
requiring more than 8 CDR-1s will need additional power
supplies, whose location and system connection will depend
on the topology and cable lengths involved. Full details are
provided with each CDR-1.
The CDR-1 provides the user with local source selection
and level control for the zone in which it is tted. It
additionally allows selection of any zone groups to which
the zone has been assigned, which gives simple and complete
control over audio in multiple areas which may be split or
joined in different ways at different times.
Once enabled on the DCM-1 and a local key code entered,
zone EQ is also adjustable from the CDR‑1, allowing audio
optimisation from within the zone itself. An Installer Mode
permits zone assignment and adjustment of other installation
parameters.
Page 11
Overview
DCM-1 User Manual v1.0 9
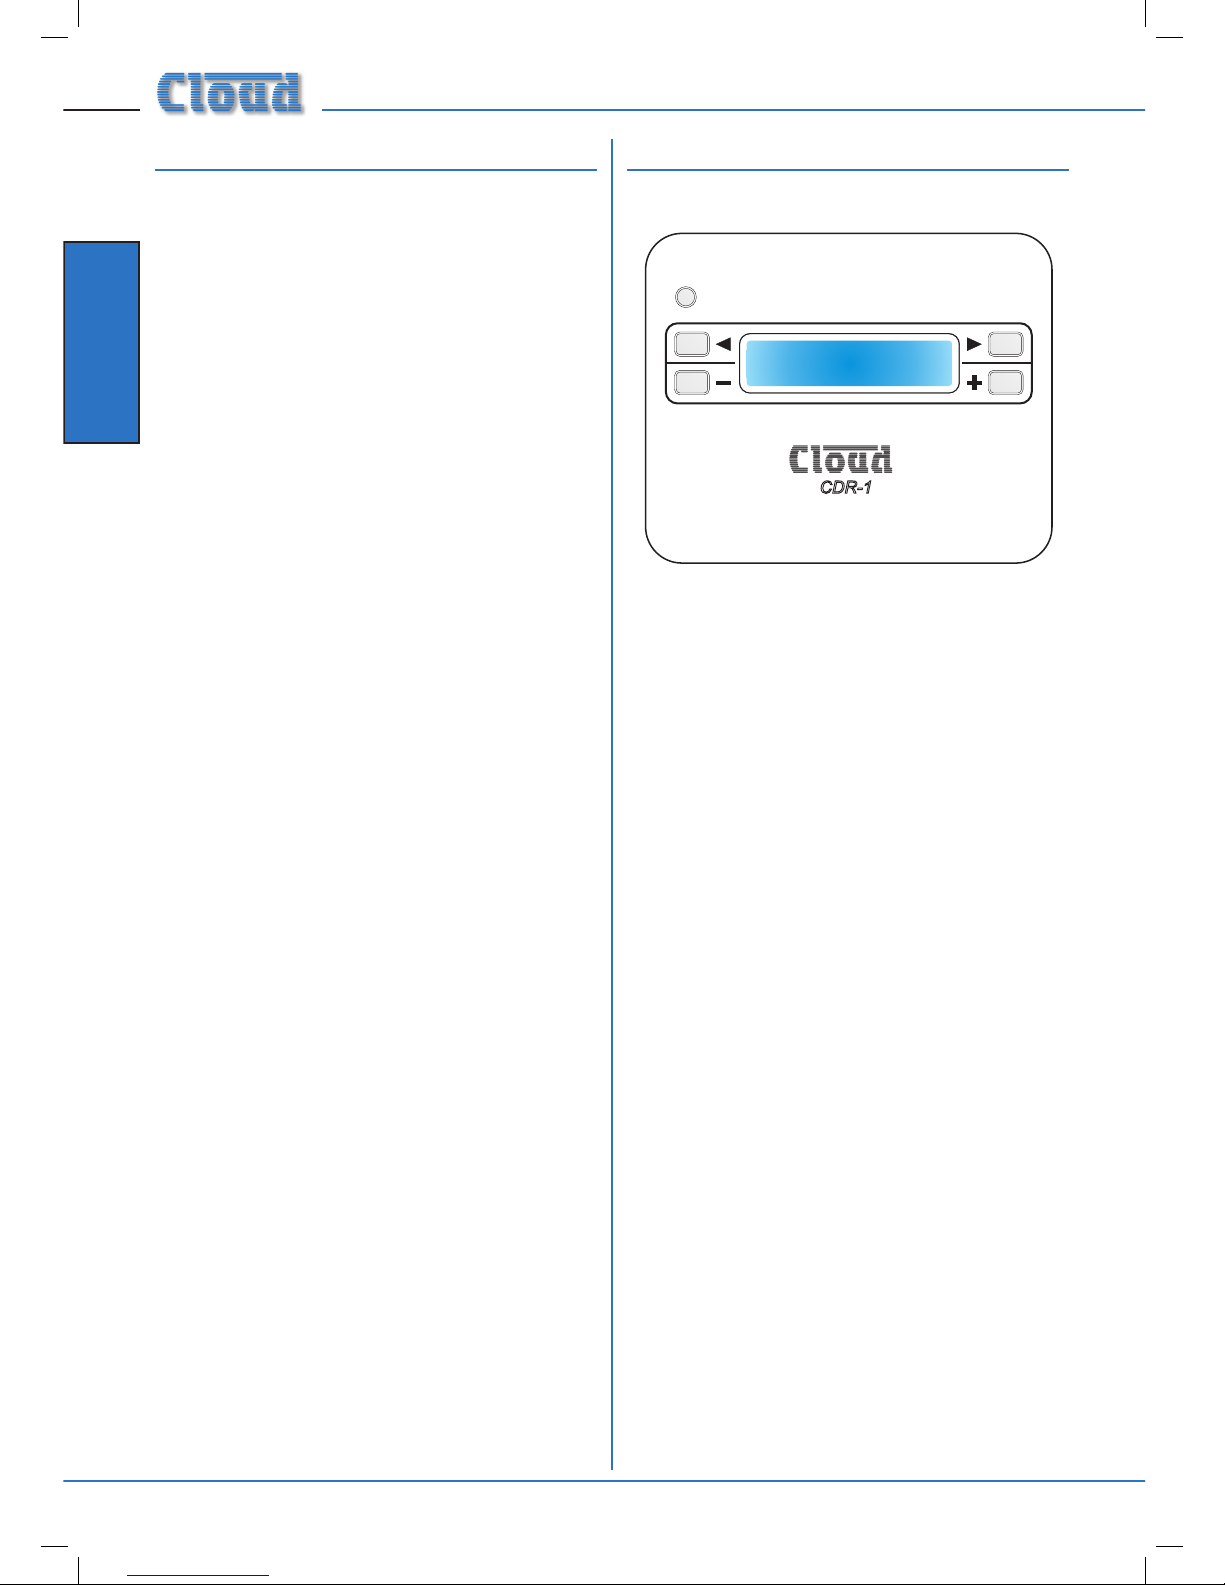
LE-1
The LE-1 is an input connector plate which can be installed
wherever required. Versions are available to t standard UK,
US or Australian dual-gang electrical back boxes. It allows
connection of a stereo unbalanced line-level audio source,
such as a portable music centre, laptop, radio mic receiver
or similar, and connects to one of the DCM-1’s Extension
Ports with a single screened CAT-5 cable.
Multiple LE-1s may be “daisy-chained” together to provide
input points at different locations in the same zone. Signals
applied to plates wired in this way will be summed together.
An internal gating circuit on each plate automatically
“disconnects” any chained plates which are not in use, to
minimise noise contribution.
The LE-1’s inputs are electronically buffered to minimise
noise and interference pickup, and input gain is locally
adjustable with a preset control. Two types of input
connector are provided for user convenience: dual phono
sockets and a 3.5mm stereo jack socket; ±12dB of gain trim
adjustment is available on the faceplate.
Once connected, any audio connected to an LE-1 is treated
as any other source and can be routed to any zone in the
same manner.
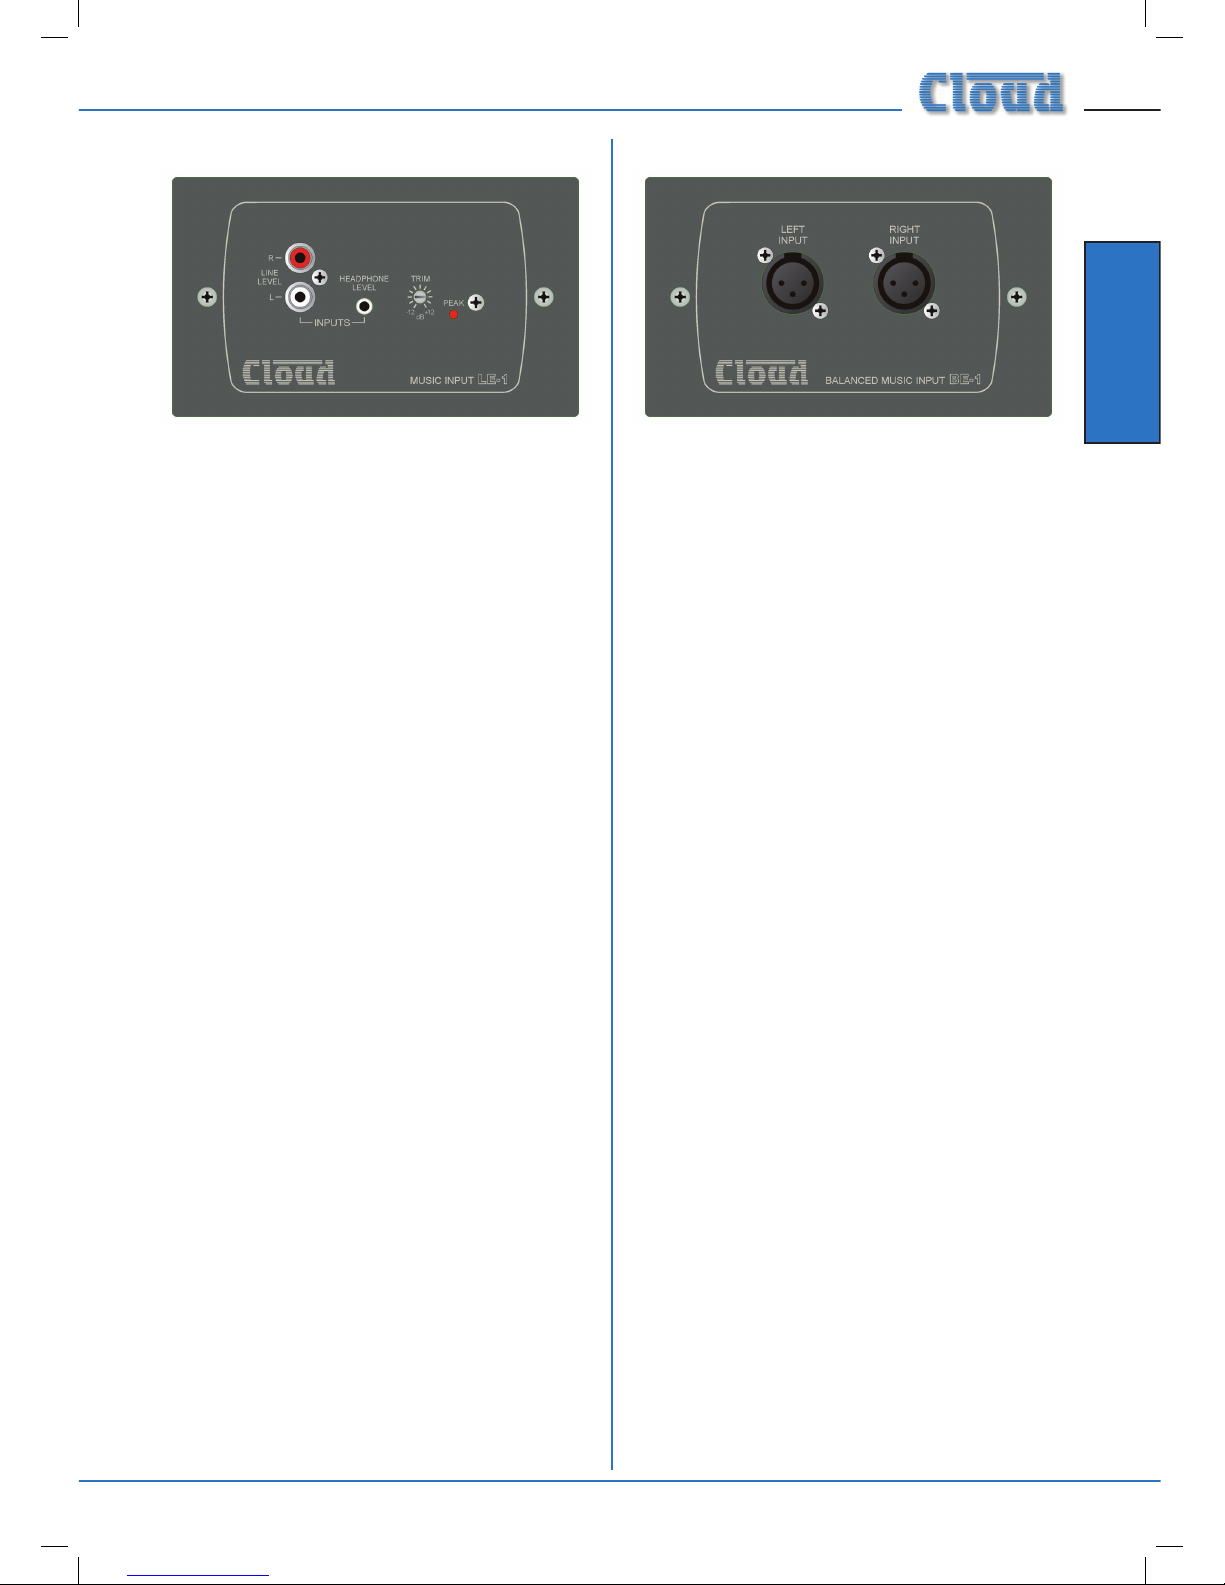
BE-1
The BE-1 is an input connector plate of similar type to the
LE-1. It provides a stereo balanced line-level input, permitting
professional audio equipment such as mixing consoles, DI
boxes or broadcast equipment to be connected. Like the LE1, it connects to one of the DCM-1’s Extension Ports with a
single screened CAT-5 cable.
BE-1s may be daisy-chained in the same way as LE-1s, and
the two types of plate may be intermixed.
Two industry-standard latching 3-pin female XLR connectors
are tted.
Once connected, any audio connected to the BE-1 is treated
as any other source and can be routed to any zone in the
same manner.
Page 12
DCM-1 User Manual v1.0
Overview
10
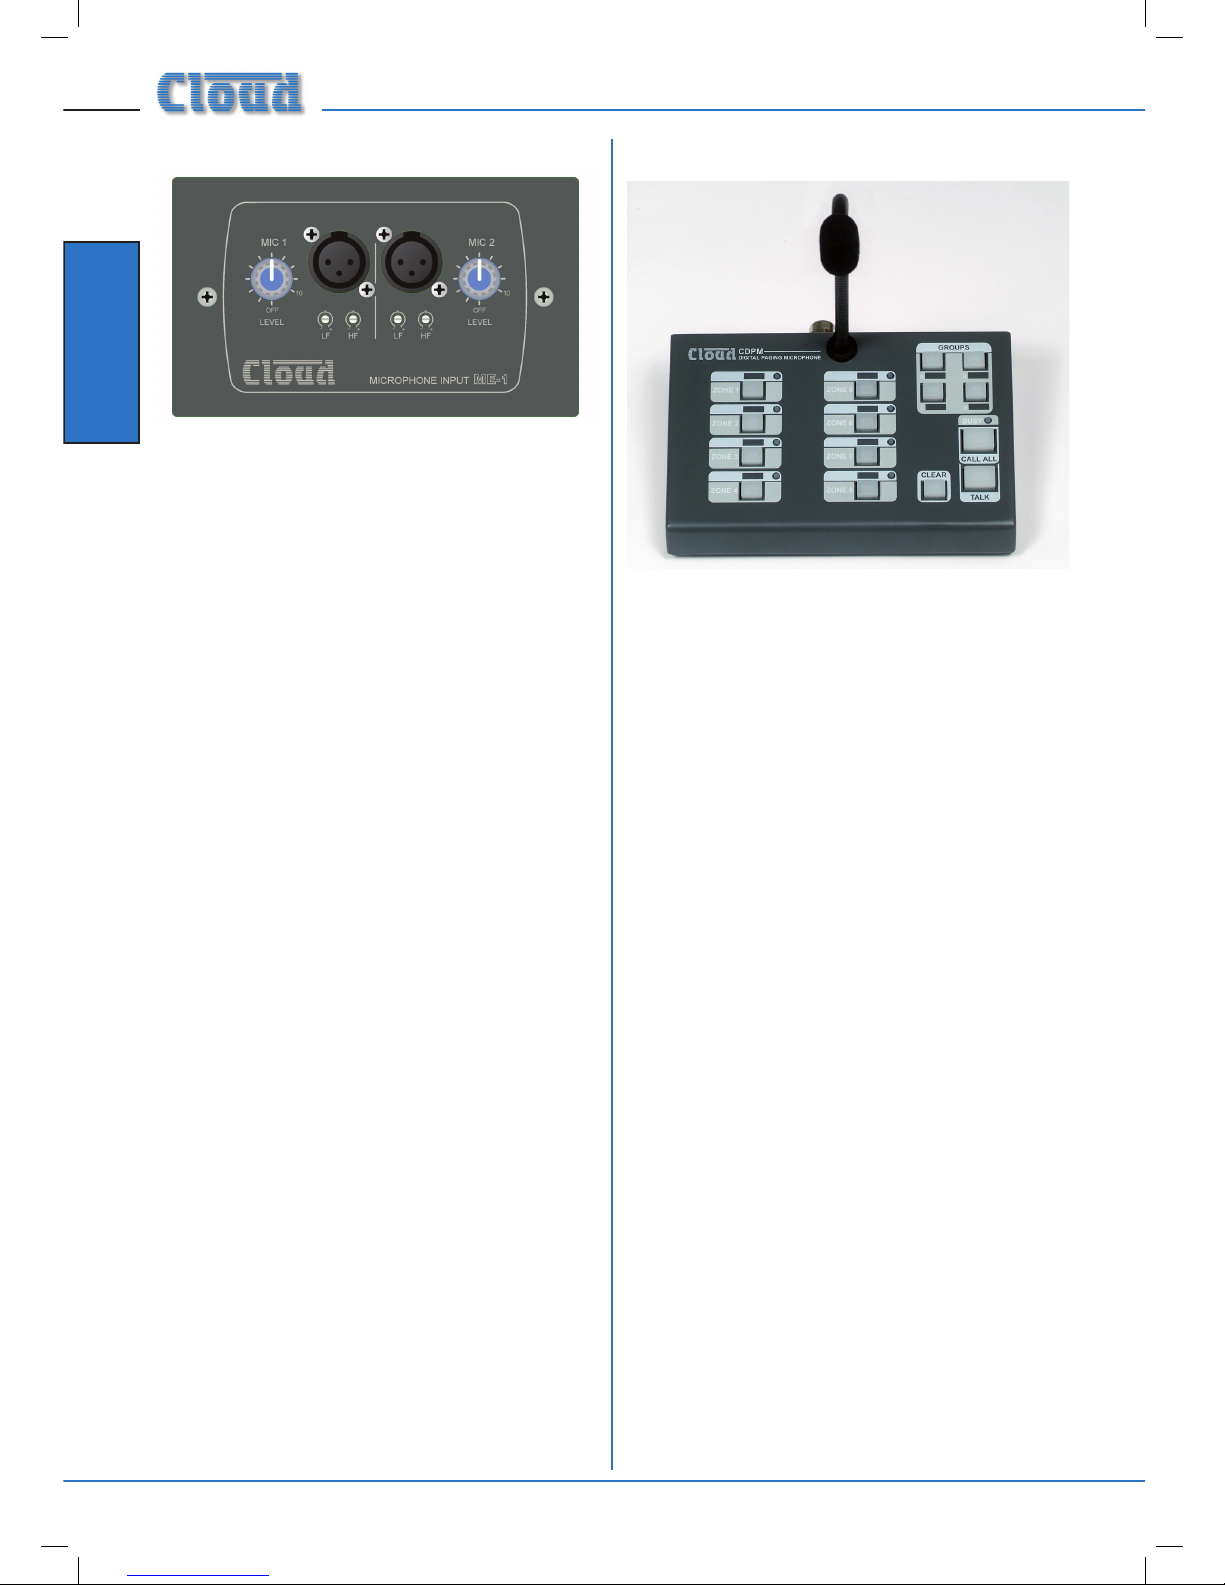
ME-1
The ME-1 input connector plate provides two balanced
microphone inputs, and is useful in multi-purpose areas
where mics are sometimes needed. The ME-1 has adjustable
mic level and EQ per input, and connects to one of the
DCM-1’s four dedicated Mic Inputs with a single screened
CAT-5 cable. The ME-1’s two inputs are mixed together at
the plate, and the summed mic signal applied to the DCM-1.
Any of the DCM‑1’s mic inputs can be routed to any zone
without restriction.
Inputs on the ME-1 are via latching 3-pin female XLR
connectors. 12v phantom power is available on either input
if required (set via a jumper accessible from the rear plate).
CDPM range
The CDPM range of paging microphones integrate directly
with the DCM-1 and provide a simple and convenient
method of adding multi‑zone paging facilities to the audio
system. Multiple CDPMs can be easily daisy-chained if more
than one paging location is needed.
Full installation and operation instructions are supplied
separately with each CDPM unit.
(Cloud Digital Paging Microphone)
Page 13
Overview
DCM-1 User Manual v1.0 11
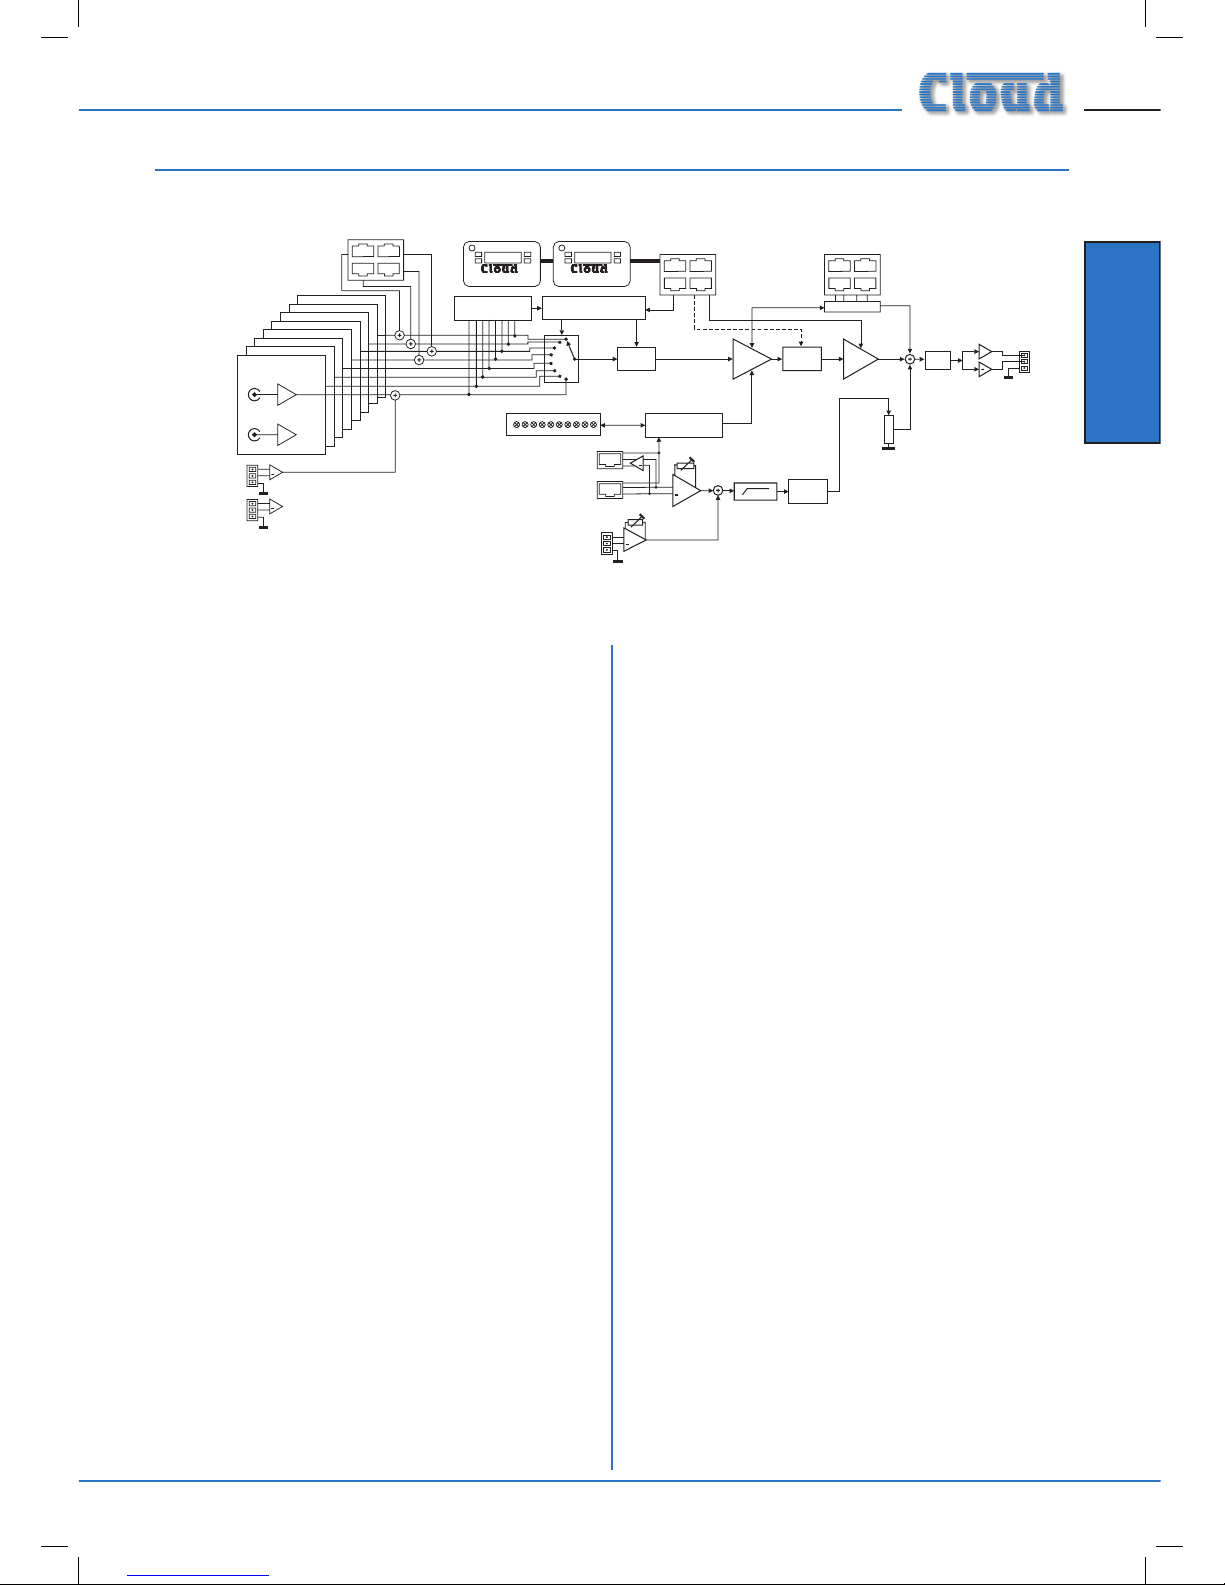
The simplied block diagram above illustrates the basic
signal architecture of the DCM-1. Only the routing and logic
for one zone output is shown.
The main system and interfacing capabilities of the DCM-1
are listed below:
Music sources and routing
Provision for 8 music sources. Inputs are stereo, linelevel and unbalanced.
Input 8 also available as a balanced input.
Inputs 1 to 4 may be fed from LE-1 or BE-1 input plates
(see above), which have a balanced connection via
dedicated input sockets.
Any music source may be routed to any zone.
Inputs available for selection may be dened, per‑zone.
Microphone Inputs
Provision for 4 ME-1 mic input plates, each of which can
accept 2 microphones.
Each mic input assignable to any zone in any
combination.
Paging mic facilities
RJ45 digital interface for CDPM Series paging
microphones.
Additional balanced input for 3rd.-party paging mic.
Per‑zone contact closure routing for 3rd.‑party mic.
Both CDPM and 3rd.-party systems may be used
together; independent gain controls.
HF/LF EQ adjustment of paging signal.
Paging level independently adjustable per‑zone.
•
•
•
•
•
•
•
•
•
•
•
•
•
Zone Outputs
8 balanced line level zone outputs.
Zones 1 & 2 are stereo, 3 to 8 are mono.
Zone Groups
Zones may be assigned in any combination to 4 Groups.
Groups can be enabled/disabled by user as required.
Groups have same source selection functions as zones.
Priority and Logic
Any music source may be assigned as priority line input,
per‑zone/group. If enabled, a signal at the priority input
overrides the source selection in the zone/group.
Priority music source may be a source normally
unavailable to a zone.
One or more priority mic inputs may be similarly
dened; an active mic signal causes the music level to
reduce (“ducking”).
During Paging, music ducking may be triggered by the
paging signal or zone selection; it can also be disabled;
these options are selectable per‑zone/group.
Independently adjustable hold and release times for all
priority types, plus music attenuation (ducking) level for
mic and paging priorities.
•
•
•
•
•
•
•
•
•
•
SPE
ZONES 1 AND 2 ARESTEREO
ZONES 3...8 ARE MONO
+
MIC PRIORITY
MICROPHONE INPUTS
EQ
VCA
ATTENUATOR
LINE 8
LINE 7
LINE 6
LINE 5
LINE 4
LINE 3
L
R
LINE 2
LINE 1
EXTENSION PORTS
1
2
3
+
+
LINE 8
BALANCED
R
L
LINE 1
LINE 2
LINE 3
LINE 4
MIC 1
MIC 2
MIC 3
MIC 4
GAIN
SOURCE SELECT LOGIC
CDR-1
CDR-1 PORTS
EQ CONTROLBY CDR-1IS ONLY
AVAILABLE INENGINEER MODE
LINE PRIORITY
LOGIC
GAIN ISAPPLIED
ACCORDING TO
SOURCE SELECTED
+
+
EQ
PAGINGACCESS
LOGIC
PAGING
MICROPHONE
INPUT
CDPM IN
CDPM THRU
+
PAGINGACCESS
Z2Z1Z3Z4
Z5
Z6
Z7
Z8
0V
+12V
CDR-1
PORT
A
PORT
A
PORT
B
PORT
B
ONLYRIGHT STEREOSIGNAL
SHOWN FOR CLARITY.
ZONES 3...8. SIGNALSARE SUMMED
TO MONOBEFORE SOURCESELECT.
1
2
3
1
2
3
1
2
3
System Block Diagram
System Capabilities
Page 14
DCM-1 User Manual v1.0
Overview
12
Remote Control
Optional CDR-1 dedicated remote control for DCM-1
available separately
Up to 100 CDR-1s may be connected to the 4 CDR-1
Ports, using standard CAT-5 UTP cable.
CDR-1s can be daisy-chained and/or wired directly to
the CDR-1 Ports as cabling convenience dictates.
Multiple CDR‑1s per‑zone permitted
CDR‑1 provides local (in‑zone) user control of source
selection and level control and key-protected EQ
adjustment.
RS232 serial remote control interface for integration
with 3rd.-party control systems (Crestron, AMX, etc.)
•
•
•
•
•
•
Misc
Programmable external Music Mute input for re alarm
interface, etc.
One input (mic or line) can be installer‑congured to
be protected from Music Mute (e.g. for evac message,
emergency mic, etc.)
Optional Bose® speaker EQ cards (per‑zone)
•
•
•
AREA 1
AREA 2
AREA 3
POWER
AMPLIFIERS
OTHER
AREAS
CD PLAYER
PC
RADIO
TUNER
FREEVIEW
RECIEVER
CDPM
PAGING
STATION
CDR-1
CDR-1
CDR-1
INPUT 1
INPUT 6
INPUT 4
INPUT 8
INPUT 2
INPUT 7
INPUT 3
INPUT 5
CDPM
MIC 1
MIC 4
MIC 2
MIC 3
PAGING MIC
PAGINGACCESS
1
2
3
4
ZONE 5
ZONE 3
ZONE 2
ZONE 6
ZONE 8
ZONE 4
ZONE 7
ZONE 1
CDR-1
POR
TS
DCM-1
System 1
Applications and Examples
The DCM‑1 will nd application in many types of premises,
including shops, bars, hotels, schools, conference centres,
ofces, etc. The congurational exibility of the DCM‑1
means that it can be set up by the system designer to
provide precisely the facilities the user needs.
A few simple examples are given below to illustrate typical
installations.
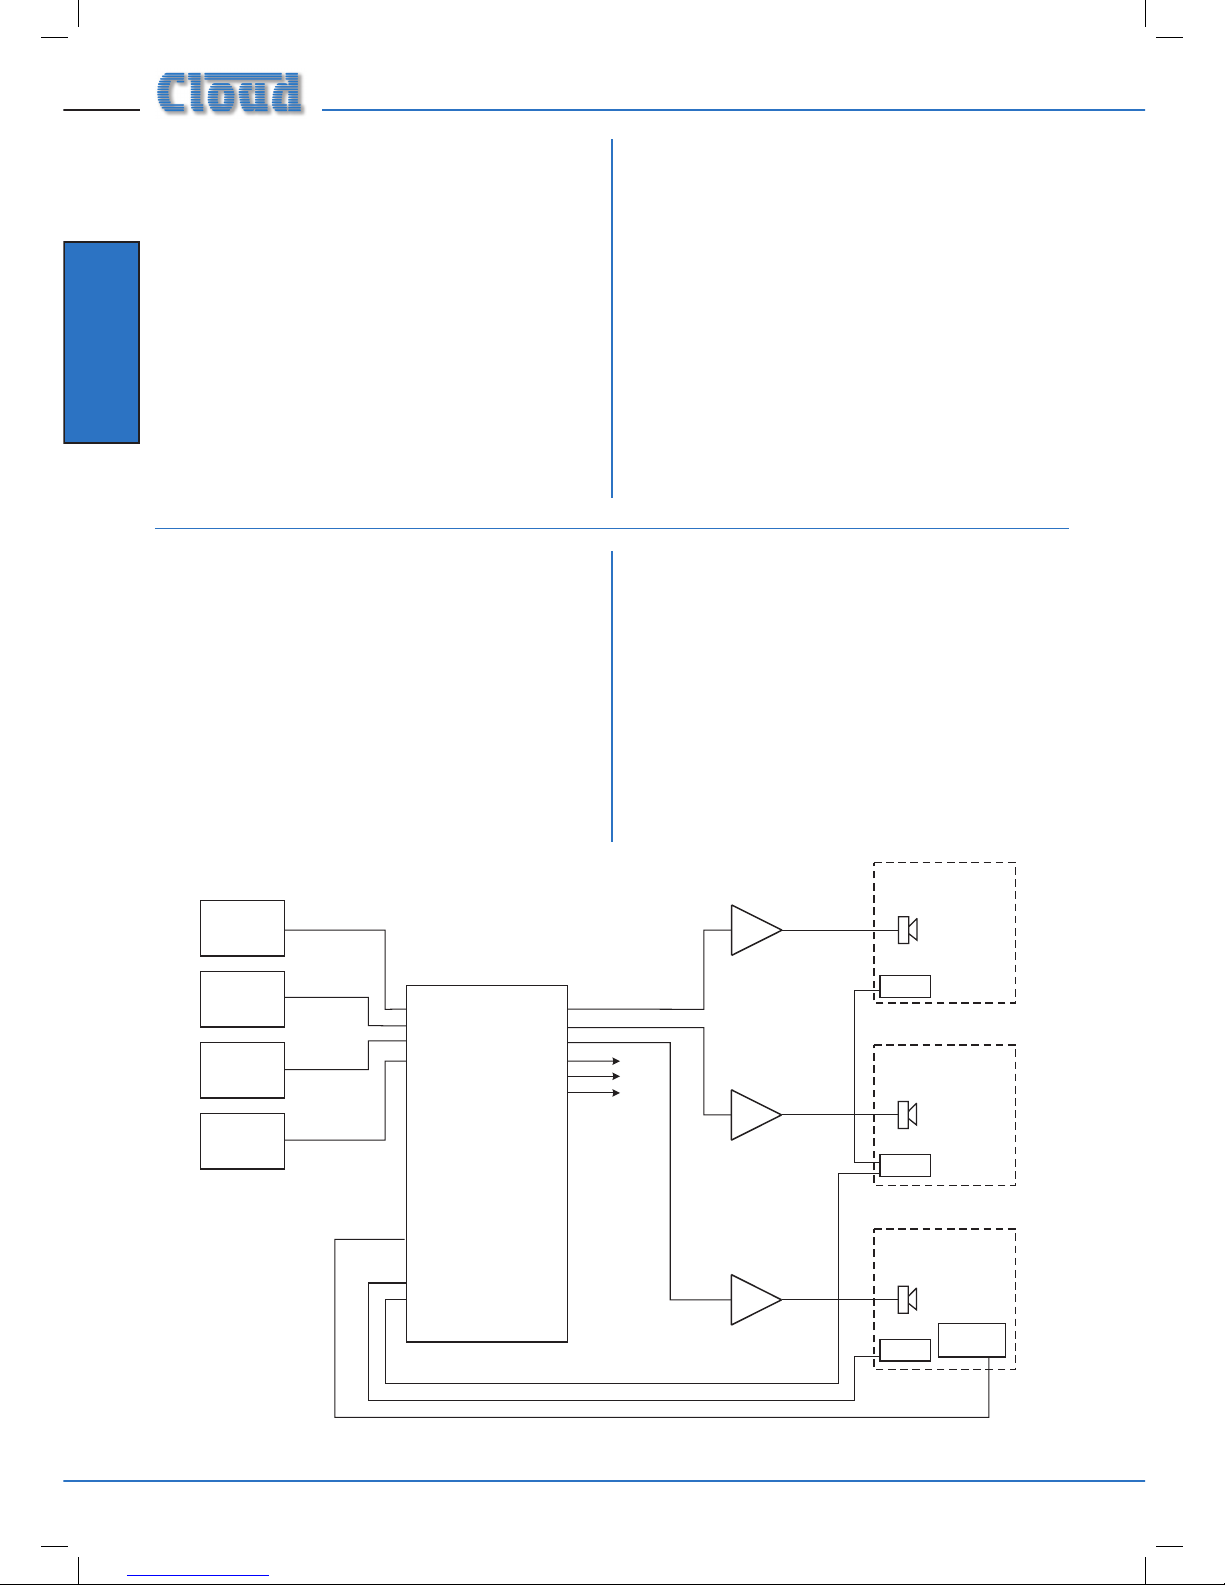
System 1
This depicts a simple system where four possible audio
sources are made available to three or more zones (areas).
Only three are shown for clarity. Points to note:
Each of the three areas shown is equipped with a
CDR-1 remote control. Note that Area 3’s remote
is wired directly back to the DCM-1, while those in
Areas 1 & 2 are daisy-chained together and wired back
to the DCM-1 separately. This is possible because the
DCM-1/CDR-1 permit almost any wiring topology that
is convenient for the building layout.
Area 3 has a Cloud CDPM paging microphone, which
would be used to originate voice messages to any of
the other areas. The paging level to Area 3 (if required)
would be adjusted on installation to be at a level that
does not cause feedback.
•
•
Page 15
Overview
DCM-1 User Manual v1.0 13
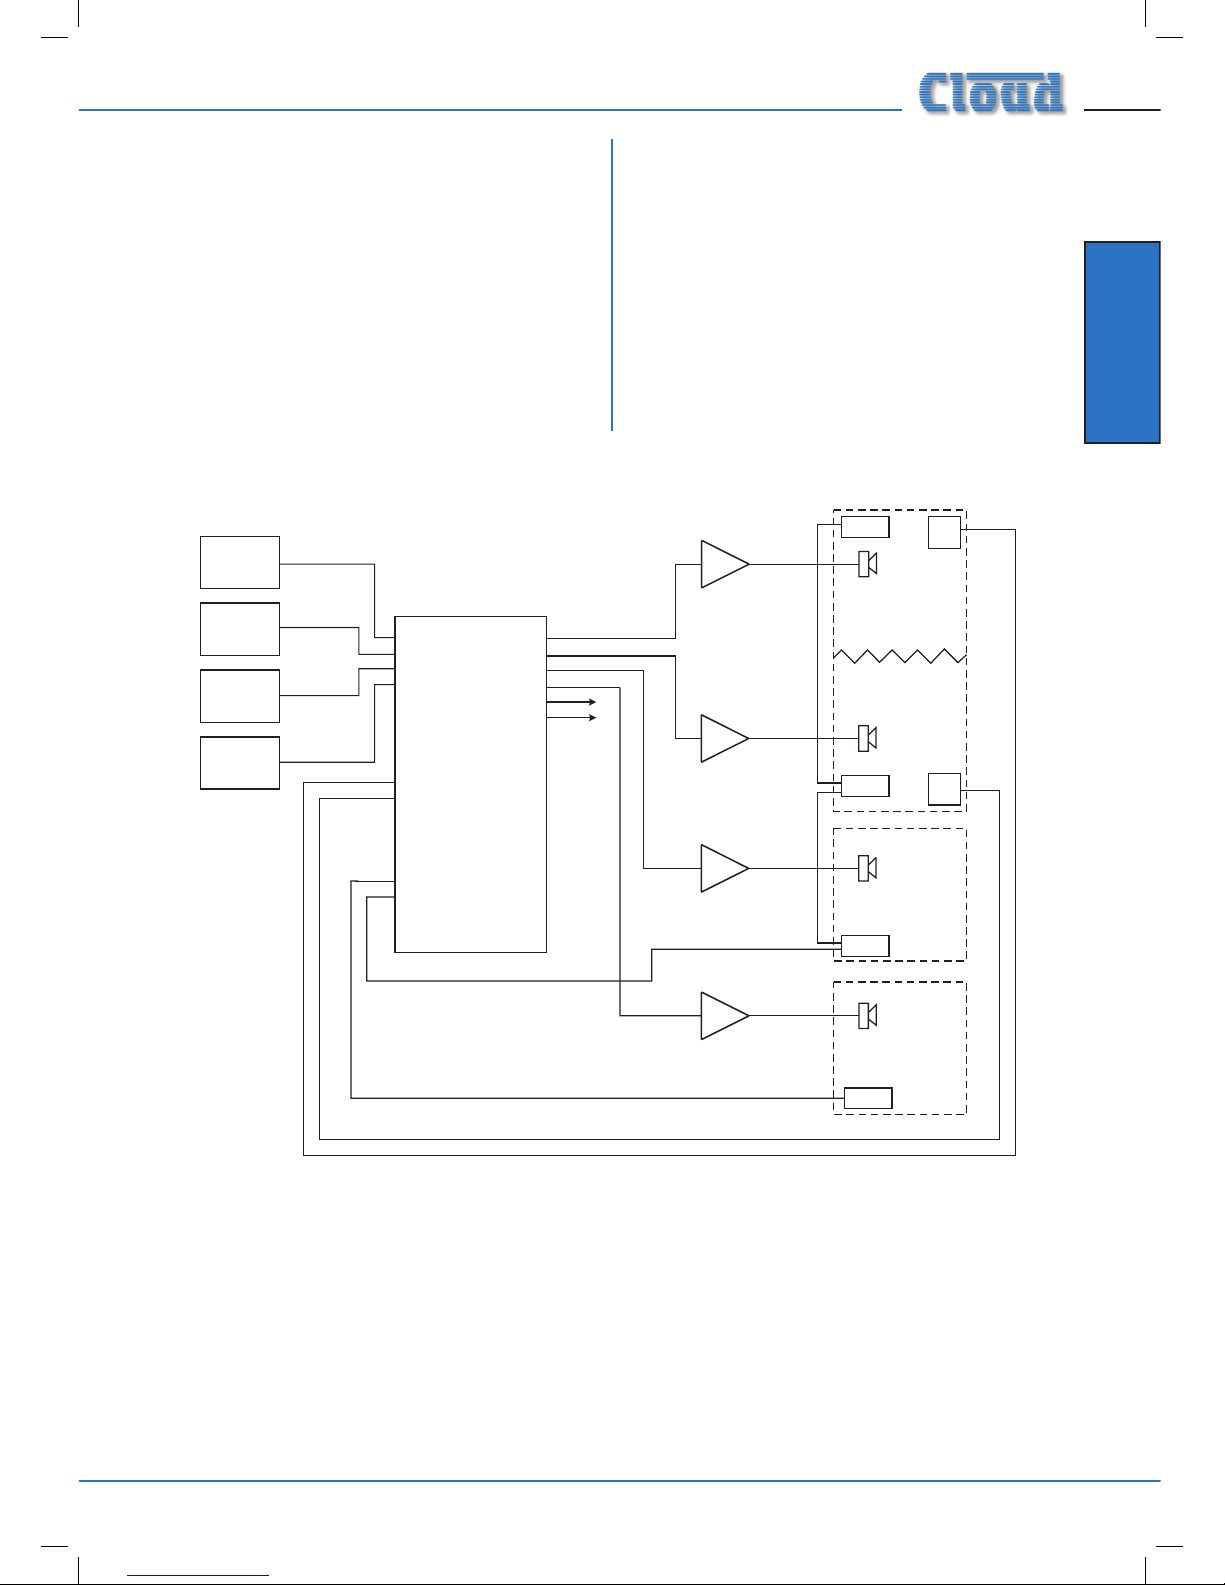
System 2
This shows a more complex system, which illustrates some
additional DCM-1 installation possibilities. Points to note:
The large area has two CDR-1 remote controls in the
same zone; typically, these might be adjacent to doors at
opposite ends of the room.
Two of the areas are separated by a folding partition
which may be removed to create one large space.
By assigning these two zones to a Group within the
DCM‑1, the two zones can be treated as one for audio
purposes when the partition is removed and return to
two separate zones when it is reinstated.
•
•
Each half of the partitioned area also has an ME-1 mic
input plate. Because these have been wired back to
the DCM-1 independently, each can be made available
to their respective room halves as and when required.
Alternatively, it may be that they are only required
when the partition is folded back; in this case they are
activated for the Group instead.
•
AREA 3
POWER
AMPLIFIERS
OTHER
AREAS
CD
JUKEBOX
OFF-AIR
RECEIVER
MP3
PLAYER
DOCK
MUSIC
SERVER
CDR-1
CDR-1
CDR-1
INPUT 1
INPUT 6
INPUT 4
INPUT 8
INPUT 2
INPUT 7
INPUT 3
INPUT 5
CDPM
MIC 1
MIC 4
MIC 2
MIC 3
PAGING MIC
PAGINGACCESS
1
2
3
4
ZONE 5
ZONE 3
ZONE 2
ZONE 6
ZONE 8
ZONE 4
ZONE 7
ZONE 1
AREAS 1 & 2
ME-1
ME-1
PARTITION
AREA 4
CDR-1
CDR-1
POR
TS
DCM-1
System 2
Page 16

DCM-1 User Manual v1.0
Overview
14
System 3
This shows a system interfaced to two paging stations, a
CDPM (which might be located at the building’s reception
desk) and a separate 3rd.-party system, which might typically
be in a security ofce. Other points to note:
The CDR‑1 remote control panels in each zone are
wired in two chains, to suit the building layout.
Two of the line inputs are from LE-1 remote line input
plates in two different zones. Other music sources have,
in this case, been connected to Inputs 5 to 8.
•
•
EXTENSION 1
INPUT 6
INPUT 8
INPUT 7
INPUT 5
CDPM
MIC 1
MIC 4
MIC 2
MIC 3
PAGING MIC
PAGINGACCESS
1
2
3
4
ZONE 5
ZONE 3
ZONE 2
ZONE 6
ZONE 8
ZONE 4
ZONE 7
ZONE 1
AREA 1
AREA 2
AREA 3
AREA 4
AREA 5
AREA 6
CDR-1
CDR-1
CDR-1 CDR-1
CDR-1
CDR-1
CDPM
SECURITY
3RD. PARTY
PAGING
SYSTEM
MIC
CONTROL
LE-1
LE-1
EXTENSION 2
EXTENSION 3
EXTENSION 4
RADIO
TUNER
TV
MP3
PLAYER
CD
PLAYER
CDR-1
POR
TS
DCM-1
System 3
Page 17
Installation
DCM-1 User Manual v1.0 15
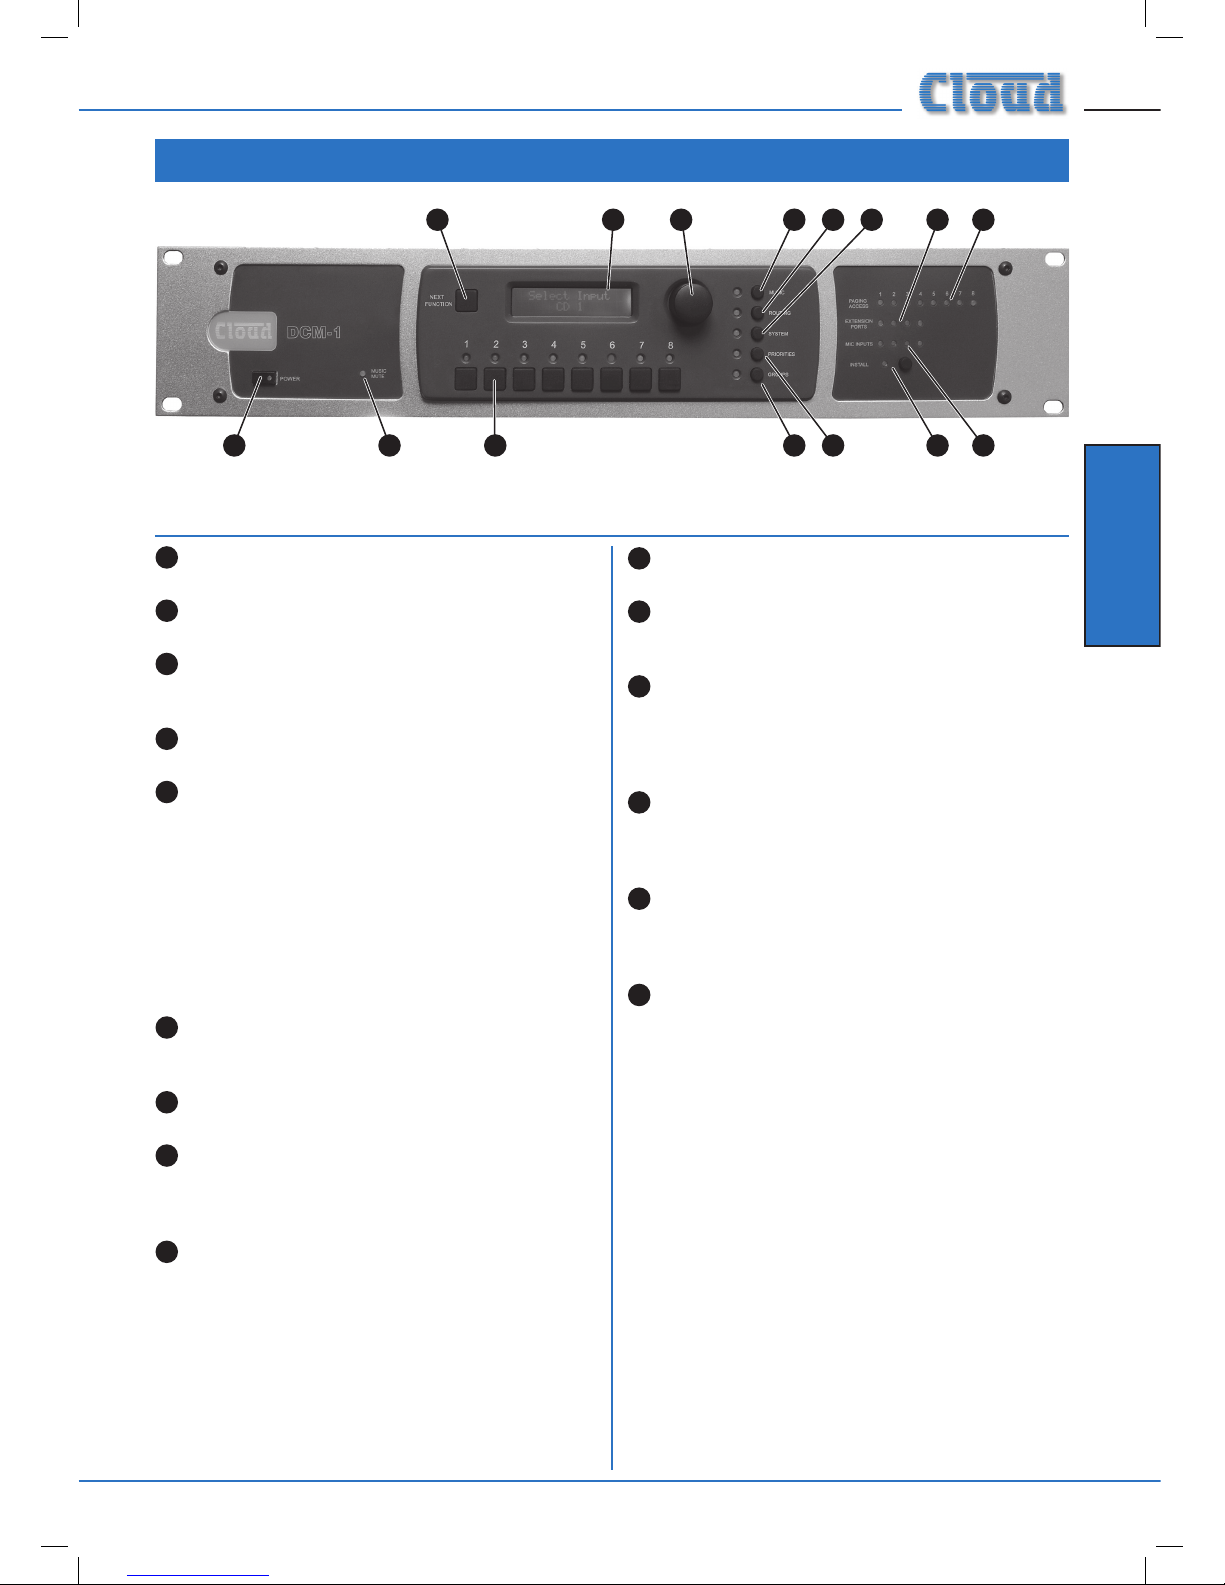
1
Power button: applies DC power to the DCM-1 (note
external PSU)
2
LCD display: 2 x 16-character backlit blue LCD
display used in all control and menu functions.
3
Rotary control: for adjusting unit parameters via the
display. The control also has a “press” action, which is
required for some front panel operations.
4
Next Function button: used to scroll through the
various functions of each menu
5
Numeric buttons 1 - 8: the operation of these
buttons varies with the selected menu function. In
many of them they represent Zones 1 to 8, each button
selecting a zone that the menu function will apply to. In
others, they may represent Inputs 1 to 8, for example.
Each button has an associated blue LED to indicate the
current status of that zone or input for the function.
The menu system is divided into ve groups, each of which
is selected by one of the menu buttons. An associated blue
LED indicates selection.
6
Music: gives access to per‑zone source selection, level
control, EQ, maximum and minimum levels, and input
gain per-input.
7
Routing: Allows per‑zone mic enabling and input
masking, plus other installation‑specic functions.
8
System: system menu includes enabling of CDR-1
Installer Mode per‑zone, mono/stereo selection for
Zones 1 & 2, RS232 port set‑up, zone and input naming,
security key set-up, etc.
9
Priorities: allows assignment of priority inputs
(including paging inputs) and adjustment of the DCM-1’s
operation when priorities are active.
10
Groups: the Group menu allows assignment of Zones
to Groups, and dened Groups to be enabled.
11
Paging Access LEDs: 8 LEDs (one per zone) which
illuminate when a zone is selected for paging from an
external paging microphone.
12
Extension Ports LEDs: 4 LEDs corresponding to
the Extension Ports of Line Inputs 1 to 4. These LEDs
illuminate when a LE-1 or BE-1 remote input plate is
connected, and the input to which it is connected is
enabled for the currently selected zone.
13
Mic Inputs LEDs: 4 LEDs corresponding to Mic Inputs
1 to 4. These LEDs illuminate when an ME-1 remote
input plate is connected, and the input to which it is
connected is enabled for the currently selected zone.
14
Install button: activates Installer Mode. Allows
access to the menu functions which are intended to be
unavailable to the user. A key needs to be entered on
the numeric buttons for Installer Mode to be active.
15
Music Mute LED: illuminates when an external Mute
is applied at the Music Mute connector (normally linked
to Fire Alarm or other emergency system).
Section 2 : Installation
3
4
6
2
8
7
12
11
515
14
131 910
Description of front panel
Page 18
DCM-1 User Manual v1.0
Installation
16
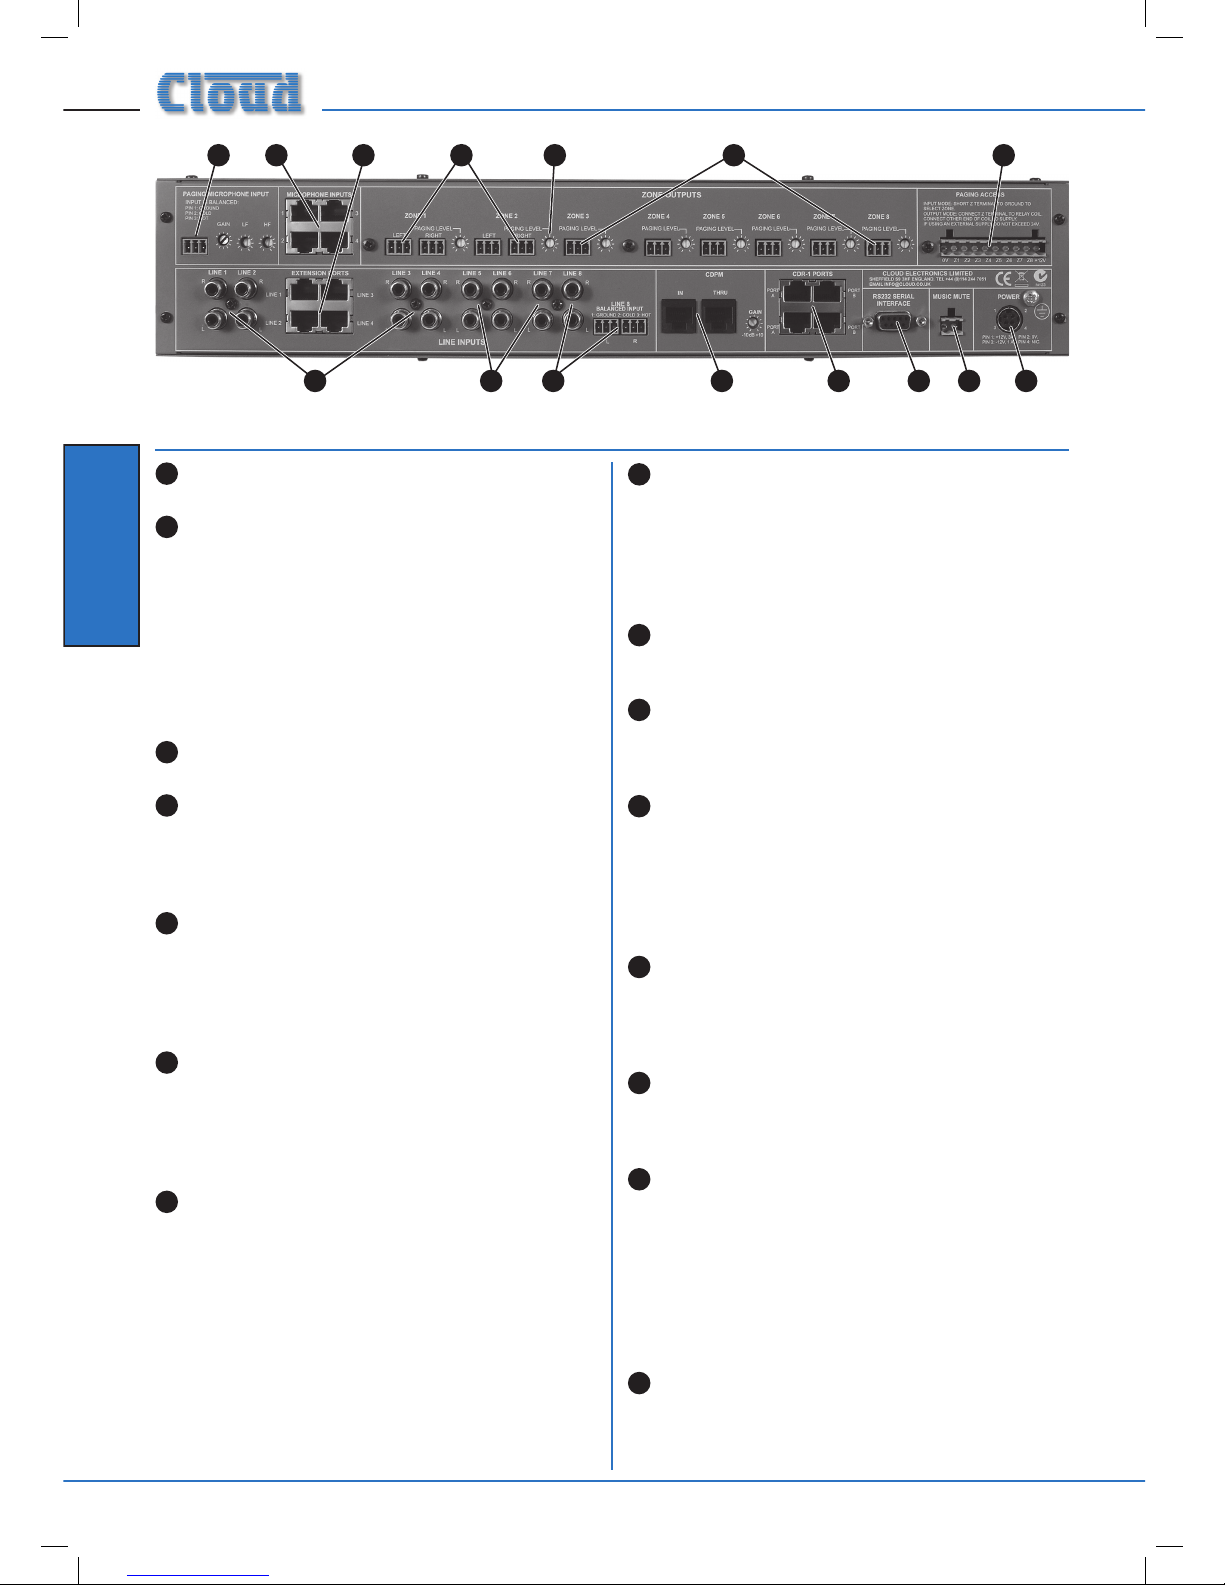
1
Line Inputs 1 to 4: inputs for music sources 1 to 4, on
phono sockets (unbalanced).
2
Extension Ports 1 to 4: These are alternative input
connectors for Line Inputs 1 to 4. If Cloud remote
line input plates (LE-1 or BE-1) are being used, they
should be connected here via screened CAT-5 cable and
shielded RJ45 connectors. These ports each provide a
stereo pair of electronically-balanced inputs, together
with DC power for the active circuitry in the remote
plate. Do not connect a music source to the phono
sockets ([1] above) of a Line Input when its Extension
Port is connected to a remote input plate.
3
Line Inputs 5 to 7: inputs for music sources 5 to 7, on
phonos only.
4
Line Input 8: Input 8 is available both as unbalanced on
phonos and electronically-balanced on 2 x 3-pin 3.5mm*
Phoenix-type connectors. The balanced input allows
connection of professional audio equipment such as
mixing consoles, DJ desks, etc.
5
Microphone Inputs 1 to 4: four shielded RJ45
sockets for the connection of Cloud ME-1 microphone
remote input plates. Connection should be via screened
CAT-5 cable. These inputs are balanced, and the
connectors additionally provide DC power for the
active circuitry in the input plates.
6
Paging mic input: balanced input for the connection
of an external paging microphone. This input is enabled
via the access connector [7]. Adjacent to the 3-pin
3.5mm* Phoenix-type connector are preset controls
for mic gain and HF/LF EQ. Phantom power is available
(enabled by internal jumper).
7
Paging Access connector: 10-pin 5mm* Phoenixtype connector providing two distinct functions. If the
DCM-1 is being used with a 3rd.-party paging system,
this connector provides contact-closure selection of
the zone(s) to be paged. If a Cloud CDPM is the only
type of paging system being used, the connector can
be reassigned as an output port, the 8 pins becoming
per‑zone open‑collector outputs which can be used
(typically) for external level restoration. 0v and +12v are
provided on the remaining two pins.
8
Zone Outputs 1 and 2: electronically-balanced
outputs on 3-pin 3.5mm* Phoenix-type connectors.
Zone Outputs 1 & 2 are stereo; separate L and R
connectors are provided. Stereo music sources routed
to Zones 1 and 2 will remain in full stereo. Each Zone
Output can be recongured as mono via the menu
system.
9
Zone Outputs 3 to 8: as Zones 1 and 2, but mono
only, with a single connector. These zones will receive a
mono L+R sum of stereo inputs routed to them.
10
Paging level controls: each Zone output has an
adjacent preset control which sets the volume of the
paging mic (either from CDPM or 3rd.-party systems) in
that zone.
11
CDPM Ports: two RJ45 sockets, IN and THRU. IN
is for the connection of Cloud CDPM Series paging
microphones; THRU is used when a system employs
multiple DCM‑1s. DC power, zone selection data and
the paging microphone signal are all catered for on
the IN socket. The adjacent preset control adjusts the
CDPM microphone level.
12
CDR-1 Ports: four RJ45 ports for connection of
CDR-1 remote control panels. CDR-1s may be daisychained, and the installer may use one or more of the
four ports for individual or daisy-chained CDR-1s as the
building layout dictates.
13
RS232 serial interface: a 9-pin female Dsub
connector providing a bi-directional RS232 interface,
enabling control of the DCM-1’s primary functions from
an external system.
14
Music Mute input: 2-pin 5mm* Phoenix-type
connector for interfacing the DCM‑1 to a re alarm
or other emergency system. The input is congurable
for use with either Normally Open (NO) or Normally
Closed (NC) contacts; shorting (or removing a short)
will mute music in all zones (see page 42). One input
source may be protected from this mute if wished,
permitting the input to be used for automatic or manual
evacuation messages (see page 42).
15
DC power connector: Locking 4-pin power mini-DIN
for connection of the DCM-1’s external DC PSU.
(* dimension refers to pin pitch)
5
6
7
8 910
4
15
1
2
3
12
11
14
13
Description of rear panel
Page 19
Installation
DCM-1 User Manual v1.0 17
Music Sources
Connect the system’s various music sources to LINE 1 to 8.
When allocating sources to inputs, bear in mind that if Cloud
LE-1 or BE-1 remote plates also form part of the system,
these can be connected to LINE 1 to 4 only.
Standard connection
All 8 line inputs offer unbalanced connection for stereo
sources on a pair of standard phono sockets (RCA jacks).
The sensitivity range available should allow most standard
items of audio equipment such as CD players, PC-based
music servers, TV tuners, etc. to operate at a satisfactory
level. Most such equipment will have stereo unbalanced
outputs, and as long as the source equipment is adjacent to
the DCM-1, normal phono-phono leads can be used.
Mono sources
If connecting a source with only a single mono output to
the DCM-1, connect it to both the L and R sockets, using a
Y-splitter lead or similar.
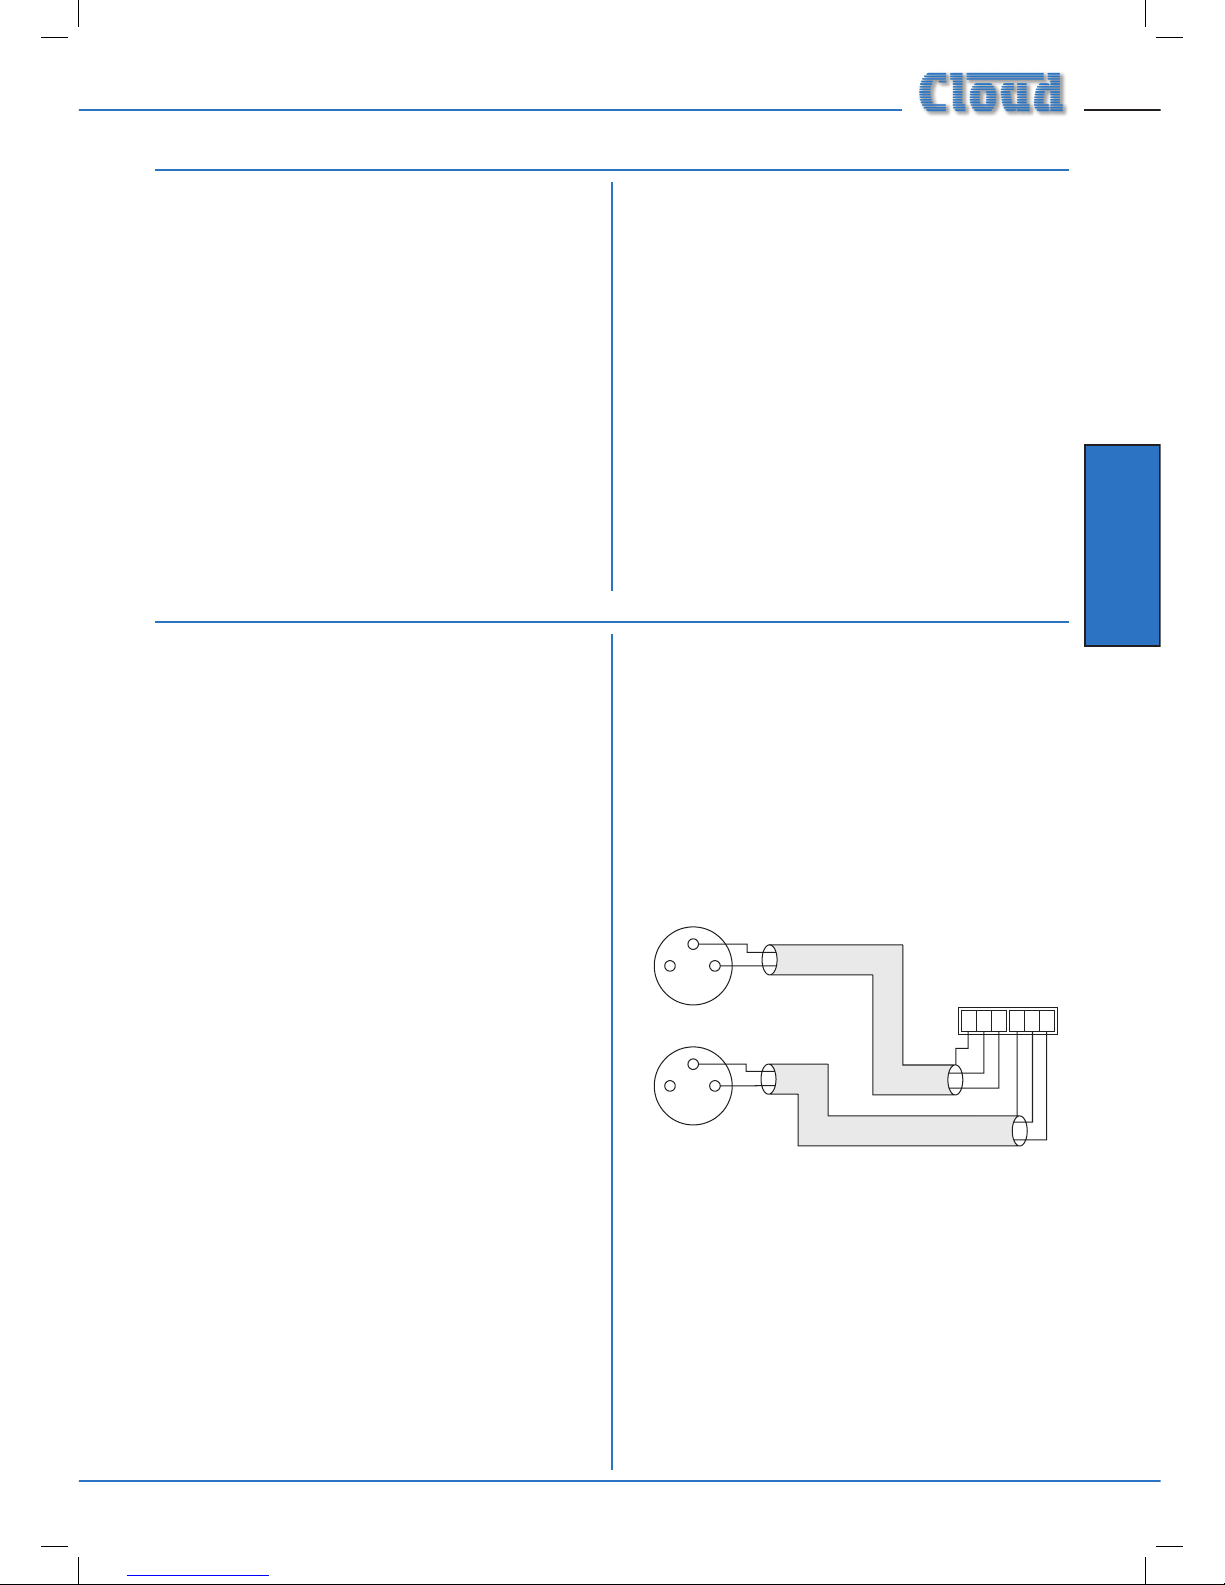
Balanced sources
LINE 8 is additionally provided with electronically-balanced
inputs, which may be used to connect source equipment
with balanced outputs. Balanced connection is always
preferable to unbalanced for situations involving long cable
runs, and should be used if one of the music sources is
remote from the DCM-1 (a DJ mixing system is a common
example).
When connecting balanced sources to LINE 8’s balanced
input connector, wire as shown below. Note that the cables’
screens are not connected at the source end.
Do not connect music sources to both the balanced and
unbalanced connectors of LINE 8.
Hardware considerations
The DCM-1 is built in a 2U-high 19” rackmount enclosure.
It is strongly recommended that the DCM-1 is
installed in a 19” rack wherever possible. The DCM-1
is approx. 160mm deep, but 250mm of rack depth should be
available to allow for rear connectors and cabling.
The DCM-1 has low power consumption and there are
no thermal considerations other than ensuring that the
ventilation grilles (one on each side, one on the bottom
panel) are not obstructed once installed. Other equipment
may be installed above or below the DCM-1 within this
constraint.
The choice of location will be dictated by the specics of the
system and building layout. It is recommended that wherever
possible, the DCM-1 should be mounted in an equipment
rack along with as many of the music sources (CD players,
music servers, TV receiver boxes, etc.) and audio power
ampliers (driving the zone loudspeakers) as practical.
When deciding the DCM-1’s location, bear in mind
that access to it will probably be required, as there are
numerous conguration settings that may need to be
changed - occasionally or frequently - depending on the daily
requirements of the building.
Power Supply
The DCM-1 requires ±12v DC, which is supplied by the
external DC Power Supply Unit (PSU) included with the
unit. This has a 1m captive cable with a moulded 4-pin plug
for connection to the DCM-1. The PSU is of the “Universal”
type, and will operate on any AC supply voltage from 100 to
240v. Wherever possible, mount the PSU in a safe location
within the equipment rack, securing both the DC cable
and the IEC mains lead with cable ties to avoid inadvertent
disconnection.
System Connections
1 2
3
LEFT
RIGHT
LEFT
RIGHT
1 2 3 1 2 3
+
+
-
-
+
+
-
-
SCN
SCN
pin 1 ground
pin 2 hot
pin 3 cold
Balanced outputs (XLRs):
DCM-1 Balanced inputs
pin 1 ground
pin 2 cold
pin 3 hot
1 2
3
Balanced source to balanced inputs
Page 20
DCM-1 User Manual v1.0
Installation
18
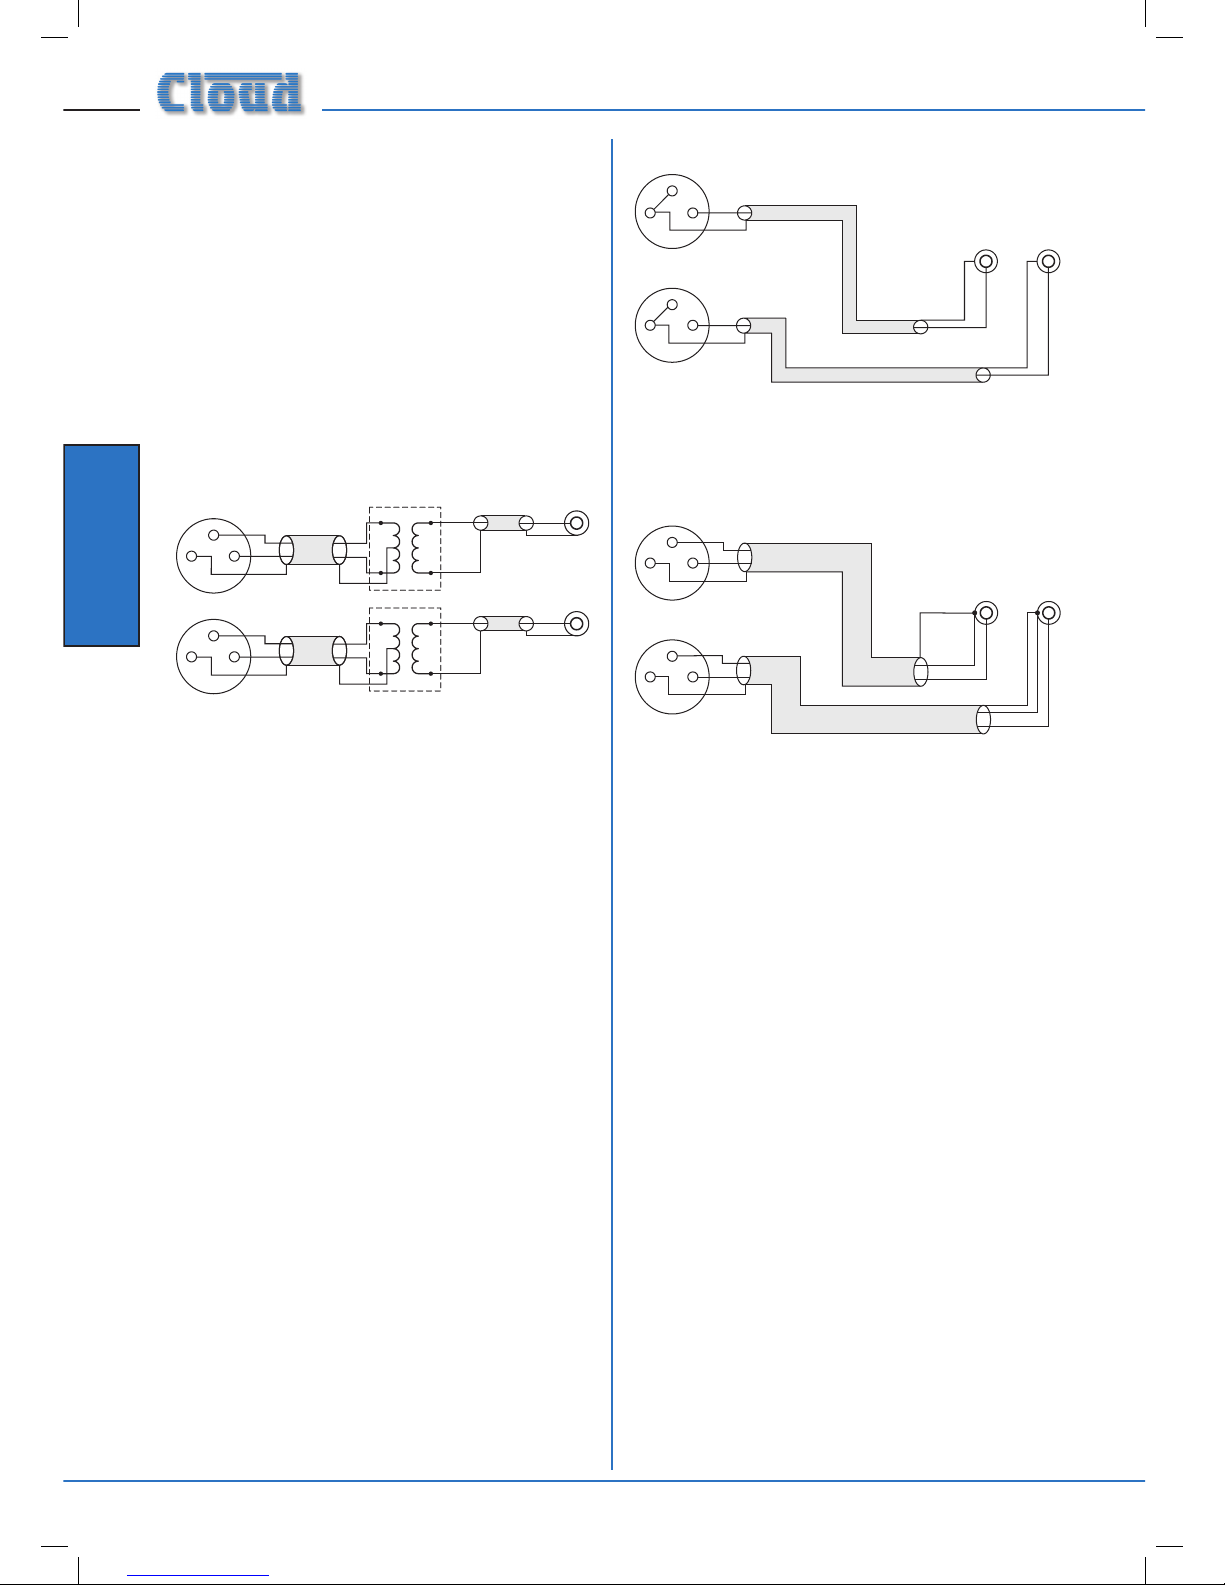
Additional balanced sources
If it is necessary to connect more than one balanced
source to the DCM-1, one of the unbalanced inputs 1 to
7 may be used, but the advantages of balanced connection
will be lost unless a balancing transformer is connected
between the source and the unbalanced input. Suitable
audio transformers, which should have a ratio of 1:1, are
readily available from major audio component suppliers. The
transformer(s) should be mounted as close to the DCM-1 as
practical, and housed in a screened enclosure if they are not
individually screened. The preferred connection method is
shown below.
If transformers are not available, a balanced source may
feed an unbalanced input directly as long as care is taken
over how the connections are made. A variety of design
techniques are in use to implement balanced outputs in
audio equipment, and some designs require different wiring
protocols to others. Installers are advised to check the
manuals with each item for guidance on how the outputs
should be connected to an unbalanced input.
However, the wiring methods shown below will work in a
large number of cases. If hum or other distortion is found to
result, try disconnecting the ‘cold’ leg of the balanced output
(pin 3 on XLRs).
Always avoid using pre-made leads of an unnecessary length.
An alternative method of providing additional balanced
sources is to use BE-1 remote input plates connected to
EXTENSION PORTS 1 to 4; these could be installed
adjacent to the DCM-1 in such a situation.
LEFT
+
-
SCN
Unbalanced
inputs
SCN
LEFT
+
-
SCN
Audio balancing transformers
RIGHT
+
-
SCN
Unbalanced
inputs
SCN
RIGHT
+
-
SCN
pin 1 ground
pin 2 hot
pin 3 cold
Balanced outputs (XLRs):
1 2
3
1 2
3
Balanced source to unbalanced inputs via transformers
Unbalanced
inputs
LEFT
RIGHT
+
+
-
-
SCN
SCN
+
+
-
-
SCN
SCN
When using twin-and-screen
cable, join ‘cold’ to screen at
DCM-1 end
LEFT RIGHT
pin 1 ground
pin 2 hot
pin 3 cold
Balanced outputs (XLRs):
1
2
3
1
2
3
Balanced source to unbalanced input - using twin-and-screen cable
1
2
3
Unbalanced
inputs
LEFT
RIGHT
+
+
SCN
SCN
+
+
SCN
SCN
When using single-core cable,
join ‘cold’ to screen at the
source
LEFT RIGHT
pin 1 ground
pin 2 hot
pin 3 cold
Balanced outputs (XLRs):
1
2
3
Balanced source to unbalanced input - using single-core cable
Page 21
Installation
DCM-1 User Manual v1.0 19
CDR-1 Remote Control Panels
Multiple CDR-1 remote control panels may be connected to
the DCM-1 either by wiring them directly and individually,
or by “daisy-chaining” them together. In most installations,
a combination of these methods is likely to be the most
convenient solution from the point of view of practical
cabling. The diagrams below illustrate the types of wiring
schemes that may be employed; almost any variation on
these is permissible.
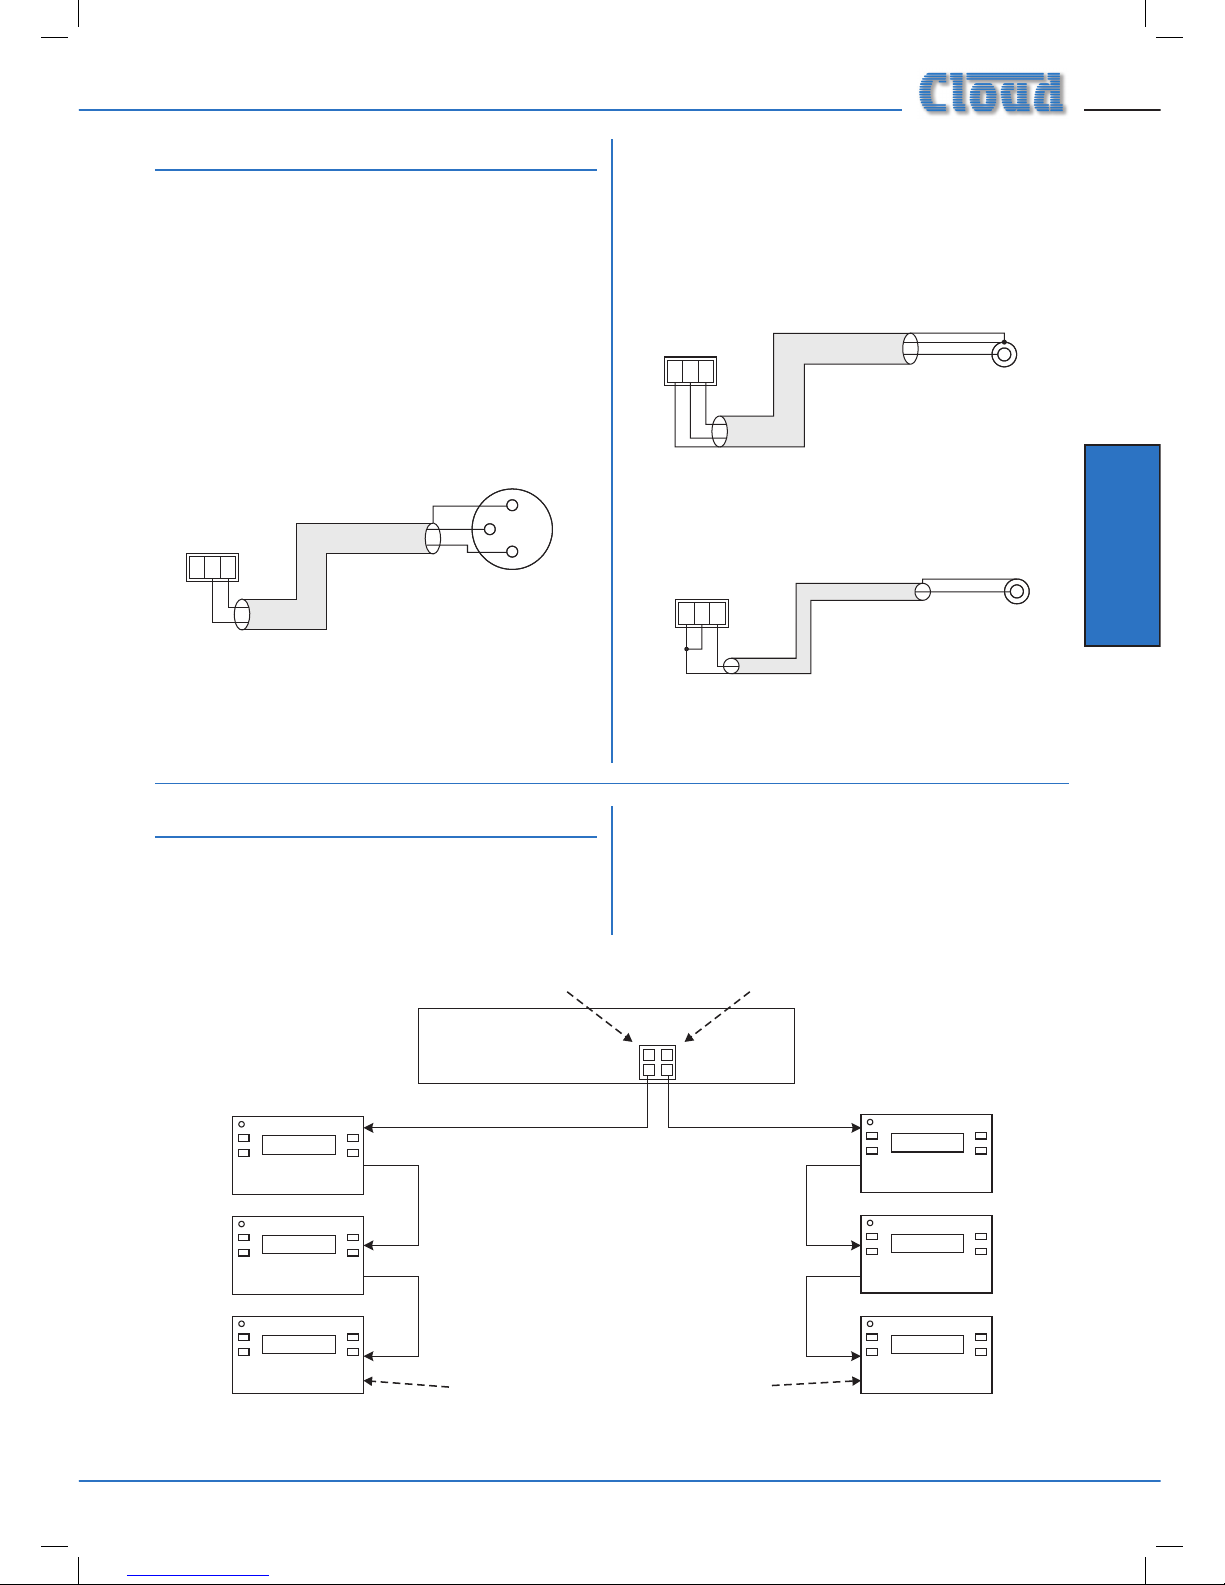
Zone outputs
Connect the inputs of the power ampliers feeding the
loudspeakers for each zone to ZONE 1 to 8. Note that
zone outputs 1 and 2 are stereo; if only one set of speakers
are being used in these zones, they may be connected to
either connector.
Standard connection
All 8 outputs provide balanced connection for wiring to
professional/industrial power ampliers with balanced inputs
(typically on XLRs). In this case, wire as the diagram below.
Note that the cables’ screens are not connected at the
source end.
Unbalanced inputs
If audio ampliers with only unbalanced inputs are being
used (e.g. hi‑ ampliers), the following wiring should be
adopted:
Always avoid using pre-made leads of an unnecessary length.
Zone
i
+
h
-
Zone
i
+
h
-
Zone
i
+
h
-
Zone
i
+
h
-
Zone
i
+
h
-
Zone
i
+
h
-
CDR-1 PORTS
PORT
A
PORT
A
PORT
B
PORT
B
Termination ON
All other terminations are OFF
Port A termination ON
Termination ON
Port B termination ON
DCM-1
IN
IN
IN
OUT
OUT
IN
IN
IN
OUT
OUT
Network diagram 1
1 2 3
+
-
+
-
12
3
SCN
pin 1 ground
pin 2 cold
pin 3 hot
DCM-1 Balanced output:
Balanced input (e.g. XLR):
pin 1 ground
pin 2 hot
pin 3 cold
Balanced out to balanced destination
1 2 3
+
-
+
-
SCN
SCN
pin 1 ground
pin 2 cold
pin 3 hot
DCM-1 Balanced output:
Unbalanced input
(e.g. phono)
When using twin-and-screen
cable, join 'cold' to screen
at the amplifier end
Balanced out to unbalanced destination using twin core cable
1 2 3
+
+
SCN
SCN
pin 1 ground
pin 2 cold
pin 3 hot
DCM-1 Balanced output:
Unbalanced input
(e.g. phono)
When using single-core
cable, join 'cold' to screen
at the DCM-1
Balanced out to unbalanced destination using single core cable
Page 22

DCM-1 User Manual v1.0
Installation
20
Note that in the above diagrams there is deliberately no
indication as to which zones any of the CDR‑1s are in; this is
because the system imposes no restriction on their physical
location. Interconnection may be made purely on the basis of
wiring convenience.
Zone
i
+
h
-
Zone
i
+
h
-
Zone
i
+
h
-
Zone
i
+
h
-
CDR-1 PORTS
PORT
A
PORT
A
PORT
B
PORT
B
Port A termination ON
Termination ON
All other terminations are OFF
DCM-1
IN
IN
IN
IN
OUT
OUT
OUT
Network diagram 3
Zone
i
+
h
-
Zone
i
+
h
-
Zone
i
+
h
-
Zone
i
+
h
-
CDR-1 PORTS
PORT
A
PORT
A
PORT
B
PORT
B
Termination ON
All other terminations are OFF
Termination ON
Termination ON Termination ON
DCM-1
IN
IN
IN
IN
Network diagram 2
Page 23

Installation
DCM-1 User Manual v1.0 21
Connections
CDR-1s are connected to the DCM-1’s CDR-1 PORTS
using standard unscreened CAT-5 cable and RJ45 connectors.
It may be possible to use pre-made CAT-5 “patch cables”
to connect any CDR‑1s installed close to the DCM‑1;
otherwise CAT-5 cable and crimp RJ45 plugs should be used.
NOTE: All CAT‑5 cabling should be wired “pin‑to‑pin”;
“crossed” or “null” cables will not work.
Wire the RJ45 connectors as per the pinout diagram at
page 54.
Note that the single CAT-5 interconnection provides DC
power as well as data. A full pin allocation of the
CDR-1 ports can be found in the Appendix at the end of this
manual.
Any of the four CDR-1 PORTS may be used. Two of these
are labelled PORT A and the other two PORT B, but the
four are electrically identical. However, use of Port A/Port B
has relevance to how terminations are set (see below).
The CDR-1 is equipped with two RJ45 connectors, labelled
POWER IN and POWER OUT. The “rst” CDR‑1 in a
daisy-chain wiring system should be connected to the
DCM-1 using its POWER IN connector. The POWER OUT
connector on this CDR-1 should be connected to the
POWER IN of the next CDR-1 in the chain, and so on until
the last CDR-1 in the chain.
Network Terminations
The CAT-5 wiring connecting the DCM-1 and CDR-1s is
essentially a data network, and as such, must be correctly
terminated. Both the DCM-1 and CDR-1 are provided with
means of setting their network terminations ON or OFF.
The rule governing terminations is:
Devices (DCM-1 or CDR-1) at the ends of a cable run
must have their terminations set ON.
All intermediate devices must have their terminations
set OFF.
If both connectors on the same DCM-1 CDR-1 PORT
(either PORT A or PORT B) are being used, the
DCM-1 may be considered as an intermediate device,
and its termination should be set to OFF.
The correct termination setting is indicated for each device
in the three network examples illustrated above. Note that
in Network Diagram 1, the DCM-1’s Ports A and B are both
in use, but only one connector is used on each. The ports
are thus at the ends of the chains, and their terminations
must therefore be set ON. In Network Diagram 2, all four
ports are in use, so the DCM-1 is “mid-chain” with respect
to both ports, so both terminations should be set OFF.
There are two network terminations in the DCM-1, one for
each port. These are set by internal jumpers J6 (Port A) and
J13 (Port B). See page 51 for details of jumper locations.
The port termination is ON when the jumper is in place.
Remove the jumper (carefully, with a pair of long-nosed
pliers) to set the port termination OFF.
The CDR-1 network termination is set by jumper J2. This
has two possible positions, marked MID (termination OFF)
and END (termination ON).
•
•
•
J2 J1
MID
END
ON
OFF
J2 J1
MID
END
ON
OFF
Diagrams showing CDR-1 jumper settings for :
a) termination OFF (MID), b) termination ON (END).
Note Jumper J1 not shown.
J2 J1
MID
END
ON
OFF
POWER
OUT
POWER
IN
FROM
DCM-1
EXT POWER
RJ45 SOCKETS FOR
DATA
INTERCONNECTION
CO-AXIAL SOCKET
FOR EXTERNAL PSU
TO NEXT
CDR-1
Data and external power connections on the CDR-1
Page 24

DCM-1 User Manual v1.0
Installation
22
Cable length and DC power considerations
The DCM‑1’s internal PSU has sufcient capacity to power 8
CDR‑1s (i.e., one per zone). If a system requires more than
8 in total, one or more additional PSUs will be required.
The maximum recommended cable length of the CDR-1
network is 1km. This gure applies either to the total cable
run between the “farthest” CDR-1 and the DCM-1 if a single
daisy-chain of CDR-1s has been employed (see Network
Diagram 3), or to the total run between the most remote
CDR-1s if the DCM-1 is in the “middle” of the chain (i.e.
multiple daisy-chains of CDR-1s, see Network Diagram 1).
Cable runs longer than this may work satisfactorily, but this
cannot be guaranteed. The probability of correct operation
is a function of cable length, the number of CDR-1s daisychained, and how many of them are at a distance from the
DCM-1 close to the maximum cable length.
If any CDR-1s in a system are found to operate unreliably,
it may be necessary to power some independently, using a
local PSU. The Cloud CPM-PSU is suitable for this purpose,
and should be connected to the EXT POWER socket in
the rear of the CDR-1. Note that any further CDR-1s
connected to the POWER OUT connector will be powered
by the external PSU. (See page 21)
If a third-party external PSU is to be used, it should be rated
at either 12 - 24V DC or 9 - 17V AC. Each CDR-1 takes
50mA at 12V, so the current capability of any PSU should
also be checked. See page 53 for details of PSU and current
ratings.
Mic and Line input plates
Cloud ME-1, LE-1 and BE-1 remote input plates may be
connected to the DCM-1 in a similar manner to that
described for the CDR-1 remote controls, except that
screened CAT-5 cable should be used.
Remote plates may be “daisy-chained” for wiring
convenience, providing that the following guidelines are
observed:
ME-1 mic input plates cannot co-exist on the same
“daisy-chain” as LE-1 line input plates or BE-1 balanced
input plates.
LE-1 and BE-1 plates can co-exist on the same “daisychain”.
If more than one plate is used for remote inputs
simultaneously, a mixed sum of all sources will be
presented to the DCM-1 input.
Note that the two mic inputs on the ME-1 remote plate
are summed together and passed to the DCM-1 as a mono
signal. The two inputs on the LE-1 and BE-1 are intended for
stereo use, and these plates’ connections to the DCM-1 are
in stereo.
The diagram below illustrates some of the connection
possibilities. Three ME-1, two LE-1 and one BE-1 plates are
shown. Microphone Inputs 1 & 3 and Extension Ports 3 & 4
are chosen for reasons of drawing clarity; any could be used
in practice.
•
•
•
LINK IN
OUT
OUT
MICROPHONE INPUTS
1
2
3
4
EXTENSION PORTS
1
234
OUT
DCM-1
OUT
LINK IN
OUT
OUT
BALANCEDMUSIC INPUT
LEFT
INPUT
RIGHT
INPUT
PEAK
MUSICINPUT
TRIM
-12 +12
dB
LINE
LEVEL
R
L
HEADPHONE
LEVEL
INPUTS
PEAK
MUSICINPUT
TRIM
-12 +12
dB
LINE
LEVEL
R
L
HEADPHONE
LEVEL
INPUTS
ME-1
ME-1
ME-1
LE-1
LE-1
BE-1
MICROPHONEINPUT
LEVEL
+
LF HF
+ +
LF HF
+
OFF
10
MIC1
LEVEL
OFF
10
MIC2
MICROPHONEINPUT
LEVEL
+
LF HF
+ +
LF HF
+
OFF
10
MIC1
LEVEL
OFF
10
MIC2
MICROPHONEINPUT
LEVEL
+
LF HF
+ +
LF HF
+
OFF
10
MIC1
LEVEL
OFF
10
MIC2
Mic/Line input plates
Page 25

Installation
DCM-1 User Manual v1.0 23
Connections and wiring
CAT-5 cables used to interconnect remote input plates carry
low-level audio. To minimise noise and interference from
outside sources, only screened CAT-5 should be used. Only
use shielded RJ45 plugs when wiring this part of the system,
bonding the foil screen of the cable to the metal screening
can of the plug.
ME-1 mic input plates should be connected to the RJ45
connectors labelled MICROPHONE INPUTS on the
DCM-1.
LE-1 line input plates and BE-1 balanced line input plates
should be connected to the RJ45 connectors labelled
EXTENSION PORTS on the DCM-1. Do not connect
any music sources to the phono sockets corresponding to
the Extension Ports being used.
The remote plates all have two RJ45 sockets, labelled
OUTPUT and LINK. The “rst” plate in a daisy‑chain
wiring system should be connected to the DCM-1 using its
OUTPUT socket. The LINK socket on this plate should be
connected to the OUTPUT of the next plate in the chain,
and so on until the last plate in the chain.
Note that the single CAT-5 interconnection provides
DC power as well as audio. A full pin allocation of the
microphone inputs and extension ports can be found in the
Appendix at the end of this manual.
The DC power consumption of the active circuitry is quite
low, and no PSU capacity problems should be experienced
in the vast majority of installations. Refer to page 53 for PSU
and current ratings.
LINK
OUTPUT
BE-1
ME-1
LE-1
OUTPUT
LINK
OUTPUT
LINK
Page 26

DCM-1 User Manual v1.0
Installation
24
CDPM Terminations
The rules that apply to terminating a network of CDR-1
remote control panels also applies to multiple CDPM paging
microphones. The DCM-1 and a set of microphones should
be considered as a “daisy-chain”, and buss terminations
should be set ON in the two devices at the “ends” of the
chain, and OFF in all others. The interconnection diagram
above indicates how these rules are applied in the various
possible wiring schemes.
In the simplest implementation of just one paging
microphone, the terminations should be set ON at both
the DCM-1 and the microphone.
If two or more microphones are daisy-chained to the
DCM-1’s IN socket, terminations must be ON at the
DCM-1 and the “end” microphone only.
If two DCM-1s are daisy-chained using the IN and
THRU connectors, terminations at the “ends” of the
chain should be ON. In the example shown above, this
will be at the paging microphone and DCM-1 #2. The
termination in DCM-1 #1 should be set to OFF (as it is
in the “middle” of the chain).
•
•
•
Refer to the CDPM Setup and Installation Guide (supplied
with each CDPM) for information on setting the buss
termination in the microphones.
The DCM-1’s CDPM buss termination is set by the internal
jumper J2. The termination is set ON when the jumper is
in place. Remove it to set the termination OFF. See also
page 51.
CDPM DC power
The DCM-1 can supply DC to power one CDPM paging
microphone. Powering of a microphone in this way is
enabled with the internal jumper J14, which is set ON as
the factory default. If the microphone connected to the
DCM-1’s CDPM IN port is self-powered, or powered
from elsewhere in a CDPM system, this jumper should be
removed. See page 53 for details of PSU and current ratings.
Adjusting paging levels
Separate controls are available at the rear panel for setting
CDPM microphone sensitivity and the paging level sent to
each Zone. Full details on adjusting these can be found at
page 44.
Cloud CDPM Paging Microphones
The DCM-1 fully supports the Cloud Paging Interface Buss
implemented across the CDPM range.
Connections and wiring
The DCM-1 is equipped with two RJ45 sockets for
connection of Cloud CDPM paging microphones. The
sockets are labelled IN and THRU. CDPM paging
microphones are similarly equipped with two RJ45 sockets,
labelled IN and OUT.
If the system being installed includes one microphone, its
OUT socket should be connected to the IN socket on the
DCM-1.
If the system requires more than one microphone, the
additional microphones should be “daisy-chained” together.
For example, two microphones would be wired by
connecting the OUT socket of one to the IN socket on the
DCM-1 as above, and then connecting the OUT socket of
the next microphone to the IN socket of the rst.
The diagram on the right illustrates the various methods
of connection. Note that the third example illustrates the
method of interfacing a CDPM-16 to two DCM-1s. In this
case, the CDPM THRU connector on the rst DCM‑1 is
connected to the IN on the second, and the CDPM Zone
Offset of the second would be set to 8. This would allow it
to correctly interpret commands from paging buttons 9-16
on the CDPM-16. See page 34 for full details of how to set
the CDPM offset.
NOTE: The CDPM THRU connector is only intended for
connection of additional DCM-1 units, not for additional
CDPM paging microphones.
CDPM paging microphones can be connected to the DCM-1
and each other using standard CAT-5 cable. If crimping RJ45
plugs to install cabling, use the pinout on page 54. A full
pinout of the CDPM Paging Interface Buss can be found in
the appendix at the end of this manual.
IN
OUT
OUT
CDPM
IN
THRU
DCM-1
OUT
OUT
Termination ON
Termination ON
Termination OFF
CDPM
IN
THRU
DCM-1
CDPM
IN
THRU
CDPM
IN
THRU
DCM-1 #2
DCM-1 #1
Termination ON
Termination
ON
Termination ON
Termination OFF
Termination
ON
Connecting Paging systems
Page 27

Installation
DCM-1 User Manual v1.0 25
Zone paging outputs
If a CDPM paging microphone system is the only one being
used with a DCM-1, the DCM-1’s Paging Access connector
may be used to provide per‑zone paging control outputs.
These can be used, for example, to activate level restoration
in 100v line systems where local speaker volume controls
are installed. When a zone is paged from the CDPM system,
the control output for that zone activates (pulls down to 0v).
The Paging Access connector’s default conguration is as a
zone input connector for use with 3rd.‑party paging systems.
Re-assignment as an output connector is made via the menu
system. See page 34 for details.
The connector is a 10-way Phoenix type. The pinout is given
in the table below:
PIN FUNCTION
1 0V
2 Zone 1 active
3 Zone 2 active
4 Zone 3 active
5 Zone 4 active
6 Zone 5 active
7 Zone 6 active
8 Zone 7 active
9 Zone 8 active
10 +12V
For many systems, the DCM-1’s internal PSU will provide
sufcient current to activate an external relay in each zone.
Relays used in this way should have a coil voltage of 12v dc
and draw less than 60mA. The “Zone active” pins (2 - 9)
should be wired to one side of the level restoration relay
coils in the relevant zones. The other side of the relays
should be commoned together and connected to the +12v
pin (10). The diagram below illustrates this.
If the level restoration relay coils draw more than 60mA
per zone, additional intermediate relays and an external PSU
must be installed. The basic wiring scheme shown above is
used, but now the “External relays” will be the intermediate
relays instead of the restoration relays themselves. The
restoration relays are then wired via the intermediate
relays’ contacts to the external PSU, providing full electrical
isolation between the DCM-1 and the external level
restoration system. This is shown in the next diagram.
An external PSU should also be used in systems using relays
with a coil voltage higher than 12v. The “Zone active” pins
are rated up to 24v, so relays of up to 24v may be switched
directly as long as the current drawn remains below 60mA.
If either the maximum current rating of 60mA or the
maximum voltage rating of 24v is exceeded, intermediate
relays must be installed as per the above diagram.
With all wiring schemes, attention must be paid to relay
polarity when wiring such a system, as the external relays
will almost certainly have a diode in parallel with the relay
coil to limit voltage spikes when the relay releases. Ensure
that the positive (+ve, or red) terminal of the relay coil is
commoned to the +12v pin (pin 10) of the Paging Access
connector, or the positive terminal of an external PSU. The
negative (-ve, or black) terminal of the relay coil should
always be wired to the “Zone active” pin (2 - 9).
See page 53 for details of the DCM-1’s PSU capabilities.
PAGING ACCESS CONNECTOR
+12v10v
865
4
3
2 7
External relays
(3 shown)
+ + +
---
External relays - internally powered
Intermediate relays
(3 shown)
EXT
PSU
+
-
PAGING ACCESS CONNECTOR
+12v
1
0v
8
6
5
4
3
2
7
+ + +
---
+
-
+
-
+
-
Restoration
relays
Level Restoration relay wiring: a) using intermediate relays for
isolation
PAGING ACCESS CONNECTOR
+12v10v
865
4
3
2 7
External
relays
(3 shown)
EXT
PSU
+
-
+ + +
---
Level Restoration relay wiring: b) using external PSU for relays
with a higher coil voltage than 12v.
Page 28

DCM-1 User Manual v1.0
Installation
26
3rd.-party Paging systems
The DCM-1 may be integrated with any paging system which
is able to provide a microphone feed and zone selection by
contact closure.
Paging microphone input
A three pin Phoenix-type connector provides an
electronically-balanced input for an external paging
microphone. This should be connected to the external
microphone using good quality low-noise microphone cable,
using the wiring shown below:
12v phantom power is available at the input for microphones
requiring external power (e.g. electret mics). Phantom
power is enabled by the internal jumper J24. The default
setting for this jumper is with phantom power OFF; move
the jumper to the other position to set phantom power ON.
See page 51 for details of jumper locations.
Adjusting paging levels
Separate controls are available at the rear panel for setting
microphone sensitivity and the paging level sent to each
Zone. Full details on adjusting these can be found at page 44.
Paging Access Connector
The Paging Access connector is used to activate the paging
microphone and to select the zone(s) to which it is to be
routed. It performs this function by default, though it can be
re‑dened in the menu system to provide per‑zone control
outputs when used with Cloud CDPM paging microphones
(see page 25). (Should a system require the use of both
CDPM and third-party paging systems, control outputs will
not be available if the connector is to be used in its “input”
mode.)
Zone activation occurs when one of the “zone active” pins
(2 - 9) is shorted to 0v (available on pin 1). Third-party
paging systems providing per‑zone contact‑closure on zone
selection can thus be easily interfaced by wiring the external
unit to the Paging Access connector as shown below:
The pinout is the same as that given in page 25. Multicore
control cable should be used for the interconnection.
Some 3rd.-party paging systems have a single “page-all”
command output, which activates all zones in use. In this
case, use the wiring scheme shown at ii) above.
PAGING ACCESS CONNECTOR
+12v10v
865
4
3
2 7
PAGE ZONE 1
PAGE ZONE 8
PAGE ZONE 7
PAGE ZONE 6
PAGE ZONE 5
PAGE ZONE 4
PAGE ZONE 3
PAGE ZONE 2
3RD-PARTY
PAGING SYSTEM
i) Individual zone paging
PAGING ACCESS CONNECTOR
+
12v
10v
86
5
4
3
2
7
3RD-PARTY
PAGING SYSTEM
ii) Page-All only
1
2
3
:
1 2 3
+
-
+
-
SCN
pin 1 ground
pin 2 hot
pin 3 cold
Balanced mic:
pin 1 ground
pin 2 cold
pin 3 hot
DCM-1 Paging
Microphone input:
Paging mic wiring
Page 29

Installation
DCM-1 User Manual v1.0 27
Visual indication that paging is taking place is given by the
Paging Access LEDs on the front panel. The LED(s) illuminate
to conrm the Zones being paged.
Music Mute
External muting of music is available at the MUSIC MUTE
connector. National or Local Authority regulations governing
such systems may require that normal programme material
(i.e., music) should be muted in an emergency, to ensure that
any emergency messages are clearly audible.
The Music Mute input is on a 2-pin Phoenix-type connector.
It should be connected to the appropriate alarm output on
whichever building management system registers the alarm
(typically the Fire System). The alarm output must be volt-
free; if no such output is available, an intermediate relay or
other isolation device must be installed between the alarm
output and the Music Mute input.
The Mute input can be programmed to operate on either
normally open (NO) or normally closed (NC) contacts via
the menu system (see page 42). The factory default setting is
NO, thus requiring a short-circuit to be applied across the
two pins of the connector for muting to occur.
Visual indication of muting being activated is given by the
Music Mute LED on the front panel.
If the audio system itself is to be used to provide voice alarm
and/or evacuation messages, the DCM-1 can be programmed
to not mute one particular input when Music Mute is made
active. This input can be permanently connected to a sound
store or emergency evacuation microphone, so that when
activated, all inputs will be muted except the emergency
source. If this facility is being used, care should be taken to
ensure the emergency source is not made available to any
zones in normal operation.
Page 30

DCM-1 User Manual v1.0
Conguration
28
SPE
ZONES 1 AND 2 ARESTEREO
ZONES 3...8 ARE MONO
+
MIC PRIORITY
MICROPHONE INPUTS
EQ
VCA
ATTENUATOR
LINE 8
LINE 7
LINE 6
LINE 5
LINE 4
LINE 3
L
R
LINE 2
LINE 1
EXTENSION PORTS
1
2
3
+
+
LINE 8
BALANCED
R
L
LINE 1
LINE 2
LINE 3
LINE 4
MIC 1
MIC 2
MIC 3
MIC 4
GAIN
SOURCE SELECT LOGIC
CDR-1
CDR-1 PORTS
EQ CONTROLBY CDR-1IS ONLY
AVAILABLE INENGINEER MODE
LINE PRIORITY
LOGIC
GAIN ISAPPLIED
ACCORDING TO
SOURCE SELECTED
+
+
EQ
PAGINGACCESS
LOGIC
PAGING
MICROPHONE
INPUT
CDPM IN
CDPM THRU
+
PAGINGACCESS
Z2Z1Z3Z4
Z5
Z6
Z7
Z8
0V
+12V
CDR-1
PORT
A
PORT
A
PORT
B
PORT
B
ONLYRIGHT STEREOSIGNAL
SHOWN FOR CLARITY.
ZONES 3...8. SIGNALSARE SUMMED
TO MONOBEFORE SOURCESELECT.
1
2
3
1
2
3
1
2
3
System Block Diagram
The DCM‑1 can be congured in a variety of ways to suit
all installed situations. Most conguration functions are
accessed through the menu system.
For convenience, the DCM-1’s basic block diagram is
repeated above.
The menu system has two modes: User Mode and Installer
Mode.
User Mode
User Mode is the default menu system mode which is
available at all times. It provides the user with the system
control functions needed on an everyday basis: music
source selection and level control for each zone, and group
activation.
Installer Mode
Access to Installer Mode is key-protected. The user should
ensure that only authorised staff who have been trained
in the DCM‑1’s conguration functions know the key.
Installer Mode allows adjustment of zone EQ, maximum and
minimum levels, microphone assignments, paging and priority
parameters, group membership and all other system setup
parameters.
Installer mode is selected by pressing the INSTALL button,
and entering the key code via the numeric buttons below
the display in response to the prompt Enter Key. The key
is always a 4‑digit number; only digits 1 to 8 are allowed.
The factory default key can be found in the Appendix; users
are strongly urged to change the key as soon as the system
is commissioned. A time‑out applies to Installer Mode; if
no keys are pressed within 45 seconds, Installer mode will
cancel and the unit returns to User Mode.
Section 3 : Conguration
Page 31

Conguration
DCM-1 User Manual v1.0 29
Navigating the menu system
The menu structure is divided into ve submenus:
Music
Routing
System
Priorities
Groups
Each submenu is entered by pressing its dedicated button;
selection is conrmed by its adjacent LED.
The Routing, System and Priorities submenus are only
available in Installer Mode, as are most of the functions in
the Music and Groups submenus.
Front Panel Centre Section
Navigation through all the submenus is performed with the
NEXT FUNCTION button, the rotary control and the eight
numeric buttons. In general, the NEXT FUNCTION button
steps through the selected submenu one function at a time
and the rotary control changes the value of the function’s
parameter. Some submenu functions also make use of the
“press” action of the rotary control. Entry to each submenu
is always at the submenu’s rst function, and each submenu
“loops round” its set of functions, with the rst reappearing
after the last.
The eight numeric buttons are used in various ways, and
may refer to the eight zones, the eight music inputs, the
four microphone inputs and so on, depending on the
menu function currently selected. With most functions, the
numeric buttons’ adjacent LEDs conrm current status.
All menu functions have a time-out period of approx. 45
seconds. If no further adjustment is made within this period,
the menu system reverts to User Mode, Music Menu, Select
Input.
In the description of the submenu options on the following
pages, the function of the various controls is given below the
display image for each option.
Key:
Rotary: the function of the rotary control
Buttons: the function of the numeric buttons 1 to 8
Press: the function obtained by pressing the rotary control
knob inwards.
•
•
•
•
•
Context-sensitive Help messages
The DCM-1’s menu system is equipped with simple Help
text for user guidance. If no adjustment is made within 10
seconds of selecting a menu function, text appears on the
display advising the operation of the rotary control and
numeric buttons for the particular function.
An example is shown below:
Page 32

DCM-1 User Manual v1.0
Conguration
30
User Mode
Only three menu functions are available to the User – two
in the Music menu and one in the Groups menu. The
required menu is selected by pressing the MUSIC or
GROUPS button. The two functions in the Music menu are
accessed by pressing the NEXT FUNCTION button
adjacent to the display.
Select Input
Source Name
Level
|||||||||
Group 1
Enable X
MUSIC MENU
GROUPS MENU
User Menu Flow Diagram
Music menu
Select Input
Rotary:
Buttons:
selects Input
select zone
The SELECT INPUT function is where the user selects
which music input source is to be routed to each Zone.
The eight numeric buttons correspond to the eight Zones;
select the one to have an input assigned. If a Group is
enabled, selecting any Zone that is a member of that Group
selects all the Zones in the Group (see Group Enable); this is
indicated by multiple LEDs being illuminated.
The rotary control scrolls through the available inputs; these
will be displayed as Input n unless the inputs have been renamed, in which case the names will be shown (see page 36
for details of renaming inputs). Selection is restricted to
those inputs which have been enabled for the zone (the
default is for all inputs to be enabled. See page 33).
Assignment of the music source takes effect as soon as the
input name is displayed; no additional “presses” are required
for the routing to change.
Note that this menu function is the default, and that all
other menu functions time out after approx. 45 seconds of
no activity. The menu system then reverts to Music Menu,
SELECT INPUT.
Level
Rotary:
Buttons:
sets Zone Level
select Zone
The LEVEL function sets the volume of music in each Zone.
The eight numeric buttons correspond to the eight Zones;
select the one to have its level adjusted. If a Group is
enabled, selecting any Zone that is a member of that Group
selects all the Zones in the Group (see below).
The rotary control adjusts the audio level in the selected
Zone (or Group). An indication of relative level is given on
the lower row of the display in the form of a bargraph.
Groups menu
Group Enable
Rotary:
Press:
Buttons:
selects Group
enable/disable Group
LEDs confirm Group membership
The GROUP ENABLE menu function allows Groups of
Zones to be enabled or disabled. The Groups must have
been previously dened – see page 43).
The rotary control selects the Group (1 to 4) to be enabled/
disabled. These will be displayed as Group n unless they
have been renamed, in which case the names will be shown
(see page 37 for details of renaming Groups).
Press the rotary control to enable or disable the Group. The
lower row of the display will show either a cross (X) or a
tick (ü) to conrm that the Group is disabled or enabled
respectively.
The LEDs above the numeric buttons illuminate in this
menu function to conrm Zone membership of the selected
Group. The buttons themselves are not used.
Page 33

Conguration
DCM-1 User Manual v1.0 31
Installer Mode
The remainder of the DCM-1’s menu system is only available
in Installer Mode; this is accessed by pressing the INSTALL
button and entering the key in response to the display
prompt. Installer Mode self-cancels after 45 seconds if no
further adjustments are made.
Music Menu
Select Input
This function is described above, in User Mode.
Level
This function is described above, in User Mode.
Treble
Rotary:
Buttons:
adjusts HF EQ
select Zone
This adjusts the music high-frequency EQ in each Zone. The
equaliser is a 6dB/octave shelving lter with a 3dB point at
10kHz.
The eight numeric buttons correspond to the eight Zones;
select the one to have its EQ adjusted.
The rotary control adjusts the HF EQ in the selected Zone.
The range of adjustment available is ±14dB in 2dB steps.
Mid
Rotary:
Buttons:
adjusts MF EQ
select Zone
This adjusts the music mid-frequency EQ in each Zone. The
equaliser is a simple bell lter with a centre frequency of
1.2kHz.
The eight numeric buttons correspond to the eight Zones;
select the one to have its EQ adjusted.
The rotary control adjusts the MF EQ in the selected Zone.
The range of adjustment available is ±14dB in 2dB steps.
Bass
Rotary:
Buttons:
adjusts LF EQ
select Zone
This adjusts the music low-frequency EQ in each Zone. The
equaliser is a 6dB/octave shelving lter with a 3dB point at
50Hz.
The eight numeric buttons correspond to the eight Zones;
select the one to have its EQ adjusted.
The rotary control adjusts the LF EQ in the selected Zone.
The range of adjustment available is ±14dB in 2dB steps.
Select Input
Input 1
Level
|||||||||
Treble
0dB
Mid
0dB
Bass
0dB
Minimum Level
-oodB
Maximum Level
0dB
Sig ||
Gain +2dB
Music Menu Flow Diagram
Page 34

DCM-1 User Manual v1.0
Conguration
32
Input Gain
Rotary:
Buttons:
adjusts Gain
select Input
The INPUT GAIN function allows adjustment of the level of
each music input, so that sources with different output levels
can be matched in volume. This adjustment will affect the
audio level of the selected source in all Zones.
The gain control range is deliberately restricted to ±12dB,
but it should permit input levels to be adjusted to suit most
sources. Should it prove inadequate, the output level of the
source should be adjusted instead.
Adjustment of input gain is not available for sources
connected via LE-1 and BE-1 remote input plates. The
presence of these plates at the Extension Ports is detected,
and the gain on inputs in use is then xed at ‑6dB. In these
cases, input gain should be adjusted with the controls
provided on the input plates themselves or at the source
itself.
The eight numeric buttons correspond to the eight line
inputs; select that to be adjusted.
The rotary control adjusts the input gain. The range of
adjustment available is ±12dB in 1dB steps.
A bargraph meter is displayed on the top row of the LCD.
It indicates input signal level; the gain should be adjusted so
that the deection reaches the “target area” at the right‑
hand end, indicated by horizontal lines.
Maximum Music Level
Rotary:
Buttons:
sets Level
select Zone
This menu function allows a maximum music level to be set
for each Zone. This is useful when audio ampliers of similar
ratings are being used for each Zone, but different music
volumes are required in the various Zones. Once set, users
will not be able to raise the volume for a Zone above the
preset maximum either from a CDR-1 remote control in the
Zone or from the DCM-1 itself.
The eight numeric buttons correspond to the eight Zones;
select that to be adjusted. The Maximum Level setting is
per-Zone only; the function is disabled if a Zone which is
a member of a currently-enabled Group is selected. If the
Maximum Level setting cannot be altered, check the settings
in the GROUP ENABLE function (in the Music menu).
The rotary control sets the maximum output level for the
selected Zone. The range of adjustment is from 0dB (the
default) to -62dB in 1dB steps, where 0dB means that no
restriction on maximum level is applied.
Note that it is not possible to set the Maximum Level equal
to or lower than any Minimum Level which has been set (see
below). Thus if the Minimum Level for a Zone has been set
to -30dB, the Maximum Level must be in the range 0dB to
-29dB.
Minimum Music Level
Rotary:
Buttons:
sets Level
select Zone
This menu function allows a minimum music level to be set
for each Zone. This prevents users from lowering the music
volume in a Zone below a preset minimum (or turning it
down completely) either from a CDR-1 remote control in
the Zone or from the DCM-1 itself.
The eight numeric buttons correspond to the eight Zones;
select that to be adjusted. As with Maximum Level, this
function is disabled for Zones belonging to enabled Groups.
The rotary control sets the minimum output level for the
selected Zone. The range of adjustment is from -ºdB (the
default) to -1dB in 1dB steps, where -ºdB means that no
restriction on minimum level is applied, and that the volume
in the selected Zone can be reduced to zero.
Note that it is not possible to set the Minimum Level equal
to or higher than the Maximum Level which has been set
(see above). Thus if the Maximum Level for a Zone has been
set to -10dB, the Minimum Level must be in the range -ºdB
to -11dB.
Page 35

Conguration
DCM-1 User Manual v1.0 33
Routing Menu
Enable Mic Inputs
Rotary:
Buttons:
selects Zone/Group
enable/disable Mic Inputs
If ME-1 remote mic input plates form part of the system, it is
likely that they will not be used all the time, and that any
mics connected to them will not necessarily need to be
heard in the same Zone(s) on every occasion. The MIC
INPUTS menu function allows the operator to activate each
of the DCM-1’s microphone inputs as required, and to
determine which Zone(s) each is routed to.
The DCM-1 imposes no restrictions on mic routing, and
it is important to note that any of the four Mic Inputs may
be routed to any Zone, regardless of the physical location
within the installation of the ME-1 plates connected to a
particular input.
In practice, many installations will only ever require a
microphone input to route to the Zone where that
microphone is physically connected. The rotary control
selects the Zone; these will be displayed as Zone n unless
the Zones have been renamed, in which case the names will
be shown (see page 37 for details of renaming Zones).
Note that rotating the control “beyond” Zone 8 allows
Groups 1 to 4 to be selected as well. This permits use of
microphones to be enabled in some areas only when a
Group is in use.
The rst four numeric buttons correspond to Mic Inputs
1 to 4. Default assignment is for all Mic Inputs to be OFF.
Pressing a key enables that Mic Input for the selected Zone
or Group; a second press disables it. Note that the keys’
illumination indicates current Mic Input-to-Zone/Group
assignment at all times.
Because ME-1 remote mic input plates can be “daisychained”, enabling one of the DCM-1’s Mic Inputs will enable
all ME-1 plates connected to that input.
No separate mic level control is available on either the
DCM-1 or CDR-1. Adjustment of microphone volume
should be made from the controls on the ME-1 plates
themselves.
Input Enable
Rotary:
Buttons:
selects Zone/Group
enable/disable Music Inputs
In some installations, it may be desirable to restrict the range
of music inputs which can be selected in one or more zones.
The INPUT ENABLE menu function allows the operator to
determine which Music Inputs are available for selection in
each Zone. The default setting is for all Music Inputs to be
available in every Zone. If some inputs are disabled for a
particular Zone, they will no longer appear on-display to the
user in the SELECT INPUT function of the Music menu in
either Installer or User modes for that Zone. They will also
be removed from the display on any CDR-1 remote controls
assigned to that Zone.
The rotary control selects the Zone in which music
inputs are to be enabled or disabled. Note that rotating
the control “beyond” Zone 8 allows Groups 1 to 4 to be
selected as well to permit source to be enabled for Groups
independently from Zones.
The eight numeric buttons correspond to the eight Music
Inputs. Default assignment is for all inputs to be enabled
for all eight Zones and all four Groups. Pressing a button
disables that Music Input from selection in the currently-
displayed Zone or Group; a second press enables it. Note
that the LEDs’ illumination indicates the current per-Zone
availability of inputs at all times.
CDR Zone Offset
0
CDPM Zone Offset
0
Access Connector
Input
Zone 1
Input Enable
Zone 1
Mic Inputs
Routing Menu Flow Diagram
Page 36

DCM-1 User Manual v1.0
Conguration
34
Congure Access Connector
Rotary: selects Input or Output mode
This menu function sets whether the rear panel Paging
Access Connector (see page 16, Item 7) is to operate as an
input or an output.
The default setting is Input. This congures the Connector
to be used for Zone selection with an 3rd.-party paging
system. The alternative setting, Output, should be used
when the DCM-1 is connected to a Cloud CDPM paging
microphone(s), and per‑zone contact closures are required
for volume restoration. See page 24 for full details of how to
use the Paging Access Connector.
Use the rotary control to change the setting. The numeric
buttons are not used in this function.
CDPM Zone Offset
Rotary: sets Offset
The purpose of the CDPM Zone Offset menu function is to
permit Cloud CDPM paging microphones to address more
than 8 zones.
The CDPM system can address up to 16 Zones (modeldependent). To permit paging of Zones 9 and higher in a
system utilising two DCM‑1s, a xed numeric offset of 8
should be set in the “second” DCM-1 (and left at the default
value of 0 in the “rst”). With the rst DCM‑1 feeding audio
to Paging Zones 1 to 8 and the second to Paging Zones 9 to
16, correct paging of the higher-numbered Zones will result.
The rotary control is used to adjust the offset value in the
range 0 (the default) to 15. Values other than 0 or 8 will only
be applicable to hybrid systems composed of a DCM-1 and
mixers of some other type. The numeric buttons are not
used in this function.
CDR Zone Offset
Rotary: sets Offset
DCM-1s may be linked together via the CDR-1 buss to
allow systems with more than 8 zones to be congured. To
maintain the freedom of CDR-1 network wiring, a CDR
Zone Offset is applied to the second (and subsequent)
DCM-1s, in order that the CDR-1s are able to recognise
that the system comprises 16 (or more) zones.
Use the rotary control to set the CDR Zone Offset on the
second (and subsequent) DCM-1s. The offset is in multiples
of 8.
For a 16‑zone system using two DCM‑1s, an offset of +8 is
applied to the “second” DCM-1, whose outputs feed Zones
9 to 16. The “rst” DCM‑1, whose outputs feed Zones 1
to 8 is left with an offset of zero. With the CDR‑1 network
connected to both DCM‑1s, all 16 zones will now be
available to each CDR-1 for assignment.
Page 37

Conguration
DCM-1 User Manual v1.0 35
System Menu
CDR Zone Setup
select ZoneButtons:
The CDR ZONE SETUP menu function lets the operator
put the CDR-1s in a system into Engineers Mode. In this
mode, per-Zone output EQ can be adjusted locally, in the
zone itself. This permits much faster and easier optimisation
of the sound as the adjustment is made from the CDR-1(s)
rather than from the DCM-1.
The eight numeric buttons correspond to the eight Zones;
select the Zone(s) where EQ is to be adjusted by pressing
the appropriate key(s). The default is for EQ Setup Mode to
be OFF for all Zones. A second press exits the mode. Note
that the keys’ illumination indicates current Zone status at
all times.
The rotary control is not used in this function.
Once a Zone has been enabled, pressing the ZONE button
twice on the CDR-1(s) in the Zone will bring up the Enter
Key request (see note below).
Zone
i
+
h
-
Enter Key
When the CDR‑1 key has been entered, the rst EQ
adjustment screen (Treble) opens. Adjustment of HF EQ
can be made with the + and – buttons. The available range is
±14dB, in 2dB steps.
CDR Zone Setup
Zone 1
Stereo X
Edit Input Label
Input 1
Edit Zone Label
Zone 1
Edit Group Label
Group 1
Set Key
1234
RS232 Baud Rate
9600
RS232 Flow
No Flow
Power Up Mode
Factory
Save Defaults
X
Update Firmware
X
Reset Mixer
System Menu Flow Diagram
Page 38

DCM-1 User Manual v1.0
Conguration
36
Further presses of the Zone button allow the MF (Mid) and
LF (Bass) EQs to be adjusted similarly. Pressing the Zone
button from the Bass screen returns the display to the level
adjustment screen. EQ Setup Mode times out after a short
period, after which time the key will need to be re-entered.
Stereo/Mono Zone selection
Rotary:
Press:
selects Zone
changes Mode
This menu function congures Zone outputs 1 and 2 as
either stereo or mono. (Note that Zone outputs 3 to 8 are
always mono.)
The rotary control selects Zone 1 or Zone 2 (by name if
they have been renamed). Pressing the control inwards sets
the Zone output to stereo (ü) or mono (X). The numeric
buttons are not used in this function.
Stereo music sources will be reproduced in stereo in Zones
1 and 2 if they are congured for stereo. Stereo is the
default setting for both Zones 1 and 2.
Rename Inputs
Rotary:
Press:
Buttons:
selects character
moves to next character
select Input
By default, the eight music inputs appear in the display as
Input 1 to Input 8. This menu function allows the operator
to rename them (typically to reect the source type, e.g. CD,
Radio, Jukebox, Server, TV, etc.)
The eight numeric buttons correspond to the eight Music
Inputs; select that to be renamed.
The current name of the selected Input is shown on the
lower row of the display, with the rst character ashing.
Rotating the rotary control changes the character. Clockwise
rotation advances through the alphabet, anticlockwise
reverses. When the required character is ashing, press the
rotary control to select it and advance to the next character.
As well as upper- and lower-case letters of the alphabet,
many non-alphabetical characters are available. The full set, in
the order in which they are presented, is shown below.
(sp) ! ” # $ % & ’ ( ) * + , - . / 0 1 2 3 4 5 6 7 8 9 : ; < = > ? @
A B C D E F G H I J K L M N O P Q R S T U V W X Y Z [ ¥ ] ^ _ `
a b c d e f g h I j k l m n o p q r s t u v w x y z { | }
Note the rst character (obtained by rotating the control
fully anticlockwise) is the space character. The software
automatically interprets two adjacent space characters to
mean the end of the text string; this saves overwriting part
of a long name with multiple spaces when replacing it with a
shorter one.
Zone
i
+
h
-
Treble
0dB
Zone
i
+
h
-
Mid
0dB
Zone
i
+
h
-
Bass
0dB
Page 39

Conguration
DCM-1 User Manual v1.0 37
Rename Zones
Rotary:
Press:
Buttons:
selects character
moves to next character
select Zone
By default, the eight output Zones appear in the display as
Zone 1 to Zone 8. This menu function allows the operator
to rename them (i.e. to allow rapid identication of the
building area).
The eight numeric buttons correspond to the eight Zones;
select that to be renamed.
The procedure used to rename the Zones is otherwise
identical to that described above for Music Inputs.
Rename Groups
Rotary:
Press:
Buttons:
selects character
moves to next character
select Group
By default, the four Zone Groups appear in the display as
Group 1 to Group 4. This menu function allows the
operator to rename them (i.e. to distinguish them more
readily from their component Zones).
The rst four numeric buttons correspond to the four
Groups; select that to be renamed.
The procedure used to rename the Groups is otherwise
identical to that described above for Music Inputs.
Set Key
enter keyButtons:
This menu function enables the DCM-1 Installer Mode key
to be changed from the factory default setting of 1234.
Changing the key from the default to one “less obvious” is
strongly recommended.
The key may be any 4-digit number, but comprised of digits 1
to 8 only.
Enter the new 4-digit key using the eight numeric buttons.
No additional actions are required for the new key to
become active.
RS232 Baud Rate
sets Baud RateRotary:
This menu function sets the data rate (baud rate) of the
DCM-1’s RS232 Control Port. If external control via RS232
does not form part of the system, the setting can be ignored.
Most external control systems are able to operate with a
wide range of baud rates. It may be simpler to set the baud
rate at the controller and leave the DCM-1’s setting at the
default.
The default setting is 9600 baud (displayed as 9600). Use the
rotary control to change the setting. Alternative baud rates
are 300, 1,200, 2,400, 4,800 and 19,200. The baud rate applies
to both data transmit and receive.
The numeric buttons are not used in this function.
RS232 Flow
sets RS232 Flow optionRotary:
Some external control systems require the RS232 ports of
devices under their control to be congured in a certain way,
particularly in regard to the way data ow between the
controller and the device is managed. The two most
common methods of data ow control are Xon/Xoff and
RTS/CTS, alternatively referred to as software control and
hardware control respectively.
The rotary control selects which of these control methods
is applied to the port. A third option, the default, is for no
ow control to be applied.
The numeric buttons are not used in this function.
Note that hardware ow control requires additional pins
on the RS232 port to be connected. See page 52 for more
details.
Page 40

DCM-1 User Manual v1.0
Conguration
38
Power Up Mode
selects Power Up optionRotary:
It will often be desirable for the DCM-1’s settings, such as
input selections, levels, etc., to be automatically restored
when it is re-powered after being off for a period
(intentionally or otherwise). The Power Up Mode function
determines the state the DCM-1 “wakes up” in when it is
powered-up.
The rotary control selects the active Power Up option from
the three available: Factory, Defaults and Last Known.
With Factory set, the DCM-1 will always return to its
original factory settings on power-up. This is the default
option. A list of the factory settings can be found at page 55.
If Power Up Mode is set to Defaults, the settings which
have been saved by the user in the Defaults memory (see
below) are restored. The third option, Last Known, will
restore the DCM-1 to the settings they were in when the
unit was last powered off.
The numeric buttons are not used in this function.
Save Defaults
Press: stores current settings
When the rotary control is pressed in, all the unit’s current
settings are stored in the Default memory. The contents of
this memory is then re-loaded on power-up, if Defaults is
set as the option in the Power Up Mode function (see
above).
The numeric buttons are not used in this function.
Update Firmware
3 times to enable firmware updatePress:
This menu function is used when a rmware update is
installed. See page 54 for full details of rmware Updates.
Pressing the control knob three times in quick succession
prepares the DCM‑1 for the rmware update. The X in the
display changes to a ü. At this point a further press cancels
the procedure. Otherwise, the DCM-1 will install the new
rmware next time it is reset (see Reset Mixer below), or
re-powered.
Neither rotation of the control knob nor the numeric
buttons are used in this function.
Reset Mixer
Press: resets Mixer
This menu function can be used to perform a hardware
reset. This is equivalent to powering the DCM-1 off and back
on again.
Press the rotary control to perform the reset. The unit
exits Installer Mode and the display returns to the User
Mode default. No other front panel controls are used in this
function.
Page 41

Conguration
DCM-1 User Manual v1.0 39
Priorities Menu
Select Priority Line Input
Rotary:
Buttons:
selects Zone/Group
select Input
Any of the inputs can be assigned a Priority Line Input; this
assignment can be made independently for each zone. The
presence of an audio signal on this input activates the
priority routing for the zone, changing its input selection to
the Priority Line Input. This forced priority continues for as
long as the audio signal remains. When the signal is removed,
the original Music input returns, after an adjustable time
period (see following menu functions). This feature can be
used to allow a jukebox to override TV sound in some areas,
for example; it is also useful for playout of timed‑interval
messages from a sound store.
The threshold for priority activation is -24dB below the
input’s nominal level.
The rotary control selects the Zone in which the priority
is to be set (displayed by name if they have been renamed).
Note that rotating the control “beyond” Zone 8 allows
Groups 1 to 4 to be selected as well to permit assignment
of a priority source for each Group as well as each Zone.
The eight numeric buttons correspond to the eight Music
Inputs. The default assignment is for no priority input to
be assigned for any Zone or Group. Pressing a key assigns
that Music Input as the Priority Line Input for the currently-
displayed Zone or Group; a second press unassigns it.
The choice of Priority Line Input for a Zone/Group can be
made from any of the eight Music sources, including any
which have been deliberately disabled for that Zone/Group
in the Input Enable function of the Routing menu (see
page 33).
Only one Music Input may be assigned as Priority Line Input
for each Zone or Group. However, any one Music Input may
be assigned to every Zone and/or Group, if wished.
NOTE: When a Priority Line Input overrides an existing
source selection, visual indication of the changed source is
given on both the DCM‑1 (if it displaying the zone where
the override is occuring) and any CDR‑1s in the zone.
Zone 1
Line Pri Sel
Line Pri Hold
3s
Line Pri Rel
1s
Zone 1
Mic Pri Sel
Mic Pri Hold
3s
Mic Pri Release
1s
Mic Pri Att
-30dB
Page Pri Sel
Off
Page Pri Hold
3s
Page Pri Rel
1s
Page Pri Att
-30dB
Emergency Source
Off
Emergency Level
||||||||||||||||
Mute Contacts
Normally Open
Priorities Menu Flow Diagram
Page 42

DCM-1 User Manual v1.0
Conguration
40
Line Priority Hold Time
Rotary: sets value
The LINE PRI HOLD parameter sets the time for which the
Line Priority Input (enabled in the LINE PRI SEL menu
function above) remains the source after the audio signal has
been removed.
The rotary control sets the Hold value in the range from
1s to 12s, in 1s increments. The default value is 3s. It may be
necessary to increase this value if the Line Priority feature
is being used with a conventional music source such as a
CD player or CD jukebox, to prevent the source selection
temporarily reverting to the original selection between
tracks, for example.
Note that the Line Priority Hold Time is global – it applies
to all Zones/Groups and Music Inputs.
The numeric buttons are not used in this function.
Line Priority Release Time
Rotary: sets value
At the end of the Line Priority Hold Time (see above), it
would be disconcerting if the audio level of the original
programme (the currently selected Music source) were to
immediately resume its previous level. Instead it ramps back
up to its previous level from zero over the Release Time
period.
The rotary control sets the Release value in the range from
1s to 12s, in 1s increments. The default value is 1s.
Note that the Line Priority Release Time is global – it applies
to all Zones/Groups and Music Inputs.
The numeric buttons are not used in this function.
Select Mic Priority Input
Rotary:
Buttons:
selects Zone/Group
select Mic Input
When a microphone is in use in a Zone (or Group) as well
as a music source, it may be desirable for the music (the line
input) to be reduced in volume, to allow the microphone
signal to be more readily heard. (This process is often called
“ducking”.) The MIC PRI SEL menu function congures the
DCM-1 to do this.
The rotary control selects the Zone in which Microphone
Priority is to be set (displayed by name if they have been
renamed). Note that rotating the control “beyond” Zone
8 allows Groups 1 to 4 to be selected as well to permit
assignment of a priority microphone for each Group as well
as each Zone.
The rst four numeric buttons correspond to the four
Microphone Inputs. If multiple ME-1 remote access plates
are daisy-chained to a Microphone Input, selecting that Input
effectively selects all the physical mic inputs connected to
it, and any or all mics plugged into them will activate the
Priority.
The default assignment is for no priority mic to be assigned
for any Zone or Group. Pressing a button assigns that
Microphone Input as a priority mic for the currently-
displayed Zone or Group; a second press unassigns it.
A mic must be enabled for the Zone or Group for it to be
available as a Mic Priority Input (see page 33 for details).
Note that more than one Mic Input may be assigned as the
Priority Mic Input for each Zone or Group, if wished.
Mic Priority Hold Time
Rotary: sets value
The MIC PRI HOLD function operates in the same way as
LINE PRI HOLD (see above), except that it applies to the
Priority Microphone instead of the Priority Music Input. It
determines how long the music will remain reduced in
volume (or “ducked”) once the priority mic signal has
stopped.
The rotary control sets the Hold value in the range from 1s
to 12s, in 1s increments. The default value is 3s.
Note that the Mic Priority Hold Time is global – it applies to
all Zones/Groups and Mic Inputs.
The numeric buttons are not used in this function.
Mic Priority Release Time
Rotary: sets value
At the end of the Mic Priority Hold Time (see above), the
level of the music programme ramps back up from its
attenuated level to its previous level over the Release Time
period.
The rotary control sets the Release value in the range from
1s to 12s, in 1s increments. The default value is 1s.
Note that the Mic Priority Release Time is global – it applies
to all Zones/Groups and Mic Inputs.
The numeric buttons are not used in this function.
Page 43

Conguration
DCM-1 User Manual v1.0 41
Mic Priority Attenuation
Rotary: sets value
MIC PRI ATT sets the amount of volume reduction to be
applied to the music programme when the priority mic
becomes active – i.e., the degree of “ducking”.
The default setting is -30dB, which should be satisfactory for
most situations. The rotary control can be used to set any
attenuation from -46dB (the quietest) to 0dB (no reduction
at all), in 1dB steps.
Note that the Mic Priority Attenuation is global – it applies
to all Zones/Groups and Mic Inputs.
The numeric buttons are not used in this function.
Page Priority Select
Rotary:
Buttons:
selects paging method
select Zone
This function (and the following three) are concerned with
how the DCM-1 handles paging from an external CDPM or
other paging microphone system. In principle, any page
received by the DCM-1 will be routed to its intended
zone(s) with the music programme in that zone(s) being
temporarily attenuated (“ducked”).
The PAGE PRI SEL function determines how a paging
microphone controls the paging access to the selected Zone.
The three possible settings are Off, Vox and Access. Each
of the eight Zones can have its own setting.
Off – the paging microphone is routed to the zone(s),
but the music programme does not attenuate. The
announcement message is mixed with the music
programme at full level.
Vox – the paging microphone has priority access to the
zone(s) as soon as an audio signal from the microphone
itself is received. Pressing zone selection buttons on the
paging microphone before the announcement is made
will thus not cause the music programme to attenuate
immediately.
Access – priority access to the zone(s) is made as soon
as a zone routing button on the paging microphone is
pressed. With this setting, the music programme will
attenuate immediately.
The numeric buttons select the Zone in which the setting is
to be applied.
The rotary control selects the function to be applied to the
selected Zone. The default setting for all Zones is Off.
•
•
•
Page Priority Hold Time
Rotary: sets value
The PAGE PRI HOLD parameter determines how long the
music will remain reduced in volume (or “ducked”) once the
paging priority has been removed.
The rotary control sets the Hold value in the range from 1s
to 12s, in 1s increments. The default value is 3s.
Note that the Page Priority Hold Time is global – it applies
to all Zones. The setting has no relevance to Zones that have
PAGE PRI SEL set to Off.
The numeric buttons are not used in this function.
Page Priority Release Time
Rotary: sets value
At the end of the Page Priority Hold Time (see above), the
level of the music programme ramps back up from its
attenuated level to its previous level over the Release Time
period.
The rotary control sets the Release value in the range from
1s to 12s, in 1s increments. The default value is 1s.
Note that the Page Priority Release Time is global – it
applies to all Zones. The setting has no relevance to Zones
that have PAGE PRI SEL set to Off.
The numeric buttons are not used in this function.
Page Priority Attenuation
Rotary: sets value
PAGE PRI ATT sets the amount of volume reduction to be
applied to the music programme when paging priority
becomes active – i.e., the degree of “ducking”.
The default setting is -30dB. The rotary control can be used
to set any attenuation from -46dB (the quietest) to 0dB (no
reduction at all), in 1dB steps.
Note that the Page Priority Attenuation is global – it applies
to all Zones. The setting has no relevance to Zones that have
PAGE PRI SEL set to Off.
The numeric buttons are not used in this function.
Page 44

DCM-1 User Manual v1.0
Conguration
42
Select Emergency Source
Rotary:
Buttons:
selects paging method
select Input (Mic or Line)
An external emergency mute applied at the Music Mute rear
connector will normally mute all eight Music Inputs and all
four Microphone Inputs. Paging remains operative. Some
installations may require that one input is reserved as an
emergency audio input, for a Fireman’s Mic or Emergency
Evacuation message. The EMERGENCY SOURCE menu
function determines which input this will be.
Any input may be nominated as the emergency source.
Either a Line or Mic Input may be chosen, making it possible
to interface either microphones directly or line-level devices
such as sound stores.
The rotary control selects the input to be used for
emergency access. Turning the control clockwise scrolls
through Line 1 to Line 8, then Mic 1 to Mic 4. If the Music
Inputs have been renamed, the names are displayed. The
default setting is Off. The menu function can be exited when
the required input is displayed; no additional button presses
are necessary.
Once an input is selected, that input will remain live when
Music Mute is active. With the default setting of Off, all
inputs will be muted when Music Mute is active.
The numeric buttons are not used in this function.
Emergency Level
Rotary: sets level
Any emergency messages routed through the system using
the Music Mute/Emergency Source outlined above should be
at a higher volume that normal music programme material.
(This is likely to be a requirement of Statutory Regulations).
This menu function allows adjustment of the audio level
of the Emergency Source (see above) when Music Mute is
active. It applies only when a Line Input is assigned as the
Emergency Source.
The default setting is maximum, but if this level causes
problems with system overloading and inadequate
intelligibility, it can be reduced with the EMERGENCY LEVEL
menu function.
Turn the rotary control anticlockwise to reduce the level.
The relative level is shown on the display as a bargraph.
The numeric buttons are not used in this function.
Congure Music Mute
Rotary: selects NC or NO
The Music Mute input’s trigger mode may be congured as a
pair of normally-open (NO) or normally-closed (NC)
contacts.
The rotary control selects either Normally Open (the
default setting) or Normally Closed.
Set the function required by the emergency system being
interfaced to. Select Normally Closed if the external
equipment maintains a short-circuit in place at the Music
Mute connector pins, removing it only when an emergency
condition arises. Select Normally Open if the external
equipment signals an emergency condition with a contact
closure.
Page 45

Conguration
DCM-1 User Manual v1.0 43
Groups Menu
Group Enable
This function is described in User Mode. See page 30.
Dene Groups
Rotary:
Buttons:
selects Group
select Zones
The GROUP MEMBER menu function allows the operator
to dene which Zones should be combined to form Groups.
Four Groups can be dened, with no restriction on Zone
membership. A Zone may be a member of more than one
Group, but if so, only one Group which includes that Zone
may be enabled at a time. Once set up, a Group may be
enabled or disabled at will by the user, via the GROUP
ENABLE function of the Groups Menu.
The rotary control selects the Group to have Zones
assigned. The Groups will be displayed as Group 1 to
Group 4 unless they have been renamed, in which case the
names will be displayed.
The eight numeric buttons correspond to the eight Zones;
they select Zone membership of the currently-selected
Group. Press the numeric buttons to select or deselect
Zones from the Group. Conrmation of Group membership
is given by the LEDs above the numeric buttons.
It should be noted that if a system uses multiple DCM-1s,
Groups can only comprise Zones within each DCM‑1;
Zones from different DCM-1s cannot be combined.
Group 1
Enable X
Group 1
Group Member
Groups Menu Flow Diagram
Page 46

DCM-1 User Manual v1.0
Conguration
44
Other DCM-1 adjustments
In addition to the settings and adjustments made via the
menu system, the DCM-1 has a number of adjustments
which are made elsewhere. Most are concerned with paging
and are located on the rear panel; they are intended to be
set at the time of installation and left. All the controls are
recessed trimpot types, and should be turned carefully with
a trimming tool. Attempting to adjust them with an oversize
screwdriver will cause damage.
Paging mic gain
PAGING MICROPHONE INPUT
LF
HF
INPUT IS BALANCED:
GAIN (dB)
PIN 1: GROUND
PIN 2: COLD
PIN 3: HOT
50
10
1 2 3
-
+
-
+
This control sets the sensitivity of the Paging Mic Input, for
3rd.‑party paging systems. The gain range is 10dB to 50dB;
installers should check the mic signal level available from the
paging system, and intially set this control accordingly.
Its setting will affect the paging mic level in all zones being
paged.
CDPM paging microphone gain
CDPM
GAIN (dB)
IN
THRU
-10
+10
This control sets the mic level for a CDPM paging system
interfaced with the DCM-1. Like the Paging mic level (above),
its setting affects all zones being paged, and its adjustment is
made in the same way. The gain range is ±10dB.
Paging mic EQ
PAGING MICROPHONE INPUT
LF
HF
INPUT IS BALANCED:
GAIN (dB)
PIN 1: GROUND
PIN 2: COLD
PIN 3: HOT
50
10
1 2 3
-
+
-
+
HF and LF EQ controls for paging mics are provided. These
may be adjusted to reduce any extraneous noise in the
vicinity of the paging mic, or to compensate for any
undesirable colouration of the mic itself. The controls are
adjacent to the (3rd.-party) Paging Mic Input, but they affect
both microphones connected to the Paging Mic Input and
mic signals from a CDPM connected to the CDPM ports.
The HF control provides up to 10dB cut or boost above
5kHz, and the LF control 10dB cut or boost below 100Hz.
Again, these controls should be adjusted using a test
message, ideally to the zone where the DCM‑1 is installed so
that the effect of the adjustment can be heard by the person
making it.
As the controls affect both the CDPM and 3rd.-party paging
mic inputs, a degree of compromise may be necessary if a
system requires both inputs to be used.
Zone Paging Levels
PAGING LEVEL
ZONE 6
0 10
1 2 3
Each zone output connector has an adjacent preset control
which sets the volume for paging in that Zone. The Paging
Level adjustment for a Zone is completely independent of
the music level adjustment for that Zone, the latter being set
by the user.
Page 47

Conguration
DCM-1 User Manual v1.0 45
Setting up levels for best performance
To optimise signal levels through the DCM-1 and obtain
the best signal-to-noise performance, we recommend the
following procedure is followed for adjusting music and
paging levels.
1. Choose a suitable music source and set the INPUT
GAIN of its input so the signal is peaking within the
target area, via the Music menu in Installer mode.
2. Route this music source to a convenient Zone and
adjust the LEVEL in this zone to 0dB (i.e. maximum)
again via the Music menu.
3. Adjust the gain of the power ampliers feeding the
loudspeakers in that Zone so that the sound level in the
Zone is as loud as is likely to be required.
4. Set the paging microphone level control for that zone to
maximum.
5. Adjust the Paging Mic Gain or CDPM Gain whilst
making an announcement to match the level of the
announcement with the desired maximum level of the
music.
6. Adjust the paging microphone for preferred
announcement level in the zone.
7. Repeat step 1 for other music sources.
8. Repeat steps 2,3 and 6 for the other zone outputs.
Display Contrast adjustment
The display should be easily readable in most normal
situations. If it is necessary to alter the display contrast
to improve readability under extreme ambient lighting
conditions, remove the top cover (8 screws) and locate the
trimpot at the left-hand end of the PCB mounted directly
behind the front panel. This can be adjusted as required.
Replace the cover using the same screws.
CDR-1 Remote Control Plates
Most audio systems based around the DCM-1 will include
CDR‑1 remote control plates to permit in‑zone selection of
music source and level.
An overview of the CDR-1 can be found at page 8 and notes
on installation and wiring at page 19.
User Operation
The backlight in the CDR-1’s display automatically times-out
after a few seconds (the actual time is programmable) to
minimise power consumption. The display is “woken up” by
pressing the ZONE button, and the unit conrms the Zone
it has been assigned to, either as Zone n, or by name if the
zones have been renamed (see diagram below).
Zone
i
+
h
-
Current Zone
Reception
Press Zone button to "wake up" display
CDR-1 User Mode: i) wake-up display
Zone
i
+
h
-
Music Server
Level |||||||||||||||
keys select line input (music source)
i h
keys adjust music level
and
CDR-1 User Mode: ii) adjustment display
The CDR-1 will change to the adjustment display shown at
ii) above after approx. 10 seconds, or immediately if any of
the other four buttons are pressed. The i and h buttons can
now be used to scroll through the inputs available to the
zone. Only those inputs which have been enabled in the
DCM-1 menu system at ROUTING > INPUT ENABLE will
be displayed. The + and – buttons adjust the volume.
Page 48

DCM-1 User Manual v1.0
Conguration
46
This sequence is modied if the Zone has been dened as a
member of a Group. If so, the next press of ZONE after the
panel “wakes-up” displays the Engineer Mode Enter Key
screen. This gives the user the option of entering the key,
after which the display will show the Group Select screen.
Zone
i
+
h
-
Enter Key
Zone
i
+
h
-
Group Select
Group 1
keys select Zone or Group(s)
and
The + and – keys may now be used to change enable or
disable any Groups of which the Zone has been dened as
a member. If the Zone is only a member of one Group, the
lower row of the display will toggle between Zone n and
Group m where n and m are the Zone and Group numbers
respectively. If the Zone belongs to more than one Group,
the additional Groups will be displayed in turn; pressing
ZONE when a Group is displayed will enable that Group;
pressing ZONE when the Zone is displayed will disable a
Group and return to normal operation.
Engineer Mode
The CDR-1s may be placed in Engineer Mode to allow EQ
adjustment to be performed from within the zone itself.
Engineer Mode is fully described at page 35.
Installer Mode
Installation of a CDR-1 necessitates the activation of a
further mode, Installer Mode, to allow some additional
parameters to be set, including zone assignment.
To activate Installer Mode:
If the CDR-1 has already been installed, remove it from its
back box and disconnect the power supply, either by
unplugging the POWER IN RJ45 connector if the CDR-1 is
being powered from elsewhere in the system, or by
unplugging the local PSU if it is being powered locally. Move
the jumper J1 as shown below.
J2 J1
MID
END
ON
OFF
J2 J1
MID
END
ON
OFF
Normal Mode Installer Mode
Reconnect the CDR-1 to its power supply, and the
display will change to the rst of the four menu functions
available in Installer Mode. Pressing ZONE steps through
each function in turn (in the same manner as the NEXT
FUNCTION button in the DCM-1’s menu system). The two
User Mode screens are also presented before the menu
loops around.
The i , h , + and – buttons are used to adjust the parameters
in each function.
Note that the display time-out is disabled in Installer Mode.
Remember to unpower the CDR-1 and put J1 back to its
“normal” setting after conguration is complete.
Page 49

Conguration
DCM-1 User Manual v1.0 47
Backlight Adjust
Contrast Adjust
Inactivity Time
5s
Assign Zone
Zone 1
Set Key
<<>>
Input 4
Current Zone
Zone 2
Level
INSTALLER
MODE
FUNCTIONS
USER
FUNCTIONS
Treble
0dB
Mid
0dB
Bass
0dB
Enter Key
Group Select
Group 3
Group
Member ?
NO
YES
ENGINEER
MODE
ENABLED
KEY NEEDS TO BE
ENTERED ONCE ONLY
SELECT ZONE
OR GROUP(S)
ENGINEER
MODE
FUNCTIONS
CDR-1 Installer and Engineer Modes
Page 50

DCM-1 User Manual v1.0
Conguration
48
Display adjustments
The rst menu function allows adjustment of the display
contrast and backlight to suit different ambient lighting
conditions. The i and h buttons adjust the backlight level and
the + and – buttons adjust the contrast.
Inactivity Time
This function sets the display time-out. Use the + and –
buttons to set a value of between zero and 30 seconds; the
default is 10 seconds. The display backlight will turn off after
this delay, following the last CDR-1 button press. If the delay
is set to zero, the backlight remains on at all times.
Assign Zone
This assigns the CDR-1 to a particular Zone. The
+ and – buttons scroll through the 8 Zones; note in this
function they they are displayed as Zone n even if they have
been renamed. The default setting is Zone 1.
Once a CDR-1 has been assigned to a Zone with the
ASSIGN ZONE function, all operations on that CDR-1 will
affect all the speakers being driven from that Zone Output.
It is possible for more than one CDR-1 to be assigned
to the same Zone in a system. This will be useful in some
situations, such as in large rooms. All CDR-1s assigned to the
same Zone will be able to control operation in that Zone.
Set Key
This lets the installer set the 4-character key code used
to access CDR-1 Engineer Mode, once the CDR-1(s) in a
particular Zone have been enabled in the DCM-1 System
Menu (with the CDR ZONE SETUP function).
The bottom row of the LCD rst displays the current key;
the factory default is <<>>. Any permutation of the four
characters <, >, + and – may be used (except four identical
characters); as soon as any of the four buttons is pressed,
the existing key is erased. The key must have 4 characters.
If a key consisting of four identical characters is entered, the
bottom line of the display will show None. This overrides
the requirement for a key to be entered to use Engineer
Mode, and the EQ adjustment and Group Select screens will
be available to ther User as soon as the Zone is enabled in
CDR ZONE ENABLE.
Combining Engineer and Installer Modes
It may be convenient to enable CDR-1 Engineer Mode as
each CDR-1 is being installed, as this will allow the Zone
EQ to be set at the same time. When Engineer Mode is
enabled, the three EQ adjustment functions are presented in
sequence after the User functions, as shown in the owchart
on page 47.
Page 51

Conguration
DCM-1 User Manual v1.0 49
If an installation requires more than 8 Zones, multiple
DCM-1s may be interconnected to provide a system with
a larger number of outputs. For example, 2 DCM-1s will
provide 16 zones, 3 DCM‑1s 24 zones, and so on.
System Interconnections
In order to provide a transparent system which can be
operated with the same ease as one with a single DCM-1,
interconnections between multiple DCM-1s must follow a
few rules. The range of possibilities afforded by using multiple
DCM-1s is extremely large, and each installation will be
guided by the user’s requirements and the building layout.
The example given is for a simple 16‑zone system
comprising 2 DCM-1s, with a CDR-1 in each of the 16
zones. The block diagram below shows how the various
inputs are – or are not – interconnected. All possible
connections have been depicted, though it is recognised
that most systems will not use all of a DCM-1’s connectivity
simultaneously.
Line Inputs
It will generally be possible to directly parallel the outputs
of music sources to the Line Inputs of several DCM-1s using
suitable junction boxes or adaptors. Installers should satisfy
themselves that the the output of each music source is not
reduced in level or frequency response by such a multiple
connection; for most equipment, ve is the upper limit of
unbalanced inputs which can be paralleled in this way.
A more satisfactory solution is to use a stereo audio
distribution amplier (DA) for each source, with as many
outputs as the number of DCM-1s being fed. Connect the
amplier input to the source and the outputs to the same‑
numbered input of each DCM-1.
DCM-1 #1
INPUT 1
INPUT 6
INPUT 4
INPUT 8
INPUT 2
INPUT 7
INPUT 3
INPUT 5
CDPM
MIC 1
MIC 4
MIC 2
MIC 3
PAGINGMIC
PAGINGACCESS
ZONE 5
ZONE 3
ZONE 2
ZONE 6
ZONE 8
ZONE 4
ZONE 7
ZONE 1
EXT 1
EXT 4
EXT 3
EXT 2
IN
THRU
MUSIC MUTE
RS232
DCM-1 #2
INPUT 1
INPUT 6
INPUT 4
INPUT 8
INPUT 2
INPUT 7
INPUT 3
INPUT 5
CDPM
MIC 1
MIC 4
MIC 2
MIC 3
PAGINGMIC
PAGINGACCESS
ZONE 5
ZONE 3
ZONE 2
ZONE 6
ZONE 8
ZONE 4
ZONE 7
ZONE 1
EXT 1
EXT 4
EXT 3
EXT 2
IN
THRU
MUSIC MUTE
RS232
ZONE 5
ZONE 3
ZONE 2
ZONE 6
ZONE 8
ZONE 4
ZONE 7
ZONE 1
ZONE 13
ZONE 11
ZONE 10
ZONE 14
ZONE 16
ZONE 12
ZONE 15
ZONE 9
See note
in text
MUSIC SOURCES
1 TO 8
REMOTE LINE
INPUTS IN ZONES
1 TO 8
REMOTE LINE
INPUTS IN ZONES
9 TO 16
REMOTE MIC
INPUTS IN ZONES
1 TO 8
REMOTE MIC
INPUTS IN ZONES
9 TO 16
FROM THIRD
PARTY PAGING
SYSTEM
FROM CDPM
CDR-1 NETWORK A
CDR-1 NETWORK B
RS232 A
RS232 B
SPLITTER
CDR-1 PORTS
1
2
1
2
PORT A PORT B
CDR-1 PORTS
1
2
1
2
PORT A PORT B
Two DCM-1 Units forming a 16 Zone system
Larger systems – cascading DCM-1s
Page 52

DCM-1 User Manual v1.0
Conguration
50
Extension Ports
The Extension Ports cannot be paralleled, but this is unlikely
to be a system requirement as the use of remote line
input plates (LE-1s and BE-1s) will be limited to the Zones
in which they are located. They will thus be wired to the
Extension Ports on the DCM-1 feeding those Zones, and not
to any other.
Mic Inputs
ME-1 remote mic input plates cannot be paralleled to
multiple DCM-1s, but their use will also be limited to the
Zones where they are installed. Any ME-1s in a system
should be connected to the Mic Inputs of the DCM-1
feeding the Zones where they are located.
Zone Outputs
Each DCM-1’s Zone outputs will feed a separate set of
power ampliers for those Zones. Thus in the example
shown, DCM‑1 #1’s outputs will feed the ampliers driving
the loudspeakers located in Zones 1 to 8, while DCM-1 #2’s
outputs will feed the ampliers driving the loudspeakers
located in Zones 9 to 16.
CDR-1s
Using more than one DCM-1 in a system does not greatly
compromise the exibility of CDR‑1 network wiring.
The Installation section of this manual gives examples of
the various wiring topologies which may be adopted (see
page 19); that used in any particular installation will be
dictated by building layout and wiring convenience.
The example above shows two chains of CDR-1s – called
‘network A’ and ‘network B’ for reference, connected to two
of the CDR-1 Ports on DCM-1 #1, one to PORT A, the
other PORT B. Only one CDR-1 interconnection is needed
between multiple DCM-1s. Either of DCM-1 #1’s two
remaining ports may be used to connect the CDR network
to DCM-1 #2, and any of DCM-1 #2’s four ports may be
used. In the diagram, the second PORT A socket on DCM-1
#1 is connected to one of the PORT A sockets on DCM-1
#2. In this case, the PORT A CDR-1 termination would be
set OFF in DCM-1 #1 and ON in DCM-1 #2. The PORT
B termination would be set ON in DCM-1 #1, and the
corresponding jumper setting in DCM-1 #2 is unimportant.
It is important to recognise that the CDR-1s on each of the
two chains in this example can be anywhere in the building,
in any Zones.
So that any CDR-1 in this system is assignable to any of
the 16 Zones, the CDR-1 Zone Offset function must be
set to +8 on DCM‑1 #2. This is set in the menu system; see
page 34 for full details. With this setting made and the two
DCM-1s interconnected as shown, all CDR-1s in the system
will offer all 16 Zones in their ASSIGN ZONE function when
CDR-1 Installer Mode is activated (see page 45).
The restriction placed on CDR-1 network wiring by multiple
DCM-1s results from the necessity of using one CDR-1 Port
on DCM-1 #1 to route the network through to DCM-1 #2.
In the example shown, the building network wiring would be
limited to six chains, three on each DCM-1.
It should be recognised that neither a CDR-1 network
interconnection between multiple DCM-1s, nor the use of
CDR Offsets may be necessary at all, if a network topology
can be installed which limits the CDR-1s on any one chain
to Zones which are being controlled by a single DCM-1.
Thus in the example, if the CDR-1s in Zones 1 to 8 were
on a single chain, and those in Zones 9 to 16 on another, the
rst could be connected only to DCM‑1 #1 and the second
to DCM-1 #2, providing a simpler wiring system.
When planning the CDR-1 network, the DC power supply
capability of each DCM-1 must also be taken into account.
As each DCM‑1 can only supply sufcient current to
operate 8 CDR-1s, it may be that an external PSU(s) will be
required at some position(s) in the chain(s) when multiple
DCM-1s are being used. Although interconnecting two
DCM-1s as shown in the example permits full access to all
zones in operation, it does not mean that 16 CDR‑1s can be
powered by using two DCM-1s. If the system in the example
was connected to a single chain of 16 CDR-1s (with Port B
being ignored), an external PSU would need to be added to
the chain at the CDR-1 #9, to power the “farthest” 8
CDR-1s.
CDPM
In order for a CDPM system to access all 16 Zones, the
two DCM-1s should be interconnected as shown, with the
CDPM THRU connector of DCM-1 #1 connected to the
CDPM IN of #2. The CDPM termination in CDM-1 #1
should be set OFF, and that in DCM-1 #2 should be set ON.
See also page 24.
3rd.-party paging system
The microphone of a 3rd.-party paging system will need to
address all Zones, so it must be connected to the Paging
Mic Input of both DCM-1s. Paralleling a microphone signal
is not recommended, and a microphone splitter, of either
active or passive type, should be used as shown.
Interfacing a 3rd.‑party paging system to a 16‑zone system
will require separate connections to the Paging Access
Connectors of the two DCM-1s. The paging commands
for Zones 1 to 8 should be wired to the Paging Access
Connector of DCM-1 #1, and those for Zones 9 to 16 to
that of DCM-1 #2. The general wiring procedures described
at page 26 should be followed.
Music Mute Input
The Music Mute Inputs on the two DCM-1s can be
paralleled together, though this is not ideal. A preferred
solution, if available, is to use a separate set of emergency
system contacts for each DCM-1 making up the system.
RS232 Control
If the DCM-1s are to be controlled via RS232 by an
external control system, the two DCM-1s should be
treated independently. Connect each DCM-1’s RS232 port
to a separate RS232 port on the system controller. The
controller should be programmed to address each unit
independently.
Page 53

Appendix
DCM-1 User Manual v1.0 51
Jumper locations and settings
The DCM-1 has various internal jumpers, the setting of
which may require alteration during installation. The table
below lists each jumper and its purpose, together with the
factory default setting.
NOTE: J15, J16, J17 and J18 are reserved.
The diagram below shows the locations of the internal
jumpers (not to scale). In the case of the jumpers having two
possible positions, the black square in the symbol indicates
the default setting. If any jumpers need to be changed, undo
the 8 screws securing the top cover of the DCM-1, and
remove it. Use a pair of snipe-nosed pliers to gently remove
the jumpers, and to reposition them if necessary. Rex the
top cover using the original screws.
Section 4 : Appendix
JUMPER NAME PURPOSE DEFAULT
J2 CDPM bus termination ABSENT = CDPM termination OFF
PRESENT = CDPM termination ON
Present
J6 CDR-1 Port A bus termination ABSENT = CDR-1 Port A termination OFF
PRESENT = CDR-1 Port A termination ON
Present
J7 CDPM ground link ABSENT = CDPM signal ground “lifted”
PRESENT = CDPM signal ground connected
Present
J8 Reset Installer PIN Reinstates original factory key for enabling Installer Mode. Replace after use. Off
J9 Force Factory Defaults Reinstates original factory settings except Input/Zone/Group names. Replace
after use.
Off
J10 Bootloader baud rate: select 1 Changes baud rate for rmware updates.
See table page 54.
Off
J11 Bootloader baud rate: select 2 Off
J13 CDR-1 Port B bus termination OFF = CDR-1 Port B termination OFF
ON = CDR-1 Port B termination ON
Present
J14 CDPM power link OFF = CDPM power off
ON = DC power for CDPM is available at CDPM IN connector.
Present
J24 Paging mic phantom power OFF: paging mic phantom power OFF
ON: paging mic phantom power ON
Off
J25 EQ Module: Zone 1 R
Must be present if no EQ module is tted Present
J26 EQ Module: Zone 2 R
J27 EQ Module: Zone 3
J28 EQ Module: Zone 5
J29 EQ Module: Zone 6
J30 EQ Module: Zone 7
J31 EQ Module: Zone 4
J32 EQ Module: Zone 8
J33 EQ Module: Zone 1 L
J34 EQ Module: Zone 2 L
J2
J
6
J
13
J
7
J
14
J8J9J10J
11
J15J16J17J
18
J
32
J
27
J
28
J
30
J
31
J
29
J26J
34
J
33
J
25
J
24
(UPPER PCB)
(LOWER PCB)
KEY:
Jumper with two possible positions; black
square indicates factory default setting.
Jumper with one position (i.e., present or not)
Jumper Locations
Page 54

DCM-1 User Manual v1.0
Appendix
52
RS232 Serial Control
The rear panel RS232 Serial Interface provides serial control
of almost every DCM-1 function, parameter and setting. The
DCM-1 appears as a DCE device to controlling equipment.
The full RS232 protocol is beyond the scope of this manual,
but can be downloaded from www.cloud.co.uk.
This section provides only details of the port parameters
and an abridged serial command list, which comprises the
normal User controls.
Pinout
The rear panel connector is a D9F. The pinout is shown in
the table:
PIN FUNCTION
1 n/u
2 Data receive
3 Data transmit
4 DTR
5 0v
6 DSR
7 RTS
8 CTS
9 n/u
Not all control systems interpret “Tx” and “Rx” the same
way, and the installer should check whether pins 2 and 3
(and 7 and 8 if used) should be “crossed” within the cable.
The installer should also check whether the control system
being used requires RS232 ow control to be implemented,
and if so, whether hardware control or software control is
used. Hardware ow control (sometimes called RTS/CTS)
requires pins 7 and 8 (at the DCM-1 end) to be connected.
CONTROLLER
1
9
8
7
6
5
4
3
2
DCM-1
Tx
Tx
RxRx
CTSCTS
RTS
RTS
Connect if hardware
flow control is
required
RS232 connection
Port parameters
PARAMETER VALUE/SETTING
Data type: RS232C serial
Data speed 300/1200/2400/4800/9600/19200 baud, software
selectable
Word length 8 bits
Parity None
Stop bits One
Abridged command set
The commands listed in the table below are the equivalent
of the operating controls available in User Mode. For all
other commands, data requests and responses, please refer
to the DCM-1’s full RS232 protocol document.
GENERAL FORMAT
FUNCTION COMMAND (ASCII)
Route Input x to Zone y <Zy.MU,Sx/>
Set audio level in Zone y to -mdB <Zy.MU,Lm/>
Reduce audio level in Zone y by pdB <Zy.MU,LDp/>
Increase audio level in Zone y by qdB <Zy.MU,LUq/>
Enable Group z <Gz,E/>
Disable Group z <Gz,D/>
Enable paging to Zone y (see Example 4) <PM,PAy/>
Release paging <PM,PR/>
Examples
1) Input Selection
The values of x and y in the general format are the Input No.
(1 to 8) and the Zone No. (1 to 8) respectively.
EXAMPLE COMMAND
Select Input 3 in
Zone 6
ASCII <Z6.MU,S3/>
HEX 3C 5A 36 2E 4D 55 2C 53 33 2F 3E
2) Zone Levels
Levels can either be set to an absolute value (in dBs), or
increased/decreased by a specied number of dBs.
For absolute levels, the number of dBs corresponds to
attenuation rather than gain, thus 0dB is maximum level
and at ‑62dB the zone is muted. The values of y and m
in the general format are the Zone No. (1 to 8) and the
attenuation level in dBs (0 to 62) respectively.
To alter the Zone level by a specied amount, the additional
ASCII characters ‘U’ (up) or ‘D’ (down) are added to the
string. The values of y, p and q in the general format are the
Zone No. (1 to 8), the level increase in dBs (0 to 62), or the
level decrease in dBs (0 to 62) respectively. A command to
increment the level by a number of dBs greater than the
current attenuation will set the level to maximum. Similarly,
a command to decrement the level by a number of dBs
greater than (62 minus the current attenuation) will mute
the Zone output.
EXAMPLE COMMAND
Set level in Zone
2 to -12dB
ASCII <Z2.MU,L12/>
HEX 3C 5A 32 2E 4D 55 2C 4C 31 32 2F 3E
Reduce level in
Zone 1 by 10dB
ASCII <Z1.MU,LD10/>
HEX 3C 5A 31 2E 4D 55 2C 4C 44 31 30 2F 3E
Increase level in
Zone 5 by 6dB
ASCII <Z5.MU,LU6/>
HEX 3C 5A 35 2E 4D 55 2C 4C 55 36 2F 3E
Page 55

Appendix
DCM-1 User Manual v1.0 53
3) Enable/Disable Groups
Zone membership of Groups must rst be dened in the
menu system (at GROUPS > GROUP MEMBER).
The value of z in the general format is the Group No.
(1 to 4).
EXAMPLE COMMAND
Enable Group 3 ASCII <G3,E/>
HEX 3C 47 33 2C 45 2F 3E
Disable Group 1 ASCII <G1,D/>
HEX 3C 47 31 2C 44 2F 3E
4) Enable/Release Paging
RS232 control of paging applies only to 3rd.-party paging
systems connected to the Paging Mic Input.
This command differs from the others in that the value of y
in the general format is in the form of an 8-character mask
of ASCII “X’s” (select) and “O’s” (don’t select), with the
character position in the mask denoting the Zone number.
EXAMPLE COMMAND
Enable paging
to Zone 2
ASCII <PM,PAOXOOOOOO/>
HEX 3C 50 4D 2C 50 41 4F 58 (4F 4F 4F 4F 4F 4F)
2F 3E
Enable paging
to Zones 4
to 7
ASCII
<PM,PAOOOXXXXO/>
HEX
3C 50 4D 2C 50 41 4F 4F 4F 58 58 58 58 (4F)
2F 3E
Cancel paging ASCII <PM,PR/>
HEX 3C 50 4D 2C 50 52 2F 3E
Note that it is not strictly necessary to transmit the “O”
character (4Fh) for channel numbers above the highest being
paged. Thus <PM,PAOX/> (ASCII) would sufce in the rst
example above, and <PM,PAOOOXXXX/> in the second.
However, the full eight characters are shown in the table for
completeness, with the extra characters in brackets in the
hex version.
PSU capability
In addition to supplying the DCM-1’s internal circuitry,
the PSU has the capacity to power some additional items
which may form part of a complete system. These include
CDR-1 remote control panels, remote mic and line input
plates, CDPM microphones and any level restoration relays
which may be connected at the Paging Access Connector in
Output mode.
The maximum current capacity of the PSU available for
powering external items is 650mA on each of the +12v
and ‑12v rails. This should be used as the guide gure when
calculating whether any external PSUs will be required in a
system. Additionally, there is a limit on the current which can
be fed through the CDR-1 POWER IN and POWER OUT
connectors; only 8 CDR‑1s can be powered from the four
CDR-1 Ports, even though their current requirement is less
than 650mA.
Current consumption of the various items is listed in the
table below.
ITEM
CURRENT
@ +12V
CURRENT
@ -12V
MAX.
NO.
CDR-1 remote control panel 50mA nil 8
CDPM-8 paging microphone 83mA nil 1
CDPM-16 paging microphone 107mA nil 1
BE-1 remote line input plate (bal.) 24mA 24mA
LE-1 remote line input plate 22mA 22mA
ME-1 remote mic input plate 43mA 43mA
Restoration relays (see below) Nil
The installer should ensure that the total current drawn by
all the external items in a system does not exceed 650mA.
If the Paging Access connector is being used as an output to
operate level restoration relays (either directly or indirectly
– see page 24), the current taken by the relay coils must also
be taken into account. The open-collector outputs at this
connector are limited to 60mA per zone.
If the total current required by external items does exceed
650mA on either rail, additional PSUs will need to be added
to the system. The Cloud CPM-PSU is suitable for powering
CDR-1 remote control panels and CDPM microphones and
can be readily interfaced with the respective networks.
PSU performance will be degraded at ambient temperatures
in excess of 35OC.
Page 56

DCM-1 User Manual v1.0
Appendix
54
RJ45 pinouts
The standard RJ45 wiring convention is as shown below:
The table below lists the pin allocation of the various RJ45
sockets on the DCM-1’s rear panel.
PIN CDPM
CDR-1
PORTS
EXTENSION
PORTS
MICROPHONE
INPUTS
1 Mic (hot) Left (cold) Mic sum (cold)
2 Mic (cold) Left (hot) Mic sum (hot)
3 Sense Sense
4 DC +ve DC +ve DC +ve DC +ve
5 0v 0v 0v 0v
6 DC –ve DC –ve
7 Data H Data H Right (hot)
8 Data L Data L Right (cold)
Fitting Bose® Series II EQ cards
The DCM-1 is compatible with Bose Series II
loudspeakers; a single‑channel Bose equalisation module
may be tted to as many Zone outputs as necessary.
Equalisation modules for the following Bose models are
available:
Panaray MA12
Panaray 402-II, 502B and 502BEX
Panaray LT Series: Models 3302, 4402, 9402 and 9702
Other modules are available; please enquire.
To install equalisation modules, rst remove the top cover
from the DCM-1 (8 screws). The modules plug into the
white 12-pin connectors on the upper PCB. Note the
header connectors on the PCB have two notches on
one side only; these engage with lugs on the equalisation
module’s mating connector to ensure correct orientation.
After tting equalisation modules to any channel(s), the
corresponding module bypass jumper(s) must be removed in
order for the module to function. These are J25 to J34; see
the Appendix section “PCB jumper locations and settings”
page 51 for full details. Replace the top cover with the
original screws after tting.
•
•
•
Firmware updates
This section describes the process for upgrading the
DCM‑1’s rmware.
As a responsible manufacturer, Cloud Electronics adopt
a policy of continuous product development. As with all
software-based products, it may be desirable from time to
time to update the rmware in the DCM‑1 with a more
recent version. You can contact your Cloud dealer or
distributor, or visit the Cloud website at www.cloud.co.uk
for details of updates.
Updates are downloadable from the Cloud website, or if you
prefer, from your local dealer/distributor on a CD-ROM.
The new rmware is transferred from a PC to the DCM‑1
via the latter’s RS232 port. The PC used for the transfer
should have a 9‑pin COM port; if not, a USB‑to‑COM
convertor should be used. A straight-through, fully-populated
D9 cable should be used. The default baud rate for transfer
is 115200 baud, but this can be altered by changing the
positions of jumpers J10 & J11 (see page 51 for jumper
locations). The table below gives the alternative baud rates
available:
J10 J11 BAUD RATE
OFF OFF 115200
OFF ON 57600
ON OFF 19200
ON ON 9600
Firmware update is initiated by selecting the FIRMWARE
UPDATE function in the System menu (see page 38). The
DCM-1 should then be powered off and back on again,
or reset with the Reset Mixer function. At this point, a
bootloader routine will be entered, indicated by the front
panel LEDs 1 to 8 ashing in an odd/even sequence. The
display will indicate details of recovery procedure (should
bootloader be entered accidentally) and how to change the
baud rate.
The new rmware can now be transferred. Should the
transfer fail, turn the DCM-1 off, and hold the NEXT button
down while powering it back on again. Go immediately
to the FIRMWARE UPDATE menu function, and turn the
bootloader off.
Full instructions on how to perform an update will be
provided with the update le, including details of the PC
software application for handling the le transfer.
PIN CAT5 CORE
1 White + Orange
2 Orange
3 White + Green
4 Blue
5 White + Blue
6 Green
7 White + Brown
8 Brown
1
8
1
8
1
8
Page 57

Appendix
DCM-1 User Manual v1.0 55
Factory default settings
(Includes Installer Mode key)
The table below lists the default factory settings for all
DCM-1 menu options. These are the settings which the unit
will assume on power-up if POWER UP MODE is set to
Factory.
The factory default key for enabling Installer Mode is
included in the list at System Mode/Set Key.
MUSIC MENU
Select Input Input 1 routed to all Zones; no other
assignments
Level All Zones at minimum (muted)
Treble 0dB
Mid 0dB
Bass 0dB
Input Gain All Inputs 0dB
Maximum Music Level All Zones 0dB (max.)
Minimum Music Level All Zones ‑∞dB (muted, min.)
ROUTING MENU
Enable Mic Inputs No Mics assigned to any Zone
Input Enable All Inputs available in all Zones
Congure Access Connector Input
CDPM Zone Offset 0
CDR Zone Offset 0
SYSTEM MENU
CDR Zone Setup All Zones OFF
Stereo/Mono Zone Selection Zones 1 and 2 stereo
Rename Inputs Input 1 to Input 8
Rename Zones Zone 1 to 8
Rename Groups Groups 1 to 4
Set Key 1234
RS232 Baud Rate 9600
RS232 Flow Control OFF
Power Up Mode Factory
Save Defaults n/a
Update Firmware OFF
Reset Mixer n/a
PRIORITIES MENU
Select Priority Line Input No Input assigned to any Zone
Line Priority Hold Time 3 sec.
Line Priority Release Time 1 sec.
Set Mic Priority Input No Input assigned to any Zone.
Mic Priority Hold Time 3 sec.
Mic Priority Release Time 1 sec.
Mic Priority Attenuation 30dB
Page Priority Select Off
Page Priority Hold Time 3 secs.
Page Priority Release Time 1 sec.
Page Priority Attenuation 30dB
Select Emergency Source No Input assigned
Emergency Level Maximum
Congure Music Mute Normally Open (NO)
GROUPS MENU
Group Enable No Groups enabled
Group Member No Groups dened
Note that restoring the factory default settings (either by
setting Power Up Mode to Factory, or moving jumper J9)
does not overwrite any Input, Zone or Group names that
have been assigned.
EMC considerations
The Cloud DCM-1 fully conforms to the relevant
electromagnetic compatibility (EMC) standards and
is technically well behaved; you should experience no
operational problems, and under normal circumstances, no
special precautions need to be taken.
If the unit is to be installed in close proximity to potential
sources of RF disturbance such as high power transmitting
stations, radar facilities, etc., the performance of the mixer
may be reduced; we suggest that particular attention is paid
to screening of audio cables – especially microphone cables,
and that all cables are kept as short as possible.
Page 58

DCM-1 User Manual v1.0
Appendix
56
Specications
LINE INPUTS
Frequency Response 20Hz ‑ 20kHz ±1dB
Distortion <0.05%, 20Hz ‑ 20kHz
Sensitivity 195mV (-12dBu) to 3.1V (+12dBu)
Input Gain Control 24dB range
Input Impedance 47kΩ
Headroom >+10dB
Noise -90dB A weighted (0dB gain)
Equalisation HF: ±14dB/10kHz
MID: ±14dB/1200Hz
LF: ±14dB/50Hz
PAGING MICROPHONE INPUT
Frequency Response 100Hz / ‑3dB(lter) to 20kHz ±0.5dB
Distortion <0.05% 20Hz‑20kHz
Gain Range 10dB - 50dB
Input Impedance >2kΩ (balanced)
Phantom power +12V (PCB jumper for on/off)
Headroom >20dB
Noise ‑120dB EIN 22Hz ‑ 22kHz (150Ω)
Equalisation HF: ±10dB/5kHz
LF: ±10dB/100Hz
OUTPUTS
Balanced Zone Outputs 775mV (0dBu)
Minimum load impedance 600Ω
Maximum output level +10dBu (2.6V)
EXTERNAL POWER SUPPLY
External Supply Input 100V‑240V AC; 47‑63Hz; 1.35A
Power supply +12V, 3A; ‑12V 1A
PHYSICAL
Dimensions (w x h x d) 482.6mm x 88mm x 170mm deep (2U 19”
rackmounting unit). Dimensions do not allow
for rear connectors/cabling.
Weight 3.12 kg net
Page 59

Appendix
DCM-1 User Manual v1.0 57
User Conguration
Notes Overleaf
Page 60

DCM-1 User Manual v1.0
Appendix
58
DCM‑1 Conguration Notes
Complete this form when installation is complete and leave with User.
MUSIC SOURCES - NAMES
INPUT SOURCE
1
2
3
4
5
6
7
8
ZONES - NAMES
ZONE LOCATION
1
2
3
4
5
6
7
8
GROUP SETUP
GROUP LOCATION & FUNCTION
CONNECTS ZONES (tick)
1 2 3 4 5 6 7 8
1
2
3
4
To change Music Source for a Zone
If top line of display does not show “Select Input”, press
MUSIC button.
Press the button (1 to 8) which corresponds to the
Zone.
Turn the knob until the bottom line of the display shows
the music source required.
To alter Music Volume in a Zone
If top line of display does not show “Select Input”, press
MUSIC button.
Press the NEXT FUNCTION button so that the top
line of the display shows “Level”.
Press the button (1 to 8) which corresponds to the
Zone.
Adjust the volume in the Zone with the knob.
•
•
•
•
•
•
•
To enable/disable a Group of Zones
Press the GROUPS button
Turn the knob until the required Zone Group is
displayed on the top line
Press the knob in to enable (or disable) the Group.
•
•
•
(to be left with the User)
Page 61

Appendix
DCM-1 User Manual v1.0 59
Installer Conguration
Notes Overleaf
Page 62

DCM-1 User Manual v1.0
Appendix
60
DCM‑1 Installer Conguration Notes
These tables should be lled in when the installation is complete to provide a record of the DCM‑1’s conguration.
ZONE 1 2 3 4 5 6 7 8
MENU NAME Enter Name of Zone
MUSIC
Treble Record settings
Mid
Bass
Maximum Level
Minimum Level
ROUTING
Input Enable Input 1 Tick enabled Inputs in each Zone
Input 2
Input 3
Input 4
Input 5
Input 6
Input 7
Input 8
Zones 1/2 Stereo? Tick if stereo
PRIORITIES
Priority Line Input Enter Priority Line Input No. for each Zone
Hold Time Record settings
Release Time
Priority Mic Input Enter Priority Mic Input No. for each Zone
Hold Time Record settings
Release Time
Attenuation
Page Priority Select Enter Paging method set: OFF/VOX/ACCESS
Hold Time Record settings
Release Time
Attenuation
GROUPS
Group Membership Group 1 Tick Zones assigned to each Group
Group 2
Group 3
Group 4
Page 63

Appendix
DCM-1 User Manual v1.0 61
ZONE 1 2 3 4 5 6 7 8
MENU NAME Enter Name of Zone
REMOTE INPUT
PLATES
LE-1 Extension Port 1 Tick Zones with LE-1 Plates connected to each
Extension Port
Extension Port 2
Extension Port 3
Extension Port 4
BE-1 Extension Port 1 Tick Zones with BE-1 Plates connected to each
Extension Port
Extension Port 2
Extension Port 3
Extension Port 4
ME-1 Mic Input 1 Tick Zones with ME-1 Plates connected to each
Mic Input
Mic Input 2
Mic Input 3
Mic Input 4
INPUT SETTINGS NAME Enter Name of Input
MUSIC
Input Gain Record settings
GLOBAL SETTINGS SETTINGS
ROUTING MENU Access Connector Input or Output
CDPM Zone Offset Record value (if used)
CDR Zone Offset
SYSTEM MENU RS232 Baud Rate Record settings
RS232 Flow Control
Power Up Mode Factory/Defaults/Last
PRIORITIES MENU Emergency Source Record Input assigned
Emergency Level Estimate % level
Music Mute Input NO or NC
Page 64

DCM-1 User Manual v1.062
Notes
Page 65

DCM-1 User Manual v1.0 63
Notes
Page 66

DCM-1 User Manual v1.064
Notes
Page 67

Page 68

Cloud Electronics Limited
140 Staniforth Road
Shefeld S9 3HF
England
Tel: +44 (0)114 244 7051
Fax: +44 (0)114 242 5462
email: info@cloud.co.uk
web: www.cloud.co.uk
 Loading...