

Page 1

Version 6
46/50
Setup and
Installation Guide
46/50 INTEGRATED MIXER-AMPLIFIER
Cloud Electronics Limited
Copyright Cloud Electronics Limited 2013
‘Clearly Better Sound’
Page 2

CLOUD ELECTRONICS LIMITED
46/50 Setup and Installation Guide
©
Cloud Electronics Limited
140 Staniforth Road • Sheffield S9 3HF • England
Phone +44 (0)114 244 7051 • Fax +44 (0)114 242 5462
E-mail technical@cloud.co.uk • WebSite www.cloud.co.uk
Page 3

CLOUD ELECTRONICS LIMITED
Table of Contents
Section Page
46/50 Integrated Mixer Amplifier Setup And Installation Guide
1 Safety Notes . . . . . . . . . . . . . . . . . . . . . . . . . . . . . . . . . . . . . . . . .1
2 General Description . . . . . . . . . . . . . . . . . . . . . . . . . . . . . . . . . . .1
3 Schematic Diagram . . . . . . . . . . . . . . . . . . . . . . . . . . . . . . . . . . . .2
4 Installation . . . . . . . . . . . . . . . . . . . . . . . . . . . . . . . . . . . . . . . . . . .2
5 Music Inputs . . . . . . . . . . . . . . . . . . . . . . . . . . . . . . . . . . . . . . . . .2
5.1 Sensitivity & Gain Control . . . . . . . . . . . . . . . . . . . . . . . . . .2
5.2 Music Control - Local or Remote . . . . . . . . . . . . . . . . . . . . .3
5.3 Music Equalisation . . . . . . . . . . . . . . . . . . . . . . . . . . . . . . . . .4
5.4 Line 6 Priority over Zone 1 . . . . . . . . . . . . . . . . . . . . . . . . . .4
6 Microphone Inputs . . . . . . . . . . . . . . . . . . . . . . . . . . . . . . . . . . . .5
6.1 Paging Microphone & Access Contacts . . . . . . . . . . . . . . . .6
6.2 Connecting Multiple PM4s to a 46/50 . . . . . . . . . . . . . . . . .7
6.3 Microphone Gain Control . . . . . . . . . . . . . . . . . . . . . . . . . . .7
6.4 Microphone Equalisation . . . . . . . . . . . . . . . . . . . . . . . . . . .7
6.5 High Pass Filter . . . . . . . . . . . . . . . . . . . . . . . . . . . . . . . . . . .7
6.6 Microphone Level Controls . . . . . . . . . . . . . . . . . . . . . . . . . .8
6.7 Microphone Priority . . . . . . . . . . . . . . . . . . . . . . . . . . . . . . . .8
7 Output Details . . . . . . . . . . . . . . . . . . . . . . . . . . . . . . . . . . . . . . .9
7.1 Speaker Outputs . . . . . . . . . . . . . . . . . . . . . . . . . . . . . . . . . . .9
7.2 Auxiliary Outputs . . . . . . . . . . . . . . . . . . . . . . . . . . . . . . . . . .9
8 Slave Facility . . . . . . . . . . . . . . . . . . . . . . . . . . . . . . . . . . . . . . . . .9
9 Zone 1 Facility Input . . . . . . . . . . . . . . . . . . . . . . . . . . . . . . . . .10
10 Power Supply Capacity . . . . . . . . . . . . . . . . . . . . . . . . . . . . . . .10
Page 4

CLOUD ELECTRONICS LIMITED
Table of Contents
Section Page
46/50 Integrated Mixer Amplifier Setup And Installation Guide
11 Active Remote Modules . . . . . . . . . . . . . . . . . . . . . . . . . . . . . .11
11.1 AE-1 Aerobics Module . . . . . . . . . . . . . . . . . . . . . . . . . . .11
11.2 DM-1 Dual Microphone Input Module . . . . . . . . . . . . . .12
11.3 Wiring 2 or more DM-1's in a daisy chain format . . . . . .12
11.4 LM-1 Mic/line plus remote control of music signals. . . .13
12 Microphone Priority over Facility Input . . . . . . . . . . . . . . . .13
13 Active Speaker Equalisation Modules . . . . . . . . . . . . . . . . . . .14
14 100V or 70V Line Operation . . . . . . . . . . . . . . . . . . . . . . . . . .15
15 Remote Music Mute - Fire Alarm interface . . . . . . . . . . . . . .15
16 DC Control of Music Functions . . . . . . . . . . . . . . . . . . . . . . .16
17 Solving problems . . . . . . . . . . . . . . . . . . . . . . . . . . . . . . . . . . .17
17.1 Ground loops (aka Earth loops) . . . . . . . . . . . . . . . . . . . .17
17.2 Connecting balanced signals to unbalanced line inputs. .17
18 Technical Specification . . . . . . . . . . . . . . . . . . . . . . . . . . . . . . .18
19 General Specifications . . . . . . . . . . . . . . . . . . . . . . . . . . . . . . .18
Page 5

46/50 Integrated Mixer Amplifier Setup And Installation Guide
CLOUD ELECTRONICS LIMITED
1 Safety Notes
For more detailed information refer to the rear of the manual.
• Do not expose the unit to water or moisture.
• Do not expose the unit to naked flames.
• Do not block or restrict any air vent.
• Do not operate the unit in ambient temperatures above 35°C.
• Do not touch any part or terminal carrying the hazardous live symbol ( ) while power is
supplied to the unit.
• Do not perform any internal adjustments unless you are qualified to do so and fully
understand the hazards associated with mains operated equipment.
• The unit has no user serviceable parts. Refer any servicing to qualified service personnel.
• If the moulded plug is cut off the lead for any reason, the discarded plug is a potential
hazard and should be disposed of in a responsible manner.
2 General Description
The Cloud 46/50 is a versatile, Four Zone 50W x 4 Integrated Mixer Amplifier. It has applications where
up to two microphones and six line level music signals are required to feed four separate areas in any
combination. There are various optional accessories that extend the flexibility of the 46/50:
• A paging mic with pre-announcement chime.
• Optional remote plates that allow remote control of music level and source selection.
• An internally mounted 4 channel 100V/70V line transformer module.
• Active input modules for Zone 1 only, such as the DM-1 or LM-1.
• Internal active equalisation modules for speakers
Along with these accessories the 46/50 has: - microphone priorities, fire alarm mute, auxiliary outputs for
Zones 1 & 2 only and the possibility for Line 6 to have priority over the music signals of Zone 1 only.
The front panel controls are reduced to a minimum to avoid confusion; if preferred, the 46/50 can be
positioned in a protected area with the remote music source and level controls positioned in the most
appropriate location. All pre-set controls are on the rear panel or on the front panel protected by a cover.
1
V6 070113
Page 6
46/50 Integrated Mixer Amplifier Setup And Installation Guide
CLOUD ELECTRONICS LIMITED
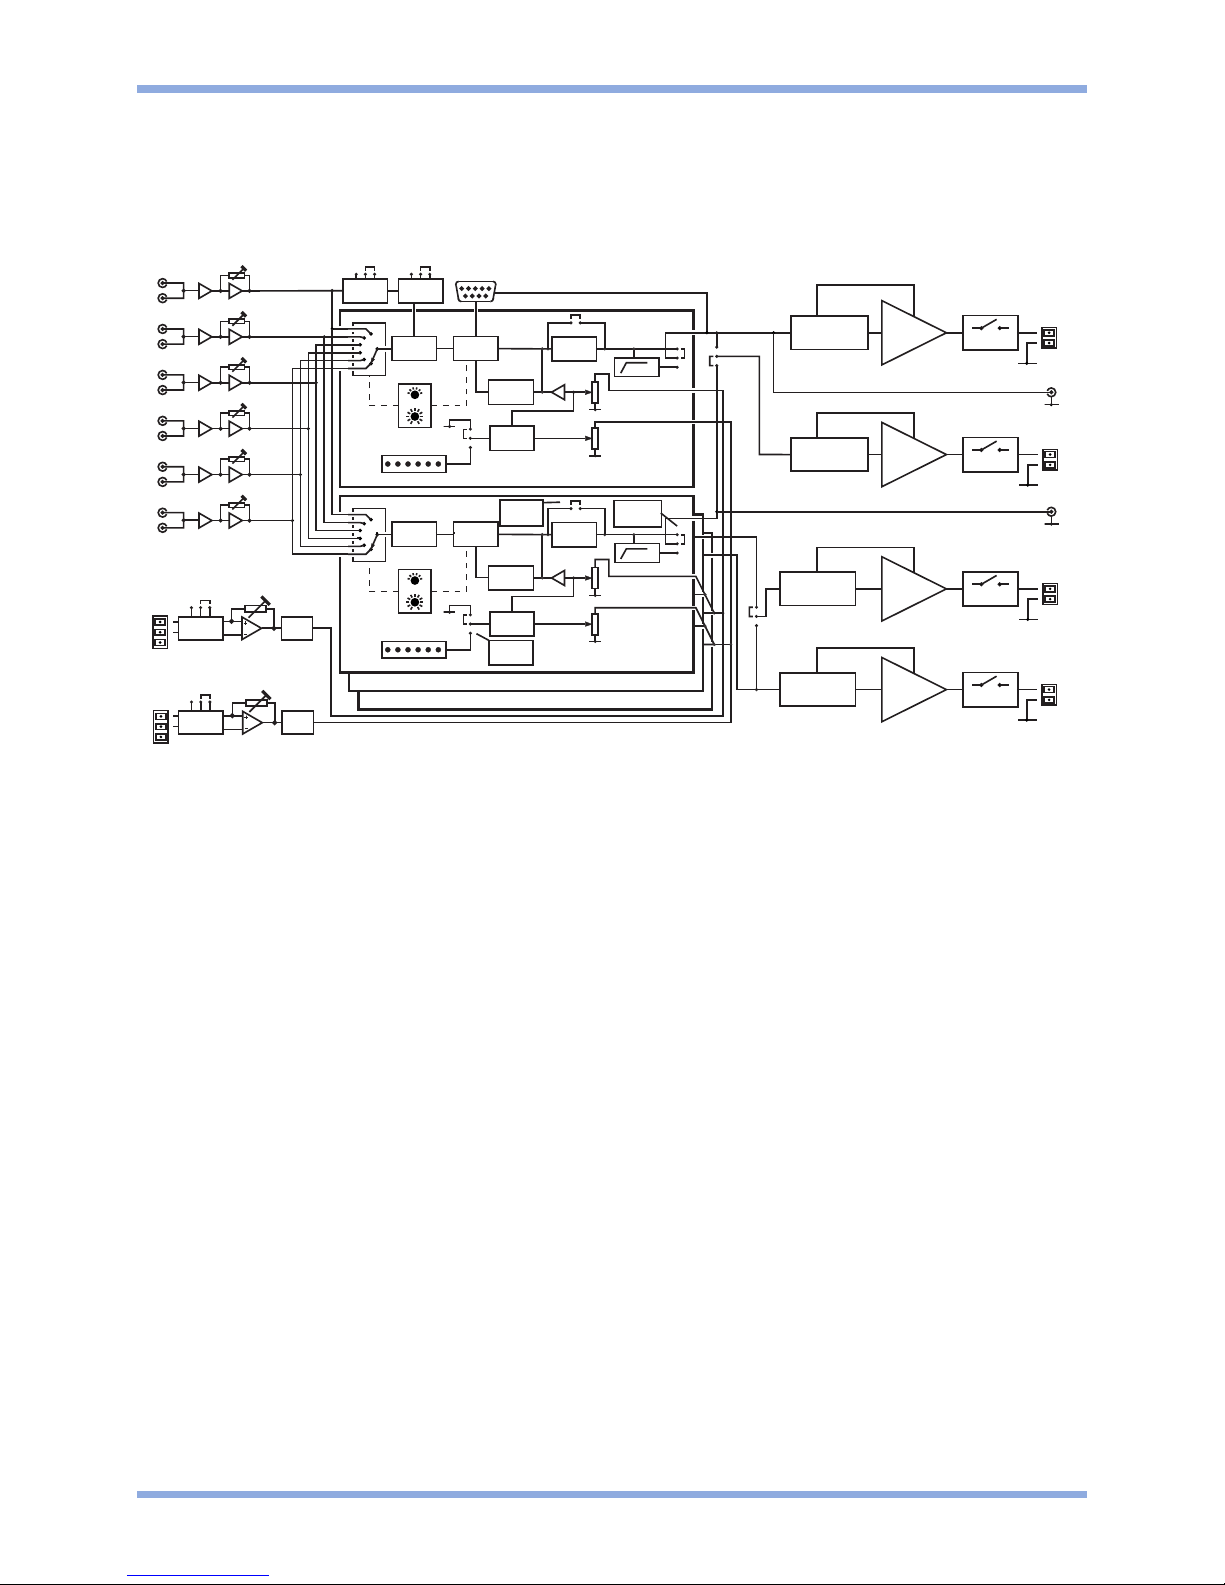
3 Schematic Diagram
4 Installation
The Cloud 46/50 occupies two units of a standard 19" equipment rack. Sufficient ventilation should be
provided particularly where it is required to deliver a high output power for long periods of time; the unit
draws cool air through the front panel and exhausts through the rear panel. The 46/50 is 320mm deep
but a depth of 400mm should be allowed to clear connectors.
5 Music Inputs
The 46/50 operates in mono but has six stereo line inputs, which are internally mixed to form a mono
signal. The line inputs are suitable for most music sources such as compact disc players, tape players
and receivers etc. All inputs are unbalanced and use RCA type phono sockets. Input impedance is 47kW.
5.1 Sensitivity & Gain Control
All six line inputs have a pre-set gain control on the rear panel adjacent to the respective input
sockets. The input sensitivity can be varied from -12dBu (195mV) to +8dBu (2.0V). The pre-set
gain controls should be set so that all the input signals operate at the same level within the 46/50
and the music level controls have an optimum range of control.
2
V6 070113
MUSIC
E
Q
MUSIC
V
CA
SPEAKER
MODULE
LINE6
LINE5
L
INE4
LINE3
L
INE2
LINE1
L
INE6
P
RIORITY
R
ELEASE
T
IME
MUSICEQMUSIC
VCA
SPEAKER
MODULE
6
5Hz
6
5Hz
R
SL-6(OPTIONAL)
M
IC1
M
IC2
OFF
ON
OFF
ON
J7
J
8
J23
PAGINGMICINTERFACE
G
ATE
PRIORITY
R
SL-6(OPTIONAL)
MIC1
MIC2
OFF
ON
OFF
O
N
PAGINGMICINTERFACE
GATE
PRIORITY
ZONE1
ZONE2
ZONE3
ZONE4
F
ACILITY PORT
EQ
GAIN
MIC1INPUT
EQ
GAIN
M
IC2INPUT
PHANTOM
POWER
PHANTOM
POWER
D
YNAMICCLIP
P
ROTECTION
DYNAMICCLIP
P
ROTECTION
D
YNAMICCLIP
PROTECTION
D
YNAMICCLIP
PROTECTION
PROTECT
PROTECT
P
ROTECT
PROTECT
5
0W
POWER
AMP
5
0W
P
OWER
AMP
5
0W
POWER
AMP
5
0W
P
OWER
A
MP
Z
ONE2=J9
ZONE3=J16
ZONE4=J18
Z
ONE2=J10
ZONE3=J17
ZONE4=J19
Z
ONE2=J22
ZONE3=J21
Z
ONE4=J20
SLAVEZONE3
AMP TOZONE4
Z
ONE1
O
UTPUT
Z1 AUXOUT
Z2 AUXOUT
ZONE2
O
UTPUT
ZONE3
OUTPUT
ZONE4
OUTPUT
OFF
O
N
OFF
O
N
J
13
J15
ON
ON
J1
J
25
J24
ON
OFF
J2
O
FF
OFF 3s
6s
SLAVE
Z
ONE2
A
MP TO
ZONE1
Page 7
46/50 Integrated Mixer Amplifier Setup And Installation Guide
CLOUD ELECTRONICS LIMITED
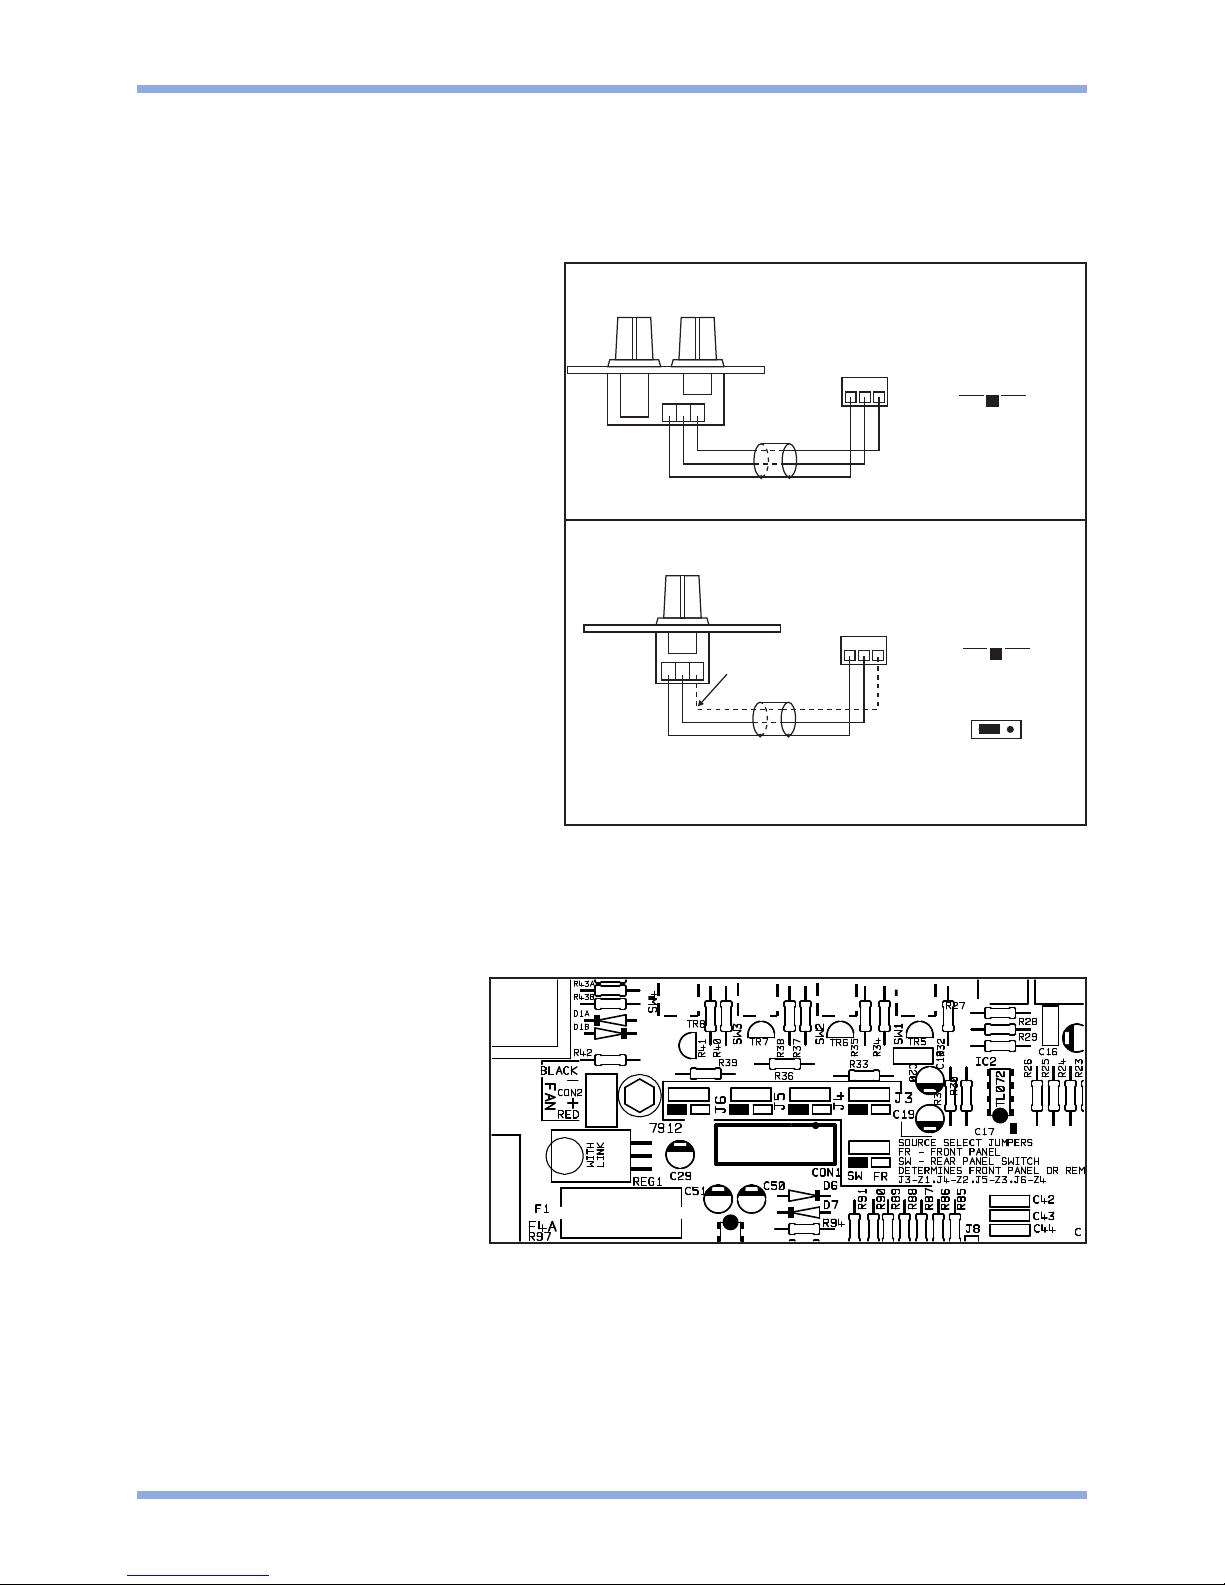
5.2 Music Control - Local or Remote
The music source and music
level control functions can be
controlled from either the front
panel, or a remote control plate
located up to 100m from the
46/50. There are two remote
control plates available for the
46/50 the RSL-6 and the RL-1.
The RSL-6 should be used
when remote control of music
source and music level is
required whereas the RL-1 can
be used when the application
calls for remote control of the
level only (source selection via
front panel). RSL-6 and RL-1
remote control plates can be
mounted onto a standard British
flush or surface mounted 25mm
deep back box. Two-core cable
with overall screen should be
used to connect the remote
controls to the Cloud 46/50 the
diagrams above show how to
connect the two remote plates.
When using an RL-1 remote level control with the 46/50, the relevant jumpers (see list below)
should be in the 'FR' position to allow front panel control of the music source. Self-adhesive
labels (supplied) can be affixed to the front panel and/or RSL-6 to identify the available input
sources.
The RSL-6A and RL-1A are available for the American market. They operate identically to the
RSL-6 and RL-1 but have been designed to fit a single gang US electrical outlet box. Front panel
dimensions are 4
1
/2"x 23/4"
3
V6 070113
1
23
RSL-6
1
23
3POLE
CONNECTOR
MUSICCONTROL
R
EMOTE(IN)
M
USICCONTROLSWITCHSHOULD
BESETTOTHE‘REMOTE’POSITION
S
TANDARDWIRINGCONVENTION
USETWO-CORESCREENEDCABLE
REMOTECONTROLOFMUSICSOURCEANDLEVEL
123
3POLE
CONNECTOR
MUSICCONTROL
REMOTE(IN)
MUSICCONTROLSWITCHSHOULD
BESETTOTHE‘REMOTE’POSITION
FORAPPLICATIONSREQUIRINGREMOTECONTROLOF
MUSICLEVELWITHFRONTPANELSOURCESELECTION
REMOTECONTROLOFMUSICLEVEL (WITHFRONTPANELSOURCESELECTION)
123
RL-1
SOURCE
SELECT
JUMPER
FRSW
THERELEVANTJUMPERSSHOULD
BESETTOTHE‘FR’POSITION
ATTENTION!
REMOVEPOWERCABLEBEFOREMAKINGANYINTERNALADJUSTMENTS
OPTIONALWIRE
Location of J3, J4, J5 and J6
J3: Zone 1
J4: Zone 2
J5: Zone 3
J6: Zone 4
Page 8
46/50 Integrated Mixer Amplifier Setup And Installation Guide
CLOUD ELECTRONICS LIMITED
5.3 Music Equalisation
Each zone has separate treble and bass controls for the music signals only, allowing an installer
to tailor the response of the music signals to suit the acoustics and speakers of each individual
zone. The equalisation controls are concealed behind a removable plate secured to the front
panel with Allen screws; to gain access to the equalisation controls use the supplied Allen key.
Once the plate has been removed the equalisation controls can be seen below the music
controls for each zone; they are clearly marked 'HF' (High Frequency) and 'LF' (Low Frequency).
A flat frequency response can be achieved by positioning the slots on the control shafts in the
horizontal plane; the HF control has a range of ±10dB at 10kHz and the LF control has a range
of ±10dB at 50Hz.
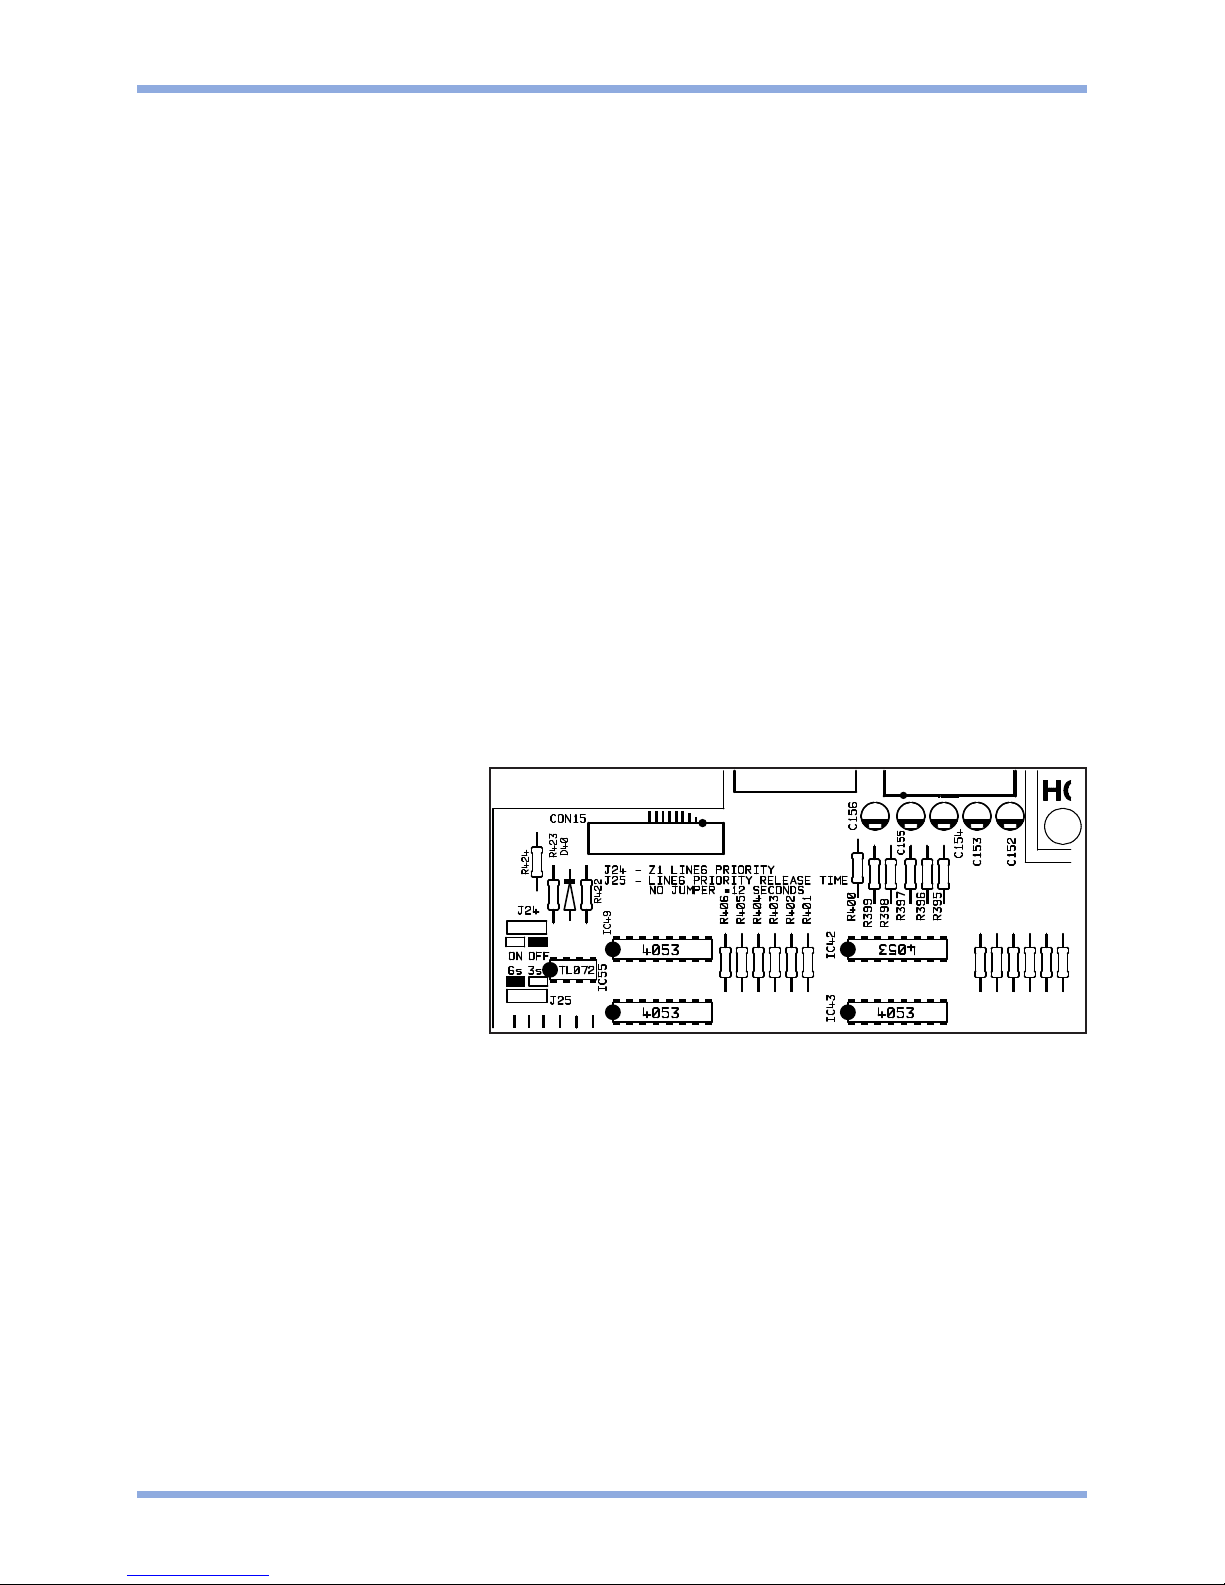
5.4 Line 6 Priority over Zone 1
The Cloud 46/50 has a facility that allows Line 6 a fully automatic priority over the music signal
of Zone 1 only. This is intended for use with input sources such as jukeboxes or spot
announcement players. Should you wish to activate line 6 priority set internal jumper J24 to the
'ON' position. When line 6 priority is activated, Zone 1 functions normally until a signal is detected
at line 6, at which point the selected music source in Zone 1 will mute, allowing the line 6 signal
to be heard. Once the signal on line 6 ceases, the selected music source in Zone 1 will smoothly
restore to its former level. The time taken for this restoration can be 3, 6 or 12 seconds
dependant on how internal jumper J25 has been set; the factory default restoration time is 3
seconds.
When setting the jumper please ensure that you:
• Remove the mains cable from the rear of the product before removing the top
panel.
• Only reassemble the unit using screws identical to the original parts.
4
V6 070113
Location of Jumper J24 and J25
J24: L6 Priority on/off
J25: Release Tme
3s
6s
12s
Page 9

46/50 Integrated Mixer Amplifier Setup And Installation Guide
CLOUD ELECTRONICS LIMITED
6 Microphone Inputs
Two microphone inputs are provided each having electronically balanced, transformer-less circuitry
configured for optimum low noise performance. The input impedance is greater than 2kW and suitable for
microphones in the 200W to 600W range. Inputs are via 3-pin plug in screw terminal type connectors
(Phoenix type) located on the rear panel. A facility to provide 15V phantom power is included for each
microphone that is activated by setting the relevant internal jumpers from the list below to the ‘ON'
position:
J1: Mic 1 Phantom Power
J2: Mic 2 Phantom Power
For balanced mics connect the screen to pin 1, the in-phase signal (+) to pin 3 and reverse phase signal
(-) to pin 2. For unbalanced mics, connect pin 1 (ground) to pin 2 then use pin 1 for the cable screen and
pin 3 as hot. Do not use the phantom power facility with unbalanced terminations.
When setting the jumper(s) please ensure that you:
• Remove the mains cable from the rear of the product before removing the top panel.
• Only reassemble the unit using screws identical to the original parts.
• Use a microphone that requires phantom power.
5
V6 070113
Location of Jumper J1 and J2
1
23
3POLE
CONNECTOR
GROUND(SCREEN)
REV-PHASE(-)
IN-PHASE(+)
123
3POLE
CONNECTOR
GROUND(SCREEN)
IN-PHASE(+)
MICINPUTTERMINATION
BALANCED
UNBALANCED
Diagrams Show Balanced and Unbalanced Microphone Wiring
Page 10
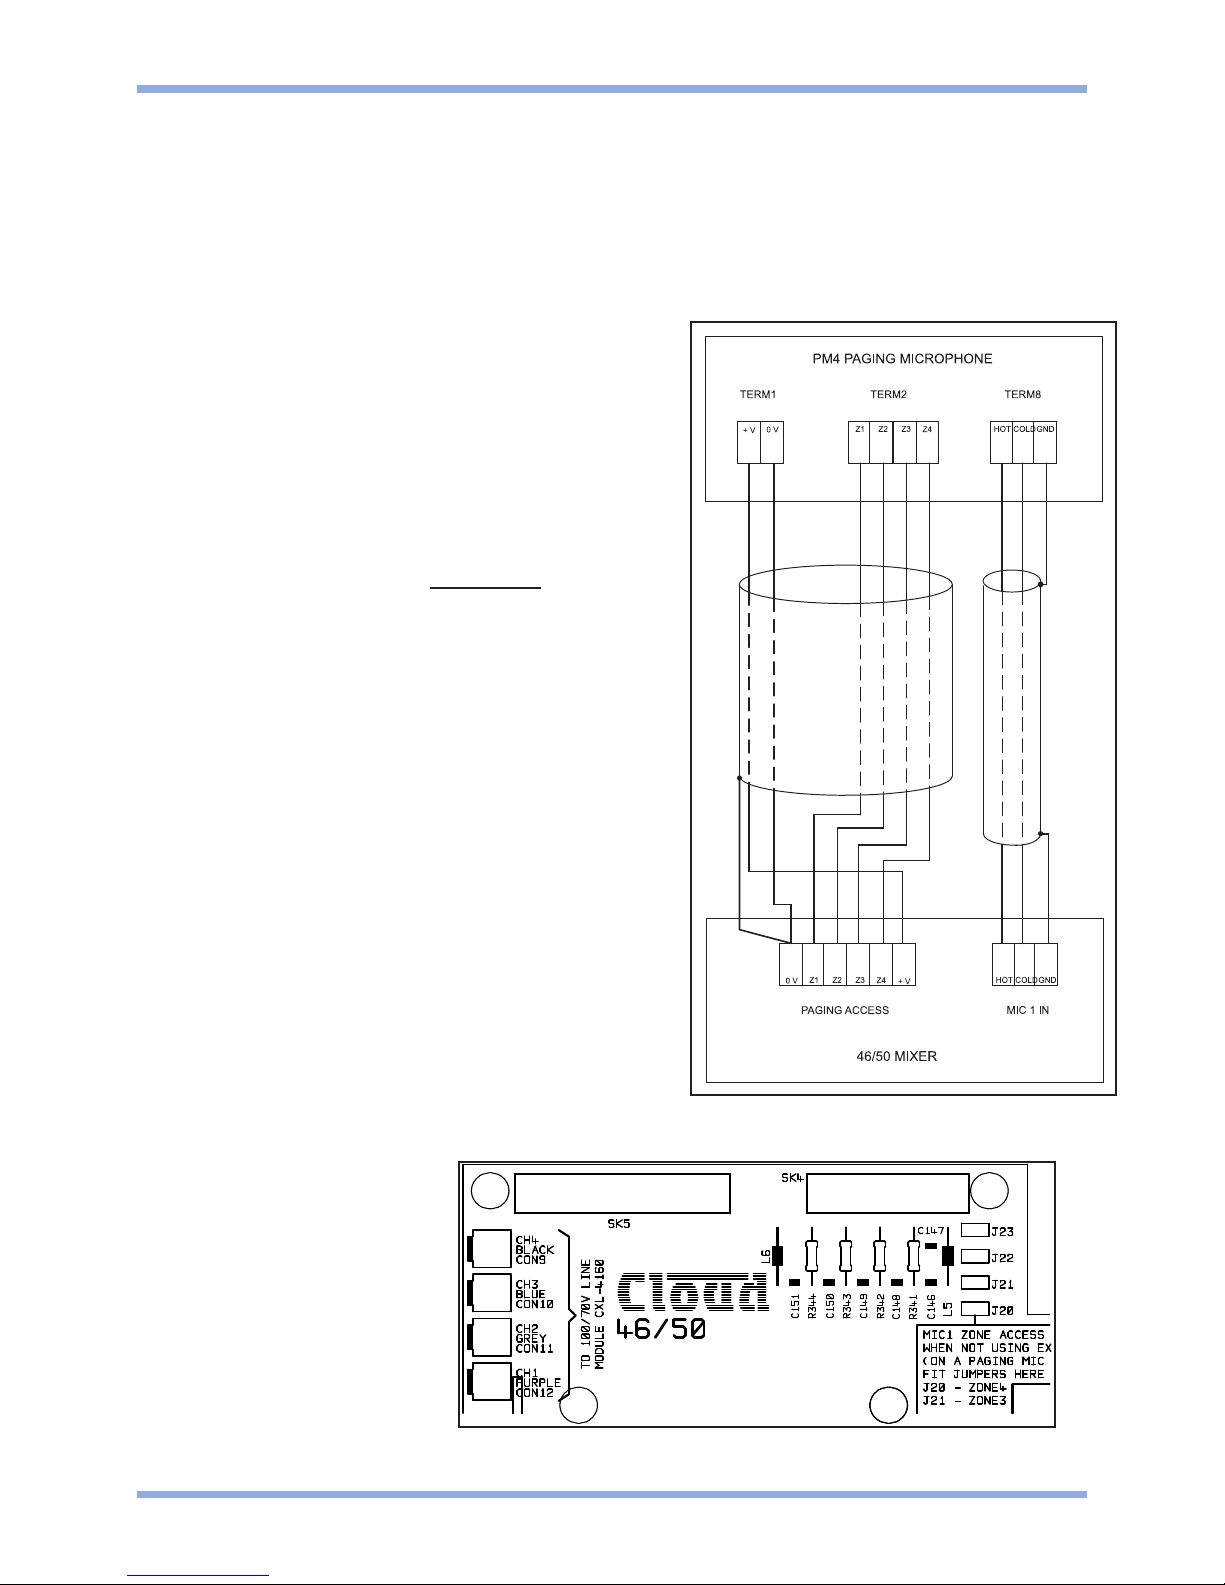
6.1 Paging Microphone & Access Contacts
The Cloud PM4 four zone paging microphone is an accessory for the Cloud 46/50; it features
zone selection switches which allow paging to all four zones in any combination and a 'call all'
button that is used for convenient announcements to all zones. In addition to this the PM4 has
a built in chime.
The PM4 connects to the 46/50 via its analogue
interface. It must be wired using 2-core
screened cable directly to the MIC 1 input and
6-core cable with overall screen to the paging
microphone connector (as shown adjacent).
See “PM4/8/12/16 Installation and User
Guide”, page 18, “Connecting the PM to a
mixer via the analogue interface” for more
details.
IMPORTANT
When connecting a PM4 to the 46/50, jumpers
J20,21,22 and 23 must be removed for the
paging microphone to operate correctly. A
diagram that shows the jumper locations on the
46/50 PCB can be found below.
NOTE: We advise that when you remove a
jumper you leave it connected to one pin of the
header so it remains with the apparatus for
future use.
When setting the jumper(s) please ensure that
you:
• Remove the mains cable from
the rear of the product before
removing the top panel.
• Only reassemble the unit using
screws identical to the original
parts.
46/50 Integrated Mixer Amplifier Setup And Installation Guide
CLOUD ELECTRONICS LIMITED
6
V6 070113
Wiring a PM4 to a 46/50
Location of Jumpers J20, J21, J22 and J23
J20: Bypass Zone 4
J21: Bypass Zone 3
J22: Bypass Zone 2
J23: Bypass Zone 1
Page 11

46/50 Integrated Mixer Amplifier Setup And Installation Guide
CLOUD ELECTRONICS LIMITED
6.2 Connecting Multiple PM4s to a 46/50
Multiple PM4 microphones can be connected to the 46/50 by wiring them either in parallel with
their analogue interface or daisy chaining the digital interface. See the “PM4/8/12/16
Installation and User Guide”, page 27, “Systems with multiple paging microphones” for
more details. If wiring using the analogue interface note that the 46/50 can only supply enough
power for one paging microphone, any additional PM4 mics will require their own external power
supply (CPM-PSU) and should not have their +V termination wired back to the 46/50. See
section 10 for details of current availibility and consumption.
6.3 Microphone Gain Control
Pre-set gain controls are provided adjacent to the respective microphone input. The gain can be
adjusted from 10dB to 50dB. A high overload margin is maintained at all gain settings.
6.4 Microphone Equalisation
Two-band equalisation is provided for both Mic 1 and Mic 2. The pre-set controls to adjust the
equalisation are located to the right of each rear panel microphone connector. The
characteristics of the equalisation are optimised for the tonal correction of speech signals. The
HF control provides ±10dB at 5kHz whilst the LF control provides ±10dB at 100Hz.
6.5 High Pass Filter
Both microphone channels pass through independent high pass filters operating at 100Hz that
provide effective attenuation of breath blasts and LF handling noises. The circuitry providing this
feature is fixed and cannot be defeated.
7
V6 070113
Page 12

46/50 Integrated Mixer Amplifier Setup And Installation Guide
CLOUD ELECTRONICS LIMITED
6.6 Microphone Level Controls
Each zone has separate front panel mounted level controls for Mic 1 and Mic 2. The level
controls allow the user to adjust the microphone signals to a suitable level in any zone; rotating
any Mic level control fully anti-clockwise effectively turns the microphone off.
All microphone signals are routed directly to the respective power amplifier stage, and are
therefore totally unaffected by the music controls and line 6 priority. Mic 1 and Mic 2 rear panel
gain controls should be set to a level where it is not possible to have excessive gain even when
the front panel level controls are fully clockwise.
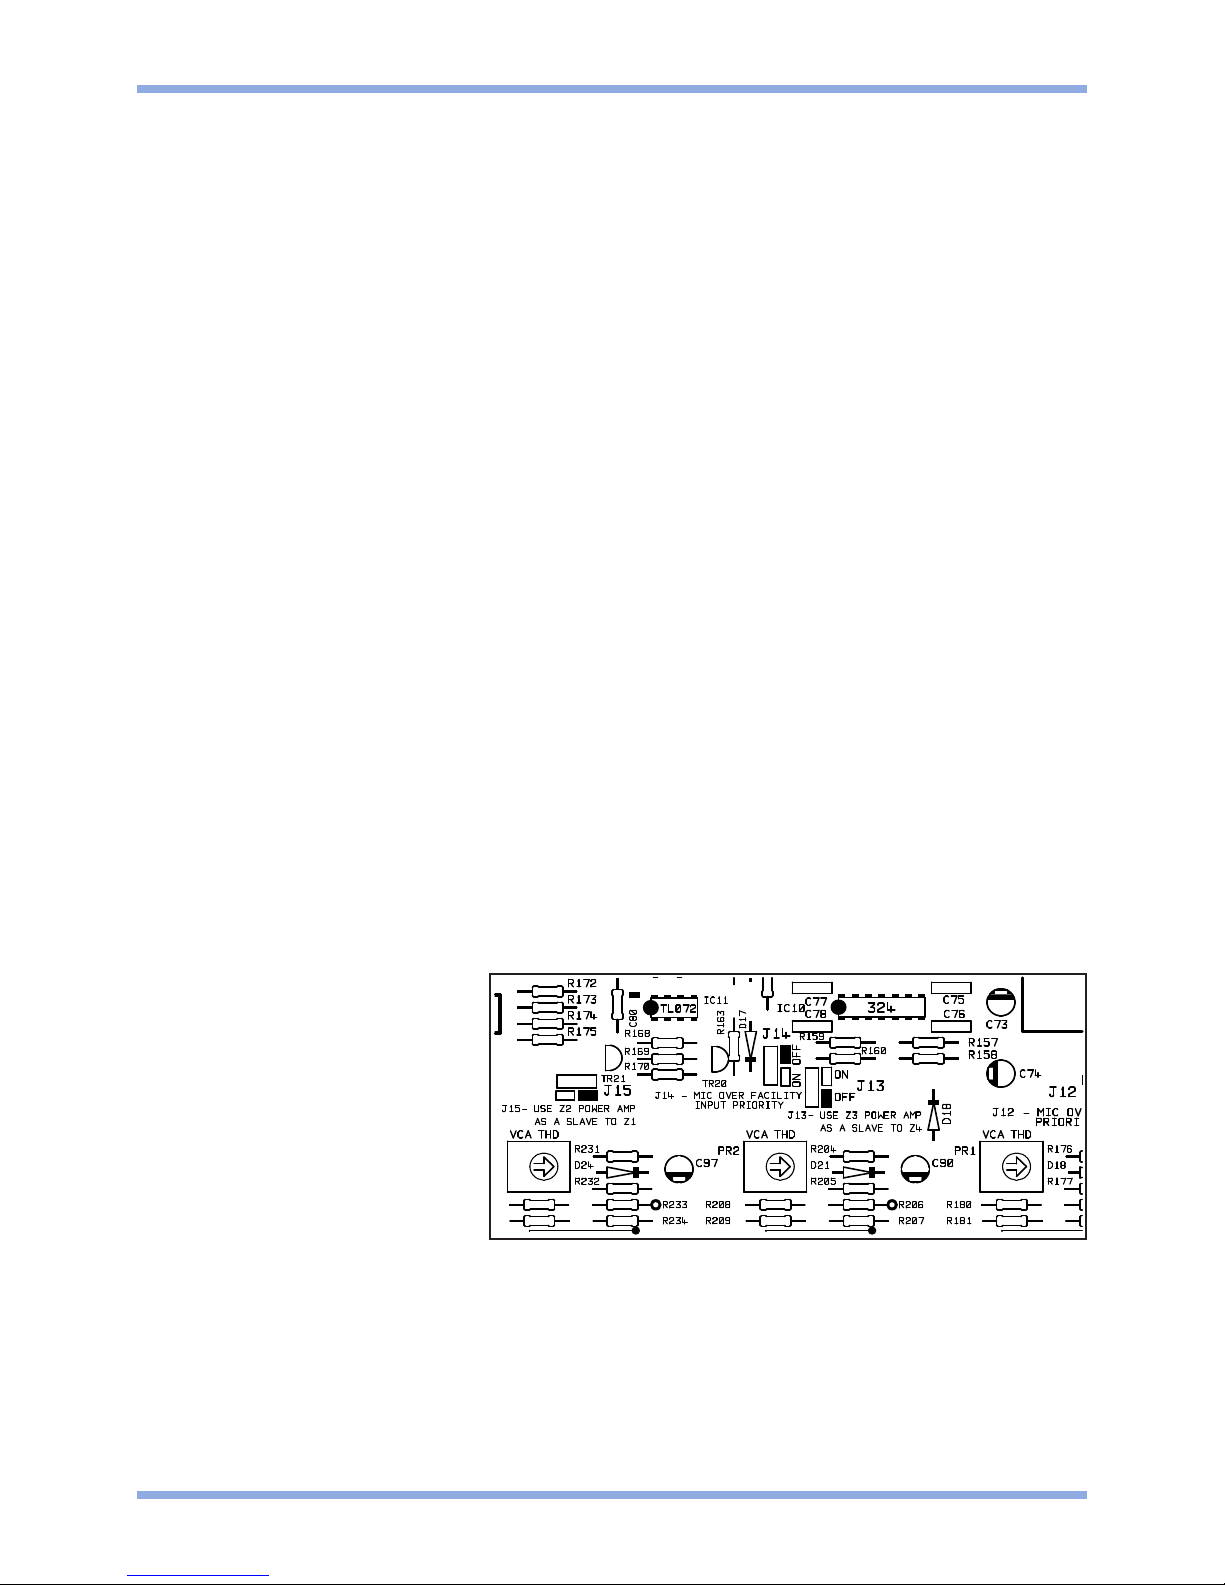
6.7 Microphone Priority
Independent, automatic voice operated priority is provided so that when a microphone is used,
the music signals will attenuate by approximately 30dB; after the announcement, the music
signals will restore smoothly to their former level. If microphone over music priority is not desired
set internal jumper J12 to the 'OFF' position. PCB location of jumper J12 is shown below: -
A second microphone priority allows the signals of Mic 1 to mute those of Mic 2. This Mic 1 over
Mic 2 priority in each zone can be defeated by removing a diode from the PCB; D30 for Zone 1,
D25 for Zone 2, D22 for Zone 3, and D19 for Zone 4.
When removing diodes D19, D22, D25 or D30 or setting jumper J12 please ensure that you:
• Remove the mains cable from the rear of the product before removing the top
panel.
• Only reassemble the unit using screws identical to the original parts.
8
V6 070113
Location of Jumper J12
Location of D19, D22, D25, and D30.
Page 13
46/50 Integrated Mixer Amplifier Setup And Installation Guide
CLOUD ELECTRONICS LIMITED
7 Output Details
7.1 Speaker Outputs
Each speaker output uses a 2-pole plug-in screw terminal (Phoenix type) located on the rear
panel; these connectors can accommodate flexible leads up to 2.5mm². It is good practice to
distance output wiring from input wiring at all times and use twisted pair cable for the speaker
wiring, ensuring that it remains twisted right up until termination.
7.2 Auxiliary Outputs
Auxiliary outputs are provided on the 46/50 for zones 1 and 2 only. The audio from these outputs
follows the programme in the respective zone up to the equalisation module fittings. The outputs
are taken prior to the slave jumpers (see section 8). Each output is nominally 0dBu (775mV rms)
and can be used to connect to a slave amplifier for areas where more than 50W of power is
required. It is possible to use both the auxiliary output and the speaker output on a given zone
at the same time.
8 Slave Facility
Where the application has fewer than 4 zones, and one or more of the zones require more than 50W, the
46/50 provides a facility to slave two amplifier output stages to a single mixer stage. This is achieved by
setting the appropriate internal jumper to the ‘ON’ position. The amplifier for zone 2 can be slaved to
follow the programme on zone 1 (jumper J15), and the amplifier for zone 3 can be slaved to follow the
programme on zone 4 (jumper J13). Note that each speaker output will still require an isolated speaker
network regardless of the slave settings. This means that the areas which require more than 50W will
need to be split into two networks of 50W or less. The amplifier sections of the 46/50 cannot be
configured to run in bridged mode.
NOTE: When using the zone 2 amplifier as a slave to zone 1, the zone 2 auxiliary output still follows the
programme on zone 2.
9
V6 070113
J15: Links Zone 1 Programme
to Zone 2 Amplifier
J13: Links Zone 3 Programme
to Zone 4 Amplifier
Location of Jumpers J13 and J15
Page 14

9 Zone 1 Facility Input
Zone 1 has a facility input; this 9 pin sub D connector provides
direct access to the zone and is primarily used to connect one of
the dedicated active remote input modules such as the DM-1 or
LM-1. An active module can extend the facilities of the 46/50 by
providing local zone access and control remotely. (See section
11 for more details on active modules).
10 Power Supply Capacity
The power supply of the 46/50 has an external load capacity of 80mA. Care should be taken when wiring
or connecting modules and external devices to the 46/50 since exceeding the external load capacity risks
temporary power supply failure. The table below lists the current consumption of each compatible 46/50
module and external device. Use this table to verify that the external load of your proposed system falls
within the specified limits.
NOTE: If the 46/50 has a PM4 paging microphone installed, you have the option to power the microphone
with the 'CPM-PSU' external power supply. This will reduce the load on the system by 72mA. If a power
supply failure occurs switch off the 46/50 and disconnect the external devices, the 46/50 should be left
off for approximately 30 seconds to allow it to reset. Check the wiring and total current consumption of
the external active devices before reconnecting the power and if the problem persists contact our
technical department.
External Active Device / Internal Module Current Consumption
PM4 72mA
AE-1 9mA
DM-1 18mA
LM-1 12mA
BOSE EQ: M8, M32, MA12, 402, 502A, 802, MB4,
MB24, 502B, 502BEX
12mA
BOSE EQ: LT3202, LT4402, LT9402, LT9702 17mA
BOSE EQ: M16 34mA
46/50 Integrated Mixer Amplifier Setup And Installation Guide
CLOUD ELECTRONICS LIMITED
10
V6 070113
1
2
34
5
6789
REMOTE
SOURCE
REMOTE
LEVEL
BALANCEDINPUT
+
-
NOISE
GATE
NOISY
0V
-15V
+15V
0V
VCACONTROL
VOLTAGE
Facility Input Pin Configuration
Page 15
46/50 Integrated Mixer Amplifier Setup And Installation Guide
CLOUD ELECTRONICS LIMITED
11 Active Remote Modules
The Cloud DM-1 & LM-1 are the same physical size as a double UK electrical socket (BS4662 & BS1363
type) and can be mounted in the recessed back box provided or be surfaced mounted in a standard
35mm deep housing. The modules should be wired back to the facility input of the 46/50 using a single
multi-core screened cable. The module terminations are conventional screw terminals and the facility
input on the 46/50 is a 9-pin sub-D type connector. A suitable 9 pin sub-D connector is provided with each
module. Great care must be taken when terminating the modules as power is derived from the 46/50 and
certain wiring errors can cause power supply problems resulting in temporary failure of the 46/50; always
check your wiring before testing the system. Please refer to section 9 for further details of the facility
input connector.
The AE-1A, DM-1A and LM-1A are available for the American market. They have identical operation to
the AE-1, DM-1 and LM-1 but have been designed to fit a 11/2" deep US three-gang box. The front panel
dimensions of the US variants are 41/2" x 63/8".
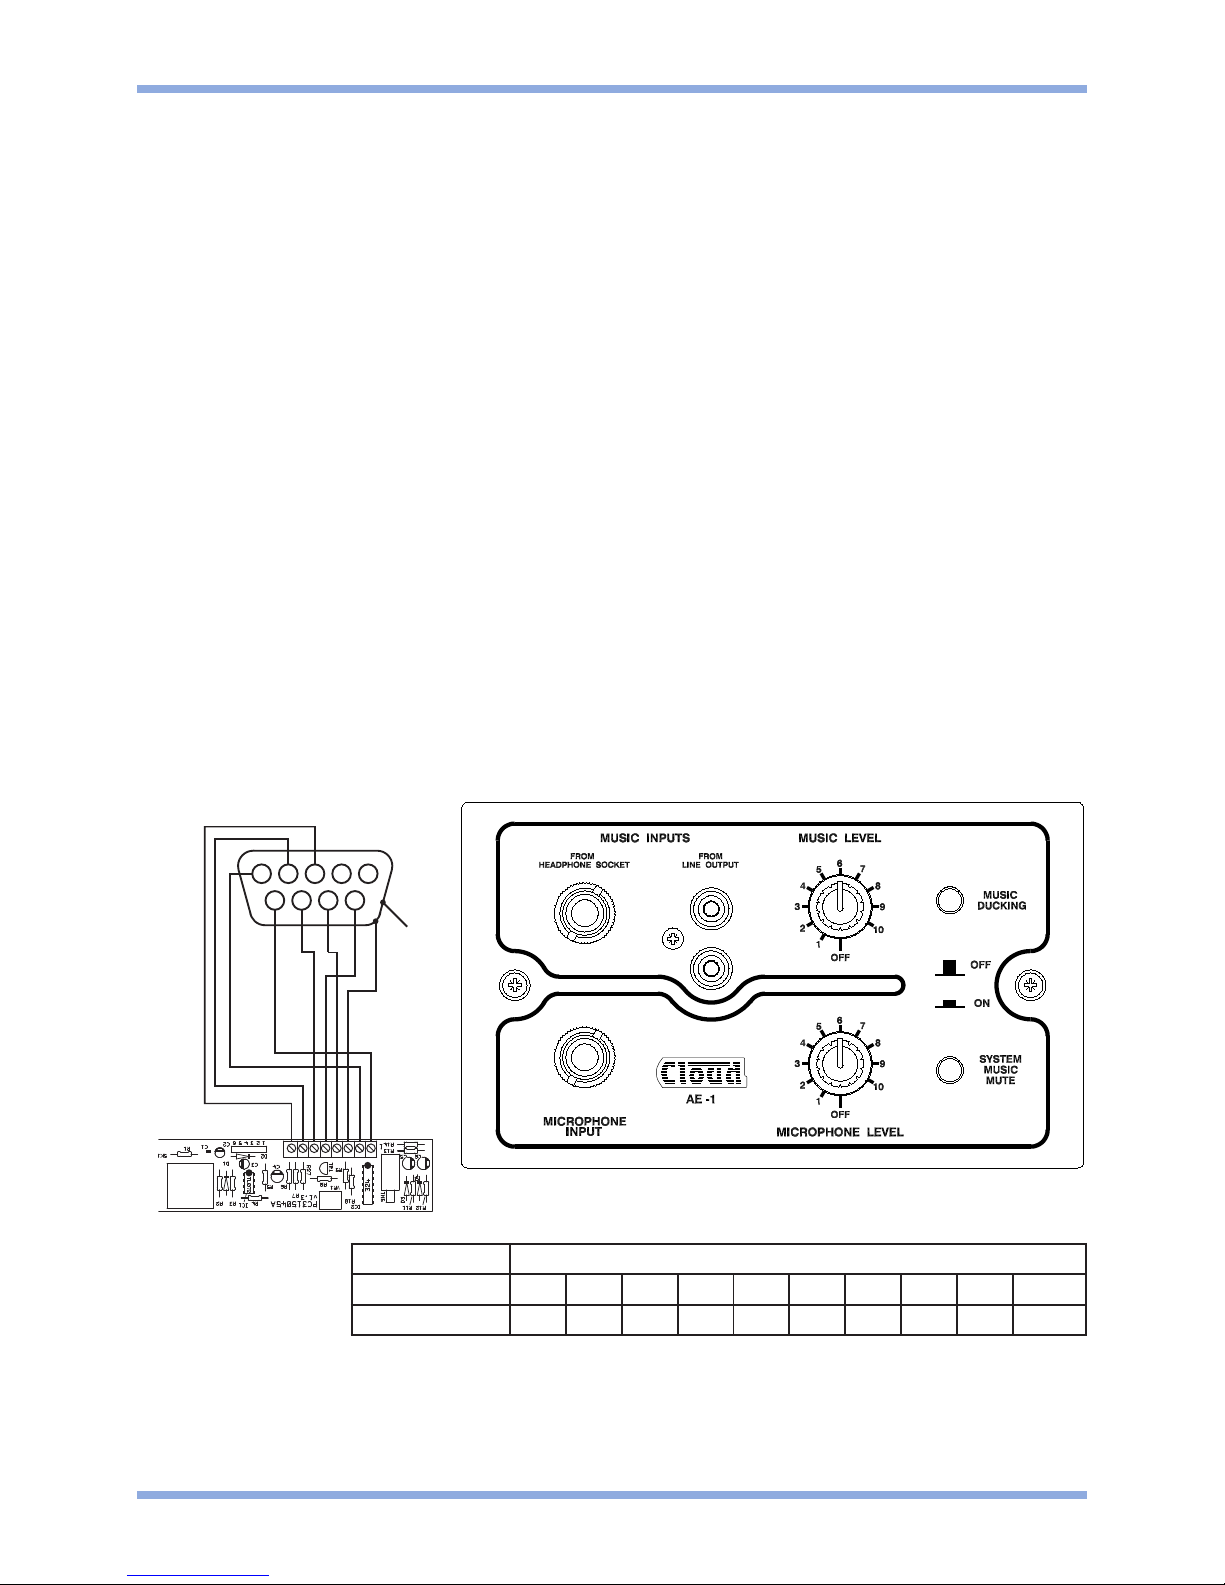
11.1 AE-1 Aerobics Module (obsolete)
The Cloud AE-1 is a remotely located active module with facilities for a line level music signal
and an unbalanced microphone. The AE-1 can be used for applications where the facilities it
provides match the system requirements, the prime application being the fitness suite where
aerobic instructors are required to connect their music source and radio mic directly into the
house system. A system music mute function allows AE-1 signals to mute main system music if
required. The 'music ducking' facility provides local mic over local music priority. Use 7-core
screened cable to link the AE-1 to the facility input.
11
V6 070113
1
2
345
6789
12345678
AE-1
FAC IL I TY
PORT
CABLE
SCREEN
CONNECTOR PIN NUMBER
9 PIN SUB D 1 2 3 4 5 6 7 8 9 SHELL
AE-1 Terminals N/C N/C 8 7 2 5 4 6 1 3
AE-1 CONNECTION TABLE
Page 16

46/50 Integrated Mixer Amplifier Setup And Installation Guide
CLOUD ELECTRONICS LIMITED
11.2 DM-1 Dual Microphone Input Module
The Cloud DM-1 is a remotely located active module with two balanced microphone inputs via 3
pin female XLR connectors. Each input has a level control and tamperproof treble and bass
equalisation controls. A 'music ducking' switch provides facility input priority over the main
system music if required. Modules can be linked when wired in a 'daisy chain' format (see section
11.3). Use 7-core screened cable to link the DM-1 to the facility input.
11.3 Wiring 2 or more DM-1's in a daisy chain format
The following diagram shows how to connect two DM-1's together in a daisy chain format, when
wired in this configuration the EQ controls on each DM-1 should be set to the neutral position; if
any adjustment is required then the controls of the DM-1 'nearest' the mixer should be used. Use
7-core screened cable to link first DM-1 to the facility input and 5-core screened cable when
wiring one DM-1 to another.
12
V6 070113
1
2
3
45
6789
FAC IL I TY
PORT
CABLE
SCREEN
DM-1
12345678
CONNECTOR PIN NUMBER
9 PIN SUB D 1 2 3 4 5 6 7 8 9 SHELL
DM-1 Terminals N/C N/C 5 6 2 7 8 4 1 3
DM-1 CONNECTION TABLE
1
2
345
6789
FAC IL I TY
PORT
CABLE
SCREEN
DM-1DM-1
1233 44 55 66 77 89108
Page 17

46/50 Integrated Mixer Amplifier Setup And Installation Guide
CLOUD ELECTRONICS LIMITED
11.4 LM-1 Mic/line plus remote control of music
signals.
The Cloud LM-1 is a remotely located active module with a balanced microphone input, a line
level music input and music source select & level controls (rather like a built in RSL-6). A
microphone priority switch provides the option to reduce the level of the music signal when the
mic is used. Use 9 core screened cable to wire the LM-1 to the 46/50. When an LM-1 is used
the music control switch should be set to the 'remote' position.
12 Microphone Priority over Facility Input
Mic 1 and Mic 2 have priority over facility input signals; should you wish to remove this priority set internal
jumper J14 (see diagram below) to the 'OFF' position.
When setting the jumper(s) please ensure that you:
• Remove the mains cable from the rear of the product before removing the top panel.
• Only reassemble the unit using screws identical to the original parts.
13
V6 070113
1
2
345
6789
FACILITYPORT
CABLE
SCREEN
123456789
10
LM-1
CONNECTOR PIN NUMBER
9 PIN SUB D 1 2 3 4 5 6 7 8 9 SHELL
LM-1 Terminals 1 2 7 6 4 9 10 8 5 3
LM-1 CONNECTION TABLE
J14: Microphone over Facility
audio priority
Location of Jumper J14
Page 18

46/50 Integrated Mixer Amplifier Setup And Installation Guide
CLOUD ELECTRONICS LIMITED
13 Active Speaker Equalisation Modules
Each output channel has the facility to connect a plug-in, speaker equaliser module. See the table below
for details of the connector for each output and the respective bypass jumper.
Installation:
1. Switch off the mains supply and remove the 46/50’s power lead.
2. Remove the unit’s top panel
3. Remove bypass jumper (see table below for jumper map). We advise that when
removing a jumper link, the connector remain attached to one pin of the header. This
prevents loss of the link.
4. Fit the EQ module card to the connector. The EQ card should be perpendicular
to the main board.
5. Apply moderate pressure to the EQ module until it locates with a click.
6. Replace the top panel.
NOTE: We advise that when you remove a jumper you leave it connected to one pin of the header so it
remains with the apparatus for future use.
When setting the jumper(s) please ensure that you:
• Remove the mains cable from the rear of the product before removing the top panel.
• Only reassemble the unit using screws identical to the original parts.
14
V6 070113
Location of Jumpers J8 and J10
Location of Jumpers J17 and J19
Zone Connector Jumper
1 CON 3 J8
2 CON 4 J10
3 CON 7 J17
4 CON 8 J19
Page 19
46/50 Integrated Mixer Amplifier Setup And Installation Guide
CLOUD ELECTRONICS LIMITED
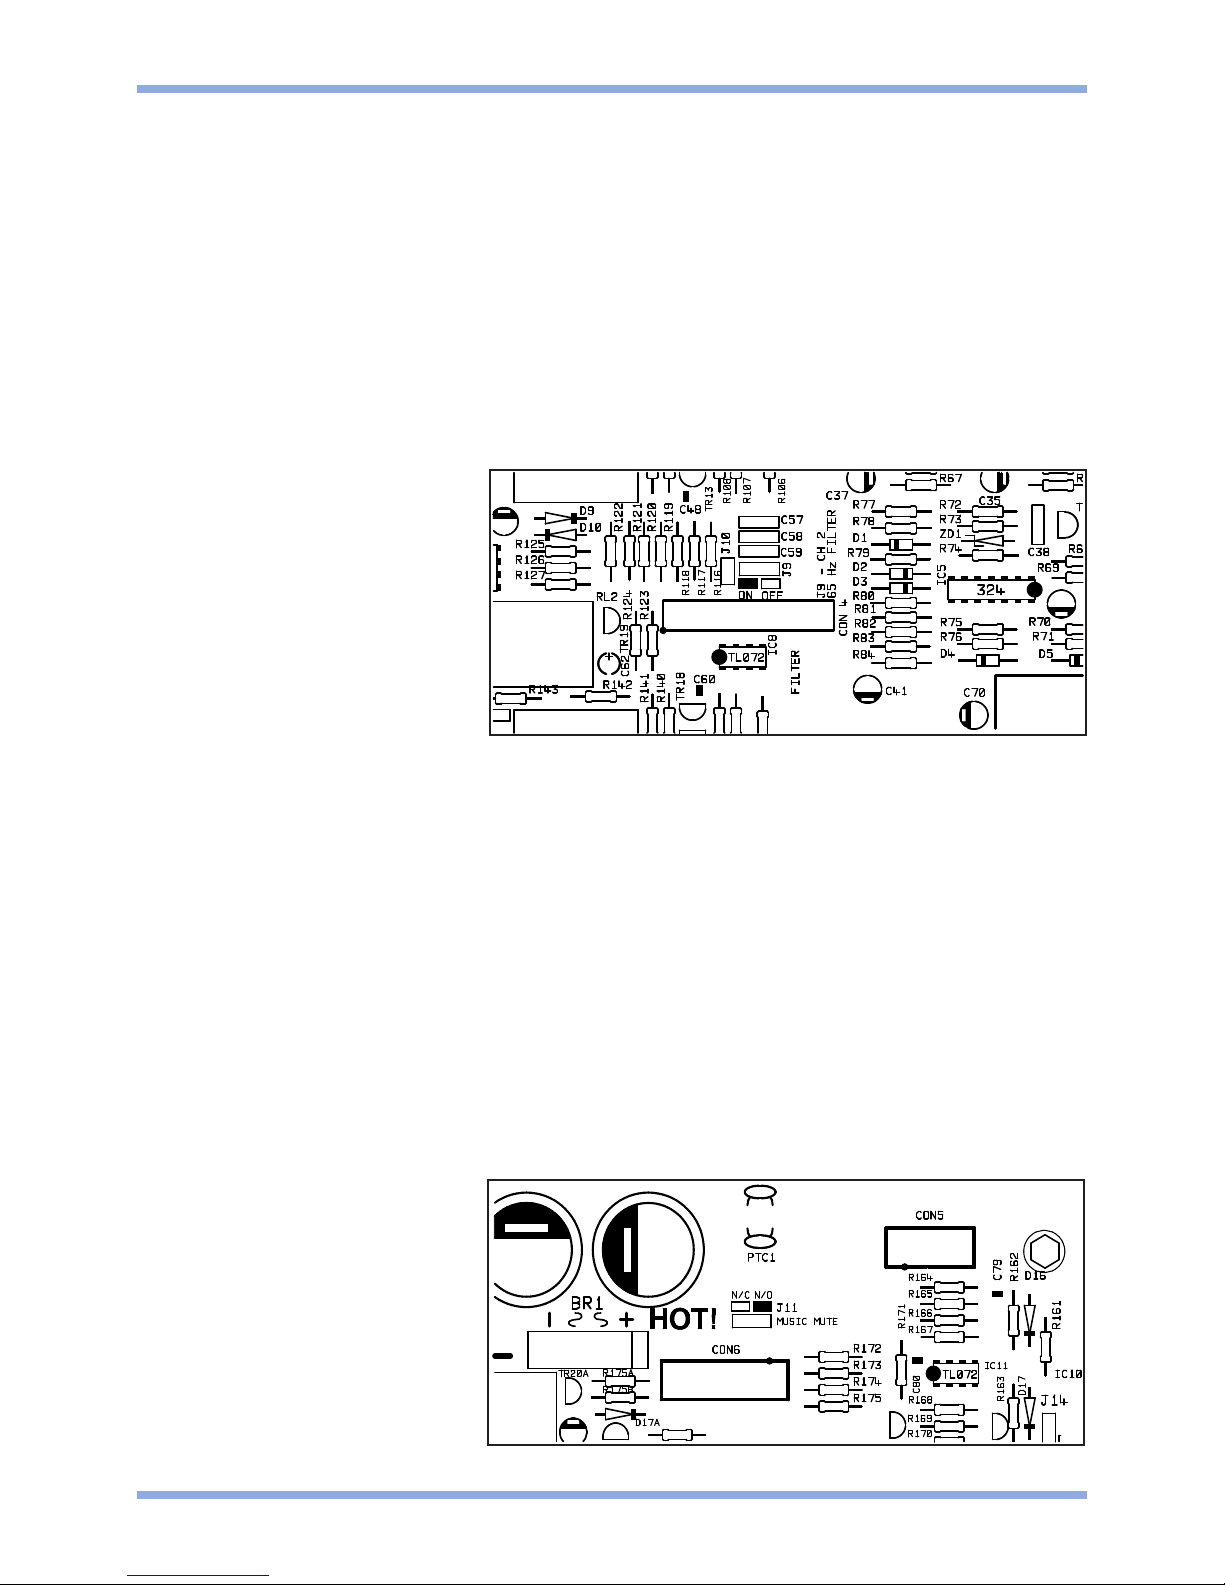
14 100V or 70V Line Operation
A four-channel line transformer module the CXL-4160 is available as an accessory. This gives the 46/50
up to four 100V or 70V, 40 watt outputs. This module is designed to fit inside the 46/50 chassis and may
be configured for 70 or 100V operation by means of wire links on the PCB. Unless specified otherwise,
the module is pre-configured for 100V output. Each of the four output transformers on the module is
connected to the main circuit board by independent cables. If a transformer output is not in use, its input
cable should be disconnected from the main circuit board. When a transformer is in use, the 65Hz high
pass filter for that transformer's zone must be activated by setting the appropriate jumper to the 'ON'
position. The jumpers are marked as follows:
J7: Zone 1
J9: Zone 2
J16: Zone 3
J18: Zone 4
If the filter is not switched on, high signal levels at low frequencies may result in the transformer
saturating and the amplifier's VI limiter operating.
When setting the jumper(s) please ensure that you:
• Remove the mains cable from the rear of the product before removing the top panel.
• Only reassemble the unit using screws identical to the original parts.
15 Remote Music Mute - Fire Alarm interface
In certain installations, such as licensed premises or retail outlets within a shopping mall, there may be
a local authority or fire service requirement to mute the music signals via a fire alarm control panel in an
alarm condition. The 46/50 provides the facility to do this using a fully isolated pair of relay contacts
which are triggered in an alarm condition. Relay contacts can be normally-open or normally-closed, but
the internal jumper J11 MUST be configured to match the relay.
• N/O: Normally Open means
the relay contacts close in an
alarm condition
• N/C: Normally Closed means
the relay contacts open in an
alarm condition
15
V6 070113
Location of 65Hz Filter Jumper for Zone 2
(The other 65Hz jumpers are placed similarly around the PCB)
Location of Jumper J11
Page 20

46/50 Integrated Mixer Amplifier Setup And Installation Guide
CLOUD ELECTRONICS LIMITED
16 DC Control of Music Functions
The 46/50 can be used as part of an automated sound system by controlling the music level and music
source with a pair of external 0-10V DC voltages. The 3-pole connectors that are normally used to
terminate RSL-6 or RL-1 remote control plates can be used to feed two separate control voltages into the
46/50 on a zone-by-zone basis. Pin 1 is a ground (0V) termination common to both control voltages; this
should be connected to the technical ground (0V) of the voltage source, Pin 2 is the control voltage input
for the music level and pin 3 is used to control the music source selection.
Control of music level
A maximum gain reduction of 70dB can be achieved with a control voltage of +10V;
the rate of attenuation is approximately 130mV per dB. A control voltage of zero realises unity gain (full
volume), however, with no external connection to pin 2, an internal 4k7 resistor connected to +15V will
'pull up' the control voltage to provide maximum attenuation. The output impedance of the control voltage
source should be low enough to overcome the influence of this resistor.
Music source selection
Here are the details of the music source select control voltages (pin 3) required to switch the six line input
signals:
Off >+9.0V
Line 1 +7.5V
Line 2 +6.0V
Line 3 +4.5V
Line 4 +3.0V
Line 5 +1.5V
Line 6 0V
With no external connection to pin 3, an internal 15k resistor connected to +15V will 'pull up' the source
select control voltage and the 'off' position will be selected. The output impedance of the control voltage
source should be low enough to overcome the influence of this resistor. If you would like to fix the music
source to a particular line input, wire a fixed resistor from the table below between pins 1 & 3 on the
remote control connector:
Line 1 16k Line 4 3k9
Line 2 11k Line 5 1k8
Line 3 6k8 Line 6 wire link
If the control voltage source is not isolated from the power earth, there is a small risk of creating a 'ground
loop' by linking the 46/50 technical ground to the ground of the equipment providing the control voltages.
To minimise this risk of a ground loop occurring, we suggest that all pieces of equipment be positioned
in close proximity and supplied from the same power outlet.
16
V6 070113
Page 21

46/50 Integrated Mixer Amplifier Setup And Installation Guide
CLOUD ELECTRONICS LIMITED
17 Solving problems
17.1 Ground loops (aka Earth loops)
Despite your best efforts, if the completed sound system 'hums' you probably have a 'ground
loop'; the offending signal source can be found by setting the volume control to minimum then
disconnecting the input leads (both left & right channels) on each line input until the 'hum'
disappears. This problem is often caused by terminating a screened input cable into a signal
source positioned a significant distance from the 46/50.
A good way of avoiding this potential problem is to use signal sources (CD players and the like)
that are double insulated with no connection to the mains supply earth. If a signal feed is derived
from a second device (a club or microphone mixer for example) it would be perfectly normal to
expect this to be earthed; we suggest that a transformer be used to isolate the signal and prevent
a noisy loop (see diagrams below).
17.2 Connecting balanced signals to unbalanced line
inputs.
We recommend the use of a transformer to convert a balanced signal to an unbalanced signal
suitable for direct connection to the 46/50 line inputs. The transformer should be mounted close
to the 46/50 and the unbalanced output lead should be kept as short as possible. Where both
the source and destination units are earthed, it is important to isolate the primary and secondary
windings to avoid a potential ground loop; if there is any doubt about this, we suggest that the
balanced cable screen is not connected at the transformer end. RS Components part 210-6447
is a suitable transformer for this application we recommend that the screening can (part number
210-6469) also be fitted to the transformer; Canford Audio supplies a similar transformer (part
number OEP Z1604). All transformers should be wired to give a ratio of 1:1.
17
V6 070113
SINGLESCREEN
CABLE
SINGLESCREEN
CABLE
HOT
SCREEN
HOT
SCREEN
HOT
SCREEN
HOT
COLD
TWO-CORE
SCREENED
CABLE
(SCREENNOTCONNECTED
ATTHISEND)
HOT
HOT
COLD
TWO-CORE
SCREENED
CABLE
TWO-CORE
SCREENED
CABLE
(SCREENNOTCONNECTED
ATTHISEND)
SINGLESCREEN
CABLE
COLD
SCREEN
CONVERTINGUNBALANCED
TOBALANCEDUSINGA
1:1RATIOTRANSFORMER
CONVERTINGTWOPIECES
OFUNBALANCEDEQUIPMENT
USINGA1:1RATIOTRANSFORMER
CONNECTINGTWOPIECESOF
BALANCEDEQUIPMENTUSINGA
1:1RATIOTRANSFORMER
Page 22

46/50 Integrated Mixer Amplifier Setup And Installation Guide
CLOUD ELECTRONICS LIMITED
18
V6 070113
18 Technical Specification
Line Inputs
Microphone Inputs
Outputs
19 General Specifications
Speaker Outputs
50 watts rms/4W 35watts rms/8W via 'Phoenix' type plug-in
screw terminals
Auxiliary Outputs (Z1&2)
0dBu into 600W min
100V Line Output
100 volts balanced - 250W min load (optional module)
70V Line Output
70 volts balanced - 125W min load (optional module)
Protection DCP, VI Limiting, DC Offset, Thermal & switch-on delay
Cooling Variable speed DC fan
Power input 230V ±5% (115V ±5% available)
Fuse rating 230V - T3.15A H 115V - T6.3A H
Fuse type 20mm x 5mm 250V
Dimensions 482.60mm x 88.00mm(2U) x 320.00mm deep (+ con)
Weight 7.65kg net
Frequency Response 100Hz / -3dB(filter) 20kHz ±0.5dB
Distortion <0.05% 20Hz-20kHz
Gain Range 10dB-50dB
Input Impedance
>2kW (balanced)
Common mode rejection >70dB 1kHz
Headroom >20dB
Noise -128dB EIN 22Hz-22kHz (150W)
Equalisation HF: ±10dB/5kHz LF: ±10dB/100Hz
Frequency Response 20Hz-20kHz +0, -3dB
Distortion <0.03% 20Hz -20kHz
Sensitivity 195mV (-12dBu) to 2.0V (+8dBu)
Input Gain Control 20dB range
Input Impedance
47kW
Headroom >20dB
Noise -90dB rms 22Hz - 22kHz (0dB gain)
Equalisation HF: ±10dB/10kHz LF: ±10dB/50Hz
This product conforms to the following European EMC Standards:
BS EN 55103-1:1997
BS EN 55103-2:1997
This product has been tested for use in commercial and light industrial environments. If the
equipment is used in controlled EMC environments, the urban outdoors, heavy industrial
environments or close to railways, transmitters, overhead power lines etc. the performance of
the unit may be degraded.
The product conforms to the following European electrical safety standard
BS EN 60065:1998
Page 23

46/50 Integrated Mixer Amplifier Setup And Installation Guide
CLOUD ELECTRONICS LIMITED
19
V6 070113
Safety Considerations and Information
The unit must be earthed. Ensure that the mains power supply provides an effective earth
connection using a three-wire termination.
When the mains switch is in the off 'O' position the live and neutral conductors of the
mains transformer are disconnected.
CAUTION - Installation
Do not expose the unit to water or moisture.
Do not expose the unit to naked flames.
Do not block or restrict any air vent.
Do not place liquid filled containers on or around the unit
Do not operate the unit in ambient temperatures above 35°C.
CAUTION- Hazardous Live
Do not touch any part or terminal carrying the hazardous live symbol ( ) while power is
supplied to the unit.
Terminals to which the hazardous live symbol refers require installation by a qualified
person.
CAUTION- Mains Fuse
Replace the mains fuse only with the same type and rating as marked on the rear panel.
The fuse body size is 20mm x 5mm.
CAUTION- Servicing
The unit contains no user serviceable parts. Refer servicing to qualified service personnel.
Do not perform servicing unless you are qualified to do so.
Disconnect the power cable from the unit before removing the top panel and do not make any
internal adjustments with the unit switched on.
Only reassemble the unit using screws identical to the original parts.
In the interest of continuing improvements Cloud Electronics Limited reserves the right to alter
specifications without prior notice.
Cloud Electronics Limited 140 Staniforth Road Sheffield S9 3HF England
Telephone +44 (0) 114 244 7051 Fax +44 (0) 114 242 5462 E-mail: Info@cloud.co.uk
E&OE
Page 24

Notes:
 Loading...