

Page 1
| 2 |
LVM-601.2
MADE IN SWEDEN
User Manual
LVM-601.2
Remote Controlled Motorized Wallmount
Page 2

| 2 |
LVM-601.2
MADE IN SWEDEN
General Safety Precautions
• Read the owners manual carefully before installation.
• Installation of the wallmount should be made by qualified installator.
• This device is intended for installation of flatscreens in dry areas only.
• Other application is not recommended as it may damage the equipment.
• Do not try to operate the wallmount by hand.
Introduction
The wall mount is a remote controlled, motorized wall mount for LCD-TV and
Plasma-TV. The action is reversible, so you can install it for both left and right
action and it will angle out the TV up to 90 degrees! You can also install the
TV in the ceiling.
It will fit various sizes, from 26-inch up to 50-inch. (50kg maximum for in/out
action, 13kg for mounting in the ceiling). Vesa standard is not needed on your
TV as the installation brackets are individually adjustable. The construction
also features unique two way pitch adjustments which allows you to adjust the
TV to perfect horizontal and vertical alignment on the wall.
If you already have a late edition of Khor or Chameleon LCD from Lava Electronics, you can use the standard TV remote controls special buttons to operate the wall mount. If you do not, there are two alternatives: you can program
the receiver of the wall mount to operate on your existing remotes or you can
use the remote included in the package. This remote also has the key functions, such as volume, program change, source, for operating the Khor and
Chameleon LCD-TV.
NOTE!
English
Page 3
| 3 |
LVM-601.2
MADE IN SWEDEN
Assembly
The wall mount with a TV fitted are rather heavy,
so make sure that the wall you intend to mount it
on is solid. If not, you have to reinforce the wall
with a minimum 15mm plywood board in order
to make a safe installation. Pay attention that
screws are not included for mounting the
bracket in the wall. Screw should have maxi-
mum Ø 6mm, the head should have Ø of 12-16mm. Minimum 150 kg safe working load/
screw!
Before you start, make sure that you have the following tools available:
Drilling machine, drills, Philips 2 Screwdriver, (Pozidrive 2 Screwdriver), water level,
wrench (or 8 & 10mm fixed tool). Pay attention to electrical screwdriver may not be used
when assembly the wall mount.
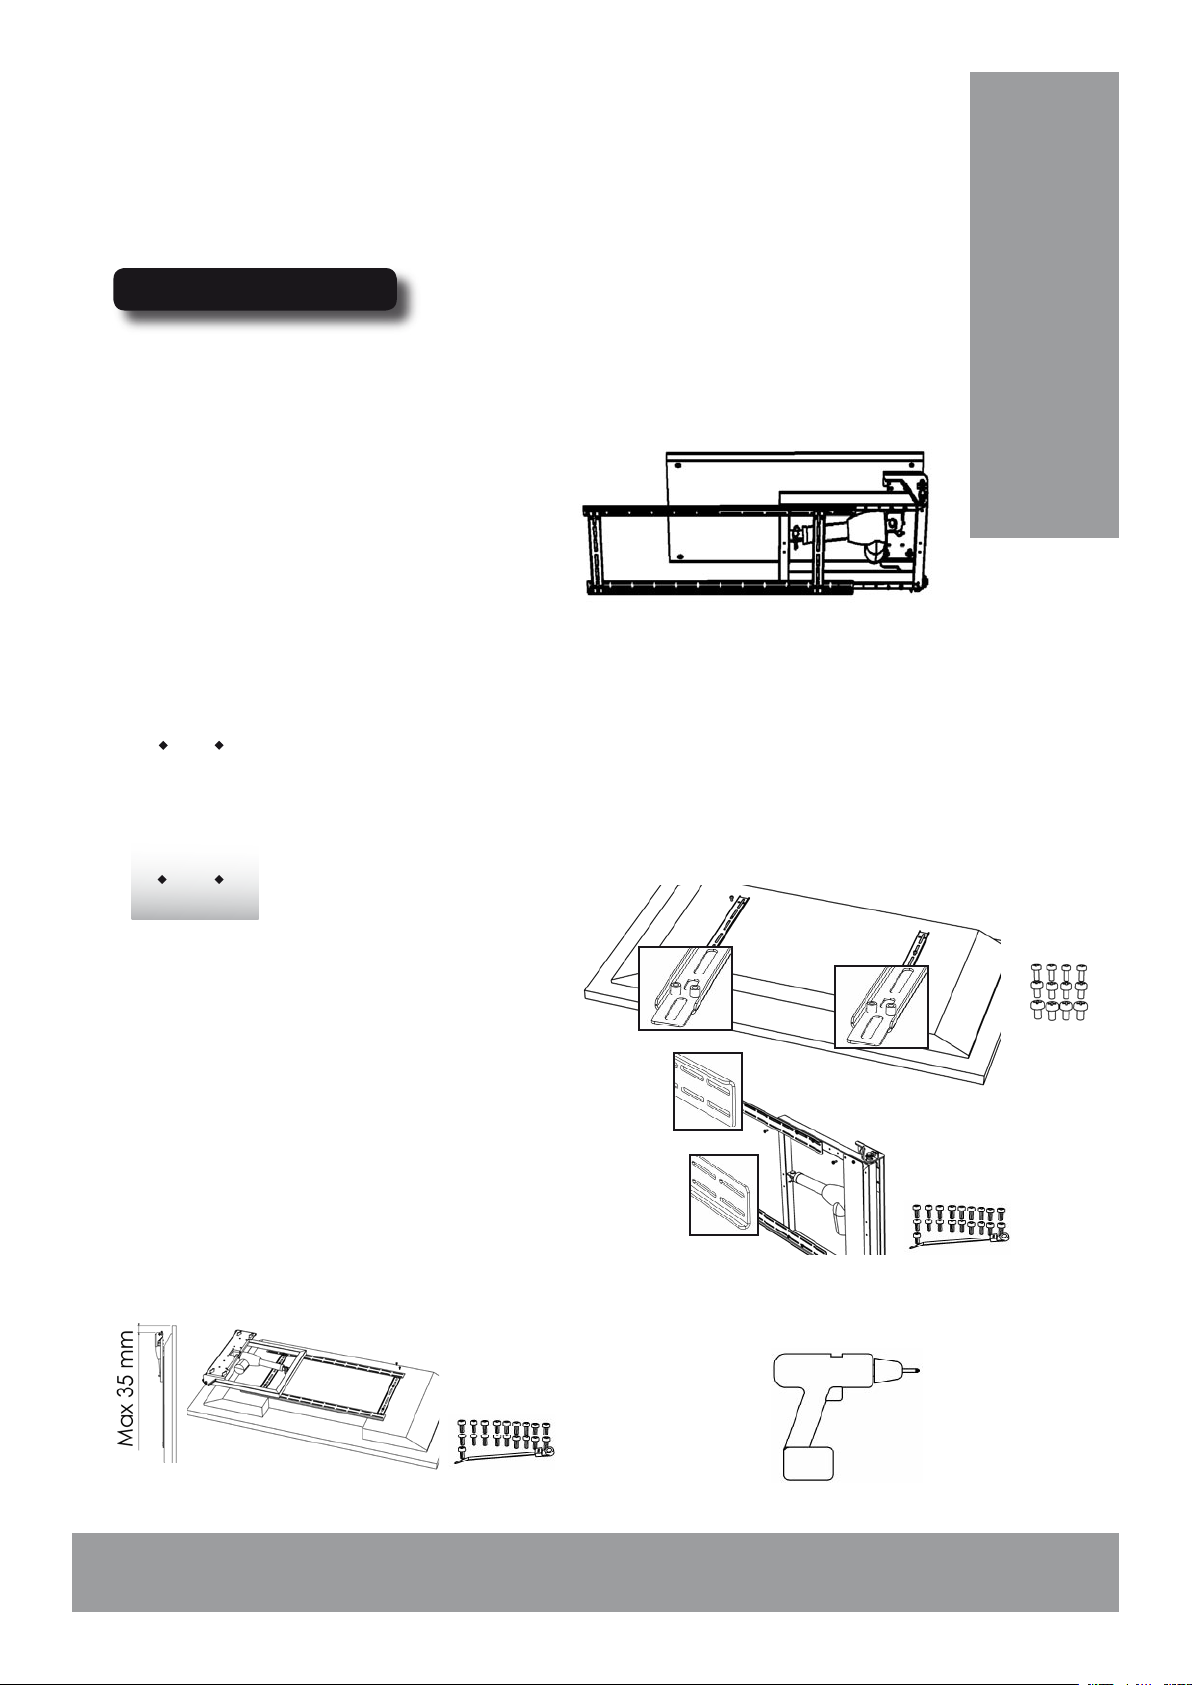
2. Use the screw that match the size of your TV
to fix the U-profiles on the TV as the illustration
shows.
3. Fasten the L-profiles and cover plate to the frame. Three
screws on each L-profile is minimum. Make sure that you use
the self tapping M4 screws as the frame do not have any lead
threads.
X
4. Mount the package to the U-profiles fastened on the TV.
Pay attention to have max 35mm distance between the
outer end of mount and TV. If this is more, the mount will not
be able to open the full 90 degrees.
M4 (4+4+4 pcs)
M5 (4+4+4 pcs)
M6 (4+4+4 pcs)
M8 (4+4+4 pcs)
English
1. Use the template on back of the gift box to mark the four fixing holes for
the mount on the wall. Make sure to align them 100% vertical. Drill the holes
and securely fasten the screws. Do not tight them all the way, you will need
about 5mm clearance between the head and the wall when you hook the wall
mount on the screws. For larger units, or less stable walls, please also drill
some of the centre fastening points. (Located close to the actuator bracket).
Page 4
| 4 |
LVM-601.2
MADE IN SWEDEN
Assembly
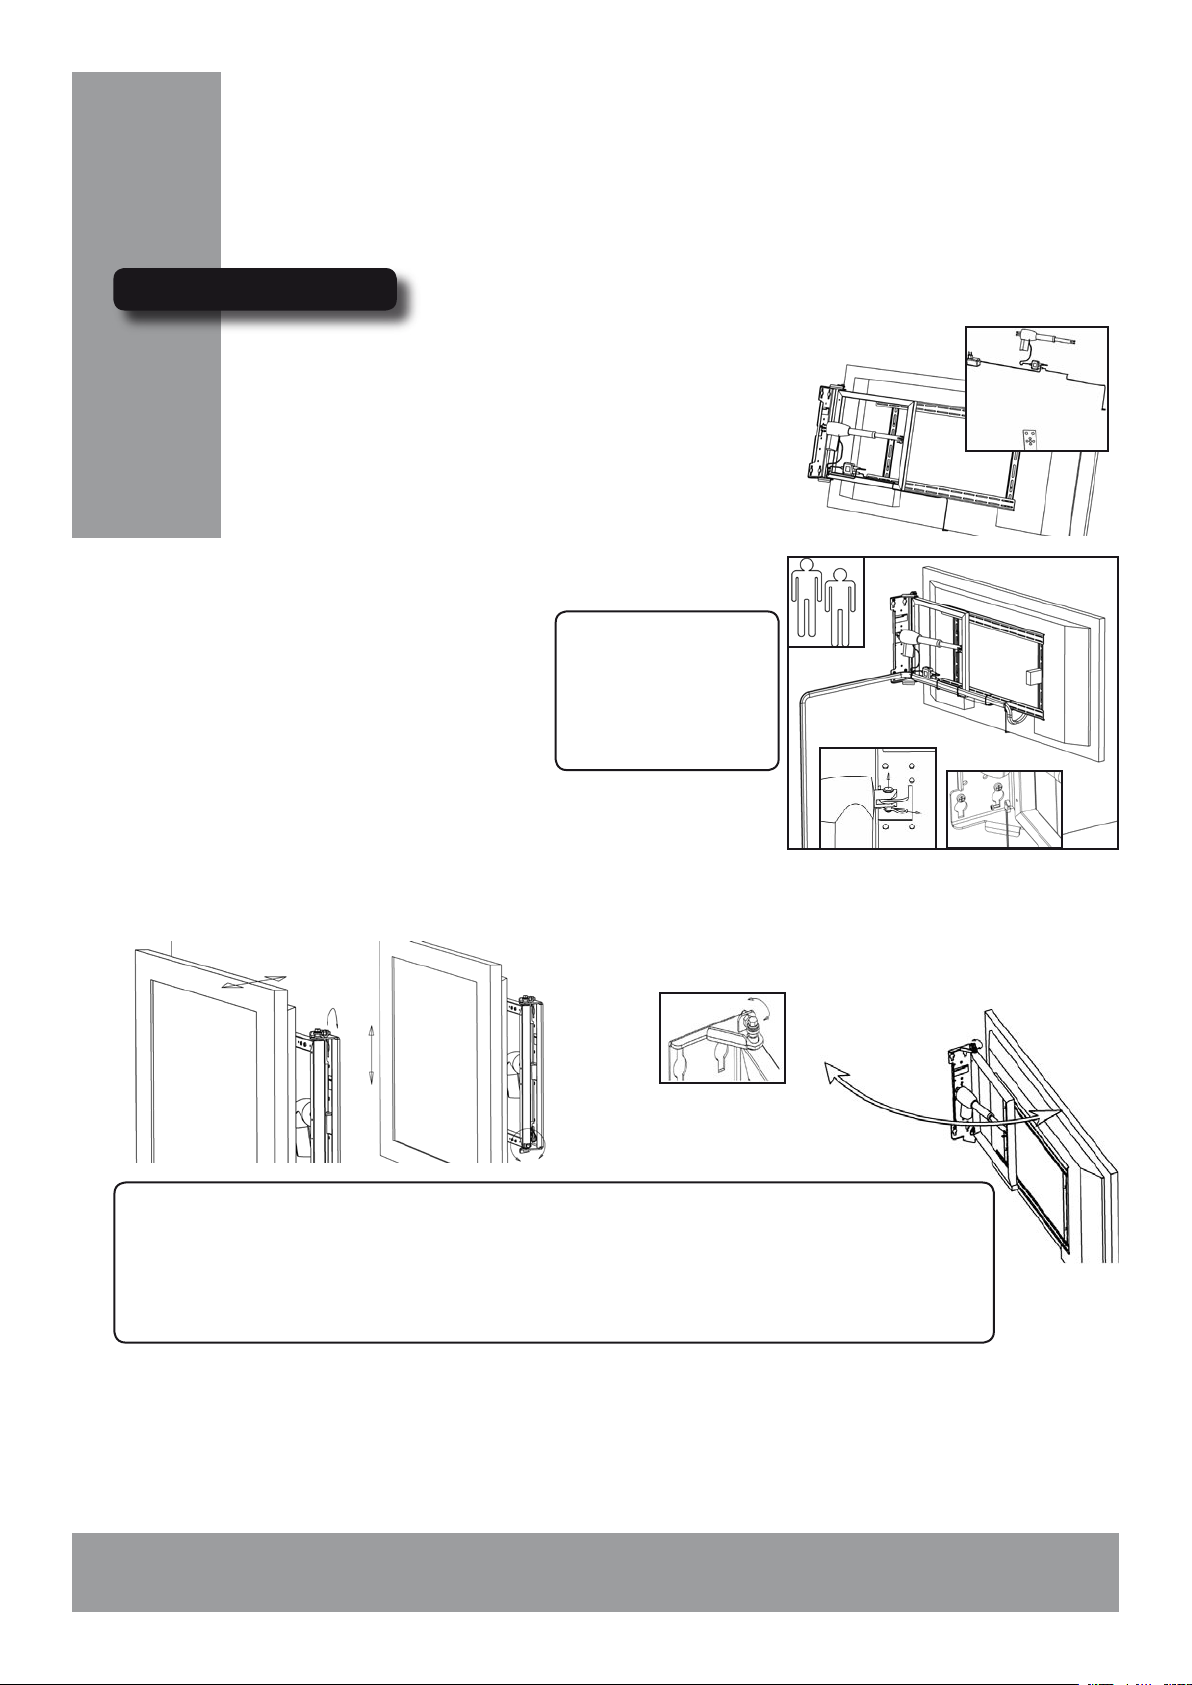
5. Fix the central unit and connect the actuator. Con-
nect also the external IR eye and powersupply temporarily. Press the enclosed remote to open the mount fully.
Disconnect and remove the powersupply and IR eye.
6. Lift up the TV-wallmount package and hang it gently on the screws
in the wall. Align it vertical with the water level and tight the screws.
Remove the locking sprint and washer, fold out
the actuator from the bracket. Mount the additional screws in the wall. Assembly the actuator
again. Connect all cables for the TV and also the
powersupply and IR eye to the wall mount. Wire
them to the frame with the enclosed cable ties.
Pay attention to that no cables get stuck in the
mechanism when operating. Fasten also the soft
stopper pad as illustrated.
7. If necessary, use the smart horizontal and vertical adjustments to
align the wall mount in level.
! Depending on wall
surface IR reflection
factor, the remote receiver may require clear
sight from IR remote
8. Carefully adjust the friction brake for smooth
operation. (Normally not necessary).
! If the TV turns out to be very slanting, or the wallmount does not fully close, you need to adjust
the U-profiles in the TV to approximately horizontal level; First set the horizontal pitch to center,
then lift the TV and gently loose the two outer screws which holds the U-profiles in the TV. Align the
TV horizontal and fasten the screws. Be careful not to loose the screws to much as it may result in the
TV to fall down! If necessary, fine adjust with the horizontal adjustment on the wall mount.
English
Page 5
| 5 |
LVM-601.2
MADE IN SWEDEN
Installation in ceiling
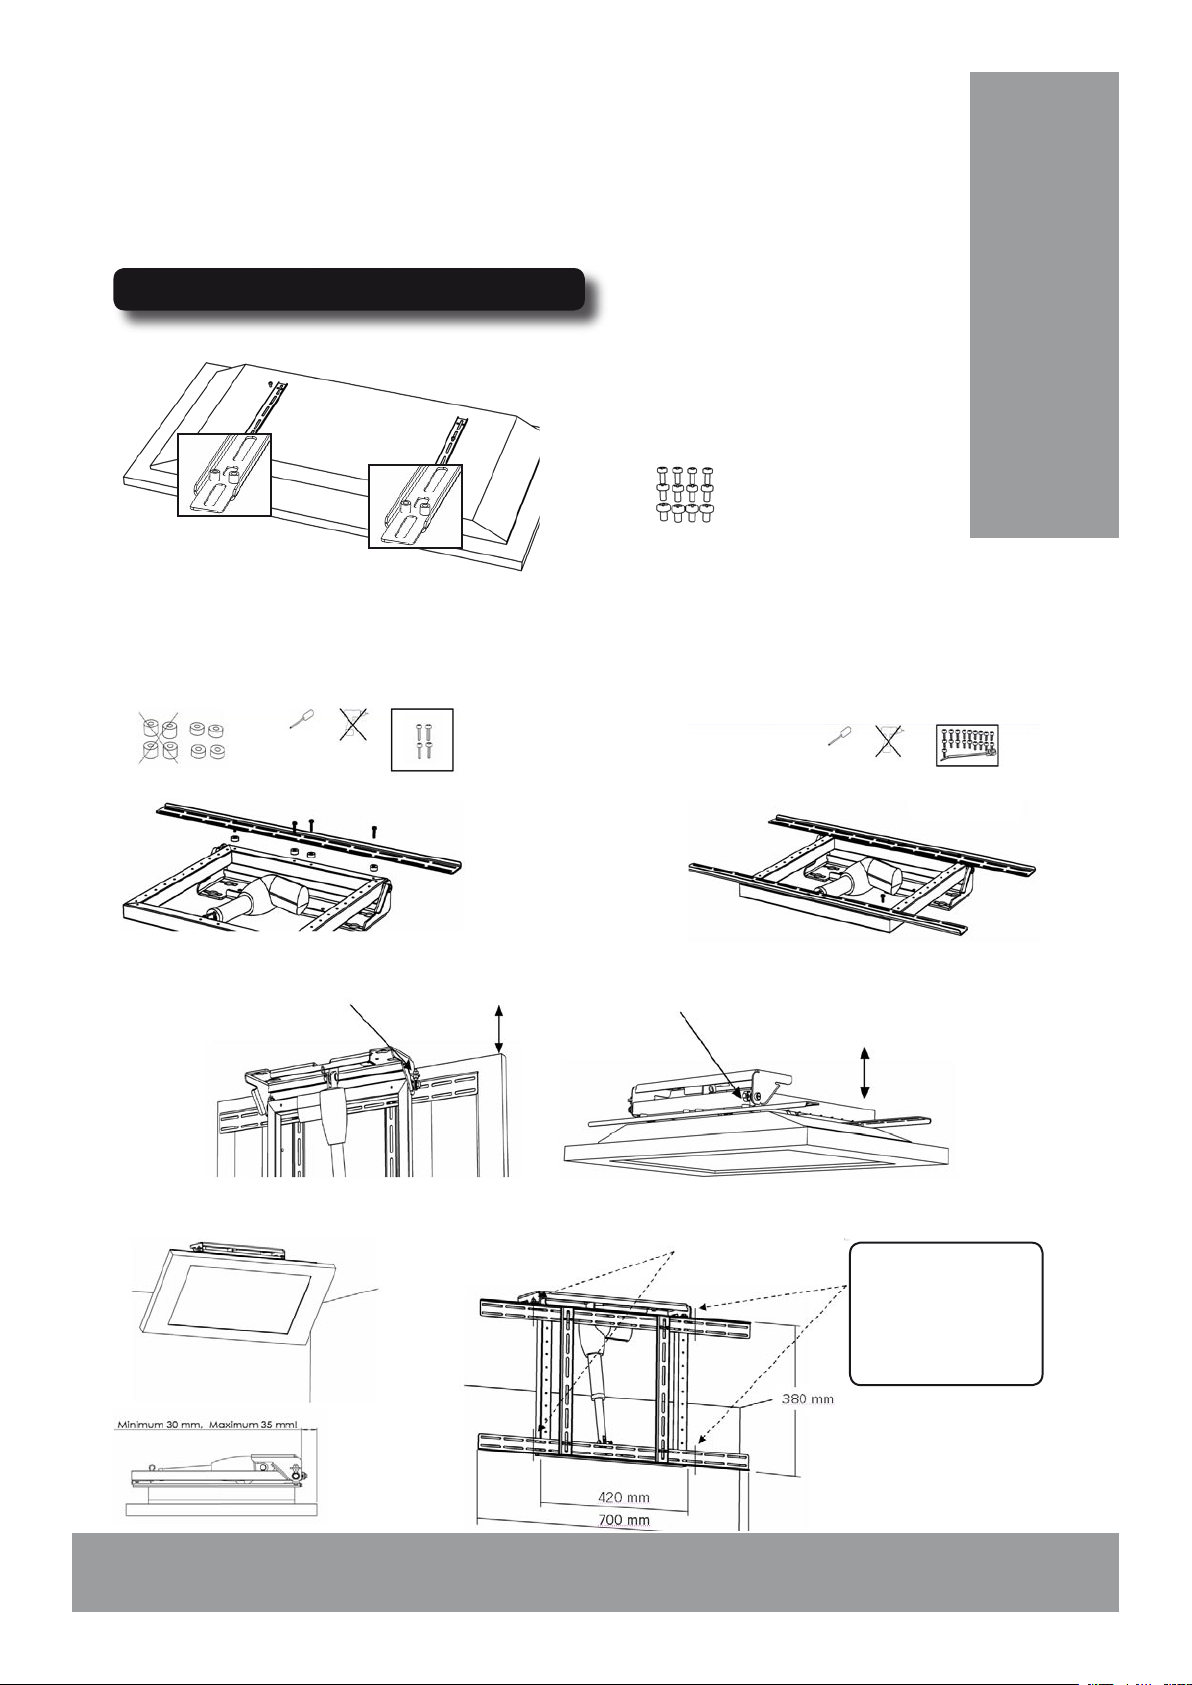
1. Use the screw that match the size of
your TV to fix the U-profiles on the TV
M4 (4+4+4 pcs)
M5 (4+4+4 pcs)
M6 (4+4+4 pcs)
M8 (4+4+4 pcs)
2. Fasten the upper L-profile to the frame.
Insert the small spacers as the illustration shows.
Make sure to use the long self tapping screws
3. Screw the lower L-profile to the frame. Make sure
that you use the self tapping M4 screws as the frame do
not have any threads.
4. If necessary, use the smart horizontal and vertical adjust-
ments to align the wall mount in level towards the ceiling.
! Depending on
the size of your TV, it
might be necessary
to cut the L-profiles.
English
Page 6

| 6 |
LVM-601.2
MADE IN SWEDEN
Operation
Learning
The learnable wallmount receiver is pre-programmed to operate with the late edition of Lava
Chameleon and Khor series remote controls. If you do not have such TV, please use the enclosed remote (which also can be used to operate the most common functions on the above
mentiond Lava models). You can also learn the receiver to operate from one of your existing
remotes, for example your TV control. Here is how you do:
1. Flip the switch to ”Learn Motor 1” mode.
2. Press and hold for 2 sec the button on your remote that you want to use for out operation.
3. Release the button, and led flashes red.
4. Press and hold the same button again for 2 sec.
5. Release the button, and the led is green.
6. Press and hold for 2 sec the button on your remote that you want to use for in operation.
7. Release the button, and led flashes green.
8. Press and hold the same button again for 2 sec.
9. Release, and the led turns off.
10. Learning completed, flip the switch back to ”Operate Mode” and you can start to use.
! Even though
this decvice is
designed to handle
most of the remote
formats on the
market, some may
not work. In this
case try another
one, or use the
enclosed remote.
Note! It is neccessary that you wait for at least 1
sec. between pressing the keys when programming.
The central unit has beside learning and operate mode
also a ”Lock” function which if it is switched on, disables
all functions. This can be used in public places or to
prevent children from using the device
English
Specifications
Operation Voltage: 100-240VAC, Secondary 12VDC 2A
Max weight on TV at wall installation 50kg
Max weight on TV at ceiling installation: 13kg. This can be increased if the powersupply is replaced. Contact your dealer.
Dimensions on TV at wall installation: Width: 700-1300mm Height: 430-∞mm
Dimensions on TV at ceiling installation: Width: 420-∞mm Height: 400-470mm
Fits wall mount screw location on TV: Width: 50-668mm Height: 50-400mm
* For illustration of details, look at the rear of this User manual.
Using
The in and out function have a 1sec delay in order to avoid any accidental use. Press and
hold the button on your remote, and the wall mount starts to move after 1sec. Release the
button, and the mount stops and locks in that position.
Page 7

| 7 |
LVM-601.2
MADE IN SWEDEN
Notes
English
Page 8

| 8 |
LVM-601.2
MADE IN SWEDEN
Säkerhetsföreskrifter
• Läs bruksanvisningen noga före installation.
• Montering av fästet bör göras av proffesionell installatör.
• Fästet är endast avsett för montering av LCD/Plasma-TV i torra utrymmen.
• Andra applikationer kan orsaka skada på utrustningen.
• Rör inte TV-n under tiden fästet rör sig.
Beskrivning
LVM-601.2 är ett fjärrstyrt motoriserat väggfäste till Plasma eller LCD-TV. Man
kan montera det för antingen vänster eller höger funktion. Fästet kan fälla ut
TV-n upp till 90 grader ut från väggen. Apparaten kan även monteras i taket.
Fästet passar flesta storlekar av TV, allt från 26 upp till 50 tum. (Max vikt på
TV vid väggmontering är 50kg, vid takmontering 13kg) Vesa standard på
skruvhålen i apparaten är inte nödvändig eftersom fästskenorna är individuellt
justerbara. Fästet har även två unika justeringar, vilka innebär att apparaten
kan justeras horisontellt och vertikalt för att hamna exakt i våg.
Om du har den senaste generationen av Lava’s Khor eller Chameleon serie
kan du använda TV-ns fjärrkontroll för att manövrera fästet. Du kan annars
”lära” mottagaren till fästet att kontrolleras från någon av dina egna fjärrkontroller, exempelvis den till din TV. Det följer också med en liten fjärrkontroll
till fästet som även kan användas till att styra de vanligaste funktionerna på
Lava’s Khor och Chameleon LCD-TV.
OBSERVERA!
Svenska
Page 9

| 9 |
LVM-601.2
MADE IN SWEDEN
Montering
Fästet med en TV monterad är tungt så det är
nödvändigt att det monteras i en solid vägg eller
i en regel. Är detta ej möjligt måste en förstärkning göras. Lämpligast är en skiva i plywood
som bilden visar. Tjocklek bör vara minst 15mm.
Notera att skruvar för montering i vägg inte är
inkluderat i förpackninegn. Skruven skall ha en
diameter på max. 6mm, skallen skall vara mellan 12-16mm i diameter. Brottstyrka på skruven
skall vara minimum 150 kg/ skruv.
Innan du börjar, se till att du har följande verktyg tillgängliga:
Borrmaskin, borr, Philips 2 mejsel, (Pozidrive 2 mejsel), vattenpass, 8 och 10mm ringnyckel, (skiftnyckel). Observera att elektrisk skruvdragare inte får användas vid monte-
ring av detaljerna till fästet.
1. Använd mallen på baksidan av kartongen för att markera ut de fyra
hålen för fixering av fästet i väggen. Använd vattenpasset för att se till att
dessa hamnar helt i lod. Borra upp hålen och skruva i skruvarna. (Är det
betongvägg måste plugg användas). Dra inte skruvarna ända in, utan lämna
ungefär 5 mm mellan skalle och vägg. Om väggen är instabil eller apparaten
tung, borra även hål för skruvarna som sitter runt infästningen för motorn.
2. Ta fram de skruvar som passar i din TV från
påsen och montera U-profilerna på apparaten som
bilden visar. Här monteras även de medföljande distanserna som kan användas för att luta apparaten.
3. Skruva fast L-profilerna och täckplåten i ramen med de
självgängande M4 skruvarna som bilden visar. Tre skruvar i
varje L-profil är minimum för att säkerställa fullgod stabilitet.
X
4. Montera ramen med skenorna på U-profilerna som sitter
på TV-n. Observera att ytterkant på fästet måste ha max
35mm till ytterkant på apparaten. Detta är nödvändigt för att
apparaten skall kunna fällas fullt ut.
M4 (4+4+4 pcs)
M5 (4+4+4 pcs)
M6 (4+4+4 pcs)
M8 (4+4+4 pcs)
Svenska
Page 10

| 10 |
LVM-601.2
MADE IN SWEDEN
Montering
5. Montera styrenheten och koppla in motorn. Anslut
tillfälligt även spänningsdelen och IR ögat. Använd den
bifogade fjärrkontrollen och öppna upp fästet fullt. Koppla
ur och ta bort spänningsdelen och IR ögat.
6. Lyft och häng försiktigt upp apparaten/fästet på skruvarna som sit-
ter i väggen. Använd vattenpasset att justera så det sitter i lod och dra
åt skruvarna. Dra bort sprinten och lyft ur bulten och brickan där motorn
sitter fast i vägg-delen av fästet. Detta är nödvändigt för att komma åt de
skruvhål som sitter runt motorn. Dra i skruvarna
och montera tillbaka motorn. Anslut samtliga
kablar till TV-n samt spänningsdel och IR öga till
motorfästet. Fixera dem i ramen med de medföljande buntbanden. Se till att inga kablar kan
fastna i den rörliga mekanismen under drift. Montera stoppkudden som bilden visar.
7. Om apparaten hänger snett, justera upp den med skruvarna som
bilderna visar.
! Beroende på hur
väl väggen och golvet
reflekterar IR signaler,
måste ibland IR ögat
sitta synligt.
8. Justera bromsen för mjuk rörelse. (Är nor-
malt inte nödvändigt)
Svenska
! Om apparaten hänger väldigt snett eller om den inte fälls ända in, kan man behöva justera ap-
paraten mot U-profilerna; Justera tillbaka den horisontella justeringen till mittläge, lyft försiktigt upp
TV-n och lossa skruvarna som håller U-profilerna i apparaten ett halvt varv. Lyft upp apparaten så
den är horisontell och dra åt skruvarna. Se till att inte lossa skruvarna för mycket eftersom apparaten
kan lossna och falla i golvet! Om det behövs, finjustera med den horisontella justerskruven.
Page 11

| 11 |
LVM-601.2
MADE IN SWEDEN
Montering i tak
1. Ta fram de skruvar som passar i din
TV från påsen och montera U-profilerna på
apparaten som bilden visar.
M4 (4+4+4 pcs)
M5 (4+4+4 pcs)
M6 (4+4+4 pcs)
M8 (4+4+4 pcs)
2. Skruva fast den övre L-profilen och de tunna
distanserna med de långa självgängande skruvarna som bilden visar.
3. Skruva den undre L-profilen med de korta självgän-
gande skruvarna i ramen.
4.Om apparaten hänger snett, justera upp den den med skru-
varna som bilderna visar.
! Beroende på
storleken på TV:n,
kan skenorna behöva
kapas av.
Svenska
Page 12

| 12 |
LVM-601.2
MADE IN SWEDEN
Användning
Programmering
Den lärbara mottagaren är förprogrammerad att fungera ihop med den senaste versionen av
Lava’s Khor och Chameleon fjärrkontroller. Har du en annan TV kan du lära mottagaren kommando från en valfri fjärrkontroll. (Du kan så klart även använda den bifogade kontrollen). Så
här går programmeringen till:
1. Slå om switchen till ”Learn Motor 1”
2. Tryck och håll inne i 2 sek den knappen som du vill använda för att fälla ut fästet.
3. Släpp knappen och lysdioden blinkar rött.
4. Tryck och håll inne samma knapp i 2 sek.
5. Släpp knappen och lysdioden lyser grönt.
6. Tryck och håll inne i 2 sek den knappen som du vill använda för att fälla in fästet.
7. Släpp knappen och lysdioden blinkar grönt.
8. Tryck och håll inne samma knapp i 2 sek.
9. Släpp knappen och lysdioden slocknar.
10. Programmering är färdig, slå tillbaka switchen till “Operate ”och fästet kan användas.
! Trots att mot-
tagaren är lärbar,
finns det vissa IR
protokoll som inte
går att lära in. Om
det inte skulle
fungera, prova med
en annan fjärrkontroll eller använd
den bifogade.
Observera! För att inlärning skall fungera måste man
vänta minst en sekund mellan knapptryckningarna.
Centralenheter har ytterligare ett val på omkopplaren.
“Lock” används för att deaktivera motoriseringen. Detta
kan vara användbart i publika miljöer eller för att hindra
barn från att leka med fästet.
Svenska
Specifikationer
Matningsspänning: 100-240VAC, Sekundär 12VDC 2A
Max vikt på TV vid väggmontering: 50kg
Max vikt på TV vid takmontering: 13-kg Detta kan ökas vid byte av spänningsdel. Kontakta din åf för detaljer.
Yttermått på TV vid väggmontering: Bredd: 700-1300mm Höjd: 430-∞mm
Yttermått på TV vid takmontering: Bredd: 420-∞mm Höjd: 400-470mm
Passar hålbild på TV: Bredd: 50-668mm Höjd: 50-400mm
* Se baksida på bruksanvisning för illustration av mått.
Handhavande
Styrningen till fästet har en fördröjning på 1 sekund för att förhindra oavsiktlig användning.
Tryck och håll inne knappen på fjärrkontrollen, och fästet börjar röra sig efter 1 sekund. Släpp
knappen och fästet stannar och fixeras i det läget.
Page 13

| 13 |
LVM-601.2
MADE IN SWEDEN
Svenska
Egna noteringar
Page 14

© www.lava-electronics.com
50 – 400mm
0-90°
Maximum 50 kg
Mount on wall
Maximum 13 kg
Mount on ceiling
Partnumber: 10904-6
 Loading...