

Page 1

Always carry safely…
Please take the time to read through all of the instructions before using your Caboo, we would ask you to pay special attention to the safety precautions
and warnings below, these are designed to ensure safe carrying at all times. With practice it will be second nature for you to carry your baby, but in the
meantime you can practice with a soft toy or doll in front of the mirror to build up your condence! Download the video demonstration from www.caboo.
info before you start!
Safety precautions
Make sure baby is in view at all times…regularly check your baby is secure and happy
Keep baby high up on your chest… close enough to kiss
Keep baby’s chin off their chest…at least 1cm gap and free owing air
Baby should be held comfortably close…and fully supported
Make sure baby is central…and the cross section is spread out under their bottom
Don’t overdress your baby… remember your body heat will keep them warm so dress them down a layer and never cover baby’s head or face with
an item of your own clothing.
Use common sense… don’t engage in activities which may expose you or your baby to unnecessary danger or risk… hot food or drink, handling knives
or operating machinery
WARNINGS
PLEASE ENSURE THAT TOGGLE AND CORD ARE ALWAYS UNDERNEATH YOUR BABY AND NEVER NEAR BABY’S HEAD OR NECK
TAKE CARE WHEN BENDING OR LEANING FORWARD, ALWAYS SUPPORT BABY
THIS CARRIER IS NOT SUITABLE FOR USE DURING SPORTING ACTIVITIES
YOUR BALANCE MAY BE ADVERSELY AFFECTED BY YOUR MOVEMENT AND THAT OF YOUR CHILD
Wash at 30°C tumble dry on low heat!
Special note when washing…Tie your Caboo inside a pillowcase when washing and drying to keep the rings away from the machine drum and reduce the noise.
*Close accept no responsibility for individual appliances.
IMPORTANT! KEEP FOR FUTURE REFERENCE
Page 2
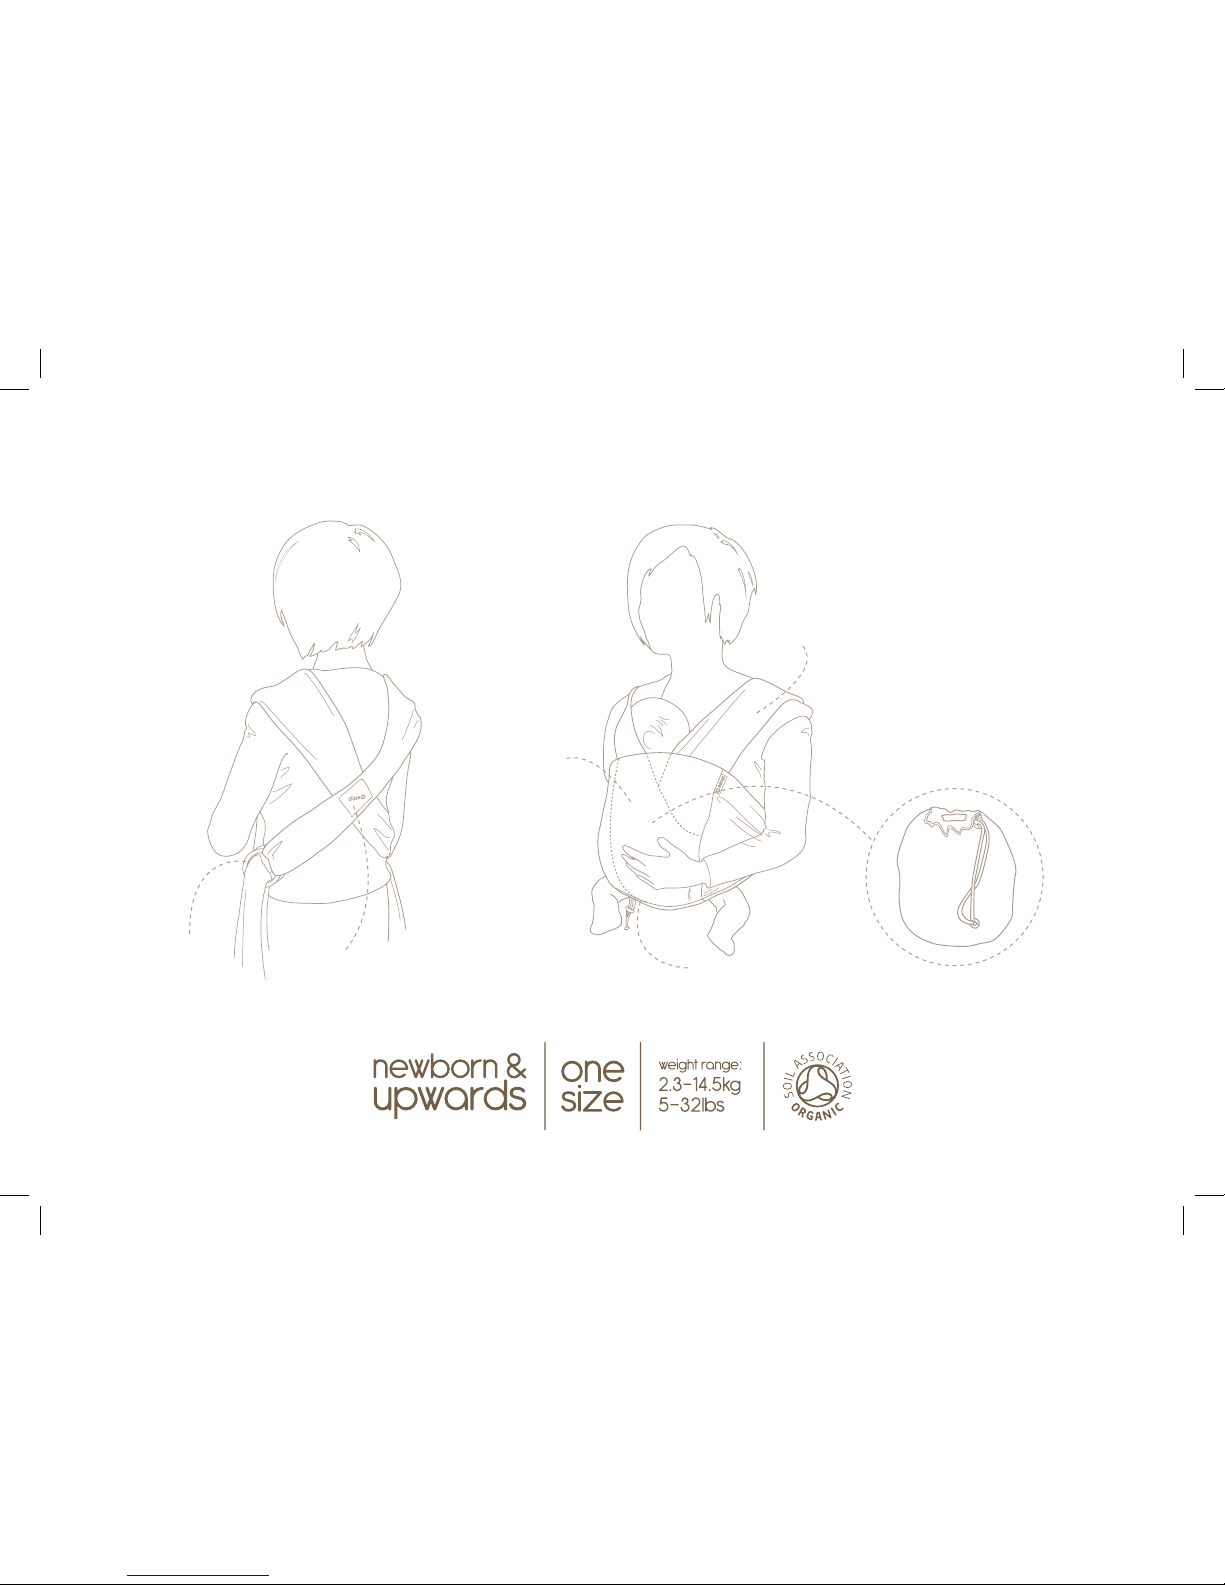
Parts of my Caboo...
rin gs
the xed cross
inner strap
outer strap
the wrap/bag
cord and toggle
Page 3
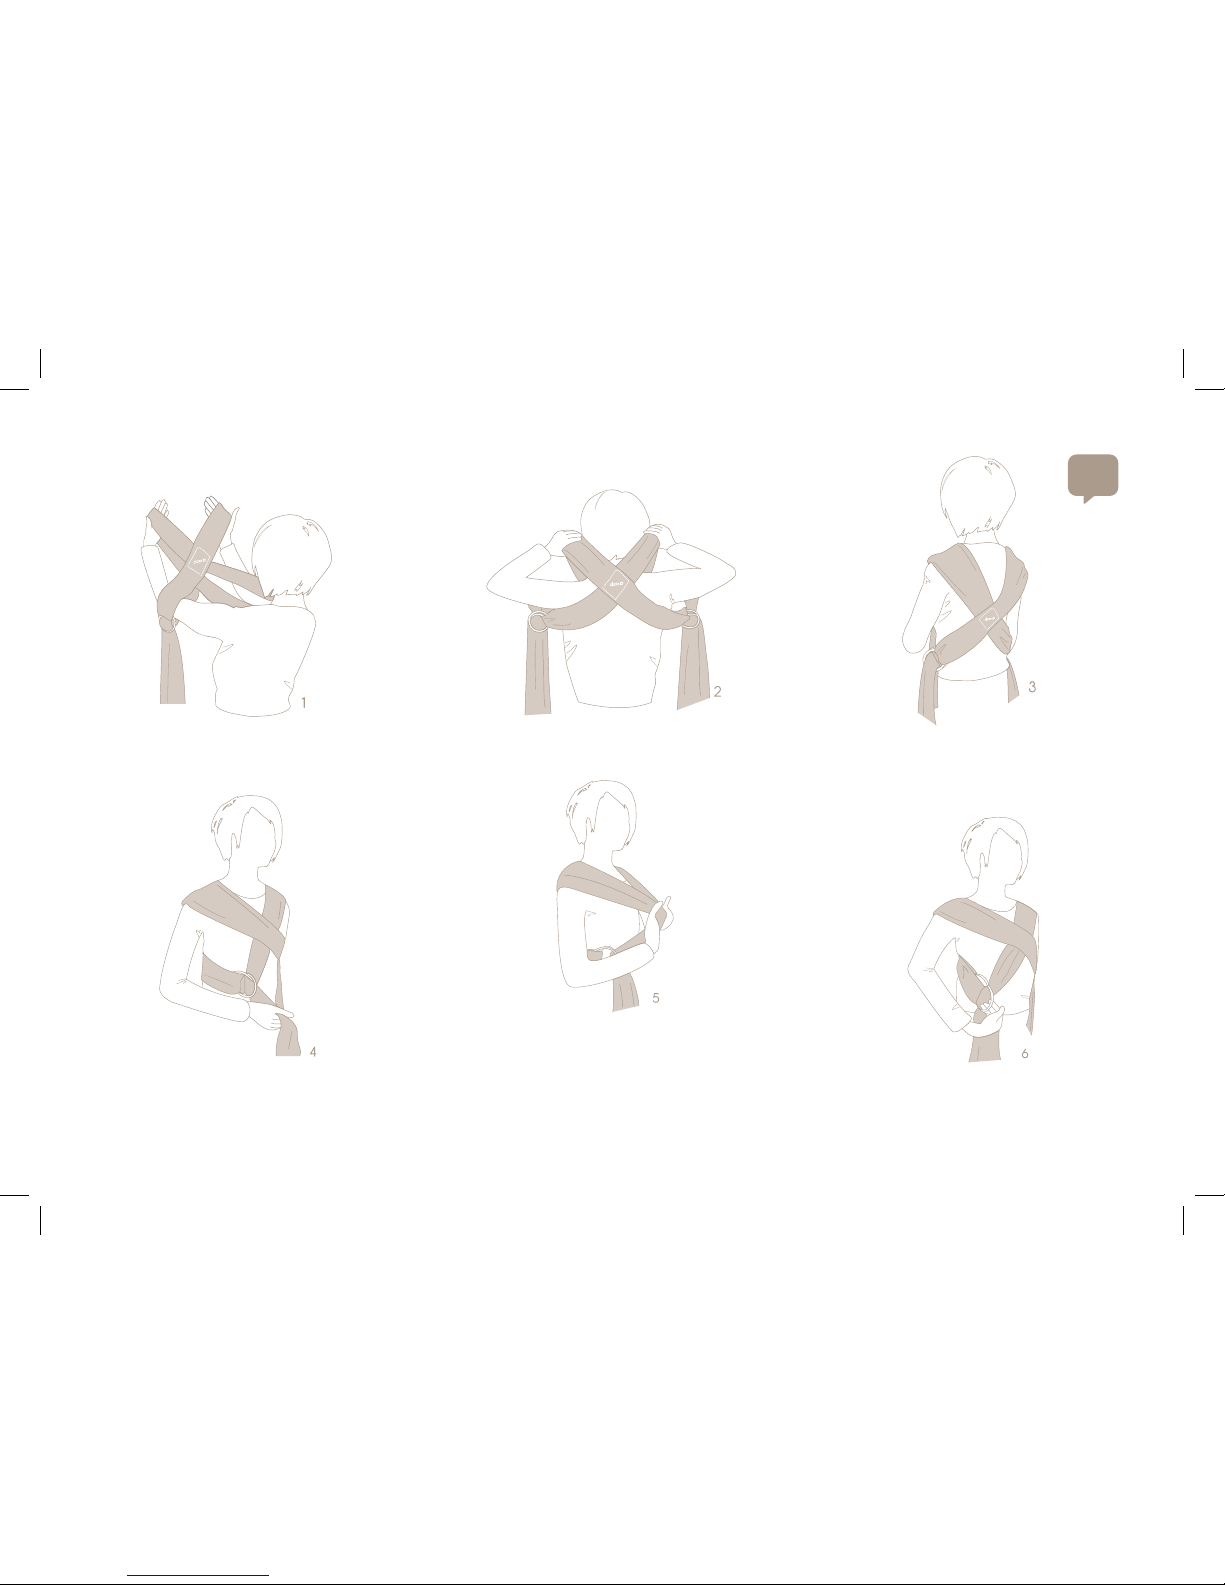
Fig A.1 - Hold the carrier out in front of you as
shown…the Close logo should be facing you
reading the right way up.
Fig A.2 - Place the carrier over your head like
a T-shirt…your arms should go out through
the sides.
Fig A.3 - Pull the carrier down at the cross or
feed it back over your shoulders ensuring that
none of the fabric is twisted…the xed cross
should be in your mid to low back.
Fig A.4 - Tighten the carrier by pulling down
and forward evenly on both straps leaving just
enough room to get your baby in...it is important
that it’s not too loose.
Fig A.5 - To check you have left enough room, simply
place your hands behind the straps as shown…you
should be able to stretch the fabric approximately 1 012 cm cl ear f rom your chest, no more. Take some time to
identify t he in ner strap this is the strap that runs closest to
your body, the other is referred to as your outer strap.
Fig A.6 - To loosen the fabric at any time lift
the visible f ront/top ring u p and outwards
and pull back the fabric above the ring to
lengthen the strap.
Putting on your Caboo…
A
Page 4
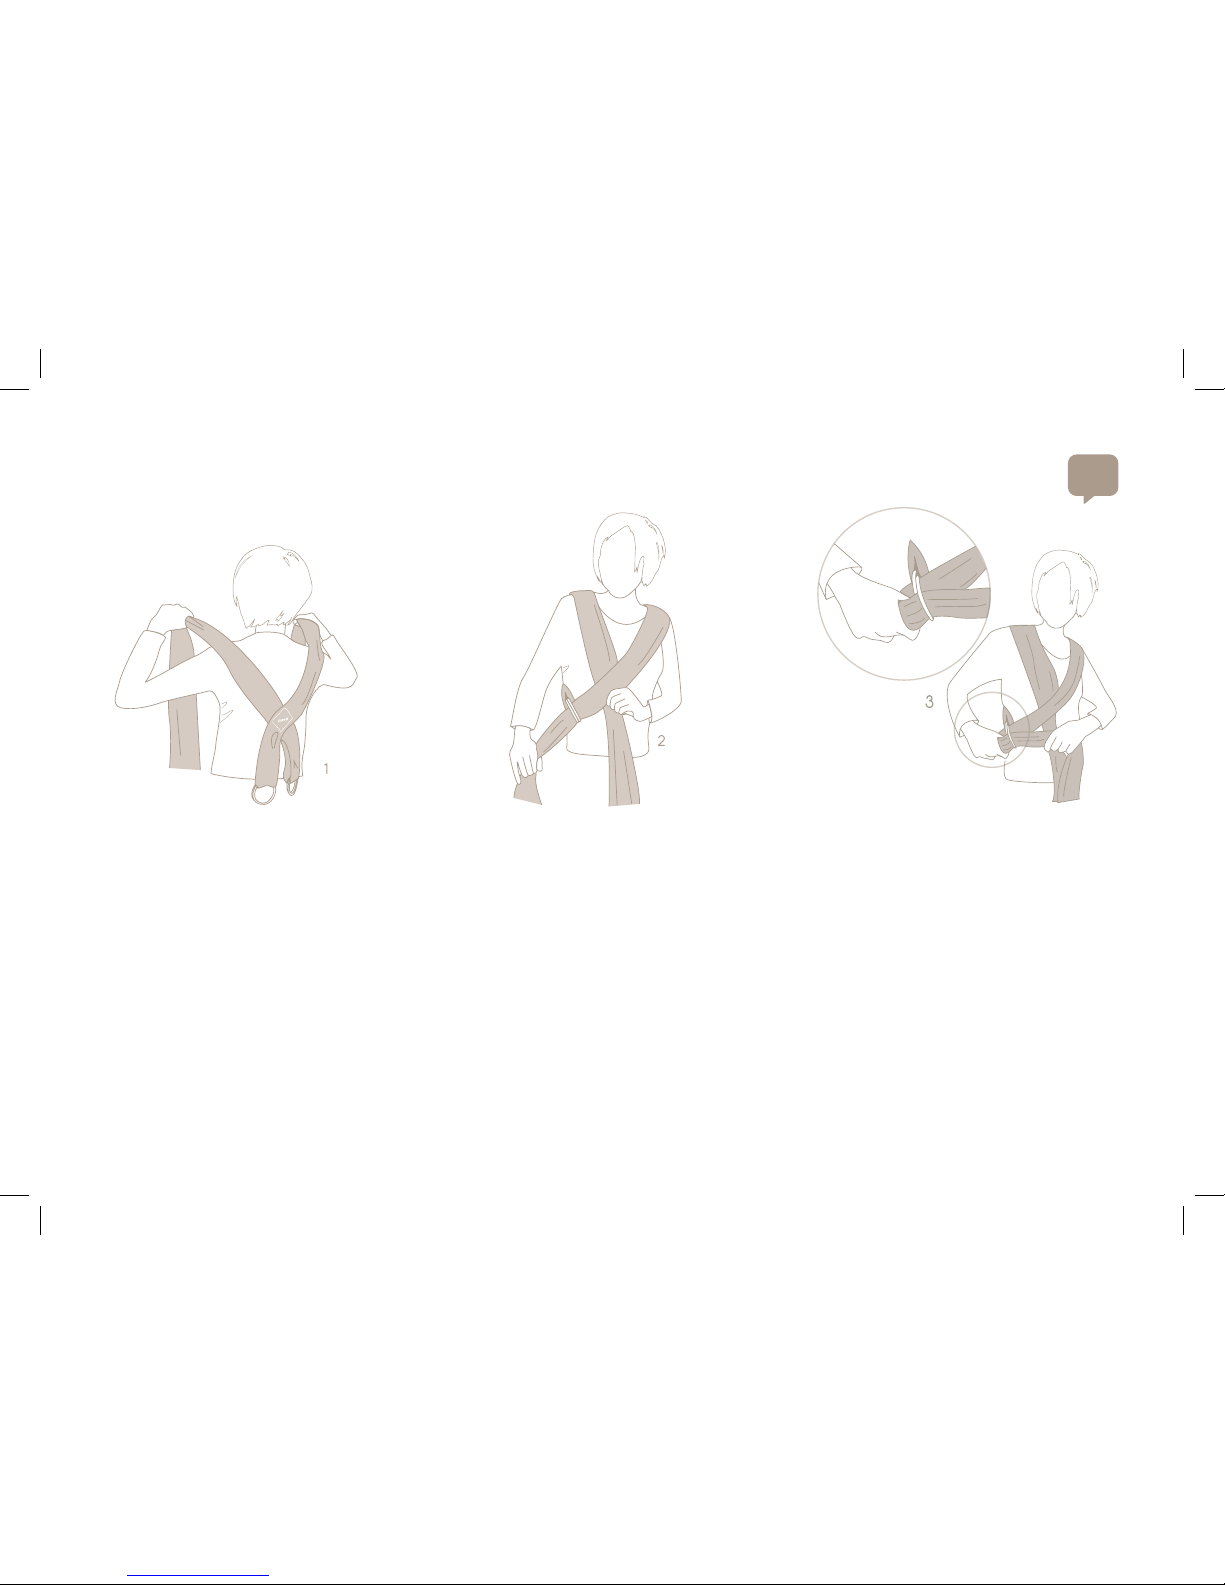
If you need to thread the rings before use…
Then repeat the steps right to left and go straight to Fig A.3 and follow the steps from there.
Special note for breastfeeding mums…
Re-thread the rings to alternate sides when breastfeeding, (make sure baby is not in the carrier); pull the fabric of the inner strap out of the rings …take
it back across you over the top of the opposite strap and re-thread in the same rings.
Fig B.1 - Take the carrier out of the bag and
place it over your shoulders, cross section to
the back.
Fig B.3 - Then take the end of the strap and
thread it back through the front/top ring. To test
whether you have threaded them correctly pull
on the fabric behind the rings…it should stay
rmly in place.
B
Fig B.2 - Take the strap over your left shoulder
across your body and thread through both
rings.
Page 5
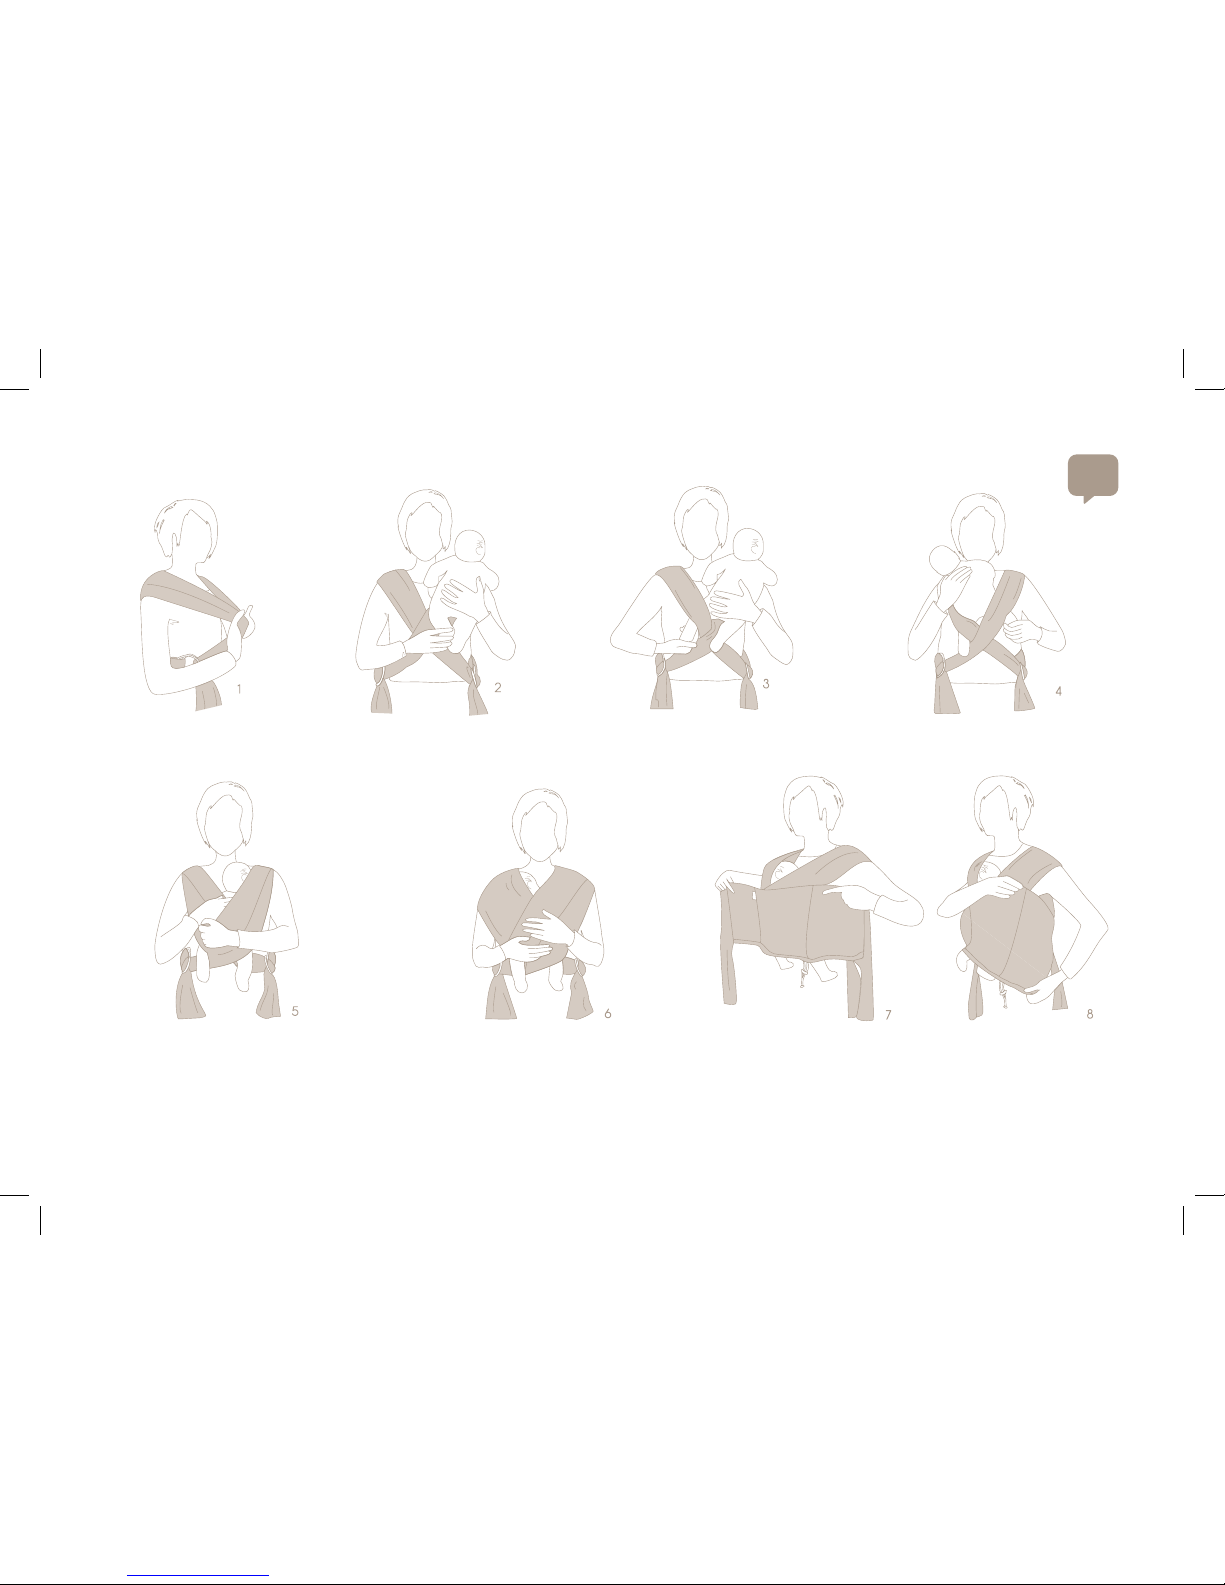
Positions 0-3 months - Weight range 5lbs – 2.3kg+
Upright position…
Fig C.1 - Always check you have left
10-12 cm space between you and
the carrier.
Fig C.2 - Pick baby up and support them
with one hand hig h over your shoulder
on the outer strap side.
Fig C.3 - Use your free hand to reach under the
top part of the inner strap, slide it down and
guide your baby’s leg through.
Fig C.4 - Transfer your baby to the opposite
shoulder supporting their head a nd collect the
other leg through the outer strap.
Fig C.5 - Lower baby’s bottom down inside the
cross created by the straps. Spread the straps
(inner strap rst) fully and evenly all across
your baby’s back and arms and all the way to
the back of baby’s knees so they sit in a frog
legged position …ie wit h their knees higher than
their bottom.
Fig C.6 - Lay baby’s cheek against your chest to ensure
they have free owing air… their chin should be clear of their
chest. To give your newborn the neck support they need
simply spread t he fabric from one shoulder behind ba by’s
head…it is good to do this with a baby of any age while they
sleep. The loose ends of the straps may be tied to the front
or behind you.
Fig C.7 - Turn the bag inside out
to make it into the wrap, then
place the wrap around you
both, with the cord and toggle
always at the bottom nearest
your baby’s legs.
Fig C.8 - Tie securely in a double knot
behind your back. Spread the material out to bring the top edge level wi th
top of baby’s shou lders, and tighten
the toggle under your baby’s bottom
to secure the wrap and support your
ba by.
C
Page 6
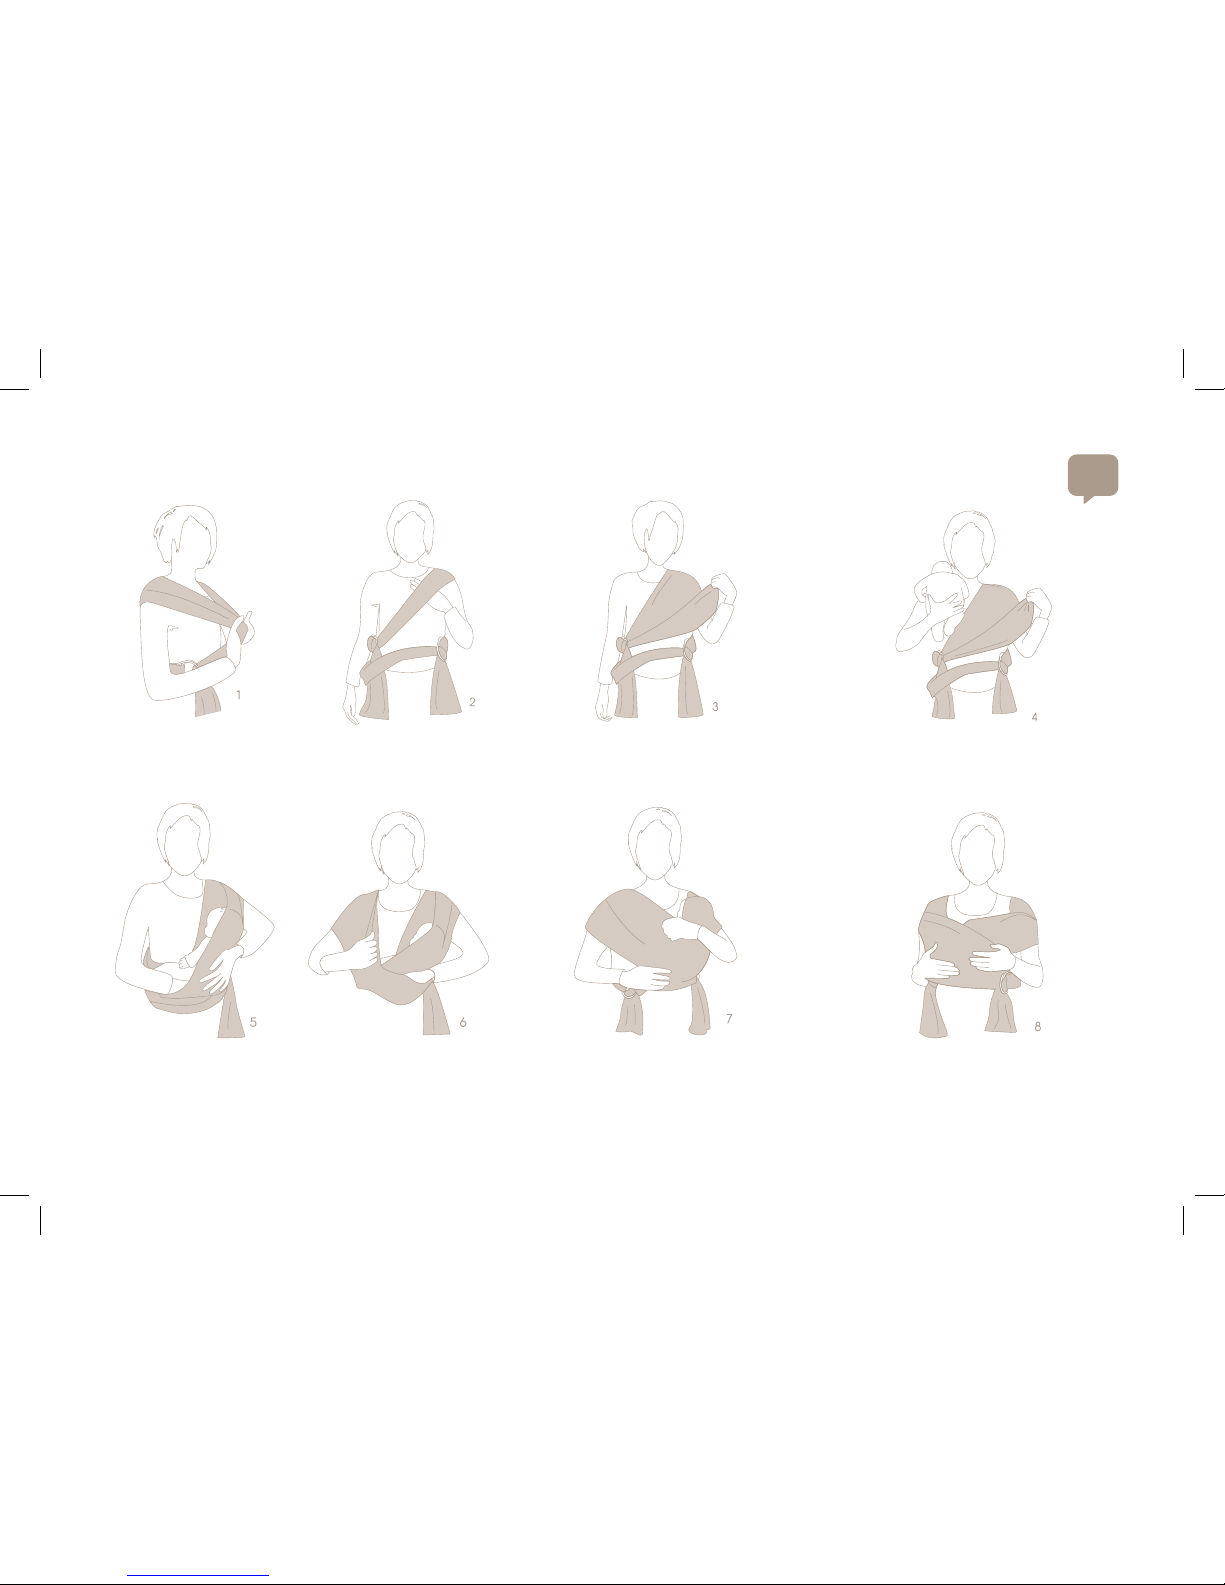
Cradle or breast feeding position…
Put the carrier on repeating steps Fig A.1 to A.4 …bear in mind the straps may need to be a little looser than in the upright position to get baby in.
Fig D.1 - Always check if you have
left 10-12 cm space between you
and the carrier.
Fig D.8- When you have baby in the correct position pull
the outer strap back up over your shoulder whilst spread-
ing lower fabric out to support baby. Make sure baby’s feet
are away from the rings then tighten and tie.
Fig D.2 - Leave the inner strap
where it is a nd slide the outer
strap down off the shoulder.
Fig D.3 - Create a hammock with the inner strap…
keeping one edge of fabric next to your neck , pull
the opposite edge down and then fold it back up
onto the shoulder.
Fig D.4 - Pick up baby and support them with one
hand high over the free shoulder, take hold of the
outer edge of the hammock with your f ree hand
to make room for baby.
D
Fig D.5 and D.6 - Lower baby down into the hammock area bottom rst
(making sure their bottom sits in the deepest part) ...lay baby back across
you…using your free hand check there is a mple fabric on the inside a nd
outside edge along the length of thei r body.
Fig D.7 - When feeding your baby you
can tilt them towards you by placi ng the
arm closest to you down a little resting
around your waist.
Page 7
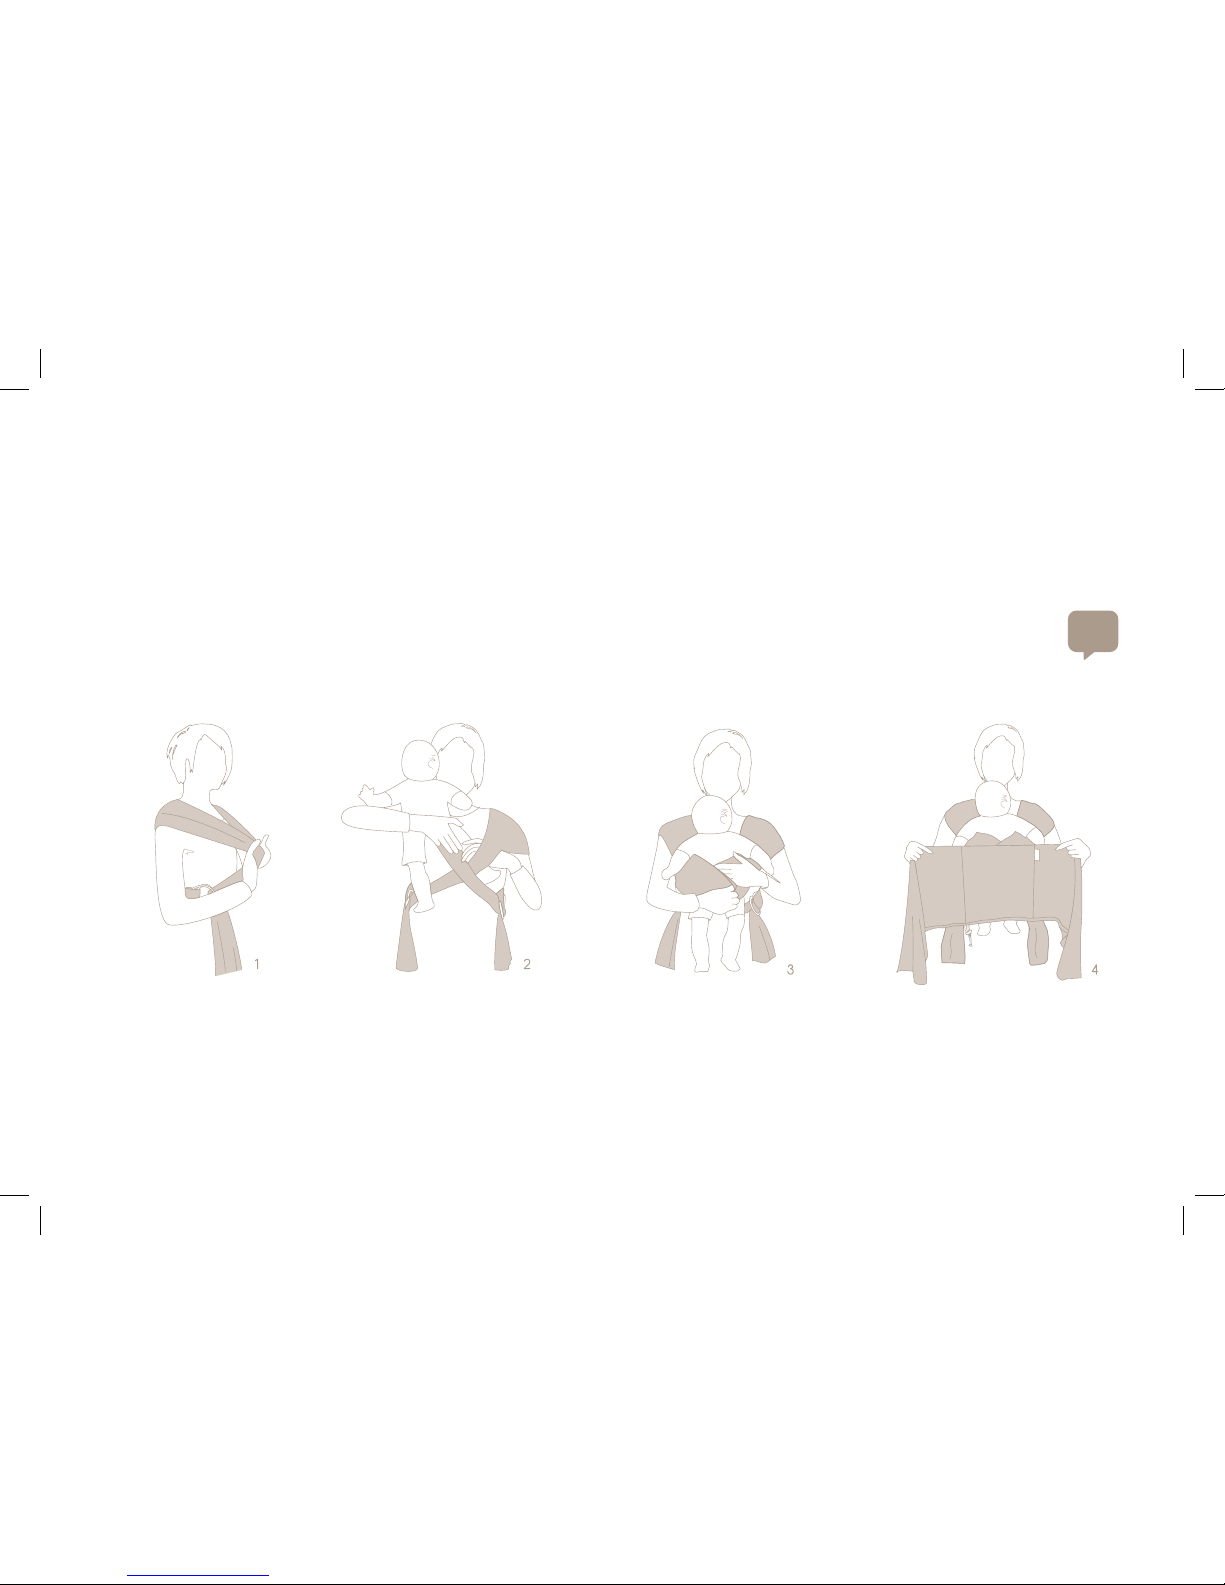
Get the most from your Caboo when nursing
When feeding in the carrier you may need to adjust the strap so baby can approach the nipple at the right angle, you can do this by loosening the rings nearest
baby’s feet… this will let the head down slightly. You may also wish to fold the strap over and down the shoulder slightly on the head side so you can easily maintain
visual contact with your baby while feeding. To alternate to the opposite breast you will need to take baby out and change the inner strap to the outer strap…
see steps on threading the rings (Fig B.1 to B.3)
Positions 4 Months + Weight range: Max weight 14.5kg 32lbs
Upright facing in
*for babies who can hold their own head 3-4 months
Fig E.1 to E.4 - Follow the steps from Fig C.1 to C.4 however baby’s arms do not need to be contained by the strap…at this age baby’s head will only need supporting when
they are sleeping, for added security try tucking one arm in whilst they sleep. The supporting wrap should always be worn in this position.
E
Page 8
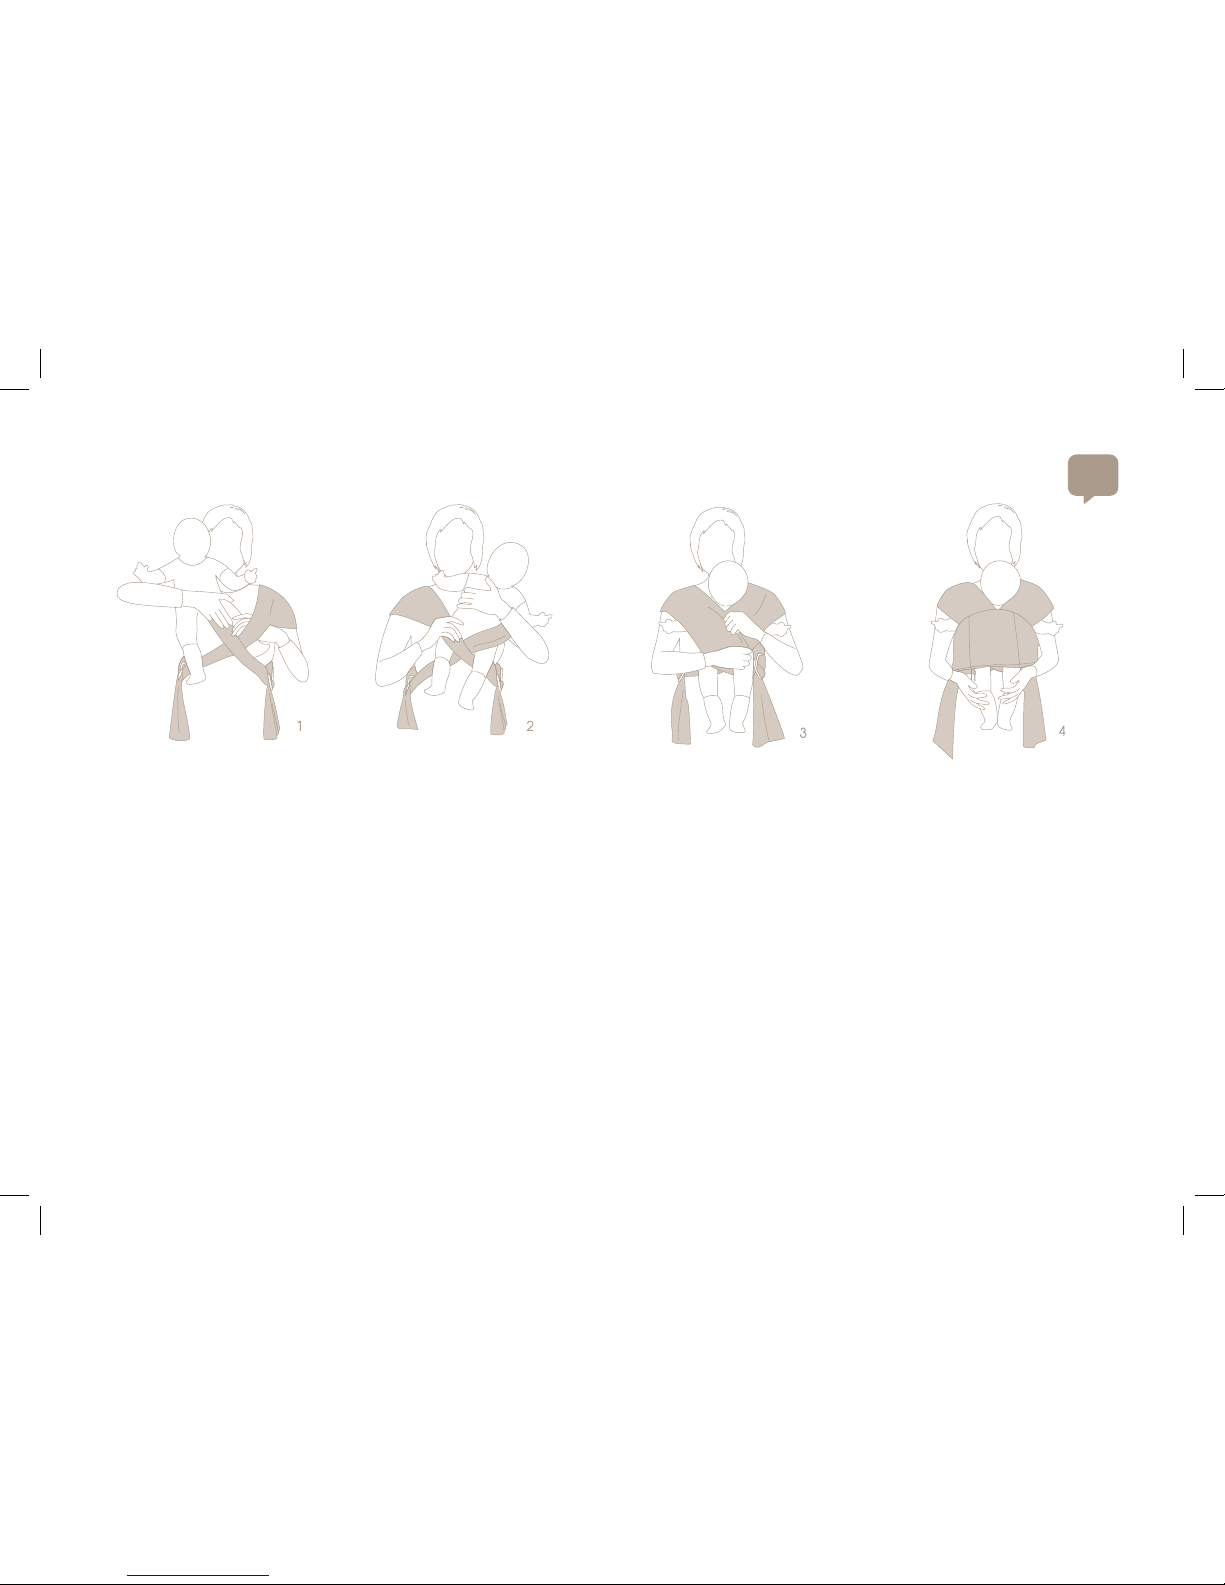
Upright facing out
*for babies with excellent head control 4-5 months
Fig F.1 to F.4 - Follow the steps from Fig A.1 to A.4… then put baby into the carrier in the same way you do for the other positions but instead of facing in your baby faces away
from you…
It is important to hold your baby high up when putting them in (** for bigger babies see our handy tip below) make sure both straps are spread out well between the legs
and go over baby’s shoulders as shown. You should always wear the supporting wrap for additional support.
** If baby is walking you can kneel on the oor behind your baby and they can simply step back placing their legs through the carrier and arms behind the straps.
Special precautions for facing out…
Baby should not be carried in this position for extended periods of more than 30 min utes and should never be left to sleep in th is position. Al ways ma ke sure baby’s
arms are behind the straps in this position.
9 months +
For other ways to carry your baby with an older baby please visit our website www.caboo.info and search for handy tips on carrying.
F
Page 9

Taking off your Caboo…
Upright position...
Untie and take off the wrap, loosen the rings slightly to release the fabric, support your baby with one hand while you pull the fabric back with the other until you can get
under each arm (and cupped behind the head for a newborn) then simply lift them up and away from you to free the legs.
Cradle / Breastfeeding position…
Supporting baby rmly, slide the outer strap off your shoulder…place one hand between the inner strap and baby’s bottom, with the other hand gently pull the fabric away
from baby so you can put your hand behind their head…then lift your baby up and out.
We hope you enjoy your Caboo…although awards are nice we think happy mums, dads and babies are the best accolade we can receive.
Why not join the Close community…we would love to hear all about your adventures with our carrier, whether on our doorstep or on the other
side of the world.
 Loading...