

Page 1

Clorox® Total 6
®
Electrostatic Sprayer CLX
Atomizador Electrostático CLX
Pulvérisateur électrostatique CLX
For Indoor and Outdoor
Commercial Use
Para Uso Comercial en
Interiores y Exteriores
Pour usage commercial
à l’intérieur ou à l’extérieur
Operator’s
Manual
EN | 2–11
Manual del
Operador
ES | 12–21
Manuel de
l’utilisateur
FR | 22–31
For service and support,
contact Service Tech Team
www.servicetechteam.com
Para obtener servicio y apoyo,
comuníquese con el Equipo de
Servicio Técnico en:
www.servicetechteam.com
TM
Pour communiquer avec notre
équipe de services et de soutien
techniques, consultez son
site Web à
www.servicetechteam.com.
Page 2

2 | EN EN | 3
SAFETY NOTICES
Warnings 3
Safety Decal 4
Protective Gear 5
IMPORTANT SAFETY PRECAUTIONS
Power Connection 5
Grounding Instructions 5
Extension Cord 5
Shock/Electrical Hazard 6
General Safety 6
Chemicals 6
SYSTEM COMPONENTS
Clorox® Total 360® Base Unit 7
Clorox® Total 360® Sprayer 7
Nozzle 7
OPERATING INSTRUCTIONS
Preparing the Spray Area 8
Unit Operation/Setup 8
Sprayer Operation During Cleaning 8
Changing Clorox-Approved Products 8
After Use and Storage 8
MAINTENANCE
Sprayer Body 9
Peristaltic Pump 9
Nozzle 9
SPECIFICATIONS 10
TROUBLESHOOTING 10
EQUIPMENT WARRANTY 11
SAFETY NOTICES
This manual contains information that is important for you to
know and understand before operating the Clorox® Total 360®
Electrostatic Sprayer. This information relates to protecting your
safety and ensures product reliability and performance. It is the
owner’s responsibility to ensure that all who operate this equipment
read this manual.
Warnings
To help you recognize this information we use the warning symbols
below. Please read the manual carefully, and pay special attention
to the symbols and warning labels. Warning labels indicate a
potentially hazardous situation which, if not avoided, could result
in death or serious injury.
WARNINGS
• Read and fully understand the Clorox® Total 360® Electrostatic
Sprayer Operator’s Manual prior to using the electrostatic
sprayer.
• Read and fully understand Clorox-approved product labels
prior to using any liquid product with the Clorox® Total 360®
Electrostatic Sprayer.
• Clorox® Total 360® Electrostatic Sprayers are for both indoor
and outdoor commercial use.
• Clorox® Total 360® Electrostatic Sprayers should never be used
in a hazardous environment.
• Clorox® Total 360® Electrostatic Sprayers should never be used
in an area containing volatile chemicals. Nor should they be
used in any area containing volatile or explosive levels of gas,
vapor or particulates.
• Clorox® Total 360® Electrostatic Sprayers should never be used
by untrained personnel.
WARNINGS
PRESSURIZED EQUIPMENT HAZARD
Fluid from equipment that leaks or ruptures from a component
can splash in the eyes or on skin, causing serious injury. In order
to help prevent a leak or rupture:
• Check hoses, tubes and couplings
daily. Replace worn or damaged parts
immediately.
WARNINGS
PLASTIC PARTS CLEANING SOLVENT HAZARD
Many solvents can degrade plastic parts and cause them to fail,
which can lead to serious injury or property damage. In order to
help prevent against degradation:
• Use only compatible water-based solvents
to clean plastic structural pressure
containing parts.
• See technical data in this and all other
equipment instruction manuals. Read fluid
and solvent manufacturer’s Safety Data
Sheets (SDS) and recommendations prior
to use.
WARNINGS
FIRE, EXPLOSION AND ELECTRIC SHOCK HAZARD
Flammable fumes, such as solvent and paint fumes, in work
areas can ignite or explode. To help prevent fire, explosion
and electric shock:
• Electrostatic equipment must be used
only by trained, qualified personnel who
understand the requirements of this manual.
• Stop operation immediately if static sparking
occurs or you feel shock. Do not use
equipment until you identify and correct
the problem.
• Use and clean equipment only in wellventilated area.
• Never spray a flammable chemical
(with a flashpoint less than 140°F [60°C]).
• Do not plug or unplug power cords or
turn lights on or o when flammable
fumes are present.
• Keep spray area free of debris, including
solvents, rags, gasoline or any flammable
chemicals.
• Keep a working fire extinguisher in the
work area.
Table of Contents
Page 3

4 | EN EN | 5
Protective Gear
Personal Protective Equipment (PPE) must comply with the
American National Standards Institute’s ANSI Z87.1-1989 standard
if purchased after July 5, 1994, or ANSI Z87.1-1968 or with the
standard of the country in use.
• Eye and face PPE shall be distinctly marked to facilitate
identification of the manufacturer. (1910.133[a][4]).
• The following minimum requirements must be met by all
protective devices. Protectors shall:
- Provide adequate protection against the particular hazards
for which they are designed
- Be of safe design and construction for the work to be
performed
- Be reasonably comfortable when worn under the designated
conditions
- Fit snugly and not unduly interfere with the movements
of the wearer
- Be durable
- Be capable of being disinfected
- Be easily cleanable
- Be distinctly marked to facilitate identification only
of the manufacturer
RECOMMEND USE OF FULLY ENCLOSED EYEWEAR
PROTECTIONS, SUCH AS GOGGLES, WHEN USING THIS DEVICE.
ALWAYS USE APPROPRIATE PPE, LISTED ON THE CLOROXAPPROVED PRODUCT’S SAFETY DATA SHEET (SDS).
CLOROX SDSs CAN BE FOUND AT
WWW.THECLOROXCOMPANY.COM/BRANDS/SAFETYINFORMATION/SDS/.
Safety Decal
This decal is located on the top-most deck surface forward of the
bottle storage location.
WARNINGS
EQUIPMENT MISUSE HAZARD
Misuse can cause death or serious injury
• Do not operate the unit when fatigued or
under the influence of drugs or alcohol.
• Use fluids and solvents that are compatible
with equipment wetted parts. See technical
data in all equipment manuals. Read fluid
and solvent manufacturer’s warnings. For
complete information about your material,
request SDS from distributor or retailer.
• Do not leave the work area while equipment
is energized.
• Turn o all equipment when not in use.
• Check equipment daily. Repair or replace
worn or damaged parts immediately with
genuine replacement parts from trusted
Clorox partners only.
• Do not alter or modify equipment.
Alterations or modifications void your
Clorox® Total 360® warranty and agency
approvals, and create safety hazards.
• Route hoses and power cords away from
trac areas, sharp edges, moving parts
and hot surfaces.
WARNINGS
CHEMICAL USE HAZARD
Each chemical, such as a disinfectant, has a unique set of hazards
and needs to be handled properly to ensure worker safety.
• The Clorox® Total 360® Electrostatic Sprayer can only be used
with products that have been approved by Clorox. Never spray
any liquid product that is not a Clorox-approved product. The
Clorox® Total 360® Electrostatic Sprayer warranty is voided
if the Clorox® Total 360® Electrostatic Sprayer is used with
products that are not approved by Clorox. Be aware that many
chemical liquids can be harmful if they are not used properly.
• Read and understand the Clorox-approved product’s SDS and
label prior to use.
• Be aware of first-aid procedures related to the product in use.
• It is a violation of Federal law to use a chemical in a manner
inconsistent with its label.
• Use personal protective equipment as detailed by the Cloroxapproved product’s SDS.
• For use with non-flammable, non-combustible and non-volatile
fluids only. Never spray a flammable chemical (flash point less
than 140°F [60°C]) .
• Ensure the area being sprayed has proper ventilation.
• Store all chemicals in original containers in a cool, dry place,
away from heat and open flames.
• Do not reuse or refill a chemical container.
• To dispose of Clorox-approved products refer to product labels.
WARNINGS
PERSONAL PROTECTIVE EQUIPMENT
Wear appropriate protective equipment when in the work area
to help prevent serious injury.
• Recommend use of fully enclosed eyewear
protections, such as goggles, when using
this device.
• Refer to product specific Clorox Safety Data
Sheets (SDS) for any additional Personal
Protective Equipment (PPE).
IMPORTANT SAFETY PRECAUTIONS
When using an electrical appliance, it is important to understand
that some circuits are electrically live, even when the power switch
is in the o position. Basic safety precautions should always be
followed to reduce the risk of burns, fire, electrical shock, injury
and/or death.
Power Connection
Our power plug must be used with a three-pronged, grounded
outlet, rated for no less than 15A service. Always verify before
product use. This appliance is for use on a nominal 120V/60Hz
circuit with a verified ground plug. Check with a qualified electrician
to ensure you have the correct electrical service and grounding.
Grounding Instructions
This appliance must be grounded. In the event of malfunction
or breakdown, grounding provides a path of least resistance
for an electric current to reduce the risk of electric shock. This
appliance is equipped with a cord having an equipment-grounding
conductor and a grounding plug. The plug must be plugged into
an appropriate outlet that is properly installed and grounded in
accordance with all local codes and ordinances. Never use an
adapter with this product.
DANGER: Improper connection of the equipment-grounding
conductor can result in a risk of electric shock. The conductor with
insulation having an outer surface that is green, with or without
yellow stripes, is the equipment-grounding conductor. If repair or
replacement of the cord or plug is necessary, do not connect the
equipment-grounding conductor to a live terminal. Check with a
qualified electrician or serviceman if the grounding instructions are
not completely understood or if in doubt as to whether the appliance
is properly grounded. Do not modify the plug provided with the
appliance — if it will not fit the outlet, have a proper outlet installed by
a qualified electrician. Never use an adapter with this product.
Extension Cord
Clorox provides a 25-foot (7.6m) extension cord with each Total
360® Electrostatic Sprayer and strongly recommends that you use
this approved extension cord. Make sure your extension cord is in
good condition. Inspect cords periodically and replace if damaged.
If an alternate extension cord is used, be aware that an undersized
extension cord will cause a drop of in-line voltage, which
could result in a loss of power, damage to the product and/or
overheating. Always use a suciently rated extension cord.
IMPORTANT: Clorox recommends using a 12/3 gauge extension
cord, no longer than 100 feet (30.5m). Additionally, Clorox also
recommends the use of a GFCI (ground fault circuit interrupter)
power outlet or extension cord. When equipped on the extension
cord, always position the GFCI toward the power outlet.
COVER OF
GROUNDED
OUTLET BOX*
GROUNDING
PIN
*120-volt grounded connectors shown. 220/240-volt grounded connectors will
dier in shape.
WARNING!
¡
ADVERTENCIA!
AVERTISSEMENTS!
NI-45400
•
Always wear appropriate Personal Protective
Equipment (PPE), as detailed in the User Manual,
when using this device. Refer to product specific
Clorox
®
Safety Data Sheets (SDS) for any additional PPE.
•
Follow instructions and precautions listed on Clorox®
manufacturing product labels.
•
Only use Clorox®-approved products through the
Clorox
®
Total 360® Sprayer.
•
Inspect power cord, sprayer and external tubing
for damage prior to use. DO NOT use if damage
is present.
•
Always use with a grounded electrical plug
and outlet.
•
Use device only as intended. Direct spray only
toward appropriate surfaces.
•
Cuando use este dispositivo, siempre use el equipo de
protección personal (EPP) apropiado, como se detalla
en el Manual del Usuario. Consulte las Fichas de Datos
de Seguridad (FDS) para cualquier EPP adicional.
•
Siga las instrucciones y precauciones que se listan
en las etiquetas de fabricación del producto Clorox
®
.
•
Utilice solamente productos Clorox® aprobados por
el Atomizador Clorox
®
Total 360®.
•
Antes de usarlo inspeccione el cable de electricidad,
el rociador y la tubería externa por daños. NO lo use
si hay daños presentes.
•
Siempre usarlo con un enchufe y toma de corriente
eléctrica con conexión a tierra.
•
Solamente utilice el dispositivo para lo que fue
diseñado. Solo rocié directamente en las superficies
adecuadas.
•
Au moment d’utiliser le pulvérisateur, toujours porter un
équipement de protection personnelle (ÉPP) adéquat, tel
que décrit dans le manuel de l’utilisateur. Se reporter à
la fiche signalétique du produit nettoyant Clorox
®
afin de
connaître tout autre ÉPP requis pour son emploi.
•
Suivre les instructions et les mises en garde indiquées
sur l’étiquette d’origine de chaque produit Clorox
®
.
•
Utiliser le pulvérisateur Clorox® Total 360® uniquement
avec les produits Clorox
®
approuvés à cette fin.
•
Avant l’emploi, inspecter le cordon d’alimentation,
l’appareil lui-même et les tubes externes pour
vérifier l’absence de dommages. NE PAS utiliser
le pulvérisateur en présence de dommages.
•
Toujours brancher le pulvérisateur dans une prise
de courant avec mise à la terre.
•
Utiliser le pulvérisateur strictement selon le mode
d’emploi. Toujours diriger le jet directement vers
les surfaces à traiter.
Page 4

6 | EN EN | 7
Shock/Electrical Hazard
As with most electrical appliances, electrical parts are electrically
live even when the switch is o. To reduce the risk of burns, fire,
electric shock or injury:
1. Use this unit only for its intended use, as described in this
manual.
2. Do not use while bathing.
3. Do not place or store unit where it can fall or be pulled into
water or other liquid.
4. If unit falls into water, unplug immediately. Do not reach into
water to retrieve.
5. Never operate this unit if it has been dropped, damaged or is
working improperly. Contact an authorized Clorox technician.
6. Keep the cord away from heated surfaces.
7. Never block the air openings of the unit or place it on a soft
surface (bed or couch), where the air openings may become
blocked.
8. Never drop or insert any object into any opening.
9. Do not use with a damaged or broken power cord.
10. Never store at a temperature above 140°F (60°C).
11. This unit may be warm when in use. Do not let heated surface
touch bare skin.
General Safety
Lack of attention to safety can result in reduced eciency,
accidents, personal injury or death. Watch for safety hazards and
correct deficiencies promptly. Use the following safety precautions
as a guide when using this machine.
1. Read the operator’s manual. Failure to do so is considered
misuse of the equipment.
2. Use the Clorox® Total 360® Electrostatic Sprayer unit only for its
intended use, as described in this manual.
3. Before operating equipment, become familiar with all caution
and warning decals axed to the equipment.
4. Do not use the Clorox® Total 360® Electrostatic Sprayer in a
hazardous location.
5. Only trained personnel familiar with the Clorox® Total 360®
Electrostatic Sprayer and Clorox-approved products should be
allowed to operate.
6. Do not allow personnel to operate the sprayer without proper
instruction or under the influence of alcohol or drugs.
7. Use an extension cord meeting or exceeding the specification
detailed in the Extension Cord section.
8. Store sprayer in a cool, dry place. Do not expose to extreme
temperatures.
9. Purge liquid line before storing the unit.
10. Be aware, even when the sprayer is o, power is still supplied
to the unit when plugged into an electrical outlet.
11. Never hang unit from cord.
12. A sprayer should never be left unattended when plugged in.
13. A resettable breaker is provided on the rear of the unit.
It will trip if the unit experiences an electrical short.
14. Always turn o sprayer after each application
and before unplugging.
15. Always unplug unit from outlet when not in use or when
leaving it unattended.
16. Never unplug by pulling the cord or with wet hands.
Always unplug by grasping the plug.
17. Do not pull or carry the sprayer by the power cord.
18. Do not crimp the cord or strain it around sharp edges,
as doing so might damage the cord.
19. Do not use the Clorox® Total 360® Electrostatic Sprayer
with a damaged power cord.
20. Always thoroughly inspect product before usage.
21. For questions or concerns about the Clorox® Total 360®
Electrostatic Sprayer, contact Service Tech Team at
www.servicetechteam.com.
Chemicals
The Clorox® Total 360® Electrostatic Sprayer can only be used
with products that have been approved by Clorox. The Clorox®
Total 360® Electrostatic Sprayer warranty is voided if the Clorox®
Total 360® Electrostatic Sprayer is used with products that are not
approved by Clorox. Be aware that many chemical liquids can be
harmful if they are not used properly.
1. Always use appropriate personal protective equipment (PPE)
when operating the Clorox® Total 360® Electrostatic Sprayer.
Refer to product SDS for proper PPE.
2. Follow the liquid product label and SDS for proper storing,
handling and disposing of any liquid products used in the
Clorox® Total 360® Electrostatic Sprayer.
3. Know the length of time required by each liquid product
application before allowing people and pets to return to the
sprayed area.
4. Tampering with Clorox-approved products, product containers
and the Clorox® Total 360® Electrostatic Sprayer in any form will
void the customer warranty.
5. To dispose of Clorox-approved products refer to product labels.
6. If liquid products come into contact with your skin or eyes,
please refer to product label and SDS.
7. Never aim the sprayer at yourself or another person.
IMPORTANT: Safety data sheets (SDS) are available for all liquid
products that have been approved for use in the Clorox® Total 360®
Electrostatic Sprayer. These SDSs will inform you of any hazards
and precautions of which you should be aware. All employees that
use the product must be aware of and have access to the SDS. They
should also be trained for and aware of their safety while working
with liquid products. It is the responsibility of the owner of the
equipment to obtain an SDS from Clorox for each chemical used.
Visit www.thecloroxcompany.com/brands/safety-information/sds/
for more information.
Nozzle
The nozzle assembly is located at the end of the sprayer. It is
composed of a spring-loaded contact, external O-ring, nozzle
cover, liquid tip and electrode. These are the only user-serviceable
components. To access the nozzle components, unscrew the nozzle
cover counterclockwise by hand. It is very important to follow all
maintenance and cleaning procedures to ensure that the sprayer
will function optimally. After servicing the nozzle, it is extremely
important to return the nozzle to its seat position and avoid
overtightening.
NOTE: As the sprayer becomes dirty from typical use, a 70%
isopropyl alcohol cleaner that is manually applied is recommended
on the outside surfaces. This discourages dripping from the nozzle.
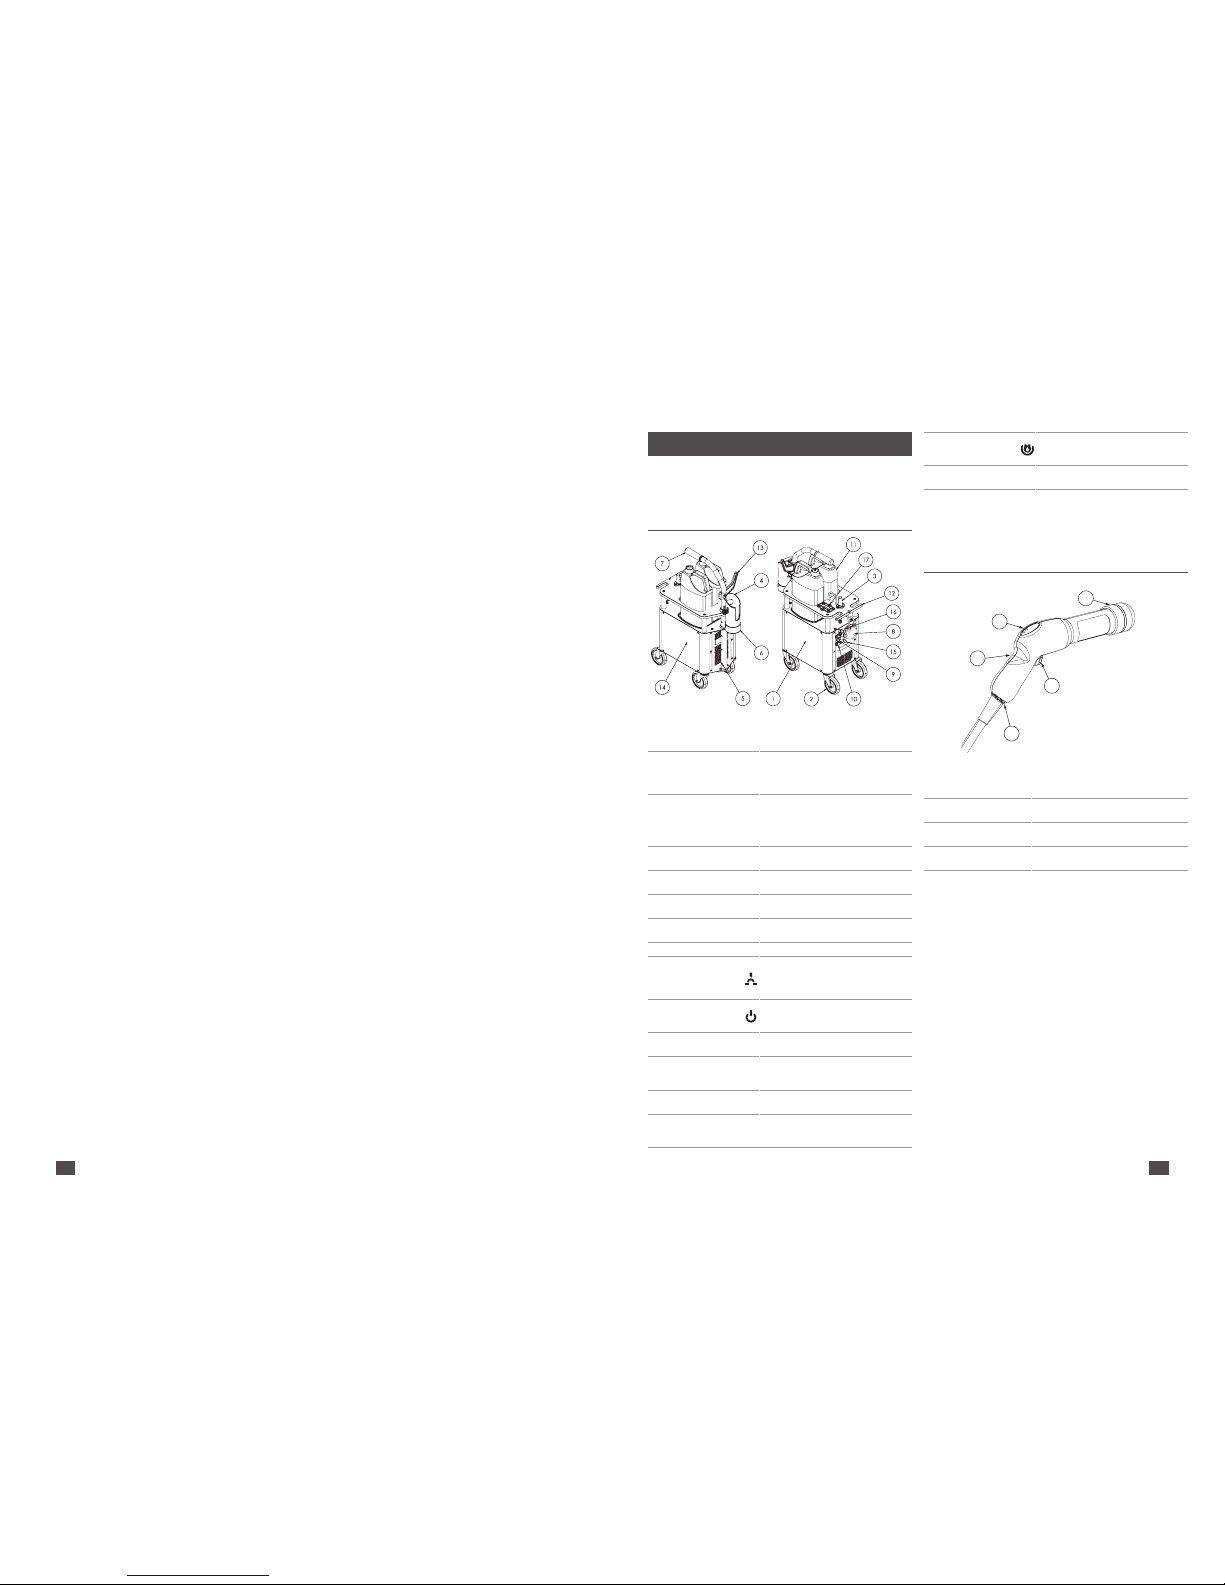
Clorox® Total 360® Base Unit
1 Air Compressor Atomizes and propels the liquid.
Includes built-in auto-resetting
thermal safeguard against
compressor overheating.
2 Non-Marking Wheels Large wheels, for easy transport and
maneuverability, will not leave scu
marks. Do not require inflation.
3 Sprayer Connect Line Connect line consists of three
components: electrical line, liquid line
and air line. The connect line connects
the sprayer to the base unit.
4 Sprayer Holster Holds the sprayer.
5 Handle Adjust
Buttons
Adjusts handle height.
(Squeeze to adjust.)
6 Removable Drip Cup Collects any dripping from the
sprayer.
7 Adjustable Handle Handle position is raised, lowered
and rotated by the two button snaps.
8 Peristaltic Pump Provides liquid up to sprayer.
9 Circuit Breaker User resettable circuit breaker and
will only trip if a short occurs in the
base unit.
10 Main Power
Switch
Powers system to a ready state.
11 1-Gallon Chemical
Containers
Chemical containers
(not included with equipment).
12 Extension Cord
Holder
Located at the rear of the unit for
extension cord storage.
13 Cord Management
Hook
Stores or hangs the extension cord.
14 Frame ABS and glass-filled nylon frame
and hardware design for long-term
durability.
15 Pump Purge
Switch
Purges product from liquid line.
(Press to purge.)
16 Sprayer Electrical
Disconnect
Electrical connection for sprayer.
17 Reservoir A reservoir to ensure a consistent
liquid flow.
Clorox® Total 360® Sprayer
1
5
2
4
3
1 Trigger Button 1-click functionality /
operates the sprayer/device.
2 Instrument Panel Indicates the power, sprayer
and electrostatics are on.
3 Nozzle Cover Located on the front of the sprayer.
4 Sprayer Grip Handle positioned for ambidextrous
use.
5 Sprayer Connect Connect line consists of three
components: electrical line, liquid line
and air line.
SYSTEM COMPONENTS
The patented Clorox® Total 360® Electrostatic Sprayer was
engineered with the end-user in mind. It is durable, highly
mobile and incredibly eective for electrostatic delivery.
Page 5

8 | EN EN | 9
Changing Clorox-Approved Products
1. Stop spraying the Clorox® Total 360® Electrostatic Sprayer.
2. Disconnect the bottle connection from the Clorox-approved
product that is to be changed and remove from the sprayer.
Cap the removed product if it is being stored.
3. Purging the Clorox® Total 360® Electrostatic Sprayer: Depress
into an inconspicuous corner, container or drain. Spray the
Clorox® Total 360® Electrostatic Sprayer for about 20 seconds
to purge the system.
4. Choose the appropriate Clorox-approved product for cleaning,
sanitizing or disinfecting.
5. Mount desired Clorox-approved product on Clorox® Total
360® Electrostatic Sprayer base. Ensure that the bottles are
positioned with the opening facing up and the opening facing
the dispensing tubes.
6. Unscrew the lid on the Clorox-approved products of your
choice and connect the Clorox® Total 360® Electrostatic Sprayer
dispensing cap to the bottle. Be sure the cap is screwed all the
way down; do not overtighten.
7. Priming the Clorox® Total 360® Electrostatic Sprayer: Depress
into an inconspicuous corner, container or drain. Spray the
Clorox® Total 360® Electrostatic Sprayer for about 20 seconds
to generate a steady flow of solution.
After Use and Storage
1. Stop spraying the Clorox® Total 360® Electrostatic Sprayer.
2. Disconnect the bottle connection from the Clorox-approved
product that is to be changed and remove from the sprayer.
Cap the removed product if it is being stored.
3. Emptying drip cup holder (if necessary): Rotate the drip cup
90 degrees, making sure to hold it level to prevent spillage.
Remove and empty the drip cup. Reinstall the empty drip
cup by rotating it 90 degrees in the opposite direction until
it is snug.
4. Purging the Clorox® Total 360® Electrostatic Sprayer:
Depress into an inconspicuous corner, container or drain.
Spray the Clorox® Total 360® Electrostatic Sprayer for
about 20 seconds to purge the system.
5. Turn o the unit. Blue indicator light on the instrument panel
and base of the unit should no longer be illuminated.
6. Unplug the Clorox® Total 360® Electrostatic Sprayer from wall.
7. Wrap cord on cord holder on the Clorox® Total 360® base unit.
8. Store in a safe, dry place.
Preparing the Spray Area
1. Clean gross filth by using standard manual cleaning protocols.
2. Close the room to the general public for cleaning. Place signs
or warning indicators on doors that indicate no one should
enter the room.
3. Power o any sensitive electrical devices but do not unplug them.
Unit Operation/Setup
1. Choose the appropriate Clorox-approved product for cleaning,
sanitizing or disinfecting.
2. Mount desired Clorox-approved product on Clorox® Total
360® Electrostatic Sprayer base. Ensure that the bottles are
positioned with the opening facing up and the opening facing
the dispensing tubes.
3. Unscrew the lid on the Clorox-approved product of your choice
and connect the Clorox® Total 360® Electrostatic Sprayer
dispensing cap to the bottle. Be sure the cap is screwed all the
way down; do not overtighten.
4. Unwrap electrical cord completely and plug Clorox® Total 360®
Electrostatic Sprayer into a grounded, three-pronged socket.
5. Put on appropriate personal protective equipment. See section
on personal protective equipment on page 5.
6. Locate the On/O switch on the base unit. Push the Total 360®
sprayer to the “On” position. A blue light will illuminate on both
the sprayer instrument panel and unit power switch.
7. Remove the sprayer from the unit. A blue power indicator light
should be illuminated on the sprayer.
8. The system is now ready for use.
9. Priming the Clorox® Total 360® Electrostatic Sprayer: Depress
into an inconspicuous corner, container or drain. Spray the
Clorox® Total 360® Electrostatic Sprayer for about 20 seconds
to generate a steady flow of solution.
10. When spraying, a second blue indicator light will illuminate on
the sprayer instrument panel when the trigger is depressed.
NOTE: Sprayer will automatically stay on until trigger is
depressed an additional time.
NOTE: Unit will not operate properly at 40°F (4.5°C) or less.
Sprayer Operation During Cleaning
1. Position Clorox® Total 360® Electrostatic Sprayer in a rear
corner of the area.
2. Direct the nozzle at the desired surface.
3. Begin to spray. Press the sprayer button once to initiate
spraying. Press once to stop flow of the sprayer.
4. Follow a continuous path around the area working from high
to low areas, moving the sprayer in a sweeping motion until
surfaces are thoroughly wet.
5. After spraying, keep the area closed to the public,
based on product SDSs.
6. Remove the closed sign from the door once the reentry
time has expired.
Nozzle
To ensure trouble-free operation of your unit, it is recommended
that the operator rinse the nozzle out with clean water before
final storage at the end of each day. By cleaning your sprayer’s
nozzle after each usage, you will avoid the long-term chemical
buildup that eventually causes clogs, poor spray patterns and a
shortened life of the nozzle components. In addition to rinsing
with clean water after each use, the nozzle should periodically
be disassembled and cleaned. Regular maintenance should be
performed. Nozzle maintenance schedule will vary, depending
on how often the sprayer is used and adherence to pre- and postspray maintenance guidelines.
It is recommended that you thoroughly read the service outline
below before performing any regular nozzle maintenance.
To Clean/Inspect the Nozzle Assembly
1. Unscrew the cap from the nozzle base. Clean any debris from
or around any of the interior surfaces with warm soapy water.
2. Inspect for any damage to the liquid tip. If the spray pattern
was noted to be inconsistent or nontypical of a healthy
symmetrical spray, remove/replace the liquid tip with an
appropriate 7/16” (12 mm) socket wrench.
3. Inspect the nozzle electrode for any signs of electrical arching,
burn and/or corrosion. Gently push down on the spring-loaded
contact to verify a smooth spring return. If any issues are noted,
remove/replace immediately. This is done by gently pulling
on the spring-loaded contact with a pair of pliers. Otherwise,
service the spring-loaded contact by applying a generous
amount of dielectric grease, available at any local automotive/
hardware store.
4. Be sure to also thoroughly clean all interior surfaces of the
nozzle cover, including the main orifice. Never use a wire brush,
file or sandpaper to clean any surface or orifice.
Important: The nozzle cover should be hand-tightened.
Never use pliers or other tools to tighten it, as this may cause
damage. Removal of the nozzle electrode is not necessary
for cleaning.
Sprayer Body
The sprayer body has no serviceable parts inside. Do not open the
unit shell, as doing so will void the warranty on the sprayer. If you
need to have your sprayer serviced, contact Service Tech Team at
www.servicetechteam.com.
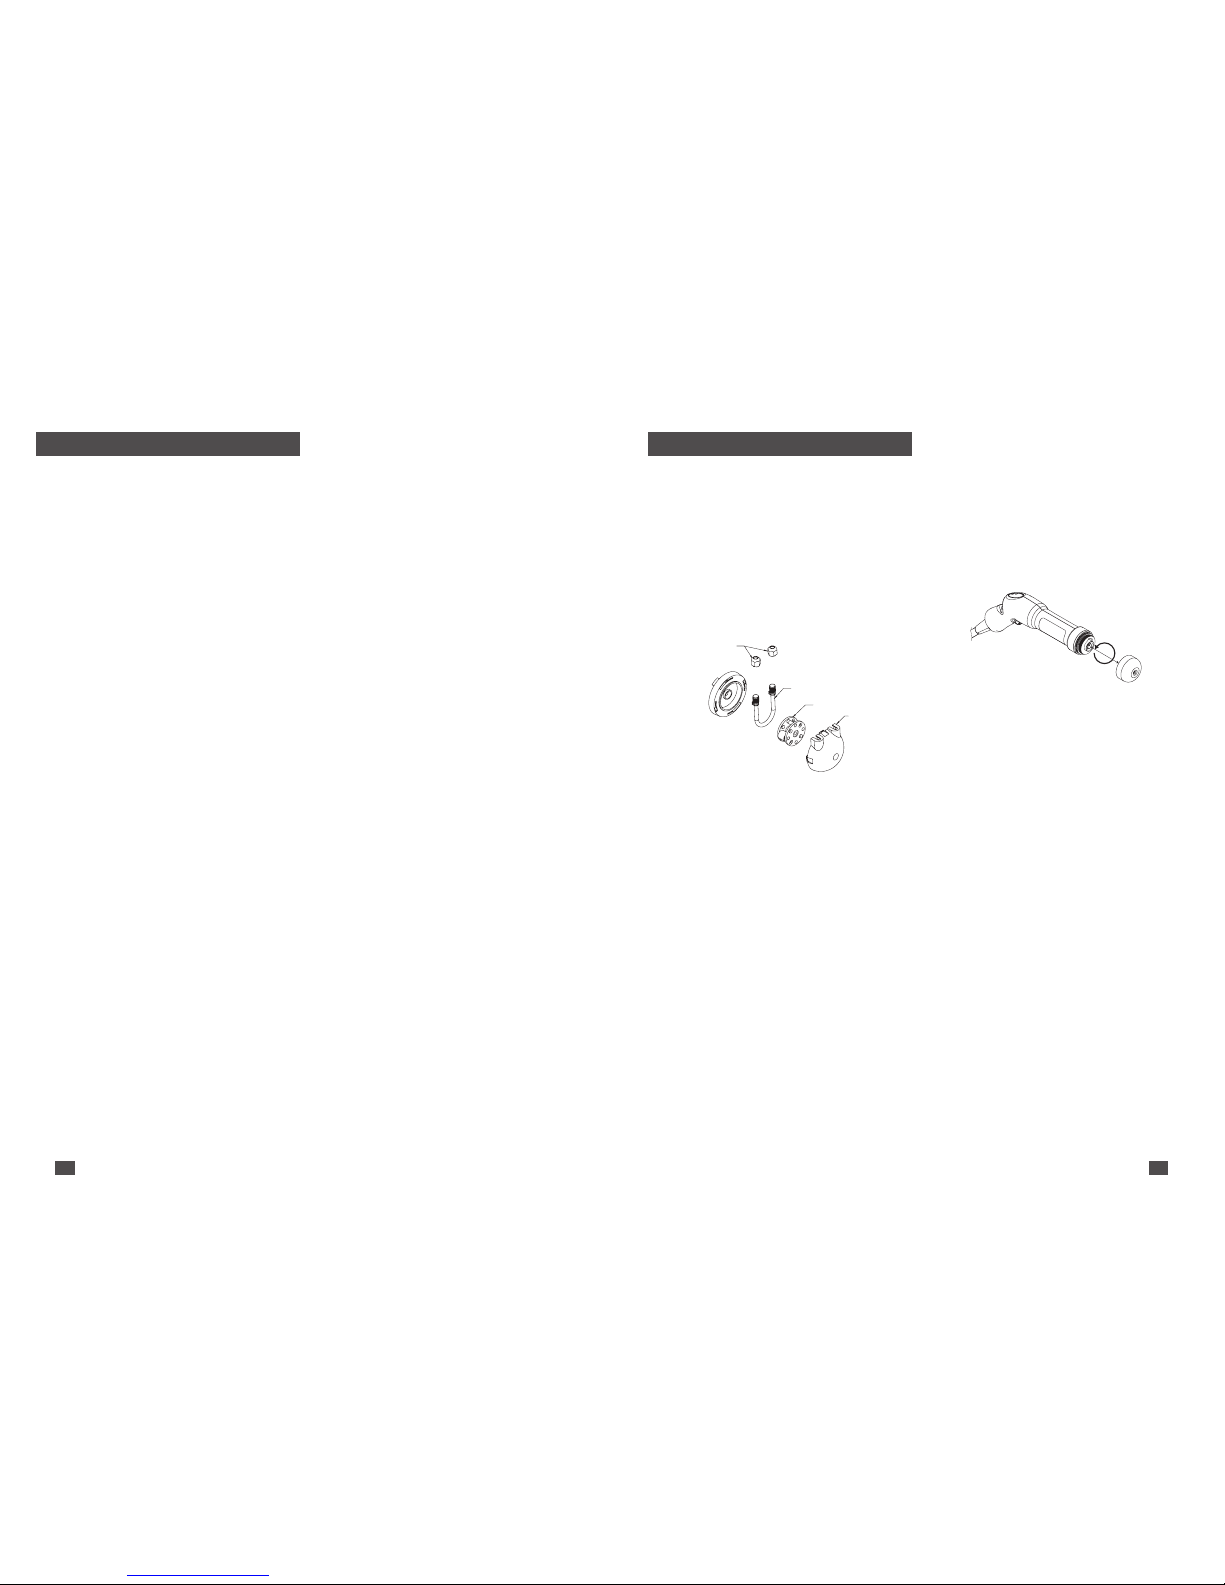
Peristaltic Pump
Tube Leader Assembly
Carriage Assembly
Cover
Tube Nuts
1. Disconnect the clear tubing inlet and outlet by twisting the
Tube Nuts counterclockwise until both tubes have separated.
2. Rotate the Cover counterclockwise and pull it free from the unit.
3. Remove the Carriage Assembly from the Cover.
4. Remove and discard the old Tube Leader Assembly.
5. Grease the new Tube Leader Assembly with the supplied grease.
6. Replace the Tube Leader Assembly with a new one and reinstall
the Carriage and Cover in reverse order being careful not to
damage the Tube Leader Assembly.
OPERATING INSTRUCTIONS MAINTENANCE
In order for the Clorox® Total 360® Electrostatic Sprayer to remain
functional, the equipment should be cleaned on a regular basis.
In addition to general cleaning of the unit, two user-serviceable
areas — peristaltic pump and sprayer nozzle — should be
maintained and serviced regularly.
Page 6

10 | EN EN | 11
Volts ~115V
Running AMPS 6.0
Startup AMPS 14.6
Frequency 60 Hz
Standard Hose Length 7 ft. (2.13 m)
Dimensions 25 3/8 in. (64 cm) H x 10 1/16 in.
(26 cm) W x 17 1/8 in. (43 cm) L
Air Line Pressure 35 psi (2.4 Bar)
Weight – Empty 43 lbs (20 kg)
Weight – Full 59 lbs (27 kg)
Shipping Weight 52 lbs (24 kg)
Flow Rate 4.3 oz./min (130ml/min)
Volts ~240V
Running AMPS 3.0
Startup AMPS 7.0
Frequency 50 Hz
Standard Hose Length 7 ft. (2.13m)
Dimensions 29.25 in. (0.74m) H x 10.00 in. (0.25m)
W x 16.00 in. (0.40m) D
Air Line Pressure 35 psi (2.4 Bar)
Weight – Empty 43 lbs (20 kg)
Weight – Full 59 lbs (27 kg)
Shipping Weight 52 lbs (24 kg)
Flow Rate 4.3 oz./min (130ml/min)
Excessive nozzle dripping
Potential Issue Corrective Action
Damage to nozzle assembly Inspect for damage and faulty
parts. If present, contact the
Clorox® Total 360® Electrostatic
Sprayer support center service
department.
Damage to peristaltic pump
tubing
Replace pump tubing.
Dirty exterior sprayer surfaces Clean exterior surfaces with
solvent (70–90% alcohol).
System will not turn on or has shut o suddenly
Potential Issue Corrective Action
No power Verify the unit is plugged
in and on a known working
power outlet.
System is not switched on Depress power switch
to illuminate.
Compressor shuts o suddenly
or won’t run while depressing
the sprayer trigger
This is a sign that the unit’s
circuit breaker has tripped
or that the compressor has
overheated. The user should
look to see if the white button
(within its clear moisture cover)
has popped out. If it has, the
user should power o the
machine, look for any physical
objects that could be loose or
stuck in any of the ventilation
openings and clear/dislodge.
Press the button in and then
attempt to power the unit back
on. If the problem persists,
the user should let the unit sit
for 30 minutes to see if it’s an
overheating issue. If the unit
still refuses to restart after a
cool down, then the user should
contact technical service.
Compressor has overheated Allow the unit to sit for a
minimum of 30 minutes
with the power o.
Unit stalls at initial trigger This may be a sign of a cold
start. Warm unit up by pressing
the trigger and letting unit run
for up to two minutes.
Trigger o, then on. Unit should
run normally.
No spray, erratic spray or weak spray
Potential Issue Corrective Action
Out of liquid solution Inspect product container
for solution level and replace
if empty.
Blockage in the nozzle
or liquid tip
Remove the nozzle cover
and/or liquid tip to inspect
for blockages.
Spray appears weak The user should power the unit
o, unplug from the wall and
seek out a dierent electrical
outlet to try. If unavailable,
they should look to see if other
devices are running on the same
electrical circuit. Power those o
if necessary.
This could be a result of an
underrated extension cord. If an
extension cord is being used,
remove and test the unit while
using only the connected power
cord. See the extension cord
section for more information.
Damage to liquid hose
or peristaltic pump tubing
Inspect the liquid line for kinks
and/or damage.
Air pressure seems low or weak
Potential Issue Corrective Action
Damage to the air hose Inspect hose for knicks,
damage or areas where air
is escaping.
Blockage in the nozzle Remove the nozzle cover
and inspect for blockages.
Clogged air filter Replace air filter.
SPECIFICATIONS for 115V model
SPECIFICATIONS for 240V model
TROUBLESHOOTING
NOTE: Do NOT use a chemical in the unit that is not a Cloroxapproved product. If you encounter the issues listed below, use the
suggested troubleshooting methods. If you encounter an issue that
is not addressed in this manual, contact Service Tech Team at
www.servicetechteam.com.
EQUIPMENT WARRANTY
Clorox warrants the original purchaser of any Clorox® Total 360®
Electrostatic Sprayer that the equipment shall be free from
defects, material and workmanship, for a period of one year after
the date of delivery.
Disclaimer of Implied Warranties and Consequential Damages
The Clorox obligation under this warranty, to the extent allowed
by law, is in lieu of all warranties, implied or expressed, including
implied warranties of merchantability and fitness for a particular
purpose and any liability for incidental and consequential damages
with respect to the sale or use of the items warranted.
Such incidental or consequential damages shall include, but are
not limited to: transportation, charges other than normal freight
charges, cost of installation other than cost approved by Clorox,
duty, taxes, charges for normal service or adjustments, loss of
income, expenses due to loss, damage, detention or delay in the
delivery of equipment or parts resulting from acts beyond the
control of Clorox.
THIS WARRANTY SHALL NOT APPLY TO:
1. Defects, failures, damages or performance limitations caused
in whole or in part by:
a. Power failures, surges, accidents, actions of third parties,
weather or other acts of God, or
b. The product being subjected to abuse, mishandling,
misuse, negligence, improper storage, service or operation,
or unauthorized attempts to repair or alter the equipment
in any way.
2. Any product in which any chemical other than chemical sold by
or on behalf of Clorox and expressly identified by Clorox for use
in such product.
3. Normal wear and tear.
NO EMPLOYEE OR REPRESENTATIVE OF CLOROX IS AUTHORIZED
TO CHANGE THIS WARRANTY IN ANY WAY OR GRANT ANY
OTHER WARRANTY UNLESS SUCH CHANGE IS MADE IN WRITING
AND IS SIGNED BY A CORPORATE OFFICER OF CLOROX.
Page 7

12 | ES ES | 13
AVISOS DE SEGURIDAD
Advertencias 13
Calcomanía de Seguridad 14
Equipo de Protección 15
MEDIDAS DE SEGURIDAD IMPORTANTES
Conexión Eléctrica 15
Instrucciones de Conexión a Tierra 15
Cable de Extensión 15
Peligro de Descarga / Eléctrico 16
Seguridad General 16
Productos Químicos 16
COMPONENTES DEL SISTEMA
Unidad Base Clorox® Total 360® 17
Atomizador Clorox® Total 360® 17
Boquilla 17
INSTRUCCIONES DE FUNCIONAMIENTO
Preparación de la Zona que se va a Rociar 18
Funcionamiento / Configuración de la Unidad 18
Funcionamiento del Atomizador Durante la Limpieza 18
Cambio de Productos Aprobados por Clorox 18
Después de Usar y Almacenamiento 18
MANTENIMIENTO
Cuerpo del Atomizador 19
Bomba Peristáltica 19
Boquilla 19
ESPECIFICACIONES 20
SOLUCIÓN DE PROBLEMAS 20
GARANTÍA DEL EQUIPO 21
Tabla de Contenido
AVISOS DE SEGURIDAD
Este manual contiene importante información que el usuario debe
saber y entender antes de operar el Atomizador Electrostático
Clorox® Total 360®. Esta información se refiere a la protección de
su seguridad y garantiza la fiabilidad y el rendimiento del producto.
Es responsabilidad del propietario asegurarse de que todos los que
operan este equipo, lean este manual.
Advertencias
Para ayudarle a identificar esta información, usamos los
símbolos de advertencia indicados a continuación. Por favor,
lea cuidadosamente el manual y preste especial atención a los
símbolos y etiquetas de advertencia. Las etiquetas de advertencia
indican una situación potencialmente peligrosa que, si no se evita,
podría causar la muerte o lesiones graves.
ADVERTENCIAS
• Antes de usar el atomizador electrostático, lea y entienda
completamente el Manual del Operador del Atomizador
Electrostático Clorox® Total 360®.
• Antes de usar cualquier producto líquido con el Atomizador
Electrostático Clorox® Total 360®, lea y entienda completamente
las etiquetas de los productos aprobados por Clorox.
• Los Atomizadores Electrostáticos Clorox® Total 360® son para
uso comercial tanto en interiores como en exteriores.
• Los Atomizadores Electrostáticos Clorox® Total 360® nunca
deben usarse en un entorno peligroso.
• Los Atomizadores Electrostáticos Clorox® Total 360® nunca
deben usarse en un área que contenga productos químicos
volátiles. Tampoco deben utilizarse en ningún lugar donde
existen niveles de gases, vapores o partículas volátiles
o explosivas.
• Los Atomizadores Electrostáticos Clorox® Total 360® nunca
deben ser utilizados por personal no entrenado.
ADVERTENCIAS
PELIGRO DE EQUIPO PRESURIZADO
El líquido de un equipo con un componente que tenga fugas
o rupturas puede salpicar los ojos o la piel, causando lesiones
graves. Con el fin de prevenir una fuga o ruptura:
• Revise diariamente las mangueras, tubos y
acopladores. Reemplace inmediatamente las
partes desgastadas o dañadas.
ADVERTENCIAS
PELIGRO QUE POSA EL SOLVENTE DE LIMPIEZA A LAS PIEZAS
DE PLÁSTICO
Muchos solventes pueden degradar las piezas de plástico y hacer
que fallen, lo que puede provocar lesiones graves o daños a la
propiedad. Con el fin de ayudar a prevenir la degradación:
• Use sólo solventes a base de agua para
limpiar las piezas estructurales plásticas que
contienen presión.
• Consulte los datos técnicos en éste y en
todos los demás manuales de instrucciones
del equipo. Antes de usarlo, lea las Fichas
de Datos de Seguridad (SDS) y las
recomendaciones del fabricante de los
líquidos y solventes.
ADVERTENCIAS
PELIGRO DE INCENDIO, EXPLOSIÓN Y DESCARGA ELÉCTRICA
Los vapores inflamables en el área de trabajo, como vapores de
solventes y pintura, pueden encenderse o explotar. Para evitar
incendios, explosiones y descargas eléctricas:
• El equipo electrostático debe ser utilizado
únicamente por personal capacitado y
calificado que entienda los requisitos de este
manual.
• Detenga el funcionamiento inmediatamente
si se producen chispas estáticas o siente
un choque. No utilice el equipo hasta que
identifique y corrija el problema.
• Utilice y limpie el equipo solamente en áreas
bien ventiladas.
• Nunca rocíe un producto químico inflamable
(con un punto de ignición inferior a 140˚F
[60˚C]).
• Cuando haya vapores inflamables, no
conecte ni desconecte los cables de
electricidad ni encienda o apague las luces.
• Mantenga el área de rociado libre de basura,
incluyendo solventes, trapos, gasolina o
cualquier producto químico inflamable.
• Mantenga un extinguidor de incendios
funcional en el área de trabajo.
Page 8

14 | ES ES | 15
Calcomanía de Seguridad
Esta calcomanía se encuentra en la superficie de la cubierta más
alta enfrente de la ubicación de almacenamiento de la botella.
ADVERTENCIAS
PELIGRO DEL USO INCORRECTO DEL EQUIPO
El uso indebido puede causar la muerte o lesiones graves
• No opere la unidad cuando esté fatigado o
bajo la influencia de drogas o alcohol.
• Utilice líquidos y solventes compatibles con
las piezas húmedas del equipo. Consulte los
datos técnicos en todos los manuales del
equipo. Lea las advertencias del fabricante
de los líquidos y solventes. Para obtener
información completa sobre su material,
solicite las Fichas de Datos de Seguridad
(SDS) al distribuidor o minorista.
• No deje el área de trabajo mientras el equipo
esté activado.
• Apague todo el equipo cuando no esté en
uso.
• Revise el equipo diariamente. Repare o
reemplace inmediatamente las piezas
desgastadas o dañadas solamente con
piezas de repuesto originales de los
asociados de confianza de Clorox.
• No altere ni modifique el equipo. Las
alteraciones o modificaciones anulan
la garantía de Clorox® Total 360® y las
aprobaciones de la agencia, y crean peligros
de seguridad.
• Coloque las mangueras y los cables de
electricidad en un lugar apartado de áreas
de tráfico, bordes afilados, partes móviles y
superficies calientes.
ADVERTENCIAS
PELIGRO EN USAR QUÍMICOS
Todo producto químico, tal como un desinfectante, conlleva
un conjunto único de peligros y necesita ser manejado
adecuadamente para garantizar la seguridad del trabajador.
• El Atomizador Electrostático Clorox® Total 360® se debe utilizar
sólo con productos aprobados por Clorox. Nunca rocíe ningún
producto líquido que no sea un producto aprobado por
Clorox. Usar el Atomizador Electrostático Clorox® Total 360®
con productos no aprobados por Clorox invalida la garantía.
Tenga en cuenta que muchos líquidos químicos pueden ser
dañinos si no se utilizan correctamente.
• Antes de usarlos, lea y entienda las Fichas de Datos de
Seguridad (SDS) de los productos aprobados por Clorox.
• Infórmese sobre los procedimientos de primeros auxilios
relacionados con el producto en uso.
• El uso de un producto químico de una manera diferente a la
especificada en su etiqueta constituye una violación de la ley
federal.
• Use el equipo de protección personal como se indica en las
Fichas de Datos de Seguridad (SDS) del producto aprobado
por Clorox.
• Para uso exclusivo con líquidos no inflamables, no
combustibles y no volátiles. Nunca rocíe un producto químico
inflamable (punto de ignición inferior a 140˚ F [60˚C]).
• Asegúrese de que el área que se está rociando tenga una
ventilación adecuada.
• Almacene todos los productos químicos en sus envases
originales en un lugar fresco y seco, lejos del calor y las llamas.
• No vuelva a usar ni a llenar un recipiente de productos
químicos.
• Para desechar los productos aprobados por Clorox, consulte
las etiquetas del producto.
ADVERTENCIAS
EQUIPO DE PROTECCIÓN PERSONAL
Use equipo de protección apropiado cuando esté en el área de
trabajo para ayudar a prevenir lesiones graves.
• Es recomendable el uso de protección
ocular completamente cerrada, como gafas
protectoras, cuando usa este equipo.
• Consulte las Fichas de Datos de Seguridad
de Clorox (SDS) específicas del producto
para cualquier Equipo Protector Personal
(EPP) adicional.
Equipo de Protección
El Equipo de Protección Personal (EPP) debe cumplir con la Norma
ANSI Z87.1-1989 del American National Standards Institute si fué
adquirido después del 5 de julio de 1994, o ANSI Z87.1-1968 con la
norma del país en uso.
• Los PPE de los ojos y la cara deberán estar claramente marcados
para facilitar la identificación del fabricante. [1910.133 (a) (4)].
• Todos los dispositivos de protección deben cumplir los siguientes
requisitos mínimos. Los protectores deberán:
- Proporcionar una protección adecuada contra los peligros
particulares para los que están diseñados.
- Ser de diseño y construcción seguros para el trabajo a
desempeñar.
- Ser razonablemente cómodos cuando se usan bajo las
condiciones designadas.
- Ajustarse cómodamente y no interferir indebidamente con los
movimientos del usuario.
- Ser durables.
- Pueden ser desinfectados.
- Pueden limpiarse fácilmente.
- Estar claramente marcados para facilitar la identificación única
del fabricante.
SE RECOMIENDA EL USO DE PROTECCIÓN OCULAR
COMPLETAMENTE CERRADA, COMO GAFAS PROTECTORAS,
CUANDO USE ESTE EQUIPO.
USE SIEMPRE LOS EPP APROPIADOS, LISTADOS EN LAS FICHA
DE DATOS DE SEGURIDAD DE PRODUCTOS APROBADOS POR
CLOROX (SDS). PUEDE ENCONTRAR LAS FICHAS DE DATOS DE
SEGURIDAD DE CLOROX EN WWW.THECLOROXCOMPANY.COM/
BRANDS/SAFETY-INFORMATION/SDS/.
MEDIDAS DE SEGURIDAD IMPORTANTES
Cuando utilice un aparato eléctrico, es importante entender que
algunos circuitos están eléctricamente activos, incluso cuando el
interruptor de electricidad está en la posición de apagado. Siempre
se deben seguir las precauciones básicas de seguridad para reducir
el riesgo de quemaduras, incendios, descargas eléctricas, lesiones
y / o muerte.
Conexión Eléctrica
Nuestro enchufe debe utilizarse con un tomacorriente de 3
terminales con conexión a tierra, clasificado para un servicio no
inferior a 15A. Siempre verifique esto antes de usar el producto.
Este aparato se utiliza en un circuito nominal de 120V / 60Hz
con un enchufe a tierra verificado. Consulte con un electricista
calificado para asegurarse de que tiene el servicio eléctrico y la
conexión a tierra correctos.
TAPA DE LA CAJA
DE SALIDA A
TIERRA *
TERMINAL DE
CONEXIÓN A
TIERRA
* Se muestran conectores a tierra de 120 voltios. La forma de los conectores a tierra
de 220/240 voltios será diferente.
Instrucciones para la Conexión a Tierra
Este aparato debe estar conectado a tierra. En caso de mal
funcionamiento o avería, la conexión a tierra proporciona una
trayectoria de menor resistencia a la corriente eléctrica para reducir
el riesgo de descarga eléctrica. Este aparato está equipado con un
cable que tiene un conductor de conexión a tierra, del equipo y un
enchufe de conexión a tierra. El enchufe debe estar enchufado en
un tomacorriente apropiado que esté correctamente instalado y
conectado a tierra de acuerdo con todos los códigos y reglamentos
locales. Nunca utilice un adaptador con este producto.
PELIGRO: La conexión incorrecta del equipo conductor de
conexión a tierra puede ocasionar un riesgo de descarga eléctrica.
El conductor con aislamiento que tiene una superficie exterior que
es verde, con o sin rayas amarillas, es el conductor de conexión a
tierra del equipo. Si es necesario reparar o reemplazar el cable o
enchufe, no conecte el equipo conductor de tierra a una terminal
conectada. Si no entiende completamente las instrucciones
de conexión a tierra o si tiene dudas de si el aparato está
debidamente conectado a tierra consulte con un electricista o un
técnico calificado. No modifique el enchufe proporcionado con el
aparato — si no encaja en el tomacorriente, pídale a un electricista
calificado que instale un tomacorriente adecuado. Nunca utilice un
adaptador con este producto.
Cable de Extensión
Clorox proporciona un cable de extensión de 25 pies (7.6 m)
con cada Atomizador Electrostático Total 360® y recomienda
encarecidamente que use este cable de extensión aprobado.
Asegúrese de que el cable de extensión esté en buenas
condiciones. Inspeccione periódicamente los cables y reemplácelos
si están dañados. Si utiliza otro cable de extensión, tenga en
cuenta que un cable de extensión demasiado pequeño causará una
caída de tensión en la línea, lo que podría ocasionar la pérdida de
electricidad, daños al producto y/o sobrecalentamiento. Siempre
utilice un cable de extensión de suficiente potencia nominal.
IMPORTANTE: Clorox recomienda utilizar un cable de extensión
de 12/3 de calibre, que no exceda 100 pies (30.5m) de longitud.
Además, Clorox también recomienda el uso de un tomacorriente
GFCI (interruptor de circuito por falla a tierra) o cable de extensión.
Cuando esté equipado con el cable de extensión, coloque siempre
el GFCI hacia el tomacorriente.
WARNING!
¡
ADVERTENCIA!
AVERTISSEMENTS!
NI-45400
•
Always wear appropriate Personal Protective
Equipment (PPE), as detailed in the User Manual,
when using this device. Refer to product specific
Clorox
®
Safety Data Sheets (SDS) for any additional PPE.
•
Follow instructions and precautions listed on Clorox®
manufacturing product labels.
•
Only use Clorox®-approved products through the
Clorox
®
Total 360® Sprayer.
•
Inspect power cord, sprayer and external tubing
for damage prior to use. DO NOT use if damage
is present.
•
Always use with a grounded electrical plug
and outlet.
•
Use device only as intended. Direct spray only
toward appropriate surfaces.
•
Cuando use este dispositivo, siempre use el equipo de
protección personal (EPP) apropiado, como se detalla
en el Manual del Usuario. Consulte las Fichas de Datos
de Seguridad (FDS) para cualquier EPP adicional.
•
Siga las instrucciones y precauciones que se listan
en las etiquetas de fabricación del producto Clorox
®
.
•
Utilice solamente productos Clorox® aprobados por
el Atomizador Clorox
®
Total 360®.
•
Antes de usarlo inspeccione el cable de electricidad,
el rociador y la tubería externa por daños. NO lo use
si hay daños presentes.
•
Siempre usarlo con un enchufe y toma de corriente
eléctrica con conexión a tierra.
•
Solamente utilice el dispositivo para lo que fue
diseñado. Solo rocié directamente en las superficies
adecuadas.
•
Au moment d’utiliser le pulvérisateur, toujours porter un
équipement de protection personnelle (ÉPP) adéquat, tel
que décrit dans le manuel de l’utilisateur. Se reporter à
la fiche signalétique du produit nettoyant Clorox
®
afin de
connaître tout autre ÉPP requis pour son emploi.
•
Suivre les instructions et les mises en garde indiquées
sur l’étiquette d’origine de chaque produit Clorox
®
.
•
Utiliser le pulvérisateur Clorox® Total 360® uniquement
avec les produits Clorox
®
approuvés à cette fin.
•
Avant l’emploi, inspecter le cordon d’alimentation,
l’appareil lui-même et les tubes externes pour
vérifier l’absence de dommages. NE PAS utiliser
le pulvérisateur en présence de dommages.
•
Toujours brancher le pulvérisateur dans une prise
de courant avec mise à la terre.
•
Utiliser le pulvérisateur strictement selon le mode
d’emploi. Toujours diriger le jet directement vers
les surfaces à traiter.
Page 9
16 | ES ES | 17
Peligro de Descarga / Eléctrico
Como con la mayoría de los electrodomésticos, las partes eléctricas
están eléctricamente activas incluso cuando el interruptor está
apagado. Para reducir el riesgo de quemaduras, incendios,
descargas eléctricas o lesiones:
1. Utilice esta unidad solamente para el uso que ha sido diseñada,
tal como se describe en este manual.
2. No la use mientras se baña.
3. No coloque ni almacene la unidad donde se pueda caer o tirar
al agua u otro líquido.
4. Si la unidad cae en el agua, desconéctela inmediatamente.
No meta la mano en el agua para recuperarla.
5. Nunca maneje esta unidad si se ha caído, se ha dañado o no
está funcionando correctamente. Póngase en contacto con
un técnico autorizado de Clorox.
6. Mantenga el cable alejado de superficies calientes.
7. Nunca bloquee las aberturas de aire de la unidad ni la coloque
en una superficie blanda (cama o sofá), donde las aberturas de
aire se pueden bloquear.
8. Nunca deje caer ni introduzca ningún objeto en las aberturas.
9. No la use con un cable de electricidad dañado o roto.
10. Nunca la almacene a una temperatura por encima de 140 °F
(60 °C).
11. Esta unidad puede estar caliente cuando está en uso. No deje
que la superficie caliente toque la piel.
Seguridad General
La falta de atención a la seguridad puede resultar en menor
eficiencia, accidentes, lesiones personales o la muerte. Tenga
cuidado con los peligros de seguridad y corrija las deficiencias
con prontitud. Cuando use esta máquina, utilice las siguientes
precauciones de seguridad como guía.
1. Lea el manual del operador. De no hacerlo, se considera mal uso
del equipo.
2. Use la unidad de Atomizador Electrostático Clorox® Total 360®
solamente para el uso para que ha sido diseñada, tal como se
describe en este manual.
3. Antes de manejar el equipo, familiarícese con todas las
calcomanías de precaución y advertencia colocadas en el
equipo.
4. No utilice el Atomizador Electrostático Clorox® Total 360®
en un lugar peligroso.
5. Sólo el personal entrenado y familiarizado con el Atomizador
Electrostático Clorox® Total 360® y los productos aprobados
por Clorox es permitido manejarlo.
6. No permita que el personal maneje el atomizador sin haber
recibido instrucción adecuada o que está bajo la influencia
de alcohol o drogas.
7. Utilice un cable de extensión que cumpla o exceda las
especificaciones detalladas en la sección del Cable de
Extensión.
8. Almacene el atomizador en un lugar fresco y seco.
No lo exponga a temperaturas extremas.
9. Limpie la línea de líquido antes de almacenar la unidad.
10. Esté consciente que incluso cuando el atomizador está
apagado, la unidad continúa recibiendo electricidad mientras
se sigue suministrando electricidad está enchufada a un
tomacorriente.
11. Nunca cuelgue la unidad del cable.
12. Nunca debe dejarse desatendido un atomizador cuando está
enchufado.
13. En la parte trasera de la unidad hay un disyuntor reposicionable
que se activará si la unidad experimenta un cortocircuito eléctrico.
14. Siempre apague el atomizador después de cada aplicación
y antes de desconectar.
15. Siempre desenchufe la unidad del tomacorriente cuando no
esté en uso o cuando la deje desatendida.
16. Nunca desenchufe tirando del cable o con las manos mojadas.
Siempre desenchufe agarrando el enchufe.
17. No hale ni acarree el atomizador por el cable de electricidad.
18. No apriete ni coloque el cable alrededor de bordes afilados,
ya que podría dañar el cable.
19. No utilice el Atomizador Electrostático Clorox® Total 360®
con un cable de electricidad dañado.
20. Siempre inspeccione el producto antes de usarlo.
21. Para preguntas o inquietudes sobre el Atomizador
Electrostático Clorox® Total 360®, comuníquese con el equipo
de servicio técnico en www.servicetechteam.com.
Productos Químicos
El Atomizador Electrostático Clorox® Total 360® se debe utilizar
solo con productos aprobados por Clorox. Si el Atomizado
Electrostático Clorox® Total 360® es utilizado con productos que
no están aprobados por Clorox, se invalida la garantía. Tenga en
cuenta que muchos líquidos químicos pueden ser dañinos si no se
utilizan correctamente.
1. Cuando utilice el Atomizador Electrostático Clorox® Total 360®,
siempre use el equipo de protección personal (EPP) apropiado.
Consulte la Ficha de Datos de Seguridad (SDS) del producto
para obtener el EPP adecuado.
2. Siga las indicaciones de la etiqueta del producto líquido y de
la SDS para almacenar, manipular y desechar adecuadamente
cualquier producto líquido utilizado en el Atomizador
Electrostático Clorox® Total 360®.
3. Conozca el tiempo requerido para cada aplicación de producto
líquido antes de permitir que las personas y las mascotas
vuelvan al área rociada.
4. Cualquier alteración que se haga a los productos aprobados
por Clorox, contenedores de productos y el Atomizador
Electrostático Clorox® Total 360® anulará la garantía al cliente.
5. Para desechar los productos aprobados por Clorox, consulte las
etiquetas del producto.
6. Si los productos líquidos entran en contacto con su piel u ojos,
consulte la etiqueta del producto y la SDS.
7. Nunca apunte el rociador hacia usted o hacia a otra persona.
IMPORTANTE: Las fichas de datos de seguridad (SDS) están
disponibles para todos los productos líquidos que han sido
aprobados para usar en el Atomizador Electrostático Clorox®
Total 360®. Estas SDS le informarán de cualquier peligro y
precaución que deba tener en cuenta. Todos los empleados
que usan el producto deben conocer y tener acceso a las SDS.
También deben ser entrenados y estar conscientes de su seguridad
mientras trabajan con productos líquidos. Es responsabilidad
del propietario del equipo obtener una SDS de Clorox para cada
producto químico utilizado. Para más información, visite
www.thecloroxcompany.com/brands/safety-information/sds/.
Boquilla
El conjunto de la boquilla está situado al extremo final del
atomizador. Está compuesto por un contacto con resorte, una
junta tórica externa, una tapa de boquilla, punta líquida y un
electrodo. Estos son los únicos componentes que pueden ser
revisados por el usuario. Para acceder a los componentes de la
boquilla, desenrosque la boquilla con la mano en dirección opuesta
a las manecillas del reloj. Es muy importante seguir todos los
procedimientos de mantenimiento y limpieza para asegurar el
funcionamiento óptimo del atomizador. Después de darle servicio,
es sumamente importante volver a poner la boquilla en su lugar
evitando apretarla demasiado.
NOTA: A medida que el atomizador se ensucia debido al uso
normal, se recomienda un limpiador de alcohol isopropílico al 70%
que se aplica manualmente en las superficies externas. Esto evita el
goteo de la boquilla.
Unidad Base Clorox® Total 360®
1 Compresor de Aire Atomiza e impulsa el líquido. Incluye
reposicionamiento automático
de protección térmica contra el
sobrecalentamiento del compresor.
2 Ruedas que No Dejan
Rayas
Ruedas grandes, para facilitar
su transporte y maniobrabilidad,
no dejan marcas de rayones. No
necesitan inflarse.
3 Línea de Conexión
del Rociador
La línea de conexión consta de tres
componentes: línea eléctrica, línea
de líquido y línea de aire. La línea
de conexión conecta el rociador a la
unidad base.
4 Funda del
Atomizador
Sostiene el atomizador.
5 Botones de Ajuste
del Mango
Ajustan la altura del mango.
(Apriete para ajustar.)
6 Copa de Goteo
Removible
Recoge cualquier goteo del
atomizador.
7 Manija Ajustable La posición del mango se eleva, baja
y gira por los dos botones de ajuste.
8 Bomba Peristáltica Proporciona líquido al atomizador.
9 Disyuntor Disyuntor reajustable por el usuario
que se activa solamente si se
produce un cortocircuito en la
unidad base.
10 Interruptor
Principal de
Electricidad
Proporciona electricidad al sistema
para que esté listo.
11 Contenedores
Químicos de 1 Galón
Envases de productos químicos
(no incluidos con el equipo).
12 Portacable para el
Cable de Extensión
Ubicado en la parte posterior de la
unidad para almacenar el cable de
extensión.
13 Gancho para el
Manejo del Cable
Para almacenar o colgar el cable de
extensión.
14 Marco Marco de nylon relleno de fibra de
vidrio y ABS y accesorios diseñados
para durabilidad a largo plazo.
Atomizador Clorox® Total 360®
1
5
2
4
3
1 Botón Disparador Funcionalidad de 1 clic / opera el
atomizador / dispositivo.
2 Panel de
Instrumentos
Indica que la energía, el atomizador y
la electrostática están encendidos.
3 Tapa de la Boquilla Ubicada en la parte delantera del
atomizador.
4 Agarradera del
Atomizador
Posición del mango para uso
ambidiestro.
5 Conexión del
Atomizador
La línea de conexión consiste de tres
componentes: línea eléctrica, línea de
líquido y línea de aire.
COMPONENTES DEL SISTEMA
El Atomizador Electrostático Clorox® Total 360® patentado fue
diseñado tomando el usuario como el objetivo principal. Es un
dispositivo duradero, altamente móvil e increíblemente eficaz para
el servicio electrostático.
15 Interruptor para
la Limpieza de
la Bomba
Elimina el producto de la línea de
líquido. (Presione para limpiar.)
16
Desconexión Eléctrica
del Atomizador
Conexión eléctrica para el
atomizador.
17 Depósito Un depósito para garantizar un flujo
constante de líquido.
Page 10
18 | ES ES | 19
6. Una vez que haya transcurrido el período de reingreso, retire
de la puerta el letrero de cerrado.
Cambio de Productos Aprobados por Clorox
1. Deje de rociar el Atomizador Electrostático Clorox® Total 360®.
2. Desconecte la conexión de la botella del producto aprobado
por Clorox que se va a cambiar y retírelo del rociador. Tape el
producto retirado si se va a almacenar.
3. Limpie el Atomizador Electrostático Clorox® Total 360®:
Presione apuntando hacia una esquina no visible, envase o
desagüe. Rocíe el Atomizador Electrostático Clorox® Total 360®
durante unos 20 segundos para limpiar el sistema.
4. Elija el producto aprobado por Clorox para limpiar, sanitizar o
desinfectar.
5. Coloque el producto deseado, aprobado por Clorox, en la base
del Atomizador Electroestático Clorox® Total 360®. Asegúrese
de que las botellas estén colocadas boca arriba y la abertura
mirando hacia los tubos dispensadores.
6. Desatornille la tapa de los productos elegidos, aprobados
por Clorox, y conecte la tapa dispensadora del Atomizador
Electroestático Clorox® Total 360® a la botella. Asegúrese
de que la tapa esté completamente enroscada, no la apriete
demasiado.
7. Prepare el Atomizador Electrostático Clorox® Total 360®:
Presione apuntando hacia una esquina no visible, envase o
desagüe. Rocíe el Atomizador Electrostático Clorox® Total 360®
durante unos 20 segundos para generar un flujo constante
de la solución.
Después de Usar y Almacenamiento
1. Deje de rociar el Atomizador Electrostático Clorox® Total 360®.
2. Desconecte la conexión de la botella del producto aprobado
por Clorox que se va a cambiar y retírelo del atomizador. Tape
el producto retirado si se va a almacenar.
3. Para vaciar la copa de goteo (si es necesario): Gire la copa de
goteo 90 grados, asegurándose de mantenerla nivelada para
evitar derrames. Retire la copa de goteo de su soporte y vacíe
el contenido. Vuelva a instalar la copa de goteo vacía girándola
a 90 grados en dirección opuesta hasta que quede ajustada.
4. Limpie el Atomizador Electrostático Clorox® Total 360®:
Presione apuntando hacia una esquina no visible, envase o
desagüe. Rocíe el Atomizador Electrostático Clorox® Total 360®
durante unos 20 segundos para limpiar el sistema.
5. Apague la unidad. La luz indicadora azul en el panel de
instrumentos y en la base de la unidad deben estar apagadas.
6. Desconecte de la pared el Atomizador Electrostático Clorox®
Total 360®.
7. Envuelva el cable en el portacable de la unidad base de Clorox®
Total 360®.
8. Almacene en un lugar seguro y seco.
Preparación de la Zona que se va a Rociar
1. Limpie el exceso de mugre usando los protocolos de limpieza
estándares.
2. Para la limpieza, cierre la habitación al público en general.
Coloque letreros o indicadores de advertencia en las puertas
que indiquen que nadie debe entrar en la habitación.
3. Apague todos los dispositivos eléctricos sensibles,
pero no los desenchufe.
Funcionamiento / Configuración de la Unidad
1. Elija el producto apropiado aprobado por Clorox para limpiar,
sanitizar o desinfectar.
2. Coloque el producto deseado, aprobado por Clorox, en la base
del Atomizador Electroestático Clorox® Total 360®. Asegúrese
de que las botellas estén colocadas boca arriba con la abertura
mirando hacia los tubos dispensadores.
3. Desatornille la tapa del producto aprobado por Clorox de
su elección y conecte la tapa dispensadora del Atomizador
Electroestático Clorox® Total 360® a la botella. Asegúrese
de que la tapa esté completamente enroscada, no la apriete
demasiado.
4. Desenvuelva completamente el cable eléctrico y enchufe
el Atomizador Electroestático Clorox® Total 360® en un
tomacorriente de tres terminales conectado a tierra.
5. Póngase el equipo de protección personal apropiado. Vea la
sección sobre el equipo de protección personal en la página 15.
6. Localice el interruptor de encendido / apagado en la unidad
base. Oprima el Atomizador Total 360® a la posición “On”. Una
luz azul se iluminará tanto en el panel de instrumentos del
atomizador como en el interruptor de electricidad de la unidad.
7. Retire el atomizador de la unidad. Una luz indicadora de
encendido de color azul debe estar iluminada en el atomizador.
8. El sistema está listo para usarlo.
9. Prepare el Atomizador Electrostático Clorox® Total 360®:
Presione apuntando hacia una esquina no visible, envase o
desagüe. Rocíe el Atomizador Electrostático Clorox® Total 360®
durante unos 20 segundos para generar un flujo constante
de la solución.
10. Cuando esté rociando, al presionar el gatillo se iluminará una
segunda luz azul en el panel de instrumentos del atomizador.
NOTA: El rociador permanecerá automáticamente encendido
hasta que se vuelva a presionar el gatillo una vez más.
NOTA: La unidad no funcionará correctamente a 40 °F (4.5 °C)
o menos.
Funcionamiento del Atomizador Durante
la Limpieza
1. Coloque el Atomizador Electrostático Clorox® Total 360®
en una esquina trasera del área.
2. Dirija la boquilla a la superficie deseada.
3. Comience a rociar. Presione una vez el botón del atomizador
para empezar a rociar. Presione una vez para detener el flujo
del atomizador.
4. Siga una trayectoria continua alrededor del área trabajando
desde las áreas altas a las bajas moviendo el atomizador
en un movimiento de barrido hasta que las superficies estén
bien mojadas.
5. Después de rociar, mantenga el área cerrada al público
de acuerdo a la SDS del producto.
INSTRUCCIONES DE FUNCIONAMIENTO
Boquilla
Para asegurar el funcionamiento sin problemas de su unidad,
se recomienda que el operador enjuague la boquilla con agua
limpia antes del almacenamiento definitivo al final de cada día. Al
limpiar la boquilla del atomizador después de cada uso, evitará la
acumulación de químicos a largo plazo que eventualmente causa
obstrucciones, patrones de rociado deficientes y reduce la vida
útil de los componentes de la boquilla. Además de enjuagarse con
agua limpia después de cada uso, la boquilla se debe desmontar y
limpiar periódicamente. Debe realizarse un mantenimiento regular.
El programa de mantenimiento de las boquillas varía dependiendo
de la frecuencia de uso del atomizador y la adherencia a las pautas
de mantenimiento antes y después de rociar.
Se recomienda leer detenidamente la guía del mantenimiento que
aparece a continuación antes de realizar cualquier mantenimiento
regular de la boquilla.
Para limpiar / Inspeccionar el Conjunto de la Boquilla
1. Desenrosque la tapa de la base de la boquilla. Limpie con agua
tibia jabonosa cualquier residuo en o alrededor de cualquiera
de las superficies interiores.
2. Inspeccione para ver si hay algún daño a la punta líquida. Si
observa que el patrón de rociar es inconsistente o atípico de
un rocío simétrico saludable, quite o reemplace la punta líquida
con una llave de cubo apropiada de 7/16" (12 mm).
3. Revise bien el electrodo de la boquilla para ver si muestra
alguna seña de arco eléctrico, quemadura y /o corrosión.
Presione suavemente el contacto de resorte para comprobar
que el retorno del resorte no es abrupto. Si se observan
problemas, retírelo/reemplácelo inmediatamente. Esto se hace
tirando suavemente del contacto de resorte con un par de
pinzas. De lo contrario, aplique una cantidad generosa de grasa
dieléctrica, que está disponible en cualquier ferretería o tienda
local de artículos para automóviles.
4. También asegúrese de limpiar a fondo todas las superficies
interiores de la cubierta de la boquilla, incluyendo el orificio
principal. Nunca utilice un cepillo de alambre, lima o papel de
lija para limpiar cualquier superficie u orificio.
Importante: La cubierta de la boquilla se debe apretar a mano.
Nunca use pinzas ni ninguna otra herramienta para apretarla, ya
que esto podría causar daños. No se necesita remover la boquilla
del electrodo para limpiarla.
Cuerpo del Atomizador
El cuerpo del atomizador no tiene partes reparables en su
interior. No abra el armazón de la unidad porque al hacerlo
anulará la garantía del atomizador. Si necesita reparar su
atomizador, comuníquese con el Equipo Técnico de Servicio al
www.servicetechteam.com.
Bomba Peristáltica
Conjunto del Tubo Guía
Conjunto del C
oche
Cubierta
Tuercas de Tubo
1. Desconecte la entrada y la salida del tubo transparente girando
las Tuercas del Tubo en sentido contrario a las manecillas del
reloj hasta que ambos tubos se hayan separado.
2. Gire la Cubierta en sentido contrario a las agujas del reloj
y suéltela de la unidad.
3. Retire el Conjunto del Coche de la Cubierta.
4. Retire y deseche el Conjunto del Tubo Guía viejo.
5. Engrase el Conjunto del Tubo Guía nuevo con la grasa
suministrada.
6. Vuelva a colocar el Conjunto del Tubo Guía con uno nuevo
y vuelva a instalar el Carro y la Cubierta en orden inverso,
teniendo cuidado de no dañar el Conjunto del Tubo Guía.
MANTENIMIENTO
Para que el Atomizador Electrostático Clorox® Total 360® mantenga
su funcionalidad, se debe limpiar periódicamente. Además de la
limpieza general de la unidad, las dos áreas accesibles al usuario (la
bomba peristáltica y la boquilla del atomizador) se deben mantener
y revisar.
Page 11

20 | ES ES | 21
Voltios ~115V
AMPS en marcha
normal
6.0
AMPS de arranque 14.6
Frecuencia 60 Hz2
Longitud Estándar
de la Manguera
7 pies (2.13m)
Dimensiones 25 3/8 pulgadas (64 cm) Alto x 10
1/16 pulgadas (26 cm) Ancho x 17 1/8
pulgadas (43 cm) Largo
Presión de la Línea
de Aire
35 psi (2.4 Bar)
Peso – Vacío 43 libras (20 kg)
Peso – Lleno 59 libras (27 kg)
Peso de Envío 52 libras (24 kg)
Caudal 4.3 oz./min (130 ml / min)
Voltios ~240V
AMPS en marcha
normal
3.0
AMPS de arranque 7.0
Frecuencia 50 Hz
Longitud Estándar
de la Manguera
7 pies (2.13m)
Dimensiones 29.25 pulgadas (0.74 m) Alto x 10.00
pulgadas (0.25 m) Ancho x 16.00
pulgadas (0.40 m) Dia.
Presión de la Línea
de Aire
35 psi (2.4 Bar)
Peso – Vacío 43 libras (20 kg)
Peso – Lleno 59 libras (27 kg)
Peso de Envío 52 libras (24 kg)
Caudal 4.3 oz./min (130 ml / min)
Goteo excesivo de la boquilla
Posible Problema Acción Correctiva
Daño al conjunto de
la boquilla
Revise bien para ver si hay daños
y piezas defectuosas. Si los hay,
comuníquese al departamento
de servicio del centro de apoyo
del Atomizador Electroestático
Clorox® Total 360®.
Daño a la tubería de
la bomba peristáltica
Reemplace el tubo de la bomba.
Superficies exteriores sucias
del atomizador
Limpie las superficies
exteriores con un solvente
(70-90% de alcohol).
El sistema no se enciende o se ha apagado de repente
Posible Problema Acción Correctiva
No hay energía Verifique que la unidad esté
enchufada y conectada a un
tomacorriente que sabe que
funciona.
El sistema no está encendido Presione el interruptor de
corriente para iluminar.
El compresor se apaga
repentinamente o no
funciona mientras se
presiona el gatillo del
atomizador
Esta es una señal que el
disyuntor de la unidad se ha
atascado o que el compresor se
ha sobrecalentado. El usuario
debe mirar para ver si el botón
blanco (dentro de su cubierta
transparente contra humedad)
se ha salido. Si es así, el usuario
debe apagar la máquina, buscar
cualquier objeto físico que
pueda estar suelto o atascado
en cualquiera de las aberturas
de ventilación y despejar /
desalojar la abertura afectada.
Presione el botón y luego intente
volver a encender la unidad. Si
el problema persiste, el usuario
debe dejar reposar la unidad
durante 30 minutos para ver si es
sobrecalentamiento. Si la unidad
todavía rehúsa volver a encenderse
después de enfriarse, entonces el
usuario debe ponerse en contacto
con el servicio técnico.
El compresor se ha
sobrecalentado
Deje que la unidad repose durante
un mínimo de 30 minutos con la
alimentación apagada.
La unidad se para al solo
arrancar
Esto puede ser una señal de un
arranque en frío. Caliente la unidad
presionando el gatillo y dejando
que la unidad funcione hasta por
dos minutos. Apague y luego
vuelva a encender. La unidad
debería funcionar normalmente.
ESPECIFICACIONES para el modelo de 115V
ESPECIFICACIONES para el modelo de 240V
SOLUCIÓN DE PROBLEMAS
NOTA: NO use un producto químico en la unidad que no sea un
producto aprobado por Clorox. Si encuentra los problemas que
se enumeran a continuación, utilice los métodos sugeridos de
solución de problemas. Si encuentra un problema que no se aborda
en este manual, comuníquese con el Equipo de Servicio Técnico
www.servicetechteam.com.
No rocía, el rocío es irregular o débil
Posible Problema Acción Correctiva
No tiene la solución líquida Revise el recipiente del
producto para ver el nivel de la
solución y reemplácelo si está
vacío.
Bloqueo en la boquilla o punta
líquida
Retire la cubierta de la boquilla
y/o la punta líquida para ver si
hay obstrucciones.
El rocío parece débil El usuario debe apagar
la unidad, desenchufarla
de la pared y buscar un
tomacorriente diferente para
volver a intentarlo. Si no
hay otro tomacorriente, vea
si otros dispositivos están
funcionando en el mismo
circuito eléctrico. Apáguelos
si es necesario. Esto podría
ser el resultado de un cable
de extensión subestimado. Si
se está utilizando un cable de
extensión, retire y pruebe la
unidad utilizando sólo el cable
de electricidad conectado.
Vea la sección del cable de
extensión para obtener más
información.
Daños a la manguera del
líquido o a la tubería de la
bomba peristáltica
Revise la línea de líquido para
ver si hay torceduras y/o daños.
La presión de aire parece baja o débil
Posible Problema Acción Correctiva
Daño a la manguera de aire Revise la manguera para ver si
tiene torceduras, daños o áreas
donde el aire está escapando.
Bloqueo en la boquilla Retire la cubierta de la boquilla
y vea si hay obstrucciones.
Filtro de aire obstruido Cambie el filtro de aire.
GARANTÍA DEL EQUIPO
Clorox garantiza al comprador original de cualquier Atomizador
Electrostático Clorox® Total 360® que el equipo estará libre de
defectos de material y mano de obra por un período de un año
después de la fecha de entrega.
Descargo de responsabilidad de garantías implícitas
y daños consecuentes
La obligación de Clorox bajo esta garantía, en la medida permitida
por la ley, reemplaza todas las garantías, implícitas o expresadas,
incluyendo garantías implícitas de comerciabilidad e idoneidad
para un propósito en particular y cualquier responsabilidad por
daños incidentales y consecuentes con respecto a la venta o uso
de los artículos garantizados.
Dichos daños incidentales o consecuentes incluirán pero no se
limitan a: transporte, cargos que no sean gastos de transporte
normales, costo de instalación que no sea el costo aprobado por
Clorox, derechos, impuestos, cargos por servicio normal o ajustes,
pérdida de ingresos, gastos debidos a la pérdida, daño, detención
o retraso en la entrega de equipos o partes resultantes de acciones
fuera del control de Clorox.
ESTA GARANTÍA NO ES APLICABLE A:
1. Defectos, fallas, daños o limitaciones de rendimiento causados
total o parcialmente por:
a. Fallas de energía, sobrecargas, accidentes, acciones de
terceros, condiciones meteorológicas u otras circunstancias
de fuerza mayor, o
b. El producto ha sido sujeto a abuso, mal manejo, mal
uso, negligencia, almacenamiento, servicio u operación
inadecuados, o intentos no autorizados de reparar o alterar
el equipo de alguna manera.
2. Cualquier producto en el que cualquier químico distinto del
químico vendido por Clorox o en su nombre y expresamente
identificado por Clorox para su uso en dicho producto.
3. Desgaste normal.
NINGÚN EMPLEADO O REPRESENTANTE DE CLOROX ESTÁ
AUTORIZADO A CAMBIAR ESTA GARANTÍA DE NINGUNA
MANERA U OTORGAR CUALQUIER OTRA GARANTÍA A MENOS
QUE TAL CAMBIO SE HAGA POR ESCRITO Y ES FIRMADO POR
UN OFICIAL CORPORATIVO DE CLOROX.
Page 12
22 | FR FR | 23
CONSIGNES DE SÉCURITÉ
Avertissements 23
Autocollant de sécurité 24
Équipement de protection personnelle 25
IMPORTANTES MESURES DE SÉCURITÉ
Branchement de l’appareil 25
Mise à la terre 25
Emploi d’une rallonge électrique 25
Prévention des chocs électriques 26
Consignes générales 26
Emploi de produits chimiques 26
COMPOSANTES DU SYSTÈME
Unité de base Clorox® Total 360® 27
Pistolet Clorox® Total 360® 27
Buse du pistolet 27
MODE D’EMPLOI
Préparation des surfaces à traiter 28
Démarrage et utilisation de l’unité 28
Nettoyage par pulvérisation 28
Changement de produit approuvé par Clorox 28
Entretien et rangement après l’utilisation 28
ENTRETIEN
Chariot et compresseur 29
Pompe péristaltique 29
Buse du pistolet 29
CARACTÉRISTIQUES 30
DÉPANNAGE 30
GARANTIE SUR L’ÉQUIPEMENT 31
Table des matières
CONSIGNES DE SÉCURITÉ
Ce manuel contient des renseignements importants que vous
devez lire et comprendre avant d’utiliser le pulvérisateur
électrostatique Clorox® Total 360®. Ces renseignements portent
sur la façon de vous protéger contre tout risque lié à l’emploi de
l’appareil et d’en tirer le meilleur rendement possible. Il incombe
au propriétaire de s’assurer que toutes les personnes appelées à
utiliser le pulvérisateur lisent ce manuel.
Avertissements
Pour vous aider à repérer ce type de renseignements, nous utilisons
les symboles ci-dessous pour vous alerter contre les dangers
potentiels. Veuillez lire ce manuel attentivement et accorder une
attention particulière aux symboles et aux avertissements fournis
dans les encadrés. Ceux-ci servent à signaler et à prévenir toute
situation potentiellement dangereuse pouvant causer la mort ou des
blessures graves.
AVERTISSEMENTS
• Bien lire et comprendre le manuel de l’utilisateur du
pulvérisateur électrostatique Clorox® Total 360® avant d’utiliser
l’appareil.
• Bien lire et comprendre l’étiquette des produits liquides
approuvés par Clorox avant de les utiliser avec le pulvérisateur
électrostatique Clorox® Total 360®.
• Le pulvérisateur électrostatique Clorox® Total 360® est conçu
pour un usage commercial à l’intérieur comme à l’extérieur.
• Le pulvérisateur électrostatique Clorox® Total 360® ne doit
jamais être utilisé dans un environnement dangereux.
• Le pulvérisateur électrostatique Clorox® Total 360® ne doit
jamais être utilisé dans un milieu où des produits chimiques
volatils sont présents, ni dans un endroit où des gaz, des
vapeurs ou des particules sont présents à l’état volatil ou à des
niveaux qui présentent un risque d’explosion.
• Le pulvérisateur électrostatique Clorox® Total 360® ne doit
jamais être utilisé par du personnel non formé.
AVERTISSEMENTS
DANGER : ÉQUIPEMENT PRESSURISÉ
Des fuites de liquide causées par un bris ou une rupture d’une
composante du système peuvent éclabousser les yeux ou la peau
de l’utilisateur et causer des blessures graves. Les précautions
suivantes peuvent aider à prévenir les fuites ou la rupture d’une
composante du système :
• Vérifier chaque jour les tuyaux, les
tubes et les raccordements. Remplacer
immédiatement toute pièce usée ou
endommagée.
AVERTISSEMENTS
DANGER POUR LES PIÈCES EN PLASTIQUE À L’EMPLOI
DE SOLVANTS DE NETTOYAGE
De nombreux solvants peuvent dégrader les pièces en plastique
et entraîner leur défaillance, ce qui peut causer des blessures
graves ou endommager le système. Les précautions suivantes
peuvent aider à prévenir ce type de dégradation chimique :
• Utiliser uniquement des solvants compatibles
à base d’eau pour nettoyer les pièces de
plastique pressurisées.
• Avant d’utiliser l’appareil, consulter
les données techniques contenues
dans ce manuel ou dans celui de tout
autre équipement connexe. Prendre
connaissance des fiches signalétiques et des
recommandations propres aux liquides et
aux solvants utilisés.
AVERTISSEMENTS
RISQUES D’INCENDIE, D’EXPLOSION ET DE CHOC ÉLECTRIQUE
Les émanations inflammables provenant des solvants ou de la
peinture en milieu de travail peuvent prendre feu ou exploser.
Les précautions suivantes peuvent aider à prévenir les risques
d’incendie, d’explosion et de choc électrique :
• L’équipement électrostatique doit être utilisé
uniquement par des personnes formées et
qualifiées, qui comprennent les instructions
fournies dans ce manuel.
• Cesser immédiatement d’utiliser l’appareil en
présence d’étincelles statiques ou en cas de
choc électrique. Ne pas utiliser le système
tant que le problème n’a pas été identifié et
corrigé.
• Utiliser et nettoyer l’équipement uniquement
dans un endroit bien aéré.
• Ne jamais pulvériser de produit chimique
inflammable (dont le point d’éclair est
inférieur à 60 °C
/ 140 °F).
• En présence d’émanations inflammables,
ne pas brancher ni débrancher le cordon
d’alimentation, et ne pas allumer ni éteindre
de lumières.
• S’il y a lieu, débarrasser la zone à traiter
des déchets, solvants, guenilles, contenants
d’essence et produits chimiques inflammables.
• Garder en tout temps un extincteur
d’incendie sur les lieux de travail.
Page 13
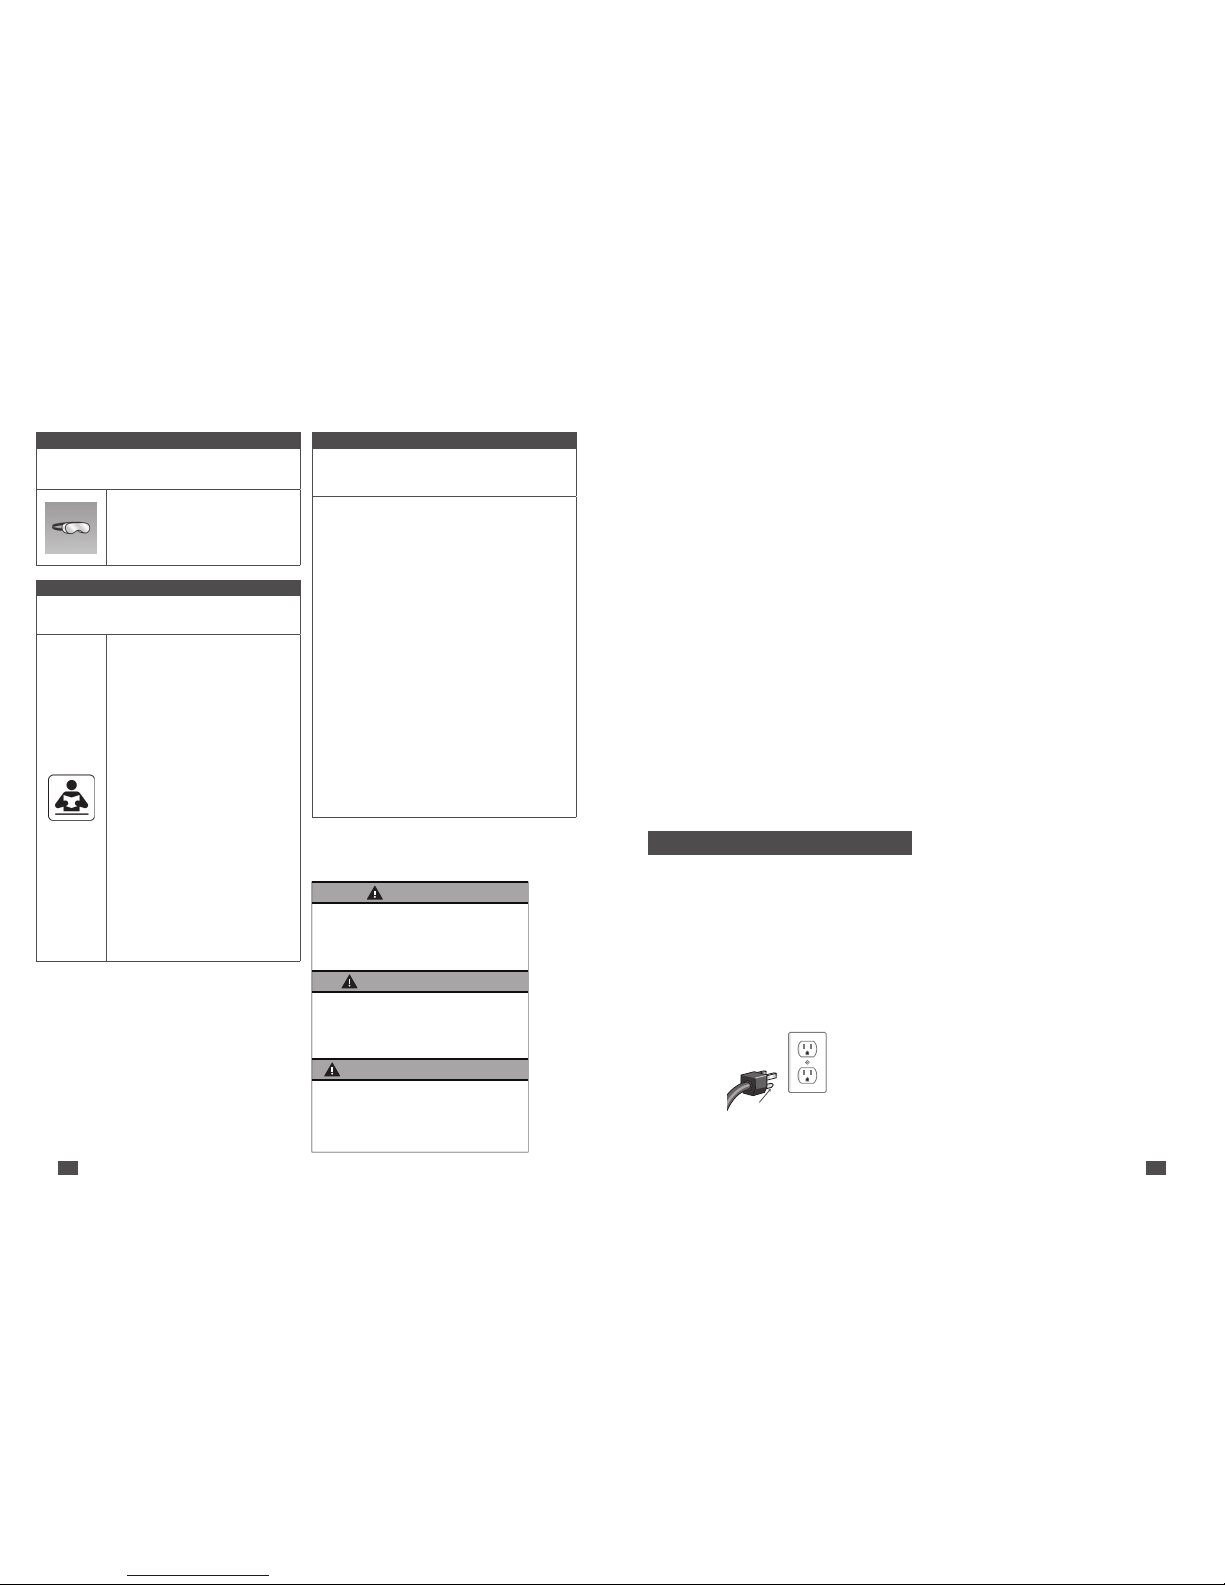
24 | FR FR | 25
Autocollant de sécurité
Cet autocollant est apposé sur le plateau supérieur de l’unité
de base, à l’avant de l’emplacement des bidons.
AVERTISSEMENTS
RISQUES LIÉS À UN MAUVAIS USAGE DU SYSTÈME
Un mauvais usage du pulvérisateur peut causer la mort ou des
blessures graves.
• Ne pas utiliser l’appareil en état de fatigue,
ni avec les facultés aaiblies par la drogue
ou l’alcool.
• Utiliser des liquides et des solvants
compatibles avec les pièces de l’appareil
appelées à entrer en contact avec les
liquides. Consulter les données techniques
dans tous les manuels d’utilisation, et lire
les avertissements du fabricant des liquides
et des solvants utilisés. Demander aux
distributeurs ou aux détaillants la fiche
signalétique de tout matériel utilisé afin
d’obtenir des renseignements complets.
• Ne pas quitter les lieux de travail pendant
que l’appareil est en marche.
• Éteindre l’appareil lorsque celui-ci ne sert pas.
• Vérifier chaque jour l’état de l’équipement.
Réparer ou remplacer immédiatement les
pièces usées ou endommagées par des
pièces de rechange authentiques, obtenues
auprès de partenaires approuvés par Clorox.
• Ne pas transformer ni modifier l’équipement,
car cela annulerait la garantie du pulvérisateur
Clorox® Total 360® et les approbations
du bureau d’homologation. De plus, cela
pourrait entraîner des risques pour la
sécurité des utilisateurs.
•
Faire passer les tuyaux et les cordons
électriques
à l’écart des zones d’auence,
des bords aigus, des pièces mobiles et des
surfaces chaudes.
AVERTISSEMENTS
RISQUES LIÉS À L’EMPLOI DES PRODUITS CHIMIQUES
Chaque produit chimique, y compris les produits désinfectants,
comporte ses propres risques et doit être manipulé correctement
pour ne pas mettre la sécurité des travailleurs en danger.
• Le pulvérisateur électrostatique Clorox® Total 360® doit être
utilisé uniquement avec des produits approuvés par Clorox.
Ne jamais pulvériser de produit liquide n’ayant pas été
approuvé par Clorox. La garantie du pulvérisateur sera
annulée si celui-ci est utilisé avec des produits qui ne sont
pas approuvés par Clorox. Il est utile de rappeler qu’un
grand nombre de produits chimiques liquides peuvent être
dangereux s’ils ne sont pas utilisés tel qu’indiqué.
• Bien lire et comprendre l’étiquette et la fiche signalétique des
produits approuvés par Clorox avant de les utiliser.
• Prendre connaissance des premiers soins à administrer en cas
d’accident à l’emploi du produit.
• La loi fédérale interdit d’utiliser un produit chimique de
manière contraire au mode d’emploi figurant sur son étiquette.
• Porter un équipement de protection personnelle tel que décrit
dans la fiche signalétique du produit approuvé par Clorox.
• Utiliser le système uniquement avec des liquides
ininflammables, non combustibles et non volatils. Ne jamais
pulvériser de produit chimique inflammable (dont le point
d’éclair est inférieur à 60 °C
/ 140 °F).
• Assurer une bonne ventilation dans les endroits où le
pulvérisateur sera utilisé.
• Conserver tous les produits chimiques dans leurs contenants
d’origine dans un endroit frais et sec, à l’abri des sources de
chaleur et des flammes nues.
• Ne pas réutiliser ni remplir de nouveau les contenants de
produits chimiques.
• Se reporter à l’étiquette du produit approuvé par Clorox pour
les instructions de mise au rebut.
AVERTISSEMENTS
ÉQUIPEMENT DE PROTECTION PERSONNELLE
Toujours porter un équipement de protection personnelle sur les
lieux de travail afin de prévenir les blessures graves.
• Il est recommandé de porter une protection
oculaire complète (par ex., lunettes à coques
étanches) à l’emploi de cet appareil.
• Se reporter à la fiche signalétique du produit
nettoyant Clorox® afin de connaître tout
autre équipement de protection personnelle
(ÉPP) requis pour son emploi.
Équipement de protection personnelle
L’équipement de protection personnelle (ÉPP) doit être conforme à
la norme ANSI Z87.1-1989 du American National Standards Institute
s’il a été acheté après le 5 juillet 1994, ou encore, à la norme ANSI
Z87.1-1968 ou à la norme applicable dans le pays de l’utilisateur.
• Le nom du fabricant doit être clairement indiqué sur l’ÉPP
destiné aux yeux et au visage [1910.133(a)(4)].
• Tous les dispositifs de protection personnelle doivent remplir les
critères de base suivants : Ils doivent...
- protéger adéquatement des dangers contre lesquels ils sont
spécialement conçus.
- être de conception et de facture sécuritaires pour les tâches
auxquels ils sont destinés.
- être raisonnablement confortables lorsqu’ils sont portés dans
les conditions attendues.
- être bien ajustés et ne pas entraver outre mesure les
mouvements de la personne qui les porte.
- être durables.
- pouvoir être désinfectés.
- être faciles à nettoyer.
- être marqués de manière à faciliter l’identification du fabricant.
IL EST RECOMMANDÉ DE PORTER UNE PROTECTION OCULAIRE
COMPLÈTE (PAR EX., LUNETTES À COQUES ÉTANCHES)
À L’EMPLOI DE CET APPAREIL. TOUJOURS UTILISER L’ÉPP
APPROPRIÉ, TEL QUE DÉCRIT DANS LA FICHE SIGNALÉTIQUE
DU PRODUIT APPROUVÉ PAR CLOROX. LES FICHES
SIGNALÉTIQUES DES PRODUITS CLOROX SONT ACCESSIBLES
À WWW.THECLOROXCOMPANY.COM/BRANDS/SAFETYINFORMATION/SDS/.
IMPORTANTES MESURES DE SÉCURITÉ
Lorsqu’on utilise un appareil électrique, il est important de
se rappeler que certains circuits sont sous tension même si
l’interrupteur est en position OFF. L’utilisateur doit toujours observer
quelques précautions élémentaires pour réduire tout risque de
brûlures, d’incendie, de choc électrique, de blessures et/ou de mort.
Branchement de l’appareil
Le cordon d’alimentation doit être branché dans une prise avec
mise à la terre compatible avec les fiches à trois broches et
homologuée pour 15 A minimum. Toujours vérifier cette exigence
au préalable. Cet appareil est conçu pour un circuit nominal de
120 V / 60 Hz avec mise à la terre vérifiée. Consulter un électricien
qualifié pour confirmer la capacité du réseau électrique et la
conformité de la mise à la terre.
VUE DE FACE
D’UNE PRISE
AVEC MISE
À LA TERRE*
BROCHE
DE MISE
À LA TERRE
*Image montrant une prise et une fiche pour courant de 120 V avec mise à la terre.
La prise et la fiche pour courant de 220/240 V sont de formes diérentes.
Mise à la terre
Cet appareil doit être branché dans une prise de courant avec mise
à la terre. En cas de défectuosité ou de défaillance, la mise à la
terre fournit au courant électrique une voie de moindre résistance
afin de réduire les risques de choc électrique. L’appareil est doté
d’un cordon muni d’un conducteur de mise à la terre et d’une fiche
à trois broches pour la mise à la terre. La fiche doit être branchée
dans une prise de courant installée adéquatement et mise à la
terre conformément à tous les codes et à toutes les ordonnances
à l’échelle locale. Ne jamais utiliser d’adaptateur avec ce produit.
DANGER : Un mauvais raccordement du conducteur de mise à la
terre peut occasionner un risque de choc électrique. Le conducteur
de mise à la terre est celui qui est isolé et dont la surface extérieure
est verte, avec ou sans bandes jaunes. S’il est nécessaire de réparer
ou de remplacer le cordon ou la fiche de l’appareil, ne pas raccorder
le conducteur de mise à la terre à une borne sous tension. Consulter
un électricien qualifié ou un technicien du service après-vente
si les instructions de mise à la terre sont mal comprises ou en
cas d’incertitude quant à la façon de mettre l’appareil à la terre
convenablement. Ne pas modifier la fiche fournie avec le cordon
d’alimentation de l’appareil — si la fiche n’entre pas dans la prise,
demander à un électricien qualifié d’installer une prise de courant
appropriée. Ne jamais utiliser d’adaptateur avec ce produit.
Emploi d’une rallonge électrique
Clorox fournit une rallonge électrique de 7,6 m (25 pi) avec chaque
pulvérisateur électrostatique Total 360® et conseille fortement
d’utiliser uniquement cette rallonge approuvée. Toujours vérifier
que cette rallonge est en bon état. Inspecter périodiquement les
rallonges et les remplacer si elles présentent des dommages. Si
une autre rallonge électrique est utilisée, il est important de se
rappeler qu’une rallonge de trop faible calibre peut créer une baisse
de tension et entraîner une perte de puissance, des dommages au
système et/ou une surchaue de l’équipement. Toujours utiliser une
rallonge électrique de calibre susant.
IMPORTANT : Clorox recommande d’utiliser une rallonge électrique
de calibre 12 à 3 broches, dont la longueur ne dépasse pas 30,5 m
(100 pi). Clorox recommande également de choisir des prises de
courant ou des rallonges électriques dotées d’un disjoncteur de fuite
à la terre (DDFT). Lorsque ce disjoncteur est intégré à une rallonge
électrique, toujours orienter celui-ci vers la prise de courant.
WARNING!
¡
ADVERTENCIA!
AVERTISSEMENTS!
NI-45400
•
Always wear appropriate Personal Protective
Equipment (PPE), as detailed in the User Manual,
when using this device. Refer to product specific
Clorox
®
Safety Data Sheets (SDS) for any additional PPE.
•
Follow instructions and precautions listed on Clorox®
manufacturing product labels.
•
Only use Clorox®-approved products through the
Clorox
®
Total 360® Sprayer.
•
Inspect power cord, sprayer and external tubing
for damage prior to use. DO NOT use if damage
is present.
•
Always use with a grounded electrical plug
and outlet.
•
Use device only as intended. Direct spray only
toward appropriate surfaces.
•
Cuando use este dispositivo, siempre use el equipo de
protección personal (EPP) apropiado, como se detalla
en el Manual del Usuario. Consulte las Fichas de Datos
de Seguridad (FDS) para cualquier EPP adicional.
•
Siga las instrucciones y precauciones que se listan
en las etiquetas de fabricación del producto Clorox
®
.
•
Utilice solamente productos Clorox® aprobados por
el Atomizador Clorox
®
Total 360®.
•
Antes de usarlo inspeccione el cable de electricidad,
el rociador y la tubería externa por daños. NO lo use
si hay daños presentes.
•
Siempre usarlo con un enchufe y toma de corriente
eléctrica con conexión a tierra.
•
Solamente utilice el dispositivo para lo que fue
diseñado. Solo rocié directamente en las superficies
adecuadas.
•
Au moment d’utiliser le pulvérisateur, toujours porter un
équipement de protection personnelle (ÉPP) adéquat, tel
que décrit dans le manuel de l’utilisateur. Se reporter à
la fiche signalétique du produit nettoyant Clorox
®
afin de
connaître tout autre ÉPP requis pour son emploi.
•
Suivre les instructions et les mises en garde indiquées
sur l’étiquette d’origine de chaque produit Clorox
®
.
•
Utiliser le pulvérisateur Clorox® Total 360® uniquement
avec les produits Clorox
®
approuvés à cette fin.
•
Avant l’emploi, inspecter le cordon d’alimentation,
l’appareil lui-même et les tubes externes pour
vérifier l’absence de dommages. NE PAS utiliser
le pulvérisateur en présence de dommages.
•
Toujours brancher le pulvérisateur dans une prise
de courant avec mise à la terre.
•
Utiliser le pulvérisateur strictement selon le mode
d’emploi. Toujours diriger le jet directement vers
les surfaces à traiter.
Page 14

26 | FR FR | 27
13 Crochet
pour cordon
Permet de ranger ou de suspendre
le cordon d’alimentation ou la
rallonge électrique.
14
Chariot
Chariot et garnitures en ABS et
en nylon armé de verre pour une
meilleure durabilité.
15 Interrupteur de
purge de la pompe
Purge le tuyau d’admission de son
liquide (appuyer pour purger).
16
Prise de raccordement
du pistolet
Raccordement électrique du pistolet.
17 Réservoir
Réservoir permettant d’assurer un
débit constant de liquide.
Prévention des chocs électriques
Comme dans la plupart des appareils électriques, les composantes
du circuit électrique du pulvérisateur Clorox® Total 360® peuvent
être sous tension même si l’interrupteur est en position OFF.
Les précautions suivantes peuvent aider à réduire les risques de
brûlures, d’incendie, de choc électrique ou de blessures.
1. Utiliser cet appareil uniquement selon l’usage auquel il est
destiné, tel que décrit dans le présent manuel.
2. Ne pas utiliser l’appareil en étant immergé dans l’eau.
3. Ne pas placer ni ranger l’appareil dans un endroit où il pourrait
tomber ou être tiré dans l’eau (ou dans tout autre liquide).
4. Si l’appareil tombe dans l’eau, le débrancher immédiatement.
Ne pas mettre les mains dans l’eau pour le récupérer.
5. Cesser d’utiliser l’appareil s’il est tombé au sol, s’il a été
endommagé ou s’il ne fonctionne pas normalement.
Communiquer avec un technicien Clorox autorisé.
6. Tenir le cordon d’alimentation à l’écart des surfaces chaudes.
7. Ne jamais obstruer les bouches d’air de l’appareil ni placer
celui-ci sur une surface souple (matelas ou divan), car cela
pourrait entraver la circulation d’air.
8. Ne jamais introduire ni laisser tomber d’objet dans les orifices
de l’appareil.
9. Ne pas utiliser l’appareil si le cordon d’alimentation est
endommagé ou brisé.
10. Ne jamais ranger l’appareil à des températures supérieures
à 60 °C
(140 °F).
11. Les surfaces de l’unité peuvent devenir chaudes lorsque
l’appareil est en marche. Éviter tout contact entre la peau
nue et les surfaces chaudes.
Consignes générales
Tout manquement aux présentes consignes de sécurité peut
donner lieu à un rendement inférieur de l’équipement, voire causer
un accident, des lésions corporelles ou la mort. Surveiller tout
signe de danger et rectifier la situation dans les plus brefs délais.
Prendre toutes les précautions suivantes à l’emploi de l’appareil.
1. Lire le présent manuel de l’utilisateur. Tout manquement
à cette consigne sera considéré comme un mauvais usage
de l’équipement.
2. Utiliser le pulvérisateur électrostatique Clorox® Total 360®
uniquement pour l’usage auquel il est destiné, tel que décrit
dans le présent manuel.
3. Avant d’utiliser l’équipement, se familiariser avec tous
les autocollants de sécurité et d’avertissements qui s’y
trouvent apposés.
4. Utiliser le pulvérisateur électrostatique Clorox® Total 360®
uniquement en lieu sûr.
5. Le pulvérisateur électrostatique Clorox® Total 360® doit être
utilisé uniquement par du personnel formé, qui connaît bien
l’appareil et les produits approuvés par Clorox.
6. Ne pas laisser le personnel utiliser le pulvérisateur sans
instructions ou avec les facultés aaiblies par l’alcool ou
la drogue.
7. Le cas échéant, utiliser une rallonge électrique qui respecte ou
surpasse les exigences décrites dans la section « Emploi d’une
rallonge électrique » à la page précédente.
8. Ranger le pulvérisateur dans un endroit frais et sec.
Ne pas l’exposer à des températures extrêmes.
9. Purger le tuyau d’admission de tout son liquide avant
de ranger l’unité.
10. Tant qu’il est branché, le système demeure alimenté en
électricité même s’il est en position OFF. La prudence est
donc de mise.
11. Ne jamais suspendre l’unité par son cordon d’alimentation.
12. Ne jamais laisser un pulvérisateur branché sans surveillance.
13. Un disjoncteur réenclenchable situé à l’arrière de l’unité se
déclenche lorsqu’il y a un court-circuit dans l’unité de base.
14. Toujours éteindre le pulvérisateur après une application et avant
de le débrancher.
15. Toujours débrancher l’appareil lorsqu’il ne sert pas ou lorsqu’il
est laissé sans surveillance.
16. Ne jamais débrancher l’appareil en tirant sur le cordon
d’alimentation ou en ayant les mains mouillées. Toujours
débrancher en tenant la fiche entre les doigts.
17. Ne jamais déplacer l’appareil en le tirant par le cordon
d’alimentation.
18. Éviter de plier le cordon d’alimentation ou de le faire passer
contre des bords aigus, car cela pourrait l’endommager.
19. Ne pas utiliser l’appareil si le cordon d’alimentation est
endommagé.
20. Toujours inspecter minutieusement l’appareil avant de l’utiliser.
21. Pour toute question ou préoccupation au sujet du pulvérisateur
électrostatique Clorox® Total 360®, communiquer avec notre
équipe de services et de soutien techniques en consultant son
site Web à www.servicetechteam.com.
Emploi de produits chimiques
Le pulvérisateur électrostatique Clorox® Total 360® doit être utilisé
exclusivement avec des produits approuvés par Clorox. La garantie
du pulvérisateur sera annulée si celui-ci est utilisé avec des produits
qui ne sont pas approuvés par Clorox. Il est utile de rappeler
qu’un grand nombre de produits chimiques liquides peuvent être
dangereux s’ils ne sont pas utilisés tel qu’indiqué.
1. Toujours porter un équipement de protection personnelle (ÉPP)
à l’emploi du pulvérisateur électrostatique Clorox® Total 360®.
Consulter la fiche signalétique du produit utilisé pour connaître
les besoins précis en ÉPP.
2. Suivre les instructions de rangement, de manipulation et
de mise au rebut sur l’étiquette ou la fiche signalétique de
chaque produit chimique liquide utilisé avec le pulvérisateur
électrostatique Clorox® Total 360®.
3. Pour chaque produit chimique diérent, vérifier la durée
d’attente requise avant que les gens et les animaux puissent
de nouveau accéder aux lieux après l’application.
4. Toute modification non autorisée, de quelque façon que ce soit,
d’un produit approuvé par Clorox, des contenants de produits
ou du pulvérisateur électrostatique Clorox® Total 360® annulera
la garantie.
5. Se reporter à l’étiquette du produit approuvé par Clorox
pour les instructions de mise au rebut.
6. Si le produit liquide entre en contact avec la peau ou les yeux,
consulter les consignes de premiers soins indiquées
sur l’étiquette du produit et la fiche signalétique.
7. Ne jamais diriger le pistolet vers soi ni vers une autre personne.
IMPORTANT : Les fiches signalétiques de tous les produits
liquides approuvés par Clorox pour le pulvérisateur électrostatique
Clorox® Total 360® sont accessibles dans le but d’informer les
utilisateurs des dangers et des précautions dont ils doivent
prendre connaissance. Tous les employés appelés à manipuler ces
produits doivent connaître l’existence de ces fiches et pouvoir
y accéder. Ils doivent également avoir reçu une formation en la
matière et faire preuve de vigilance en travaillant avec des produits
chimiques liquides. Il incombe au propriétaire de l’appareil d’obtenir
la fiche signalétique de chaque produit chimique utilisé avec le
pulvérisateur Clorox® Total 360®.
Visiter www.thecloroxcompany.com/brands/safety-information/sds/
pour de plus amples renseignements.
Buse
La buse est située à l’extrémité du pistolet. Elle se compose d’un
contact à ressort, d’un joint torique externe, d’un couvre-buse, d’un
embout de buse et d’une électrode. Ces pièces sont les seules que
l’utilisateur peut entretenir par lui-même. Pour y accéder, dévisser
manuellement le couvre-buse en tournant vers la gauche. Il est
très important d’observer toutes les procédures d’entretien et
de nettoyage pour que le pistolet fonctionne de façon optimale.
Après l’entretien ou le remplacement de pièces, il est extrêmement
important de réassembler et de réaligner les pièces du pistolet
comme à l’origine, en évitant de les serrer excessivement.
REMARQUE : Même dans des conditions normales d’utilisation, le
pistolet finit par accumuler de la saleté. Nettoyer manuellement les
surfaces extérieures avec une solution d’alcool isopropylique à 70 %.
Cette précaution aide à prévenir l’échappement de liquide du pistolet.
1 Compresseur d’air Pulvérise et propulse le liquide.
Comprend un relais thermique intégré
auto-réenclenchable pour protéger le
compresseur contre la surchaue.
2 Roues non
marquantes
Roues de grandes dimensions
pour faciliter le transport et la
maniabilité. Ne laissent aucune
marque de dérapage et n’ont nul
besoin d’être gonflées.
3 Faisceau
de raccordement
du pistolet
Ce faisceau se compose de trois
parties : le fil d’alimentation électrique
du pistolet, le tuyau d’admission du
liquide et le tuyau d’air comprimé.
Il permet de raccorder le pistolet à
l’unité de base.
4 Porte-pistolet Permet de ranger le pistolet.
5 Boutons-poussoirs
pour ajuster la
poignée
Permettent d’ajuster la hauteur
de la poignée (presser pour ajuster).
6 Égouttoir amovible Permet de recueillir le liquide
qui s’écoule du pulvérisateur.
7 Poignée ajustable La poignée peut être allongée,
abaissée ou tournée au moyen
de deux boutons-poussoirs.
8 Pompe péristaltique Achemine le liquide jusqu’au pistolet.
9 Disjoncteur Disjoncteur réenclenchable qui se
déclenche uniquement lorsqu’il y a un
court-circuit dans l’unité de base.
10 Principal
interrupteur
de courant
Permet la mise sous tension
du système.
11 Contenants de
produits chimiques
(3,78 L/1 gallon)
Contenants de produits chimiques
(non compris avec l’équipement).
12 Support de cordon
électrique
Situé à l’arrière de l’unité pour
permettre d’y enrouler le cordon
d’alimentation ou la rallonge
électrique.
Pistolet du pulvérisateur Clorox® Total 360®
1
5
2
4
3
1 Gâchette
à bouton-poussoir
Il sut d’appuyer une fois sur le bouton
pour faire fonctionner le pistolet.
2 Tableau
de commande
Indique la mise sous tension de
l’unité de base, du pistolet et du
système électrostatique.
3 Couvre-buse Situé à la tête du pistolet.
4 Prise du pistolet Permet de saisir le pistolet
de n’importe quelle main.
5 Faisceau
de raccordement
du pistolet
Ce faisceau se compose de trois
parties : le fil d’alimentation électrique
du pistolet, le tuyau d’admission du
liquide et le tuyau d’air comprimé.
COMPOSANTES DU SYSTÈME
Le pulvérisateur électrostatique Clorox® Total 360® est un système
breveté qui a été mis au point en tenant compte des utilisateurs
finals. Fait de matériaux durables et très mobile, il permet une
pulvérisation électrostatique des plus ecaces.
Unité de base du système Clorox® Total 360®
Page 15

28 | FR FR | 29
5. Après le traitement, laisser l’endroit fermé au public aussi
longtemps que l’indique la fiche signalétique du produit utilisé.
6. Retirer la pancarte ou le chevalet interdisant l’accès au lieu dès
que le temps d’attente indiqué est écoulé.
Changement de produit approuvé par Clorox
1. Cesser de pulvériser.
2. Enlever le bouchon du tuyau d’admission fixé au bidon du
produit à remplacer, puis retirer le bidon. Remettre le bouchon
du bidon en place si celui-ci doit être rangé.
3. Pour purger le pistolet, orienter celui-ci vers un coin peu
visible, un récipient ou un drain, puis appuyer sur la gâchette.
Pulvériser pendant 20 secondes environ, jusqu’à ce que tout
le liquide soit évacué.
4. Choisir le nettoyant approprié et approuvé par Clorox pour les
travaux de nettoyage, d’assainissement ou de désinfection.
5. Placer le bidon de solution sur l’unité de base. Vérifier que
l’ouverture du bidon est orientée vers le haut et qu’elle fait face
aux tuyaux.
6. Dévisser le bouchon du produit approuvé par Clorox, puis
visser le bouchon du tuyau d’admission sur l’ouverture du
bidon. Vérifier que le bouchon est vissé jusqu’au bout sans
être excessivement serré.
7. Pour amorcer le pistolet, orienter celui-ci vers un coin peu
visible, un récipient ou un drain, puis appuyer sur la gâchette.
Pulvériser pendant 20 secondes environ, jusqu’à ce que le débit
soit constant.
Entretien et rangement après l’utilisation
1. Cesser de pulvériser.
2. Enlever le bouchon du tuyau d’admission fixé au bidon du
produit, puis retirer le bidon. Remettre le bouchon du bidon
en place si celui-ci doit être rangé.
3. Pour vider l’égouttoir (au besoin) : Faire pivoter l’égouttoir d’un
quart de tour en le tenant bien droit afin d’éviter de répandre
le liquide. Retirer et vider l’égouttoir. Réinsérer l’égouttoir en
le faisant pivoter d’un quart de tour en sens inverse, jusqu’à ce
qu’il tienne bien en place.
4. Pour purger le pistolet, orienter celui-ci vers un coin peu
visible, un récipient ou un drain, puis appuyer sur la gâchette.
Pulvériser pendant 20 secondes environ, jusqu’à ce que tout
le liquide soit évacué.
5. Éteindre l’unité à l’aide de l’interrupteur. Les voyants bleus
sur le tableau de commande du pistolet et sur l’unité de base
ne devraient plus être allumés.
6. Débrancher l’appareil.
7. Enrouler le cordon d’alimentation autour du support intégré
à l’unité de base.
8. Ranger dans un endroit sec et sécuritaire.
Préparation des surfaces à traiter
1. Nettoyer la saleté visible en observant les protocoles en vigueur
au sein de l’établissement.
2. Bloquer l’accès du public à la pièce en plaçant une pancarte sur la
porte ou un chevalet devant la porte indiquant de ne pas entrer.
3. Éteindre tous les appareils électriques sensibles, sans toutefois
les débrancher.
Démarrage et utilisation de l’unité
1. Choisir le nettoyant approprié et approuvé par Clorox pour les
travaux de nettoyage, d’assainissement ou de désinfection.
2. Placer le bidon de solution sur l’unité de base. Vérifier que
l’ouverture du bidon est orientée vers le haut et qu’elle fait face
aux tuyaux.
3. Dévisser le bouchon du produit approuvé par Clorox,
puis visser le bouchon du tuyau d’admission sur l’ouverture
du bidon. Vérifier que le bouchon est vissé jusqu’au bout
sans être excessivement serré.
4. Dérouler le cordon d’alimentation au complet et brancher la fiche
à trois broches dans une prise de courant avec mise à la terre.
5. Revêtir l’équipement de protection personnelle qui convient.
Consulter la section « Équipement de protection personnelle »
à la page 25.
6. Repérer l’interrupteur ON/OFF sur l’unité de base. Appuyer
sur l’interrupteur pour mettre l’appareil sous tension. Un voyant
bleu apparaîtra sur le tableau de commande du pistolet, et
l’interrupteur s’illuminera également en bleu pour indiquer
que l’unité est sous tension.
7. Retirer le pistolet du porte-pistolet. Un voyant bleu devrait être
allumé sur celui-ci pour indiquer qu’il est sous tension.
8. Le système est maintenant prêt à l’emploi.
9. Pour amorcer le pistolet, l’orienter vers un coin peu visible, un
récipient ou un drain, puis appuyer sur le bouton de la gâchette.
Pulvériser pendant 20 secondes environ, jusqu’à ce que le débit
soit constant.
10. Lorsque l’utilisateur appuie sur la gâchette, un deuxième voyant
bleu s’allume sur le tableau de commande du pistolet.
REMARQUE : Le pistolet restera automatiquement sous
tension jusqu’à ce que l’utilisateur appuie sur la gâchette
une fois de plus.
REMARQUE : L’unité ne donne pas son plein rendement
à une température de 4,5 °C (40 °F) ou moins.
Nettoyage par pulvérisation
1. Placer le pulvérisateur électrostatique Clorox® Total 360®
dans un coin situé à l’arrière de l’endroit à traiter.
2. Diriger le pistolet vers la surface cible.
3. Commencer à pulvériser en appuyant sur la gâchette une
première fois. Appuyer de nouveau sur la gâchette pour
interrompre le jet.
4. Pulvériser en suivant un tracé uniforme, en partant du point
le plus élevé puis en descendant vers le bas, en eectuant un
mouvement de va-et-vient continu. Continuer ainsi jusqu’à ce
que toutes les surfaces soient bien mouillées.
MODE D’EMPLOI
Buse du pistolet
Pour assurer le bon fonctionnement du pulvérisateur, il est
recommandé à l’utilisateur de rincer la buse à l’eau claire avant
de ranger l’appareil à la fin de chaque journée. Cette précaution
permet d’éviter l’accumulation de dépôts chimiques qui peuvent
éventuellement obstruer la buse, donner un jet inégal et accélérer
l’usure des pièces. En plus de rincer la buse à l’eau claire après
chaque usage, il est important de démonter celle-ci et de nettoyer
les pièces de temps à autre. Ces mesures doivent être appliquées
régulièrement, selon un échéancier qui peut varier en fonction de
la fréquence d’utilisation de l’équipement et de l’observance des
lignes directrices concernant l’entretien du système avant et après
chaque utilisation.
Il est recommandé de bien lire les directives suivantes
avant de soumettre la buse à des travaux d’entretien courants.
Pour nettoyer et inspecter la buse
1. Dévisser le couvre-buse et le retirer du pistolet. Déloger toute
saleté présente sur la face intérieure et les contours en utilisant
de l’eau chaude savonneuse.
2. Inspecter la buse pour vérifier si l’embout est en bon état. Si
la pulvérisation était inégale ou atypique par rapport à un jet
normal et symétrique, enlever l’embout à l’aide d’une clé à
douille de 12 mm (7/16 po), puis le remplacer par un neuf.
3. Inspecter l’électrode pour vérifier tout signe d’arc électrique,
de brûlure et/ou de corrosion. Appuyer légèrement sur le
contact à ressort pour vérifier s’il remonte normalement. S’il ne
remonte pas, enlever délicatement la pièce à l’aide d’une paire
de pinces et la remplacer immédiatement. Sinon, appliquer une
généreuse quantité de graisse diélectrique (disponible dans les
garages et les quincailleries) sur la pièce.
4. Vérifier que l’intérieur du couvre-buse est bien nettoyé, y
compris l’orifice de pulvérisation. Ne jamais utiliser de brosse
métallique, de lime ni de papier sablé pour nettoyer les surfaces
ou l’orifice.
Important : Le couvre-buse doit être remis en place et serré
manuellement. Ne jamais utiliser de pinces ni aucun autre outil pour
serrer le couvre-buse, car cela pourrait endommager la pièce. Il n’est
pas nécessaire de dégager l’électrode pour eectuer le nettoyage.
Chariot et compresseur
Le chariot ne comporte aucune pièce interne pouvant être
entretenue par l’utilisateur. Ne pas ouvrir la coque, car cela
annulerait la garantie. En cas de panne de l’appareil, communiquer
avec notre équipe de services et de soutien techniques en consultant
son site Web à www.servicetechteam.com.
Pompe péristaltique
1. Débrancher les tuyaux d’admission transparents en desserrant
les écrous (vers la gauche) jusqu’à ce que les tuyaux se séparent.
2. Tourner le couvercle vers la gauche pour le dégager de l’unité.
3. Retirer le rotor du couvercle.
4. Retirer et mettre au rebut le tuyau péristaltique.
5. Lubrifier le nouveau tuyau péristaltique avec la graisse fournie.
6. Installer le nouveau tuyau et remettre en place le rotor d’abord,
puis le couvercle, en prenant soin de ne pas abîmer le tuyau
péristaltique.
ENTRETIEN
Pour assurer le bon fonctionnement du pulvérisateur électrostatique
Clorox® Total 360®, l’équipement doit être nettoyé régulièrement.
Outre le nettoyage général de l’unité de base, deux autres parties
du système exigent un entretien régulier : la pompe péristaltique et
la buse du pistolet.
Page 16

30 | FR FR | 31
Alimentation ~115 V
Intensité électrique
de fonctionnement
6,0 A
Intensité électrique
au démarrage
14,6 A
Fréquence 60 Hz
Longueur standard
des tuyaux
2,13 m (7 pi)
Dimensions 64 cm x 26 cm x 43 cm / 25 3/8 po
x 10 1/16 po x 17 1/8 po (haut. x larg. x prof.)
Pression d’air
comprimé
35 psi (2,4 bars)
Poids à l’état vide 20 kg (43 lb)
Poids à l’état plein 27 kg (59 lb)
Poids à l’expédition 24 kg (52 lb)
Débit 130 mL/min (4,3 oz/min)
Alimentation ~240 V
Intensité électrique
de fonctionnement
3,0 A
Intensité électrique
au démarrage
7,0 A
Fréquence 50 Hz
Longueur standard
des tuyaux
2,13 m (7 pi)
Dimensions 74 cm x 25 cm x 40 cm / 29,25 po
x 10 po x 16 po (haut. x larg. x prof.)
Pression d’air
comprimé
35 psi (2,4 bars)
Poids à l’état vide 20 kg (43 lb)
Poids à l’état plein 27 kg (59 lb)
Poids à l’expédition 24 kg (52 lb)
Débit 130 mL/min (4,3 oz/min)
Échappement excessif de liquide du pistolet
Problème potentiel Mesure correctrice
Dommages à la buse Vérifier si la buse présente des
dommages ou si des pièces sont
défaillantes. Dans l’armative,
communiquer avec notre équipe de
services et de soutien techniques.
Dommages au tuyau
péristaltique de la pompe
Remplacer le tuyau de la pompe.
Encrassement des surfaces
extérieures du pistolet
Nettoyer les surfaces extérieures
avec un solvant (alcool à 70 – 90 %).
L’appareil ne se met pas sous tension
ou s’éteint soudainement.
Problème potentiel Mesure correctrice
L’appareil reste éteint. Vérifier que l’appareil est bien
branché et que la prise de courant
fonctionne normalement.
Le système ne s’allume pas. Appuyer sur l’interrupteur de mise
sous tension jusqu’à ce que le
voyant bleu s’allume.
Le compresseur s’éteint
soudainement ou ne
fonctionne pas lorsque
l’utilisateur appuie sur
la gâchette du pistolet.
Voilà un signe que le disjoncteur
de l’unité s’est déclenché ou que
le compresseur a surchaué.
L’utilisateur doit vérifier si le
bouton blanc (sous son protecteur
transparent) du disjoncteur est
soulevé. Si tel est le cas, il doit
éteindre l’appareil et vérifier si des
objets pourraient s’être logés ou
coincés dans les bouches d’air de
l’appareil, puis les déloger. Appuyer
sur le bouton blanc, puis remettre
l’appareil sous tension. Si l’appareil
ne s’allume toujours pas, le laisser
reposer pendant 30 minutes, car
il pourrait s’agir d’un problème de
surchaue. Si l’unité ne démarre
toujours pas après cette période de
refroidissement, communiquer avec
le service technique.
Le compresseur surchaue. Éteindre l’appareil et le laisser
reposer au moins 30 minutes avant
de le remettre sous tension.
L’unité ne se met pas
en marche à la première
impulsion.
Cela peut être un signe de
démarrage à froid. Réchauer
l’unité en appuyant sur la gâchette
et en laissant celle-ci fonctionner
pendant 2 minutes. Appuyer,
puis relâcher la gâchette. L’unité
devrait maintenant fonctionner
normalement.
CARACTÉRISTIQUES du modèle de 115 V
CARACTÉRISTIQUES du modèle de 240 V
DÉPANNAGE
REMARQUE : Ne JAMAIS pulvériser de produit liquide n’ayant pas
été approuvé par Clorox. Si l’un des problèmes décrits ci-dessous
survient, essayer de le résoudre en suivant les mesures suggérées.
Si un problème survient et qu’aucune solution n’est proposée dans
ce manuel, communiquer avec notre équipe de services et de soutien
techniques en consultant son site Web à www.servicetechteam.com.
Absence de jet, jet inégal ou jet faible
Problème potentiel Mesure correctrice
La solution liquide est épuisée. Vérifier le niveau de liquide
dans le contenant, et si celui-ci
est vide, le remplacer.
Quelque chose obstrue la buse
ou l’embout.
Retirer le couvre-buse et/
ou l’embout de la buse pour
vérifier si quelque chose y est
resté logé ou coincé.
Le jet manque de puissance. L’utilisateur doit éteindre
l’appareil, le débrancher et le
brancher de nouveau dans
une autre prise de courant.
Si aucune autre prise n’est
disponible, vérifier si d’autres
appareils sont alimentés par le
même circuit électrique, et les
éteindre au besoin.
L’utilisation d’une rallonge de
calibre insusant peut être
à l’origine du problème. Si
l’appareil est utilisé avec une
rallonge électrique, enlever
celle-ci, et tester l’unité au
moyen de son propre cordon
d’alimentation. Consulter la
section « Emploi d’une rallonge
électrique » pour en savoir plus
à ce sujet.
Le tuyau d’admission de liquide
ou de la pompe péristaltique
est endommagé.
Inspecter le tuyau d’admission
du liquide et vérifier s’il est
plié et/ou s’il présente des
dommages.
La pression d’air est basse ou faible.
Problème potentiel Mesure correctrice
Dommages au tuyau d’air
comprimé
Inspecter le tuyau et vérifier
l’absence de plis, de dommages
ou de fuites d’air.
Obstruction de la buse Dévisser le couvre-buse et
vérifier tout signe d’obstruction.
Obstruction du filtre à air Remplacer le filtre à air.
GARANTIE SUR L’ÉQUIPEMENT
Clorox ore à l’acheteur initial du pulvérisateur électrostatique
Clorox® Total 360® une garantie contre tout défaut de matériaux
ou de fabrication pour une période d’un an après la date de livraison.
Déni de garantie implicite et de responsabilité en cas de
dommages indirects
L’obligation de Clorox en vertu de la présente garantie remplace,
dans la mesure permise par la loi, toute garantie implicite ou
explicite quant à la qualité marchande du produit, à son adéquation
à un usage particulier ou à la responsabilité du fabricant en cas de
dommages indirects ou accessoires, dans le cadre de la vente ou de
l’utilisation du produit sous garantie.
Les dommages indirects ou accessoires incluent, sans toutefois
s’y limiter, les frais de transport, les charges en sus des frais
d’expédition courants, les coûts d’installation non approuvés par
Clorox, les frais de douanes et d’accises, les taxes, les frais de
service normal ou les ajustements, les pertes de revenus ainsi que
les dépenses causées par la perte, les dommages, la rétention ou
les délais en cours d’expédition de l’équipement ou des pièces,
dans la mesure où de tels frais sont occasionnés par une cause
indépendante de la volonté de Clorox.
CETTE GARANTIE NE COUVRE PAS :
1. Les défauts, défectuosités, dommages ou limitations de
rendement causés, en tout ou en partie, par :
a. une panne de courant, une surtension du réseau électrique,
un accident, un acte commis par un tiers, une intempérie ou
une catastrophe naturelle, ou
b. une mauvaise utilisation ou un traitement abusif de
l’équipement, une négligence, un entreposage, un entretien
ou un usage non conforme, ou toute tentative de réparation
ou de modification de l’équipement de quelque manière que
ce soit.
2. Tout produit dans lequel on a utilisé un produit chimique qui
n’a pas été vendu par ou au nom de Clorox et qui n’a pas été
expressément approuvé par Clorox comme composante du
produit en question.
3. L’usure normale des pièces.
AUCUN EMPLOYÉ NI AUCUN REPRÉSENTANT DE CLOROX N’EST
AUTORISÉ À APPORTER QUELQUE CHANGEMENT QUE CE SOIT
À LA PRÉSENTE GARANTIE NI À CONSENTIR UNE QUELQUE
AUTRE GARANTIE, À MOINS QU’UN TEL CHANGEMENT SOIT
SIGNIFIÉ PAR ÉCRIT ET CONTRESIGNÉ PAR UN DIRIGEANT DE
LA SOCIÉTÉ CLOROX.
Page 17

TM
Electrostatic Sprayer CLX
Atomizador Electrostático CLX
Pulvérisateur électrostatique CLX
Clorox United States
© 2018 The Clorox Company
Professional Products Division
1221 Broadway
Oakland, CA 94612
1-800-492-9729
www.cloroxtotal360.com
Clorox Total 360 is a registered trademark in the U.S.A. / Clorox Total 360 est une marque déposée aux États-Unis.
Clorox Canada
© 2018 The Clorox Company
of Canada, Ltd.
150 Biscayne Crescent
Brampton, ON L6W 4V3
1-800-492-9729
www.cloroxtotal360.ca
Cbee (Europe) Ltd.
Eton House, 2nd Floor
18-24 Paradise Road
Richmond TW9 1SE,
United Kingdom
Tel: +44 (0) 208 614 7120
Fax: +44 (0) 208 940 2040
consumerservices@clorox.co.uk
Clorox Australia Pty Ltd.
Level 3, 10 Herb Elliott Avenue
Sydney Olympic Park, NSW 2127
Phone: 1300 731 030
Clorox New Zealand Ltd.
Level 8, Building 5, Central Park,
660-670 Great South Road,
Penrose, Auckland 1061
Phone: 0800 108 858
NI-45092
 Loading...