

Clore Automotive Truck PAC ES-6000, Truck PAC ES-6500, Truck PAC ES-8000, Truck PAC ES-8500 User Manual
PORTABLE POWER SOURCE
USER’S MANUAL
UNIDAD PORTÁTIL DE
ALIMENTACIÓN ELÉCTRICA
ALIMENTATION PORTABLE
MANUEL DE L’UTILISATEUR
FONTE DE ENERGIA PORTÁTIL
MANUAL DO USUÁRIO
E
N
G
L
I
S
H
E
S
P
A
Ñ
O
L
DRAAGBARE ELEKTRICITEITSBRON
GEBRUIKSAANWIJZING
C
H
POWER LEVEL
E
A
R
G
CHARGING
E
PORT
D
F
C
H
A
T
R
E
G
S
I
T
N
G
MODELS:
ES-6000
ES-6500
ES-8000
ES-8500
© CMC June 2000 Form No. 842-279-000 Rev. A
F
R
A
N
Ç
A
I
S
P
O
R
T
U
G
U
Ê
S
N
E
D
E
R
L
A
N
D
S
INTRODUCTION
E
This unit has a sealed lead acid battery that should be kept at full charge. Recharge
N
when first received, immediately after each use, and every three months if not used.
G
Failure to maintain a full charge may cause the battery life to be reduced greatly. This
L
unit contains a smart circuit which allows it to be left on charge continuously without
I
damage.
S
H
Dear Customer: CONGRATULATIONS. You have just purchased the finest quality
portable power source and engine starters on the market. We have taken numerous
measures in quality control and in our manufacturing processes to ensure that your
product arrives in top condition, and that it will perform to your satisfaction. In the rare
event that your portable power source contains a damaged or missing item, does not
perform as specified, or requires warranty service, DO NOT RETURN YOUR
PORTABLE POWER SOURCE TO THE STORE.
Please call our TOLL FREE NUMBER in the United States (800-328-2921), or Canada
(800-668-8642) and ask for Technical Service. Our technical service representative
will expedite delivery of your part. If your product needs warranty service, our technical
service representative will help you obtain the fastest remedy possible under the
warranty. Save your purchase receipt, it is required for warranty service.
5
4
1
3
2
C
H
C
H
A
T
R
E
G
S
T
A
POWER LEVEL
R
G
CHARGING
E
PORT
D
F
I
E
N
G
6
DC TO AC INVERTER
9
11
7
8
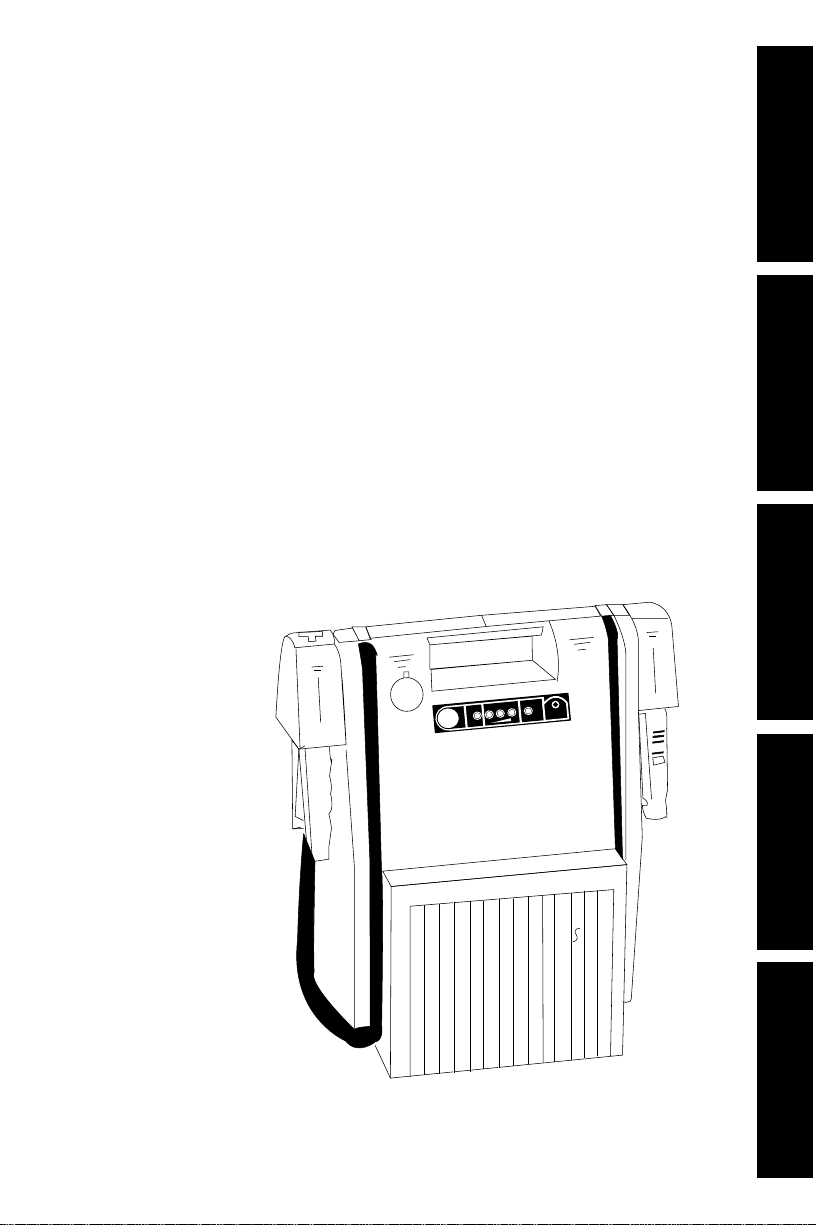
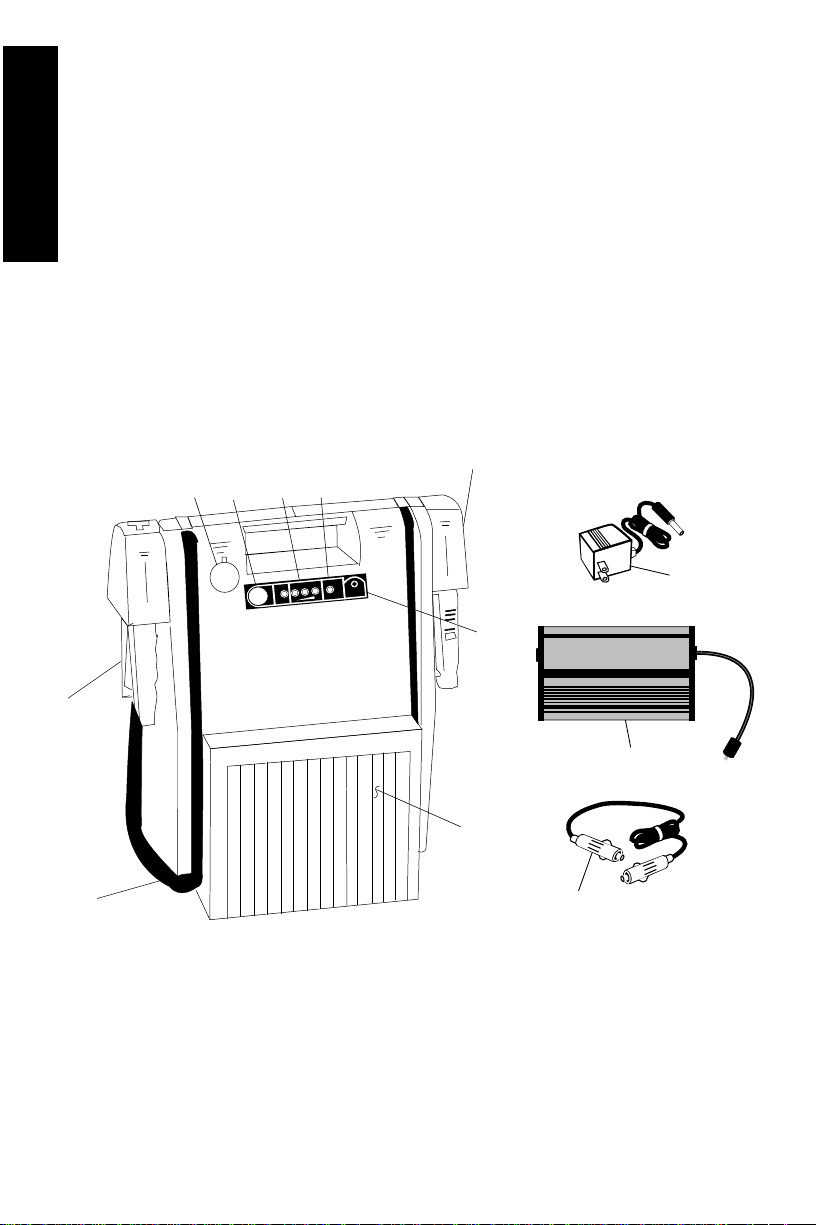
1. 12 Vdc Power Receptacle
2. Test Button
3. State of Charge Indicators
4. CHARGED indicator (charge complete)
5. Safety Storage Holsters
6. Charging Socket
7. Case
8. Flexible Heavy Duty Cables
9. Heavy Duty Clamps
10. Wall Charger
11. Inverter (optional)
12. Power Charging Cord (optional)
12
Figure 1. Portable Power Source and Accessories
Consumer: Retain these instructions for future use. Read all instructions
carefully before using this portable power source.
2
10

PORTABLE POWER
SOURCE FEATURES
• Provides plenty of power for starting
vehicles. More than enough to start
most cars. May also be used in
DEEP CYCLE applications.
• The portable power source will
power most 12 Vdc accessories
equipped with a male cigar lighter
plug. The dc outlet has automatic
overload protection.
• Test switch and LED lights. State of
the art circuit. For a complete test,
push test button for 10 seconds, if
the three red lights stay on, the
portable power source is fully
charged.
• Safety storage holsters prevent
accidental sparking of clamps and
rotate 90° for easy clamp removal.
• Cable grooves lock the cables for
clean storage. (No unsightly
dangling wires).
• The portable power source contains
the latest technology with its sealed
non-spillable battery. The portable
power source may be stored in any
position.
Accessories
1. Wall charger (see 10, Figure 1)
• ES-6000:
ESA-26
(1.5 Amp 12 Vdc Charger)
• ES-8000:
ESA-210
(0.75 Amp 24 Vdc Charger)
• ES-6500 & ES-8500:
(varies by country)
2. Inverter (sold separately, see 11,
Figure 1)
• ES-6000 & ES-6500:
SBPI-175, SBPI-300, SBPI-600
(12 VDC to 120 VAC)
Note: Use of an inverter using 240 watts
or more requires the connection to
be made through the clamps instead
of the 12 Vdc power receptacle.
3. Optional power charging cord (see
12, Figure 1)
• ES-6000 & ES-6500:
ESA-21
SAFETY SUMMARY
SAVE THESE INSTRUCTIONS— This
manual contains important safety and
operating instructions.
Contains sealed,
Pb
IMPORTANT SAFETY
INFORMATION
• Working in the vicinity of a lead acid
battery is dangerous. Batteries
generate explosive gases during
normal battery operation. For this
reason, it is essential that you read
this manual and follow the
instructions exactly.
• To reduce risk of battery explosion,
follow these instructions and those
published by battery manufacturer
and manufacturer of any equipment
you intend to use in vicinity of
battery. Review cautionary marking
on these products and on engine.
• Someone should be within range of
your voice or close enough to come
to your aid when you work near a
lead-acid battery.
• Have plenty of fresh water and soap
nearby in case battery acid contacts
skin, clothing, or eyes.
• Wear complete eye protection and
clothing protection. Avoid touching
eyes while working near battery.
• If battery acid contacts skin or
clothing, wash immediately with
non-spillable lead
acid battery. Must
be disposed of properly.
WARNING
RISK OF EXPLOSIVE
GASES.
E
N
G
L
I
S
H
3

soap and water. If acid enters eye,
E
N
G
L
S
H
immediately flood eye with running
cold water for at least 10 minutes
and get medical attention
immediately.
• NEVER smoke or allow a spark or
I
flame in vicinity of battery or engine.
• Be extra cautious to reduce risk of
dropping a metal tool onto battery. It
might spark or short circuit battery or
other electrical part that may cause
explosion.
• Remove personal metal items such
as rings, bracelets, necklaces and
watches when working with a leadacid battery. A lead-acid battery can
produce a short-circuit current high
enough to weld a ring or the like to
metal causing a severe burn.
• Use portable power source for
charging or boosting LEAD-ACID
battery only. Do not use for charging
dry-cell batteries that are commonly
used with home appliances. These
batteries may burst and cause injury
to persons and damage to property.
• NEVER charge or boost a frozen
battery.
• NEVER allow clamps to touch
together or to contact the same piece
of metal to prevent arcing.
• Use of an attachment not
recommended or sold by the
manufacturer, may result in a risk of
damage to the unit, or injury to
personnel.
• When using the wall charger or
power extension cord, pull on the
plug and NEVER ON THE WIRE
when disconnecting.
• Do not recharge the portable power
source with a damaged wall charger
or power extension cord. Replace
them immediately.
• The portable power source may be
used under any weather condition.
Rain, snow, hot, or cold temperatures.
However, recharging the unit should
only be done indoors.
4
• Do not submerge in water.
• Do not operate with flammables
such as gasoline etc.
• If the portable power source receives
a sharp blow or is otherwise
damaged, in any way, have it
checked by a qualified service
person. If the portable power source
is leaking battery acid do not ship it.
Take it to the closest battery recycler
in your area.
• Do not disassemble the portable
power source. Have it checked by a
qualified service person.
• The portable power source should
never be left in a total discharged
state for any period of time. Damage
to the battery could be permanent
with poor performance as a result.
When not in use, leave the portable
power source connected to the wall
charger or recharge every three (3)
months.
OPERATING
INSTRUCTIONS
CHARGING YOUR NEW
PORTABLE POWER
SOURCE
Your Portable Power Source was
precharged at the factory. It is best for the
battery in the Portable Power Source be
kept at full charge. We recommend that
you should leave the Portable Power
Source plugged in to the wall outlet until it
is required for use. The charging circuit is
automatic, and will not overcharge when
using the wall charger. When all the
power level lights and the charged light
come on while charging or the test button
is pressed, your unit is fully charged.
C
POWER LEVEL
H
T
A
E
R
G
S
I
T
N
E
G
Figure 2. Test Button & Charge Lights
C
H
A
R
G
CHARGING
E
F
PORT
D

CHECKING POWER LEVEL
Check power level of the Portable Power
Source with the test button. Lights will
come on in sequence from empty to the
charged light. The CHARGED LIGHT will
come on when the test button is
depressed and the Portable Power
Source has a full charge.
RECHARGING THE
PORTABLE POWER
SOURCE
Note: There are two ways to charge the
portable power source. The first
method is automatic charging
with the provided wall charger
(preferred). The second is
through the 12 Vdc power
receptacle using the power
charging cord. The second
method is not automatic and
requires watching because the
portable power source could be
damaged due to overcharging.
The second method will only
charge one of the two batteries in
the ES-8000 & ES-8500, so it is
not recommended for these units.
1. With the wall charger. The portable
power source is automatically
charged using the wall charger. A
CHARGING JACK (found on the
front of your portable power source)
is connected through a smart circuit
board to the portable power source
making recharging automatic. If
your Portable Power Source is
completely discharged, it may take
up to 30 hours for recharging.
Overcharging is not a problem
when using the wall charger and
the portable power source can be
left connected to the wall charger
indefinitely.
a. Insert the wall charger plug (see
6, Figure 1) into the CHARGING
JACK (mounted on the front of
the portable power source)
b. Connect the wall charger AC/
DC ADAPTOR to the ac outlet
(the CHARGING light will light).
c. Allow the portable power source
to charge until the CHARGED
light comes on (you can monitor
the progress by checking the
red POWER LEVEL lights –
when all three POWER LEVEL
lights are lit the CHARGED light
should eventually come on).
d. Once the CHARGED light
comes on, charge another three
to six hours, (three hours is
acceptable but to ensure
maximum output capability, six
hours is preferred).
e. If you are not going to need the
portable power source right
away you may leave the wall
charger connected to the
portable power source. We
recommend that the wall
charger remain connected to the
portable power source whenever the portable power source
is not in use.
2. With the Optional Charging Cord.
Start the vehicle engine. Plug one
end of the power extension cord
into the portable power source
power receptacle and the other end
into a vehicle lighter outlet. Press
the test button once every hour to
check the POWER LEVEL. When
all of the red lights and the charged
light come on, charge the portable
power source another 1 to 2 hours
to insure a complete recharge. DO
NOT OVERCHARGE! This is NOT
an automatic method of charging
the portable power source. You
must frequently monitor the
charging process (POWER LEVEL
indicators by pressing the TEST
button) to ensure the portable
power source is not overcharged.
Overcharging with this method will
damage your portable power
source.
Note: Test button needs to be pressed
to check power level and charged
light.
E
N
G
L
I
S
H
5

USED AS AN EMERGENCY
JUMP STARTER
E
N
NOTE:For maximum power, do not store
G
L
I
S
H
below 50° when using as a jump
starter.
WARNING
RISK OF INJURY FROM
MOVING PARTS.
• NEVER connect the Portable Power
Source clamps to a vehicle when the
engine is running.
• ALWAYS stay clear of fan blades,
fan belts, pulleys and other moving
engine parts when working near an
engine. Moving engine parts can
cause severe personal injury
including dismemberment.
• ALWAYS make sure that the
Portable Power Source cables and
clamps are positioned so they will
not come in contact with any moving
engine parts.
1. Tur n ignition off before making
cable connections.
2. Do not touch RED (POS +) clamp to
BLACK (NEG –) clamp.
3. Use in well ventilated area.
4. Shield eyes.
5. Clamp the positive (red, +) clamp to
the positive terminal on the weak
battery (for negative ground
system).
6. Clamp the negative (black, –) clamp
to the engine (ground). Make sure
cables are not in the path of moving
belts or fan. Do not connect to the
negative clamp to any fuel lines.
7. Stay clear of batteries while jump
starting.
8. Start the vehicle.
Note: If the vehicle doesn’t start within 6
seconds, let the TRUCK PAC's
internal battery cool for three (3)
minutes before attempting to start
the vehicle again or damage to
the unit may occur.
6
9. Disconnect the negative (black
cable) clamp from vehicle ground
(the engine).
10. Disconnect the positive (red cable)
clamp from the positive (POS, +)
battery terminal.
11. Return the clamps to their holsters
for storage.
USED AS AN ALTERNATIVE
POWER SUPPLY FOR
VEHICLES
(
FOR 12 VOLT SYSTEMS ONLY)
The portable power source is an
ESSENTIAL tool for all who replace
automobile batteries. Most vehicles have
some type of electronic component with
memory, such as alarm systems,
computers, radios, phones, etc. and when
the vehicle's battery is replaced, memory
is lost. However, if the power extension
cord is plugged from the portable power
source to the cigar lighter outlet on the
vehicle, the memory can be saved.
MULTI PURPOSE POWER
SUPPLY
The ES-6000, ES-6500, ES-8000, and
ES-8500 are also portable power sources
for most 12 Volt accessories with a male
cigar lighter plug.
When used with an inverter, they can
operate appliances normally powered by
120 Vac or 240 Vac.
Note: Use of an inverter using 240 watts
or more requires the connection to
be made through the clamps instead
of the 12 Vdc power receptacle.
USED AS A 12 VOLT DC
BATTERY CHARGER
1. Plug the power extension cord from
the portable power source to the
vehicle’s 12Vdc cigar lighter outlet
for 30 minutes.
NOTE:Some vehicle’s ignition keys must
be turned to accessory to activate
the cigar lighter socket.

2. Remove the power extension cord
and start the car.
NOTE:A defective battery may refuse to
accept a charge from the portable
power source.
TROUBLESHOOTING
Problem: 1 or 2 lights come on,
charger is plugged in for 24
hours and there is no
change in status of lights.
Answer: Check charger to see if it
is charging. Charger should
be warm. The charging light
on the Portable Po wer
Source should also be lit if
there is a good connection.
Problem: Charger is working (it’s
warm) but still no change
in status of lights.
Answer: Possible defective battery.
Problem: When the test button is
pushed, no lights come on,
but when the charger is
plugged into the portable
power source, all the lights
come on.
Answer: Defective battery.
Question: What will cause a battery
to go bad?
Answer: Intense use without
allowing a cool down
period: SEE NOTE: USED
AS AN EMERGENCY
JUMP STARTER.
Problem: Portable power source is
fully charged but will not
start an engine.
Answer: Check where the wire
meets the jaw on the
portable power source clip.
Make sure they are well
crimped. Move the clamps
back and forth to verify a
good connection on the
vehicle. Only one side of
the clamp carries power—
make sure the side with
the cable is connected to
bare metal on the vehicle.
Problem: When trying to use an
accessory through the
cigar lighter outlet on the
portable power source, I
heard a clicking sound
coming from inside the
portable power source.
Answer: The accessory is drawing
too many amps, causing
the internal circuit breaker
to cycle ON and OFF. The
accessory may be drawing
more than 20 amps or
there may be a problem
with the accessory (such
as a short circuit) that is
causing the overload
condition.
QUESTIONS & ANSWERS
Question: How many jump starts can
a fully charged Booster
pac do before needing to
be recharged?
Answer: 1 to 30. Factors are
temperature, general
condition of vehicle, engine
type and size.
Question: Can the portable power
source's battery be
replaced?
Answer: Yes, call Rapid Repair
Service at US (800) 3282921 CANADA
(800) 668-8642.
Question: Can the portable power
source be recycled?
Answer: Yes, the environment was
one of our main concerns
E
N
G
L
I
S
H
7

in the development and
E
N
G
L
I
S
Question: What is the ideal in-use
H
designing of the portable
power source. Most
battery outlets can dispose
of this product at its life's
end.
storage temperature of the
portable power source?
Answer: Room temperature. The
portable power source will
also operate at below zero
temperatures, however its
power will be less. Intense
heat will accelerate self
discharge.
Question: I have a regular 10 amp
battery charger, can I use
it to recharge the portable
power source?
Answer: No, only the wall charger
supplied with the Portable
Pow er Source should be
used. A higher amp
charger may damage the
batteries.
Question: Is the portable power
source goof proof?
Answer: No. Jump starting
instructions must be
followed. See back of
portable power source.
Question: I'm recharging my portable
power source, should the
charged light immediately
come on?
Answer: No. The charged light will
only come on once the
Booster pac approaches
full charge. Ho we v er , the
charging light (first one on
left) should come
indicating that charging is
taking place.
!!! IMPORTANT !!!
BATTERY REMOVAL AND
DISPOSAL
Contains sealed,
Pb
The battery inside this portable power
source is a sealed lead-acid battery. By
LAW, it is required to be removed and
recycled or disposed of properly. While
there are federal regulations that must be
followed throughout the United States,
your individual state or local governments
may have additional regulations to be
followed in your area.
When the battery in this product is in need
of replacement, remove it according to
the instructions provided below and take
it to your local recycling center for proper
recycling or disposal. If you don’t have a
local recycling center that handles sealed
lead-acid batteries, contact your local
environmental agency for instructions.
Battery Removal Instructions
Begin by making sure that both booster
clamps are securely stowed in their
holsters on each side of the portable
power source.
1. Remove all 13 screws (4 on the left
2. Remove the cables from the battery
3. Lift the battery out of the front half of
4. To install a new batter y, reverse the
Note: Remember that the red wires
non-spillable lead
acid battery. Must
be disposed of properly.
side, 4 on the right side, 4 on the
bottom, and 1 under the front label
near the top). Then lift off the back
cover.
or batteries.
the enclosure.
above procedure.
connect to the positive (+) battery
terminal and the black wires
connect to the negative (–) battery
terminal.
8

INTRODUCCIÓN
Esta unidad tiene una batería de plomo-ácido sellada que debe mantenerse a plena
carga. Recargue la batería por primera vez cuando la reciba, luego deberá cargarla
después de cada uso y cada tres meses si no la usa. Si no toma esta precaución, la
duración de la batería podría reducirse considerablemente. Este cargador tiene un
circuito inteligente que permite dejarlo continuamente en carga sin riesgo de daño.
Estimado cliente: FELICITACIONES. Acaba de comprar la unidad portátil para
alimentación eléctrica y arranque de motor más fina del mercado. Hemos tomado
numerosas medidas en control de calidad y en nuestros procesos de fabricación para
asegurarnos de que su producto le llegue en óptimas condiciones y funcione en forma
satisfactoria. En el caso poco probable de que su unidad de alimentación eléctrica
contenga una pieza dañada o que le falte una pieza, o de que usted no obtenga el
resultado esperado según las especificaciones, o requiera servicio bajo la garantía,
NO DEVUELVA SU UNIDAD PORTÁTIL DE ALIMENTACIÓN ELÉCTRICA A LA
TIENDA.
Llame a nuestro NÚMERO DE LARGA DISTANCIA GRATUITA en E.U.A. (800-328-
2921), o en Canadá (800-668-8642) y pregunte por Servicio Técnico (Technical
Service). Nuestro representante de servicio técnico agilizará la entrega de su repuesto.
Si el producto requiere servicio bajo garantía, nuestro representante le ayudará con la
solución más rápida posible para su garantía. Guarde su recibo de compra, porque
se lo pedirán para el servicio de garantía.
5
4
1
3
2
E
S
P
A
Ñ
O
L
C
H
A
C
POWER LEVEL
H
R
A
T
G
R
E
G
S
T
CHARGING
E
PORT
D
F
I
E
N
G
10
6
DC TO AC INVERTER
9
11
7
8
1. Receptáculo de energía de 12 Vcc
2. Botón de prueba
3. Indicadores de estado de carga
4. Indicador de CARGA (carga completa)
5. Cubiertas de seguridad para las pinzas
6. Enchufe para carga
7. Estuche
8. Cables flexibles para uso pesado
9. Pinzas para uso pesado
10. Cargador de pared
11. Inversor (opcional)
12. Adaptador para vehículo (opcional)
12
Figura 1. Unidad portátil de alimentación y accesorios
Nota al usuario: Guarde estas instrucciones para uso futuro. Debe leerlas
cuidadosamente antes de usar esta unidad portátil de alimentación.
1

CARACTERÍSTICAS DE LA
UNIDAD PORTÁTIL DE
ALIMENTACIÓN
• Tiene la potencia necesaria para el
arranque de vehículos, con energía
más que suficiente para arrancar la
mayoría de los automóviles. Puede
usarse también en aplicaciones de
CICLO PROLONGADO marinas.
• Esta unidad portátil se usa también
para alimentar accesorios de 12 V
E
S
P
A
Ñ
O
L
de CC, equipados con un enchufe
macho de encendedor de cigarrillos.
La toma de corriente continua tiene
protección automática contra
sobrecargas.
• Interruptor de prueba e indicadores
LED. Circuitos de la tecnología más
avanzada. Para realizar una prueba
completa, oprima el botón de prueba
por 10 segundos, y si las tres luces
rojas permanecen encendidas, la
fuente portátil de alimentación está
completamente cargada.
• Las fundas de seguridad previenen
chispas accidentales de las pinzas, y
giran 90° para sacarlas fácilmente.
• Las ranuras laterales sirven para
guardar los cables bien sujetados y
limpios (así no se ven cables
colgando).
• Se ha usado la tecnología más
avanzada, incluyendo una batería
sellada, a prueba de derrames. La
unidad portátil de alimentación
puede guardarse en cualquier
posición.
Accesorios
1. Cargador de pared (10, Figura 1)
• ES-6000:
ESA-26
(Cargador de 1,5 A / 12 Vcc)
• ES-8000:
ESA-210
(Cargador de 0,75 A / 24 Vcc)
• ES-6500 & ES-8500:
(varía de un país a otro)
2
2. Inversor (vendido separadamente,
ver 11, Figura 1)
• ES-6000 y ES-6500:
SBPI-175, SBPI-300, SBPI-600
(12 Vcc a 120 Vca)
Nota: Si se usa un inversor que
consuma 240 W o más, se
requiere hacer la conexión por
medio de las pinzas y no por
medio del enchufe de 12 Vcc.
3. Adaptador opcional para vehículo
(ver 12, Figura 1)
• ES-6000 y ES-6500:
ESA-21
RESUMEN DE
SEGURIDAD
GUARDE ESTAS INSTRUCCIONES—
Este manual contiene instrucciones
importantes de seguridad y operación.
Pb
INFORMACIÓN
IMPORTANTE DE
SEGURIDAD
ADVERTENCIA
RIESGO DE GASES
EXPLOSIVOS.
• Trabajar cerca de acumuladores es
peligroso. Las baterías generan
gases explosivos durante el
funcionamiento normal. Por eso, es
sumamente importante que lea este
manual antes de usar la unidad
portátil de alimentación eléctrica y
que siga las instrucciones al pie de
la letra.
• Para reducir el riesgo de explosiones
de la batería, siga estas
instrucciones así como las

instrucciones publicadas por el
fabricante de la batería y el de
cualquier otro equipo que se use
cerca de la misma. Preste atención a
las indicaciones de precaución en
estos productos y en el motor.
• Cuando trabaje cerca de una batería
de plomo-ácido asegúrese de que
haya alguien lo suficientemente
cerca como para que pueda oírlo o
ayudarlo en caso necesario.
• Tenga cerca abundante agua fresca
y jabón por si el ácido de la batería
entra en contacto con su piel, ropa u
ojos.
• Use protección completa para los
ojos y ropa protectora. No se toque
los ojos cuando trabaje cerca de una
batería.
• Si el ácido de la batería le toca la
piel o la ropa, lávese inmediatamente
con agua y jabón. Si le entra ácido
en los ojos, enjuáguelos
inmediatamente con agua corriente
durante unos 10 minutos por lo
menos y consiga atención médica
enseguida.
• NUNCA fume ni permita la presencia
de chispas o llamas cerca de la
batería o del motor.
• Tenga cuidado especialmente para
evitar el riesgo de que alguna
herramienta metálica caiga sobre la
batería. Podría producir chispas o
un cortocircuito en la batería o en
alguna otra pieza eléctrica, con
riesgo de ocasionar una explosión.
• Quítese los objetos personales
metálicos, como anillos, pulseras,
collares y relojes al trabajar con una
batería de plomo-ácido. Este tipo de
baterías puede producir una
corriente de cortocircuito
suficientemente intensa para soldar
un anillo u otro objeto similar al metal
causando quemaduras graves.
• Use su unidad de alimentación para
cargar o reforzar baterías de
PLOMO-ÁCIDO solamente. No la
use para cargar baterías de celdas
secas, comúnmente usadas en
aparatos electrodomésticos. Ese
tipo de baterías podría explotar,
causando lesiones personales y
daños a la propiedad.
• NUNCA cargue ni refuerce la carga
de una batería congelada.
• NUNCA deje que las pinzas se
toquen entre sí o entren en contacto
con la misma pieza metálica, para
prevenir un arco eléctrico.
• El uso de un accesorio no
recomendado o vendido por el
fabricante podría crear un riesgo de
daño a la unidad, o lesiones a
personas.
• Tire del enchufe, NUNCA DEL
CABLE, al desconectar el cargador
de pared o el cable de extensión, si
los usa.
• No recargue la unidad portátil de
alimentación eléctrica con un
cargador de pared o un cable
dañados. Reemplácelos
inmediatamente.
• La unidad portátil de alimentación
eléctrica se puede usar en cualquier
tipo de clima, con lluvia, nieve,
temperaturas altas o bajas. Sin
embargo, la recarga debe hacerse
solamente en el interior de un local.
• No sumerja la unidad en agua.
• No o la haga funcionar donde haya
substancias inflamables tales como
gasolina, etc.
• Si la unidad portátil de alimentación
eléctrica recibe un golpe fuerte o se
daña algún modo, pida que la revise
un técnico de servicio calificado. Si
la unidad tiene una fuga de ácido de
la batería, no la envíe por ningún
medio. Llévela en persona al centro
de reciclado de baterías más
cercano a su zona.
• No desarme la unidad. Pida que la
revise un técnico de servicio
calificado.
E
S
P
A
Ñ
O
L
3

• La unidad portátil de alimentación
eléctrica no deberá dejarse
totalmente descargada por un tiempo
prolongado. Eso podría causarle
daños permanentes, reduciendo así
su rendimiento. Si no usa la unidad,
déjela conectada al cargador de
pared o recárguela cada tres (3)
meses.
INSTRUCCIONES
E
S
P
A
Ñ
O
L
DE OPERACIÓN
CÓMO CARGAR LA UNIDAD
PORTÁTIL DE
ALIMENTACIÓN
Su fuente portátil de alimentación viene
cargada de fábrica. Lo ideal es que se
mantenga completamente cargada.
Nosotros recomendamos que se deje
enchufada la unidad portátil de
alimentación en la toma de corriente de
la pared hasta que se vaya a usar. Su
circuito de carga es automático, y no se
sobrecargará cuando esté conectado al
cargador de pared. Cuando todas las
luces de nivel de potencia y la luz
indicadora de carga durante la carga o
cuando se oprime el botón de prueba, su
unidad estará completamente cargada.
C
POWER LEVEL
H
T
A
E
R
G
S
I
T
N
E
G
Figura 2. Botón de prueba y luces
indicadoras de carga
VERIFICACIÓN DEL NIVEL
DE POTENCIA
Verifique el nivel de potencia de la unidad
de alimentación oprimiendo el botón de
prueba. Las luces encenderán en
secuencia desde la luz de batería
descargada hasta la luz carga completa.
LA LUZ DE CARGA COMPLETA
encenderá cuando se oprima el botón de
prueba y la unidad portátil de
alimentación esté totalmente cargada.
4
C
H
A
R
G
E
F
D
CHARGING
PORT
RECARGA DE LA UNIDAD
PORTÁTIL DE
ALIMENTACIÓN
Nota: Hay dos maneras de cargar la
unidad portátil de alimentación. El
primer método es el de carga
automática con el cargador de
pared que se proporciona (método
preferido). El segundo es por
medio de un receptáculo de
energía de 12 Vcc, usando el
cable adaptador para vehículo. El
segundo método no es
automático, y se requiere poner
atención, porque se puede dañar
la unidad portátil debido a una
sobrecarga. El segundo método
solamente sirve para cargar una
de las dos baterías de ES-8000 y
ES-8500 y, por lo tanto, no se
recomienda para estas unidades.
1. Con el cargador de pared. La
unidad portátil de alimentación se
carga automáticamente con el
cargador de pared. Un CONTACTO
PARA CARGA (se encuentra en el
frente de su unidad portátil de
alimentación) se conecta a través de
una placa de circuito inteligente a la
unidad portátil de alimentación para
hacer automática la recarga. Si su
unidad de alimentación está
completamente descargada, su
recarga puede tardar hasta 30
horas. La sobrecarga no es
problema cuando se utiliza el
cargador de pared, ya que la unidad
portátil puede dejarse conectada
indefinidamente al cargador.
a. Inserte la clavija del cargador de
pared (6, Figura 1) en el
CONTACTO PARA CARGA
(montado en el frente de la
unidad portátil de alimentación)
b. Conecte el ADAPTADOR de CA/
CC al enchufe de corriente
alterna en la pared (se
encenderá la luz de CARGA).
c. Permita que la unidad portátil de
alimentación se cargue hasta
que encienda la luz de carga

completa (CHARGED). Puede
verificar el proceso de carga
observando la luces rojas de
nivel de potencia (POWER
LEVEL). Cuando todas las luces
de nivel de potencia se
enciendan, también debe
encenderse la luz de carga
completa (CHARGED).
d. Una vez que se encienda la luz
verde de carga completa
(CHARGED), deje cargando por
tres a seis horas adicionales (es
aceptable esperar tres horas
pero, para asegurar su máxima
capacidad, es preferible esperar
seis horas).
e. Si no va a necesitar la unidad
portátil de alimentación
inmediatamente, la puede dejar
enchufada al cargador de pared
Recomendamos que la unidad
permanezca conectada al
cargador de pared siempre que
esté en uso.
2. Encienda el motor del vehículo.
Conecte una punta del cable de
extensión en el receptáculo de
corriente de la unidad portátil de
alimentación y la otra punta en el
enchufe de encendedor de
cigarrillos del vehículo. Presione el
botón de prueba una vez cada hora
para verificar el NÍVEL DE
POTENCIA. Cuando todas las luces
rojas y la luz indicadora de carga
encienden, cargue la unidad portátil
por 1 a 2 horas adicionales para
asegurar una recarga completa. ¡NO
DEBE SOBRECARGARLA! Este
NO es un método automático de
carga de la unidad portátil. Usted
debe vigilar frecuentemente el
proceso de carga (indicadores de
NIVEL DE POTENCIA, oprimiendo
el botón de PRUEBA) para asegurar
que no se sobrecargue la unidad de
alimentación. Una sobrecarga
causada por este método dañará su
unidad portátil de alimentación.
Nota: Se debe oprimir el botón de
prueba para verificar el nivel de
potencia y la luz indicadora de
carga completa.
COMO ARRANCADOR EN
UN CASO DE EMERGENCIA
Nota: Para obtener el máximo
rendimiento posible, no la guarde
a una temperatura menor de 10°C
(50°F) cuando se use como
arrancador auxiliar.
ADVERTENCIA
RIESGO DE LESIONES
CAUSADAS POR
PIEZAS MÓVILES.
• Nunca conecte las pinzas de la
unidad portátil a un vehículo que
tenga el motor en funcionamiento.
• SIEMPRE manténgase apartado de
las correas del ventilador, de poleas
y otras piezas móviles del motor
cuando trabaje cerca de un motor.
Las piezas móviles pueden causar
lesiones personales graves, e
incluso mutilaciones.
• SIEMPRE asegúrese que los cables
y las pinzas de su unidad portátil
queden acomodados de manera que
no hagan contacto con piezas
móviles del motor.
1. Desactive el sistema de ignición
antes de conectar los cables.
2. No toque la pinza ROJA (POS, +)
con la pinza NEGRA (NEG, –).
3. Use la unidad en áreas bien
ventiladas.
4. Proteja sus ojos.
5. Fije la pinza positiva (roja, +) a la
terminal positiva de la batería débil.
(para un sistema de tierra negativa).
6. Fije la pinza negativa (negra, –) al
motor (tierra). Verifique que los
cables no queden en el camino de
correas móviles o del ventilador. No
conecte la pinza negativa a ningún
tubo de combustible.
E
S
P
A
Ñ
O
L
5

7. Manténgase apartado de las
baterías cuando pase corriente a un
vehículo para arrancarlo.
8. Encienda el vehículo (gire la llave
del encendido).
Nota: Si el vehículo no arranca en los
primeros 6 segundos, deje que la
batería interna de su unidad
portátil de alimentación se enfríe
por 3 minutos antes de tratar de
arrancar de nuevo el vehículo
E
S
P
A
Ñ
O
L
porque, de no hacerlo, podría
dañar la unidad de alimentación.
9. Desconecte del vehículo la pinza
negativa (cable negro) de la tierra
del vehículo (el motor).
10. Desconecte la pinza positiva (cable
rojo) de la terminal positiva de la
batería (POS, +).
11. Coloque as pinças de volta nos
coldres para armazenagem.
COMO FUENTE DE
POTENCIA ALTERNATIVA
PARA VEHÍCULOS
(SOLAMENTE PARA SISTEMAS
DE 12 V)
La unidad portátil de alimentación de
corriente es una herramienta ESENCIAL
para todas las personas que reemplazan
baterías de vehículos. Casi todos los
vehículos tienen componentes
electrónicos con memoria, como sistemas
de alarma, computadoras, radios,
teléfonos, etc. Siempre que se reemplace
la batería de un vehículo se perderá la
memoria. No obtante, si el cable de
extensión está enchufado a la unidad
portátil de alimentación eléctrica y al
encendedor de cigarrillos, se puede
conservar la memoria.
COMO FUENTE DE
POTENCIA PARA
MÚLTIPLES USOS
Los modelos ES-6000, ES-6500, ES-8000
y ES-8500 también son unidades
portátiles de alimentación para la mayoría
de los aparatos que tengan enchufe de
6
12 Vcc con conector macho para
encendedor de cigarrillos.
Si se usa con un inversor, puede hacer
funcionar aparatos electrodomésticos que
normalmente funcionan con corriente
alterna de 120 V CA ó 240 V.
Nota: Si se usa un inversor que
consuma 240 W o más, se
requiere hacer la conexión por
medio de las pinzas y no por
medio del enchufe de 12 Vcc.
USADA COMO CARGADOR
DE BATERÍAS DE 12 V CC
1. Enchufe el cable de extensión de la
fuente portátil de alimentación al
enchufe del encendedor de
cigarrillos del vehículo durante unos
30 minutos.
Nota: En algunos vehículos hay que
girar la llave de arranque a la
posición de accesorio para activar
el encendedor de cigarrillos.
2. Desconecte el cable adaptador para
vehículo y arranque el carro.
Nota: Una batería defectuosa puede
rechazar la carga de una fuente
portátil de alimentación.
DIAGNÓSTICO Y
CORRECCIÓN DE
FALLAS
Problema: Se encienden 1 ó 2
luces; el cargador ha
estado enchufado
durante 24 horas y no
cambia la condición de
las luces.
Respuesta: Compruebe si el
cargador está
cargando. Debe estar
caliente. La luz de
carga en la unidad
portátil debe estar
encendida si hay buena
conexión.

Problema: El cargador funciona
bien, está caliente, pero
sigue sin haber cambio
en las luces.
Respuesta: Posiblemente una
batería defectuosa.
Problema: Cuando se oprime el
botón de prueba, no se
enciende ninguna luz.
Cuando se enchufa el
cargador a la unidad
portátil de alimentación,
todas las luces se
encienden.
Respuesta: Batería defectuosa.
Pregunta: ¿Cuál puede ser la
causa de falla de la
batería?
Respuesta: Uso intenso sin un
período de
enfriamiento. VER LA
NOTA: COMO
ARRANCADOR EN UN
CASO DE
EMERGENCIA.
Problema: La unidad portátil de
alimentación eléctrica
está totalmente
cargada pero no tiene
potencia para arrancar
un motor.
Respuesta: Compruebe el punto de
contacto entre el cable
y la pinza de la unidad
portátil de alimentación.
Cerciórese que la pinza
este prensando bien el
cable. Mueva las pinzas
hacia adelante y hacia
atrás para asegurar
buena conexión en el
vehículo. Sólo un lado
de la pinza tiene
corriente. Asegúrese
que el lado del cable
quede en contacto con
el metal descubierto del
vehículo.
Problema: Al tratar de usar un
accesorio conectado al
enchufe para cable de
encendedor de
cigarrillos en la unidad
portátil de alimentación
eléctrica, se oye un
chasquido en el interior
de la unidad.
Respuesta: El accesorio está
consumiendo
demasiado amperaje,
haciendo que el
disyuntor interno
cambie a “ON” y “OFF”.
El accesorio puede
estar consumiendo más
de 20 A, o puede ser
que exista un problema
con el accesorio, como
un cortocircuito, lo cual
causa sobrecarga.
PREGUNTAS Y
RESPUESTAS
Pregunta: ¿Cuántos arranques de
emergencia se pueden
efectuar con una
unidad portátil de
alimentación
completamente
cargada sin necesidad
de recargarla?
Respuesta: De 1 a 30. Depende de
factores tales como la
temperatura, el estado
general del vehículo y
el tipo y tamaño del
motor.
E
S
P
A
Ñ
O
L
7
 Loading...