


Bluetooth Stereo Headset
Clips Neckband
NB-K3 / NB-K2
User Manual
Carefully read this user manual before using your new CLIPS Neckband NB-K3
Bluetooth Stereo Headset . Please follow the instructions and important safety advice.
If used properly, the Cl ips Neckband w i ll provide l ong and useful service.
Basic information to connect
Clips Message Reader
Package Contents
This package contains the products listed below. Please check the packag ing contents
before use.
☐ NB – K3 …………………………………………………………………….1pc
☐ USB ChargingCable .......................................................................…1pc
☐ User Manual ……………………………………………………………….1pc
This feature enabl es you to receive the call alert plus i ncomi ng
phone numbers and messages throug h a built-in speaker or
earphones. Please download and install the “Clips Message Reader”
app from Andr oid’ s Play Store. (Android OS ONL Y)
Use the device ID to searc h for Bl uetooth using y our Smartphon e or PC.
Device ID: NB-K3
1
The USB Charging Adapter in the packaging i s designed for this
product ONLY. Please DO NOT use it to charge other devices.
It is not interchangeab l e with other char g er s , as i t may cause
damage if used with other products.
!
Caution
*LED turns green when device is fully charged.
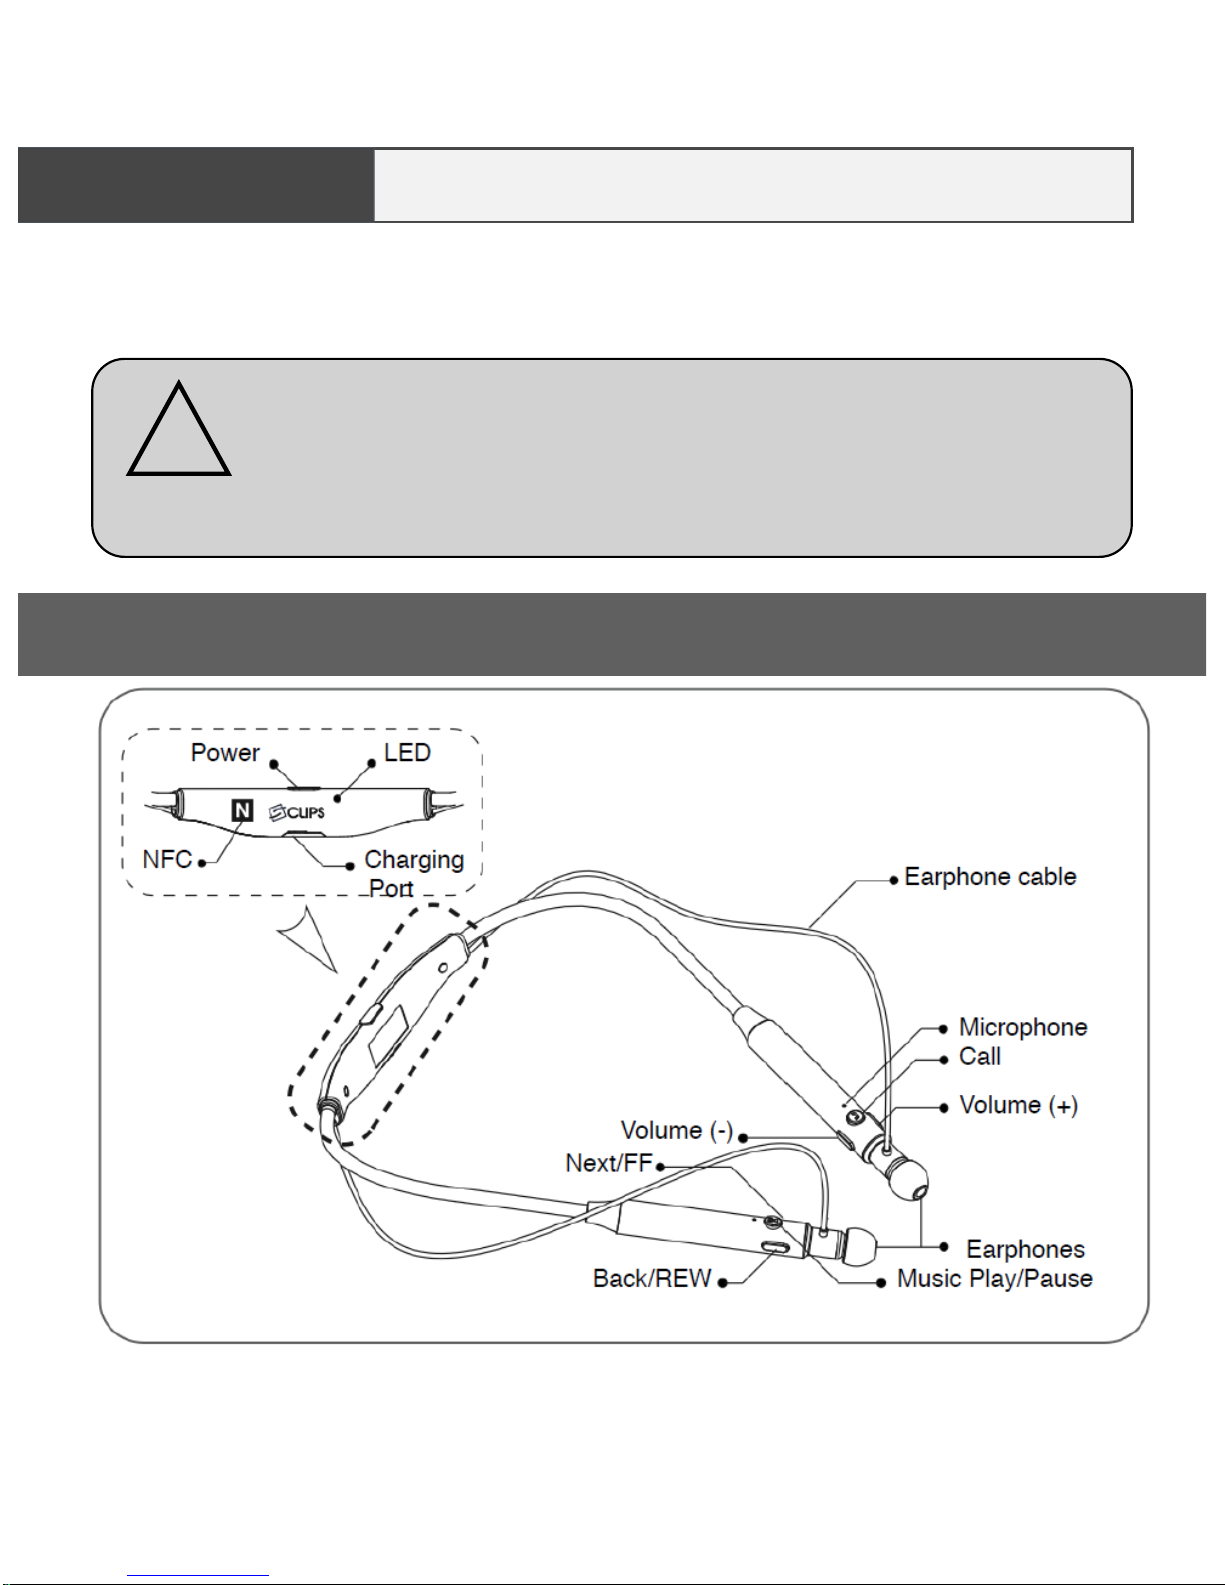
Description
CHARGE Before Use!
You M UST charge the device before using the charging cable provi ded.
The LED charging indicator will TURN GREEN w hen char g i ng i s complete.
2
NOTE: Vibration cannot be turned OFF.

Item
Operation LED Display
Power ON
Push the Power/Call button for approximately
2 seconds to turn on.
Red and Blue LED
blinks
Power OFF
Push the Power/Call button for more than 3 seconds to
turn off.
LED will turn off
Single Pairing
Push the Power/Call button for more than 2 seconds
from the POWER OFF position.
Red and blue LEDs
blinks
Multi Pairing
Push the Power/Call button for more than 5 seconds
from the POWER ON position.
Red and
blue LEDs blinks
Pairing Reset
Push the Power/Call button and Volume Control - bu
tton together for more than 5 seconds from the
POWER ON position.
V olume Control
Push the Volume Control button (“+/-”) just once,
quickly.
Make a Call
Push the (on and off ) Power/Call button approximately
1 second (starts dialing the last dialed number)
Answer a Call
Push the Power/Call button one time, quickly,
when receiving a call.
Reject a Call
Push the (on and off ) Power/Call button and hold for
more than 1 second, when receiving a call.
Ending a Call
Push the Power/Call button one time, quickly ,
when on the call.
Playing Music
Push the Music Playback / Pause button
quickly , one
time.
Blue LED blinks
Pause Music
Push the Music Playback / Pause button quickly,
one time.
Next Song
Push the
Next / FF”
button slowly for approximately 1
second
Previous Song
Push the Back / REW button slowly for approximately
1 second
Ending Music
Push the Music Playback / Pause button slowly ,for a
pproximately 2 seconds.
3

How to Set Pairin g Mode ( Init ial register ing of the devic e )
Every Bluetooth enabled device must be initiated by the customer. Thi s means a
“pairing” procedure with the host device or smartphone is required. This requires a
PIN number or auto-pairing before the first time use of the product. Please refer to
this Quick Start Guide for pairing with smartphones.
LED OFF
(Power Off)
LED ON
(Red after Blue)
LED ON (Red ⟷ Green)
blinking at the same time
(Pairing Mode)
2. Searching for the product from device before connecting
Searching for the product from a paired devi ce--The way search mode works may
differ for some devices, depending on manufacture. Pl ease refer to the “Quick Start
Guide” or user manual of such devices.
3. Registering the product from the device before connecting
The product (NB-K3) will show up on the Bl uetooth device, s mart phone or PC. Just
select the product and reg ist er it. The LED indicator w ill turn green, blinking slow l y
while it completes the pair ing . After that, it will connect automatic allyand your
Neckband will be ready for use.
4
QUICK START Guide
1.Setting with pairing mode for the product (NB-K3)
Push the Power/Call button for more than 2 seconds from “the status of Poweroff”. LED indicator will blink red and green t ogether so as to turn on the pairing
mode. Initi al ly the pairing mode setting was input to y our device at the factory.*
✻ This device will automatically pair with previously paired devices. For more details,
please check your smartphone user manual or contact your smartphone manufacturer.

Red Blue alternately blinking
(when pairing)
Blue indicator blinking slowly
indicates pairing is completed.
5
PAIRING Connection

6
NFC PAIRING Connectio n
■ NFC pairing function only can use with for NFC supported smartphones.
1. Turn the NF C on from NFC supported smartphones.
2. Face and touch of smartphone NFC spot and NB-K3 “N mark” NFC spot each other
then confirm “LED” light is on.
3. If you see the screen below from the smartphone then select yes.
4. On the smartphone screen it will shows “ Pairing~ / Connection~” then wait until it
shows “Connected with bluetooth stereo set”. When NB-K3 is connected w ith the
smartphonethen it will announce you with voice “ connected with the phone”.
5. After being connected with smartphone and NB-K3 you may retouch NFC spot each
other then it will automatically disconnec t. And you can repeat the process to
reconnect simply retouch NF C spot each other again.
* Please note: Every smartphones may have different NFC spot by its brand a nd
manufacturer. Do touch NFC spot of NB-K3 spot and the phone device for the
connection.

Power ON/OFF
■ Power ON (Voice Prompt: Say “Power on”) Automatic Power-Off
Push the Power/Call button approximatel y 2 seconds usi ng the Power-On/Off button,
then the LED indicator w ill turn from blue to red to turn power ON. If it does have the
paired device near the product, it will try to connect automatically. If the connection is
completed, the LED indicator will alternately turn from red to blu e to show it is ready to use.
If the pairing is interrupted, the r ed and bl ue LED will alternately keep bli nking .
■ Power OFF (Voice Prompt: Say “Power off”)
Push the Power/Call button approximatel y 3 seconds from the power -on, then LED
indicator will turn to red after blue and turn off the LED i ndi cator to Power OFF.
Make a call using smartphones
NOTE: The operation might be different for your smartphone or device as interactions
may vary depending on the specification of the products.
■Receiving a Call (Voice Prompt: Say “Connecting”)
When a call comes t o in to y our smartphone , the product starts vibrating*
and the LED indicator blinks blue. Push Power/Call button once quickly.
Please speak clear ly and directl y into the microphone.If the sound you talk
seems too low to the oppone n t.
✻ NOTE: Vibration CANNOT be turned OFF.
7
NOTE: If the signal is lost between device and product, due to such things as turning off the
smartphone or disconnection of the pairing after power is turned on, the red LED indicator
will turn on, indicating the problem, and automatically shut off the product after a brief delay.

■ Playing the Music: Push the Music Playback button IMMEDIATELY
after music has been selected on your smartphone..
■ Pause the Music : Push the Music Playback button quickly
while playi ng music.
■ Ending the Music: Push the Music Playback button slowly, for about 2 seconds.
■ Select next song(FF): Push the Volume UP “+” slowl y, for about 2 seconds.
■ Select previous song (REW): Push the Volume Down “-” slowly, for about 2
seconds.
* NOTE: Operation is the same for both earphone and speaker modes.
❊NB-K2 supports apt-X codec for Android by aptX®, which is highly optimi z ed for
Hi-Fi audio in Bluetooth Technology.
■Ending a Call
Push on and off the Power/Call button for 1 second w hile communica tio n.
■Reject a Call
Push the (on and off ) Power/Call button and hold for more than 1 second,
when receiv i ng a c al l.
■Last Call Redial
Push on and off the Power/Call button long enough for 1 second.
■ V oice Call
Push the Power/Call button shortly for one time (Voice Call enabled phone ONLY).
■ Control Volume
Use the Volume Control button (Volume +/- ) to adjust your audio level. If you are
unable to make it loud enough to hear properly, increase the volume of your smartphone.
Music Playback
8

Multi-Pairing
1. Pair the NB-K3 with the first smartphone
2. Power off of the NB-K3 when the pairing is completed.
3. Turn the Bluetooth function off on the smartphone.
4. Prepare the second smartphone and push Power/Call button for
more than 5 seconds, the Red and Blue LED will blink alternately
(entering the pairing mode of the NB-K3).
5. Pair the NB-K3 with second smartphone.
6. After being paired with second smartphone, power-on the first
smartphone, then select the NB-K3 from the Bluetooth menu so as
to connect with first smartphone.
7. NB-K3 will connect automatic ally every time the power is on.
NOTE: When connected with two phones, some phones might not
connect properly. Please contact the manufacturer.
■ Pairing with two smartphones
■ When two phones are connected with the product
Receiving a call from two smartphones
• Receive first phone call by push Power/Call button quickly
• Push Power/Call button slowly for 1 second then it will convert first call to
on hold and will connect to send receiving call

Anti Lost Function
• Product will alert you with vibration within 20 seconds after the
smartphone is being away and disconnected from the product
without turning off the bluetooth mode on the smartphone.
• This function only w orks when the product is powered on and paired
with smartphone.
• First alarm will vibrate when the phone is away from the product
approximately 10m within maximum 20 seconds.
* Distance will vary by its wireless environment s around.
• Product vibrates frequently within 20 seconds then it will re-paired
after a while the product is being near enough to the smartphone
back again.
■ This product supports Anti Lost Function of smartphone by using bluetooth
connectivity.
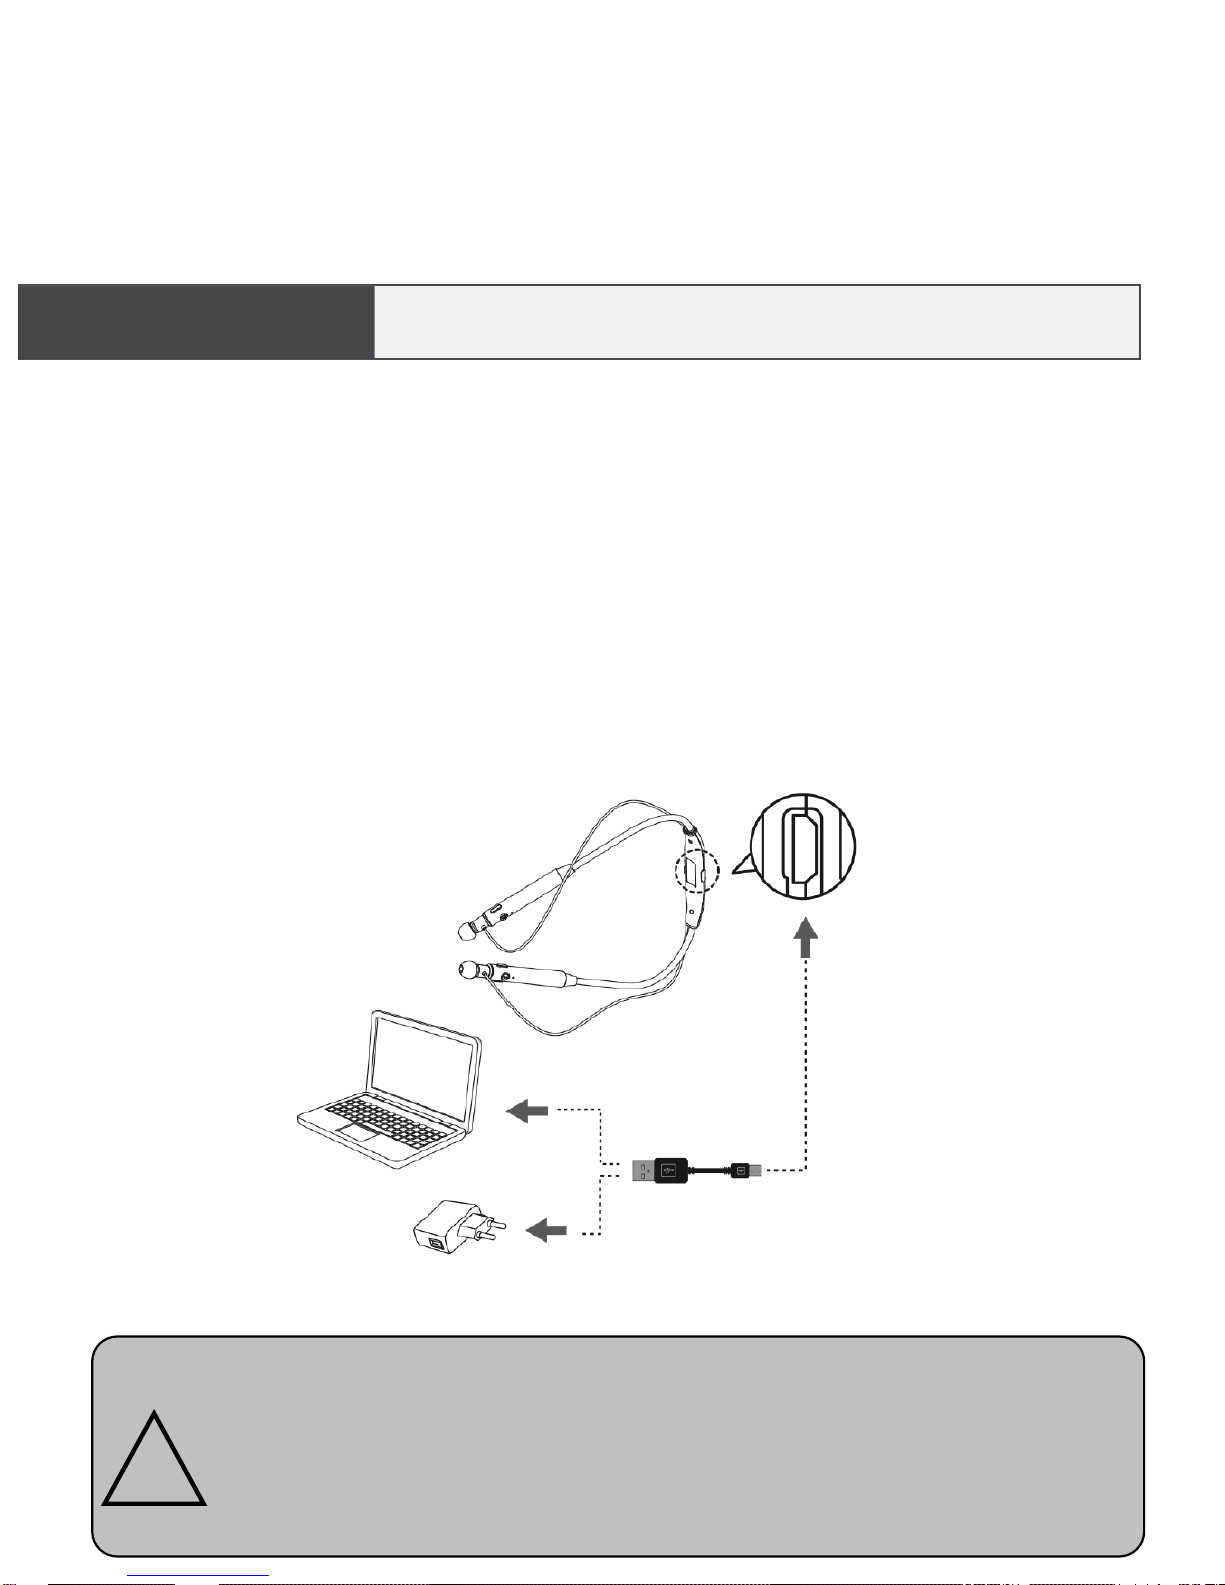
Follow these steps:
1. Remove the USB charging adapter from the packaging.
2. Plug the adapter into the charging port of the product.
3. Plug the USB connector of the USB charging adapter into a USB AC
adapter or the USB port of a PC (personal computer).
4. A Green LED will light up when charging. Do not use while charging.
5. Do not use until the unit has been fully charged.
Charging will take approximately 2 hours to comple te . If the LED
indicator does not tur n off a fter 2 hours, please unplug the USB
charging adapter and plug it again. Charging more than 2 hours may
reduce the battery life and it may cause the unit to malfunction. The
product could not be operating while charging.
!
Charging Device Battery
CHARGING

Product NB-K2
Bluetooth Standard V4.0
Frequencies 2.402MHz ~ 2.480MHz
Supported Bluetooth
Profiles
HSP, HPP, A2DP , A VRCP
Audio Codec High Quality Audio apt-X supported
T ran smi t ti ng D ist ance
10m ❊1
Continuous Stand-by
Time
480 hours ❊2
Continuous Ta lking
Time
20 hours ❊2
Music Playb ack Max 16 hours with volume 6 of 10
Environment Conditions
Operating
Temperature
5 ~ 35℃
Humidity
0 ~ 80% (without frozen
)
Storage
Temperature
-10 ~ 50℃
Humidity
0 ~ 80% (without frozen
)
Input Volta ge DC 5V
Battery Type Lithium Poly mer
Dimension 141mm x 158mm
Weight Approx. 27g
*NOTE: The appearance and specifications may be changed without prior notice for
the improvement of the product.
❊1. It is the ideal distance since the wireless transmit distance can vary for different
Bluetooth transmission devices and environmental circumstances.
❊2. Use time can vary based on conditions such as longer distances between product
and Bluetooth device and varying volume adjustment, which affects the power
consumption of the product.
12

13
Do not disassemble and/or modify t his pr oduct. Such disassembly
immediately v oids the war ranty. It may also cause product failure
and/or a fire haz ar d t hat may per s onall y endanger the user. Put
SAFETY FIRST!
Do not use the headset at high volume for an extended period of
time. Doing so can cause hearing loss . Always listen at moderate
levels. Put SAFETY FIRST!
Operate this product within the temperature range of -10º C to 60º
C (14º F to 140º F) only. Damage caused by use outside of that
range may not be covered by the warr anty.
Do not expose this product to wet places, l i q ui ds, and/or flame
sources. It may cause product failure and/or a fire hazard. Such
damage is not covered by the warranty. Put SAFETY FIRST!
Do not impact or drop this product. It may cause damage
or failure.
Do not clean this product with water, alcohol, benzene, or
solvent. It may cause damage or failure.
While driving, walking, or running, do not listen to music
or otherwise use this product’s headphon es ( earphones) as
such distractions have been shown to cause traffic or other
accidents r es ul ti ng i n bodi ly injury or death. Put SAFETY
FIRST!
Check and follow loc al law s regarding use of mobile
phones and headset/headph ones (ear phones) whil e
operating any vehicle or using equipment that r eq ui r es your
full attention. If you use a headset/headp hone (earphone s)
while engagi ng i n any such activ ity, be sure to focus on
safety. Put SAFETY FIRST!
Warnings and Cautions

FCC Information to User
This equipment has been tested and found to comply with the limits for a Class B digital
device, pursuant to Part 15 of the FCC Rules. These limits are designed to provide
reasonable protection against harmful interference in a residential installation. This
equipment generates, uses and can radiate radio frequency energy and, if not installed
and used in accordance with the instructions, may cause harmful interference to radio
communications. However, there is no guarantee that interference will not occur in a
particular installation. If this equipment does cause harmful interference to radio or
television reception, which can be determined by turning the equipment off and on, the
user is encouraged to try to correct the interference by one of the following measures:
•
Reorient or relocate the receiving antenna.
•
Increase the separation between the equipment and receiver.
•
Connect the equipment into an outlet on a circuit different from that to which
the receiver is con-nected.
•
Consult the dealer or an experienced radio/TV technician for help.
Caution
Modifications not expressly approved by the party responsible for compliance could
void the user’s authority to operate the equipment.
FCC Compliance Information : This device complies with Part 15 of the FCC Rules.
Operation is subject to the following two conditions: (1) This device may not cause
harmful interference, and (2) this device must accept any interference received, including
interference that may cause undesired operation
 Loading...