


ClipperCreek, Inc.
Innovative Infrastructure for
Electric and Hybrid Vehicles
• • • • • • •
Model CS-40
User’s Manual

CS-40 User’s Manual
PLEASE NOTE
This user’s manual includes the latest information at the time of printing.
ClipperCreek, Inc. reserves the right to make changes to this product without
further notice. Changes or modifications to this product by other than an
authorized service facility may void the product warranty.
If you have questions about the use of this product, contact your customer
service representative. Refer to the Customer Support section located in this
guide.
CS-40 User’s Manual, Version 01 February, 2013
CS-40 User Manual DLP 130201 Consecutive v04.pmd
Copyright © 2013. ClipperCreek, Inc.
All rights reserved. Printed in the USA.
Please v i s it ClipperCreek’s Website @ www.clipperc reek.net

CS-40 User’s Manual
CONTENTS
IMPORTANT SAFETY INSTRUCTIONS
Safety Guidelines . . . . . . . . . . . . . . . . . . . . . . . . . . . . . . . . . . 1
FCC INFORMATION . . . . . . . . . . . . . . . . . . . . . . . . . . . . . 2
OPERATION
Front Panel . . . . . . . . . . . . . . . . . . . . . . . . . . . . . . . . . . . . 3
In Case of Difficulty . . . . . . . . . . . . . . . . . . . . . . . . . . . . . 4
FEATURES
Personal Protection System . . . . . . . . . . . . . . . . . . . . . . . . 5
Ground Monitor Circuit . . . . . . . . . . . . . . . . . . . . . . . . . . . 5
Auto-Reclosure . . . . . . . . . . . . . . . . . . . . . . . . . . . . . . . . . 5
Off-Peak Charging . . . . . . . . . . . . . . . . . . . . . . . . . . . . . . 5
Cold Load Pickup . . . . . . . . . . . . . . . . . . . . . . . . . . . . . . . 5
External Error Indication . . . . . . . . . . . . . . . . . . . . . . . . . . 6
Maintenance Current . . . . . . . . . . . . . . . . . . . . . . . . . . . . . 6
INSTALLATION
Service Connections . . . . . . . . . . . . . . . . . . . . . . . . . . . . . . 7
Mounting Procedures . . . . . . . . . . . . . . . . . . . . . . . . . . . . . 10
Wiring . . . . . . . . . . . . . . . . . . . . . . . . . . . . . . . . . . . . . . . . 11
Testing After Installation. . . . . . . . . . . . . . . . . . . . . . . . . . . 12
FOR THE SERVICE TECHNICIAN . . . . . . . . . . . . . . . . . . 13
SPECIFICATIONS . . . . . . . . . . . . . . . . . . . . . . . . . . . . . . . . 15
WA RR AN T Y I N FO RM ATI ON . . . . . . . . . . . . . . . . . . . . . . 17
CUSTOMER SUPPORT . . . . . . . . . . . . . . . . . . . . . . . . . . . 19
MAINTENANCE . . . . . . . . . . . . . . . . . . . . . . . . . . . . . . . . . 19
Page 1
CS-40 User’s Manual
Caution This symbol means be careful. Yo u ar e c ap a bl e o f
doing something that might result in damage to equipment.
Warning This symbol means danger. Yo u a re in a s it u at io n
that could cause bodily injury. Before you work on any
electrical equipment, be aware of the hazards involved with
electrical circuitry and standard practices for preventing
accidents.
IMPORTANT SAFETY INSTRUCTIONS
Carefully read these instructions and the charging instructions in your
vehicle owner’s handbook before charging your electric vehicle.
The following symbols may be found in your handbook or on labels
affixed to your conductive charge station:
Note This means pay particular attention. Notes contain helpful
suggestions.
Safety Guidelines
• Use this charge station to charge electric vehicles equipped with a
conductive charge port only. See the vehicle’s owner’s handbook to
determine if the vehicle is equipped with a conductive charge port.
• Make certain the charge station’s supply cable is positioned so it will
not be stepped on, tripped over, or otherwise subjected to damage or
stress.
• There are no user serviceable parts inside. Refer to the Customer
Support section in this manual for service information. Do not attempt
to repair or service the charge station yourself.
• Do not operate your charge station with a visibly damaged supply cable
or charge station. Contact your Service Representative for service
immediately. Refer to the Customer Support section in this manual for
information on the Service Representative in your area.

Page 2
CS-40 User’s Manual
Warning: Turn off input power to your charge station at the circuit
breaker panel before servicing or cleaning the unit.
VENTILATION: Some electric vehicles require an external
ventilation system to prevent the accumulation of hazardous or
explosive gases when charging indoors. Check the vehicle’s owner’s
handbook to determine if your vehicle requires ventilation during
indoor charging.
Those vehicles which follow the SAE J1772 standard for communication with the charging station can inform the CS-40 that they require an
exhaust fan. The CS-40 is not equipped to control ventilation fans. If
an exhaust fan is requested, the CS-40 will not charge the vehicle. If
this function is required, ask your ClipperCreek representative for
information on other products which have the exhaust fan control
feature.
Caution: DO NOT charge your vehicle indoors if it requires
ventilation. Contact your Service Representative for information.
·
Note
FCC INFORMATION
This device complies with Part 15 of the FCC rules. Operation is subject
to the following two conditions: (1) This device may not cause harmful
interference, and (2) This device must accept any interference received,
including interference that may cause undesired operation.
This product has been designed to protect against Radio Frequency
Interference (RFI). However there are some instances where high powered
radio signals or nearby RF-producing equipment (such as digital phones, RF
communications equipment, etc.) could affect operation.
If interference to your charge station is suspected, we suggest the following
steps be taken before consulting your ClipperCreek Sales and Service
Representative for assistance:
1. Reorient or relocate nearby electrical appliances or equipment
during charging.
2. Turn off nearby electrical appliances or equipment during
charging.
Caution Changes or modifications to this product by other than an
authorized service facility could void FCC compliance.
Page 3
The CS-40 Electric Vehicle Charging Station is very easy to use. Just remove the
charging connector from its holder, and plug it into the vehicle’s charge port. If
there is a mechanical latch that holds the connector firmly while charging, be sure
the latch has “clicked” into place. Normally, the vehicle will immediately request a
charge, the Green CHARGING light will come on, and charging will begin. After an
average driving day, it will require a few hours to recharge completely. Charging
overnight is the most convenient way to ensure the vehicle’s full range will be
available for the next day.
If the vehicle has stopped charging, the Green CHARGING light will be out.
Remove the cable and you’re ready to use the vehicle. If the charging is still in
progress, first push the button on the CS-40’s front panel. The charging light will
start blinking. Now you can remove the connector.
OPERATION
The CS-40 Electric Vehicle Charging Station is a conductive charge station that
provides the electric vehicle (EV) user with a safe and manageable link between
the power grid and the electric vehicle.
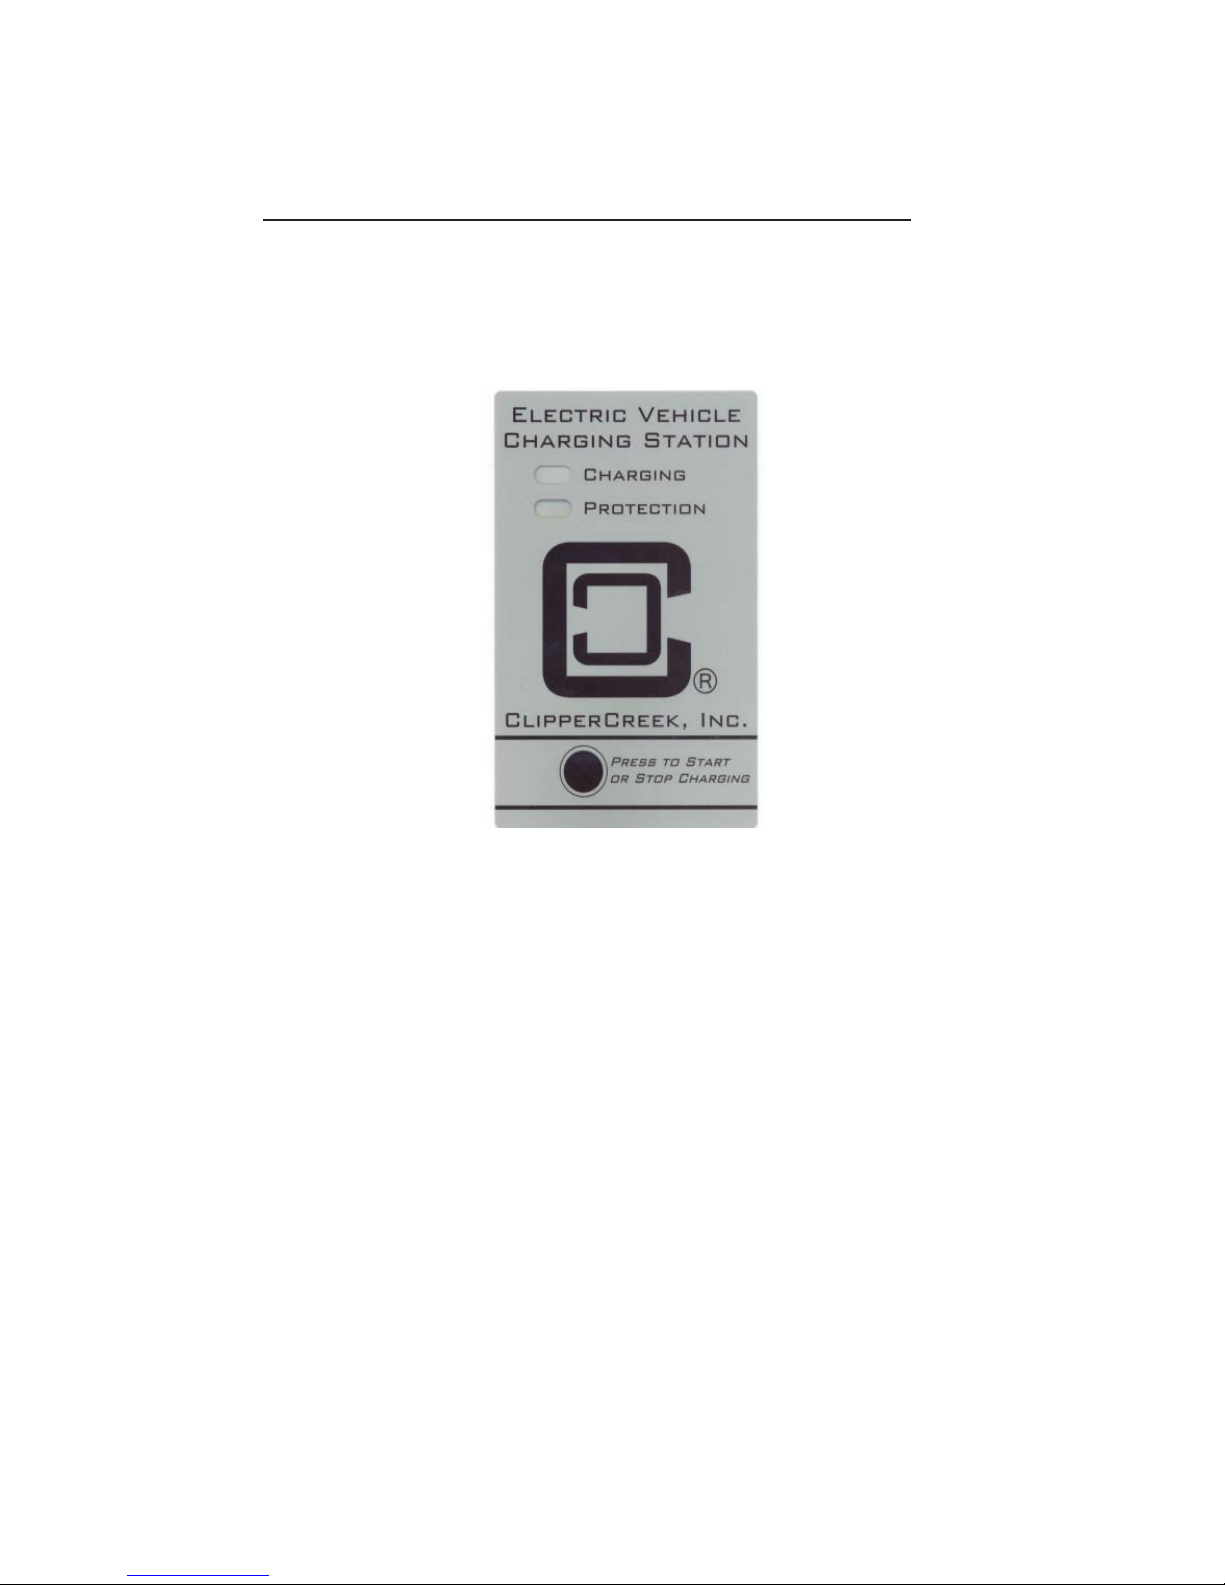
Figure 1. The CS-40 Front Panel
Front Panel
The front panel has a GREEN and a RED light to indicate the status of the CS-40.
The operational state of the unit can be known just by looking at the panel
lights, and comparing them with table 1 on page 4.
CS-40 User’s Manual

In Case of Difficulty
ClipperCreek recognizes that this Charging Station will be heavily relied upon to
charge your electric vehicle for daily transportation needs. Therefore, every
effort will be made to restore service should problems arise.
In the event of a problem, charging will stop and the Red PROTECTION light will
come on. If this happens, please try the two simple steps below before calling
your Service Representative.
1. Remove the cable connector from the vehicle socket. The Red PROTECTION
light may go out. If it does go out, plug the connector back into the socket, and
see if charging begins normally.
2. If the Red PROTECTION light does not go out when the connector is removed, be sure the connector is removed from the vehicle socket and switch off
power at the circuit breaker feeding power to the CS-40. Wait a few seconds and
switch the circuit breaker back on again. If the Red PROTECTION light does not
come back on, re-connect the cable to the vehicle. Charging should begin
normally. If charging does not begin, or if the Red PROTECTION light comes
back on, call Service Representative.
The information gained by the above steps will help the Service Representative
decide what the problem is, and how best to get your CS-40 operational again as
quickly as possible.
Page 4
Ta bl e 1. Fr on t P ane l I nd ic at or s
CS-40 User’s Manual
Note: in the table above, a (--) symbol indicates the LED is off.
(Green) (Red)
CHARGING PROTECTION
-- --
Vehicle not connected, or vehicle not
requesting charge.
lit -- Vehic le is c h argin g.
-- lit
The grou nd f ault i s tripped, the g roun d is
missing, or service is required.
lit lit There i s a problem o n the vehi c le.
blink --
Charging was interrupted by the User or - disabled by external Timer - or - unit
is in Cold Load Pickup.
Status of CS-40

Page 5
CS-40 User’s Manual
FEATURES
The following features are supported by the CS-40:
Personal Protection System: Ground Fault protection with Self-Testing and
Auto-Reclosure (see below), no manual resetting or testing is
necessary.
Ground Monitoring Circuit: Cons tan tly chec king f or the pre sen ce of a
Safety Ground connection.
Auto-Reclosure: If a prob lem o ccurs that interrupts char ging , the unit will
automatically clear all error indications after 5 minutes, and attempt to begin
charging again. If the problem is immediately sensed a second time, it will
wait another 5 minutes and try again. This process will repeat several times,
at which point power will be removed and no further attempt will be made.
The Red PROTECTION light on the front panel will be lit.
This feature helps ensure that your vehicle will be charged and ready for use
when needed. Temporary problem indications such as ground-faults or
utility power surges can be overcome automatically without the need for the
user to manually re-initiate charging.
Off-Peak Charging: For this feature, you must have an external timer
installed (purchased separately), and also have your local utility install a
special Time of Use meter. Many utilities plan to give very low rates to
those EV owners who charge in the late evening. If a timer is installed, you
do not have to wait until the late evening to plug the CS-40’s connector into
the vehicle. You may plug in at any time. Even though the vehicle may
immediately request a charge, the timer will cause the CS-40 to delay
energizing the cable until the off-peak hours when most electric utilities have
light demand. With this feature, the Green CHARGING light will be blinking
while the vehicle is waiting for the timer to allow charging.
If this feature is desired, please call your local utility to be sure the Time of
Use meter is available in your area before having the timer installed. Technical information to help connect the timer to the CS-40 can be found in the
section titled Load Management Inputs on page 16 in this manual.
Cold Load Pickup: This feat ure is bu ilt -in t o th e CS- 40, but w ill onl y be
apparent when the utility power fails during charging. If the charging
connector is still plugged into the vehicle when utility power is restored, the
Green CHARGING light will blink and the unit will not energize the cable for
a random time between 2 and 12 minutes. This is to prevent the utility’s grid
from experiencing a large surge at turn-on, allowing EV’s in the area to begin
drawing current at random times rather than all at once.

Page 6
CS-40 User’s Manual
Note: The vehicle does not need the owners attention after a power outage.
The CS-40 will automatically resume charging when power is
restored.
External Error Indication: When ever the R ed PR OTEC TION ligh t is l it, a
relay on the board will provide a contact closure that can be used to
remotely indicate that a problem exists. A fleet vehicle yard, for example,
could use this feature to light a lamp or ring a bell in the main office, letting
them know immediately that a vehicle has a charging problem. This early
warning helps assure that each vehicle will be properly charged and ready
for use when needed.
Maintenance Current: If t he u nit is s et u p fo r Off- Peak C harging as described above, normal charging current cannot be drawn by the vehicle until
the Off-Peak hours. However, the CS-40 can be set up to allow a minimum
amount of current while waiting for the timer to allow full-rate charging. This
is known as Maintenance Current, used for all power needs on the vehicle
except charging the main battery pack. An example would be preheating the
cab, or keeping the auxiliary battery topped off. As in the Off-Peak mode
above, the Green CHARGING light will flash if the vehicle is connected and
waiting for the timer to allow charging. The contactor will close immediately
to supply this small amount of power, but the main battery pack will not be
allowed to charge.
The Maintenance Current feature can be selected by connecting the Timer’s
control wire to the High/Low pin on the 4-terminal Terminal Block. Connecting to the High/Off pin will remove all power from the vehicle until the OffPeak Charging time arrives. The correct pin can easily be identified by
looking at the wiring diagram for the CS-40 on page 11. The other two pins
on the terminal block are the relay contacts for the External Indicator.
In summary, making the best use of the Maintenance Current feature will
require the following:
1. Installation of a Time-Of-Use meter by the electric utility.
2. Installation of a clock/timer to allow the CS-40 to charge only during
Off-Peak hours.
3. Connecting the timer’s control wire to the High/Low pin on the
Termina l Blo ck.
Page 7
CS-40 User’s Manual
INSTALLATION
Service Connections
Caution This is a single-phase device. Do not connect all 3
phases of a 3-phase feed !!! Yo u m ay u se a ny t wo p h a se s o f a 3 -
phase wye-connected feed. The center-point of the 3 phases
(usually used as Neutral) must be grounded somewhere in the
system. A current-carrying Neutral is not needed by the CS-40.
Only Line 1, Line 2, and Ground are required, as shown in Fig 4.
Caution The two phases used must each measure 120V
to Neutral. Earth Ground must be connected to Neutral at only
one point, usually at the Service Entry Breaker Panel.
Caution If a 240V 3-phase feed is from a Delta-connected
secondary, the leg used must have a center-tap. That tap must be
Grounded. Only the two phases either side of the center-tapped
leg can be used. See Fig. 5 below.
Caution Warranty is void if this unit is wired improperly
Warning Only a qualified electrician should perform the
installation. The installation must be performed in accordance
with all local electrical codes and ordinances.
Only 3 wires are connected, but care must be taken that the service transformer
secondary connection is definitely known, and the 3 wires from the main circuit
breaker panel are connected and labeled correctly. Figures 3, 4, and 5 below
show the most common service transformer secondary wiring formats.
Notice that L1, L2, & Gnd are labeled on each diagram. Those transformer
outputs correspond to the same inputs on the CS-40. Also, each of the two 3phase diagrams shows an L3 output, which is not used. Do not connect all three
phases of a 3-phase secondary to the CS-40. This is a single-phase device.
The Neutral at the service panel must be connected to earth ground somewhere
in the system on any of the three connection arrangements. Ground-fault
protection is not possible unless the Neutral (center-tap on the service transformer) is connected to an earth ground. If no ground is provided by the
electrical service, a grounding stake must be driven into the ground nearby,
following local electrical codes. The grounding stake must be connected to the
ground bar in the main breaker panel, and Neutral connected to ground at that
point.

Page 8
CS-40 User’s Manual
120V
120V
NEUTRAL
(NOT USED)
L1
L2
GND
240V
Figure 3. 220/240V Single Phase
Warning Local electrical codes must always be followed when
installing the grounding stake.
The following diagrams illustrate the 3 service transformer secondary connections most common in the United States.
120V
120V
NEUTRAL
(NOT USED)
GND
L1
L2
L3 (NOT USED)
208V
Figure 4. 208V 3-Phase, Wye-Connected

Page 9
CS-40 User’s Manual
With a wye-connected secondary, any two of the legs can be used
to provide 208V to the CS-40. For example, L1 & L2, or L1 & L3, or
L2 & L3. Leave the unused leg open. Do not connect it to a Neutral
bar, or to Ground. Be sure the center point is grounded to earth
somewhere in the system.
Figure 5. 240V 3-Phase, Delta-Connected, with center-tap on one leg.
Note
Caution With the delta connection, one leg must be center tapped,
and only the two phases on either side of the center tap can be
used. The two phases must both measure 120V to neutral. The
third line (L3) of the delta is 208V, with respect to neutral, and is
sometimes referred to as a “stinger”. Do not use this thirdline!
Consult the transformer manufacturer’s literature to be sure the
single leg can supply the required power..
Caution A 3-phase delta-connected transformer secondary
without a center-tap on one leg is not usable with the CS-40.
No “neutral” point is available to be connected to ground for
ground-fault protection, and the CS-40 will not allow the contactor
to close if it does not sense the presence of a ground wire
connected to a “neutral” point on the transformer secondary.
L3 (NOT USED)
L1
L2
GND
NEUTRAL
(NOT USED)
120V
120V
240V

Page 10
CS-40 User’s Manual
1Locate the wall mounting position of
the EVSE:
•Position the bottom of the
charge station 38 inches above
the ground.
•The mounting holes are spaced
16" apart to accommodate wall
studs.
•If you do not have solid
structural framing on those
centers, you must provide an
adequate alternative mounting
surface for the EVSE.
Mounting Procedures
Figure 7. CS-40 Installation Template
2Attach the charge station to the wall studs using (4) ¼ x 2 ½” lag screws.
3Use a multi-set or equivalent if mounting on a concrete wall.
4Remove the applicable knock-out in the charge station, push the power
leads through the hole, then connect the power conduit to the hole.
5After mounting, continue the installation using the Wiring Instructions
beginning on Page 11.
Figure 6. Wall mounting of CS-40.

Page 11
CS-40 User’s Manual
Wiring
Before connecting wires to the CS-40, please carefully read the section of this
manual titled Service Connections, on page 7. If you are unsure of the type of
power provided at the service panel, please consult with your local utility or call
your Service Representative for assistance.
Figure 8. CS-40 Service Wiring
Note: To o pen the e nclosure door, remove the two screws o n the le ft-hand
side, using a T15 Torx L Driver.
Relay 2
Relay 1
Hi/Lo
Hi/Off
Service Side
Vehicle Side
Vehicle
Ground
Service
Ground
J1772 Conductors
VEHICLE PILOT - Blue
VEHICLE GROUND - Green
VEHICLE LINE 2 - Red
VEHICLE LINE 1 - Black
DIAGNOSTICS
ClipperCreek, Inc.
PUSH BOTH
TO TEST
READY
CHARGE
GND MSNG
GFCI TRIP
LD MGMT DISABLE
CS Series
3 AUG, 2009
BOM V1.7
PCB V1.4
SCHV1.7
JMP2
JMP1
1L1
3L2
2T1 4T2
CONTACTOR
Terminal
Square D 8910DPA42
Service Ground Lug
Torq in-lbs
25
40

Page 12
CS-40 User’s Manual
Tes ti ng A fter Ins ta ll ati on
Apply utility power, and observe that only the Diagnostic LED is
flashing on the circuit board. If it is not flashing, the board may be
defective.
The Charge Test buttons on the PC board simulate connection to a
vehicle. Push the two Charge Test buttons at the same time. The
contactor should close, and the large Green CHARGING light should
light.
If a vehicle is available, connect the CS-40 to the vehicle and verify that
the contactor closes and the Green CHARGING light comes on.
Installation is complete.
The CS-40 requires a dedicated 208/240 VAC 50/60 Hz, single-phase
circuit, with its own 40A circuit breaker.
Do not use a GFCI breaker with the CS-40. The CS-40 contains a
Personnel Protection circuit that is the equivalent and specifically
designed for use with electric vehicles.
Only 3 wires are needed to wire the CS-40 (Line 1, Line 2, and Service
Ground), as shown in Fig 8. Wire the unit from the breaker panel using
wire sized according to local electrical codes. The circuit breaker should
be rated at 40A. Derating a 40A breaker 25% for continous duty allows
30A of continuous current.
The two phases (Line 1 and Line 2) are terminated on the input side of
the contactor itself, as shown in Figure 8. Use 75
°C or greater copper
wire for the contactor Line 1 and Line 2 service input.
The Service Ground is terminated on the Ground Terminal at the bottom
of the enclosure. Use 75
°C or greater copper or aluminum wire for the
Service Ground.
Be careful not to damage the PC Board when removing the power-entry
knockout, attaching the conduit, or when wiring the service conductors
to the contactor.

Page 13
CS-40 User’s Manual
FOR THE SERVICE TECHNICIAN
There are 4 small LEDs on the PC board to help diagnose problems:
Diagnostic – this is the “heartbeat” of the system. When only this LED is slowly
flashing, the system has not detected any failures. If it is lit but not flashing, the
board is defective. If its not lit, either no power is applied, or the board is
defective.
To test the system, p ress and hold the two Charg e Test buttons s imultane ously.
If the contactor closes, the CS-40 is operating normally. If a vehicle is available,
connect the charging cable. The contactor should close. If not, the charging
cable or vehicle socket may be defective, or the vehicle is not requesting a
charge.
If the CS-40 detects an internal failure, the Diagnostic LED will blink at a faster
rate. One of the other LEDs may also be lit and indicate the nature of the problem,
such as an inoperative Ground Fault circuitry, or a missing Service Ground.
Load Management Disable: Lit, with a slo w-bl inki ng Di agno stic LED, when
either the Cold Load Pickup or External Timer mode are active. This is not a
failure mode, merely a status indicator. The front panel green Charge LED will be
blinking. The CS-40’s cable must be connected to a vehicle for this LED to blink.
The front panel light will be off when the cable is not connected.
GFCI Trip: Lit when the unit has detected a ground fault. When a fault has
occurred, the contactor will open, the front panel Red PROTECTION light will
also be lit, and the Diagnostic LED will be flashing at a faster rate. The system
waits 5 minutes after sensing a fault, then automatically attempts recovery. After
several such attempts, it will stay in the Protection mode.
If a ground fault error or an EV connection error has been detected:
1. Remove the EV c onnector from t he vehicle
2. Inspect the connector and the vehicle’s c ha rge port. Be s ure th ey are
clean and undamaged.
3. Reconnect t o t he vehicle. If the f au lt condition p er si sts, a p ro bl em may
exist on the vehicle.
4. Refer to the vehicle owner’s manual for instructions on inspecting and
cleaning the charge port.
5. Plug t he EV connector b ac k i nt o t he vehicle.
6. If t he ground fault e rr or is s ti ll detected, c on ta ct your c us to mer Service
Representative for assistance.

Page 14
CS-40 User’s Manual
Ground Missing: Lit wh en the unit has detected a missing Service Ground. The
CS-40 will not close the contactor until a proper Service Ground has been
connected. The front panel Red PROTECTION light will be lit, and the Diagnostic
LED will be flashing at a faster rate.
Note: If a missing ground is discovered, power should be turned off before reconnecting the ground. If ground is reconnected without turning off the power,
it will be necessary to wait 5 minutes for the
CS-40 to clear the Ground Missing error.
Tabl e 2 be low illust rates the informat ion that can b e obtained from the 4 LEDs on
the PC board.
Table 2. PC Board Diagnostic LEDs
sutatS
1DEL2DEL3DEL4DEL
citsongaiD
etaRknilB
tmgMdaoL
elbasiD
ICFG
pirT
dnuorG
gnissiM
noitarepOlamroNwols------
gnigra
hCwols------
delbasiDegrahCwolstil----
pirTDICCtsaf--til--
gnissiMdnuorGtsaf----til
deriuqeRecivreStsaf------
Note: a (--) symbol indicates the LED is off.

Page 15
CS-40 User’s Manual
SPECIFICATIONS for CS-40
Line Input Power - Service Entrance
Vo l t a g e & W i r i n g 2 4 0 V A C s i n g l e - p h a s e - L 1 , L 2 , a n d S a f e t y G r o u n d
208V AC 3-phase, wye-connected - Any 2 phases, and
Safety Ground
240V AC 3-phase, delta-connected. With center-tap
on one leg, must use only the two phases on either
side of the center-tap. The two phases must both
measure 120V AC to ground. Do not use the third leg
(208V “stinger”).
Current 40A Circuit Breaker. The maximum current for the
vehicle is 30A, set by the duty cycle of the Pilot
waveform.
Frequency 50/60 Hz
Output Power Va r i ab l e d e p e n di n g o n ve h i c l e. Veh i c l e s w i ll b e
limited to 30A. At 240V, this will be about 7.2
KW.
Dimensions
Height 304 mm (12 in)
Width 457 mm (18 in)
Depth 203 mm (8 in)
Color Gray
Cable Length approximately 6.8 m (22 ft)
Weight (without Cable) 11 kg (24 lbs)
Environment
Operating Temperature -40°C (-40°F) to +50°C (+122°F)
NEMA Rating NEMA 4 - outdoor use, watertight.
Timer Connection Ground to disable charging, leave open to charge.
12 volts with 1K source resistance when open
circuit, 12 ma sink current when grounded.
Error Relay Contacts Dry contact, 24V AC/DC max, 5A current max, closed
if error present.
Agency Approvals UL Listed, FCC Part 15 Class B

Page 16
CS-40 User’s Manual
Load Management Inputs
If your unit has been configured for Off-Peak Charging, the Green CHARGING
light may be blinking after you plug in the cable, and the contactor may not
close. This means that a timer, or other device, has been connected to the
Load Management input, and charging will not occur until a specified time,
possibly later in the evening when electrical rates are better. To override this
feature and begin charging immediately, push the button.
Pressing the button will alternately Stop and Re-Start charging. The button will
not initiate charging unless the cable is connected, and the vehicle is requesting
a charge.
There are two Load Management inputs, labeled High/Low and High/Off, on a
terminal block as shown in Fig. 9 below. Grounding High/Off will completely
inhibit charging until it is released. Grounding High/Low will tell the CS-40 to
send a signal to the vehicle instructing it not to charge, but instead to draw only
a minimum amount of current for auxilliary uses such as cooling down the battery
pack, or pre-heating the cab in the early morning.
Fig 9. 4-Position Terminal Block
Relay Output
The 2 terminals labeled Relay Out 1 & 2 are dry contacts that are normally open.
If the Protection light comes on, or if other internal problem is sensed by the CS40’s computer, these contacts will close. This can be used to power a remote
indicator to warn the user that a problem exists, giving them the opportunity to
correct the problem and help ensure the vehicle will be charged when needed.
Hi/Lo
Relay 2
Relay 1
Hi/Off
Load Management
Terminal Block Inputs

Page 17
CS-40 User’s Manual
LIMITED WARRANTY – ELECTRIC VEHICLE SUPPLY EQUIPMENT
MODEL CS-40
ClipperCreek, Inc.
11850 Kemper Road
Auburn, California 95603
ClipperCreek shall provide the following warranty with respect to the Products to
Representative, its Sub-Representatives and their customers:
Product 1-year parts, 1-year factory labor,
ClipperCreek, Inc. warrants this product to be free from defects in material and
workmanship. The warrantee period shall commence on the date of installation
date (first use). The product installation date must be evidenced and communicated to ClipperCreek by way of the warrantee registration card (or its equivalent). The warrantee registration card must be filled out completely and accurately, and returned to ClipperCreek within 30 days after installation, and the
product installation date shall be within 6 months after the purchase date. If a
Product installation date is not communicated to ClipperCreek as described
above, the product purchase date shall serve as the warranty commencement
date.
If this product is defective in materials or workmanship during the warranty
period, Clippercreek will, at its option, repair or replace the product. Repair parts
and /or replacement products may be either new or reconditioned at
ClipperCreek’s discretion. This limited warranty does not cover service or parts
to repair damage due to improper installation or use, including but not limited to
improper connections with peripherals, external electrical faults, accident,
disaster, misuse, abuse or modifications to the product not approved in writing
by ClipperCreek. Any service repair outside the scope of this limited warranty
shall be at applicable rates and terms then in effect.
All other express and implied warranties for this product including the warranties
of merchantability and fitness for a particular purpose, are hereby disclaimed.
Some states do not allow the exclusion of implied warranties or limitations on
how long an implied warranty lasts, so the above limitation may not apply to you.
If this product is not as warranted above, your sole and exclusive remedy shall
be repair or replacement as provided above. In no event will ClipperCreek, any of
its authorized sales and service representatives, or its parent company be liable
to customer or any third party for any damages in excess of the purchase price of
the product.

Page 18
CS-40 User’s Manual
To o bt a in w a rr a nt y s er v ic e :
Call your nearest authorized Service Representative or ClipperCreek at the above
number. You will receive information as to how service for the product will be
provided.
If you mail or ship the product in for service, you must insure the product,
prepay all shipping charges, and properly pack it for shipment in its original
shipping container or its equivalent. You are responsible for all loss or damage
that may occur in transit.
Yo u m us t p r ov i de pr o of of pu r ch a se of th e p r od u ct an d t h e p ur c ha s e d at e b e fo r e
any warranty service can be performed.
This limitation applies to damages of any kind including any direct or indirect
damages, lost profits, lost saving or other special, incidental, exemplary or
consequential damages whether for breach of contract, tort or otherwise or
whether arising out of the use of or inability to use the product, even if
ClipperCreek or an authorized ClipperCreek representative or dealer has been
advised of the possibility of such damages or of any claim by any other party.
Some states do not allow the exclusion or limitation of incidental damages for
some products, so the above limitation or exclusion may not apply to you.
This warranty gives you specific legal rights, and you may also have other rights
which may vary from state to state.

Page 19
CS-40 User’s Manual
CUSTOMER SUPPORT
Call your Service Representative at any time, 24 hours a day, at the number
below. PLEASE HAVE THE MODEL NUMBER AND SERIAL NUMBER
AVA I L A B L E W H E N Y O U C A L L . Thes e c an be foun d o n the sid e o f the
enclosure. If your call is made after business hours or on weekends, please leave
your name, telephone number, the unit’s serial number, and a brief description of
the problem. A Service Representative will call back at the earliest opportunity.
1. Turn off your charge station at the circuit breaker before cleaning.
2. Clean your charge station using a soft cloth lightly moistened with
mild detergent solution. Never use any type of abrasive pad, scouring
powder, or flammable solvents such as alcohol or benzene.
MAINTENANCE
War ning To r educe the risk of elect rica l shoc k or equi pme nt
damage, do not allow liquid to enter the unit while cleaning it.
The CS-40 requires no periodic maintenance other than occasional cleaning.
Please v i s it ClipperCreek’s Website @ www.clippe rcreek.net
Distributor
Place Contact Information
Sticker Here.

ClipperCreek, Inc.
11850 Kemper Rd., Suite E
Auburn, CA 95603
www.ClipperCreek.net
 Loading...