

Page 1
Keison Products www.keison.co.uk sales@keison.co.uk Tel: +44 (0)1245 600560
Page 2

1
1. CP-100/100D FEATURES.............................................................................................................................. 2
2. P ARTS CHECKLIST....................................................................................................................................... 3
3. INST ALLATION............................................................................................................................................... 4
4. CONTROLS AND FUNCTIONALITIES....................................................................................................... 6
5. PHONE CONFIGURATION............................................................................................................................8
6. MAKING / RECEIVING PHONE CALLS................................................................................................... 22
7. ADDITIONAL FUNCTIONS .........................................................................................................................23
8. WIRELESS-LAN EXTENSION.................................................................................................................... 29
9. FIRMWARE UPGR ADE............................................................................................................................... 30
10. CHARACTER INPUT USING KEYPAD................................................................................................... 32
Contents
Keison Products www.keison.co.uk sales@keison.co.uk Tel: +44 (0)1245 600560
Page 3

2
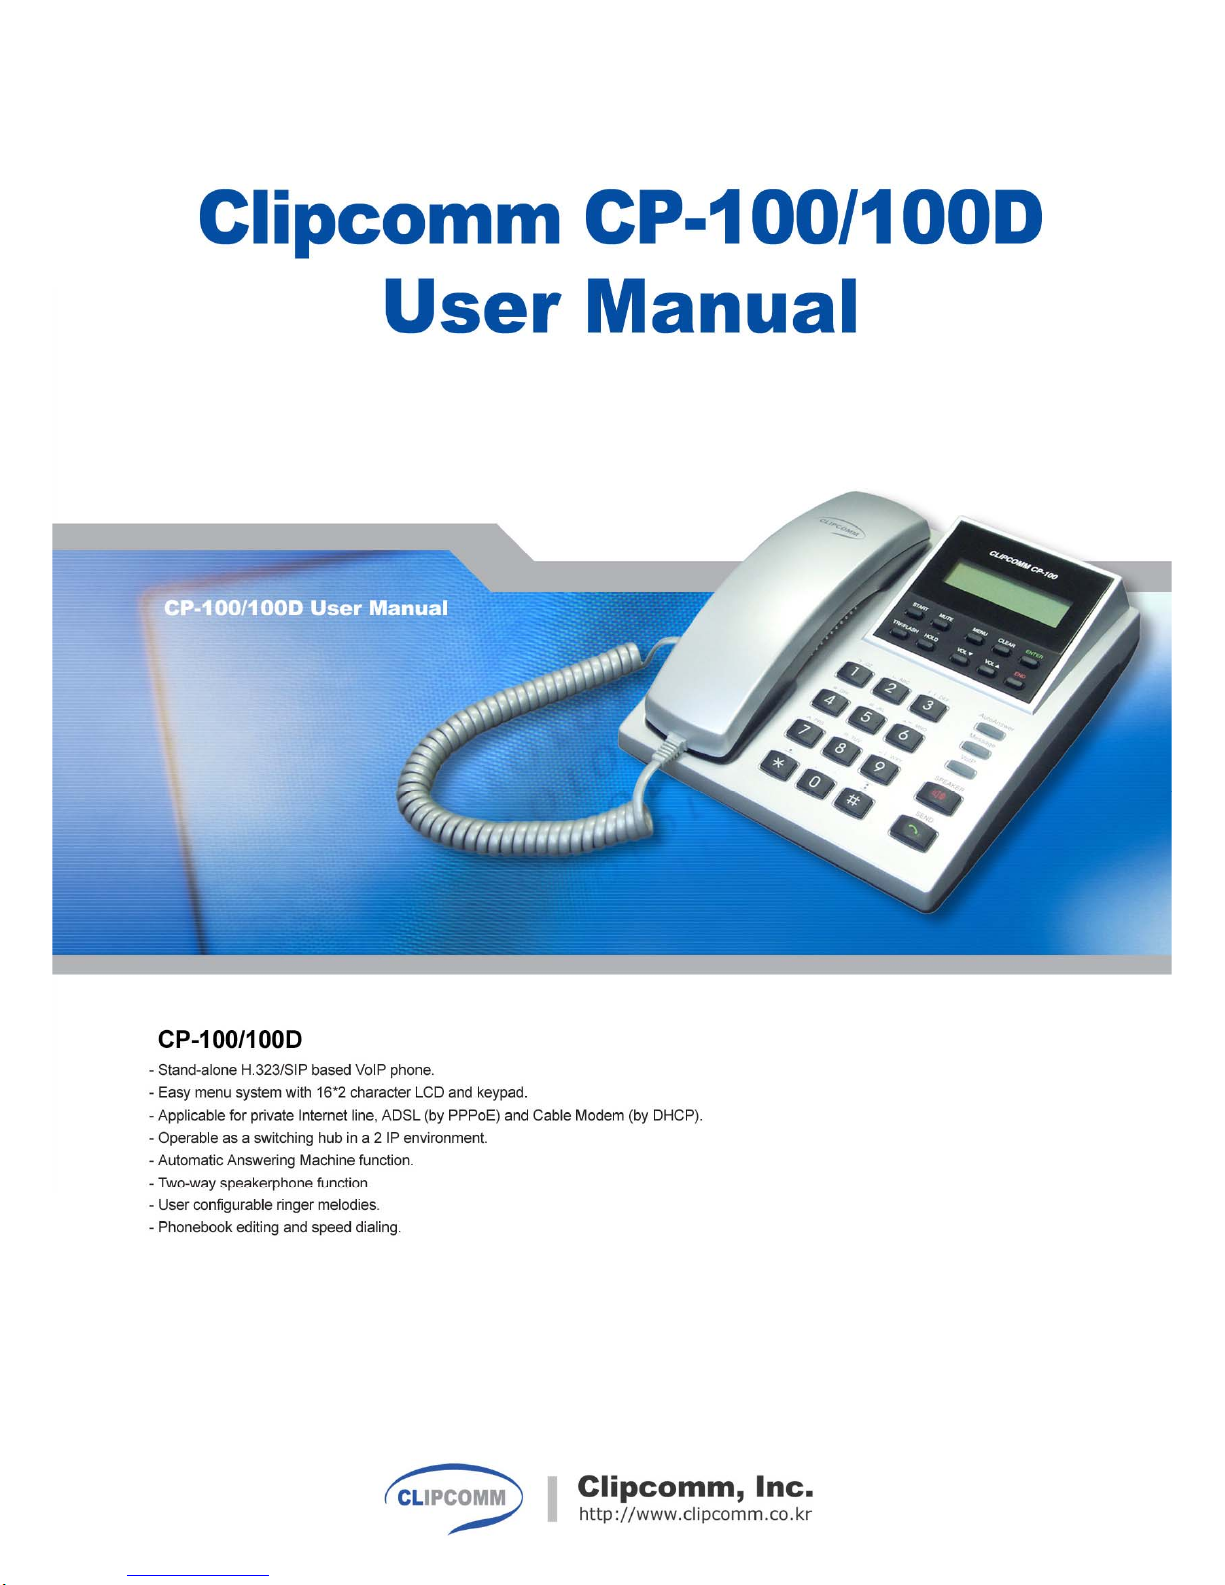
1. CP-100/100D Features
z Stand-alone H.323/SIP-based VoIP pho ne.
z Easy menu system with 16*2 character LCD and keypad.
z Applicable for private Internet line, ADSL (by PPPoE) and Cable Modem (by DHCP).
z Operable as a switching hub in a 2 IP environment.(CP-100D only)
z Automatic Answering Machine function.
z Two-way speake rph one function.
z User configurable ringer melodies.
z Phonebook editing and speed dialing.
z Works as a wireless LAN access point or station when a wireless LAN PCMCIA card is
inserted.
1. CP-100/100D Features
Keison Products www.keison.co.uk sales@keison.co.uk Tel: +44 (0)1245 600560
Page 4

3
2. Parts Checklist
Please check to ensure that you have all the following components in the pa ckage:
Item Quantity Usage
CP-100/100D 1 CP-100/100D Main Body
User Manual 1 This user manual
Handset 1 CP-100/100D Handset
Power Adaptor 1 DC 12V power supply
LAN Cable 1 RJ45 LAN cable for network access
2. Parts Checklist
Keison Products www.keison.co.uk sales@keison.co.uk Tel: +44 (0)1245 600560
Page 5

4
3. Installation
Check the location of each port and follow the below instruction to install your CP-100/100D correctly.
3.1. CP-100
① Connect handset to your CP-100 body.
② Connect UTP cable linked with ADSL/cable modem/hub to the ‘LAN’ port at the rear panel of your
CP-100/100D. (Figure’s “B”)
③ Connect the supplied power adapter (12V DC) to the power input jack. (Figure’s “A”)
④ Connect the wired headset. (Figure’s “C”)
3.2. CP-100D
① Connect handset to your CP-100D body.
② Connect UTP cable linked with ADSL/cable modem/hub to the ‘LAN’ port at the rear panel of your
3. Installation
Keison Products www.keison.co.uk sales@keison.co.uk Tel: +44 (0)1245 600560
Page 6

5
CP-100/100D. (Figure’s “C”)
③ Connect the supplied power adapter (12V DC) to the power input jack. (Figure’s “A”)
④ Connect the LAN cable from PC’s LAN port to the ‘PC’ port to use NAT. (Figure’s “B”)
⑤ Connect the wired headset. (Figure’s “D”)
³ Caution: Please be sure to use only the supplied AC power adapter. Otherwise, proper
function of your CP-100/100D is not guaranteed.
Keison Products www.keison.co.uk sales@keison.co.uk Tel: +44 (0)1245 600560
Page 7
6
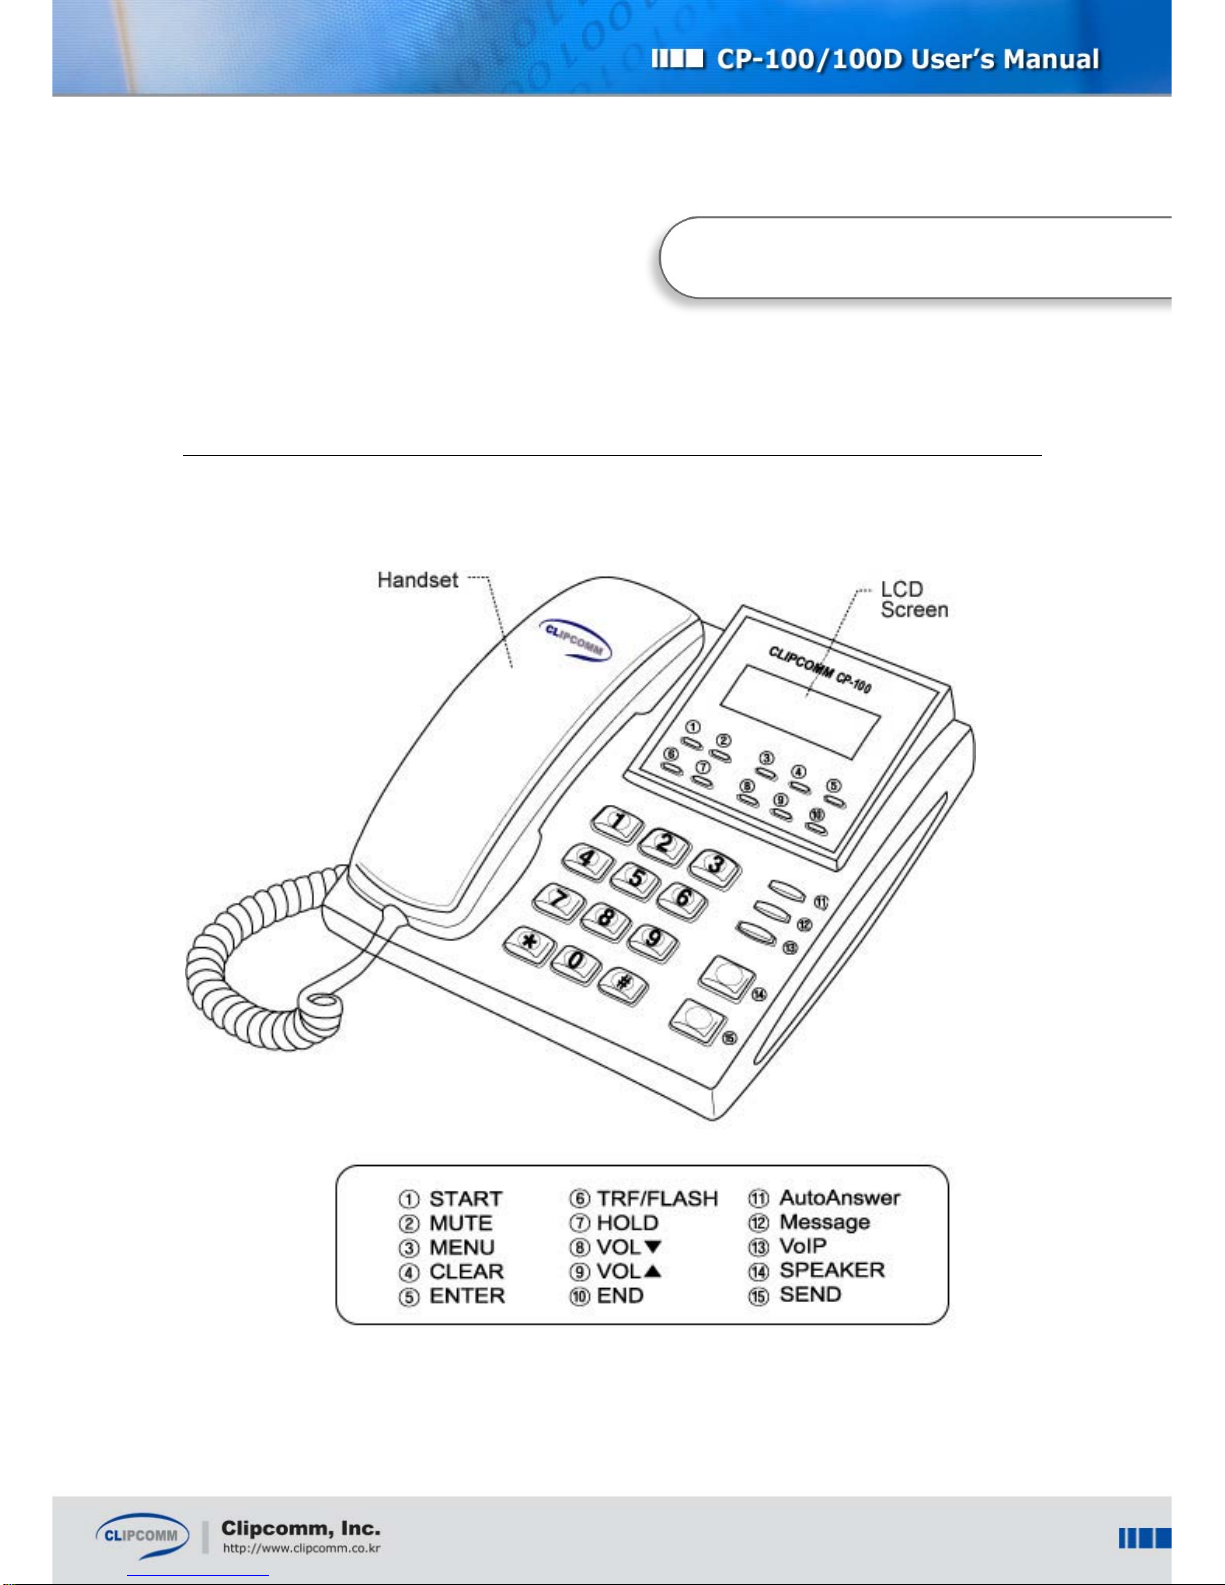
4. Controls and Functionalities
4. Controls and Functionalities
Keison Products www.keison.co.uk sales@keison.co.uk Tel: +44 (0)1245 600560
Page 8

7
Controls Functionality
Handset ♦ Used for normal telephone functionality.
LCD display ♦ Displays system status and user information.
START ♦ Restarts network access via ADSL, DHCP, Static IP mode.
MUTE ♦ Deactivates your handset microphone.
MENU
♦ Initial state: activates main menu.
♦ Character input state: changes input mode
(upper case/ lower case/ numeric/ symbolic).
♦ Phonebook lookup state: displays edit menu.
♦ Message check state: plays previous message.
CLEAR
♦ Character input state : same as backspace
♦ Phonebook delete menu : deletes ph onebook.
♦ Message check state : deletes current message and plays the
next message.
♦ All the other states : acti vates previous level menu.
ENTER
♦ Activates inverted menu item.
♦ Confirms input of cha racter string or numeric constants.
♦ Message check state: plays next message
TRF/FLASH
♦ Initiates call transfer.
♦ While you are dialing, y ou can re-dial using this button.
HOLD ♦ Holds current call and transmits hold signal to the held peer.
VOL(▲▼)
♦ During conversatio n: adjusts receiver volume.
♦ In ringer setting menu: adjusts ringer volume.
♦ During other menu manipulation: navigates among menu
items.
Button
Part A
END
♦ Returns to main menu.
♦ During conversation: finishe s call se ssion.
AutoAnswer
♦ Toggles auto answer mode. If auto answer mode is enabled,
its LED is ON.
Message
♦ Plays received voice messages. If new message(s) arrived, its
LED flashes.
VoIP
♦ If VoIP call is valid, its LED is ON. If registration is failed or
VoIP call is invalid, its LED flashes.
SPEAKER ♦ Activates speaker phone mode.
Button
Part B
SEND ♦ Makes an outgoing call after phone number input.
Dial buttons
♦ Used for phone number or character input.
♦ Also used for direct selection of menu item.
Keison Products www.keison.co.uk sales@keison.co.uk Tel: +44 (0)1245 600560
Page 9

8
5. Phone Configuration
After installation, you need to configure your CP-100/100D according to your environment. You can
configure your CP-100/100D by either the LCD menu or internal Web interface. From now on, LCD
and keypad based configuration method is going to be explained. For Web based configuration,
please refer to section 5.6 “Internal Web Interface.”
To begin phone configuration using LCD and keypad, select MENU button Æ “3:Phone Mgmnt” then,
phone configuration sub-menu appears as follows:
1: Set Network
2: Set VoIP
3: Call Forward
4: Wireless LAN
5: Change Pwd
5.1. Network Configuration
To use your CP-100/100D IP Phone functionality, you need to subscribe for an Internet access line
from your local ISP (Internet Service Provider). It could be leased line, ADSL or Cable modem. If your
CP-100/100D is directly connected to an external ADSL modem, you need to configure your system to
use ADSL. If your CP-100/100D is directly connected to a Cable modem or receives IP address
configuration from a DHCP server in your local network, you need to configure your system to use
DHCP. Otherwise, you need to configure your CP-100/100D with static IP address information.
To begin network configuration using LCD and keypad, select MENU button Æ “3:Phone Mgmnt” Æ
“1:Set Network” then, network configuration sub-menu appears as follows:
5. Phone Configuration
Keison Products www.keison.co.uk sales@keison.co.uk Tel: +44 (0)1245 600560
Page 10

9
1: Current Info
2: Change Config
5.1.1. Static IP Setting
① Select MENU Æ “3: Phone Mgmnt”Æ “1: Set Network” Æ “2:Change Config”.
1: Static IP
2: DHCP
3: ADSL
② Select “1:Static IP”, if you want to configure your CP-100/100D in static IP environment.
③ Select “1:IP Address” and enter required IP address using keypad. To confirm or cancel your input,
press ENTER or END button. You can enter dots (“.”) in the IP address using # button.
IP address
211.12.23.34_
④ Gateway, DNS, and Netmask addresses can be set by the same procedure.
⑤ Updated static IP configuration will take effect only after restarting the system. You can restart
your system with the new configuration simply by power cycling or selecting “5:Restart Network”
and press ENTER at static IP sub menu.
5.1.2. Dynamic IP (DHCP) Setting
① Select MENU Æ “3: Phone Mgmnt”Æ “1: Set Network” Æ “2:Change Config”.
1: Static IP
2: DHCP
3: ADSL
② Select “2: DHCP ” if you want to configure your CP-100/100D in DHCP environment.
Use DHCP mode?
Yes[ * ] No[ ]
Keison Products www.keison.co.uk sales@keison.co.uk Tel: +44 (0)1245 600560
Page 11

10
③ Select “Yes” and press ENTER. Your CP-100/100D will automatically restart in DHCP client mode
after a few seconds.
5.1.3. ADSL Setting
① Select MENU Æ “3: Phone Mgmnt”Æ “1: Set Network” Æ “2:Change Config”.
1: Static IP
2: DHCP
3: ADSL
② Select “3: ADSL” if you want to configure your CP-100/100D in ADSL environment.
1: ADSL ID
2: ADSL Password
3: Service Provider
4: Connect ADSL
③ Enter your ADSL ID an d password respectively using sub menu 1 and 2.
Enter ADSL ID [ a ]
myid_
④ Select a specific ADSL service provider using sub menu 3.
⑤ Select “4:Connect ADSL” and press ENTER. Your CP-100/100D will automatically restart in
ADSL mode. In SIP version, you should restart system manually.
⑥ When ADSL connection fails, press START button to try again.
5.1.4. Viewing Current IP Setting
① Select MENU Æ “3: Phone Mgmnt”Æ “1: Set Network”.
1: Current Info
2: Change Config
② ② Select “1:Current Info”. Then current network configuration status will be displayed.
Keison Products www.keison.co.uk sales@keison.co.uk Tel: +44 (0)1245 600560
Page 12

11
1: Current Mode
DHCP
2: IP address
192.168.0.223
3: G/W Address
192.168.0.1
4: DNS Address
168.126.63.1
5: Netmask
255.255.255.0
6: Enet Address
000788100AE1
5.2. VoIP Configuration - H.323 version
You need to subscribe for an ITSP (Internet Telephony Service Provider) to use versatile VoIP services.
You can use this VoIP configuration menu to configure your CP-100/100D according to your local
ITSP’s requirements.
To begin VoIP configuration using LCD and keypad, select MENU button Æ “3:Phone Mgmnt” Æ
“2:Set VoIP,” then, VoIP configuration sub-menu appears as follows:
1: Use GK
2: GK Address
3: GK Password
4: H.323 ID
5: E.164 ID
6: Voice Codec
7: NAT Traversal
8: RRQ Time
5.2.1. Gatekeeper Configuration
① Select “1:Use GK” and select “Yes” if you want to use a gatekeeper.
Use Gatekeeper?
Yes [ * ] No [ ]
Keison Products www.keison.co.uk sales@keison.co.uk Tel: +44 (0)1245 600560
Page 13

12
② Select “2:Gatekeeper Address” and enter proper IP address of a gatekeeper. To confirm or cancel
your input, press ENTER or END button.
GK Address
211.28.99.97_
③ GK Password, H.323 ID, E.164 ID, Voice Codec, and RRQ Time (Registration Request Time
Interval) can be set by the similar procedure. You can select voice codec among G.723.1A,
G.711
µ
-law, G.711 A-law, and G.729AB co dec.
5.2.2. NAT traver sal (External IP)
① If you are using private IP(under NAT) and want to use NAT traversal to make a call to outside of
NAT, set "Use NAT Traversal" enable. Otherwise, make it disable.
② When you use NAT traversal, you need to enter the external or Internet IP address of the NAT
Router in “NAT Router IP”. The phone includes this IP address in the H323 messages it sends to
other H323 user agents to indicate that this is the address to which H323 and RTP packets are
sent.
5.2.3. Restart System after VoIP Configuration
① When you press CLEAR button to exit VoIP configuration sub menu, your CP-100/100D asks you
whether to restart. By selecting “Yes,” your CP-100/100D will restart with the new VoIP
configuration. If you select “No,” the modified configuration is stored and takes effect only after
restarting.
Restart System?
Yes [ * ] No [ ]
³ Note: For more detailed VoIP configuration, you can use the internal Web interface of CP-
100/100D.
Keison Products www.keison.co.uk sales@keison.co.uk Tel: +44 (0)1245 600560
Page 14

13
5.3. VoIP Configuration - SIP version
You need to subscribe for an ITSP (Internet Telephony Service Provider) to use versatile VoIP services.
You can use this VoIP configuration menu to configure your CP-100/100D according to your local
ITSP’s requirements.
To begin VoIP configuration using LCD and keypad, select MENU button Æ “3:Phone Mgmnt” Æ
“2:Set VoIP”, then, VoIP configuration sub-menu appears as follows:
Keison Products www.keison.co.uk sales@keison.co.uk Tel: +44 (0)1245 600560
Page 15

14
1: Proxy Config
2: Name Config
3: Voice Codec
4: NAT Traversal
5.3.1. Proxy Configuration
① Select “1:Proxy Config”.
1: Registration
Success
2: Outbound Proxy
192.168.0.1
3: Registrar Server
192.168.0.1
4: SIP Server
www.clipcomm.co.kr
5: Expiry[sec]
3600
② “1:Registration” shows the state of the registration.
③ Select “2:Outbound Proxy” and enter the address of outbound proxy.
Outbound Proxy [1]
__
④ Registrar Server, SIP Server, and Expiry can be set by the similar procedure. Usually, registrar
server is same as outbound proxy. SIP server is likely as domain name. Expiry is registration
interval to keep connecting to server.
5.3.2. Name Configuration
① Select “2:Name Config”.
1: User ID
20002
2: Display Name
clip
3: Password
0000
Keison Products www.keison.co.uk sales@keison.co.uk Tel: +44 (0)1245 600560
Page 16

15
② Select “1:User ID” and enter proper number for SIP. To confirm or cancel your input, press
ENTER or END button. User ID is used for phone number after registration.
[1] User ID
20002
③ Display name and password can be set by similar procedure. Display name is user name, and
password is PIN code for registration to registrar.
5.3.3. Codec Selection
Select “3:Voice Codec”, then current codec is shown for a sec, and the menu is displayed.
1:G.723.1
2:G.711 Mu Law
3:G .7 1 1 A Law
4:G .7 29 Annex A
Select the codec you want to use.
5.3.4. NAT Traversal
① Select “4:NAT Traversal ”.
1:NAT Function
No Use
2: STUN Server
3: NAT Router IP
4: NAT Timer
5.3.4.1. NAT Traversal using STUN server
① If you use NAT traversal using STUN server, select “1:NAT Function” and select “2:STUN”.
Keison Products www.keison.co.uk sales@keison.co.uk Tel: +44 (0)1245 600560
Page 17

16
1. No Use
2. STUN
3. Manual
② After selecting “1:NAT Function”, select “2:STUN Address”. Enter the address of STUN server.
This address can be FQDN.
[a] STUN Address
clipcomm.co.kr:5088
5.3.4.2. NAT Traversal without STUN server
① If you use NAT traversal without STUN server, you should know the external IP address of NAT
router. Select, “1:NAT Function” and then select “3:Manual”.
② After selecting “1:NAT Function”, select “3:NAT Router IP”. Enter the external address of NAT
router.
[a] NAT Router IP
5.3.4.3. NAT session keep time
Select “4:NAT T imer”. Enter the time to send packet for kee ping NAT session.
NAT Timer
30
³ Note: For more detailed VoIP configuration, you can use the internal Web interface of CP-
100/100D.
Keison Products www.keison.co.uk sales@keison.co.uk Tel: +44 (0)1245 600560
Page 18

17
5.4. Call Forwarding
You can configure that CP-100/100D can forward incoming call to selected number.
① Select Menu Æ”3:Phone Mgmnt”Æ”3:Call Forward”
1: Setting
Disable
2: Forwarding No.
② Select “1:Setting”, and choose condition when you want to enable call forwarding function.
Keison Products www.keison.co.uk sales@keison.co.uk Tel: +44 (0)1245 600560
Page 19

18
1: Disable
2: Unconditional
3: on Busy
4: on No Answer
In H.323 version, “3:on Busy” and “4:on No Answer” is not available.
③ Select “2:Forwarding No”. Enter the number where you want to forward incoming call.
³ Note: The settings are prioritized; 1) auto answering 2) call forwarding. That is, if you set on
auto answering, then you can’t use call forwarding.
5.5. Changing Password
① A default password of CP-100/100D is set as “0000.” We recommend that you change this
default password to prevent any unwanted access to your phone. To change the 4-digit password,
select MENUÆ”3:Phone Mgmnt”Æ“5:Change pwd.”
② Enter a new 4-digit password (numerical only).
③ Enter the new password again to confirm.
5.6. Internal Web Interface
You can configure and monitor your CP-100/100D using the internal Web interface. When the network
configuration of your CP-100/100D is completed and the CP-100/100D properly connects to your
network, you can access the internal Web interface of your CP-100/100D via following HTTP address
and port number:
http:// IP address of your CP-100/100D:1001
Enter “admin” as the User ID and “0000” as the password once the pop-up window appears.
5.6.1. System Information
z System Status: Displays current system status information regarding network and H.323/SIP.
z Technical Specification: Lists software version, serial number, MAC address, and other
detailed specifications.of CP-100/100D.
Keison Products www.keison.co.uk sales@keison.co.uk Tel: +44 (0)1245 600560
Page 20

19
5.6.2. System Configuration
z Network Setting: You can configure IP address and time server.
z H.323(or SIP) Setting: You can configure various H.323(or SIP) related parameters such as IP
address of H.323 gatekeeper, H.323 ID, E.164 ID, etc.
z Current Setting: Shows all the current system settings of your CP-100/100D.
5.6.2.1. Network Setting
① lick “Network Setting” and fill in each of items.
② After completing filling up values, click “Save and Restart” button and CP-100/100D will restart
automatically with the updated setting. If you click “Save” button, the updated network setting is
stored in your CP-100/100D but will not take effect until restarts.
³ Note: Please refer to the following terminology for your network setting.
z Static IP: If you want to assign static IP address to your CP-100/100D, choose “Static IP”
radio button and fill the following items.
IP : IP address of your CP-100/100D.
Gateway : : IP address of the gateway in your local network.
Subnet Mask : Network mask of your local network.
z DHCP: Choose “DHCP” radio button if your CP-100/100D directly connects to a Cable modem
or receives IP address configuration from a DHCP server in your local network.
z ADSL (PPPoE): If you want to directly connect your CP-100/100D to the external ADSL
modem supporting PPPoE interface, choose “ADSL (PPPoE)” radio button and fill the following
items :
ID : User ID for the ADSL network.
Password : Password for the ADSL network.
z DNS Server: IP address of a domain name server in your network.
5.6.2.2. H.323 Setting
① Click “H.323” and fill in each of items.
② After completing filling up values, click “Save and Restart” button and CP-100/100D will restart
automatically with the updated setting. If you click “Save” button, the updated setting is stored in
your CP-100/100D but will not take effect until rest art.
³ Note: Please refer to the following terminology for your H.323 setting.
z Use gatekeeper: If enabled, CP-100/100D tries to communicate with the gatekeeper whose
address is specified in “Gatekeeper address” tab.
z Fast start: If enabled, CP-100/100D tries to make outgoing call by fast start procedure.
Keison Products www.keison.co.uk sales@keison.co.uk Tel: +44 (0)1245 600560
Page 21

20
z H245 Tunneling: If enabled, CP-100/100D uses H.245 tunneling in making an outgoing call.
z Gatekeeper address: If “Use gatekeeper” is enabled, the IP address of gatekeeper is set by
this tab.
z Skip GRQ: If “Skip GRQ” is enabled, CP-100/100D does not send GRQ to register.
z Gatekeeper Password: Password to register to gatekeeper
z Use H.323 ID: If enabled, CP-100/100D sets an H.323 ID in making an outgoing call.
z H.323 ID: An H.323 ID that can be used in gatekeeper registration.
z Use E.164 ID: If enabled, CP-100/100D sets an E.164 ID in making an outgoing call.
z E.164 ID: An E.323 ID that can be used i n gatekeeper registration.
z Use dedicated gateway: if enabled, CP-100/100D always makes outgoing call via a
dedicated gateway. If the ‘Use gatekeeper’ field is enabled, this field is ignored.
z Dedicated gateway: IP address of the dedicated gateway.
z Use VAD: If enabled, CP-100/100D continuously monitors voice activity and does not send
voice data when it detects silence.
z Min Jitter Buffer Size: Minimum jitter buffer size for voice conversation.
z Max Jitter Buffer Size: Maximum jitter buffer size for voice con ver sation.
z Q.931 Port Configuration: You can set Q.931 port number manually if you want.
z RAS Configuration: You can set RAS port number manually if you want.
z H.245 Port Configuration: You can set H.245 port number manually if you want.
z RTP Port Base Configuration: You can set base port number for RTP base using this tab.
RTP port is increased per calls, and circulates between [RTP port base] and [RTP port base+ 3].
z Use NA T Traversal: If enabled, you can make and receive calls behind NAT.
z NA T Router IP : If you are using NAT traversal, you can set external IP address of NAT router.
5.6.2.3. SIP setting
If your CP-100/100Dis equipped with SIP firmware, you have to change the configuration relat ed to the
URI and proxy server. Please inquire of the administrator about the specific parameters.
z Registrar Server: The address of registrar server. Usually, this address may be identical to
outbound proxy.
z Outbound Proxy: The address of where SIP packet is sent.
z Password: The password required for registration.
z Expiry Timer: The time to determine registration failure
z Proxy Port: Base port where outbound proxy receives CP-100/100D’s SIP packet.
z RTP Port: Base RTP port for voice packet streaming
z Local Port: Base SIP port where CP-100/100D sends and receives SIP packet.
z User ID: The user name or phone number which is used for SIP communi cation
z Display Name: The display name which is used for SIP communication
z Authentication ID: ID for registration.
Keison Products www.keison.co.uk sales@keison.co.uk Tel: +44 (0)1245 600560
Page 22

21
z Voice codec: The type of codec for voice compression and packetization.
z Sending DTMF: CP-100/100D can send DTMF with RTP packet(RFC2833) or INFO message.
z Max-Forwards: Valid number hops for SIP packets
z NAT Traversal: You can select “STUN” if you use NAT traversal function with STUN server.
Otherwise you can select “Manual” if you use NAT traversal function without STUN server.
z STUN Server(FQDN): If you use NAT traversal with STUN server, input the address of STUN
server. This address can be FQDN.
z NAT Router IP: If you use NAT traversal without STUN server, input the address of your NAT
router.
z NAT Timer: you can set time to send packets for keeping NAT session
5.7. Wireless LAN Configuration
Before using the wireless LAN functions of your CP-100/100D, make sure that an interoperable
wireless LAN PC card is used. An interoperable 802.11b PC card is based on Intersil’s Prism chipset
and original Intersil firmware. Examples of interoperable wireless LAN cards include Linksys’s WPC11,
SMC’s 2632W, and Gemtek’s WL-211.
Item Meaning
Default
Value
Mode
Disable : Don’t use wireless LAN.
AP : Wireless LAN interface operates as a wireless LAN access point.
Station : Wireless LAN interface operates as a wireless LAN station
Disable
ESSID
Set ESSID. If the ‘Mode’ above is ‘AP’, this should be a unique ESSID of the
wireless service area, and if the ‘Mode’ is ‘Station’, this should be the same
as the ESSID of the Wireless LAN AP to which CP-100D will connect.
clip
Channel Frequency band to use for communication with AP 1
Rates Data-rate to use for communication with AP All rates
WEP
Mode : Encryption mode for secure 802.11b communication.
(Disabled / 64 bit / 128 bit )
Key # : seed string used for encryption
Default Key : key index to be used for encryption
Disabled
WLAN
DHCP
server
In the ‘AP’ mode,
Disable : Turn of f the CP-100D’s DHCP server
Enable : Turn on the CP-100D’s DHCP server for wireless LAN clients.
Enable
Keison Products www.keison.co.uk sales@keison.co.uk Tel: +44 (0)1245 600560
Page 23

22
6. Making / Receiving Phone Calls
6.1. Making VoIP Phone Calls
6.1.1. Calling by IP Address in VoIP Service Mode
① Pick up the handset (or press SPEAKER button).
② Enter callee’s IP address. Use “#” button for dot (“.”) between IP numerals. Use CLEAR button to
correct telephone number.
③ Press SEND button.
6.1.2. Calling by General Telephone Number in VoIP Service Mode
① Pick up the handset (or press SPEAKER button).
② Enter callee’s telephone number. Use CLEAR button to correct telephone number.
③ Press SEND button.
Ú You can adjust receiver volume during conversation using VOL (▲,▼) buttons.
Ú By pressing MENU button instead of SEND button after phone number input, you can save
the phone number in the phonebook.
Ú After picking up the handset, recently placed call history is listed on the LCD screen when
you press SEND button first. You can make a call from a phone number in the call history
by select the number using VOL (▲,▼) buttons and then pressing SEND button again.
6.2. Receiving VoIP Calls
① Pick up the handset when the phone bell rings (or press SPEAKER button).
② Talk over the phone.
③ Hang up the handset when your call is finished (or press END button).
6. Making / Receiving Phone Calls
Keison Products www.keison.co.uk sales@keison.co.uk Tel: +44 (0)1245 600560
Page 24

23
7. Additional Functions
There are many additional functions besides just making or receiving calls in your CP-100/100D. This
chapter explains how to invoke and use the additional functions.
7.1. Automatic Answering
Press MENU Æ select “1:Auto answer” menu to configure and manage automatic answering
functionality of your CP-100/100D.
1: Outgoing Msg
2: Check Msg
3: Erase All Msg
4: Waiting Time
7.1.1. Managing Your Own Outgoing Message
① Select “1:OGM.”
1: Record OGM
2: Play Back OGM
3: Delete OGM
② Select “1:Record OGM” and follow the instructions displayed on LCD to record your own outgoing
message.
③ You can hear the recorded outgoing message by selecting “2: Play Back OGM,” or delete by
selecting “3: Delete OGM.”
7.1.2. Checking Voice Messages
① Select “2:Check Msg” to play voice messages in message box. You can more easily check new
voice messages by pressing Message button when its LED flashes.
② Voice messages are played and displayed in time order.
7. Additional Functions
Keison Products www.keison.co.uk sales@keison.co.uk Tel: +44 (0)1245 600560
Page 25

24
New msg : 0
Total msg : 1
9/25 05:26 PM
192.168.0.186
③ To adjust volume during message playing, use VOL (▲,▼) buttons.
④ Press ENTER button for next message and MENU for previous message.
⑤ To delete current message, press CLEAR button.
7.1.3. Erase All Voice Messages
You can erase all voice messages in message box by selecting “3: Erase All Msg” menu and select
“Yes.”
7.1.4. Waiting time
You can select the waiting time before auto answering by selecting “4: Waiting Ti me”
7.2. Phonebook
You can check call history and manage your own phone number lists with Phonebook function. Press
MENU Æ select ”2: Phonebook” to activate the Phonebook menus.
7.2.1. Checking Call History
① Select “1:Placed” or “2:Received” or “3:Missed” menu to check call history.
② You can check specific information on a placed or received or missed call using VOL (▲,▼)
button + ENTER button or numeric buttons directly.
Ú Note: During checking information on a phone number…
- You can add the phone number to the phonebook by pressing MENU button.
- You can make a call to the phone number by picking up your handset and then
pressing SEND button.
Keison Products www.keison.co.uk sales@keison.co.uk Tel: +44 (0)1245 600560
Page 26

25
7.2.2. Searching for a Phonebook Entry
You can find a phonebook entry either by name, phone number or phonebook entry number.
① Select “4:Search”.
② Select a sub-menu among “All Entries”, “By Name”, “By Phone No.” or “By Entry No.”
③ Enter a name, phone number or entry number you are searching for and press ENTER button.
④ Found phonebook entries are listed.
⑤ Press ENTER and it shows detailed information of the phonebook entry.
7.2.3. Adding an Entry to Phonebook
① Select “5:Register.”
② Enter name & phone number.
③ Press ENTER button to add to phonebook.
7.2.4. Deleting Call History
① Select “6:Delete Calls”
② Select “1:Placed Call” or “2:Received Call” or “3:Missed Call”.
③ Select “Y es” to delete the call history permanently
7.2.5. Empty Phonebook
① Select “7:Empty Phonebook.”
② Select “Yes” to empty all the phone book entries.
7.3. Extra Configuration
Press MENU Æ select ”4: Extra Config”. Then, extra configuration sub-menu appears as follows:
1: Set Ringer
2: Screen Msg
3: Time Server
4: Time Zone
5: Set Alarm
6: Lock Phone
Keison Products www.keison.co.uk sales@keison.co.uk Tel: +44 (0)1245 600560
Page 27

26
7.3.1. Set Ringer
① Select “1: Set Ringer”, then, ringer configuration sub-menu appears as follows:
1: Ringer Melody
2: Ringer Volume
② Select “1:Ringer Melody” : use VOL (▲,▼) buttons to locate an appropriate ringer melody and
press ENTER button to change current ringer m elody setting.
③ Select “2:Ringer Volume” : adjust volume using VOL (▲,▼) buttons and press ENTER button to
change current ringer volume setting.
7.3.2. Screen Msg
① To change screen message, select “2:Screen Msg” and then, a sub-menu appears as follows:
1: User Defined
2: Use ID
② Default screen message of CP-100/100D is “CLIPCOMM CP-100/100D,” which can be changed.
To change screen message of your CP-100/100D, select “1:User Defined” (your own message) or
“2: Use ID.” (in H.323 version, H.323 ID or E.164 ID)
③ Press ENTER button and then the initial screen message will be changed.
7.3.3. Time Server
① Your CP-100/100D communicates with a time-server to get information on current time. To change
the time-server, select “3:Time Server.”
Enter IP Address
211.234.222.98_
② Enter the IP address of new time-server using keypad. To confirm or cancel your input, press
ENTER or END button.
7.3.4. Time Zone
① Using this menu, you can set proper time zone of your location. The CP-100/100D displays
current wall-clock time according to the time information from a time-server interpreted by this
time zone. To set current time-zone of your CP-100/100D, select “4:Time Zone.”
Keison Products www.keison.co.uk sales@keison.co.uk Tel: +44 (0)1245 600560
Page 28

27
7.3.5. Set Alarm
① Press MENU Æ “4:Extra Config” Æ ”5: Set Alarm” to activate alarm setting sub-menu.
1: Cancel Alarm
2: Alarm Time
3: Alarm Melody
② Select “1:Cancel Alarm”, and then, select “Yes” to cancel alarm.
③ In H.323 version, select “2:Alarm Time” and enter appropriate time you want to set, select AM/PM
using VOL (▲,▼) buttons, and then press ENTER button. Then, choose the number of alarming
(Once or Daily) and save current setting by pressing ENTER button.
__(h)__(m)
AM( * )PM( ) Once
④ In SIP version, select “2:Alarm Time” and choose the number of alarming (Once or Daily). Then,
enter appropriate time you want to set.
04/20 13h:28m
__h:__m
⑤ Select “3:Alarm Melody”, then, you can change alarm melody and volume.
7.3.6. Locking your CP-100/100D
① To prevent others from using your CP-100/100D, you can lock your phone. To enable phone
locking, select “6:Lock Phone.”
Input Passwd [1]
__
② After entering password, select option to restrict use of phone
③ When phone locking is enabled, you will be asked to enter a password whenever you pick up the
handset or press SPEAKER button to make a phone call.
Keison Products www.keison.co.uk sales@keison.co.uk Tel: +44 (0)1245 600560
Page 29

28
7.4. Firmware Management
Your CP-100/100 D automatically checks the updated version.
① Press MENU and select “5:Firmware” to enter the firmware update menu of CP-100/100D.
1:Firmware Ver.
2:Update
3:Update Server
② Select “1:Firmware Ver.” to check the current firmware version.
③ Select “3:Update Server” to check the IP address of update server.
④ Select “2:Update” to update your CP-100/100D with latest firmware.
³ CAUTION! Do not disturb CP-100/100D until firmware upgrade is finished!! Normally,
firmware upgrade takes about 1 minute. When upgrade is completed, CP-100/100D
automatically restarts.
Keison Products www.keison.co.uk sales@keison.co.uk Tel: +44 (0)1245 600560
Page 30

29
8. Wireless-LAN Extension
Insert Clipcomm’s wireless LAN extension card into the CP-100/100D PCMCIA extension slot as
shown in the figure below. After inserting the IEEE 802.11b wireless LAN extension card, the CP100/100D can be used as a wireless LAN access-point or wireless LAN station. For its configuration,
refer to the section “5.7 Wireless LAN Configuration” of this manual.
8. Wireless-LAN
Keison Products www.keison.co.uk sales@keison.co.uk Tel: +44 (0)1245 600560
Page 31

30
9. Firmware Upgrade
9.1. Firmware Upgrade by FTP
When your CP-100/100D is accessible by its IP address, you can upgrade its firmware by FTP, which
is the fastest firmware upgrading method. FTP cannot be used when your CP-100/100D is in abnormal
state or not connected to the network.
³ To get the latest version of firmware, please contact tech support at CLIPCOMM’s website
or send an e-mail to techsupport@clipcomm.co.kr.
The following example shows how a command line FTP client is used to upload a new firmware (“CP100/100D.fls”) to the CP-100/100D. Its IP address is 192.168.0.36. Enter “admin” as the user name
and type in the password that is set in the VoIP configuration web page of the CP-100/100D. The
default password is “0000.”The system will reboot automatically when upgrading the firmware by FTP
is completed.
C:\> ftp 192.168.0.36
Connected to 192.168.0.36.
220 FTP Server Ready
User (192.168.0.36:(none)): admin <Enter>
230 Logged in
ftp> bin
200 T ype OK
ftp> put CP-100/100D.fls flash
200 Port command okay
150 Opening data connection for STOR (192.168.0.14,1161)
226 File received OK – 1053136 bytes in 10.640 sec
ftp: 1053136 bytes sent in 10.55Seconds 99.82 Kbytes/sec.
9. Firmware U
pg
rade
Keison Products www.keison.co.uk sales@keison.co.uk Tel: +44 (0)1245 600560
Page 32

31
³ CAUTION! Do not disturb CP-100/100D until firmware upgrade is finished!! Normally,
firmware upgrade takes about 1 minute. When upgrade is completed, CP-100/100D
automatically restarts.
9.2. Firmware Upgrade by UTP Cable
In case your CP-100/100D is not accessible via its IP address, you can perform firmware upgrade by
connecting the CP-100/100D and a PC using UTP cable. The PC should have an Ethernet interface.
This method requires a firmware-uploading program installed on PC, which can be downloadable at
CLIPCOMM’s technical support page.
Firmware upgrade by UTP cable is performed by the following procedure:
① Turn-off your CP-100/100D.
② Connect your CP-100/100D and PC with UTP cable. You can connect PC and “LAN” port of CP-
100/100D directly with UTP cable. Or you can configure that PC and CP-100/100D are connected
to same HUB.
③ Execute firmware upload program on PC. Contact techsupport website of CLIPCOMM.
④ Assign new firmware file and turn on your CP-100/100D with both AutoAnswer and VoIP button
pressed. Release buttons after a few seconds.
⑤ Firmware uploading begins when you press “OK” button of the firmware upload program.
Keison Products www.keison.co.uk sales@keison.co.uk Tel: +44 (0)1245 600560
Page 33

32
10. Character Input Using Keypad
In character input mode during menu manipulation, you can change current character set by pressing
MENU button repetitively. The character set circulates as follows:
English upper case ( [A] ) / English lower case ( [a] ) / Numeric ( [1] ) / Symbolic( [@] )
10.1. English Characters
z Press MENU button a few times until one of upper case ( [A] ) and lower case ( [a] ) set is
selected.
z Two or three alphabets are mapped to all nine numeric buttons from 1 to 9. You can input a
specific alphabet by pressing the button to which the alphabet is mapped. If printed alphabet is
not the one you want, you can switch among three alphabets using
¾
and # buttons.
z Example: “A” “B” and “C” are mapped to 2 button, thus,
A : 2
B : 2 +
¾
C : 2 + #
z To input a space, press 0 button.
10.2. Symbolic Characters
① In character input mode, press MENU button a few times until symbolic ( [@] ) set is selected.
② When symbolic set is selected, each numeric key represents a specific symbol as following table:
Key Symbol Key Symbol Key Symbol
1 ! 2 @ 3 $
4 ? 5 : 6 ,
7 ( 8 ) 9 -
* * 0 ~ # #
10. Character Input Using Keypad
Keison Products www.keison.co.uk sales@keison.co.uk Tel: +44 (0)1245 600560
 Loading...