

Clint CAD15 User Manual
USER GUIDE
BRUGERVEJLEDNING
BEDIENUNGSANLEITUNG
DAB/DAB+ Digital
Radio Adapter
CAD15

www.clintdigital.com
ENGLISH
CAD15
DAB/DAB+ Digital Radio Adapter
Quick Guide
2
www.clintdigital.com
ENGLISH
INTRODUCTION
with cigarette lighter
Cradl e
Multi language
English only.
Clint CAD15 is a digital radio adaptor with Bluetooth for in-Car use, to receive the DAB/DAB+
stations and re-broadcast them on an FM frequency.
The Bluetooth function can be used for music streaming or handsfree phone calls.
CAD15 supports advanced radio features like Traffic Announcement, Service Following,
Automatic Frequency Change, and Alternative Frequency etc..
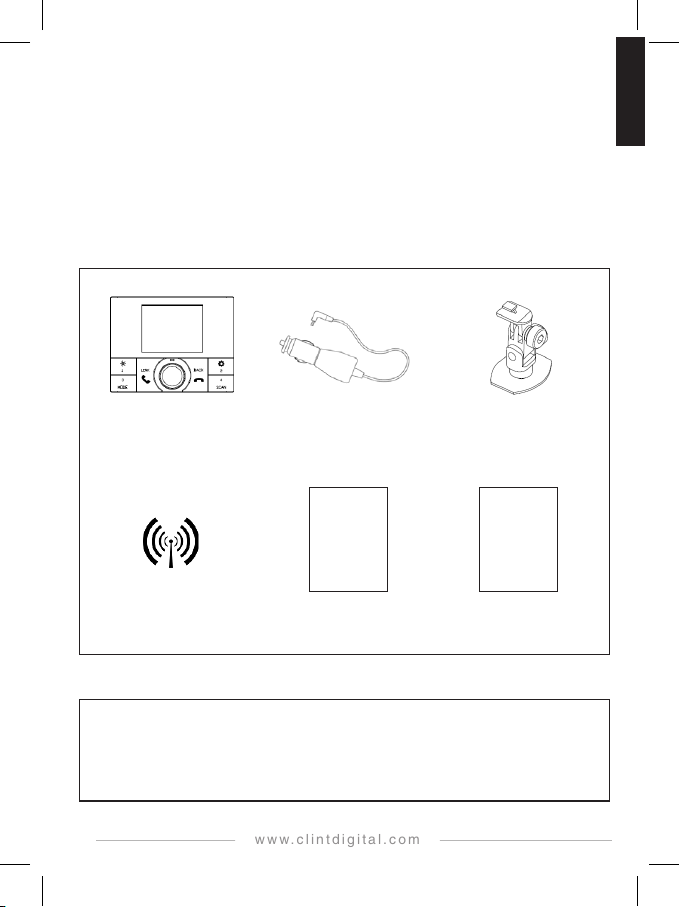
CONTENTS OF PACKAGE
Power cable
CAD15 unit
DAB Antenna Quick Guide
You must use the supplied power cable with cigarette lighter only, and not any other power
cables, to work with CAD15; and you must not use the supplied power cable to work with any
other devices. If you do not follow this instruction, damage may occur which is not covered
by the warranty.
3
CAD15
User Guide
ATTENTION
CAD15
User Manual
Full User Manual
www.clintdigital.com
ENGLISH
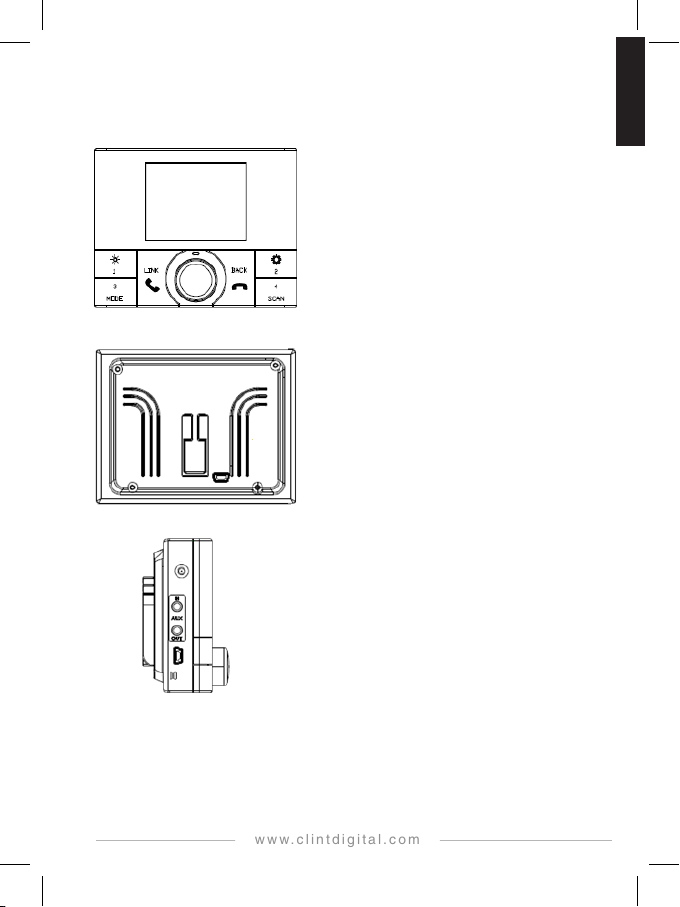
OVERVIEW OF THE CONTROLS AND CONNECTORS
❶
❶
Front Panel
Back Panel
Side Panel
❶ LCD
➌
❷ Control keys and rotary knob
➌ Main microphone
❷
❶ Snap-in, for cradle
❷
❶
➌
❷
❷ Gaps, for securing antenna cable and power cable
➌ SW update cable connector
❶ SMB Connector, for DAB antenna
❷ 3.5mm stereo audio jack, for aux in/out
➌ Power jack, for supplied power cable
➍ Auxiliary microphone
➌
➍
4
www.clintdigital.com
ENGLISH
INSTALLATION
❶
➌
❶
➎
1) Unpack and connect all accessories to CAD15 (only use the supplied accessories).
If using the included cradle, please find suitable placement for easy operation
as well as a “driving safe position”.
(For more detailed installation guidelines, we refer to the full English user manual)
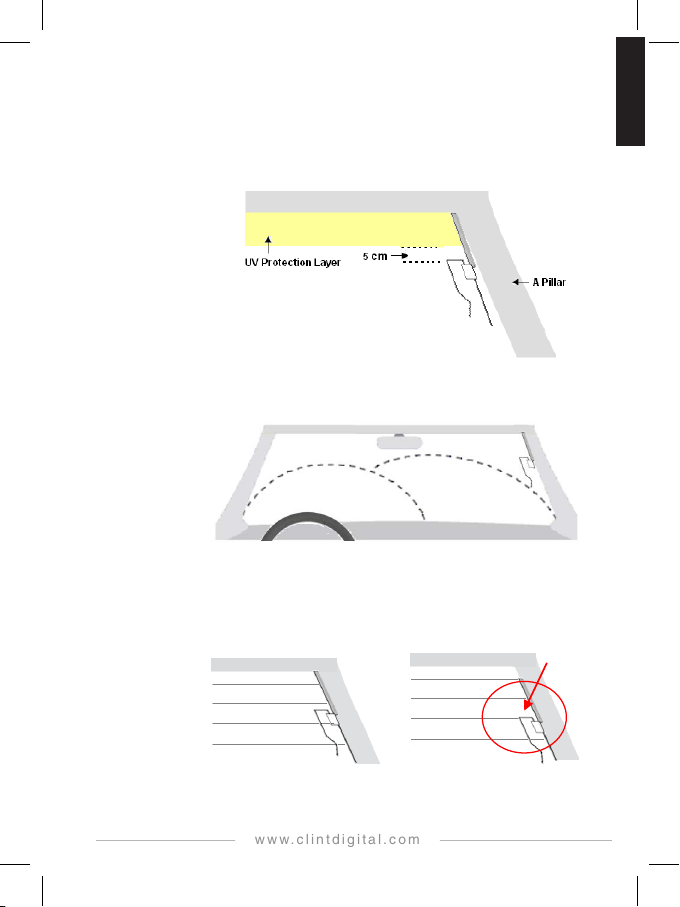
2) Install the included antenna as illustrated on below figures (please pay attention !)
(If you use third part antennas, we cannot guarantee the performance. Any damages to the
antenna caused by incorrect installation, is not covered by warranty.)
3) Before installing the antenna, please make sure to clean all surfaces according
to the instructions given by the car manufacturer.
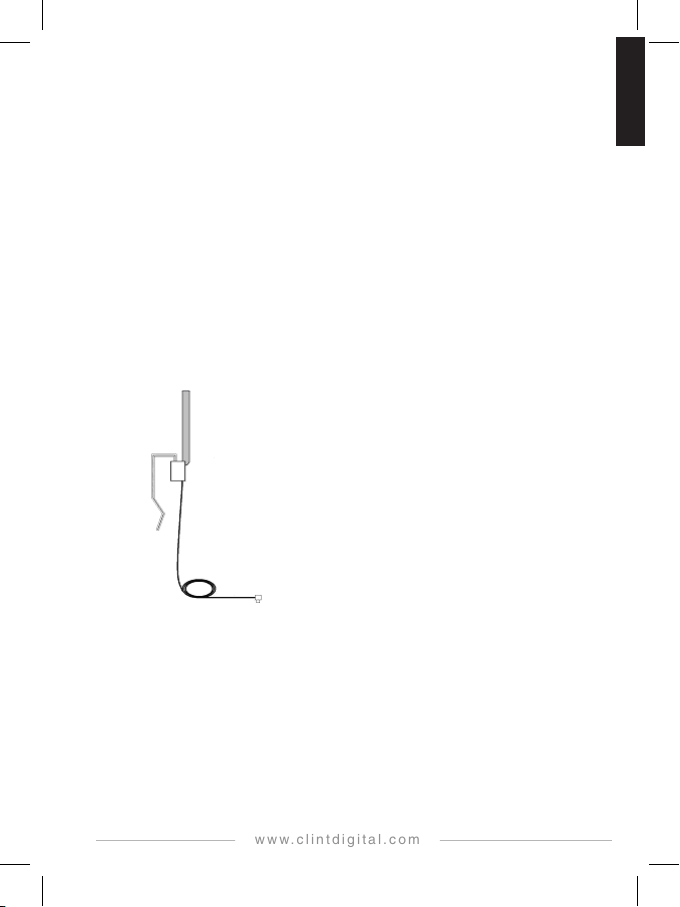
Antenna Installation (Note: the included antenna is an active antenna)
Overview
❷
Antenna 1
❷ Antenna 2
➌ Signal Booster
➍ Antenna Cable
➎ SMB Connector
➍
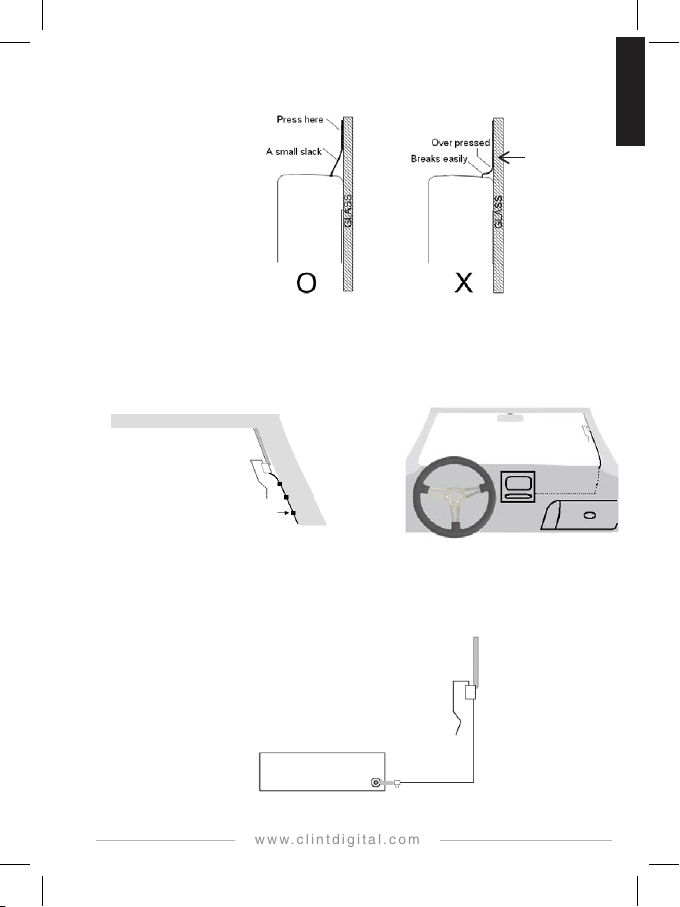
Caution:
Once the antenna is adhered to the windshield it cannot be relocated. Please test
the antenna in its location before removing the adhesive separator and permanently
fixing it to the windshield. The antennas that have been adhered in location are
not valid for return and warranty claims.
5
www.clintdigital.com
ENGLISH
Procedure
1 Front windshield installation
1.1 The antenna shall be mounted at the passenger side and on the inside
of the windshield.
1.2 The glass-mount antenna must be placed outside of the swept area of the
windshield wiper.
2 Rear windshield installation (if possible)
6
Fig 1 Fig 2
www.clintdigital.com
ENGLISH
3 Pay attention not to damage the thin antenna wires.
Signal
Signal
Antenna 1
Booster
4 Cable arrangement.
Arranging the cable, to not interfere with your driving safety.
5 Connect antenna to the CAD15 receiver.
DAB Receiver
Booster
7
www.clintdigital.com
ENGLISH
BASIC LCD DISPLAY AND OPERATION
Basic LCD Display – DAB Mode
Basic LCD Display – Audio Steaming
DAB signal strength for the selected DAB station
1.
2. Bluetooth indicator
3. Bit rate for the selected DAB station
4. DAB/DAB+ indicator for the selected DAB station
5. Channel frequency for the selected DAB station
6. DAB station name for the selected DAB station
7. DLS/DL+ information and ensemble name display for
the selected DAB station, or Hands Free information
(Bluetooth device name, Caller ID, Active Line)
8. System’s FM transmitting frequency to car radio
9. Link mode indicator - AFC_H, AFC_L, or AUTOSCAN
1. System’s FM transmitting frequency to car radio
2. Link mode indicator - AFC_H, AFC_L, or AUTOSCAN
3. Audio streaming indicator
4. Bluetooth indicator
No icon – disabled
– enabled but not connected
5. Auxiliary input /Bluetooth audio input, icon display, or
– enabled and connected
Hands Free information (Bluetooth device name,
Caller ID, Active Line)
8
www.clintdigital.com
ENGLISH
Basic operation
key
There are 6 control keys and a rotary knob the CAD15 unit:
Control
Press to enter Preset List in group 1.
Keep pressing key 1 to move among the 4 memory presets locations.
Press the rotary knob to recall the desired memory preset, or press and hold key 1 to program
1
the desired memory preset with the listening DAB station.
Press and Hold to toggle LCD backlight brightness level between high and low.
Press to enter Preset List in group 3
Keep pressing key 3 to move among the 4 memory presets locations.
3
Press the rotary knob to recall the desired memory preset, or press and hold key 3 to program
MODE
SCAN
the desired memory preset with the listening DAB station.
Press and Hold to toggle CAD15 audio input between DAB or AUX mode.
Press to enter Preset List in group 2
Keep pressing key 2 to move among the 4 memory presets locations.
Press the rotary knob to recall the desired memory preset, or press and hold key 2 to program
the desired memory preset with the listening DAB station.
Press and Hold to enter Menu Function
DA B Ra di oTex t – enable/disable display of DLS/DL+ information from the station,
DAB Lis t Order – change DAB station list sequence by alphabet or ensemble.
DAB List Reset – erase the DAB station list and perform a full scan of DAB stations
Bluetooth – enable/disable Bluetooth function.
Bluetooth Pair – enter Bluetooth device pairing mode.
2
Bluetooth Info – display the connected device information.
Bluetooth Reset – perform reset to erase all existing paired devices setup.
Link Mode – select operating mode (AFC_H/AFC_L/AutoScan).
AutoPowerDown – select inactive timeout (no key pressed) to standby mode
Antenna Power – set ON for active DAB antenna, set OFF for passive antenna.
Set Background – change the LED background display.
Module Upgrade – upgrade the module software to a new version.
Factory R eset– return all system settings to factory defaults.
Press to enter Preset List in group 4.
Keep pressing key 4 to move among the 4 memory presets locations.
4
Press the rotary knob to recall the desired memory preset, or press and hold key 4 to program
the desired memory preset with the listening DAB station.
Press and Hold to Perform a full scan for DAB stations.
General operation
9
 Loading...