

Page 1
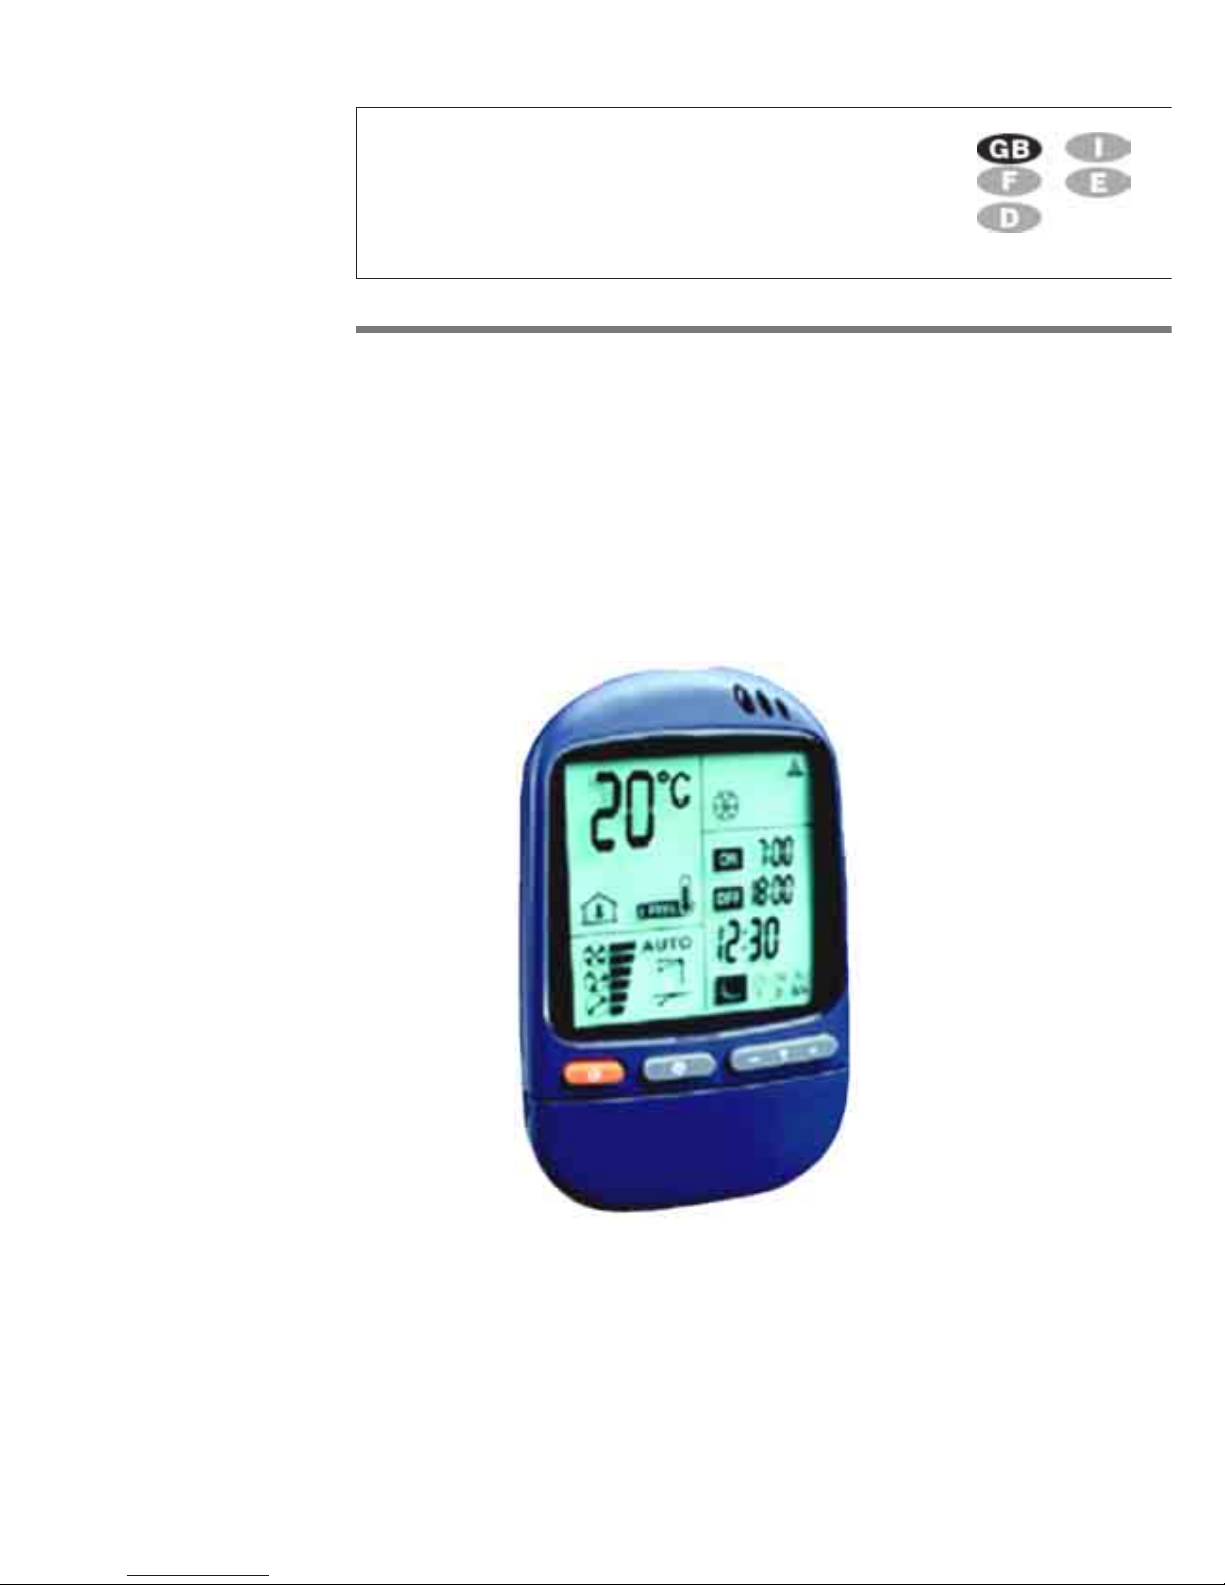
OPERATING MANUALOPERATING MANUAL
OPERATING MANUALOPERATING MANUAL
OPERATING MANUAL
MURC4 G - 399420MURC4 G - 399420
MURC4 G - 399420MURC4 G - 399420
MURC4 G - 399420
CLIMATISATION
RR
RR
R
C4C4
C4C4
C4
remote controlremote control
remote controlremote control
remote control
Page 2
2
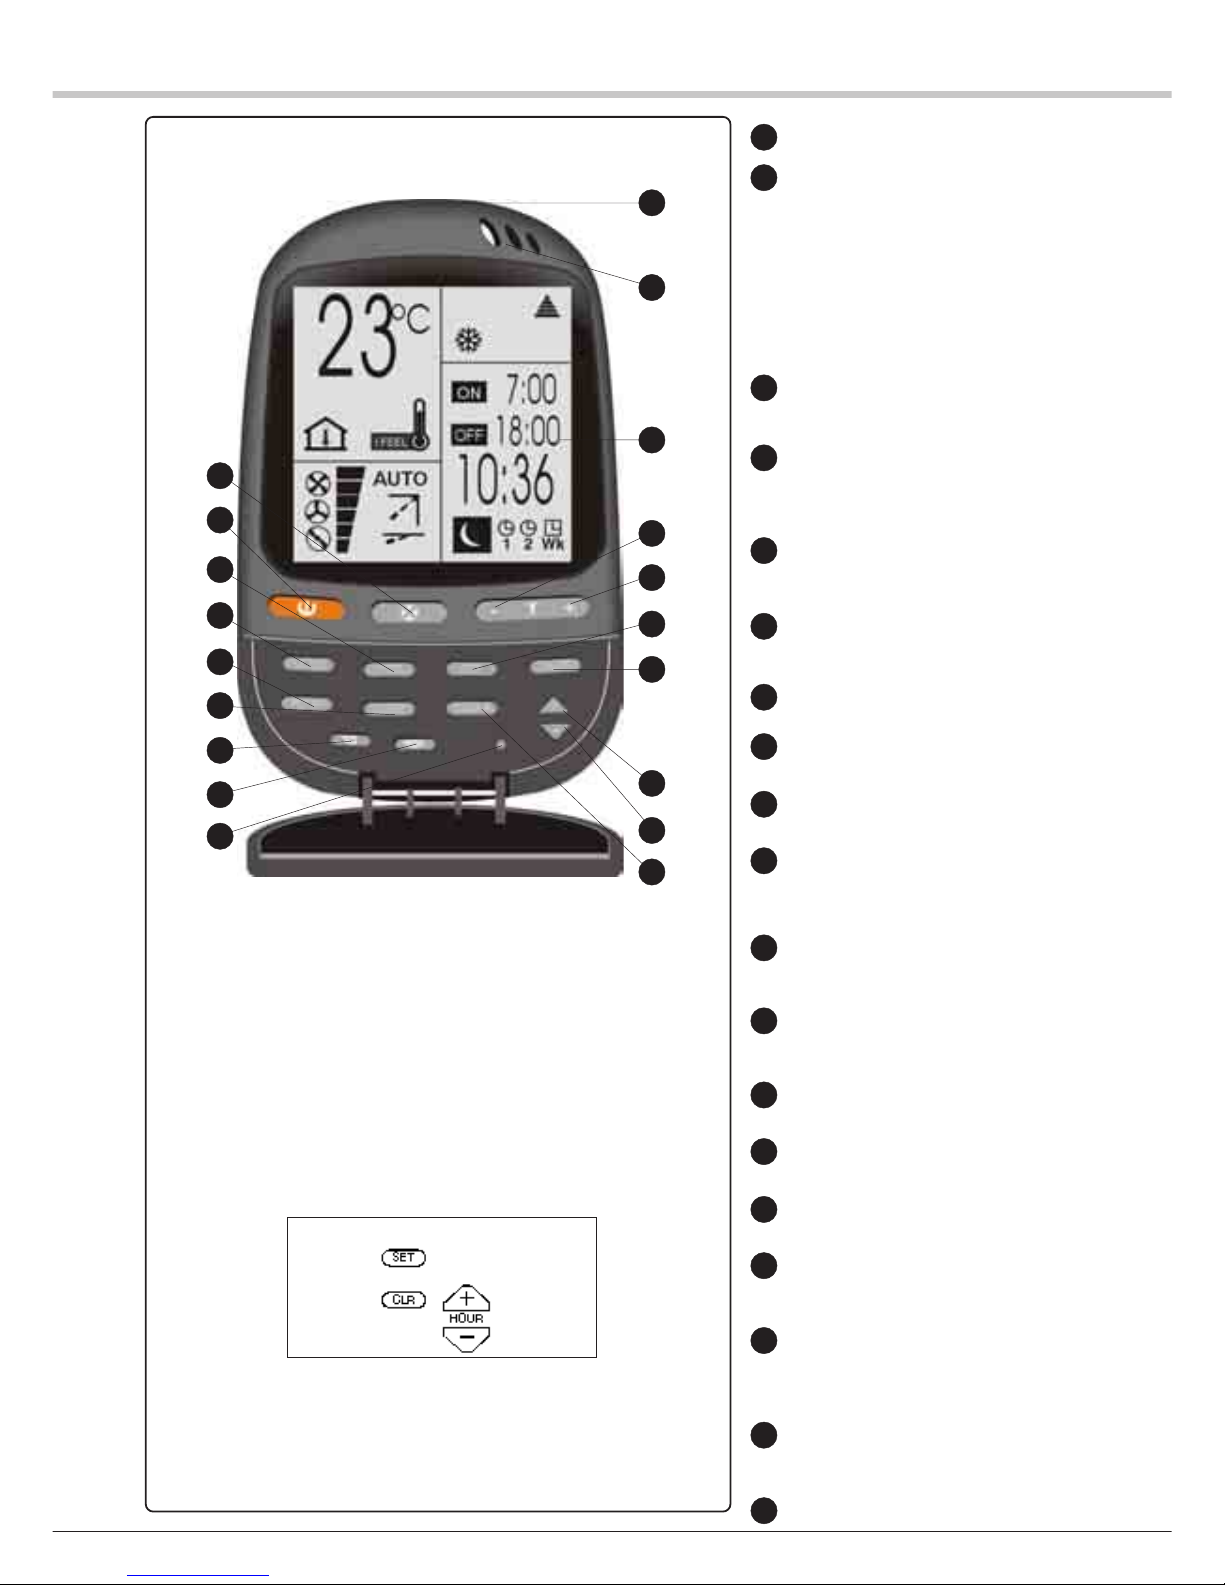
ON / OFF key
Operating mode selection key for
COOLING (except Water chiller wall
unit)
HEATING (except Water chiller wall
unit)
AUTOMATIC COOLING / HEATING REGULATION,
VENTILATION,
DEHUMIDIFICATION(except Water
chiller wall unit)
I FEEL key: local detection of temperature
VENTILATION SPEED or AUTOMATIC VENTILATION selection key
Ambient temperature increase key
Ambient temperature decrease key
SLEEP key
Directional vane sweeping (only wall unit
and water chiller wall unit)
Directional vane sweeping(only wall unit
and water chiller wall unit)
PROGRAMMING selection key
“+” key: increases the operating time datum
“-” key: decreases the operating time datum
Liquid crystal diode display (BACK LIGHT
OPTIONAL)
I FEEL sensor
Infrared signal transmitter
ROOM key: display of the ambient
temperature
SET key: sets the switch-on and/or switchoff times of the PROGRAMMING FUNCTION
CLEAR key: cancels the preset parameters
of the clock
LOCK keyTouche SET
RESET FUNCTION:
1) Remove one battery
2) Simultaneously press these 4 keys until
the symbols are no longer displayed
3) Reinstall the battery
NOTE :NOTE :
NOTE :NOTE :
NOTE :
Open the cover / flap to access the control keys.
The four keys to be pressed are:
1
2
3
4
5
6
7
8
9
10
11
12
13
14
15
16
17
18
19
9
4
16
1
3
2
7
8
19
6
5
17
13
14
15
10
11
12
18
Page 3
3
INSTRUCTIONS FOR THE REMOTE CONTROL
OPERATION OF THE PROGRAMMING FUNCTIONS
Four different types of programming function can be selected with the remote control. Two
daily programming functions (called T1 & T2) and two optional week-end programming functions
(called WKT1 & WKT2). Each of these programming functions can be selected by pressing
the TIMER key (10). To adjust the programs, use the HOUR + key (11) and HOUR - key (12).
The SET key (17) activates the programming function, and the CLEAR key (18) cancels it.
A. DAILY PROGRAMMING
Daily programming functions T1 and T2 enable the switch-on and switch-off times to be programmed
separately over two different periods. Once it has been set, the programming function will run every
day.
B. WEEK-END PROGRAMMING (OPTIONAL)
Week-end programming functions WKT1 and WKT2 enable the switch-on and switch-off to be
programmed separately over two different periods, for two days only.
These programs will operate on the specified day and following day, for two days only.
At midnight on the second day, the WK programming function stops and the daily programming
function resumes its normal operation.
* WKT1 - Active on the specified day
* WKT2 - Active on the day after the specified day
REMARK:
1. During the operation of the week-end programming functions, the daily programming functions are
deactivated.
2. The WK programming functions must be reactivated before each week-end.
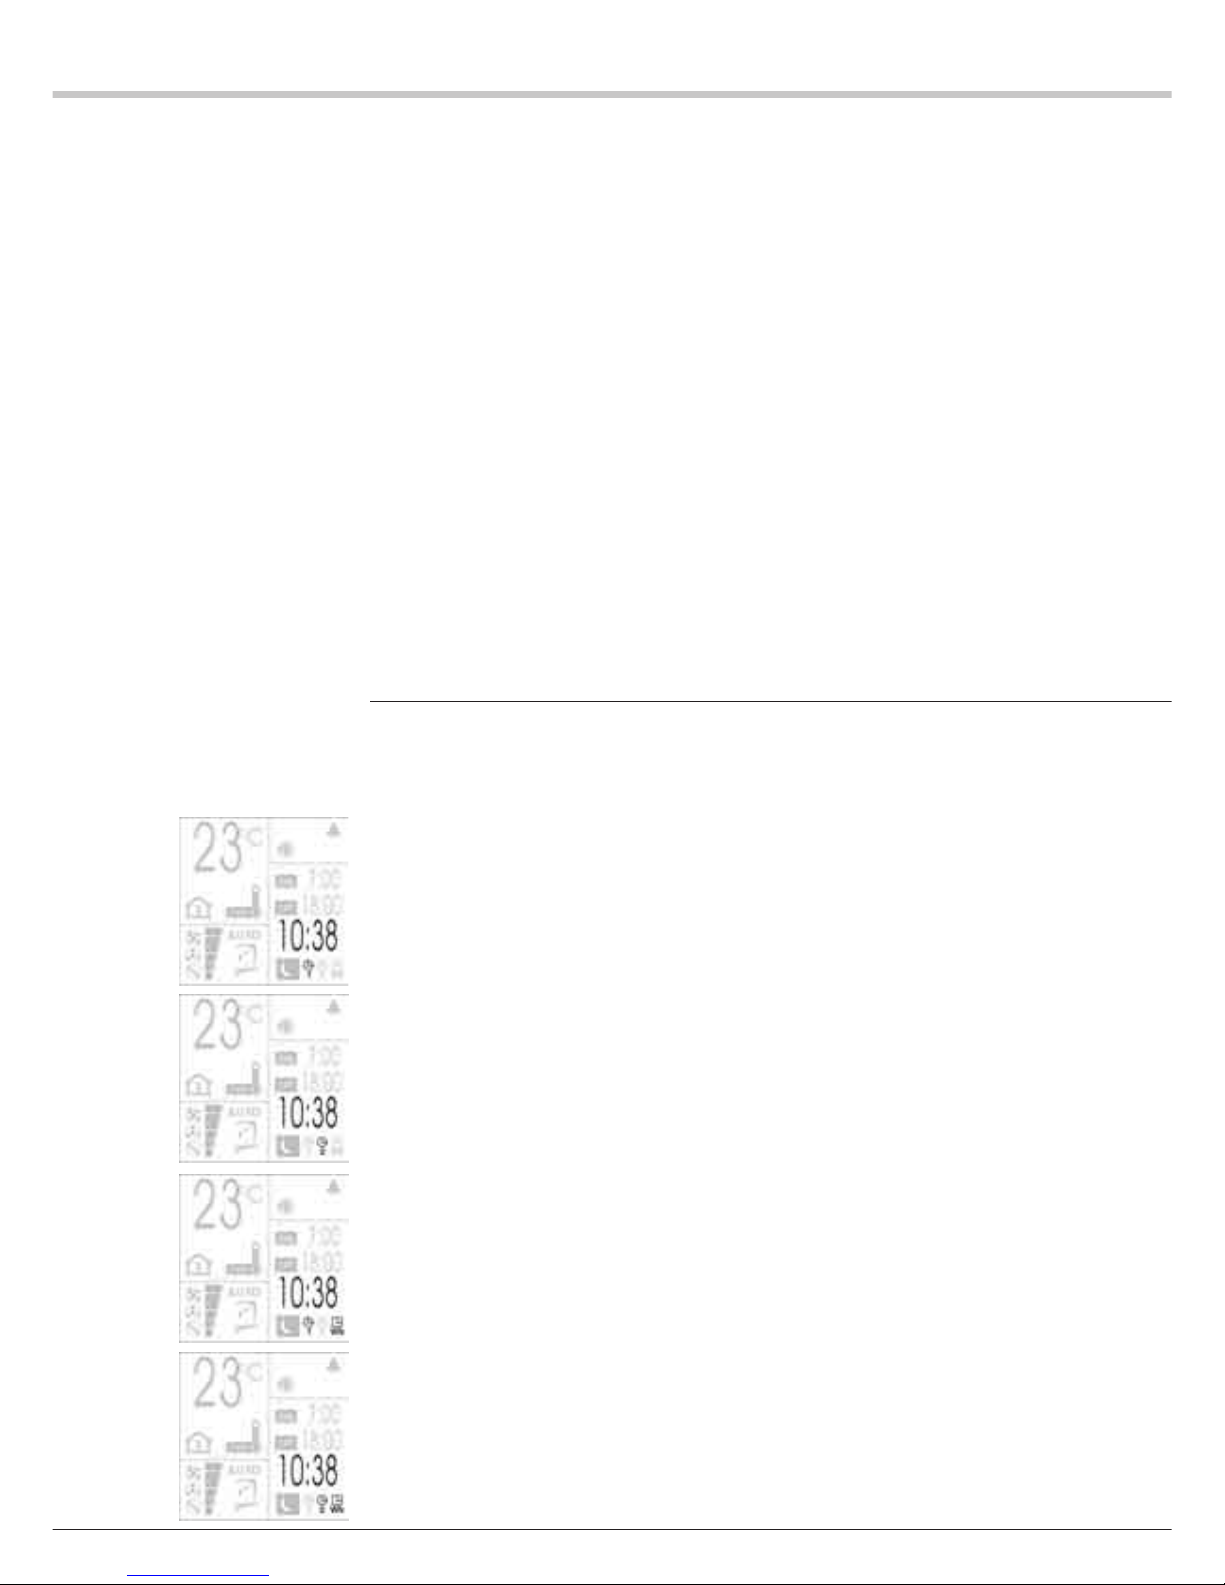
C. CHOICE OF A PROGRAMMING FUNCTION
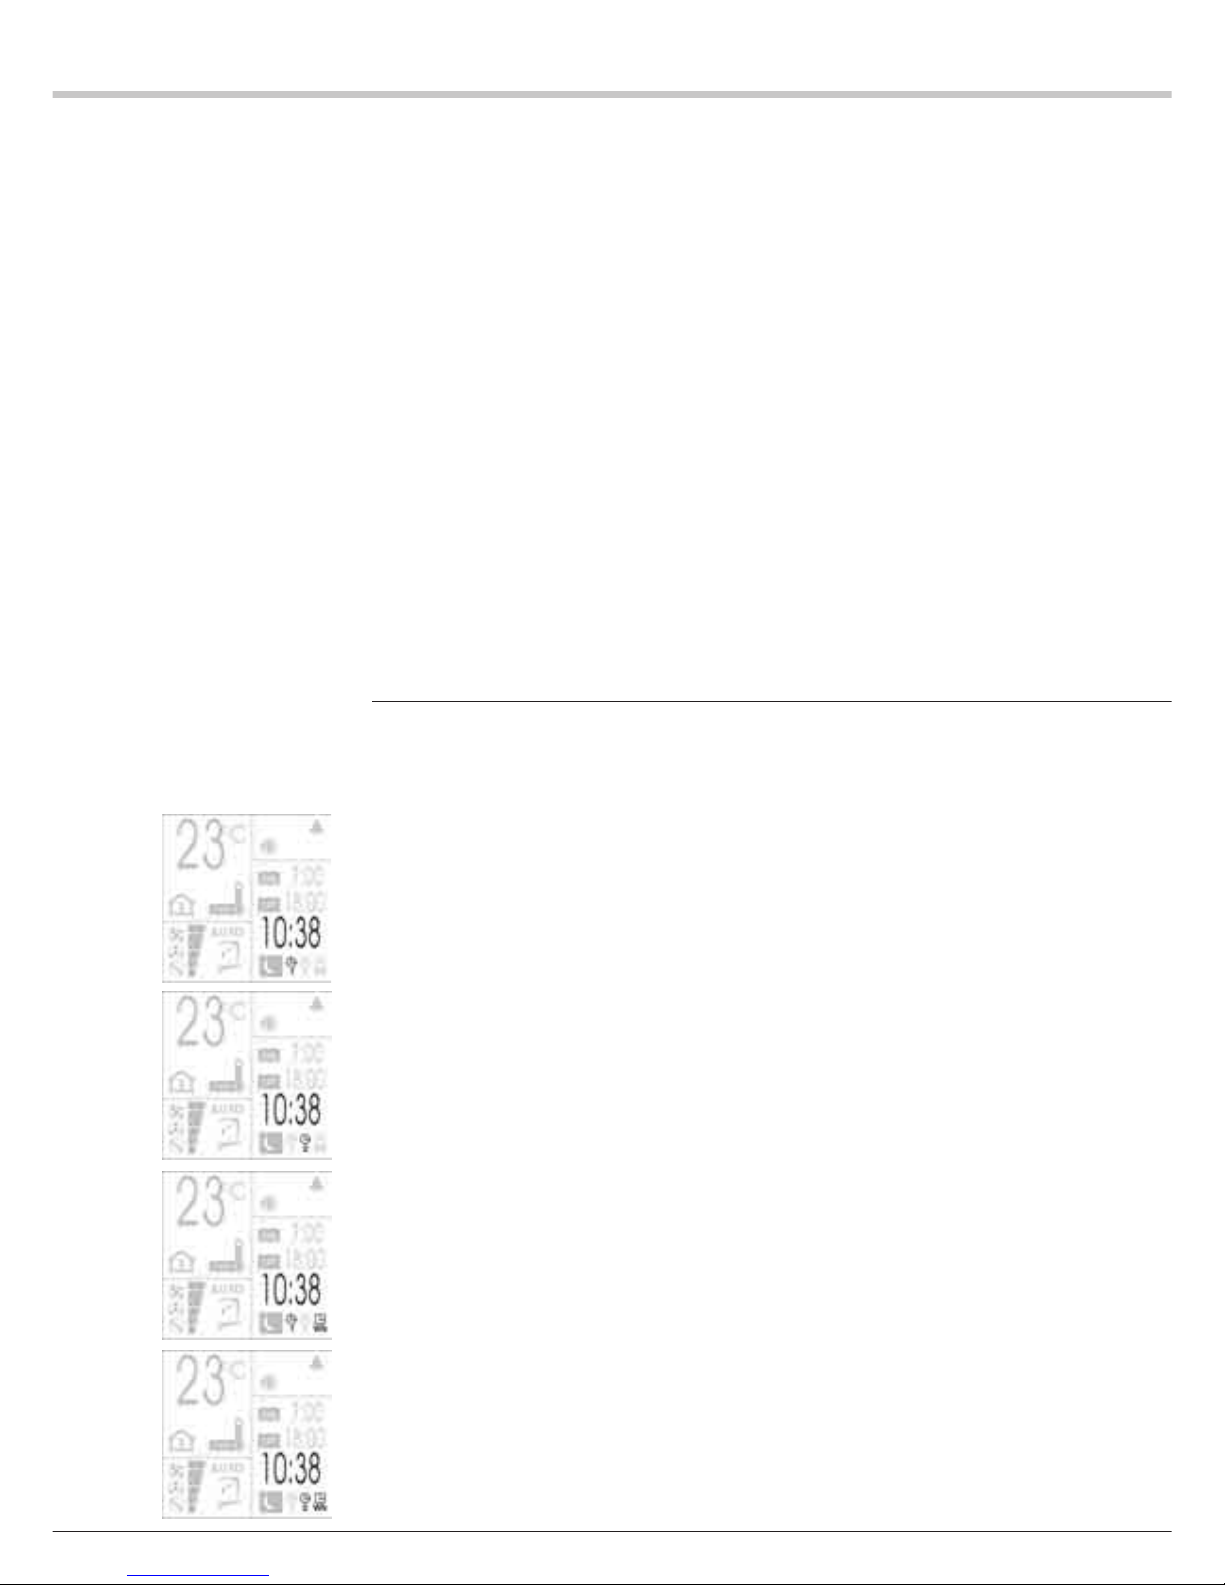
Press the TIMER key (10) to select a programming function. Each
time the TIMER key (10) is pressed, one of the four programming
icons shown below appears on the LCD display.
1 Press the TIMER key to select daily programming function T2.
Icon 2 of Programming function T2 flashes.
2 Press the TIMER key to select daily programming function T2.
Icon 2 of Programming function T2 flashes.
3 Press the TIMER key to select week-end programming function
WKT1.
Icons 1 and WK flash.
4 Press the TIMER key to select week-end programming function
WKT2.
Icons 2 and WK flash.
Page 4
4
ADJUSTMENT OF THE SWITCH-ON TIME
After selecting a programming function (T1, T2 or WKT1, WKT2),
proceed as follows to adjust the programmed switch-on time.
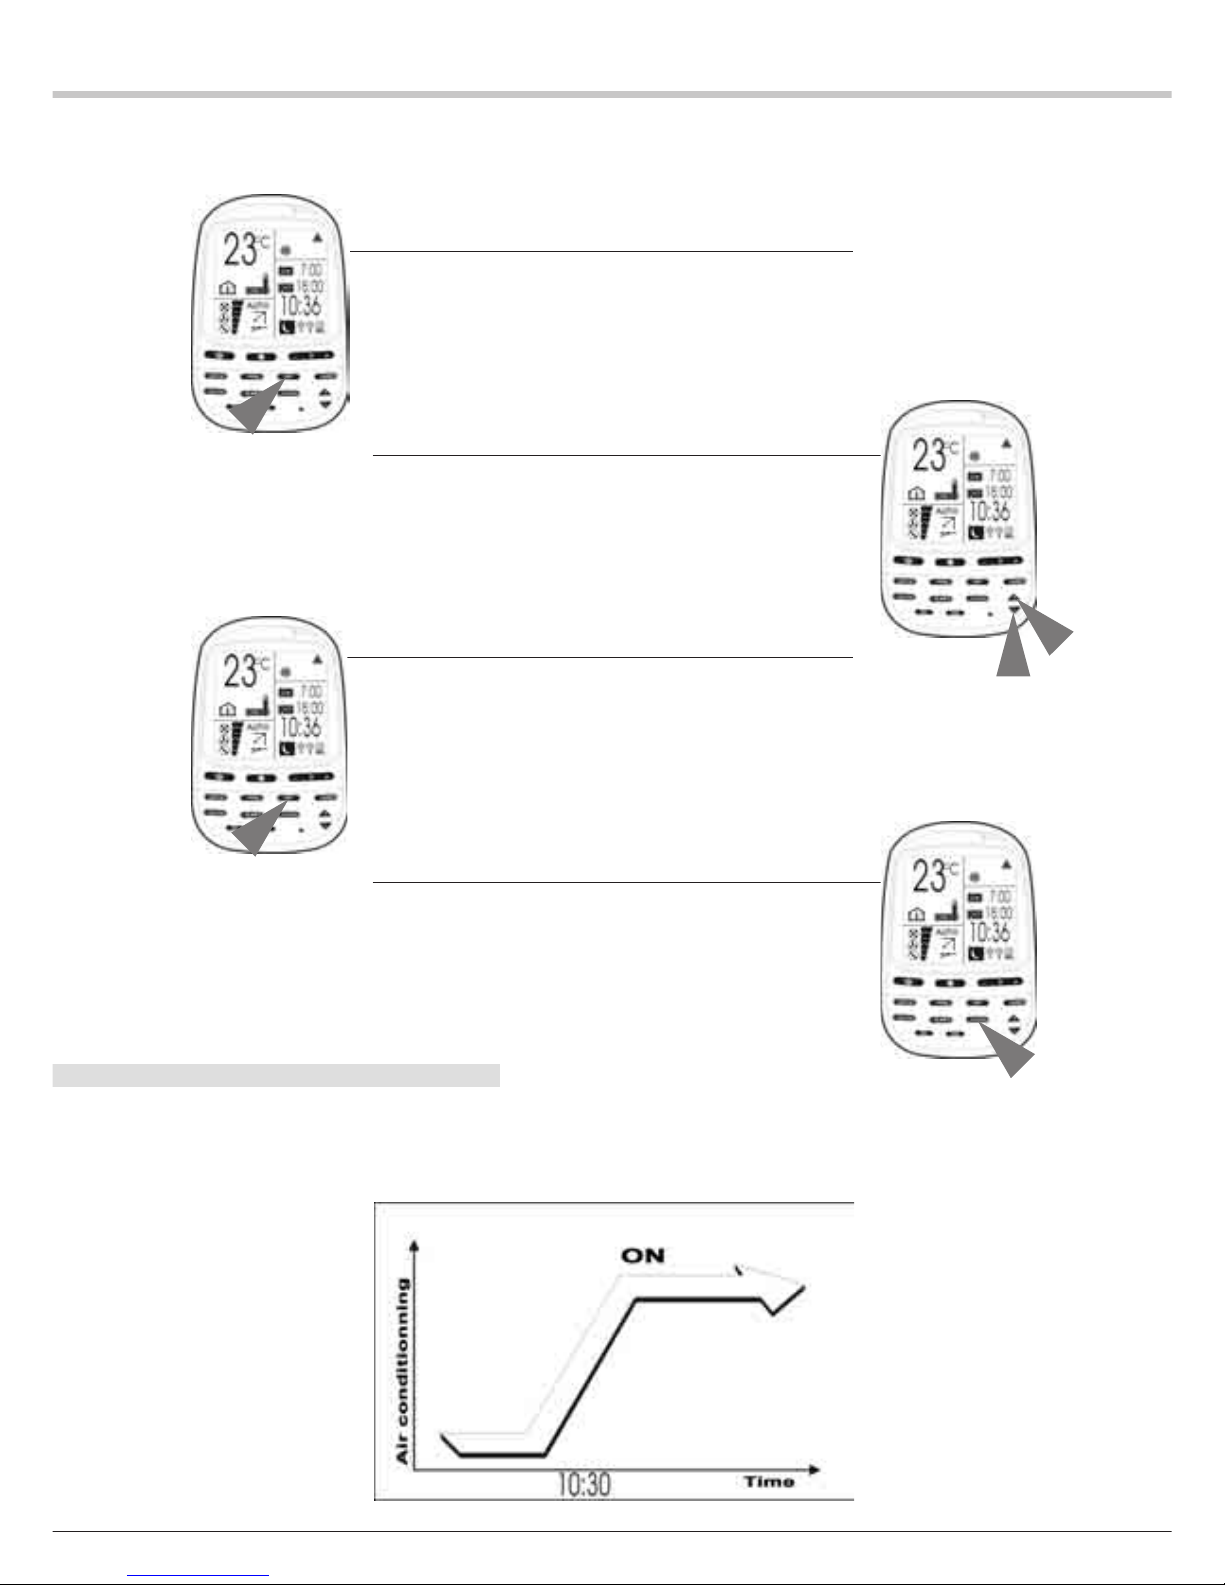
EXAMPLE: Air conditioner switch-on at 10:30 (a.m.)
1 Press the SET key
The ON (switch-on) icon and the switch-on time flash.
2 Adjust the hour and minutes.
1. Set the switch-on time to 10:30
2. Press the HOUR + key to increase the time or the HOUR - key to
decrease it.
3 Press the SET key.
1. The switch-on time is programmed for 10:30 (a.m.) (the “ON”
[Switch-on] icon comes on steadily).
2. The “OFF” [Switch-off] icon and the switch-off time flash.
4 Press the CLEAR key.
The programmed switch-off is no longer displayed.
REMARKS:REMARKS:
REMARKS:REMARKS:
REMARKS:
1. The implicit settings of the programming functions are 7:00 and
18:00 (7 a.m. and 6 p.m.) for the switch-on and switch-off times.
2. The programming mode will always display the last switch-on and
switch-off (ON and OFF) settings on the LCD display.
Page 5
5
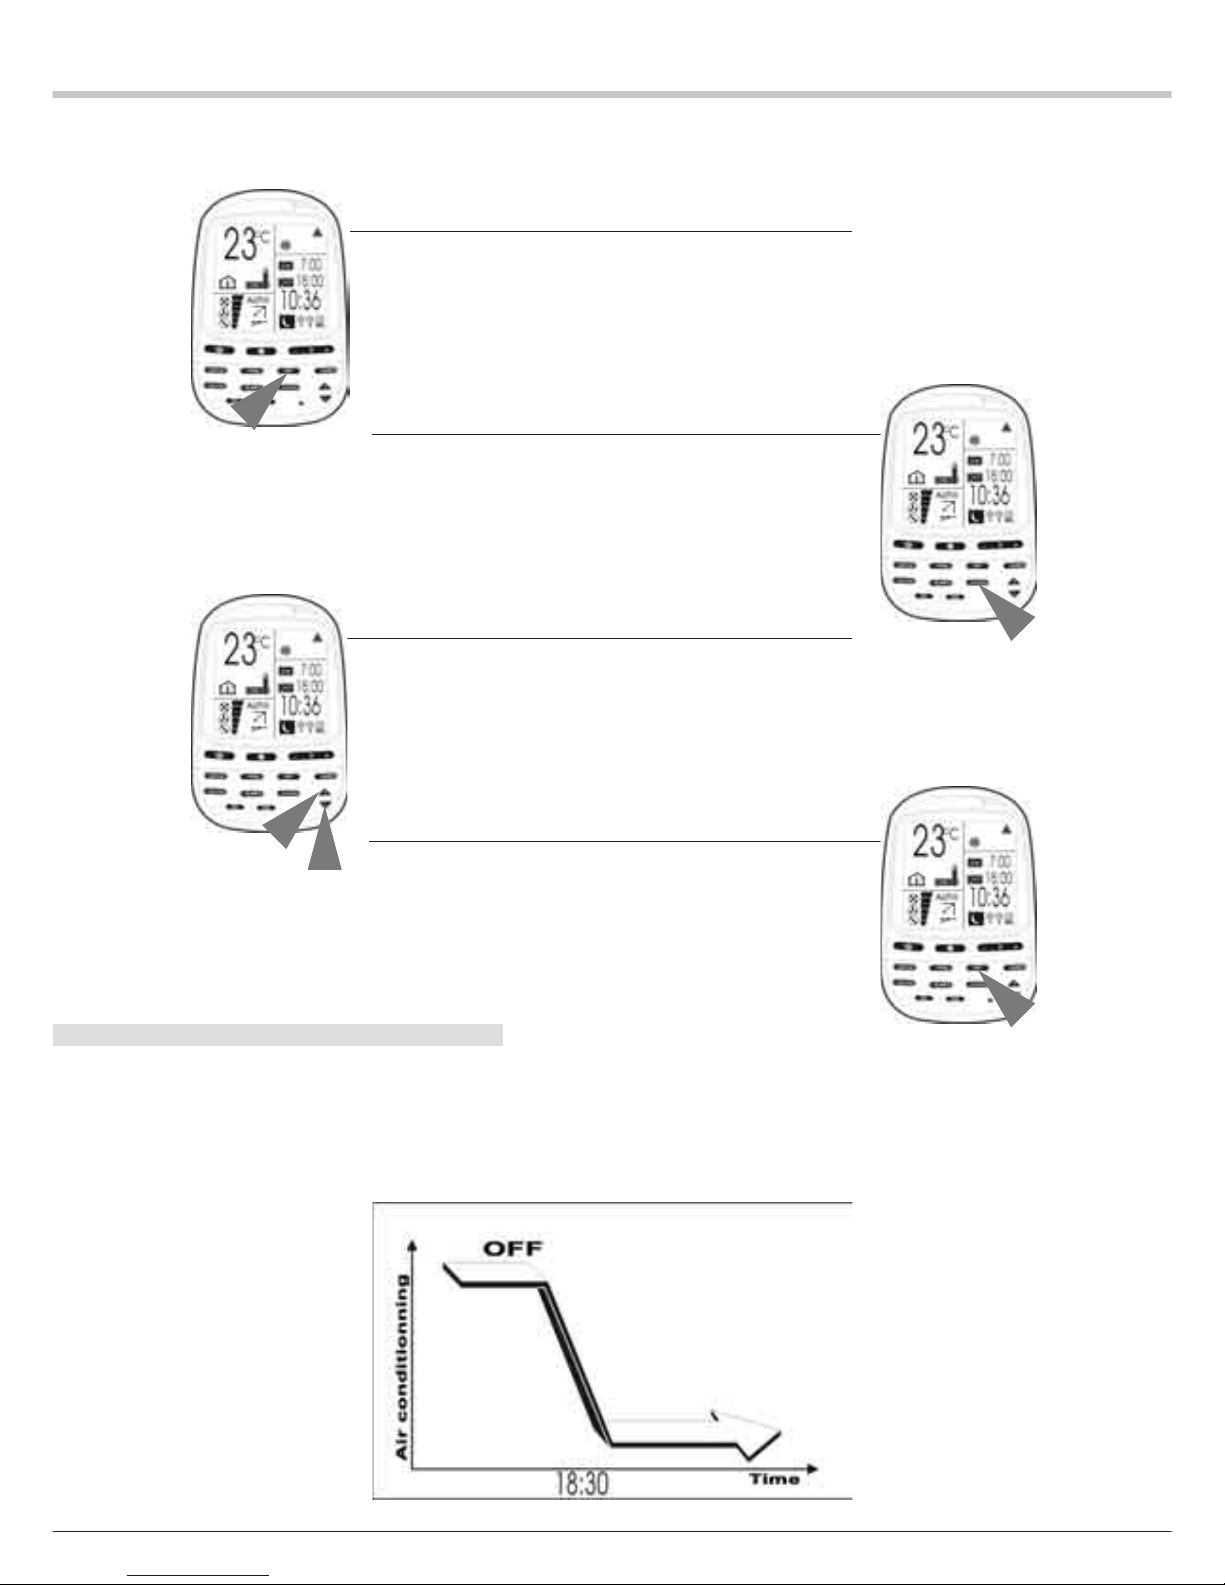
ADJUSTMENT OF THE SWITCH-OFF TIME
After selecting a programming function (T1, T2 or WKT1, WKT2),
proceed as follows to adjust the programmed switch-off time.
EXAMPLE: Air conditioner switch-off at 18:30 (6:30 p.m.)
1 Press the SET key
The ON (switch-on) icon and the switch-on time flash.
2 Press the CLEAR key.
1. The programmed switch-on is no longer displayed.
2. The “OFF” (Switch-off) icon and the switch-off time flash.
3 Adjust the hour and minutes.
1. Set the switch-off time to 18:30 (6:30 p.m.)
2. Press the HOUR + key to increase the time or the HOUR - key to
decrease it.
4 Press the SET key.
1. The switch-off time is programmed for 18:30 (6:30 p.m.) (the
“OFF” icon of the programming function comes on steadily).
REMARKS:REMARKS:
REMARKS:REMARKS:
REMARKS:
1. The implicit settings of the programming functions are 7:00 and
18:00 (7 a.m. and 6 p.m.) for the switch-on and switch-off times.
2. The programming mode will always display the last switch-on and
switch-off settings on the LCD display.
Page 6
6
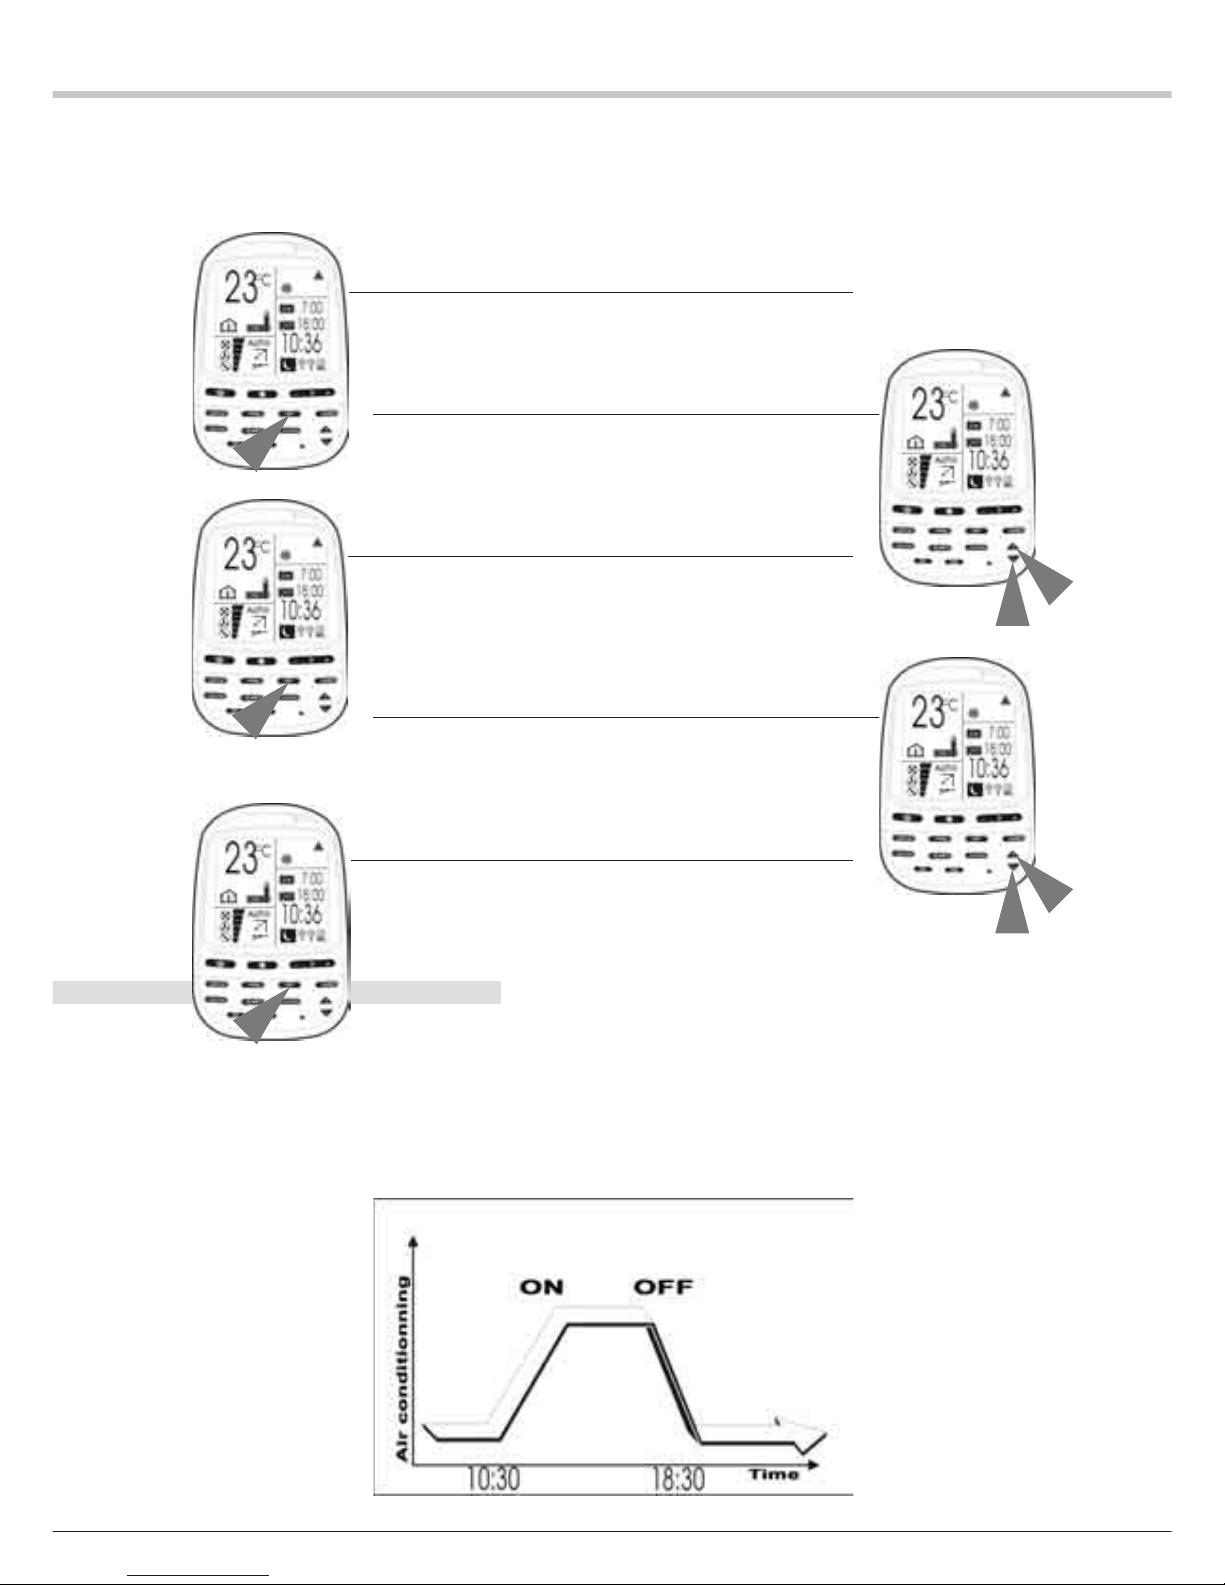
ADJUSTMENT OF THE SWITCH-ON AND SWITCH-OFF
TIMES
After selecting a programming function (T1, T2 or WKT1, WKT2),
proceed as follows to adjust the programmed switch-on and
switch-off times.
EXAMPLE: Air conditioner switch-on at 10:30 (a.m.) and switchoff at 18:30 (6:30 p.m.)
1 Press the SET key
The ON (switch-on) icon and the switch-on time flash.
2 Adjust the hour and minutes.
1. Set the switch-on time (ON) to 10:30
2. Press the HOUR + key to increase the time or the HOUR - key to
decrease it.
3 Press the SET key.
1. The switch-on time is programmed for 10:30 (a.m.) (the ON icon
flashes
2
).
2. The “OFF” (Switch-off) icon and the switch-off time flash.
4 Adjust the hour and minutes.
1. Set the switch-off time (OFF) to 18:30 (6:30 p.m.)
2. Press the HOUR + key to increase the time or the HOUR - key to
decrease it.
5 Press the SET key.
The switch-off time is programmed for 18:30 (6:30 p.m.) (the “OFF”
icon of the programming function comes on steadily).
REMARKS:REMARKS:
REMARKS:REMARKS:
REMARKS:
1. The implicit settings of the programming functions are 7:00 and
18:00 (7 a.m. and 6 p.m.) for the switch-on and switch-off times.
2. The programming mode will always display the last switch-on and
switch-off settings on the LCD display.
3. Pressing the CLEAR key (18) for 5 seconds cancels all the
programming function settings and erases the display of the
programming.
Page 7
7
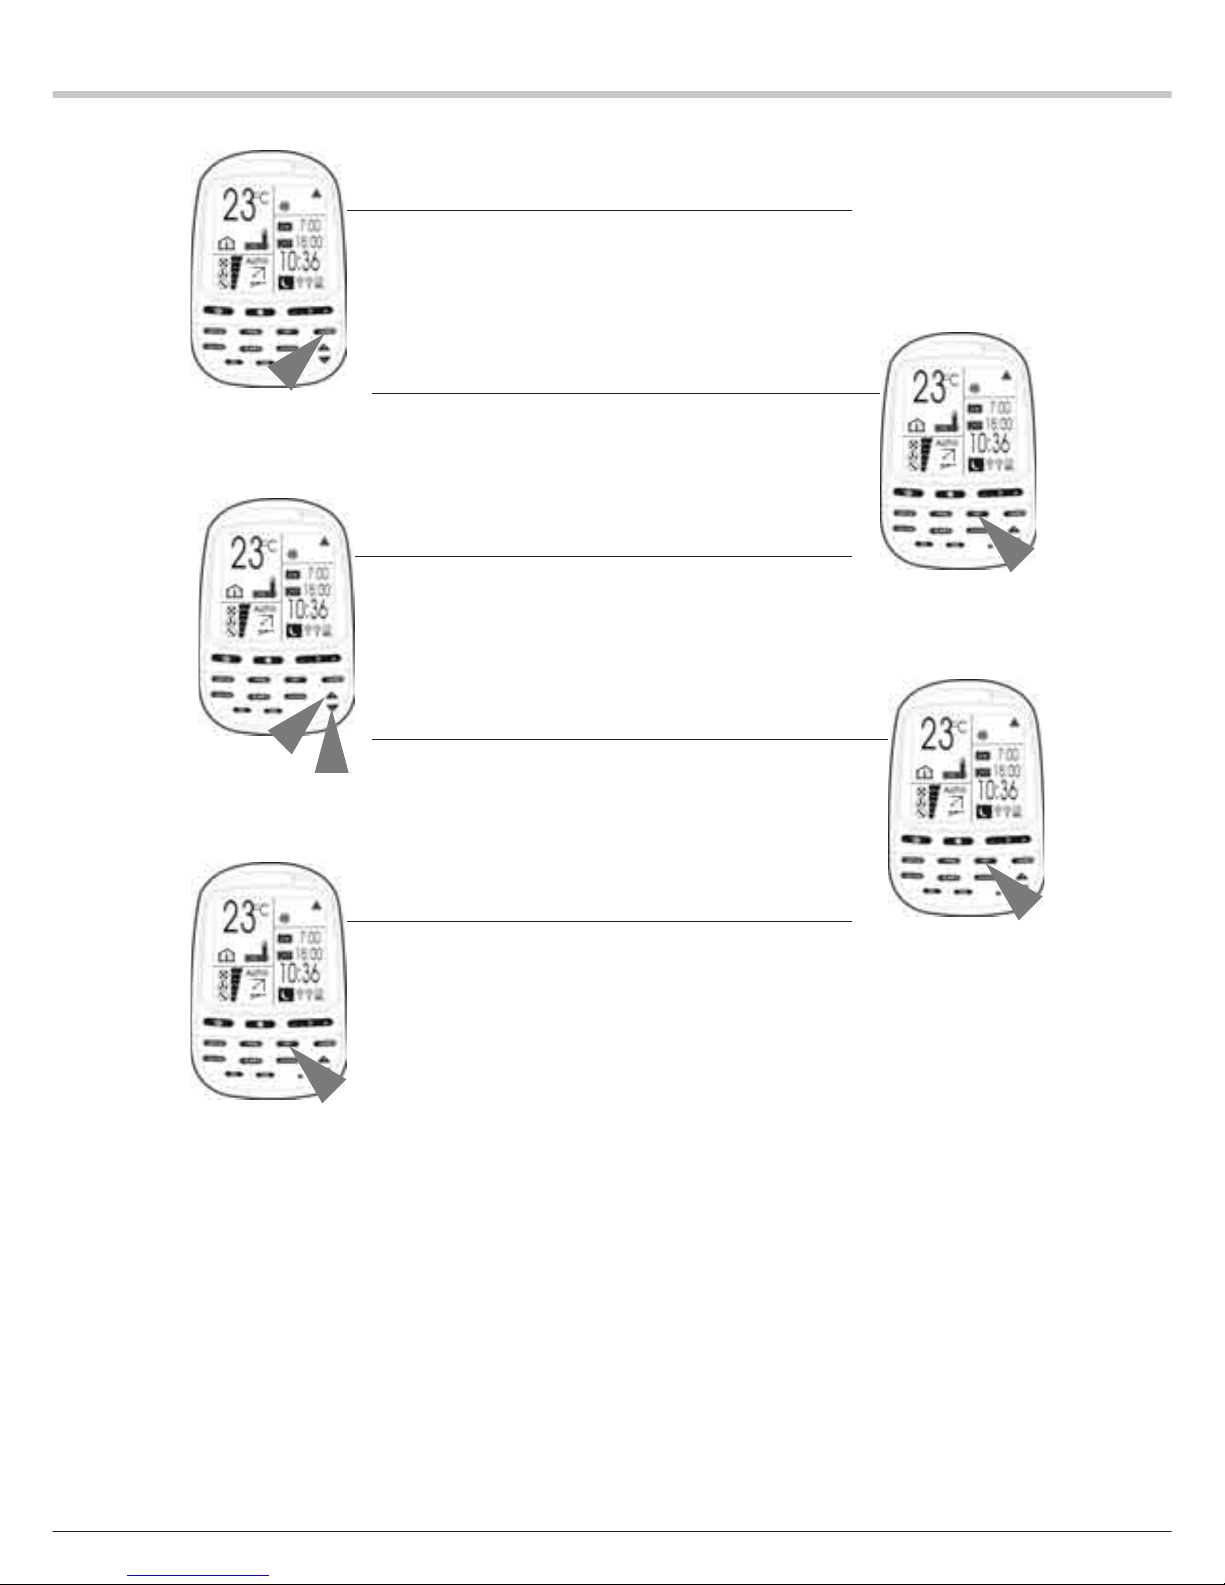
TO CHANGE THE PRESET TIMES
Example: To change the switch-on time from 10:30 (a.m.) to 9:20 (a.m.)
(without changing the switch-off time).
1 Press the TIMER key until the icon of the selected programming
function flashes.
REMARK: the times already programmed into the corresponding
programming function are displayed without flashing.
2 Press the SET key to enter the edit mode.
The ON (Switch-on) icon and the switch-on time flash.
3 Change the time to 9:20 (a.m.) by pressing the HOUR - key.
The ON icon and the switch-on time flash.
4 Press the SET key to save the new setting.
The ON icon and the switch-on time come on steadily, and the
“OFF” (Switch-off) icon and the switch-off time flash.
5 Press the SET key to confirm the previous setting of the switch-off
time.
The ON and OFF icons and the corresponding programmed times
come on steadily.
Page 8
8
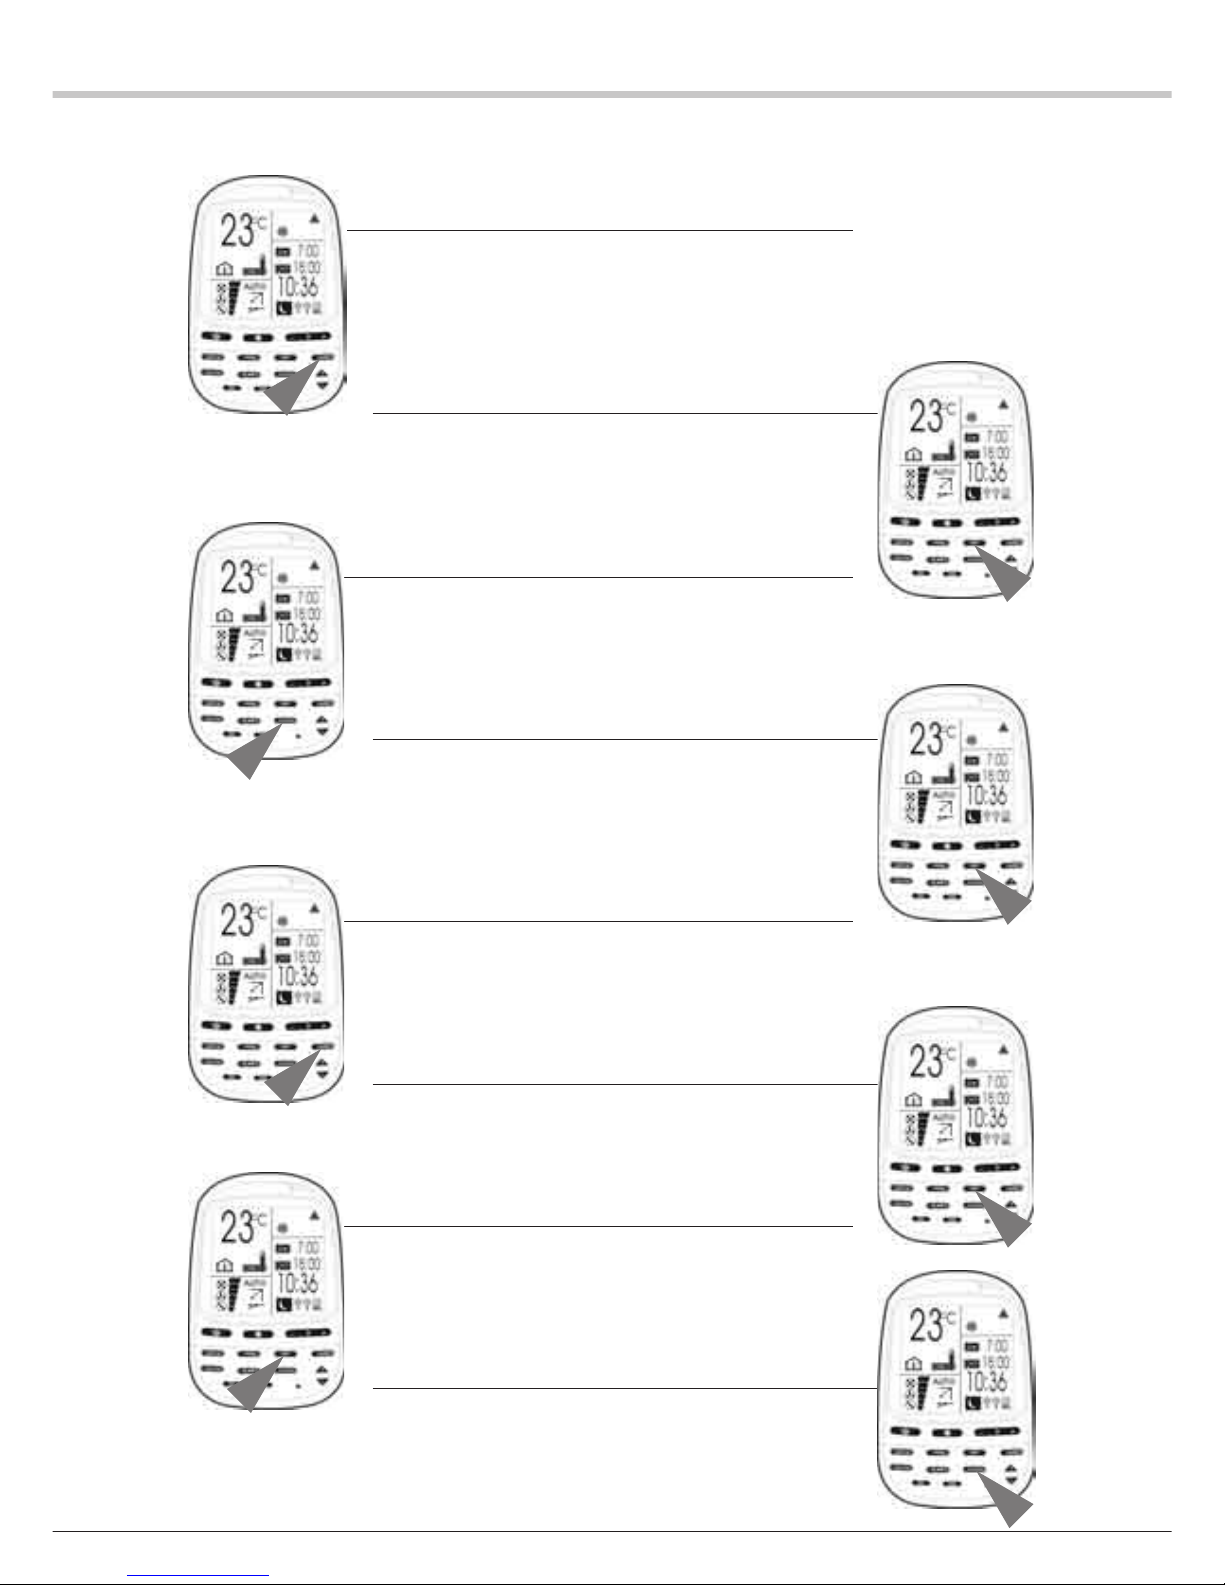
TO CANCEL THE TIME SETTING OF A SPECIFIC PROGRAMMING
FUNCTION
To cancel the switch-on time whilst retaining the previously set switchoff time.
1 Press the TIMER key to select the required programming function.
The selected programming function icon flashes and the
corresponding previously programmed switch-on and switch-off
times come on steadily.
2 Press the SET key to enter the edit mode.
The ON (Switch-on) icon and the switch-on time flash.
3 Press the CLEAR key
The switch-on time is cleared. The OFF (Switch-off) icon and the
switch-off time flash.
4 Press the SET key
This confirms the new setting
TO CANCEL THE SWITCH-OFF TIME WHILST RETAINING THE
PREVIOUSLY SET SWITCH-ON TIME.
1 Press the TIMER key to select the required programming function.
The selected programming function flashes and the corresponding
previously programmed switch-on and switch-off times come on
steadily.
2 Press the SET key.
The ON icon and the switch-on time flash.
3 Press the SET key.
The ON icon and the switch-on time come on steadily.
The OFF icon and the switch-off time flash.
4 Press the CLEAR key
The switch-off time is cleared.
Page 9
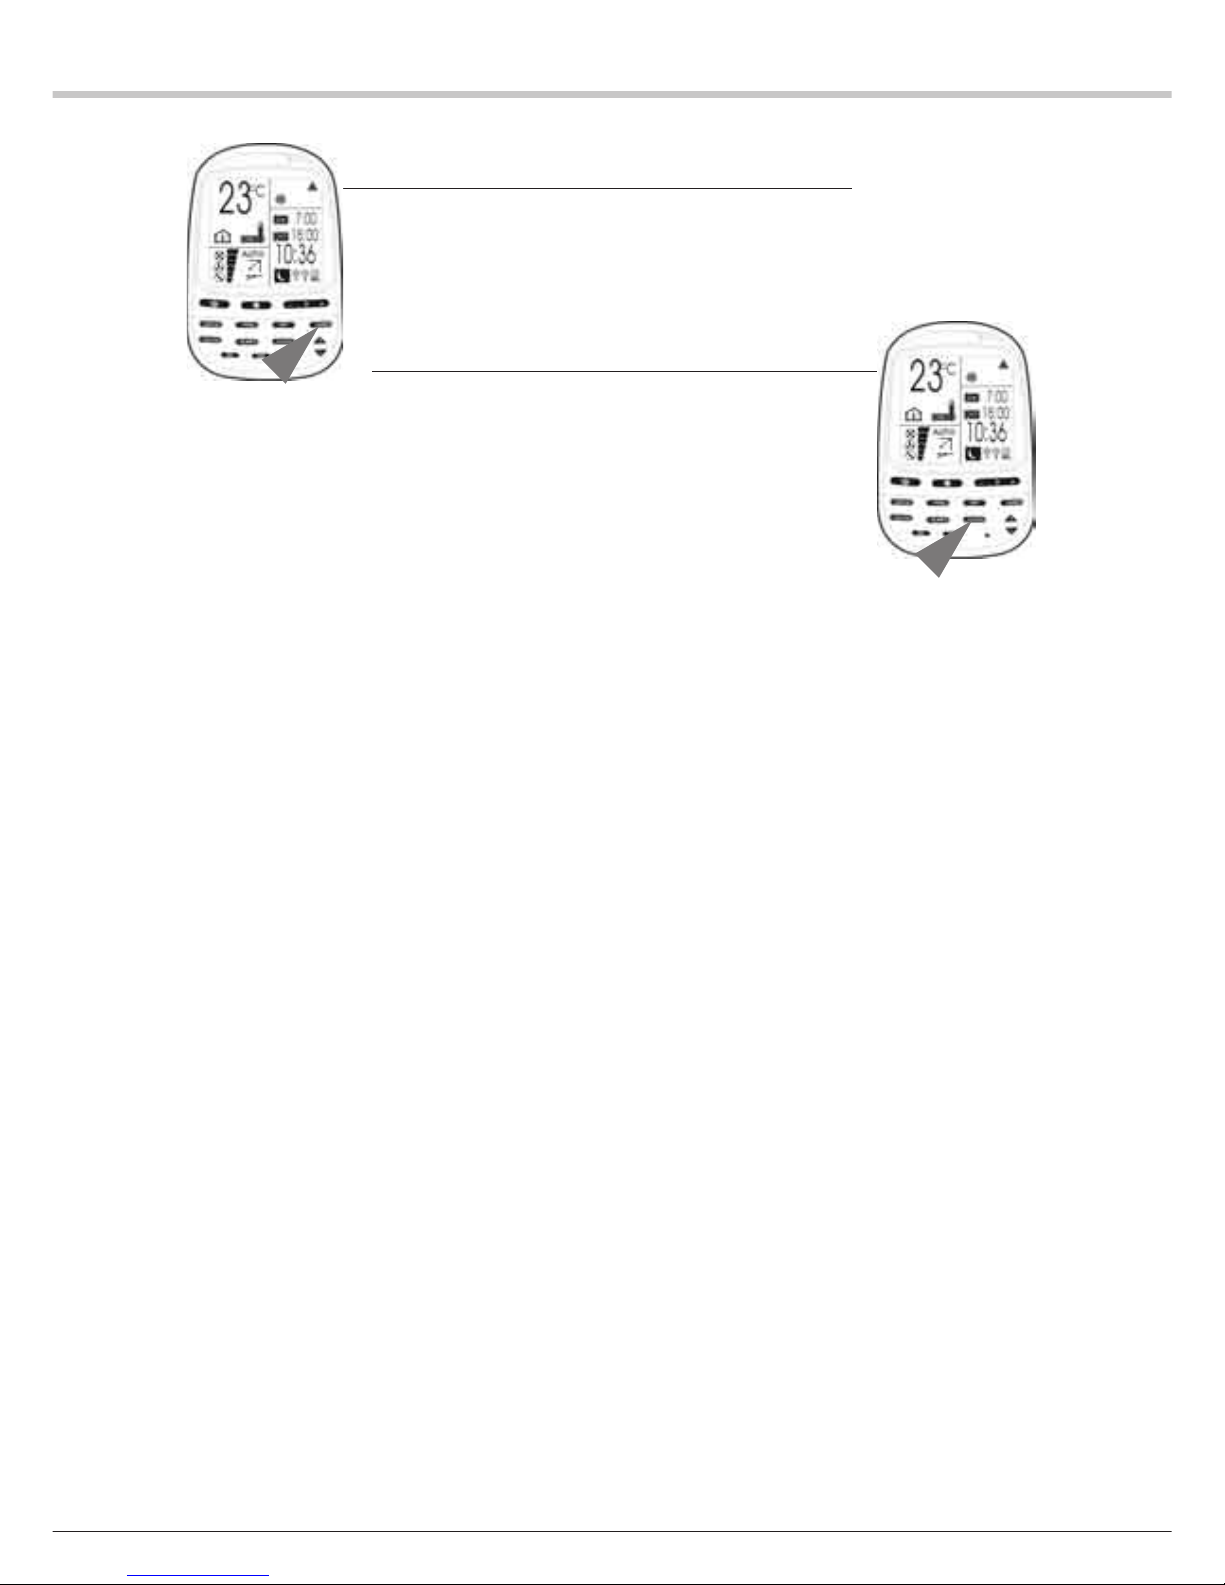
9
TO CANCEL THE SWITCH-ON AND SWITCH-OFF SETTINGS.
1 Press the TIMER key to select the required programming function.
The selected programming function icon flashes and the corresponding
previously programmed switch-on and switch-off times come on
steadily.
2 Press the CLEAR key
All the settings in the selected programming function are cleared.
NIGHT SLOW (SLEEP) FUNCTIONNIGHT SLOW (SLEEP) FUNCTION
NIGHT SLOW (SLEEP) FUNCTIONNIGHT SLOW (SLEEP) FUNCTION
NIGHT SLOW (SLEEP) FUNCTION
Press the SLEEP key (7) to select the night slow function.
The night slow icon and the implicit night slow termination time icon (7
hours after the current time) flash.
The implicit setting can be set to any value between 3 hours and 12
hours, by pressing the HOUR + key (11) or the HOUR - key (12).
(The initial value displayed by the SLEEP clock is either the implicit
value or the selected value, plus the current time).
Example: It is currently 23:00 (11 p.m.) and the sleep mode is selected.
The sleep mode termination time will implicitly be 6:00 (6 a.m.) If the
sleep mode value is set to 10 hours, the sleep mode termination
time will be 9:00 (9 a.m.).
Page 10

10
Page 11
MANUEL D'UTILISATIONMANUEL D'UTILISATION
MANUEL D'UTILISATIONMANUEL D'UTILISATION
MANUEL D'UTILISATION
MURC4 G - 399420MURC4 G - 399420
MURC4 G - 399420MURC4 G - 399420
MURC4 G - 399420
CLIMATISATION
TélécommandeTélécommande
TélécommandeTélécommande
Télécommande
RR
RR
R
C4C4
C4C4
C4
Page 12
2
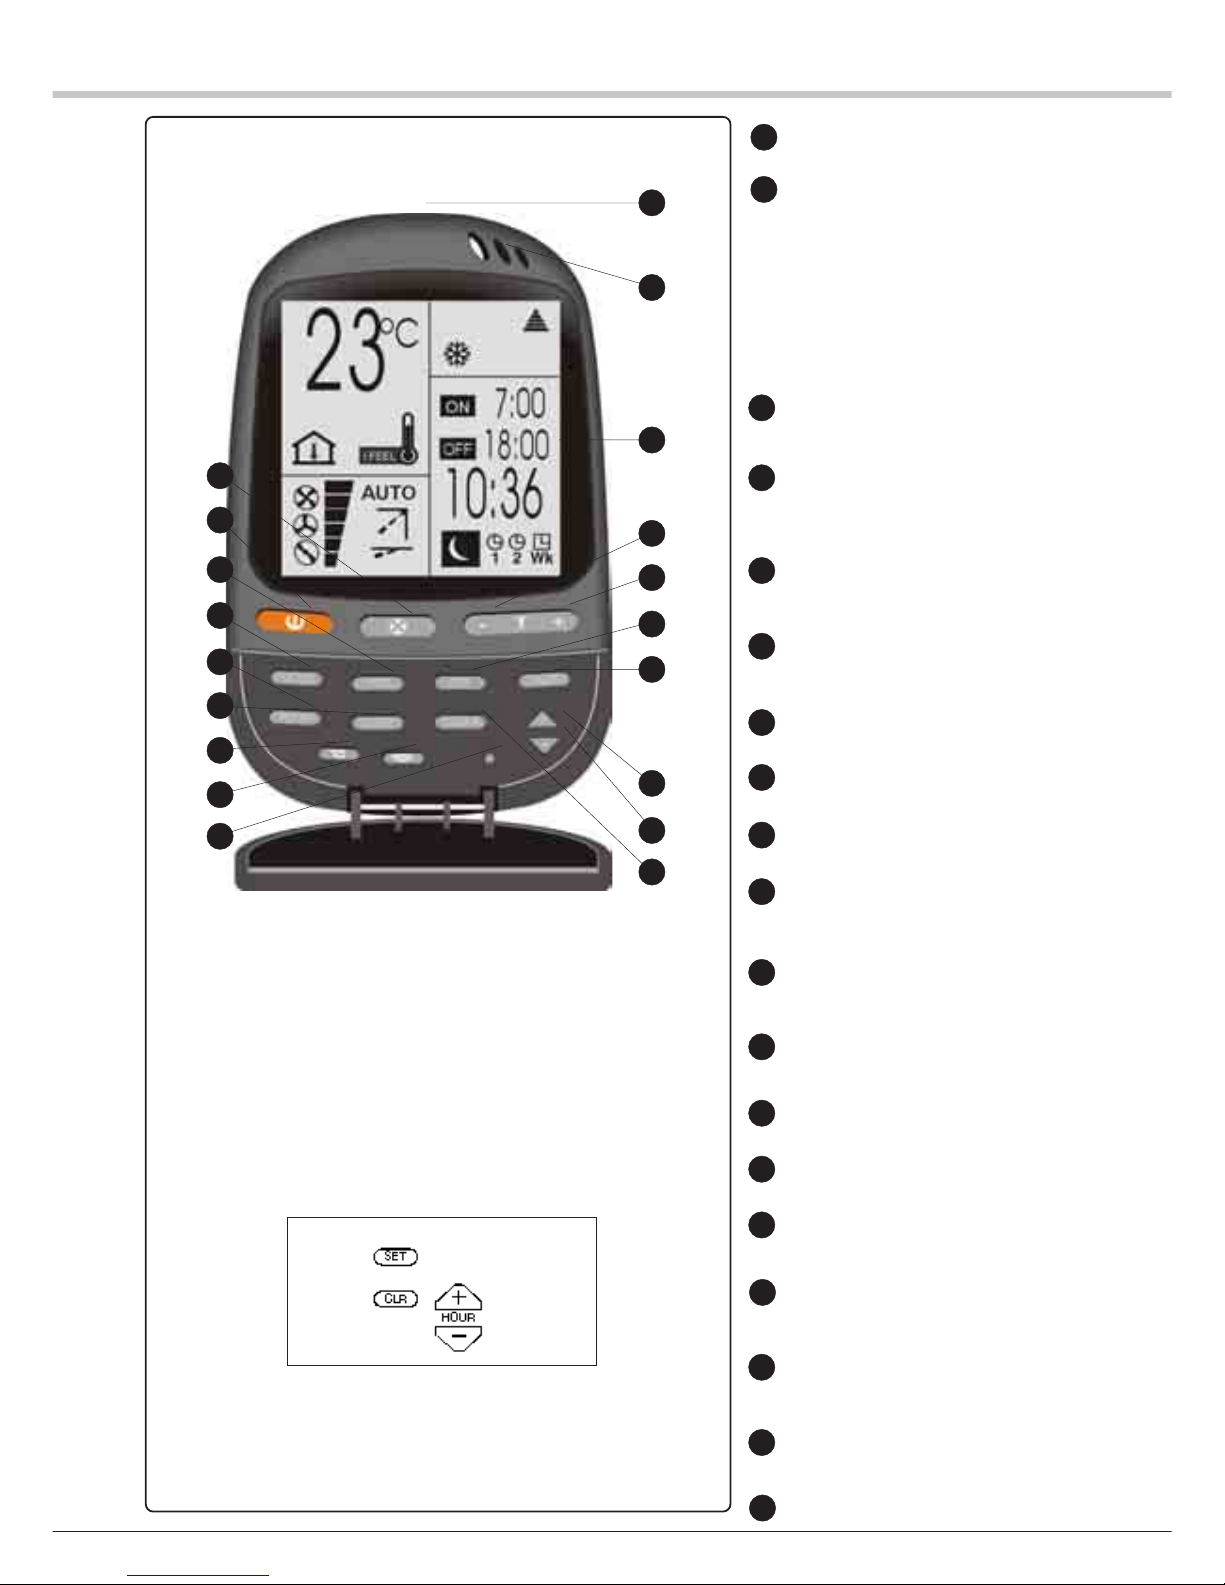
Touche START / STOP
(Marche / Arrêt)
Touche de sélection du mode de fonctionnement en :
FROID (sauf pour muraux eau
glacée)
CHAUFFAGE (sauf pour muraux "eau
glacée")
REGULATION AUTOMATIQUE FROID /
CHAUD
VENTILATION
DESHUMIDIFICATION (sauf pour
muraux "eau glacée")
Touche I FEEL : détection locale de la
température
Touche de sélection de la VITESSE de
VENTILATION ou de la VENTILATION
AUTOMATIQUE
Touche d'élévation de la température
ambiante
Touche d'abaissement de la température
ambiante
Touche SLEEP
Balayage des volets (seulement pour
muraux et muraux "eau glacée")
Balayage des volets (seulement pour
muraux et muraux "eau glacée")
Touche de sélection de la PROGRAMMATION
Touche + : augmente la consigne de
durée de fonctionnement
Touche - : diminue la consigne de durée
de fonctionnement
Afficheur à cristaux liquides
RETROECLAIRAGE (OPTIONNEL)
Capteur I FEEL
Emetteur du signal infrarouge
Touche ROOM : affichage de la température ambiante
Touche SET : fixe les heures de marche
et/ou d'arrêt de la PROGRAMMATION
Touche CLEAR : annule les paramètres
de l'horloge
Touche VERROUILLAGE
FONCTION RESET :
1) Retirer 1 pile.
2) Maintenir simultanément ces 4 touches
jusqu'à extinction des symboles.
3) Remettre la pile.
NOTE :NOTE :
NOTE :NOTE :
NOTE :
Ouvrir le couvercle / volet pour accéder
aux boutons de commande.
Les quatre touches concernées sont :
1
2
3
4
5
6
7
8
9
10
11
12
13
14
15
16
9
4
16
1
3
2
7
8
19
6
5
17
13
14
15
10
11
12
18
19
18
17
Page 13
3
MODE D'EMPLOI DE LA TELECOMMANDE
FONCTIONNEMENT DE LA PROGRAMMATION
Quatre programmations peuvent être choisies sur la télécommande. Deux programmations journalières (appelées T1 & T2) et deux programmations de week-end en option (appelées WKT1 & WKT2).
Chacune de ces programmations peut être sélectionnée en appuyant sur la touche TIMER (10). Pour
régler les programmations, utiliser respectivement les touches HOUR + (11) et - (12). La touche SET
(17) active la programmation et la touche CLEAR (18) l’annule.
A. PROGRAMMATION JOURNALIERE
Les programmations journalières T1 et T2 permettent de programmer la mise en marche et l’arrêt
séparément sur deux périodes différentes. Une fois réglée, la programmation agira quotidiennement.
B. PROGRAMMATION DE WEEK-END (EN OPTION)
Les programmations de week-end WKT1 et WKT2 permettent de programmer la mise en marche et
l’arrêt séparément sur deux périodes différentes, pendant deux jours seulement.
Ces programmations agiront le jour choisi et le jour suivant uniquement.
A 24:00 h le second jour, la programmation WK n’agira plus et la programmation journalière reprendra
son action normale.
* WKT1 - Active le jour fixé
* WKT2 - Active le jour suivant le jour fixé
REMARQUE :
1. Pendant le fonctionnement des programmations de week-end, les programmations journalières
sont mises hors fonction.
2. Les programmations WK doivent être réactivées avant chaque week-end.
C. CHOIX D’UNE PROGRAMMATION
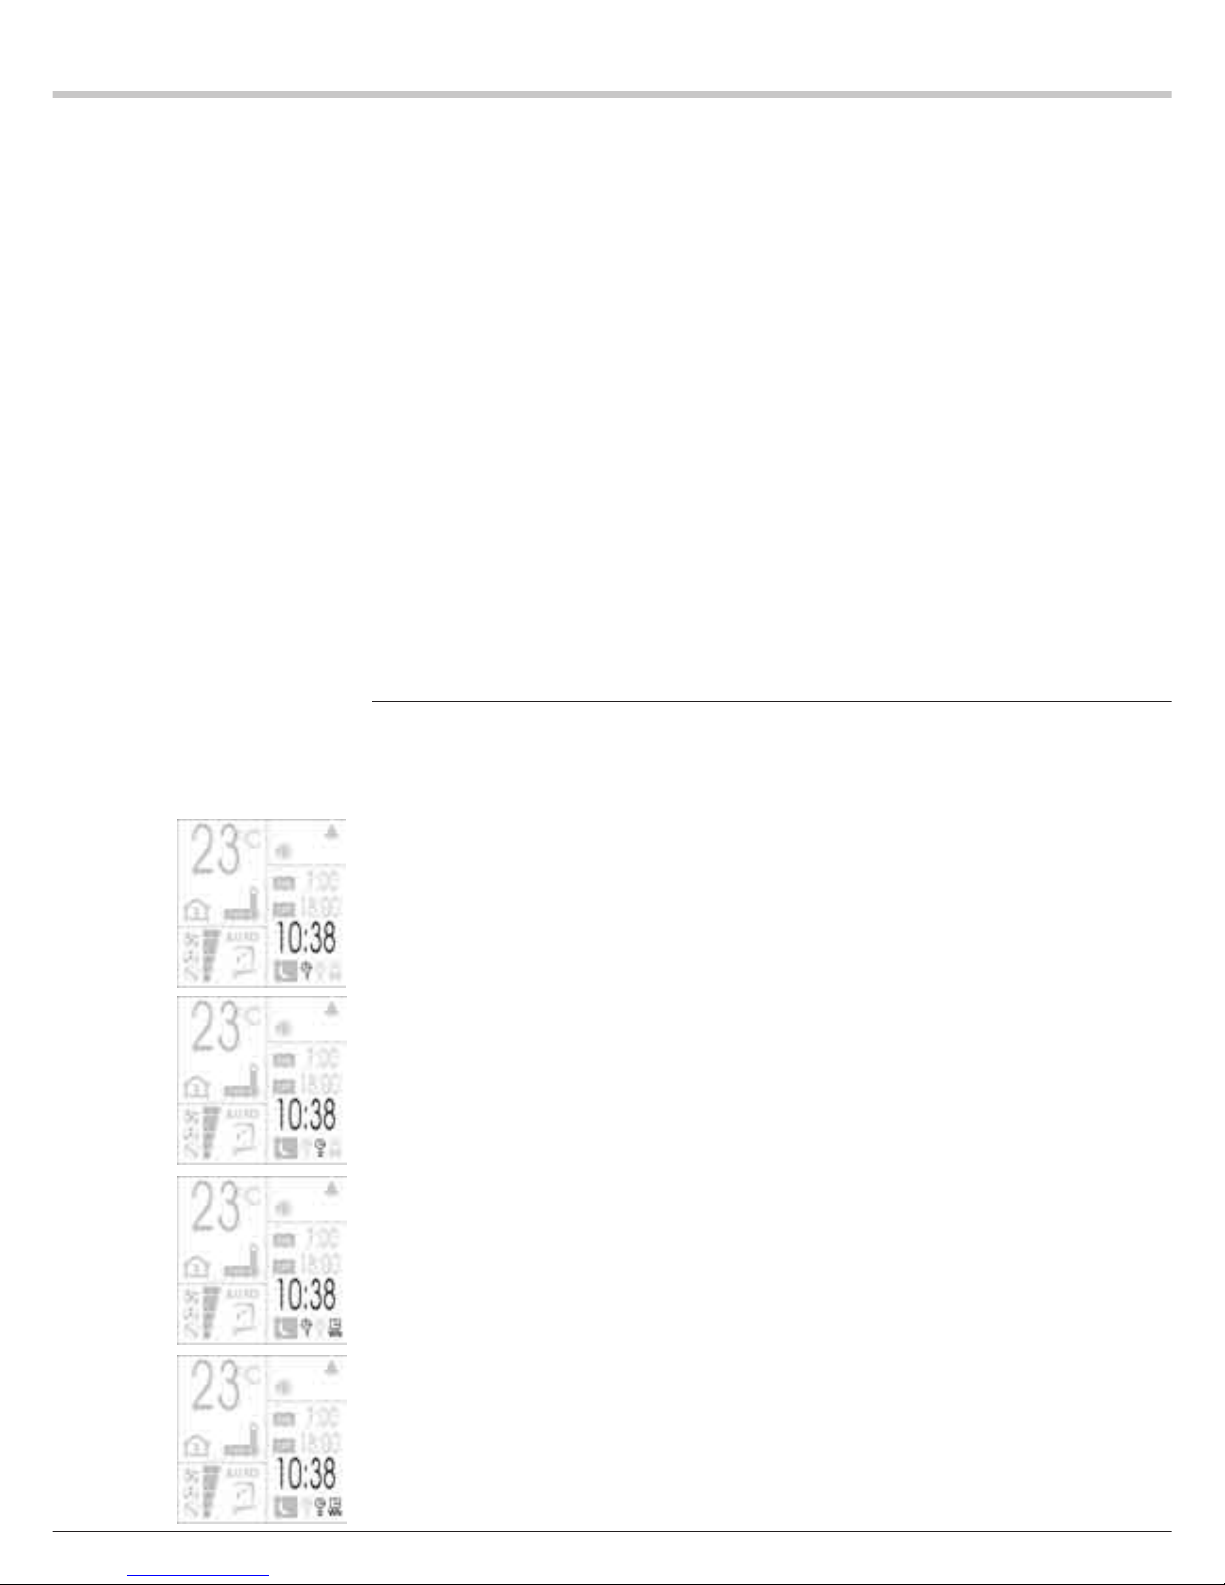
Appuyer sur la touche TIMER (10) pour choisir une programmation. A chaque pression sur la touche TIMER (10), une des quatre icônes de programmation ci-dessous apparait sur l’afficheur
à cristaux liquides.
1 Appuyer sur la touche TIMER pour choisir la programmation jour-
nalière T1.
L’icône 1 de la Programmation T1 clignote.
2 Appuyer sur la touche TIMER pour choisir la programmation jour-
nalière T2.
L’icône 2 de la Programmation T2 clignote.
3 Appuyer sur la touche TIMER pour choisir la programmation de
week-end WKT1.
Les icônes 1 et WK clignotent.
4 Appuyer sur la touche TIMER pour choisir la programmation de
week-end WKT2.
Les icônes 2 et WK clignotent.
Page 14
4
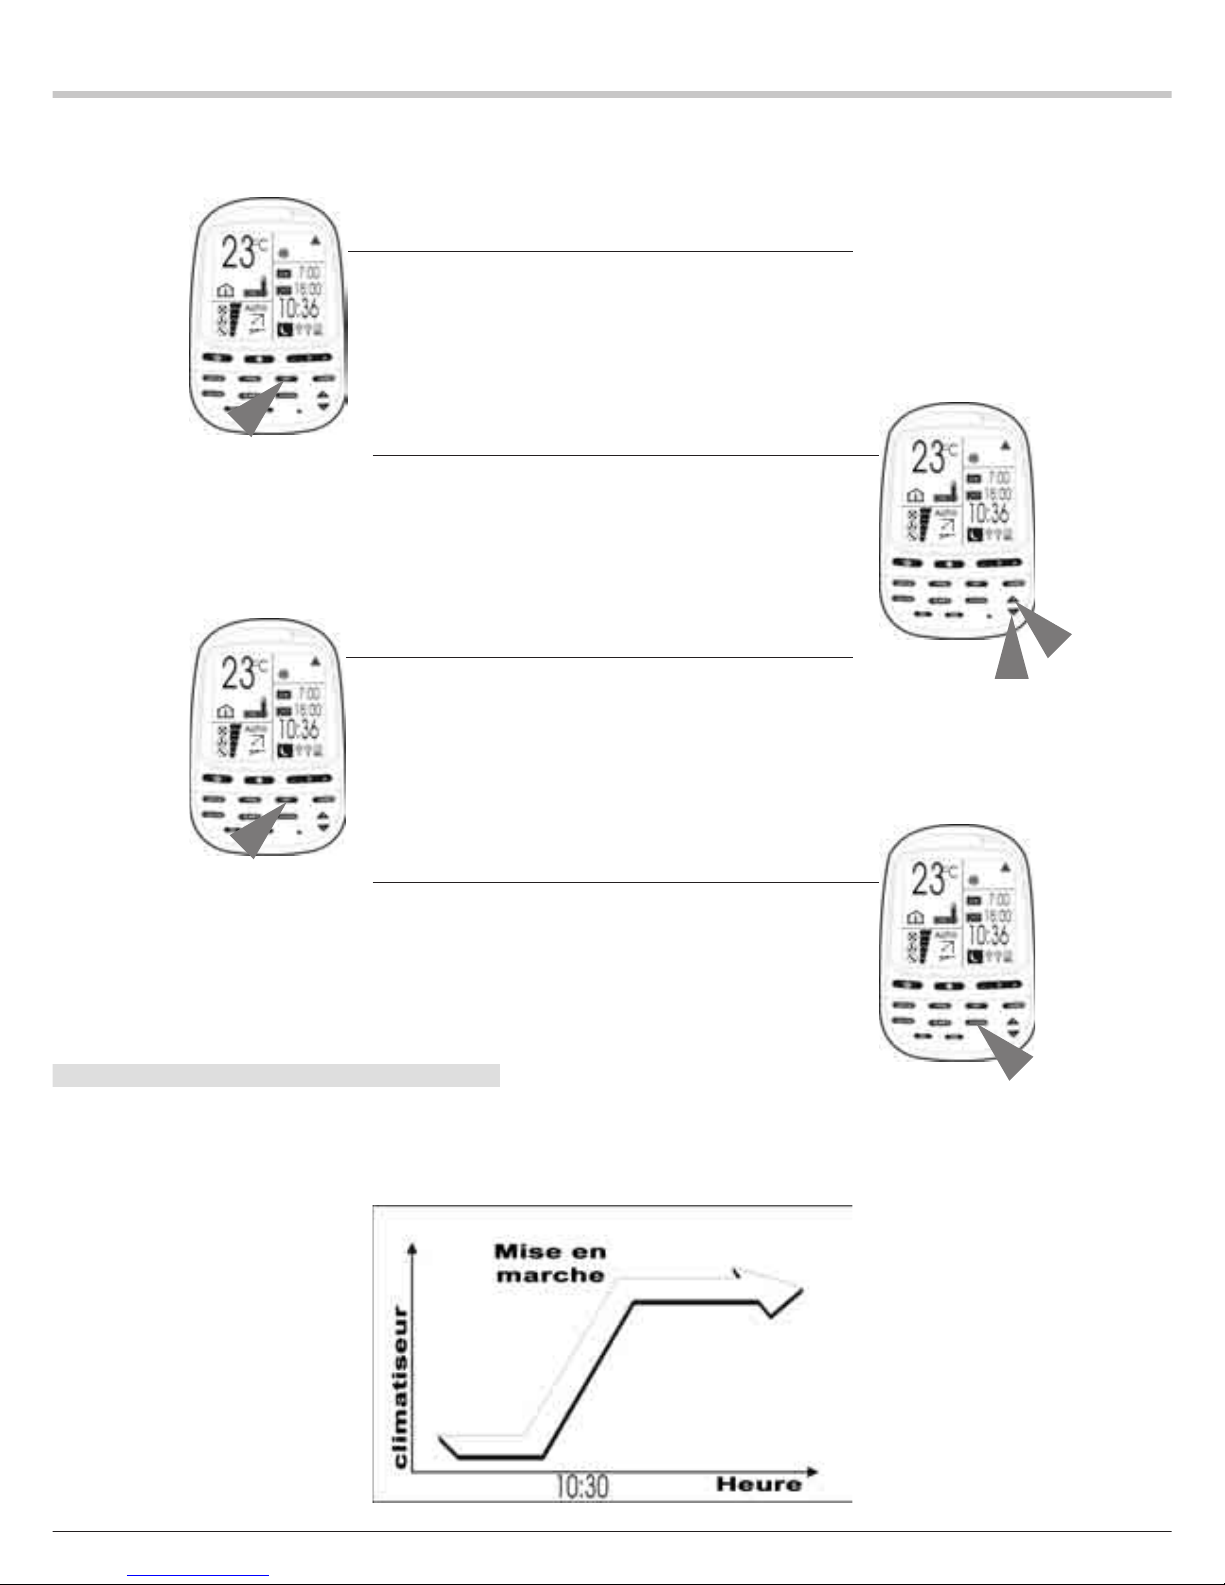
RÉGLAGE DE L’HEURE DE MISE EN MARCHE
Après avoir choisi une programmation (T1, T2 ou WKT1, WKT2),
procéder comme suit pour régler l’heure de mise en marche programmée.
EXEMPLE : Mise en marche du climatiseur à 10 h 30.
1 Appuyer sur la touche SET.
L’icône ON (Mise en marche) et les chiffres de l’heure de mise
en marche clignotent.
2 Régler les heures et les minutes.
1. Régler l’heure de mise en marche à 10:30.
2. Appuyer sur la touche HOUR + pour faire avancer l’heure et
sur la touche HOUR - pour la faire reculer.
3 Appuyer sur la touche SET.
1. L’heure de mise en marche est programmée à 10:30 (l’icône
«ON» [Mise en marche] s’allume).
2. L’icône «OFF» (Arrêt) et les chiffres de l’heure d’arrêt clignotent.
4 Appuyer sur la touche CLEAR.
L’arrêt programmé est effacé.
REMARQUES :
1. Le réglage implicite des programmations est respectivement
de 7:00 et 18:00 pour les heures de mise en marche et d’arrêt.
2. Le mode programmation affichera toujours les derniers réglages de mise en marche et d’arrêt (ON et OFF) sur l’afficheur à
cristaux liquides.
Page 15
5
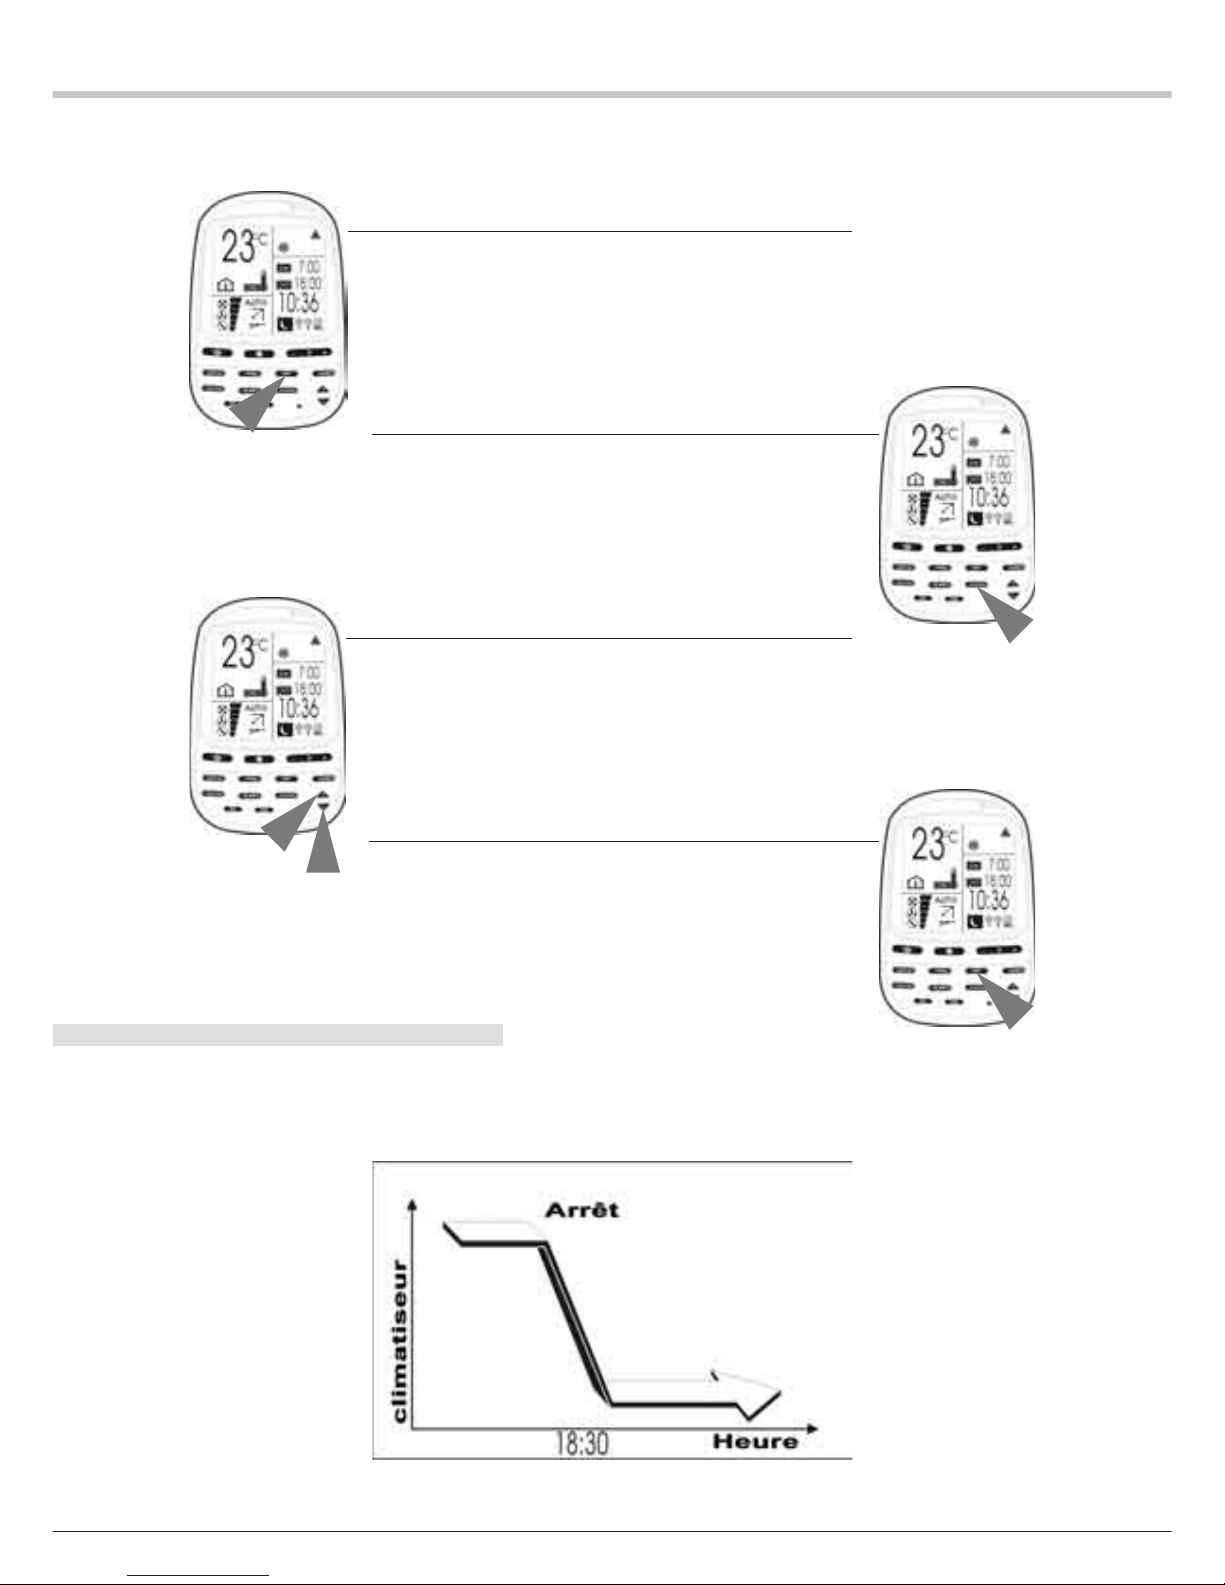
RÉGLAGE DE L’ARRÊT PROGRAMMÉ
Après avoir choisi une programmation (T1, T2 ou WKT1, WKT2),
procéder comme suit pour régler l’heure d’arrêt programmé.
EXEMPLE : Arrêt du climatiseur à 18:30.
1 Appuyer sur la touche SET.
L’icône ON (Mise en marche) et les chiffres de l’heure de mise
en marche clignotent.
2 Appuyer sur la touche CLEAR.
1. L’heure de mise en marche est effacée.
2. L’icône OFF (Arrêt) et les chiffres de l’heure d’arrêt clignotent.
3 Régler les heures et les minutes.
1. Régler l’heure d’arrêt à 18:30.
2. Appuyer sur la touche HOUR + pour faire avancer l’heure et
sur la touche HOUR - pour la faire reculer.
4 Appuyer sur la touche SET.
L’heure d’arrêt est programmée à 18:30 (l’icône OFF de la programmation s’allume).
REMARQUES :
1. Le réglage implicite des programmations est respectivement
de 7:00 et 18:00 pour la mise en marche et l’arrêt.
2. Le mode programmation affichera toujours les derniers réglages de mise en marche et d’arrêt sur l’afficheur à cristaux liquides.
Page 16
6
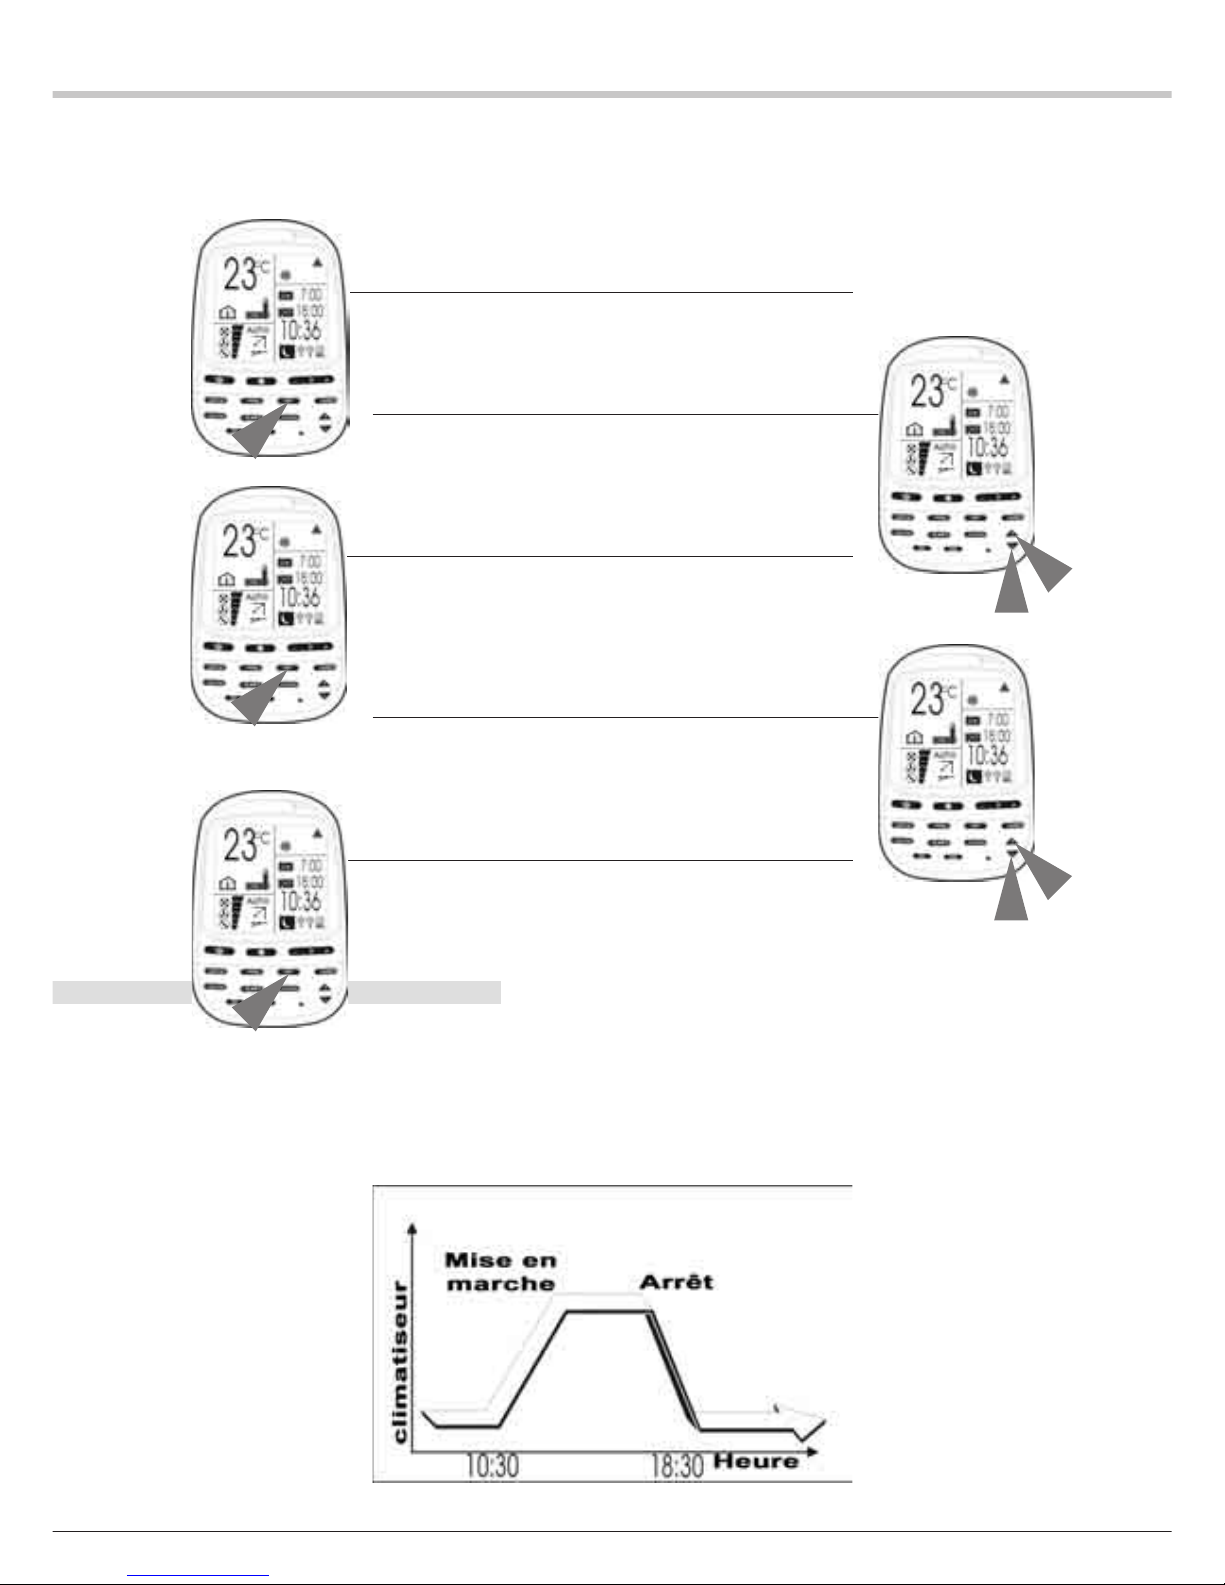
RÉGLAGE DES HEURES DE MISE EN MARCHE ET
D’ARRÊT
Après avoir choisi une programmation (T1, T2 ou WKT1, WKT2),
procéder de la manière suivante pour régler les heures de mise
en marche et d’arrêt programmés.
EXEMPLE : Mise en marche du climatiseur à 10:30 et arrêt à
18:30.
1 Appuyer sur la touche SET.
L’icône ON (Mise en marche) et les chiffres de l’heure de mise
en marche clignotent.
2 Régler les heures et les minutes.
1. Régler l’heure de mise en marche (ON) à 10:30.
2. Appuyer sur la touche HOUR + pour faire avancer l’heure et
sur la touche HOUR - pour la faire reculer.
3 Appuyer sur la touche SET.
1. L’heure de mise en marche est programmée à 10:30 (l’icône
ON clignote).
2. L’icône OFF (Arrêt) et les chiffres de l’heure d’arrêt de la programmation clignotent.
4 Régler les heures et les minutes.
1. Régler l’heure d’arrêt (OFF) à 18:30.
2. Appuyer sur la touche HOUR + pour faire avancer l’heure et
sur la touche HOUR - pour la faire reculer.
5 Appuyer sur la touche SET.
L’heure d’arrêt (OFF) est programmée à 18:30 (l’icône OFF de la
programmation s’allume).
REMARQUES :
1. Les réglages implicites des programmations sont respectivement de 7:00 et 18:00 pour la mise en marche et l’arrêt.
2. Le mode programmation affichera toujours les derniers réglages de mise en marche et d’arrêt sur l’afficheur à cristaux liquides.
3. Une pression sur la touche CLEAR (18) pendant 5 secondes
annulera tous les réglages de programmation et effacera l’affichage de la programmation.
Page 17
7
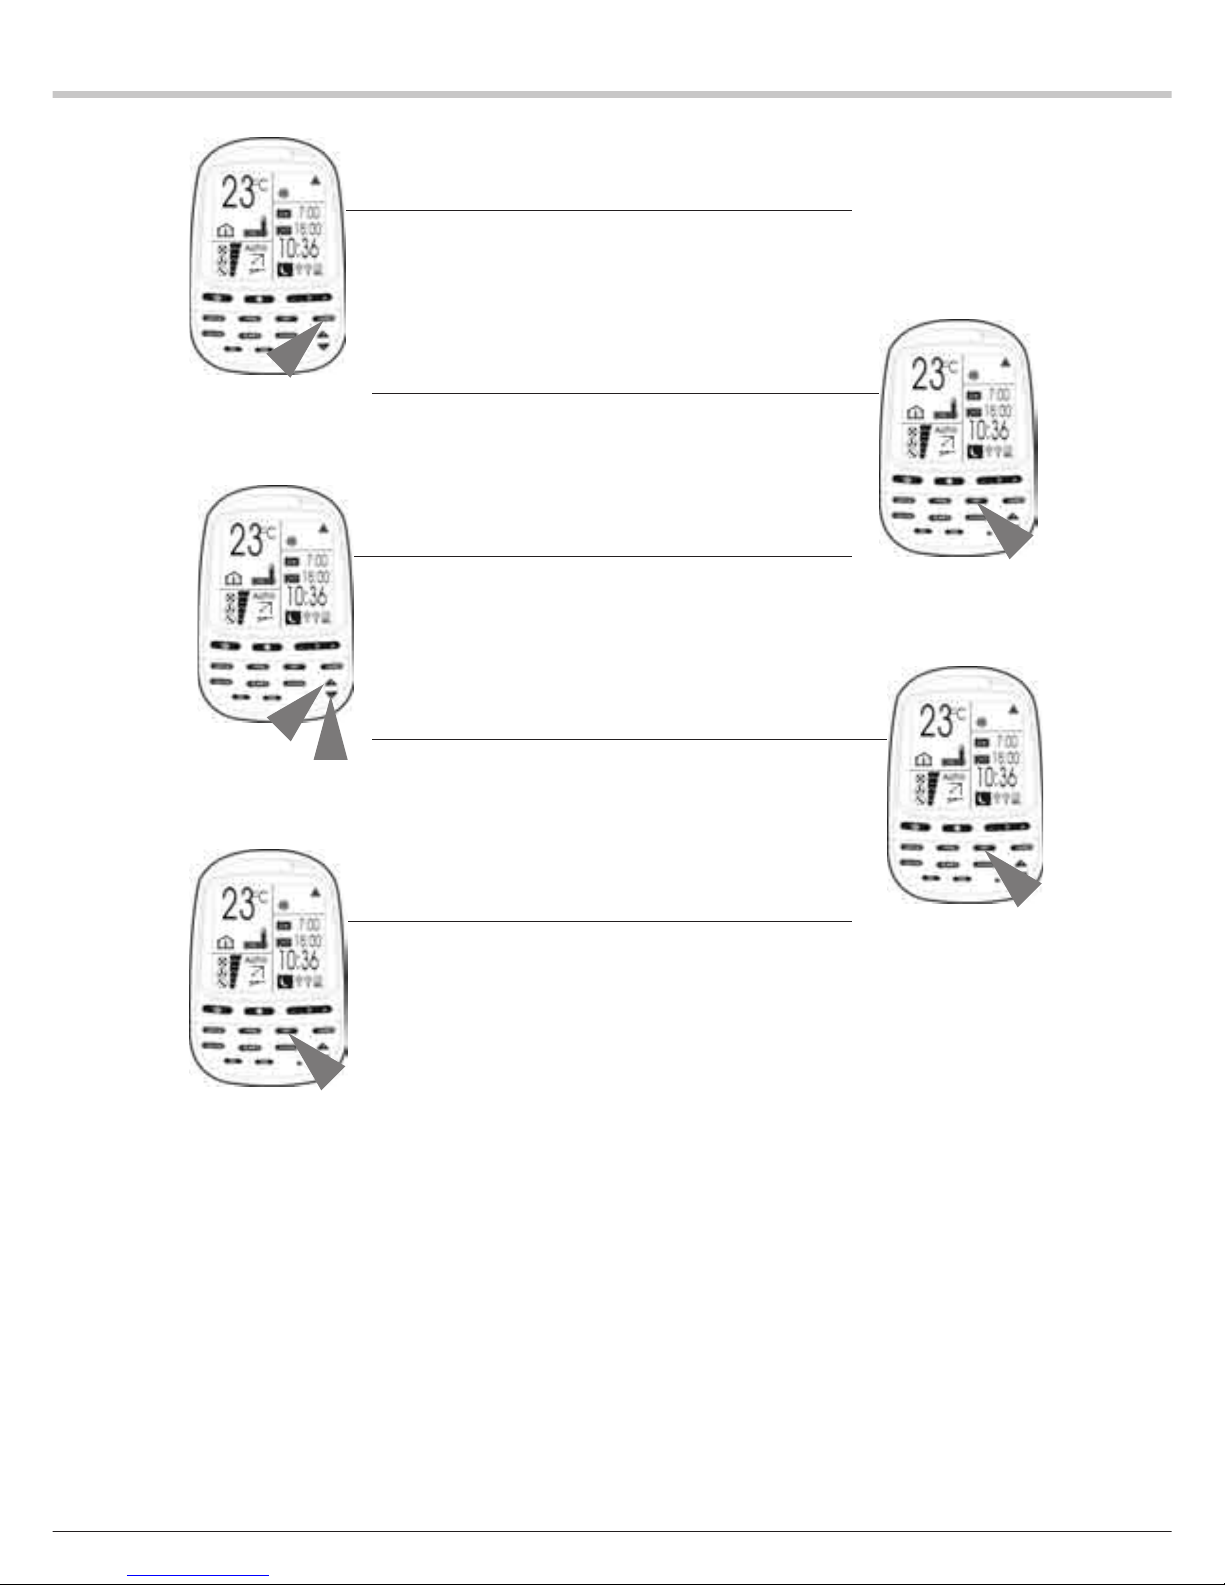
POUR MODIFIER LE REGLAGE DE L’HEURE
EXEMPLE : Pour avancer l’heure de mise en marche de 10:30 à
9:20 (tout en conservant le réglage de l’heure d’arrêt).
1 Appuyer sur la touche TIMER jusqu’à ce que l’icône de la pro-
grammation choisie clignote.
REMARQUE : les chiffres de la programmation correspondante
réglés antérieurement s’afficheront sans clignoter.
2 Appuyer sur la touche SET pour passer en mode édition.
L’icône ON (Mise en marche) et les chiffres de l’heure de mise
en marche clignotent.
3 Modifier le réglage de l’heure en 9:20, en appuyant sur la touche
HOUR -.
L’icône ON et les chiffres de l’heure de mise en marche clignotent.
4 Appuyer sur la touche SET pour sauvegarder le nouveau réglage.
L’icône ON et les chiffres de l’heure de mise en marche s’allument, et l’icône OFF (Arrêt) et les chiffres de l’heure d’arrêt clignotent.
5 Appuyer sur la touche SET pour confirmer le réglage antérieur de
l’heure d’arrêt.
Les icônes ON et OFF et les chiffres d’heure de la programmation correspondante s’allument.
Page 18
8
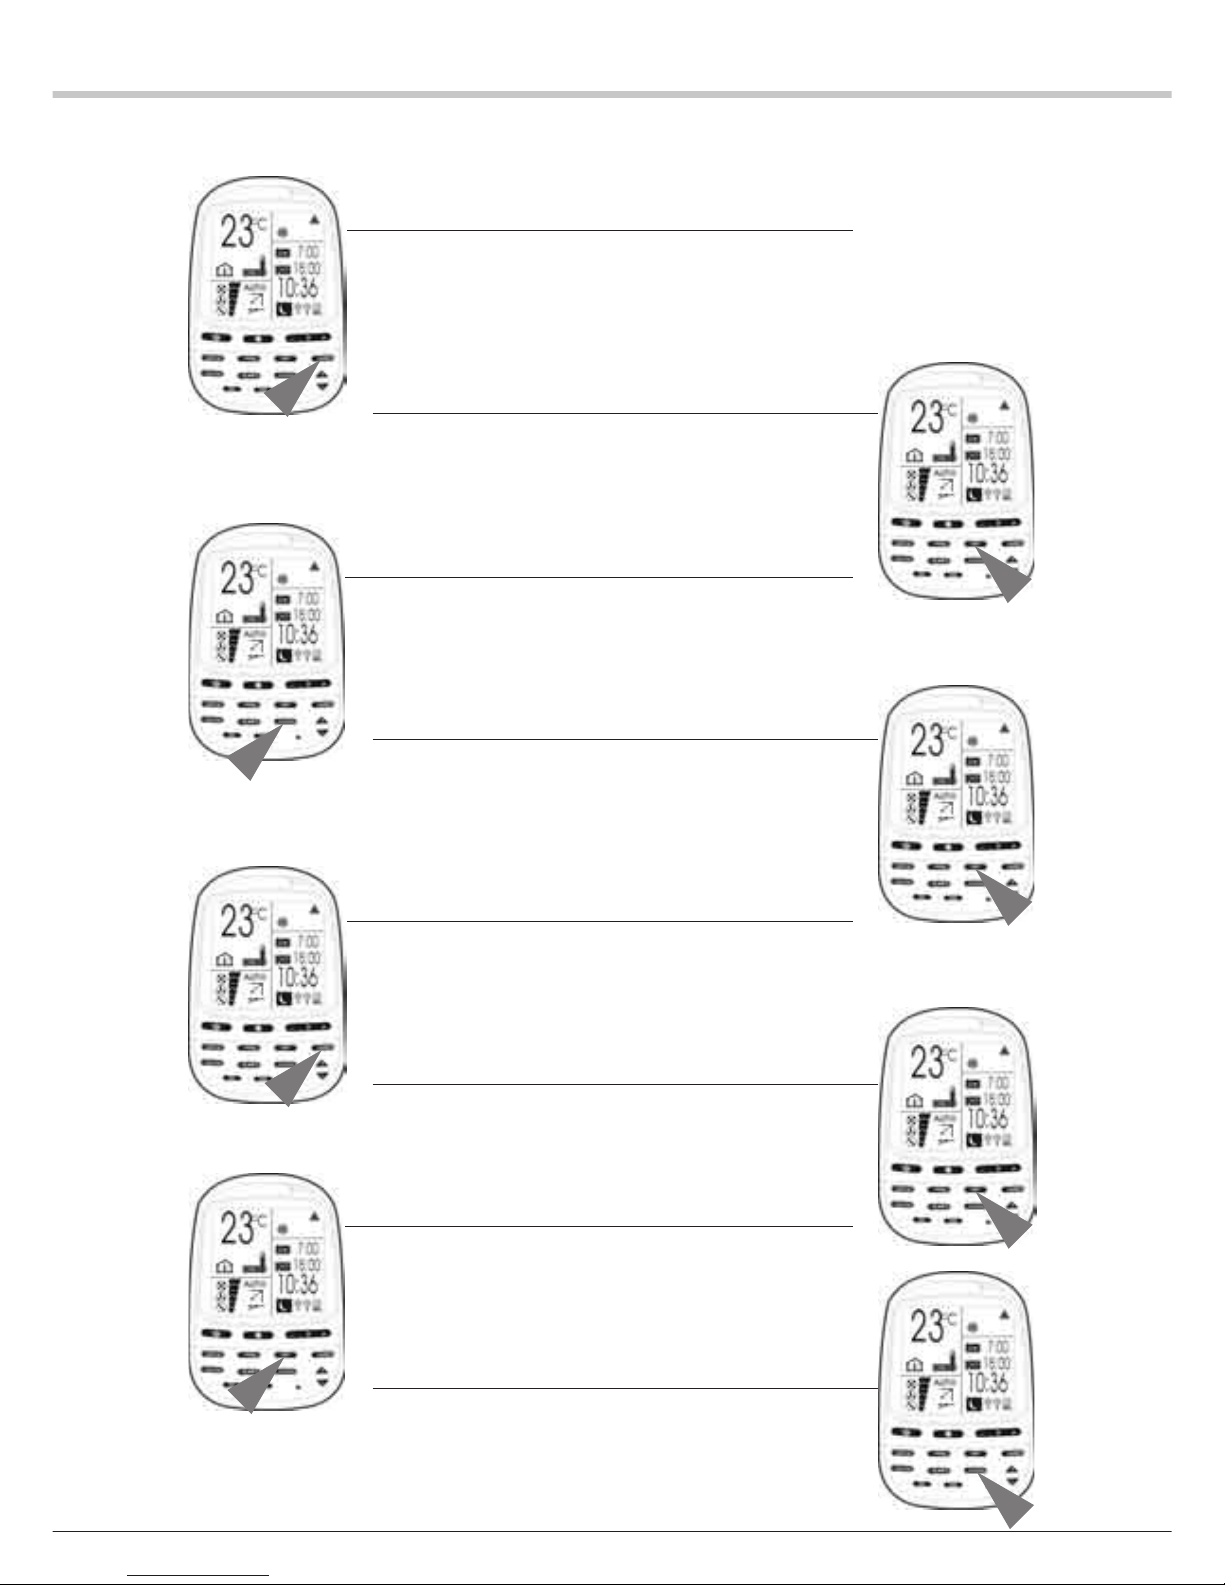
POUR ANNULER LE REGLAGE D’HEURE D’UNE
PROGRAMMATION SPECIFIQUE
Pour annuler l’heure de mise en marche, tout en conservant le
réglage de l’heure d’arrêt.
1 Appuyer sur la touche TIMER pour choisir une programmation.
L’icône de la programmation choisie clignote et les réglages
d’heure de mise en marche et d’arrêt antérieurs correspondants
s’allument.
2 Appuyer sur la touche SET.
L’icône ON (Mise en marche) et les chiffres de l’heure de mise
en marche clignotent.
3 Appuyer sur la touche CLEAR.
L’heure de mise en marche est effacée. L’icône OFF (Arrêt) et
les chiffres de l’heure d’arrêt clignotent.
4 Appuyer sur la touche SET.
Confirmation du nouveau réglage.
POUR ANNULER L’HEURE D’ARRÊT, TOUT EN CONSERVANT
LE RÉGLAGE DE L’HEURE DE MISE EN MARCHE.
1 Appuyer sur la touche TIMER pour choisir une programmation.
L’icône de la programmation choisie clignote et les réglages
d’heure de mise en marche et d’arrêt antérieurs correspondants
s’allument.
2 Appuyer sur la touche SET.
L’icône ON et les chiffres de l’heure de mise en marche clignotent.
3 Appuyer sur la touche SET.
L’icône ON et les chiffres de l’heure de mise en marche s’allument.
L’icône OFF et les chiffres de l’heure d’arrêt clignotent.
4 Appuyer sur la touche CLEAR.
L’heure d’arrêt est effacée.
Page 19
9
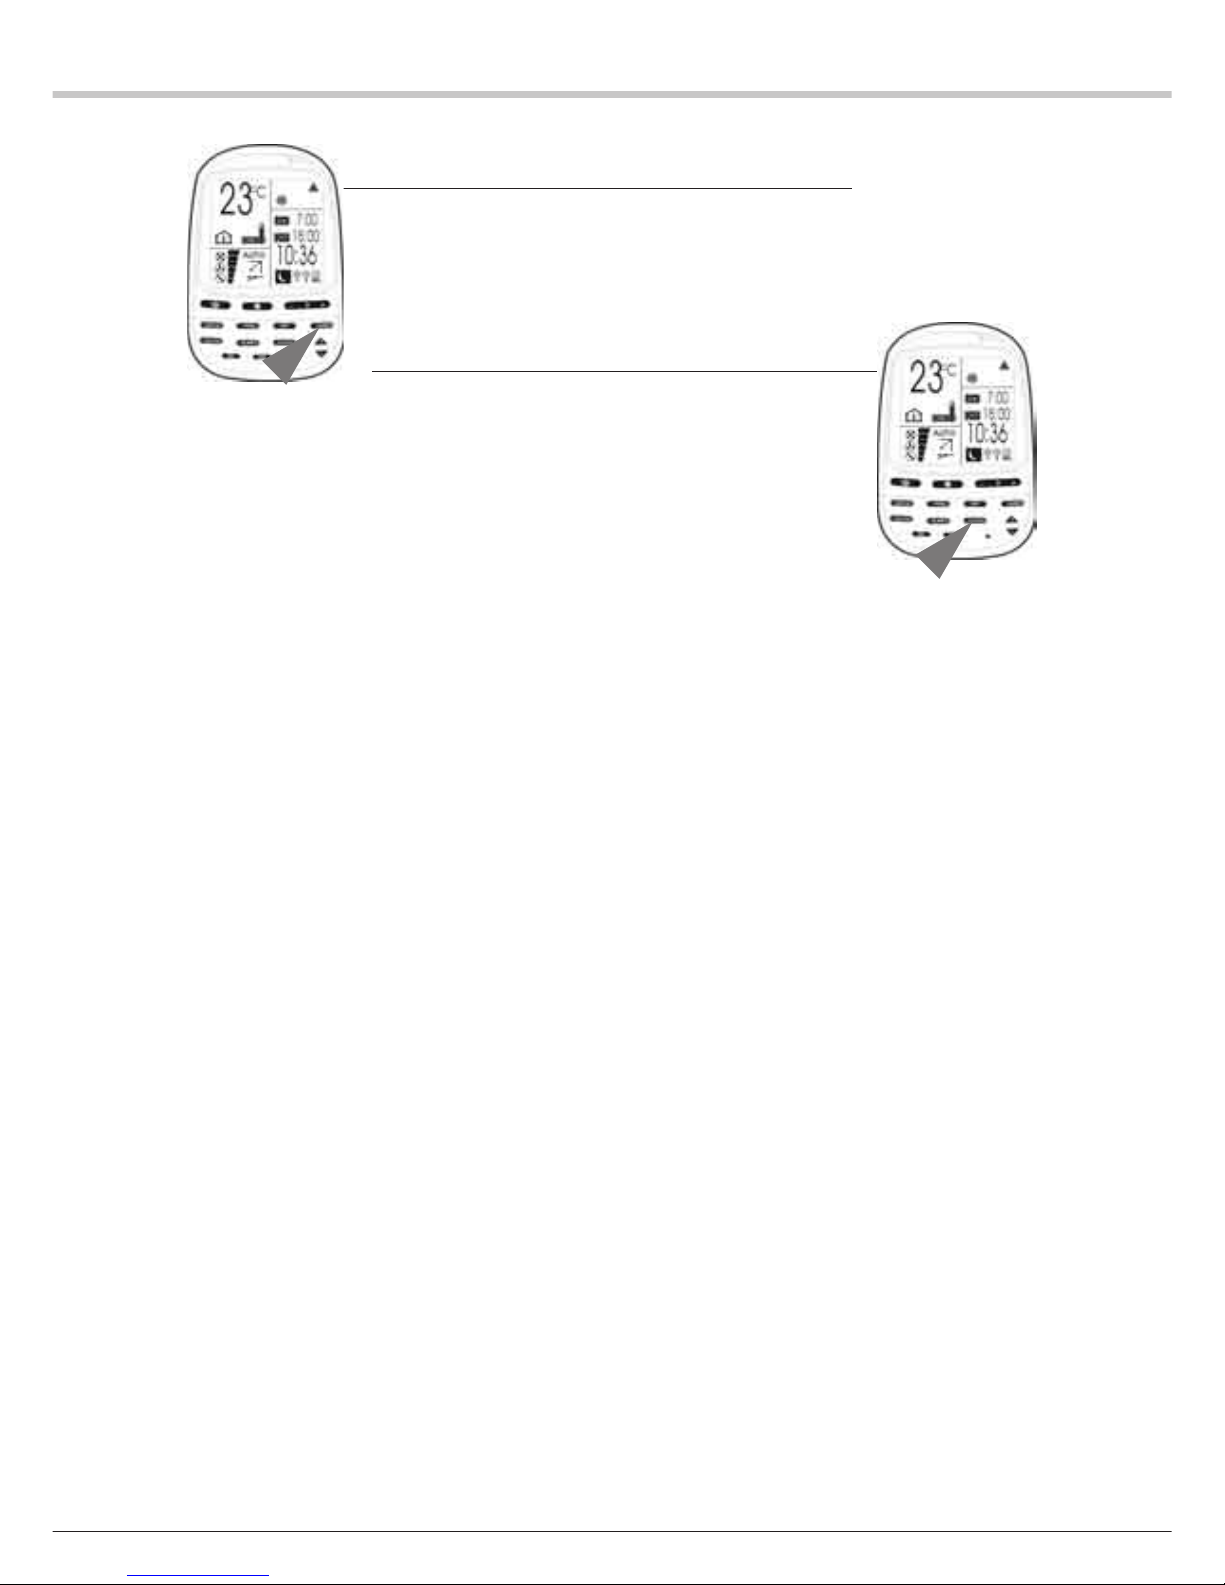
POUR ANNULER LES RÉGLAGES D’HEURE DE MISE EN
MARCHE ET D’ARRÊT.
1 Appuyer sur la touche TIMER pour choisir une programmation.
L’icône de la programmation choisie clignote et les réglages
d’heure de mise en marche et d’arrêt antérieurs correspondants
s’allument.
2 Appuyer sur la touche CLEAR.
Tous les réglages de la programmation choisie sont effacés.
FONCTION RALENTI DE NUIT
Appuyer sur la touche SLEEP (7) pour sélectionner la fonction Ralenti de nuit.
L’icône de Ralenti de nuit s’allume et l’icône d’heure d’arrêt implicite du ralenti de nuit (7 heures après l’heure actuelle) clignote.
Le réglage implicite peut être modifié, de 3 à 12 h, en appuyant
respectivement sur les touches HOUR + (11) et HOUR - (12).
(L’horloge du ralenti de nuit affichera initialement le réglage implicite ou le réglage choisi plus l’heure actuelle).
Exemple : Il est actuellement 23:00 et le mode ralenti de nuit est
sélectionné. L’heure d’arrêt du ralenti de nuit sera implicitement
6:00. Si la temporisation d’arrêt est fixée à 10 h, l’heure d’arrêt du
ralenti de nuit sera 9:00.
Page 20

10
Page 21
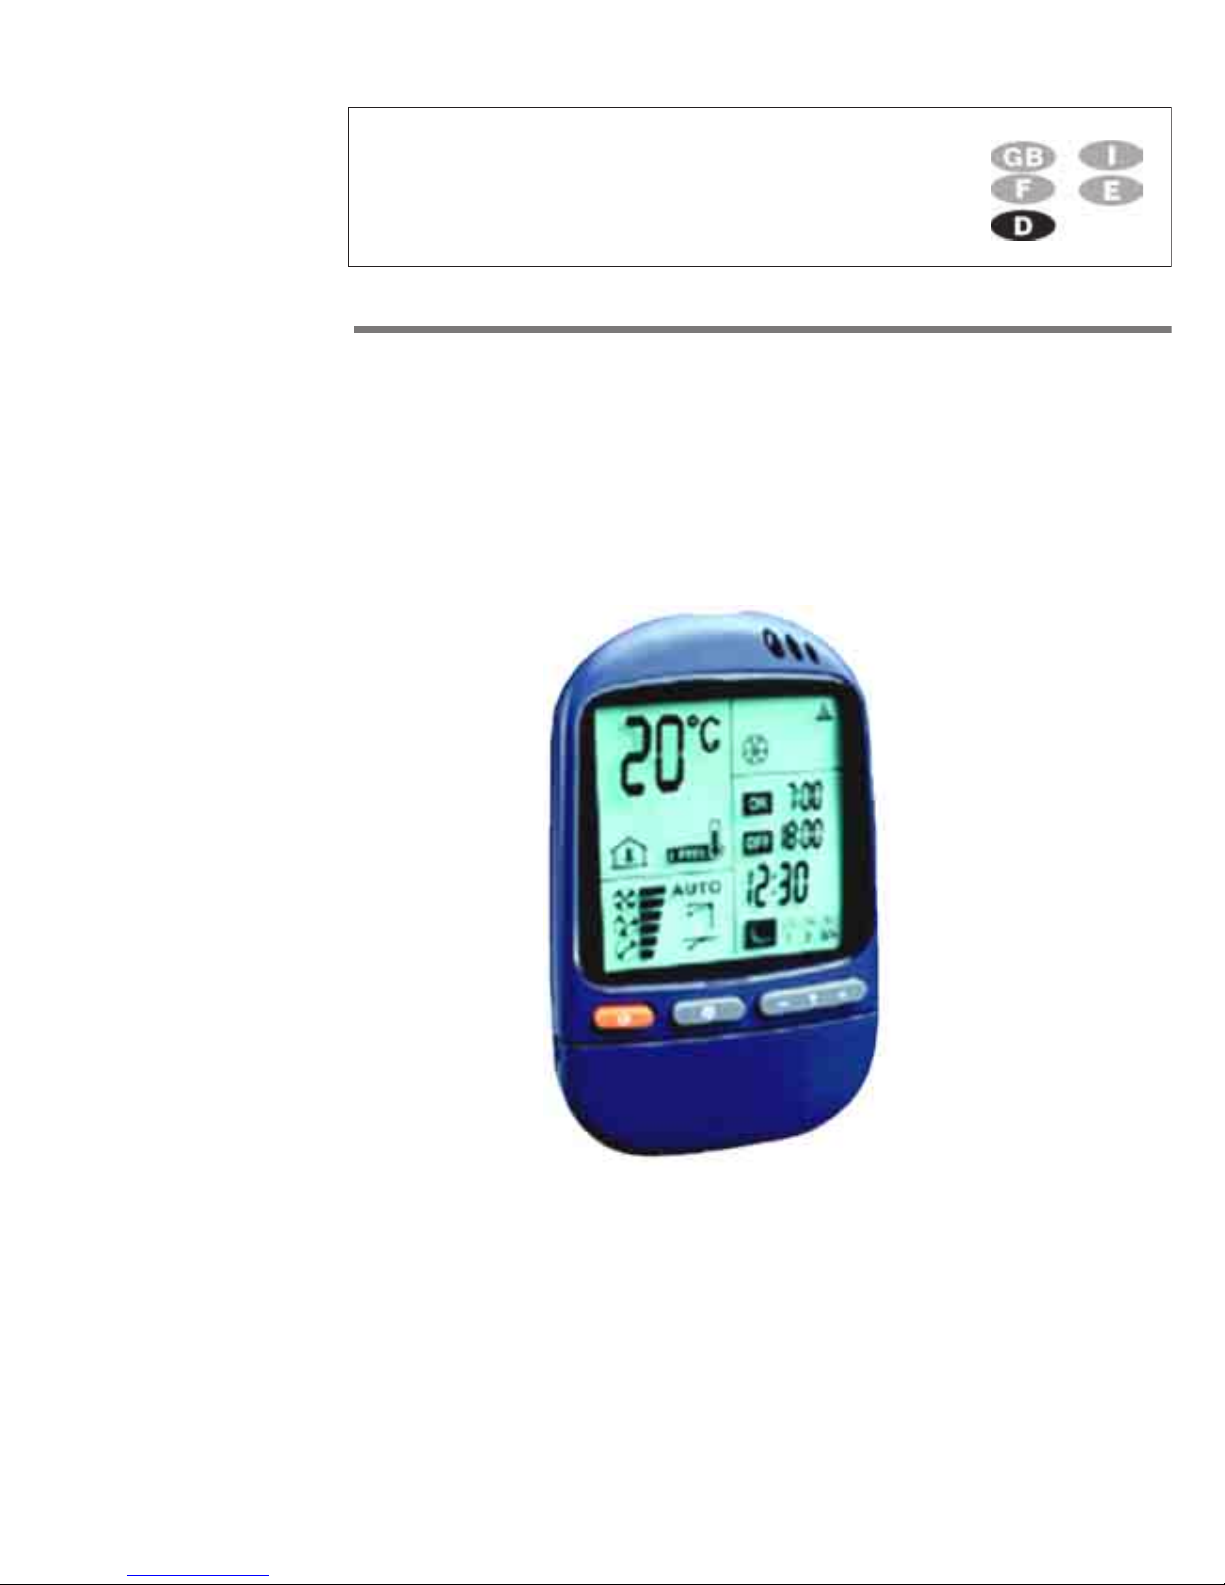
BENUTZERHANDBUCHBENUTZERHANDBUCH
BENUTZERHANDBUCHBENUTZERHANDBUCH
BENUTZERHANDBUCH
MURC4 G - 399420MURC4 G - 399420
MURC4 G - 399420MURC4 G - 399420
MURC4 G - 399420
CLIMATISATION
FernbedienungFernbedienung
FernbedienungFernbedienung
Fernbedienung
RC4
Page 22
2
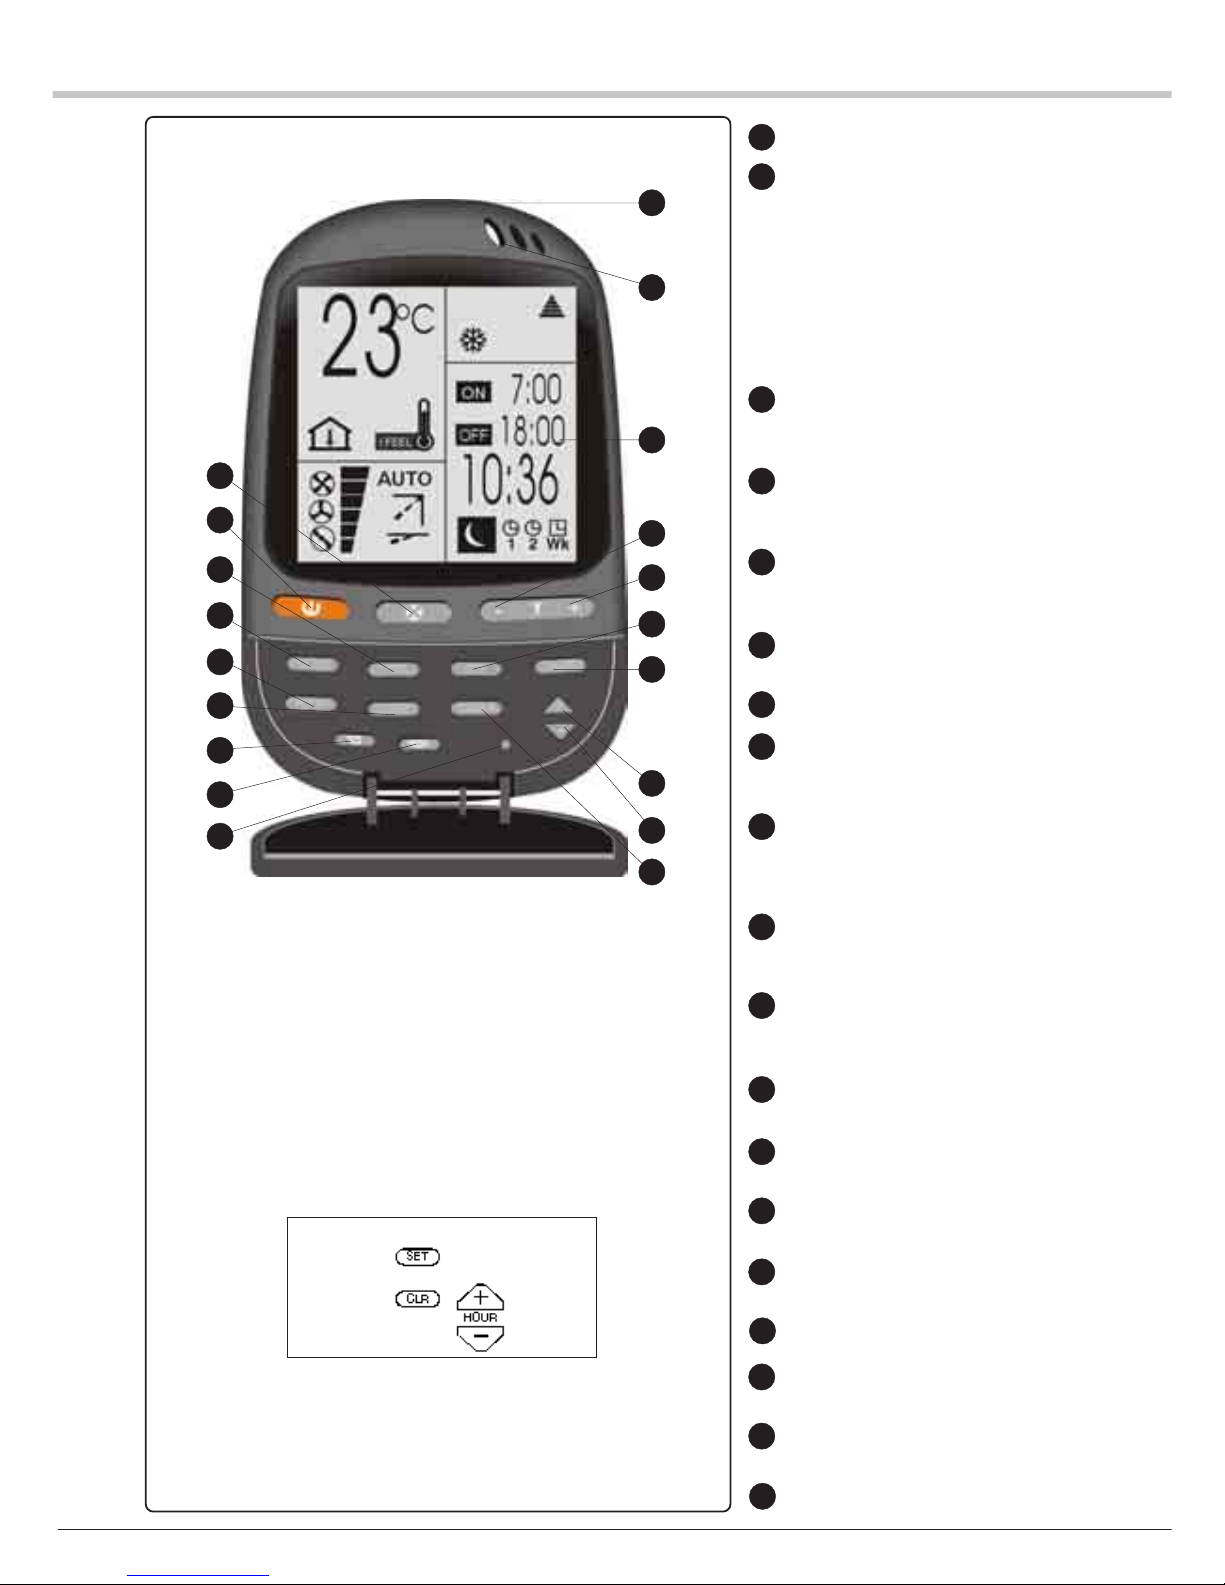
START- / STOP-Taste (EIN / AUS)
Betriebsartwahltaste
KÜHLUNG
(außer bei Wandinnenteil
Kaltwasser)
HEIZUNG,
(außer bei Wandinnenteil
Kaltwasser)
AUTOMATISCHE REGELUNG
KÜHLUNG /HEIZUNG,
LÜFTUNG,
ENTFEUCHTUNG
(außer bei
Wandinnenteil Kaltwasser)
I FEEL – Taste : lokale Temperaturerfassung
Wahltaste der LÜFTERDREHZAHL oder der
AUTOMATISCHEN LÜFTUNG
Taste für Raumtemperaturerhöhung
Taste zum Senken der Raumtemperatur
SLEEP – Taste
Sweep-Funktion der
Klappen
(Wandinnenteil und
Wandinnenteil Kaltwasser)
Sweep-Funktion der
Klappen(Wandinnenteil und
Wandinnenteil Kaltwasser)
Wahltaste PROGRAMMIERUNG
Taste + : Verlängerung der Betriebsdauer
Taste - : Verkürzung der Betriebsdauer
LCD-Display RÜCKSEITIGES LICHT
(FAKULTATIV)
I FEEL – Temperaturfühler
Infrarotsender
ROOM-Taste : Anzeige der Raumtemperatur
SET-Taste : Wahl der Ein-/Ausschaltzeit bei
PROGRAMMIERUNG
CLEAR-Taste : Nullstellung der Schaltuhr-
Parameter
Verriegelungstaste
RESET – FUNKTION :
1) Eine Batterie entnehmen.
2) Diese 4 Tasten gleichzeitig gedrückt halten
bis zum Erlöschen der Symbole.
3) Die Batterie wieder einlegen.
HINWEIS :
Zur Betätigung der Bedienelemente den
Deckel / die Klappe öffnen.
Die vier Tasten sind folgende :
9
4
16
1
3
2
7
8
19
6
5
17
13
14
15
10
11
12
18
18
17
2
1
3
4
5
6
7
8
9
10
11
12
13
14
15
16
19
Page 23
3
BEDIENUNGSANLEITUNG DER FERNBEDIENUNG
PROGRAMMIERUNG
Auf der Fernbedienung können vier verschiedene Programmierungen gewählt werden. Zwei
Tagesprogrammierungen (T1 & T2 genannt) und als Option zwei Wochenendprogrammierungen
(WKT1 & WKT2 genannt). Jede dieser Programmierungen kann durch Drücken der TIMER-Taste (10)
gewählt werden. Zum Einstellen der Programmierungen jeweils die Tasten HOUR + (11) und – (12)
wählen. Mit der SET-Taste (17) wird die Progammierung aktiviert und mit der CLEAR-Taste (18) wird sie
annulliert.
A.TAGESPROGRAMMIERUNG
Mit den Tagesprogrammierungen T1 und T2 können Einschalten und Ausschalten jeweils getrennt für
zwei verschiedene Zeiträume programmiert werden. Die so eingestellte Programmierung wird täglich
funktionieren.
B.WOCHENENDPROGRAMMIERUNG (OPTION)
Mit den Wochenendprogrammierungen WKT1 und WKT2 können Einschalten und Ausschalten jeweils
getrennt für zwei verschiedene Zeiträume für nur zwei Tage programmiert werden. Diese
Programmierungen werden nur an dem gewählten und dem darauf folgenden Tag funktionieren.
Um 24h00 des zweiten Tages wird die Wochenendprogrammierung nicht mehr funktionieren, und die
Tagesprogrammierung wird erneut einsetzen.
· WKT1 – aktiv am festgesetzten Tag
· WKT2 – aktiv an dem auf den festgesetzten Tag folgenden Tag.
ANMERKUNG :
1. Während der Dauer der Wochenendprogrammierungen sind die Tagesprogrammierungen außer
Betrieb gesetzt.
2. Die Wochenendprogrammierungen müssen vor jedem Wochenende erneut aktiviert werden.
C. WAHL EINER PROGRAMMIERUNG
Zur Wahl einer Programmierung die TIMER-Taste (10) drücken. Bei
jedem Druck auf die TIMER-Taste (10) erscheint eines der vier
nachstehenden Programmierungssymbole auf dem LCD-Display.
1. Die TIMER-Taste drücken, um die Tagesprogrammierung T1 zu
wählen.
Das Symbol 1 der Programmierung T1 blinkt.
2. Die TIMER-Taste drücken, um die Tagesprogrammierung T2 zu
wählen.
Das Symbol 2 der Programmierung T2 blinkt.
3. Die TIMER-Taste drücken, um die Wochenendprogrammierung
WKT1 zu wählen.
Die Symbole 1 und Wochenende (WK) blinken.
4. Die TIMER-Taste drücken, um die Wochenendprogrammierung
WKT2 zu wählen.
Die Symbole 2 und Wochenende (WK) blinken.
Page 24
4
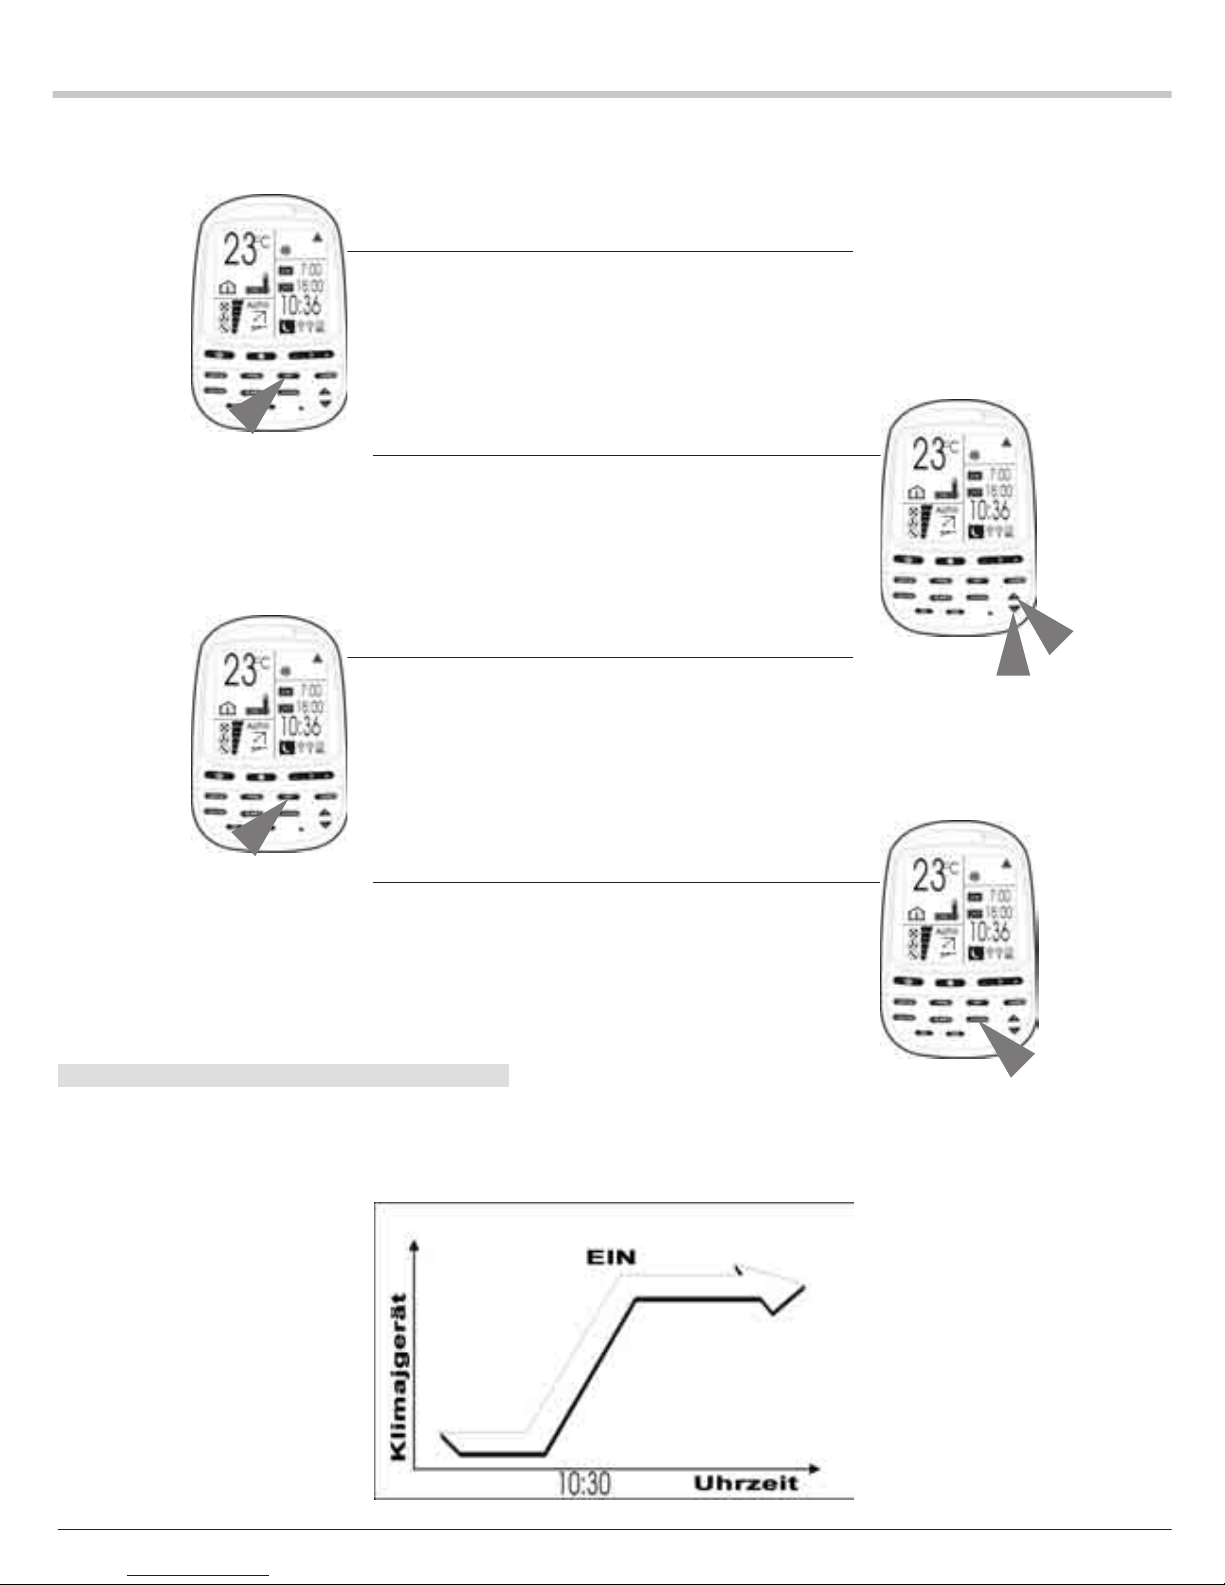
EINSTELLEN DER EINSCHALTZEIT
Nach Wahl einer Programmierung (T1, T2 oder WKT1, WKT2) wird die
programmierte Einschaltzeit folgendermaßen eingestellt.
BEISPIEL : Einschalten des Klimagerätes um 10h30.
1. Die SET-Taste drücken.
Das Symbol ON (Ein) und die Ziffern der Einschaltzeit blinken.
2. Einstellen von Stunden und Minuten.
1- Die Einschaltzeit auf 10h30 einstellen.
2- Um die Zeit vorzustellen, die HOUR-Taste + drücken, und um die
Zeit zurückzustellen, die HOUR-Taste – drücken.
3. Die SET-Taste drücken.
1- Die Einschaltzeit ist nun auf 10h30 programmiert (das Symbol
« ON » (Ein) leuchtet).
2- Das Symbol « OFF » (Aus) und die Ziffern der Ausschaltzeit
blinken.
4. Die CLEAR-Taste drücken.
Die programmierte Ausschaltzeit wird gelöscht.
ANMERKUNG :
1. Die impliziten Einstellungen der Einschalt- und Ausschaltzeit sind
jeweils für 7h00 und 18h00 programmiert.
2. Im Programmiermodus werden immer die letzten Einstellungen der
Einschalt- und Ausschaltzeit (ON und OFF) auf der LCD-Anzeige
angezeigt.
Page 25
5
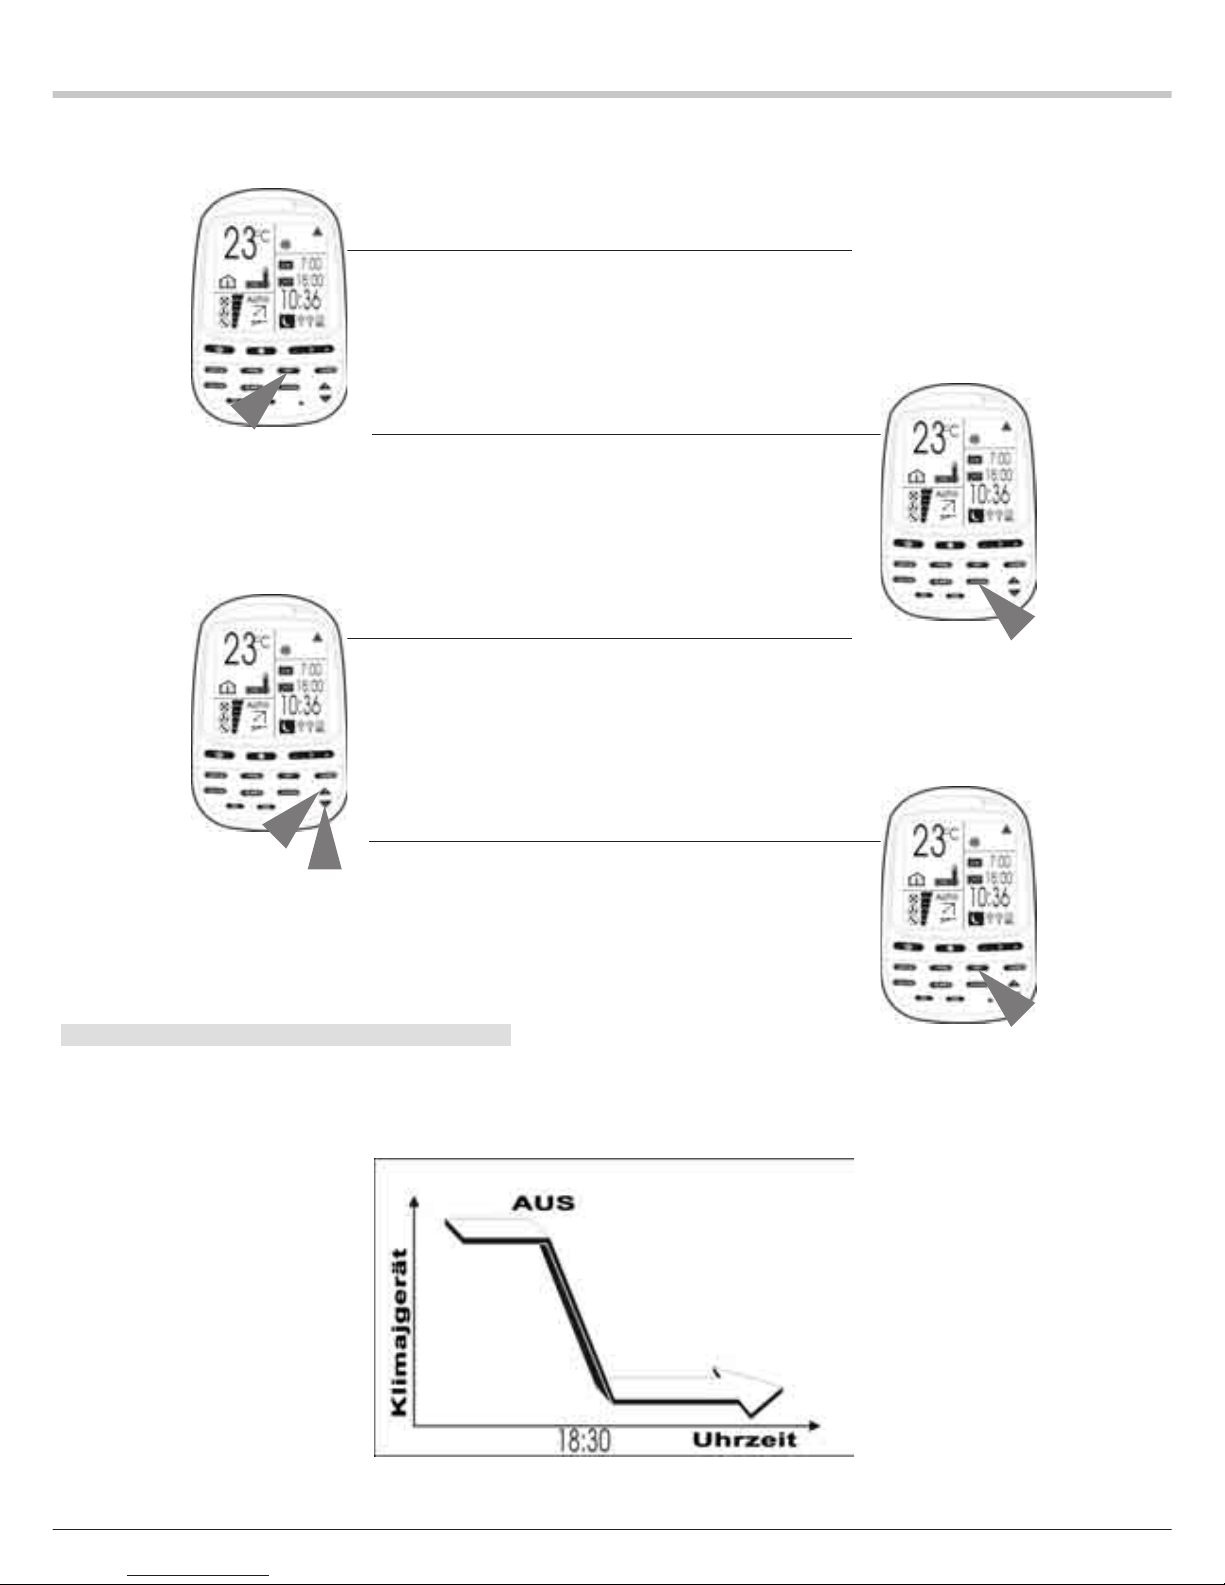
EINSTELLEN DER PROGRAMMIERTEN AUSSCHALTZEIT
Nach Wahl einer Programmierung (T1, T2 oder WKT1, WKT2) wird
die programmierte Ausschaltzeit folgendermaßen eingestellt.
BEISPIEL : Ausschalten des Klimagerätes um 18h30.
1. Die SET-Taste drücken.
Das Symbol ON (Ein) und die Ziffern der Einschaltzeit blinken.
2. Die CLEAR-Taste drücken.
1- Die Einschaltzeit wird gelöscht.
2- Das Symbol OFF (Aus) und die Ziffern der Ausschaltzeit blinken.
3. Einstellen von Stunden und Minuten.
1- Die Ausschaltzeit auf 18h30 einstellen.
2- Um die Zeit vorzustellen, die HOUR-Taste + drücken, und um die
Zeit zurückzustellen, die HOUR-Taste – drücken.
4. Die SET-Taste drücken.
Die Ausschaltzeit ist nun auf 18h30 programmiert (das Symbol
« OFF » (Aus) der Programmierung leuchtet).
ANMERKUNG :
1. Die impliziten Einstellungen der Einschalt- und Ausschaltzeit sind
jeweils für 7h00 und 18h00 programmiert.
2. Im Programmiermodus werden immer die letzten Einstellungen der
Einschalt- und Ausschaltzeit auf der LCD-Anzeige angezeigt.
Page 26
6
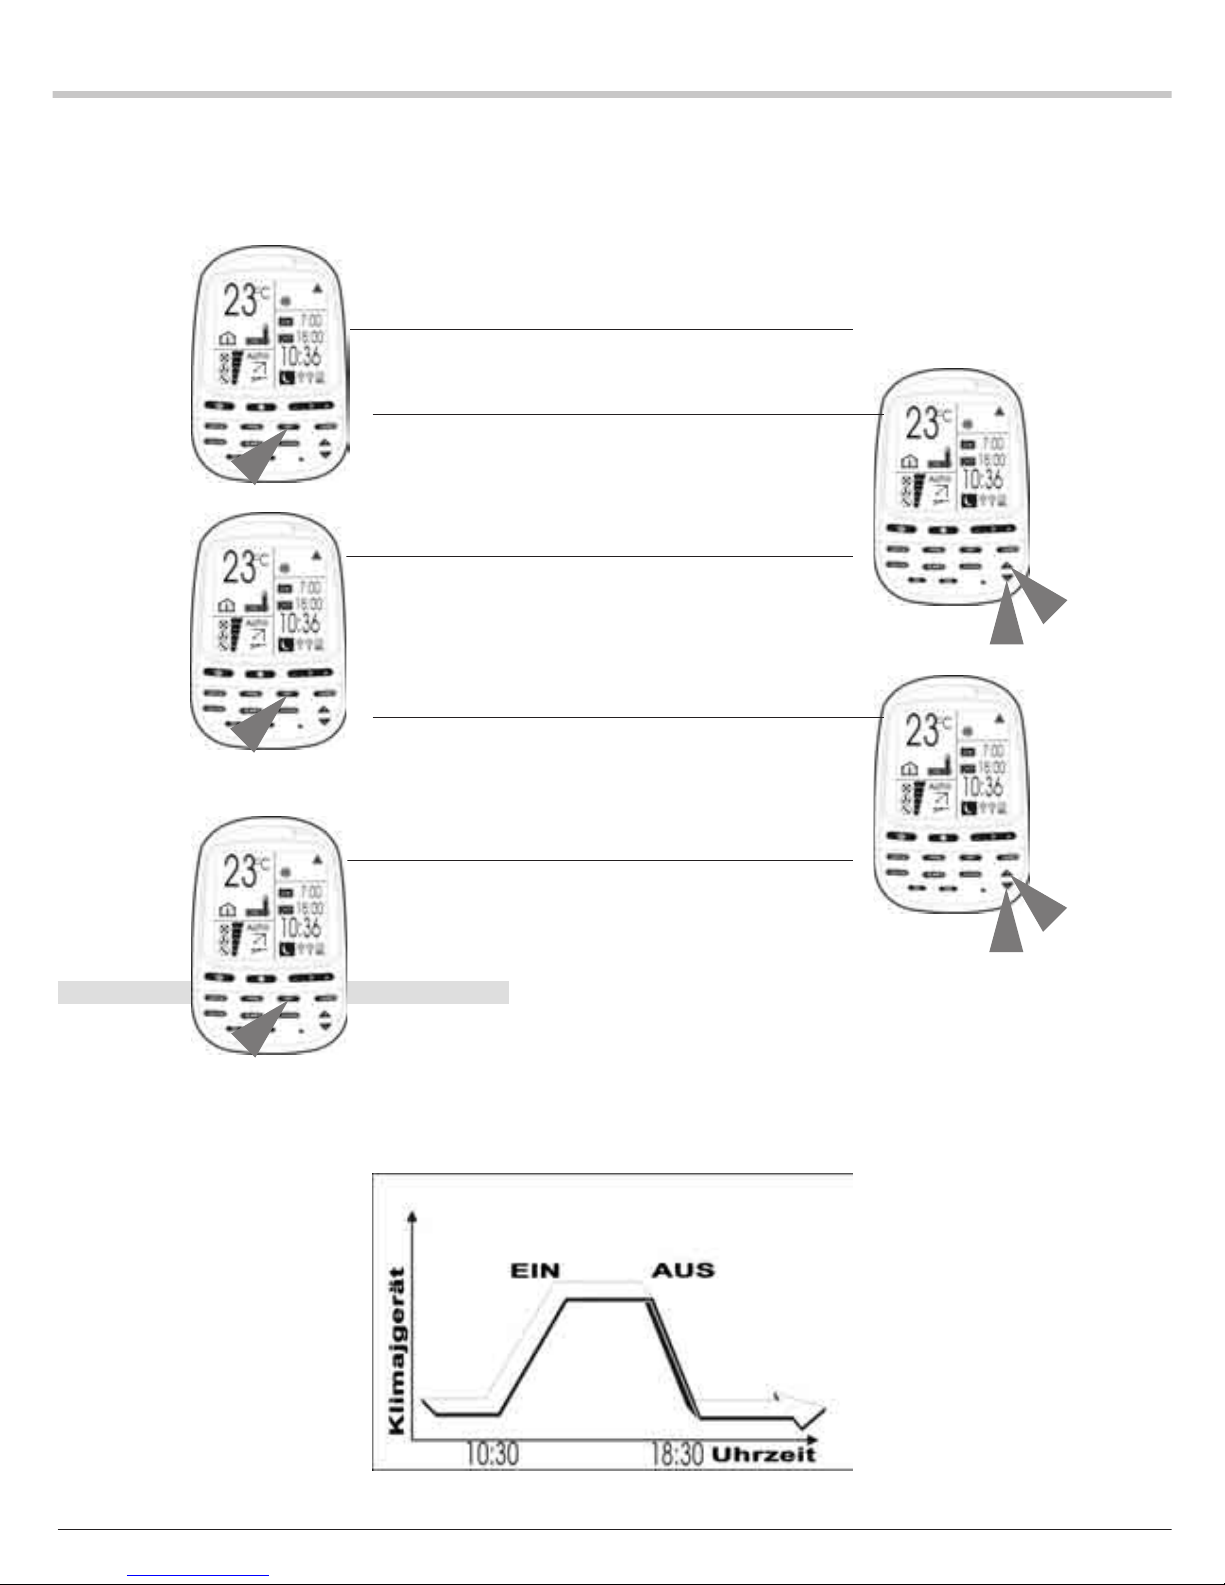
EINSTELLEN VON EINSCHALT- UND AUSSCHALTZEIT
Nach Wahl einer Programmierung (T1, T2 oder WKT1, WKT2)
werden die programmierten Ein- und Ausschaltzeiten
folgendermaßen eingestellt.
BEISPIEL : Einschalten des Klimagerätes um 10h30 und Ausschalten
des Klimagerätes um 18h30.
1. Die SET-Taste drücken.
2. Einstellen von Stunden und Minuten.
1- Die Einschaltzeit (ON) auf 10h30 einstellen.
2- Um die Zeit vorzustellen, die HOUR-Taste + drücken, und um die
Zeit zurückzustellen, die HOUR-Taste – drücken.
3. Die SET-Taste drücken.
1- Die Einschaltzeit ist für 10h30 programmiert (das Symbol ON
blinkt).
2- Das Symbol OFF (Aus) und die Ziffern der programmierten
Ausschaltzeit blinken.
4. Einstellen von Stunden und Minuten.
1- Die Ausschaltzeit (OFF) auf 18h30 einstellen.
2- Um die Zeit vorzustellen, die HOUR-Taste + drücken, und um die
Zeit zurückzustellen, die HOUR-Taste – drücken.
5. Die SET-Taste drücken.
Die Ausschaltzeit (OFF) ist für 18h30 programmiert (Symbol OFF
der Programmierung leuchtet).
ANMERKUNG :
1. Die impliziten Einstellungen der Einschalt- und Ausschaltzeit sind
jeweils für 7h00 und 18h00 programmiert.
2. Im Programmiermodus werden immer die letzten Einstellungen der
Einschalt- und Ausschaltzeit auf der LCD-Anzeige angezeigt.
3. Durch Drücken der CLEAR-Taste (18) während 5 Sekunden werden
alle Programmierungen annulliert und die Anzeige der
Programmierung gelöscht.
Page 27
7
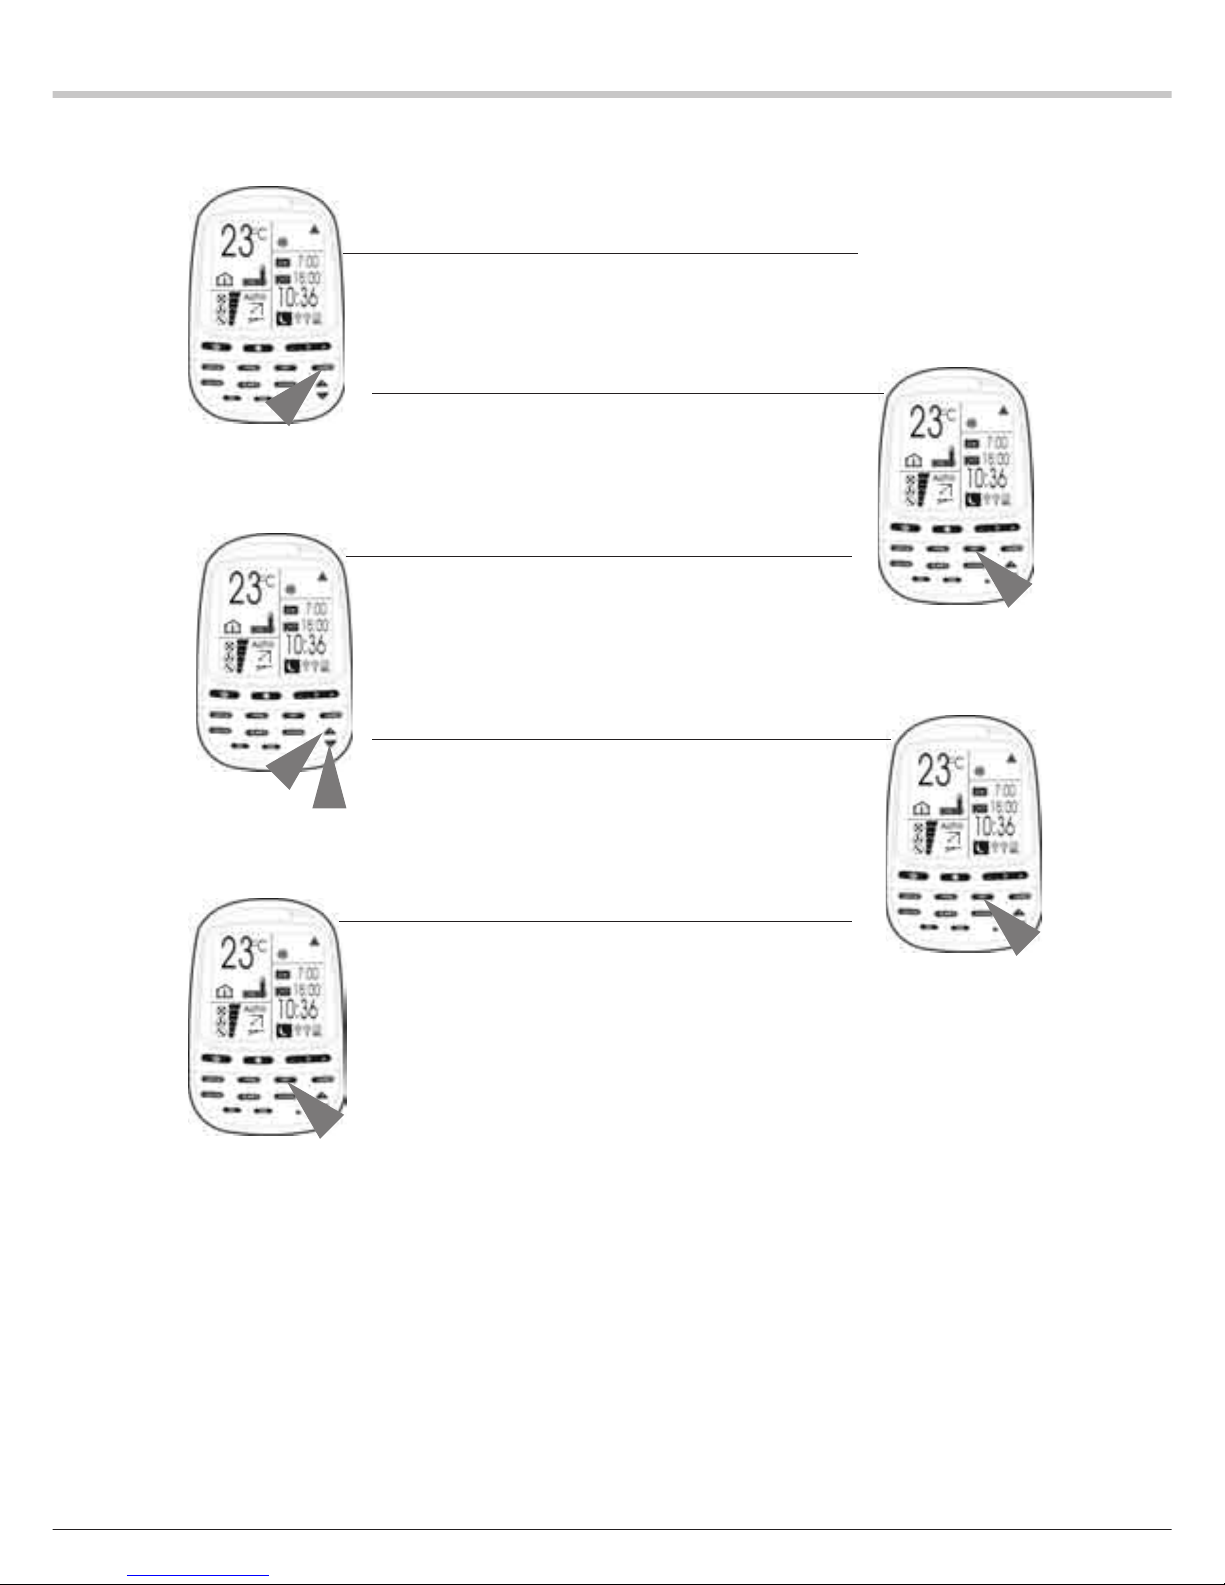
ÄNDERN DER ZEITEINSTELLUNG
BEISPIEL : Um die Einschaltzeit von 10h30 auf 9h20 vorzustellen
(die Einstellung der Ausschaltzeit bleibt unverändert).
1. Die TIMER-Taste drücken, bis das Symbol der gewählten
Programmierung blinkt.
ANMERKUNG : die zuvor eingestellten Ziffern der entsprechenden
Programmierung werden angezeigt, blinken aber nicht.
2. Die SET-Taste drücken, um in den Bearbeitungsmodus
überzugehen. Das Symbol ON (Ein) und die Ziffern der Einschaltzeit
blinken.
3. Durch Drücken der Taste HOUR – die Uhrzeit auf 9h20 einstellen.
Das Symbol ON und die Ziffern der Einschaltzeit blinken.
4. Die SET-Taste drücken, um die neue Einstellung zu speichern. Das
Symbol ON und die Ziffern der Einschaltzeit leuchten, das Symbol
OFF (Aus) und die Ziffern der Ausschaltzeit blinken.
5. Die SET-Taste drücken, um die vorherige Einstellung der
Ausschaltzeit zu bestätigen.
Die Symbole ON und OFF und die Ziffern der jeweils programmierten
Uhrzeiten leuchten.
Page 28
8
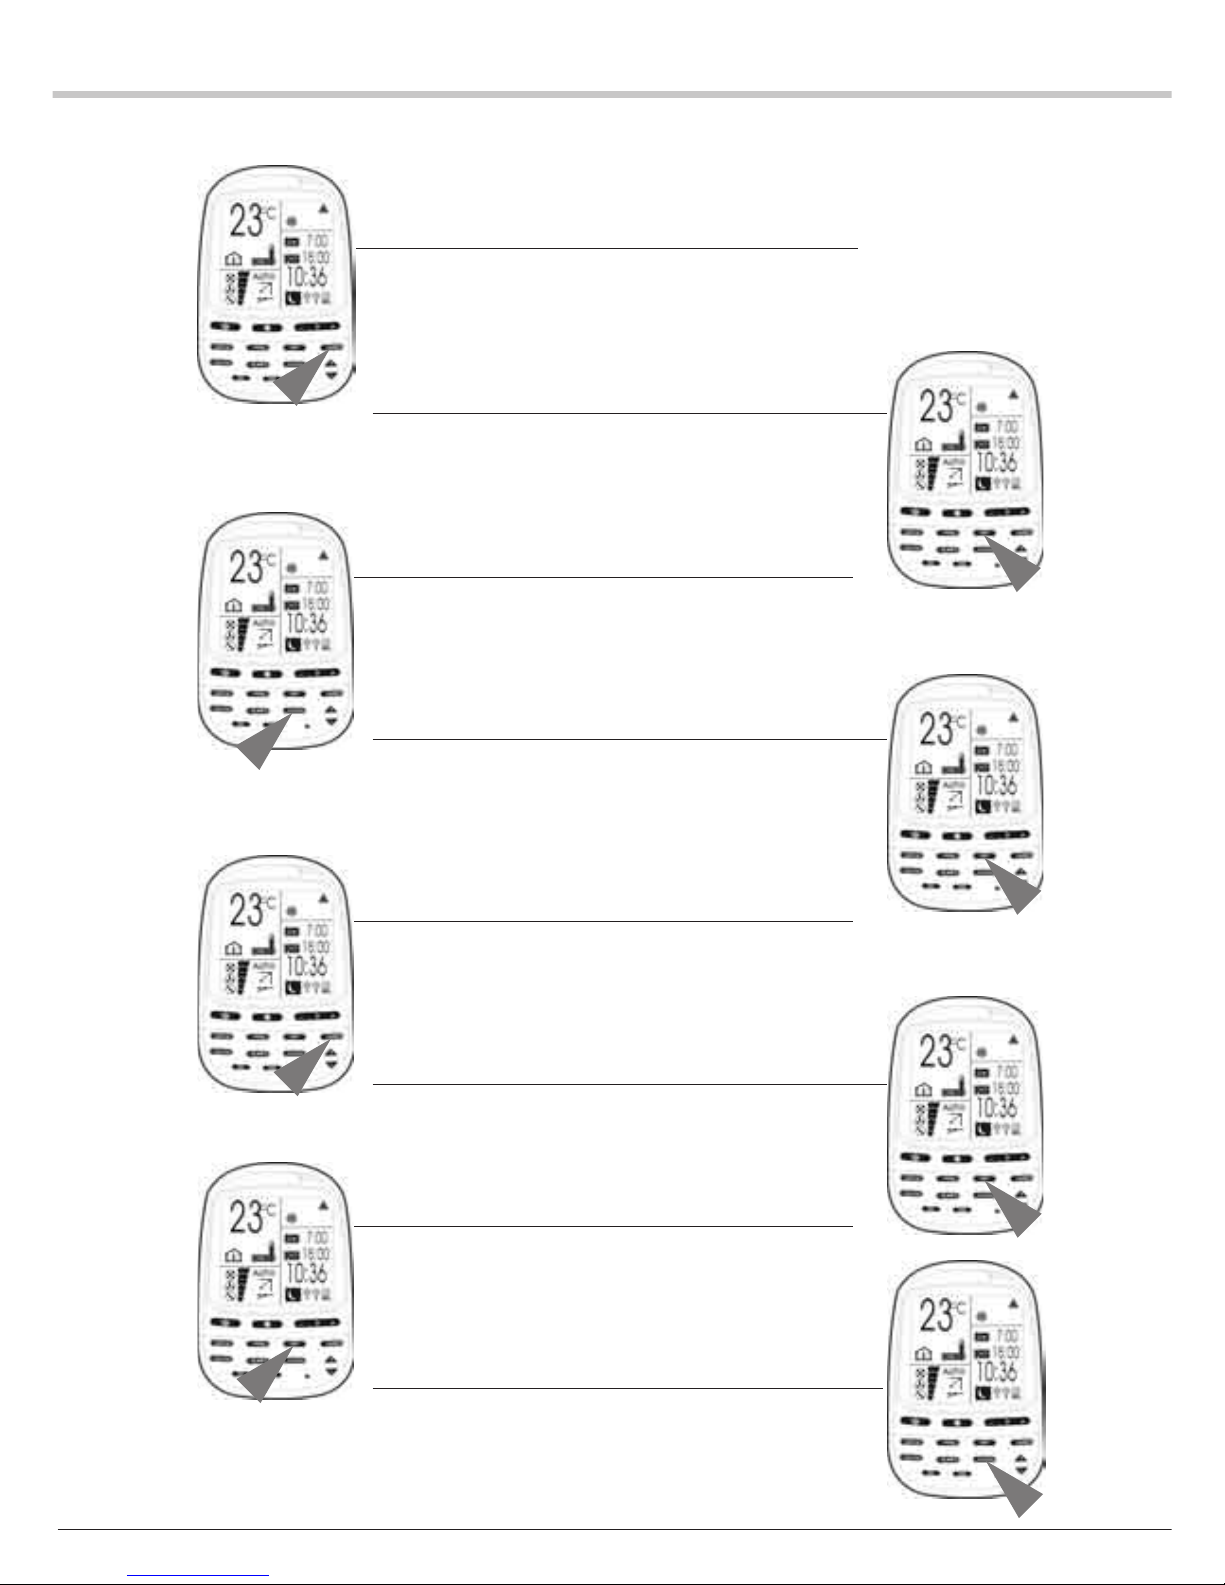
ANNULLIEREN DER ZEITEINSTELLUNG EINER
SPEZIFISCHEN PROGRAMMIERUNG
Annullieren der Einschaltzeit, ohne die Ausschaltzeit zu verändern.
1. Die TIMER-Taste drücken, um eine Programmierung zu wählen.
Das Symbol der gewählten Programmierung blinkt, und die
vorhergehenden Einstellungen der Ein- und Ausschaltzeit leuchten.
2. Die SET-Taste drücken. Das Symbol ON (Ein) und die Ziffern der
Einschaltzeit blinken.
3. Die CLEAR-Taste drücken. Die Einschaltzeit wird gelöscht. Das
Symbol OFF (Aus) und die Ziffern der Ausschaltzeit blinken.
4. Die SET-Taste drücken. Bestätigung der neuen Einstellung.
ANNULLIEREN DER AUSSCHALTZEIT, OHNE DIE
EINSCHALTZEIT ZU VERÄNDERN.
1. Die TIMER-Taste drücken, um eine Programmierung zu wählen.
Das Symbol der gewählten Programmierung blinkt, und die
vorhergehenden Einstellungen der Ein- und Ausschaltzeit leuchten.
2. Die SET-Taste drücken. Das Symbol ON (Ein) und die Ziffern der
Einschaltzeit blinken.
3.Die SET-Taste drücken. Das Symbol ON und die Ziffern der
Einschaltzeit leuchten.
Das Symbol OFFund die Ziffern der Ausschaltzeit blinken.
4. Die CLEAR-Taste drücken.
Die Ausschaltzeit wird gelöscht.
Page 29
9
ANNULLIEREN VON EINSCHALT- UND AUSSCHALTZEIT
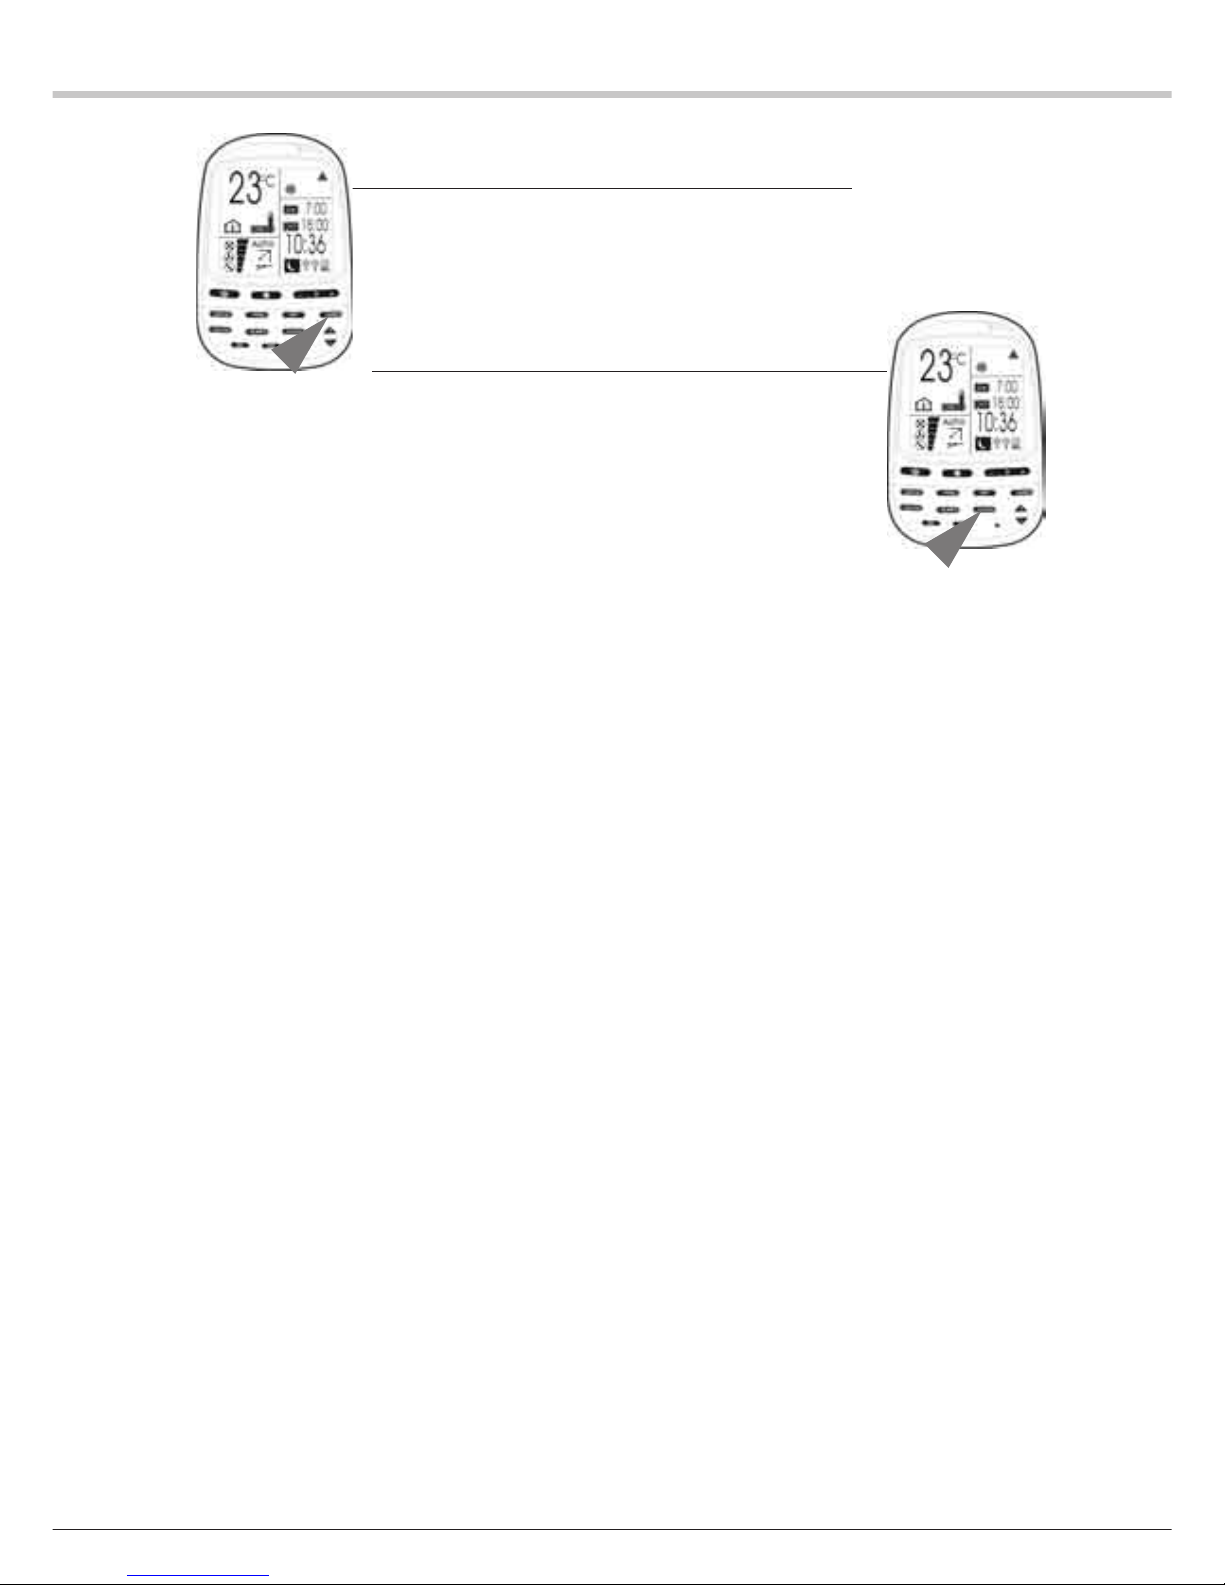
1. Die TIMER-Taste drücken, um eine Programmierung zu wählen.
Das Symbol der gewählten Programmierung blinkt, und die
vorhergehenden Einstellungen der Ein- und Ausschaltzeit leuchten.
2.Die CLEAR-Taste drücken. Alle Einstellungen der gewählten
Programmierung werden gelöscht.
FUNKTION ECONOMIC-BETRIEB
Die SLEEP-Taste (7) drücken, um die Funktion Economic-Betrieb
(Nachtbetrieb) zu wählen.
Das Symbol für Economic-Betrieb leuchtet, und das Symbol der
impliziten Ausschaltzeit (7 Stunden nach der augenblicklichen Uhrzeit)
blinkt. Die implizite Einstellung kann um 3 bis 12 Std. geändert werden,
indem man jeweils die Tasten HOUR + (11) und HOUR – (12) drückt.
(Der Zeitschalter für Economic-Betrieb zeigt zuerst die implizite
Einstellung oder die gewählte Einstellung + aktuelle Uhrzeit an).
Beispiel : Es ist z. Zt. 23h00, und der Economic-Betrieb ist gewählt.
Die implizite Ausschaltzeit für den Economic-Betrieb ist 6h00. Falls
die Ausschaltverzögerung auf 10h00 festgesetzt ist, wird der
Economic-Betrieb um 9h00 ausgeschaltet.
Page 30

10
Page 31
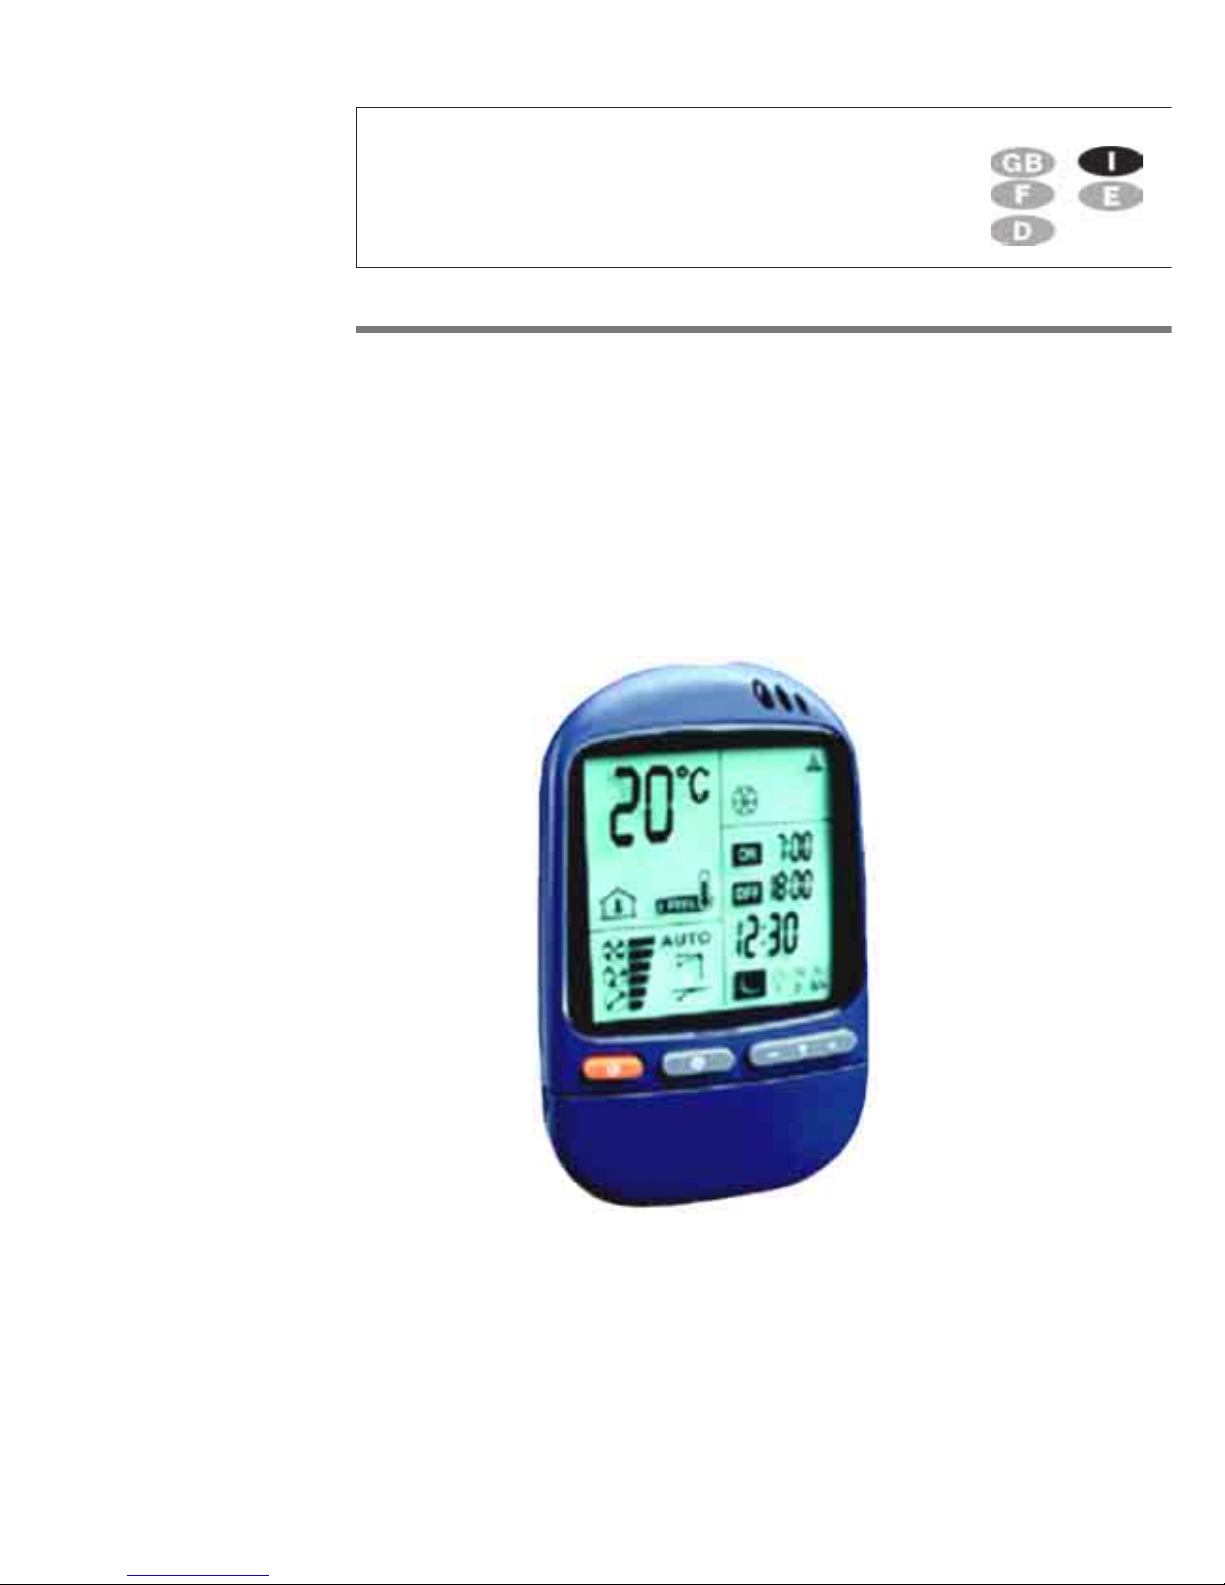
MANUALE PER L'USOMANUALE PER L'USO
MANUALE PER L'USOMANUALE PER L'USO
MANUALE PER L'USO
MURC4 G MURC4 G
MURC4 G MURC4 G
MURC4 G
- 399420- 399420
- 399420- 399420
- 399420
CLIMATISATION
Telecomando Telecomando
Telecomando Telecomando
Telecomando
RR
RR
R
C4C4
C4C4
C4
Page 32
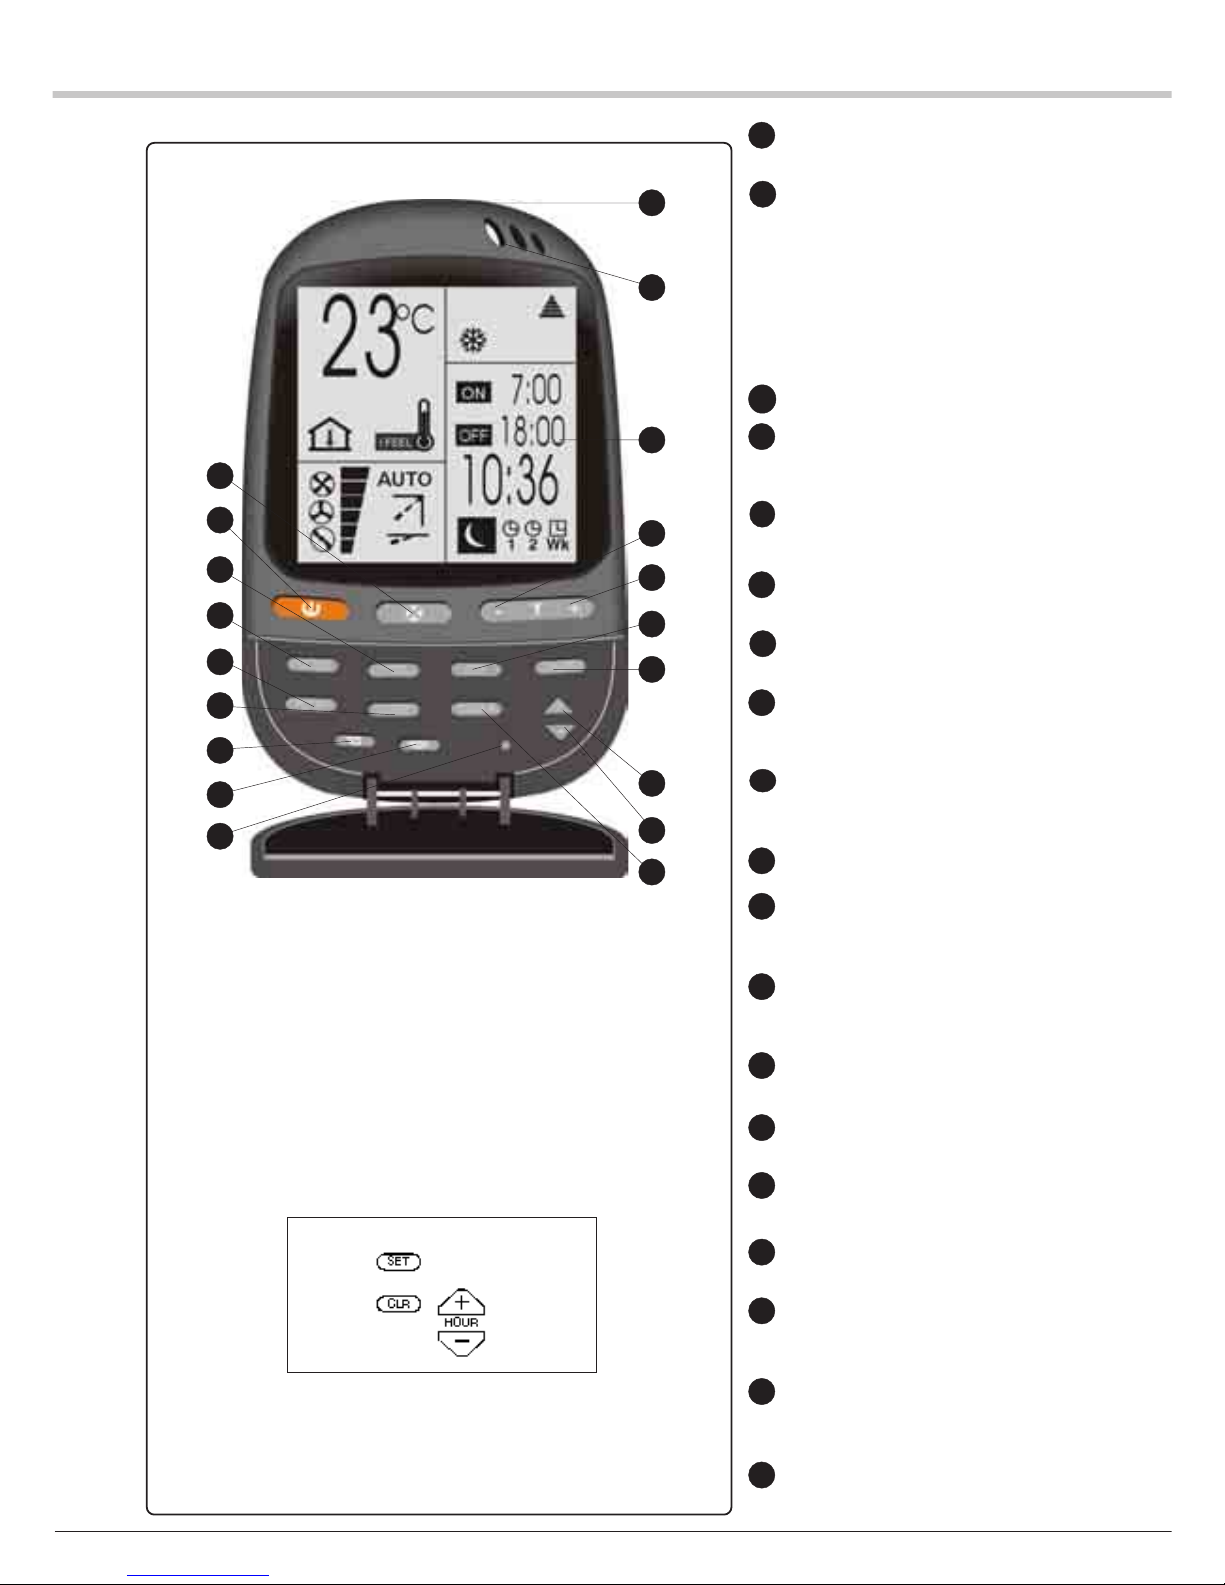
2
Tasto START / STOP
(Marcia / Arresto)
Tasto di selezione del modo di funzionamento
RAFFREDDAMENTO (Tranne per apparecchi
a parete acqua ghiacciata)
RISCALDAMENTO (Tranne per apparecchi a
parete acqua ghiacciata)
REGOLAZIONE AUTO FREDDO/CALDO
VENTILAZIONE
DEUMIDIFICAZIONE (Tranne per apparecchi
a parete acqua ghiacciata)
Tasto I FEEL: rilevamento locale della temperatura
Tasto di selezione della VELOCITÀ di VENTILAZIONE
o della VENTILAZIONE AUTOMATICA (a seconda
dell’unità interna)
Tasto di aumento della temperatura ambiente
Tasto di riduzione della temperatura ambiente
Tasto SLEEP
Scansione degli sportelli (soltanto per
apparecchi a parere ed apparecchio a
parete acqua ghiacciata)
Scansione degli sportelli (soltanto per
apparecchi a parere ed apparecchio a
parete acqua ghiacciata)
Tasto di selezione della PROGRAMMAZIONE
Tasto +: aumenta il valore preimpostato della durata
di funzionamento
Tasto -: diminuisce il valore preimpostato della durata
di funzionamento
Display a cristalli liquidi
LUCE POSTERIORE (OP-
TIONNEL)
Sensore I FEEL
Emettitore del segnale infrarosso
Tasto ROOM: visualizzazione della temperatura
ambiente
Tasto SET: imposta le ore di funzionamento e/o di
arresto della PROGRAMMAZIONE
Tasto CLEAR: annulla i parametri dell’orologio
Tasto CHIUSURA
FUNZIONE RESET:
1) Togliere 1 pila.
2) Premere contemporaneamente i 4 tasti
qui di seguito riportati fino a
spegnimento dei simboli.
3) Rimettere la pila.
NOTA:
Aprire il coperchio / sportello per accedere ai
pulsanti di comando.
I quattro tasti interessati sono:
9
4
16
1
3
2
7
8
19
6
5
17
13
14
15
10
11
12
18
1
3
4
6
7
10
11
17
18
5
8
9
12
13
14
15
16
19
2
Page 33
3
MODALITÀ D’USO DEL TELECOMANDOMODALITÀ D’USO DEL TELECOMANDO
MODALITÀ D’USO DEL TELECOMANDOMODALITÀ D’USO DEL TELECOMANDO
MODALITÀ D’USO DEL TELECOMANDO
FUNZIONAMENTO DELLA PROGRAMMAZIONEFUNZIONAMENTO DELLA PROGRAMMAZIONE
FUNZIONAMENTO DELLA PROGRAMMAZIONEFUNZIONAMENTO DELLA PROGRAMMAZIONE
FUNZIONAMENTO DELLA PROGRAMMAZIONE
Possono essere scelte quattro programmazioni sul telecomando. Due programmazioni giornaliere
(chiamate T1 & T2) e due programmazione di fine settimana in opzione (chiamate WK1 & WK2). Ognuna
di queste programmazioni può essere selezionata premendo il tasto TIMER (10). Per regolare le
programmazioni, utilizzare rispettivamente i tasti HOUR + (11) e - (12). Il tasto SET (17) attiva la
programmazione ed il tasto CLEAR (18) la annulla.
A.A.
A.A.
A.
PROGRAMMAZIONE GIORNALIERAPROGRAMMAZIONE GIORNALIERA
PROGRAMMAZIONE GIORNALIERAPROGRAMMAZIONE GIORNALIERA
PROGRAMMAZIONE GIORNALIERA
Le programmazioni giornaliere T1 e T2 permettono di programmare l’accensione e lo spegnimento
separatamente su due periodi diversi. Una volta regolata, la programmazione agirà
quotidianamente.
B.B.
B.B.
B.
PROGRAMMAZIONE DI FINE SETTIMANA (IN OPZIONE)PROGRAMMAZIONE DI FINE SETTIMANA (IN OPZIONE)
PROGRAMMAZIONE DI FINE SETTIMANA (IN OPZIONE)PROGRAMMAZIONE DI FINE SETTIMANA (IN OPZIONE)
PROGRAMMAZIONE DI FINE SETTIMANA (IN OPZIONE)
Le programmazioni di fine settimana WKT1 e WKT2 permettono di programmare l’accensione e
lo spegnimento, soltanto per due giorni.
Queste programmazioni agiranno soltanto il giorno scelto ed il giorno successivo.
Alle ore 24.00 il secondo giorno, la programmazione WK non agirà più e la programmazione
giornaliera riprenderà la sua azione normale.
* WKT1 - Attiva il giorno preimpostato
* WKT2 - Attiva il giorno successivo al giorno preimpostato
OSSERVAZIONE:
1. Durante il funzionamento delle programmazioni di fine settimana, le programmazioni giornaliere
vengono disattivate.
2. Le programmazioni WK devono essere riattivate prima di ogni fine settimana.
C.C.
C.C.
C.
SCELSCEL
SCELSCEL
SCEL
TT
TT
T
A DI UNA PROGRAMMAZIONEA DI UNA PROGRAMMAZIONE
A DI UNA PROGRAMMAZIONEA DI UNA PROGRAMMAZIONE
A DI UNA PROGRAMMAZIONE
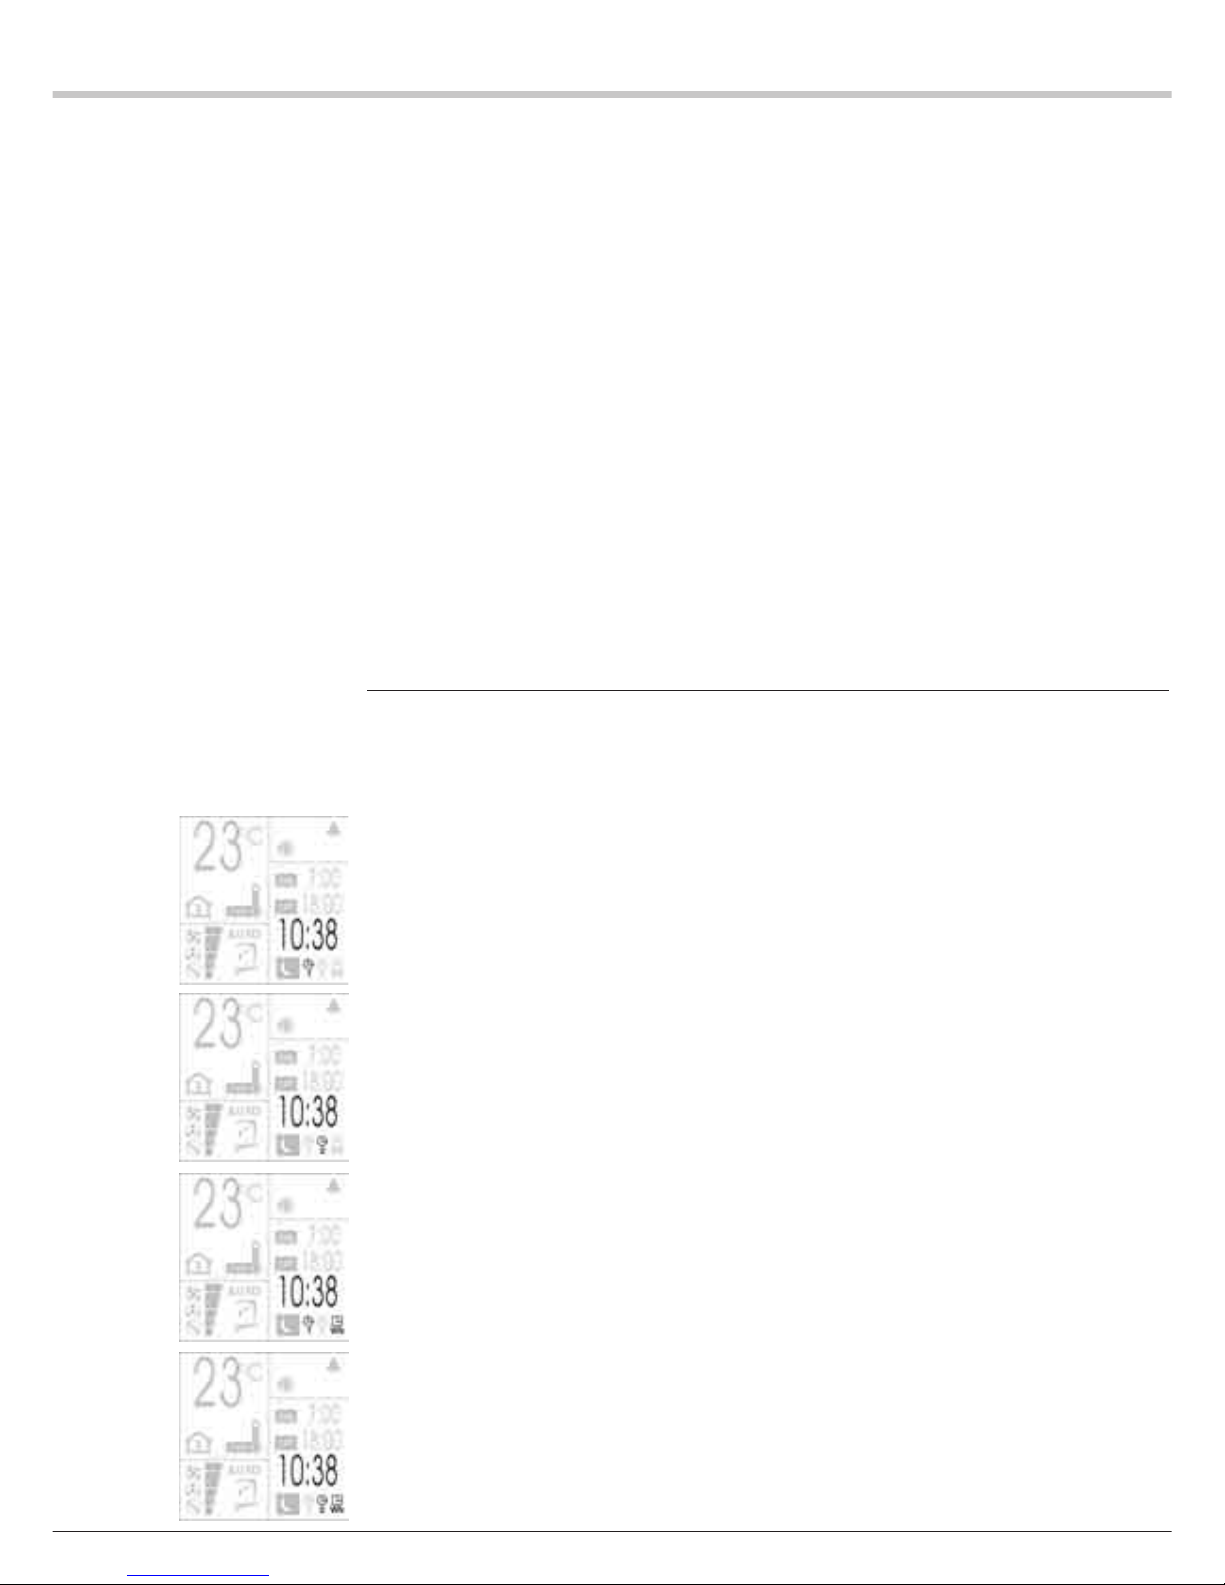
Premere il tasto TIMER (10) per scegliere una
programmazione. Ad ogni pressione del tasto TIMER (10),
una delle quattro icone di programmazione qui di seguito
riportate appare sul display a cristalli liquidi.
1. Premere il tasto TIMER per scegliere la programmazione
giornaliera T1.
L’icona 1 della Programmazione T1 lampeggia.
2. Premere il tasto TIMER per scegliere la programmazione
giornaliera T2.
L’icona 2 della Programmazione T2 lampeggia.
3. Premere il tasto TIMER per scegliere la programmazione di
fine settimana WKT1.
Le icone 1 e WK lampeggiano.
4. Premere il tasto TIMER per scegliere la programmazione di
fine settimana WKT2.
Le icone 2 e WK lampeggiano.
Page 34
4
REGOLAZIONE DELL’ORA DI AVVIAMENTOREGOLAZIONE DELL’ORA DI AVVIAMENTO
REGOLAZIONE DELL’ORA DI AVVIAMENTOREGOLAZIONE DELL’ORA DI AVVIAMENTO
REGOLAZIONE DELL’ORA DI AVVIAMENTO
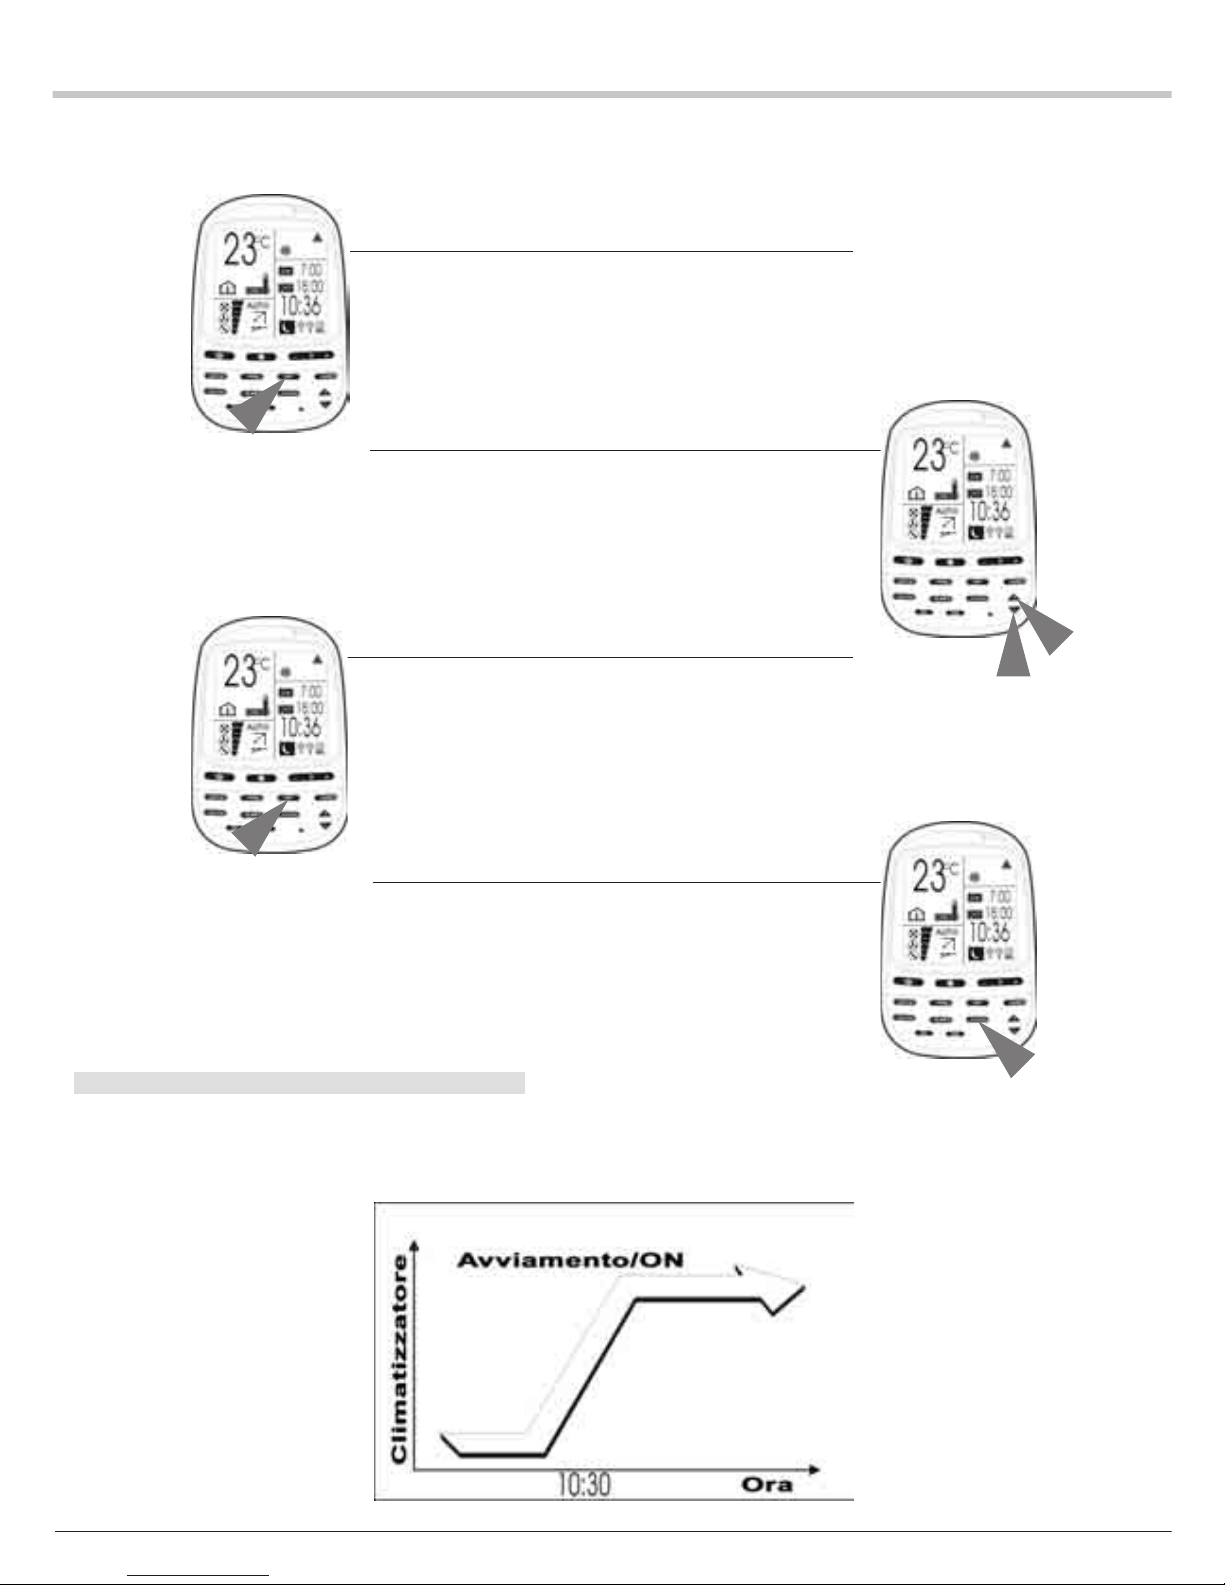
Dopo aver scelto una programmazione (T1, T2 o WKT1, WKT2),
procedere come segue per impostare l’ora di avviamento
programmata.
ESEMPIO: Avviamento del climatizzatore alle ore 10:30.
1. Premere il tasto SET
L’icona ON (Avviamento) e le cifre dell’ora di avviamento
lampeggiano.
2. Impostare le ore ed i minuti.
1. Impostare l’ora di avviamento alle ore 10:30.
2. Premere il tasto HOUR + per far avanzare l’ora e il tasto
HOUR - per farla indietreggiare
3. Premere il tasto SET.
1. L’ora di avviamento viene programmata alle ore 10:30 (l’icona
«ON» [Avviamento] si accende).
2. L’icona «OFF» (Arresto) e le cifre dell’ora di arresto
lampeggiano.
4. Premere il tasto CLEAR.
L’arresto programmato viene cancellato.
OSSERVAZIONI:OSSERVAZIONI:
OSSERVAZIONI:OSSERVAZIONI:
OSSERVAZIONI:
1. L’impostazione implicita delle programmazioni è rispettivamente di
7:00 e 18:00 per le ore di avviamento e di arresto.
2. Il modo programmazione visualizzerà sempre le ultime impostazioni
di avviamento ed arresto (ON e OFF) sul display a cristalli liquidi.
Page 35
5
REGOLAZIONE DELL’ARRESTO PROGRAMMATOREGOLAZIONE DELL’ARRESTO PROGRAMMATO
REGOLAZIONE DELL’ARRESTO PROGRAMMATOREGOLAZIONE DELL’ARRESTO PROGRAMMATO
REGOLAZIONE DELL’ARRESTO PROGRAMMATO
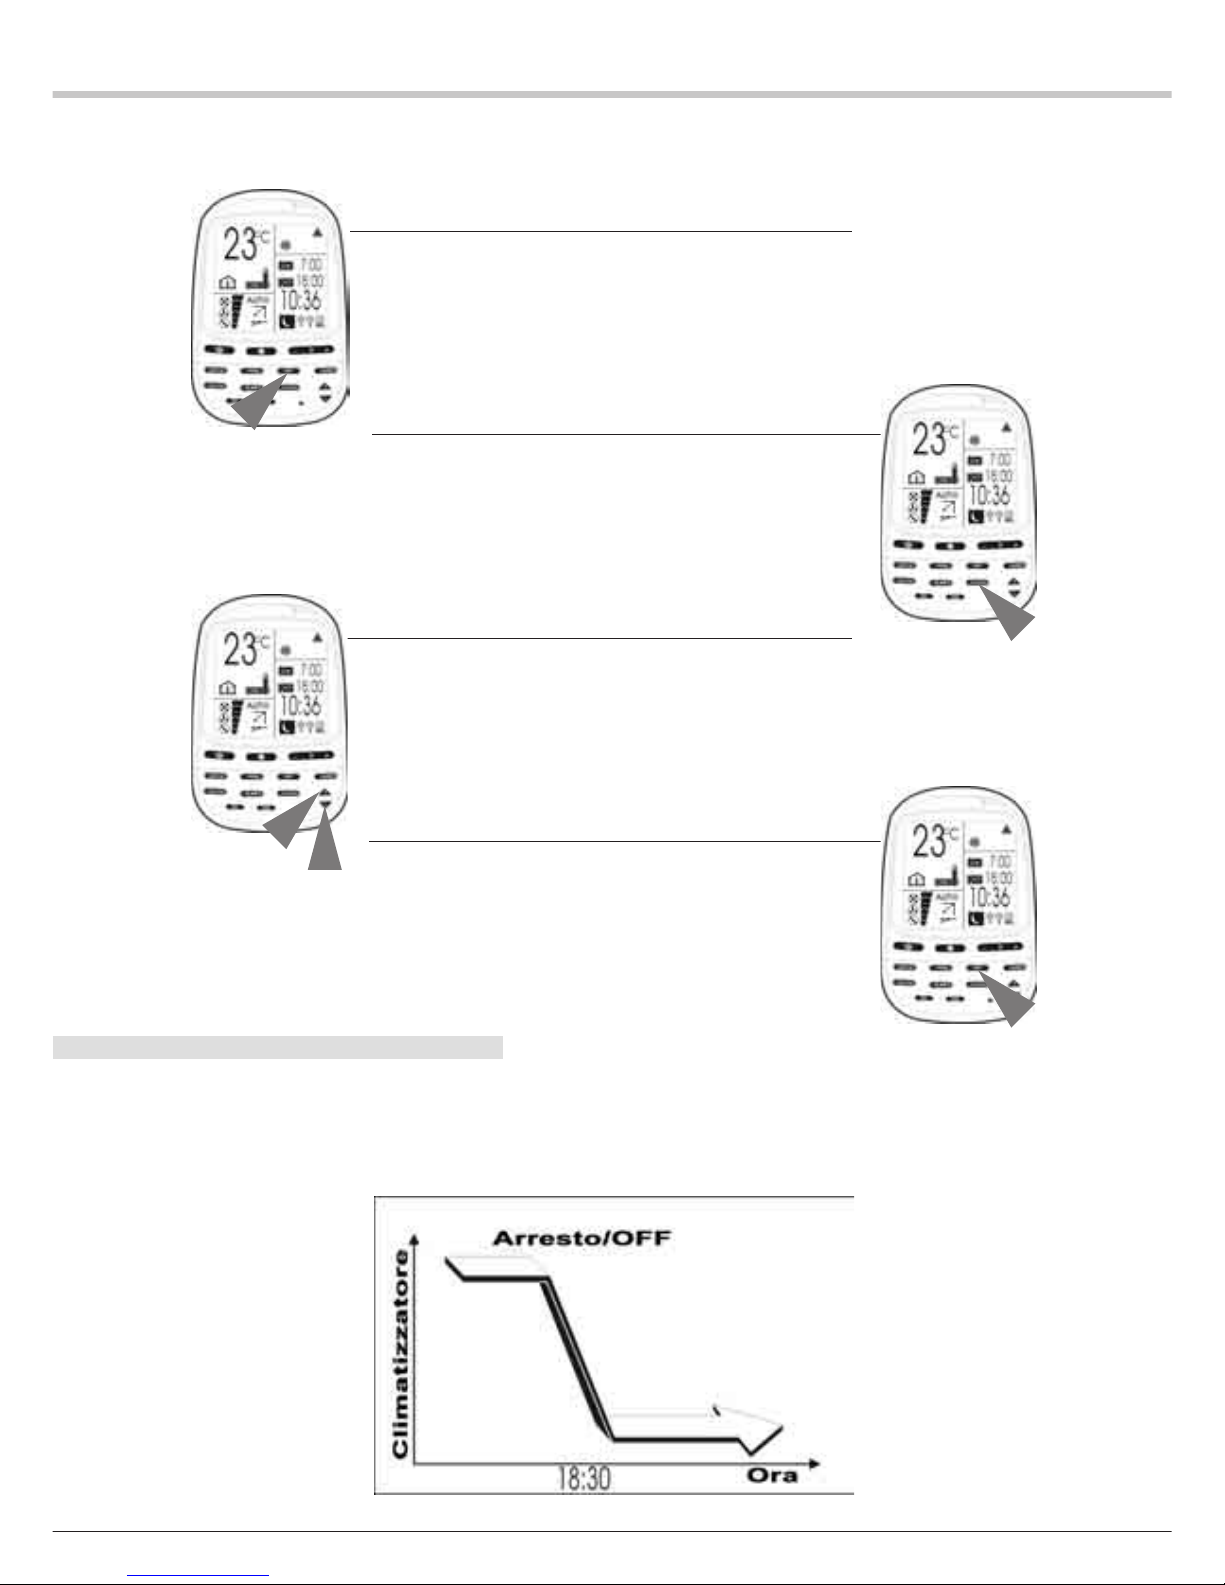
Dopo aver scelto una programmazione (T1, T2 o WKT1, WKT2),
procedere come segue per regolare l’ora di arresto programmata.
ESEMPIO: Arresto del climatizzatore alle ore 18:30.
1. Premere il tasto SET.
L’icona ON (Avviamento) e le cifre dell’ora di avviamento
lampeggiano.
2. Premere il tasto CLEAR.
1. L’ora di avviamento viene cancellata.
2. L’icona OFF (Arresto) e le cifre dell’ora di arresto
lampeggiano.
3. Impostare le ore ed i minuti.
1. Impostare l’ora di arresto alle 18:30.
2. Premere il tasto HOUR + per far avanzare l’ora ed il tasto
HOUR - per farla indietreggiare.
4. Premere il tasto SET.
L’ora di arresto viene programmata alle ore 18:30 (l’icona
OFF della programmazione si accende).
OSSERVAZIONI:OSSERVAZIONI:
OSSERVAZIONI:OSSERVAZIONI:
OSSERVAZIONI:
1. L’impostazione implicita delle programmazioni è rispettivamente di
7:00 e 18:00 per l’avviamento e l’arresto.
2. Il modo programmazione visualizzerà le ultime impostazioni di
avviamento e di arresto sul display a cristalli liquidi.
REGOLAZIONE DELLE ORE DI AVVIAMENTO E DIREGOLAZIONE DELLE ORE DI AVVIAMENTO E DI
REGOLAZIONE DELLE ORE DI AVVIAMENTO E DIREGOLAZIONE DELLE ORE DI AVVIAMENTO E DI
REGOLAZIONE DELLE ORE DI AVVIAMENTO E DI
Page 36
6
ARRESTOARRESTO
ARRESTOARRESTO
ARRESTO
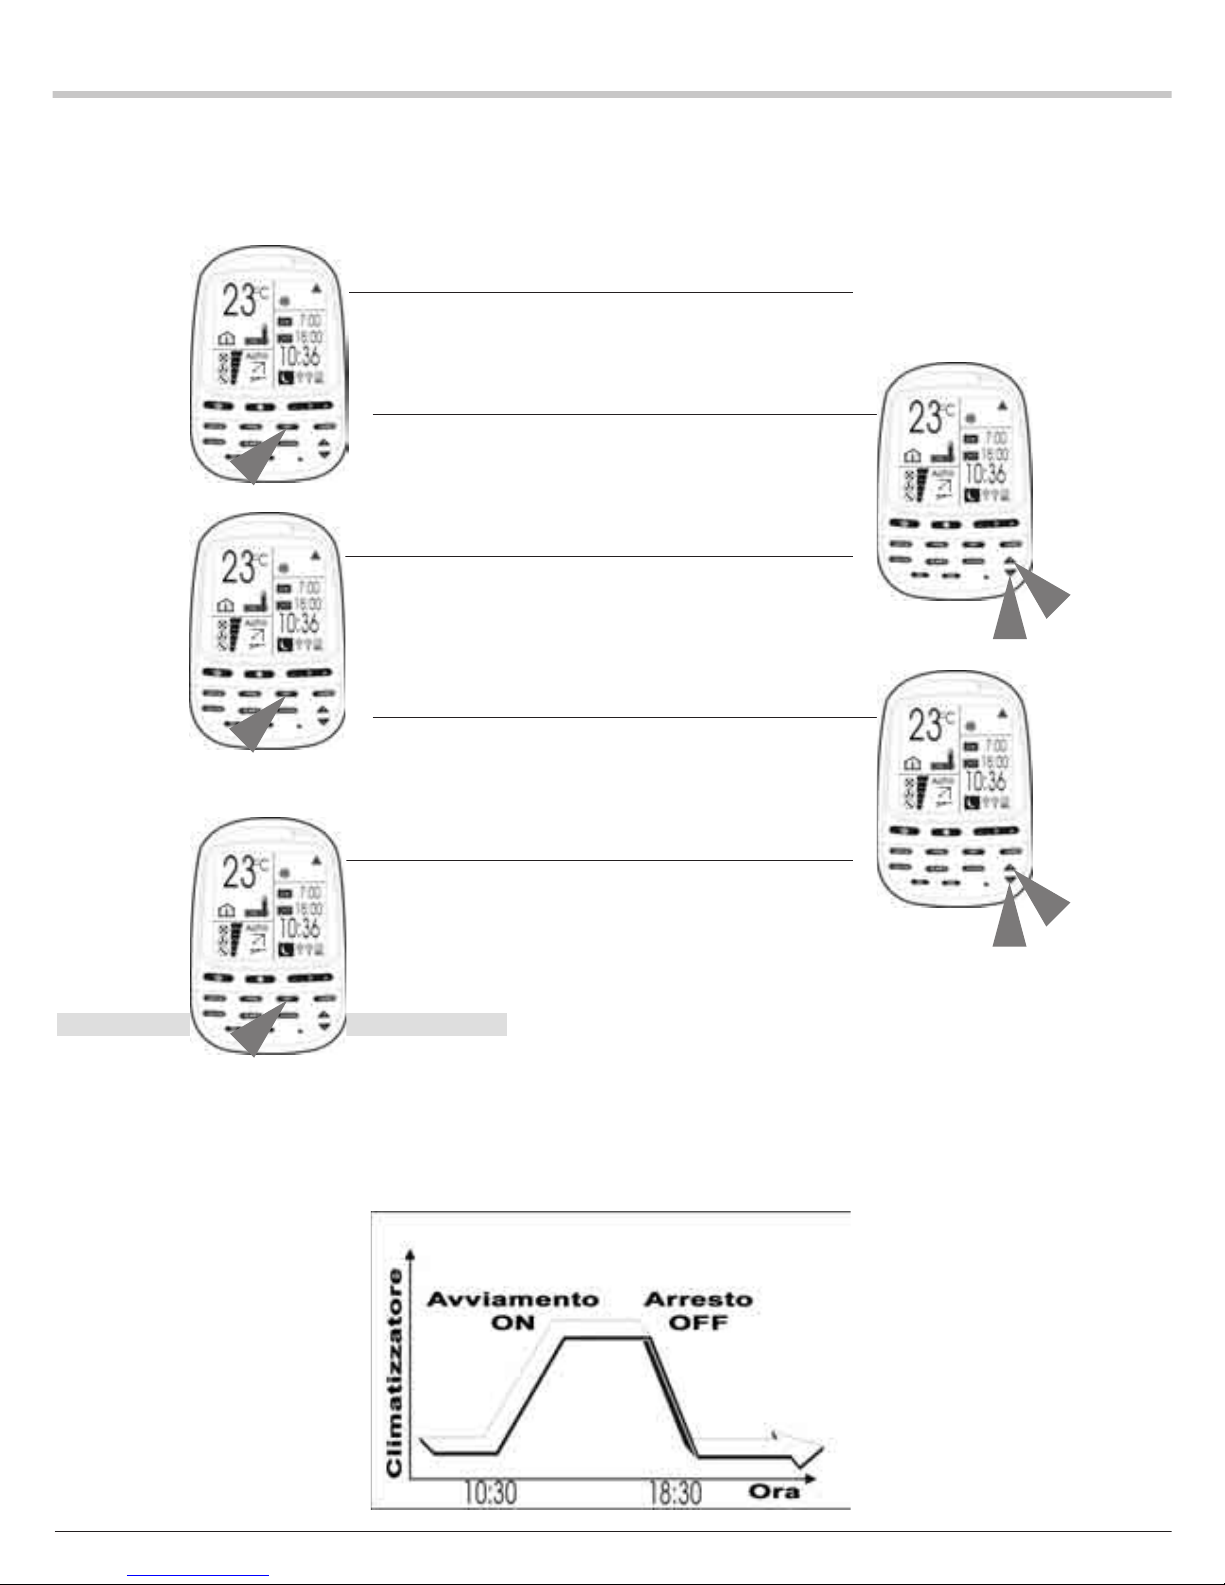
Dopo aver scelto una programmazione (T1, T2 o WKT1, WKT2),
procedere come segue per impostare le ore di avviamento e di arresto
programmate.
ESEMPIO: Avviamento del climatizzatore alle ore 10:30 e Arresto alle
ore 18:30.
1. Premere il tasto SET.
L’icona ON (Avviamento) e le cifre dell’ora di avviamento
lampeggiano.
2. Impostare le ore ed i minuti.
1. Impostare l’ora di avviamento (ON) su 10:30.
2. Premere il tasto HOUR + per fare avanzare l’ora e il tasto
HOUR - per farla indietreggiare.
3. Premere il tasto SET.
1. L’ora di avviamento viene programmata alle 10:30 (l’icona
ON lampeggia).
2. L’icona OFF (Arresto) e le cifre dell’ora di arresto della
programmazione lampeggiano.
4. Impostare le ore ed i minuti.
1. Impostare l’ora di arresto (OFF) su 18:30.
2. Premere il tasto HOUR + per far avanzare l’ora e il tasto
HOUR - per farla indietreggiare.
5. Premere il tasto SET.
L’ora di arresto (OFF) viene programmata alle 18:30 (l’icona
OFF della programmazione si accende).
OSSERVAZIONI:OSSERVAZIONI:
OSSERVAZIONI:OSSERVAZIONI:
OSSERVAZIONI:
1. Le impostazioni implicite delle programmazioni sono rispettivamente
di 7:00 e 18:00 per l’avviamento e l’arresto.
2. Il modo programmazione visualizzerà sempre le ultime impostazioni
di avviamento e di arresto sul display a cristalli liquidi.
3. Una pressione del tasto CLEAR (18) per 5 secondi annullerà tutte le
impostazioni di programmazione e cancellerà la visualizzazione della
programmazione.
Page 37
7
PER MODIFICARE LA REGOLAZIONE DELL’ORAPER MODIFICARE LA REGOLAZIONE DELL’ORA
PER MODIFICARE LA REGOLAZIONE DELL’ORAPER MODIFICARE LA REGOLAZIONE DELL’ORA
PER MODIFICARE LA REGOLAZIONE DELL’ORA
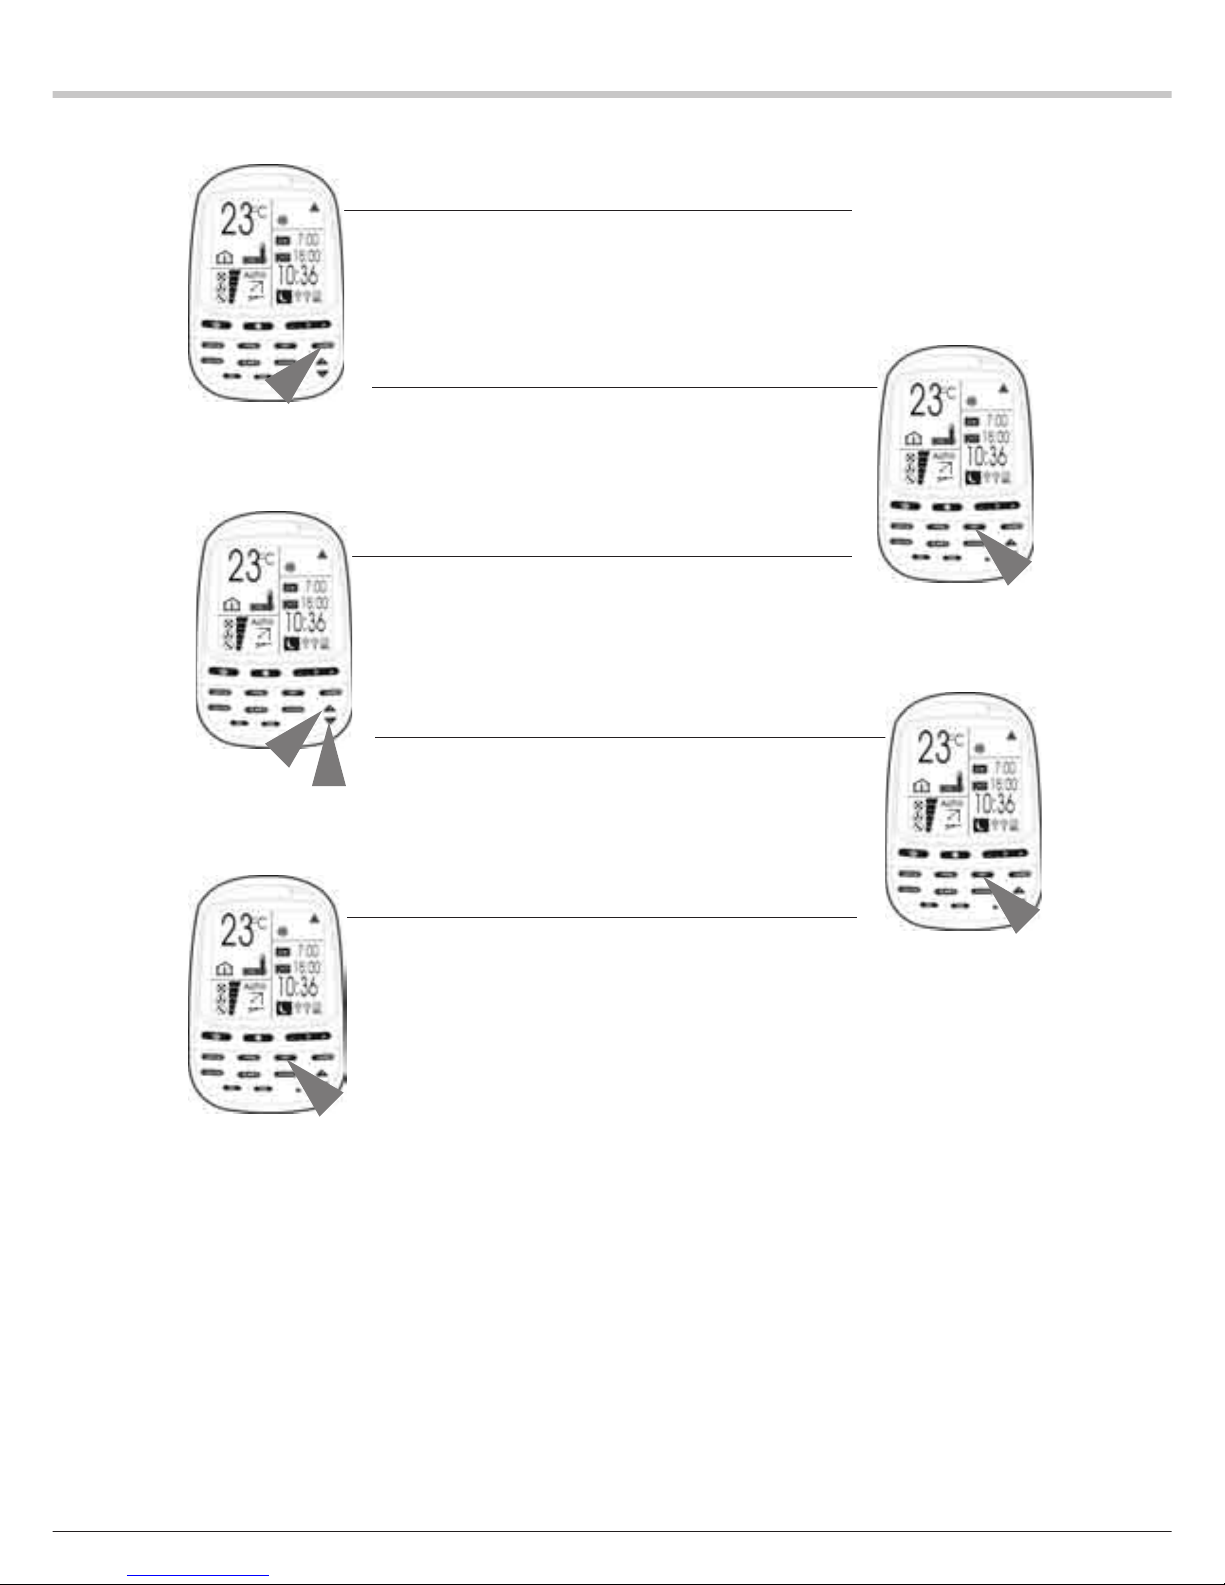
ESEMPIO: Per far avanzare l’ora di avviamento dalle ore 10:30 alle ore
9:20 (con il mantenimento dell’impostazione dell’ora di arresto).
1. Premere il tasto TIMER fino a che l’icona della programmazione
scelta lampeggi.
OSSERVAZIONE: le cifre della relativa programmazione
precedentemente impostate verranno visualizzate senza
lampeggiare.
2. Premere il tasto SET per passare in modo edizione.
L’icona ON (Avviamento) e le cifre dell’ora di avviamento
lampeggiano.
3. Modificare l’impostazione dell’ora su 9:20 mediante pressione
del tasto «HOUR».
L’icona ON e le cifre dell’ora di avviamento lampeggiano.
4. Premere il tasto SET per salvare la nuova impostazione. L’icona
ON e le cifre dell’ora di avviamento si accendono, e l’icona
OFF (Arresto) e le cifre dell’ora di arresto lampeggiano.
5. Premere il tasto SET per convalidare la precedente impostazione
dell’ora di arresto.
Le icone ON e OFF, nonché le cifre dell’ora della relative
programmazione si accendono.
Page 38
8
PER ANNULLARE L’IMPOSTAZIONE DELL’ORA DI UNAPER ANNULLARE L’IMPOSTAZIONE DELL’ORA DI UNA
PER ANNULLARE L’IMPOSTAZIONE DELL’ORA DI UNAPER ANNULLARE L’IMPOSTAZIONE DELL’ORA DI UNA
PER ANNULLARE L’IMPOSTAZIONE DELL’ORA DI UNA
PROGRAMMAZIONE SPECIFICAPROGRAMMAZIONE SPECIFICA
PROGRAMMAZIONE SPECIFICAPROGRAMMAZIONE SPECIFICA
PROGRAMMAZIONE SPECIFICA
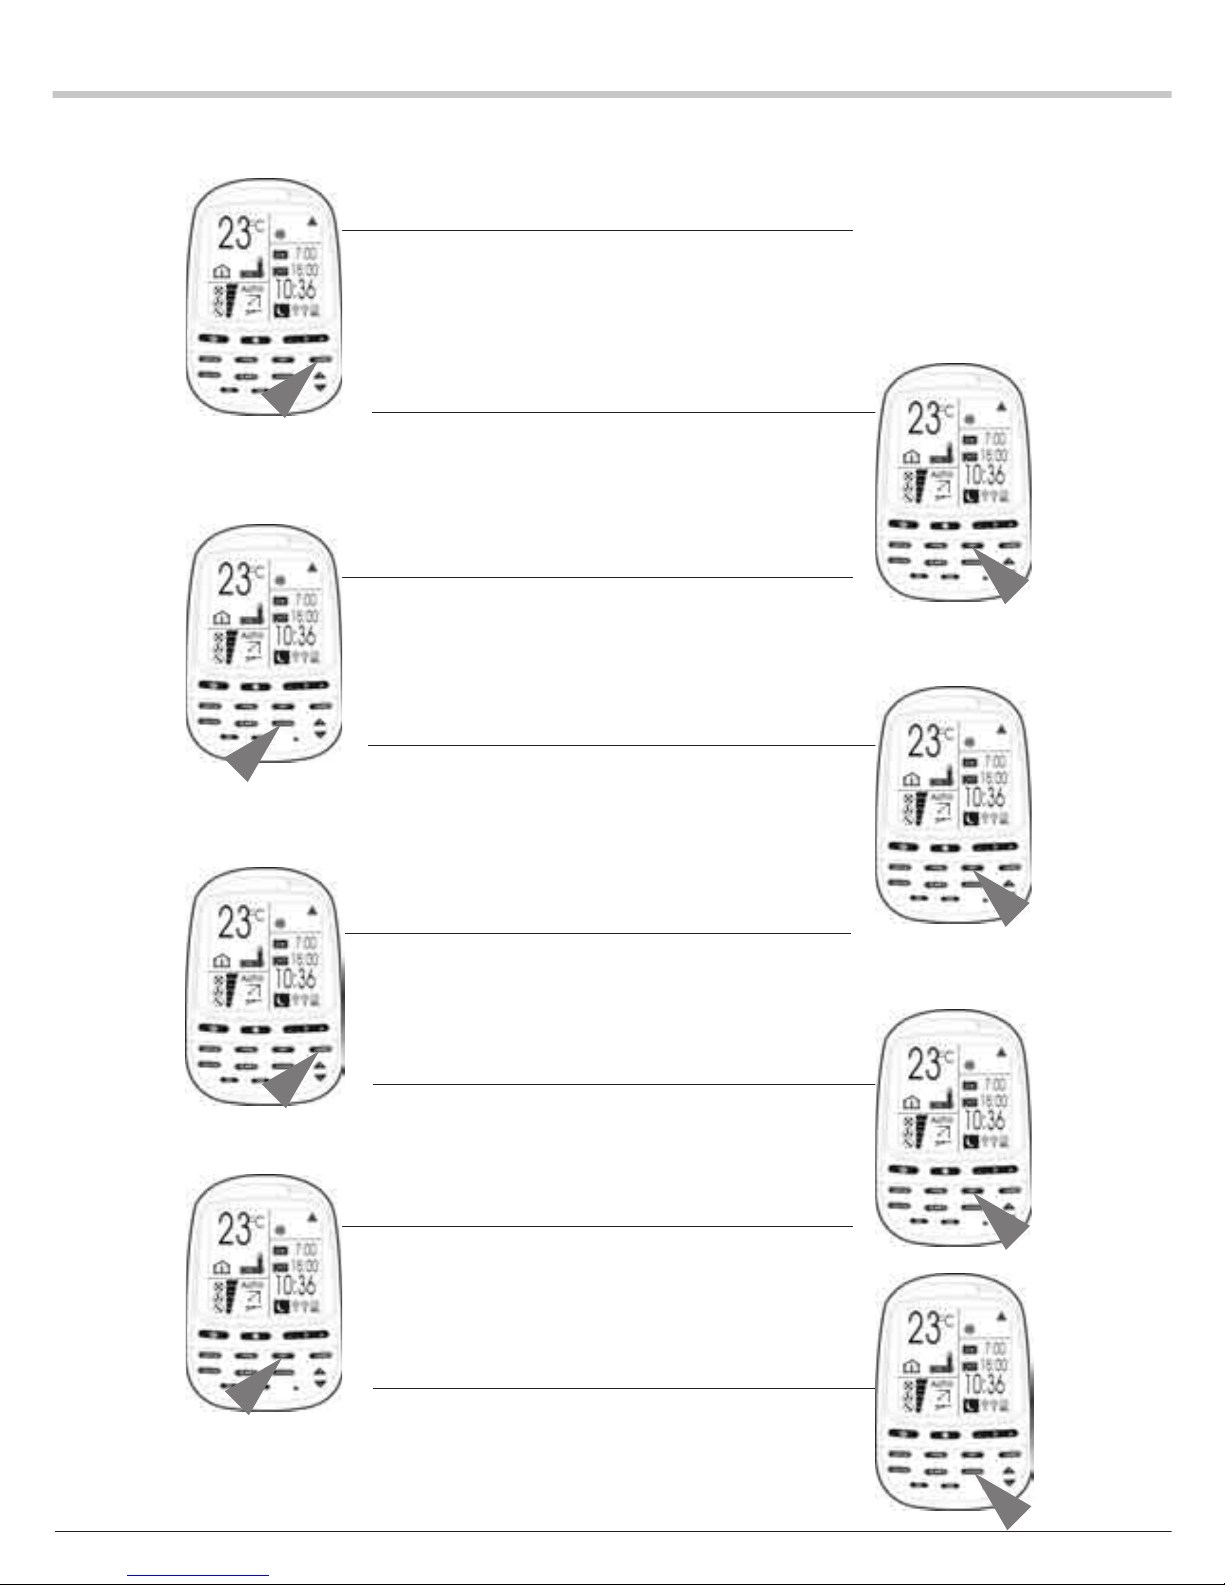
Per annullare l’ora di avviamento, con il mantenimento
dell’impostazione dell’ora di arresto, procedere come segue.
1. Premere il tasto TIMER per scegliere una programmazione.
L’icona della programmazione scelta lampeggia e le precedenti
impostazioni dell’ora di avviamento e di arresto si accendono.
2. Premere il tasto SET.
L’icona ON (Avviamento) e le cifre dell’ora di avviamento
lampeggiano.
3. Premere il tasto CLEAR.
L’ora di avviamento viene cancellata. L’icona OFF (Arresto) e
le cifre dell’ora di arresto lampeggiano.
4. Premere il tasto SET.
Convalida della nuova impostazione.
PER ANNULLARE L’ORA DI ARRESTO CON ILPER ANNULLARE L’ORA DI ARRESTO CON IL
PER ANNULLARE L’ORA DI ARRESTO CON ILPER ANNULLARE L’ORA DI ARRESTO CON IL
PER ANNULLARE L’ORA DI ARRESTO CON IL
MANTENIMENTO DELL’IMPOSTAZIONE DELL’ORA DIMANTENIMENTO DELL’IMPOSTAZIONE DELL’ORA DI
MANTENIMENTO DELL’IMPOSTAZIONE DELL’ORA DIMANTENIMENTO DELL’IMPOSTAZIONE DELL’ORA DI
MANTENIMENTO DELL’IMPOSTAZIONE DELL’ORA DI
AVVIAMENTOAVVIAMENTO
AVVIAMENTOAVVIAMENTO
AVVIAMENTO
1. Premere il tasto TIMER per scegliere una programmazione.
L’icona della programmazione scelta lampeggia e le relative
impostazioni precedenti dell’ora di avviamento e di arresto si
accendono.
2. Premere il tasto SET.
L’icona ON e le cifre dell’ora di avviamento lampeggiano.
3. Premere il tasto SET.
L’icona ON e le cifre dell’ora di avviamento si accendono.
L’icona OFF e le cifre di arresto lampeggiano.
4. Premere il tasto CLEAR.
L’ora di arresto viene cancellata.
Page 39
9
PER ANNULLARE LE IMPOSTAZIONE DELL’ORA DIPER ANNULLARE LE IMPOSTAZIONE DELL’ORA DI
PER ANNULLARE LE IMPOSTAZIONE DELL’ORA DIPER ANNULLARE LE IMPOSTAZIONE DELL’ORA DI
PER ANNULLARE LE IMPOSTAZIONE DELL’ORA DI
AVVIAMENTO E DI ARRESTOAVVIAMENTO E DI ARRESTO
AVVIAMENTO E DI ARRESTOAVVIAMENTO E DI ARRESTO
AVVIAMENTO E DI ARRESTO
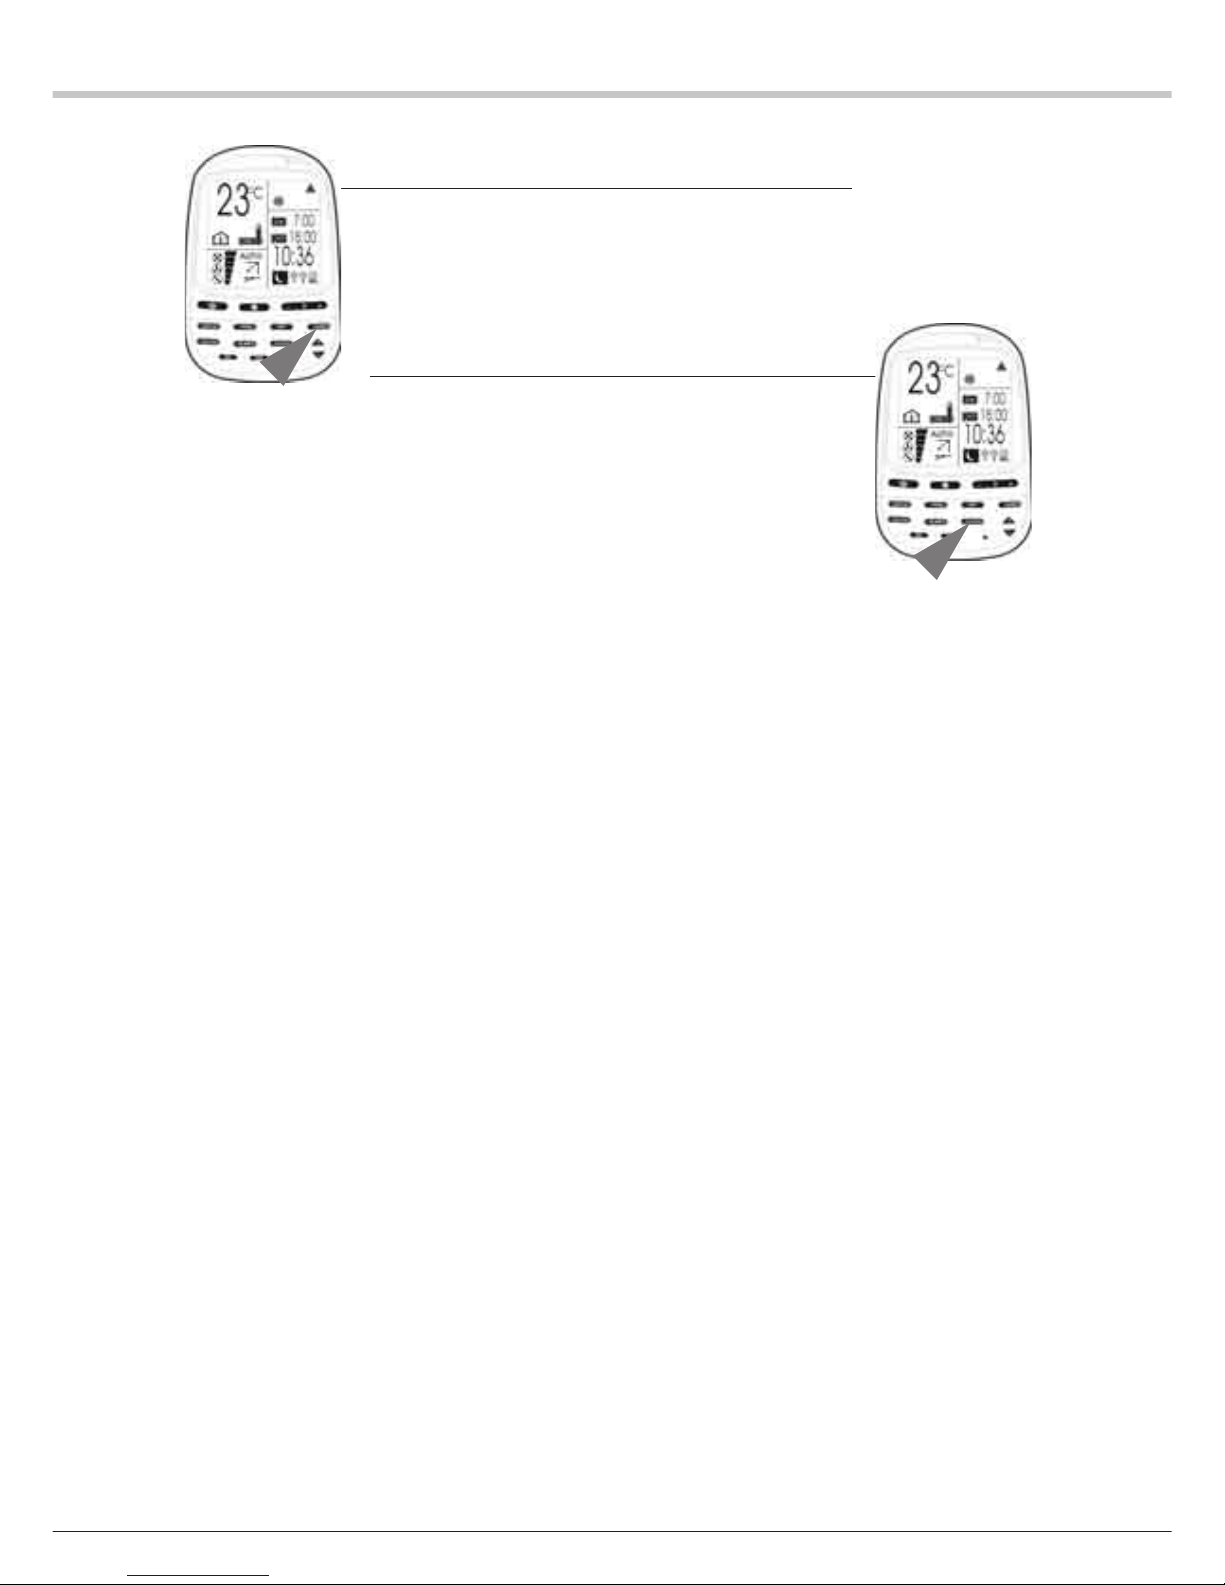
1. Premere il tasto TIMER per scegliere una programmazione.
L’icona della programmazione scelta lampeggia e le relative
impostazioni precedenti dell’ora di avviamento e di arresto si
accendono.
2. Premere il tasto CLEAR.
Tutte le impostazioni della programmazione scelta vengono
cancellate.
FUNZIONE RALLENTAMENTO DI NOTTEFUNZIONE RALLENTAMENTO DI NOTTE
FUNZIONE RALLENTAMENTO DI NOTTEFUNZIONE RALLENTAMENTO DI NOTTE
FUNZIONE RALLENTAMENTO DI NOTTE
Premere il tasto SLEEP (7) per selezionare la funzione Rallentamento di
notte.
L’icona del rallentamento di notte si accende e l’icona dell’ora di arresto
implicito del rallentamento di notte (7 ore dopo l’ora corrente) lampeggia.
L’impostazione implicita può essere modificata, da 3 a 12 ore, premendo
rispettivamente i tasti HOUR + (11) e HOUR - (12). (L’orologio del
rallentamento di notte visualizzerà inizialmente l’impostazione implicita
o l’impostazione scelta più l’ora corrente).
Esempio: Sono le ore 23:00 e viene selezionato il modo rallentamento
di notte. L’ora di arresto del rallentamento di notte sarà implicitamente le
ore 6:00. Se la temporizzazione di arresto viene impostata alle ore 10,
l’ora di arresto del rallentamento di notte sarà 9:00.
Page 40

10
Page 41
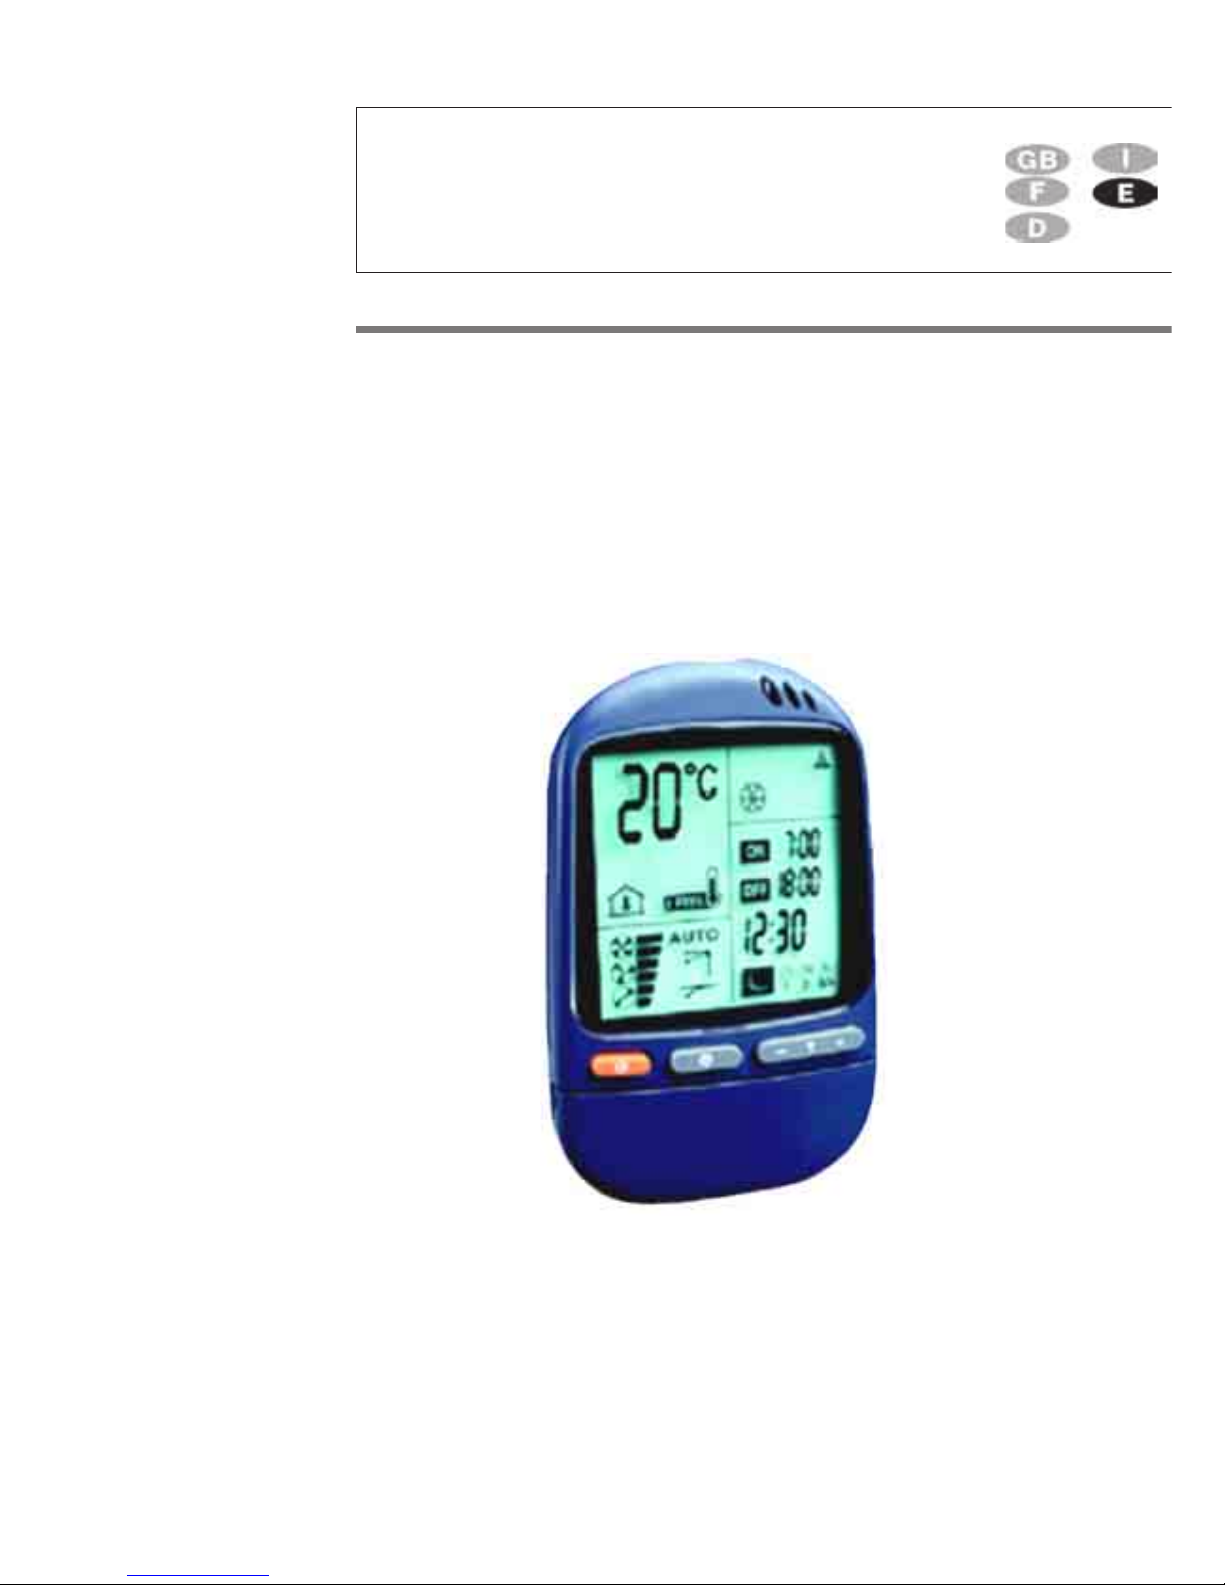
MANUAL DE UTILIZACIÓNMANUAL DE UTILIZACIÓN
MANUAL DE UTILIZACIÓNMANUAL DE UTILIZACIÓN
MANUAL DE UTILIZACIÓN
MURC4MURC4
MURC4MURC4
MURC4
G - 399420 G - 399420
G - 399420 G - 399420
G - 399420
CLIMATIZACIÓN
Mando a distancia Mando a distancia
Mando a distancia Mando a distancia
Mando a distancia
RR
RR
R
C4C4
C4C4
C4
Page 42
2
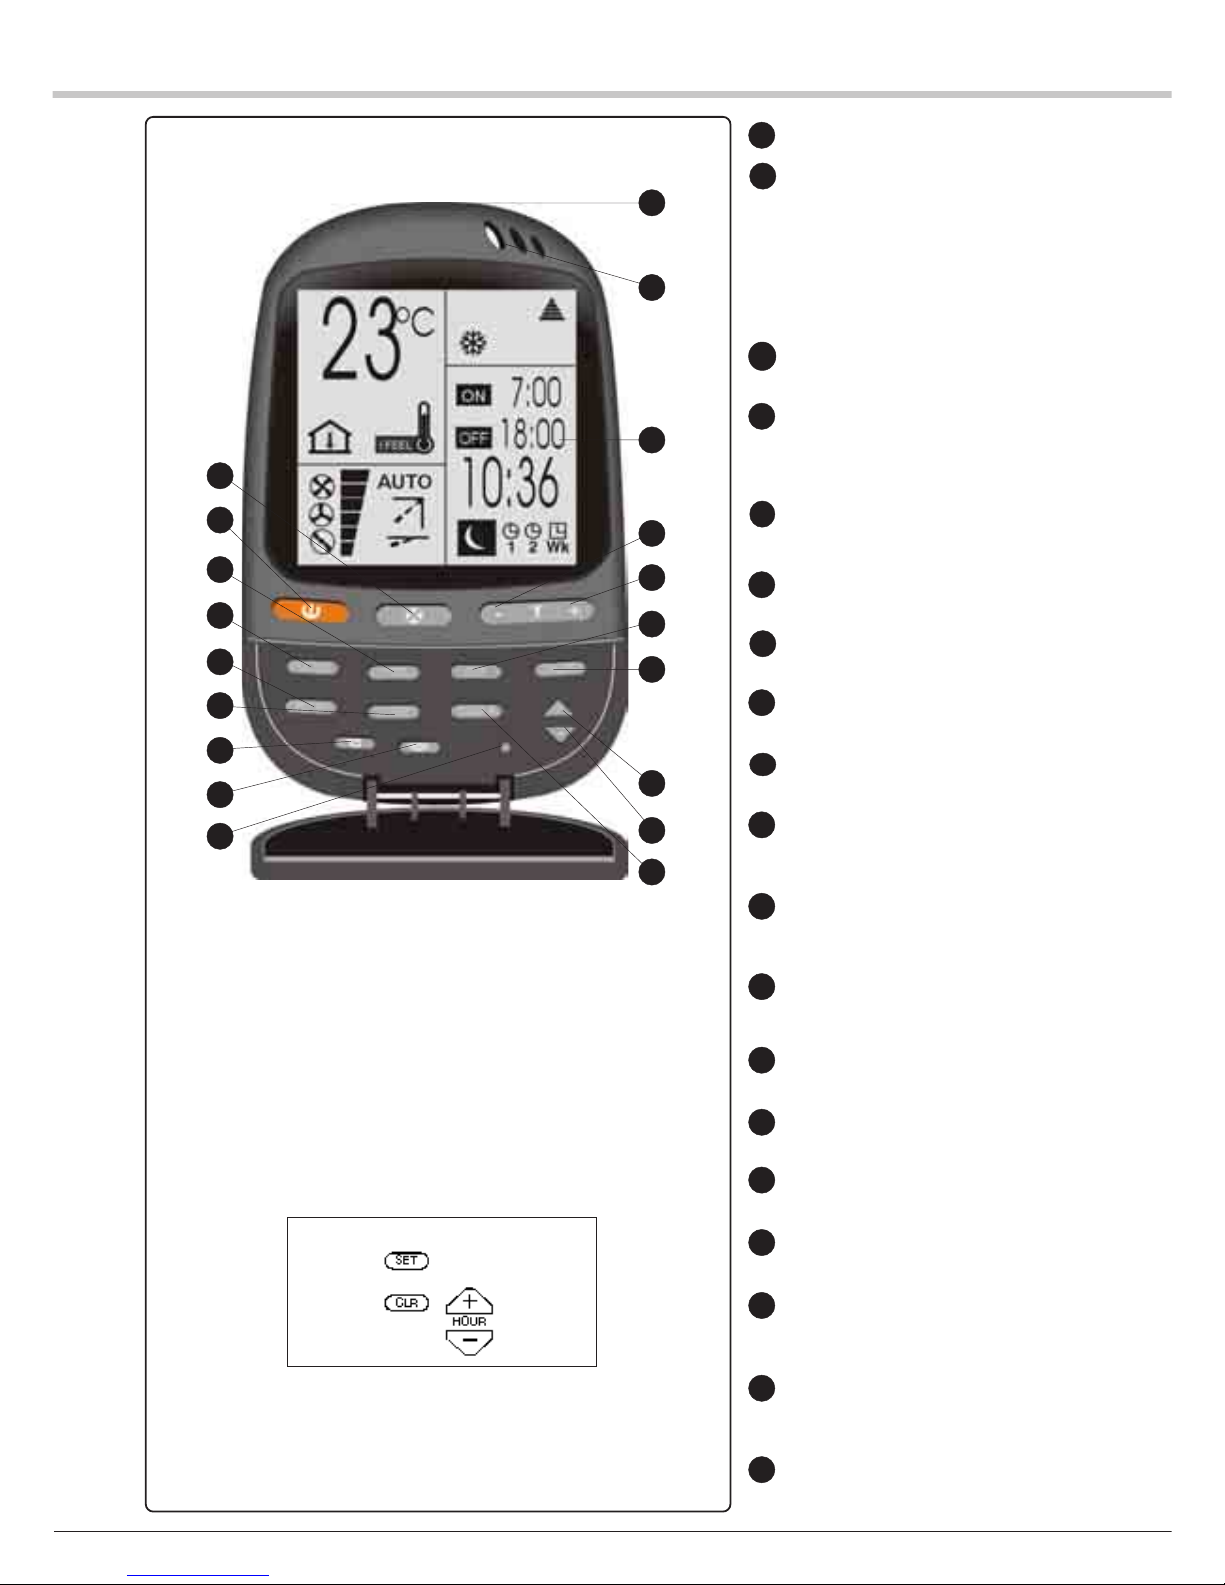
Tecla STAR / STOP (Marcha / Parada)
Tecla de selección del modo de funcionamiento en:
FRÍO (salvo para murales "agua fria")
CALEFACCIÓN (salvo para murales "agua
fria")
REGULACIÓN AUTOMÁTICA FRÍO / CALOR
VENTILACIÓN
DESHUMIDIFICACIÓN (salvo para murales
"agua fria")
Tecla I FEEL: detección local de la temperatura
Tecla de selección de la VELOCIDAD de
VENTILACIÓN o de la VENTILACIÓN AUTOMÁTICA
(según unidad interior)
Tecla de elevación de la temperatura ambiente
Tecla de disminución de la temperatura ambiente
Tecla SLEEP
Barrido de las lamas (únicamente para mu-
rales y murales "agua fria")
Barrido de las lamas (únicamente para murales y murales "agua fria")
Tecla de selección de la PROGRAMACIÓN
Tecla +: aumenta el punto de consigna del tiempo
de funcionamiento
Tecla -: disminuye el punto de consigna del tiempo
de funcionamiento
Pantalla de cristal líquido
LUZ TRASERA
(OPCIÓN)
Sensor I FEEL
Emisor de la señal infrarroja
Tecla ROOM: visualización de la temperatura
ambiente
Tecla SET: fija las horas de funcionamiento y/o de
parada de la programación
Tecla CLEAR: anula los parámetros del reloj
Tecla BLOQUEO
FUNCIÓN RESET:
1) Retirar 1 pila.
2) Mantener pulsadas simultáneamente estas 4 teclas hasta que se apaguen los
símbolos.
3) Colocar la pila.
NOTA:
Abrir la tapa / trampilla para acceder a los
botones de mando.
Las cuatro teclas son las siguientes:
9
4
16
1
3
2
7
8
19
6
5
17
13
14
15
10
11
12
18
1
2
3
4
6
7
10
11
17
18
5
8
9
12
13
14
15
16
19
Page 43
3
MODO DE EMPLEO DEL MANDO A DISTANCIA
FUNCIONAMIENTO DE LA PROGRAMACIÓNFUNCIONAMIENTO DE LA PROGRAMACIÓN
FUNCIONAMIENTO DE LA PROGRAMACIÓNFUNCIONAMIENTO DE LA PROGRAMACIÓN
FUNCIONAMIENTO DE LA PROGRAMACIÓN
En el mando a distancia se pueden seleccionar cuatro programaciones: dos diarias (denominadas T1 &
T2) y dos de fin de semana opcionales (denominadas WKT1 & WKT2). Cada una de ellas se puede
seleccionar pulsando la tecla TIMER (10). Para regular las programaciones, utilizar respectivamente las
teclas HOUR + (11) y - (12). La tecla SET (17) activa la programación y la tecla CLEAR (18) la cancela.
A. PROGRAMACIÓN DIARIAA. PROGRAMACIÓN DIARIA
A. PROGRAMACIÓN DIARIAA. PROGRAMACIÓN DIARIA
A. PROGRAMACIÓN DIARIA
Las programaciones diarias T1 y T2 permiten programar la puesta en marcha y la parada individualmente,
en dos períodos diferentes. Una vez ajustada, la programación funcionará diariamente.
B. PROGRAMACIÓN DE FIN DE SEMANA (OPCIONAL)B. PROGRAMACIÓN DE FIN DE SEMANA (OPCIONAL)
B. PROGRAMACIÓN DE FIN DE SEMANA (OPCIONAL)B. PROGRAMACIÓN DE FIN DE SEMANA (OPCIONAL)
B. PROGRAMACIÓN DE FIN DE SEMANA (OPCIONAL)
Las programaciones de fin de semana WKT1 y WKT2 permiten programar la puesta en marcha y la
parada individualmente, en dos períodos diferentes, sólo durante dos días.
Estas programaciones sólo funcionarán el día seleccionado y el siguiente.
A las 24,00 h del segundo día, la programación WK dejará de funcionar y la programación diaria
reanudará su acción normal.
* WKT1 - Activa el día fijado
* WKT2 - Activa el día siguiente al día fijado
OBSERVACIÓN:
1. Durante el funcionamiento de las programaciones de fin de semana, las programaciones diarias no
son operativas.
2. Las programaciones WK deben reactivarse antes de cada fin de semana.
C. SELECCIÓN DE UNA PROGRAMACIÓNC. SELECCIÓN DE UNA PROGRAMACIÓN
C. SELECCIÓN DE UNA PROGRAMACIÓNC. SELECCIÓN DE UNA PROGRAMACIÓN
C. SELECCIÓN DE UNA PROGRAMACIÓN
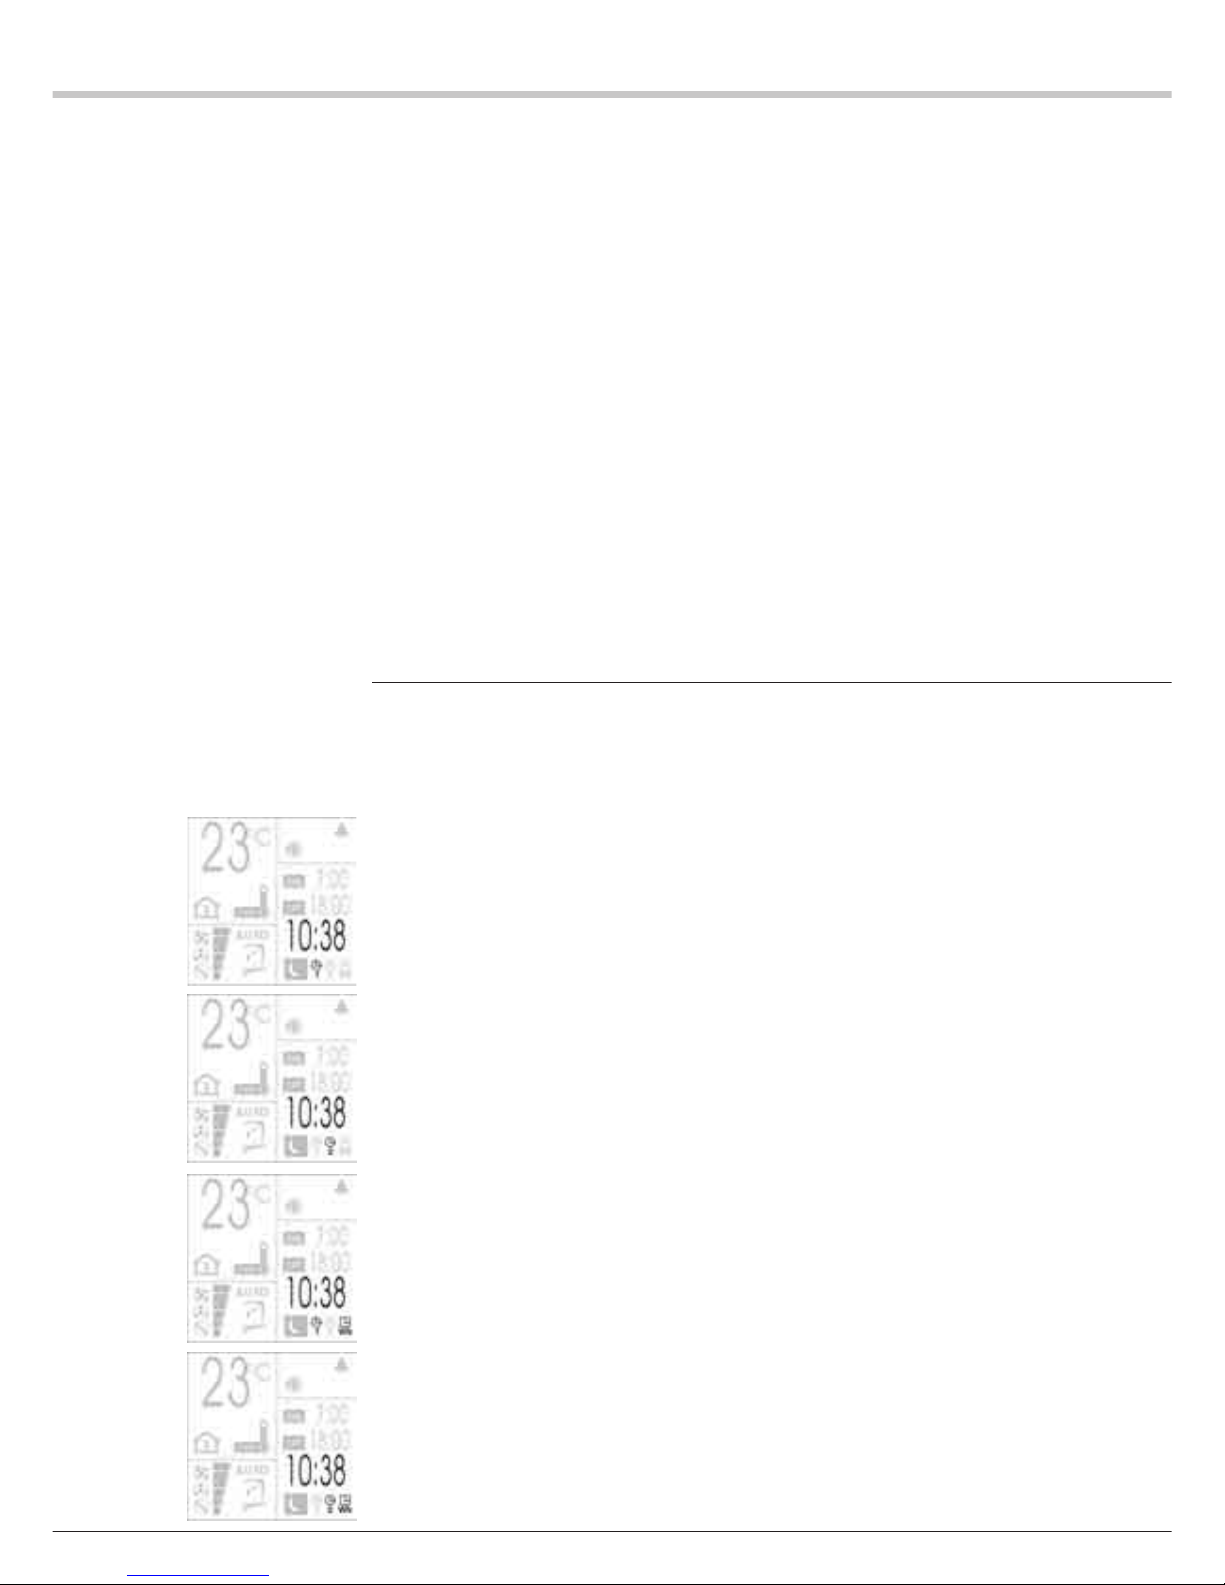
Pulsar la tecla TIMER (10) para seleccionar una programación. Cada vez que se pulse la tecla TIMER
(10), en la pantalla de cristal líquido aparece uno de los cuatro iconos
de programación siguientes.
1 Pulsar la tecla TIMER para seleccionar la programación diaria T1.
El icono 1 de la Programación T1 parpadea.
2 Pulsar la tecla TIMER para seleccionar la programación diaria T2.
El icono 2 de la Programación T2 parpadea.
3 Pulsar la tecla TIMER para seleccionar la programación de fin de
semana WKT1.
Los iconos 1 y WK parpadean.
4 Pulsar la tecla TIMER para seleccionar la programación de fin de
semana WKT2.
Los iconos 2 y WK parpadean.
Page 44
4
AJUSTE DE LA HORA DE PUESTA EN MARCHAAJUSTE DE LA HORA DE PUESTA EN MARCHA
AJUSTE DE LA HORA DE PUESTA EN MARCHAAJUSTE DE LA HORA DE PUESTA EN MARCHA
AJUSTE DE LA HORA DE PUESTA EN MARCHA
Después de haber seleccionado una programación (T1, T2 o WKT1,
WKT2), proceder de la siguiente forma para ajustar la hora de puesta
en marcha programada:
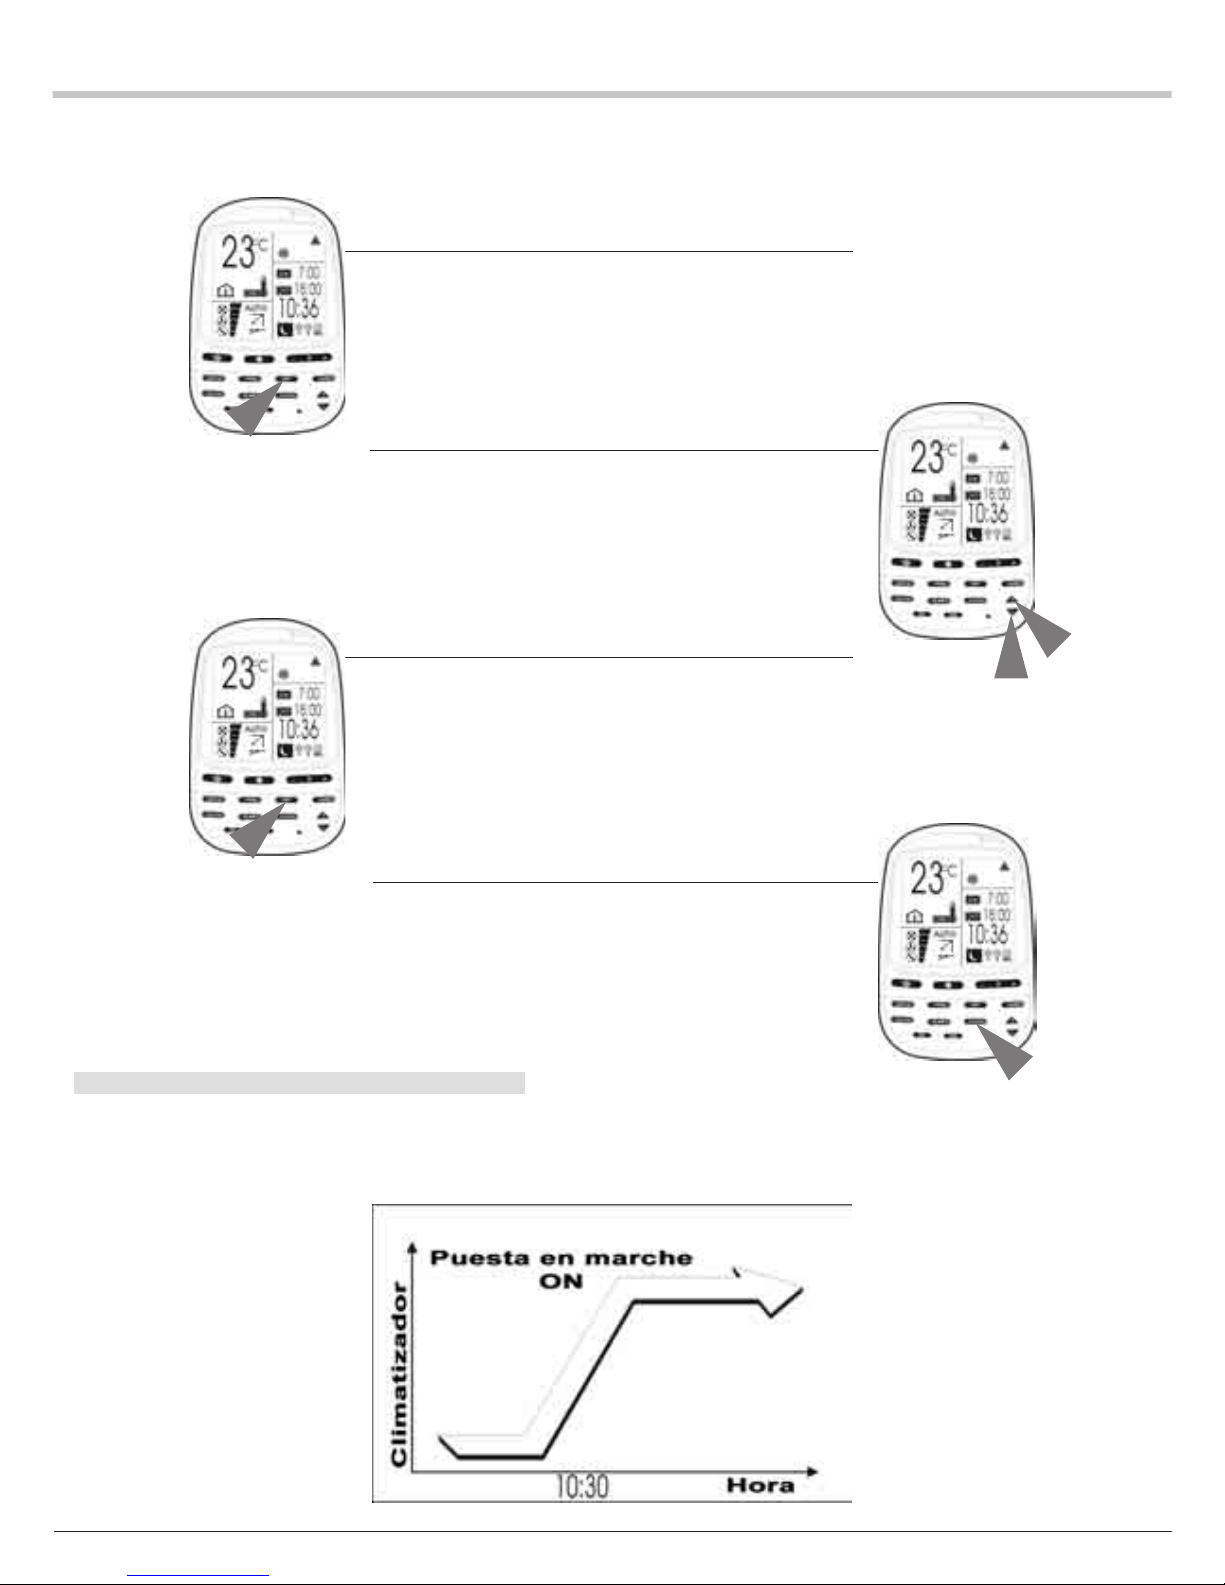
POR EJEMPLO: Puesta en marcha del climatizador a las 10,30 h.
1 Pulsar la tecla SET.
El icono ON (Puesta en marcha) y las cifras de la hora de puesta en
marcha parpadean.
2 Ajustar las horas y los minutos.
1. Ajustar la hora de puesta en marcha a las 10,30 h.
2. Pulsar la tecla HOUR + para hacer avanzar la hora y la tecla
HOUR - para hacerla retroceder.
3 Pulsar la tecla SET.
1. La hora de puesta en marcha se programa a las 10,30 h (el
icono “ON” [Puesta en marcha] se enciende).
2. El icono “OFF” (Parada) y las cifras de la hora de parada
parpadean.
4 Pulsar la tecla CLEAR
La parada programada se borra.
OBSERVACIONES:OBSERVACIONES:
OBSERVACIONES:OBSERVACIONES:
OBSERVACIONES:
1. El ajuste implícito de las programaciones es, respectivamente, de
7,00 y de 18,00 para las horas de puesta en marcha y de parada.
2. El modo de programación siempre presentará en la pantalla de
cristal líquido los últimos ajustes de puesta en marcha y de parada (ON
y OFF).
Page 45
5
AJUSTE DE LA PAJUSTE DE LA P
AJUSTE DE LA PAJUSTE DE LA P
AJUSTE DE LA P
ARADARAD
ARADARAD
ARAD
A PROGRAMADA PROGRAMAD
A PROGRAMADA PROGRAMAD
A PROGRAMAD
AA
AA
A
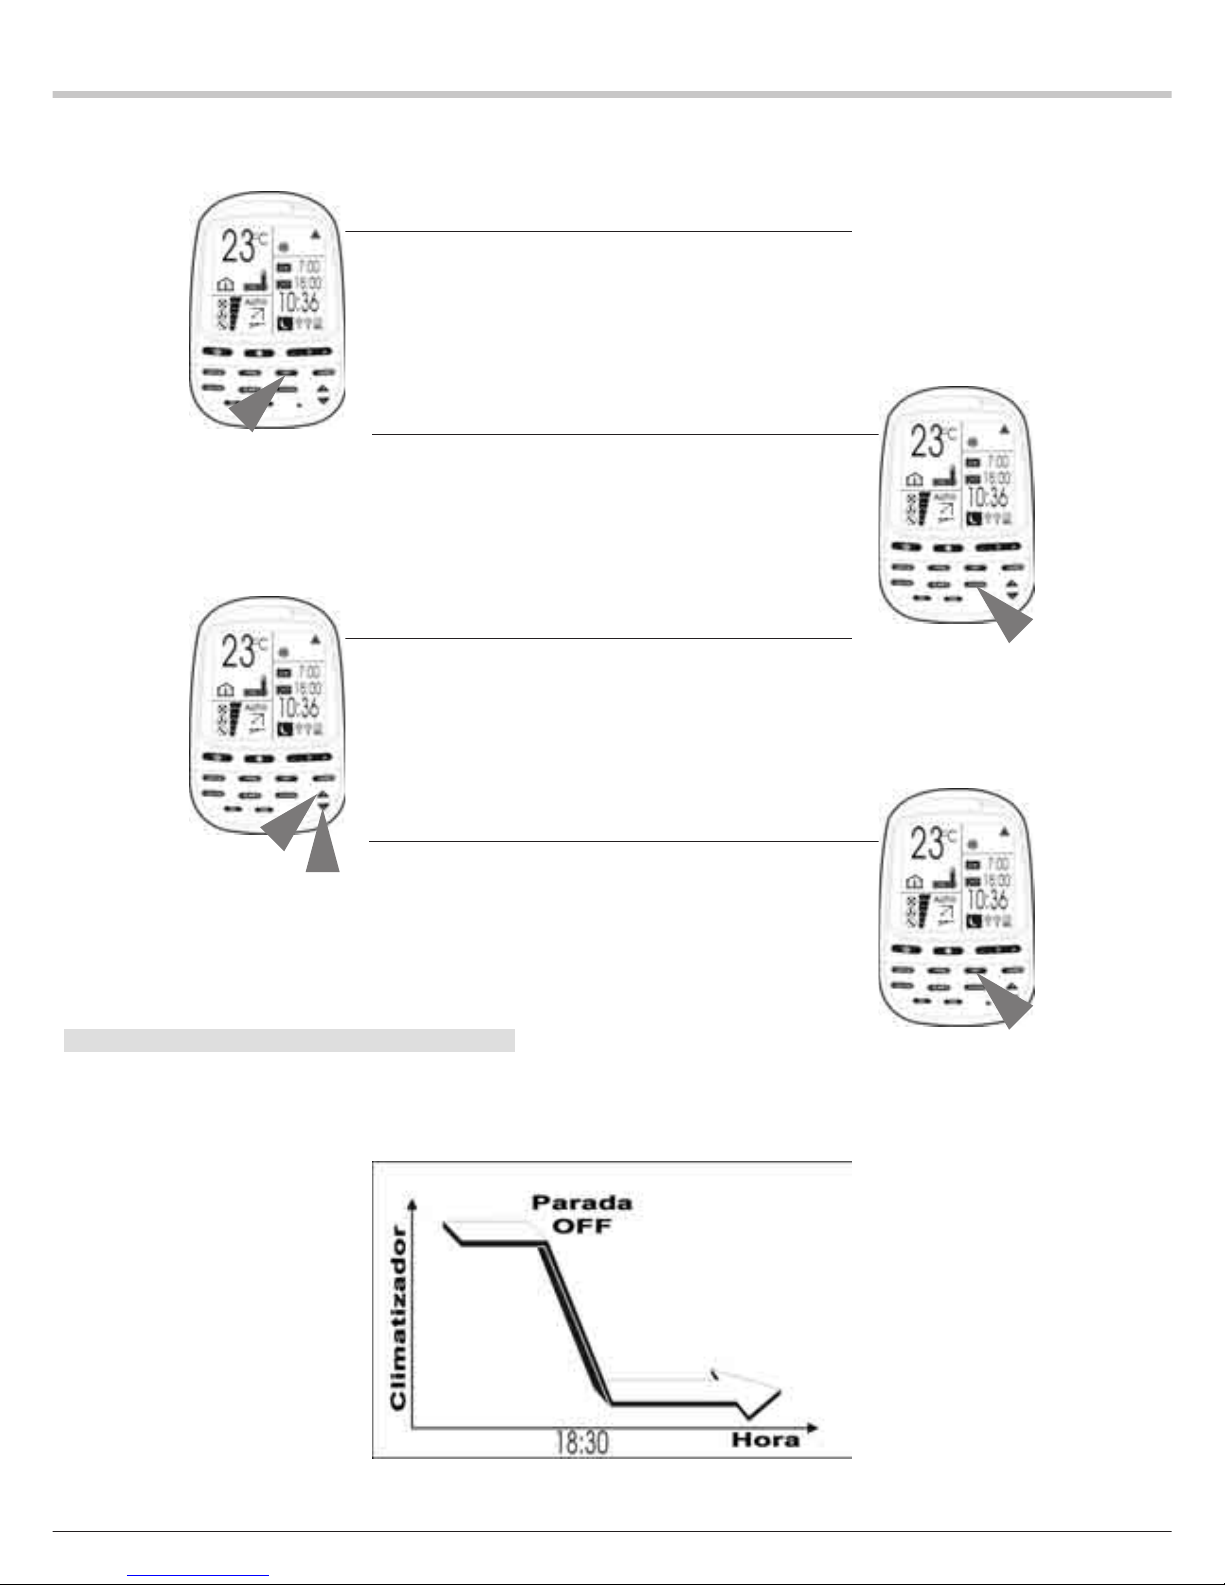
Después de haber seleccionado una programación (T1, T2 o WKT1,
WKT2), proceder de la siguiente forma para ajustar la hora de parada
programada.
POR EJEMPLO: Parada del climatizador a las 18,30 h.
1 Pulsar la tecla SET.
El icono ON (Puesta en marcha) y las cifras de la hora de puesta
en marcha parpadean.
2 Pulsar la tecla CLEAR.
1. La hora de puesta en marcha se borra.
2. El icono OFF (Parada) y las cifras de la hora de parada
parpadean.
3 Ajustar las horas y los minutos.
1. Ajustar la hora de parada a las 18,30 h.
2. Pulsar la tecla HOUR + para hacer avanzar la hora y la tecla
HOUR - para hacerla retroceder.
4 Pulsar la tecla SET.
La hora de parada se programa a las 18,30 h (el icono OFF de la
programación se enciende).
OBSERVACIONES:OBSERVACIONES:
OBSERVACIONES:OBSERVACIONES:
OBSERVACIONES:
1. El ajuste implícito de las programaciones es, respectivamente, de
7,00 y de 18,00 para las horas de puesta en marcha y de parada.
2. El modo de programación siempre presentará en la pantalla de
cristal líquido los últimos ajustes de puesta en marcha y de parada.
Page 46
6
AJUSTE DE LAS HORAS DE PUESTA EN MARCHA Y DEAJUSTE DE LAS HORAS DE PUESTA EN MARCHA Y DE
AJUSTE DE LAS HORAS DE PUESTA EN MARCHA Y DEAJUSTE DE LAS HORAS DE PUESTA EN MARCHA Y DE
AJUSTE DE LAS HORAS DE PUESTA EN MARCHA Y DE
PP
PP
P
ARADARAD
ARADARAD
ARAD
AA
AA
A
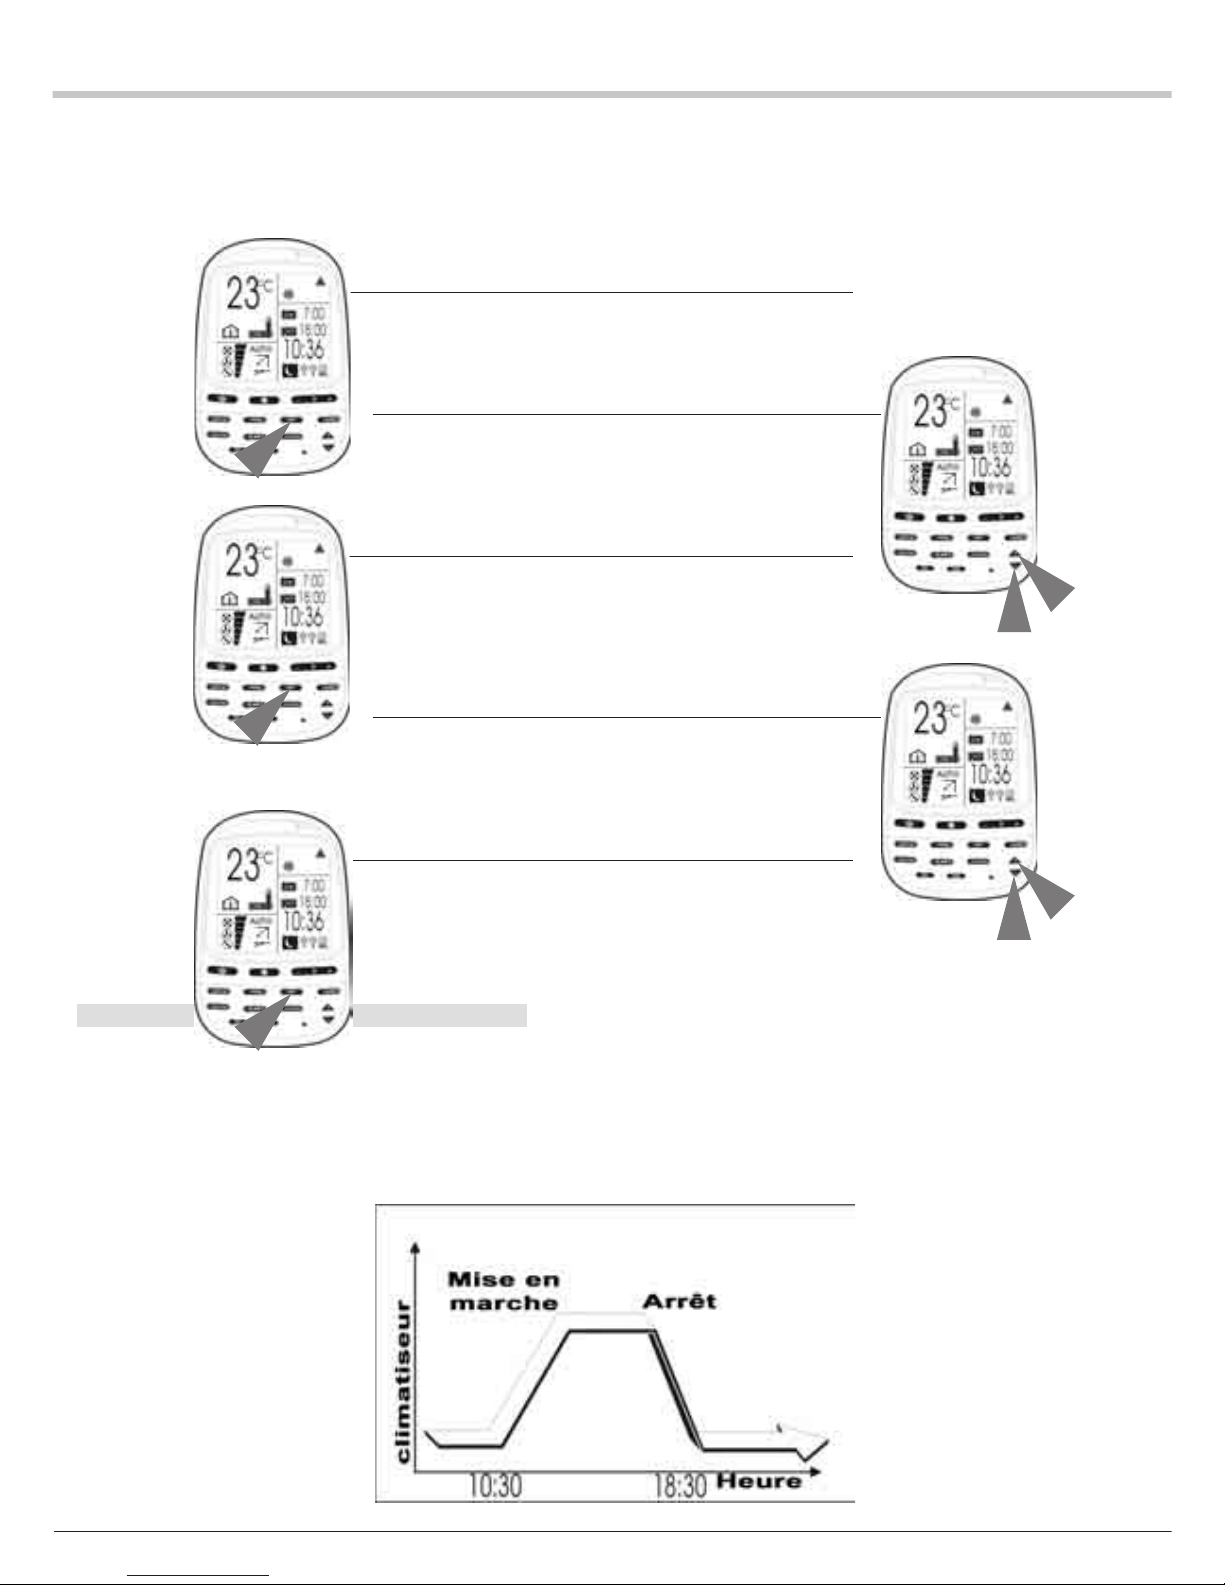
Después de haber seleccionado una programación (T1, T2 o WKT1,
WKT2), proceder de la siguiente forma para ajustar las horas de
puesta en marcha y de parada programadas.
POR EJEMPLO: Puesta en marcha del climatizador a las 10,30 h y de
parada a las 18,30 h.
1 Pulsar la tecla SET.
El icono ON (Puesta en marcha) y las cifras de la hora de puesta
en marcha parpadean.
2 Ajustar las horas y los minutos.
1. Ajustar la hora de puesta en marcha (ON) a las 10,30 h.
2. Pulsar la tecla HOUR + para hacer avanzar la hora y la tecla
HOUR - para hacerla retroceder.
3 Pulsar la tecla SET.
1. La hora de puesta en marcha se programa a las 10,30 h (el
icono ON parpadea).
2. El icono OFF (Parada) y las cifras de la hora de parada de la
programación parpadean.
4 Ajustar las horas y los minutos.
1. Ajustar la hora de parada (OFF) a las 18,30 h.
2. Pulsar la tecla HOUR + para hacer avanzar la hora y la tecla
HOUR - para hacerla retroceder.
5 Pulsar la tecla SET.
La hora de parada (OFF) se programa a las 18,30 h (el icono OFF
de la programación se enciende).
OBSERVACIONES:OBSERVACIONES:
OBSERVACIONES:OBSERVACIONES:
OBSERVACIONES:
1. El ajuste implícito de las programaciones es respectivamente de
7,00 y de 18,00 para las horas de puesta en marcha y de parada.
2. El modo de programación siempre presentará en la pantalla de
cristal líquido los últimos ajustes de puesta en marcha y de parada.
3. Una presión en la tecla CLEAR (18) durante 5 segundos anulará
todos los ajustes de programación y borrará la visualización de la
programación.
Page 47
7
PP
PP
P
ARA MODIFICAR EL AJUSTE DE LA HORAARA MODIFICAR EL AJUSTE DE LA HORA
ARA MODIFICAR EL AJUSTE DE LA HORAARA MODIFICAR EL AJUSTE DE LA HORA
ARA MODIFICAR EL AJUSTE DE LA HORA
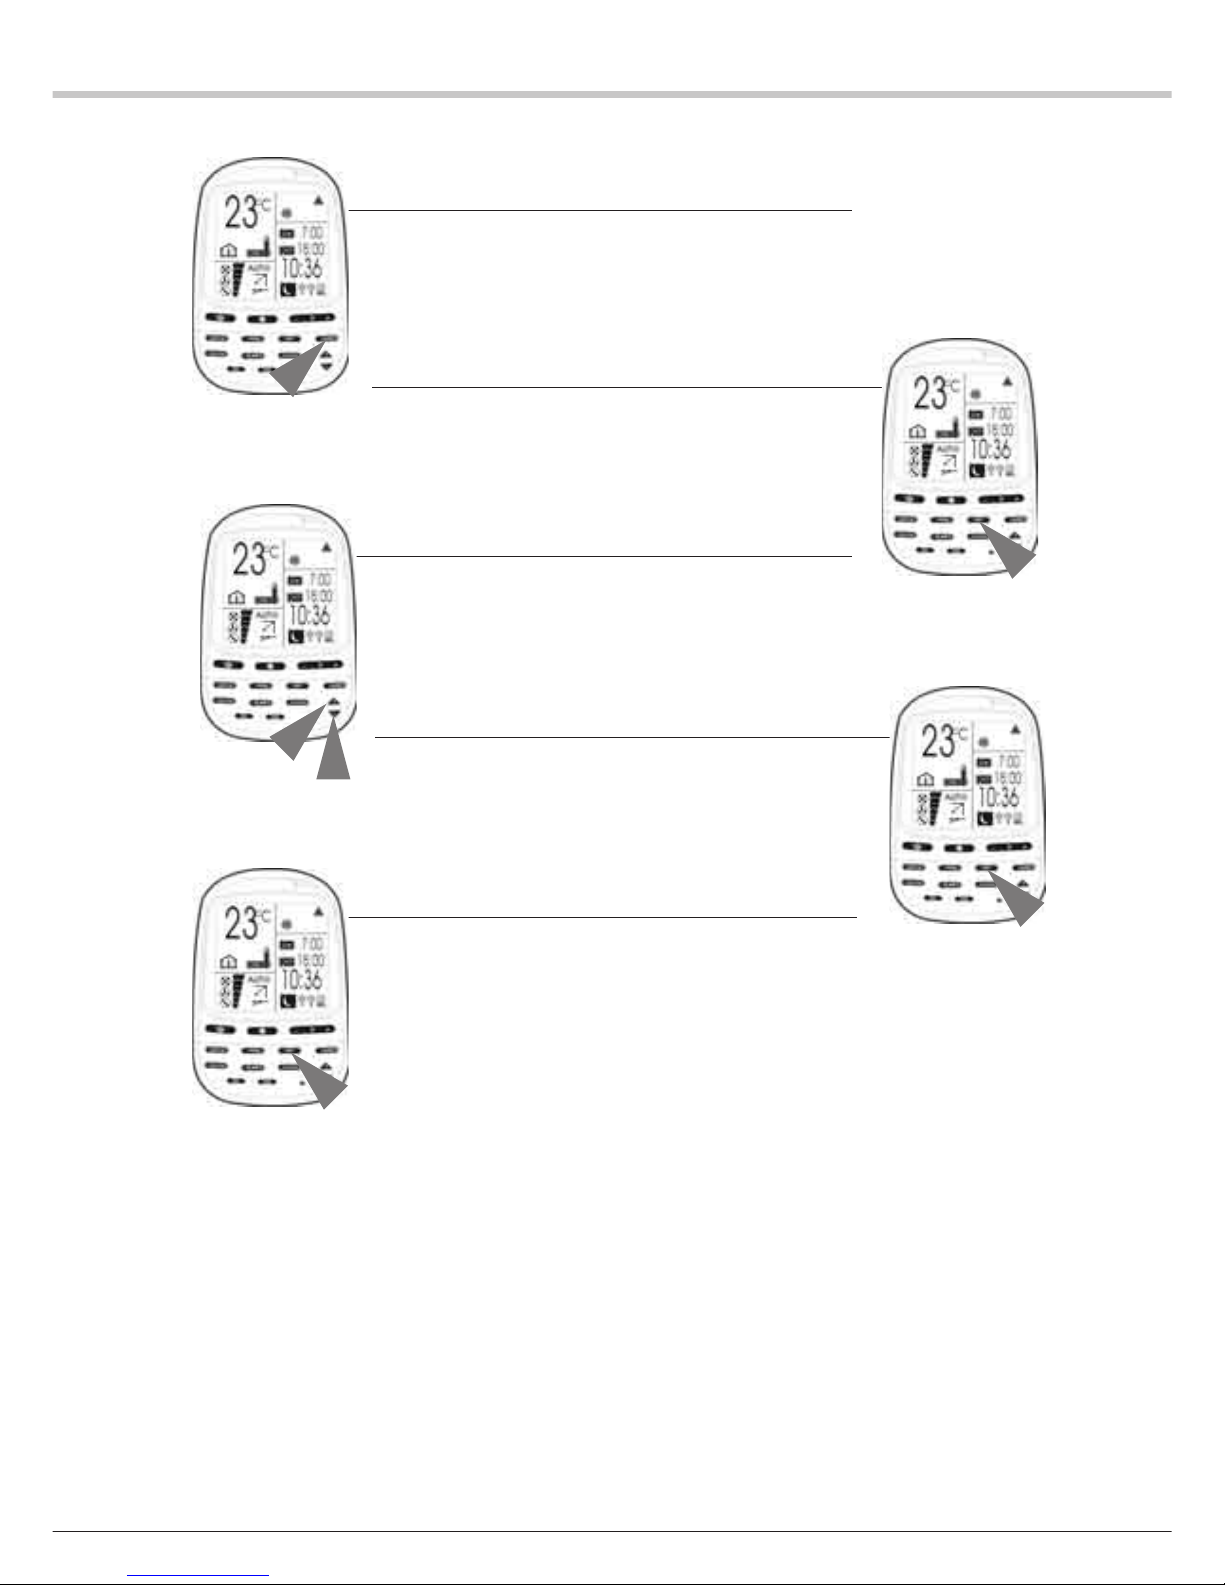
POR EJEMPLO: Para avanzar la hora de puesta en marcha de 10,30 h a
9,20 h (conservando el ajuste de la hora de parada).
1 Pulsar la tecla TIMER hasta que el icono de la programación selec-
cionada parpadee.
OBSERVACIÓN: Las cifras de la programación correspondiente ajustadas anteriormente se visualizarán sin parpadear.
2 Pulsar la tecla SET para pasar al modo edición.
El icono ON (Puesta en marcha) y las cifras de la hora de puesta en
marcha parpadean.
3 Modificar el ajuste de la hora a 9,20 h, pulsando la tecla HOUR -.
El icono ON y las cifras de la hora de puesta en marcha parpadean.
4 Pulsar la tecla SET para memorizar el nuevo ajuste. El icono ON y las
cifras de la hora de puesta en marcha se encienden. El icono OFF
(Parada) y las cifras de la hora de parada parpadean.
5 Pulsar la tecla SET para confirmar el ajuste anterior de la hora de
parada.
Los iconos ON y OFF y las cifras de hora de la programación correspondiente se encienden.
Page 48
8
PP
PP
P
ARA ANULAR EL AJUSTE DE HORA DE UNA PROGRA-ARA ANULAR EL AJUSTE DE HORA DE UNA PROGRA-
ARA ANULAR EL AJUSTE DE HORA DE UNA PROGRA-ARA ANULAR EL AJUSTE DE HORA DE UNA PROGRA-
ARA ANULAR EL AJUSTE DE HORA DE UNA PROGRA-
MACIÓN ESPECÍFICAMACIÓN ESPECÍFICA
MACIÓN ESPECÍFICAMACIÓN ESPECÍFICA
MACIÓN ESPECÍFICA
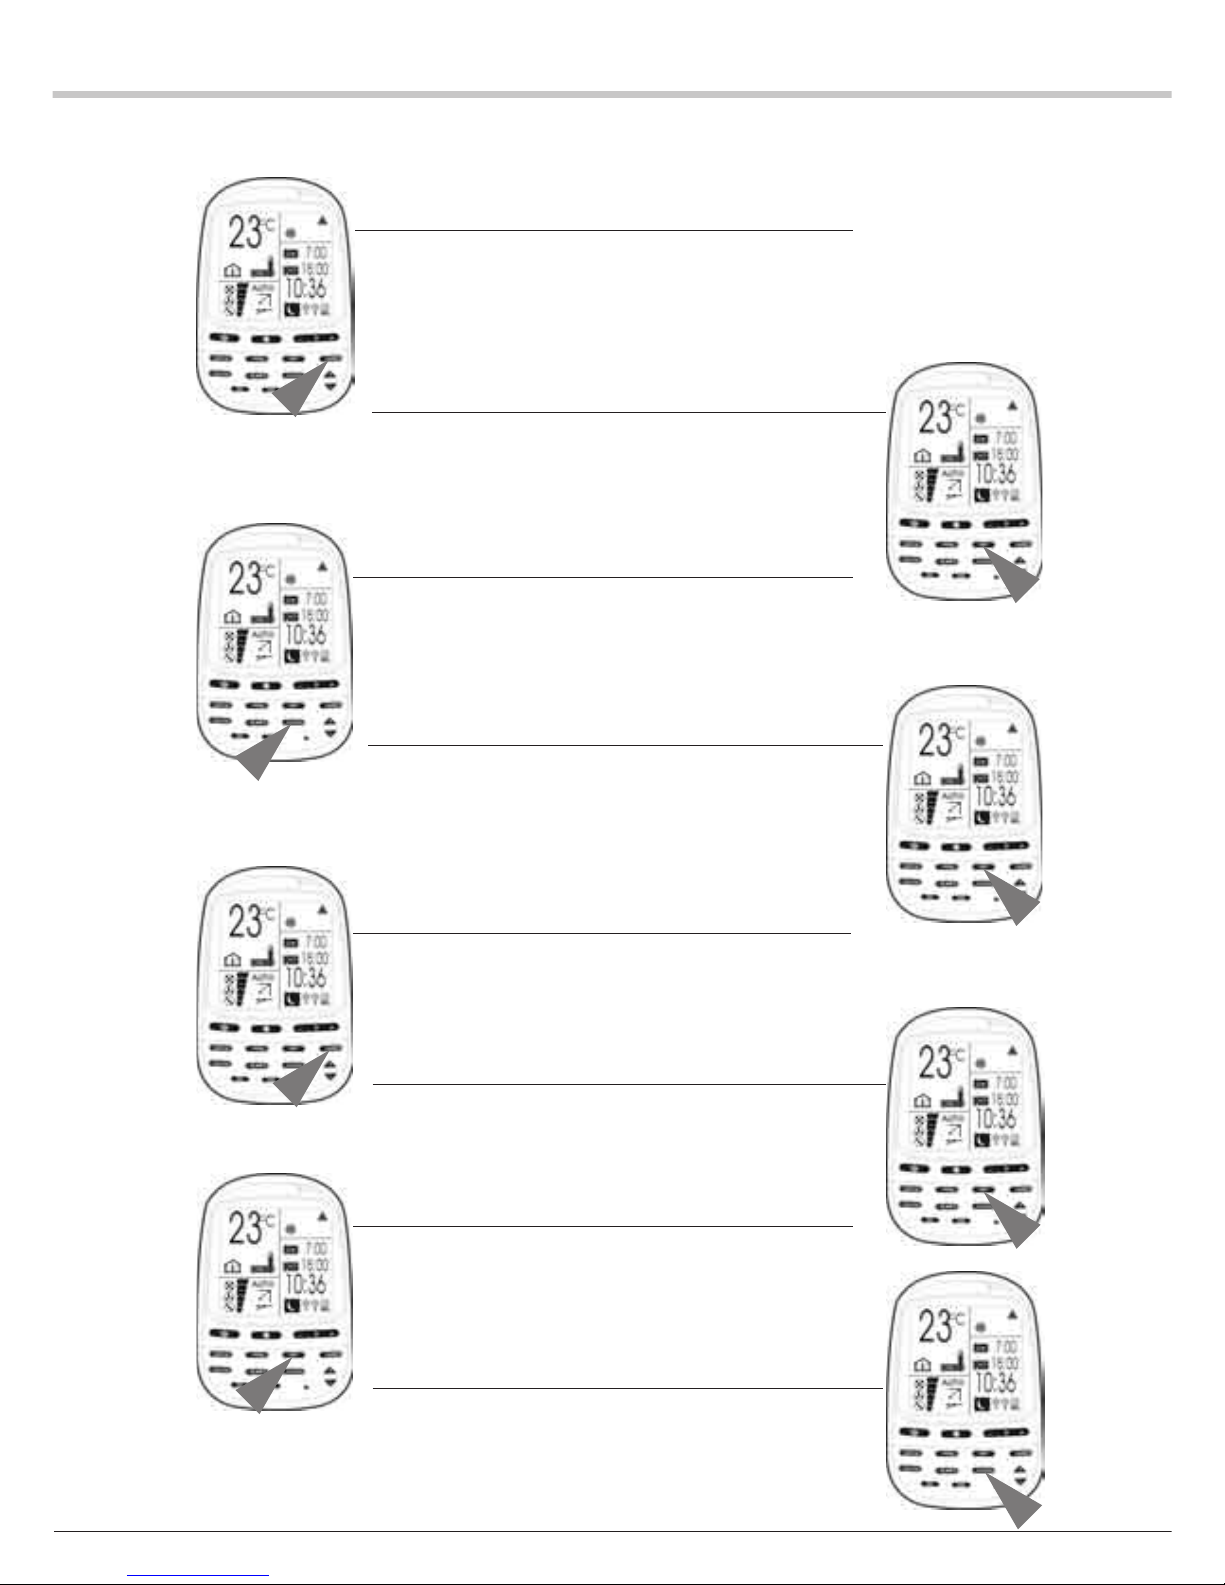
Para anular la hora de puesta en marcha, conservando el ajuste de la
hora de parada.
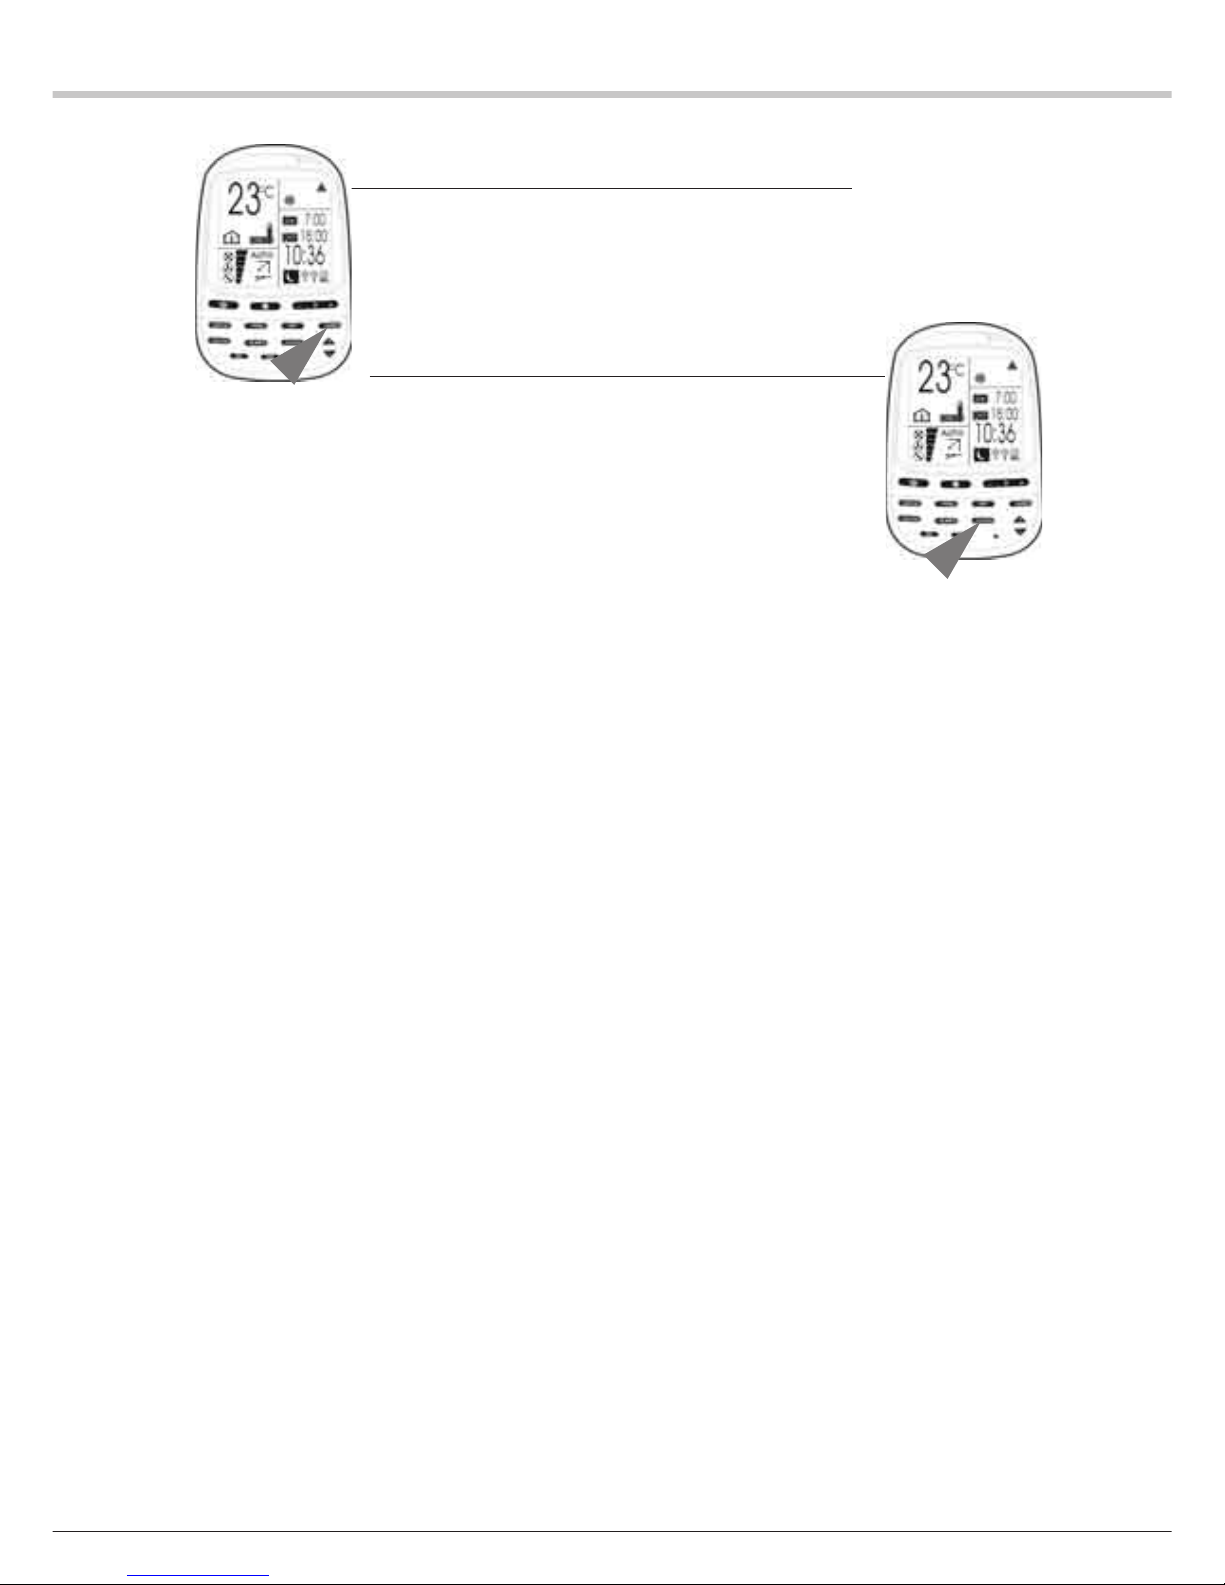
1 Pulsar la tecla TIMER para seleccionar una programación. El ico-
no de la programación seleccionada parpadea y los ajustes de
hora de puesta en marcha y de parada anteriores correspondientes se encienden.
2 Pulsar la tecla SET.
El icono ON (Puesta en marcha) y las cifras de la hora de puesta
en marcha parpadean.
3 Pulsar la tecla CLEAR.
La hora de puesta en marcha se borra. El icono OFF (Parada) y
las cifras de la hora de parada parpadean.
4 Pulsar la tecla SET.
Confirmación del nuevo ajuste.
PP
PP
P
ARA ANULAR LA HORA DE PARA ANULAR LA HORA DE P
ARA ANULAR LA HORA DE PARA ANULAR LA HORA DE P
ARA ANULAR LA HORA DE P
ARADARAD
ARADARAD
ARAD
AA
AA
A
, CONSERV, CONSERV
, CONSERV, CONSERV
, CONSERV
ANDO ELANDO EL
ANDO ELANDO EL
ANDO EL
AJUSTE DE LA HORA DE PUESTA EN MARCHA.AJUSTE DE LA HORA DE PUESTA EN MARCHA.
AJUSTE DE LA HORA DE PUESTA EN MARCHA.AJUSTE DE LA HORA DE PUESTA EN MARCHA.
AJUSTE DE LA HORA DE PUESTA EN MARCHA.
1 Pulsar la tecla TIMER para seleccionar una programación. El ico-
no de la programación seleccionada parpadea y los ajustes de
hora de puesta en marcha y de parada anteriores correspondientes se encienden.
2 Pulsar la tecla SET.
El icono ON y las cifras de la hora de puesta en marcha parpadean.
3 Pulsar la tecla SET.
El icono ON y las cifras de la hora de puesta en marcha se encienden.
El icono OFF y las cifras de la hora de parada parpadean.
4 Pulsar la tecla CLEAR.
La hora de parada se borra.
Page 49
9
PP
PP
P
ARA ANULAR LARA ANULAR L
ARA ANULAR LARA ANULAR L
ARA ANULAR L
OS AJUSTES DE HORA DE PUESTOS AJUSTES DE HORA DE PUEST
OS AJUSTES DE HORA DE PUESTOS AJUSTES DE HORA DE PUEST
OS AJUSTES DE HORA DE PUEST
A ENA EN
A ENA EN
A EN
MARCHA Y DE PMARCHA Y DE P
MARCHA Y DE PMARCHA Y DE P
MARCHA Y DE P
ARADARAD
ARADARAD
ARAD
AA
AA
A
..
..
.
1 Pulsar la tecla TIMER para seleccionar una programación.
El icono de la programación seleccionada parpadea y los ajustes
de hora de puesta en marcha y de parada anteriores correspondientes se encienden.
2 Pulsar la tecla CLEAR.
Todos los ajustes de la programación seleccionada se borran.
FUNCIÓN RALENTÍ NOCTURNOFUNCIÓN RALENTÍ NOCTURNO
FUNCIÓN RALENTÍ NOCTURNOFUNCIÓN RALENTÍ NOCTURNO
FUNCIÓN RALENTÍ NOCTURNO
Pulsar la tecla SLEEP (7) para seleccionar la función Ralentí nocturno.
El icono de Ralentí nocturno se enciende y el icono de hora de parada
implícita del ralentí nocturno (7 horas después de la hora actual) parpadea.
El ajuste implícito puede modificarse de 3 a 12 h, pulsando respectivamente las teclas HOUR + (11) y HOUR - (12).
(El reloj del ralentí nocturno visualizará inicialmente el ajuste implícito o
el ajuste seleccionado para la hora actual).
Por ejemplo: Actualmente son las 23,00 h y se ha seleccionado el
modo ralentí nocturno. La hora de parada del ralentí nocturno será
implícitamente las 6,00 h. Si la temporización de parada se ha fijado a
las 10,00 h, la hora de parada del ralentí nocturno serán las 9,00 h.
Page 50

10
Page 51

Page 52

As part of our ongoing product improvement programme, our products
are subject to change without prior notice. Non contractual photos.
Dans un souci d'amélioration constante, nos produits peuvent être
modifiés sans préavis. Photos non contractuelles.
In dem Bemühen um ständige Verbesserung können unsere
Erzeugnisse ohne vorherige Ankündigung geändert werden. Fotos
nicht vertraglich bindend.
A causa della politica di continua miglioria posta in atto dal costruttore,
questi prodotti sono soggetti a modifiche senza alcun obbligo di
preavviso. Le foto pubblicate non danno luogo ad alcun vincolo
contrattuale.
Con objeto de mejorar constantemente, nuestros productos pueden
ser modificados sin previo aviso. Fotos no contractuales.
Iber elco s.a.
Ciències, 71-81,
Módulo 5, Polígono Pedrosa
08908 L’HOSPITALET DE LLOBREGAT
BARCELONA - ESPAÑA
Wesper
42 cours Jean-Jaurès
17800 PONS - FRANCE
A.C.E Marketing
1 bis, Avenue du 8 Mai 1945
Saint-Quentin-en-Yvelines
78284 GUYANCOURT Cedex - FRANCE
ACE Klimatechnik GmbH
Berner Straße 43
60437 FRANKFURT/MAIN - GERMANY
Itelco-Clima Srl
Via XXV Aprile, 29
20030 BARLASSINA (MI) - ITALY
ECP (Australia) Pty Ltd
745 Springvale Road
Mulgrave
3170 VICTORIA - AUSTRALIA
Elco Klima Sanayi ve Ticaret Ltd. Sti.
Yeniyol Sok. Etap Is Merkezi D Blok
No: 22 D: 4, Acibadem
80010 ISTANBUL - TURKEY
ACE Klima Hellas M.E.P.E.
98A, Vassilissis Sofias Ave.
115 28 ATHENS - GREECE
Tecnoaire S.A.
Pringles 1265
1183 BUENOS AIRES - ARGENTINA
Tel. : +33-5 46 92 33 33
Tél. : +33-1 39 44 78 00
Tel. : +49-69 507 02-0
Tel. : +39 0362 6801
Tel. : +34 (93) 264 66 00
Tel. : +61-3 9271 3505
Tel. : +90-216 428 7235
Tel. : +30-2 10 7474 926
Tel. : +(54 11) 4860 7900
Fax : +33-5 46 91 26 44
Fax : +33-1 39 44 11 55
Fax : +49-69 507 02-250
Fax : +39 0362 680281
Fax : +34 (93) 335 95 38
Fax : +61-3 9271 3515
Fax : +90-216 428 6675
Fax : +30-2 10 7474 934
Fax : +(54 11) 4860 7916
www.wesper.com
www.airwell.com
www.airwell.de
www.itelco-clima.com
www.iberelco.es
www.airwell.com.au
www.elcoklima.com.tr
www.electrahellas.gr
www.electra.com.ar
 Loading...