


Climateright CR12000SACH User Manual

easyair
OWNER’S MANUAL &
INSTALLATION GUIDE
Do it y urself
Install without the need for
an HVAC technician
Mini Split - Single Zone
Air Conditioner
and Heat Pump
Model: CR12000SACH
IMPORTANT: READ CAREFULLY BEFORE ASSEMBLY AND USE
Read and follow all safety rules and instructions before operating this equipment.
THIS PRODUCT IS INTENDED FOR HOUSEHOLD USE ONLY.
Please keep this manual for future reference.
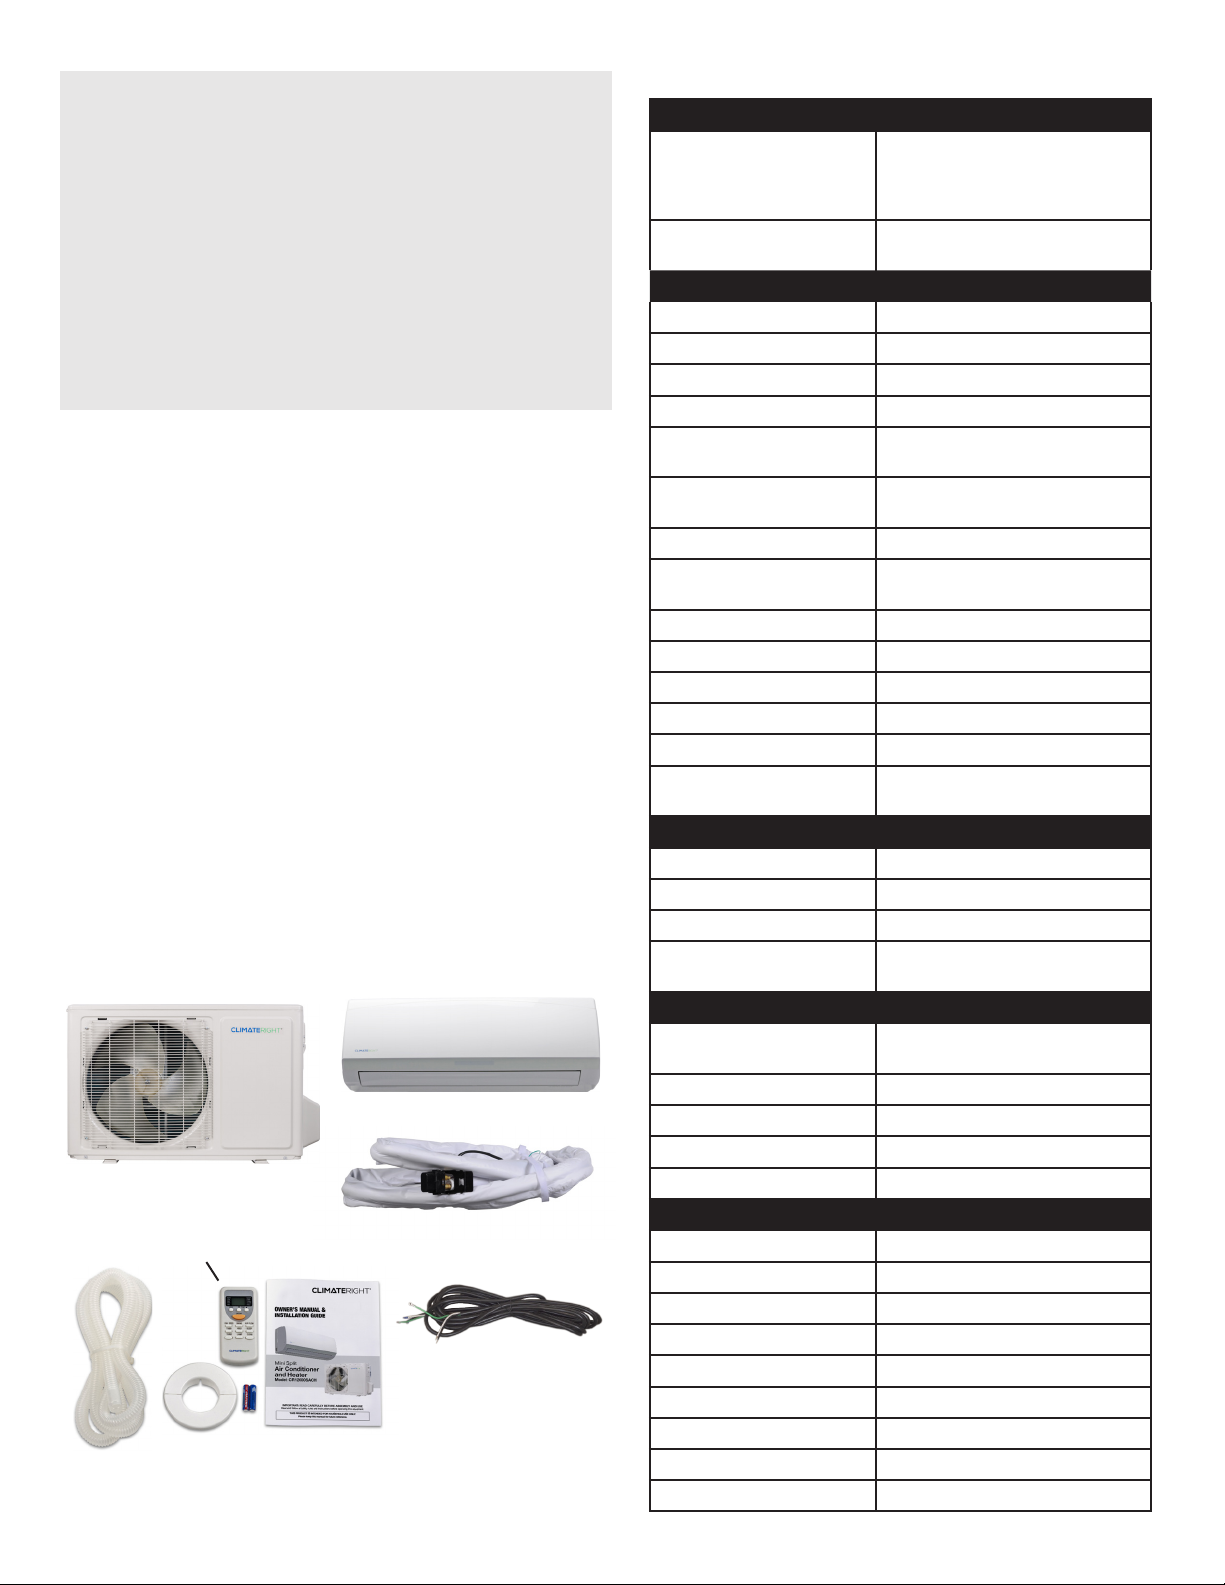
TABLE OF CONTENTS
Introduction & Contents ...2
Product Specications ....2
Safety Instructions ........3
Product Description ......4
Indoor Unit Digital Display ..5
Remote User Guide .......5
Remote Diagram .........6
Pre Set-up Instructions ....7
Indoor Unit Installation ....7
Outdoor Unit Installation ..10
Wiring Outdoor Unit .....12
Maintenance ...........14
Troubleshooting .........14
Error Codes ............14
Warranty ..............16
INTRODUCTION
Thank you for choosing ClimateRight. This owner’s manual
will provide you with valuable information necessary for the
proper care, installation, and maintenance of your new product.
Please take a few moments to thoroughly read the instructions
and familiarize yourself with all the operational aspects of your
new ClimateRight Mini-Split Air Conditioner and Heater.
For your records, please attach a copy of your
sales receipt to this manual.
Also, write the store name/location, date purchased,
and serial number below:
Store Name: ____________________________________________
Location: _______________________________________________
Date Purchased: _________________________________________
Serial Number: __________________________________________
PACKAGE CONTENTS:
Evaporator (indoor unit)
Condenser (outdoor unit)
16' Line Set (pre attached to
back of evaporator)
Utility Power Cable
(2) AAA Batteries
Drain Hose
Remote with
Hole
Cover
Manual
SPECIFICATIONS
Model CR12000SACH
Suitable Applications Garages, Sheds, Cabins,
Warranty 3 Years Parts and Labor,
Features
Airow (cfm) 323
Modes of Operation
Delay Timer 24 Hour On/O
Fan Speed 4 Speeds High | Medium | Low | Auto
Duct System Through-wall with 2.75” diameter
Mount Interior: Wall Mount
Plug Type Parallel/NEMA 5-15
Control Panel Temperature Display Only (operates
Remote Control Infrared Remote
Compressor Rotary
Thermostat Digital
Refrigerant R410a (800g) Line Set is Pre-charged
Filter Included, washable
Noise Interior Unit: 42 dB
Capacity
Cooling BTU 12,000
Dehumidication (pts./hour) 1.25
Heating BTU 14,000 (heat pump)
Approximate Max Enclosure
Size
Power
Cooling - Rated Amps
(operating)
Cooling Watts (W) 1,170
Voltage (Max) (V) 115@60hz
Heating - Rated Amps 15.4A
Heating Watts 1,280
Weights and Dimensions
Interior Unit Dimensions 31.5” x 11.0”x7.5”
Exterior Unit Dimensions 32”x10.1”x21.3”
Interior Unit Case Dimensions 34.5”x16.1”x13.9”
Exterior Unit Case Dimensions 36.2”x13.2”x24.4”
Interior Unit Weight 30.86 lbs
Exterior Unit Weight 70.55 lbs
Interior Unit Case Weight 35.25 lbs
Exterior Unit Case Weight 74.96 lbs
Length of Line Set 16 feet
Greenhouses, Room Additions,
Apartments, Condos, Sun rooms,
Tiny Houses
5 Years on Compressor
Heating, Cooling, Fan, Dehumidify, Auto
hole
Exterior: Level Surface
with remote)
Exterior Unit: 53 dB
500-550 sq. ft. (Well insulated)
11.3A
2

SAFETY INSTRUCTIONS
IMPORTANT SAFETY INSTRUCTIONS FOR USING YOUR
Mini Split Air Conditioner and Heater
This symbol indicates that ignoring instructions may
cause death or serious injury.
This symbol indicates that ignoring instructions may
cause moderate injury to your person, or damage to
your unit or other property.
This symbol indicates that you must never perform
the action indicated.
WARNING:
This appliance can be used by children aged from 8 years and
above and persons with reduced physical, sensory or mental
capabilities or lack of experience and knowledge if they have
been given supervision or instruction concerning use of the
appliance in a safe way and understand the hazards involved.
Children shall not play with the appliance. If an abnormal
situation arises (like a burning smell), immediately turn o the
unit. Call your dealer for instructions to avoid electric shock, re
or injury.
DO NOT:
• DO NOT insert ngers, rods or other objects into the air inlet
or outlet. This may cause injury, since the fan may be rotating
at high speeds.
• DO NOT use ammable sprays such as hair spray, lacquer or
paint near the unit. This may cause re or combustion.
• DO NOT operate the air conditioner in places near or around
combustible gases. Emitted gas may collect around the unit
and cause explosion.
• DO NOT operate the air conditioner in a wet room (e.g.,
bathroom or laundry room). This can cause electrical shock
and cause the product to deteriorate.
• DO NOT expose your body directly to cool air for a
prolonged period of time.
• DO NOT store outside unit on its side, it must always stay in
upright position.
CAUTION:
• If the air conditioner is used together with burners or other
heating devices, thoroughly ventilate the room to avoid
oxygen deciency.
• Turn o the air conditioner and unplug the unit if you are not
going to use it for a long time.
• Turn o and unplug the unit during storms.
• Make sure that water condensation can drain unhindered
from the unit.
• Do not operate the air conditioner with wet hands. This may
cause electric shock.
• Do not use device for any other purpose than its intended use.
• Do not climb onto or place objects on top of the outdoor unit.
• Do not allow the air conditioner to operate for long periods of
time with doors or windows open, or if the humidity is very high.
WARNING: TO REDUCE THE RISK
OF FIRE, ELECTRIC SHOCK OR INJURY:
• Fully assemble before operating.
• Do not repair or modify the unit. All repairs should be
completed by a qualied technician.
• The plug for this unit is polarized with one blade wider than
the other. Do not force the plug into an electrical outlet. Do
not alter the plug in any way. If the plug does not t into
the outlet, reverse the plug. If it still does not t, contact a
qualied technician to install a proper outlet.
• Do not use if the power cord is damaged or the connection
to the wall outlet is loose.
• Operate product only at voltage specied on the
identication plate located on the lower back on the unit.
• Do not damage, break, forcefully bend, pull, twist, bundle,
coat, pinch, or place heavy objects on the power cord.
• If the power cord is damaged, it must be repaired by a
qualied technician.
• Do not handle the power cord with wet hands.
• Do not operate the unit when using indoor smokegenerating insecticides.
• Do not clean unit with benzene or paint thinner.
• Do not spray insecticides on the unit.
• Unit will not remove radon or carbon monoxide emitted from
heating appliances or other sources.
• Do not block the air intake or air outlet vents. Ensure that
there is proper airow around the product.
• Install the unit in a rm location that can support the unit’s
weight. If the chosen location cannot support the unit’s
weight, or the installation is not done properly, the unit may
drop and cause serious injury and damage.
• Do not use near hot objects.
• Do not use where the unit may come into contact with steam.
• Do not use the indoor or outdoor unit on its side.
• Keep away from products that generate oily residue.
• Keep children and pets away from the product.
• Always unplug the unit before cleaning or servicing.
• Use of an extension cord is not recommended as it
could prevent the unit from operating normally and could
potentially pose a re and safety risk. It is recommended
that unit is located near a 3-prong 115V GFCI outlet. If one
is not available, a qualied electrician should install one.
• For all electrical work, use the specied cables. Connect
cables tightly, and clamp them securely to prevent external
forces from damaging the terminal. Improper electrical
connections can overheat and cause re, and may also
cause shock
3

PRODUCT DESCRIPTION
Indoor Unit Wall
Mount Bracket
Indoor Unit,
Evaporator
Adjustable
Fan Vent
HOW IT WORKS
This air conditioner is designed to create
a comfortable climate for individuals in the
aected room. It can cool and dehumidify the air
completely automatically and also provide heat
using a heat pump. Air pulled by the fan enters
through the grill of the front panel and passes
through the lter, which traps dust inside. Air is
then sent to the heat exchanger and is cooled,
dehumidied, or re-heated by the heat exchanger.
Heat removed from the air is then sent outside.
When the cycle is nished, the fan sends the
freshened air back into the room. The direction of
the air outlet is regulated by the aps, which are
motorized to move up and down as well as side
to side by the vertical directors.
Clip on exterior
hole cover
Drain Line
Electrical Wiring
Refrigerant Line
(Pre-lled with Refrigerant)
Line Set
(Pre attached to back of indoor unit)
Remote
Outdoor Unit,
Condenser
4
Power Cord
Quick Connect
Refrigerant
connection

INDOOR UNIT DIGITAL DISPLAY
POWER ICON:
Green: Indicates unit is on
Red: Indicates unit is o
TEMPERATURE AND ERROR CODE DISPLAY:
Solid number: temperature reading of indoor environment
Blinking number: Display blinks when you set the desired temperature. Once desired temp
is set the display will go back to current indoor environment temperature and begin moving
towards the desired temp.
Error code identier: If display shows a letter rather than a number then refer to page 14 to
identify the error.
REMOTE USER GUIDE
IMPORTANT: Remote must be pointed at indoor unit's
sensor and be within range to function properly.
Auto Mode: The auto mode allows the air conditioner to
maintain a pre-programmed temperature of 76 degrees in
the aected room. While in this mode, the air conditioner will
automatically select the appropriate fan speed and mode of
operation, COOL or HEAT, to maintain that temperature.
Cooling Mode: The cooling mode allows the air conditioner
to cool the room while dehumidifying the air at the same time.
To activate the cooling mode, press the MODE button on the
remote until the symbol is pointing to COOL on the remote’s
display. The desired cooling temperature is set by using the
TEMP buttons on the remote to set the system to a
temperature lower than that of the room.
Dry Mode: The system can be set to run in DRY mode,
reducing the humidity of the air in the room for increased
comfort. To activate the dry mode, press the MODE button on
the remote until the symbol is pointing to DRY on the remote’s
display. The air conditioner will automatically cycle between
cooling and fan only modes to dehumidify the air.
Heating Mode: The heating mode allows the air conditioner
to produce hot air using a heat pump. To activate the heating
mode, press the MODE button on the remote until the symbol
is pointing to HEAT on the remote’s display. The desired heating
temperature is set by using the TEMP buttons on the remote
to set the system to a temperature higher than that of the room.
IMPORTANT: When switching unit to heat the units fan will not
blow while the heat pump in the outdoor unit heats up. The
ambient temperature around the outdoor condenser will eect
heat up period. This may take several minutes.
Fan Mode: The system can be set to run in FAN mode,
providing ventilation only. To activate the fan mode, press the
MODE button on the remote until the symbol is pointing to
FAN on the remote’s display. Pressing the FAN SPEED button
while in this mode changes the fan speed to LOW, MEDIUM,
HIGH, and AUTO. The remote control will automatically save
the last fan speed setting from the previous time the system
was in operation.
Sleep Function: This system can also function in SLEEP
mode, which will automatically adjust the temperature to
maximize comfort during night time sleep. To put the air
conditioner into SLEEP mode, press the SLEEP button on the
remote until the symbol is pointing to SLEEP on the remote’s
display. If the system is set to run using the cooling or dry
modes, the set temperature will automatically be raised by 1
degree every 60 minutes for a total of 2 degrees during the
rst 2 hours. If the system is set to run using the heat mode,
the set temperature will be gradually lower by 2 degrees
during the rst 2 hours. After 10 hours operating in the SLEEP
mode, the system will switch o automatically.
Timer Function: The TIMER function allows the system to
automatically switch on and o based on your settings. To set
timed start, the system should be turned o. Press TIMER, set
the desired temperature by the pressing the or buttons.
Press TIMER again and set the amount of time, again using
the or buttons. Press TIMER again until the display
shows the amount of time entered until the programmed
TIMER start. The timer is now set. Before setting the timer
you will need to select the mode of operation, the fan speed,
and desired temperature then turn the system o using the
ON/OFF button. To cancel a timed start that has already been
entered, press the TIMER button again.
To set a timed stop, the system should be turned on. Press the
TIMER button, then use the or buttons to set the amount
of time desired until the system will automatically stop. As you
do this, the display will show the amount of time the system
can be programmed to stop after. To cancel a timed stop that
has already been entered, press the TIMER button again.
If the system loses power or is turned o, it will be necessary
to reset a timed start or timed stop again using the above
instructions. Both timer functions can only be programmed in
hour increments.
5
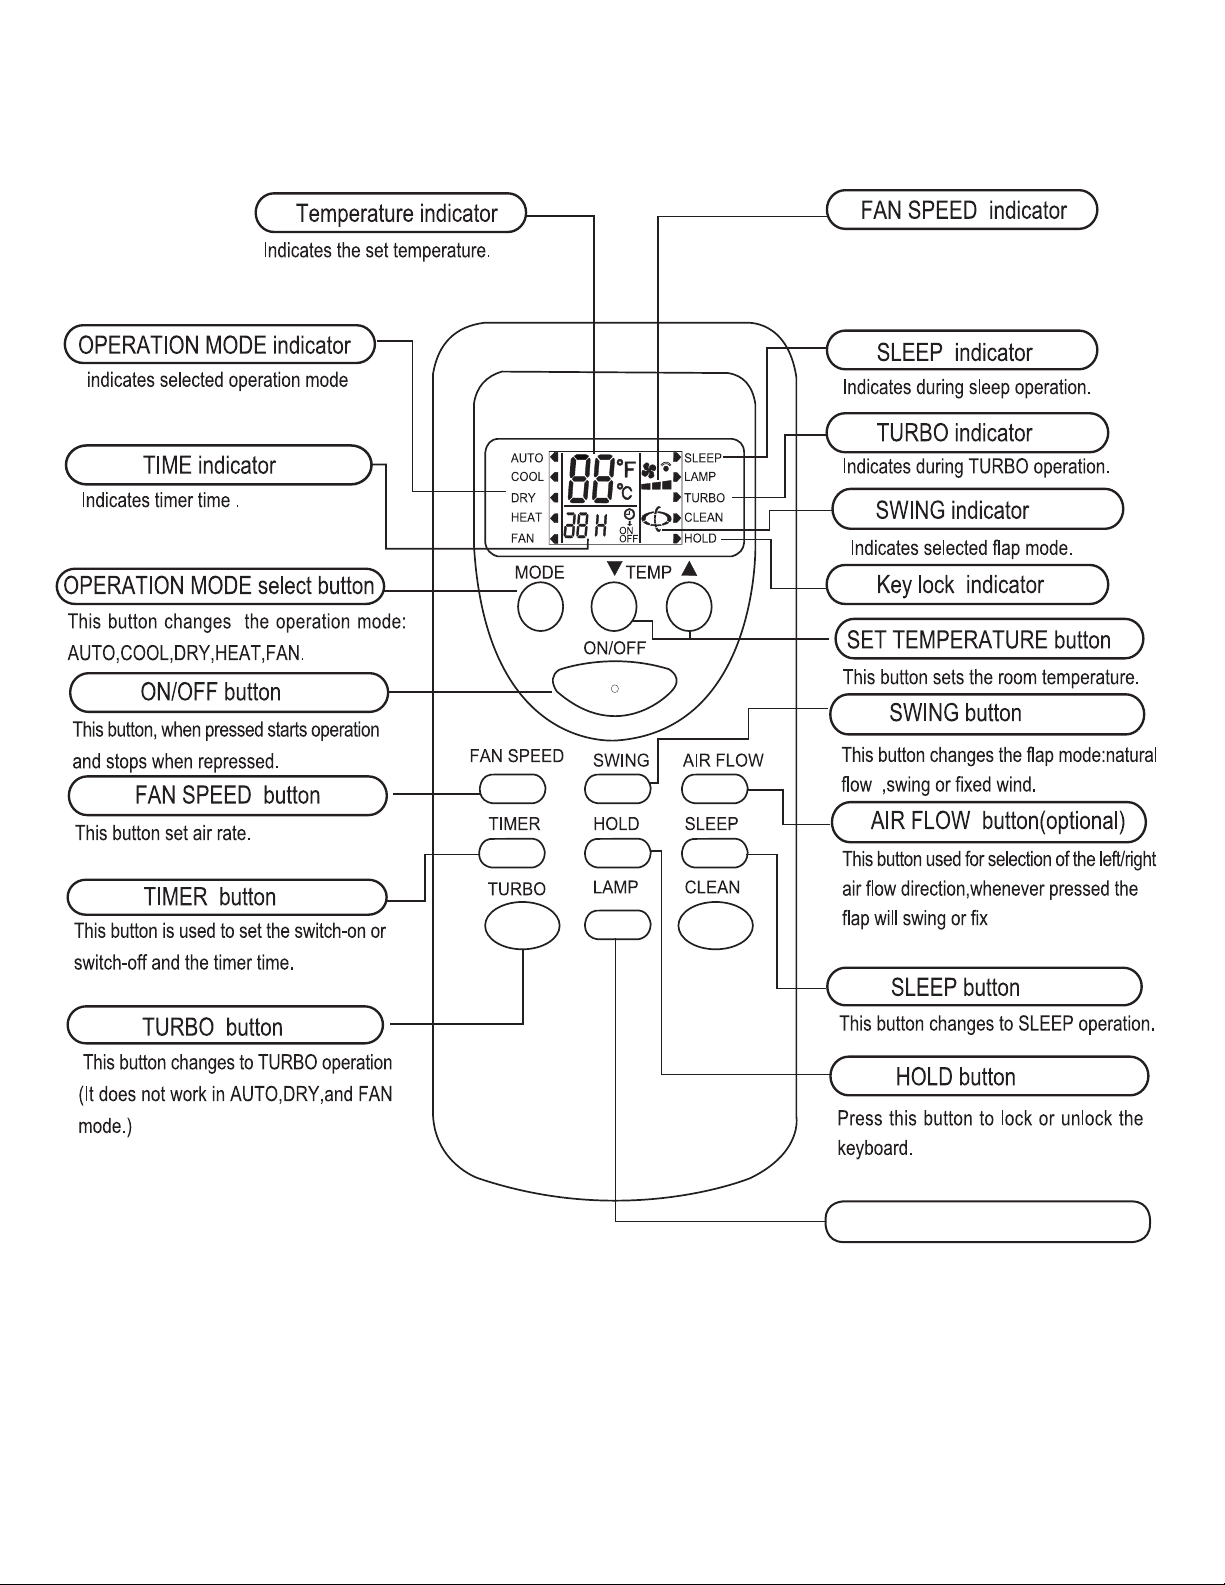
REMOTE CONTROLLER BUTTON DIAGRAM
Indicates the selected air rate.
(It works on three dimensional air ow model.)
LAMP button
Turns o digital display on indoor unit.
6