

Clicker KLIK2U User Manual
CLICKER
®
MODEL KLIK2U
Universal Garage Door Opener Wireless Keyless Entry
Read instructions thoroughly BEFORE beginning. Start with garage door
closed. Determine garage door opener type - Smart/Learn button or DIP
Switch. The Smart/Learn button or DIP Switches are located on motor unit
or external receiver. Refer to owner’s manual if necessary.
To prevent possible SERIOUS INJURY or DEATH from a moving gate or garage door:
• ALWAYS keep remote controls out of reach of children. NEVER permit children to operate, or
play with remote controls.
• Activate gate or door ONLY when it can be seen clearly, is properly adjusted and there are no
obstructions to door travel.
• ALWAYS keep gate or garage door in sight until completely closed. NEVER permit anyone to
cross path of moving gate or door.
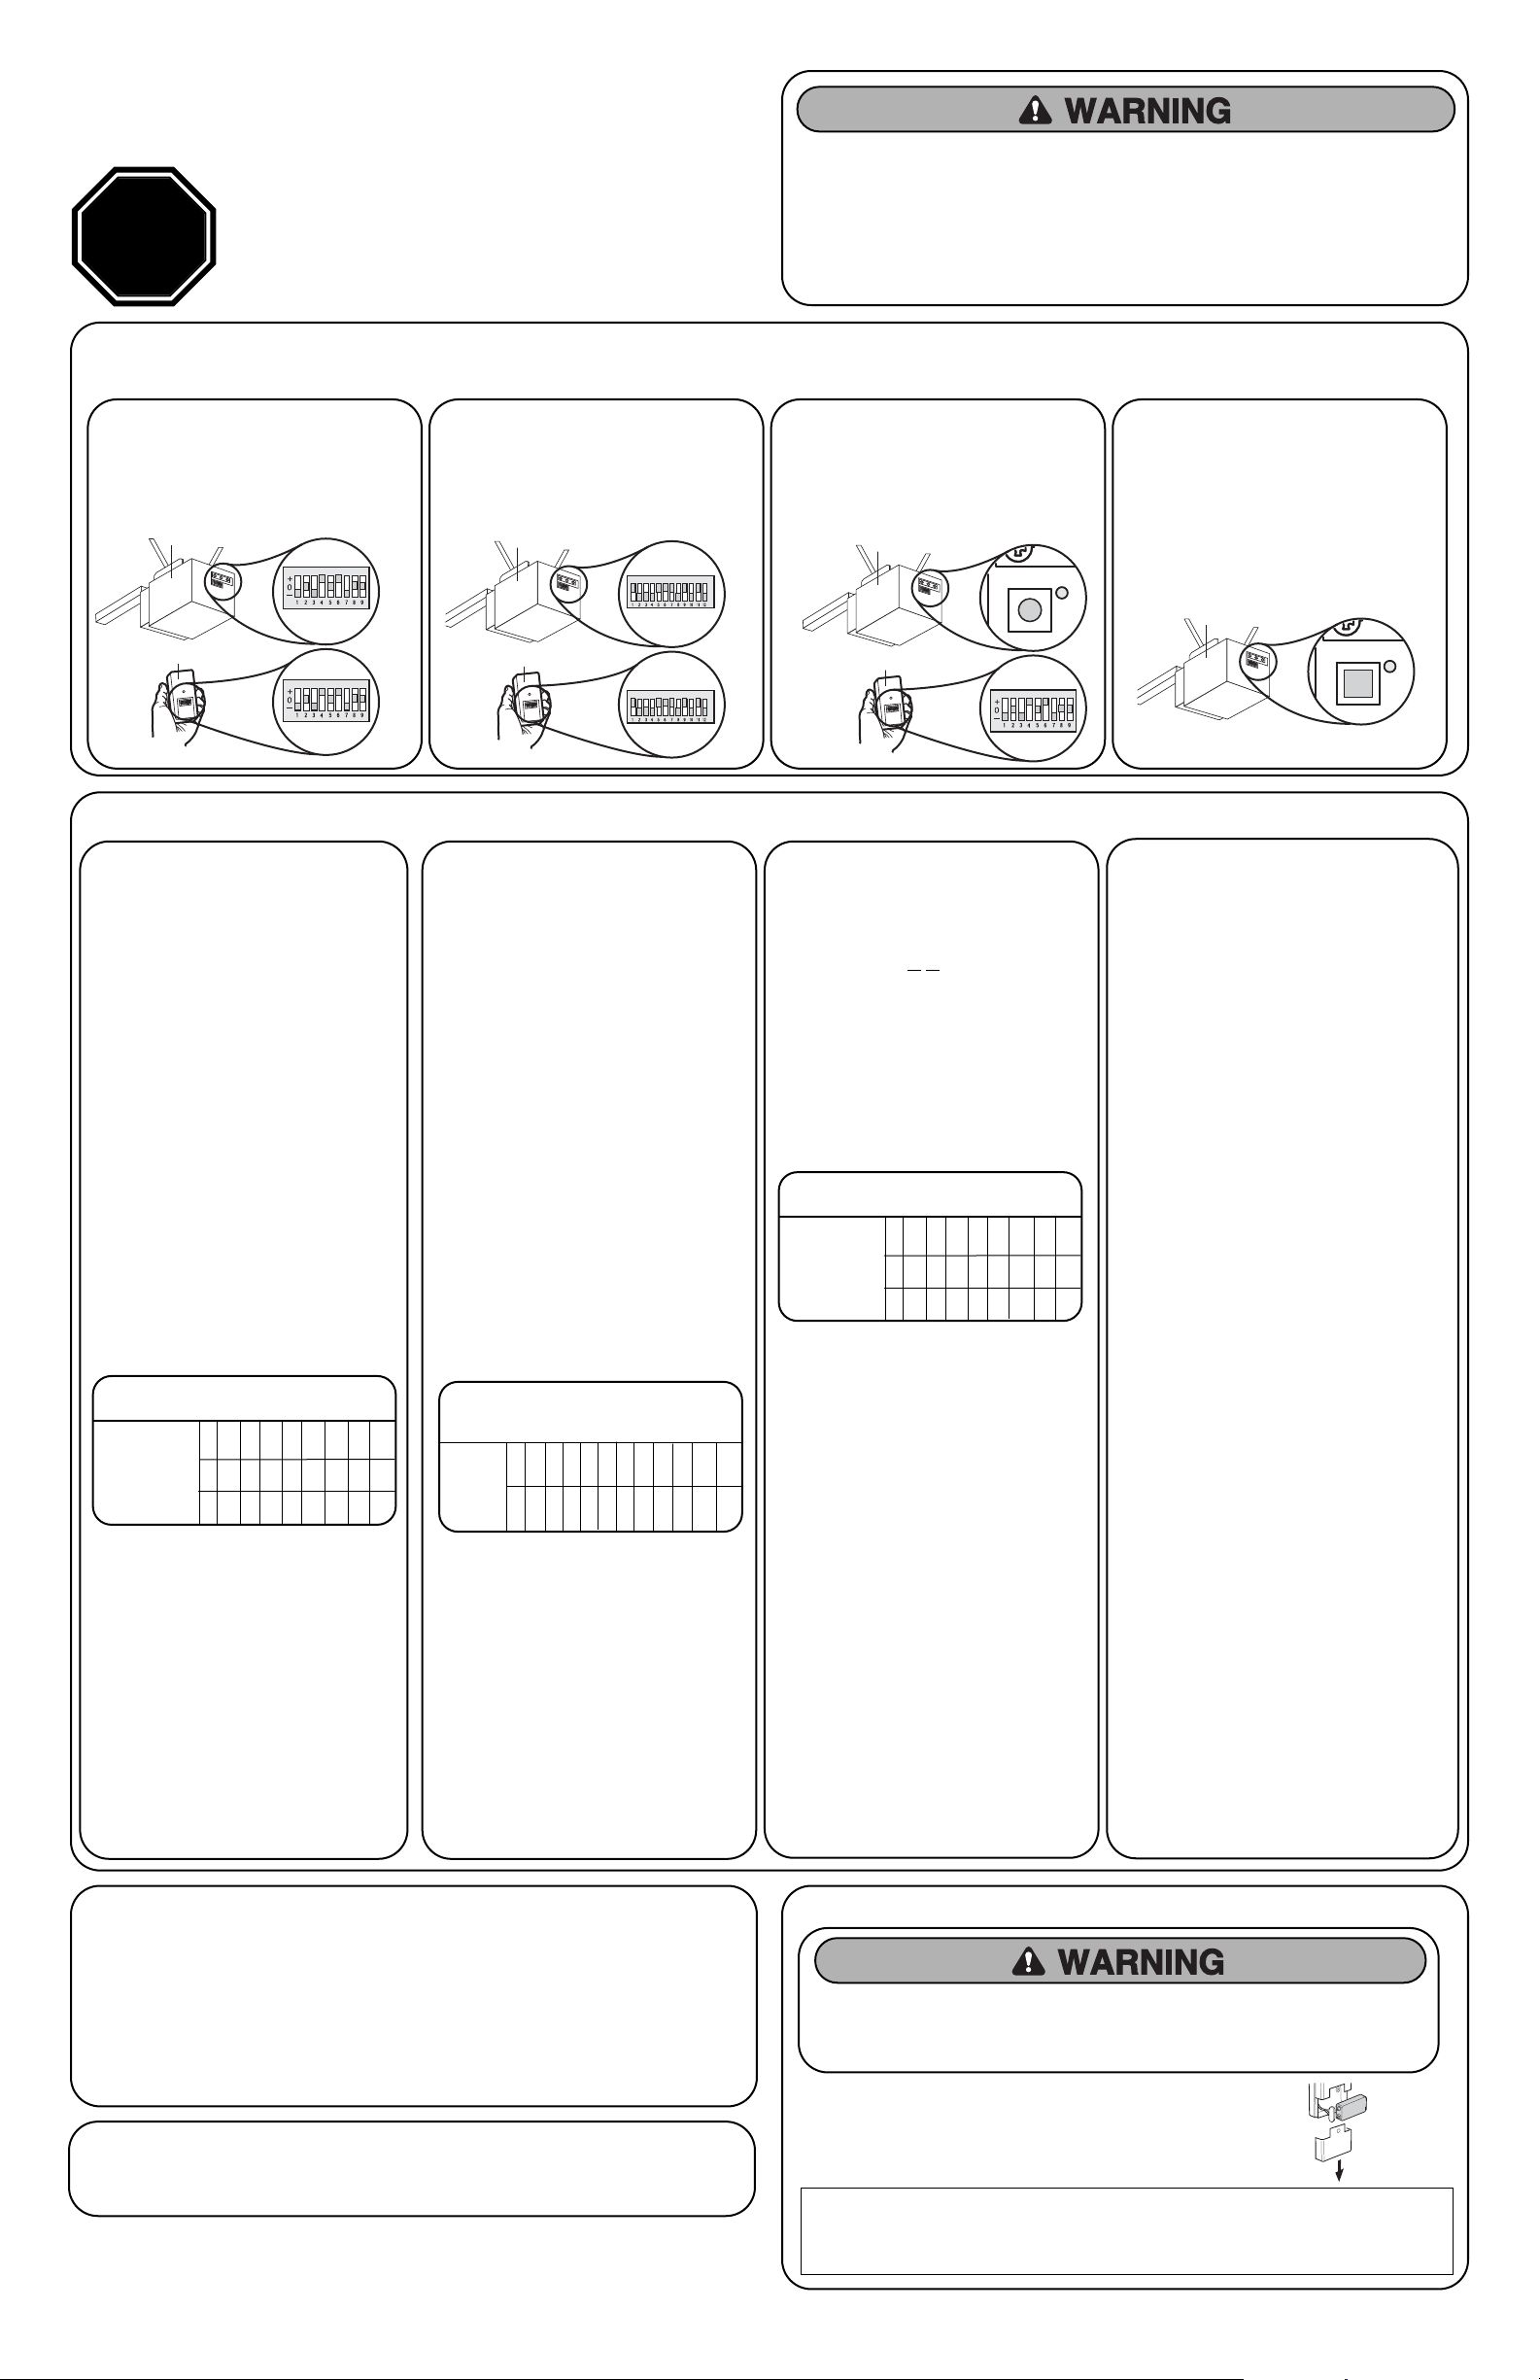
STOP
Determine Garage Door Opener Types:
© 2007, Clicker Corporation
114A3484B All Rights Reserved
www.clickerproducts.com • 1-800-442-1255
Chamberlain, LiftMaster and Moore-O-Matic are Trademarks of Chamberlain Group. Genie is a Trademark of Overhead Door Corporation. Overhead
Door is a trademark of Overhead Door Corporation. Linear is a Trademark of Linear Corporation. Master Mechanic is a Trademark of TruServ. Sears
is a Trademark of Sears & Roebuck. Stanley is a Trademark of The Stanley Works. Wayne Dalton is a trademark of Wayne Dalton Corporation. Do It
is a trademark of Do It Best Corporation.
1. Remove cover.
2. Remove battery cover to expose mounting holes.
3. Remove battery and mount keypad using screws provided.
4. Reassemble.
MOUNT THE KEYPAD
NOTICE: To comply with FCC and or Industry Canada (IC) rules, adjustment or modifications of this receiver and/or transmitter
are prohibited, except for changing the code setting or replacing the battery. THERE ARE NO OTHER USER SERVICEABLE PARTS.
Tested to Comply with FCC Standards FOR HOME OR OFFICE USE. Operation is subject to the following two conditions: (1) this
device may not cause harmful interference, and (2) this device must accept any interference received, including interference that
may cause undesired operation.
BATTERY
Replace the 9-Volt battery when keypad light becomes dim
or does not light up. Slide cover up, remove battery cover,
and replace battery. Re-programming may be necessary.
To prevent possible SERIOUS INJURY or DEATH:
• NEVER allow small children near batteries.
• If battery is swallowed, immediately notify doctor.
Install out of the reach of children at a minimum height of 5 feet (1.5 m). Secure keypad to
a smooth surface. Mount the keypad out of the path of the moving garage door, but within
sight of it (4" clearance is needed for the cover.)
CHANGING YOUR 4-DIGIT PIN
Enter existing PIN, press *, enter new PIN and press *. To test and use, enter your new
PIN and press the 0 key.
TYPE 1
Programming:
Proceed with instructions according to your garage door opener type. NOTE: Your motor unit and/or remote control may look different.
Chamberlain, Sears Craftsman, LiftMaster,
Master Mechanic and Do It garage door
openers or receivers with:
3 position DIP switches.
TYPE 1 TYPE 2 TYPE 3
Opener
Chamberlain, Sears Craftsman, LiftMaster,
Master Mechanic, Do It, Genie Intellicode,
Overhead Door, Stanley, Wayne Dalton or
Linear garage door openers with:
Smart/Learn button.
TYPE 4
1. Select and write a 4-digit PIN:
__ __ __ __
2. Determine your opener ID using the list
below.
ID DIP Switch Type
• 11 = DIP switch garage door openers
(U.S.)
• 12 = 9 DIP switch garage door
openers (Canada)
• 15 = 8 DIP switch garage door
openers
• 19 = 7 DIP switch garage door
openers
(Write opener ID here: __ __)
3. The first DIP switch must be set to the
“-” position on your remote and opener.
Record your DIP switch sequence for
remaining DIP switches. If the DIP
switch is in the “+” position place a 1,
“0” position place a 2, “-” position place
a 3 in the corresponding box in the
chart below: NOTE: Leave any unused
switch locations blank.
Genie, Linear and Moore-O-Matic garage
door openers or receivers with:
2 position DIP switches.
+
0
-
123456 789
DIP Switch
Sequence
3
Write your DIP switch sequence below:
_________________________
4. Press * and # keys together until
keypad stops flashing.
5. Enter PIN from step 1, press #.
6. Enter ID from step 2, press #.
7. Enter DIP switch sequence from step 3
and press # key.
8. To test and use, wait until lights turn off,
enter your PIN and press the 0 key.
If opener does not function, repeat
programming.
TYPE 2
1. Select and write a 4-digit PIN:
__ __ __ __
2. Determine your opener ID using the list
below.
ID DIP Switch Type
• 13 = 12 DIP switch Genie garage door
openers
• 14 = 10 DIP switch Linear garage door
openers
• 16 = 10 DIP switch Stanley garage door
openers
• 17 = 9 DIP switch Genie garage
door openers
• 18 = 8 DIP switch Linear,
Moore-O-Matic garage door openers
(Write opener ID here: __ __)
3. Record your DIP switch sequence. If DIP
switch is in the “on” or “up” position place
a 1, “off” or “down” position place a 2 in
the corresponding box in the chart below:
NOTE: Leave any unused switch locations
blank.
Write your DIP switch sequence below:
_________________________
4. Press * and # keys together until
keypad stops flashing.
5. Enter PIN from step 1, press #
6. Enter ID from step 2, press #.
7. Enter DIP switch sequence from step 3
and press # key.
8. To test and use, wait until lights turn off,
enter your PIN and press the 0 key.
If opener does not function, flip DIP
switches, so if a switch is “on” or “up” flip
it “off” or “down” in step 3.
TYPE 3
1. Select and write a 4-digit PIN:
__ __ __ __
2. Your opener ID is 11.
1
1
3. Record your DIP switch sequence. Set
your first DIP switch to “-”, your first
DIP switch must be set to the “-”
position on your remote and opener. If
the DIP switch is in the “+” position
place a 1, “0” position place a 2, “-”
position place a 3 in the corresponding
box in the chart below: NOTE: Leave
any unused switch locations blank.
Write your DIP switch sequence below:
_________________________
4. Press * and # keys together until
keypad stops flashing.
5. Enter PIN from step 1, press #.
6. Enter 11, press #.
7. Enter DIP switch sequence from step 3,
press #.
8. Press and release the Smart/Learn
button on garage door opener.
9. Enter your 4 digit PIN and press the 0
key.
10. To test and use, wait until light turns off,
enter your PIN and press the 0 key.
If opener does not function, repeat
programming.
TYPE 4
1. Select and write a 4-digit PIN:
__ __ __ __
2. Determine your opener ID using the list
below.
ID Garage door opener brand and
manufacturing dates
• 1 = Linear garage door openers
manufactured from 1997 to present.
• 2 = Chamberlain, Sears Craftsman,
LiftMaster, Master Mechanic and
Do It garage door openers manufactured
from 1997 to 2004 [Orange Button].
• 3 = Chamberlain, Sears Craftsman,
LiftMaster, Master Mechanic and
Do It garage door openers manufactured
from 2005 to present [Purple Button].
• 4 = Chamberlain, Sears Craftsman,
LiftMaster, Master Mechanic and
Do It garage door openers manufactured
from 1993 to 1996 [Green Button].
• 5 = Genie Intellicode and Overhead Door
garage door openers manufactured from
2005 to present (315 MHz).
• 6 = Genie Intellicode and Overhead Door
garage door openers manufactured from
1995 to present (390 MHz).
• 7 = Stanley garage door openers
manufactured in 1998-present.
• 9 = Wayne Dalton garage door openers
manufactured in 1999-present.
(Write opener ID here: __)
3. Press * and # keys together until keypad
stops flashing.
4. Enter PIN from step 1, press #.
5. Enter ID from step 2, press #.
6. Press and release the Smart/Learn button on
garage door opener.
7. Enter your 4 digit PIN and press the 0 key.
NOTE: For Genie and Overhead Door units,
press “0” twice.
8. To test and use, wait until light turns off, enter
your PIN and press the 0 key.
If opener does not function, repeat
programming.
12345678 9101112
DIP
Switch
Sequence
ON
OFF
Remote Control
Opener
Opener
Remote Control
ON
ON
Opener
Remote Control
Chamberlain, Sears Craftsman, LiftMaster,
Master Mechanic and Do It garage door
openers or receivers with:
Yellow, white or grey Smart/Learn
buttons.
+
0
-
123456 789
DIP Switch
Sequence
3

CLICKER
®
MODELO KLIK2U
Control inalámbrico universal de apertura de puertas de
garaje
Lea completamente ls instrucciones ANTES de empezar. Empiece con la puerta
del garaje cerrada. Identifique el tipo de abridor de puerta de garaje – botón
Smart/Learn o interruptor DIP. El botón Smart/Learn o los interruptores DIP
están ubicados en la unidad del motor o receptor externo. Consulte el manual
del propietario si es necesario.
Para impedir posibles LESIONES GRAVES o MORTALES debido al movimiento de una compuerta o puerta
de garaje:
• Mantenga SIEMPRE los controles remotos fuera del alcance de los niños. No permita NUNCA a niños
que las operen ni que jueguen con los transmisores de control remoto
• Active la compuerta o la puerta SÓLO cuando la pueda ver claramente, esté bien ajustada y no haya
obstrucciones en el recorrido de la puerta.
• Mantenga SIEMPRE la compuerta o la puerta del garaje a la vista hasta que esté completamente
cerrada. No deje NUNCA que nadie cruce la trayectoria de la compuerta o puerta en movimiento.
ALTO
Identifique los tipos de abridor de puerta de garaje:
© 2007, Clicker Corporation
114A3484B Todos los derechos reservads
www.clickerproducts.com • 1-800-442-1255
Chamberlain, LiftMaster y Moore-O-Matic son marcas comerciales de Chamberlain Group. Genie es una marca
comercial de Overhead Door Corporation. Overhead Door es una marca comercial de Overhead Door Corporation.
Linear es una marca comercial de Linear Corporation. Stanley es una marca comercial de The Stanley Works. Wayne
Dalton es una marca comercial de Wayne Dalton Corporation. Do It es una marca comercial de Do It Best Corporation.
1. Quite cubierta.
2. Quite cubierta de la pila para ver las orificios de installación.
3. Quite la pila y instale el control inalámbrico con los tornillos suministrados.
4. Vuelva a montar.
INSTALLACIÓN DEL CONTROL INALÁMBRICO
PILA
Reemplace la pila de 9 voltios cuando la luz del control comience a
atenuarse o no encienda. Deslice la tapa hacia arriba, quite la cubierta
de la pila y reemplácela. Puede ser necesario reprogramar el control
después de remplazar la pila.
Para evitar la posibilidad de LESIONES GRAVES O incluso LA MUERTE:
• NUNCA permita que los niños pequeños estén cerca de las baterías.
• Si alguien se traga una batería, llame al médico de inmediato.
Debe Instale 1.5 m (5 pies) del piso, fuera del alcanze de los niños. Fije el control inalámbrico al
una superficie plana. Instale el control inalámbrico alejado de las partes móviles de la puerta,
pero an la vista de la puerta (la separación del 10 cm (4 pulg.) es necesaria para la cubierta.)
PARA CAMBIAR EL NIP DE 4 DÍGITOS
Introduzca el NIP que existente, presione *, introduzca el NIP nuevo y presione *. Para
realizar una prueba y usar, introduzca su NIP nuevo y presione el boton 0.
Programación:
Pase a las instrucciones que correspondan al tipo de abridor de puerta de garaje. NOTA: Su unidad del motor y/o control remoto pueden parecer diferentes.
Abridor de puerta de garaje o receptores de
Chamberlain, Sears Craftsman, LiftMaster,
Master Mechanic y Do It con:
Interruptores DIP de 3 posiciones.
TIPO 1 TIPO 2 TIPO 3
Opener
Abridor de puerta de garaje o receptores de
Chamberlain, Sears Craftsman, LiftMaster,
Master Mechanic, Do It, Genie Intellicode,
Overhead Door, Stanley, Wayne Dalton o
Linear con:
Botones de SMART/LEARN.
TIPO 4
Abridor de puerta de garaje o receptores de
Genie, Linear y Mooor-O-Matic con:
Interruptores DIP de 2 posiciones.
Remote Control
Opener
Opener
Remote Control
ON
ON
Opener
Remote Control
Abridor de puerta de garaje o receptores de
Chamberlain, Sears Craftsman, LiftMaster,
Master Mechanic y Do It con:
Botones de SMART/LEARN amarillo,
blanco o gris.
ADVERTENCIAADVERTENCIAADVERTENCIA
Abridor
Control Remoto
Abridor
Control Remoto
Abridor
Control Remoto
Abridor
ADVERTENCIAADVERTENCIAADVERTENCIA
AVISO: Para cumplir con las reglas de la FCC y/o de Canadá (IC), ajustes o modificaciones de este receptor y/o transmisor están
prohibidos, excepto por el cambio de la graduación del código o el reemplazo de la pila. NO HAY OTRAS PIEZAS REPARABLES DEL
USUARIO.
Se ha probado para cumplir con las normas de la FCC para USO DEL HOGAR O DE LA OFICINA. La operación está sujeta a las dos
condiciones siguientes:(1) este dispositivo no puede causar interferencia perjudicial, y (2) este dispositivo debe aceptar cualquier
interferencia recibida, incluyendo la interferencia que puede causar una operación no deseable.
TIPO 1
1. Seleccione y escriba un NIP de 4 dígitos:
__ __ __ __
2. Indentifique su numbero de Identificación
(ID) usando el lista abajo.
ID Tipo del interrupotores DIP
• 11 = Abridores de puerta de garaje con
interruptores DIP (E.U.)
• 12 = Abridores de puerta de garaje con
9 interruptores DIP (Canadá)
• 15 = Abridores de puerta de garaje con
8 interruptores DIP
• 19 = Abridores de puerta de garaje con
7 interruptores DIP
(Escriba el ID del abridor aqui: __ __)
3. El interruptor primero debe ser al el
posición “-” en su control remoto y
abridor. Escriba el secesión de los
interruptores por los interruptores que
restante. Si el interruptor está en la
posición “+” introduzca un 1, para la
posición “0” un 2, para la posición “-” un
3 en la casilla correspondiente en la
siguiente gráfica: NOTA: Deje cualquier
espacio en blanco inusitado de las
localizaciones del interruptor.
+
0
-
123456 789
Secesión de
interruptores NIP
3
Escriba su secesión de los interruptores
NIP abajo:
_________________________
4. Presione * y # simultáneamente hasta que
el control inalámbrico deje de parpadear.
5. Introduzca el NIP de paso 1, presione #.
6. Introduzca el ID de paso 2, presione #.
7. Introduzca el secesión de interruptores NIP
de paso 3 y presione el botón.
8. Para realizar una prueba y usar, introduzca
su NIP nuevo y presione el boton 0.
Si el abridor no activo, repetir programmación.
TIPO 2
1. Seleccione y escriba un NIP de 4 dígitos:
__ __ __ __
2. Indentifique su numbero de Identificación (ID)
usando el lista abajo.
ID Tipo del interrupotores DIP
• 13 = Abridores de puerta de garaje de
Genie con 12 interruptores DIP
• 14 = Abridores de puerta de garaje de
Linear con 10 interruptores DIP
• 16 = Abridores de puerta de garaje de
Stanley con 10 interruptores DIP
• 17 = Abridores de puerta de garaje de
Genie con 9 interruptores DIP
• 18 = Abridores de puerta de garaje de
Linear o Moore-O-Matic con 8
interruptores DIP
(Escriba el ID del abridor aqui: __ __)
3. Escriba el secesión de los interruptores por
los interruptores que restante. Si el
interruptor está en la posición “on
(encendido)” o arriba introduzca un 1, para la
posición “off (apagado)”o abajo un 2 en la
casilla correspondiente en la siguiente gráfica:
NOTA: Deje cualquier espacio en blanco
inusitado de las localizaciones del interruptor.
TIPO 3
1. Seleccione y escriba un NIP de 4 dígitos:
__ __ __ __
2. El ID de su abridor es 11.
1
1
3. El interruptor primero debe ser al el
posición “-” en su control remoto y abridor.
Escriba el secesión de los interruptores por
los interruptores que restante. Si el
interruptor está en la posición “+”
introduzca un 1, para la posición “0” un 2,
para la posición “-” un 3 en la casilla
correspondiente en la siguiente gráfica:
NOTA: Deje cualquier espacio en blanco
inusitado de las localizaciones del
interruptor.
Escriba su secesión de los interruptores
NIP abajo:
_________________________
4. Presione * y # simultáneamente hasta que
el control inalámbrico deje de parpadear.
5. Introduzca el NIP de paso 1, presione #.
6. Introduzca 11, presione #.
7. Introduzca el secesión de interruptores NIP
de paso 3 y presione el botón.
8. Presione y suelte el botón de Smart/Learn
en el abridor de puerta de garaje.
9. Introduzca su NIP de 4 digitos y presione
el botón 0.
10. Para realizar una prueba y usar, introduzca
su NIP nuevo y presione el boton 0.
Si el abridor no activo, repetir programmación.
TIPO 4
1. Seleccione y escriba un NIP de 4 dígitos:
__ __ __ __
2. Indentifique su numbero de Identificación (ID)
usando el lista abajo.
ID Marca de abridor de puerta de garaje y
fecha de fábrica
• 1 = Abridores de puerta de garaje de Linear
fábrica desde 1997 al presente.
• 2 = Abridores de puerta de garaje de
Chamberlain, Sears Craftsman, LiftMaster,
Master Mechanic y Do It fábrica desde
1997 al 2004 [Botón anaranjado].
• 3 = Abridores de puerta de garaje de
Chamberlain, Sears Craftsman, LiftMaster,
Master Mechanic y Do It fábrica desde
2005 al presente [Botón morado].
• 4 = Abridores de puerta de garaje de
Chamberlain, Sears Craftsman, LiftMaster,
Master Mechanic y Do It fábrica desde
1993 al 1996 [Botón verde].
• 5 = Abridores de puerta de garaje de Genie
Intellicode y Overhead Door fábrica desde
2005 al presente (315 MHz).
• 6 = Abridores de puerta de garaje de Genie
Intellicode y Overhead Door fábrica desde
1995 al presente (390 MHz).
• 7 = Abridores de puerta de garaje de Stanley
fábrica desde 1998 al presente.
• 9 = Abridores de puerta de garaje de Wayne
Dalton fábrica desde 1999 al presente.
(Escriba el ID del abridor aqui: __ __)
3. Presione * y # simultáneamente hasta que el
control inalámbrico deje de parpadear.
4. Introduzca el NIP de paso 1, presione #.
5. Introduzca 11, presione #.
6. Presione y suelte el botón de Smart/Learn en el
abridor de puerta de garaje.
7. Introduzca su NIP de 4 digitos y presione el
botón 0.
NOTA: Pesione el botón “0” dos veces para
unidades de Genie y Overhead Door.
8. Para realizar una prueba y usar, introduzca su
NIP nuevo y presione el boton 0.
Si el abridor no activo, repetir programmación.
12345678 9101112
Secesión de
interruptores
NIP
ON
(encendido)
OFF
(apagado)
+
0
-
123456 789
Secesión de
interruptores NIP
3
Escriba su secesión de los interruptores NIP
abajo:
_________________________
4. Presione * y # simultáneamente hasta que el
control inalámbrico deje de parpadear
5. Introduzca el NIP de paso 1, presione #.
6. Introduzca el ID de paso 2, presione #.
7. Introduzca el secesión de interruptores NIP
de paso 3 y presione el botón.
8. Para realizar una prueba y usar, introduzca
su NIP nuevo y presione el boton 0.
Si el abridor no activo, reverso los interruptores
de manera que, un interruptor es “on
(encendido)” o arriba, el interruptor es “off
(apagado)” o abajo en paso 3.
 Loading...