

Clicker K3 Quick Manual
FEATURES
Congratulations! The Clicker Model K3 you have purchased is one
of the most unique keypad transmitters available. It is compatible
with
most
garage door opener systems manufactured by
Chamberlain
®
, Genie®, Lift-Master®, Linear®, Master Mechanic®,
Moore-O-Matic
®
, Multi-Code®, Sears®, Stanley®, and Wayne Dalton®.
Please note that the K3 is
not
compatible with rotating code systems
such as Intellicode™ or Security+™, developed by several of these
manufacturers since 1996.
The Clicker K3 can be programmed to operate one or two garage
door openers, including different brands. When used with two doors,
each door is programmed separately, with separate Personal
Identification Numbers (PINs).
In addition, the K3 must be programmed to your system’s security
code. If your system uses code switches, you must match the
existing code. If your system does not use code switches but
does
have a smart button, you may enter any random 9 digit code into
the K3, then program your system’s receiver to accept this code. All
programming is done through the keypad.
When properly programmed, the K3 will open your garage door
when your PIN, plus any additional number, is pressed. The keypad
remains active for approximately 30 seconds after the last button is
pushed. During this interval you may stop or reverse a moving door
by pushing any numbered key.
If you press an incorrect number, wait 30 seconds and start over.
We suggest you first read through the instructions in their entirety,
then return to Part 1. Follow instructions carefully.
Do not install the unit until programming is completed and tested
from the intended location.
PART 1 – IDENTIFYING YOUR EXISTING BRAND AND CODE
Step 1: Place an X in Table 1 below next to the brand of your
opener. If you are programming your K3 for more than one door
opener, place an X next to the brand you will program first.
Table 1
___1 Linear, Moore-O-Matic (8 code switches)
___2 Stanley (10 code switches)
___3 Multi-Code (10 code switches)
___4 Sears, Chamberlain, Lift-Master, Master Mechanic,
Wayne Dalton (9 code switches or none; only these brands
may
have a smart button)
___5 Genie (9 code switches)
___6 Genie (12 code switches)
Step 2: Determine whether your system uses code switches.
Depending on your brand, you may have 8, 9, 10 or 12. They are
usually located on the opener receiver panel (perhaps under the
lamp cover). The receiver is normally attached to the garage door
opener, or mounted on a wall and wired to the opener. Your existing
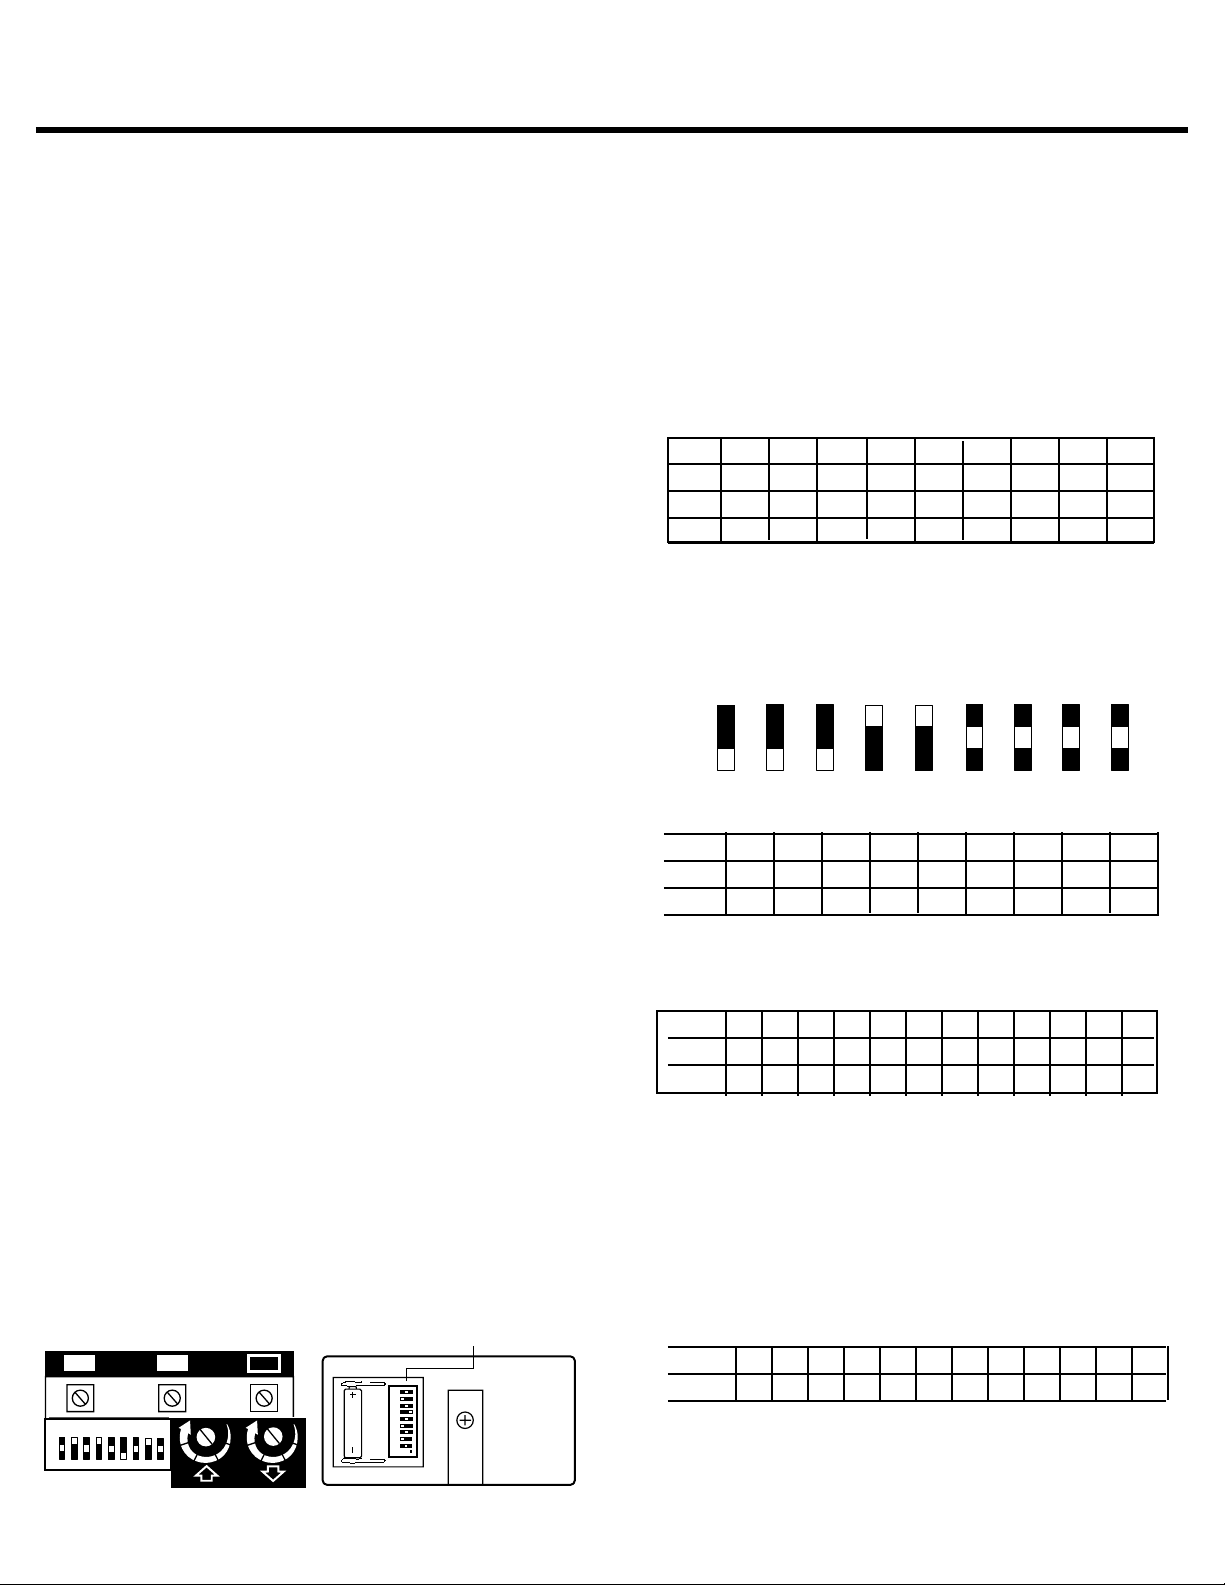
remote will have matching code switches inside the case. The
illustration shows a receiver panel and remote with 9 code switches.
•
If your system has code switches
you must program the K3 to
match the existing code. Proceed to Table 2 or 3, depending on
your brand.
•
If your Chamberlain, Lift-Master, Master Mechanic, Sears, or
Wayne Dalton receiver does not have code switches,
choose
any random 9 digit code to program the K3. Use Table 2 and enter
a setting of 1, 2, or 3 for each column. Fill only 1 box per column,
and ignore the table instructions pertaining to code switches. Then
proceed to
PART 2 – PROGRAMMING PROCEDURES.
Table 2
Chamberlain, Lift-Master, Master Mechanic,
Sears, or Wayne Dalton
123456789
+
0
–
Examine the code switches on your receiver. This table is 9 columns
across, one for each code switch. Place a “1” in each box that
corresponds with a switch in “+” position. Place a “2” in each box
that corresponds with a switch in “0” position. Place a “3” in each
box that corresponds with a switch in “–” position. Fill only 1 box
per column.
Example: (white squares indicate switch position)
+
11
0
2222
–
333
Table 3
Genie, Linear, Moore-O-Matic, Multi-Code, Stanley
12 3456789101112
ON/UP
OFF/DN
Examine the code switches on your receiver or remote. It will have
either 8, 9, 10, or 12 code switches. Place a “1” in each box that
corresponds with a switch in the “on” or “up” position. Place a “2”
in each box that corresponds with a switch in the “off” or “down”
position. Fill only 1 box per column, and only as many columns as
you have code switches. See example below.
NOTE: Some Stanley and Multi-Code units label their code switches
open and close. For Clicker coding purposes,
Close = on, Open = off .
Example of a Stanley with 10 code switches:
CLOSE
11 111
OPEN
22 222
Step 3: Verify the code numbers you entered in the table to be sure
they match your system’s code. Then proceed to
PART 2 –
PROGRAMMING PROCEDURES.
CLICKER MODEL K3
WIRELESS KEYPAD
1
2345678
+
0
9
Receiver Panel
1
2
3
–
Code switches
(white squares indicate position)
1
23456789
+
0
Remote Code Switches
For use with Garage Door Openers
+
0
–

PART 2 – PROGRAMMING PROCEDURES
A. PROGRAMMING YOUR PIN
Step 1: Choose a 3-digit PIN using any combination of numbers
from 0 to 9.
Step 2: Replace the existing PIN (factory set at 123 for Door 1 and
456 for Door 2) with your chosen PIN as follows:
a. Press numbers 1, 2, and 3 (for Door Two, press 4, 5, 6)
b. Press the ✽ key.
c. Press your new 3-digit PIN.
d. Press the ✽ key again.
Wait 30 seconds before proceeding to B.
(NOTE: To change PINs in the future, see Part 3 – Information.
It will not be necessary to repeat B. PROGRAMMING YOUR
SECURITY CODE.)
B. PROGRAMMING YOUR SECURITY CODE
Step 1: Enter your PIN into the keypad.
Step 2: Press the # key.
Step 3: Press one of the following number keys, depending on your
system brand as checked in Table 1:
• 1 (Linear, Moore-O-Matic)
• 2 (Stanley)
• 3 (Multi-Code)
• 4 (Chamberlain, Lift-Master, Master Mechanic, Sears,
Wayne Dalton)
• 5 (9 code switch Genie)
• 6 (12 code switch Genie)
Step 4: Press the # key again.
Step 5: Enter your code switch numbers from Table 2 or 3, column
by column, beginning with the first column in the table. See
examples below.
Example 1: (Table 2) 9 code switches or random 9 digit code
+
11
0
2222
–
333
Press 3 three times, 1 twice, 2 four times.
Example 2: (Table 3) Press 1, 2, 1, 2, etc.
ON
111111
OFF
222222
Step 6: Press the # key again.
•
If your system has code switches,
programming is complete.
Wait 30 seconds and proceed to
C. TESTING YOUR SYSTEM
to
make sure the K3 activates your opener.
•
If your system does not have code switches,
you must program
your receiver to accept the random 9 digit code you entered from
Table 2. Wait 30 seconds and proceed to Step 7.
Step 7: (For receivers without code switches)
a. Locate the “smart” programming
button on your receiver panel.
b. Enter your PIN into the keypad.
c. Press and HOLD any additional
number key.
d. Press (for not longer than two
seconds) and release the “smart”
button on the receiver. The adjacent
indicator light will blink.
e. Release the number key.
Programming is complete. Wait 30 seconds and proceed to
C. TESTING YOUR SYSTEM
to make sure the K3 activates your
opener.
NOTE: To program a second door, return to A and choose a
different PIN. In Step 2a, press 4, 5, 6 instead of 1, 2, 3.
C. TESTING YOUR SYSTEM
Take the unit to the approximate location where it will be mounted.
Stand clear of the garage door, and:
• Enter your PIN.
• Enter any additional number.
If the system has been programmed correctly, the door should open.
If it does not, see
D. TROUBLESHOOTING.
NOTE: When using the keypad to open your door, always enter
your PIN and one additional number.
D. TROUBLESHOOTING
• If the door does not open:
– PIN may be incorrect
– Security code may not match operator
– Check battery
• If the keypad does not light up when a number is pressed,
replace battery.
PART 3 – INSTALLATION
AND GENERAL INFORMATION
MOUNTING THE K3
Select a smooth vertical surface in a location out of the path of the
moving garage door, but within sight of it. You will need a clearance
of at least 4-1/2 inches above the keypad for the cover.
Remove the slide up keypad cover and the battery cover. Remove
the battery from its compartment (it is not necessary to disconnect
it). Mount the keypad using the screws supplied, then replace
components.
BATTERY REPLACEMENT
The keypad should light up and remain illuminated for approximately
6 seconds after a number is pressed. Replace the 9 volt battery
when the keypad lamps become dim. Slide the keypad cover up into
the stop position. Unscrew the battery cover and replace battery.
Memory is not lost when the battery is removed.
INFORMATION
• Entering an incorrect PIN will lock out the unit for 30 seconds.
• To change your PIN:
a. Press your existing PIN.
b. Press the ✽ key.
c. Press your new 3 digit PIN.
d. Press the ✽ key again.
When changing PINs in the future, it is not necessary to reprogram your security code.
CAUTION
Use of this wireless keypad should be limited to responsible
adults. Automatic Gate and Garage Door systems are
dangerous. They can cause great bodily harm and injury and can
result in death. Always exercise caution when using wireless
keypads. Do not operate keypad to activate a gate or door unless
you can see that the area is clear. Always keep children away from
automatic doors and gates.
TECHNICAL SUPPORT: 800-442-1255
(Monday-Friday 6
AM – 7PM CST; Saturday 8AM - 6PM)
Chamberlain and Lift-Master are Trademarks of Chamberlain Group. Genie is a
Trademark of Overhead Door Corporation. Linear/Moore-O-Matic is a Trademark of
Linear Corporation. Master Mechanic is a Trademark of TruServe. Multi-Code is a
Trademark of Whistler Corporation. Sears is a Trademark of Sears & Roebuck. Stanley
is a Trademark of Stanley Corporation. Wayne Dalton is a Trademark of Wayne Dalton.
©2000, The Chamberlain Group, Inc.
114A2355B All Rights Reserved Printed in Mexico
1
2
3
9
9
1
"Smart" (learn)
Button
7
5
KG
Indicator Light
1
7
3
3
5
KG
 Loading...