

Page 1
PLEASE FOLLOW ALL INSTRUCTIONS IN THE ORDER THEY ARE PRESENTED
STARTING WITH THE "INTRODUCTION".
Congratulations! The Clicker Model K1 you have purchased is one of the most unique
keypad transmitters available. The K1 works in conjunction with most Stanley, Linear,
Multi-Code and Moore-O-Matic garage door operator systems. In order to identify your
brand look for the company name on your existing transmitter or garage door operator.
The KI transmitter can be programmed to operate one or two garage doors. It is possible to program the system to replace the 8 position Linear and 10 position Stanley
Multi-Code type transmitters through the use of separate PIN numbers.
All the information that the keypad system needs for proper operation is programmed
through the keyboard. The K1 system will not operate until it is properly programmed. It
is therefore important that each instruction be followed in the order presented.
NOTE: During the programming it is necessary to wait 30 seconds between each step.
This is a normal part of the setup of the K1 keypad transmitter.
Press any number on the keyboard. The keyboard should light up and remain illumi-
nated for approximately 6 seconds. If it does not light up refer to the BATTERY REPLACEMENT section and check to make sure that the battery is properly connected.
Wait 30 seconds before proceeding to the next step.
A. Pick any 3 numbers you can remember. (Use any combination or any order of
three numbers you desire.)
B. Follow each step carefully:
(1) Press the numbers 1, 2 & 3
(2) Press the "*" key
(3) Press the three numbers you want as your PIN number
(4) Press the "*" key again
(5) Wait 30 seconds before proceeding to the next step
EXAMPLE: Press 1,2,3, press *, press XXX (your PIN number) press *.
STEP 1:
STEP 2: PROGRAMMING YOUR PIN NUMBER FOR DOOR ONE
Page 2
A. Open your present remote transmitter or receiver so that you can see the number of code
switches (dip switches).
B. From the list below, determine which transmitter type your present system uses. (The name
of your present system can be found on the operator, the remote transmitter or receiver).
1. Linear (Ultra-Lift, Electronic Command or other)
2. Stanley or Multi-Code (But not Multi-Emac)
C. If you have a Linear proceed straight to the Linear Data Entry Table below. If you have the
Stanley or Multi-Code proceed straight to the Stanley / Multi-Code Data Entry Table below.
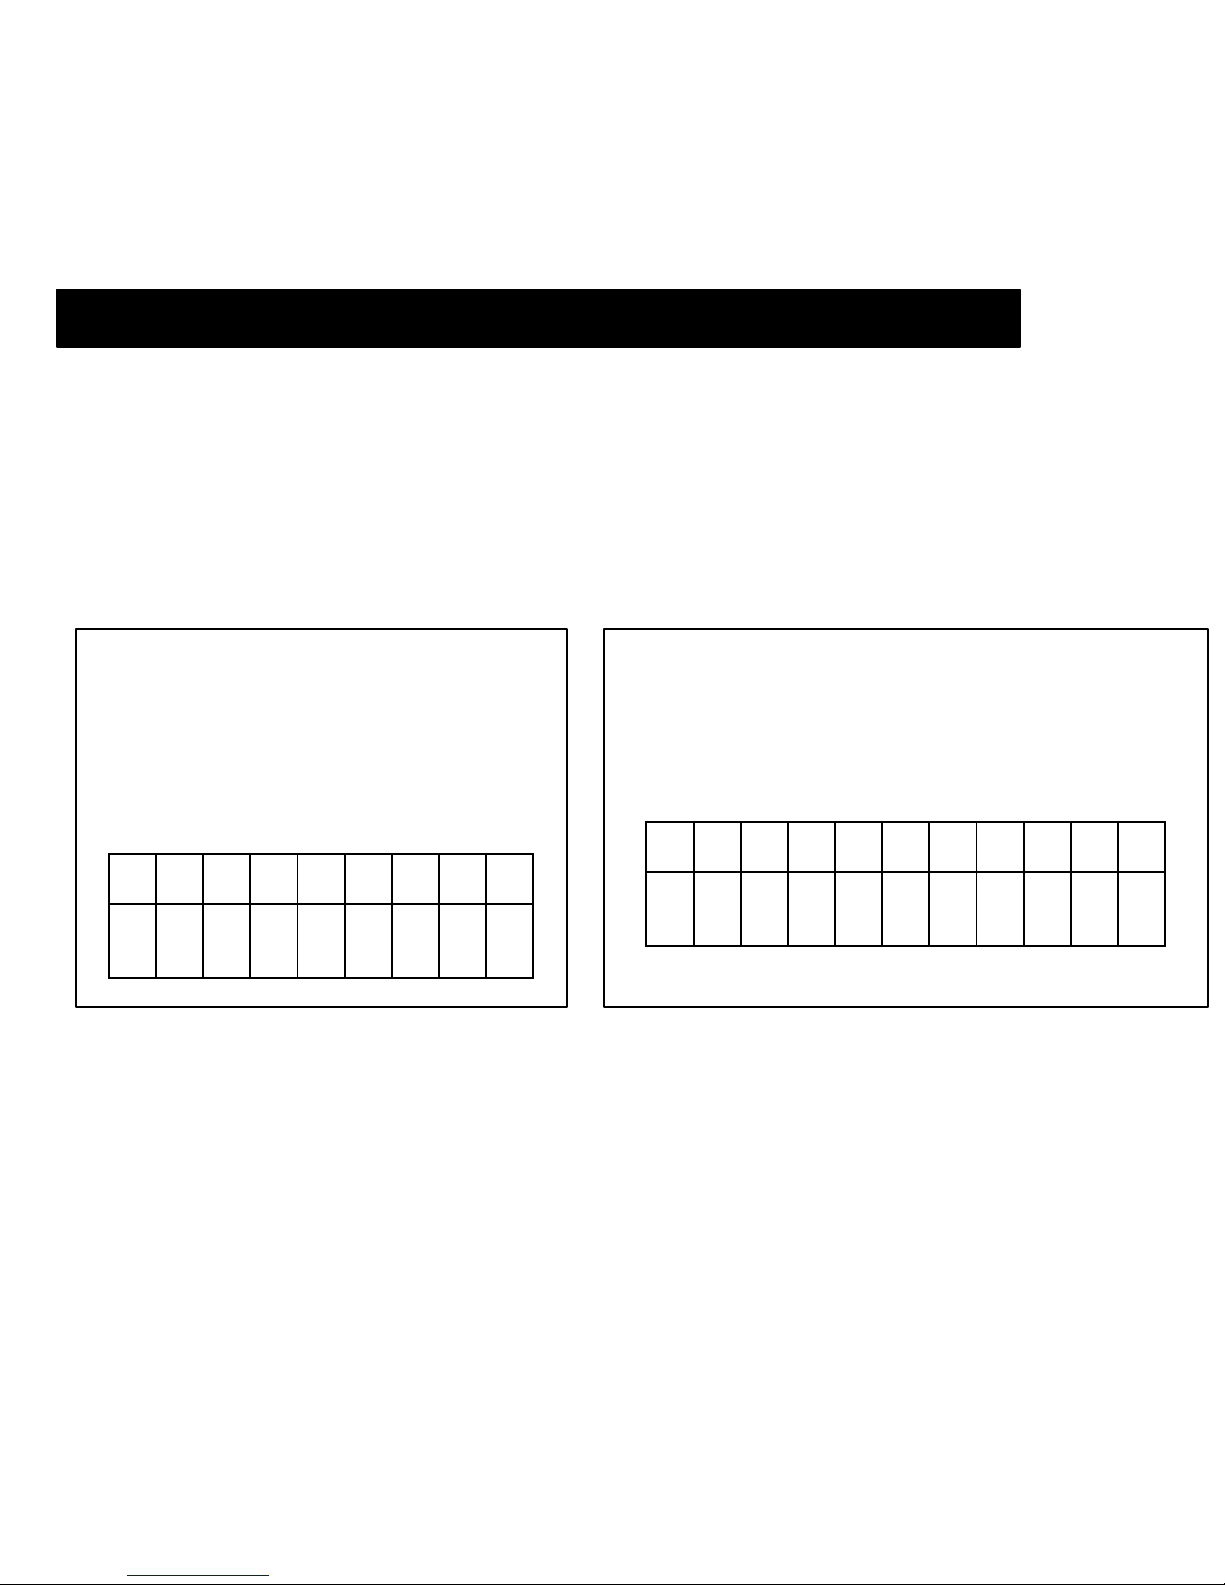
STEP 3: PROGRAMMING TRANSMITTER TYPE & DIP SWITCH SETTINGS
LINEAR DATA ENTRY
Look at your system transmitter or receiver,
and making sure that you place a number in
each of the eight boxes:
Place a 1 " in each box where the code switch
is set into the "ON" position.
Place a T" in each box where the code switch
is set into the "OFF" position.
U
P
D
W
N
STANLEY or MULTI-CODE DATA ENTRY
Look at your system transmitter or receiver, and making
sure that you place a number in each of the ten boxes:
Place a 1 in each box where the code switch is set into the
"UP" position.
Place a "2" in each box where the code switch is set into the
"DOWN" position.
U
P
D
W
N
D. Recheck to make sure that each number in the box corresponds to the setting of
your receiver or remote transmitter making sure there is a number in each box.
E. You are now ready to enter your security code (above) into the K1 memory. It is
important you follow each sequence as presented and that you push each button
carefully.
Page 3

(1) Your PIN number
(2) Press the “#” key
(3) Press one of the following:
The “1" key if you have a Linear transmitter
The "2" key if you have a Stanley transmitter
The "3” key if you have a Multi-Code transmitter
(4) Press the “#” key
(5) Enter the eight or ten numbers from your Data Entry Table in sequence
order, checking off each number as it is entered.
(6) Press the “#" key
NOTE: If the data is not entered properly the K1 system will automatically reset. When this
happens the keyboard light will extinguish. Wait 30 seconds and repeat STEP E. Your System
has now been programmed.
NOTE: The KI keypad remains active for approximately 30 seconds after the last keyboard button
is pushed. This feature is included so that it is possible to activate the keypad to stop and or
reverse a moving door without having to reenter your PIN number. Press any key EXCEPT the "*"
or "#" to use this feature.
Take the unit to the approximate location that it will be mounted. STAND CLEAR OF THE
GARAGE DOOR, and:
A. Enter your PIN number.
B. Enter one additional number (it can be any number). If the system has
been programmed correctly the door should open, if not see "Troubleshooting"
NOTE:
When using your keypad always enter one additional number after your PIN number, to
open the door.
If you have the same brand of garage door opener on your second door and want to use the K1
Keypad to open the door follow each of the previous steps EXCEPT STEP TWO. To program the
second
PIN number into the K1 system use the numbers 4, 5, and 6 instead of 1, 2, 3 and then
enter a new PIN (Different from door one) into the unit. All other instructions are the same.
A. Locate the mounting screws supplied.
B. Remove the Battery Cover and the slide up
cover. Carefully remove the battery from its
compartment. (it is not necessary to
disconnect the battery)
C. Mount the K1 Keypad (using the screws
supplied) to a flat vertical surface near your
garage door.
CAUTION. Make sure there is enough room
above the keypad to slide the cover up. Check to
make sure that you mount the unit out of the
path of a moving door.
A. Slide up the K1 Keypad cover into the stop position.
B. Unscrew the battery cover.
C. Remove the old battery and replace with new one.
D. Replace the battery cover.
1. Replace the battery when the keypad lamps become dim.
2. Memory is NOT lost when the battery is removed.
3. You may change PIN numbers as often as you like.
4. Any incorrect PIN number entry will lockout the unit for 30 seconds.
Step 4: TESTING YOUR SYSTEM
BATTERY REPLACEMENT
GENERAL INFORMATION
Page 4

TROUBLESHOOTING
Keypad does not light up - Replace battery
Door does not open Wrong PIN number Check battery
Door code does not match operator
CAUTION
Use of this wireless keypad should be limited to responsible adults. Automatic Gate
and Garage Door systems are dangerous. They can cause great bodily harm and
injury and can result in death. Always exercise caution when using wireless
keypads. Do not operate keypad to activate a gate or door unless you can clearly
see that the area is clear. Always keep children away from automatic doors and
gates.
WARRANTY
This Clicker Corporation product is warranted to the end user to be free of defects
in material or workmanship for a period of 12 months from date of purchase. Proof
of this purchase date, such as a dated sales receipt must accompany any and all
warranty claims. Defective product should be returned to the address specified
below. Return product will be replaced or repaired free of charge and returned to
you transportation prepaid. This warranty is valid only in the United States, District
of Columbia and the Commonwealth of Puerto Rico.
There are no obligation or liabilities on the part of The Clicker Corporation for
consequential damages arising out or in connection wit the use of performance of
this product or other indirect damages with respect to loss of property, revenue,
profit, cost of removal, installation or reinstallations. Implied warranties, including
those of merchantability and fitness for a particular purpose are limited to one year
from the date of purchase. The Limited warranty give you specific right. You have
others, which vary from State to State.
For Warranty Service return to: The Clicker Corp. 540 S. Andreasen Dr. Suite C Escondido,
CA 92029
 Loading...