

ClickAlarm PS1201CA User guide
to see if the surrounding conditions have activated it – such as
cooking fumes from the kitchen. It may be necessary to
relocate the detector to prevent a repetition.
Do not disconnect the battery to silence nuisance alarms –
open a window or fan the air around the detector to disperse
the smoke. The detector will switch o as soon as the smoke
has gone.
7 Battery replacement
The battery should be replaced every 5 years or if a low
battery signal occurs. If the battery is running low, a warning
signal will be given – the unit will “beep” once ever y 45
seconds, and continue to do so for up to 30 days. The battery
should be replaced immediately this warning signal starts.
To replace the battery, simply open the detector and release
it from the cord, rod or chain of the ceiling light , remove the
old battery and replace it with a fresh one (see label inside
the battery compartment for a list of the correct batteries to
install).
Place the detector back onto the cord, rod or chain of
the ceiling light. Always test the detector after battery
replacement to ensure it has been connected correctly.
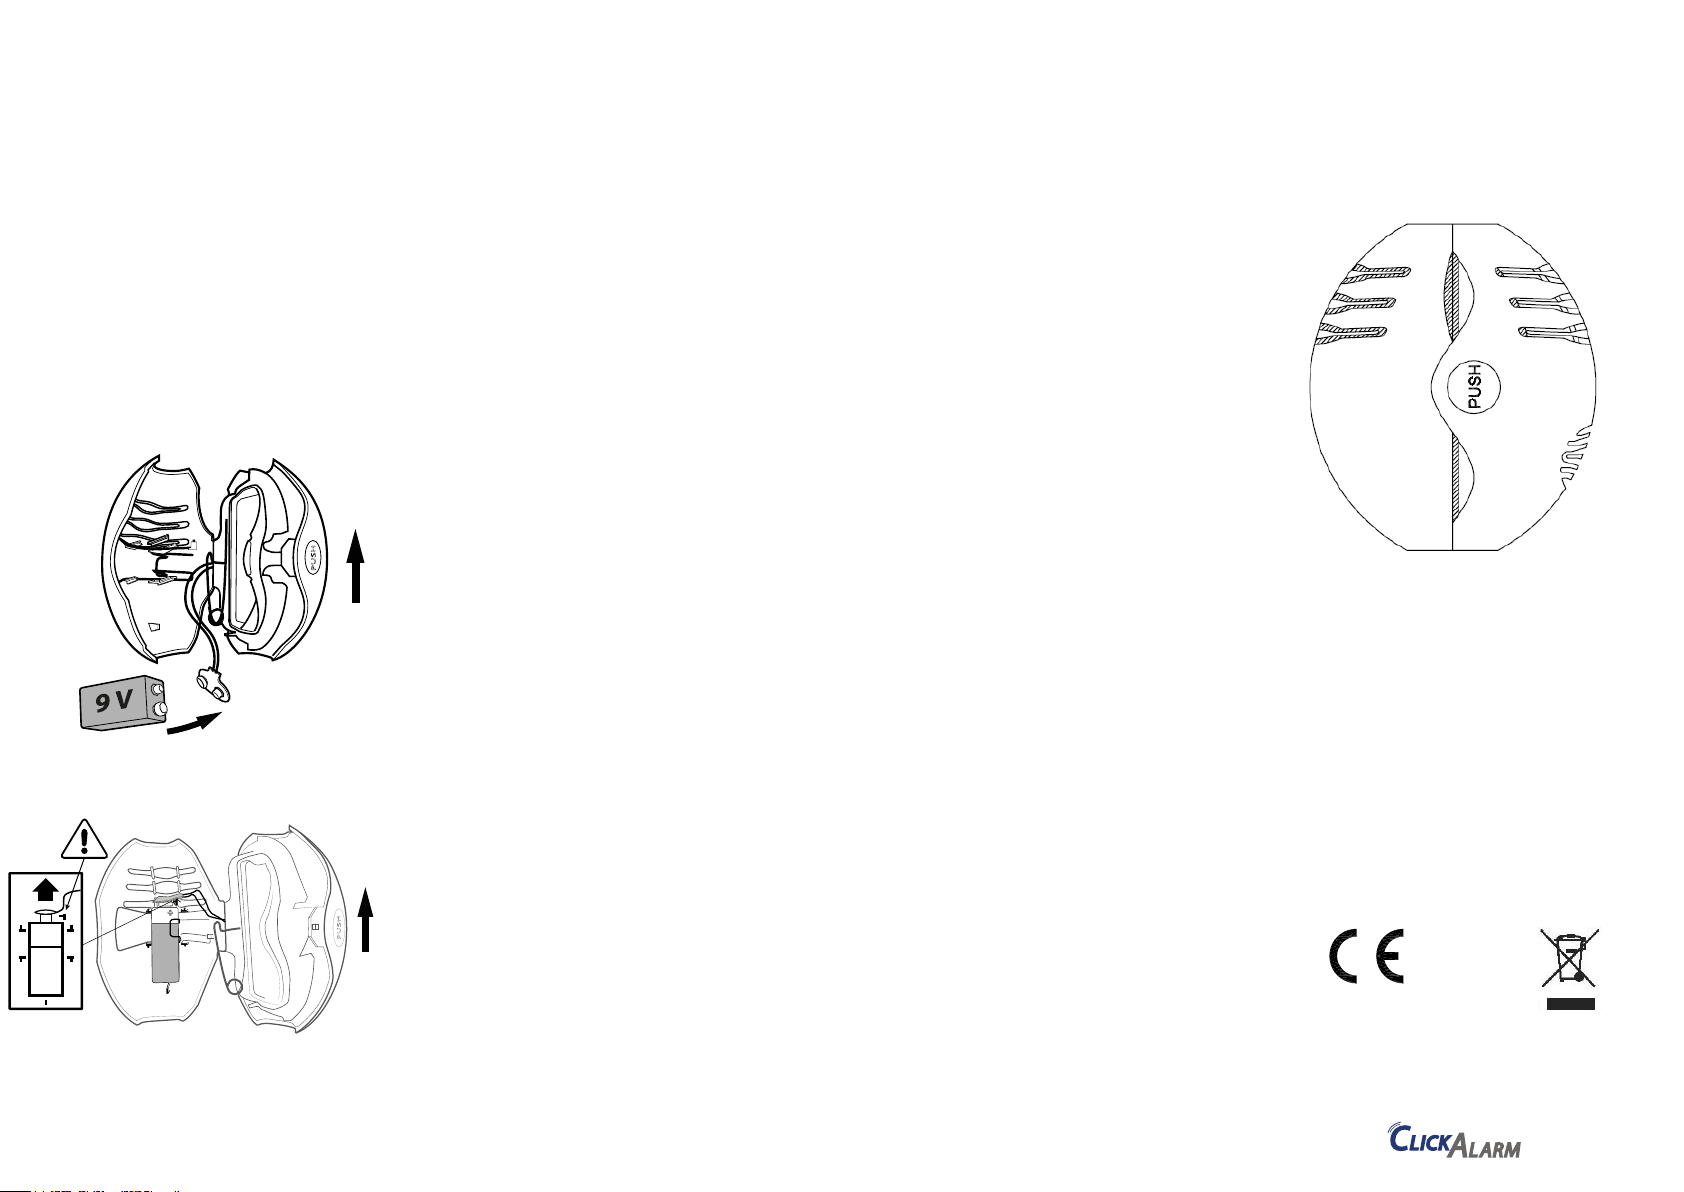
Figure 7
UP
Connect the battery to the battery lead
Figure 8
UP
Fit battery under the wire. Place the battery as shown in the
diagram with the connector facing up and the top guide
pin located between the battery and connector.
8 Maintenance
Apart from battery replacement, the only other maintenance
required is cleaning. Every six months gently clean the unit
with a soft brush or the brush attachment on a vacuum
cleaner to remove the dust.
Always test the smoke detector after cleaning or replacing the
battery.
Warning: Do not paint the smoke detector.
9 Protecting your family from re
Smoke detectors are a vital form of protection from re in the
home, but there are a number of other ways you can reduce
the risk of re.
In addition, to installing smoke detectors in all the relevant
locations following all the instructions, cleaning the detectors,
testing them once a week and replacing the units immediately
if they are not working properly, the following re safety rules
should be followed:
1. Never smoke in bed.
2. Keep matches and lighters away from children.
3. Always store ammable materials, such as petrol,
in proper containers, and never use them near sparks or
ames.
4. Do not overload electrical circuits.
5. Ensure that electrical appliances are in good
condition and that they carry the recognized approval.
6. Do not allow rubbish to accumulate.
7. Make sure that heating system are serviced and
that chimneys are cleaned regularly.
8. Keep portable heaters and other open ames, such
as candles, away from combustible materials.
9. Provide additional re safety equipment, such as re
extinguishers and re blankets, and ensure that all
members of the household know how to use them.
Draw up an escape plan from your home and practice it with
your family. Draw up a oor plan that shows at least two
escape routes from each room in the house. Familiarise your
family with the sound of the smoke detector and make sure
children are aware of what the signal means. Brief everyone on
how to leave the building in case of re (see section 11).
Identify both a meeting place, a safe distance from the house
and the nearest place to call the re brigade. Fire drills should
be held at least once every six months to make sure everyone
is familiar with the procedure.
10 What to do when there is a re
If there is a re in your home, the precautions described will
increase your chance of escaping safety. The following
rules should always be highlighted during re drills so that
they are remembered in the case of real emergency:
1. Stay calm and think clearly about the pre-arranged escape
plan.
2. Leave the house as soon as possible following the planned
escape route. Do not stop to collect personal belongings.
3. Check doors to see if they are hot. If a door is hot, do not
open it – use another escape route.
4. Keep all doors and windows shut, opening only as a means
of escaping.
5. Smoke rises, so keep close to the oor – if necessary crawl.
6. Take short breaths and if possible, cover the mouth and
nose with a wet cloth.
7. Make your way to the pre-arranged meeting point and call
the re brigade. Make sure you give your full name and
address.
8. Never re-enter a burning house.
For further information on re safety and prevention,
contact your local re prevention ocer.
11 Limitations of smoke detectors
Smoke detectors are designed to provide the earliest possible
warning of a re, and can provide valuable time to escape.
They do, however, have limitations:
1. They will not work without power, i.e. if the detector does
not contain a battery, the wrong type of battery has been
used, the battery has been installed incorrectly, or the
battery is simply dead, the smoke detector will not
function.
2. The detector will only sound once smoke has entered the
sensing chamber. Anything that prevents smoke reaching
the detector may delay or prevent the detector from
sounding. Smoke from res in chimneys or walls, on roofs
or the other side of closed doors may not be detected
unless a signicant amount of smoke reaches the detector.
Smoke detectors should the therefore be installed in every
room or at least on every oor of your home.
3. Smoke detectors cannot always be heard. Smoke detectors
sounding the other side of a closed door or on another
oor may not wake a sound sleeper, and may not be heard
over other noise, such as trac, the TV or radio. Smoke
detectors may not be heard by persons who are hard of
hearing.
4. Smoke detectors have a limited life. The manufacturer
recommends that the detector should not be used for
more than 10 years.
5. This smoke detector is not a substitute for personal or
property insurance. Appropriate insurance cover is your
responsibility. Please consult with your insurance agent.
12 Five Year Limited Warranty
The manufacturer warranty this product (excluding the
battery) to be free from defects in materials and
workmanship for ve years from the date of purchase.
This only applies if the detector is used in the normal way and
is serviced regularly. The warranty is also conditional on the
smoke detector not having been modied or subject to
attempted repairs. The warranty excludes incidental and
consequential damages.
Your statutory rights as a customer are in no way
compromised by this warranty. If you think your smoke
detector is faulty, do not attempt to repair it, as this will
invalidate the warranty. Return the smoke detector.
Warning! Do not attempt to disassemble detector which
may become damaged or improper in operation.
If found to have been misused or abused,
WARRANTY will be void.
INSTRUCTION LEAFLET
For models:
PS1201CA (CLICKALARM)
- 9V DC Optical Smoke detector
Important:
Please read carefully before installation
and keep for future reference. This leaet
contains important information about the
installation and operation of your smoke
detector. Please ensure that this leaet
remains in the household where the detector
is installed and leave this manual or a
copy for the end user.
EN14604:2005/AC 2008
0086-CPR-664190
DoP: PS1201CA-20122016
O&G Licensing AB
Stora Gråmunkegränd 1
111 27 Stockholm, Sweden
18
1 Basic information about smoke detectors
1. The detector is designed to detect smoke entering the
sensing chamber (not heat or ames). Once smoke has
been detected the 85dB siren will sound as an early
warning signal that could provide precious time for you
and your family to escape.
2. This smoke detector will not prevent a re: it is purely an
alarm signal.
3. Place your smoke detector as close to the centre of the
ceiling as possible.
4. Place a smoke detector on every oor and outside every
sleeping area of your home.
5. The detector may beep when the battery is installed – this
indicates that it has been tted correctly. The red LED will
ash every 45 seconds to indicate that it is receiving power
from the battery.
6. If the detector beeps once every 45 seconds, the battery
needs to be replaced.
7. Test your detector once a week by pushing the test button
for approx. 5 seconds.
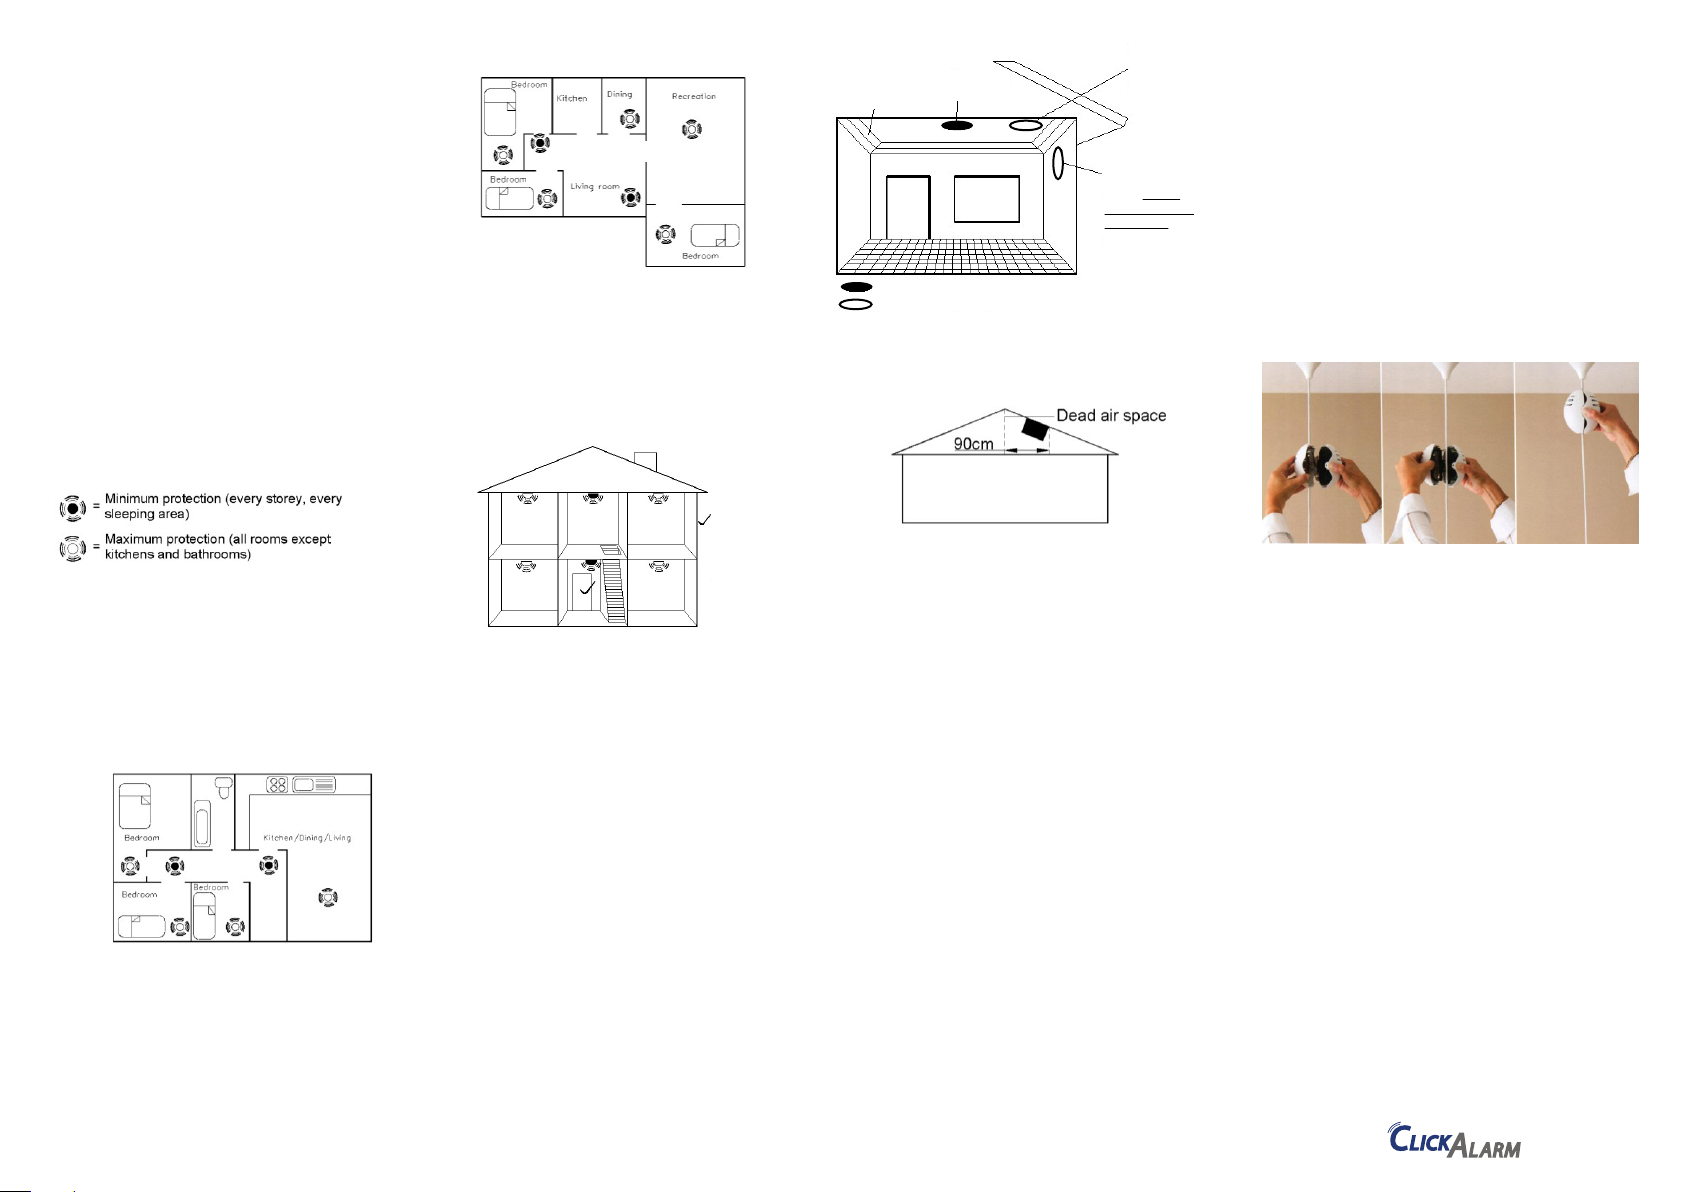
2 Locating your smoke detector
For maximum protection we strongly recommend that you
install a smoke detector in every room (except bathrooms and
kitchens). The minimum level of coverage is one per oor or
one outside each sleeping area, however, we suggest that you
follow the guidelines below.
Single storey dwellings
For the minimum level of protection in a single storey
dwelling, such as at or bungalow, the smoke detector should
be located between the sleeping area and the living area (see
gure 1). This will mean that the detector is near the most
likely source of a re (i.e. living rooms and kitchens).
It is important to ensure that the detector in this location is
loud enough to wake people sleeping in the bedrooms.
Figure 1
Single storey dwellings with more than one sleeping areas
(see gure 2) should have a detector located outside each
area. If a hallway is longer than 12 meters, one detector will
not be sucient. A smoke detector should be located at each
end.
Figure 2
Multi storey dwellings
For the minimum level of protection in a multi storey dwelling,
smoke detectors should be placed on the ground oor near
the stairs (this will detect smoke from a re in the kitchen or
living room before it reaches the upstairs landing and
bedrooms), and on the upstairs landing (to detect smoke from
a re in a bedroom).
Figure 3
= Best location
for a single
smoke
detector
in a two storey
building
For maximum protection, a smoke detector should be placed
in every room (except kitchens and bathrooms), particularly
when:
1. Bedroom doors are kept shut at night (a detector in the
hallway may not wake the occupant through a closed
doors).
2. Rooms contain electrical appliances such as heaters or
electric blankets.
3. Bedrooms are occupied by smokers.
4. Rooms are occupied by persons who may not be able to
respond very quickly, such as the elderly or young children.
Important: This smoke detector is only suitable for individual
household units and not for multi occupancy blocks,
commercial or industrial use.
3 Positioning the smoke detector
Once the most suitable location has been found, the smoke
detector must be positioned where it will be most eective.
A central ceiling position is the most suitable for the detector
as smoke rises and spreads out. If this is not possible, the
detector can be mounted on the wall. The area around the
corner of the ceiling is dead air space where the air does not
move, so do not position the detector on the ceiling closer
than 10 cm from the wall, and on wall. Place the detector
at least 10 cm but no further than 15 cm from the ceiling
(See gure 4).
Figure 4
Dead air
space
When installing the detector in a room with a sloped or
peaked roof, position it 90 cm horizontally from the highest
point as dead air at the apex may prevent smoke from
reaching the unit (see gure 5).
Best in centre
of ceiling
Best Location
Acceptable locations
No closer
than 10cm
from the
side wall
Mount on
wall at least
10cm from
ceiling but no
more than 15cm
from ceiling
Figure 5
4 Where not to put the smoke detector
The smoke detector should NOT be located in the following
areas:
1. Bathrooms, garages and any rooms where the detector
may be triggered by local conditions, i.e. steam or
condensation in a bathroom, smoke from cooking
appliances, and fumes from vehicles.
2. Location where extremes in temperature occur (below
4°C/39°F or above 40°C/104°F, such as attics).
3. Near decorative features/ttings that may prevent smoke
from entering the detector, such as light ttings, door or
window frames.
4. On any surface that is warmer or colder than the rest of the
room. Temperature dierences may prevent smoke from
reaching the detector (such as loft hatches or uninsulated
exterior walls).
5. Near air vents, drafty windows or heaters – the direction of
air ow may be changed and smoke driven away from the
detector.
6. In dead air spaces – see gures 4 and 5.
7. In very dusty or dirty areas – dust can build up in the
sensing chamber and make the detector overly sensitive,
or it can block the vents into the sensing chamber
preventing smoke from entering.
8. In infested areas – small insects entering the detector
maycause nuisance alarms.
9. Location where it is awkward to reach the detector for
testing, cleaning, battery changing etc.
5 Smoke Detector Installation
Clickalarm is snapped into place, without tools, on to the cord,
rod or chain of the ceiling light.
1. Hold the Clickalarm with the hinge away from you, and the
test button to the right.
2. Press in the recess (PUSH) with your right thumb and open
the two halves of the shell:
- In the left half is the battery
- In the right half is the clip that you x around the cord,
rod or chain
3. Take out the battery and remove the plastic cover. Attach
the battery to the battery lead, and put back the battery in
the spring, with the terminals pointing downwards. Look in
the left shell of the to check for correct positioning. The
smoke detector is now activated.
4. Press the test button. If the Clickalarm is working correctly,
it will emit a beep.
5. Open the clip with your left thumb at the thumb grip
indicated. Fix the clip around the cord, rob or chain up to
7 mm in diameter.
6. Close the outer halves.
7. Push the Clickalarm up as high as possible on the lamp
cord. Check that it cannot slide down.
Figure 6
6 How to test that the smoke detector is working
The detector has a test button on the front. To test the unit,
press and hold the button until the detector sounds. Note: It
may be necessary to press the test button for up to 10 seconds
before the detector sounds. When the button is released, the
siren will stop. The detector should be tested at least once a
week. Do not test the smoke detector with a ame.
The red LED within the test button will ash approximately
every 45 seconds to indicate that the smoke detector is
functioning correctly.
If the red LED is not ashing, or the unit does not respond
to the test button:
1. Make sure the unit contains the recommended type of
battery (see label inside of the battery compartment).
2. Ensure the battery is installed correctly.
3. Make sure the unit has been cleaned adequately.
4. Check for obvious damage.
If the detector still fails to work, do not attempt to repair it
yourself, as this will invalidate any guarantee (see
“warranty” on back page). Return the unit with proof of
purchase to the distributor indicating the nature of the
problem.
False alarms – If the detector sounds and there is no sign of a
re, rstly ensure that everyone in the house is in a safe
position, and then investigate.
Check the house carefully to make sure that a re is not
smoldering. Check the location of the detector that sounded
 Loading...