

Page 1

User Manual
CLEW Pre Rider Snowboard Binding
11/2019 | Tested according to DIN ISO 14573 | Article number 1000001
Page 2

!
.
Attention
Snowboarding is a hazardous activity. Use of this product may cause serious
bodily injury to any and all parts of the user’s body. The CLEW snowboard binding has a non-release binding system which does not release automatically even
upon impact. This product is used at the rider’s own risk.
Use of this product by minors should be supervised by an adult. It is recommended that the user receives instructions from a snowboard instructor before
using this equipment.
This snowboard binding is only suitable for users with a minimum of 45kg and a
maximum of 110kg body weight.
2 / 19User Manual
Page 3

Content
4
5
6
7
9
11
16
17
19
Package contents
Overview
Positioning
Mounting
Setting options
Use
Replacements
Warnings
Contact
3 / 19User Manual
Page 4
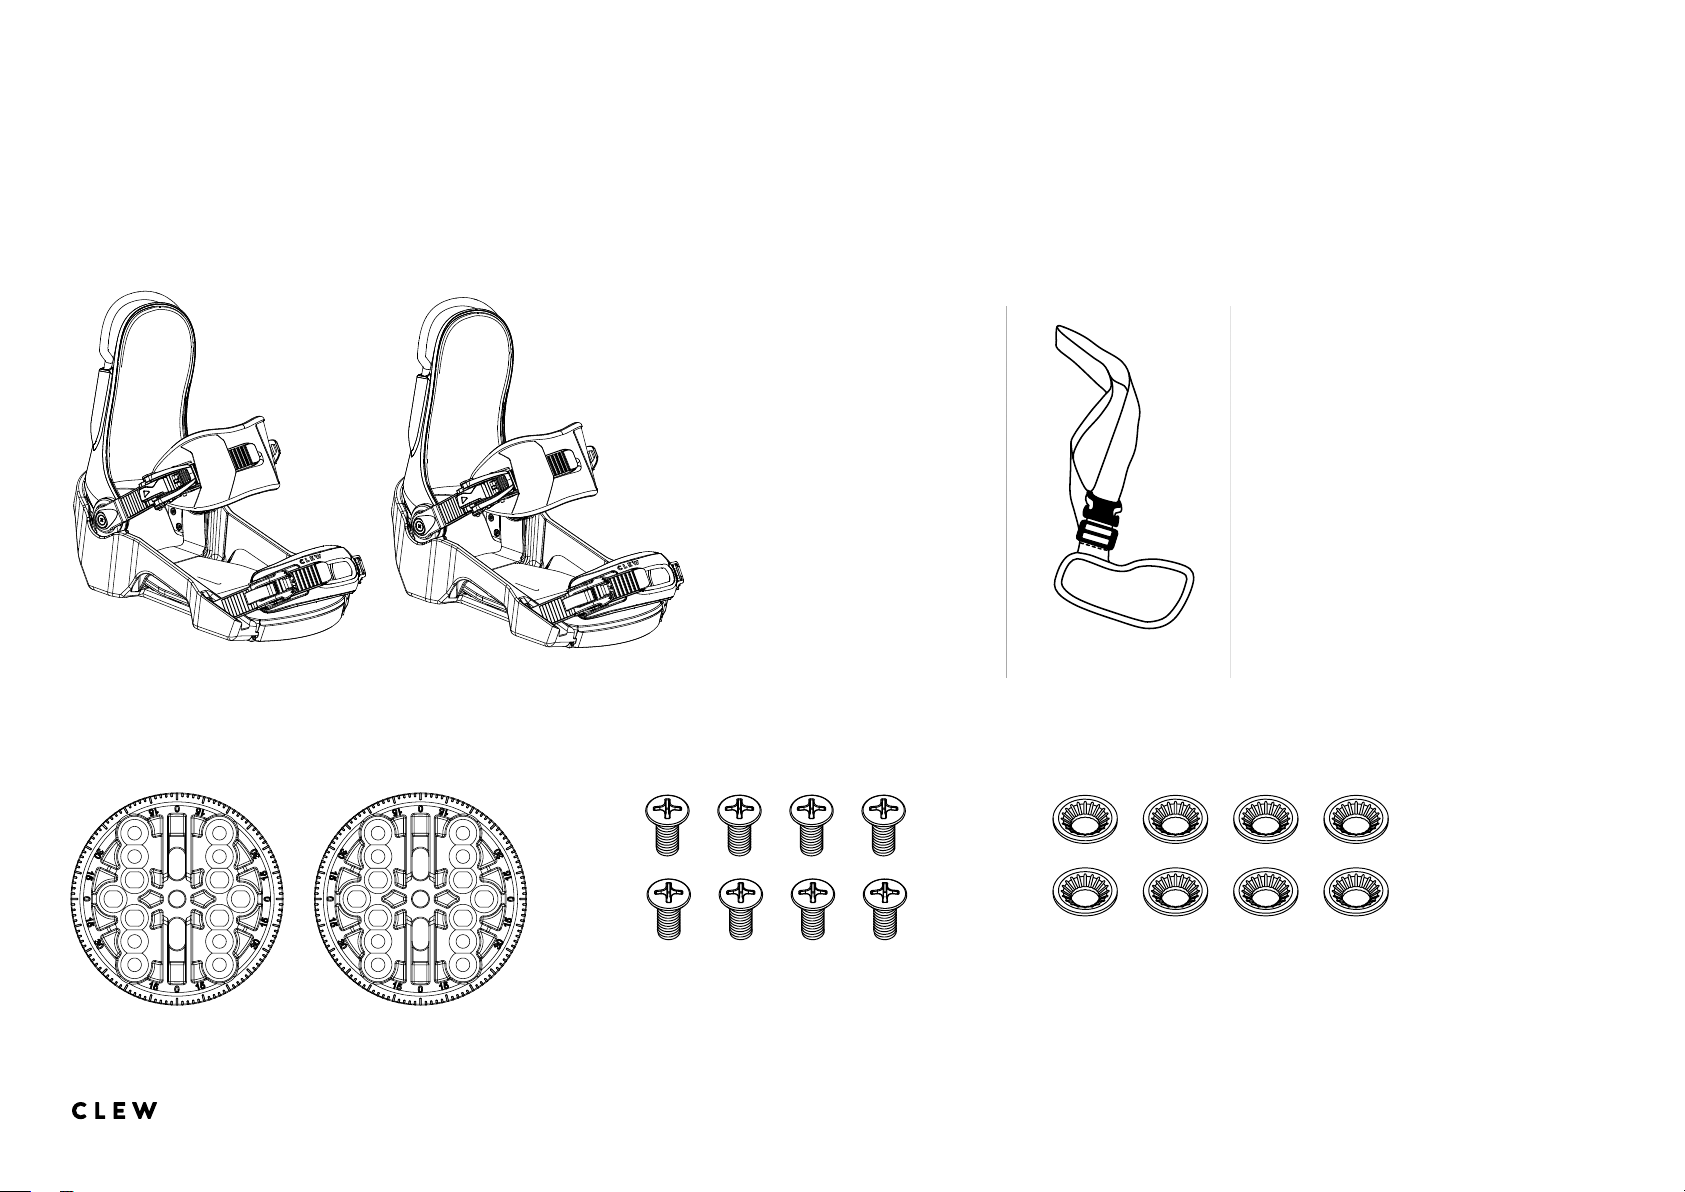
Package contents
Paketinhalt
2 CLEW Snowboardbindungen
2 Pre Rider* Snowboard Bindings
1 leash
2 mounting discs 8 screws (M6) 8 washers
*Model: Pre Rider Type A by CLEW; Size M+
4 / 19User Manual
Page 5
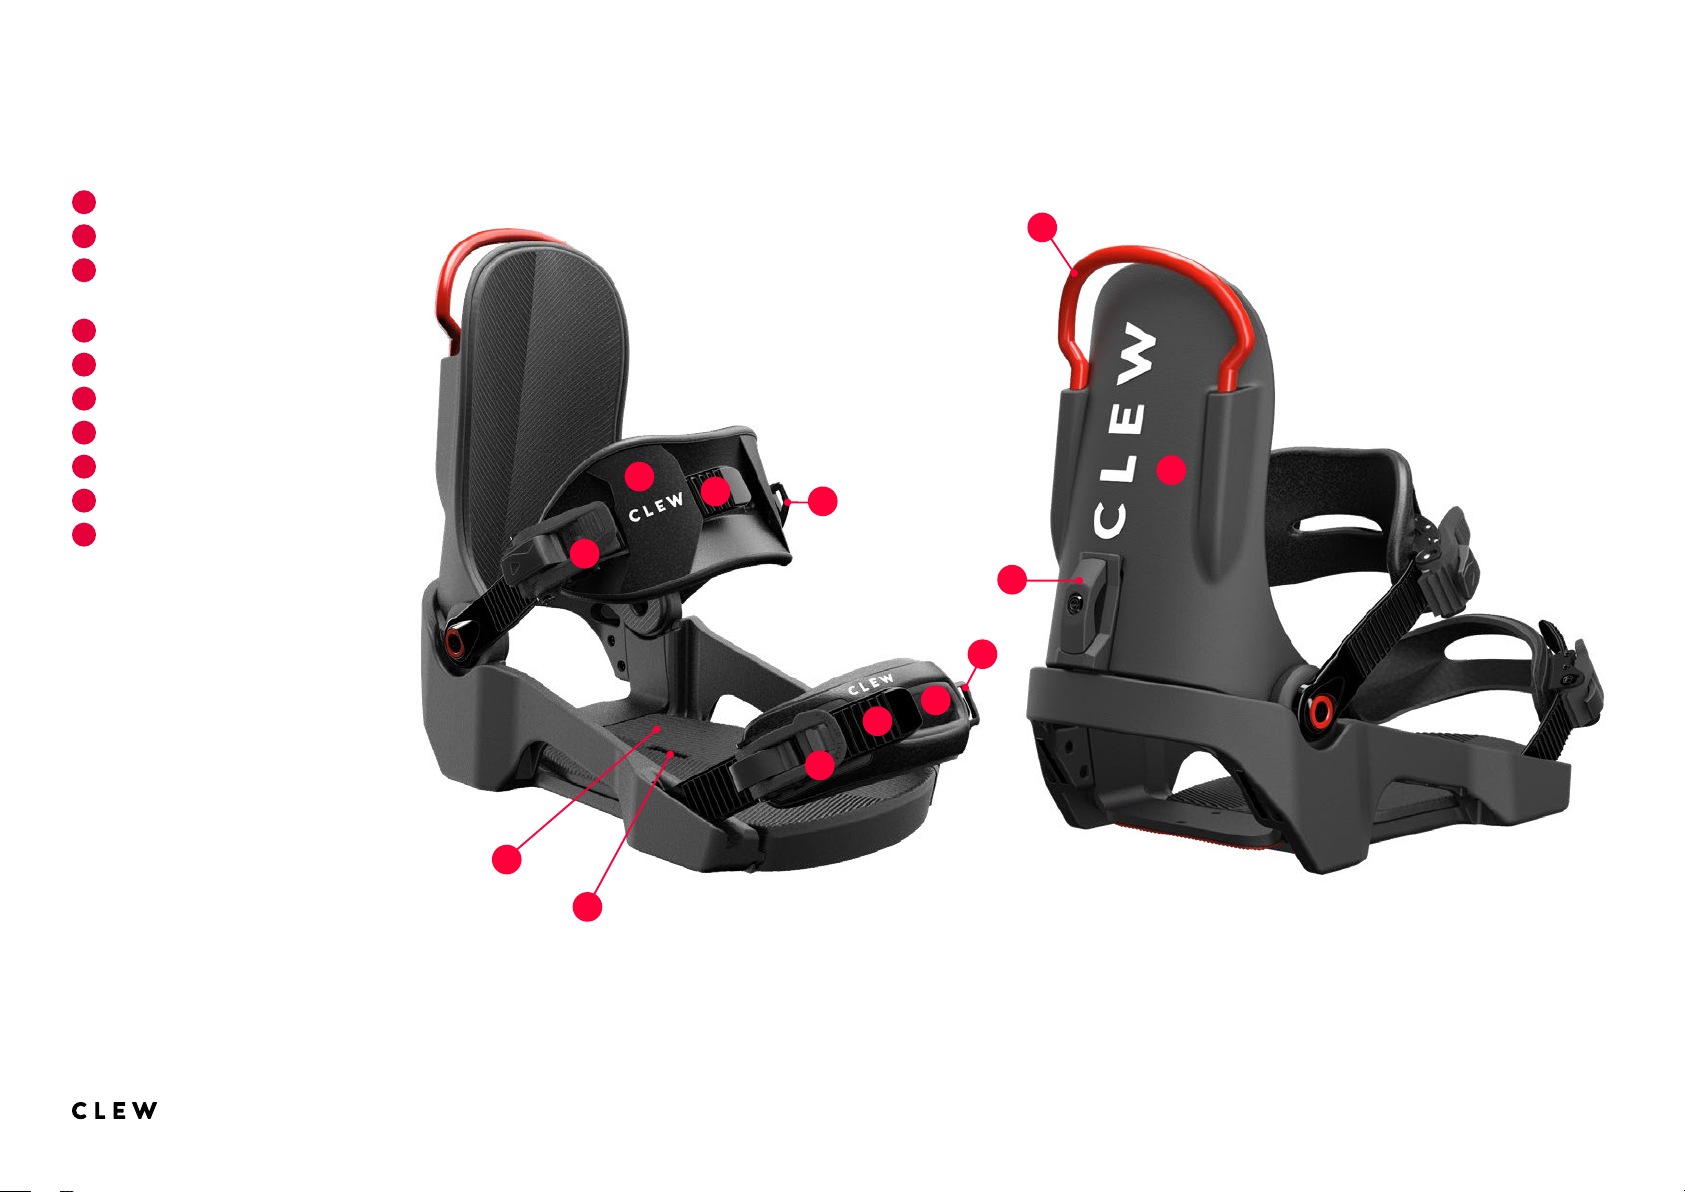
Overview
Handle
2
Highback
3
Lever for adjusting
the highback angle
4
Ankle strap
Toe strap
6
Ankle/toe tongue
Ankle buckle
Locking lever
9
Footbed
10
Fixing screw (disc)
1
4
6
2
3
5
6
9
10
5 / 19User Manual
Page 6

Positioning
The CLEW mounting system oers many possible angles and positions. A good starting point is the reference position given on
most boards.
Snowboard bindings can be mounted „goofy“ (right foot forward)
or „regular“ (left foot forward). Choose the position that feels most
natural to you and mount the bindings accordingly.
We also recommend to use an anti-slip pad. See page 16 for more
information.
?
Which position suits you best?
Tip 1 To find out whether you are riding regular or goofy, previous experience
in related sports (such as skateboarding, wakeboarding, surfing, or mono water
skiing) can be helpful.
GoofyRegular
Tip 2 Another way to find out whether you are a regular or goofy rider is to let
a friend push you from behind. The foot that steps forward first should be the
leading foot on the board.
Tip 3 In powder and deep snow many snowboarders recommend attaching the
bindings a bit further back. So that the weight is more on the rear end (tail) of
the snowboard.
6 / 19User Manual
Page 7
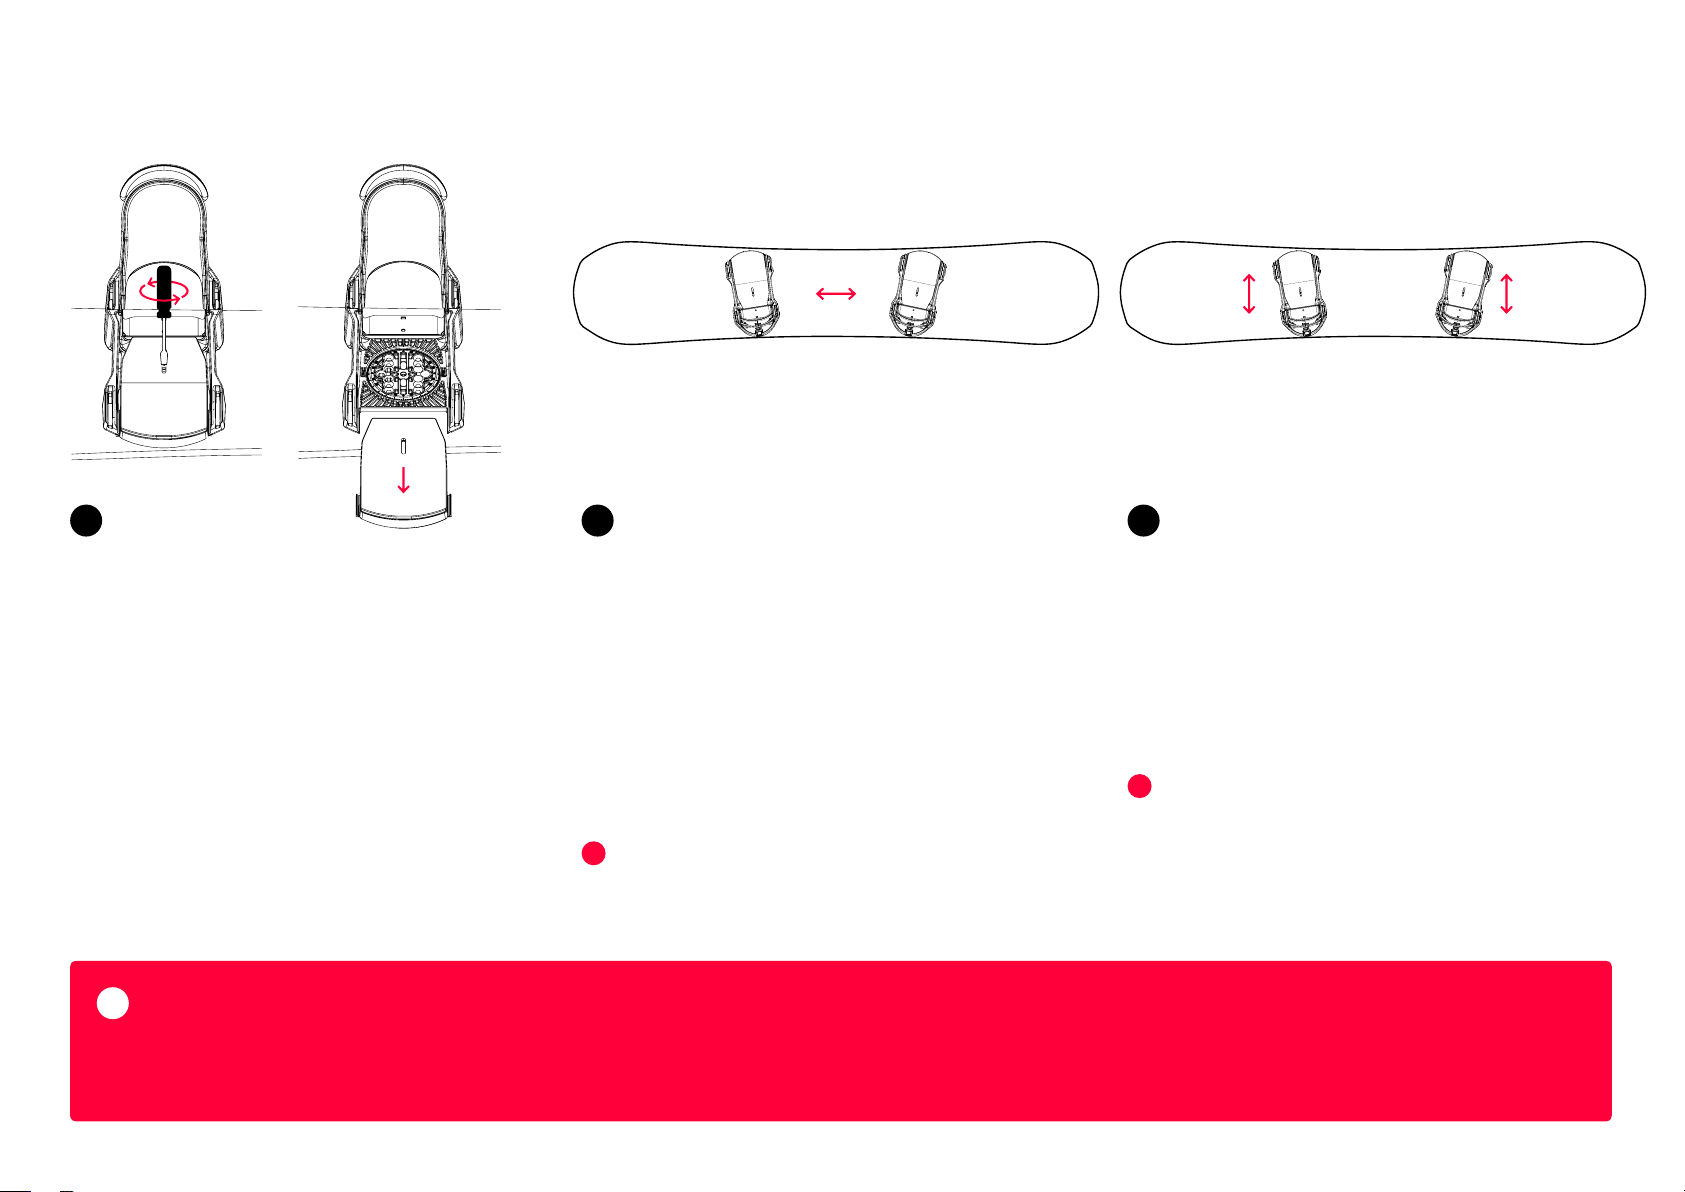
Mounting
1 2
Unscrew the fixing screw and push
the footbed forward to remove it.
CLEW bindings are supplied with all the necessary hardware for mounting. Use only the hardware provided with the binding, since it has been chosen to
!
.
provide the best board-to-binding connection. Using dierent mounting screws may cause damage to the board, place the user at risk of binding failure
and void the binding warranty.
If you are not confident about mounting the binding yourself, there are many well qualified snowboard shops which will gladly provide this service.
Arrange the binding in the proper
angle and distance on the snowboard.
The binding pair should always be
placed in the middle of the snowboard. With one exception: in deep
snow, it is also good to ride with
the binding slightly shifted back.
?
Not sure which position is best for you?
On page 6 we have some tips for you!
4
Define the horizontal location of the
binidng.
For ideal force transmission, the
binding with soft boot should be
centered on the snowboard.
!
You can adjust the footbed individually.
That is especially useful for big feet.
We explain how it works on page 8.
Page 8
!
4
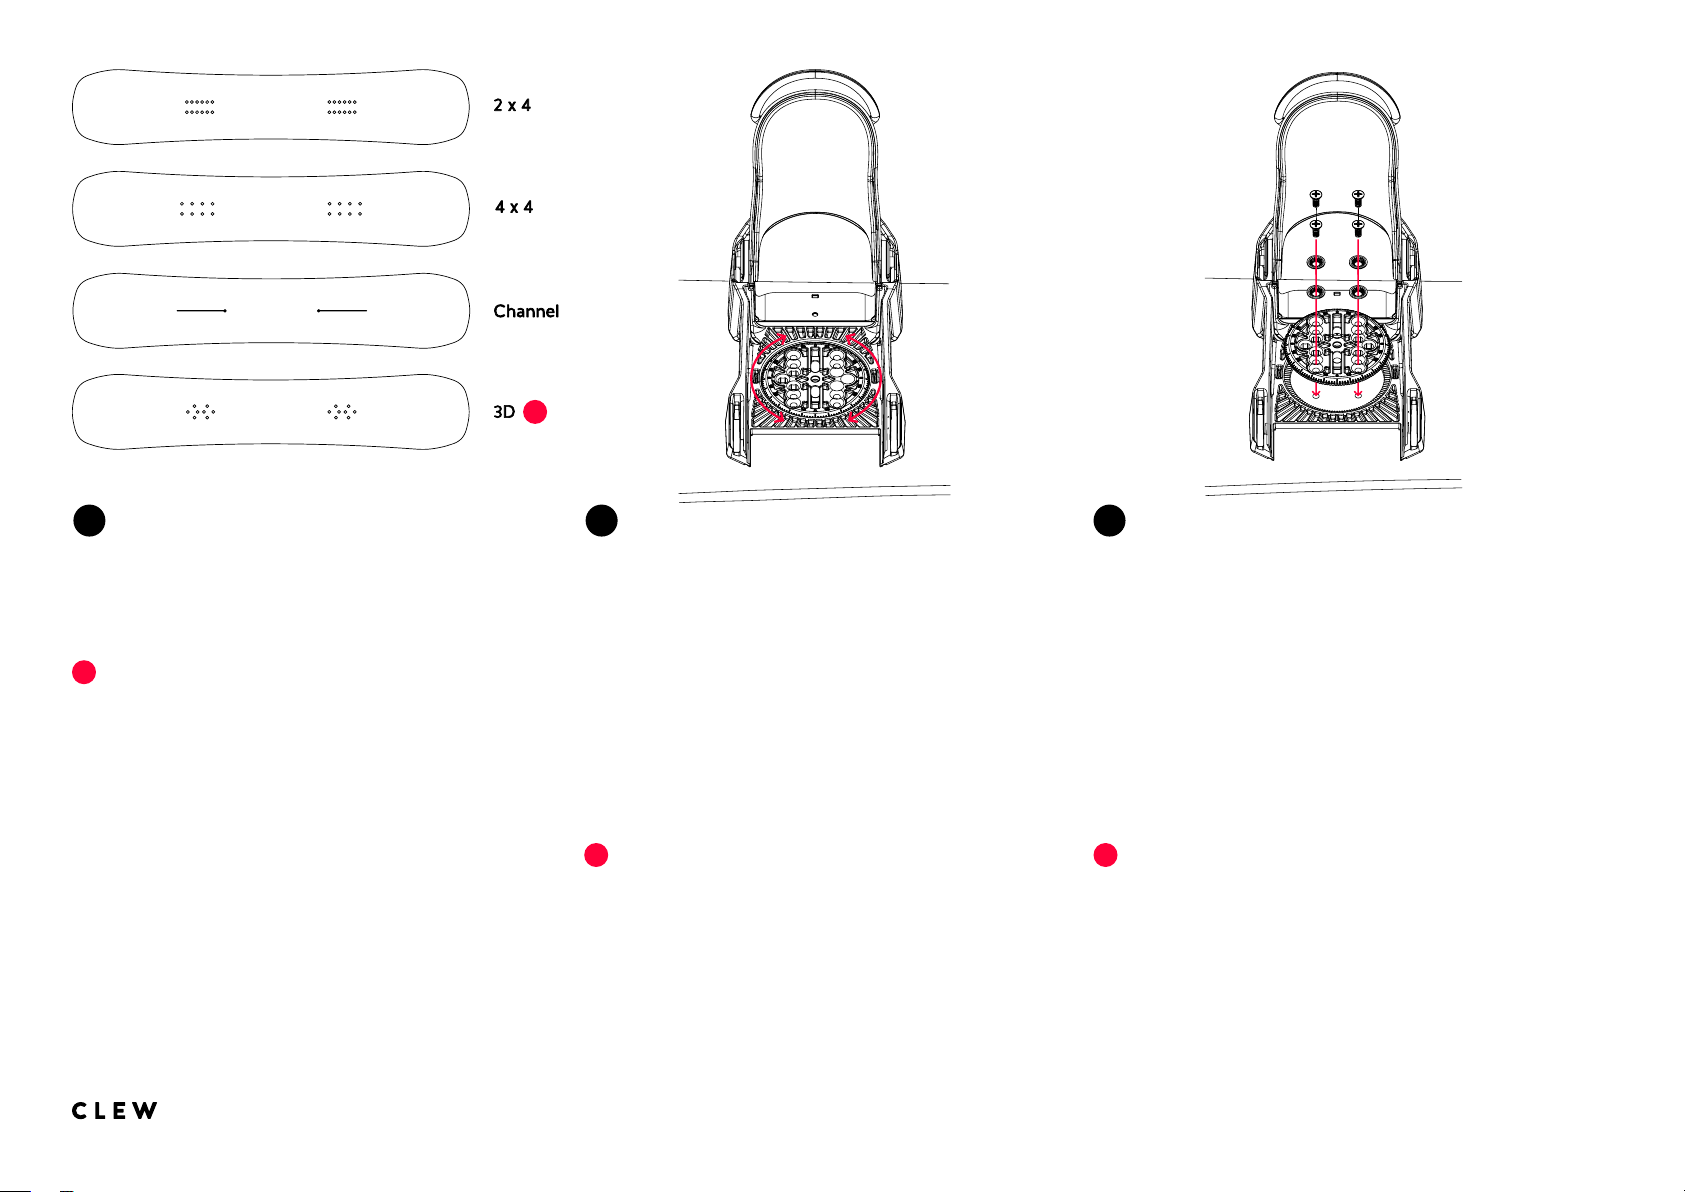
The CLEW binding can be used with
the hole patterns shown above.
!
If your board has a 3D hole pattern,
you will need a special mounting disc,
which we provide free of charge.
In this case, contact CLEW Support
([email protected]).
3
Line up the holes with the inserts in
your board and then find your preferred angle by rotating the binding
under the disc.
To read the angle, see where the
marks on the binding line up with
the angle marks on the disc.
!
Most riders in our team set their binding
angles to around 15° on their front foot
and -9° on their back foot.
5
Put a washer under each screw and
loosely screw in all four screws. When
all four screws are loosely screwed in,
tighten all screws one by one.
Check the screws each time before
snowboarding to ensure that they are
tightened and undamaged.
!
Do not use any type of Loctite or similar
products which can critically reduce the
strength of plastic parts.
8 / 19User Manual
Page 9
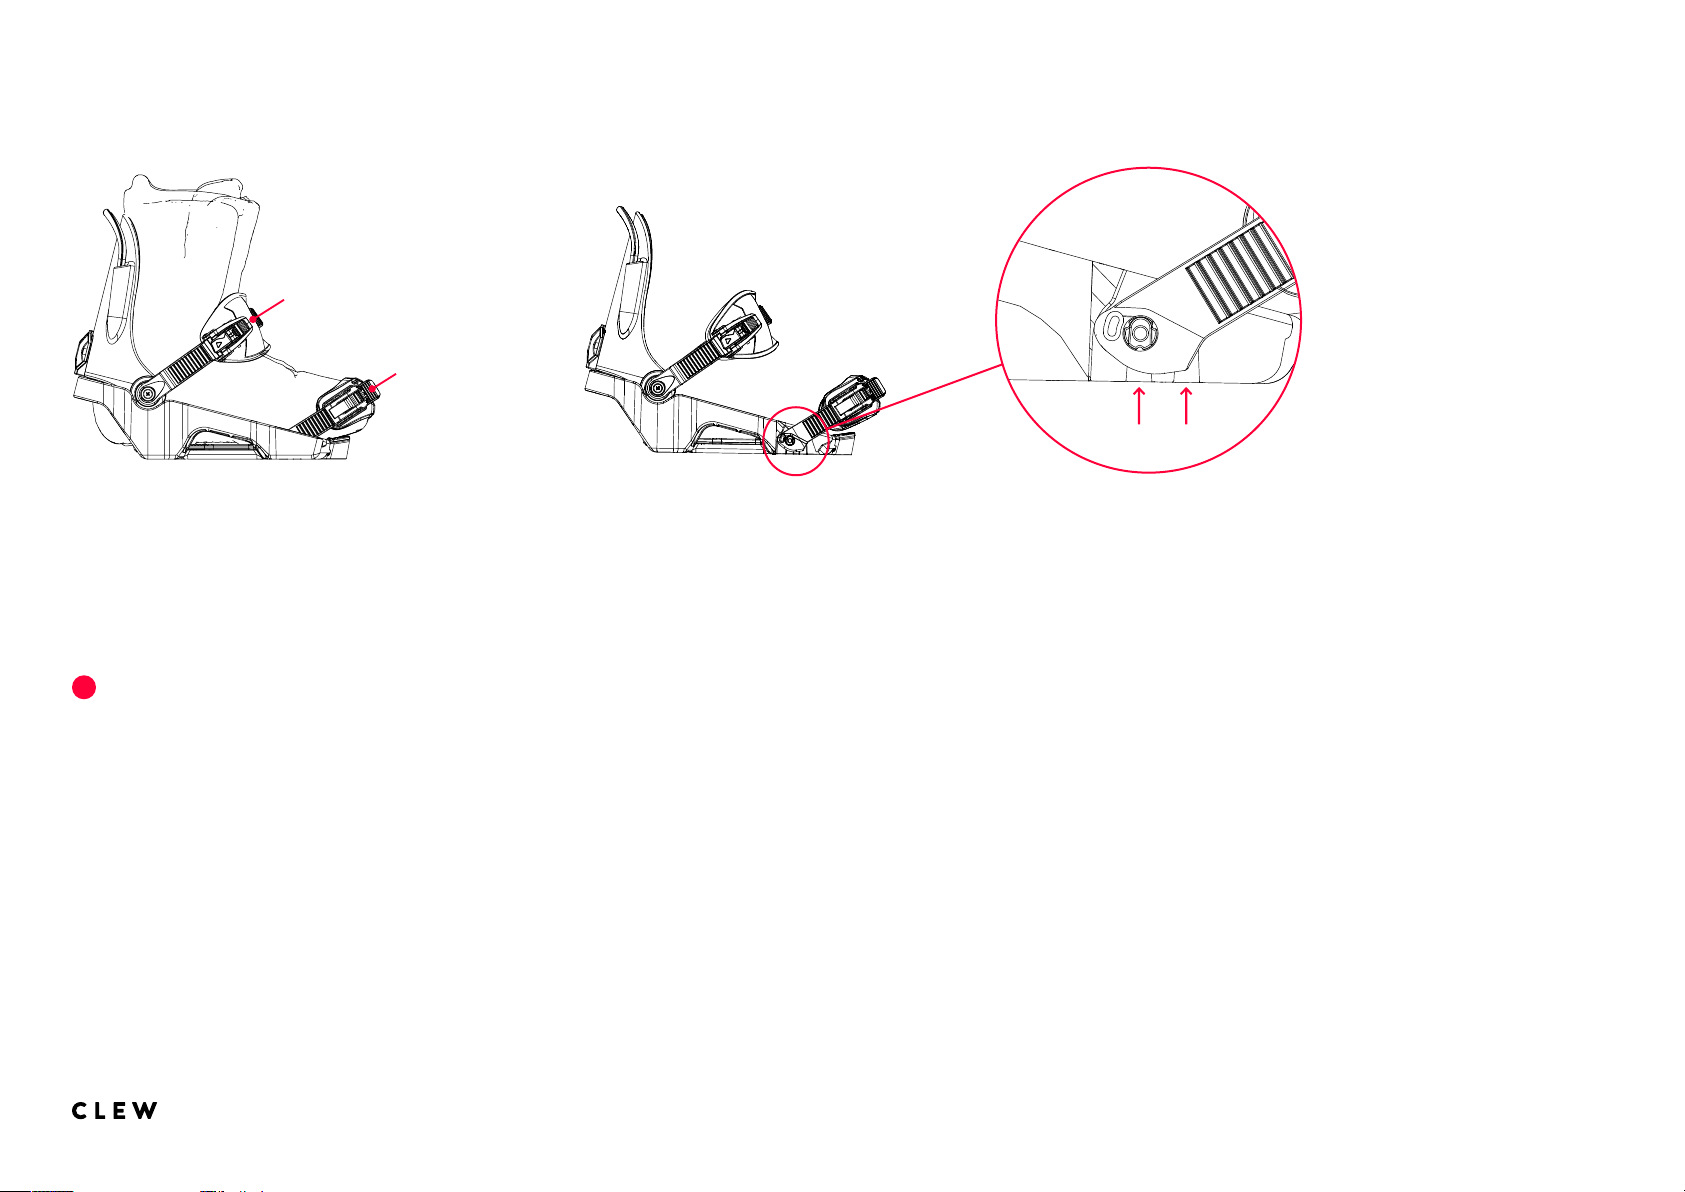
Setting options
Ankle strap
Toe strap
Ankle strap
Open the safety lever, adjust the
length and close it again.
!
Adjust all straps so that at least 2.5 cm of
ratchet band remains behind the ratchet.
Toe strap
For the step-in function to work best,
the CLEW toe strap should be worn
over the toe.
To find the best position, you need to
adjust the length of the band: open the
safety lever, set the correct length and
close the lever again.
The position of the toe strap can be
changed by pushing the strap down,
out of the base, and sliding it into the
second available slot.
Pos.1
pos.1 pos.2
Pos.2
The toe buckle can be locked by
pressing its ratchet lever down.
To unlock the toe buckle pull its
ratchet lever up.
9 / 19User Manual
Page 10
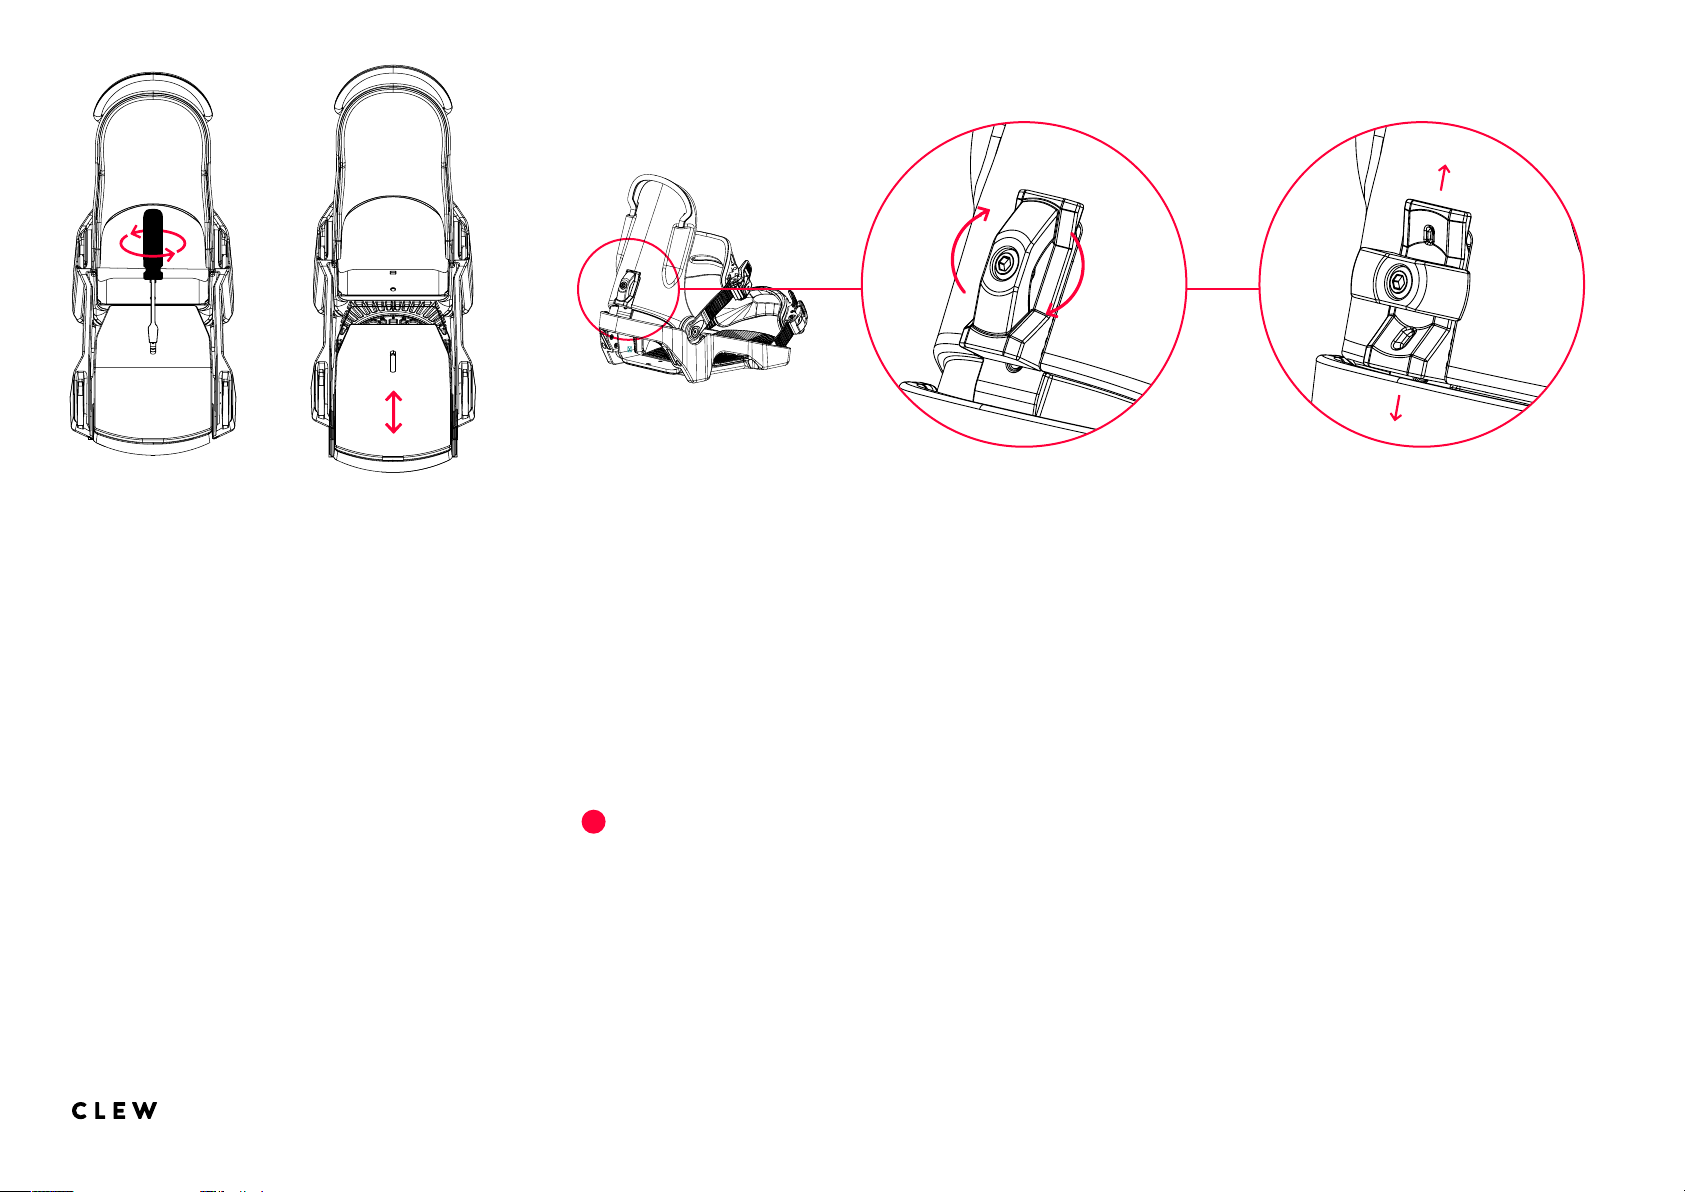
Footbed
Forward Lean
For ideal force transmission, you
can adjust the length of the footbed.
Loosen the fixing screw and slide
the footbed towards the desired position. Make sure that the footbed
does not extend beyond the edge
of the board. Then tighten the fixing
screw again.
Turn the lever to a horizontal position,
then move it to the desired position.
Turn the lever back to the vertical position and make sure it is tight. Check
it each time before snowboarding to
make sure it is tight and undamaged.
!
More forward lean is recommended for
aggressive riding styles and in icy conditions,
less forward lean for a more relaxed standing
position.
10 / 19User Manual
Page 11
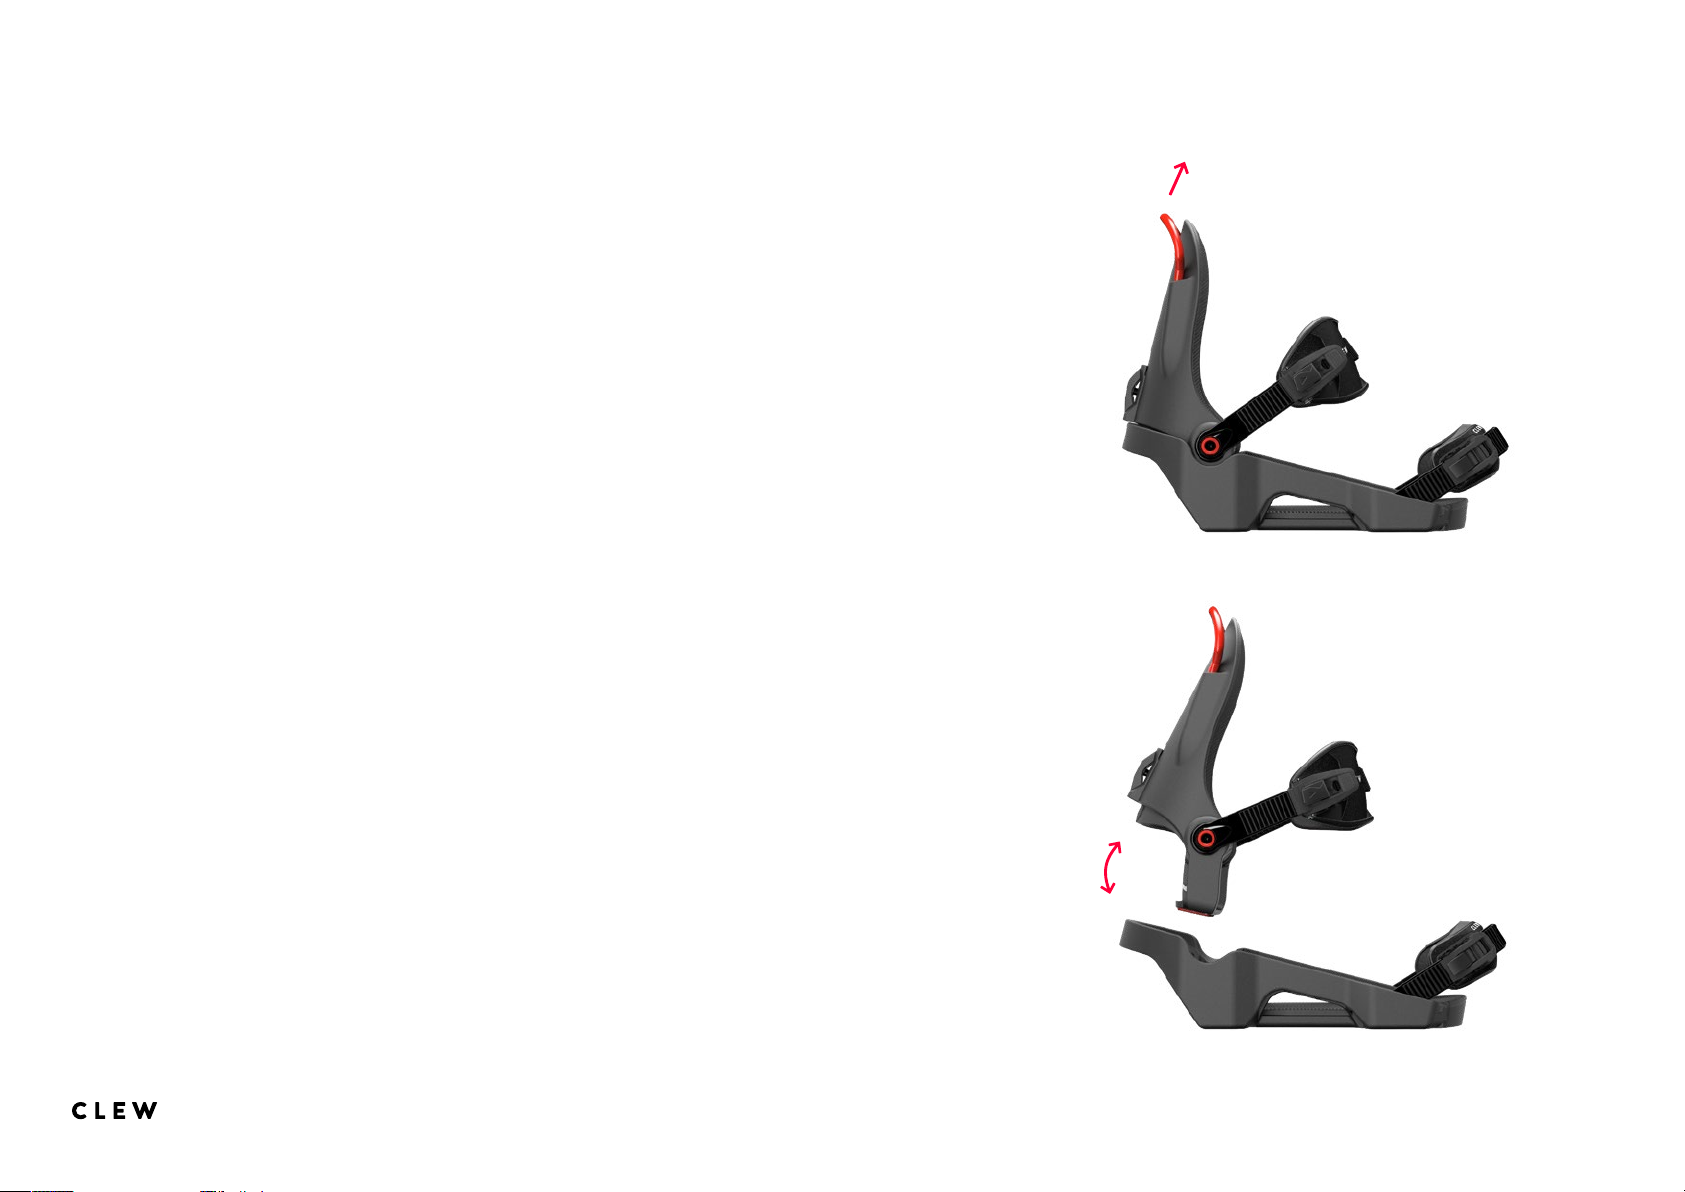
Use of the CLEW Pre Rider Binding
Before the first ride
Strap the binding with the highback attached to the base
1. Open all straps.
2. Remove snow, ice and dirt from your softboot and put your foot in the first binding.
Make sure your heel pushes against the highback.
3. Close both straps: Push the ratchet band as far as possible into the buckle and
tighten the strap by moving the lever alternately forward and backward. For ideal
grip, see also page 9.
4. Repeat steps 2 and 3 for the second binding.
5. O to the slopes!
On the slopes
Step out
Pull the red handle on the highback, and step out first with your heel and then the
whole foot.
Step in
Step in with your toes first and guide your foot to the toe strap. Then lower the heel
until you click in the lowest position. Check the locking mechanism by trying to
get out without using the pull handle. Do not ride until you are sure that the locking
mechanism is locked.
At the end of a snowboard day
Open all straps to step out
Pull the levers of the buckles and pull the ratchet o the ratchet band. Then simply
step out of binding, see also page 9.
11 / 19User Manual
Page 12

Additional notes
When should the step in /out
function not be used?
The CLEW system is very useful,
but in two situations it is better to
release your boot by opening the
buckles as usual:
• In knee-deep powder snow when
you do not have the possibility to
free your board from snow by
shaking or wiping it o.
• On very steep slopes
Depending on your level of experience, decide when it is more practical for you not to use the step-in
system.
Use with snow on the binding
Of course, snow on the binding can
always occur when snowboarding. If
there is a lot of snow, we recommend
removing as much of it as possible
by briefly shaking or wiping it o.
Stepping in is possible with some
snow on the binding. For this purpose,
the CLEW binding is equipped with a
particularly snow and ice proof mechanism and several latching steps.
Make sure that you are standing
deep enough in the base plate with
the foot part in place and your ratchet teeth clicked in. Once the binding has locked in place, it does not
release itself until you pull the handle
and at the same time lift the foot
backwards out of the binding.
Where to use it
The Pre Rider binding is particularly suitable for the use on slopes
and cross-country but less for the
snowboard park or for freestyle, as
it is slightly heavier and stier than
a binding without a step-in system.
High jumps and intensive use can
lead to stronger wear and tear.
The Pre Rider binding has been developed to save time and energy and
provides a great riding experience on
slopes and in deep snow.
12 / 19User Manual
Page 13
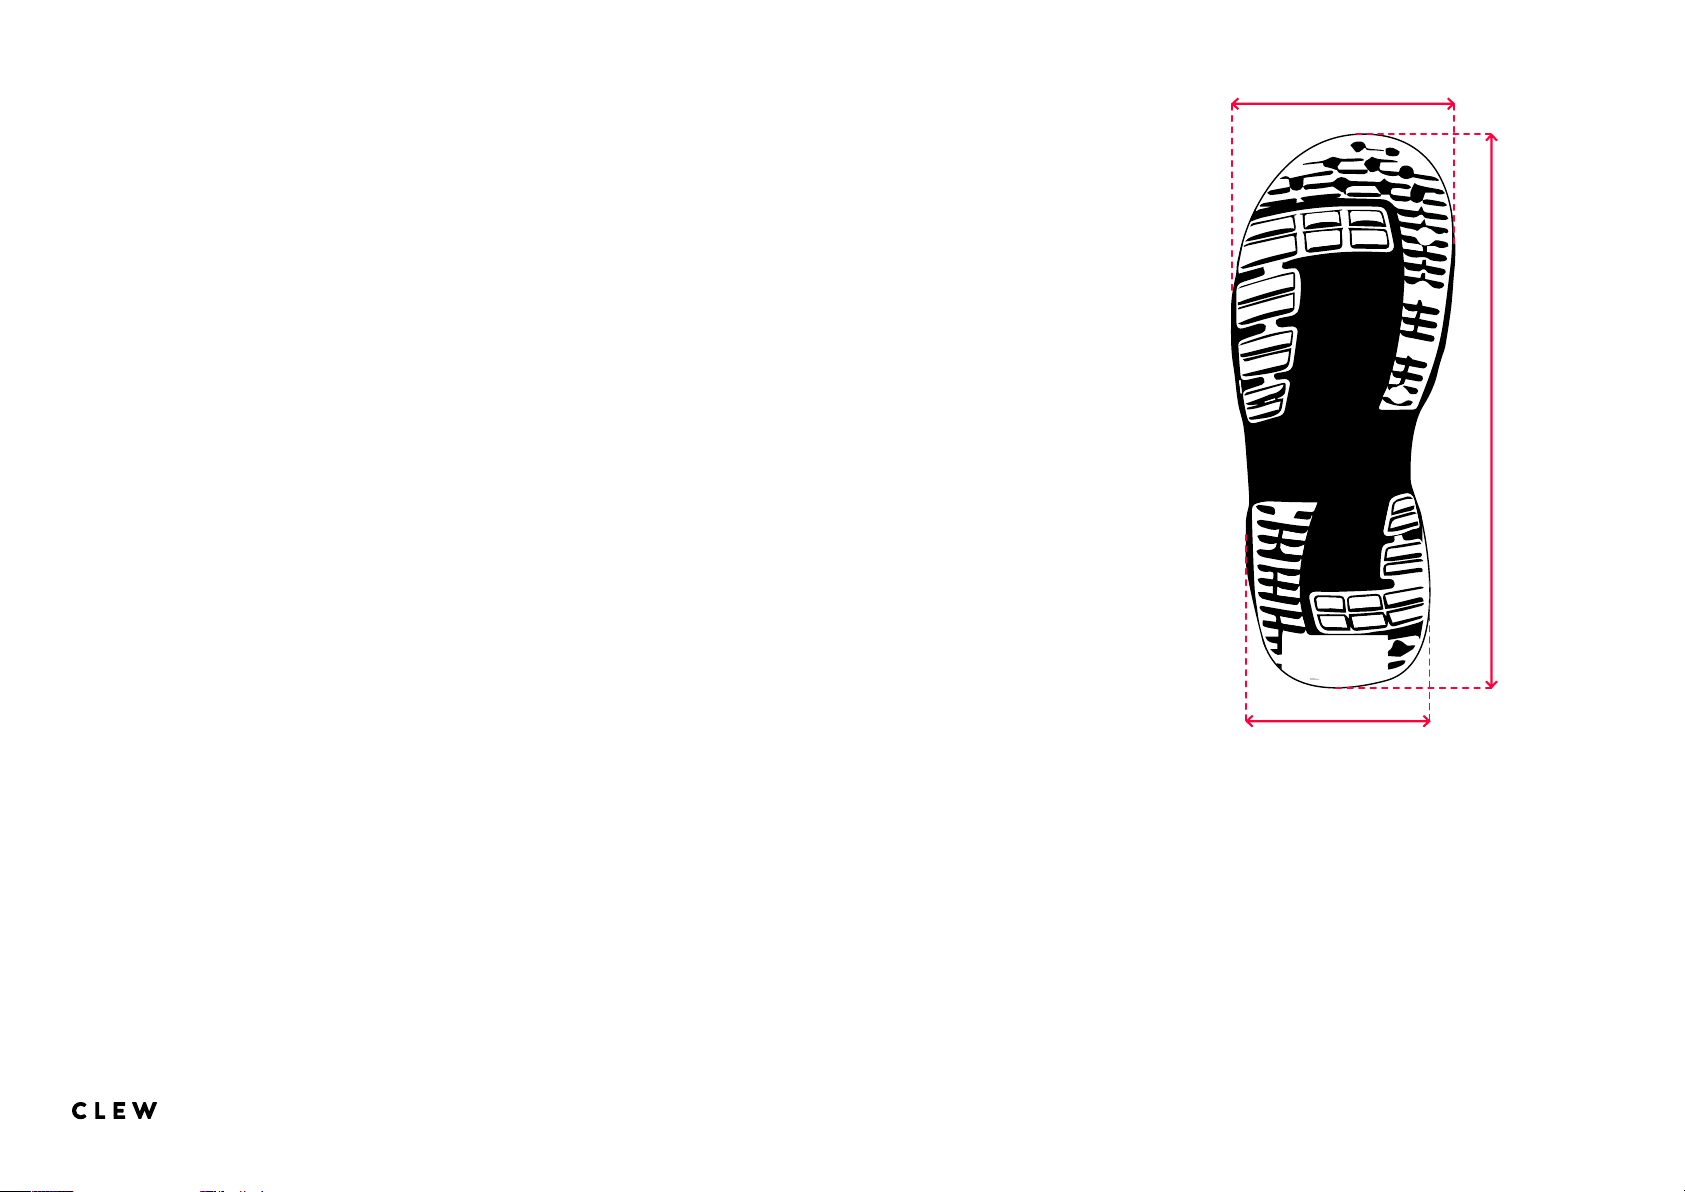
Walking with the foot part on
Which soft boots are suitable
110 - 125 mm
The foot part is barely noticable
while walking. However, be careful if
you are walking on a smooth surface (eg in ski huts or ski cellars). If
stepped on in a crooked manner or
strange angle, the rubber sole could
slip away. The sole of the foot part is
made from the same material, as the
soles of usual snowboard boots.
With the foot part strapped on the
boot you should pay attention to
your surroundings, so that you do
not bump into anything or get stuck.
To avoid heavy wear, we recommend
that you do not walk on tarmac or on
gravel with the foot part strapped on
your boot.
We have tested many snowboard
softboots of dierent brands, but not
every softboot is equally well suited
for the CLEW binding. In principle,
the boots will fit if they do not exceed
or fall short of the dimensions indicated in the illustration on the right.
Please note that some snowboard
boots may cause friction. If this happens with your softboot, we would be
glad if you send us this info, so that
we can further improve our bindings.
300 - 340 mm
90 - 105 mm
13 / 19User Manual
Page 14
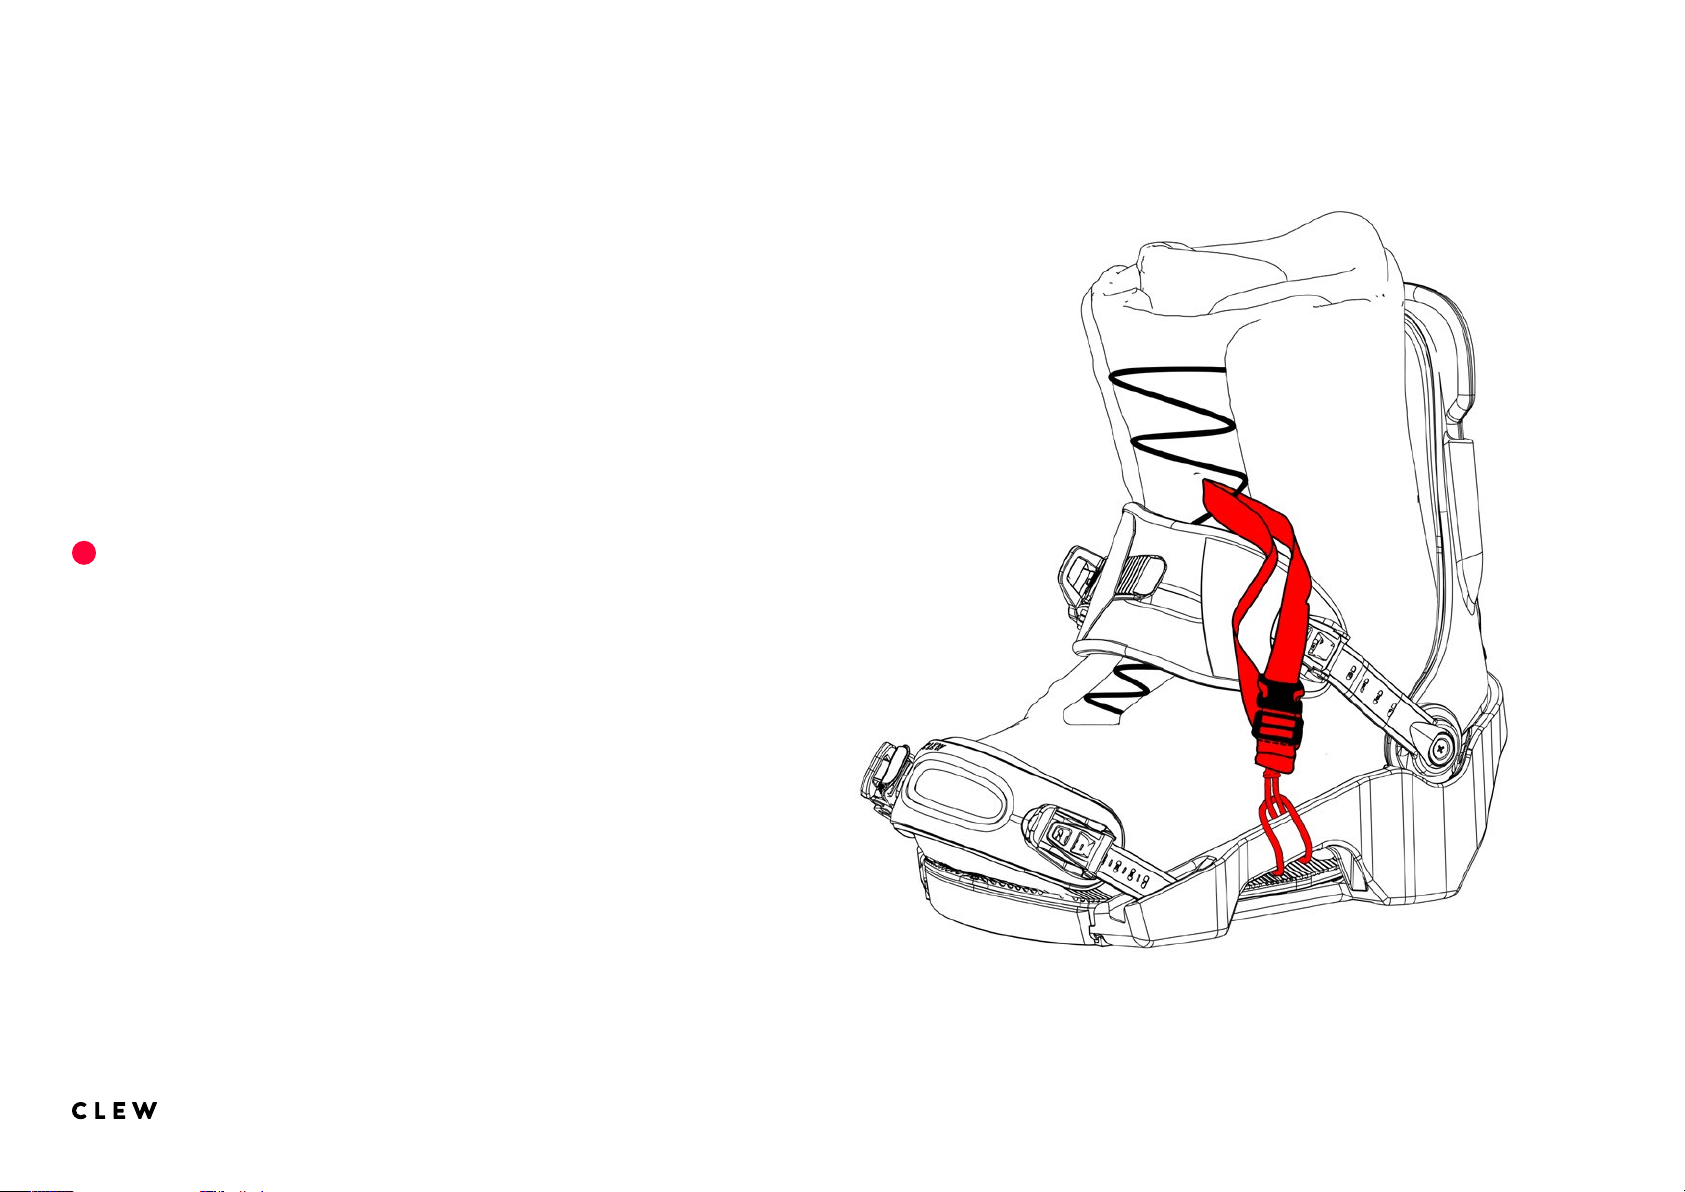
Use of a leash
Attach the leash to the softboot of the forefoot. To do
this first wind the leash around the side bar of the binding, thread the leash through the loop and pull it tight.
The other end is attached by hooking the ring to the
laces of your soft boot.
Always attach the leash first before buckling up the snowboard and last when unbuckling.
!
If you choose not to use a leash, you endanger other people and
animals on the slopes. Because without the leash the snowboard can
slide downhill on its own and thus represents an unpredictable danger.
14 / 19User Manual
Page 15
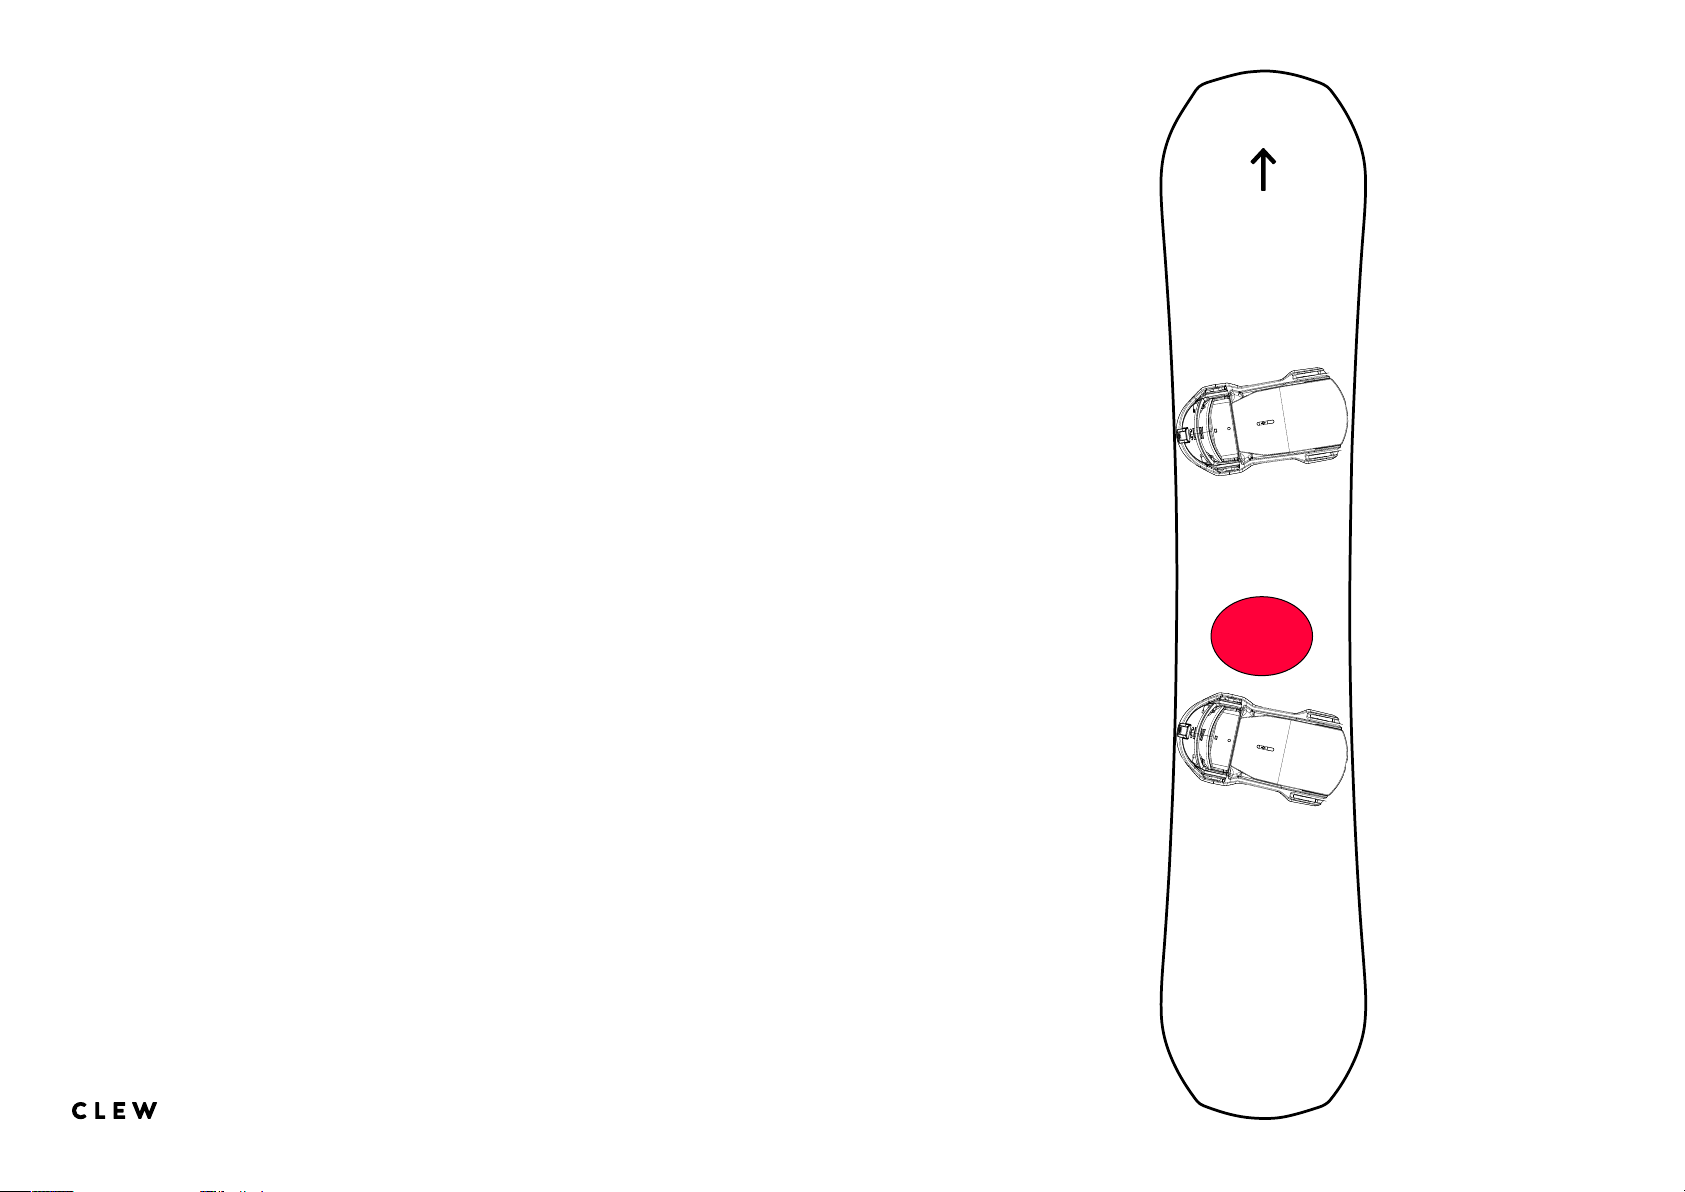
Use of an anti-slip pad
We recommend the use of an anti-slip pad. Should you
step onto the board with your softboot (including the
CLEW foot part), you will have improved grip with the
pad and reduce the risk of slipping o your snowboard.
15 / 19User Manual
Page 16

Replacements
Replacement parts can be provided for all components of
the CLEW Pre Rider binding.
With the purchase of a Pre Rider product you are entitled
to the CLEW Premium Support for two years: We guarantee a quick and free replacement of all faulty or worn out
components within the warranty period.
16 / 19User Manual
Page 17

Warning
Only use this product if you have read and understood all the warnings and instructions. Changes
to this information reserved. Current versions can be found at www.clew.de.
This product may not be altered or modified and is only suitable for users with a minimum of
45kg and a maximum of 110kg body weight. Users under the age of 18 should read this user
manual with their parent or legal guardian, and should not use this product without proper guidance and supervision. Children should always be under adult supervision when snowboarding. Snowboarding is a dangerous activity with unpredictable dangers. The use of snowboard
equipment, jumps and any natural or artificial terrain involves the risk of serious injury to any
part of the body, disability or death.
Snowboard bindings remain securely attached to your feet in most circumstances. However, in
some cases, the bindings may come o your softboots. On a mountain you should use a suitable storing device, so that the snowboard cannot slide o. Snowboards, snowboard bindings
and / or storing devices are not intended as a braking device in the event of a fall and must not
be used as such. Also, they are not intended to protect against any injury to any part of the
body, including the wrist, elbows, knees, shoulders and head. You risk exposing yourself to injury, regardless of whether your feet remain attached or detached during the use of snowboard
bindings. For beginners, it is therefore highly recommended to take lessons. Riders should always snowboard within the limits of their abilities and never exceed these limits.
CLEW strongly recommends wearing a snowboard helmet and proper protective clothing. A
helmet can reduce the risk of serious or fatal injury, but cannot be completely ruled out even
at low speeds. The snowboard must always be fastened to the rider with an approved fastening
17 / 19User Manual
Page 18

device when riding or walking. Should the attachment be loosened for any reason, the board
should be flipped over and with the bindings firmly pressed into the snow to prevent it from
sliding down the slope. Only softboots specially designed for snowboarding should be used.
Before each use, the bindings should be inspected to ensure that all parts are safe and not
damaged or missing. Vibrational and UV light exposure during normal use can cause parts to
become loose or impair their function.
For your CLEW bindings you should use only CLEW approved replacement parts. This product
is intended only for snowboarding on snow. Before snowboarding, familiarize yourself with the
terrain and all its characteristics. All regulations and signs as well as all laws, regulations and
rules of conduct on the slopes must be observed. Keep this manual for future reference. By
using this product, you agree to this manual for all future use. By using this product, you are
agreeing to the above stated terms and conditions and that you have read and understood the
instructions and warnings.
18 / 19User Manual
Page 19

Enjoy snowboarding with your
CLEW Pre Rider snowboard binding!
Do you still have questions?
Then send us an email to [email protected]
or check out our website on clew.de
CLEW GmbH
Heßstraße 89, 80797 Munich, Germany
19 / 19User Manual
 Loading...