

Page 1

W540EU
Page 2

Page 3

Notebook Computer
W540EU
Service Manual
Preface
Preface
I
Page 4

Preface
Preface
Notice
The company reserves the right to revise this publication or to change its contents without notice. Information contained
herein is for reference only and does not constitute a commitment on the part of the manufacturer or any subsequent vendor. They assume no responsibility or liability for any errors or inaccuracies that may appear in this publication nor are
they in anyway responsible for any loss or damage resulting from the use (or misuse) of this publication.
This publication and any accompanying software may not, in whole or in part, be reproduced, translated, transmitted or
reduced to any machine readable form without prior consent from the vendor, manufacturer or creators of this publication, except for copies kept by the user for backup purposes.
Brand and product names mentioned in this publication may or may not be copyrights and/or registered trademarks of
their respective companies. They are mentioned for identification purposes only and are not intended as an endorsement
of that product or its manufacturer.
Version 1.0
July 2012
Trademarks
Intel, Pentium and Intel Core are trademarks of Intel Corporation.
Windows® is a registered trademark of Microsoft Corporation.
Other brand and product names are trademarks and /or registered trademarks of their respective companies.
II
Page 5

About this Manual
This manual is intended for service personnel who have completed sufficient training to undertake the maintenance and
inspection of personal computers.
It is organized to allow you to look up basic information for servicing and/or upgrading components of the W540EU
series notebook PC.
The following information is included:
Chapter 1, Introduction, provides general information about the location of system elements and their specifications.
Chapter 2, Disassembly, provides step-by-step instructions for disassembling parts and subsystems and how to upgrade
elements of the system.
Preface
Appendix A, Part Lists
Appendix B, Schematic Diagrams
Appendix C, Updating the FLASH ROM BIOS
Preface
III
Page 6

Preface
Preface
IMPORTANT SAFETY INSTRUCTIONS
Follow basic safety precautions, including those listed below, to reduce the risk of fire, electric shock and injury to persons when using any electrical equipment:
1. Do not use this product near water, for example near a bath tub, wash bowl, kitchen sink or laundry tub, in a wet
basement or near a swimming pool.
2. Avoid using a telephone (other than a cordless type) durin g an ele ctrical sto rm. There may be a remote risk of electrical shock from lightning.
3. Do not use the telephone to report a gas leak in the vicinity of the leak.
4. Use only the power cord and batteries indicated in this manual. Do not dispose of batteries in a fire. They may
explode. Check with local codes for possible special disposal instructions.
5. This product is intended to be supplied by a Listed Power Unit with an AC Input of 100 - 240V, 50 - 60Hz, DC Output
of 19V, 3.42A or 18.5V, 3.5A (65 Watts) minimum AC/DC Adapter.
CAUTION
This Computer’s Optical Device is a Laser Class 1 Product
IV
FCC Statement
This device complies with Part 15 of the FCC Rules. Operation is subject to the following two conditions:
This device may not cause harmful interference.
This device must accept any interference received, including interference that may cause undesired operation.
Page 7
Instructions for Care and Operation
The notebook computer is quite rugged, but it can be damaged. To prevent this, follow these suggestions:
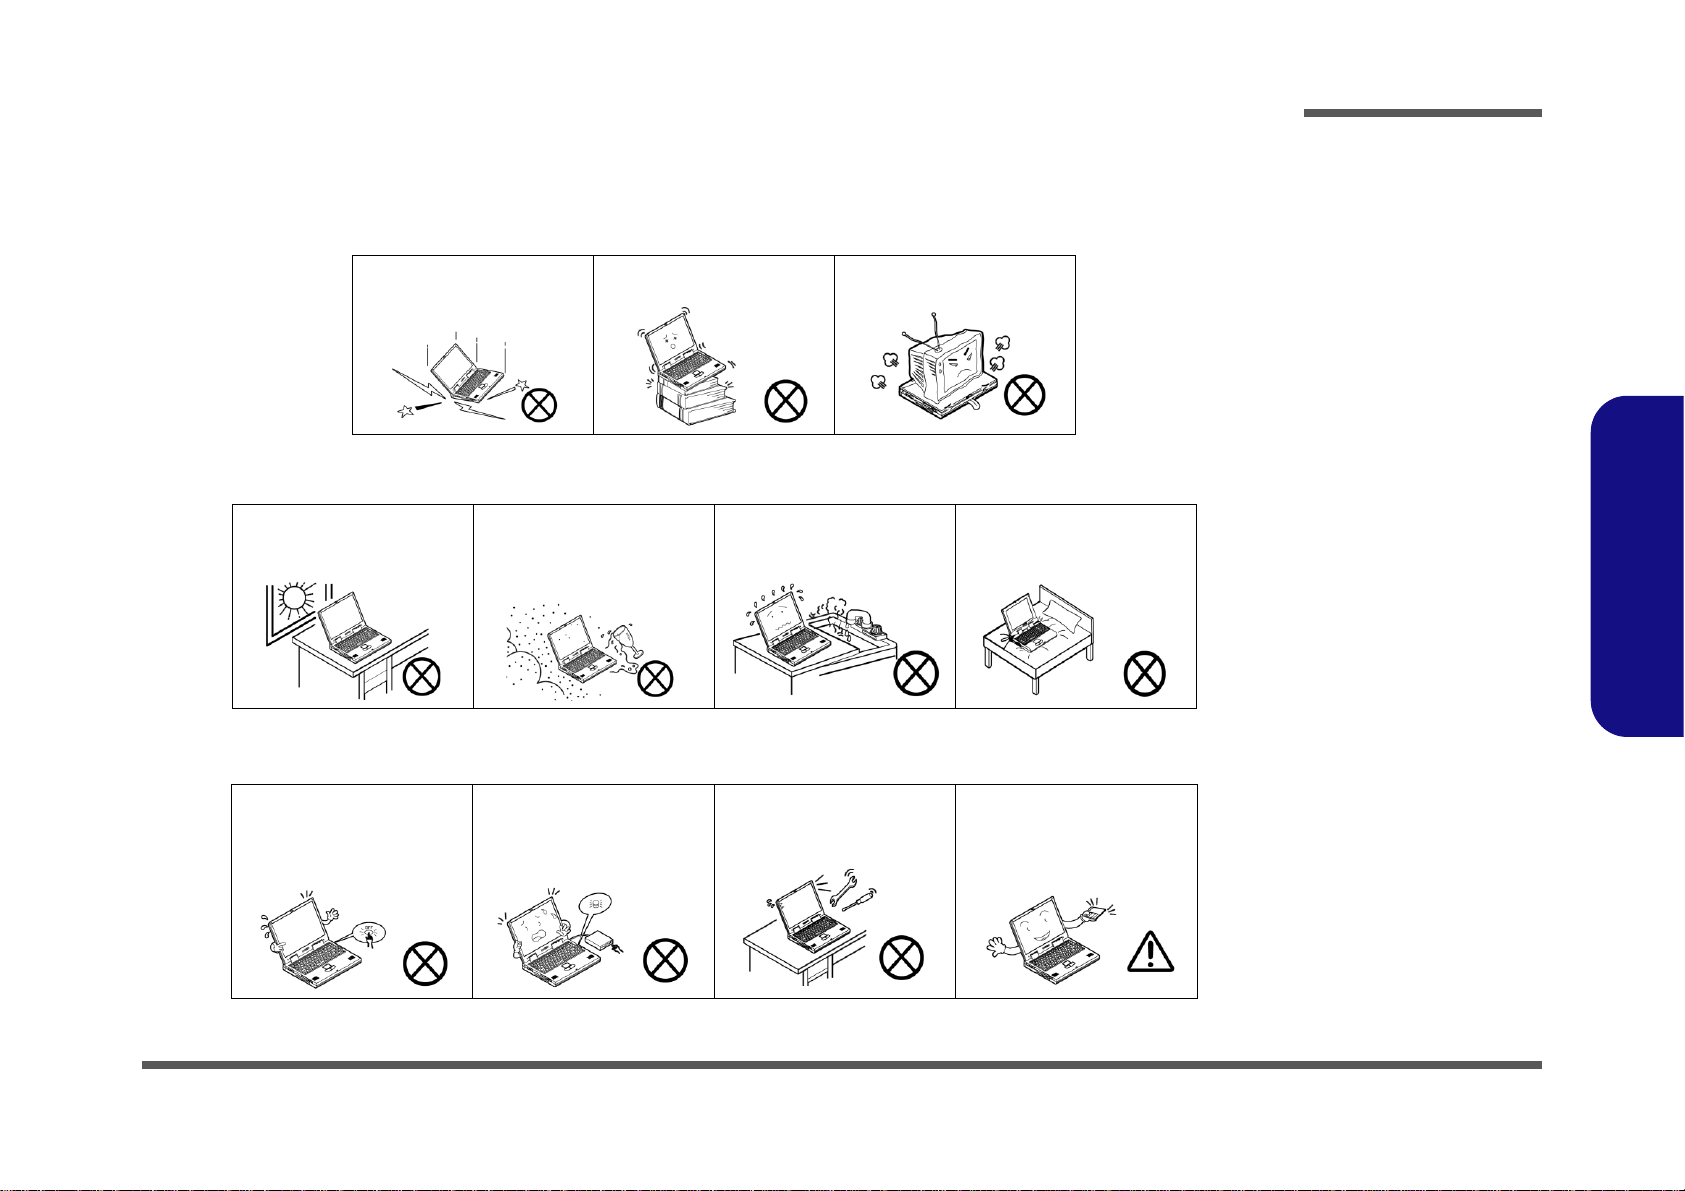
1. Don’t drop it, or expose it to shock. If the computer falls, the case and the components could be damaged.
Preface
Do not expose the computer
to any shock or vibration.
Do not place it on an unstable
surface.
Do not place anything heavy
on the computer.
2. Keep it dry, and don’t overheat it. Keep the computer and power supply away from any kind of heating element. This
is an electrical appliance. If water or any other liquid gets into it, the co mputer could be badly damaged.
Do not expose it to excessive
heat or direct sunlight.
Do not leave it in a place
where foreign matter or moisture may affect the system.
Don’t use or store the computer in a humid environment.
Do not place the computer on
any surface which will block
the vents.
3. Follow the proper working procedures for the computer. Shut the computer down properly and don’t forget to save
your work. Remember to periodically save your data as data may be lost if the battery is depleted.
Do not turn off the power
until you properly shut down
all programs.
Do not turn off any peripheral
devices when the computer is
on.
Do not disassemble the computer by yourself.
Perform routine maintenance
on your computer.
Preface
V
Page 8
Preface
Power Safety
Warning
Before you undertake
any upgrade procedures, make sure that
you have turned off the
power, and disconnected all peripherals
and cables (including
telephone lines and
power cord). It is advisable to also remove
your battery in order to
prevent accidentally
turning the machine
on.
4. Avoid interference. Keep the computer away from high capacity transformers, electric moto rs, and other strong mag-
netic fields. These can hinder proper performance and damage your data.
5. Take care when using peripheral devices.
Preface
VI
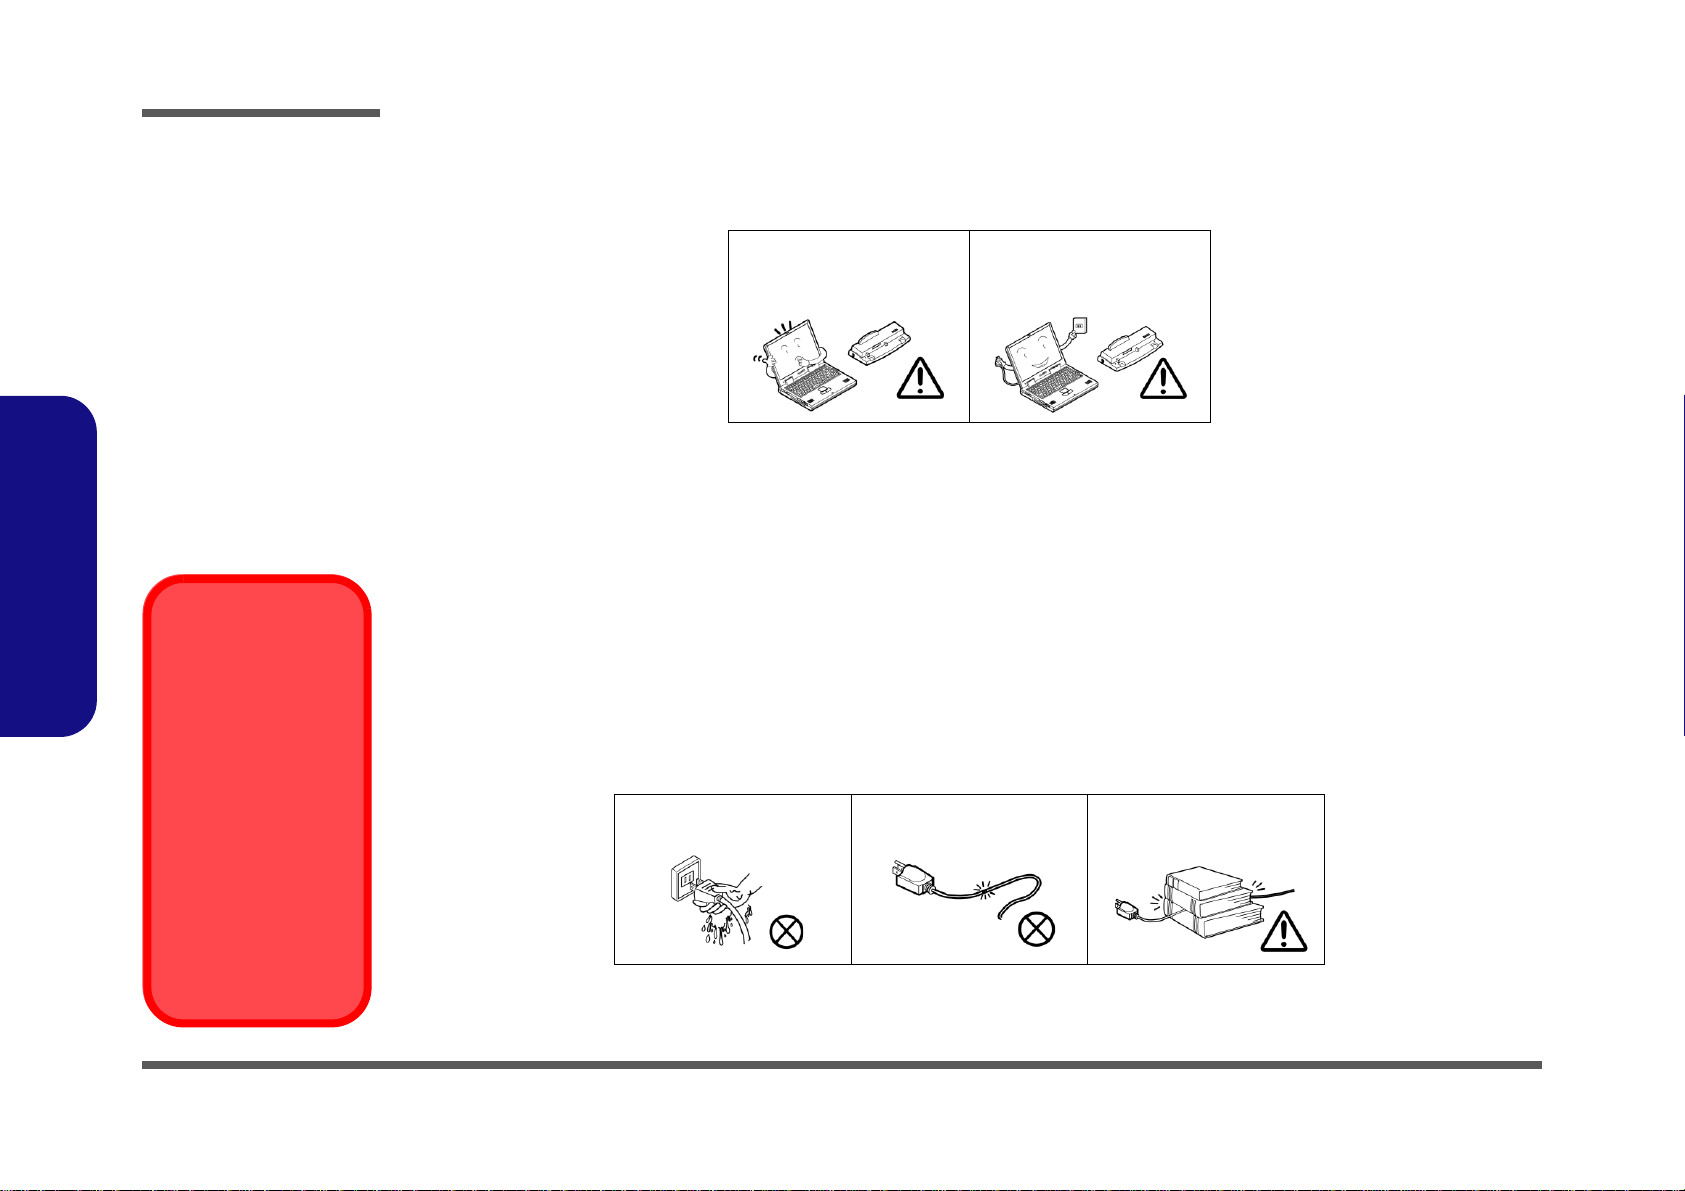
Use only approved brands of
peripherals.
Unplug the power cord befor e
attaching peripheral devices.
Power Safety
The computer has specific power requirements:
• Only use a power adapter approved for use with this computer.
• Your AC adapter may be designed for international travel but it still requ ires a steady, uninterrupte d power supp ly. If you are
unsure of your local power specifications, consult your service representative or local power company.
• The power adapter may have either a 2-prong or a 3-prong grounded plug. The third prong is an important safety feature; do
not defeat its purpose. If you do not have access to a compatible outlet, have a qualified electrician install one.
• When you want to unplug the power cord, be sure to disconn ect it by the plug head, not by its wire.
• Make sure the socket and any extension cord(s) you use can support the total current load of all the connected devices.
• Before cleaning the computer, make sure it is disconnected from any external power supplies.
Do not plug in the power
cord if you are wet.
Do not use the power cord if
it is broken.
Do not place heavy objects
on the power cord.
Page 9
Battery Precautions
Battery Disposal
The product that you have purchased contains a rechargeable battery. The battery is recyclable. At the end of its useful life, under various state and local laws, it may be illegal to dispose of this battery into the municipal waste stream. Check with your local solid waste
officials for details in your area for recycling options or proper disposal.
Caution
Danger of explosion if battery is incorrectly replaced. Replace only with the same or equivalent type recommended by the manufacturer.
Discard used battery according to the manufacturer’s instructions.
Battery Level
Click the battery icon in the taskbar to see the current battery level and charge status. A battery that drops below a level of 10%
will not allow the computer to boot up. Make sure that any battery that drops below 10% is recharged within one week.
• Only use batteries designed for this computer. The wrong battery type may explode, leak or damage the computer.
• Do not continue to use a battery that has been dropped, or that appears damaged (e.g. bent or twisted) in any way. Even if the
computer continues to work with a damaged battery in place, it may cause circuit damage, which may possibly result in fire.
• Recharge the batteries using the notebook’s system. Incorrect recharging may make the battery explode.
• Do not try to repair a battery pack. Refer any battery pack repair or replacement to your service representative or qualified service
personnel.
• Keep children away from, and promptly dispose of a damaged battery. Always dispose of batteries carefully. Batteries may explode
or leak if exposed to fire, or improperly handled or discarded.
• Keep the battery away from metal appliances.
• Affix tape to the battery contacts before disposing of the battery.
• Do not touch the battery contacts with your hands or metal objects.
Battery Guidelines
The following can also apply to any backup batteries you may have.
• If you do not use the battery for an extended period, then remove the battery from the computer for storage.
• Before removing the battery for storage charge it to 60% - 70%.
• Check stored batteries at least every 3 months and charge them to 60% - 70%.
Preface
Preface
VII
Page 10
Preface
Shut Down
Note that you should always shut your computer down by
choosing Shut Down
from the Start Menu.
This will help prevent
hard disk or system
problems.
130 ?
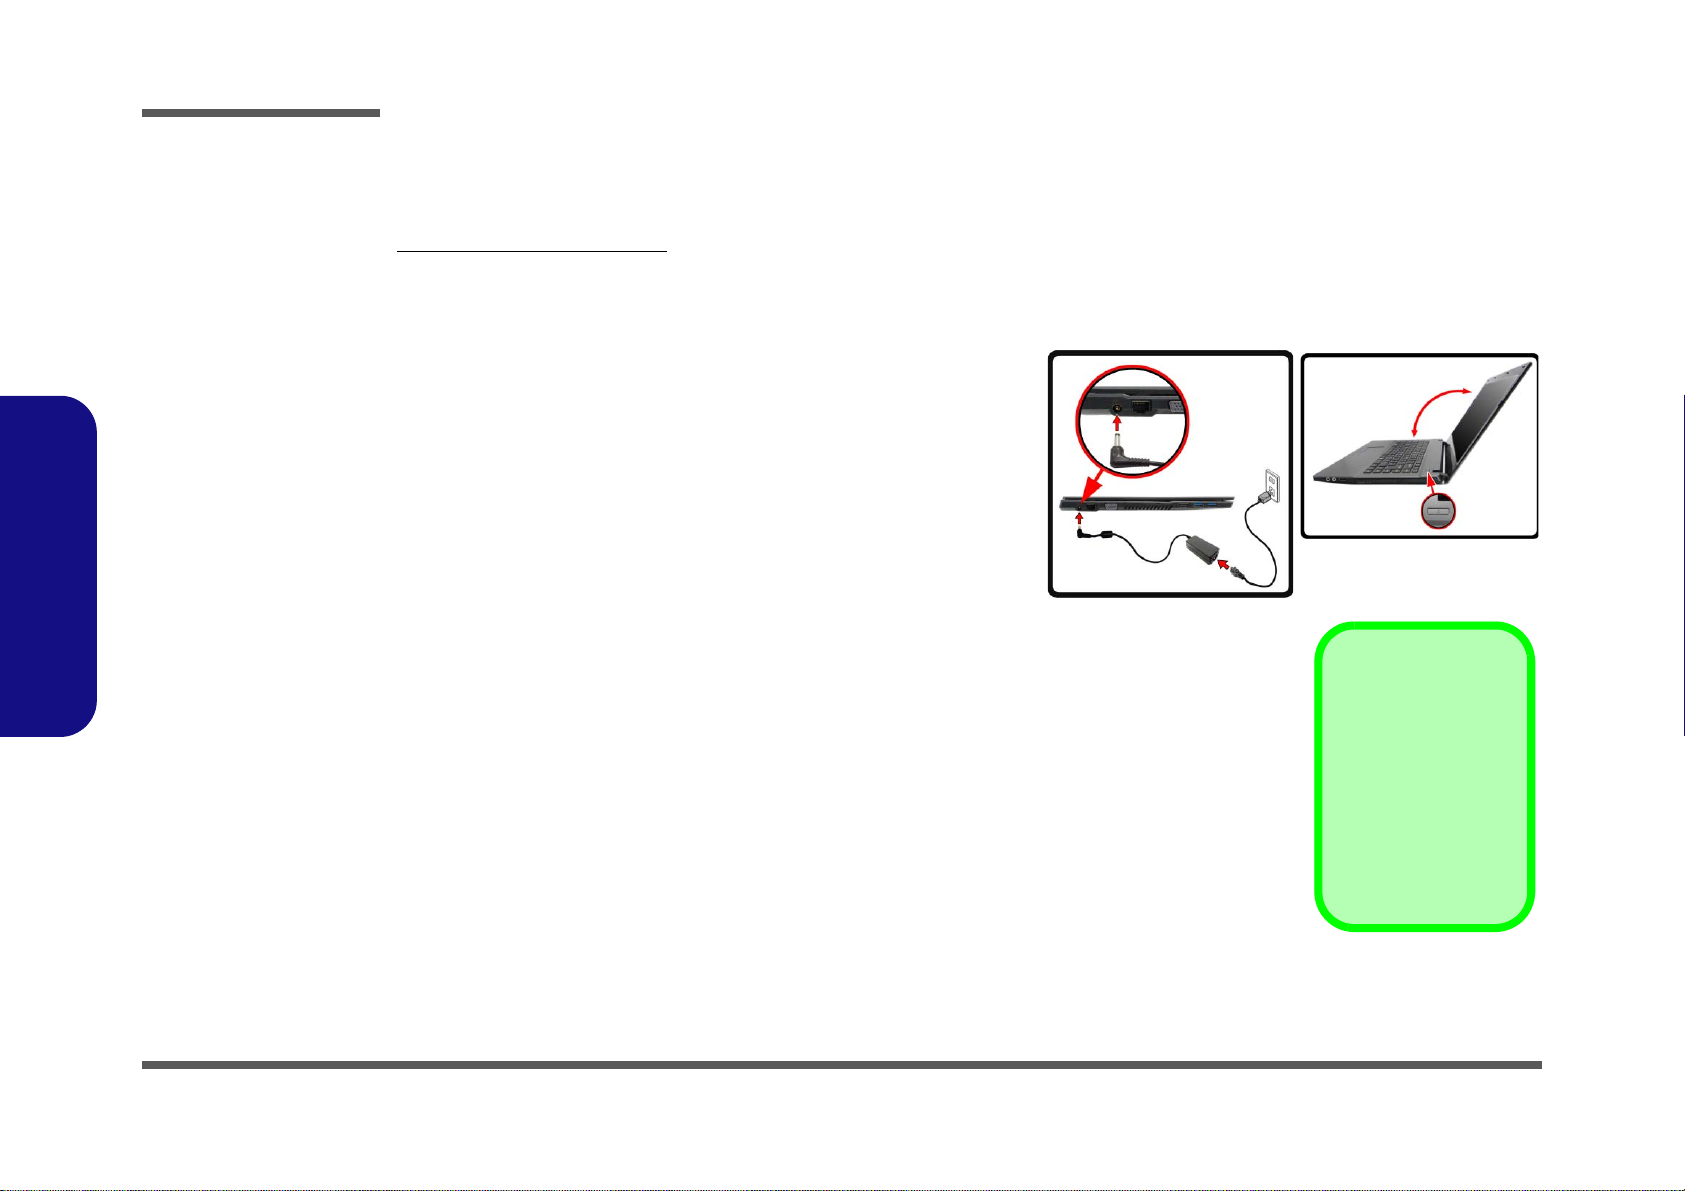
Figure 1
Opening the Lid/LCD/
Computer with AC/DC
Adapter Plugged-In
Preface
Related Documents
You may also need to consult the following manual for additional information:
User’s Manual on CD/DVD
This describes the notebook PC’s features and the procedures for operating the computer and its ROM-based setup program. It also describes the installation and operation of the utility programs provided with the notebook PC.
System Startup
1. Remove all packing materials.
2. Place the computer on a stable surface.
3. Insert the battery and make sure it is locked in position.
4. Securely attach any peripherals you want to use with the computer
(e.g. keyboard and mouse) to their ports.
5. Attach the AC/DC adapter to the DC-In jack at the rear of the
computer, then plug the AC power cord into an outlet, and connect
the AC power cord to the AC/DC adapter .
6. Use one hand to raise the
not exceed 130 degrees)
1) to support the base of the computer ( Note: Never lift the computer
by the lid/LCD).
7. Press the power button to turn the comp ut er “on ”.
lid/LCD to a comfortable viewing angle
;
use the other hand (as illustrated in Figure
(do
VIII
Page 11

Contents
Preface
Introduction ..............................................1-1
Overview ......................................................................................... 1-1
Specifications ..................................................................................1-2
External Locator - Top View with LCD Panel Open ......................1-4
External Locator - Front & Right Side Views .................................1-5
External Locator - Left Side & Rear View .....................................1-6
External Locator - Bottom View .....................................................1-7
Mainboard Overview - Top (Key Parts) .........................................1-8
Mainboard Overview - Bottom (Key Parts) ....................................1-9
Mainboard Overview - Top (Connectors) .....................................1-10
Mainboard Overview - Bottom (Connectors) ...............................1-11
Disassembly ...............................................2-1
Overview ......................................................................................... 2-1
Maintenance Tools ..........................................................................2-2
Connections .....................................................................................2-2
Maintenance Precautions .................................................................2-3
Disassembly Steps ...........................................................................2-4
Removing the Battery ......................................................................2-5
Removing the Hard Disk Drive .......................................................2-6
Removing the Optical (CD/DVD) Device ......................................2-8
Removing the System Memory (RAM) ........................................2-10
Removing and Installing a Processor ............................................2-12
Removing the Wireless LAN Module and Keyboard ...................2-15
Removing the 3.75G Module ........................................................2-18
Removing the CCD .......................................................................2-19
Part Lists ..................................................A-1
Part List Illustration Location ........................................................A-2
Top .................................................................................................A-3
Bottom ............................................................................................ A-4
SATA BLU RAY COMBO ........................................................... A-5
DVD DUAL ................................................................................... A-6
Dummy ODD ................................................................................. A-7
LCD ............................................................................................... A-8
Schematic Diagrams.................................B-1
System Block Diagram ...................................................................B-2
Processor 1/7-DMI, FDI, PEG ........................................................B-3
Processor 2/7- CLK, MISC .............................................................B-4
Processor 3/7- (DDR3) ...................................................................B-5
Processor 4/7- Power ......................................................................B-6
Processor 5/7- GFX PWR ...............................................................B-7
Processor 6/7- GND ........................................................................B-8
Processor 7/7- RSVD ......................................................................B-9
DDR3 SO-DIMM_0 .....................................................................B-10
DDR3 SO-DIMM_1 .....................................................................B-11
PANEL, INVERTER, CRT ..........................................................B-12
PCH 1/9- RTC, HDA, SATA .......................................................B-13
PCH 2/9- PCIE, SMBUS, CLK ....................................................B-14
PCH 3/9- DMI, FDI, PWRGD .....................................................B-15
PCH 4/9- LVDS, DDI, CRT .........................................................B-16
PCH 5/9- PCI, USB, RSVD .........................................................B-17
PCH 6/9- GPIO, CPU ...................................................................B-18
PCH 7/9- PWR .............................................................................B-19
PCH 8/9 POWER .........................................................................B-20
PCH 9/9- GND .............................................................................B-21
WLAN, 3G, MSATA ...................................................................B-22
CCD, TPM, FAN, CLICK ............................................................B-23
USB3.0, LID SWITCH .................................................................B-24
Card Reader (RTL8411) ...............................................................B-25
SATA ODD, LED, USB CHARGE .............................................B-26
Preface
IX
Page 12

Preface
HDMI, RJ45 .................................................................................B-27
AUDIO CODEC VT1802P .......................................................... B-28
KBC-ITE IT8518E ....................................................................... B-29
5VS, 3VS, 1.5VS CPU .................................................................B-30
VDD3, VDD5 ...............................................................................B-31
Power 0.85VS, 1.8VS ..................................................................B-32
POWER 1.5V/1.05VS ..................................................................B-33
POWER VCORE1 ....................................................................... B-34
POWER VCORE2 ....................................................................... B-35
AC IN, CHARGER ......................................................................B-36
AUDIO BOARD ..........................................................................B-37
AUDIO BOARD (W550EU) .......................................................B-38
LID SW BOARD (W550EU) .....................................................B-39
POWER SW BOARD .................................................................. B-40
EXTERNAL ODD BOARD ........................................................ B-41
Power Diagram ............................................................................. B-42
Preface
Power On SEQ .............................................................................B-43
Updating the FLASH ROM BIOS......... C-1
Download the BIOS .......................................................................C-1
Unzip the downloaded files to a bootable CD/DVD/ or
USB Flash drive ............................................................................. C-1
Set the computer to boot from the external drive ...........................C-1
Use the flash tools to update the BIOS ..........................................C-2
Restart the computer (booting from the HDD) .............................. C-2
X
Page 13

Chapter 1: Introduction
Overview
This manual covers the information you need to service or upgrade the W540EU series notebook computer. Information
about operating the computer (e.g. getting started, and the Setup utility) is in the User’s Manual. Information about drivers (e.g. VGA & audio) is also found in the User’s Manual. The manual is shipped with the computer.
Operating systems (e.g. Window 7, etc.) have their own manuals as do application softwares (e.g. word processing and
database programs). If you have questions about those programs, you should consult those manuals.
Introduction
The W540EU series notebook is designed to be upgradeable. See Disassembly on page 2 - 1 for a detailed description
of the upgrade procedures for each specific component. Please take note of the warning and safety information indicated
by the “” symbol.
The balance of this chapter reviews the computer’s technical specifications and features.
1.Introduction
Overview 1 - 1
Page 14
Introduction
Latest Specification Information
The specifications listed here are correct at the
time of sending them to the press. Certain items
(particularly processor types/speeds) may be
changed, delayed or updated due to the manufacturer's release schedule. Check with your
service center for more details.
CPU
The CPU is not a user serviceable part. Accessing the CPU in any way may violate your
warranty.
Specifications
1.Introduction
Processor Options
Intel® Core™ i7 Processor
i7-3612QM (2.10GHz)
6MB L3 Cache, 22nm, DDR3-1600MHz, TDP 35W
i7-3520M (2.90GHz)
4MB L3 Cache, 22nm, DDR3-1600MHz, TDP 35W
Intel® Core™ i5 Processor
i5-3360M (2.80GHz), i5-3320M (2.60GHz), i5-3210M
(2.50GHz)
3MB L3 Cache, 22nm, DDR3-1600MHz, TDP 35W
Intel® Core™ i3 Processor
i3-3110M (2.40GHz)
3MB L3 Cache, 22nm, DDR3-1600MHz, TDP 35W
Core Logic
Intel® HM77 Chipset
BIOS
64Mb SPI Flash ROM
AMI BIOS
Memory
Two 204 Pin SO-DIMM Sockets Supporting DDR3 1333/
1600MHz Memory
Memory Expandable up to 8GB
(The real memory operating frequency depends on the FSB
of the processor.)
LCD
14" (35.56cm) HD TFT LCD
Video Adapter
Intel HD Graphics 4000
Dynamic Frequency (Intel Dynamic Video Memory Technology for up to 1.7GB)
Microsoft DirectX®11 Compatible
Security
Security (Kensington® Type) Lock Slot
BIOS Password
Trusted Platform Module v1.2
Audio
High Definition Audio Compliant Interface
2 * Built-In Speakers
Built-In Microphone
Storage
(Factory Option) One Changeable 9.5mm(h) Optical Device
Type Drive (Super Multi Drive Module or Blu-Ray Combo
Drive Module)
One Changeable 2.5" 9.5mm (h) SATA HDD
(Factory Option) Dummy ODD
(Factory Option) One mSATA Solid State Drive (SSD)
Pointing Device
Built-in Touchpad
Keyboard
“WinKey” keyboard (with embedded numeric keypad)
Interface
One HDMI-Out Port
One Headphone-Out Jack
One Microphone-In Jack
One RJ-45 LAN Jack
One External Monitor Port
One USB 2.0 Port
Two USB 3.0 Ports
One DC-in Jack
1 - 2 Specifications
Page 15
Introduction
Mini Card Slots
Slot 1 for WLAN Module or Combo WLAN and Bluetooth
Module
(Factory Option) Slot 2 for 3.75G/HSPA Module OR mSAT A
SSD
Card Reader
Embedded Multi-In-1 Card Reader
MMC (MultiMedia Card) / RS MMC
SD (Secure Digital) / Mini SD / SDHC/ SDXC
MS (Memory Stick) / MS Pro / MS Duo
Communication
Built-In Gigabit Ethernet LAN
(Factory Option) 2M Pixel HD PC Camera Module
(Factory Option) 3.75G/HSPA Mini-Card Module
WLAN/ Bluetooth Half Mini-Card Modules:
(Factory Option) Intel® Centrino® Wireless-N 2230 Wireless LAN (802.11b/g/n) + Bluetooth 4.0
(Factory Option) Intel® Centrino® Wireless-N 135 Wireless
LAN (802.11b/g/n) + Bluetooth 4.0
(Factory Option) Third-Party Wireless LAN (802.11b/g/n)
(Factory Option) Third-Party Wireless LAN (802.11b/g/n) +
Bluetooth 4.0
Environmental Spec
Temperature
Operating: 5
Non-Operating: -20°C - 60°C
Relative Humidity
Operating: 20% - 80%
Non-Operating: 10% - 90%
°C - 35°C
Dimensions & Weight
340mm (w) * 241mm (d) * 11 - 25.4mm (h) (Height Excluding
Battery Area)
2.15 kg
(with 48.84WH Battery and ODD)
1.Introduction
Power
6 Cell Smart Lithium-Ion Battery Pack, 48.84WH
(Factory Option) 6 Cell Smart Lithium-Ion Battery Pack,
62.16WH
Full Range AC/DC Adapter
AC Input: 100 - 240V, 50 - 60Hz
DC Output: 19V, 3.42A or 18.5V, 3.5A (65W)
Specifications 1 - 3
Page 16
Introduction
Figure 1
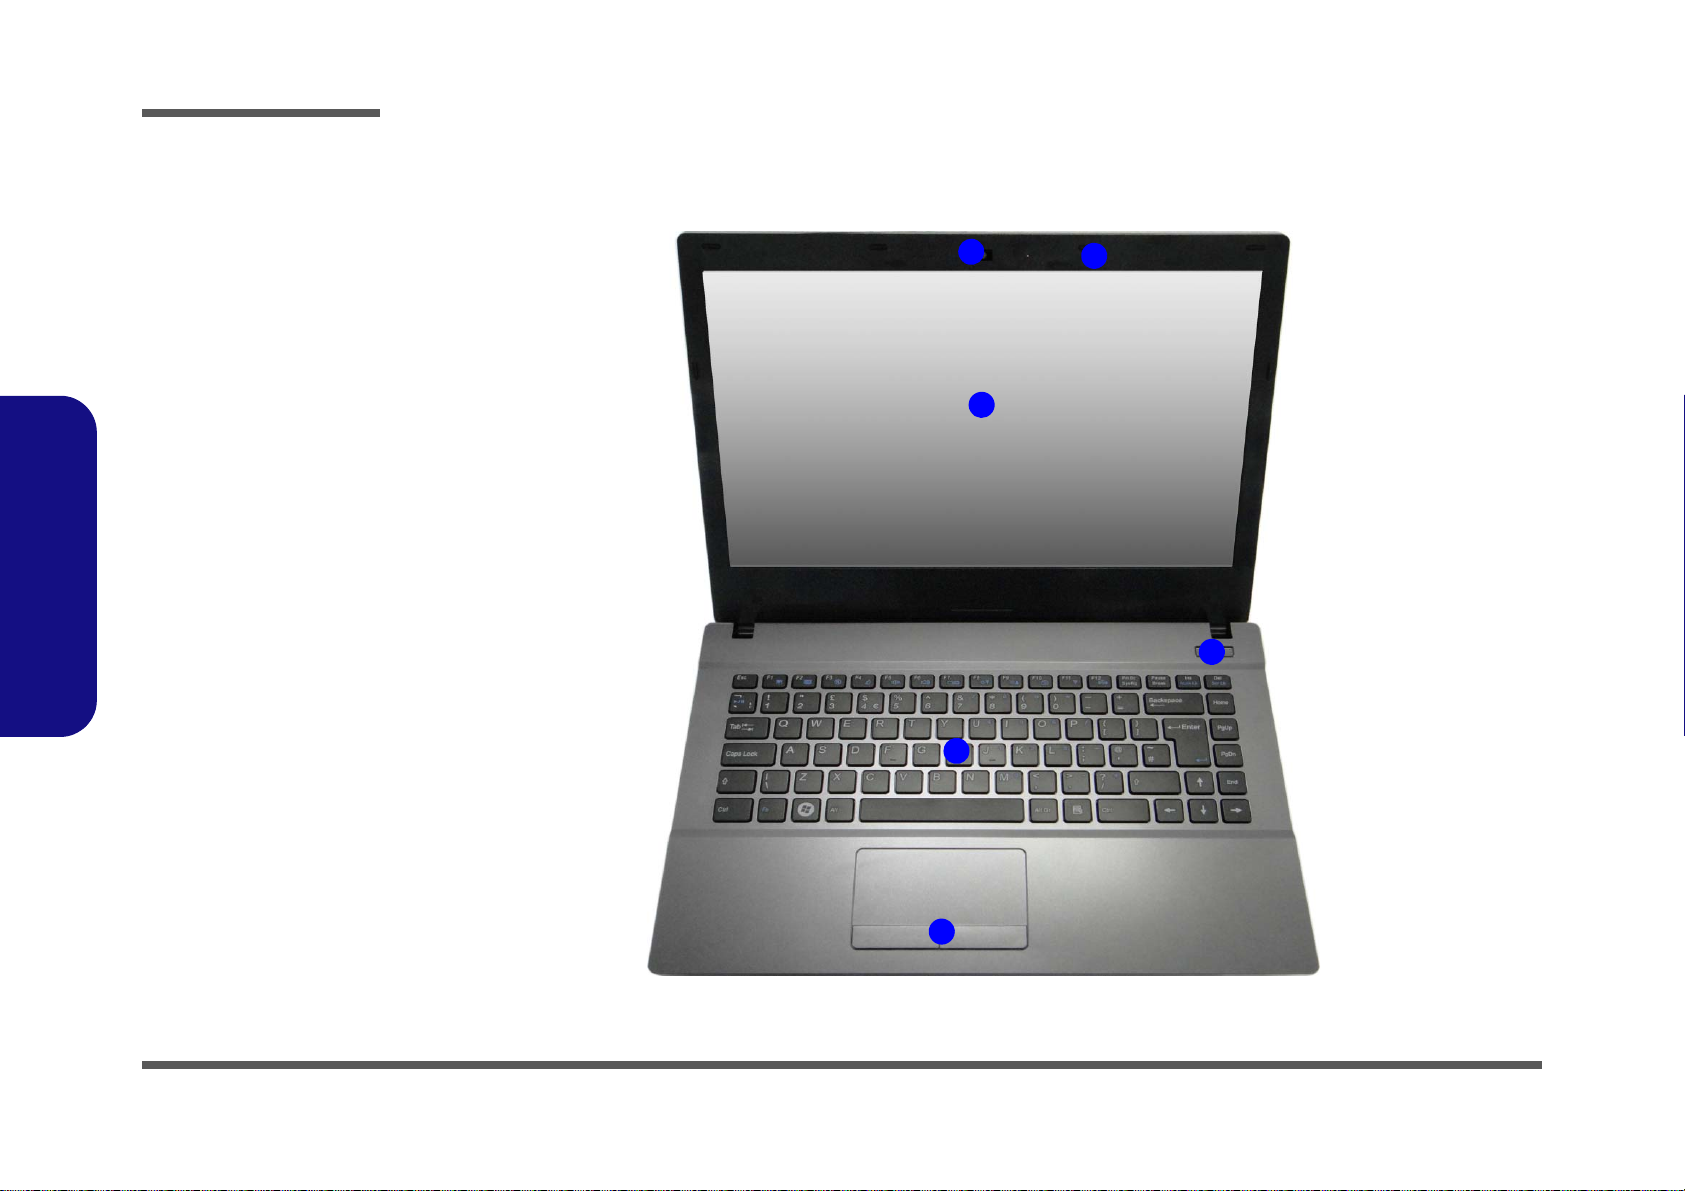
Top View
1. PC Camera
(Optional)
2. Built-In
Microphone
3. LCD
4. Power Button
5. Keyboard
6. To uchpad &
Buttons
5
3
4
6
1
2
External Locator - Top View with LCD Panel Open
1.Introduction
1 - 4 External Locator - Top View with LCD Panel Open
Page 17
External Locator - Front & Right Side Views
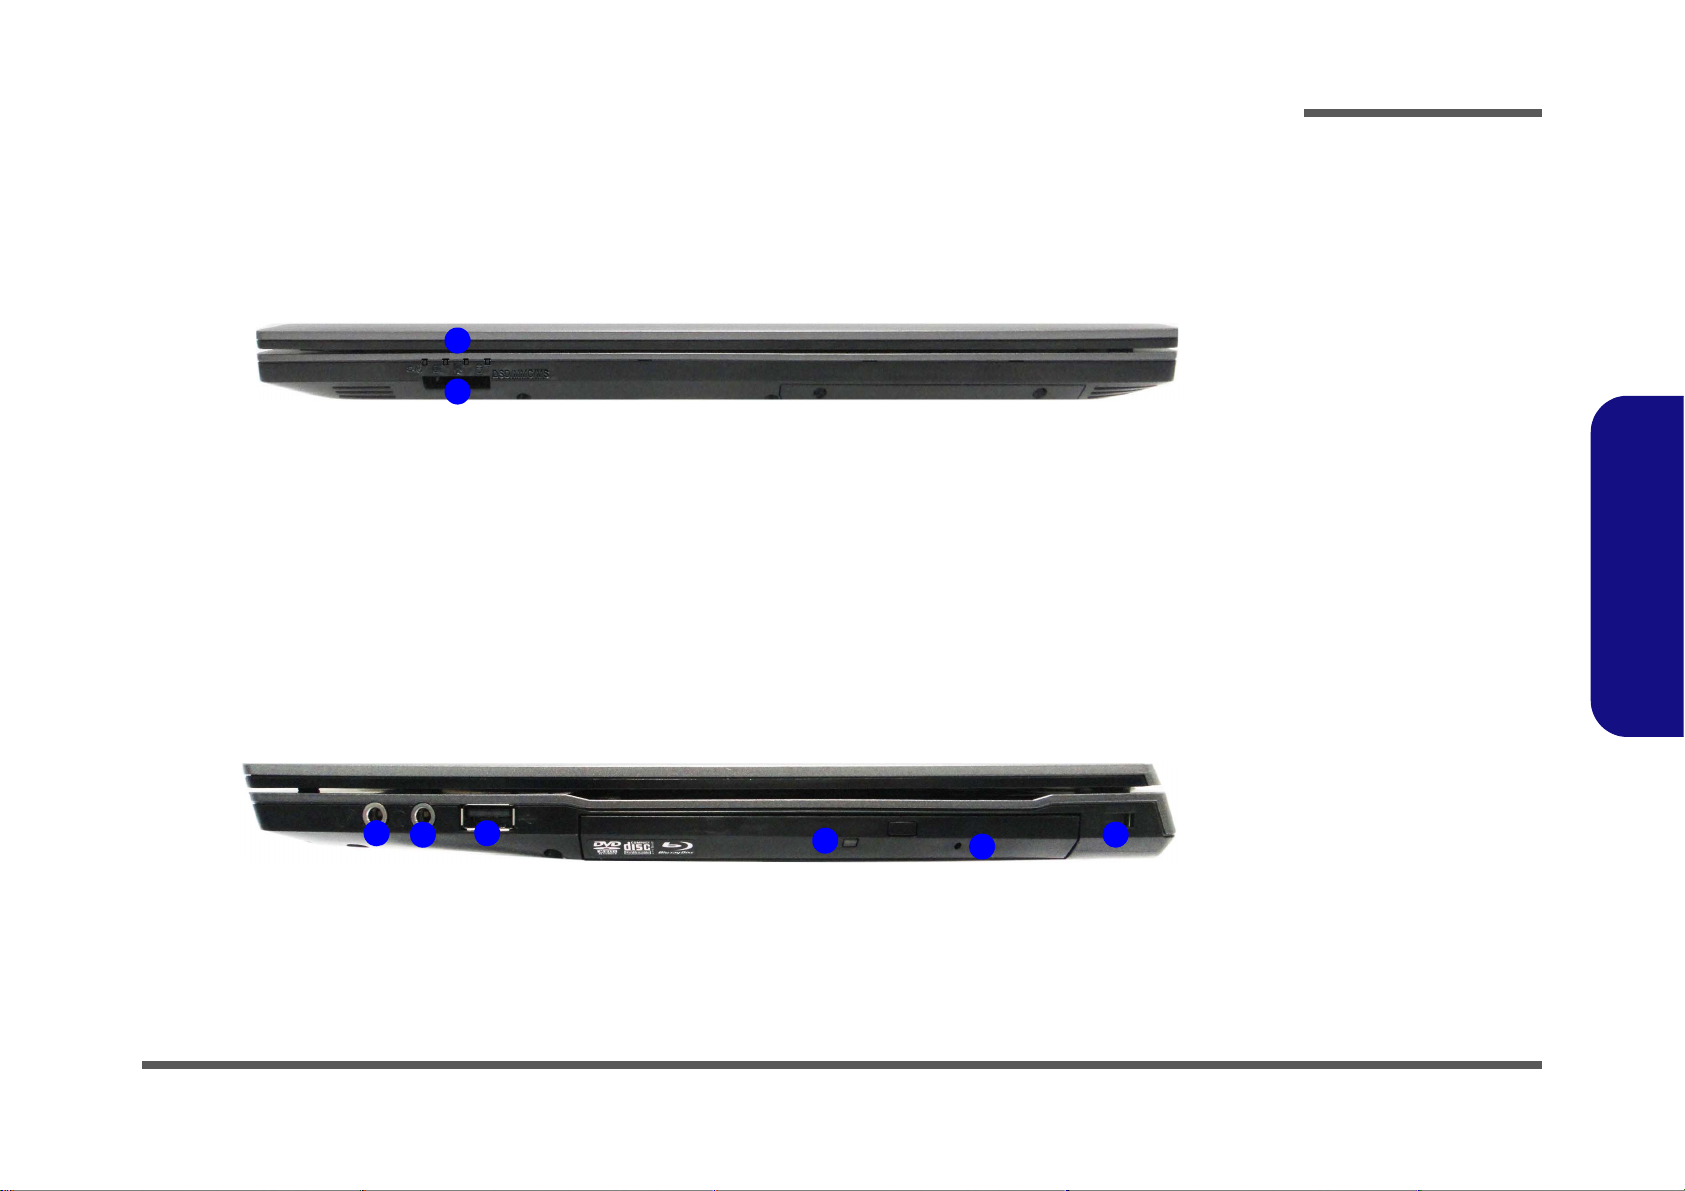
Figure 2
Front View
1. LED Power
Indicator
2. Multi-in-1 Card
Reader
Figure 3
Right Side View
1. Microphone-In
Jack
2. Headphone-Out
Jack
3. USB 2.0 Port
4. Optical Device
Drive Bay
5. Emergency Eject
Hole
6. Security Lock
Slot
FRONT VIEW
1
2
RIGHT SIDE VIEW
1
2
3
6
4
5
Introduction
1.Introduction
External Locator - Front & Right Side Views 1 - 5
Page 18
1.Introduction
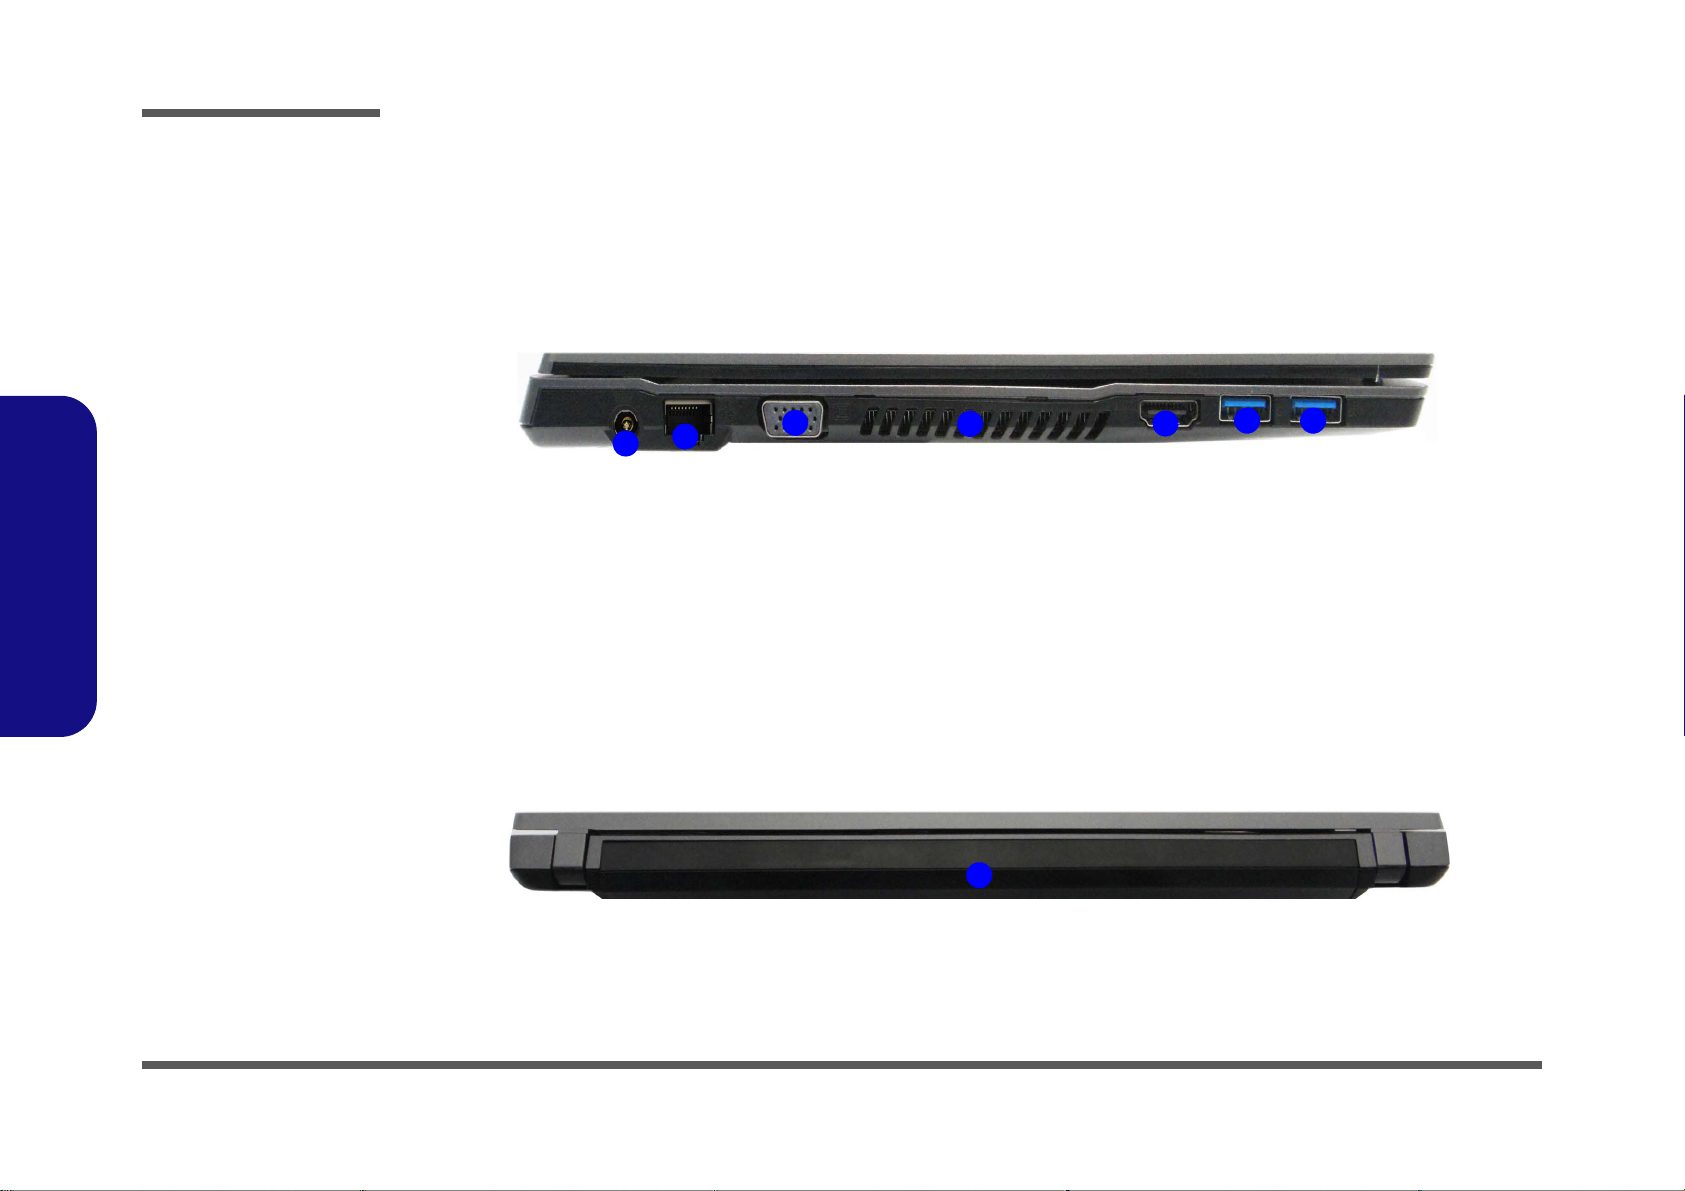
Figure 4
Left Side View
1. DC-In Jack
2. RJ-45 LAN Jack
3. External Monitor
Port
4. Vent
5. HDMI-Out Port
6. USB 3.0 Ports
LEFT SIDE VIEW
1
2
3
4
5
6 6
Figure 5
Rear View
1. Battery
REAR VIEW
1
Introduction
External Locator - Left Side & Rear View
/
1 - 6 External Locator - Left Side & Rear View
Page 19
External Locator - Bottom View
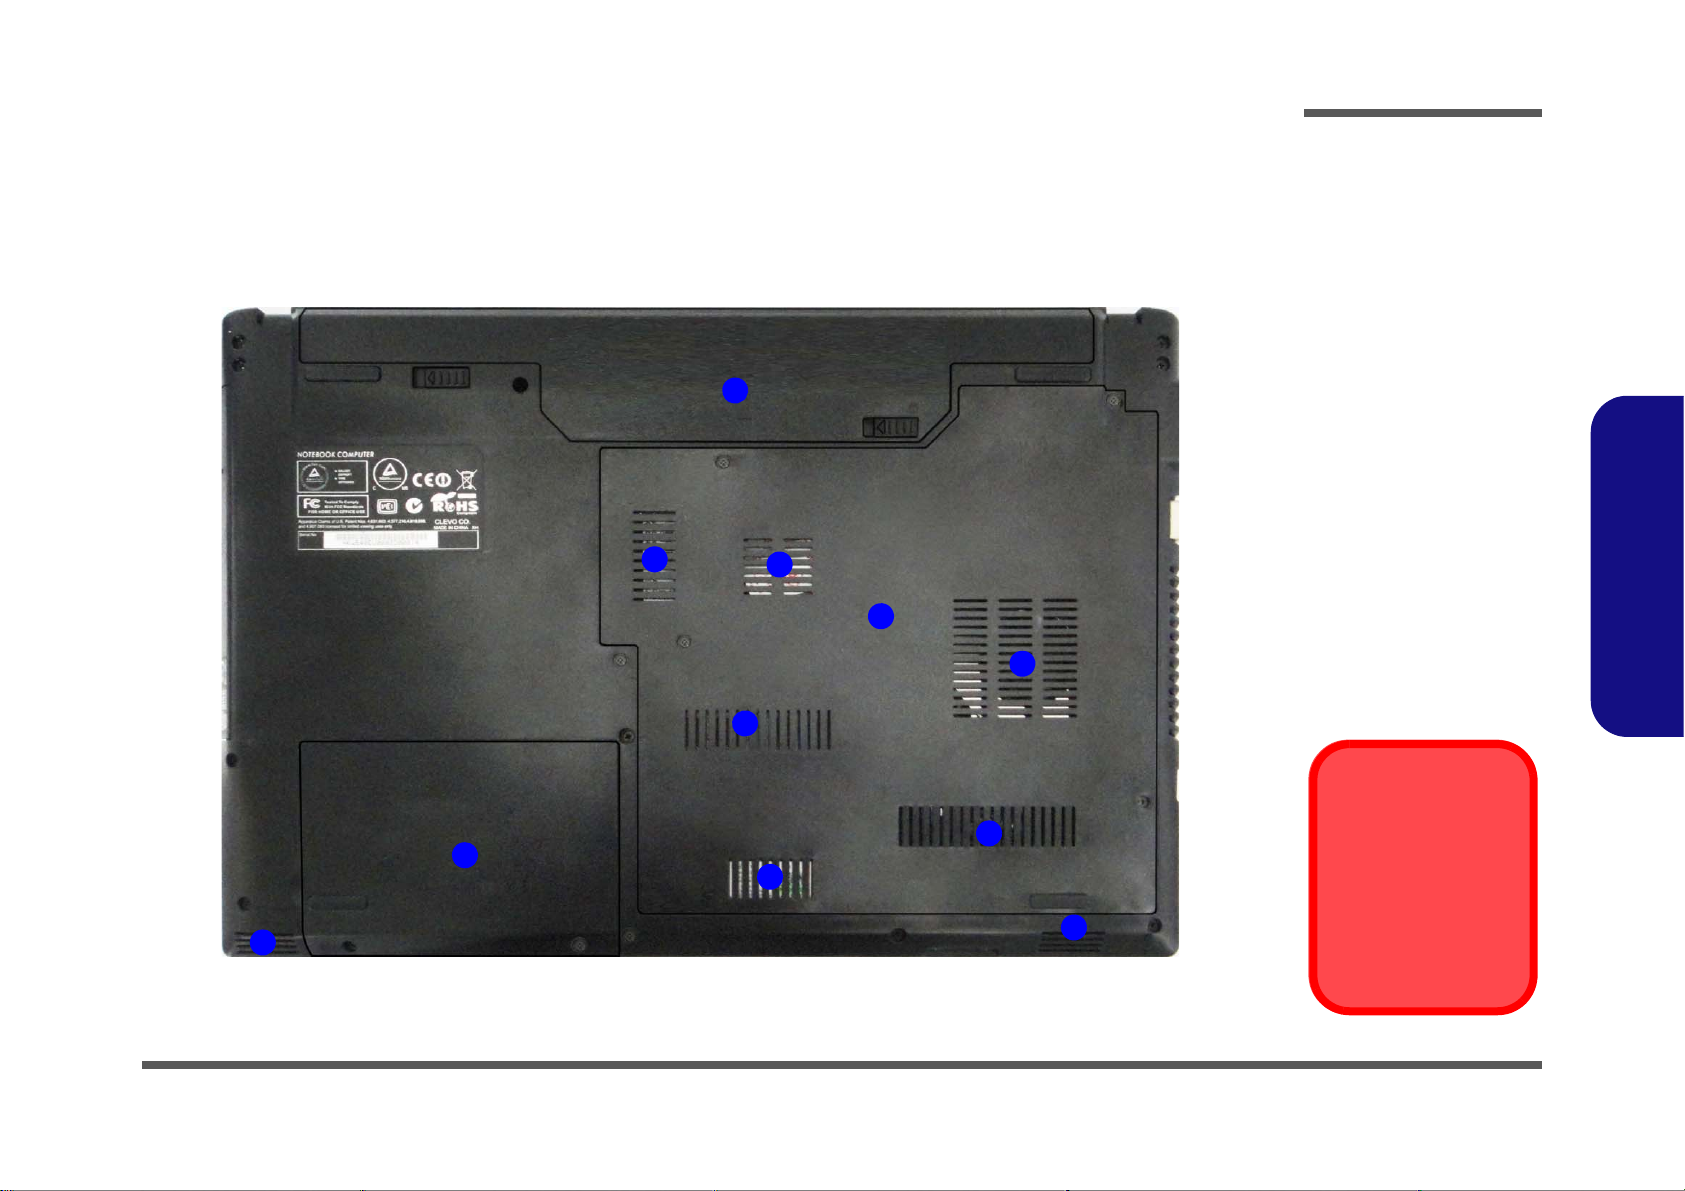
Figure 6
Bottom View
1. Battery
2. Component Bay
Cover
3. Vent
4. Hard Disk Bay
Cover
5. Speakers
Overheating
To prevent your computer from overheating, make sure nothing blocks any vent
while the computer is
in use.
2
3
1
4
3
3
5
5
3
3
3
Introduction
1.Introduction
External Locator - Bottom View 1 - 7
Page 20
Introduction
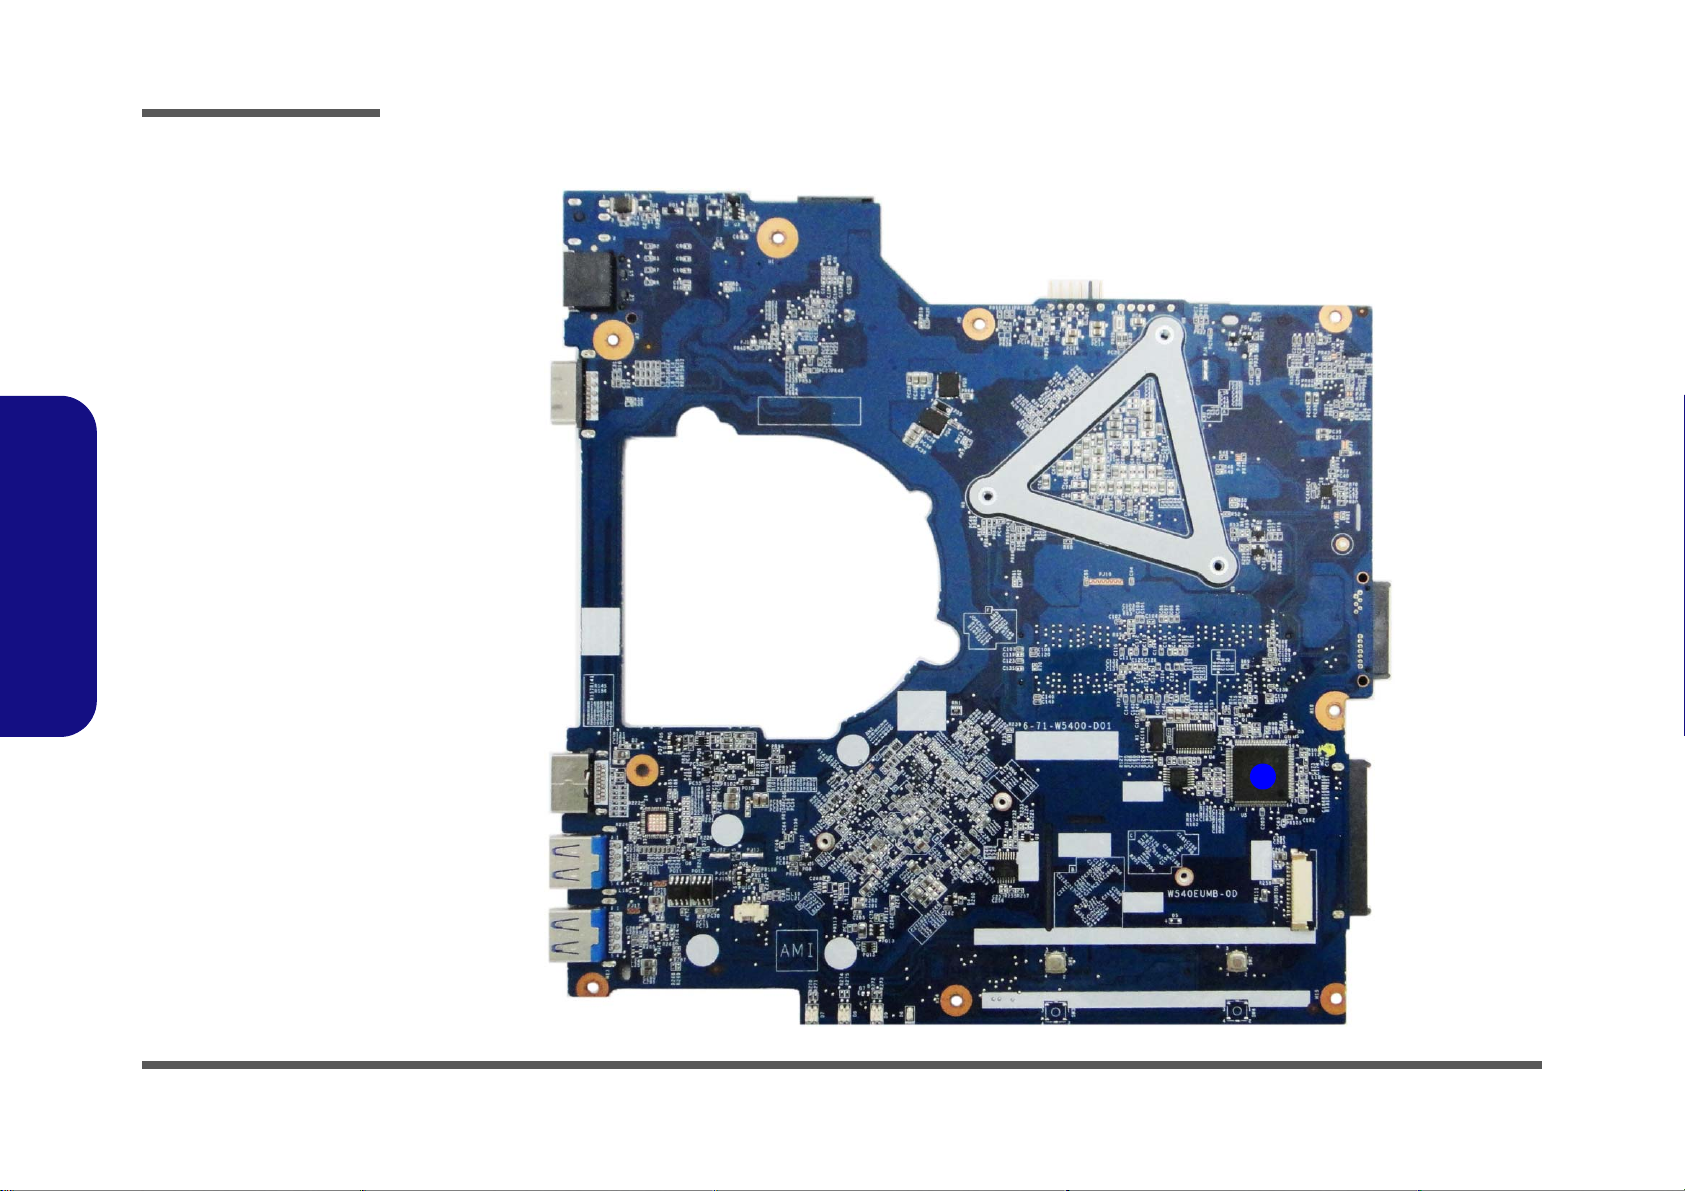
Figure 7
Mainboard Top
Key Parts
1. KBC-ITE IT8518
2.
2
3
1
1.Introduction
Mainboard Overview - Top (Key Parts)
1 - 8 Mainboard Overview - Top (Key Parts)
Page 21

Mainboard Overview - Bottom (Key Parts)
1
2
3
7
4 5
6
8
Figure 8
Mainboard Bottom
Key Parts
1. Mini-Card
Connector (3G
Module)
2. CPU Socket (no
CPU installed)
3. Memory Slots
DDR3 SO-DIMM
4. Mini-Card
Connector (WLAN
Module)
5. Audio Codec VIA
VT1802P
6. CMOS Battery
7. Platform Controller
Hub
8. RTL8411 Card
Reader + LAN
Introduction
1.Introduction
Mainboard Overview - Bottom (Key Parts) 1 - 9
Page 22
Introduction
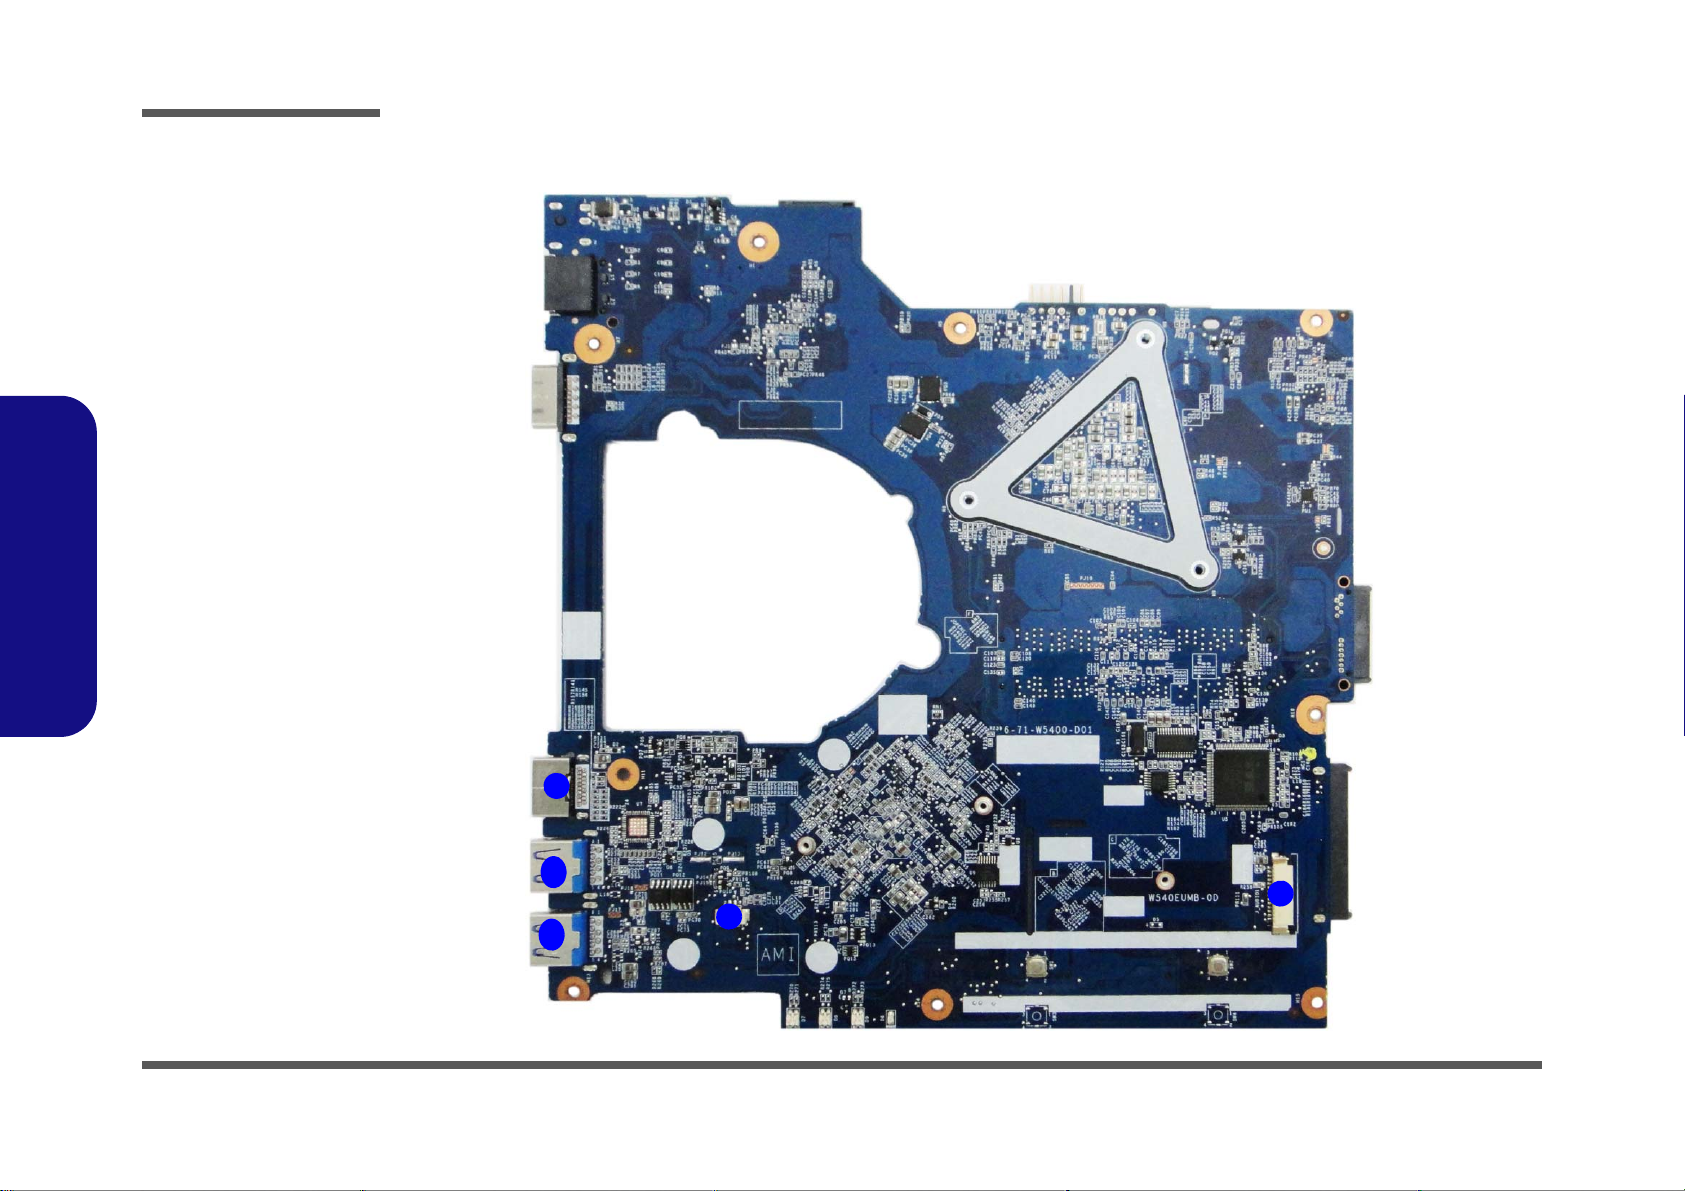
Figure 9
Mainboard Top
Connectors
1. HDMI-Out Port
2. USB Port 3.0
3. Speaker Cable
Connector
4. Audio Board
Cable Connector
7
8
9
5
6
10
11
1
2
3
2
4
1.Introduction
Mainboard Overview - Top (Connectors)
1 - 10 Mainboard Overview - Top (Connectors)
Page 23
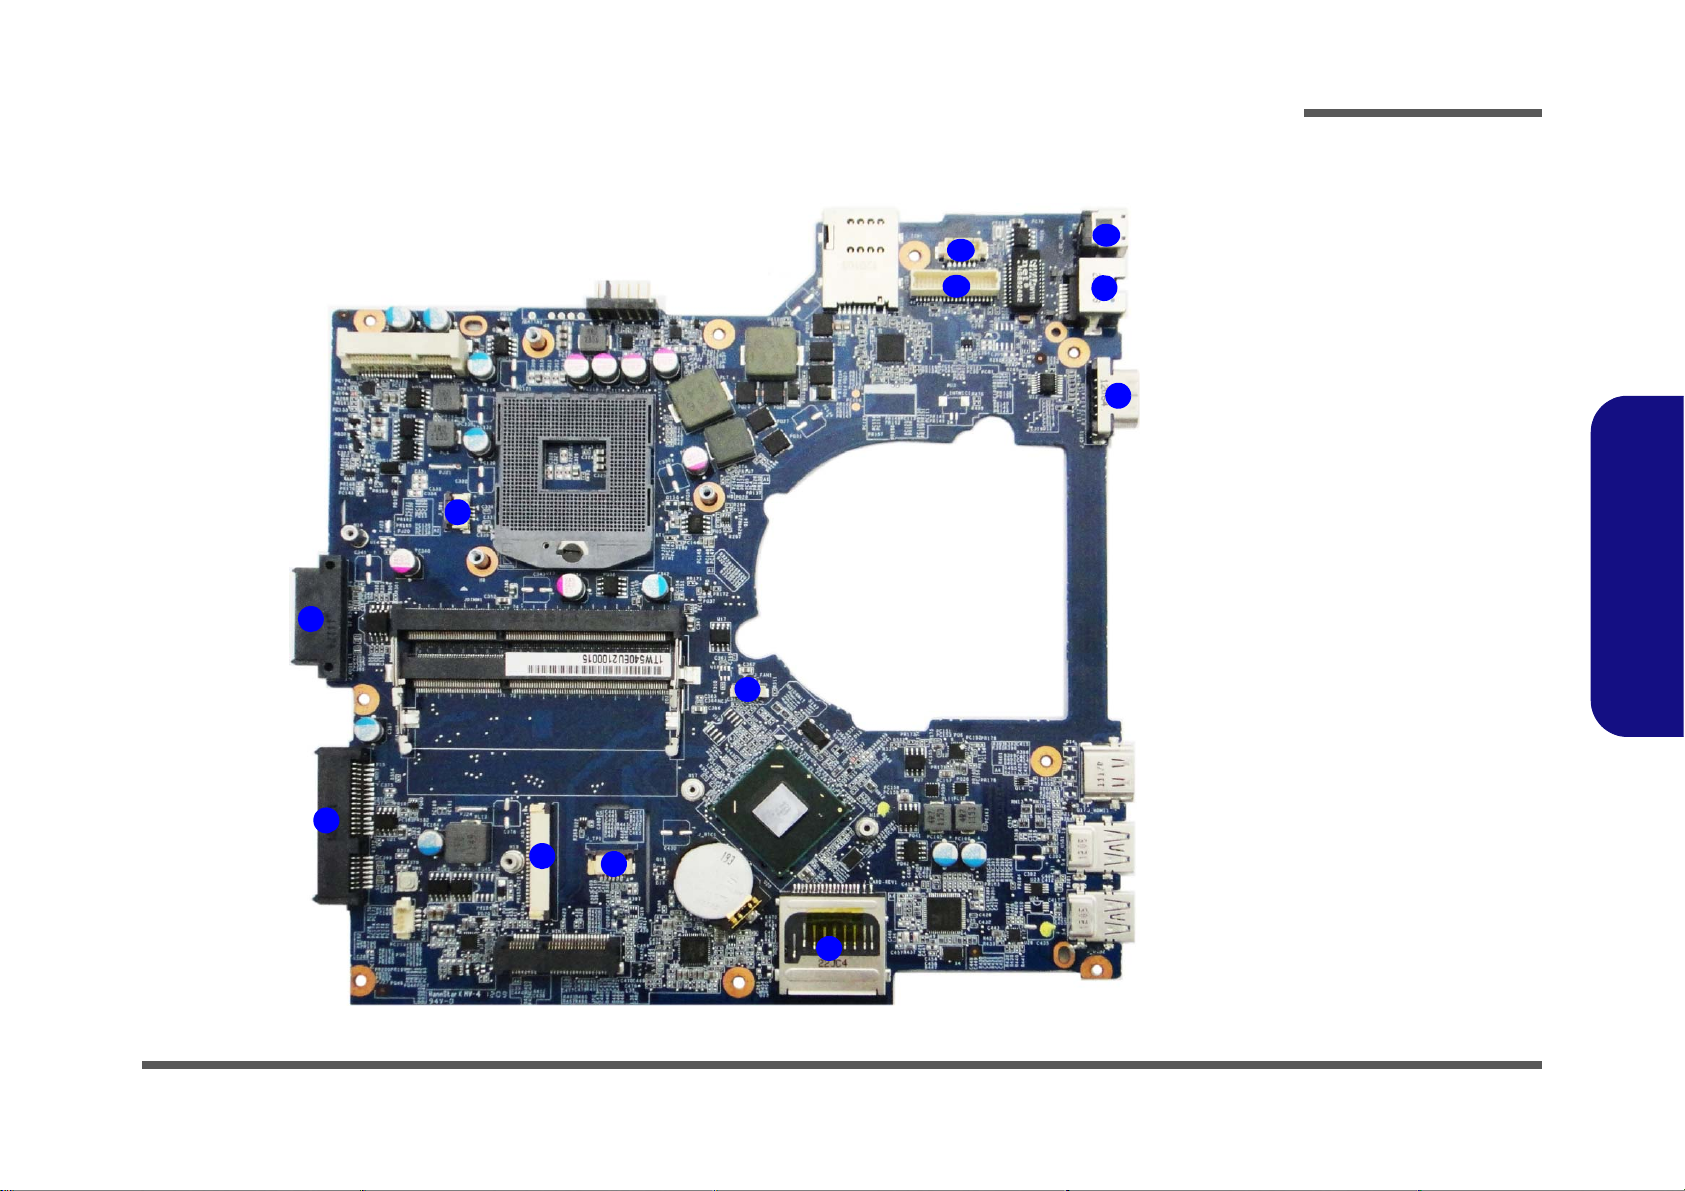
Mainboard Overview - Bottom (Connectors)
Figure 10
Mainboard Bottom
Connectors
1. ODD Connector
2. HDD Connector
3. Power Button
Cable Connector
4. Keyboard Cable
Connector
5. TouchPad Ca ble
Connector
6. Fan Cable
Connector
7. Mu lti-in-1 Card
Reader
8. External Monitor
Port
9. RJ-45 LAN Jack
10.DC-In Jack
11. LCD Cable
Connector
12.CCD Cable + INT
MIC Connector
1
2
4
6
7
8
9
3
5
10
11
12
Introduction
1.Introduction
Mainboard Overview - Bottom (Connectors) 1 - 11
Page 24

1.Introduction
Introduction
1 - 12
Page 25

Chapter 2: Disassembly
Information
Warning
Overview
This chapter provides step-by-step instructions for disassembling the W540EU series notebook’s parts and subsystems.
When it comes to reassembly, reverse the procedures (unless otherwise indicated).
We suggest you completely review any procedure before you take the computer apart.
Disassembly
Procedures such as upgrading/replacing the RAM, optical device and hard disk are included in the User’s Manual but are
repeated here for your convenience.
To make the disassembly process easier each section may have a box in the page margin. Information contained under
the figure # will give a synopsis of the sequence of procedures involved in the disassembly procedure. A box with a
lists the relevant parts you will have after the disassembly process is complete. Note: The parts listed will be for the disassembly procedure listed ONLY, and not any previous disassembly step(s) required. Refer to the part list for the previous disassembly procedure. The amount of screws you should be left with will be listed here also.
A box with a will also provide any possible helpful information. A box with a contains warnings.
An example of these types of boxes are shown in the sidebar.
2.Disassembly
Overview 2 - 1
Page 26

Disassembly
2.Disassembly
NOTE: All disassembly procedures assume that the system is turned OFF, and disconnected from any power supply (the
battery is removed too).
Maintenance Tools
The following tools are recommended when working on the notebook PC:
• M3 Philips-head screwdriver
• M2.5 Philips-head screwdriver (magnetized)
• M2 Philips-head screwdriver
• Small flat-head screwdriver
• Pair of needle-nose pliers
• Anti-static wrist-strap
Connections
Connections within the computer are one of four types:
Locking collar sockets for ribbon connectors To release these connectors, use a small flat-head screwdriver to
gently pry the locking collar away from its base. When replacing the connection, make sure the connector is oriented in the
same way. The pin1 side is usually not indicated.
2 - 2 Overview
Pressure sockets for multi-wire connectors To release this connector type, grasp it at its head and gently
rock it from side to side as you pull it out. Do not pull on the
wires themselves. When replacing the connection, do not try to
force it. The socket only fits one way.
Pressure sockets for ribbon connectors To release these connectors, use a small pair of needle-nose pli-
ers to gently lift the connector away from its socket. When replacing the connection, make sure the connector is oriented in
the same way. The pin1 side is usually not indicated.
Board-to-board or multi-pin sockets To separate the boards, gently rock them from side to side as
you pull them apart. If the connection is very tight, use a small
flat-head screwdriver - use just enough force to start.
Page 27
Maintenance Precautions
Power Safety
Warning
Before you undertake
any upgrade procedures, make sure that
you have turned off the
power, and disconnected all peripherals
and cables (including
telephone lines and
power cord). It is advisable to also remove
your battery in order to
prevent accidentally
turning the machine
on.
The following precautions are a reminder. To avoid personal injury or damage to the computer while performing a removal and/or replacement job, take the following precautions:
1. Don't drop it. Perform your repairs and/or upgrades on a stable surface. If the computer falls, the case and other
2. Don't overheat it. Note the proximity of any heating elements. Keep the computer out of direct sunlight.
3. Avoid interference. Note the proximity of any high capacity transformers, electric motors, and other strong mag-
4. Keep it dry. This is an electrical appliance. If water or any other liquid gets into it, the computer could be badly
5. Be careful with power. Avoid accidental shocks, discharges or explosions.
6. Peripherals – Turn off and detach any peripherals.
7. Beware of static discharge. ICs, such as the CPU and main support chips, are vulnerable to static electricity.
8. Beware of corrosion. As you perform your job, avoid touching any connector leads. Even the cleanest hands pro-
9. Keep your work environment clean. Tobacco smoke, dust or other air-born particulate matter is often attracted
10. Keep track of the components. When removing or re placing any part, be careful not to leave small p arts, such as
Disassembly
components could be damaged.
netic fields. These can hinder proper performance and damage components and/or data. You should also monitor
the position of magnetized tools (i.e. screwdrivers).
damaged.
2.Disassembly
•Before removing or servicing any part from the computer, turn the computer off and detach any power supplies.
•When you want to unplug the power cord or any cable/wire, be sure to disconnect it by the plug head. Do not pull on the wire.
Before handling any part in the computer, discharge any static electricity inside the computer. When handling a
printed circuit board, do not use gloves or other materials which allow static electricity buildup. We suggest that
you use an anti-static wrist strap instead.
duce oils which can attract corrosive elements.
to charged surfaces, reducing performance.
screws, loose inside the computer.
Cleaning
Do not apply cleaner directly to the computer, use a soft clean cloth.
Do not use volatile (petroleum distillates) or abrasive cleaners on any part of the computer.
Overview 2 - 3
Page 28

Disassembly
Disassembly Steps
The following table lists the disassembly steps, and on which page to find the related information. PLEASE PERFORM
THE DISASSEMBLY STEPS IN THE ORDER INDICATED.
2.Disassembly
To remove the Battery:
1. Remove the battery page 2 - 5
To remove the HDD:
1. Remove the battery page 2 - 5
2. Remove the HDD page 2 - 6
To remove the Optical Device:
1. Remove the battery page 2 - 5
2. Remove the Optical device page 2 - 8
To remove the System Memory:
1. Remove the battery page 2 - 5
2. Remove the system memory page 2 - 10
To remove and install a Processor:
1. Remove the battery page 2 - 5
2. Remove the processor page 2 - 12
3. Install the processor page 2 - 14
To remove the Wireless LAN Module & Keyboard:
To remove the 3.75G Module:
1. Remove the battery page 2 - 5
2. Remove the 3.75G module page 2 - 18
To remove the CCD Module:
1. Remove the battery page 2 - 5
2. Remove the CCD module page 2 - 19
1. Remove the battery page 2 - 5
2. Remove the WLAN & keyboard page 2 - 15
2 - 4 Disassembly Steps
Page 29

Removing the Battery
3. Battery
12634
Figure 1
Battery Removal
a. Slide the latch and hold it
in place.
b. Slide the battery in the di-
rection of the arrow.
1
a.
b.
3
2
4
1. Turn the computer off, and turn it over.
2. Slide the latch in the direction of the arrow (Figure 1a
3. Slide the latch in the direction of the arrow, and hold it in place (Figure 1a
4. Slide the battery in the direction of the arrow (Figure 1b
).
).
Disassembly
).
2.Disassembly
Removing the Battery 2 - 5
Page 30
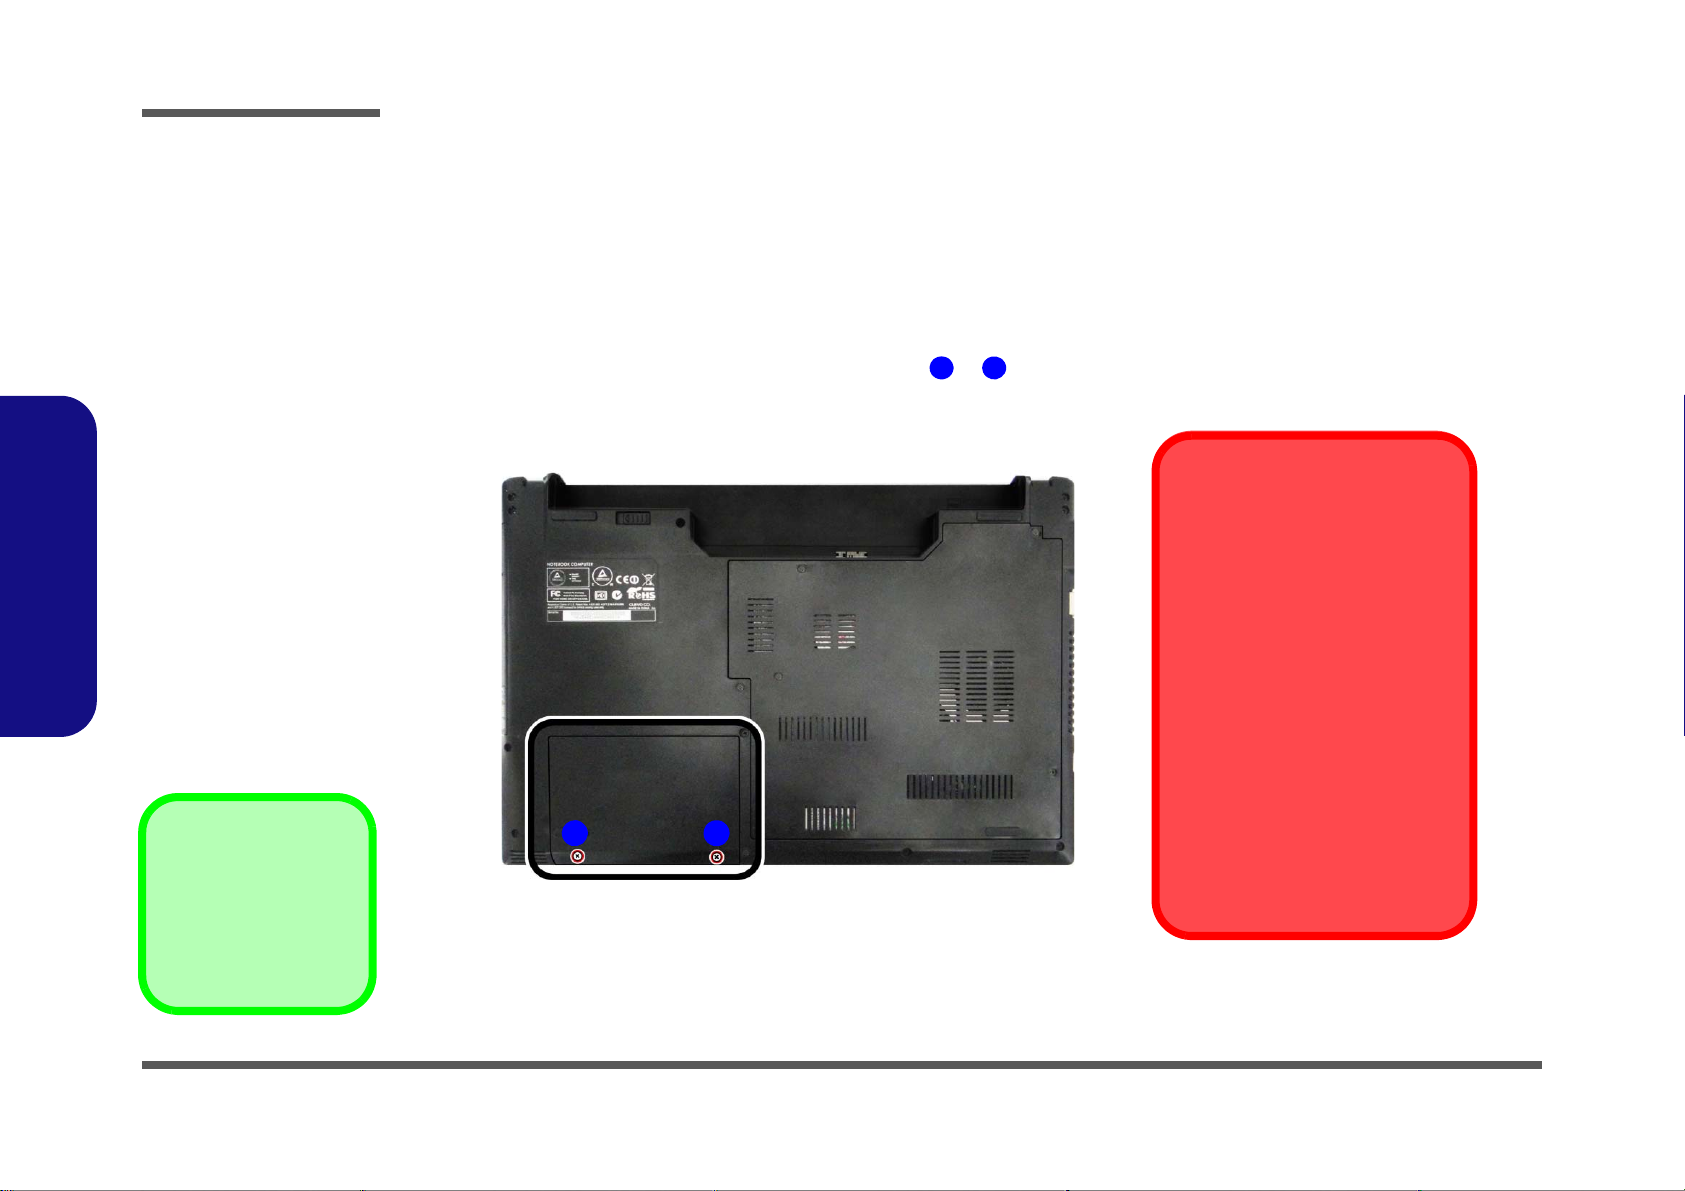
Disassembly
Figure 2
HDD Assembly
Removal
a. Locate the HDD bay cover
and remove the screws.
•2 Screws
1
2
21
a.
HDD System Warning
New HDD’s are blank. Before you
begin make sure:
You have backed up any data
you want to keep from your old
HDD.
You have all the CD-ROMs and
FDDs required to install your operating system and programs.
If you have access to the internet,
download the latest application
and hardware driver updates for
the operating system you plan to
install. Copy these to a removable medium.
Removing the Hard Disk Drive
The hard disk drive can be taken out to accommodate other 2.5" serial (SATA) hard disk drives with a height of 9.5mm
(h). Follow your operating system’s installation instructions, and install all necessary drivers and utilities (as outlined in
Chapter 4 of the User’s Manual) when setting up a new hard disk.
Hard Disk Upgrade Process
1. Turn off the computer, and remove the battery (page 2 - 5).
2. Locate the hard disk bay cover and remove screws & (Figure 2a
).
2.Disassembly
2 - 6 Removing the Hard Disk Drive
Page 31
3
645
66789
10
11
b.
c.
7
8
d.
4
e.
10
11
6
9
3
5
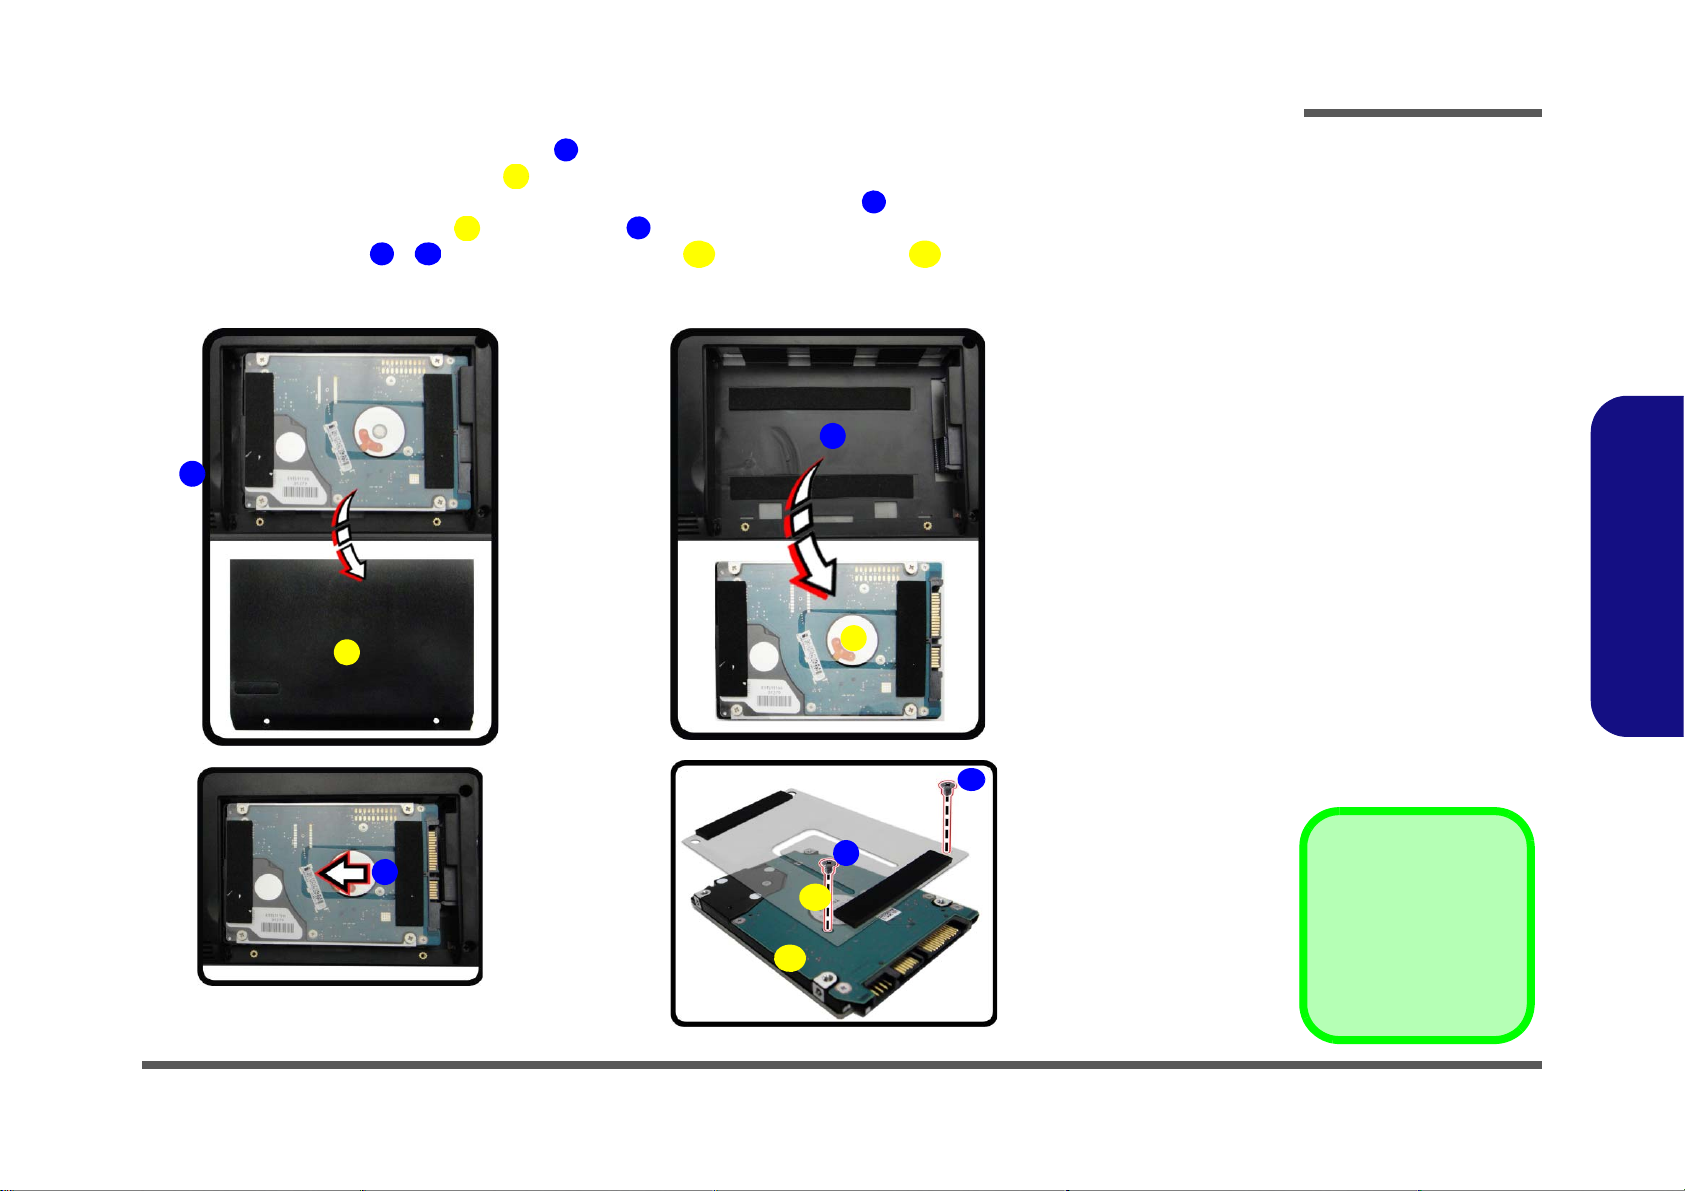
3. HDD Bay Cover
5. HDD Assembly
11.Adhesive Cover
12.HDD
•2 Screws
Figure 3
HDD Assembly
Removal (cont’d.)
b. Remove the HDD bay
cover.
c. Grip the tab and slide the
HDD assembly in the direction of the arrow.
d. Lift the HDD assembly
out of the bay.
e. Remove the screws and
adhesive cover.
Disassembly
3. Lift the hard disk bay cover from point (Figure 3b).
4. Remove the hard disk bay cover (Figure 3b).
5. Grip the tab and slide the hard disk assembly in the direction of arrow (Figure 3c).
6. Lift the hard disk assembly out of the bay (Figure 3d).
7. Remove the screw - and the adhesive cover from the hard disk
(Figure 3e).
8. Reverse the process to install a new hard disk (do not forget to replace all the screws and bay cover).
2.Disassembly
Removing the Hard Disk Drive 2 - 7
Page 32
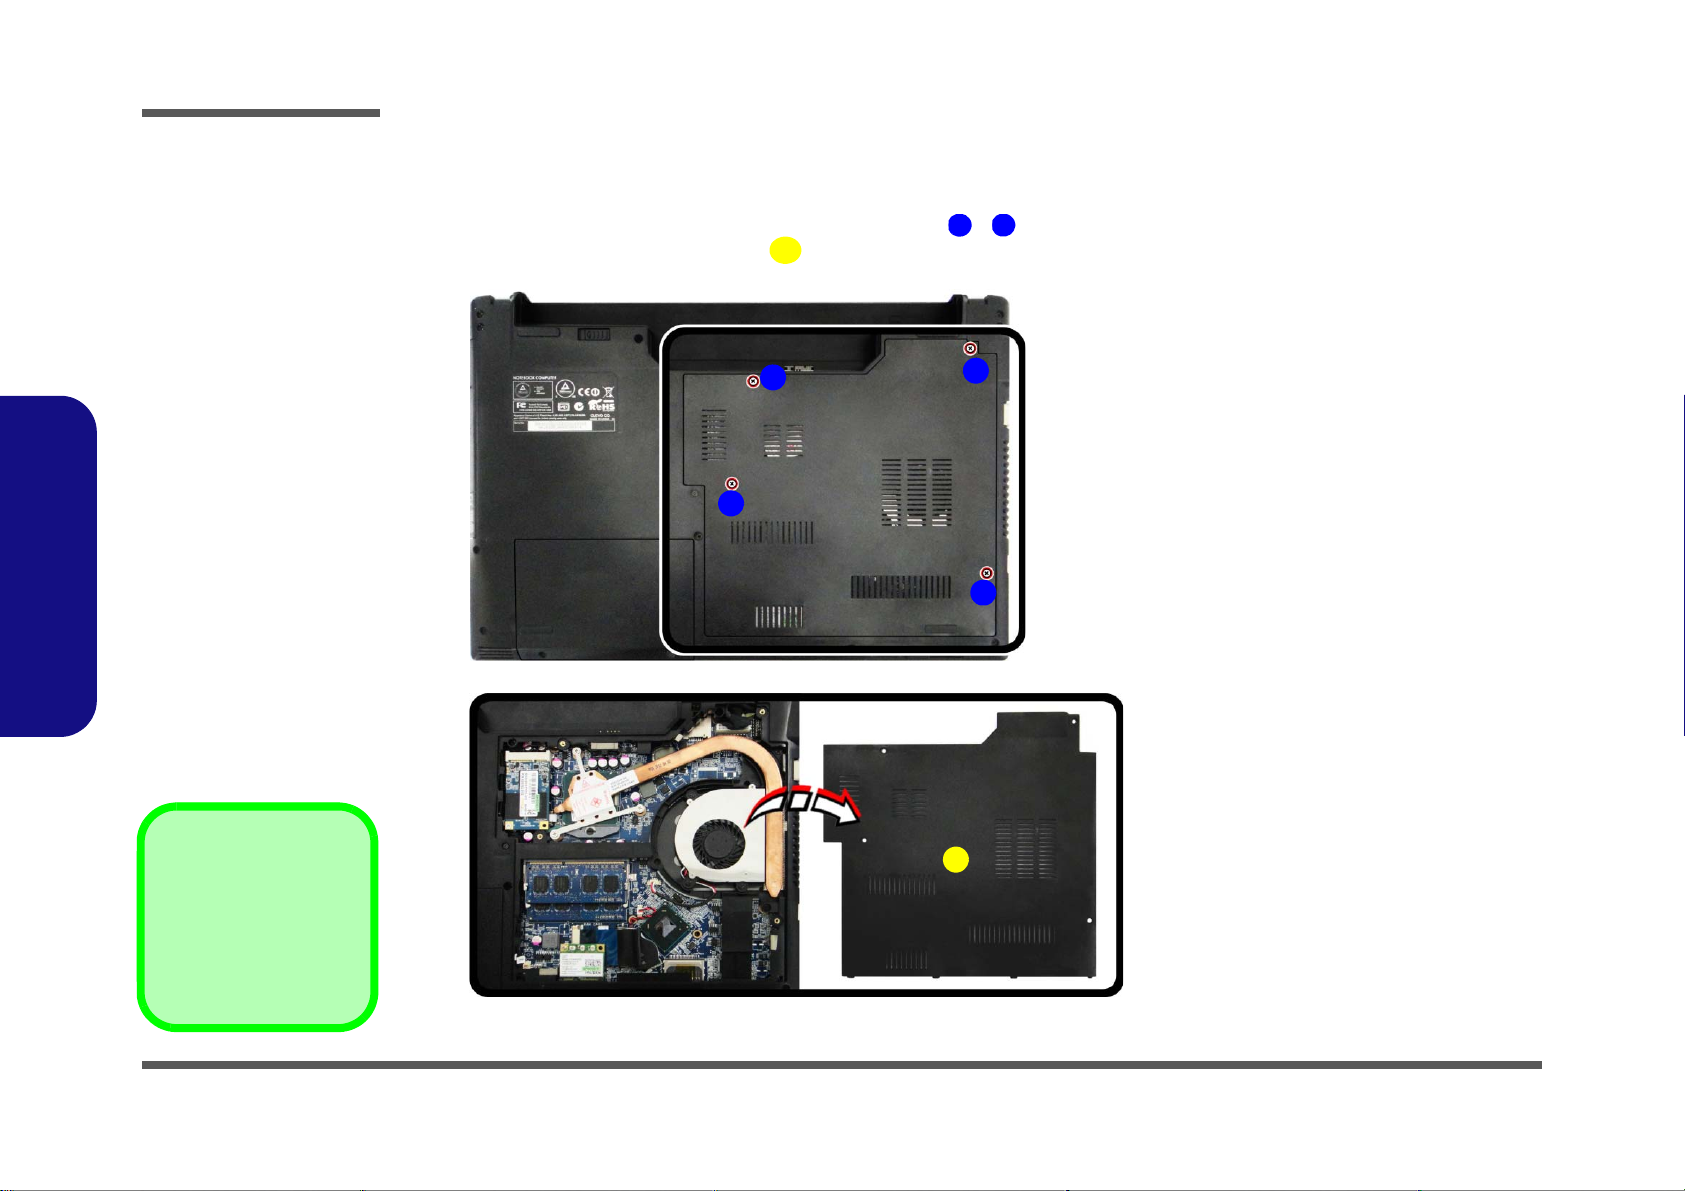
1
4
5
3. Component Bay Cover
•4 Screws
1
b.
5
a.
2
4
3
Figure 4
Optical Device
Removal
a. Remove the screws.
b. Remove the component
bay cover.
Disassembly
Removing the Optical (CD/DVD) Device
1. Turn off the computer, and remove the battery (page 2 - 5).
2. Locate the component bay cover and remove screws - (Figure 4a
3. Remove the component bay cover
(Figure 4b).
).
2.Disassembly
2 - 8 Removing the Optical (CD/DVD) Device
Page 33
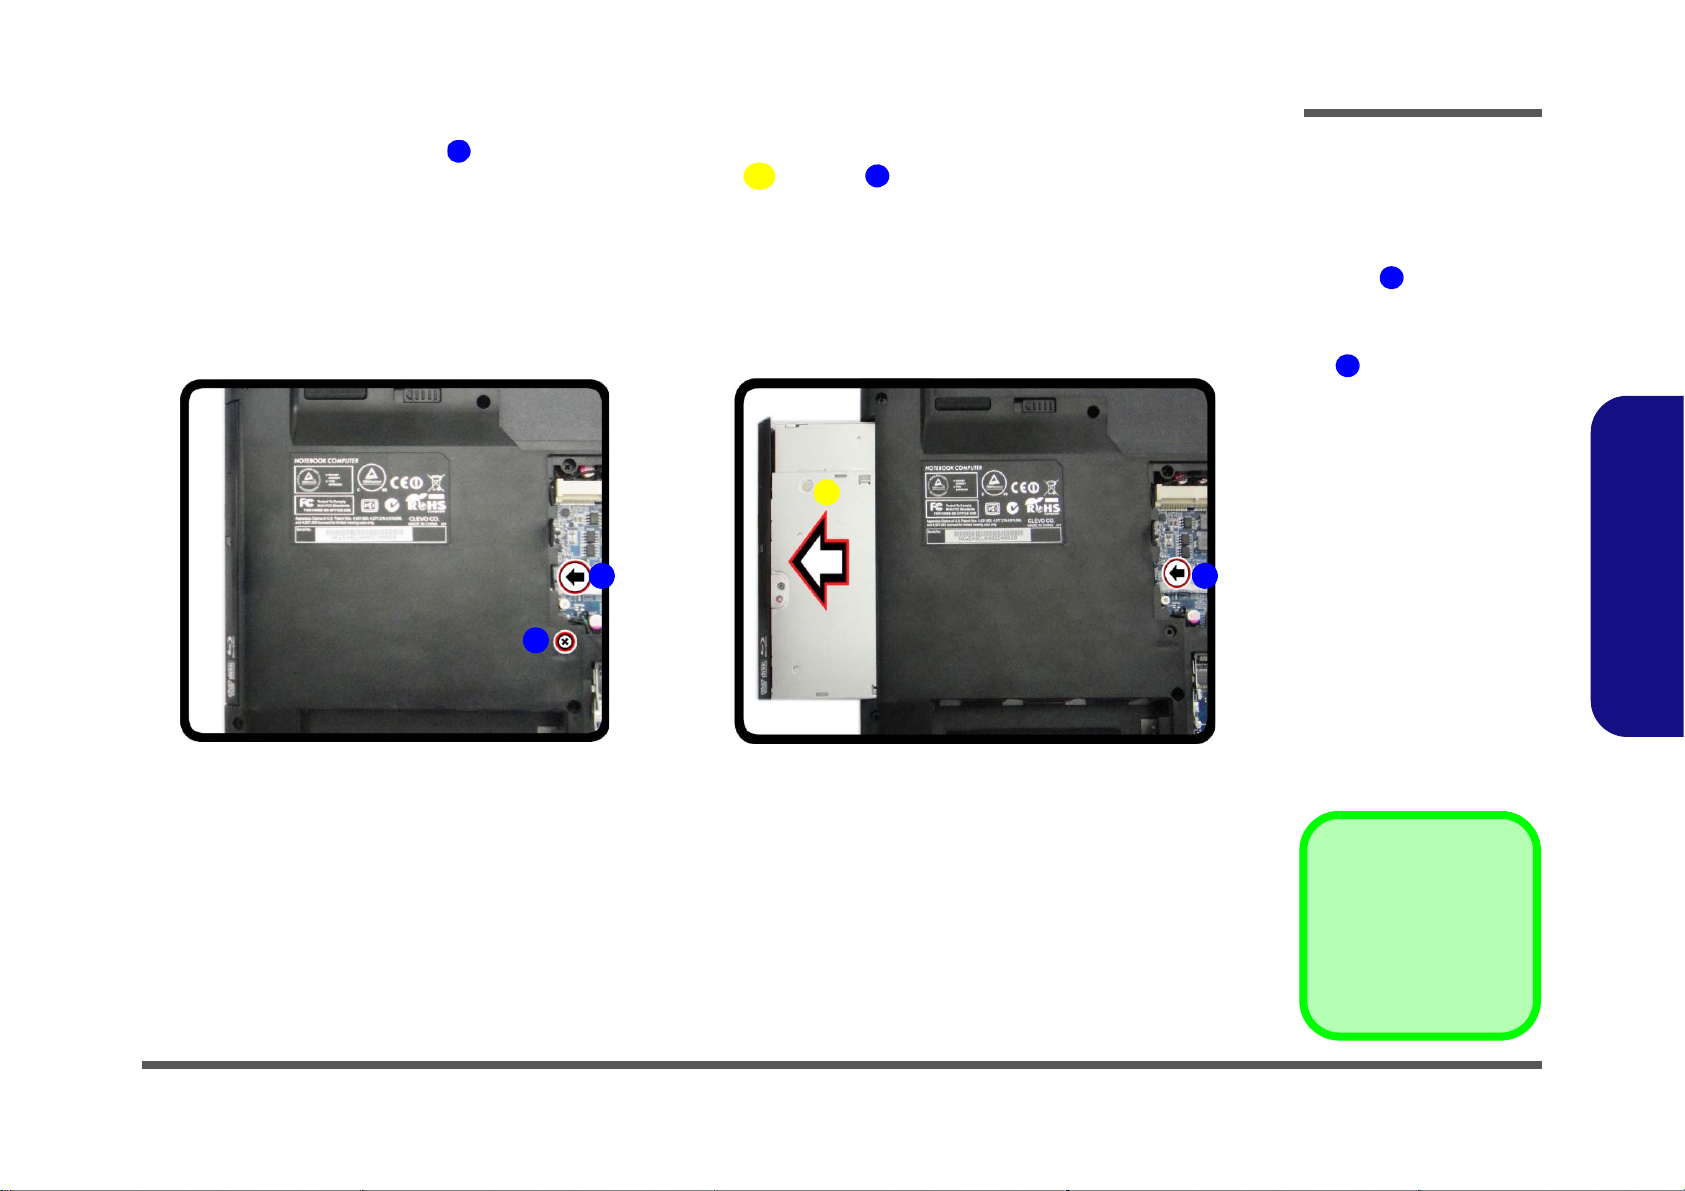
4. Remove the screw at point (Figure 5c).
6
8
7
8. Optical Device
•1 Screw
7
d.
8
c.
6
7
Figure 5
Optical Device
Removal (cont’d.)
a. Remove the screw at
point .
b. Use a screwdriver to
carefully push out the
optical device at point
.
6
7
5. Use a screwdriver to carefully push out the optical device
6. Insert the new device and carefully slide it into the computer (the device only fits one wa y. DO NOT FORCE IT; The
screw holes should line up).
7. Replace the component bay cover and screws.
8. Restart the computer to allow it to automatically detect the new device.
Disassembly
at point (Figure 5d).
2.Disassembly
Removing the Optical (CD/DVD) Device 2 - 9
Page 34
Disassembly
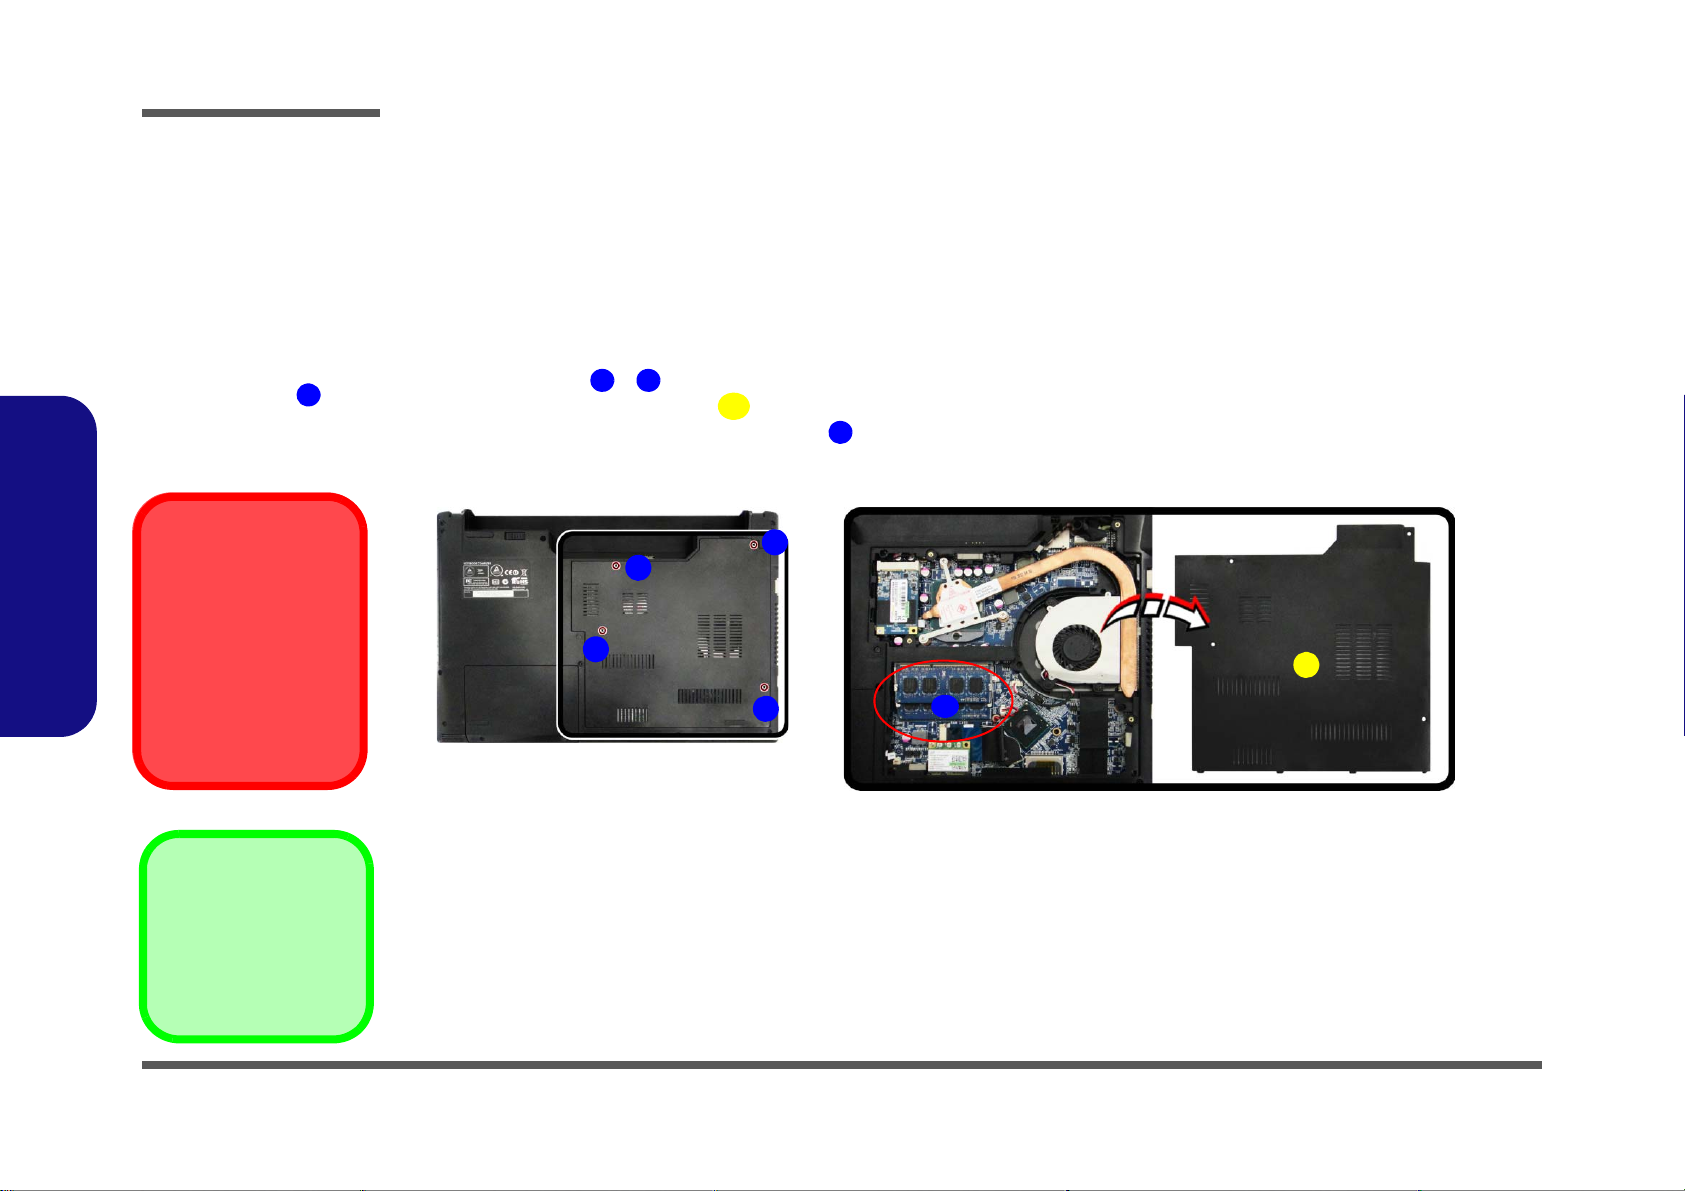
Figure 6
RAM Module
Removal
a. Remove the screws
from the component
bay cover.
b. Remove the compo-
nent bay cover. The
RAM modules will be
visible at point on
the mainboard.
Contact Warning
Be careful not to touch
the metal pins on the
module’s connecting
edge. Even the cleanest
hands have oils which
can attract particles, and
degrade the module’s
performance.
6
5. Component Bay Cover
•4 Screws
1
4
5
6
a.
b.
1
2
3
4
6
5
2.Disassembly
Removing the System Memory (RAM)
The computer has two memory sockets for 204 pin Small Outline Dual In-line Memory Modules (SO-DIMM) supporting
DDRIII (DDR3) Up to 1066/1333 MHz. The main memory can be expanded up to 8GB. The SO-DIMM modules supported are 1024MB and 2048MB DDRIII Modules. The total memory size is automatically detected by the POST routine once you turn on your computer.
Memory Upgrade Process
1. Turn off the computer, turn it over, and remove the battery (page 2 - 5).
2. Remove screws
3. Carefully lift up the bay cover .
4. The RAM modules will be visible at point on the mainboard (Figure 6b
- from the component bay cover (Figure 6a).
).
2 - 10 Removing the System Memory (RAM)
Page 35
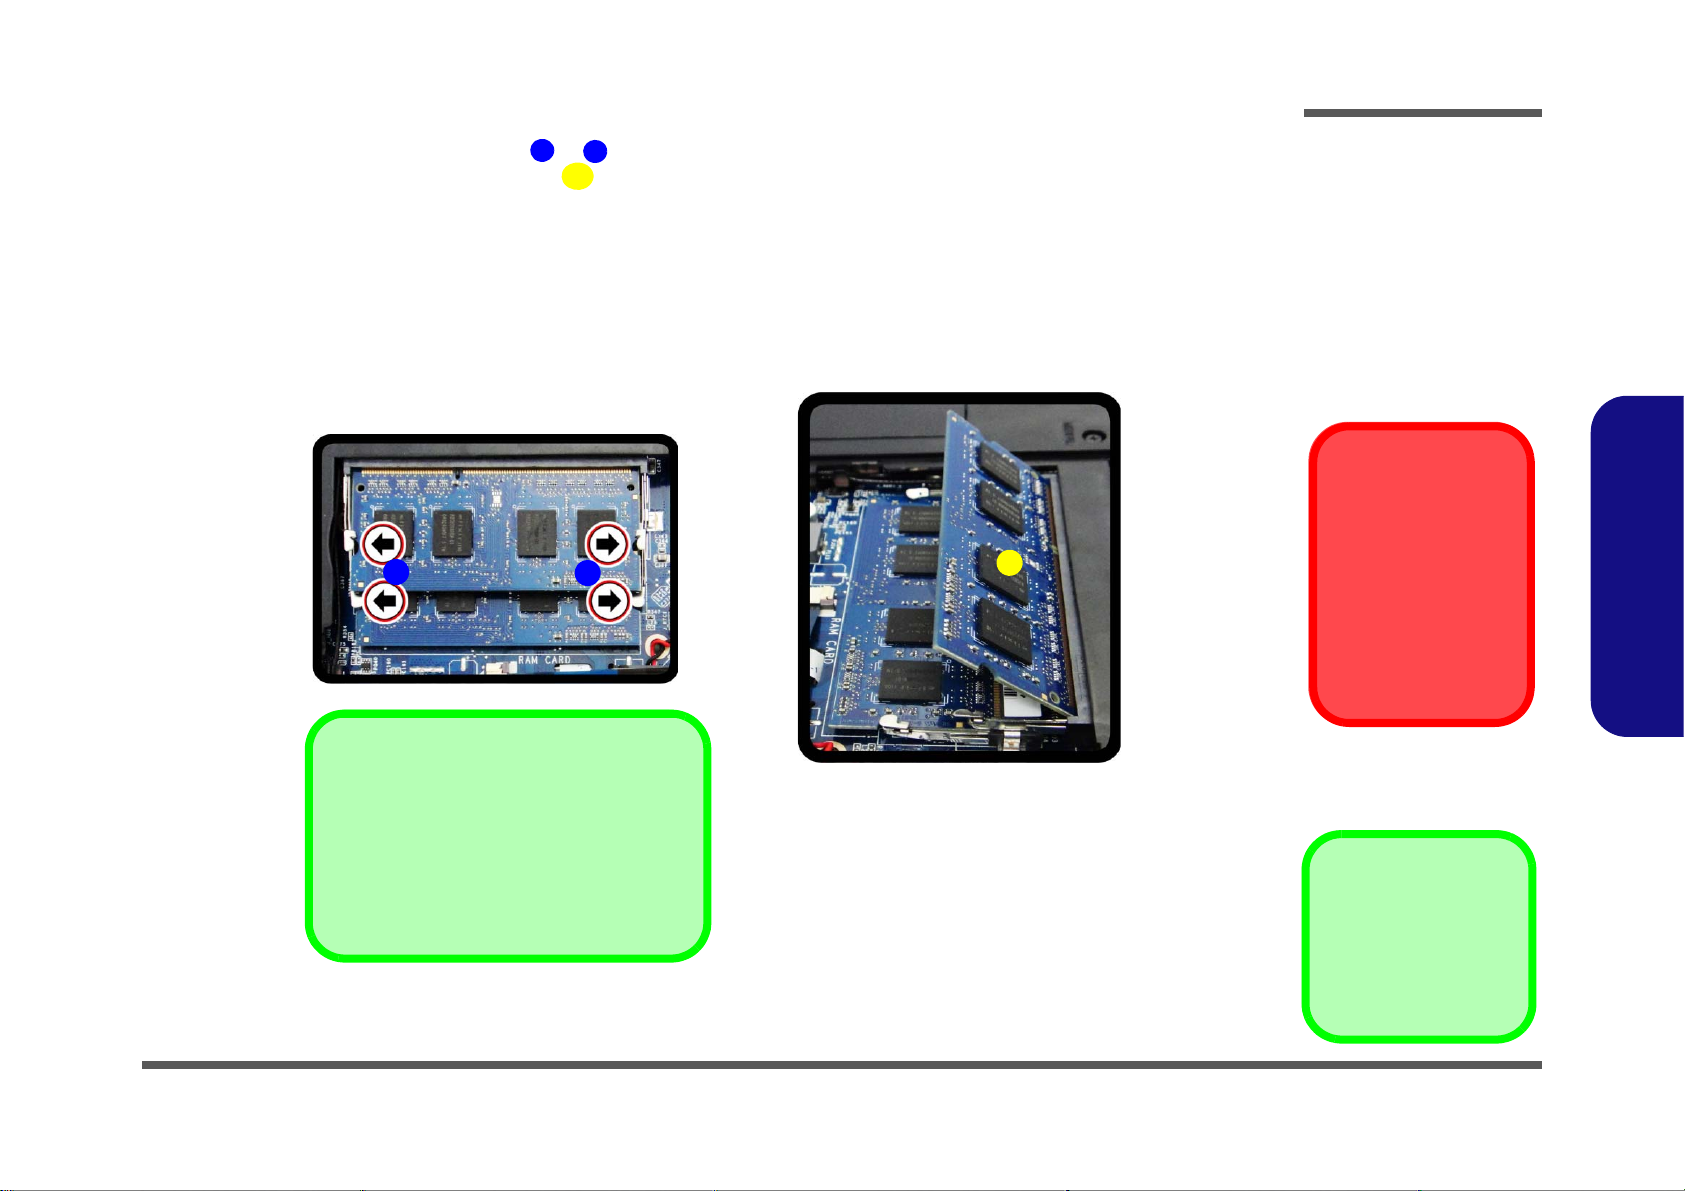
5. Gently pull the two release latches ( & ) on the sides of the memory socket in the direction indicated by the
Figure 7
RAM Module
Removal (cont’d)
c. Pull the release lat-
ches.
d. Remove the module.
Contact Warning
Be careful not to touch
the metal pins on the
module’s connecting
edge. Even the cleanest hands have oils
which can attract particles, and degrade the
module’s performance.
7
8
9
c.
d.
7
8
9
Single Memory Module Installation
If your computer has a single memory module, then insert the module into the Channel
0 (JDIMM1) socket. In this case this is the
lower memory socket (the socket closest to
the mainboard).
5. RAM
arrows (Figure 7c).
6. Pull the latches to release the second module if necessary.
7. Insert a new module holding it at about a 30° angle and fit the connectors firmly into the memory slot.
8. The module will only fit one way as defined by its pin alignment. Make sure the module is seated as far into the slot
as it will go. DO NOT FORCE IT; it should fit without much pressure.
9. Press the module in and down towards the mainboard until the slot levers click into place to secure the module.
10. Replace the component bay cover and the screws
11. Restart the computer to allow the BIOS to register the new memory configuration as it starts up.
Disassembly
The RAM module will pop-up (Figure 7d), and you can then remove it.
(see page 2 - 10).
2.Disassembly
Removing the System Memory (RAM) 2 - 11
Page 36
Disassembly
ABCE6
F
321
a.
b.
1
2
3
A
F
D
B
C
E
c.
d.
F. Fan
•3 Screws
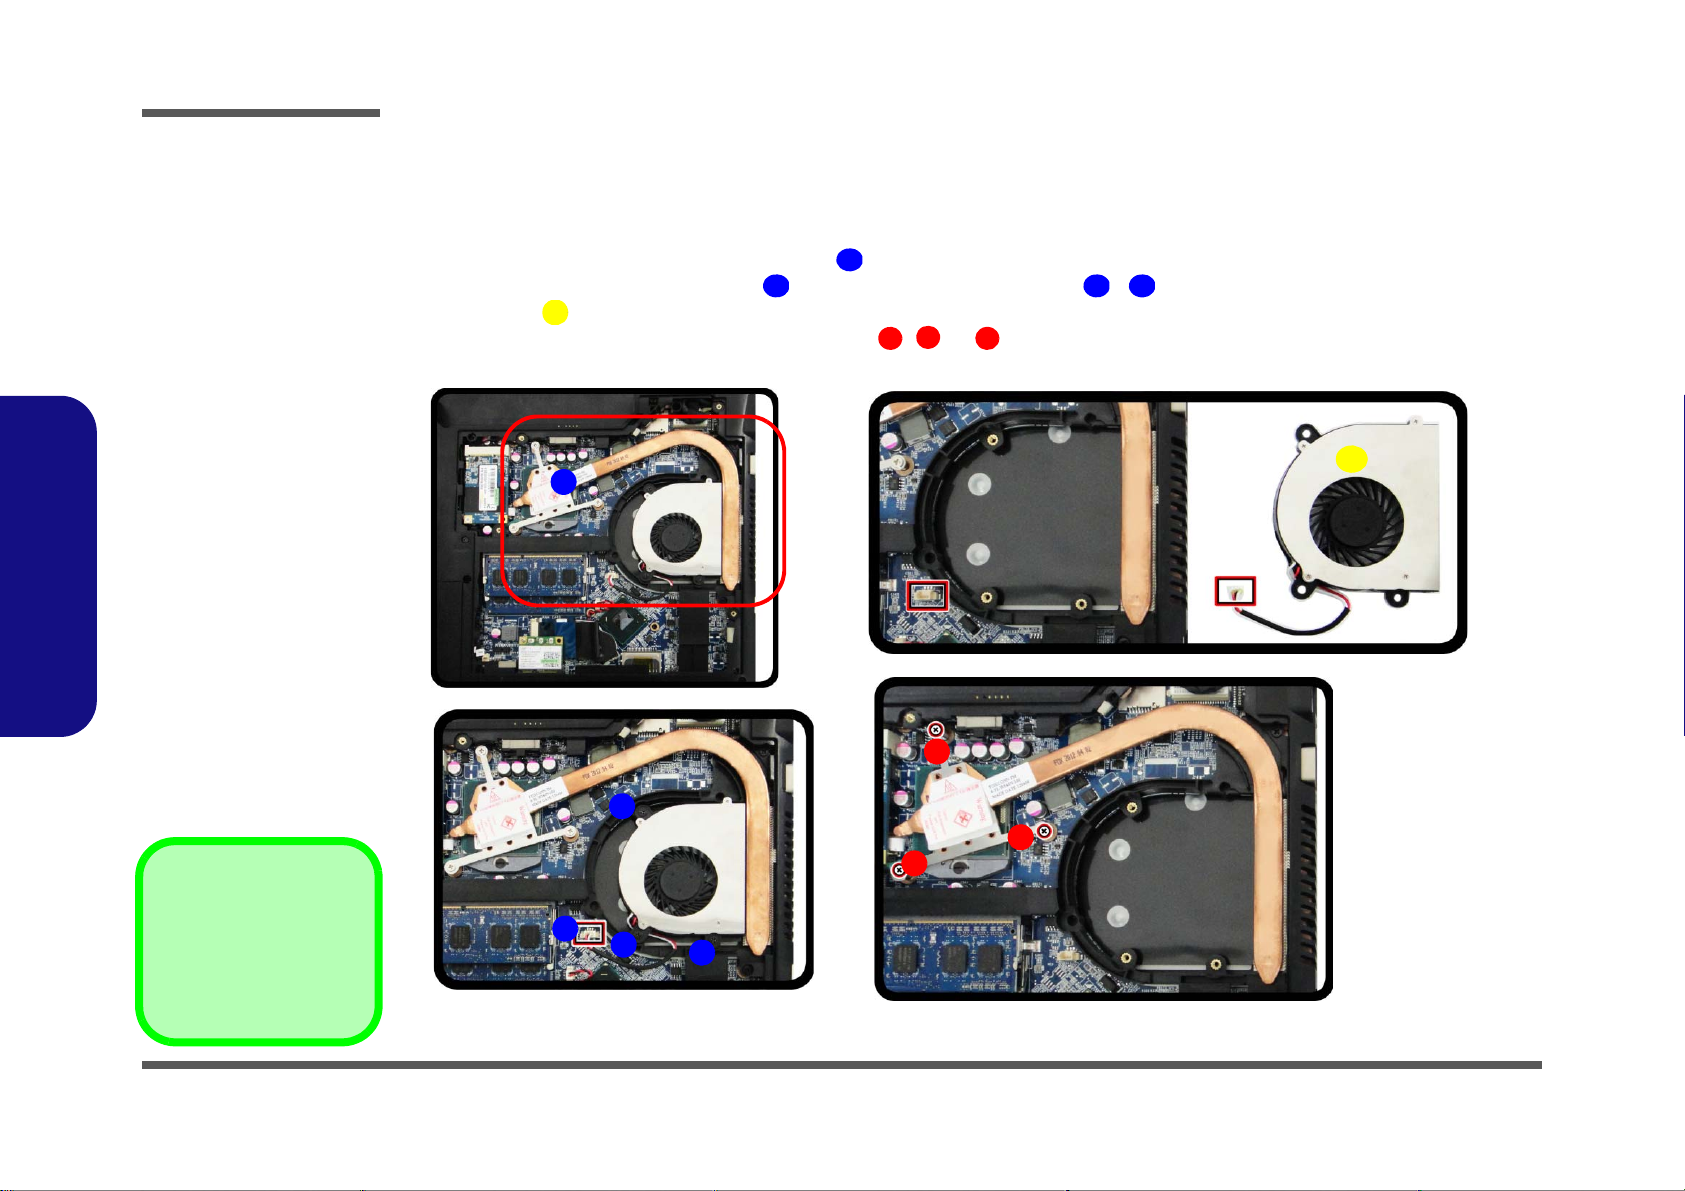
Figure 8
Processor Removal
a. Locate the CPU heat
sink.
b. Disconnect the cable
and remove the screws.
c. Remove the fan.
d. Remove the screws.
Removing and Installing a Processor
Processor Removal Procedure
1. Turn off the computer, turn it over, remove the battery (page 2 - 5) and the component bay cover (page 2 - 8).
2. The CPU heat sink will be visible at point (Figure 8a).
3. Carefully disconnect the fan cable
4. Lift the fan out of the bay (Figure 8c).
5. Loosen the CPU heat sink screws in the order
,and then remove the screws - (Figure 8b).
, & (the reverse order as indicated on the label Figure 8d.
2.Disassembly
2 - 12 Removing and Installing a Processor
Page 37
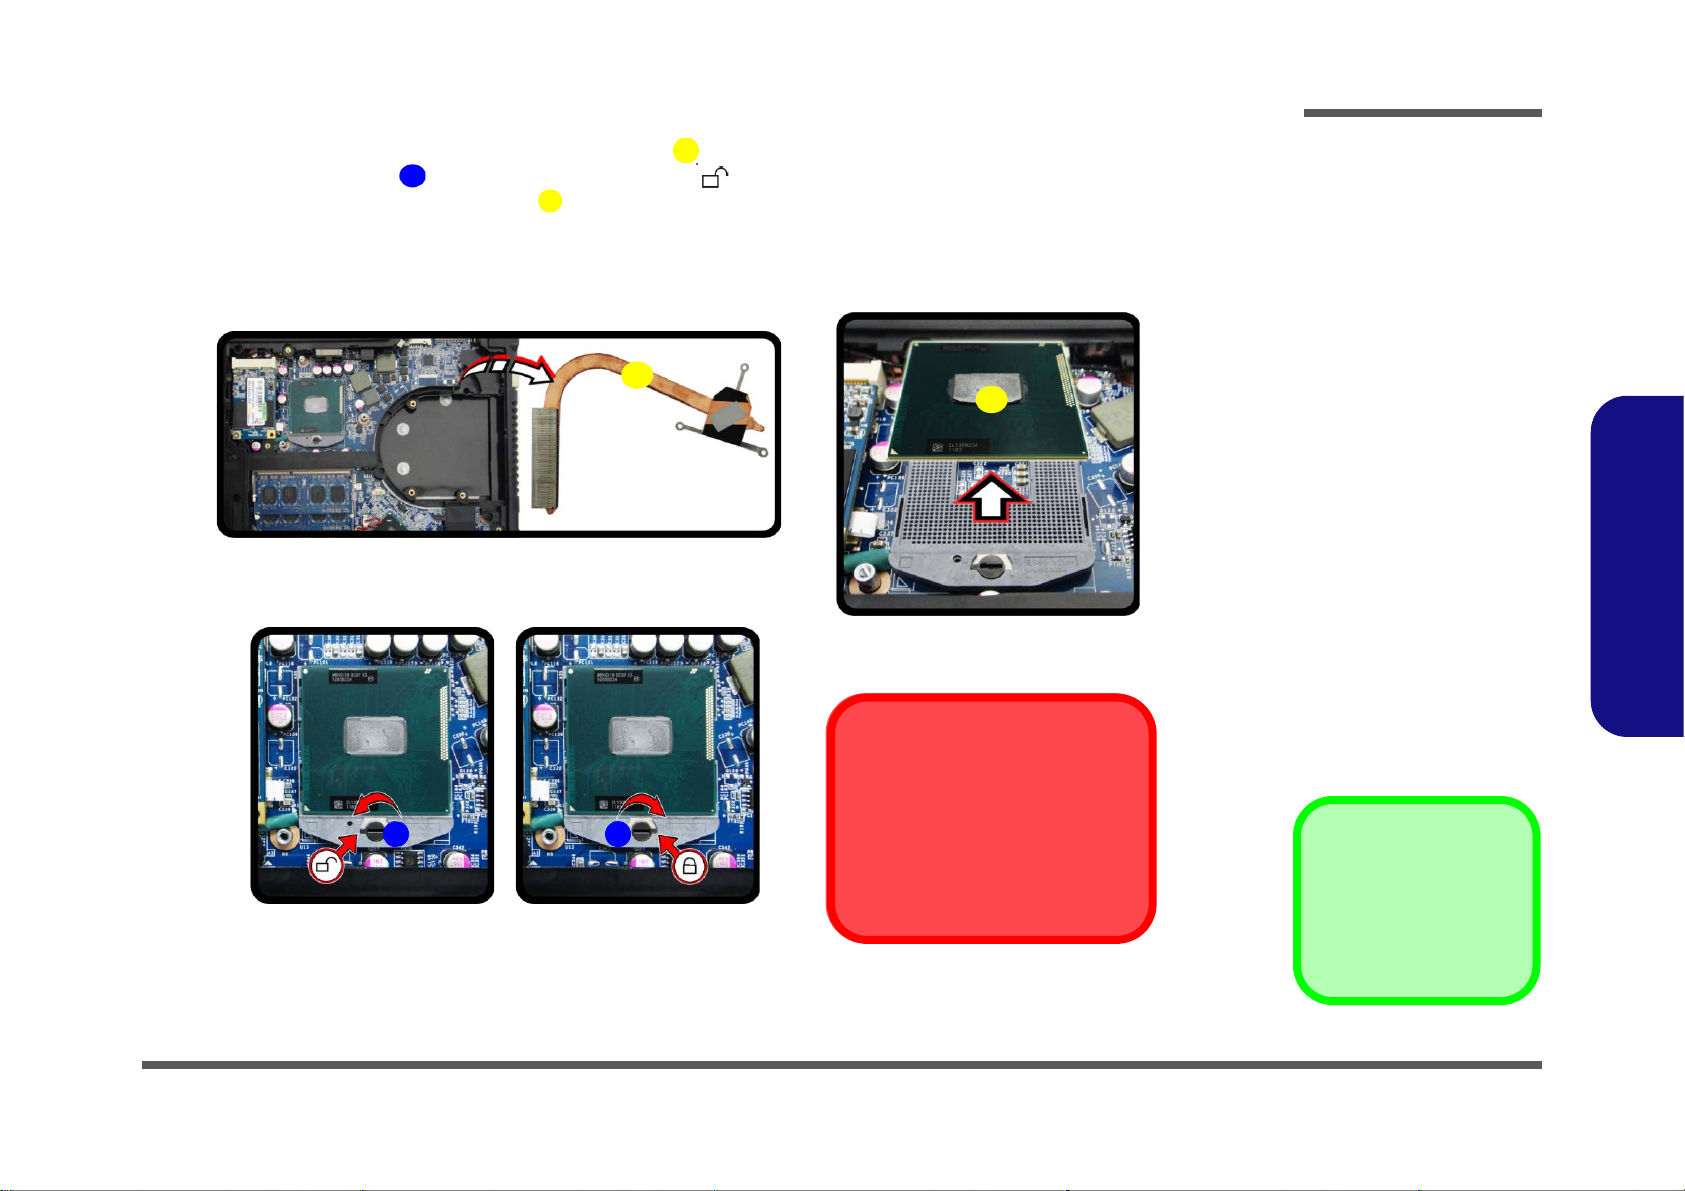
6. Carefully (it may be hot) remove the heat sink unit off the computer (Figure 9e).
6GH
I
e.
f.
I
H
g.
G
H
Caution
The heat sink, and CPU area in
general, contains parts which are
subject to high temperatures. Allow
the area time to cool before removing these parts.
G. Heat Sink
I. CPU
•6 Screws
Figure 9
Processor Removal
(cont’d)
e. Carefully remove the
heat sink unit.
f. Turn the release latch to
unlock the CPU.
g. Lift the CPU out of the
socket.
7. Turn the release latch towards the unlock symbol to release the CPU (Figure 9f).
8. Carefully (it may be hot) lift the CPU up and out of the socket (Figure 9g).
9. Reverse the process to install a new CPU.
10. When re-inserting the CPU, pay careful attention to the pin alig nme nt, it will fit only one way (DO NOT FORCE IT!)
Disassembly
2.Disassembly
Removing and Installing a Processor 2 - 13
Page 38
Disassembly
A
B
C
D
123
b.
B
a.
D
Note:
Tighten the screws in the order as
indicated on the label.
A
c.
d.
1
2
3
C
D
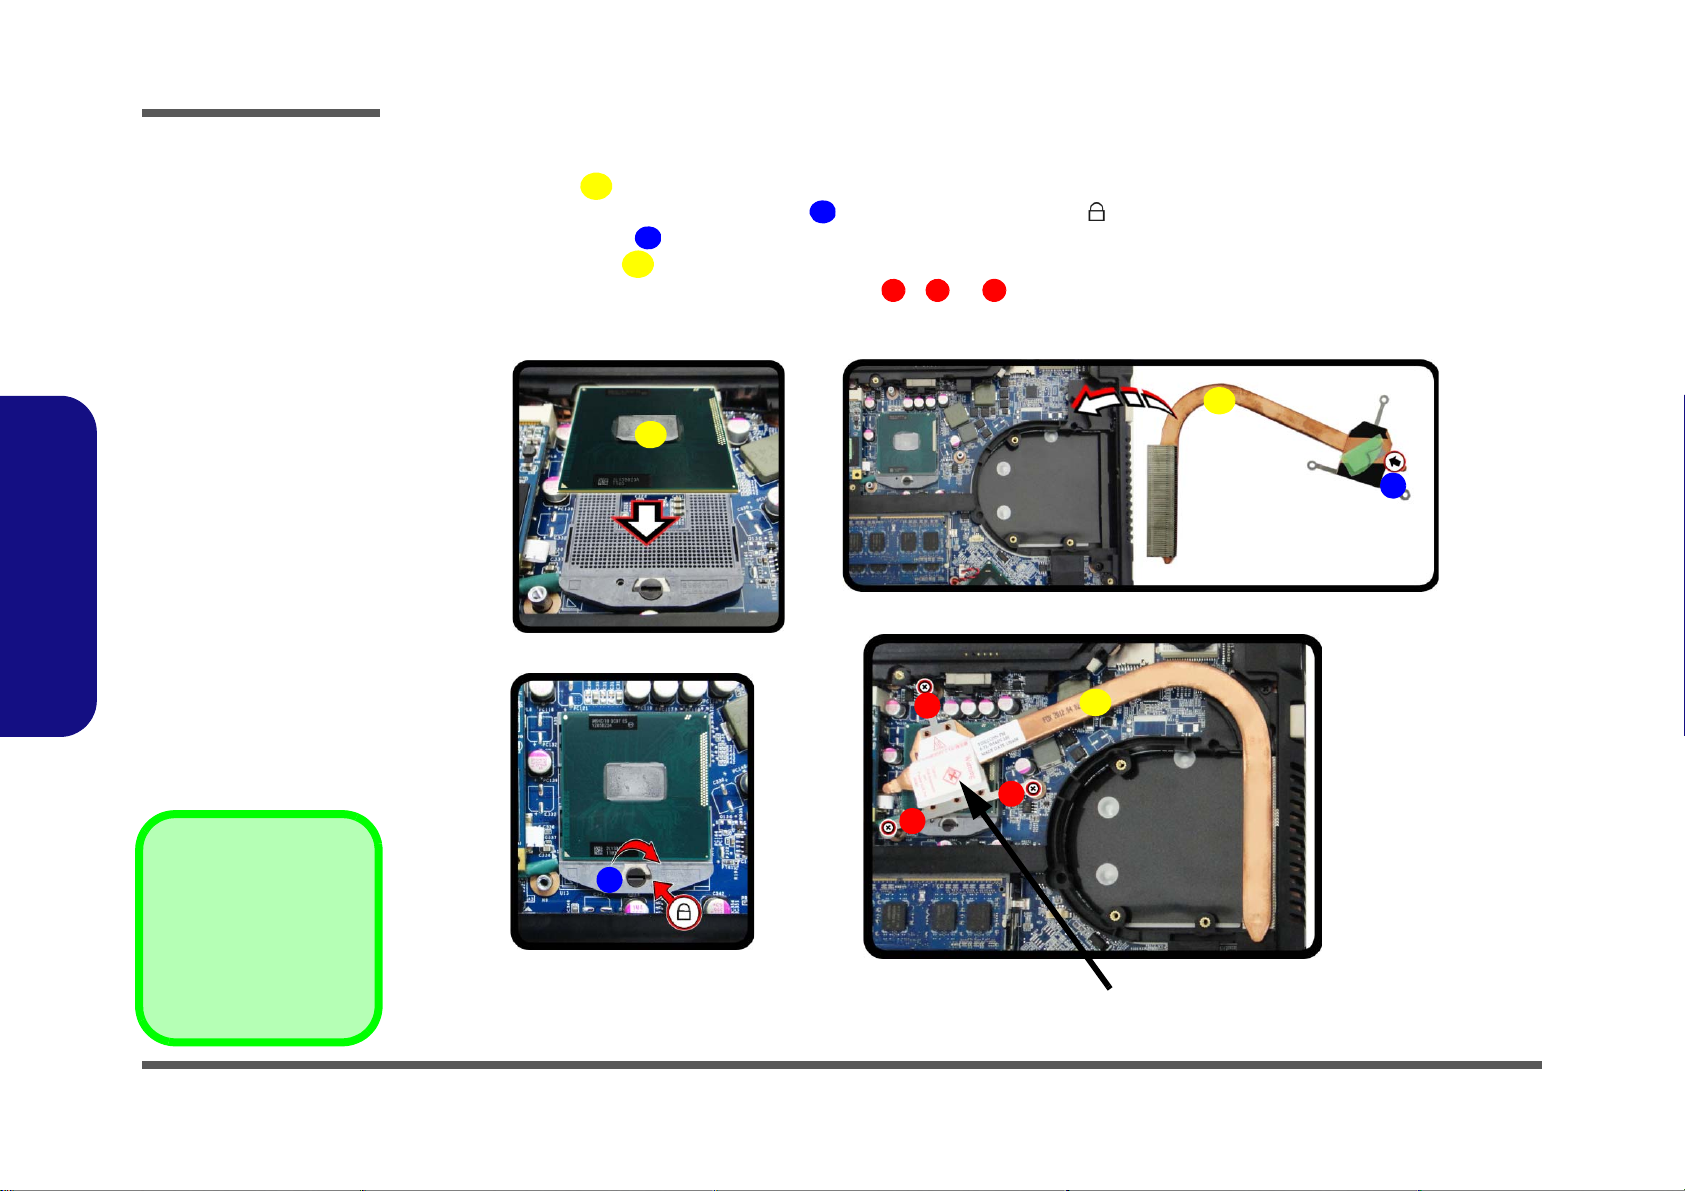
Figure 10
Processor
Installation
a. Insert the CPU.
b. Turn the release latch to-
wards the lock symbol.
c. Insert the heat sink.
d. Tighten the screws.
A. CPU
D. Heat Sink
•3 Screws
Processor Installation Procedure
1. Insert the CPU (Figure 10a), pay careful attention to the pin alignment, it will fit only one way (DO NOT
FORCE IT!), and turn the release latch towards the lock symbol (Figure 10b).
2. Remove the sticker (Figure 10c) from the heat sink unit.
3. Insert the heat sink as indicated in Figure 10c.
4. Tighten the CPU heat sink screws in the order
5. Replace the CPU fan, component bay cover and tighten the screws (page 2 - 12).
, & (the order as indicated on the label and Figure 10d).
2.Disassembly
2 - 14 Removing and Installing a Processor
Page 39
Removing the Wireless LAN Module and Keyboard
1234567
b.
c.
a.
2
3
4
1
4
d.
5
6
7
7
Touchpad Cable
The touchpad cable is underneath
the keyboard cable. When disassembling the mainboard, the touchpad cable must be disconnected.
4.Wireless LAN Module
•1 Screw
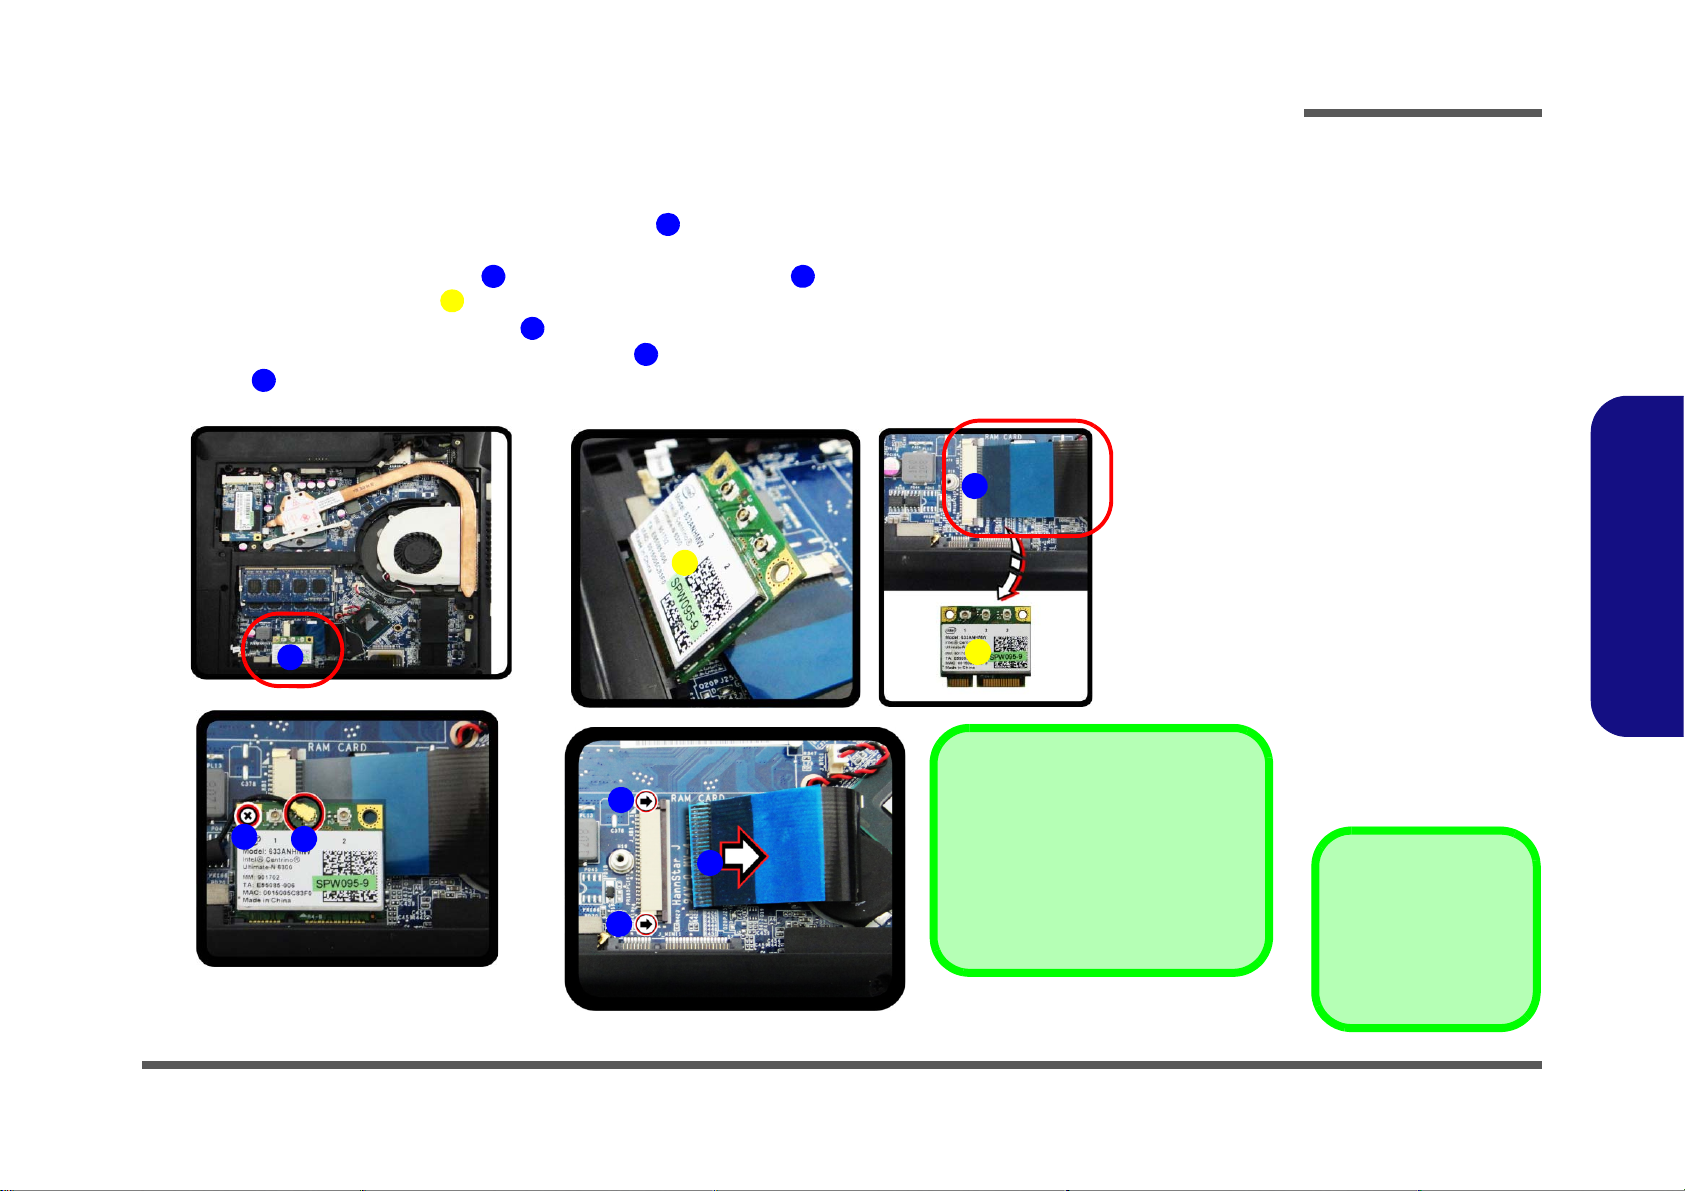
Figure 11
Wireless LAN
Module and
Keyboard Removal
a. Locate the WLAN.
b. Disconnect the cable
and remove the screw.
c. The WLAN module will
pop up.
d. Disconnect the keyboard
ribbon cable from the
locking collar socket.
Note: Make sure you
reconnect the antenna
cable to the “1 + 2”
socket (Figure 11b).
1. Turn off the computer, turn it over, remove the battery (page 2 - 5) and the component bay cover (page 2 - 8).
2. The Wireless LAN module will be visible at point on the mainboard and keyboard ribbon cable under the Wireless LAN module (Figure 11a).
3. Carefully disconnect the cable , and then remove the screw
4. The Wireless LAN module (Fi gure 11c) will pop-up, and you can remove it from the computer and the keyboard
ribbon cable will be visible at point .
5. Careful not to bend the keyboard ribbon cable . Disconnect the keyboard ribbon cable from the locking collar
socket (Figure 11d).
(Figure 11b)
Disassembly
2.Disassembly
Removing the Wireless LAN Module and Keyboard 2 - 15
Page 40
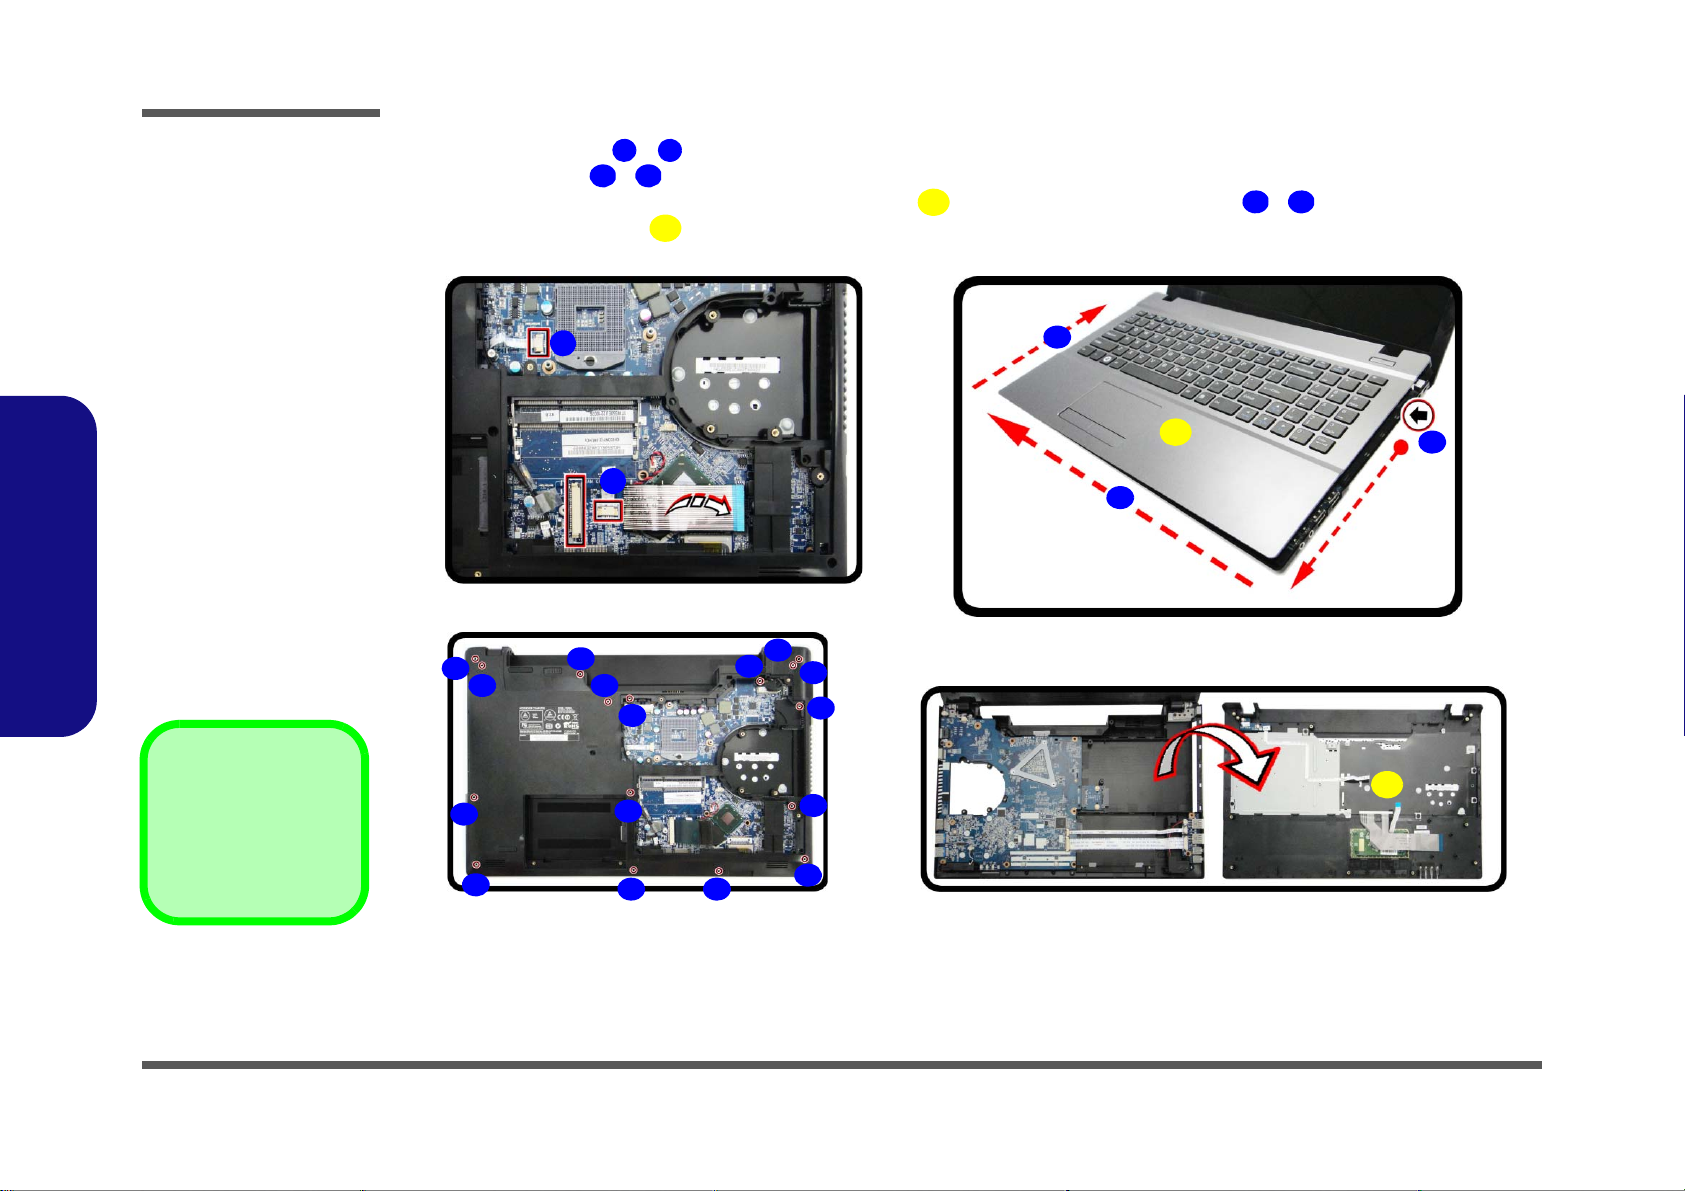
Disassembly
8
9
10
25 26A
C
26
f.
g.
e.
8
h.
9
26
10
11 13
12
14
15
16
18
17
19
21
20
22
23
24
A
25
B
C
26
26.Top Case
•16 Screws
Figure 12
Keyboard Removal
e. Disconnect the cables.
f. Remove the screws.
g. Pry the top case off the
bottom case.
h. Separate the top and
bottom case.
6. Disconnect cables - (Figure 12e).
7. Remove screws - from the bottom case.
8. Turn the computer over, carefully pry the top case off the bottom case at points - (Figure 12g).
9. Separate the top case up and off the bottom case (Figure 11h)
2.Disassembly
2 - 16 Removing the Wireless LAN Module and Keyboard
Page 41
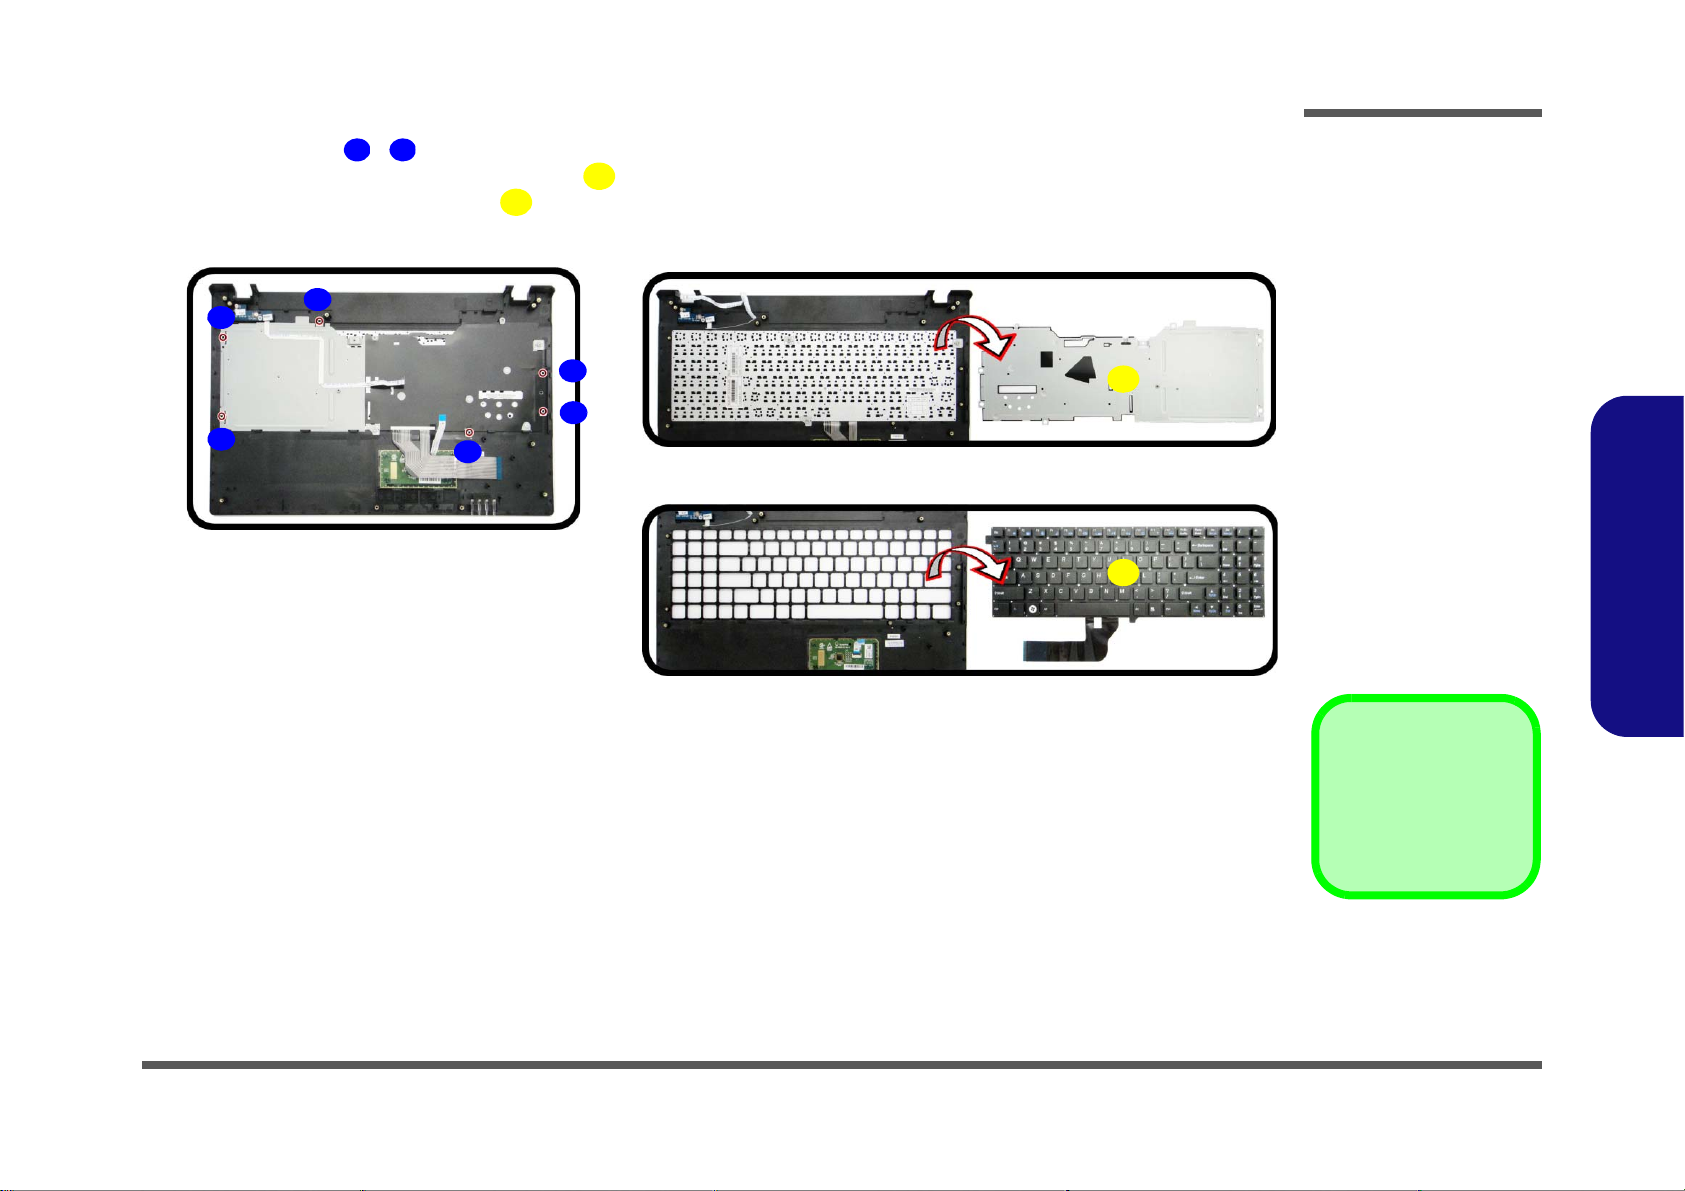
10. Remove screws - from the top case.
27
32
26
26
i.
j.
33
29
28
32
31
27
30
34
k.
33.Keyboard Shielding
Plate
34.Keyboard
•6 Screws
Figure 13
Keyboard Removal
(cont’d)
i. Remove the screws.
j. Lift the keyboard shield-
ing plate.
k. Separate the keyboard
from the top case.
11. Carefully lift the keyboard shielding plate .
12. Carefully separate the keyboard from the top case (Figure 11d).
Disassembly
2.Disassembly
Removing the Wireless LAN Module and Keyboard 2 - 17
Page 42
Disassembly
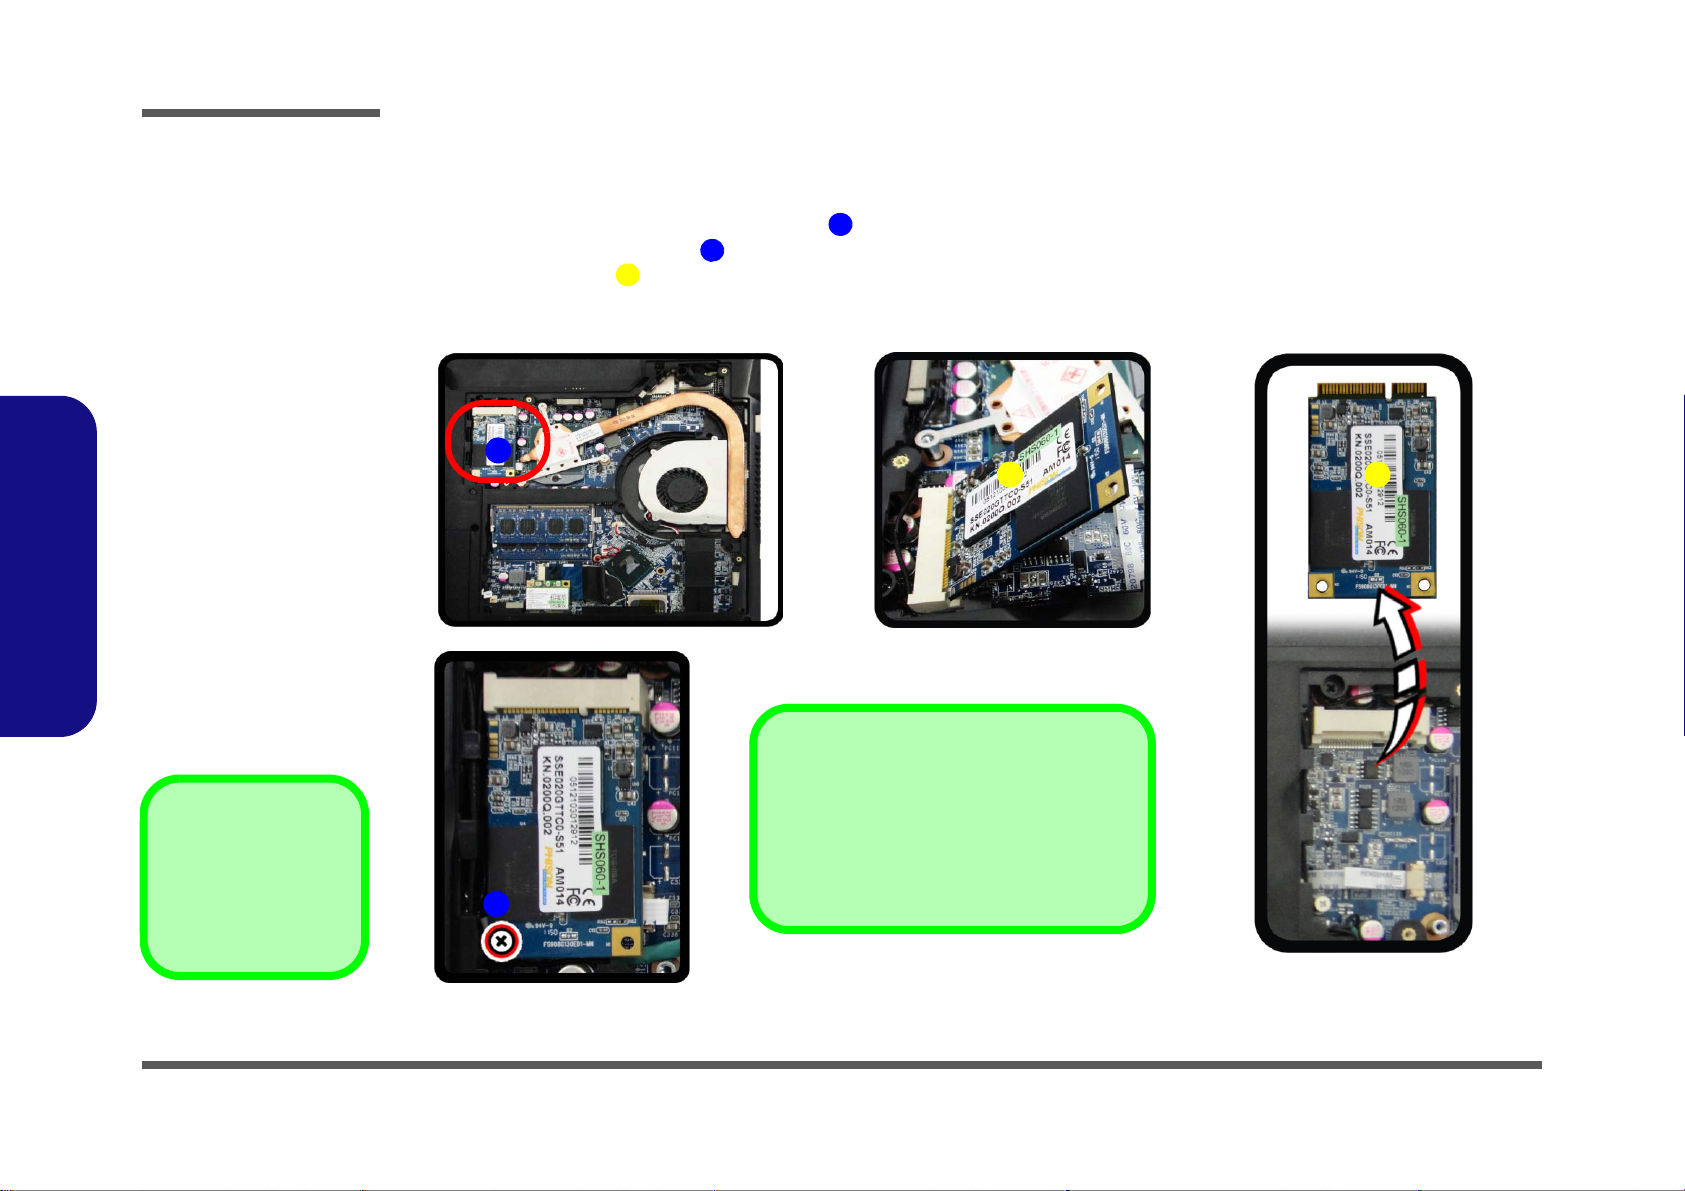
Figure 14
3G Module Removal
a. Locate the 3.75G mod-
ule.
b. Remove the screw.
c. The module will pop-up.
d. Remove the 3.75G mod-
ule.
1
2
3
b.
c.
a.
2
3
d.
3
1
a.
Power Button Cable
The power button cable is underneath the 3G
module. When disassembling the mainboard,
the power button cable must be disconnected.
3. 3.75G Module
•1 Screw
Removing the 3.75G Module
1. Turn off the computer, turn it over, remove the battery (page 2 - 12) and the component bay cover (page 2 - 10).
2. The 3.75G module will be visible at point on the mainboard (Figure 14a).
3. Carefully remove the screw
4. The 3.75G module (Figure 14c) will pop-up, and you can remove it from the computer (Figure 14d).
(Figure 14b).
2.Disassembly
2 - 18 Removing the 3.75G Module
Page 43
Removing the CCD
14589
12
13
13
b.
c.
a.
d.
4 3
1 2
9
13
8 7
5 6
13
11
10
12
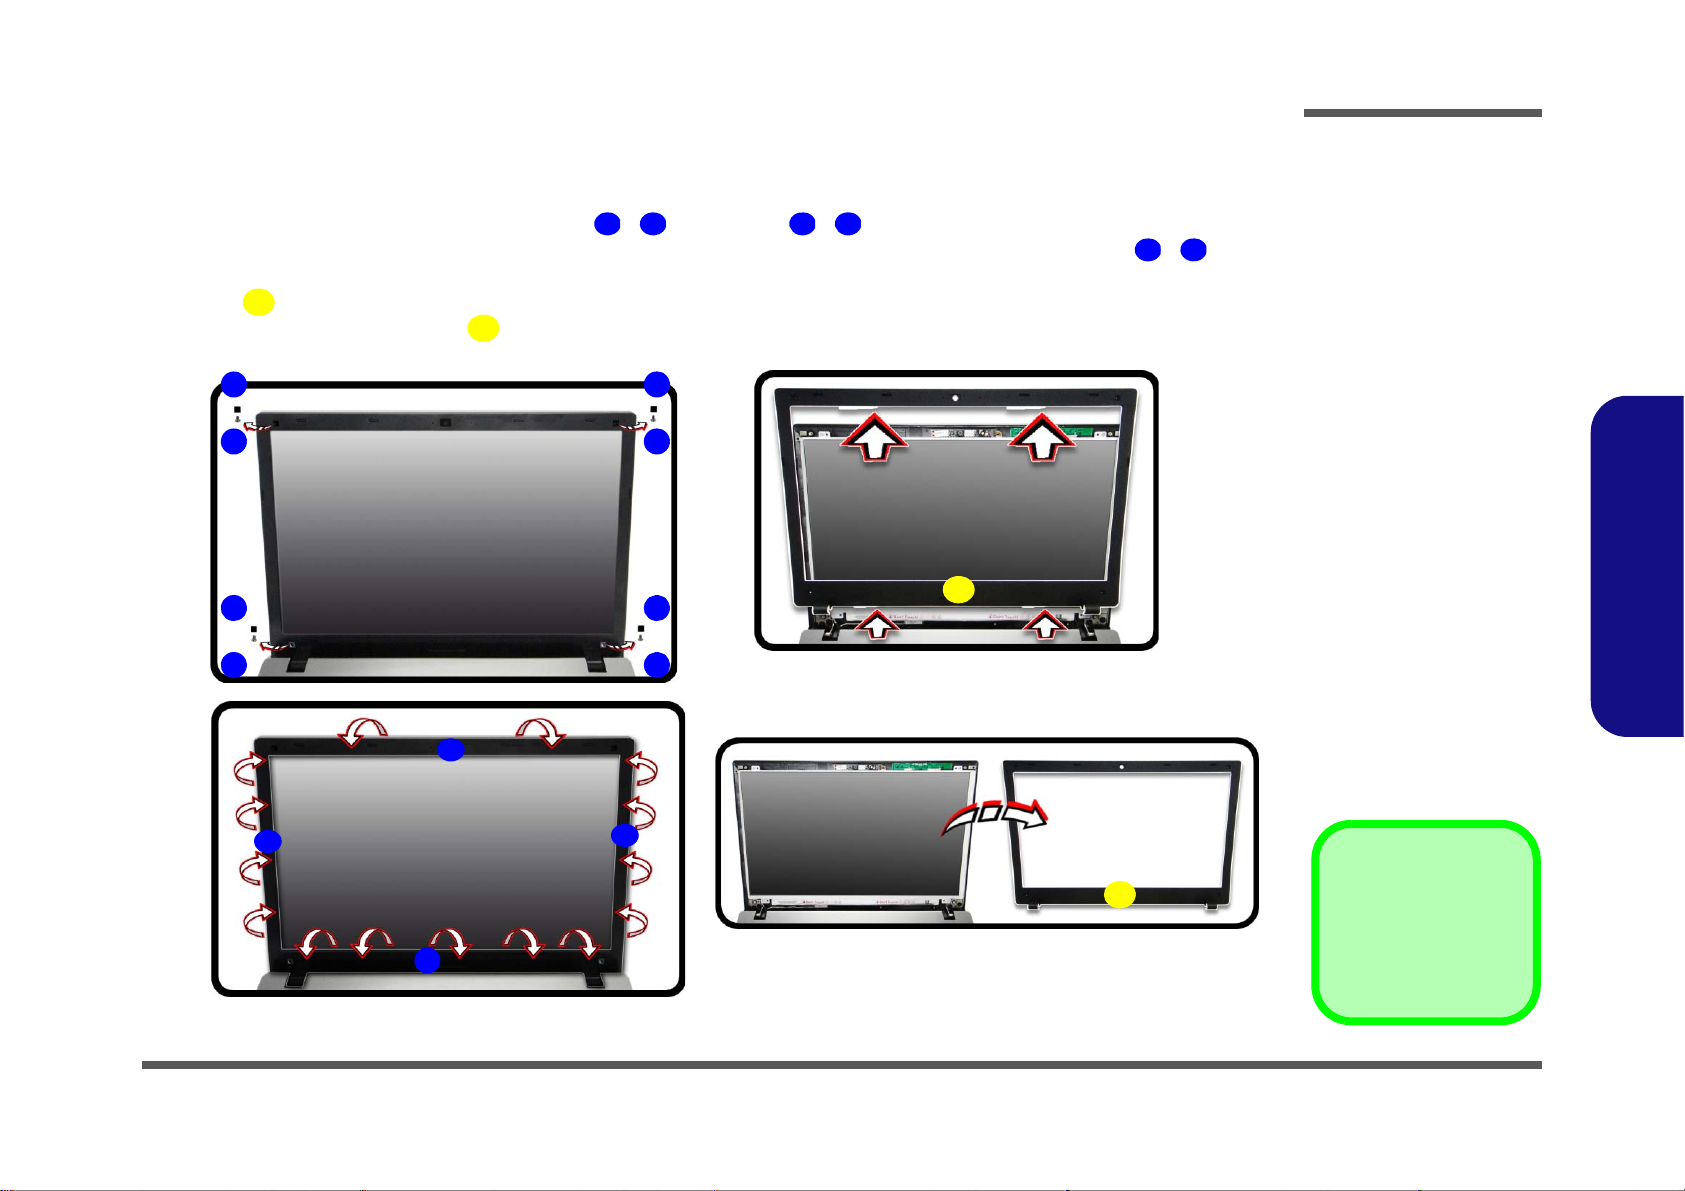
13. LCD Front Cover
•4 Screws
Figure 15
CCD Removal
a. Carefully remove the
rubber screw covers and
screws from the front
cover.
k. Run your fingers around
the inner frame of the
LCD panel at the points
indicated by the arrows.
l. Lay the computer down
on a flat surface with the
top case up forming a 90
degree angle. Push the
LCD front panel upwards
before carefully lifting it
up.
d. Remove the LCD front
cover.
1. Turn off the computer, turn it over, and remove the battery (page 2 - 12).
2. Carefully remove the rubber screw covers - and screws - from the front cover (Figure 15a).
3. Run your fingers around the inner frame of the LCD panel at the points as indicated by the arrows - .
4. Lay the computer down on a flat surface with the top case up forming a 90 degree angle. Push the LCD front
cover upwards before carefully lifting it up.
5. Remove the LCD front cover (Figure 15c).
Disassembly
2.Disassembly
Removing the CCD 2 - 19
Page 44
14
15
f.
e.
15
14
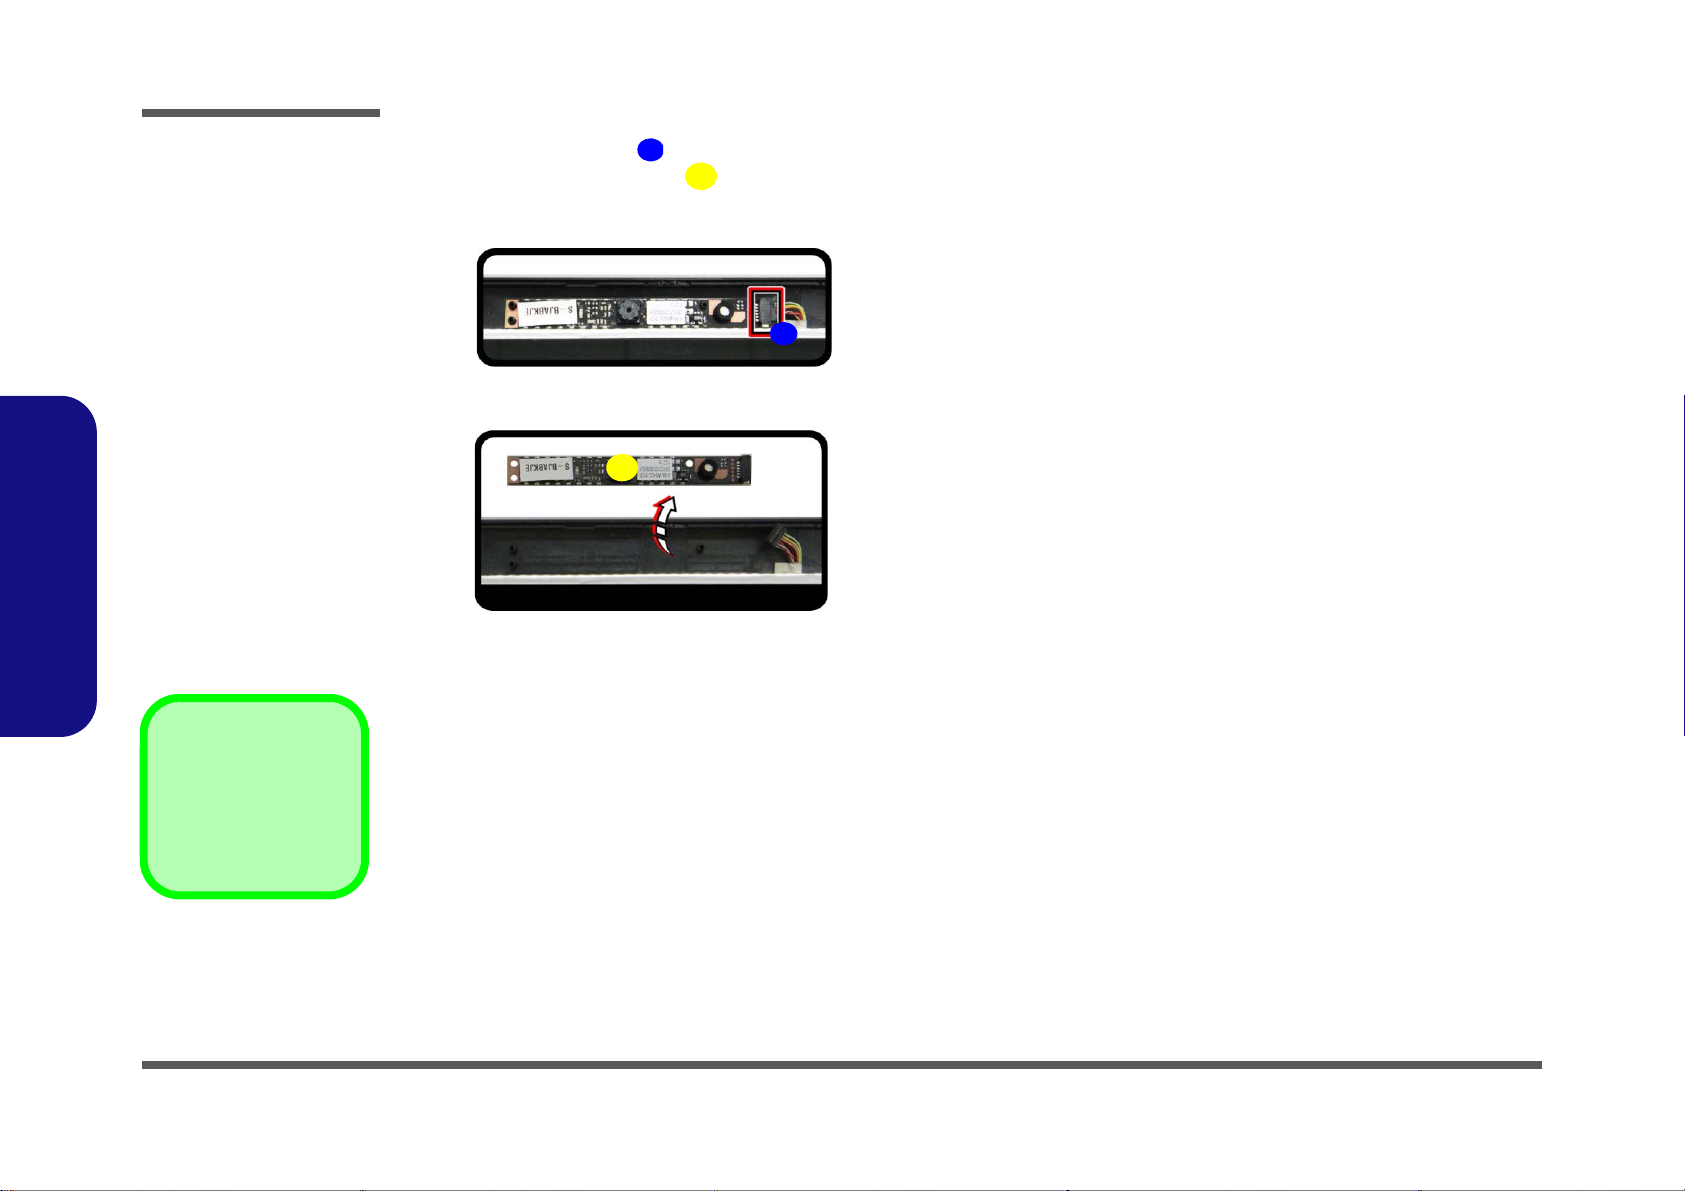
15. CCD Module
Figure 16
CCD Removal
(cont’d)
e. Disconnect the cable.
f. Remove the CCD mod-
ule.
2.Disassembly
Disassembly
6. Disconnect the cable .
7. Remove the CCD module (Figure 16f).
8. Reverse the process to install a new CCD module.
2 - 20 Removing the CCD
Page 45

Appendix A:Part Lists
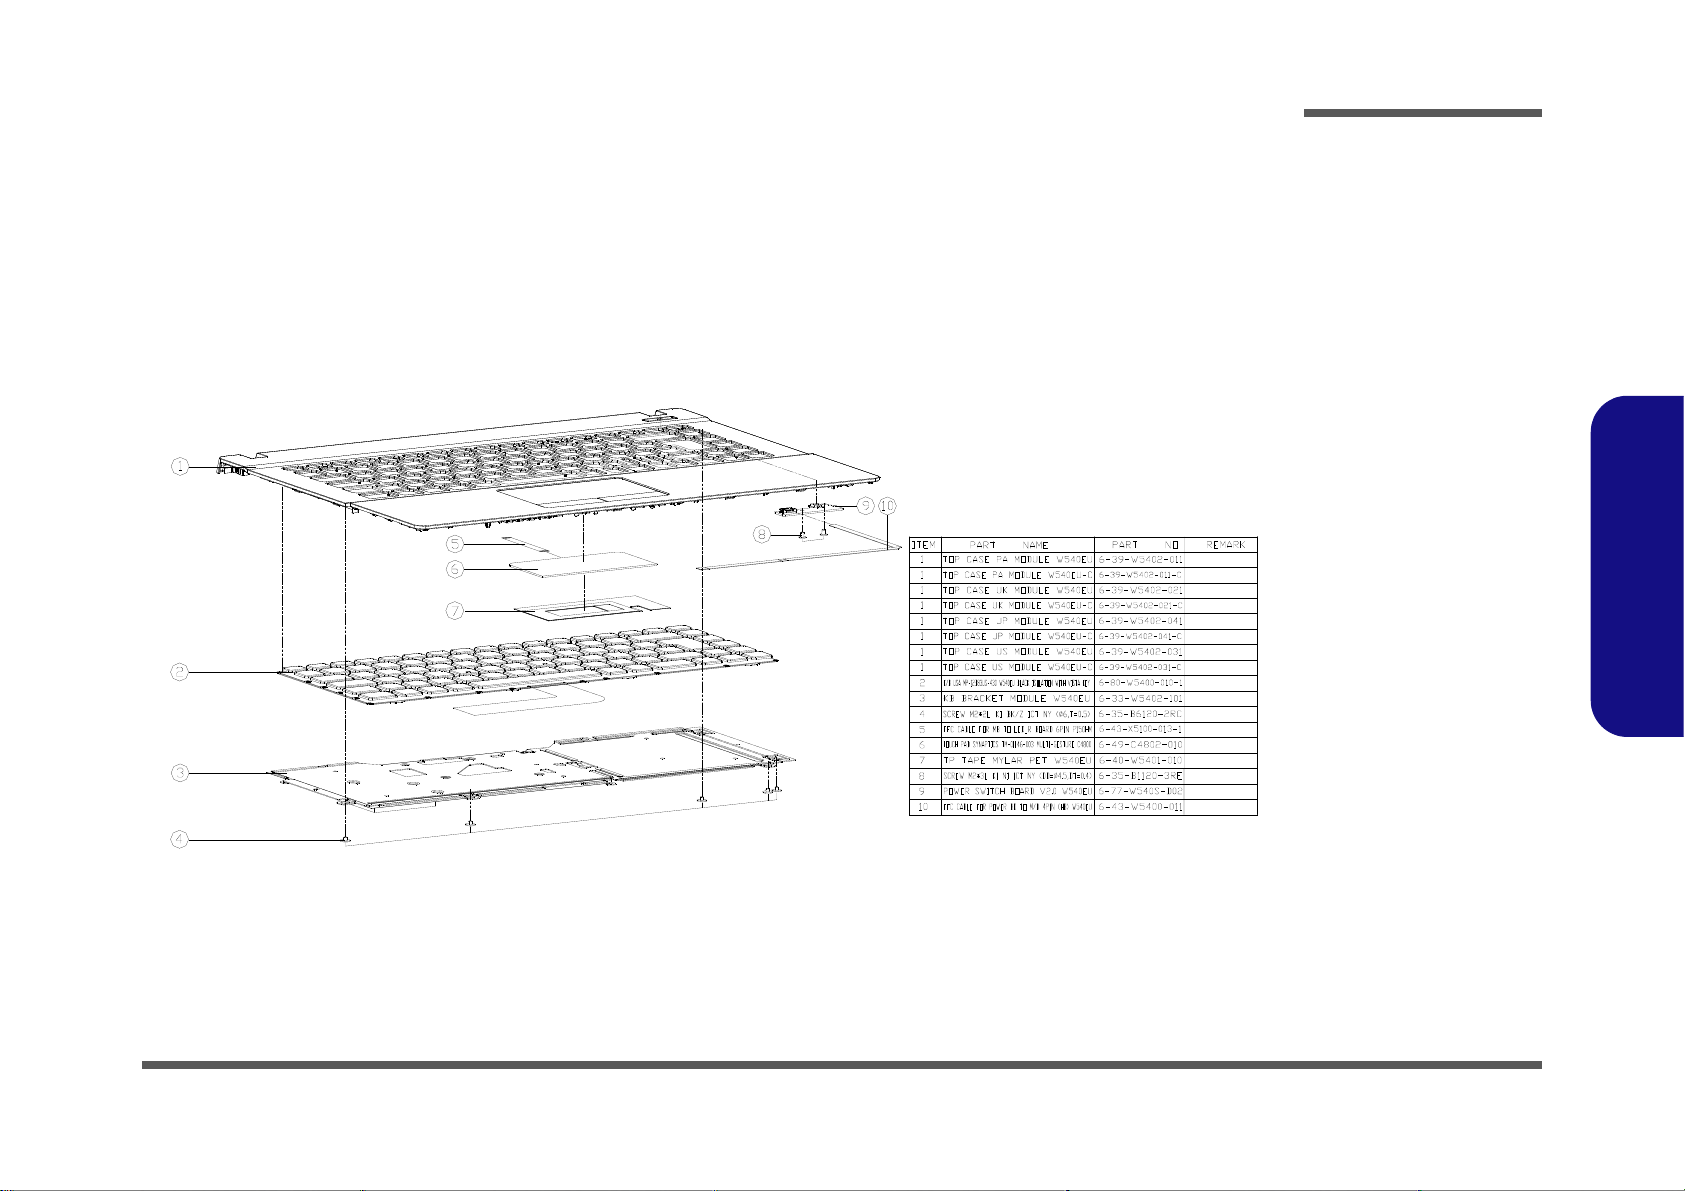
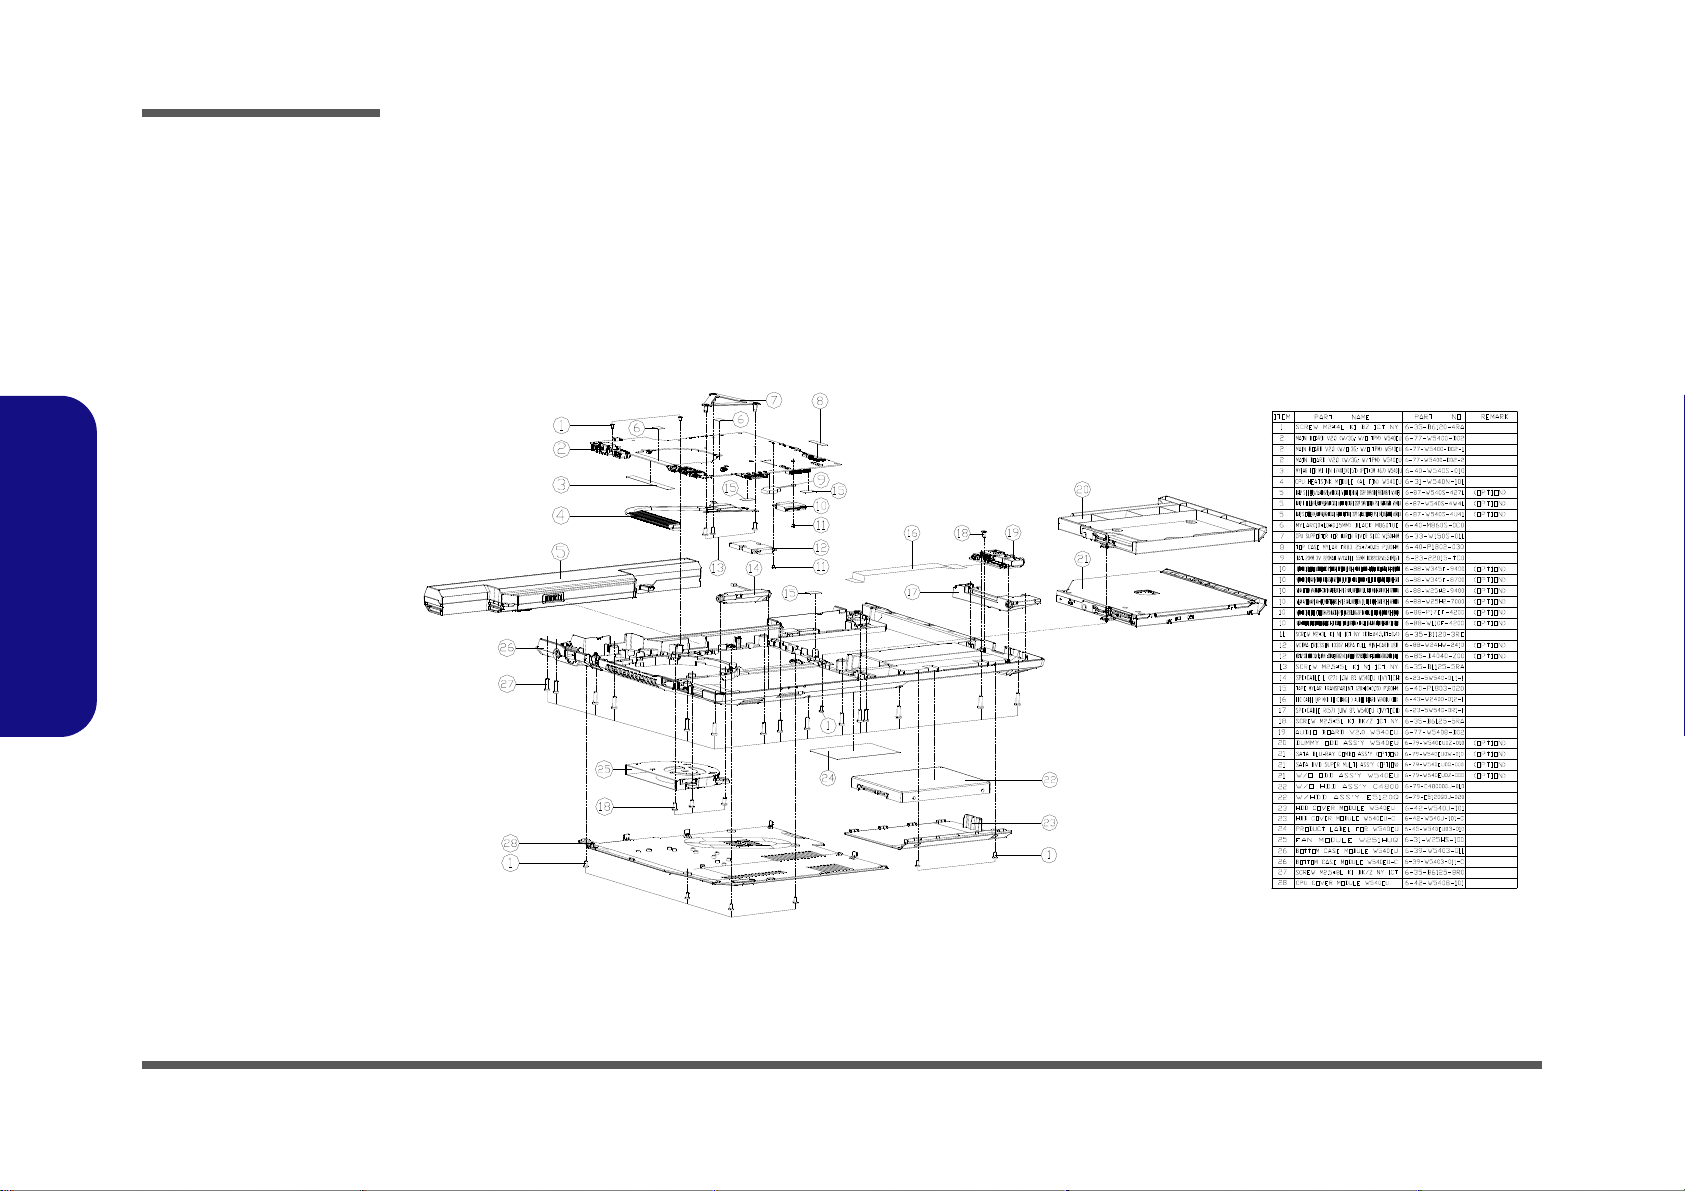
This appendix breaks down the W540EU series notebook’s construction into a series of illustrations. The component part
numbers are indicated in the tables opposite the drawings.
Note: This section indicates the manufacturer’s part numbers. Your organization may use a different system, so be sure
to cross-check any relevant documentation.
Note: Some assemblies may have parts in common (especially screws). However, the part lists DO NOT indicate the
total number of duplicated parts used.
Note: Be sure to check any update notices. The parts shown in these illustrations are appropriate for the system at the
time of publication. Over the product life, some parts may be improved or re-configured, resulting in new part numbers.
A.Part Lists
A - 1
Page 46
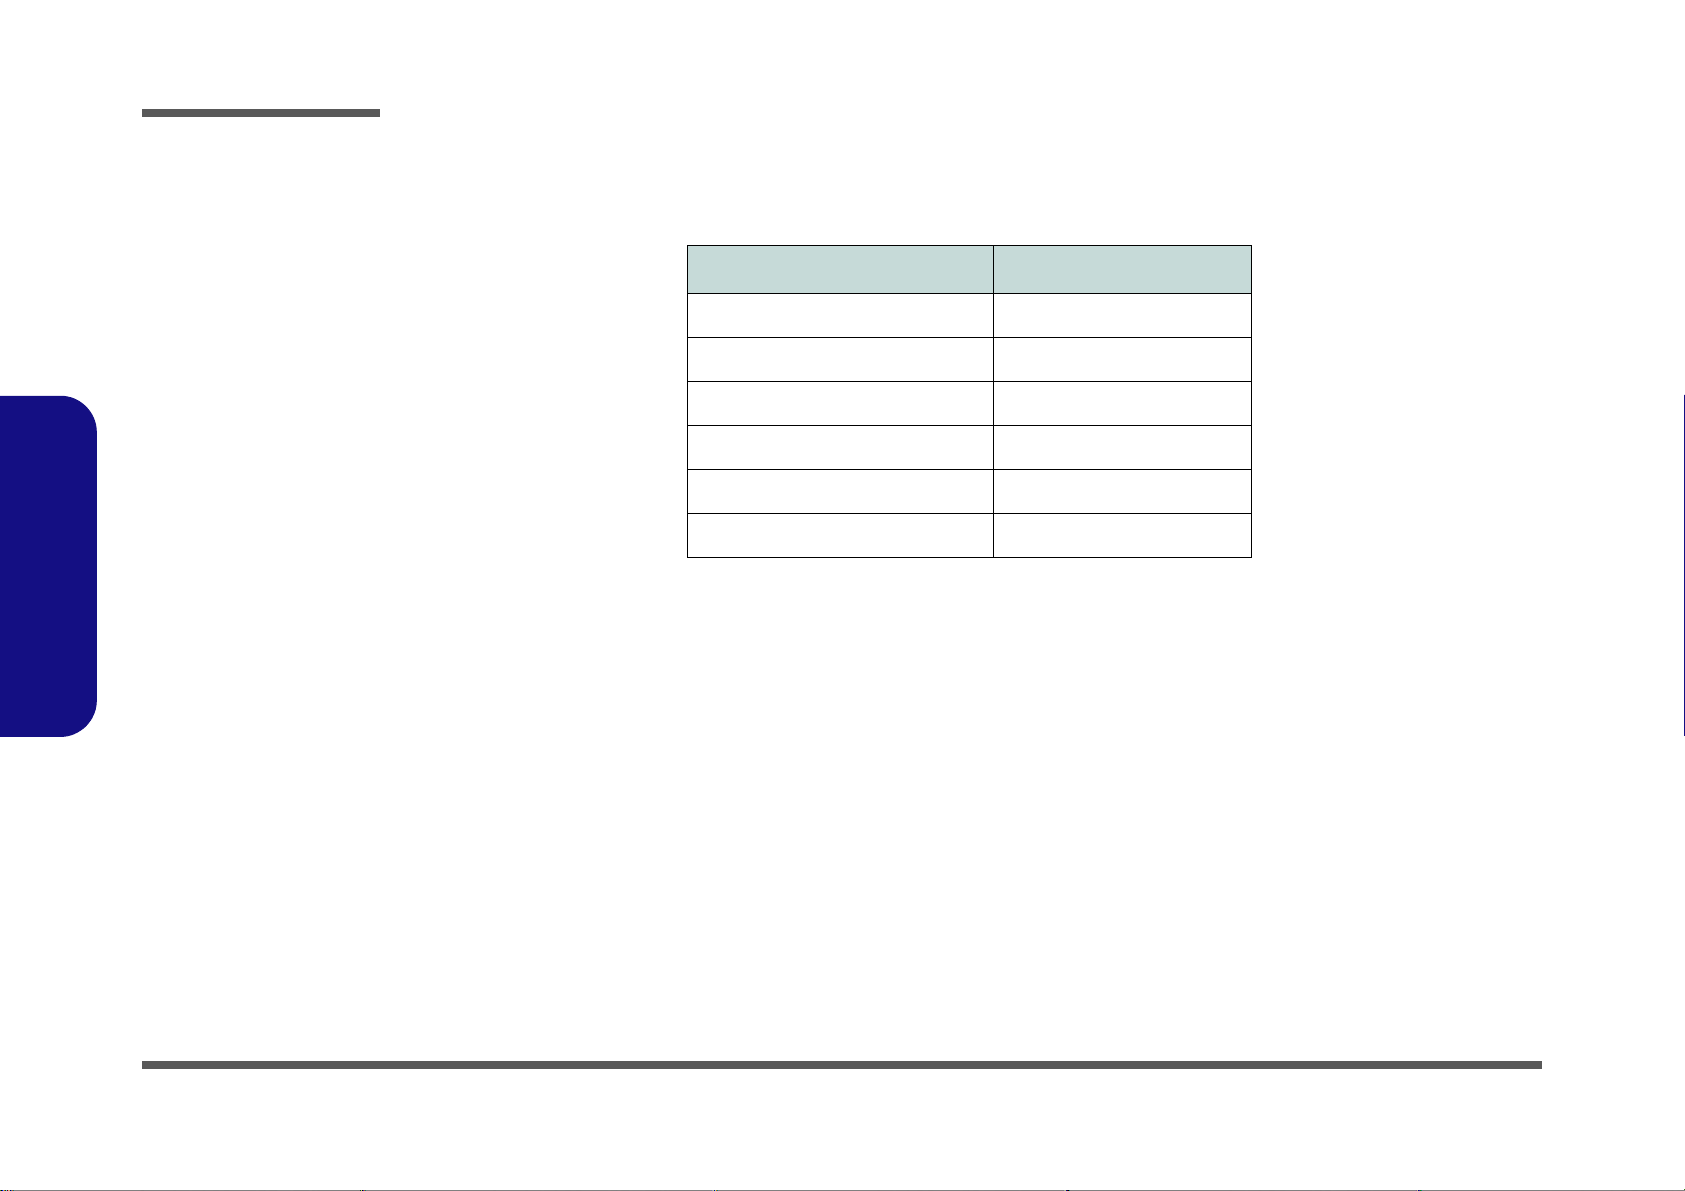
Table A - 1
Part List Illustration
Location
Part List Illustration Location
The following table indicates where to find the appropriate part list illustration.
Part
Top
page A - 3
A.Part Lists
Bottom
SATA BLU RAY COMBO
DVD Dual Drive
Dummy ODD
LCD
page A - 4
page A - 5
page A - 6
page A - 7
page A - 8
A - 2
Page 47
Top
Figure A - 1
Top
A.Part Lists
Top A - 3
Page 48
A.Part Lists
Figure A - 2
Bottom
Bottom
A - 4 Bottom
Page 49
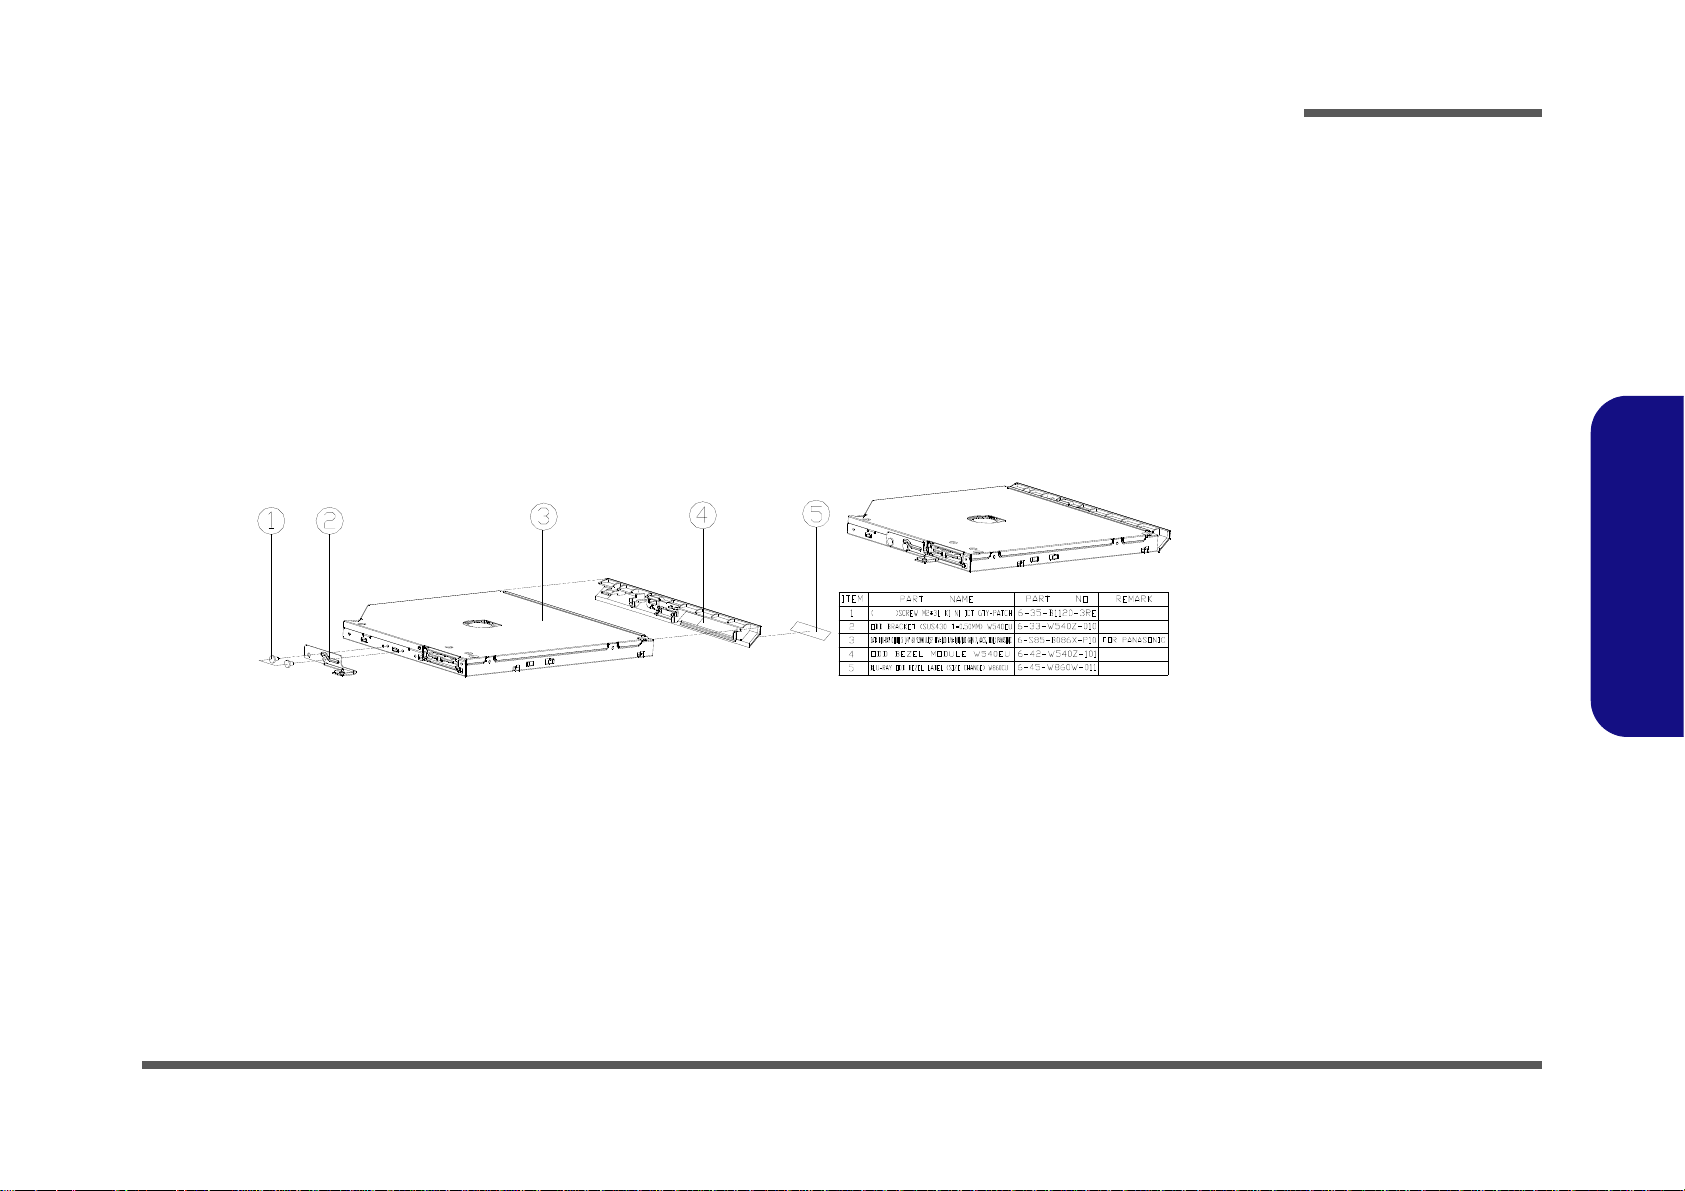
SATA BLU RAY COMBO
非耐落
Figure A - 3
SATA BLU RAY
COMBO
A.Part Lists
SATA BLU RAY COMBO A - 5
Page 50
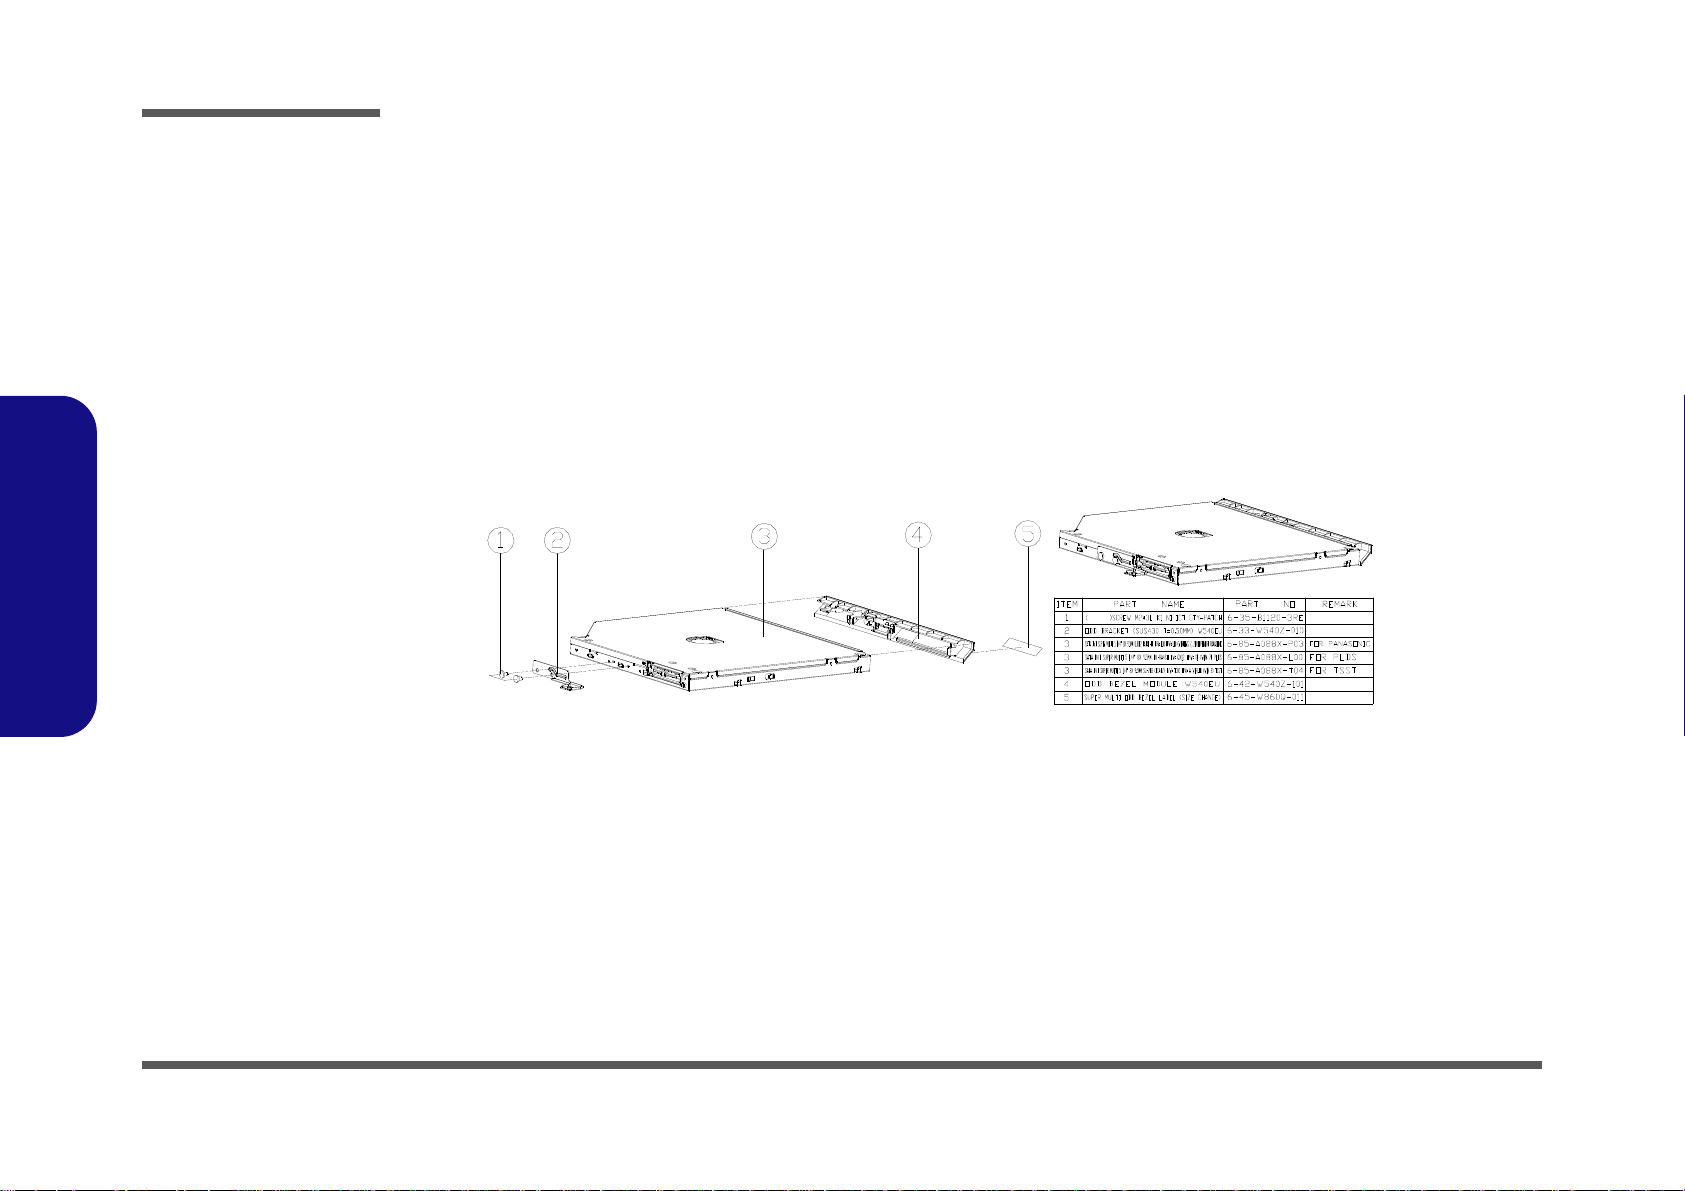
A.Part Lists
Figure A - 4
DVD DUAL
非耐落
DVD DUAL
A - 6 DVD DUAL
Page 51
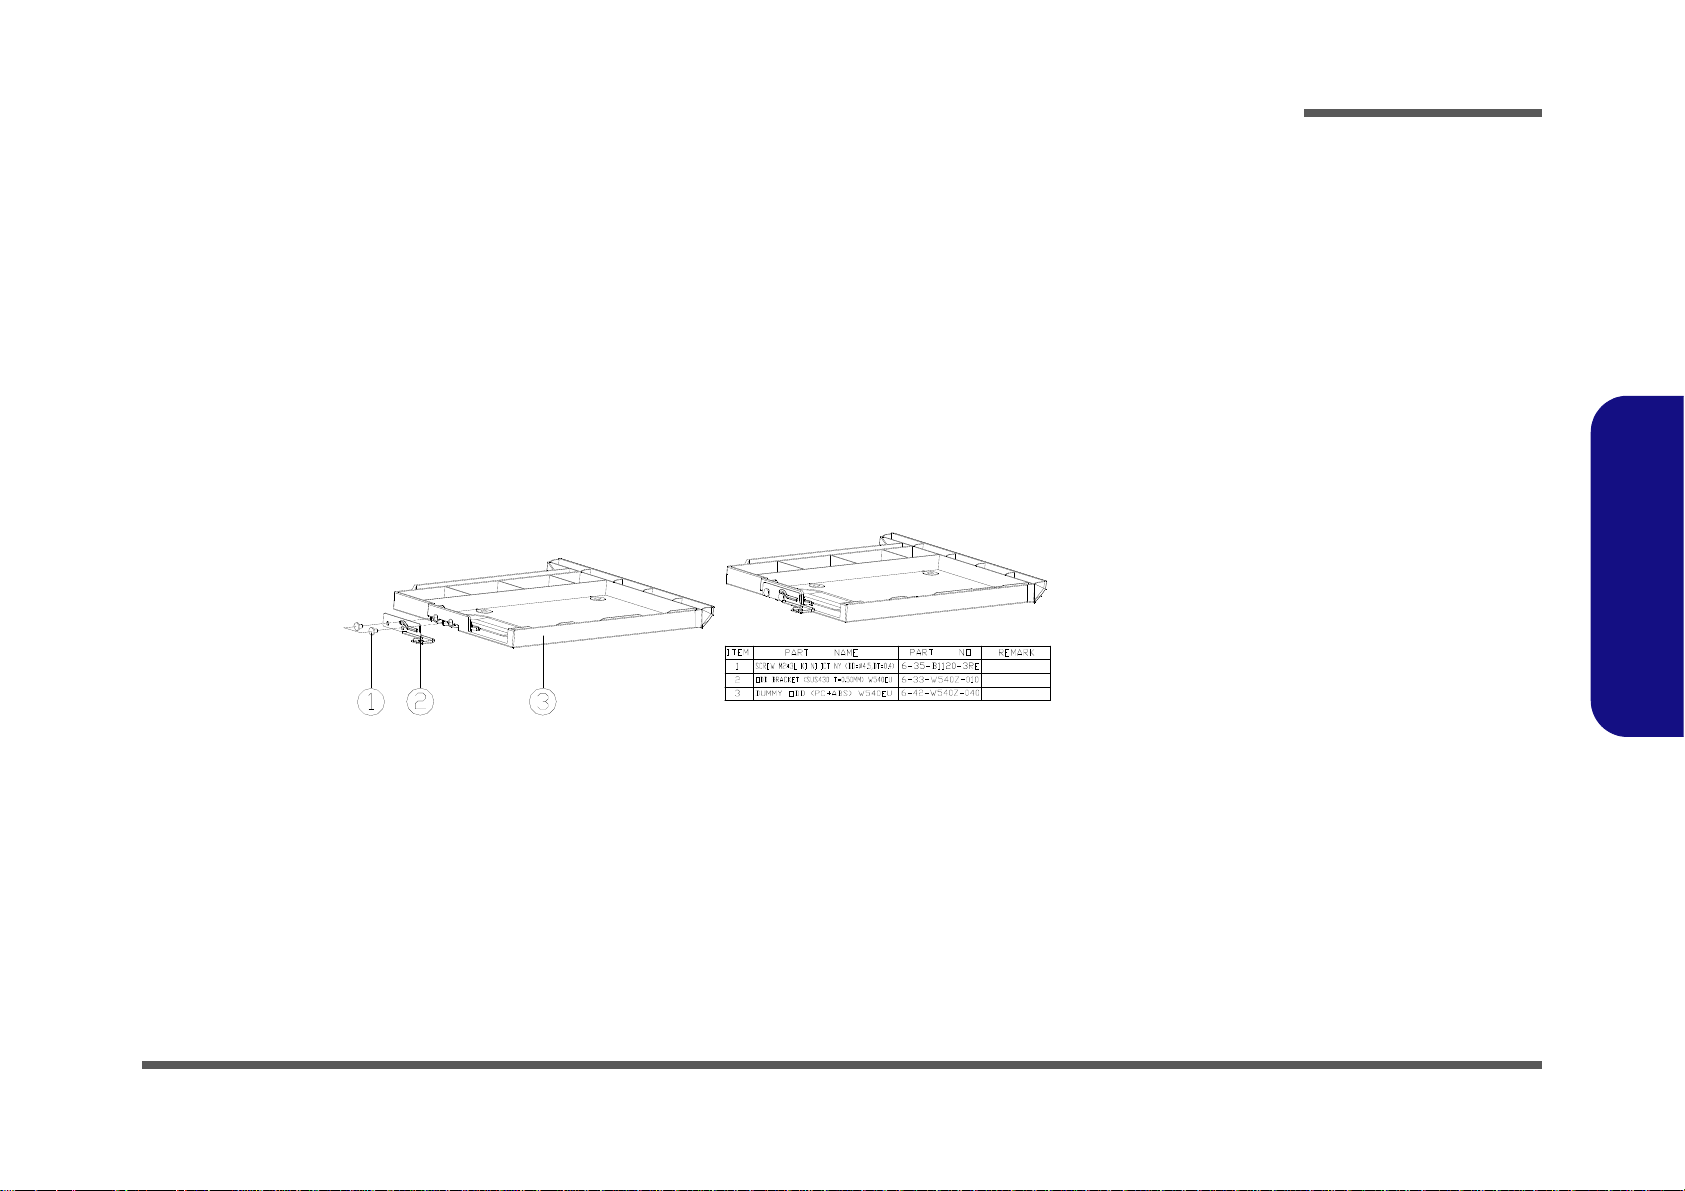
Dummy ODD
Figure A - 5
Dummy ODD
A.Part Lists
Dummy ODD A - 7
Page 52
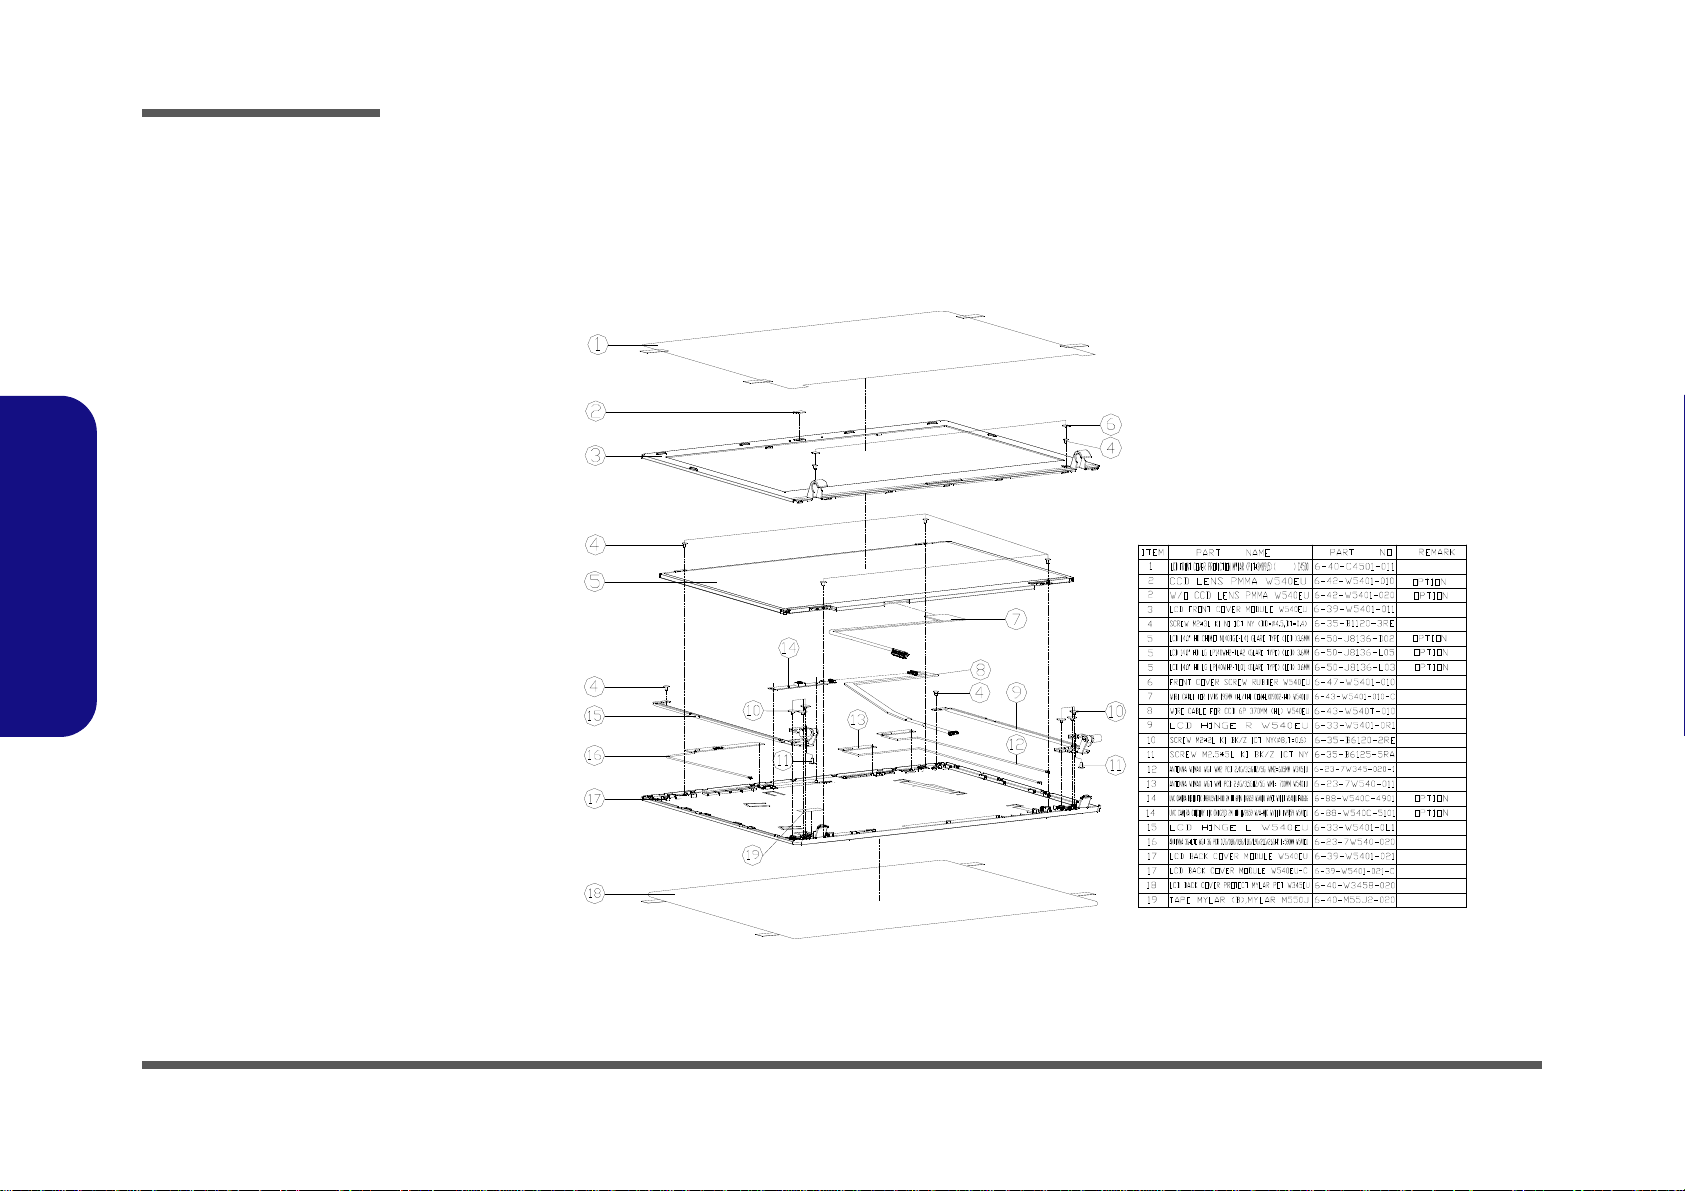
A.Part Lists
設變
Figure A - 6
LCD
LCD
A - 8 LCD
Page 53
Appendix B: Schematic Diagrams
Table B - 1
SCHEMATIC
DIAGRAMS
Version Note
The schematic diagrams in this chapter
are based upon version 6-7P-W5406-001.
If your mainboard (or
other boards) are a later version, please
check with the Service
Center for updated diagrams (if required).
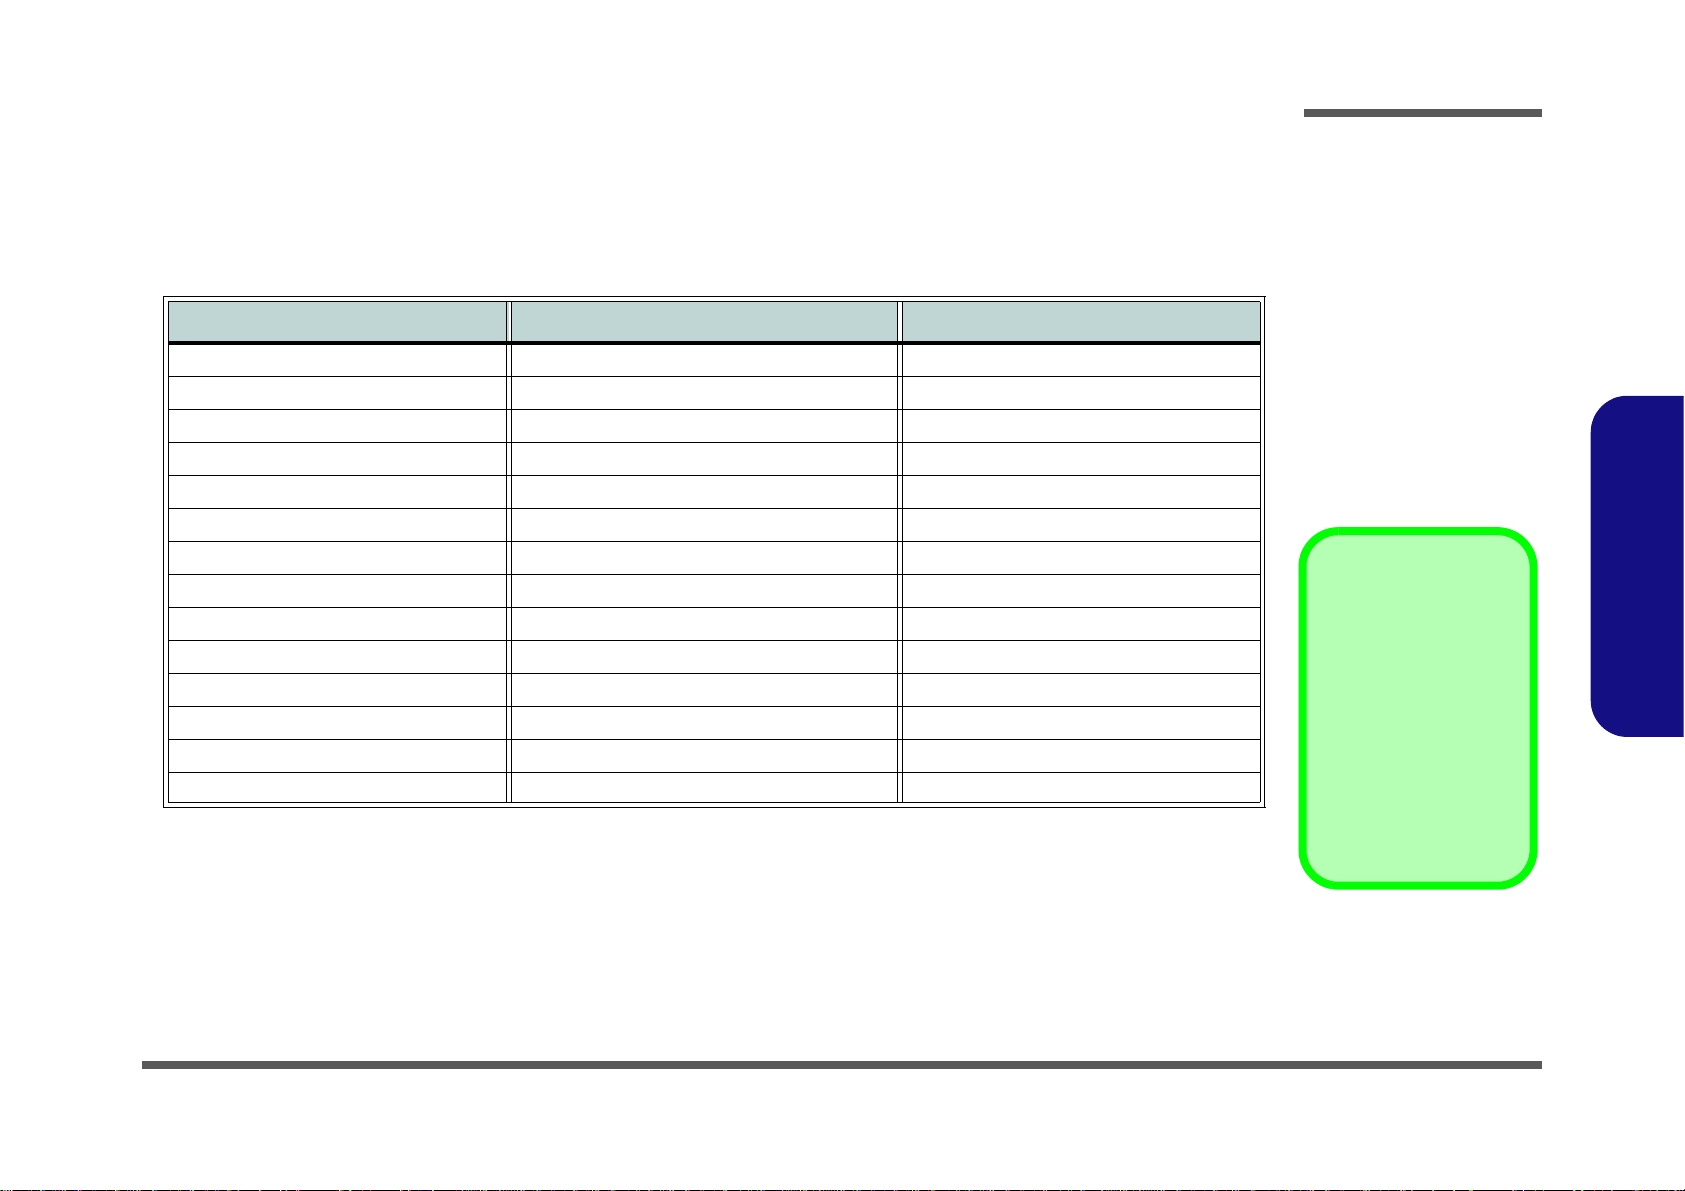
This appendix has circuit diagrams of the W540EU notebook’s PCB’s. The following table indicates where to find the
appropriate schematic diagram.
System Block Diagram - Page B - 2 PCH 4/9- LVDS, DDI, CRT - Page B - 16 5VS, 3VS, 1.5VS CPU - Page B - 30
Processor 1/7-DMI, FDI, PEG - Page B - 3 PCH 5/9- PCI, USB, RSVD - Page B - 17 VDD3, VDD5 - Page B - 31
Processor 2/7- CLK, MISC - Page B - 4 PCH 6/9- GPIO, CPU - Page B - 18 Power 0.85VS, 1.8VS - Page B - 32
Processor 3/7- (DDR3) - Page B - 5 PCH 7/9- PWR - Page B - 19 POWER 1.5V/1.05VS - Page B - 33
Processor 4/7- Power - Page B - 6 PCH 8/9 POWER - Page B - 20 POWER VCORE1 - Page B - 34
Processor 5/7- GFX PWR - Page B - 7 PCH 9/9- GND - Page B - 21 POWER VCORE2 - Page B - 35
Processor 6/7- GND - Page B - 8 WLAN, 3G, MSATA - Page B - 22 AC IN, CHARGER - Page B - 36
Processor 7/7- RSVD - Page B - 9 CCD, TPM, FAN, CLICK - Page B - 23 AUDIO BOARD - Page B - 37
DDR3 SO-DIMM_0 - Page B - 10 USB3.0, LID SWITCH - Page B - 24 AUDIO BOARD (W550EU) - Page B - 38
DDR3 SO-DIMM_1 - Page B - 11 Card Reader (RTL8411) - Page B - 25 LID SW BOARD (W550EU) - Page B - 39
PANEL, INVERTER, CRT - Page B - 12 SATA ODD, LED, USB CHARGE - Page B - 26 POWER SW BOARD - Page B - 40
PCH 1/9- RTC, HDA, SATA - Page B - 13 HDMI, RJ45 - Page B - 27 EXTERNAL ODD BOARD - Page B - 41
PCH 2/9- PCIE, SMBUS, CLK - Page B - 14 AUDIO CODEC VT1802P - Page B - 28 Power Diagram - Page B - 42
PCH 3/9- DMI, FDI, PWRGD - Page B - 15 KBC-ITE IT8518E - Page B - 29 Power On SEQ - Page B - 43
Schematic Diagrams
Diagram - Page Diagram - Page Diagram - Page
B.Schematic Diagrams
B - 1
Page 54
Schematic Diagrams
Sheet 1 of 42
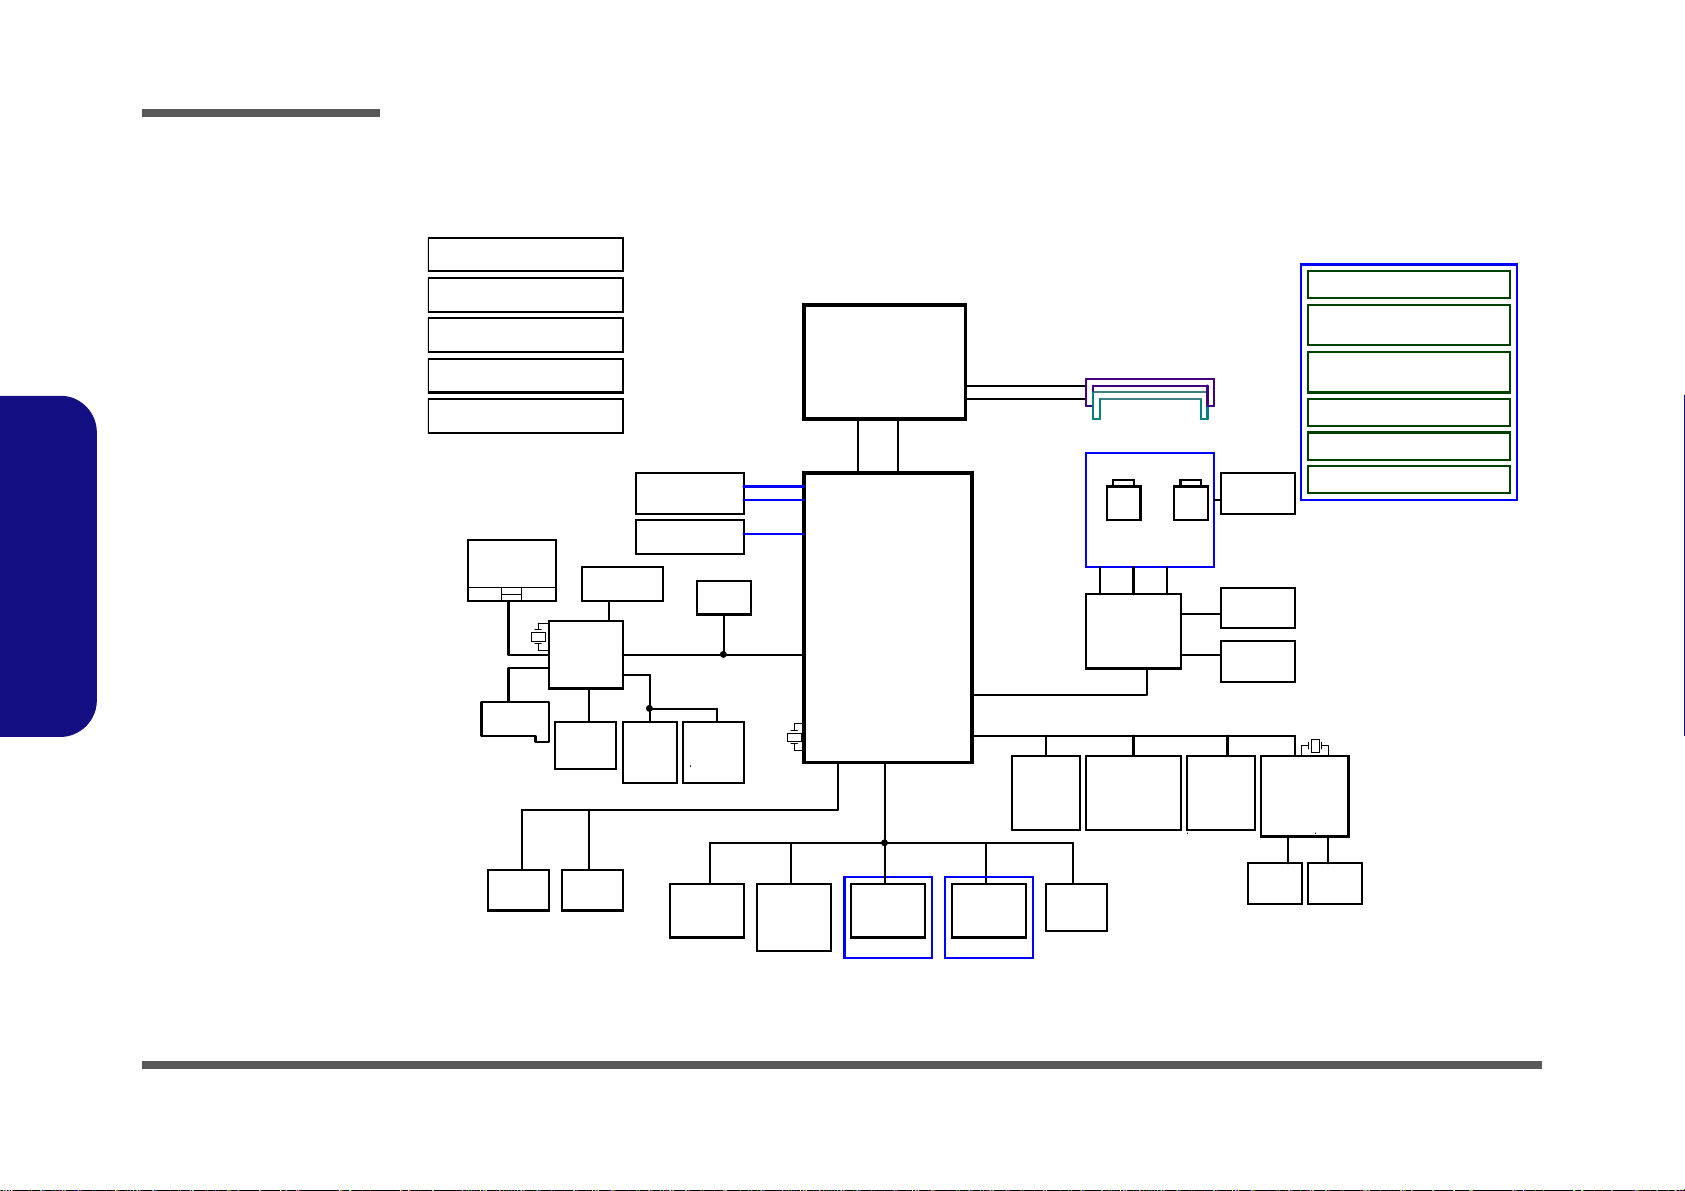
System Block
Diagram
W540EU / W550EU
Chief River System Block Diagram
(USB3)
LCD CONNECTOR <8"
TOUCH PAD
CRT CONNECTOR
LPC
CARD
READER
SMART
BATTERY
HP
OUT
<=8"
PCIE
25x25mm
989 Ball FCBGA
SENTELIC
Mini PCIE
SOCKET
M-SATA
Mini PCIE
SOCKET
WLAN
CCD
USB 2.0/3.0
USB3.0
(USB8)
USB2.0USB3.0
EC/BIOS SPI
0.5"~5.5"
INT MIC
Ivy Bridge
24 MHz
<12"
1.05VS
FDI
MIC
IN
(INT SPK R)
128pins LQFP
32.768K Hz
EC SMBUS
AZALIA LINK
0.1"~13
SYSTEM SMBUS
SATA ODDSATA HDD
LAN
ITE 8518E
<12"
PantherPoint
Controller
Hub (PCH)
INT. K/B
Azalia Codec
EC
0.5"~11"
<15"
5V,3V,5VS,3VS,1.5VS,
1.8VS,+1.5S_CPU
1.5V,0.75VS(VTT_MEM)
VDD3,VDD5
DMI*4
rPGA989/988
32.768 KHz
1.8V, 0.85VS
SATA I/II 3.0Gb/s
1333/1666 MHz
DDR3 / 1.5V
PHONE JACK x2, USB x2
AUDIO BOARD
EXTERNAL ODD BOARD
POWER SWITCH BOARD
(W550EU)
(W550EU)
(W550EU)
VIA
VT1802P
33 MHz
THERMAL
SENSOR
100 MHz
14*14*1.6mm
PROCESSOR
SMART
FAN
25 MHz
AUDIO BOARD
PHONE JACK x2, USB x1
W540EU MAIN BOARD
Charge
USB2.0
USB PORT4
AUDIO BOARD
RTL8411
(W550EU)
(USB10)
DDRIII
DDRIII
SO-DIMM2
SO-DIMM1
AUDIO BOARD
RJ-45
7IN1
SOCKET
INT SPKER-L
HDMI Connector
Mini PCIE
SOCKET
3G MSATA CARD
LID SWITCH BOARD
(USB2/SATA4)
(Optional)
INT SPKER-R
AUDIO BOARD
VCORE,VGFX_CORE
Optional
SHEET 22
TPM 1.2
(USB1)
USB PORT2 USB PORT3
(USB9)
USB PORT1
(USB0)
AC-IN
System Block Diagram
B.Schematic Diagrams
B - 2 System Block Diagram
Page 55
Processor 1/7-DMI, FDI, PEG
Sheet 2 of 42
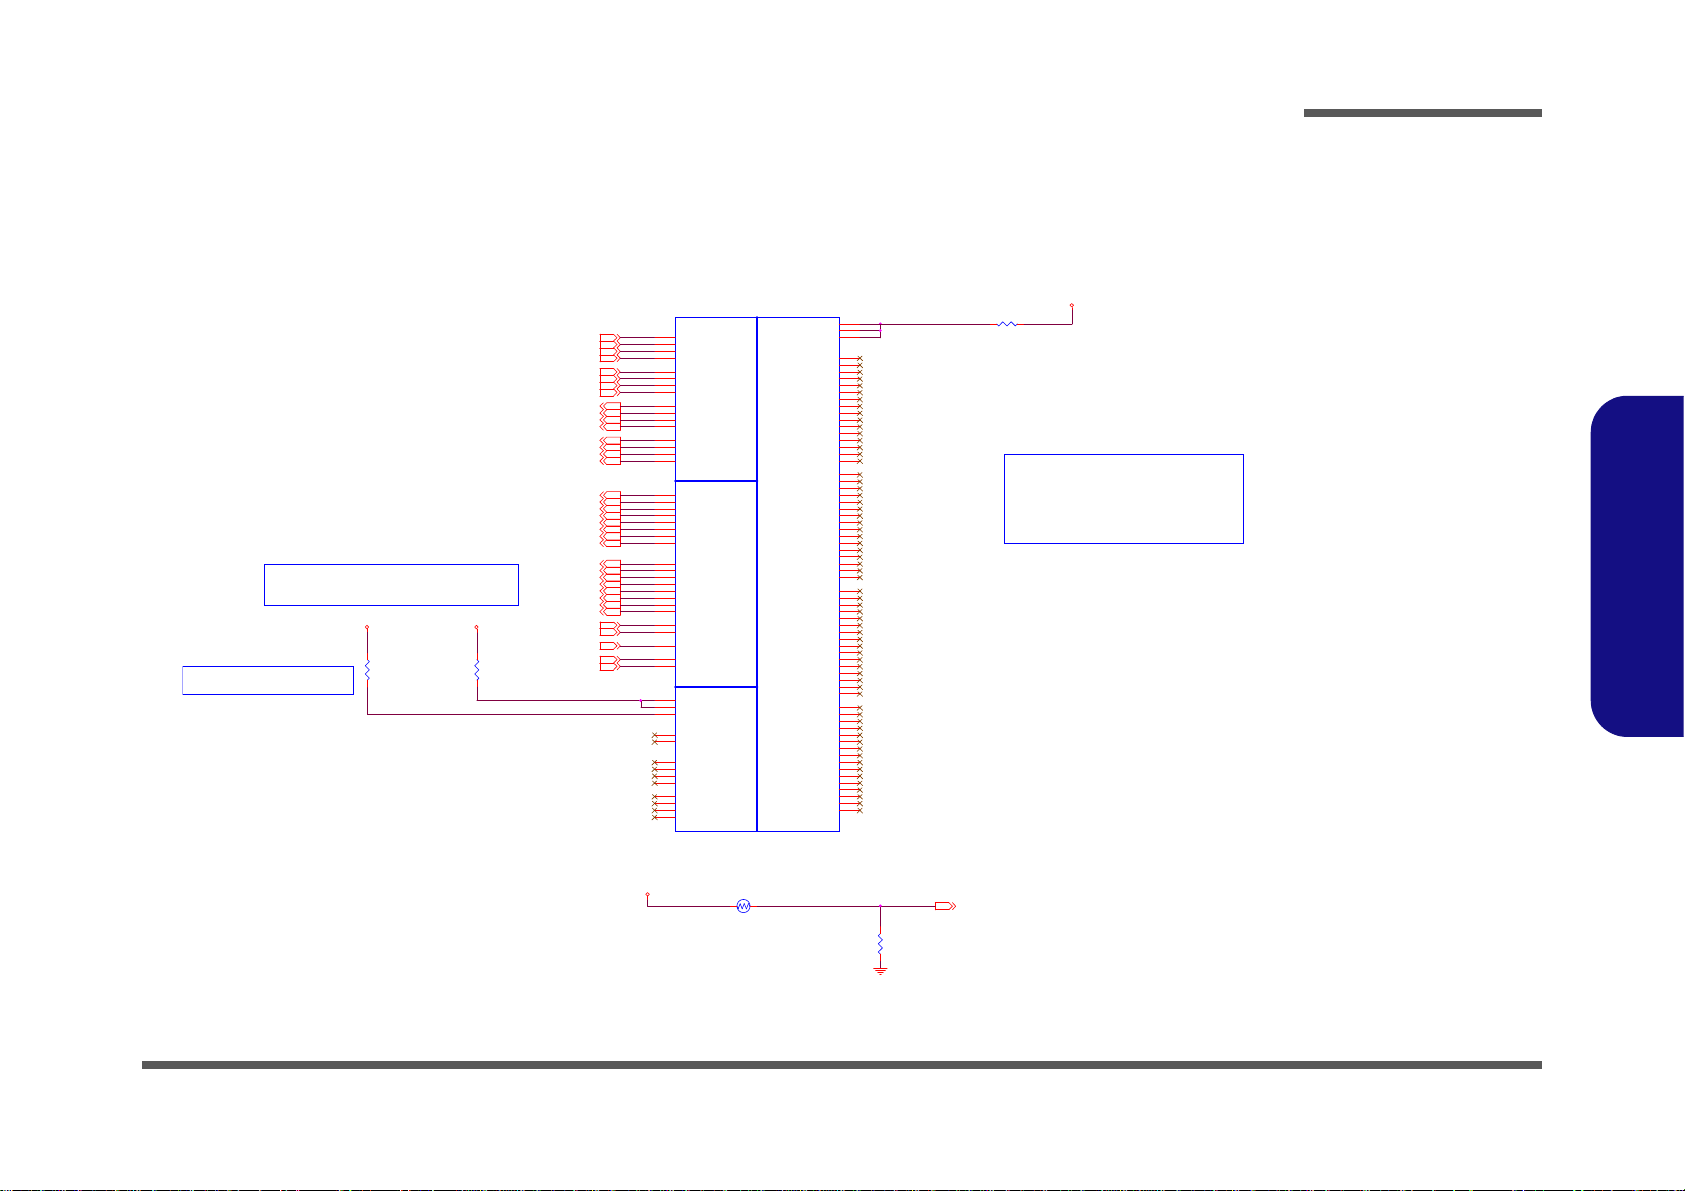
Processor 1/7-DMI,
FDI, PEG
PTH1
10K_1%_NTC_06
1 2
R47 24.9 _1%_04
R192
10K_1%_04
R48
24.9_1 %_04
R49
*1K_1%_04
PCI EXPRESS* - GRAPHICS
DMI
Intel(R) FDI
eDP
U13A
T2
DMI_RX#[0]
B27
DMI_RX#[1]
B25
DMI_RX#[2]
A25
DMI_RX#[3]
B24
DMI_RX[0]
B28
DMI_RX[1]
B26
DMI_RX[2]
A24
DMI_RX[3]
B23
DMI_TX#[0]
G21
DMI_TX#[1]
E22
DMI_TX#[2]
F21
DMI_TX#[3]
D21
DMI_TX[0]
G22
DMI_TX[1]
D22
DMI_TX[3]
C21
DMI_TX[2]
F20
FDI0_TX#[0]
A21
FDI0_TX#[1]
H19
FDI0_TX#[2]
E19
FDI0_TX#[3]
F18
FDI1_TX#[0]
B21
FDI1_TX#[1]
C20
FDI1_TX#[2]
D18
FDI1_TX#[3]
E17
FDI0_TX[0]
A22
FDI0_TX[1]
G19
FDI0_TX[2]
E20
FDI0_TX[3]
G18
FDI1_TX[0]
B20
FDI1_TX[1]
C19
FDI1_TX[2]
D19
FDI1_TX[3]
F17
FDI0_FSYN C
J18
FDI1_FSYN C
J17
FDI_INT
H20
FDI0_LSYN C
J19
FDI1_LSYN C
H17
PEG_I COMPI
J22
PEG_ICOMPO
J21
PEG_RCOMPO
H22
PEG_RX#[0]
K33
PEG_RX#[1]
M35
PEG_RX#[2]
L34
PEG_RX#[3]
J35
PEG_RX#[4]
J32
PEG_RX#[5]
H34
PEG_RX#[6]
H31
PEG_RX#[7]
G33
PEG_RX#[8]
G30
PEG_RX#[9]
F35
PEG_R X#[10]
E34
PEG_R X#[11]
E32
PEG_R X#[12]
D33
PEG_R X#[13]
D31
PEG_R X#[14]
B33
PEG_R X#[15]
C32
PEG_RX[0]
J33
PEG_RX[1]
L35
PEG_RX[2]
K34
PEG_RX[3]
H35
PEG_RX[4]
H32
PEG_RX[5]
G34
PEG_RX[6]
G31
PEG_RX[7]
F33
PEG_RX[8]
F30
PEG_RX[9]
E35
PEG_RX[10]
E33
PEG_RX[11]
F32
PEG_RX[12]
D34
PEG_RX[13]
E31
PEG_RX[14]
C33
PEG_RX[15]
B32
PEG_TX#[0]
M29
PEG_TX#[1]
M32
PEG_TX#[2]
M31
PEG_TX#[3]
L32
PEG_TX#[4]
L29
PEG_TX#[5]
K31
PEG_TX#[6]
K28
PEG_TX#[7]
J30
PEG_TX#[8]
J28
PEG_TX#[9]
H29
PEG_TX#[10]
G27
PEG_TX#[11]
E29
PEG_TX#[12]
F27
PEG_TX#[13]
D28
PEG_TX#[14]
F26
PEG_TX#[15]
E25
PEG_TX[0]
M28
PEG_TX[1]
M33
PEG_TX[2]
M30
PEG_TX[3]
L31
PEG_TX[4]
L28
PEG_TX[5]
K30
PEG_TX[6]
K27
PEG_TX[7]
J29
PEG_TX[8]
J27
PEG_TX[9]
H28
PEG_TX[10]
G28
PEG_TX[11]
E28
PEG_TX[12]
F28
PEG_TX[13]
D27
PEG_TX[14]
E26
PEG_TX[15]
D25
eDP_AUX
C15
eDP_AUX#
D15
eDP_TX[0]
C17
eDP_TX[1]
F16
eDP_TX[2]
C16
eDP_TX[3]
G15
eDP_TX#[0]
C18
eDP_TX#[1]
E16
eDP_TX#[2]
D16
eDP_TX#[3]
F15
eDP_C OMPIO
A18
eDP_H PD
B16
eDP_ICOMPO
A17
3.3V
1.05VS
1.05VS
1.05VS
DMI_TXP314
DMI_TXP214
DMI_TXP114
DMI_TXP014
DMI_TXN214
DMI_TXN114
DMI_TXN014
DMI_RXN114
DMI_RXN014
DMI_TXN314
DMI_RXP014
DMI_RXN314
DMI_RXN214
DMI_RXP314
DMI_RXP214
DMI_RXP114
FDI_LSYNC014
FDI_INT14
FDI_FSYNC114
FDI_FSYNC014
FDI_TXN114
FDI_TXN014
FDI_LSYNC114
FDI_TXN414
FDI_TXN314
FDI_TXN214
FDI_TXN714
FDI_TXN614
FDI_TXN514
FDI_TXP214
FDI_TXP114
FDI_TXP014
FDI_TXP614
FDI_TXP514
FDI_TXP414
FDI_TXP314
THERM_VOLT 28
FDI_TXP714
EDP_H PD
EDP_C OMPI O
Ivy Bridge Processor 1/7 ( DMI,PEG,FDI )
CAD NOTE: PEG_ICOMPI and RCOMPO signals
should be shorted and routed with
- max length = 500 mils
- typical impedance = 43 mohms
PEG_ICOMPO signals should be routed with
- max length = 500 mils
- typical impedance = 14.5 mohms
CAD NOTE: DP_COMPIO and ICOMPO signals
should be shorted near balls and routed with
- typical impedance < 25 mohms
EDP HPD Func tion Disab le
EDP_HPD: Pull-u p10K- DISABLED HPD
DP Compensation S ignal
PEG_IRCOMP_R
PLACE NEAR U3
20 mil
PEG Compen sation Si gnal
Schematic Diagrams
B.Schematic Diagrams
Processor 1/7-DMI, FDI, PEG B - 3
Page 56
Schematic Diagrams
Sheet 3 of 42
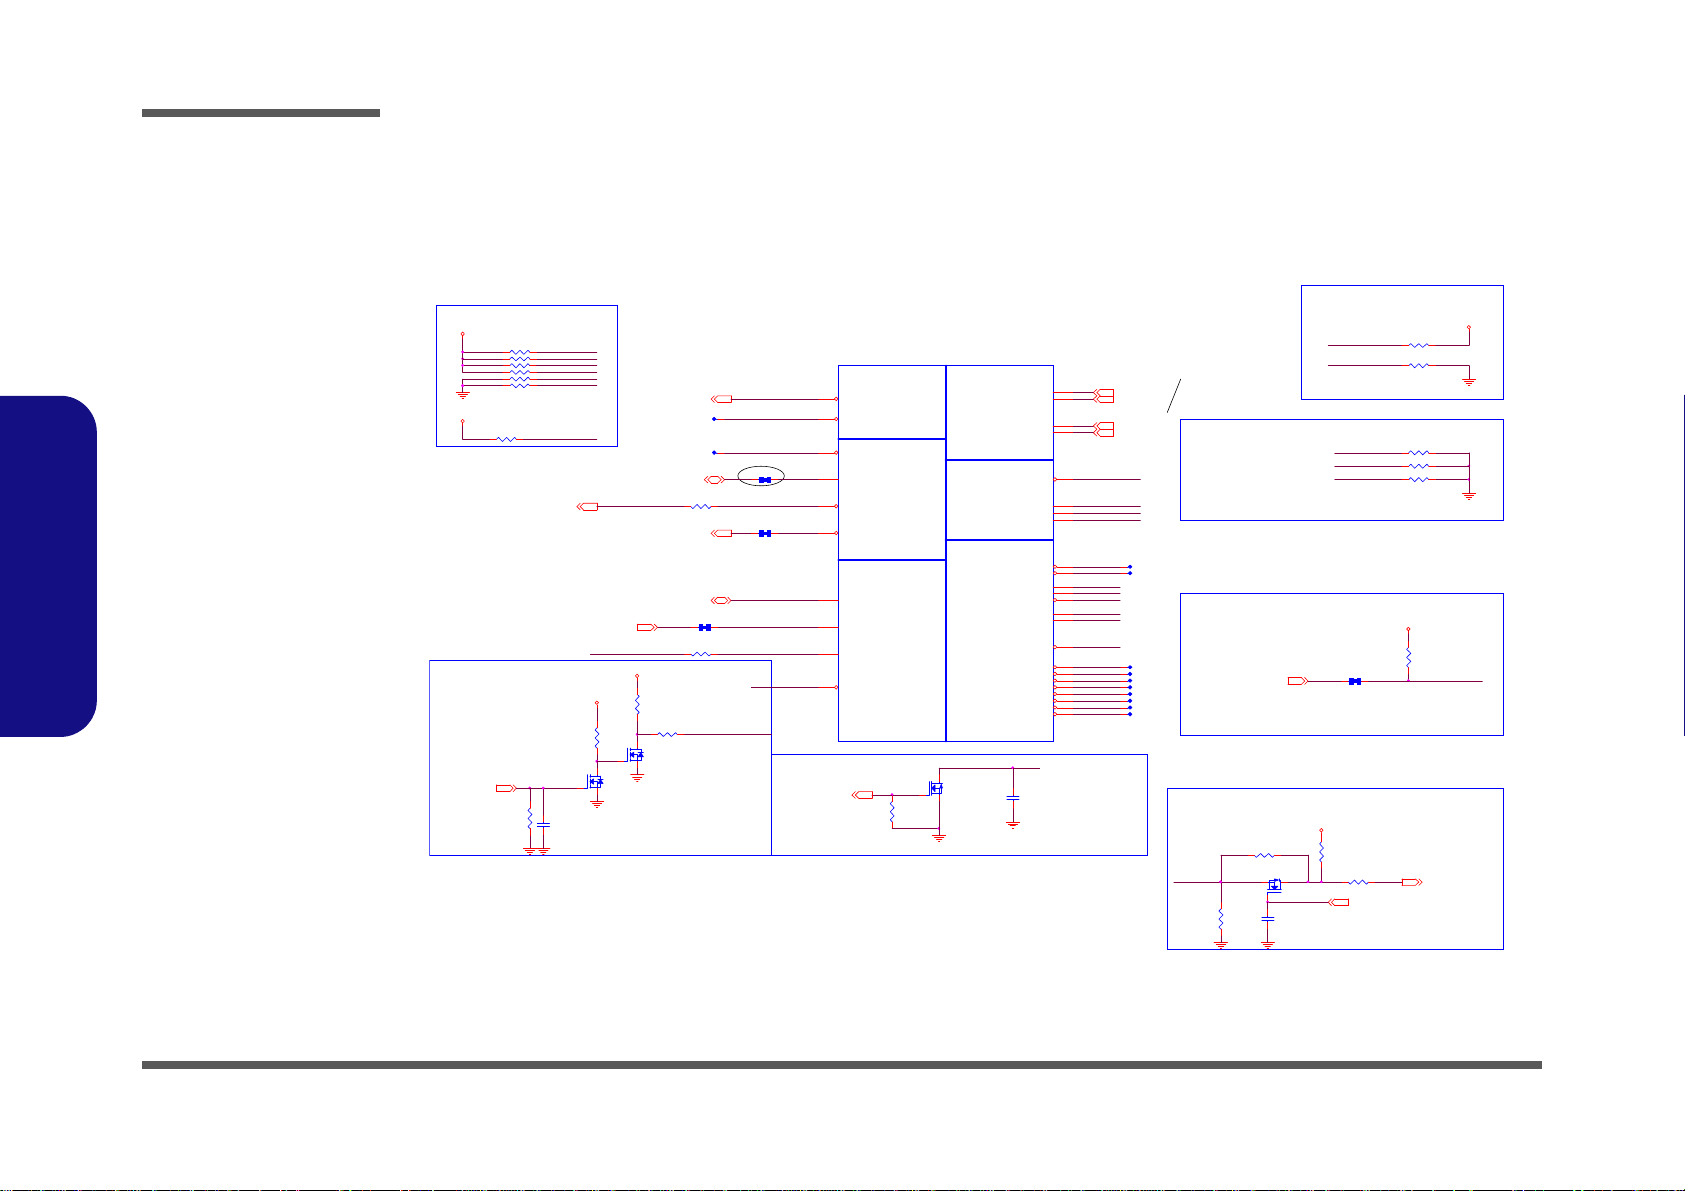
Processor 2/7-CLK,
MISC
R27 *10mil_short
3/23
PMSYS_PW RGD _BUF
H_PROCHOT#
H_CPUPWRGD_R
CAD Note: Capacitor n eed to be pl aced
close to buff er output pi n
S3 circuit:- DRAM PWR GOOD logic
H_CPUPWRGD_R
R3310K_04
Processor Pullups/Pull downs
TRACE WIDTH 10MIL, LENGTH <500MILS
BUF_CPU_RST#
H_PROCHOT#
R75 *0_04
C162
47p_50V_N PO_04
R296
75_04
R74
1K_04
R294
100K_04
R293 *1K_04
R34 *10m il_short
R22 62_04
S
D
G
Q14A
MTDN 7002 ZHS 6R
2
61
S
D
G
Q14B
MTDN7002Z HS6R
5
34
R295 43.2_1%_04
Q3
MTN7002 ZHS 3
G
DS
R26 56_1%_ 04
R297
10K_04
C151
0.047u_10 V_X7R_04
R292 130_1%_04 R62
200_1%_04
CLOCKS
MISCTHERMALPWR MANAGEMENT
DDR3
MISC
JTAG & BPM
U13B
T2
SM_RCOMP[1]
A5
SM_RCOMP[2]
A4
SM_DRAMRST#
R8
SM_RCOMP[0]
AK1
BCLK#
A27
BCLK
A28
DPLL_R EF_CLK #
A15
DPLL_REF_CLK
A16
CATERR#
AL33
PECI
AN33
PROCH OT#
AL32
THER MTR IP#
AN32
SM_DRAMPW ROK
V8
RESET#
AR33
PRDY#
AP29
PREQ#
AP27
TCK
AR26
TMS
AR27
TRS T#
AP30
TDI
AR28
TDO
AP26
DBR#
AL35
BPM#[0]
AT28
BPM#[1]
AR29
BPM#[2]
AR30
BPM#[3]
AT30
BPM#[4]
AP32
BPM#[5]
AR31
BPM#[6]
AT31
BPM#[7]
AR32
PM_SYN C
AM34
SKTOCC#
AN34
PROC_ SELECT#
C26
UNCOREPWRGOOD
AP33
Q1
MTN7002ZH S3
G
DS
R72 1K_04
C335
*68p_50V_N PO_04
R38 *51_ 04
R76
4.99K_1% _04
R105
100K_04
1.05VS
3.3VS
1.5V
1.5VS_C PU
3.3VS
1.05VS
1.05VS
CLK_EXP_N 13
CLK_EXP_P 13
CLK_DP_P 13
CLK_DP_N 13
H_PROCHOT#33
H_THRMTRIP#17
H_PECI17,28, 29
H_PM_SYNC14, 29
PLT_RST#16,22
H_CPUPWRGD17,29
DDR3_DRAMRST# 9,10
DR AMRS T_C NTR L 6 ,13
H_SNB_IVB#17,29
PM_DRAM_PWRGD14,29
XDP _ DB R _R
SM_RCO MP_2
SM_RCO MP_1
SM_RCO MP_0H_PROCHOT# H_PROCHOT#_D
XDP _ TMS
XDP_TRST#
XDP _ TC LK
VDDPWRGOOD_R
XDP_PREQ #
XDP _ TD I_ R
XDP _ TD O_ R
CPUDRAMRST#
DDR3 Compensation Signals
If PROCHOT# is not used,
then it must be terminated
with a 56-£[ +-5% pull-up
resistor to 1.05VS .
BUF_CPU_RST#
SM_RCOMP_1
SM_RCOMP_0
XDP_BPM1_R
XDP_BPM0_R
SM_RCOMP_2
XDP_BPM5_R
XDP_BPM4_R
XDP_BPM3_R
XDP_BPM2_R
PMSYS_ PWRG D_BU F
XDP_PRD Y#
XDP_BPM7_R
XDP_BPM6_R
R61 * 10mil _04
Ivy Bridge Processor 2/7 ( CLK,MISC,JTAG )
Buffered reset to CPU
S3 circuit:- DRAM_RST# to memory
should be high during S3
CPUDRAMRST#
XDP _TD O _R
XDP _D B R_ R
H_CATERR#
XDP _TR S T#
XDP _TM S
H_SNB_IVB#
PU/PD for JTAG signals
XDP_PREQ #
XDP _TD I _R
XDP _TC L K
R60 140_1%_0 4
R57 200_1%_0 4
R53 25.5_1%_04
R36 *10mil_short
R43 *51_ 04
R40 *51_ 04
R37 *51_ 04
R39 51_04
R41 *51_ 04
CAD NOTE: All DDR_COMP signals
should be routed such that :-
- max length = 500 mils
- trace width = 15mils and
- MB trace impedance < 68 mohms
(worst case resistance)
CAD Note: Use pad sharing method
for following clock resistor placement
H_PROCHOT#_EC28
Processor 2/7- CLK, MISC
B.Schematic Diagrams
B - 4 Processor 2/7- CLK, MISC
Page 57
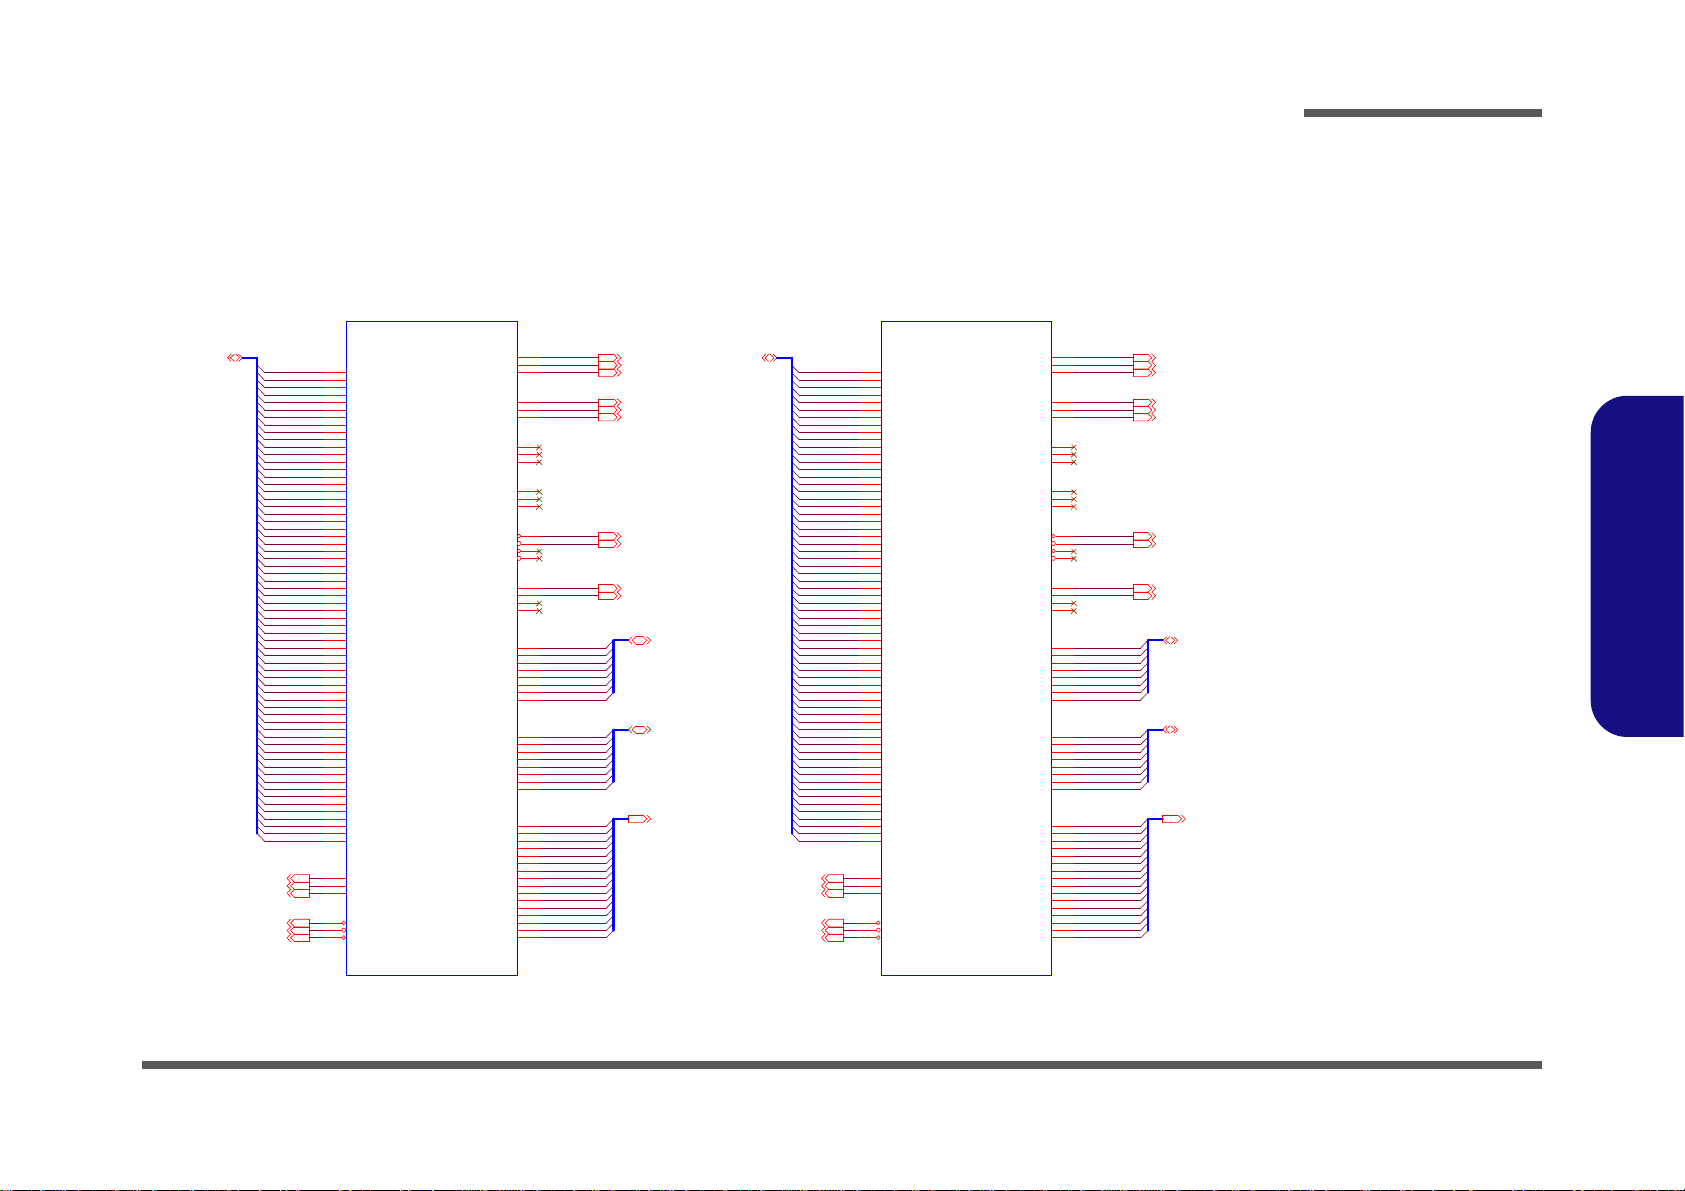
Processor 3/7- (DDR3)
M_A_D QS #7
M_A_D QS #2
M_A_D QS #1
M_A_D QS #3
M_A_D QS #4
M_A_D QS #5
M_A_D QS #6
M_A_D QS #0
M_A_D QS 4
M_A_D QS 5
M_A_D QS 6
M_A_D QS 7
M_A_D QS 0
M_A_D QS 2
M_A_D QS 1
M_A_D QS 3
M_B_DQS#5
M_B_DQS#0
M_B_DQS#1
M_B_DQS#2
M_B_DQS#3
M_B_DQS#4
M_B_DQS#6
M_B_A4
M_B_A6
M_B_A5
M_B_DQS#7
M_B_A12
M_B_A0
M_B_A1
M_B_A2
M_B_A3
M_B_A8
M_B_A9
M_B_A10
M_B_A11
M_B_A13
M_B_DQS4
M_B_DQS6
M_B_DQS5
M_B_A14
M_B_A15
M_B_A7
M_B_DQS7
M_B_DQS0
M_B_DQS1
M_B_DQS2
M_B_DQS3
DDR SYSTEM MEMORY B
U13D
T2
SB_BS[0]
AA9
SB_BS[1]
AA7
SB_BS[2]
R6
SB_CAS#
AA10
SB_RAS#
AB8
SB_WE#
AB9
SB_CK[0]
AE2
SB_CK[1]
AE1
SB_CLK#[0]
AD2
SB_CLK#[1]
AD1
SB_CKE[ 0]
R9
SB_CKE[ 1]
R10
SB_ODT[0 ]
AE4
SB_ODT[1 ]
AD4
SB_DQS[4]
AN6
SB_DQS#[4]
AN5
SB_DQS[5]
AP8
SB_DQS#[5]
AP9
SB_DQS[6]
AK11
SB_DQS#[6]
AK12
SB_DQS[7]
AP14
SB_DQS#[7]
AP15
SB_DQS[0]
C7
SB_DQS#[0]
D7
SB_DQS[1]
G3
SB_DQS#[1]
F3
SB_DQS[2]
J6
SB_DQS#[2]
K6
SB_DQS[3]
M3
SB_DQS#[3]
N3
SB_MA[0]
AA8
SB_MA[1]
T7
SB_MA[2]
R7
SB_MA[3]
T6
SB_MA[4]
T2
SB_MA[5]
T4
SB_MA[6]
T3
SB_MA[7]
R2
SB_MA[8]
T5
SB_MA[9]
R3
SB_MA[10]
AB7
SB_MA[11]
R1
SB_MA[12]
T1
SB_MA[13]
AB10
SB_MA[14]
R5
SB_MA[15]
R4
SB_DQ[0]
C9
SB_DQ[1]
A7
SB_DQ[2]
D10
SB_DQ[3]
C8
SB_DQ[4]
A9
SB_DQ[5]
A8
SB_DQ[6]
D9
SB_DQ[7]
D8
SB_DQ[8]
G4
SB_DQ[9]
F4
SB_DQ[10]
F1
SB_DQ[11]
G1
SB_DQ[12]
G5
SB_DQ[13]
F5
SB_DQ[14]
F2
SB_DQ[15]
G2
SB_DQ[16]
J7
SB_DQ[17]
J8
SB_DQ[18]
K10
SB_DQ[19]
K9
SB_DQ[20]
J9
SB_DQ[21]
J10
SB_DQ[22]
K8
SB_DQ[23]
K7
SB_DQ[24]
M5
SB_DQ[25]
N4
SB_DQ[26]
N2
SB_DQ[27]
N1
SB_DQ[28]
M4
SB_DQ[29]
N5
SB_DQ[30]
M2
SB_DQ[31]
M1
SB_DQ[32]
AM5
SB_DQ[33]
AM6
SB_DQ[34]
AR3
SB_DQ[35]
AP3
SB_DQ[36]
AN3
SB_DQ[37]
AN2
SB_DQ[38]
AN1
SB_DQ[39]
AP2
SB_DQ[40]
AP5
SB_DQ[41]
AN9
SB_DQ[42]
AT5
SB_DQ[43]
AT6
SB_DQ[44]
AP6
SB_DQ[45]
AN8
SB_DQ[46]
AR6
SB_DQ[47]
AR5
SB_DQ[48]
AR9
SB_DQ[49]
AJ11
SB_DQ[50]
AT8
SB_DQ[51]
AT9
SB_DQ[52]
AH11
SB_DQ[53]
AR8
SB_DQ[54]
AJ12
SB_DQ[55]
AH12
SB_DQ[56]
AT11
SB_DQ[57]
AN14
SB_DQ[58]
AR14
SB_DQ[59]
AT14
SB_DQ[60]
AT12
SB_DQ[61]
AN15
SB_DQ[62]
AR15
SB_DQ[63]
AT15
SB_CK[2]
AB2
SB_CLK#[2]
AA2
SB_CKE[ 2]
T9
SB_CK[3]
AA1
SB_CLK#[3]
AB1
SB_CKE[ 3]
T10
SB_CS#[0]
AD3
SB_CS#[1]
AE3
SB_CS#[2]
AD6
SB_CS#[3]
AE6
SB_ODT[2 ]
AD5
SB_ODT[3 ]
AE5
M_A_DQ[63: 0]9
DDR SYSTEM MEMORY A
U13C
T2
SA_BS[0]
AE10
SA_BS[1]
AF10
SA_BS[2]
V6
SA_C AS#
AE8
SA_R AS#
AD9
SA_WE #
AF9
SA_CK[0]
AB6
SA_CK[1]
AA5
SA_CLK#[0]
AA6
SA_CLK#[1]
AB5
SA_CKE[0]
V9
SA_CKE[1]
V10
SA_CS#[0]
AK3
SA_CS#[1]
AL3
SA_ODT[0]
AH3
SA_ODT[1]
AG3
SA_DQS[0]
D4
SA_DQS#[ 0]
C4
SA_DQS[1]
F6
SA_DQS#[ 1]
G6
SA_DQS[2]
K3
SA_DQS#[ 2]
J3
SA_DQS[3]
N6
SA_DQS#[ 3]
M6
SA_DQS[4]
AL5
SA_DQS#[ 4]
AL6
SA_DQS[5]
AM9
SA_DQS#[ 5]
AM8
SA_DQS[6]
AR11
SA_DQS#[ 6]
AR12
SA_DQS[7]
AM14
SA_DQS#[ 7]
AM15
SA_MA[0]
AD10
SA_MA[1]
W1
SA_MA[2]
W2
SA_MA[3]
W7
SA_MA[4]
V3
SA_MA[5]
V2
SA_MA[6]
W3
SA_MA[7]
W6
SA_MA[8]
V1
SA_MA[9]
W5
SA_MA[10]
AD8
SA_MA[11]
V4
SA_MA[12]
W4
SA_MA[13]
AF8
SA_MA[14]
V5
SA_MA[15]
V7
SA_D Q[0]
C5
SA_D Q[1]
D5
SA_D Q[2]
D3
SA_D Q[3]
D2
SA_D Q[4]
D6
SA_D Q[5]
C6
SA_D Q[6]
C2
SA_D Q[7]
C3
SA_D Q[8]
F10
SA_D Q[9]
F8
SA_D Q[10]
G10
SA_D Q[11]
G9
SA_D Q[12]
F9
SA_D Q[13]
F7
SA_D Q[14]
G8
SA_D Q[15]
G7
SA_D Q[16]
K4
SA_D Q[17]
K5
SA_D Q[18]
K1
SA_D Q[19]
J1
SA_D Q[20]
J5
SA_D Q[21]
J4
SA_D Q[22]
J2
SA_D Q[23]
K2
SA_D Q[24]
M8
SA_D Q[25]
N10
SA_D Q[26]
N8
SA_D Q[27]
N7
SA_D Q[28]
M10
SA_D Q[29]
M9
SA_D Q[30]
N9
SA_D Q[31]
M7
SA_D Q[32]
AG6
SA_D Q[33]
AG5
SA_D Q[34]
AK6
SA_D Q[35]
AK5
SA_D Q[36]
AH5
SA_D Q[37]
AH6
SA_D Q[38]
AJ5
SA_D Q[39]
AJ6
SA_D Q[40]
AJ8
SA_D Q[41]
AK8
SA_D Q[42]
AJ9
SA_D Q[43]
AK9
SA_D Q[44]
AH8
SA_D Q[45]
AH9
SA_D Q[46]
AL9
SA_D Q[47]
AL8
SA_D Q[48]
AP11
SA_D Q[49]
AN11
SA_D Q[50]
AL12
SA_D Q[51]
AM12
SA_D Q[52]
AM11
SA_D Q[53]
AL11
SA_D Q[54]
AP12
SA_D Q[55]
AN12
SA_D Q[56]
AJ14
SA_D Q[57]
AH14
SA_D Q[58]
AL15
SA_D Q[59]
AK15
SA_D Q[60]
AL14
SA_D Q[61]
AK14
SA_D Q[62]
AJ15
SA_D Q[63]
AH15
SA_CK[2]
AB4
SA_CLK#[2]
AA4
SA_CK[3]
AB3
SA_CLK#[3]
AA3
SA_CKE[2]
W9
SA_CKE[3]
W10
SA_CS#[2]
AG1
SA_CS#[3]
AH1
SA_ODT[2]
AG2
SA_ODT[3]
AH2
M_B_BS010
M_B_D Q[ 63 :0]10
M_B_BS210
M_B_BS110
M_A_CLK_DDR#1 9
M_A_CLK_DDR1 9
M_A_C KE 1 9
M_A_C S# 1 9
M_A_C S# 0 9
M_A_A[15:0] 9
M_A_CLK_DDR#0 9
M_A_CLK_DDR0 9
M_A_C KE 0 9
M_A_D QS#[7 :0 ] 9
M_A_DQS[7: 0] 9
M_A_O DT0 9
M_A_O DT1 9
M_A_C AS#9
M_A_BS29
M_A_BS19
M_A_BS09
M_A_W E#9
M_A_R AS#9
M_B_DQS[7:0] 10
M_B_A[15:0] 10
M_B_DQS#[7:0] 10
M_B_CKE3 10
M_B_CAS#10
M_B_W E#10
M_B_RAS#10
M_B_CKE2 10
M_B_CLK_DDR#3 10
M_B_CLK_DDR3 10
M_B_ODT3 10
M_B_CLK_DDR#2 10
M_B_CLK_DDR2 10
M_B_CS#3 10
M_B_CS#2 10
M_B_ODT2 10
M_A_D Q3
M_A_D Q2
M_A_D Q1
M_A_D Q3 2
M_A_D Q3 1
M_A_D Q3 0
M_A_D Q2 9
M_A_D Q4
M_A_D Q3 7
M_A_D Q3 6
M_A_D Q3 5
M_A_D Q3 4
M_A_D Q3 3
M_A_D Q4 4
M_A_D Q4 3
M_A_D Q4 2
M_A_D Q4 1
M_A_D Q4 0
M_A_D Q3 9
M_A_D Q4 9
M_A_D Q3 8
M_A_D Q4 7
M_A_D Q4 6
M_A_D Q4 5
M_A_D Q5 3
M_A_D Q5 2
M_A_D Q5 1
M_A_D Q2 8
M_A_D Q5 0
M_A_D Q5 6
M_A_D Q6
M_A_D Q5
M_A_D Q4 8
M_A_D Q5 5
M_A_D Q5 4
M_A_D Q6 2
M_A_D Q6 1
M_A_D Q6 0
M_A_D Q5 8
M_A_D Q5 7
M_A_D Q9
M_A_D Q8
M_A_D Q7
M_A_D Q5 9
M_A_D Q6 3
M_A_D Q1 6
M_A_D Q1 5
M_A_D Q1 4
M_A_D Q1 3
M_A_D Q1 2
M_A_D Q1 1
M_A_D Q1 0
M_A_D Q1 9
M_A_D Q1 8
M_A_D Q1 7
M_A_D Q2 5
M_A_D Q2 4
M_A_D Q2 3
M_A_D Q0
M_A_D Q2 2
M_A_D Q2 1
M_B_ DQ4 8
M_B_ DQ4 7
M_A_D Q2 0
M_A_D Q2 7
M_A_D Q2 6
M_B_ DQ5 3
M_B_ DQ5 2
M_B_ DQ5 1
M_B_ DQ5 0
M_B_ DQ4 9
M_B_ DQ5 8
M_B_ DQ5 7
M_B_ DQ5 6
M_B_ DQ5 5
M_B_ DQ5 4
M_B_ DQ6 3
M_B_ DQ6 2
M_B_ DQ6 1
M_B_ DQ6 0
M_B_ DQ5 9
M_B_ DQ2
M_B_ DQ1
M_B_ DQ1 2
M_B_ DQ1 1
M_B_ DQ8
M_B_ DQ7
M_B_ DQ6
M_B_ DQ5
M_B_ DQ4
M_B_ DQ3
M_B_ DQ1 3
M_B_ DQ0
M_B_ DQ1 0
M_B_ DQ9
M_B_ DQ1 9
M_B_ DQ1 8
M_B_ DQ1 7
M_B_ DQ1 6
M_B_ DQ1 5
M_B_ DQ1 4
M_B_ DQ2 4
M_B_ DQ2 3
M_B_ DQ2 2
M_B_ DQ2 1
M_B_ DQ2 0
M_B_ DQ2 9
M_B_ DQ2 8
M_B_ DQ2 7
M_B_ DQ2 6
M_B_ DQ2 5
M_B_ DQ3 5
M_B_ DQ3 4
M_B_ DQ3 3
M_B_ DQ3 2
M_B_ DQ3 1
M_B_ DQ3 0
M_B_ DQ4 0
M_B_ DQ3 9
M_B_ DQ3 8
M_B_ DQ3 7
M_B_ DQ3 6
M_B_ DQ4 5
M_B_ DQ4 4
M_B_ DQ4 3
M_B_ DQ4 2
M_B_ DQ4 1
Ivy Bridge Processor 3/7 ( DDR3 )
M_B_ DQ4 6
M_A_A 7
M_A_A 8
M_A_A 9
M_A_A 2
M_A_A 3
M_A_A 4
M_A_A 6
M_A_A 5
M_A_A 11
M_A_A 13
M_A_A 14
M_A_A 15
M_A_A 0
M_A_A 1
M_A_A 10
M_A_A 12
Sheet 4 of 42
Processor 3/7-
(DDR3)
Schematic Diagrams
B.Schematic Diagrams
Processor 3/7- (DDR3) B - 5
Page 58
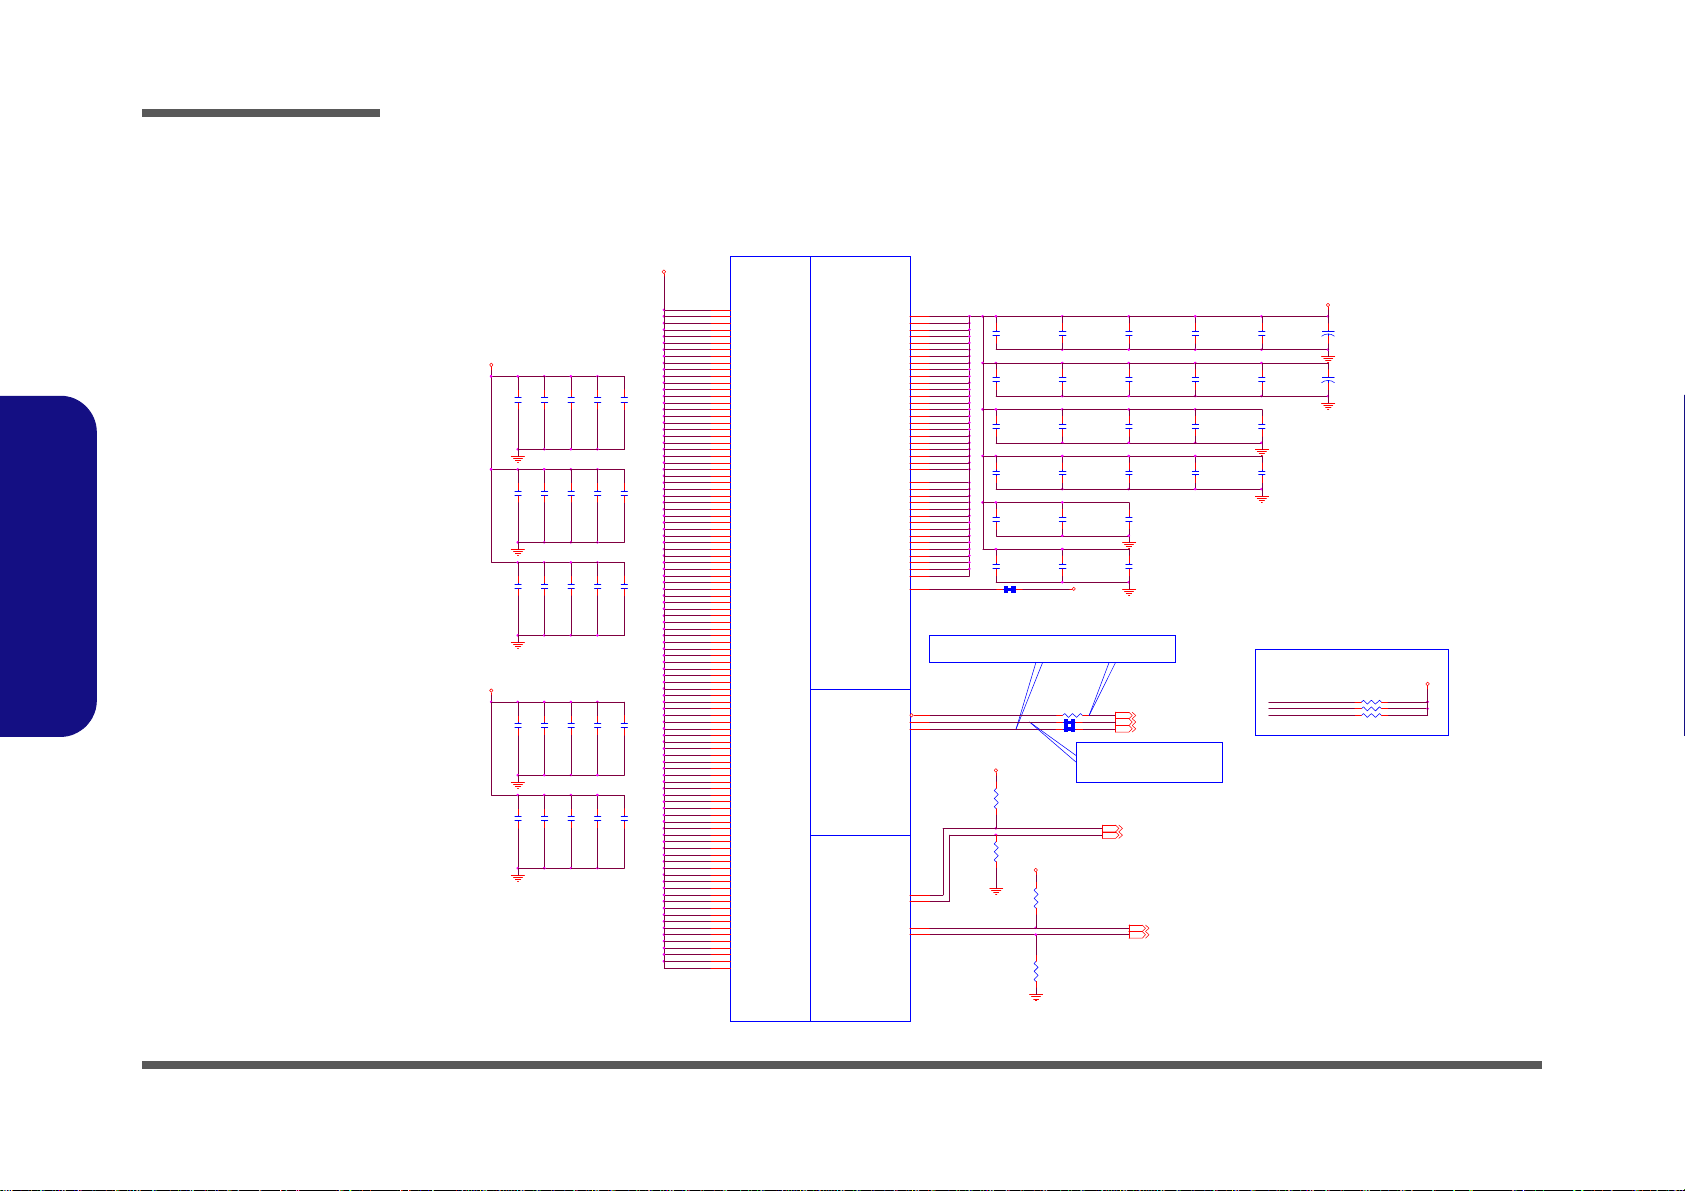
48A
Ivy Bridge Processor 4/7 ( POWER )
PROCESSOR CORE POWER
PROCESSOR UNCORE POWER
CAD Note: H_CPU_SVIDALRT#_R,H_CPU_SVIDDAT_R
Place the PU resistors close to CPU
H_CPU_SVIDDAT_R
SVID Signals
CAD Note: H_CPU_SVIDCLK_R
Place the PU
resistors close to VR
H_CPU_SVIDCLK
H_CPU_SVIDALRT#
R29 43. 2_1%_04
PR59
100_04
PR64
100_04
R21 *54.9_1%_04
H_CPU_SV IDALRT#_R
R19 130_1%_04
R50
*10_04
R45 * 15mil_sho rt_06
R51
*10_04
R20 75_04
POWER
CORE SUPPLY
PEG AND DDR
SENSE LINES SVID
U13F
T2
VCC_ SENS E
AJ35
VSS_SENSE
AJ34
VIDALERT#
AJ29
VID SCLK
AJ30
VIDSOUT
AJ28
VSS_SENSE_VCCIO
A10
VCC1
AG35
VCC2
AG34
VCC3
AG33
VCC4
AG32
VCC5
AG31
VCC6
AG30
VCC7
AG29
VCC8
AG28
VCC9
AG27
VCC10
AG26
VCC11
AF35
VCC12
AF34
VCC13
AF33
VCC14
AF32
VCC15
AF31
VCC16
AF30
VCC17
AF29
VCC18
AF28
VCC19
AF27
VCC20
AF26
VCC21
AD35
VCC22
AD34
VCC23
AD33
VCC24
AD32
VCC25
AD31
VCC26
AD30
VCC27
AD29
VCC28
AD28
VCC29
AD27
VCC30
AD26
VCC31
AC35
VCC32
AC34
VCC33
AC33
VCC34
AC32
VCC35
AC31
VCC36
AC30
VCC37
AC29
VCC38
AC28
VCC39
AC27
VCC40
AC26
VCC41
AA35
VCC42
AA34
VCC43
AA33
VCC44
AA32
VCC45
AA31
VCC46
AA30
VCC47
AA29
VCC48
AA28
VCC49
AA27
VCC50
AA26
VCC51
Y35
VCC52
Y34
VCC53
Y33
VCC54
Y32
VCC55
Y31
VCC56
Y30
VCC57
Y29
VCC58
Y28
VCC59
Y27
VCC60
Y26
VCC61
V35
VCC62
V34
VCC63
V33
VCC64
V32
VCC65
V31
VCC66
V30
VCC67
V29
VCC68
V28
VCC69
V27
VCC70
V26
VCC71
U35
VCC72
U34
VCC73
U33
VCC74
U32
VCC75
U31
VCC76
U30
VCC77
U29
VCC78
U28
VCC79
U27
VCC80
U26
VCC81
R35
VCC82
R34
VCC83
R33
VCC84
R32
VCC85
R31
VCC86
R30
VCC87
R29
VCC88
R28
VCC89
R27
VCC90
R26
VCC91
P35
VCC92
P34
VCC93
P33
VCC94
P32
VCC95
P31
VCC96
P30
VCC97
P29
VCC98
P28
VCC99
P27
VCC100
P26
VCCIO1
AH13
VCCI O12
J11
VCCI O18
G12
VCCI O19
F14
VCCI O20
F13
VCCI O21
F12
VCCI O22
F11
VCCI O23
E14
VCCI O24
E12
VCCIO2
AH10
VCCIO3
AG10
VCCIO4
AC10
VCCIO5
Y10
VCCIO6
U10
VCCIO7
P10
VCCIO8
L10
VCCIO9
J14
VCCI O10
J13
VCCI O11
J12
VCCI O13
H14
VCCI O14
H12
VCCI O15
H11
VCCI O16
G14
VCCI O17
G13
VCCI O25
E11
VCCI O32
C12
VCCI O33
C11
VCCI O34
B14
VCCI O35
B12
VCCI O36
A14
VCCI O37
A13
VCCI O38
A12
VCCI O39
A11
VCCI O26
D14
VCCI O27
D13
VCCI O28
D12
VCCI O29
D11
VCCI O30
C14
VCCI O31
C13
VCCIO_SENSE
B10
VCCI O40
J23
VCORE
1.05VS
R30 * 20mil_04
1.05VS
1.05VS
VCORE
H_CPU_SVIDCLK 33
VCORE_VSS_SENSE 33
H_CPU_SVIDDAT 33
VCORE_VCC_SENSE 33
H_CPU_SVIDALRT# 33
VCCP_S ENSE 32
VSSP_SEN SE 32
H_CPU_SVIDCLK_R
C39
22u_6.3V_X5R _08
C312
*22u_6. 3V_X5R_08
C57
*22u_6.3V_X5R_08
H_CPU_SVIDDAT_R
C328
*22u_6.3V_X5R_08
C70
*22u_6.3V _X5R_08
C56
*10u_6.3V_X5R_06
C311
*22u_6.3V_X5R_08
C326
*22u_6.3V_X5R_08
C67
22u_6.3V_X5R_08
C46
10u_6.3V_X5R _06
C36
*22u_6. 3V_X5R_08
C50
*10u_6.3V_X5R_06
C76
22u_6.3V_X5R_08
C71
*22u_6.3V_ X5R_08
C86
*22u_6.3V_X5R_08
C77
*22u_6.3V_X5R_08
C37
*10u_6. 3V_X5R_06
C45
22u_6.3V_X5R _08
C79
*22u_6.3V_X5R_08
+
C332
*220u_6. 3V_6.3* 6.3*4. 2
C38
*10u_6. 3V_X5R_06
C310
22u_6.3V_X5R _08
C327
*22u_6.3V _X5R_08
C333
*22u_6.3V_X5R_08
C52
22u_6.3V_X5R _08
C309
*22u_6.3V_X5R_08
C75
*22u_6.3V_ X5R_08
C58
*22u_6. 3V_X5R_08
C42
22u_6.3V_X5R _08
C69
*22u_6.3V_X5R_08
+
C340
560u_2.5V_6 .6*6. 6*5.9
C48
*22u_6. 3V_X5R_08
C51
*10u_6. 3V_X5R_06
C83
*22u_6.3V _X5R_08
C40
10u_6.3V_X5R _06
C43
*10u_6.3V_X5R_06
C72
22u_6.3V_X5R_08
C313
22u_6.3V_X5R _08
C80
22u_6.3V_X5R_08
C334
*22u_6.3V_X5R_08
C35
*10u_6. 3V_X5R_06
C81
*22u_6.3V_ X5R_08
C82
22u_6.3V_X5R_08
C44
22u_6.3V_X5R _08
C41
10u_6.3V_X5 R_06
C85
*22u_6.3V_ X5R_08
C68
*22u_6.3V_X5R_08
C49
22u_6.3V_X5R _08
VCORE
VCORE
C78
22u_6.3V_X5R_08
C329
22u_6.3V_X5R_08
C322
*22u_6.3V_X5R_08
C331
*22u_6.3V _X5R_08
C84
22u_6.3V_X5R_08
1.05VS
8.5A
1.05VS_VCCP_F
8.5A
R28 * 20mil_04
Sheet 5 of 42
Processor 4/7-
Power
B.Schematic Diagrams
Schematic Diagrams
Processor 4/7- Power
B - 6 Processor 4/7- Power
Page 59
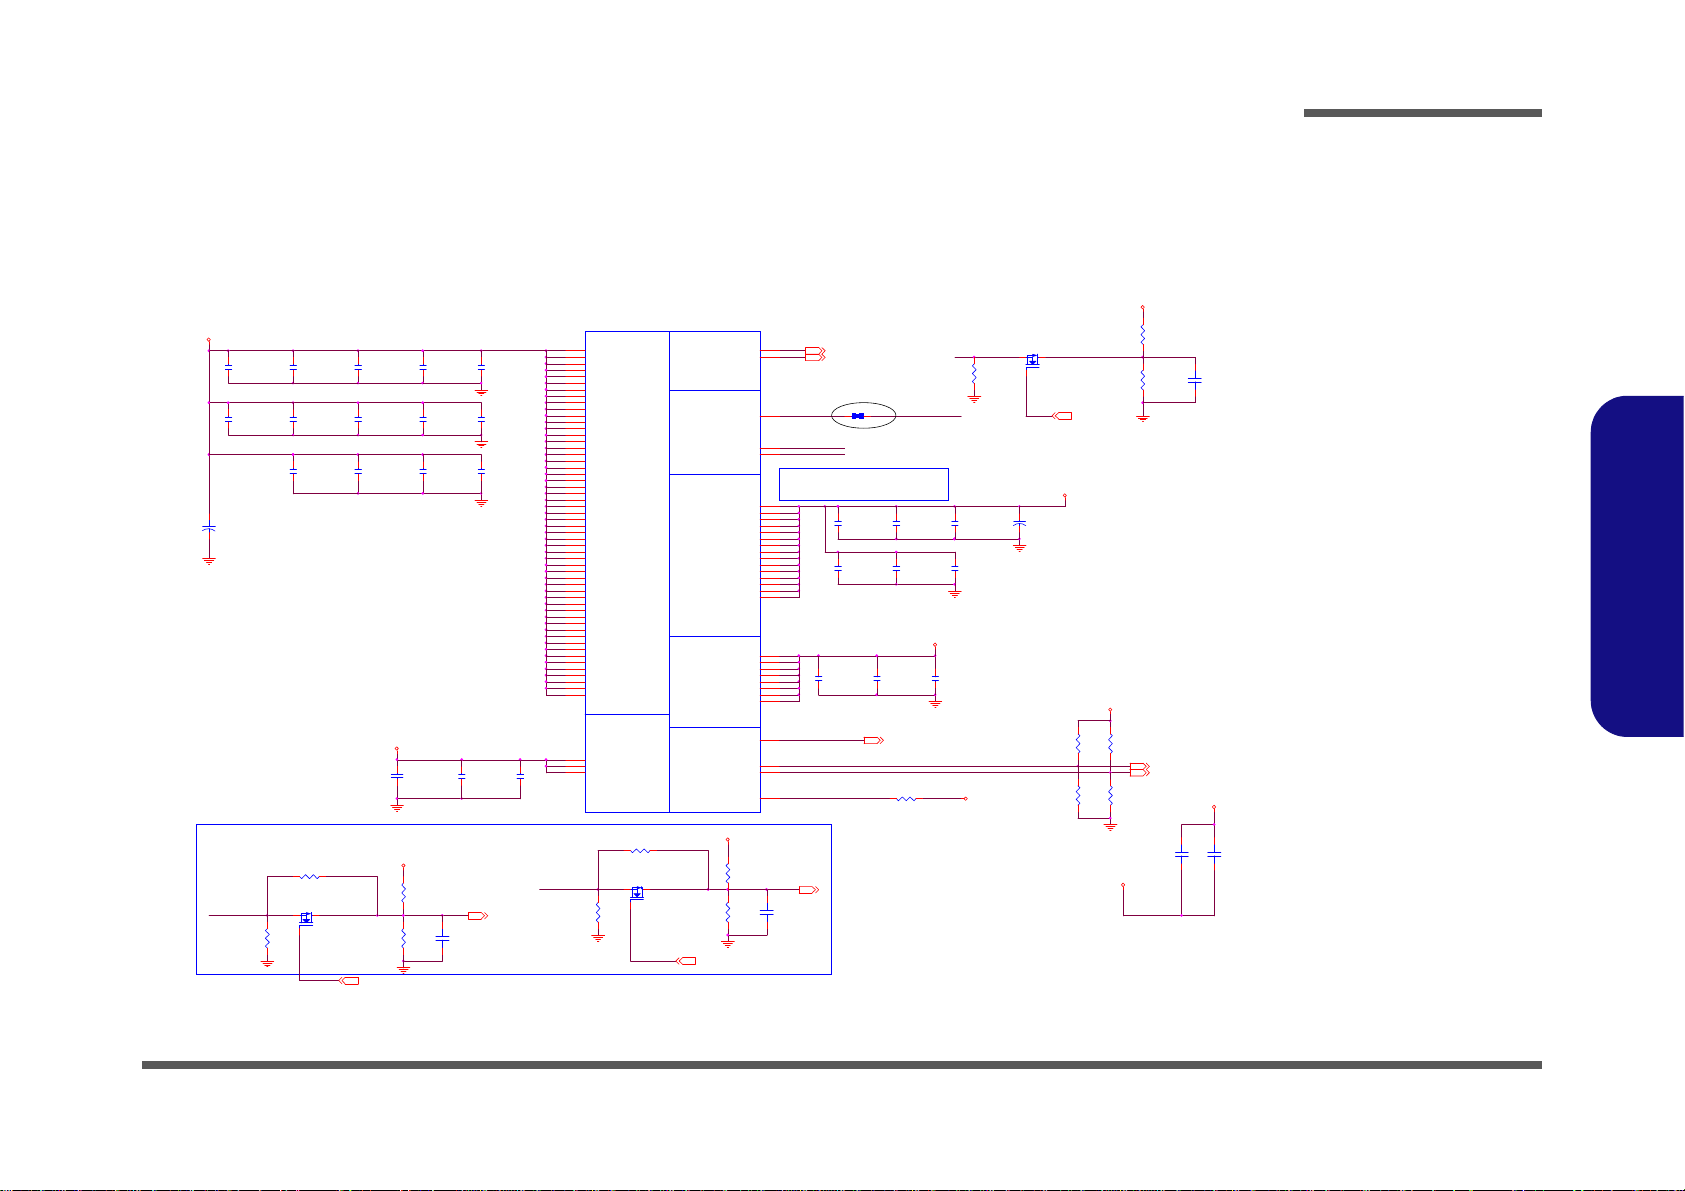
Processor 5/7- GFX PWR
+
C342
220u_6.3V_6.3*6.3* 4.2
Ivy Bridge Processor 5/7 ( GRAPHICS POWER )
6A
0.85VS
VREF_CH _B_DIMM
C336
1u_6.3V_X5R_04
C337
1u_6.3V_X5R_04
12A
C87
10u_6.3V_X5R_06
C91
10u_6.3V_X5R_06
C88
*10u_6.3V_X5R_06
C92
10u_6.3V_X5R_06
C89
10u_6.3V_X5R_06
C90
10u_6.3V_X5R_06
33A
H_SN B_IVB#_ PWRC TRL_R
CAD Note: +V_SM_VREF should
have 10 mil trace width
V_SM_VREF
VREF_CH_B_DIMM
VREF_CH_A_DIMM
1.2A
V_SM_VREF_CNT
V_SM_VRE F
¾aDIMMºÝÂ\©ñ & TRACE¥[¼e
VREF_CH_A_DIMM
R78
1K_1%_04
C349
0.1u_10V_X5R_04
R298
*1K_04
Q15
AO3402L
G
DS
C93
0.1u_10V_X5R_04
C94
0.1u_10V_X5R_04
R305
1K_1%_04
1.5VS_CPU
C150
0.1u_10V_X5R_04
R46 100K_1%_04
Q13
*AO3402L
G
DS
R55
*100K_1%_04
+
C330
*330uF_2.5V_9m_6. 3*6
R80 *0_04
Q2
AO3402L
G
DS
C95
0.1u_10V_X5R_04
R299 *0_04
R81
*1K_04
R58
1K_1%_04
R77
1K_1%_04
R31
*10K_04
R300
1K_1%_04
POWER
GRAPHICS
DDR3 -1.5V RAILS
SENSE
LINES
1.8V RAIL
SA RAIL
VREFMISC
U13G
T2
SM_VREF
AL1
VSSAXG_SENSE
AK34
VAXG_SENSE
AK35
VAXG1
AT24
VAXG2
AT23
VAXG3
AT21
VAXG4
AT20
VAXG5
AT18
VAXG6
AT17
VAXG7
AR24
VAXG8
AR23
VAXG9
AR21
VAXG10
AR20
VAXG11
AR18
VAXG12
AR17
VAXG13
AP24
VAXG14
AP23
VAXG15
AP21
VAXG16
AP20
VAXG17
AP18
VAXG18
AP17
VAXG19
AN24
VAXG20
AN23
VAXG21
AN21
VAXG22
AN20
VAXG23
AN18
VAXG24
AN17
VAXG25
AM24
VAXG26
AM23
VAXG27
AM21
VAXG28
AM20
VAXG29
AM18
VAXG30
AM17
VAXG31
AL24
VAXG32
AL23
VAXG33
AL21
VAXG34
AL20
VAXG35
AL18
VAXG36
AL17
VAXG37
AK24
VAXG38
AK23
VAXG39
AK21
VAXG40
AK20
VAXG41
AK18
VAXG42
AK17
VAXG43
AJ24
VAXG44
AJ23
VAXG45
AJ21
VAXG46
AJ20
VAXG47
AJ18
VAXG48
AJ17
VAXG49
AH24
VAXG50
AH23
VAXG51
AH21
VAXG52
AH20
VAXG53
AH18
VAXG54
AH17
VDDQ11
U4
VDDQ12
U1
VDDQ13
P7
VDDQ14
P4
VDDQ15
P1
VDDQ1
AF7
VDDQ2
AF4
VDDQ3
AF1
VDDQ4
AC7
VDDQ5
AC4
VDDQ6
AC1
VDDQ7
Y7
VDDQ8
Y4
VDDQ9
Y1
VDDQ10
U7
VCCPLL1
B6
VCCPLL2
A6
VCCSA1
M27
VCCSA2
M26
VCCSA3
L26
VCCSA4
J26
VCCSA5
J25
VCCSA6
J24
VCCSA7
H26
VCCSA8
H25
VCCSA_SENSE
H23
VCCSA_VID[1]
C24
VCCPLL3
A2
VCCSA_VID[0]
C22
SA_DI MM_VREF DQ
B4
SB_DI MM_VREF DQ
D1
VCCIO_ SEL
A19
1.8VS
1.5VS_CPU
VGFX_CORE
1.5VS_CPU
1.5V
3.3V
1.05VS
1.5V
1.5V
VR1_VC CGT_SEN SEA 33
VR1_VSSGT_SENSEA 33
VCCSA_SEN SE 31
VCCSA_VID1 31
VCCSA_VID0 31
MVREF_DQ_DIMMB 10
DRAMRST_CNTRL 3,13
MVREF _DQ_D IMMA 9
DRAMRST_CNTRL 3,13
VCCS A_SENSE
C65
*22u_6.3V_X5R_08
C61
*22u_6.3V_X5R_08
C63
22u_6.3V_X5R_08
C324
22u_6.3V_X5R_08
C321
22u_6.3V_X5R_08
C73
*22u_6.3V_X5R_08
C53
22u_6.3V_X5R_08
C325
22u_6.3V_X5R_08
C62
22u_6.3V_X5R_08
C59
22u_6.3V_X5R_08
C64
22u_6.3V_X5R_08
C74
22u_6.3V_X5R_08
C66
22u_6.3V_X5R_08
C60
22u_6.3V_X5R_08
C338
22u_6.3V_X5R_08
R288
10K_04
C55
10u_6.3V_X5R_06
C54
*10u_6.3V_X5R_06
C47
10u_6.3V_X5R_06
R54 *20mi l_04
R59
1K_1%_04
V_SM_VREF _CN T
R287
10K_04
SUSB# 14,28,29
3/23
R25
*10K_04
2/22
Sheet 6 of 42
Processor 5/7- GFX
PWR
Schematic Diagrams
B.Schematic Diagrams
Processor 5/7- GFX PWR B - 7
Page 60
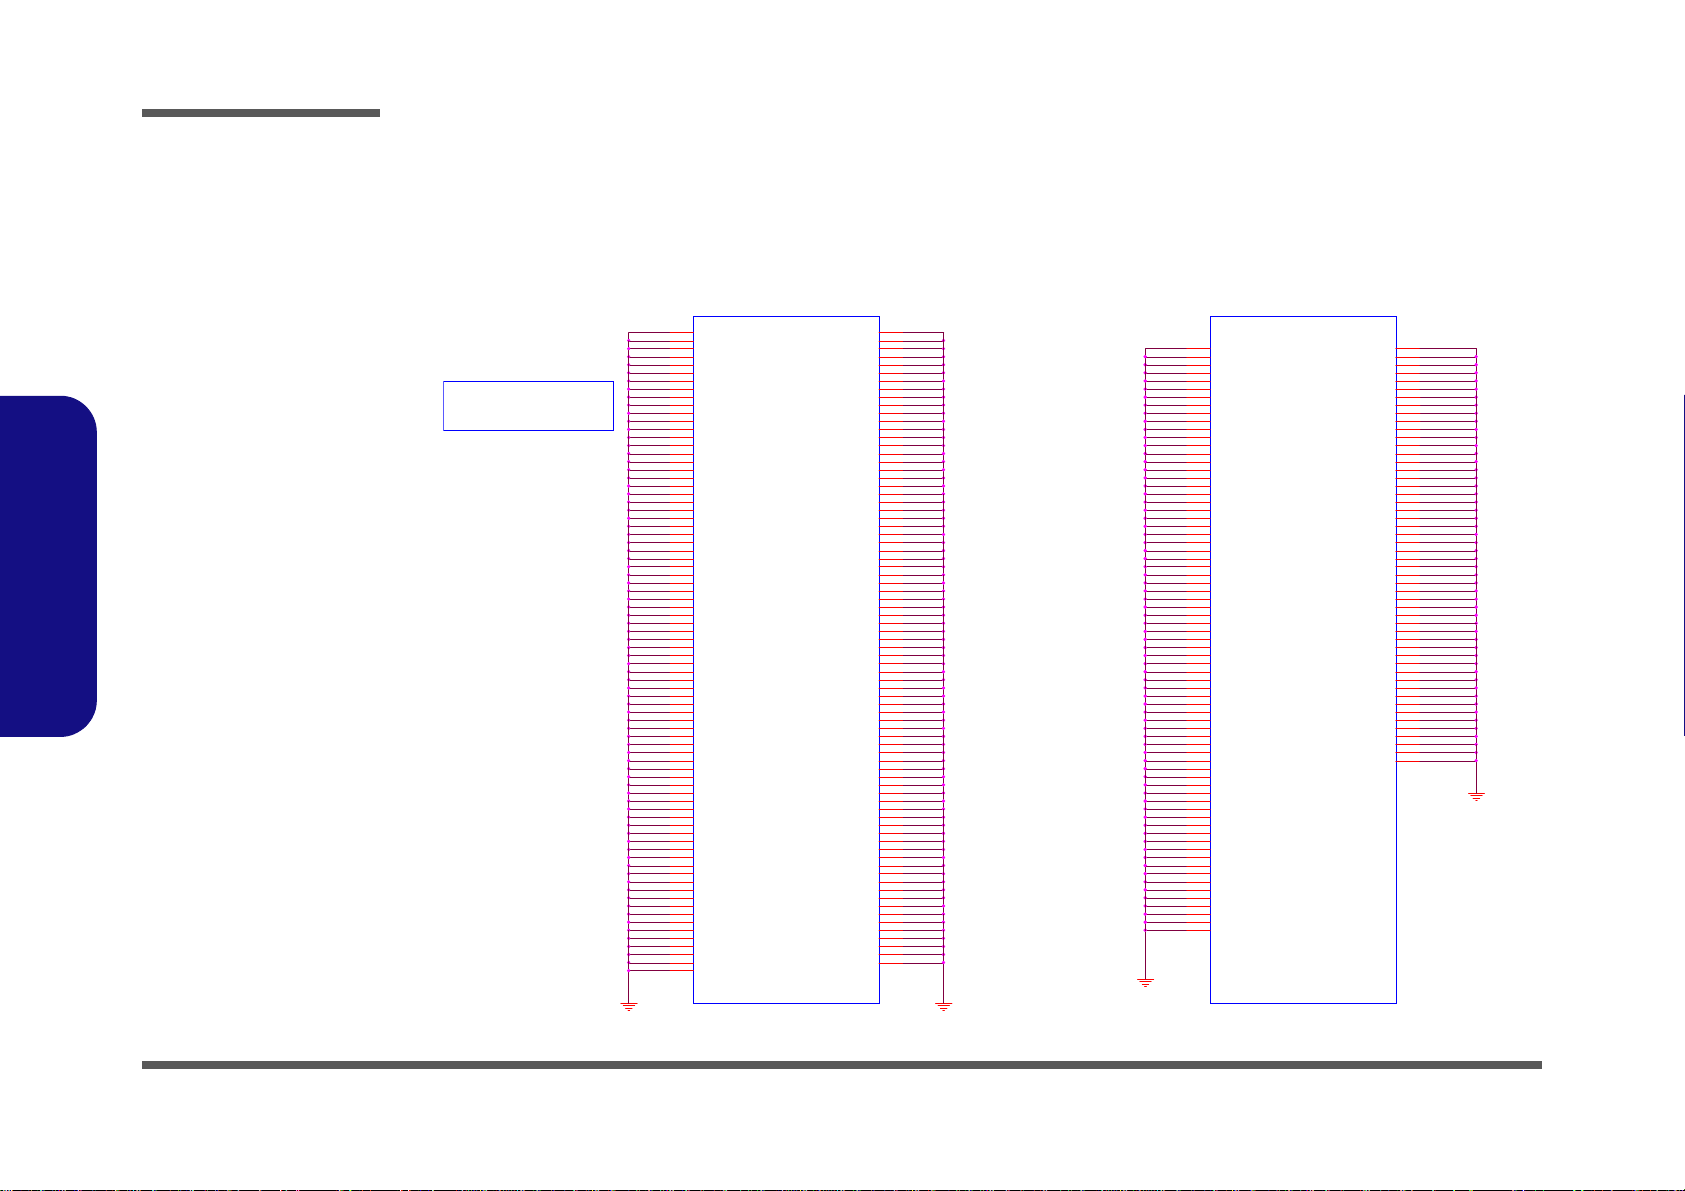
Schematic Diagrams
VSS
U13I
T2
VSS161
T35
VSS162
T34
VSS163
T33
VSS164
T32
VSS165
T31
VSS166
T30
VSS167
T29
VSS168
T28
VSS169
T27
VSS170
T26
VSS171
P9
VSS172
P8
VSS173
P6
VSS174
P5
VSS175
P3
VSS176
P2
VSS177
N35
VSS178
N34
VSS179
N33
VSS180
N32
VSS181
N31
VSS182
N30
VSS183
N29
VSS184
N28
VSS185
N27
VSS186
N26
VSS187
M34
VSS188
L33
VSS189
L30
VSS190
L27
VSS191
L9
VSS192
L8
VSS193
L6
VSS194
L5
VSS195
L4
VSS196
L3
VSS197
L2
VSS198
L1
VSS199
K35
VSS200
K32
VSS201
K29
VSS202
K26
VSS203
J34
VSS204
J31
VSS205
H33
VSS206
H30
VSS207
H27
VSS208
H24
VSS209
H21
VSS210
H18
VSS211
H15
VSS212
H13
VSS213
H10
VSS214
H9
VSS215
H8
VSS216
H7
VSS217
H6
VSS218
H5
VSS219
H4
VSS220
H3
VSS221
H2
VSS222
H1
VSS223
G35
VSS224
G32
VSS225
G29
VSS226
G26
VSS227
G23
VSS228
G20
VSS229
G17
VSS230
G11
VSS231
F34
VSS232
F31
VSS233
F29
VSS234
F22
VSS235
F19
VSS236
E30
VSS237
E27
VSS238
E24
VSS239
E21
VSS240
E18
VSS241
E15
VSS242
E13
VSS243
E10
VSS244
E9
VSS245
E8
VSS246
E7
VSS247
E6
VSS248
E5
VSS249
E4
VSS250
E3
VSS251
E2
VSS252
E1
VSS253
D35
VSS254
D32
VSS255
D29
VSS256
D26
VSS257
D20
VSS258
D17
VSS259
C34
VSS260
C31
VSS261
C28
VSS262
C27
VSS263
C25
VSS264
C23
VSS265
C10
VSS266
C1
VSS267
B22
VSS268
B19
VSS269
B17
VSS270
B15
VSS271
B13
VSS272
B11
VSS273
B9
VSS274
B8
VSS275
B7
VSS276
B5
VSS277
B3
VSS278
B2
VSS279
A35
VSS280
A32
VSS281
A29
VSS282
A26
VSS283
A23
VSS284
A20
VSS285
A3
VSS
U13H
T2
VSS1
AT35
VSS2
AT32
VSS3
AT29
VSS4
AT27
VSS5
AT25
VSS6
AT22
VSS7
AT19
VSS8
AT16
VSS9
AT13
VSS10
AT10
VSS11
AT7
VSS12
AT4
VSS13
AT3
VSS14
AR25
VSS15
AR22
VSS16
AR19
VSS17
AR16
VSS18
AR13
VSS19
AR10
VSS20
AR7
VSS21
AR4
VSS22
AR2
VSS23
AP34
VSS24
AP31
VSS25
AP28
VSS26
AP25
VSS27
AP22
VSS28
AP19
VSS29
AP16
VSS30
AP13
VSS31
AP10
VSS32
AP7
VSS33
AP4
VSS34
AP1
VSS35
AN30
VSS36
AN27
VSS37
AN25
VSS38
AN22
VSS39
AN19
VSS40
AN16
VSS41
AN13
VSS42
AN10
VSS43
AN7
VSS44
AN4
VSS45
AM29
VSS46
AM25
VSS47
AM22
VSS48
AM19
VSS49
AM16
VSS50
AM13
VSS51
AM10
VSS52
AM7
VSS53
AM4
VSS54
AM3
VSS55
AM2
VSS56
AM1
VSS57
AL34
VSS58
AL31
VSS59
AL28
VSS60
AL25
VSS61
AL22
VSS62
AL19
VSS63
AL16
VSS64
AL13
VSS65
AL10
VSS66
AL7
VSS67
AL4
VSS68
AL2
VSS69
AK33
VSS70
AK30
VSS71
AK27
VSS72
AK25
VSS73
AK22
VSS74
AK19
VSS75
AK16
VSS76
AK13
VSS77
AK10
VSS78
AK7
VSS79
AK4
VSS80
AJ25
VSS81
AJ22
VSS82
AJ19
VSS83
AJ16
VSS84
AJ13
VSS85
AJ10
VSS86
AJ7
VSS87
AJ4
VSS88
AJ3
VSS89
AJ2
VSS90
AJ1
VSS91
AH35
VSS92
AH34
VSS93
AH32
VSS94
AH30
VSS95
AH29
VSS96
AH28
VSS98
AH25
VSS99
AH22
VSS100
AH19
VSS101
AH16
VSS102
AH7
VSS103
AH4
VSS104
AG9
VSS105
AG8
VSS106
AG4
VSS107
AF6
VSS108
AF5
VSS109
AF3
VSS110
AF2
VSS111
AE35
VSS112
AE34
VSS113
AE33
VSS114
AE32
VSS115
AE31
VSS116
AE30
VSS117
AE29
VSS118
AE28
VSS119
AE27
VSS120
AE26
VSS121
AE9
VSS122
AD7
VSS123
AC9
VSS124
AC8
VSS125
AC6
VSS126
AC5
VSS127
AC3
VSS128
AC2
VSS129
AB35
VSS130
AB34
VSS131
AB33
VSS132
AB32
VSS133
AB31
VSS134
AB30
VSS135
AB29
VSS136
AB28
VSS137
AB27
VSS138
AB26
VSS139
Y9
VSS140
Y8
VSS141
Y6
VSS142
Y5
VSS143
Y3
VSS144
Y2
VSS145
W35
VSS146
W34
VSS147
W33
VSS148
W32
VSS149
W31
VSS150
W30
VSS151
W29
VSS152
W28
VSS153
W27
VSS154
W26
VSS155
U9
VSS156
U8
VSS157
U6
VSS158
U5
VSS159
U3
VSS160
U2
Ivy Bridge Processor 6/7 ( GND )
CAD Note: 0 ohm resi stor
should be place d close
to CPU
Sheet 7 of 42
Processor 6/7- GND
Processor 6/7- GND
B.Schematic Diagrams
B - 8 Processor 6/7- GND
Page 61
Processor 7/7- RSVD
H_CPU_RSVD4
H_CPU_RSVD3
H_CPU_RSVD2
H_CPU_RSVD1
CFG2
On CRB
H_SNB_IVB#_PWRCTRL = l ow, 1.0V
H_SNB_IVB#_PWRCTRL = h igh/NC, 1.05V
1: (Default) PEG Train immediately following xxRESETB de assertion
0: PEG Wait for BIOS fo r training
CFG7
R18 *1K_04
PEG DEFER TRAINING
R42 *1K_04
R14 *1K_04
R289 *1K_04
RESERVED
CFG
U13E
T2
CFG[0]
AK28
CFG[1]
AK29
CFG[2]
AL26
CFG[3]
AL27
CFG[4]
AK26
CFG[5]
AL29
CFG[6]
AL30
CFG[7]
AM31
CFG[8]
AM32
CFG[9]
AM30
CFG[10]
AM28
CFG[11]
AM26
CFG[12]
AN28
CFG[13]
AN31
CFG[14]
AN26
CFG[15]
AM27
CFG[16]
AK31
CFG[17]
AN29
RSVD34
AM33
RSVD35
AJ27
RSVD38
J16
RSVD_NCTF42
AT34
RSVD39
H16
RSVD40
G16
RSVD_NCTF41
AR35
RSVD_NCTF43
AT33
RSVD_NCTF45
AR34
RSVD_NCTF56
AT2
RSVD_NCTF57
AT1
RSVD_NCTF58
AR1
RSVD_NCTF46
B34
RSVD_NCTF47
A33
RSVD_NCTF48
A34
RSVD_NCTF49
B35
RSVD_NCTF50
C35
RSVD51
AJ32
RSVD52
AK32
RSVD27
J15
RSVD16
C30
RSVD15
D23
RSVD17
A31
RSVD18
B30
RSVD20
D30
RSVD19
B29
RSVD22
A30
RSVD21
B31
RSVD23
C29
RSVD37
T8
RSVD8
F25
RSVD9
F24
RSVD11
D24
RSVD12
G25
RSVD13
G24
RSVD14
E23
RSVD32
W8
RSVD33
AT26
RSVD_NCTF44
AP35
RSVD10
F23
RSVD5
AJ26
VAXG_VAL_SENSE
AJ31
VSSAXG_VAL_SENSE
AH31
VCC_VAL_SENSE
AJ33
VSS_VAL_SENSE
AH33
KEY
B1
VCC_DIE_SENSE
AH27
BCLK_ITP
AN35
BCLK_ITP#
AM35
VSS_DIE_SENSE
AH26
RSVD31
AK2
RSVD30
AE7
RSVD29
AG7
RSVD28
L7
RSVD24
J20
RSVD25
B18
R17 *1K_04
CFG2
Ivy Bridge Processor 7/7 ( RESERVED )
CFG6
CFG5
CFG4
1:(Default) Normal Oper ation; Lane #
definition matches sock et pin map definition
0:Lane Reversed
CFG2
CFG[6:5]
PEG Static Lane Revers al - CFG2 is for the 16x
PCIE Port Bifurcation Str aps
11: (Default) x16 - De vice 1 functions 1 an d 2 disabled
10: x8, x8 - Device 1 function 1 enabled ; function 2 disabled
01: Reserved - (Device 1 function 1 disable d ; function 2 enabl ed)
00: x8,x4,x4 - Device 1 functions 1 and 2 e nabled
CFG7
CFG4
CFG Straps for Processor
CFG7
CFG4
CFG5
Display Port Presence Strap
1:(Default) Disabled; N o Physical Display Po rt
attached to Embedded Di splay Port
0:Enabled; An external Display Port device i s
connected to the Embedd ed Display Port
CFG0
CFG6
Sheet 8 of 42
Processor 7/7-
RSVD
Schematic Diagrams
B.Schematic Diagrams
Processor 7/7- RSVD B - 9
Page 62
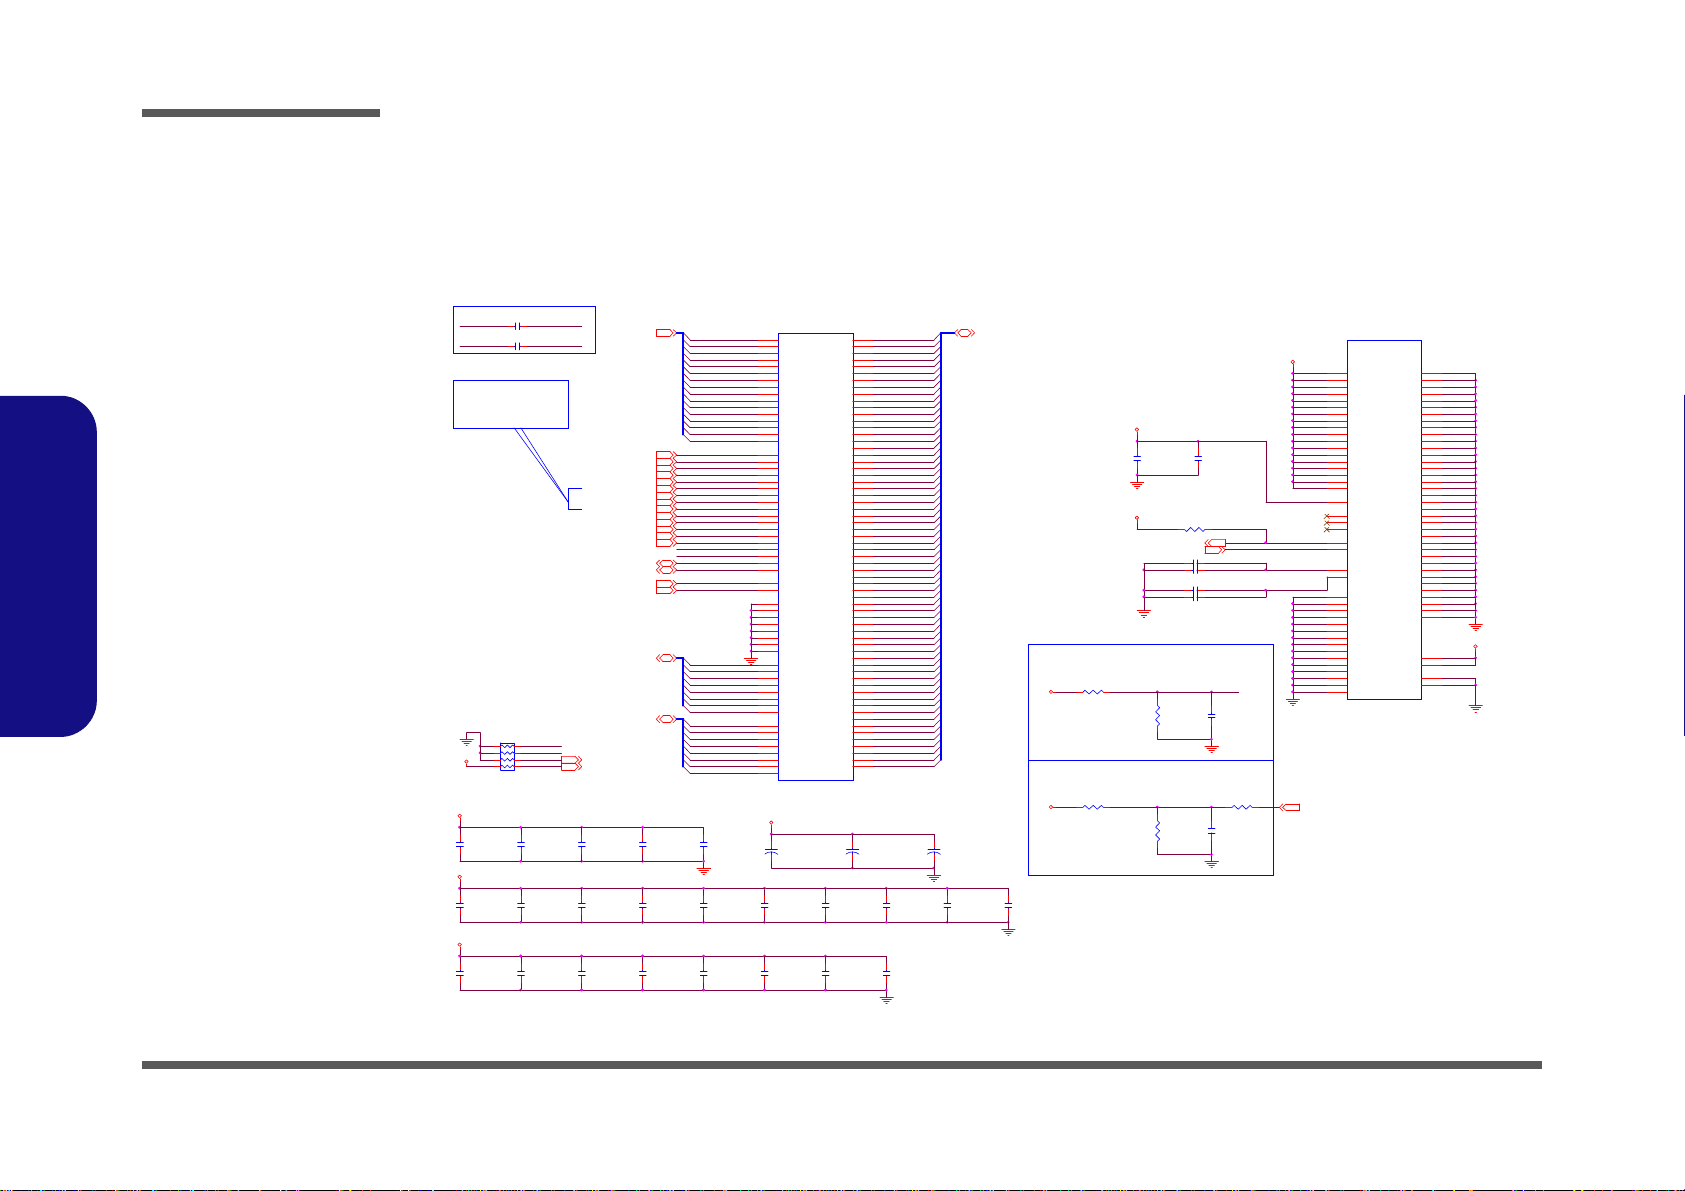
Schematic Diagrams
SO-DIMM A
M_A_DQ3
M_A_DQ2
M_A_DQ1
M_A_DQ32
M_A_DQ31
M_A_DQ30
M_A_DQ29
M_A_DQ4
M_A_DQ39
M_A_DQ37
M_A_DQ36
M_A_DQ35
M_A_DQ34
M_A_DQ33
M_A_DQ44
M_A_DQ43
M_A_DQ42
M_A_DQ41
M_A_DQ40
M_A_DQ49
M_A_DQ38
M_A_DQ47
M_A_DQ46
M_A_DQ45
M_A_DQ54
M_A_DQ53
M_A_DQ52
M_A_DQ51
M_A_DQ28
M_A_DQ50
M_A_DQ56
M_A_DQ6
M_A_DQ5
M_A_DQ48
M_A_DQ55
M_A_DQ62
M_A_DQ61
M_A_DQ60
M_A_DQ58
M_A_DQ57
M_A_DQ11
M_A_DQ9
M_A_DQ8
M_A_DQ7
M_A_DQ59
M_A_DQ63
M_A_DQ16
M_A_DQ15
M_A_DQ14
M_A_DQ13
M_A_DQ12
M_A_DQ21
M_A_DQ10
M_A_DQ19
M_A_DQ18
M_A_DQ17
TS#_ DIMM0 _110
M_A_DQ26
M_A_DQ25
M_A_DQ24
M_A_DQ23
M_A_DQ0
M_A_DQ22
M_A_DQ20
M_A_DQ27
R73 1K_1%_04
CLOSE TO SO-DIMM_0
R71
1K_1%_04
1.5V
MVREF_DIM0
C132
0.1u_10V_X5R_04
+
C378
*560u_2.5V_6.6*6.6*5.9
+
C344
560u_2. 5V_6.6* 6.6* 5.9
MVREF_DQA
20mils
signal/space/signal:
Layout Note:
8 / 4 / 8
R68
1K_1%_04
R69 1K_1%_04
C138
0.1u_10V_X5R_04
3.3VS
M_A_CLK_DDR14
M_A_ODT14
M_A_RAS#4
M_A_BS14
M_A_W E#4
M_A_CAS#4
M_A_CLK_DDR#14
M_A_ODT04
M_A_BS04
M_A_BS24
M_A_CKE04
M_A_CLK_DDR04
M_A_CLK_DDR#04
M_A_CS#14
M_A_CKE14
M_A_A[15:0]4
M_A_CS#04
1.5V
+
C343
*560u_2. 5V_6. 6*6.6 *5.9
CLOSE TO SO-DIMM_0
JD IMM2 B
DDRRK-20401-TR4B
VDD1
75
VDD2
76
VDD3
81
VDD4
82
VDD5
87
VDD6
88
VDD7
93
VDD8
94
VDD9
99
VDD1 0
100
VDD1 1
105
VDD1 2
106
VDDS PD
199
NC1
77
NC2
122
NCTEST
125
VREF _DQ
1
VSS1
2
VSS2
3
VSS3
8
VSS4
9
VSS5
13
VSS6
14
VSS7
19
VSS8
20
VSS9
25
VSS10
26
VSS11
31
VSS12
32
VSS13
37
VSS14
38
VSS15
43
VSS16
44
VSS17
48
VSS18
49
VSS19
54
VSS20
55
VSS21
60
VSS22
61
VSS23
65
VSS24
66
VSS25
71
VSS26
72
VSS27
127
VSS28
128
VSS29
133
VSS30
134
VSS31
138
VSS32
139
VSS33
144
VSS34
145
VSS35
150
VSS36
151
VSS37
155
VSS38
156
VSS39
161
VSS40
162
VSS41
167
VSS42
168
VSS43
172
VSS44
173
VSS45
178
VSS46
179
VSS47
184
VSS48
185
VSS49
189
VSS50
190
VSS51
195
VSS52
196
G2
GND2
G1
GND1
VTT2
204
VTT1
203
VREF _CA
126
RESET#
30
EVENT#
198
VDD1 3
111
VDD1 4
112
VDD1 6
118
VDD1 5
117
VDD1 7
123
VDD1 8
124
1.5V
MVREF_DQA
C149
0.1u_16V_Y5V_04
C130
0.1u_16V_Y5V_04
C131
1u_6.3V_X5R_04
C139 1u_6.3V_X5R_04
C124
0.1u_16V_Y5V_04
C146
1u_6.3V_ X5R_04
C134 *0.1u_16 V_Y5V _04
C364
1u_6.3V_ X5R_04
C153
10u_6. 3V_X5R_08
C129
0.1u_16V_Y5V_04
C144
0.1u_16V_Y5V_04
C148
1u_6.3V_ X5R_04
C141 * 1 0p_50V_NPO_04
C140
1u_6.3V_X5R_04
C143
0.1u_16V _Y5 V_04
C133 * 1 0p_50V_NPO_04
MVREF_DQA
C126
*0.1 u_16V_Y 5V_04
C145
1u_6.3V_X5R_04
JDIMM2A
DDRRK-20401-TR4B
A0
98
A1
97
A2
96
A3
95
A4
92
A5
91
A6
90
A7
86
A8
89
A9
85
A10/AP
107
A11
84
A12/BC#
83
A13
119
A14
80
A15
78
DQ0
5
DQ1
7
DQ2
15
DQ3
17
DQ4
4
DQ5
6
DQ6
16
DQ7
18
DQ8
21
DQ9
23
DQ10
33
DQ11
35
DQ12
22
DQ13
24
DQ14
34
DQ15
36
DQ16
39
DQ17
41
DQ18
51
DQ19
53
DQ20
40
DQ21
42
DQ22
50
DQ23
52
DQ24
57
DQ25
59
DQ26
67
DQ27
69
DQ28
56
DQ29
58
DQ30
68
DQ31
70
DQ32
129
DQ33
131
DQ34
141
DQ35
143
DQ36
130
DQ37
132
DQ38
140
DQ39
142
DQ40
147
DQ41
149
DQ42
157
DQ43
159
DQ44
146
DQ45
148
DQ46
158
DQ47
160
DQ48
163
DQ49
165
DQ50
175
DQ51
177
DQ52
164
DQ53
166
DQ54
174
DQ55
176
DQ56
181
DQ57
183
DQ58
191
DQ59
193
DQ60
180
DQ61
182
DQ62
192
DQ63
194
BA0
109
BA1
108
RAS#
110
WE#
113
CAS#
115
S0#
114
S1#
121
CKE0
73
CKE1
74
CK0
101
CK0#
103
CK1
102
CK1#
104
SDA
200
SCL
202
SA1
201
SA0
197
DM0
11
DM1
28
DM2
46
DM3
63
DM4
136
DM5
153
DM6
170
DM7
187
DQS0
12
DQS1
29
DQS2
47
DQS3
64
DQS4
137
DQS5
154
DQS6
171
DQS7
188
DQS0#
10
DQS1#
27
DQS2#
45
DQS3#
62
DQS4#
135
DQS5#
152
DQS6#
169
DQS7#
186
ODT0
116
ODT1
120
BA2
79
C123
1u_6.3V_X5R_04
C147
*1u_6.3V_X5R_04
RN9
10K_8P4R_ 04
1
2
3
4 5
6
7
8
C128
*0.1u_16V_Y5V_04
C127
0.1u_16V_Y5V_04
C135
*1u_6.3V_X5R_04
C136 *0.1u_16 V_Y5V _04
C142
0.1u_1 6V_Y5 V_04
R70 *10K_04
C363
*1u_6.3V_X5R_04
C137 1u_6.3V_X5R_04
C125
0.1u_16V_Y5V_04
SA0_DIM0
SA1_DIM0
M_A_CLK_DDR1 M_A_CLK_DDR#1
M_A_CLK_DDR0 M_A_CLK_DDR#0
SMB_DATA10,13
M_A_DQ[63:0] 4
SMB_CLK10,13
M_A_D QS# [7 :0]4
M_A_DQS[7:0]4
C366
10u_6.3V_X5R_08
DDR3_DRAMRST#3,10
C154
10u_6.3V_X5R_08
C152
10u_6.3V_X5R_06
M_A_A6
M_A_A5
M_A_A7
M_A_A8
M_A_A9
M_A_A0
M_A_A1
M_A_A2
M_A_A3
M_A_A4
M_A_A12
M_A_A11
M_A_A13
M_A_A14
M_A_A15
M_A_A10
M_A_DQS0
M_A_DQS1
M_A_DQS2
M_A_DQS3
M_A_DQS4
M_A_DQS5
M_A_DQS6
SA1_DIM1 10
SA0_DIM1 10
SA0_DIM0
SA1_DIM0
M_A_DQS7
M_A_DQS#0
M_A_DQS#1
M_A_DQS#2
M_A_DQS#3
MVRE F_D Q_D IM MA 6
M_A_DQS#4
MVREF_DIM0
M_A_DQS#5
M_A_DQS#6
M_A_DQS#7
R79 *0_04
3.3VS
3.3VS
1.5V
1.5V
VTT_MEM
VTT_MEM
1.5V
Sheet 9 of 42
DDR3 SO-DIMM_0
B.Schematic Diagrams
B - 10 DDR3 SO-DIMM_0
DDR3 SO-DIMM_0
Page 63
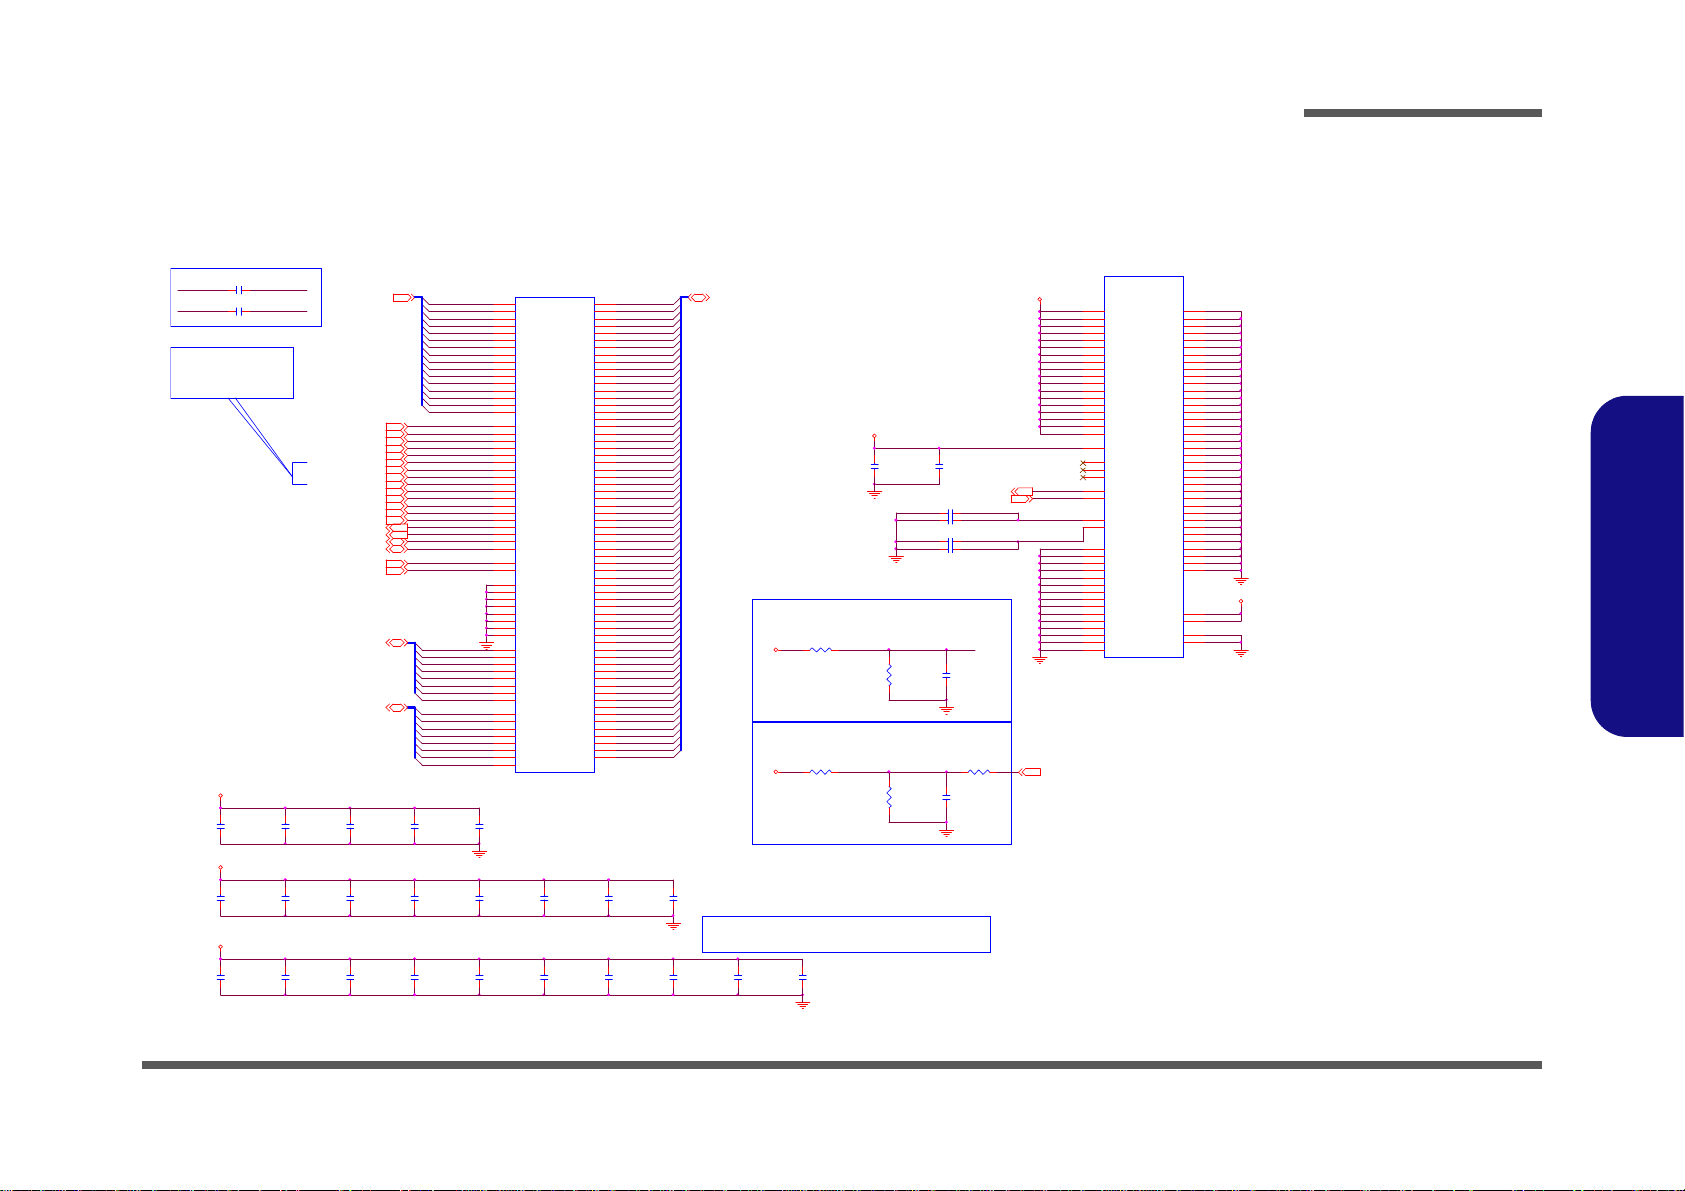
DDR3 SO-DIMM_1
3.3VS
1.5V
VTT_MEM
1.5V
1.5V
VTT_MEM
MVREF _DIM1
M_B_DQ[63:0] 4
SA0_DIM19
TS#_D IMM0 _19
SA1_DIM19
SO-DIMM B
Layout Note:
M_B_DQ3 1
M_B_DQ4 6
M_B_DQ1 3
M_B_DQ2 4
M_B_DQ5 6
M_B_DQ2 8
M_B_DQ1 1
M_B_DQ2 3
M_B_DQ6 1
M_B_DQ6 2
M_B_DQ5 8
M_B_DQ5 0
M_B_DQ1
M_B_DQ1 6
M_B_DQ6 0
M_B_DQ2
M_B_DQ4 0
M_B_DQ5 4
M_B_DQ4 1
M_B_DQ5 7
M_B_DQ3 7
M_B_DQ2 5
M_B_DQ3 0
M_B_DQ2 7
M_B_DQ4 4
M_B_DQ3
M_B_DQ7
M_B_DQ9
M_B_DQ3 4
M_B_DQ5
M_B_DQ4 7
M_B_DQ4 3
M_B_DQ3 8
M_B_DQ1 7
M_B_DQ4 2
M_B_DQ8
M_B_DQ5 9
M_B_DQ3 5
M_B_DQ3 6
8 / 4 / 8
M_B_DQ4
M_B_DQ2 6
M_B_DQ6 3
M_B_DQ3 3
M_B_DQ4 5
M_B_DQ4 8
M_B_DQ5 5
M_B_DQ2 9
M_B_DQ1 5
M_B_DQ1 0
M_B_DQ5 2
M_B_DQ5 3
M_B_DQ6
M_B_DQ1 9
M_B_DQ1 8
M_B_DQ0
M_B_DQ1 2
M_B_DQ2 0
M_B_DQ3 9
M_B_DQ4 9
M_B_DQ5 1
M_B_DQ2 1
M_B_DQ3 2
M_B_DQ1 4
M_B_DQ2 2
SO-DIMM_1 is placed farther from the GMCH than SO-DIMM_0
MVREF _DQB
M_B_A4
M_B_A6
M_B_A5
M_B_A13
M_B_A12
M_B_A0
M_B_A1
M_B_A2
M_B_A3
M_B_A7
M_B_A8
M_B_A9
M_B_A10
M_B_A11
M_B_A14
20mils
Layout Note:
SA1_DIM1
signal/space/signal:
MVREF_DIM1
CLOSE T O S O-DI M M 1
R63
1K_1%_04
R65 1K_1%_04
C102
0.1u_10V_X5R_04
1.5V
M_B_A15
M_B_DQS0
M_B_DQS6
M_B_DQS5
M_B_DQS4
M_B_DQS3
M_B_DQS2
M_B_DQS1
M_B_DQS# 3
M_B_DQS# 2
M_B_DQS# 1
M_B_DQS# 0
M_B_DQS7
M_B_DQS# 7
M_B_DQS# 6
M_B_DQS# 5
M_B_DQS# 4
M_B_CLK_DDR2 M_B_CL K_DDR #2
M_B_CLK_DDR3 M_B_CL K_DDR #3
C103 *0.1u_16V_Y5 V _04
C109 *0.1u_16V_Y5 V _04
C116
*0.1u_16V_ Y 5V_04
C104 *10p_50V_NPO_04
C108
0.1u_16V_Y5V_04
C110
1u_6.3V_X5R_04
C113
0.1u_16V_Y5V_04
C97
*0.1u_16V_Y5V_04
M_B_BS14
M_B_CLK_DDR34
M_B_A[ 15:0 ]4
M_B_CAS#4
M_B_CLK_DDR#34
M_B_RAS#4
M_B_CLK_DDR24
M_B_BS04
M_B_W E#4
M_B_ CS #34
M_B_CKE34
M_B_BS24
M_B_CKE24
M_B_ OD T34
M_B_ CS #24
M_B_CLK_DDR#24
JDIMM1B
DDRRK-20401-TP8D
VDD1
75
VDD2
76
VDD3
81
VDD4
82
VDD5
87
VDD6
88
VDD7
93
VDD8
94
VDD9
99
VDD10
100
VDD11
105
VDD12
106
VDDSPD
199
NC1
77
NC2
122
NCTEST
125
VREF_D Q
1
VSS1
2
VSS2
3
VSS3
8
VSS4
9
VSS5
13
VSS6
14
VSS7
19
VSS8
20
VSS9
25
VSS10
26
VSS11
31
VSS12
32
VSS13
37
VSS14
38
VSS15
43
VSS16
44
VSS17
48
VSS18
49
VSS19
54
VSS20
55
VSS21
60
VSS22
61
VSS23
65
VSS24
66
VSS25
71
VSS26
72
VSS27
127
VSS28
128
VSS29
133
VSS30
134
VSS31
138
VSS32
139
VSS33
144
VSS34
145
VSS35
150
VSS36
151
VSS37
155
VSS38
156
VSS39
161
VSS40
162
VSS41
167
VSS42
168
VSS43
172
VSS44
173
VSS45
178
VSS46
179
VSS47
184
VSS48
185
VSS49
189
VSS50
190
VSS51
195
VSS52
196
G2
GND2
G1
GND1
VTT2
204
VTT1
203
VREF_C A
126
RESET#
30
EVENT#
198
VDD13
111
VDD14
112
VDD16
118
VDD15
117
VDD17
123
VDD18
124
M_B_ OD T24
JDIMM1A
DDRRK-20401-TP8D
A0
98
A1
97
A2
96
A3
95
A4
92
A5
91
A6
90
A7
86
A8
89
A9
85
A10/AP
107
A11
84
A12/BC#
83
A13
119
A14
80
A15
78
DQ0
5
DQ1
7
DQ2
15
DQ3
17
DQ4
4
DQ5
6
DQ6
16
DQ7
18
DQ8
21
DQ9
23
DQ10
33
DQ11
35
DQ12
22
DQ13
24
DQ14
34
DQ15
36
DQ16
39
DQ17
41
DQ18
51
DQ19
53
DQ20
40
DQ21
42
DQ22
50
DQ23
52
DQ24
57
DQ25
59
DQ26
67
DQ27
69
DQ28
56
DQ29
58
DQ30
68
DQ31
70
DQ32
129
DQ33
131
DQ34
141
DQ35
143
DQ36
130
DQ37
132
DQ38
140
DQ39
142
DQ40
147
DQ41
149
DQ42
157
DQ43
159
DQ44
146
DQ45
148
DQ46
158
DQ47
160
DQ48
163
DQ49
165
DQ50
175
DQ51
177
DQ52
164
DQ53
166
DQ54
174
DQ55
176
DQ56
181
DQ57
183
DQ58
191
DQ59
193
DQ60
180
DQ61
182
DQ62
192
DQ63
194
BA0
109
BA1
108
RAS#
110
WE#
113
CAS#
115
S0#
114
S1#
121
CKE0
73
CKE1
74
CK0
101
CK0#
103
CK1
102
CK1#
104
SDA
200
SCL
202
SA1
201
SA0
197
DM0
11
DM1
28
DM2
46
DM3
63
DM4
136
DM5
153
DM6
170
DM7
187
DQS0
12
DQS1
29
DQS2
47
DQS3
64
DQS4
137
DQS5
154
DQS6
171
DQS7
188
DQS0#
10
DQS1#
27
DQS2#
45
DQS3#
62
DQS4#
135
DQS5#
152
DQS6#
169
DQS7#
186
ODT0
116
ODT1
120
BA2
79
C121 1u_6.3V_X5R_04
C120
1u_6.3V_X5R_04
C351
*1u_6.3V_X5R_04
C119
*1u_6.3V_X5R_04
R66 1K_1%_04
C354
1u_6.3V_X5R_04
C122
0.1u_10V_X5R_04
R67
1K_1%_04
C100
1u_6.3V_X5R_04
R64 *0_04
C105 1u_6.3V_X5R_04
C111
*1u_6.3V_X5R_04
C118
1u_6.3V_X5R_04
C99
0.1u_16V_Y5V_04
C96
0.1u_16V_Y5V_04
C98
0.1u_16V_Y5V_04
C112
1u_6.3V_X5R_04
C101
0.1u_16V_Y5V_04
C117
0.1u_16V_Y 5V_04
C114
0.1u_16V_Y5V_04
C107
1u_6.3V_X5R_04
C115
0.1u_16V_Y5V_04
C106 *10p_50V_NPO_04
SMB_CLK9,13
SMB_DATA9,13
M_B_DQS #[7:0]4
M_B_DQS[ 7:0]4
DDR3_DRAMRST#3,9
C347
10u_6.3V_X5R_08
C352
10u_6.3V_X5R_08
C155
10u_6.3V_X5R_08
C346
10u_6.3V_X5R_08
CLOSE T O S O-DI M M _1
1.5V
MVREF_DQB
MVRE F_ DQ _DI MMB 6
SA0_DIM1
Sheet 10 of 42
DDR3 SO-DIMM_1
Schematic Diagrams
B.Schematic Diagrams
DDR3 SO-DIMM_1 B - 11
Page 64
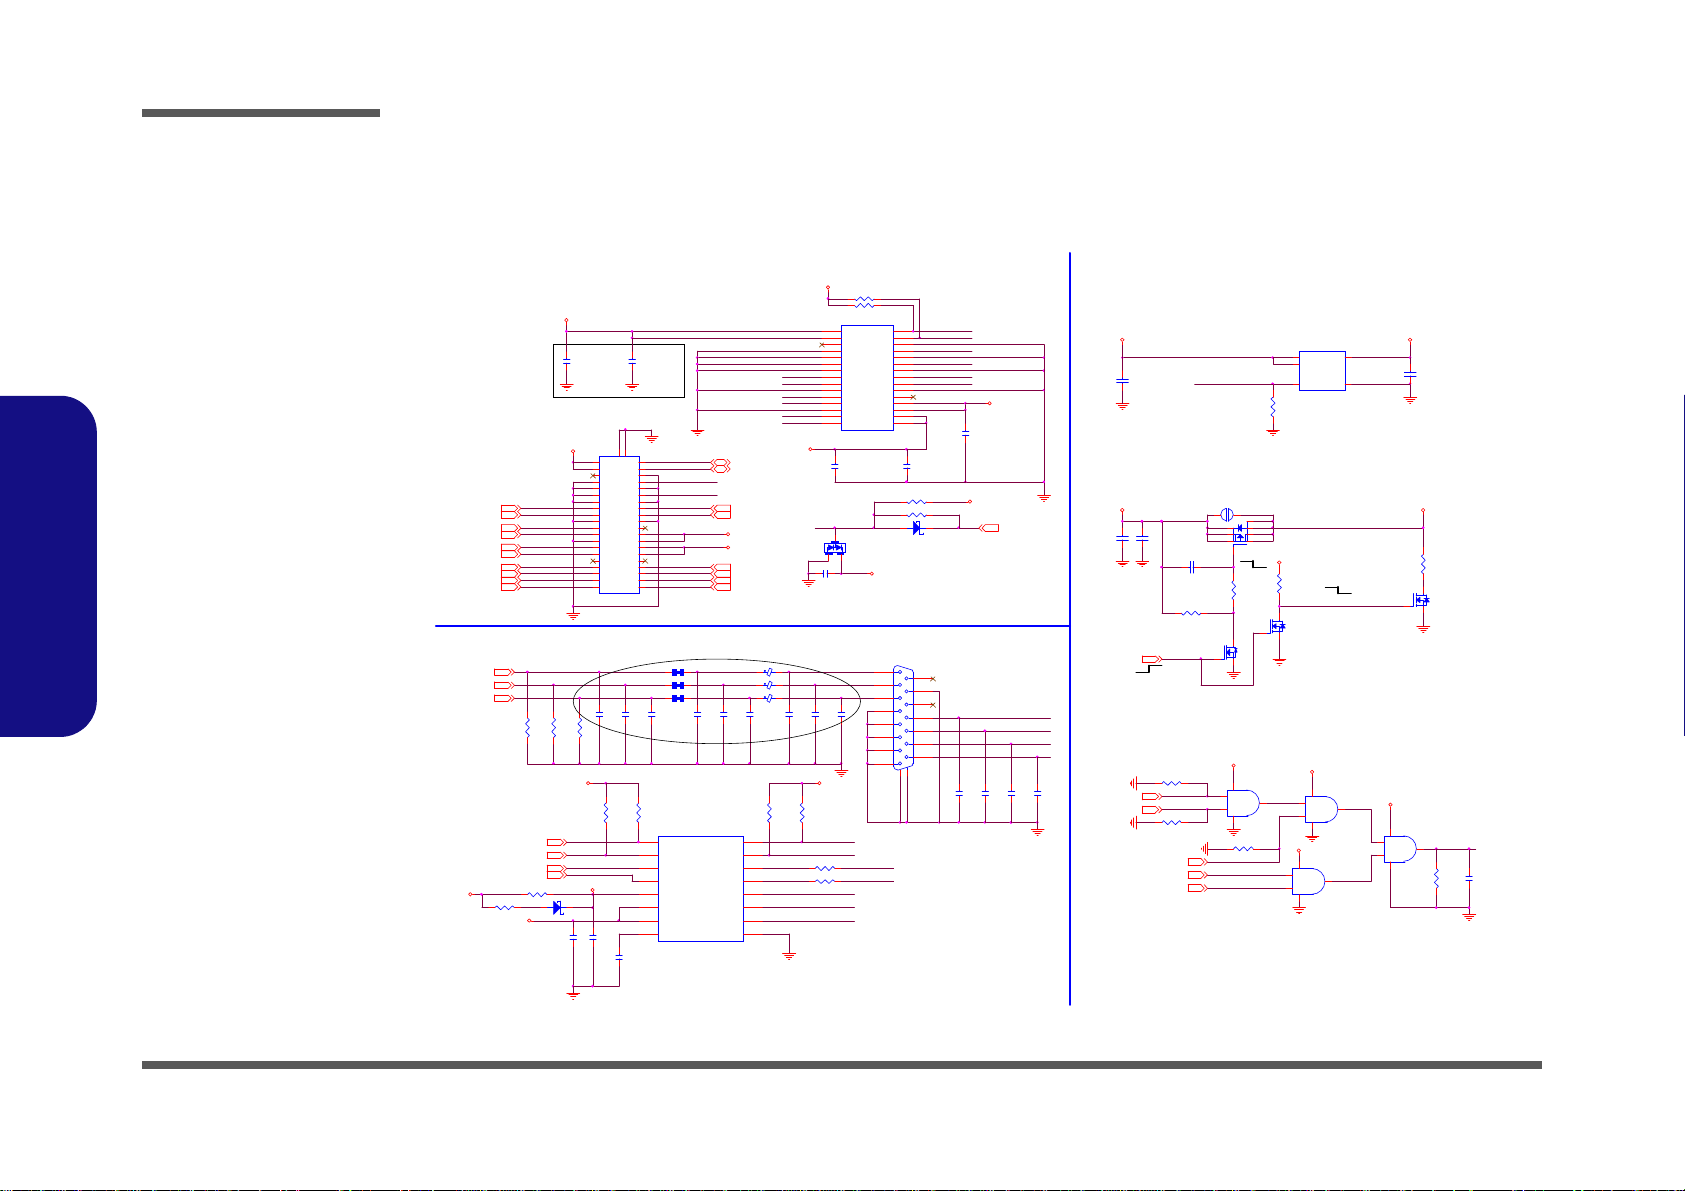
Schematic Diagrams
Sheet 11 of 42
PANEL, INVERTER,
CRT
S 6-02-07019-B20
D11
*BAV99 RECTIFIER
A
C
AC
C293
*0.01u_50V_X7R _04
R11 *20m il_04
VIN_LCD
BRIGH TNESS_R
BRIGHTNESS 28
C292
0.1u_50V_Y5V_06
C294
0.1u_16V_Y 5V_04
R9 *10K_04
PLVDD
LVDS-L0P
LVDS-LCLKN
LVDS-L1P
INV_BLON
LVDS-L2N
LVDS-L1N
LVDS-LCLKP
LVDS-L0N
BRIGHTNESS_R
LVDS-L2P
R276 2.2K_04
C295
0.1u_16V_Y 5V_04
3.3V
BLON1
J_LCD1
*87216-3006
112
2
334
4
556
6
778
8
9910
10
111112
12
131314
14
151516
16
171718
18
191920
20
212122
22
232324
24
252526
26
272728
28
292930
30
BLON
C296
4.7u_6.3V_X5R_06
C298
*0.1u_16V_Y 5V_04
24 mil
BKL_EN
R286
2.2K_04
BLON2
VIN_LCD
LVDS-L2P
P_DDC_CLK
P_DDC_DATA
R285
2.2K_04
BRIGH TNESS_R
INV_BLON
LVDS-L2N
LVDS-LCLKP
LVDS-LCLKN
M 6-02-47721-B60
J_LCD2
87216-4006
1
3
5
7
9
11
13
15
17
19
21
23
25
27
29
31
33
35
37
39
2
4
6
8
10
12
14
16
18
20
22
24
26
28
30
32
34
36
38
40
Gnd 1G1Gnd 2
G2
LVDS-L1N15
5VS
3.3VS
3.3V
3.3V
3.3V
3.3V
5VS_CRT3.3VS
3.3VS
3.3VS
3.3VS
PLVDD
L8 * 10mil_short_0 4
LVDS-L2N 15
LVDS-L2P 15
L6 * 10mil_short_0 4
LVDS-U0P 15
LVDS-U0N 15
D10 *RB751S-40C2
A C
INV_BLON
L4 * 10mil_short_0 4
LVDS-UCLKP15
LVDS-UCLKN15
LVDS-U2P 15
LVDS-U2N 15
FRED
FGRN
LID_SW#1
P_DDC_DATA 15
P_DDC_CLK 15
BYP
R23
150_1%_04
U6A
74LVC08PW
1
2
3
147
R16 33_04
R15
150_1%_04
R284 33_04
C31
220p_50V_NPO_04
L3 FC M1005MF-600T01
R32 *1_04
R164 *100K_04
C34
1000p_50V_X7R_04
C316
22p_50V_NPO_04
LVDS-L1P15
C307
1000p_50V_X7R_04
L7 FC M1005MF-600T01
U6C
74LVC08PW
9
10
8
147
C308
220p_50V_NPO_04
C318
22p_50V_NPO_04
R182 *100K_04
J_CRT1
C10556-11505-L
8
7
6
5
4
3
2
1
9
10
11
12
13
14
15
GND2
GND1
C317
22p_50V_NPO_04
C30
22p_50V_NPO_04
R174 100K_04
R277 2.2K_04
C24
22p_50V_NPO_04
L5 FC M1005MF-600T01
U6B
74LVC08PW
4
5
6
147
U12
TPD7S019
VCC_SY NC
1
VCC_VI DEO
2
VIDEO_1
3
VIDEO_2
4
VIDEO_3
5
GND
6
VCC_DDC
7
BYP
8
DDC_OUT1
9
DDC_IN1
10
DDC_IN211DDC_OUT2
12
SYNC_IN113SYNC _OUT1
14
SYNC_IN215SYNC _OUT2
16
C168
*0.1u_16V_Y5V_04
VIN_LCD
C29
*6p_50V_NPO_04
C25
*6p_50V_NPO_04
C33
*6p_50V_NPO_04
C314
0.1u_16V_Y 5V_04
U6D
74LVC08PW
12
13
11
147
C32
22p_50V_NPO_04
C315
0.1u_16V_Y5V_04
R125
1M_04
R12
150_1%_04
C319
0.1u_16V_Y5V_04
LVDS-U1P15
LVDS-U1N15
DDCLK
FBLUE
CRT
HSYNC
HSYNC
VSYNC_C
HSYNC_C
FGRN
FRED
FBLUE
VSYNC
DAC_GREEN
DAC_BLUE
5VS_CRT
DAC_HSYNC15
DAC_VSYNC15
DAC_DDCADATA15
DAC_RED
DAC_BLUE15
DAC_GREEN15
DAC_DDCACLK15
ALL_SYS_PWR GD14,28,29, 33
BKL_EN28
DAC_RED15
BLON15
LID_SW#23, 28
SB_BLON17
LVDS-LCLKP15
LVDS-LCLKN15
D12 RB751S-40C 2
A C
R24
2.2K_04
R35 1_04
ESD+LEVEL SHIFT+BUFFER
LVDS-L0N15
LVDS-L0P15
C304
*0.1u_50V_Y5V_06
C305
*0.22u_50V_Y 5V_06
Q10
*MTN7002ZHS3
G
DS
Q8
*P2003EVG
4
62
5731
8
3.3V
R278
*10K_04
LVDD_E N#
R282
*1M_04
R281 *100K_04
NB_ENAVDD15,28
VIN
R279
*220_06
S
D
G
Q9B
*MTDN7002ZHS6R
5
3
4
P_DD C_CL K
P_DD C_DATA
S
D
G
Q9A
*MTDN7002ZHS6 R
2
6
1
C303
*0.1u_50V_Y5V_06
VSYNC
DDCDATA
DDCLK
DDCDATA
PLVDD
PANEL POWER
PJ18 OPEN_2A
1 2
Modify 3/23
U11
NCT3522U
VIN
4
VIN
5
EN
3
VOUT
1
GND
2
2A 2A
3.3VS
NB_ENAVDD
C301
1u_6.3V_X5R_04
C306
*1u_6.3V_X5R_04
R280
100K_04
PLVDD
2A
PANEL CONNECTOR (30Pin & 40Pin CO-lay)
¥Î40pin connector®É, -n±N30pin
connector¤¤¶¡©T©wpin pad¿ûªO¶K±¼
CLOSE TO LVDS CONN. PIN
R283
2.2K_04
PANEL, INVERTER, CRT
B.Schematic Diagrams
B - 12 PANEL, INVERTER, CRT
Page 65
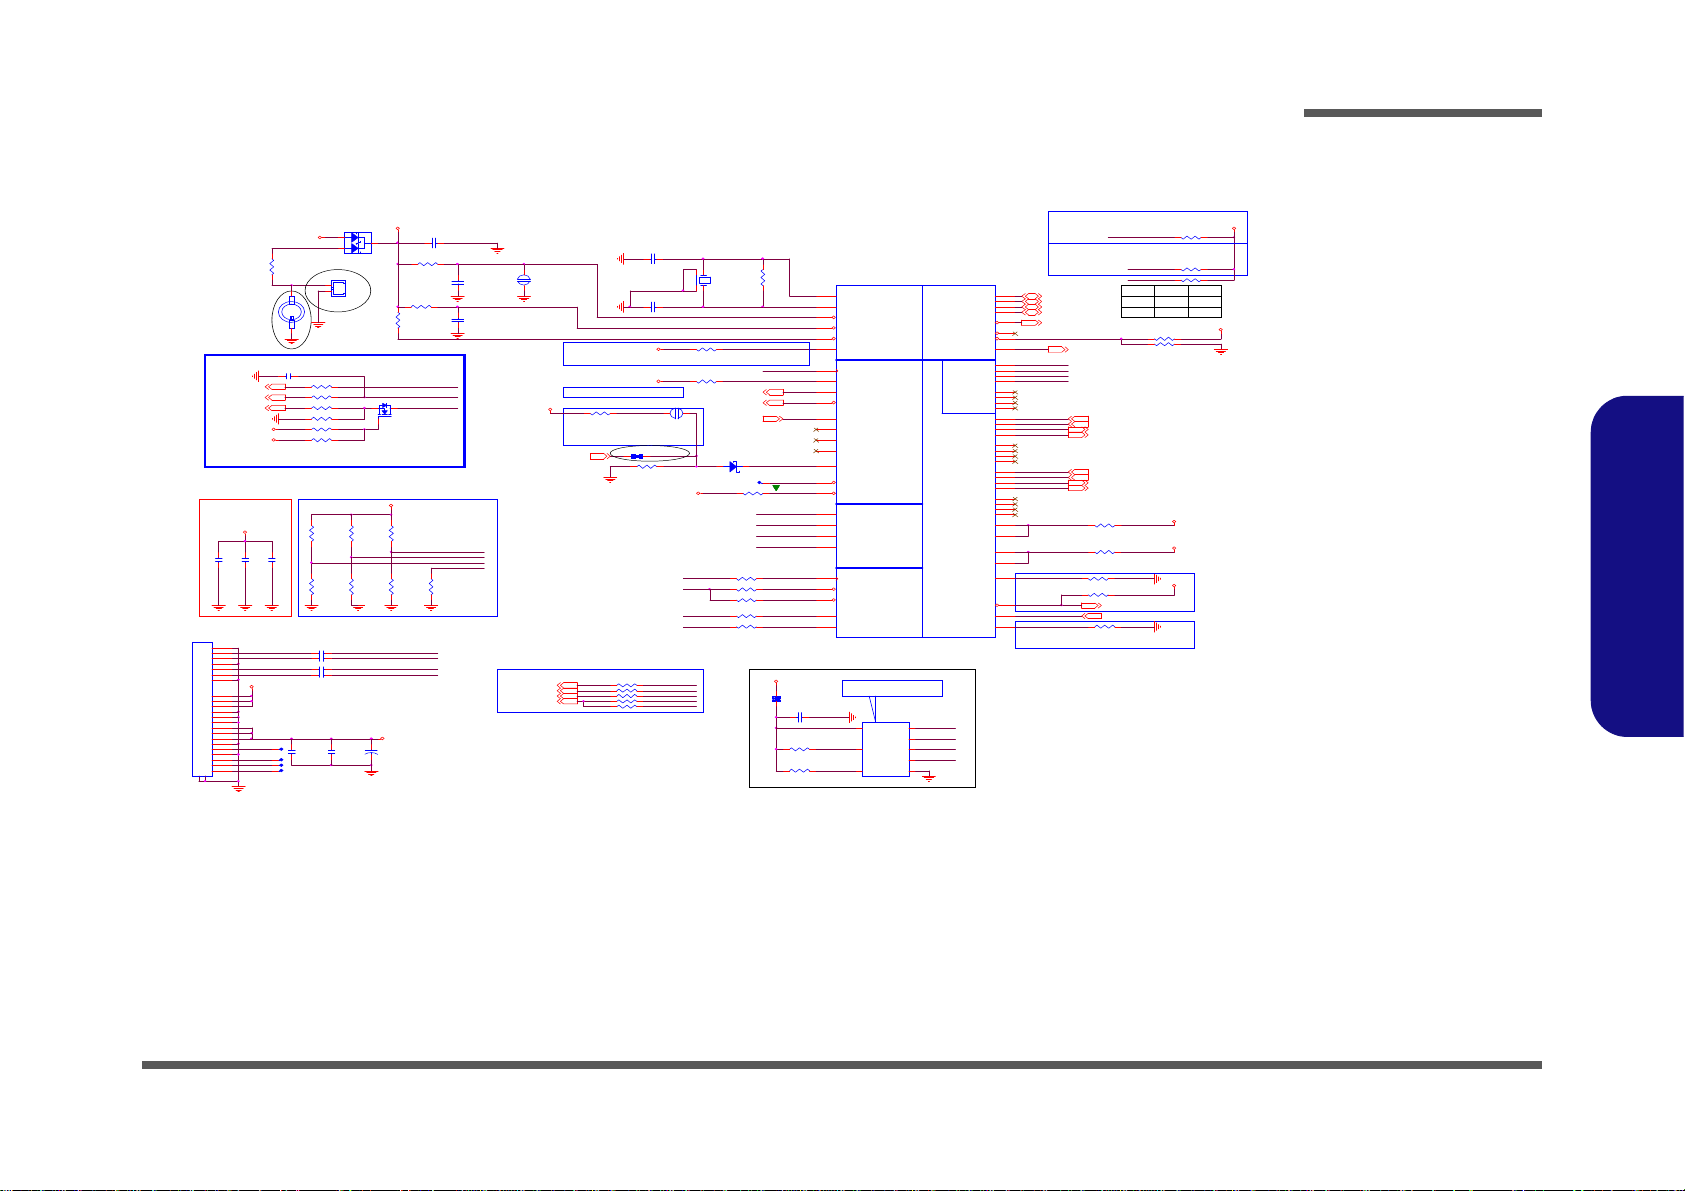
PCH 1/9- RTC, HDA, SATA
Sheet 12 of 42
PCH 1/9- RTC, HDA,
SATA
3G/MSATA
SATA_RXP0_R
SATA HDD
SATAICOMP
Board ID
JOPEN2
*OPEN_10 mil-1MM
1 2
C179
1u_6.3V_X5R_04
R98 *1K_04
R206 10 K_04
R193 1K_04
R340
10M_04
R99 * 33_04 R347 750 _1%_04
R146
1M_04
JOPEN1
*OPEN_10mil-1MM
12
R338 *1K_04
R163 10K _04
R147 330K_04
ODD_DE TECT#
R188 49. 9_1%_04
C177
1u_6.3V_X5R_04
INTVRMEN- Integrate d SUS 1.05V VRM E nable
High - Enable Inter nal VRs /Low - En able External VRs
C282 1u_6.3V _X5R_04
R132 * 1K_04
R175 37. 4_1%_04
C368
12p_50V_NPO_04
D15 RB751S-40C2
A C
R260
1K_04
SATA_TXP0_R
R208 * 10K_04
RTCIHDA
SATA
LPC
SPI
JTAG
SATA 6G
U20A
PANTHER POI NT HM77 MP
RTCX1
A20
RTCX2
C20
INTVRMEN
C17
INTRUDER#
K22
HDA_BCLK
N34
HDA_SYNC
L34
HDA_RST#
K34
HDA_SDIN0
E34
HDA_SDIN1
G34
HDA_SDIN2
C34
HDA_SDO
A36
SATALED#
P3
FWH0 / LAD0
C38
FWH1 / LAD1
A38
FWH2 / LAD2
B37
FWH3 / LAD3
C37
LDRQ1# / GPIO23
K36
FWH4 / LFRAME#
D36
LDRQ0#
E36
RTCRST#
D20
HDA_SDIN3
A34
HDA_DOCK_EN# / GPIO33
C36
HDA_DOCK_RST# / GPIO13
N32
SRTC RST#
G22
SATA0RXN
AM3
SATA0RXP
AM1
SATA0TXN
AP7
SATA0TXP
AP5
SATA1RXN
AM10
SATA1RXP
AM8
SATA1TXN
AP11
SATA1TXP
AP10
SATA2RXN
AD7
SATA2RXP
AD5
SATA2TXN
AH5
SATA2TXP
AH4
SATA3RXN
AB8
SATA3RXP
AB10
SATA3TXN
AF3
SATA3TXP
AF1
SATA4RXN
Y7
SATA4RXP
Y5
SATA4TXN
AD3
SATA4TXP
AD1
SATA5RXN
Y3
SATA5RXP
Y1
SATA5TXN
AB3
SATA5TXP
AB1
SATAICOMPI
Y10
SPI_CLK
T3
SPI_CS0#
Y14
SPI_CS1#
T1
SPI_MOSI
V4
SPI_MISO
U3
SATA0GP / GPIO2 1
V14
SATA1GP / GPIO1 9
P1
JTAG_TCK
J3
JTAG_TMS
H7
JTAG_TDI
K5
JTAG_TDO
H1
SERIRQ
V5
SPKR
T10
SATAICOMPO
Y11
SATA3COMPI
AB13
SATA3RCOMPO
AB12
SATA3RBIAS
AH1
X2
MC-306_32.768KHz
14
3 2
R97 * 0_04
R107 * 33_04
SPI_SCLK
R333 *10K_04
C
A
A
D4
BAT54CS3
1
2
3
C369
12p_50V_NPO_04
R140
20K_1%_04
R183 10 K_04
SPI_SO
R104 * 33_04
R346 *910_04
R337 * 1K_04
R161
20K_1%_04
Zo=
50£[¡Ó15%
VDD3
RTCVCC
SPI_CS_ 0#
Flash Descriptor
Security Overide
Low = Disabled-(Defa ult)
High = Enabled
RTCVCC
3.3VS
3.3VS
3.3VS
1.05VS
3.3A_1.5A_HDA_IO
1.05VS
3.3A_1.5A_HDA_IO
HDA_SDIN027
3.3V
HDA_SPKR27
HDA_RST#27
LPC_AD2 22,28
LPC_AD1 22,28
LPC_AD0 22,28
LPC_AD3 22,28
SERIRQ 22,28
LPC_FRAME# 22,28
SATA_LED# 25
ODD_D ETECT# 1 7
ME_WE28
SATA_LED#
TPM FUNCTION:SPI_SI High Enable
iTPM ENABLE/DISABLE
6-22-32R76-0B2
HDA_SDOUT_R
6-22-32R76-0BG
SATA3COMP
BBS_BIT0
PantherPoint - M (HDA,JTAG,SATA)
SATA ODD
SPI_SI
RBIAS_SATA3
NO REBOOT STRAP
NO REBOOT STRAP: HDA_SPKR High Enable
SPI_CS_ 1#
SPI_SI_ RSPI_SI
SM_INTRU DER#
4/5 co-lay
20mils
20mils
RTC CLEAR
PCH_IN TVRMEN
RTC_X1
RTC_X2
PCH_J TAG_TDI
PCH_J TAG_TMS
SRTC_RTC #
PLL ODVR VOLTAGE: HD A_SYNC
LOW-1.8 V (DEFAULT) HIGH -15V
HDA_BITCLK_R
RTC_VBAT_1
HDA_SYNC_R
BBS_BIT0 - BIOS BOOT STRAP BIT 0
HDA_SPKR
SERIRQ
LED_IGPU#
SERIRQ
RTC_RST#
SPI_SO_R
PCH_J TAG_TCK_BUF
PCH_J TAG_TDO
SATA_RXP2 25
SATA_RXN2 25
SPI_SCL K_R
J_RTC1
85205-02701
2
1
SATA_TXP2 25
SATA_TXN2 25
SATA_TXP0
SATA_TXN0
SATA_RXN0
SATA_RXP0
R344 *10mil_short_04
U19
*PCT25VF016B-75-4I-S2AF
CE#
1
SO
2
WP#
3
VSS
4
SI
5
SCK
6
HOLD#
7
VDD
8
R312
*3.3K_1%_04
R93
*3.3K_1%_04
NC3
SHORT
C365 *0.1u_1 6V_Y5V_04
ME ROM
SPI_SI
16Mbit
SPI_SC LK
SPI_CS 0#
SPI_VDD
R206
15"14"
R208
SPI_HOLD#
SPI_WP#
SPI_SO
10K
10K X
X
SPI_* = 1.5"~6.5"
3.3VS
3.3VS
5VS
SATA_RXN0
SATA_RXP0
SATA_TXP0
SATA_TXN0
C375
*2.2u_6. 3V_X5R_06
C407 0.01u_16V _X7R_04
+
C367
220u_6.3V_6.3* 6.3*4. 2
C402 0.01u_16V _X7R_04
C394 0.01u_16V _X7R_04
C376
*0.1u_16V_Y5V_04
C393 0.01u_16V _X7R_04
HDA_BITC LK_R
Close to PCH
Layout Note:
HDA_BITCLK27
HDA_SDOUT27
HDA_SYNC27
Q4
2SK3018S3
G
DS
R87 *0_ 04
R201 33_ 04
R109 33_04
R89 0_04
HSPI_SCLK28
HDA_SYNC_R
C211 22p_50V_N PO_04
R102 33_04
R113 33_04
R184 33_ 04
HSPI_MSO28
HSPI_MSI28
SPI_CS_1#
R351 33_ 04
HSPI_CE#28
SPI_SCLK_R
SPI_CS_0#
SPI_SI_R
HDA_SDOUT_R
SPI_SO_R
Share ROM
R324
*51_04
C217
*0.1u_16V_Y5V_04
C212
*0.01u_16V_X7R_04
R135
*100_1%_04
R121
*100_1%_04
Modify 1/9
R327
*100_1%_04
3.3VS
C207
*1u_6.3V_X5R_04
3.3V
3.3VS
Layout Note:
PCH_JTAG_TCK_BUF
PCH_JTAG_TDI
PCH_JTAG_TMS
PCH_JTAG_TDO
3/23
R92 * 0_04
SATA_TXP4 21
SATA_TXN4 21
SATA_RXP4 21
SATA_RXN4 21
R177 1M_04
R160 * 0_04
J_RTC2
*BAT-KB7410A P2P
PCB Footp rint = BA T-KB7410A P2P
-
2
+
1
R152 0_0 4
HDD_NC0
R110
*210_1%_04
SATA_TXN0_R
RTC_VBAT
R117
*210_1%_04
PIN GND1~2=GND
HDD_NC3
HDD_NC2
HDD_NC1
R322
*210_1%_04
3/23
SPI_CS0#
SATA_RXN0_R
5VS
SATA HDD
J_HDD1
C166W9-12205 -L
S1
S2
S3
S4
S5
S6
S7
P1
P2
P3
P4
P5
P6
P7
P8
P9
P10
P11
P12
P13
P14
P15
GND1
GND2
Schematic Diagrams
B.Schematic Diagrams
PCH 1/9- RTC, HDA, SATA B - 13
Page 66
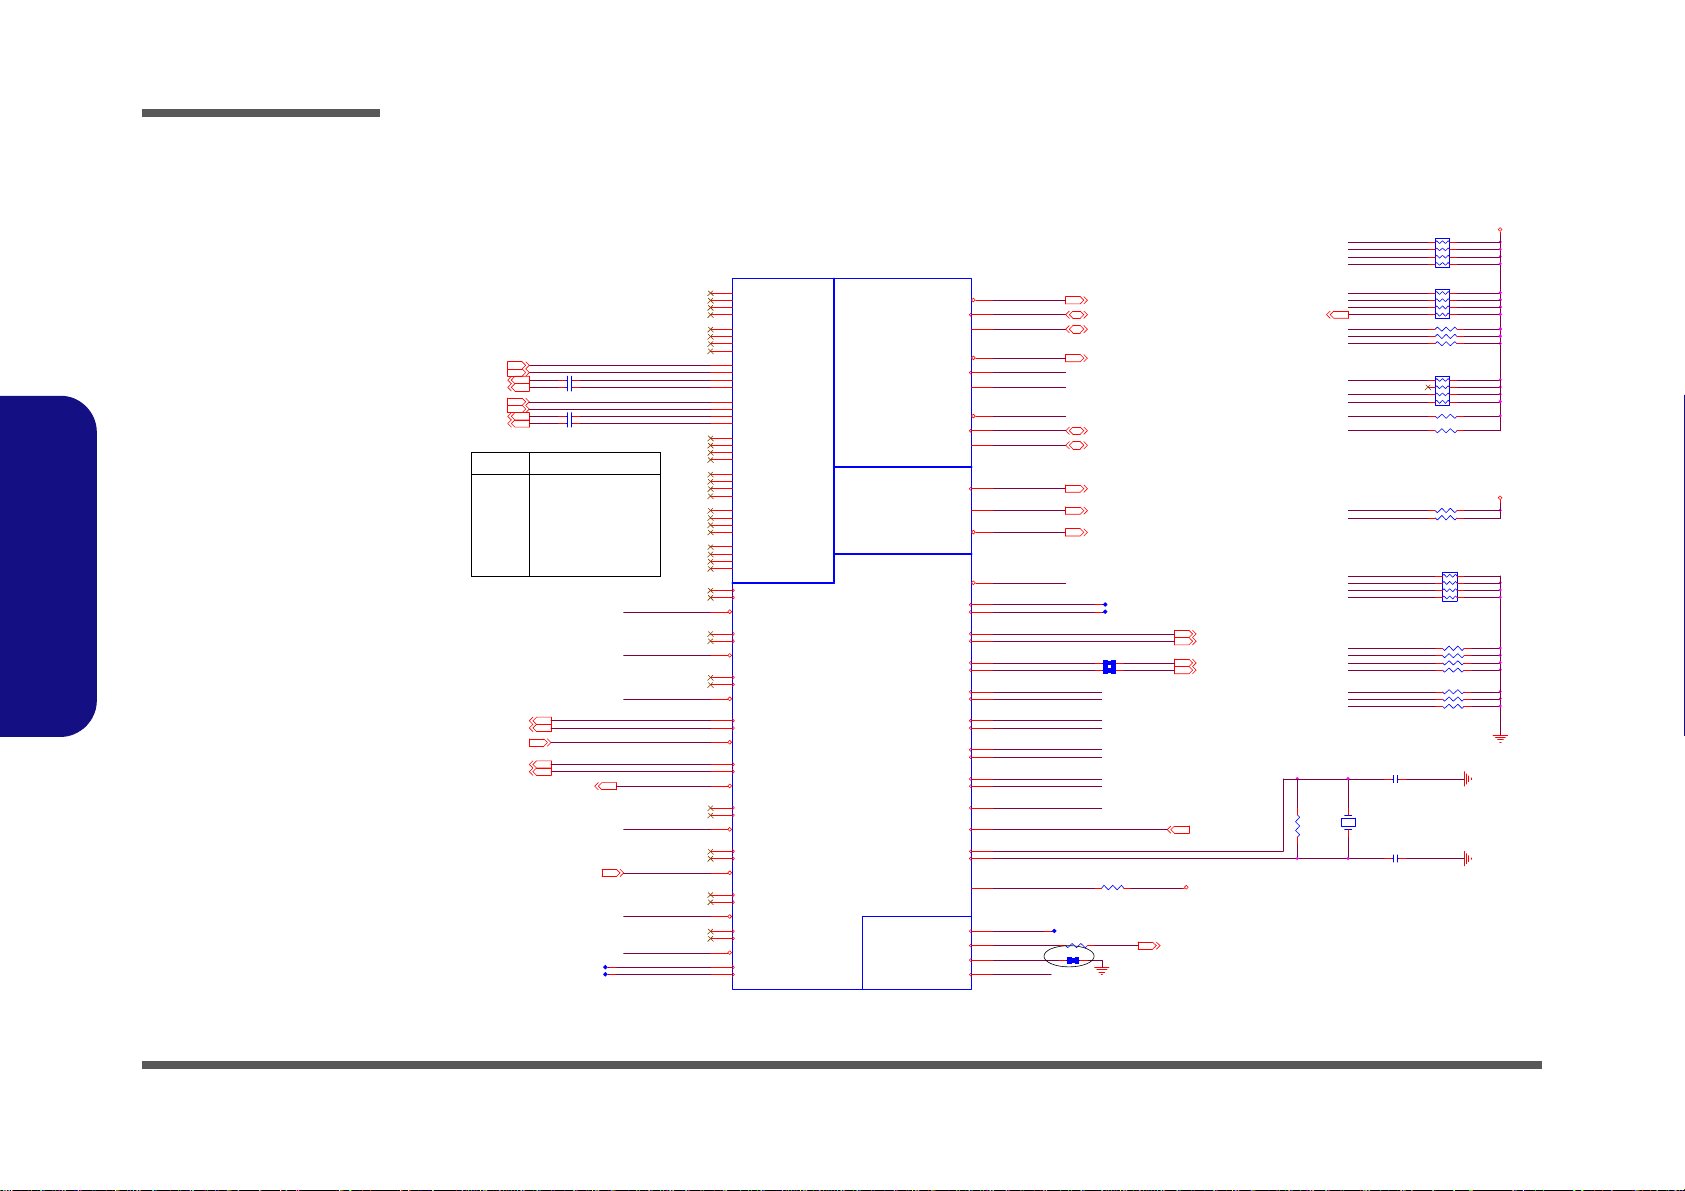
Schematic Diagrams
Sheet 13 of 42
PCH 2/9- PCIE,
SMBUS, CLK
R362 10K_04
BT_SBD#
3.3VS
R129 10K_04
PCIECLKRQ2#
SMB_DATA
USB_OC#89
TI USB3.0 unused crystal
and used P CH clock ou tput
FLEX_GLAN_CLK 24
R215 * 22_04
R180 10K_04
R173 10K_04
C265 0.1u_10V_X7R_04
C267 0.1u_10V_X7R_04
C254 0.1u_10V_X7R_04
C259 0.1u_10V_X7R_04
DGPU_PRSNT#
R115 * 10K_04
CLK_PCIE_WLAN21
CLK_PC IE_W LAN#21
PEG_PCI ECLKR Q7#
R170 10K_04
SML0_CLK
SMB_CLK
USB_OC#8916,25
CLK_PCIE_I CH_N
CLK_BUF_CPYCLK_P
CLK_BUF_CPYCLK_N
CLK_PCIE_I CH_P
6-22-25R00-1B5
6-22-25R00-1B4
6-22-25R00-1BV
R187 10K_04
X3
FSX5L_25MHZ
12
R200 * 10mil_s hort_04
R207 * 10mil_s hort_04
PEG_CLKR EQ#
LPD_SPI_IN TR#
PEG_B_CLKRQ#16
R334 10K_04
PCIECLKRQ1#
CLK_BUF_DOT96_P
PCH_GPIO65
PEG_PCIECLKRQ7#
CL_CLK1
CL_DATA1
CLK_BUF_DOT96_N
PCIECLKRQ 0#
CL_RST#1
CLK_PCIE_I CH_P
CLK_PCIE_I CH_N
CLK_BUF_REF14
R361 *1 0mil_short _04
SMB_DATA
SMB_CLK
PCH_GPIO66
PCIE_TXP3_C
PCIE_TXN3_C
PCIECLKRQ0#
PCIECLKRQ5#
PCIECLKRQ6#
R118 *10K_04
C389 22p_50V_NPO_04
RN8
10K_8P4R_04
1
2
3456
7
8
LAN_CLKREQ#
R123 2 .2K_04
R234 10K_04
PCI-E*
CLOCKS
FLEX CLOCKS
SMBUSController
Link
U20B
PANTHER POINT HM77 MP
PERN1
BG34
PERP1
BJ34
PERN2
BE34
PERP2
BF34
PERN3
BG36
PERP3
BJ36
PERN4
BF36
PERP4
BE36
PERN5
BG37
PERP5
BH37
PERN6
BJ38
PERP6
BG38
PERN7
BG40
PERP7
BJ40
PERN8
BE38
PERP8
BC38
PETN1
AV32
PETP1
AU32
PETN2
BB32
PETP2
AY32
PETN3
AV34
PETP3
AU34
PETN4
AY34
PETP4
BB34
PETN5
AY36
PETP5
BB36
PETN6
AU36
PETP6
AV36
PETN7
AY40
PETP7
BB40
PETN8
AW38
PETP8
AY38
CLKOUT_PCIE0N
Y40
CLKOUT_PCIE0P
Y39
CLKOUT_PCIE1N
AB49
CLKOUT_PCIE1P
AB47
CLKOUT_PCIE2N
AA48
CLKOUT_PCIE2P
AA47
CLKOUT_PCIE3N
Y37
CLKOUT_PCIE3P
Y36
CLKOUT_PCIE4N
Y43
CLKOUT_PCIE4P
Y45
CLKOUT_PCIE5N
V45
CLKOUT_PCIE5P
V46
CLKIN_GND1_N
BJ30
CLKIN_GND1_P
BG30
CLKIN_DMI_N
BF18
CLKIN_DMI_P
BE18
CLKIN_DOT_96N
G24
CLKIN_DOT_96P
E24
CLKIN_SATA_N
AK7
CLKIN_SATA_P
AK5
XTAL25_IN
V47
XTAL25_OUT
V49
REFCLK14I N
K45
CLKIN_PCILOOPBACK
H45
CLKOUT_PEG_A_N
AB37
CLKOUT_PEG_A_P
AB38
PEG_A_CLKRQ# / GPI O47
M10
PCIECLKR Q0# / GPI O73
J2
PCIECLKR Q1# / GPI O18
M1
PCIECLKR Q2# / GPI O20
V10
PCIECLKR Q3# / GPI O25
A8
PCIECLKR Q4# / GPI O26
L12
PCIECLKR Q5# / GPI O44
L14
CLKOUTFLEX0 / GPIO64
K43
CLKOUTFLEX1 / GPIO65
F47
CLKOUTFLEX2 / GPIO66
H47
CLKOUTFLEX3 / GPIO67
K49
CLKOUT_DMI_N
AV22
CLKOUT_DMI_P
AU22
PEG_B_CL KR Q# / G PI O56
E6
CLKOUT_PEG_B_P
AB40
CLKOUT_PEG_B_N
AB42
XCLK_RCOMP
Y47
CLKOUT_DP_P
AM13
CLKOUT_DP_N
AM12
CLKOUT_PCIE6N
V40
CLKOUT_PCIE6P
V42
PCIECLKR Q7# / GPI O46
K12
CLKOUT_PCIE7N
V38
CLKOUT_PCIE7P
V37
CLKOUT_ITPXDP_N
AK14
CLKOUT_ITPXDP_P
AK13
SMBALERT# / GPIO 11
E12
SMBCLK
H14
SMBDATA
C9
SML0ALERT# / GPIO60
A12
SML0CLK
C8
SML0DATA
G12
SML1ALERT# / PCHHOT# / GPI O74
C13
SML1CLK / GPIO58
E14
SML1DATA / GPIO75
M16
CL_CLK1
M7
CL_DATA1
T11
CL_RST1#
P10
PCIECLKR Q6# / GPI O45
T13
33MHz
R373
1M_04
100MHz
R378 90.9_1%_04
CLK_PCIE_WLAN
R319 1 K_04
R131 *10K_04
CLK_PCIE_GLAN
R134 2 .2K_04
SMD_CPU _THERM
RN1
10K_8P4R_04
1
2
3456
7
8
RN3
10K_8P4R_04
1
2
3456
7
8
C391 22p_50V_NPO_04
RN2
2.2K_8P4R_04
1
2
3456
7
8
3.3V
1.05VS
SMB_CLK 9,10
CLK_PCI_FB 16
WLAN_CLKREQ#21
SMB_DATA 9, 10
CLK_EXP_N 3
CLK_EXP_P 3
CLK_DP_P 3
CLK_DP_N 3
CL_CLK1 21
CL_RST#1 21
CL_DATA1 21
DRAMRST_CNTRL 3,6
SMC_CPU_THERM 28
SMD_CPU_THERM 28
CLK_PCIE_GLAN24
CLK_PCIE_GLAN#24
PCIE_TXP3_WLAN21
PCIE_RXP3_WLAN21
PCIE_RXN3_WLAN21
PCIE_TXP4_GLAN24
PCIE_TXN3_WLAN21
PCIE_RXP4_GLAN24
PCIE_RXN4_GLAN24
PCIE_TXN4_GLAN24
LAN_CLKREQ#16,24
BT_SBD# 2 1
CLK_BUF_REF14
PantherPoint - M (PCI-E,SMBUS,CLK)
DRAMRST_CNTRL
Lane 1 X
Lane 2 X
Lane 3 WLAN
Lane 4 GLAN / CARD READER
Lane 5 X
Lane 6 X
Lane 7 X
Lane 8 X
UsagePCI-E x1
SMC_CPU _THERM
PEG_CLKR EQ#
90.9-£[ ¡Ó1% pullup to
+VccIO
(1.05V, S0 rail)close to
PCH
PCIE_TXP4_C
PCIECLKRQ 6#
XCLK_RCOMP
XTAL25_IN
CLK_BUF_CKSSCD_P
CLK_BUF_CKSSCD_N
PCIE_TXN4_C
XTAL25_OUT
VGA_PEXCLK
VGA_PEXCLK#
SML0_DATA
120MHz
DGPU_PRSNT#
CLK_BUF_CPYCLK_P
CLK_BUF_CPYCLK_N
BT_SBD#
PCH_C LK_DP _N_R
PCH_C LK_DP _P_R
CLK_BUF_DOT96_P
CLK_BUF_CKSSCD_P
CLK_BUF_CKSSCD_N
CLK_XDP_P
CLK_XDP_N
PCH_XTAL_I N
DRAMRST_CNTRL
100MHz
100MHz
CLK_BUF_DOT96_N
CLK_PCIE_GLAN#
CLK_PCIE_WLAN#
PEG_CLKR EQ#
LPD_SPI_I NTR#
SMC_CPU _THERM
SMD_CPU _THERM
SML0_CLK
SML0_DATA
PCIECLKRQ 5#
LAN_CLKREQ#
PCIECLKRQ 1#
PEG_B_C LKRQ#
3/23
PCIECLKRQ 2#
PCH 2/9- PCIE, SMBUS, CLK
B.Schematic Diagrams
B - 14 PCH 2/9- PCIE, SMBUS, CLK
Page 67
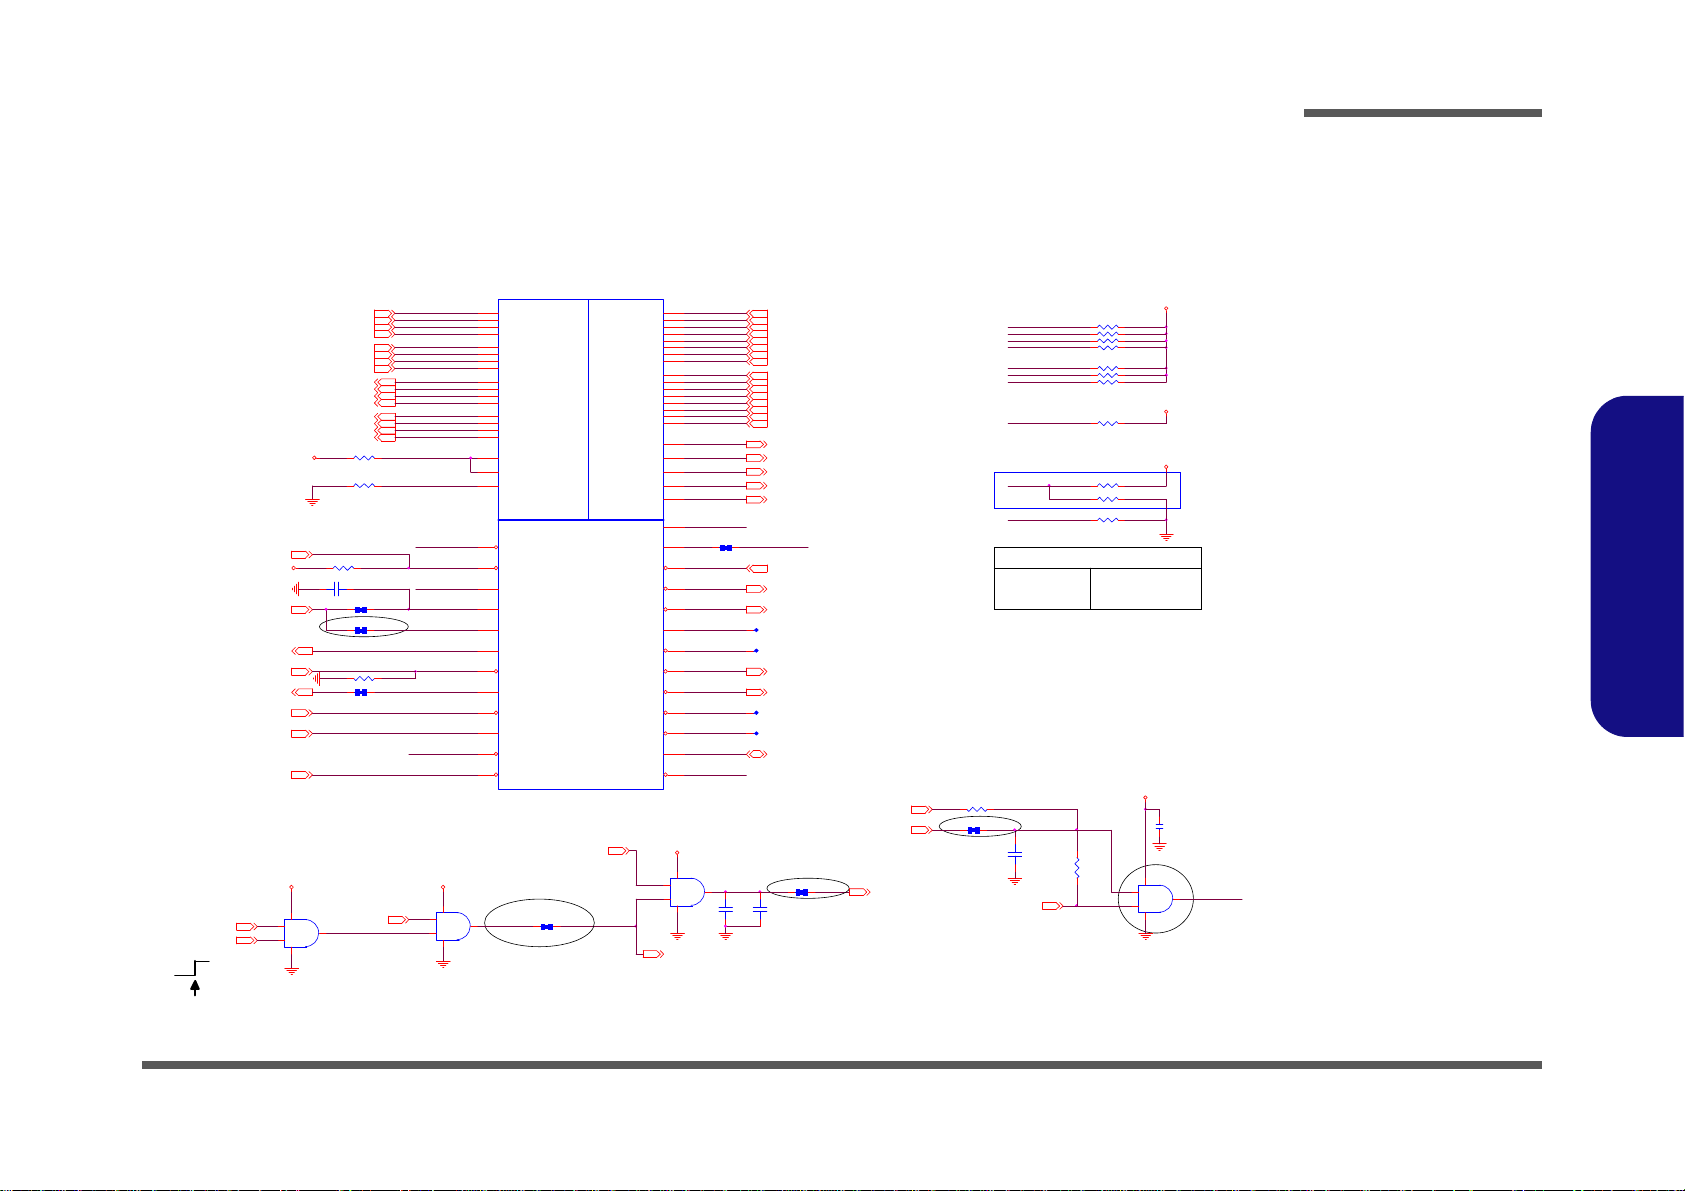
PCH 3/9- DMI, FDI, PWRGD
Sheet 14 of 42
PCH 3/9- DMI, FDI,
PWRGD
R172 *10m il_s hort
R255 *10mil_short
3/23
U9D
74LVC08PW
12
13
11
147
RSMRST#
0.85VS_EN 31
0.85VS_EN
C248 *0.1 u_10V_X5R _04
R473
*10mil_short
R318
PM_PCH_PWROK_R
DSWODVREN
DSWODVREN - On Die DSW VR E nable
PCIE_WAKE#
SUS_PW R_AC K
SWI#
PM_SLP_LAN#
SLP_A #
R321
RSMRST#
SUS_PWRACK
DMI_2RBIAS
SLP_S 5#
S4_S TATE#
DMI_COMP_R
R254 49.9_1%_04
R142 *10mil_s hort
PM_CLKRUN#
C256
*1u_6.3V_X5R_04
DMI
FDI
System Power Management
U20C
PANTHER POINT HM77 MP
DMI0RXN
BC24
DMI1RXN
BE20
DMI2RXN
BG18
DMI3RXN
BG20
DMI0RXP
BE24
DMI1RXP
BC20
DMI2RXP
BJ18
DMI3RXP
BJ20
DMI0TXN
AW24
DMI1TXN
AW20
DMI2TXN
BB18
DMI3TXN
AV18
DMI0TXP
AY24
DMI1TXP
AY20
DMI2TXP
AY18
DMI3TXP
AU18
DMI_ZCOMP
BJ24
DMI_IRCOMP
BG25
FDI_RXN0
BJ14
FDI_RXN1
AY14
FDI_RXN2
BE14
FDI_RXN3
BH13
FDI_RXN4
BC12
FDI_RXN5
BJ12
FDI_RXN6
BG10
FDI_RXN7
BG9
FDI_RXP0
BG14
FDI_RXP1
BB14
FDI_RXP2
BF14
FDI_RXP3
BG13
FDI_RXP4
BE12
FDI_RXP5
BG12
FDI_RXP6
BJ10
FDI_RXP7
BH9
FDI_FSYNC0
AV12
FDI_FSYNC1
BC10
FDI_LSYNC0
AV14
FDI_LSYNC1
BB10
FDI_INT
AW16
PMSYNCH
AP14
SLP_SU S#
G16
SLP_S3#
F4
SLP_S4#
H4
SLP_S5# / GPIO63
D10
SYS_RESET#
K3
SYS_ PWRO K
P12
PWRBTN#
E20
RI#
A10
WAKE#
B9
SUS_STAT# / GPIO61
G8
SUSCLK / GPIO62
N14
ACPRESENT / GPIO31
H20
BATLOW# / GPIO72
E10
PWROK
L22
CLKRUN# / GPIO32
N3
SUSWARN#/SUSPW RDNACK/GPI O30
K16
RSMRST#
C21
DRAMPWROK
B13
SLP_LAN# / GPIO29
K14
APWROK
L10
DPWROK
E22
DMI2RBIAS
BH21
SLP_A#
G10
DSWVRMEN
A18
SUSACK#
C12
R158 *10K_04
R149 10K_04
R244 *10mil_s hort
R116 8.2K_04
PCIE_WAKE#
R243 *10mil_s hort
R130 10K_04
SLP_S US#
R119 *10K_04
R336 8.2K_04
R318 330K_04
R321 *330K_04
R252 750_1%_04
C257
*1u_ 6.3V_X5R _04
R257 10K_04
Disabled
R330 1 0K_04
R315 1K_04
R176 10K_04
R313 10K_04
3.3VS
3.3V
RTCVCC
1.05VS
3.3VS
3.3V
PWR_BTN#
FDI_TXP5 2
FDI_TXP6 2
FDI_TXP7 2
3/23
FDI_TXP2 2
FDI_TXP3 2
FDI_TXP4 2
FDI_TXN5 2
FDI_TXP0 2
FDI_TXP1 2
FDI_TXN1 2
FDI_TXN6 2
FDI_TXN0 2
DDR _1.05VS_PW RGD
U9B
74LVC08PW
4
5
6
147
FDI_TXN4 2
FDI_TXN3 2
FDI_TXN2 2
FDI_TXN7 2
U9A
74LVC08PW
1
2
3
147
FDI_FSYNC1 2
FDI_FSYNC0 2
FDI_INT 2
3.3V
1.8VS_ PWR GD29 ,31
DDR1.5V_PWRGD32
PM_CLKRUN# 22
FDI_LSYNC1 2
FDI_LSYNC0 2
3.3V
1.05VS_PWRGD32
SUSC # 28, 32
SUSB# 6,28,29
H_PM_SYNC 3,29
PWR_BTN#28
AC_PRESENT16,28
SWI#28
PM_DRAM_PWRGD3,29
SUS_PWR_ACK28
RSMRST#28
SYS_RESET#
S4_STATE# 22
PCIE_WAKE# 21,24
ALL_SYS_PWRGD 11,28,29,33
0.85VS_PW RGD31
DMI_RXN22
DMI_RXN12
DMI_RXN02
DMI_RXP12
DMI_RXP02
DMI_RXN32
DMI_TXN02
DMI_RXP32
DMI_RXP22
DMI_TXN32
DMI_TXN22
DMI_TXN12
DMI_TXP22
DMI_TXP12
DMI_TXP02
PM_PCH_PWROK28
DMI_TXP32
AC_PRESENT
PantherPoint -M (DMI,FDI,GPIO)
SUSC LK
PM_BATLOW#
PM_MPWROK
SWI#
Enabled (DEFAU LT)
PM_SLP_LAN#
SYS_PWROK
ALL_SYS_PWRGD
SUS_PWR_ACK
DSWODVREN
PM_BATLOW#
ON
PWR_BTN#
AC_PRESENT
PM_CLKRU N#
R232 *10mil_s hort
3/23
3/23
SYS_RESET#28
R240
*0_04
VCORE _PWR GD28
R233 *0_04
From EC pin119
C225
*0.1u_10V_X5R_04
3.3V
DELAY_PWRGD29,33
PM_PCH_PWROK28
3/23
U9C
74LVC08PW
9
10
8
147
C226
*1u_6.3V_Y5V_04
SYS_PWROK
1.05VS_VTT_EN
Schematic Diagrams
B.Schematic Diagrams
PCH 3/9- DMI, FDI, PWRGD B - 15
Page 68
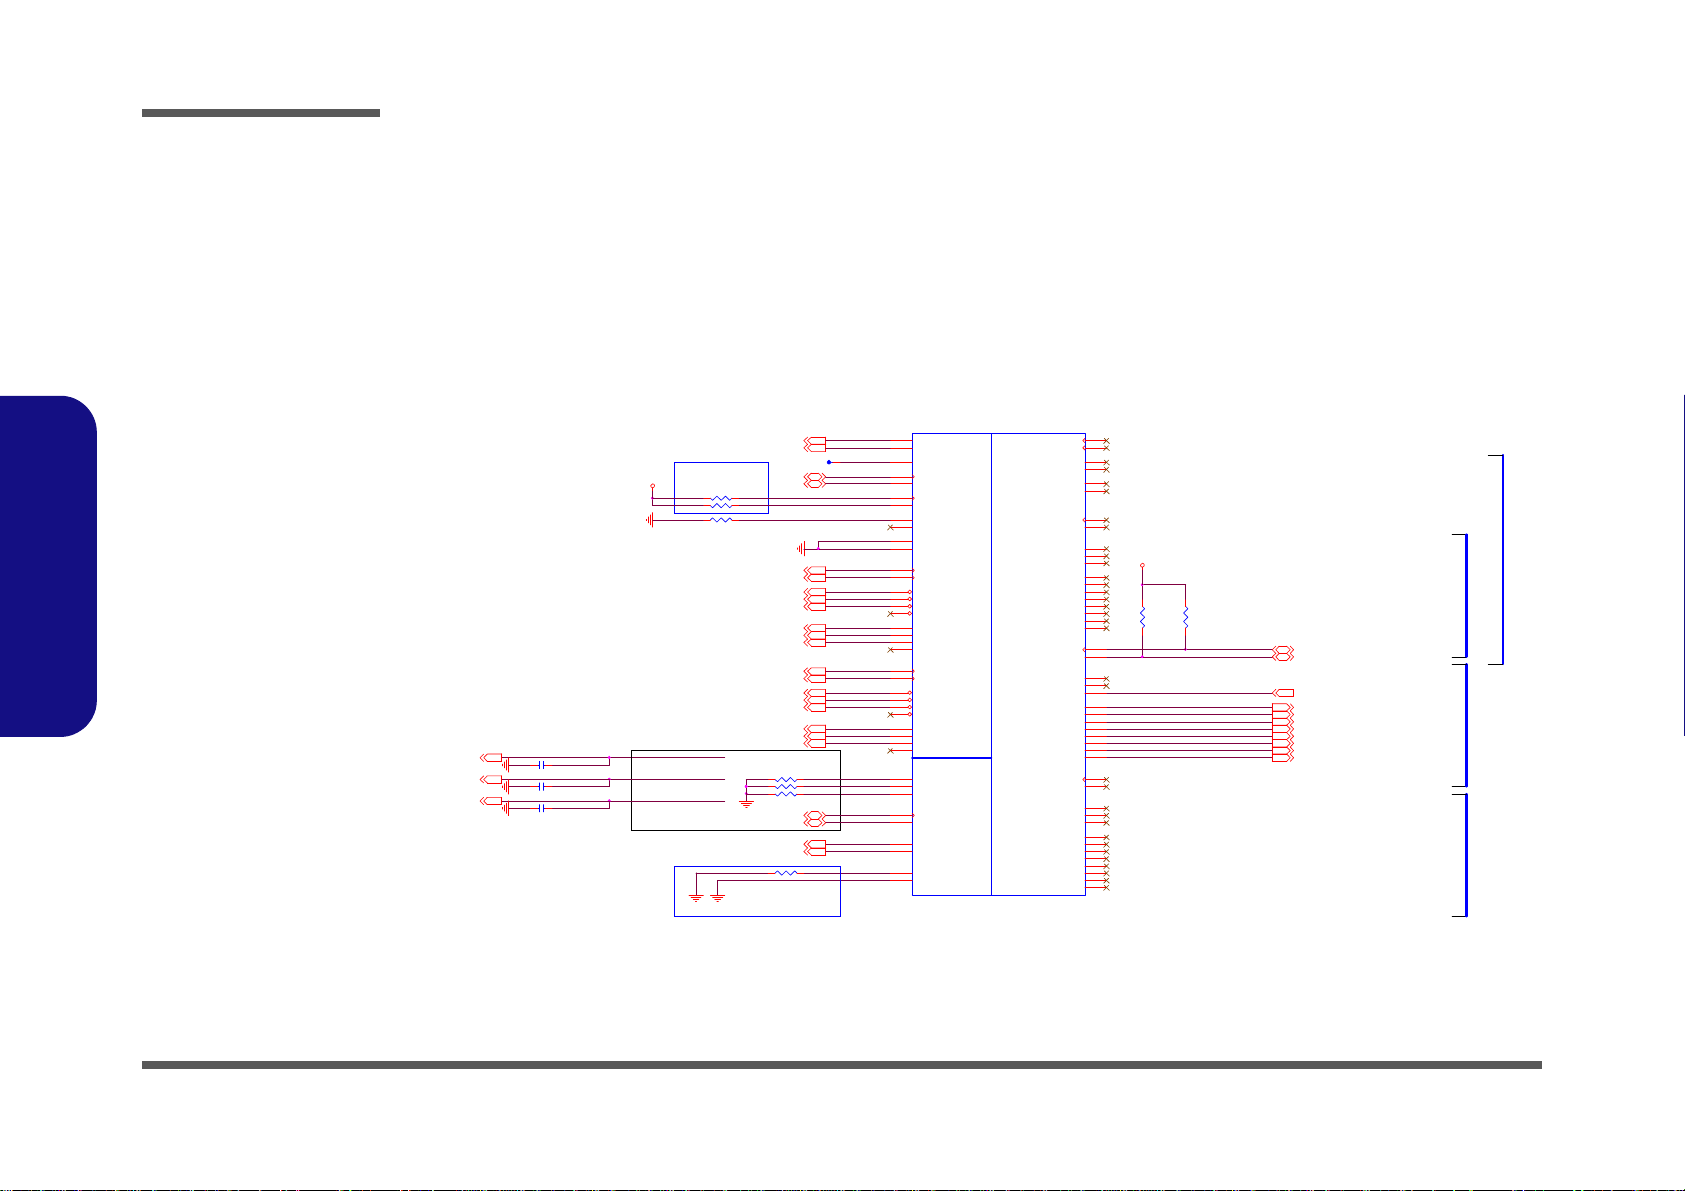
Schematic Diagrams
Sheet 15 of 42
PCH 4/9- LVDS,
DDI, CRT
R370 150_1%_04
R367 150_1%_04
R371 150_1%_04
DAC_BLUE
DAC_IREF_R
Connect to GND
PantherPoint -M (LVDS,DDI)
HDMIC_CLKCN
HDMIC_CLKCP
HDMI_HPD
HDMIC_C1CP
HDMIC_C1CN
HDMIC_C2CN
DAC_RED
HDMIC_C0CP
HDMIC_C0CN
HDMIC_C2CP
NEAR PCH
DAC_GREEN
EMI
DAC_GREEN
DAC_RED
SDVO
Display Port BDisplay Port CDisplay Port D
DAC_BLUE
R238 2.2K_04
R246 1K_1%_04
R247
2.2K_04
C388 *33p _50V_N PO_ 04
LVDS
Digital Display Interface
CRT
U20D
PANTHER POINT HM77 MP
L_BKLTC TL
P45
L_BKLTEN
J47
L_CTRL_CLK
T45
L_CTRL_DATA
P39
L_DDC_CLK
T40
L_DDC_DATA
K47
L_VDD_EN
M45
LVDSA_CLK#
AK39
LVDSA_CLK
AK40
LVDSA_DATA#0
AN48
LVDSA_DATA#1
AM47
LVDSA_DATA#2
AK47
LVDSA_DATA#3
AJ48
LVDSA_DATA0
AN47
LVDSA_DATA1
AM49
LVDSA_DATA2
AK49
LVDSA_DATA3
AJ47
LVDSB_CLK#
AF40
LVDSB_CLK
AF39
LVDSB_DATA#0
AH45
LVDSB_DATA#1
AH47
LVDSB_DATA#2
AF49
LVDSB_DATA#3
AF45
LVDSB_DATA0
AH43
DDPB_0N
AV42
DDPB_1N
AV45
LVD_VREFH
AE48
LVD_VREFL
AE47
DDPD_2N
BF42
DDPD_3N
BJ42
DDPB_2N
AU48
DDPB_3N
AV47
DDPC_0N
AY47
DDPC_1N
AY43
DDPC_2N
BA47
DDPC_3N
BB47
DDPD_0N
BB43
DDPD_1N
BF44
DDPB_0P
AV40
DDPB_1P
AV46
DDPD_2P
BE42
DDPD_3P
BG42
DDPB_2P
AU47
DDPB_3P
AV49
LVDSB_DATA1
AH49
LVDSB_DATA2
AF47
LVDSB_DATA3
AF43
LVD_I BG
AF37
LVD_VBG
AF36
DDPC_1P
AY45
DDPC_0P
AY49
DDPC_2P
BA48
DDPC_3P
BB49
DDPD_0P
BB45
DDPD_1P
BE44
CRT_BLUE
N48
CRT_DDC_CLK
T39
CRT_DDC_DATA
M40
CRT_GREEN
P49
CRT_HSYNC
M47
CR T_IR TN
T42
CRT_RED
T49
CRT_VSYNC
M49
DAC_IREF
T43
SDVO_CTRLCLK
P38
SDVO_CTRLDATA
M39
DDPC_CTRLCLK
P46
DDPC_CTRLDATA
P42
DDPD_CTRLCLK
M43
DDPD_CTRLDATA
M36
DDPB_AUXN
AT49
DDPC_AUXN
AP47
DDPD_AUXN
AT45
DDPB_AUXP
AT47
DDPC_AUXP
AP49
DDPD_AUXP
AT43
DDPB_H PD
AT40
DDPC_H PD
AT38
DDPD_H PD
BH41
SDVO_TVCLKINP
AP45
SDVO_TVCLKINN
AP43
SDVO_STALLP
AM40
SDVO_STALLN
AM42
SDVO_INTP
AP40
SDVO_INTN
AP39
R231 2.2K_04
R249
2.2K_04
C381 *33p _50V_N PO_ 04
C387 *33p _50V_N PO_ 04
R248 2.37K_1%_04
3.3VS
LVDS-LCLK P11
LVDS-LCLK N11
3.3VS
LVDS-L2N11
LVDS-L1N11
LVDS-L0N11
LVDS-L2P11
LVDS-L1P11
LVDS-L0P11
BLON11
P_DDC_D ATA11
P_DDC_C LK11
DAC_VSYNC11
DAC_HSYNC11
NB_ENAVDD11,2 8
DAC_RED11
DAC_GREEN11
DAC_DDCADATA11
DAC_DDCACLK11
LVDS-U2N11
LVDS-U1N11
LVDS-U0N11
LVDS-U0P11
LVDS-U2P11
LVDS-U1P11
DAC_BLUE11
LVDS-UCLKP11
LVDS-UCLKN11
HDMIC_C1CN 26
HDMIC_CLKCP 26
HDMIC_CLKCN 26
HDMIC_C0CN 26
HDMIC_C2CP 26
HDMIC_C2CN 26
HDMIC_C1CP 26
HDMI_CTRLDATA 26
HDMI_CTRLCLK 26
HDMIC_C0CP 26
HDMI_HPD 26
Ver:1.0
pull up 2.2K
L_CTR L_D ATA
L_CTR L_C LK
LVDS_IBG
PCH 4/9- LVDS, DDI, CRT
B.Schematic Diagrams
B - 16 PCH 4/9- LVDS, DDI, CRT
Page 69
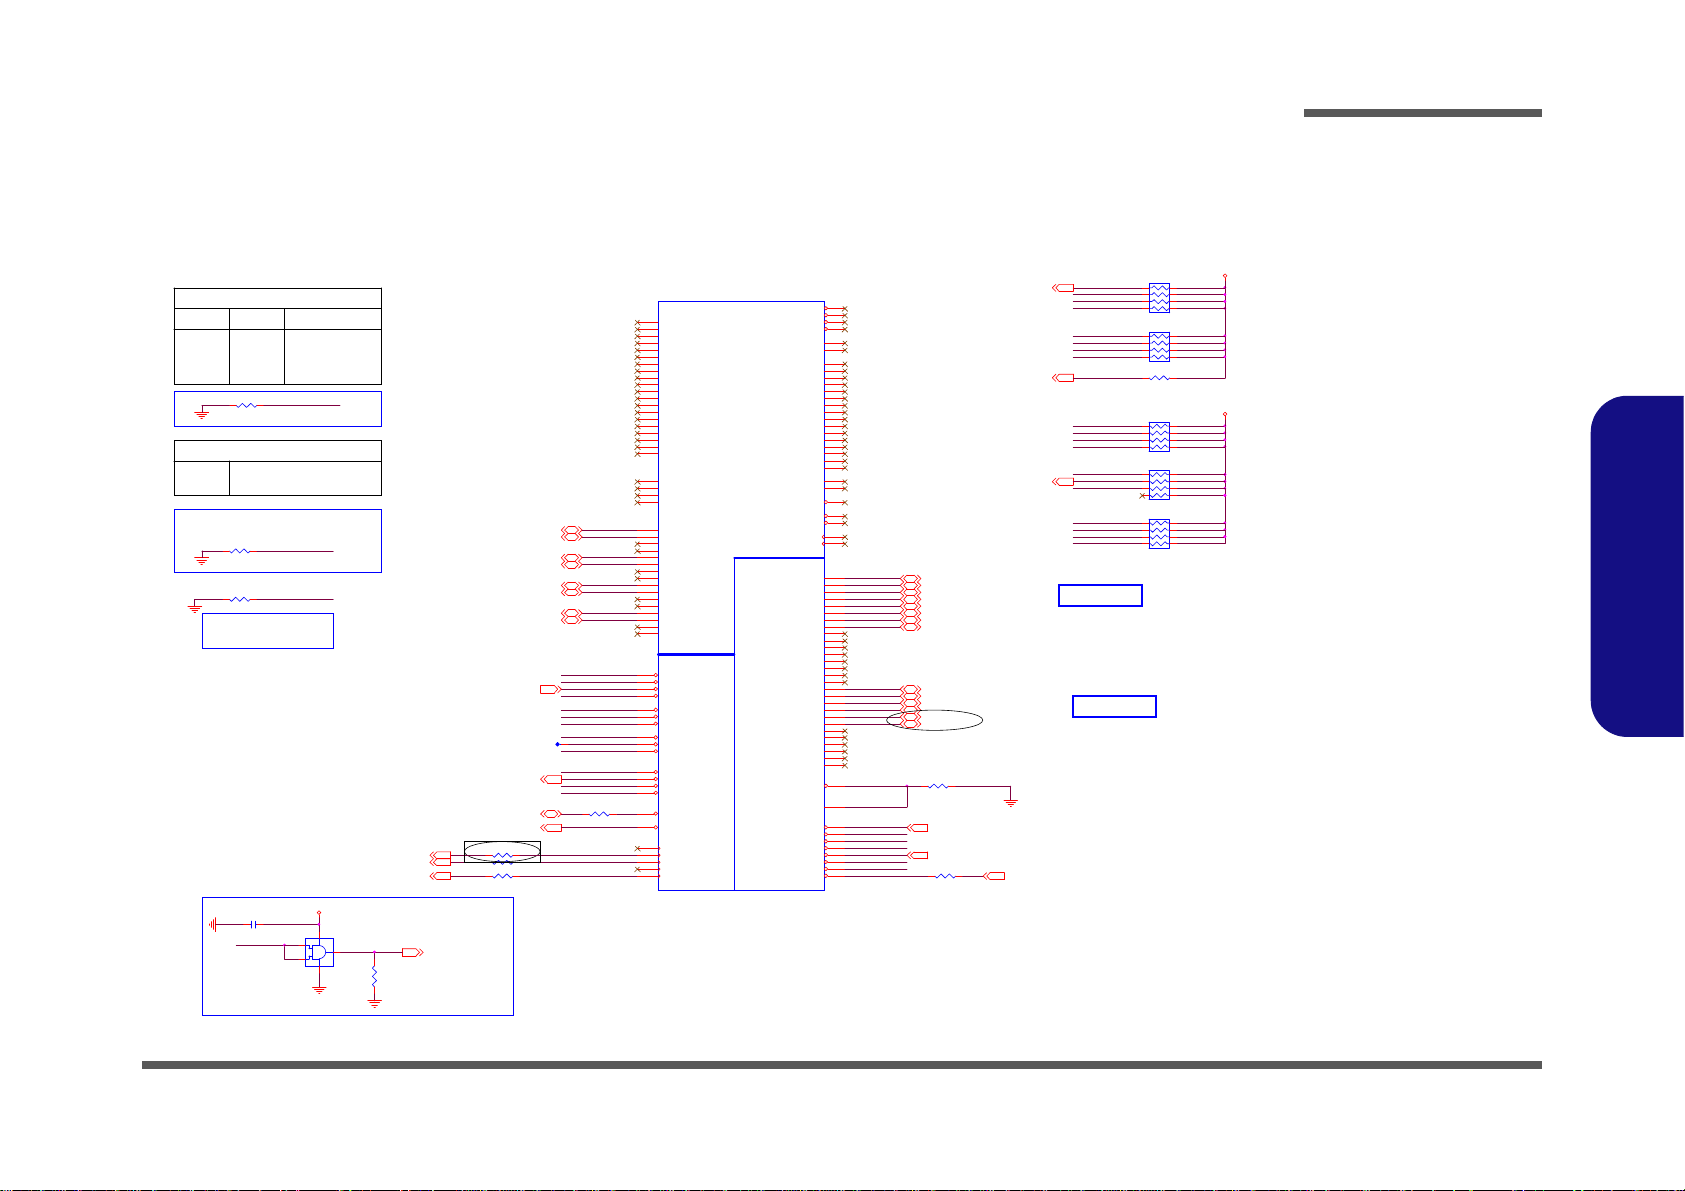
PCH 5/9- PCI, USB, RSVD
INT_PIRQA#
INT_PIRQE#
PEG_B_CLKRQ#
3/23
R348 22 .6_1 %_06
R138 *0_04
USB_OC#89 13,25
INT_PIRQG#
INT_PIRQB#
USB PORT1
USB_PN10 25
USB_PP10 25
USB_OC#14
USB PORT2
R219 *1K_04
R213 *1K_04
R199 *1K_04
R224 22_04
USB3_RX2N23
USB3_RX1N23
R223 22_04
R229 22_04
USB3_RX2P23
USB3_RX1P23
USB3_TX1N23
USB3_TX2N23
USB3_TX2P23
USB3_TX1P23
R114 *0_04
USB_OC#01
USB_PN8 22
USB_PP8 22
USB_PN9 25
USB PORT3
USB_PP9 25
INT_PIRQH#
SMI#17, 28
3/28
USB PORT4
LAN_CLKREQ#13,24
R103 *10K_04
DGPU_SELECT#
LAN_CLKREQ#
PEG_B_CLKRQ#13
INT_PIRQE#
CCD
WLAN
USB PORT0
CLK_PCI_FB_R
3G
INT_PIRQH#
INT_PIRQG#
SATA_ODD_DA#
INT_PIRQE#
CLK_PCI_KBC_R
PCLK_TPM_PCH
USB_BIAS
USB_OC#23
MPC Switch Control
MPC OFF -- 0 DEFAULT
MPC ON -- 1
INT_PIRQD#
INT_PIRQC#
INT_PIRQB#
INT_PIRQA#
USB1 Port For Debug.
LOW = PCI_GNT#3 swap override
PCI_GNT#3
Flash Descrip tor secur ity override s trap
USB PORT1
HIGH = Default
USB9 Port For Debug.
D_GPU_PWR_EN#
DGPU_HOLD_RST#
USB_OC#1011
USB_OC#67
SATA_ODD_DA#
D_GPU_PW M_SELECT#
PCI_GNT#3
BBS_BIT1
RN12 10K_8P4R_04
81
72
653
4
USB_OC#45
RSVD
PCI
USB
U20E
PANTHER POINT HM77 MP
RSVD23
AV5
RSVD1
AY7
RSVD2
AV7
RSVD3
AU3
RSVD4
BG4
RSVD5
AT10
RSVD6
BC8
RSVD7
AU2
RSVD8
AT4
RSVD17
BB5
RSVD18
BB3
RSVD19
BB7
RSVD20
BE8
RSVD21
BD4
RSVD22
BF6
RSVD9
AT3
RSVD10
AT1
RSVD11
AY3
RSVD12
AT5
RSVD13
AV3
RSVD14
AV1
RSVD15
BB1
RSVD16
BA3
RSVD25
AT8
RSVD24
AV10
RSVD26
AY5
RSVD27
BA2
RSVD28
AT12
RSVD29
BF3
PIRQA#
K40
PIRQB#
K38
PIRQC #
H38
PIRQD #
G38
REQ1# / GPIO50
C46
REQ2# / GPIO52
C44
REQ3# / GPIO54
E40
GNT1# / GPIO51
D47
GNT2# / GPIO53
E42
GNT3# / GPIO55
F46
PIRQE# / GPI O 2
G42
PIRQF# / GPIO3
G40
PIRQG# / GPIO4
C42
PIRQH# / GPIO5
D44
USBP0N
C24
USBP0P
A24
USBP1N
C25
USBP1P
B25
USBP2N
C26
USBP2P
A26
USBP3N
K28
USBP3P
H28
USBP4N
E28
USBP4P
D28
USBP5N
C28
USBP5P
A28
USBP6N
C29
USBP6P
B29
USBP7N
N28
USBP7P
M28
USBP8N
L30
USBP8P
K30
USBP9N
G30
USBP9P
E30
USBP10N
C30
USBP10P
A30
USBP11N
L32
USBP11P
K32
USBP12N
G32
USBP12P
E32
USBP13N
C32
USBP13P
A32
PME#
K10
CLKOUT_PCI0
H49
CLKOUT_PCI1
H43
CLKOUT_PCI2
J48
USBRBIAS #
C33
USBRBIAS
B33
OC0# / G PI O 59
A14
OC1# / G PI O 40
K20
OC2# / G PI O 41
B17
OC3# / G PI O 42
C16
OC4# / G PI O 43
L16
OC5# / GPIO9
A16
OC6# / G PI O 10
D14
OC7# / G PI O 14
C14
CLKOUT_PCI4
H40
CLKOUT_PCI3
K42
PLTRST#
C6
TP1
BG26
TP2
BJ26
TP3
BH25
TP6
AH38
TP7
AH37
TP8
AK43
TP9
AK45
TP16
Y13
TP17
K24
TP18
L24
TP19
AB46
TP20
AB45
TP21
B21
TP22
M20
TP23
AY16
USB3Rn1
BE28
USB3Rn2
BC30
USB3Rn3
BE32
USB3Rn4
BJ32
USB3Rp1
BC28
USB3Rp2
BE30
USB3Rp3
BF32
USB3Rp4
BG32
USB3Tn1
AV26
USB3Tn2
BB26
USB3Tn3
AU28
USB3Tn4
AY30
USB3Tp1
AU26
USB3Tp2
AY26
USB3Tp3
AV28
USB3Tp4
AW30
TP4
BJ16
TP5
BG16
TP15
AM5
TP14
AM4
TP13
AH12
TP12
H3
TP11
N30
TP10
C18
TP24
BG46
RN10 10K_8P4R_04
8 1
7 2
653
4
INT_PIRQD#
RN6 10K_8P4R_04
81
72
653
4
RN11 10K_8P4R_04
8 1
7 2
653
4
RN7 10K_8P4R_04
81
72
653
4
3.3V
3.3VS
AC_PRESENT 14,28
USB_OC#01 23,25
SATA_ODD_DA#25
PLT_RST#3,22
PME#28
USB_PN0 23
PCLK_TPM22
PCLK_KBC28
USB_PN2 21
USB_PP0 23
USB_PP3 21
USB_PN3 21
USB_PP2 21
CLK_PCI_FB13
USB_PP1 25
USB_PN1 25
USB_OC#67
USB_OC#45
USB_OC #1213
USB_OC#14
USB_OC#23
USB_OC#01
USB_OC#89
BBS_BIT1
Understand the RED FONT define
PCI_GN T#3
USB_OC #1011
BBS_BIT1 BBS_BIT0 Boot BIOS Location
0 0 LP C
0 1 Re served (N AND)
1 0 PC I
1 1 SP I
PLT_RST#
Boot BIOS Strap
PantherPoint -M (PCI,USB,NVRAM)
DGPU_HOLD_RST#
D_GPU_PWR_EN#
DGPU_SELECT#
R229 for TPM
SMI#
INT_PIRQC#17
3.3VS
BUF_PLT_RS T# 21,24,28
PLT_RST#
U22
MC74 VH C 1G08 DF T2 G
1
2
5
4
3
C380 *0.1u_ 16V_Y 5V_ 04
R368
100K_04
PIN PLT_RST# to Buffer
USB_OC#1213
Sheet 16 of 42
PCH 5/9- PCI, USB,
RSVD
Schematic Diagrams
B.Schematic Diagrams
PCH 5/9- PCI, USB, RSVD B - 17
Page 70
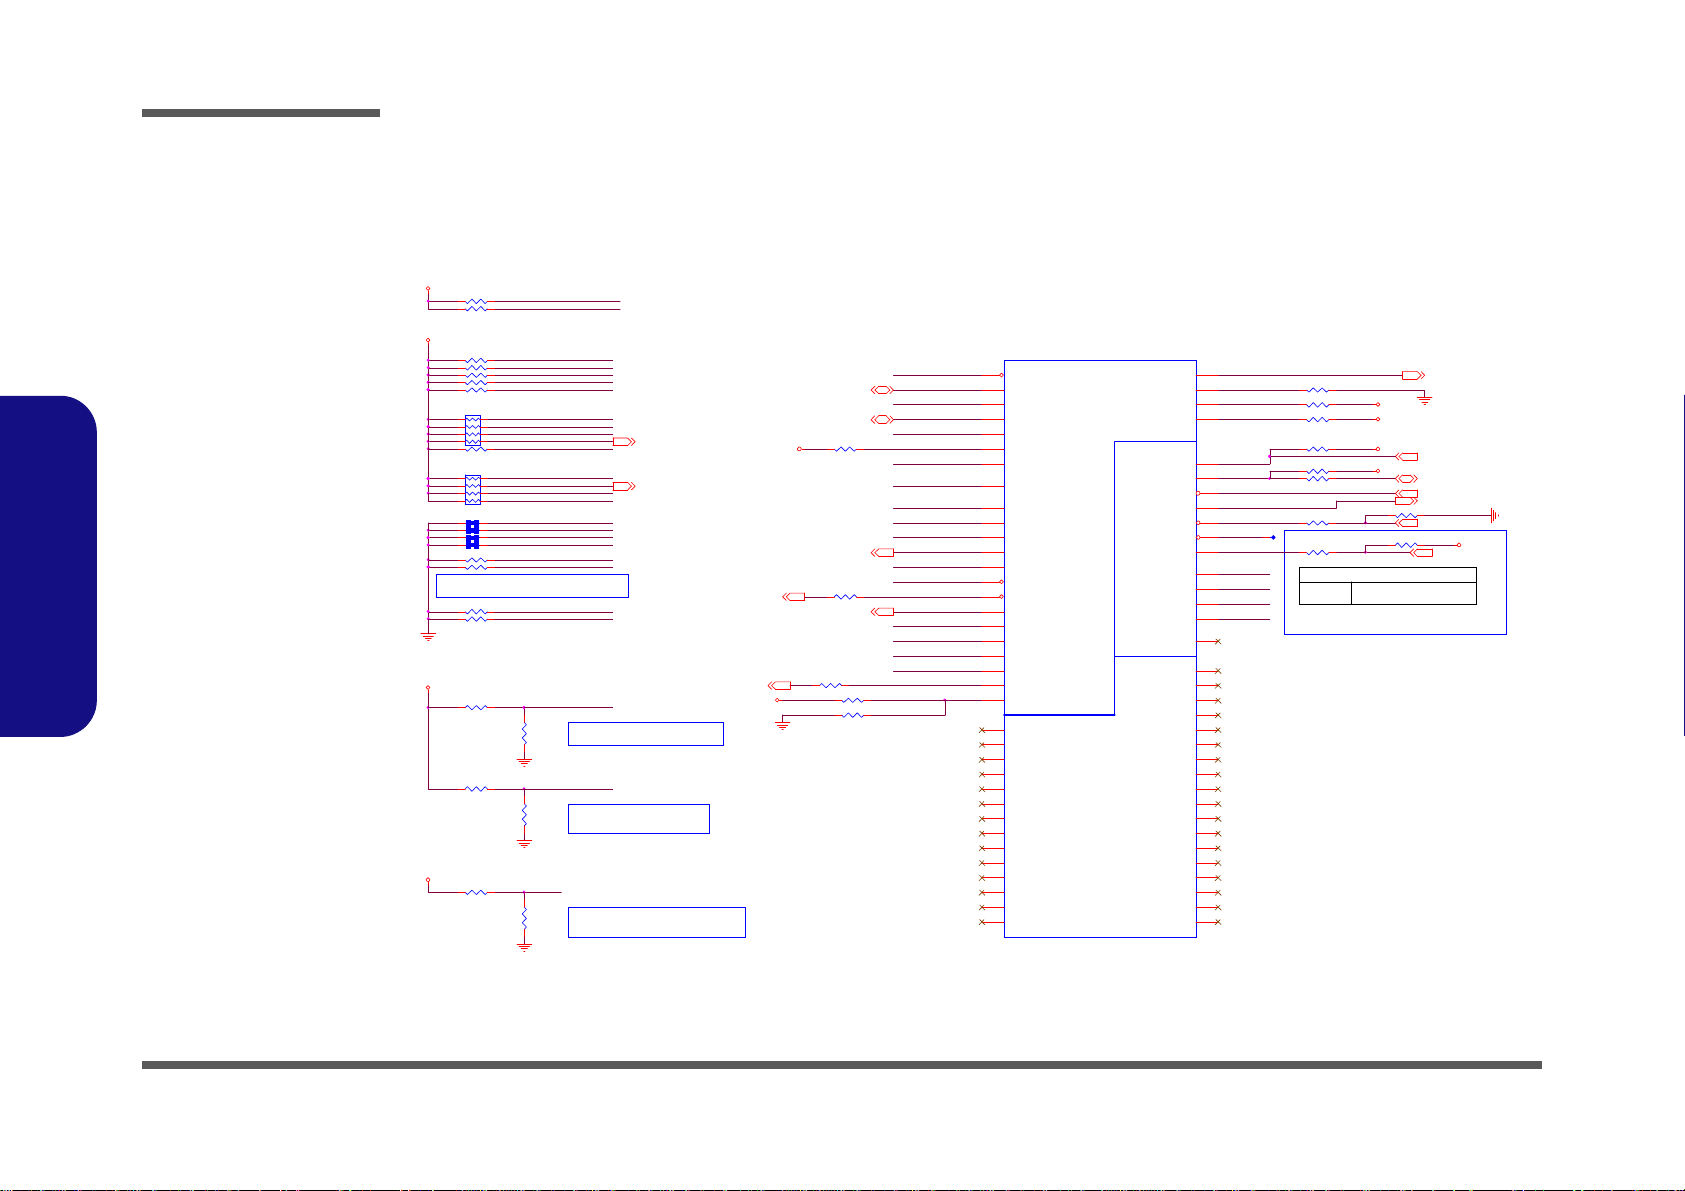
Schematic Diagrams
R357 10K_04
DGPU_PWROK
R137 10K_04
CRIT_TEMP_REP#_ R
ICPPE#28
R100 *100K_04
BOARD ID
3.3V
R106 100K_04
R139 *0_04
PLACE R553 CLOSE TO THE BRANCHING POINT
( TO CPT and NVRAM CONNECTOR
BIOS_REC
HPECI_R
FDI_OVRVLTG
EDID _SELECT#
TEST_SET_UP
HTHRMTRIP#_R
PLL_ODVR _EN
PLL_ODVR_EN:HIGH- ENABLED[DEFAULT]
LOW - DISABLED
SATA_ODD_PWRGT
KBC_RST#
SCI#
SATA_DET#4
DGPU_PWROK
FDI_OVRVLTG
ICC_EN#
SCI#
DGPU_H PD_I NTR#
HOST_ALERT#1
PLL_ODVR _EN
SATA_ODD_PWRGT
BIOS RECOVERY
DISABLE----HIGH (DEFAULT)
ENABLE-----LOW
LED_DGPU#
SMI#
GPIO71
SB_BLON
CRIT_TEMP_REP#_ R
MFG_MOD E
SATA_DET#4
SATA_ODD_PRSNT#
PCH_GPIO57
GFX_CRB_DET
GFX_CRB_DET
GPIO70
ICC_EN#
INTEGRATED Clock Chip Enable
ICC_EN#: HIGH - DISABLED [DEFAULT]
LOW - ENABLED
PCH_TS_VSS4
PCH_TS_VSS3
PCH_TS_VSS2
PCH_TS_VSS1
KBC_RST#
PCH_TS_VS S2
PCH_TS_VS S1
HOST_ALERT#2
INTERNAL GFX: LOW (DEFAULT)
EXTERNAL GFX:HIGH
S_GPIO
HOST_ALERT#1
PCH_TS_VS S4
PCH_TS_VS S3
NV_CLE
DGPU_H PD_I NTR#
Set to Vss when LOW
Set to Vcc when HIGH
NV_CLE
DMI & FDI Termination Voltage
HOST_ALERT#2 INIT3_3V#
PCH_MUTE#
RN4
10K_8P4R_04
1
2
3
4 5
6
7
8
PantherPoint - M (GPIO,VSS_NCTF,RSVD)
R349 100K_04
R359 1.5K_1%_04
R198 100K_04
R171 200K_04
TEST_SET_UP
CPU/MISC
NCTF
GPIO
U20F
PANTHER POI NT H M77 MP
GPIO2 7
E16
GPIO2 8
P8
GPIO2 4
E8
GPIO5 7
D6
LAN_PHY_PWR_CTRL / GPIO12
C4
VSS_NCTF_1
A4
VSS_NCTF_2
A44
VSS_NCTF_3
A45
VSS_NCTF_4
A46
VSS_NCTF_5
A5
VSS_NCTF_6
A6
VSS_NCTF_7
B3
VSS_NCTF_8
B47
VSS_NCTF_9
BD1
VSS_NCTF_10
BD49
VSS_NCTF_11
BE1
VSS_NCTF_12
BE49
TACH2 / GPIO6
H36
TACH0 / GPIO17
D40
TACH3 / GPIO7
E38
SATA3GP / GPIO 37
M5
SATA5GP / GPIO49 / TEMP_ALERT#
V3
SCLOCK / GPIO22
T5
SLOAD / GPI O38
N2
SDATAOUT0 / GPIO39
M3
SDATAOUT1 / GPIO48
V13
PROCPW RGD
AY11
RCIN#
P5
PECI
AU16
THRMTRIP #
AY10
GPIO8
C10
BMBUSY# / GPIO0
T7
GPIO1 5
G2
TACH1 / GPIO1
A42
SATA2GP / GPIO 36
V8
INIT3_3V#
T14
STP_PCI# / GPI O34
K1
GPIO3 5
K4
SATA4GP / GPIO 16
U2
VSS_NCTF_32
F49
A20GATE
P4
TACH4 / GPIO68
C40
TACH6 / GPIO70
C41
TACH7 / GPIO71
A40
TACH5 / GPIO69
B41
VSS_NCTF_17
BH3
VSS_NCTF_18
BH47
VSS_NCTF_19
BJ4
VSS_NCTF_20
BJ44
VSS_NCTF_21
BJ45
VSS_NCTF_22
BJ46
VSS_NCTF_23
BJ5
VSS_NCTF_24
BJ6
VSS_NCTF_25
C2
VSS_NCTF_26
C48
VSS_NCTF_27
D1
VSS_NCTF_28
D49
VSS_NCTF_29
E1
VSS_NCTF_30
E49
VSS_NCTF_31
F1
TS_VSS4
AK10
TS_VSS3
AH10
TS_VSS2
AK11
TS_VSS1
AH8
NC_1
P37
VSS_NCTF_13
BF1
VSS_NCTF_14
BF49
VSS_NCTF_15
BG2
VSS_NCTF_16
BG48
DF_TVS
AY1
RN5
10K_8P4R_04
1
2
3
4 5
6
7
8
3.3V
1.05VS
3.3VS
3.3VS
3.3VS
3.3VS
3.3V
3.3V
1.8VS
3.3VS
GA20 28
KBC_RST# 28
H_PECI 3, 28,29
SCI#28
H_THRMTRIP# 3
DGPU_PWROK
SMI#16,28
SATA_ODD_PRSNT#25
CRIT_TEMP_REP#28
MFG_MOD E
SB_BLON11
SATA_OD D_PW RGT 25
SATA_ODD_PRSNT#
ODD_DETECT# 12
H_SN B_IVB# 3, 29
BIOS_R EC
R358 1K_04
R212 390_1%_06
R350 2.2K_04
R323 *10K_04
H_CPUPWRGD 3,29
TEST_D ETTEST_DET
S_GPIO
R202 *100K_1%_04
R108 1K_04
R320 1K_04
R353 *10K_04
LED_DGPU#
R329 10K_04
R343 10K_04
R356 1K_04
R326 10K_04
LED_DGPU#
R197 *10mil_s hort_04
R153 *10mil_s hort_04
R148 *10mil_s hort_04
R165 *10mil_s hort_04
R122 100K_04
R128 *1K_04
R239 *0_04
R235 *10K_04
R133
*0_04
R325 *10K_04
R328
100K_04
R124 10K_04
R316 *10K_04
R317
1K_04
R314 10K_04
R120 *0_04
INT_PIRQC# 16
INT_PIRQC#
Sheet 17 of 42
PCH 6/9- GPIO,
CPU
PCH 6/9- GPIO, CPU
B.Schematic Diagrams
B - 18 PCH 6/9- GPIO, CPU
Page 71
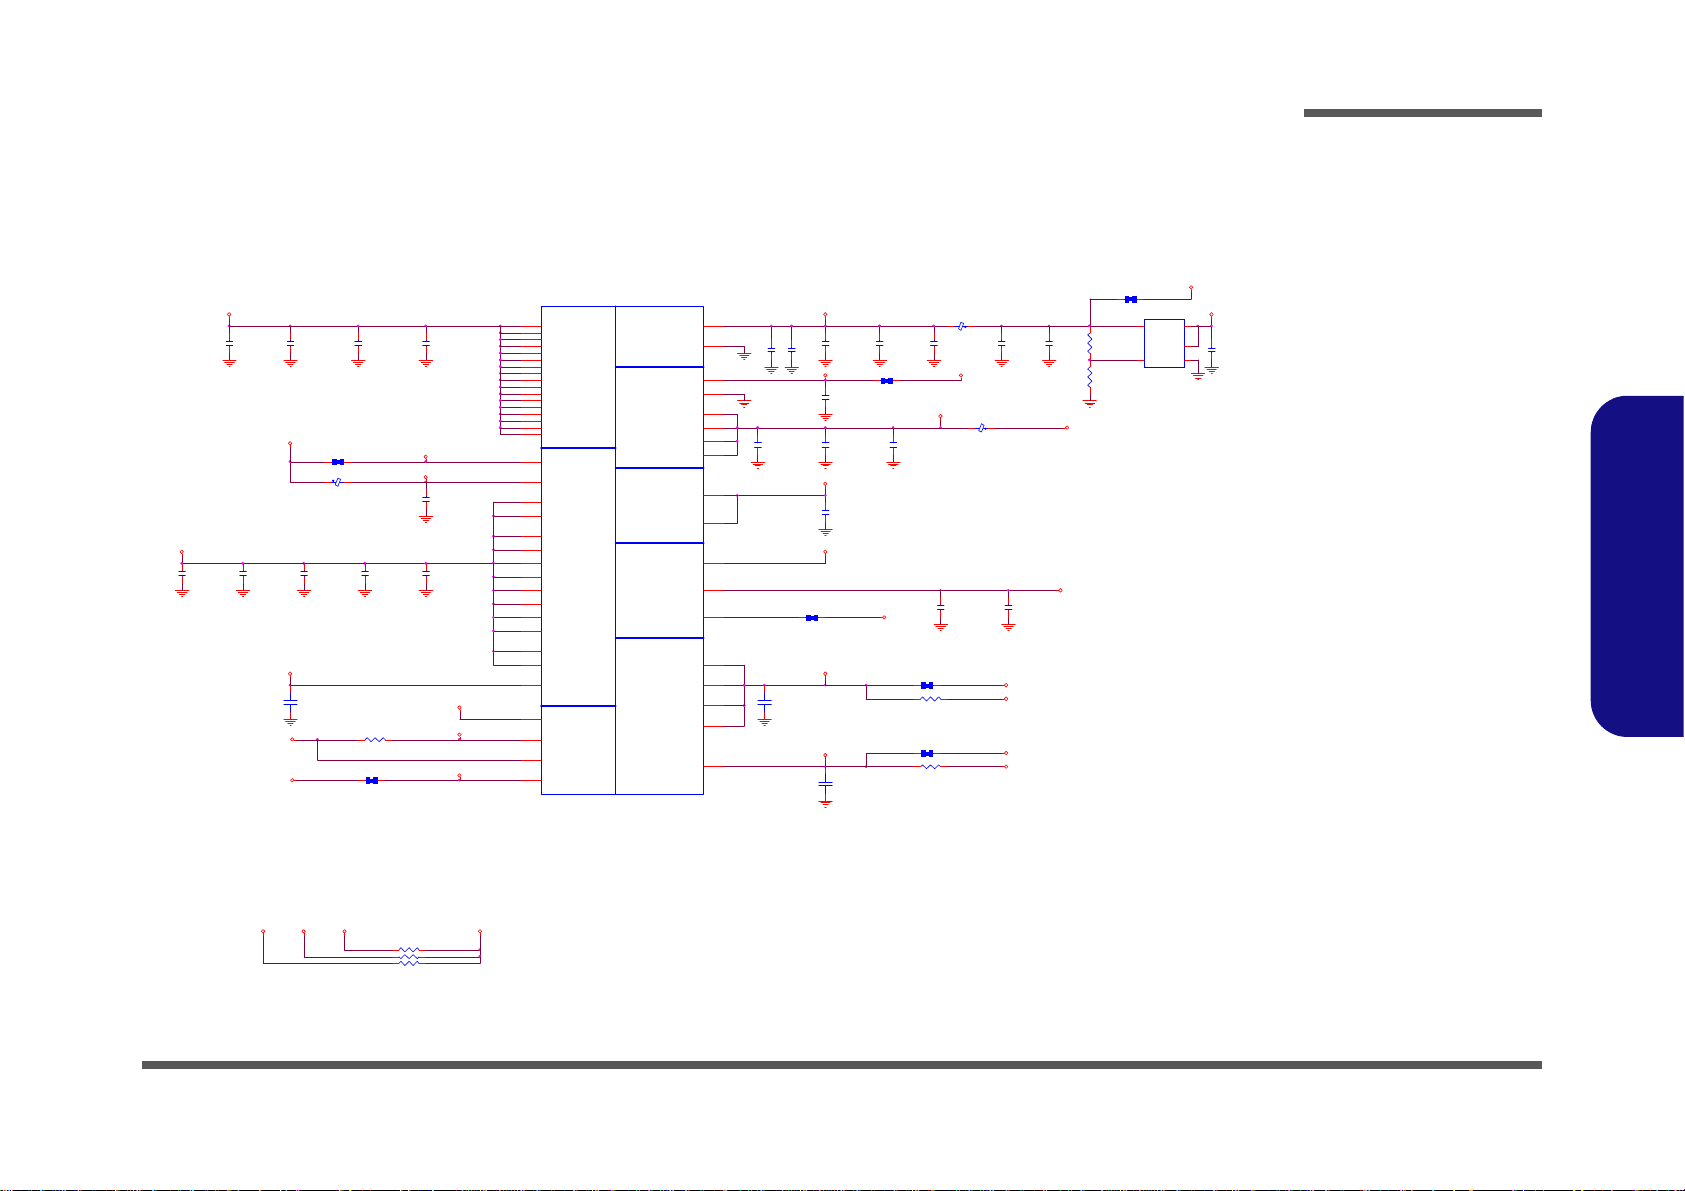
R342 *10 mil_sh ort_04
R377 *20mil_04
C266
*22u_6.3V_X5R _08
L17 *15mil_s hort_06
C395
22u_6.3V_X5R_08
C250
0.01u_16V_X7R_04
C247
0.01u_16V_X7R_04
C251
10u_6.3V_X5R_06
R250 *15mil_sh ort_06
C249
0.1u_10V_X5R_04
C235
*1u_6. 3V_X5R_04
C246
0.01u_16V_X7R_04
C230
1u_6.3V_X5R_04
C245
10u_6.3V_X5R_08
R242 *15mil_sh ort_06
C224
1u_6.3V_X5R_04
C229
1u_6.3V_X5R_04
C234
10u_6.3V_X5R_08
C244
1u_6.3V_X5R_04
C214
*1u_6.3V_X5R_04
C221
0.1u_10V_X5R_04
R261
*10K_1%_04
C268
*1u_6.3V_Y5V_04
C270
*0.1u_10V_X5R_04
R259
*23.7K_1%_04
C273
22u_6.3V_X5R_08
U10
*APL5603-33B
IN
1
SET4GND
2
SHDN#
3
OUT
5
R376 *0_04
R375 *0_04
L32 HCB1608KF-121T25
C228
1u_6.3V_X5R_04
C209
1u_6.3V_X5R_04
C261
10u_6.3V_X5R_08
C223
1u_6.3V_X5R_04
L15 H CB1608KF-121T25
L13 * HCB1005KF -121T20
R225 *15mil_s hort_06
C258
*10u_6.3V_X5R_06
R159 *15m il_shor t_06
R245 *15mil_short_06
R345 *0_04
POWER
VCC CORE
DMI
VCCIO
CRTLVDS
FDI
DFT / SPI HVCMOS
U20G
PANTHER POINT HM77 MP
VCCCORE[1]
AA23
VCCCORE[2]
AC23
VCCCORE[3]
AD21
VCCCORE[4]
AD23
VCCCORE[5]
AF21
VCCCORE[6]
AF23
VCCCORE[7]
AG21
VCCCORE[8]
AG23
VCCCORE[9]
AG24
VCCCORE[10]
AG26
VCCCORE[11]
AG27
VCCCORE[12]
AG29
VCCCORE[13]
AJ23
VCCCORE[14]
AJ26
VCCCORE[15]
AJ27
VCCDFTERM[4]
AJ17
VCCDFTERM[3]
AJ16
VCCIO[17]
AN21
VCCIO[18]
AN26
VCCIO[19]
AN27
VCCIO[20]
AP21
VCCIO[23]
AP26
VCCIO[24]
AT24
VCCIO[15]
AN16
VCCIO[16]
AN17
VCCIO[21]
AP23
VCCIO[22]
AP24
VCCADAC
U48
VCCTX_LVDS[1]
AM37
VCCTX_LVDS[2]
AM38
VCCALVDS
AK36
VCCVRM[3]
AT16
VCCVRM[2]
AP16
VCCAPLLEXP
BJ22
VccAFDIPLL
BG6
VCCIO[28]
AN19
VCCTX_LVDS[4]
AP37
VCCTX_LVDS[3]
AP36
VSSADA C
U47
VSSALVDS
AK37
VCCIO[27]
AP17
VCC3_3[6]
V33
VCC3_3[7]
V34
VCC3_3[3]
BH29
VCCDFTERM[2]
AG17
VCCDFTERM[1]
AG16
VCCDMI[1]
AT20
VCCIO[25]
AN33
VCCIO[26]
AN34
VCCCORE[16]
AJ29
VCCCORE[17]
AJ31
VCCSPI
V1
VCCCLKDMI
AB36
VCCDMI[2]
AU20
C255
0.1u_10V_X5R_04
R154 *0_04
1.05VS
1.5VS 1.5VS_1.8VS
1.05VS_VCC APLL_EXP1
1.05VS
1.05S_VCC_DMI
1.5VS_ 1.8VS
1.05VS
3.3VS
1.05VS
VCCA_D AC_3.3 VS
1.8VS_VC CTX_LVD
1.8VS
1.05VS
3.3VS
VCCME3.3V
3.3VS
1.8VS
V_NVRAM_VCCQ3.3VS
3.3VS
3.3V
3.3VS3.3VS_VCCA_LVD
1.05VS 1.8VS
1.05VS_VCCAPLL_FDI
1.5VS_1. 8VS
1.05VS
5VS
1.05VS
1.05VS_VCC APLL_EXP
160mA
190mA
VCCCLKDMI
42mA
PantherPoint -M (POWER)
266mA
42mA
160mA
1.3A
2.92A
266mA
SET
1mA
2mA
2.93A
APL5603-33B 6-02-56033-4C0
G9091-330T11UF 6-02-90913-4C0
20mA
1mA
C206
0.1u_10V_X5R_04
R218 *0_06
C373
1u_6.3V_X5R_04
60mA
C252
22u_6.3V_X5R_08
Sheet 18 of 42 PCH 7/9- PWR
PCH 7/9- PWR
Schematic Diagrams
B.Schematic Diagrams
PCH 7/9- PWR B - 19
Page 72
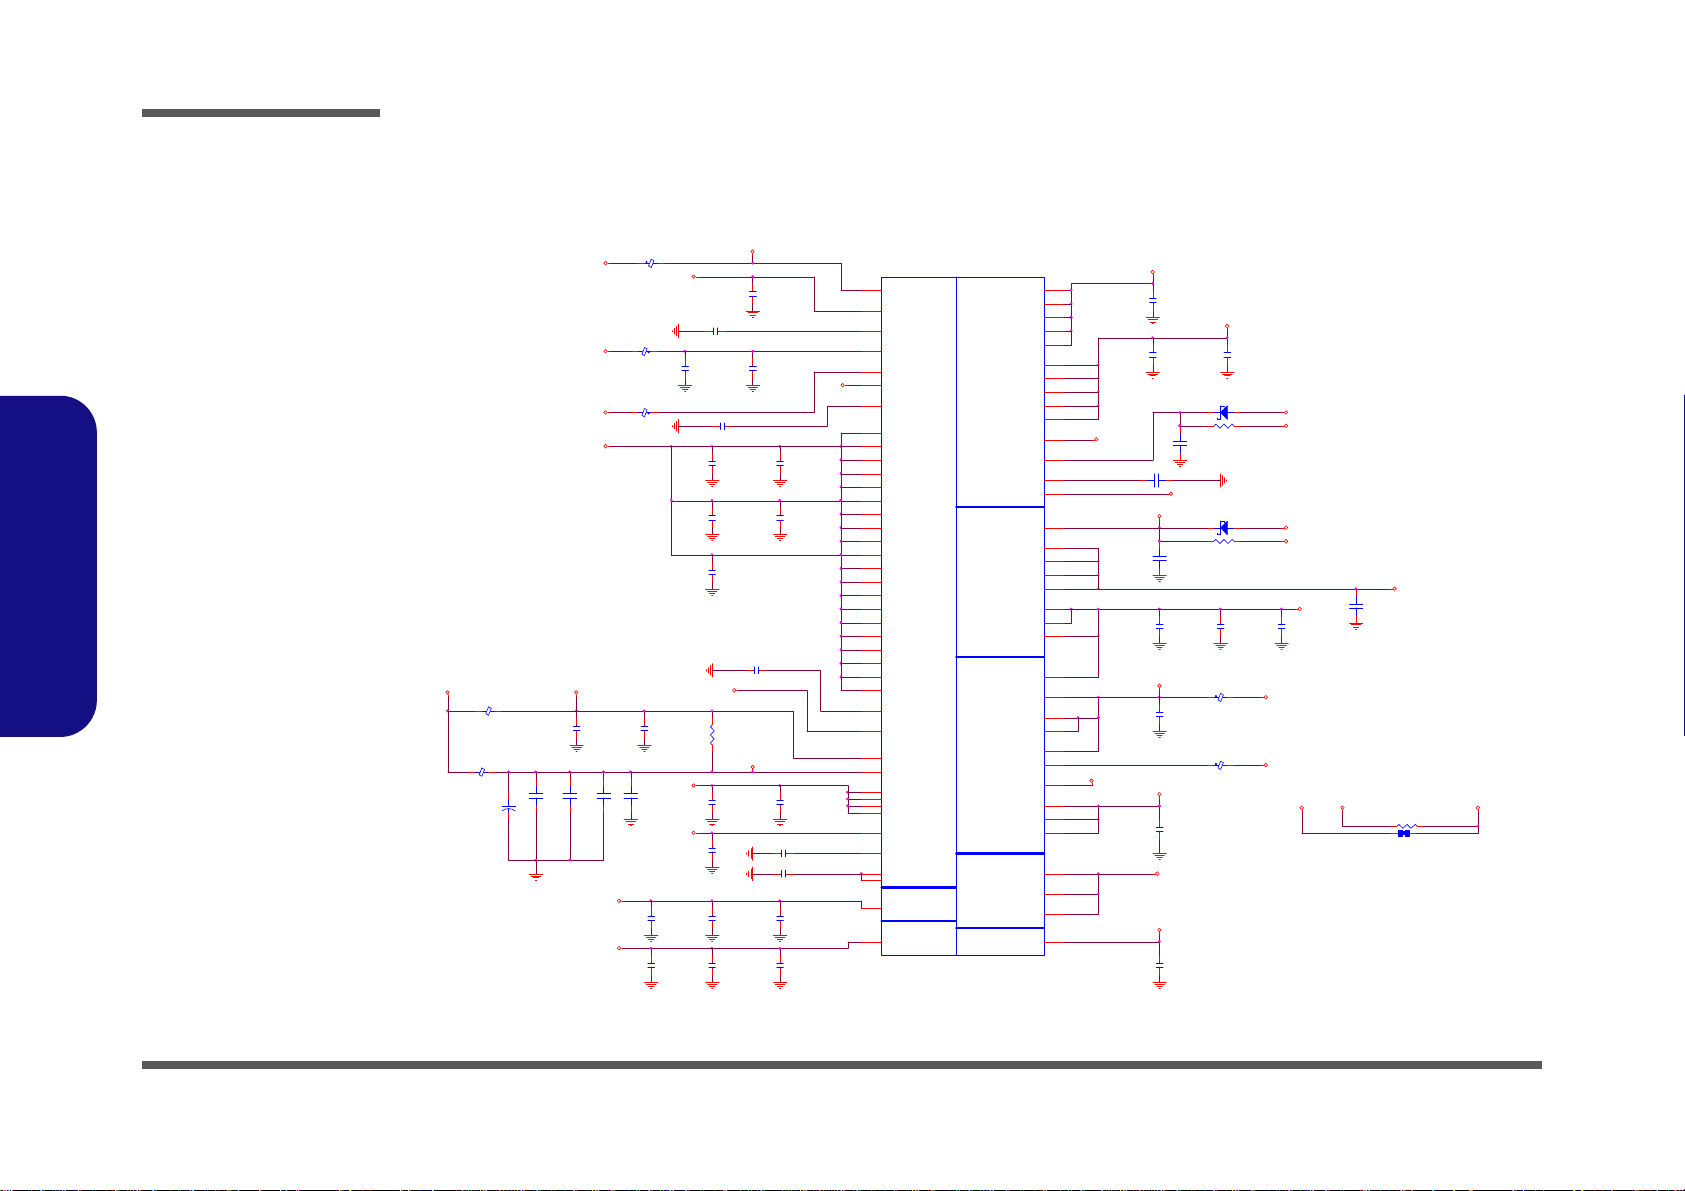
Schematic Diagrams
C219
1u_6.3V_X5R_04
C208
1u_6.3V_X5R_04
C215
22u_6.3V_X5R_08
C205
*22u_6.3V_X5R_08
C191
1u_6.3V_X5R_04
C197
0.1u_10V_X5R_04
C201
1u_6.3V_X5R_04
C182
0.1u_10V_X5R_04
C210
0.1u_10V_X5R_04
C187
*0.1u_10V_X5R_04
L11
HCB1005KF-121T20
C194
1u_6.3V_X5R_04
C195
0.1u_10V_X5R_04
L30
*HCB1005KF -121T20
R339 * 15mil_s hort_06
C181 0.1u_10V_ X5R_04
C275
1u_6.3V_X5R_04
C277
22u_6.3V_X5R_08
C180 *0. 1u_10V_X5R_04
C222
0.1u_10V_X5R_04
C220
*0.1u_10V_X5R_04
C213
4.7u_6.3V_X5R_06
C231
1u_6.3V_X5R_04
C190
0.1u_10V_X5R_04
C198
0.1u_10V_X5R_04
80mA
VCCAPLL_CPY_PCH
PCH_VCCDSW
150mA
16mA
16mA
D13 RB751S-40C2
AC
C372
0.1u_10V_X5R_04
C370
1u_6.3 V_X5R_04
C371
*0.1u_10V_X5R_04
D3 RB751S-40C2
AC
C233
10u_6.3V_X5R_06
R335 10_1%_04
C232
1u_6.3V_X5R_04
C269
1u_6.3V_X5R_04
L12
HCB1608KF-121T25
.
L20
HCB1608KF-121T25
C272
*22u_6.3V_X5R _08
C189
0.1u_10V_X5R_04
C271
22u_6.3V_X5R_08
C218 *1u_6.3V_X5R_04
DCPSUS
POWER
SATA USB
Clock and Miscellaneous
HDA
CPURTC
PCI/GPIO /LPCMISC
U20J
PANTHER POINT HM77 MP
DCPSUSBYP
V12
VCCASW [1]
AA19
VCCASW [2]
AA21
VCCASW [3]
AA24
VCCASW [5]
AA27
VCCASW [6]
AA29
VCCSU SHDA
P32
VCCSUS3_3[ 6]
P24
VCCIO[34]
T26
VCCIO[4]
AD17
VCCASW [7]
AA31
VCCASW [8]
AC26
VCCASW [9]
AC27
VCCASW [10]
AC29
VCCASW [11]
AC31
VCCASW [12]
AD29
V5REF
P34
VCC3_3[4]
T34
VCCRTC
A22
VCCSUS3_3[10]
V24
VCCSUS3_3[ 9]
V23
VCCSUS3_3[ 8]
T24
VCCSUS3_3[ 7]
T23
VCCIO[2]
AC16
VCCADPLLB
BF47
VCCDIFFCLKN[1]
AF33
V5REF_SUS
M26
VCCIO[3]
AC17
DCPSUS[1]
T17
VCCSSC
AG33
VCCADPLLA
BD47
VCCVRM[4]
Y49
VCCACLK
AD49
DCPRTC
N16
VCCASW [4]
AA26
VCCDIFFCLKN[2]
AF34
VCCI O[7]
AF17
DCPSST
V16
VCCIO[5]
AF13
VCCASW [22]
T21
VCCASW [23]
V21
VCCASW [21]
T19
VCC3_3[1]
AA16
VCC3_3[8]
W16
VCCSUS3_3[ 2]
N20
VCCSUS3_3[ 3]
N22
VCCSUS3_3[ 4]
P20
VCCSUS3_3[ 5]
P22
VCCIO[29]
N26
VCCIO[30]
P26
VCCIO[31]
P28
VCCIO[32]
T27
V_PROC_I O
BJ8
VCCIO[33]
T29
VCCDIFFCLKN[3]
AG34
VCCASW [13]
AD31
VCCASW [14]
W21
VCCASW [15]
W23
VCCASW [16]
W24
VCCASW [17]
W26
VCCASW [18]
W29
VCCASW [19]
W31
VCCASW [20]
W33
VCCIO[6]
AF14
VCCVRM[1]
AF11
VCCIO[12]
AH13
VCCIO[13]
AH14
VCC3_3[2]
AJ2
VCCAPLL SATA
AK1
DCPSUS[3]
AL24
VCCI O[14]
AL29
DCPSUS[4]
AN23
VCCSUS3_3[ 1]
AN24
VCCAPLL DMI2
BH23
DCPSUS[2]
V19
VCCDSW 3_3
T16
VCC3_3[ 5]
T38
R143 10_1%_04
.
L22
HCB1608KF-121T25
C204
1u_6.3V_X5R_04
C276
*22u_6.3V_X5R_0 8
L29
*HCB1005KF -121T20
C188
1u_6.3V_X5R_04
R341 *0_0 6
5VS
3.3V
3.3V
5VS_PCH_VCC5REFSUS
3.3VS
1.05VS
RTCVCC
1.05VS
3.3A_1.5A_HDA_IO
1.05VS
3.3V
5V
3.3VS
1.05VS
1.05VS
1.05S_SATA 3
3.3V
1.05VS
1.05VS_VC CA_CL K
1.05VS
1.05VS
1.05VS
1.05VS
1.5VS_1.8VS
1.5VS_1.8VS
1.05VS
1.05VS_VCCA_B_D PL
1.05VS
1.05VS_VCCA_A_D PL
3.3VS
1.05VS
3.3V 3.3A_1. 5A_HDA_I O
3.3V
1.05VS
<1mA
1.5V
PantherPoint - M (POWER)
2mA
1.01A
266mA
1.01A
97mA
1.05VS_VCCA PLL_SATA3
1mA
80mA
+
C430
*220u_6.3V_6. 3*6.3* 4.2
VCCSST
97mA
L16 *HC B1608KF-121T25
C216 *0. 1u_16V_Y5V_04
3mA
2.92A
VCC3_3
1mA
2.92A
266mA
5VA_PCH_VCC5REFSUS
VCCR TCEXT
1.05M_VCCSUS
VCCA_USBSUS
R258
*0_04
C200
1u_6.3V_X5R_04
C227
1u_6.3V_X5R_04
C193 *1u_6. 3V_X5R_04
C186 0.1u_10V_X5R_04
C196
1u_6.3V_X5R_04
Sheet 19 of 42
PCH 8/9 POWER
PCH 8/9 POWER
B.Schematic Diagrams
B - 20 PCH 8/9 POWER
Page 73
PCH 9/9- GND
Sheet 20 of 42 PCH 9/9- GND
Voltage Rail Voltage S0 Iccmax Current ( A)
V_CPU_IO 1.05 1 (mA)
V5REF 5 1 (mA)
V5REF_Sus 5 1 (mA)
Vcc3_3 3.3 0.266
VccADAC3 1.05 1 (mA)
VccADPLLA 1.05 0.0 8
VccADPLLB 1.05 0.0 8
VccCore 1.05 1.3
VccDMI 1.1 0.042
VccIO 1.05 2.9 25
VccASW 1.05 1.01
VccSPI 3.3 0.020
VccDSW3_3 3.3 2 (mA)
VccDFTERM 1.8 0.19
VccSus3_3 3.3 0.097
VccSusHDA 3.3 1 (mA)
VccVRM 1.5 0.16
VccClKDMI 1.05 0.02
VccSSC 1.05 0.095
VccDIFFCLKN 1.05 0.055
VccALVDS 3.3 1 (mA)
VccTX_LVDS 1.8 0.06
U20I
PANTHER POINT HM77 MP
VSS[159]
AY4
VSS[160]
AY42
VSS[161]
AY46
VSS[162]
AY8
VSS[163]
B11
VSS[164]
B15
VSS[165]
B19
VSS[166]
B23
VSS[167]
B27
VSS[168]
B31
VSS[169]
B35
VSS[170]
B39
VSS[171]
B7
VSS[173]
BB12
VSS[174]
BB16
VSS[175]
BB20
VSS[176]
BB22
VSS[177]
BB24
VSS[178]
BB28
VSS[179]
BB30
VSS[180]
BB38
VSS[181]
BB4
VSS[182]
BB46
VSS[183]
BC14
VSS[184]
BC18
VSS[185]
BC2
VSS[186]
BC22
VSS[187]
BC26
VSS[188]
BC32
VSS[189]
BC34
VSS[190]
BC36
VSS[191]
BC40
VSS[192]
BC42
VSS[193]
BC48
VSS[194]
BD46
VSS[195]
BD5
VSS[196]
BE22
VSS[197]
BE26
VSS[198]
BE40
VSS[199]
BF10
VSS[200]
BF12
VSS[201]
BF16
VSS[202]
BF20
VSS[203]
BF22
VSS[204]
BF24
VSS[205]
BF26
VSS[206]
BF28
VSS[207]
BD3
VSS[208]
BF30
VSS[209]
BF38
VSS[210]
BF40
VSS[211]
BF8
VSS[212]
BG17
VSS[213]
BG21
VSS[214]
BG33
VSS[215]
BG44
VSS[216]
BG8
VSS[217]
BH11
VSS[218]
BH15
VSS[219]
BH17
VSS[220]
BH19
VSS[222]
BH27
VSS[223]
BH31
VSS[224]
BH33
VSS[225]
BH35
VSS[226]
BH39
VSS[227]
BH43
VSS[228]
BH7
VSS[229]
D3
VSS[230]
D12
VSS[231]
D16
VSS[232]
D18
VSS[233]
D22
VSS[234]
D24
VSS[235]
D26
VSS[236]
D30
VSS[237]
D32
VSS[264]
K7
VSS[265]
L18
VSS[266]
L2
VSS[267]
L20
VSS[268]
L26
VSS[269]
L28
VSS[270]
L36
VSS[271]
L48
VSS[272]
M12
VSS[273]
P16
VSS[274]
M18
VSS[275]
M22
VSS[276]
M24
VSS[277]
M30
VSS[278]
M32
VSS[279]
M34
VSS[280]
M38
VSS[281]
M4
VSS[282]
M42
VSS[283]
M46
VSS[284]
M8
VSS[285]
N18
VSS[286]
P30
VSS[288]
P11
VSS[289]
P18
VSS[290]
T33
VSS[291]
P40
VSS[292]
P43
VSS[293]
P47
VSS[294]
P7
VSS[295]
R2
VSS[296]
R48
VSS[297]
T12
VSS[298]
T31
VSS[299]
T37
VSS[300]
T4
VSS[301]
W34
VSS[302]
T46
VSS[303]
T47
VSS[304]
T8
VSS[305]
V11
VSS[306]
V17
VSS[307]
V26
VSS[308]
V27
VSS[309]
V29
VSS[310]
V31
VSS[311]
V36
VSS[312]
V39
VSS[313]
V43
VSS[314]
V7
VSS[315]
W17
VSS[316]
W19
VSS[238]
D34
VSS[239]
D38
VSS[240]
D42
VSS[241]
D8
VSS[242]
E18
VSS[243]
E26
VSS[244]
G18
VSS[245]
G20
VSS[246]
G26
VSS[247]
G28
VSS[248]
G36
VSS[249]
G48
VSS[250]
H12
VSS[251]
H18
VSS[317]
W2
VSS[318]
W27
VSS[319]
W48
VSS[320]
Y12
VSS[321]
Y38
VSS[322]
Y4
VSS[323]
Y42
VSS[324]
Y46
VSS[325]
Y8
VSS[328]
BG29
VSS[329]
N24
VSS[330]
AJ3
VSS[287]
N47
VSS[252]
H22
VSS[253]
H24
VSS[254]
H26
VSS[255]
H30
VSS[256]
H32
VSS[257]
H34
VSS[258]
F3
VSS[262]
K39
VSS[263]
K46
VSS[259]
H46
VSS[260]
K18
VSS[261]
K26
VSS[331]
AD47
VSS[333]
B43
VSS[334]
BE10
VSS[335]
BG41
VSS[337]
G14
VSS[338]
H16
VSS[340]
T36
VSS[342]
BG22
VSS[343]
BG24
VSS[344]
C22
VSS[345]
AP13
VSS[172]
F45
VSS[221]
H10
VSS[346]
M14
VSS[347]
AP3
VSS[348]
AP1
VSS[349]
BE16
VSS[350]
BC16
VSS[351]
BG28
VSS[352]
BJ28
U20H
PANTHER POINT HM77 MP
VSS[1]
AA17
VSS[2]
AA2
VSS[3]
AA3
VSS[5]
AA34
VSS[6]
AB11
VSS[7]
AB14
VSS[8]
AB39
VSS[9]
AB4
VSS[10]
AB43
VSS[11]
AB5
VSS[12]
AB7
VSS[13]
AC19
VSS[14]
AC2
VSS[15]
AC21
VSS[16]
AC24
VSS[17]
AC33
VSS[18]
AC34
VSS[19]
AC48
VSS[20]
AD10
VSS[21]
AD11
VSS[22]
AD12
VSS[23]
AD13
VSS[24]
AD19
VSS[25]
AD24
VSS[26]
AD26
VSS[27]
AD27
VSS[28]
AD33
VSS[29]
AD34
VSS[30]
AD36
VSS[31]
AD37
VSS[33]
AD39
VSS[34]
AD4
VSS[35]
AD40
VSS[36]
AD42
VSS[37]
AD43
VSS[38]
AD45
VSS[39]
AD46
VSS[43]
AF10
VSS[44]
AF12
VSS[46]
AD16
VSS[47]
AF16
VSS[48]
AF19
VSS[49]
AF24
VSS[50]
AF26
VSS[51]
AF27
VSS[52]
AF29
VSS[53]
AF31
VSS[54]
AF38
VSS[55]
AF4
VSS[56]
AF42
VSS[57]
AF46
VSS[59]
AF7
VSS[60]
AF8
VSS[61]
AG19
VSS[62]
AG2
VSS[63]
AG31
VSS[64]
AG48
VSS[65]
AH11
VSS[66]
AH3
VSS[67]
AH36
VSS[68]
AH39
VSS[69]
AH40
VSS[70]
AH42
VSS[71]
AH46
VSS[72]
AH7
VSS[73]
AJ19
VSS[76]
AJ33
VSS[77]
AJ34
VSS[78]
AK12
VSS[79]
AK3
VSS[80]
AK38
VSS[81]
AK4
VSS[82]
AK42
VSS[83]
AK46
VSS[84]
AK8
VSS[85]
AL16
VSS[86]
AL17
VSS[87]
AL19
VSS[88]
AL2
VSS[89]
AL21
VSS[90]
AL23
VSS[91]
AL26
VSS[92]
AL27
VSS[93]
AL31
VSS[96]
AL48
VSS[97]
AM11
VSS[98]
AM14
VSS[99]
AM36
VSS[100]
AM39
VSS[102]
AM45
VSS[103]
AM46
VSS[104]
AM7
VSS[105]
AN2
VSS[106]
AN29
VSS[107]
AN3
VSS[108]
AN31
VSS[109]
AP12
VSS[110]
AP19
VSS[111]
AP28
VSS[112]
AP30
VSS[113]
AP32
VSS[114]
AP38
VSS[116]
AP42
VSS[117]
AP46
VSS[118]
AP8
VSS[119]
AR2
VSS[120]
AR48
VSS[121]
AT11
VSS[122]
AT13
VSS[123]
AT18
VSS[124]
AT22
VSS[125]
AT26
VSS[126]
AT28
VSS[127]
AT30
VSS[128]
AT32
VSS[131]
AT42
VSS[132]
AT46
VSS[133]
AT7
VSS[134]
AU24
VSS[135]
AU30
VSS[136]
AV16
VSS[137]
AV20
VSS[138]
AV24
VSS[139]
AV30
VSS[140]
AV38
VSS[141]
AV4
VSS[142]
AV43
VSS[143]
AV8
VSS[144]
AW14
VSS[145]
AW18
VSS[146]
AW2
VSS[147]
AW22
VSS[148]
AW26
VSS[149]
AW28
VSS[150]
AW32
VSS[151]
AW34
VSS[152]
AW36
VSS[153]
AW40
VSS[154]
AW48
VSS[155]
AV11
VSS[156]
AY12
VSS[157]
AY22
VSS[158]
AY28
VSS[40]
AD8
VSS[42]
AE3
VSS[45]
AD14
VSS[115]
AP4
VSS[0]
H5
VSS[58]
AF5
VSS[32]
AD38
VSS[4]
AA33
VSS[74]
AJ21
VSS[75]
AJ24
VSS[41]
AE2
VSS[129]
AT34
VSS[130]
AT39
VSS[101]
AM43
VSS[95]
AL34
VSS[94]
AL33
PantherPoint -M (GND)
Schematic Diagrams
B.Schematic Diagrams
PCH 9/9- GND B - 21
Page 74
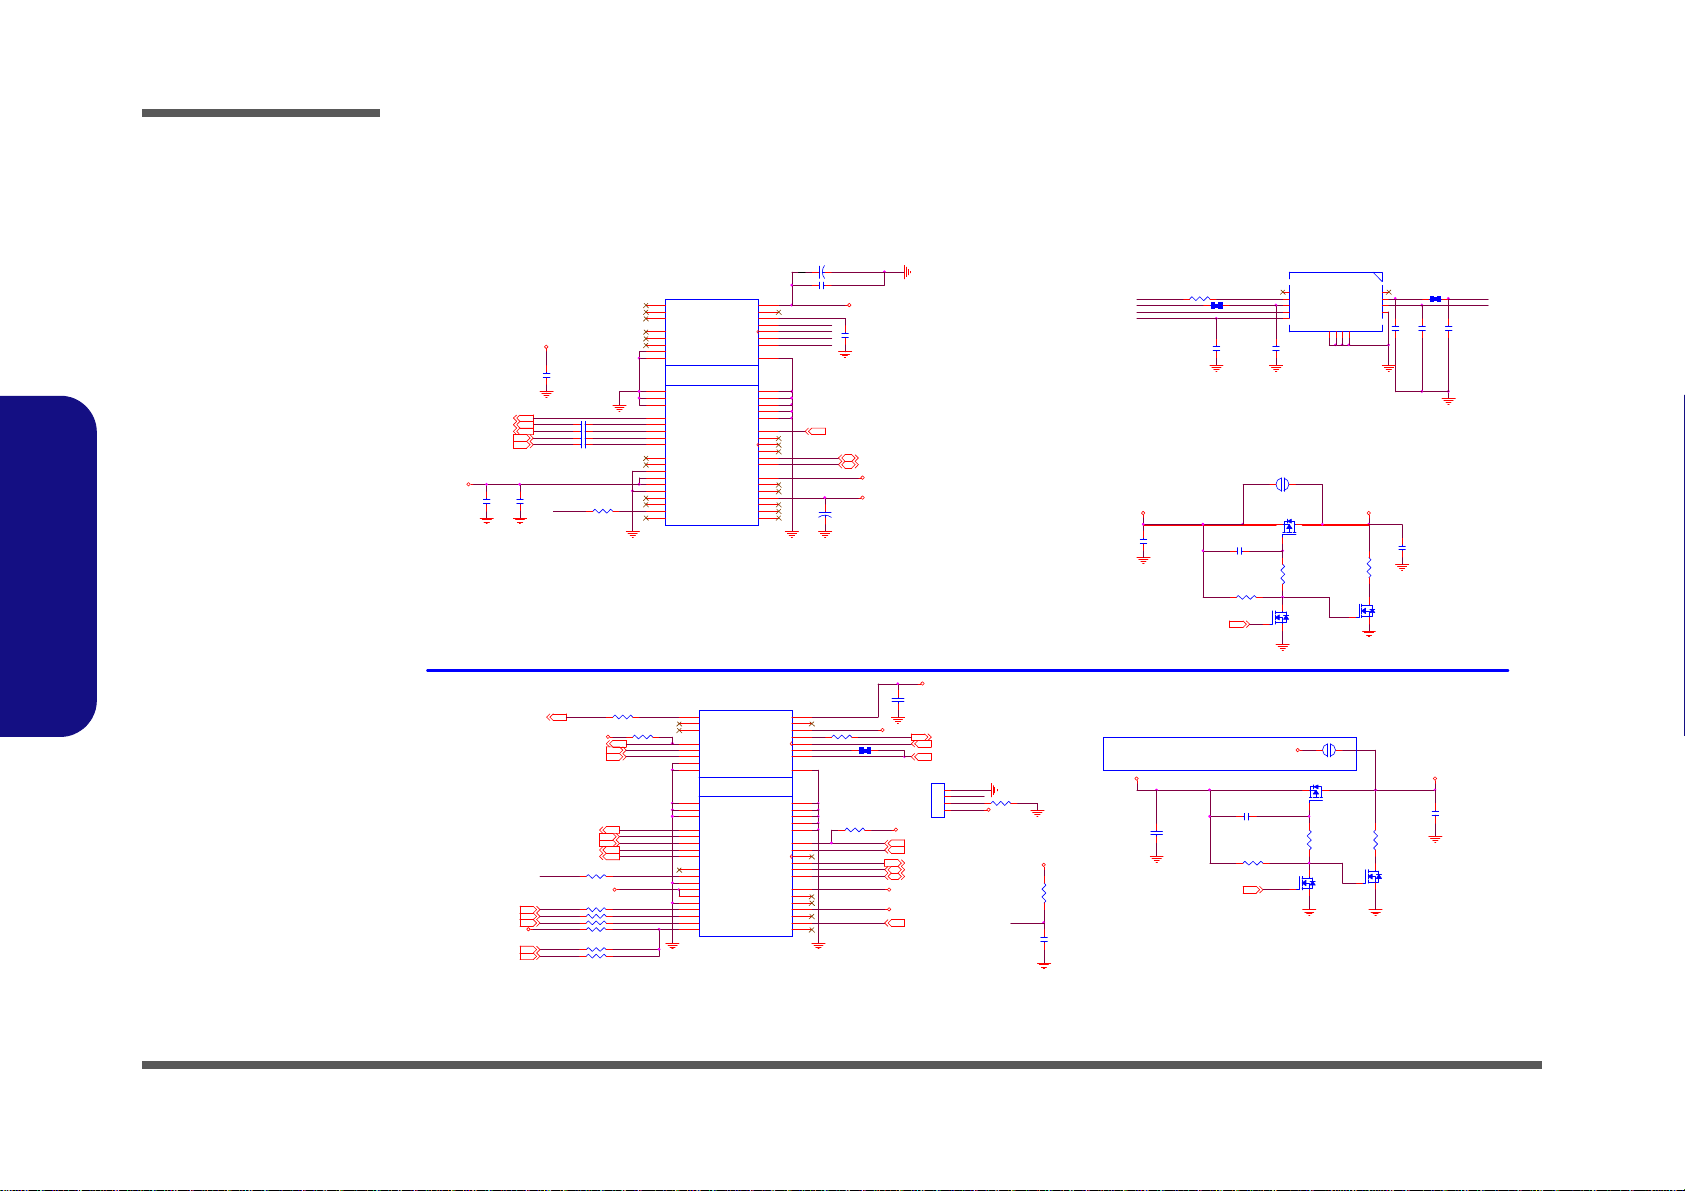
Schematic Diagrams
KEY
J_3G1
88914-5204
BT_DATA
3
BT_CHCLK
5
CLKREQ#
7
GND0
9
REFCLK-
11
REFCLK+
13
WAKE#
1
GND1
15
PETn0
23
PETp0
25
GND2
21
GND3
27
PERn0
31
PERp0
33
GND4
29
NC3
17
NC4
19
W_DISABLE #
20
NC6
37
NC7
39
NC8
41
NC9
43
NC10
45
NC11
47
NC12
49
NC13
51
LED_WLAN #
44
NC(LED_WWAN#)
42
GND6
18
UIM_VPP
16
UIM_RESET
14
3.3V_0
2
UIM_CLK
12
UIM_DATA
10
UIM_PWR
8
1.5V_0
6
GND5
4
PERSET#
22
3.3VAUX
24
GND7
26
1.5V_1
28
NC(SMB_CLK)
30
NC(SMB_DATA)
32
GND8
34
NC(USB_D -)
36
NC(USB_D+)
38
GND9
40
NC(LED_WPAN#)
46
1.5V_2
48
GND10
50
3.3V_1
52
GND11
35
3G_EN
R415 *20K_04
3G_POWER_EN28
R44
10_06
3.3V
R291
20K_1%_04
R290
100K_04
C18
10u_6.3V_X5R_06
R6 *10mi l_short_04
+
C300 220u_6.3V_6.3*6.3*4.2
R432 *0_04
C323
1u_6.3V_X5R_04
CL_RST#1_R
PCIE_WAKE#14,24
WLAN_CLKREQ#13
BT_DET#
3IN1
60mils
60mils
60mils
BT_EN_R
J_80DBG1
85205-04001
1
2
3
4
C436
*180p_50V_NPO_04
(TOP VIEW)
J_SIM1
91712-0090P
UIM_DATA
7
UIM_VPP
4
UIM_GND
2
UIM_PWR
1
UIM_RST
3
UIM_CLK
5
GNG
GND1
UIM_I/O
6
UI M_MC MD
8
DETECT_SW
9
GND
GND2
GND
GND3
GND
GND4
R416 10K_04
R419 *0_04
R422
47K_04
R4 *4.7K_04
Bottom
6-34-M52NS-020-2
+
C299
220u_6.3V_6.3*6.3*4.2
WLAN MINI CARD
R5
*10mil_short_04
R423 *10K_04
3.3V_WLAN
3.3V_WLAN
3.3V
3.3V
3.3V_WLAN
VDD3
3.3V S
3G_3.3V
3G_3.3V
3G_3.3V
3G_3.3V
3G_3.3V
C12
*22p_50V_NPO_04
C28
0.1u_16V_Y5V_04
C11
*22p_50V_NPO_04
R417 *0_04
C13
*22p_50V_NPO_04
R444 *10K_04
C21
0.1u_16V_Y5V_04
C17
0.1u_16V_Y5V_04
C14
*22p_50V_NPO_04
C26
0.1u_16V_Y5V_04
R435 *0_04
R448 *0_04
R13 *0_04
C15
0.1u_16V_Y5V_04
R451 *20mil_04
C27 0.1u_16V_Y 5V_04
R424 *0_04
WLAN_DET#28
PCIE_TXN3_WLAN13
PCIE_TXP3_WLAN13
BT_DET# 28
BT_SBD# 13
3G_DET#28
C22 0.01u_16V_X7R_04
C19 0.01u_16V_X7R_04
C23 0.01u_16V_X7R_04
C20 0.01u_16V_X7R_04
USB_PN3 16
USB_PP3 16
USB_PN2 16
USB_PP2 16
3G POWER
From EC default HI
3A3A
3G_3. 3V
Q11
AO3415
G
DS
UIM_DATA
UIM_PWR
UIM_VPP
UIM_CLK
UIM_RST
Port 2
3G/MSATA MINI CARD
S
D
G
Q12A
MTDN7002ZHS6R
2
61
S
D
G
Q12B
MTDN7002ZHS6R
5
34
CL_DATA113
CL_RST#113
CL_CLK113
80CLK
UIM_CLK UIM_VPP
UIM_RST
UIM_D UIM_DATA
C433
0.1u_16V_Y5V_04
UIM_C
UIM_PWR
UIM_PWR UIM_DATA
80_DET#
PJ7
OPEN_2A
12
MSATA POWER
C423
*1u_6.3V_X5R_04
>120 mil
S
D
G
Q19A
*RT3K44M
2
61
WLAN POWER
(FOR INTEL SMART CONNECTOR)
>120 mil
S
D
G
Q19B
*RT3K44M
5
34
3.3V
Q20
*AO3415
G
DS
CLK_PCIE_WLAN13
CLK_PCIE_WLAN#13
C418
*0.1u_16V_Y5V_04
C439 *1u_6.3V_X5R_04
WLAN_EN 28
BUF _PLT_R ST# 16 ,24, 28
BT_EN25,28
3.3V_WLAN
R414
*20K_1%_04
WLAN_CON_POWER28
80CLK 28
BT_SBD#13
R413 *100K_04
3IN1 28
3G_EN 28
R397
*10_06
±±¨îPIN 2,24 ,39,41,52
±µ¨ìEC ,¶·»PEC ½T»{
PJ25
OPEN_2A
12
3.3V
¤£»ÝSUPPORT SMART CONNECTOR ®É,
¥iJUMP SHORT ¤U¤è¹s¥ó¤£¤W¥ó
SATA_TXP412
SATA_TXN412
SATA_RXP412
SATA_RXN412
R421 *0 _04
C320
1u_6.3V_X5R_04
WAKE#
3.3V
40 mil
CL_CLK1_R
20 mil
20 mil
20 mil
Port 3
R418 *10mil_short_04
WLAN_LED# 25
GND
GND
GND
GND GND
GND
GND
GND
GND
GND
GND
GNDGND
80CLK
3IN1
VDD3
SIM CONN
Layout®É
1. SIM¤§©Ò¦³«H¸¹½u¥[ ²Ê(10mil)
2. ©Ò¦³«H¸¹½u¤§¶¡¥[G ND
3. SIM hold ¥»Åé¥|©P¥[GND³ ò¶
4. SIM CONN ¾aªñ MINI CARD CONN
3.3V_WLAN
CL_DATA1_R
BT_EN
PCIE_RXN3_WLAN13
PCIE_RXP3_WLAN13
H=8mm
KEY
J_MINI1
88912-5204M-01
COEX1
3
COEX2
5
CLKREQ#
7
GND0
9
REFCLK-
11
REFCLK+
13
WAKE#
1
GND1
15
PETn0
23
PETp0
25
GND2
21
GND3
27
PERn0
31
PERp0
33
GND4
29
Reserv ed0
17
Reserv ed1
19
W_DISABLE#
20
GND12
37
3.3VAUX_3
39
3.3VAUX_4
41
GND13
43
Reserv ed2
45
Reserv ed3
47
Reserv ed4
49
Reserv ed5
51
LED_WLAN#
44
LED_WWAN#
42
GND6
18
UIM_VPP
16
UIM_RESET
14
3.3VAUX_0
2
UIM_CLK
12
UIM_DATA
10
UIM_PWR
8
1.5V_0
6
GND5
4
PERSET#
22
3.3VAUX_1
24
GND7
26
1.5V_1
28
SMB_CLK
30
SMB_DATA
32
GND8
34
USB_D-
36
USB_D+
38
GND9
40
LED_WPAN#
46
1.5V_2
48
GND10
50
3.3VAUX_2
52
GND11
35
H=6.5mm
PCH_BT_EN_#
Sheet 21 of 42
WLAN, 3G, MSATA
WLAN, 3G, MSATA
B.Schematic Diagrams
B - 22 WLAN, 3G, MSATA
Page 75
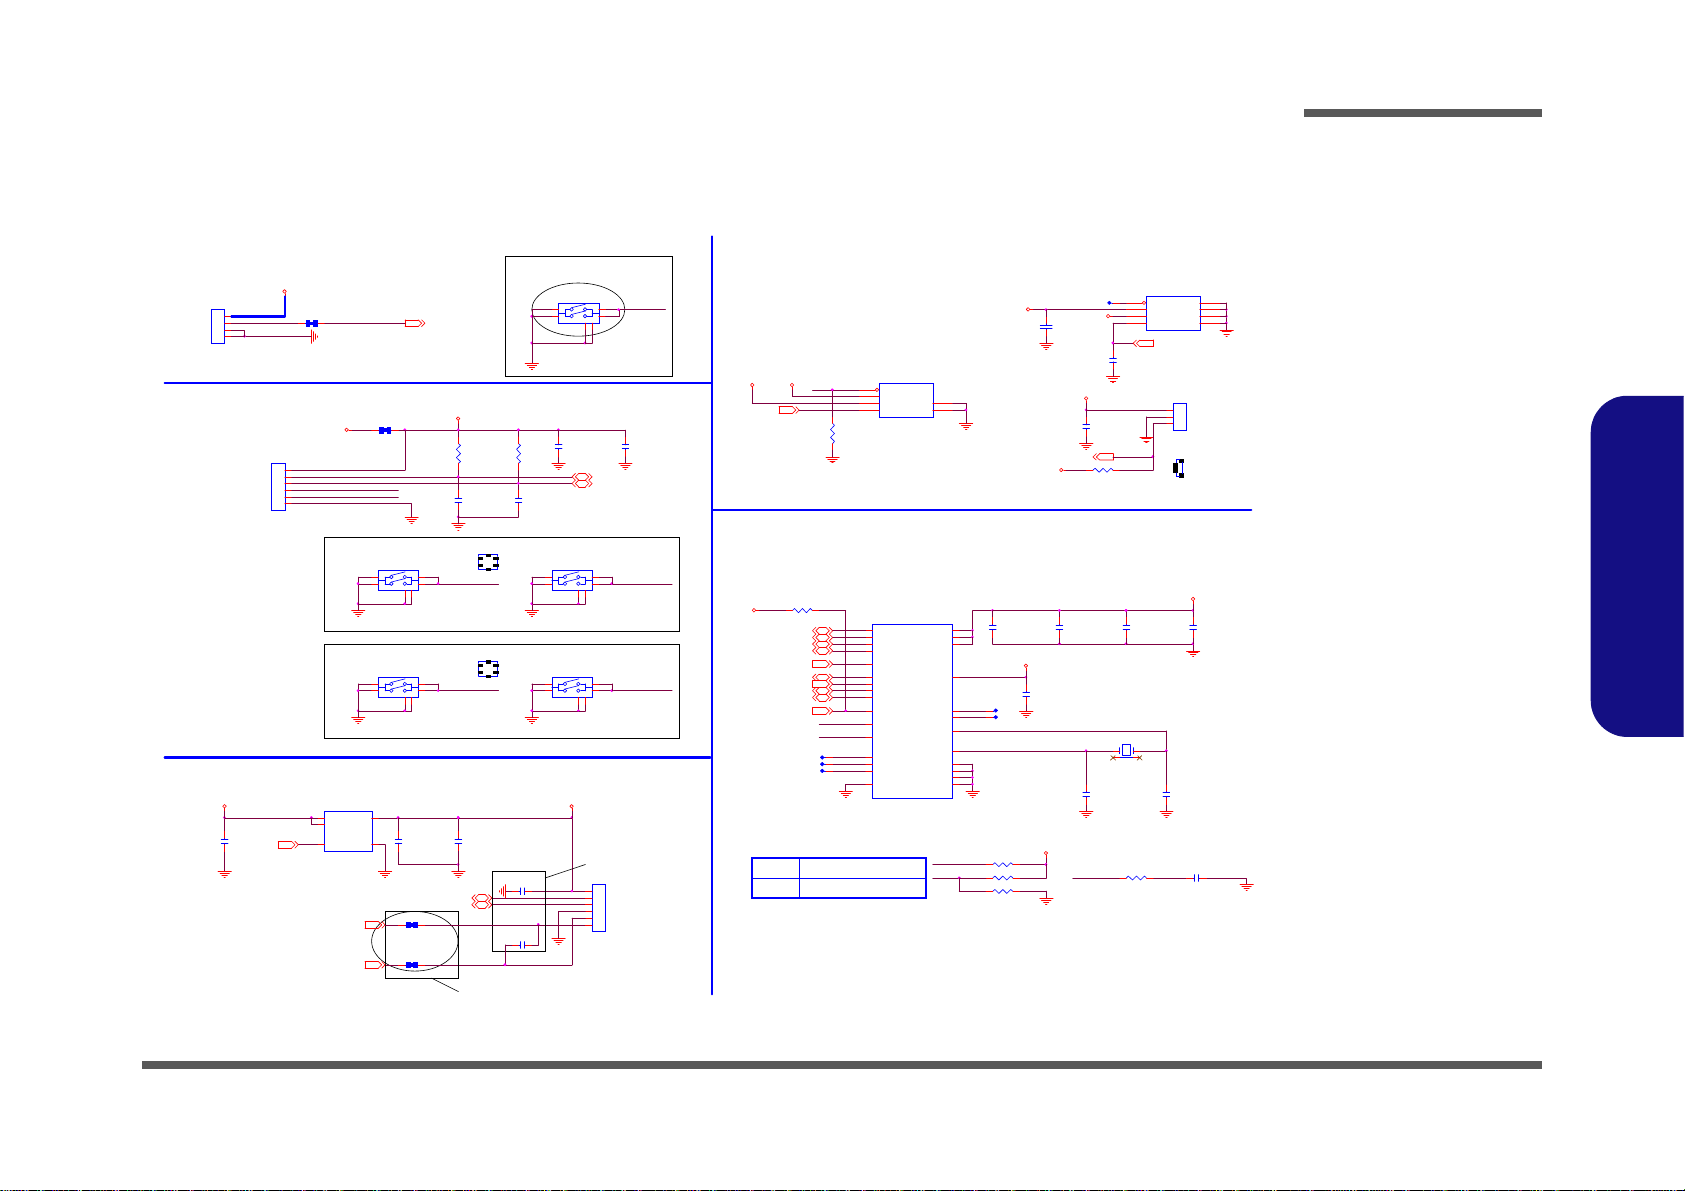
CCD, TPM, FAN, CLICK
W540EU
C362
10u_6.3V_X5R_08
TPM_BAD D
TPM_PP
J_TP1
85201-06051
1
2
3
4
5
6
AUDGR
FON#
USB_PP816
USB_PN816
C7*100p_50V_NPO_04
1A
1A
CCD + Internal MIC
From EC defa ult HI
Port8
XTAL I
TPM3005
TPM_BAD D
TPM3002
TPM_PP
TPM3001
TPM3004
TPM3003
XTAL O
6-02-03940-B20
6-02-99011-B20
6-02-00995-B20
Closs to J_CC D1
3/23
W550EU
INT_MIC_OUT27
J_CCD1
85205-06001
1
2
3
4
5
6
HI: 4E/ 4 F H
LOW: 2E/ 2F H
C4
2.2u_6.3V_X5R_06
HI: ACCESS
LOW: NORMAL ( Internal PD )
TPM_PP
TP M _BA DD
M_BTN # 29
3.3VS
5VS_FAN
PCLK_TPM1PCLK_TPM
3/23
CPU_FANSEN28
U18
*AX995B
VOUT
1
GND
5
VIN
3
FON#
4
VSET
6
GND
2
AX995B(SO T 23-6) & APE88 72
Co-L ayo ut
PN: APE8874
2nd Sour ce
R310
*0_04
5VS
CPU_FAN28
5VS_FAN
¹w¯dcost down solution
6-53-305 0B-042
POWER BU TTON
SW5
*TJG-532-V-T/R
3
1
4
2
5
6
M_BTN #
PCLK_TPM16
PLT_R ST#3,16
S4_STA TE#14
R126
*33_04
C170
0.1u_16V_Y5V_04
C361
1u_6.3V_X5R_04
C169
1u_6.3V_X5R_04
C171
*10p_50V_NPO_04
U3
G5243A
VIN
4
VIN
5
EN
3
VOUT
1
GND
2
C156
0.1u_16V_Y5V_04
IN T_MIC _OUT_ R
R85 *10K_04
TPM
U4
SLB9635TT_3.17
LAD3
17
LAD0
26
LAD1
23
LAD2
20
VDD1
10
XTAL I
13
VDD3
24
VDD2
19
LFRAME#
22
LCLK
21
LRESET#
16
SERIR Q
27
CLKRUN#
15
GND_1
4
GND_2
11
GND_3
18
GND_4
25
GPIO
6
GPIO2
2
XTAL O
14
TESTI
8
TESTBI/BADD
9
PP
7
NC_1
1
NC_2
3
NC_3
12
LPCPD#
28
VSB
5
R83 *10K_04
C163
15p_50V_NPO_04
C161
15p_50V_NPO_04
3.3VS
3.3VS
C1
*1u_6.3V_X5R_04
C157
0.1u_16V_Y5V_04
Closs to J_IN TMIC1
C5
*0.1u_16V_Y5V_04
R84 10K_04
C166
0.1u_16V_Y5V_04
X1 MC-306_32.768KHz
14
3 2
CLICK CONN
5V_CCD
5VS_FAN
5VS
5V
C360
0.1u_16V_Y5V_04
FOR POWER SW BOARD
TP_CLK 28
TP_D ATA 28
J_SW1
85201-04051
1
2
3
4
3.3VS
20mil
VDD3
AUDG_R27
C411
1u_6.3V_X5R_04
R394
10K_04
5VS_TP
C414
*10u_6.3V_X5R_06
C409
47p_50V_NPO_04
R388 *15mil _short_06
R393
10K_04
5VS
C410
47p_50V_NPO_04
R469 *10mil_short _04
R470 *10mil_short _04
1
RIGHT
KEY
LIFT
KEY
4
R52 *10m il_short_04
3
6-53-3050B-042
LPC_AD312, 28
LPC_AD112, 28
6-53-305 0B-042
2
1
RIGHT
KEY
LPC_AD012, 28
LPC_FR AME#12, 28
LPC_AD212, 28
4
PM_CLKRUN#14
SERIR Q12, 28
TPBUTTO N_L TPBUTTO N_R
LIFT
KEY
3
C6
*0.01u_16V_X7R_04
SW3
*TJG-532-V-T/R
3
1
4
2
5
6
SW4
*TJG-532-V-T/R
3
1
4
2
5
6
CSW1~4
2
6-53-3050B-0426-53-305 0B-042
TPBUTTO N_RTPBUTTO N_L
SW2
TJG-532-V-T/R
3
1
4
2
5
6
SW1
TJG-532-V-T/R
3
1
4
2
5
6
M_BTN#
J_FAN1
85205-03701
1
2
3
1
CPU FAN CONTROL
U17
NCT3940S-A
VOUT
3
GND
5
VIN
2
FON
1
VSET
4
GND
6
GND
8
GND
7
CPU_FAN
J_FAN1
FON#
R311 4.7K _04
3
TPM 1.2
LPC reset timing:
LPCPD# i n ac t ive to LRST# inact i ve 32~96us
Asserted be for e ent ering S 3
CCD_EN28
CPU_FAN 28
TPBUTTO N_R
TPBUTTO N_L
R127 *10K_04
3.3V
Sheet 22 of 42
CCD, TPM, FAN,
CLICK
Schematic Diagrams
B.Schematic Diagrams
CCD, TPM, FAN, CLICK B - 23
Page 76
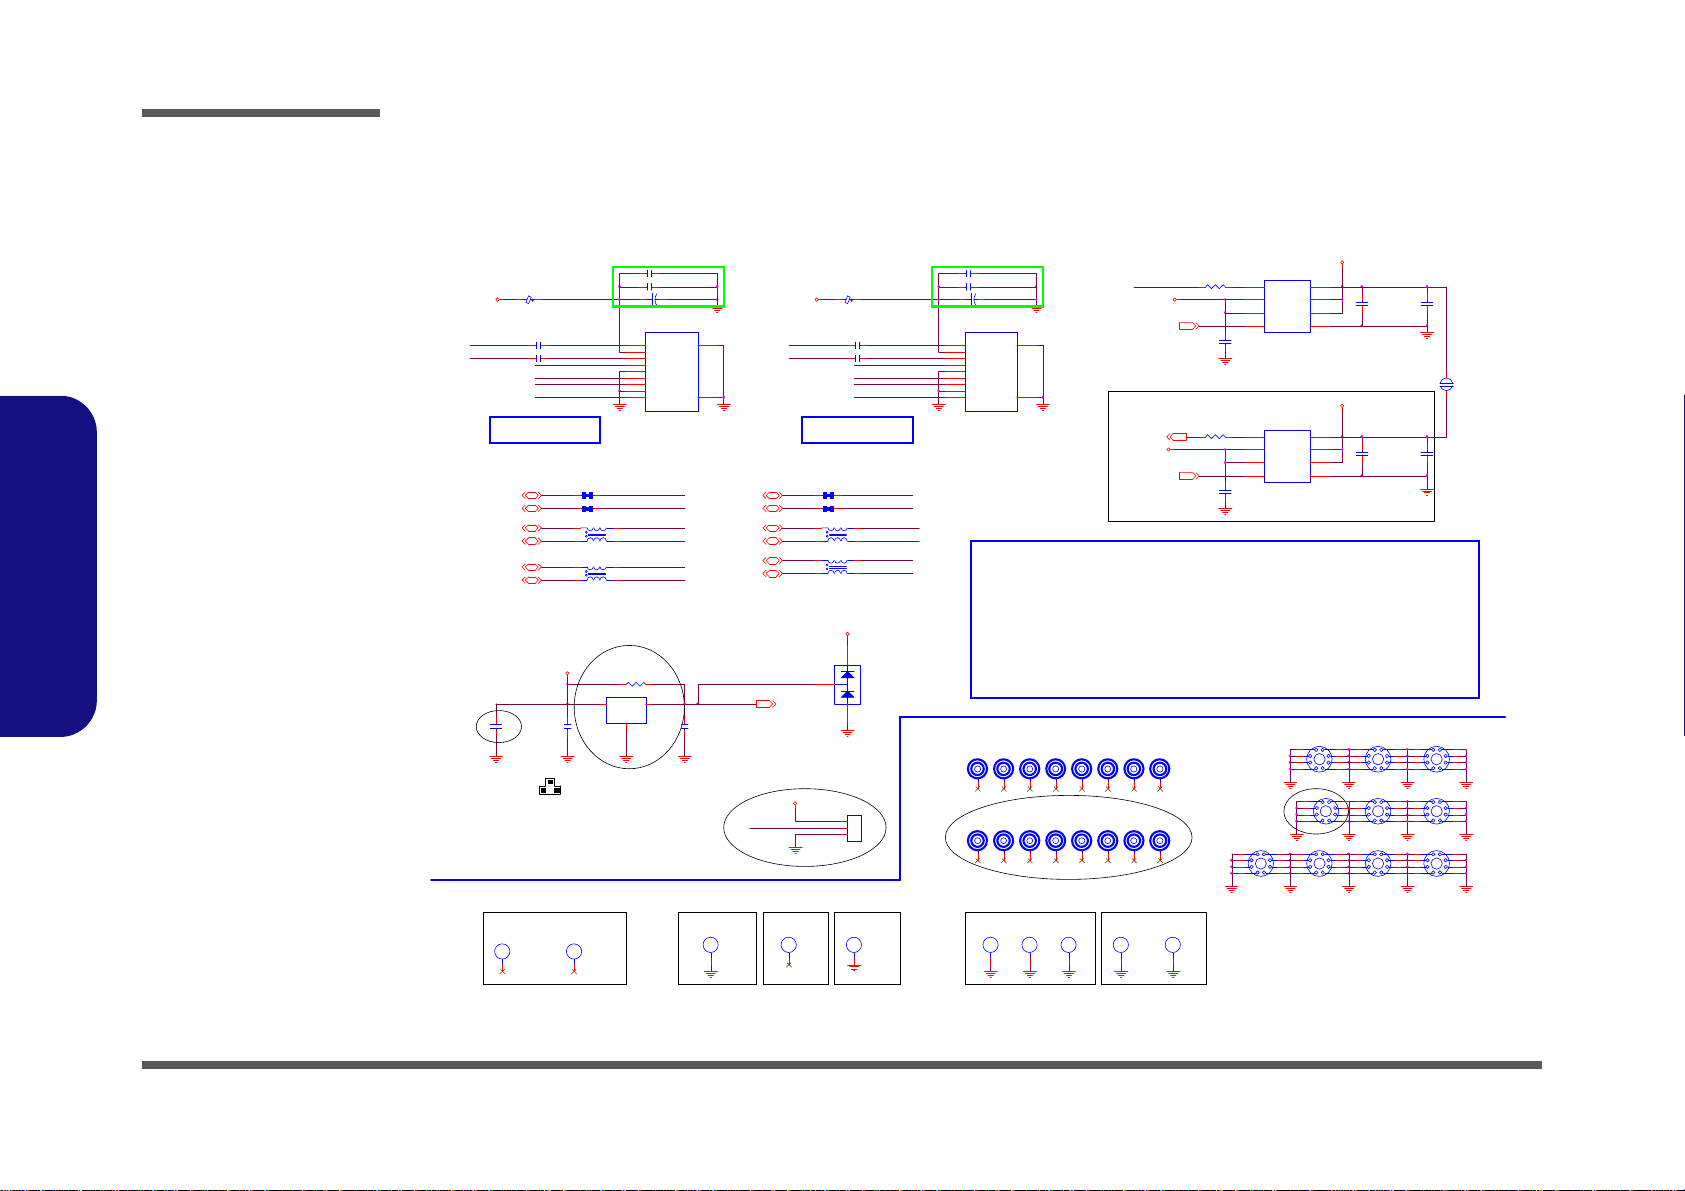
Schematic Diagrams
J_LID1
*85204-03001
1
2
3
1
H1
MTH10_ 0B8_0D2_8
2
3
4
5 6
7
8
9
1
H11
MTH8_0D2_8
2
3
4
5 6
7
8
9
1
H7
MTH10_0 B8_0D2_8
2
3
4
5 6
7
8
9
1
H15
MTH8_0D2_8
2
3
4
5 6
7
8
9
1
H14
MTH8_0D2_8
2
3
4
5 6
7
8
9
GND
GND
GND
1
H13
MTH8_0D2_8
2
3
4
5 6
7
8
9
GNDGND GND GND
GND
GND
GND GND
GND
SSTX1+
1
H2
MTH8_0D2_8
2
3
4
5 6
7
8
9
1
H5
MTH8_0D2_8
2
3
4
5 6
7
8
9
2
3
1
LID SWITCH IC
LID_SW#
SSRX1+
U1
MH248-ALFA-ESO
VCC1OUT
2
GND
3
6-02-00268-LC1
6-02-00248-LC2
C3
*100p_50V_NPO_04
C2
0.1u_16V_Y5V_04
R1 100K_04
D1
*BAV99 RECTIFIER
C
AC
A
3.3V
3.3V
USB3_TX1P16
W550EU
USB_OC#0116,25
R403 *0_04
USBVCC3.0_2
USB 3.0
L18
*WCM2012F2S-161T03-short
1
4
2
3
USB1_PP125
For W550EU 3/28
USB1_PN125
Del U2 3/23
USB_PP0+ USB_PP1+
USB_PN1-USB_PN0-
LID_SW# 11,28
LID_SW#
L25
*WCM2012F2S-161T03-short
1
4
2
3
SSTX3 +
SSRX3+
SSRX1-
C486
*1u_10V_Y5V_06
H8
H8_0D4_3H6H8_0D4_3
H9
H8_0D4_3
CPU
H16
H5_0B3_5D2_2
WLAN
H4
H2_4B5_4D2_4
H19
H6_0B4_7D3_7
H3
C4X2_4B7X5_4D4X2_4
H12
C4X2_4B7X5_4D4X2_4
ODD
H17
H6_0B4_7D3_7
H18
H6_0B4_7D3_7
+
C435 *220u_6.3V_6. 3*6.3*4. 2
USB_OC#01
R381 *0_04
W540EU
3/27
PJ17
*OPEN-3mm
1 2
C287
10u_6.3V_X5R_08
C279
10u_6.3V_X5R_08
C422
0.1u_16V_Y5V_04
U23
SY6288DCAC
VOUT1
6
VOUT38VIN2
3
VIN12VOUT2
7
GND1EN#
4
FLG#
5
C417
*0.1u_16 V_Y5V_04
U24
SY6288DCAC
VOUT1
6
VOUT38VIN2
3
VIN12VOUT2
7
GND1EN#
4
FLG#
5
C412
0.1u_16V_Y5V_04
C404
*0.1u_16 V_Y5V_04
USBVCC1
L14
*WCM2012F2S-161T03-short
1
4
2
3
5V
5V
DD_ON#25,29,32
DD_ON#25,29,32
USBVCC2
100 MIL
100 MIL
2A/90mohm
2A/90mohm
PORT 2
PORT 1
USBVCC3.0_1
M1
M-MARK
M6
M-MAR KM8M-MAR K
M7
M-MAR K
M4
M-MAR KM5M-MAR K
M2
M-MAR K
M3
M-MAR K
USBVCC2USBVCC1
SSRX3-
GND
SSTX3-
SSRX3-
4.
TXP1_R
USB_PP0+
L31
HCB1608KF-121T25
7.
C253 0.1 u_10V _X7R_04
TXN1_R
C260 0.1 u_10V _X7R_04
Diff. trace 90ohm
SSRX3+
C390 22u_6.3V_X5R_08
C386 22u_6.3V_X5R_08
USB_PN0-
USB3.0 Layout Gui delines:
CLOSE TO CONNECTOR
SSTX3+
GND
GND
USB3_TX1N16
Power Trace width=20mils, Spacing=80 mils.
5.
USB3.0 Capacito r 0.1u_10V_X7R_04 Clos e to Connector.
1.
6.
USB3.0 M ax Trace
length < 4"
PCIe Numb er of vias 4via hole(M ax).
2.
Differential pairs The USB3.0 the total trace skew less than 5 mils.
PCIe clock Differential impedance 100 ohm.8.
PCIe Differential impedance 85 ohm.
IC pad to USB Connector total length < 4"(Max)
USB3.0 Max Tr ace
length < 4"
USB3.0 Differential trace impedance: 90ohm
9.
PCIe For transmit ter and receiver the tota l trace le ngth: 1" (Min)~ ~6"(Max ).
PCIe Differential pairs and pairs spacing 20mils, with Other trace spacing 25mils.
10.
3.
USB_PP1+
C288 0 .1u_10V_X7R_04
SSRX1-
SSTX1+
USB_PN1-
SSRX1+
C289 0 .1u_10V_X7R_04
GND
CLOSE TO CONNECTOR
SSTX1-
TXP0_R
TXN0_R
C291 22u_6.3V_X5R_08
GND
Diff. tra c e 90ohm
C290 22u_6.3V_X5R_08
GND
L23
HCB1 608KF -121T2 5
USB_PP016
USB_PN016
PORT 2
PORT 1
Standard-A
J_USB1
Ni
VBUS
1
D-
2
D+
3
GND_D
7
SSRX-
5
SSRX+
6
GND
4
SSTX-
8
SSTX+9SHIELD
GND1
SHIELD
GND2
SSTX1-
USB Charge on, U24/C287 off
M9
M-MAR K
M11
M-MAR K
M10
M-MARK
M13
M-MAR K
M12
M-MAR K
M16
M-MAR K
M15
M-MAR K
M14
M-MAR K
L24
*WCM2012F2S-161T03-short
1
4
2
3
Standard-A
J_USB2
Ni
VBUS
1
D-
2
D+
3
GND_D
7
SSRX-
5
SSRX+
6
GND
4
SSTX-
8
SSTX+9SHIELD
GND1
SHIELD
GND2
USB3_RX2N16
USB3_RX1N16
USB3_RX2P16
USB3_RX1P16
USB3_TX2N16
USB3_TX2P16
SSTX3 -
4/3
3ÁûCO-LAY
+
C392 * 220u_6.3V_6.3*6.3*4.2
3ÁûCO-LAY
3.3V
R251 *10mil_short
R253 *10mil_short
6-20-B4Z20-1096-20-B4Z20-109
1
H20
MTH6_ 0D2_ 2
2
3
4
5 6
7
8
9
GND
R264 *10mil_short
Reserve 3/28
R265 *10mil_short
1
H10
MTH10_0 B8_0D2_8
2
3
4
5 6
7
8
9
Sheet 23 of 42
USB3.0, LID
SWITCH
USB3.0, LID SWITCH
B.Schematic Diagrams
B - 24 USB3.0, LID S WITCH
Page 77
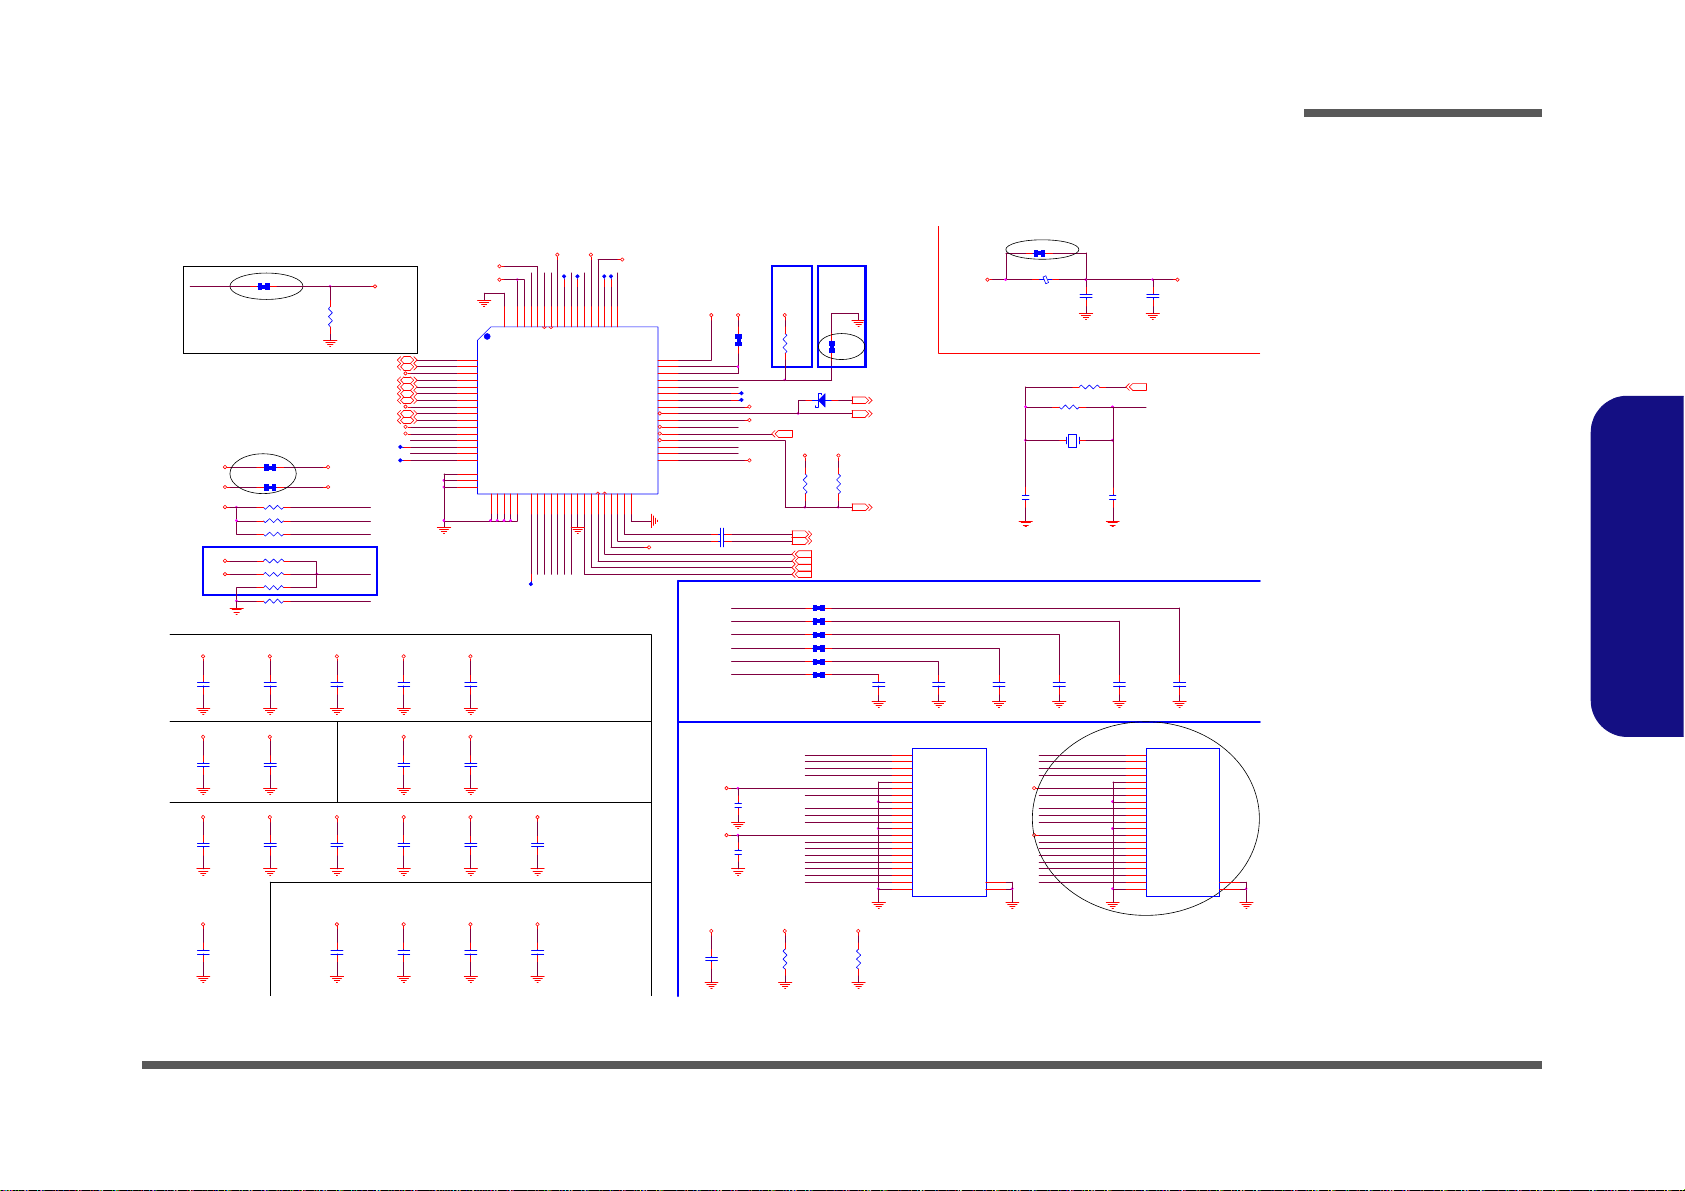
Card Reader (RTL8411)
Remind that R331 using the main po wer
(S0 power)
R389 *28mil_06
VCC_CARD
2/7
VCC_CARD
3/23
R390
*150_06
VCC_CARD
CARD_3V3
REGLX and VD D10 must be shape
SD_D3/MS_D2_R
ISOLATE#
SD_CMD_R
LED1/SPI SCK
REXT_C
LANXTAL2
SDA/SPI DI
SD_CD#
LAN_PCIE_ WAKE#
R402 1.5K_04
R431 2.49K_1%_04
R396 1K_04
R398 15K_04
R399 10K_04
3.3VS
R429 10K_04
LAN_VDD33
ISOLATE#
X4
FSX5L_25MHZ
12
EVDD10
VDD10
LANXTAL2
LAN_VDD33
SD_CLK/MS_D3_R
MS_D0
VDD3
VDDREG
SD_WP/ MS_D1
MS_B S
LED1/SPISC K
PCIE_RXP_4_GLAN
PCIE_RXN_4_GLAN
SDA/SPI DI
SD_D0_R
SD_D1/MS_CLK _R
MS_I NS #
CARD_3V3
SD_D2_R
LAN_PCI E_WAKE#
SD_D3/MS_D2_R
REXT_C
LANXTAL1
RTL8411
R405
*0_04
Pin 12
(Shape)
Pin 39
R411
*28mil_06
GND
VIA
C428
*4.7u_6.3V_X5R_06
C281
4.7u_6.3V_X5R_06
LANXTAL1
C420
*0.1u_16V_Y5V_04
C424
0.1u_16V_Y5V_04
C446
*4.7u_6.3V_X5R_06
C451
0.1u_16V_Y5V_04
C453
0.1u_16V_Y5V_04
.
L34
*SWF2520CF -4R7M-M
C426
0.1u_16V_Y5V_04
C397
*5p_50V_NPO_04
C405 0.1u_10V_X7R_04
R262
*150_06
C457
*0.1u_16V_Y5V_04
C413
*4.7u_6.3V_X5R_06
C421
0.1u_16V_Y5V_04
C399
*5p_50V_NPO_04
C285
0.1u_16V_Y5V_04
C454
0.1u_16V_Y5V_04
C408
*0.1u_16V_Y5V_04
C447
0.1u_16V_Y5V_04
C458
*4.7u_6.3V_X5R_06
D5 RB751S-40C2
AC
U25
RTL8411-CG
AVDD33
58
MS_D0/x D_D1
56
MS_D4
55
LED0/SPICSB
51
GPO
50
XD_CD#
57
SD_CD#/ MS_D 5
54
LED1/SPISCK
49
DVDD10
52
SD_CM D/MS_D 621SD_D3/MS_D 222SD_D223GND24HSIP25HSIN26REFCLK_P27REFCLK_N28EVDD1029HSOP30HSON
31
REGOUT
48
VDDR EG
47
VDDR EG
46
ENSWREG_H
45
SDA/SPI DI
44
LED3/SPID O
43
SCL/LED_CR
42
DVDD10
41
LANWAKEB
40
ISOLATEB
38
PERSTB
37
CLKREQB
36
SD_WP/MS_D1
35
MS_BS
34
AVDD33
63
RSET
62
AVDD10
61
CKXTAL260CKXTAL1
59
VDD33/18
33
GND
65
AVDD33
64
MDI P0
1
MDI N0
2
AVDD10
3
MDI P1
4
MDI N1
5
MID P2
6
MDI N2
7
AVDD10
8
MDI P3
9
MDI N3
10
AVDD33
11
DVDD33
12
Card_3V3
13
SD_D7
14
SD_D6/MS_INS#
15
SD_D5
16
SD_D417SD_D1/MS_C LK18SD_D0/MS_D 719SD_CLK/MS_D 3
20
GND
32
DVDD33
39
VDD33/18
53
GND166GND267GND368GND469GND5
70
GND6
71
GND7
72
GND8
73
C401
*5p_50V_NPO_04
C432
0.1u_16V_Y5V_04
C403
1u_6.3V_X5R_04
C400
*5p_50V_NPO_04
R263
*150_06
C406 0.1u_10V_X7R_04
C415
0.1u_16V_Y5V_04
C396
*5p_50V_NPO_04
C284
0.1u_16V_Y5V_04
C429
*0.1u_16V_Y5V_04
C448
0.1u_16V_Y5V_04
C452
0.1u_16V_Y5V_04
REGLX VDD10
VDD10
VDD33/18
REGLX
LAN_VDD33
VDD3
EVDD10
VDD10
VDD33/18
LAN_VDD33
LAN_VDD33
LAN_VDD33
VDD10VDD10
VDD10
LAN_VDD33 Rising Time¡G
1ms ~ 100ms
VDD10 VDD10VDD 10
VDDREG VD DREG
VDD33/18 VDD33/18
VDD10
LAN_VDD33
EVDD10 EVDD10
VDD10
VDD33/18 VDD33/18
LAN_VDD33LAN_VDD33
LAN_VDD33
LAN_VDD33
VCC_CARDVCC_CARD
LAN_VDD33
VCC_CARD
VCC_CARD
VCC_CARD
R386 *10mil_short _04
LAN_MDIP026
PCIE_WAKE# 14, 21
LAN_MDIN126
LAN_MDIP126
LAN_MDIN026
LAN_MDIP326
LAN_MDIN226
LAN_MDIP226
BUF_PLT_RST# 16, 21,28
PCIE_TXP4_GLAN 13
CLK_PCIE_GLAN 13
LAN_MDIN326
PCIE_RXP4_GLAN 13
CLK_PCIE_GLAN# 13
PCIE_TXN4_GLAN 13
R437 *28mil_06
LAN_PCIE_ WAKE# 28
PCIE_RXN4_GLAN 13
Switching Regulator close to pin 48
(Shape)
SD_D2
SD_D3/MS_D2
Pin 12
C416
*10u_6.3V_X5R_06
LAN_VDD33
Close to Cardrea der CONN
SD_D1/MS_CLK
MS_B S
SD_D1/MS_CLK
SD_CMD
4 IN 1 SOCKET SD/MMC/MS/MS Pro
MS_I NS #
SD_CLK/MS_D3
SD_CLK/MS_D3
MS_D 0
SD_D0
SD_WP/MS_D1
SD_D3/MS_D2
SD_D3/MS_D2
SD_D2
SD_CD#
SD_WP/MS_D1
Pin 11
LAN_VDD33
C419
0.1u_16V_Y5V_04
VDD3
R387 *10mil_short _04
SD_D0
Pin 61Pin 52Pin 3 Pin 41Pin 8
Pin 63Pin 58
Pin 47Pin 46
Pin 64
Pin 29Pin 29
Pin 33
SD_CLK/MS_D3_R
SD_D1/MS_CLK_R
Pin 53Pin 53Pin 33
SD_CLK/MS_D3
SD_D1/MS_CLK
SWR
mode
LDO
mode
Close to RTL8411 for SDXC EMI
SD_D0_R
ENSWREG
C450
22p_50V_NPO_04
SD UHS Mode Power Supply
L37¡BC177¡BC448 must close to Pin 48
SD_D2_R
R382 *10mil_short _04
C449
22p_50V_NPO_04
SD_CMD
R395 *1K_04
3/23
R430 * 1M_04
R383 *10mil_short _04
3.3V
R385 *10mil_short _04
R384 *10mil_short _04
6-22-25R00-1 B5
6-22-25R00-1 B4
6-22-25R00-1 BV
R404
*10mil_short _04
2/22
R391
10K_04
3/23
W540EU
R392
*10K_04
W550EU
Co-lay 3/28
R401 *28mil_06
LAN_CLKREQ# 13,16
R380 *28mil_06
C398
*5p_50V_NPO_04
SD_D1/MS_CLK
MS_B S
SD_D1/MS_CLK
SD_CMD
SD_D3/MS_D2
MS_I NS #
SD_CLK/MS_D3
SD_CLK/MS_D3
SD_D2
SD_WP/MS_D1
MS_D 0
SD_D0
SD_WP/MS_D1
SD_CD#
SD_D3/MS_D2
J_CARD-REV2
*3IN1
DAT2_SD
P2
VSS_MS
P21
CD/DAT3_SD
P3
CMD_SD
P4
VSS_SD
P5
VDD_SD
P6
CLK_SD
P7
VSS_SD
P8
DAT0_SD
P9
DAT1_SD
P10
WP_SD
P11
VSS_MS
P12
VCC_MS
P13
SCLK_MS
P14
DAT3_MS
P15
INS_MS
P16
DAT2_MS
P17
SDIO/DAT0_MS
P18
DAT1_MS
P19
BS_MS
P20
CD_SD
P1
GND
P23
GND
P22
R447 *0_04
From PCH pin F47
FLEX_GLAN_CLK 13
J_CARD -REV1
3IN1
DAT2_SD
P2
VSS_MS
P21
CD/DAT3_SD
P3
CMD_SD
P4
VSS_SD
P5
VDD_SD
P6
CLK_SD
P7
VSS_SD
P8
DAT0_SD
P9
DAT1_SD
P10
WP_SD
P11
VSS_MS
P12
VCC_MS
P13
SCLK_MS
P14
DAT3_MS
P15
INS_MS
P16
DAT2_MS
P17
SDIO/D AT0_MS
P18
DAT1_MS
P19
BS_MS
P20
CD_SD
P1
GND
P23
GND
P22
VDD3
SD_CMD_R
3/23
3.3V
Sheet 24 of 42
Card Reader
(RTL8411)
Schematic Diagrams
B.Schematic Diagrams
Card Reader (RTL8411) B - 25
Page 78
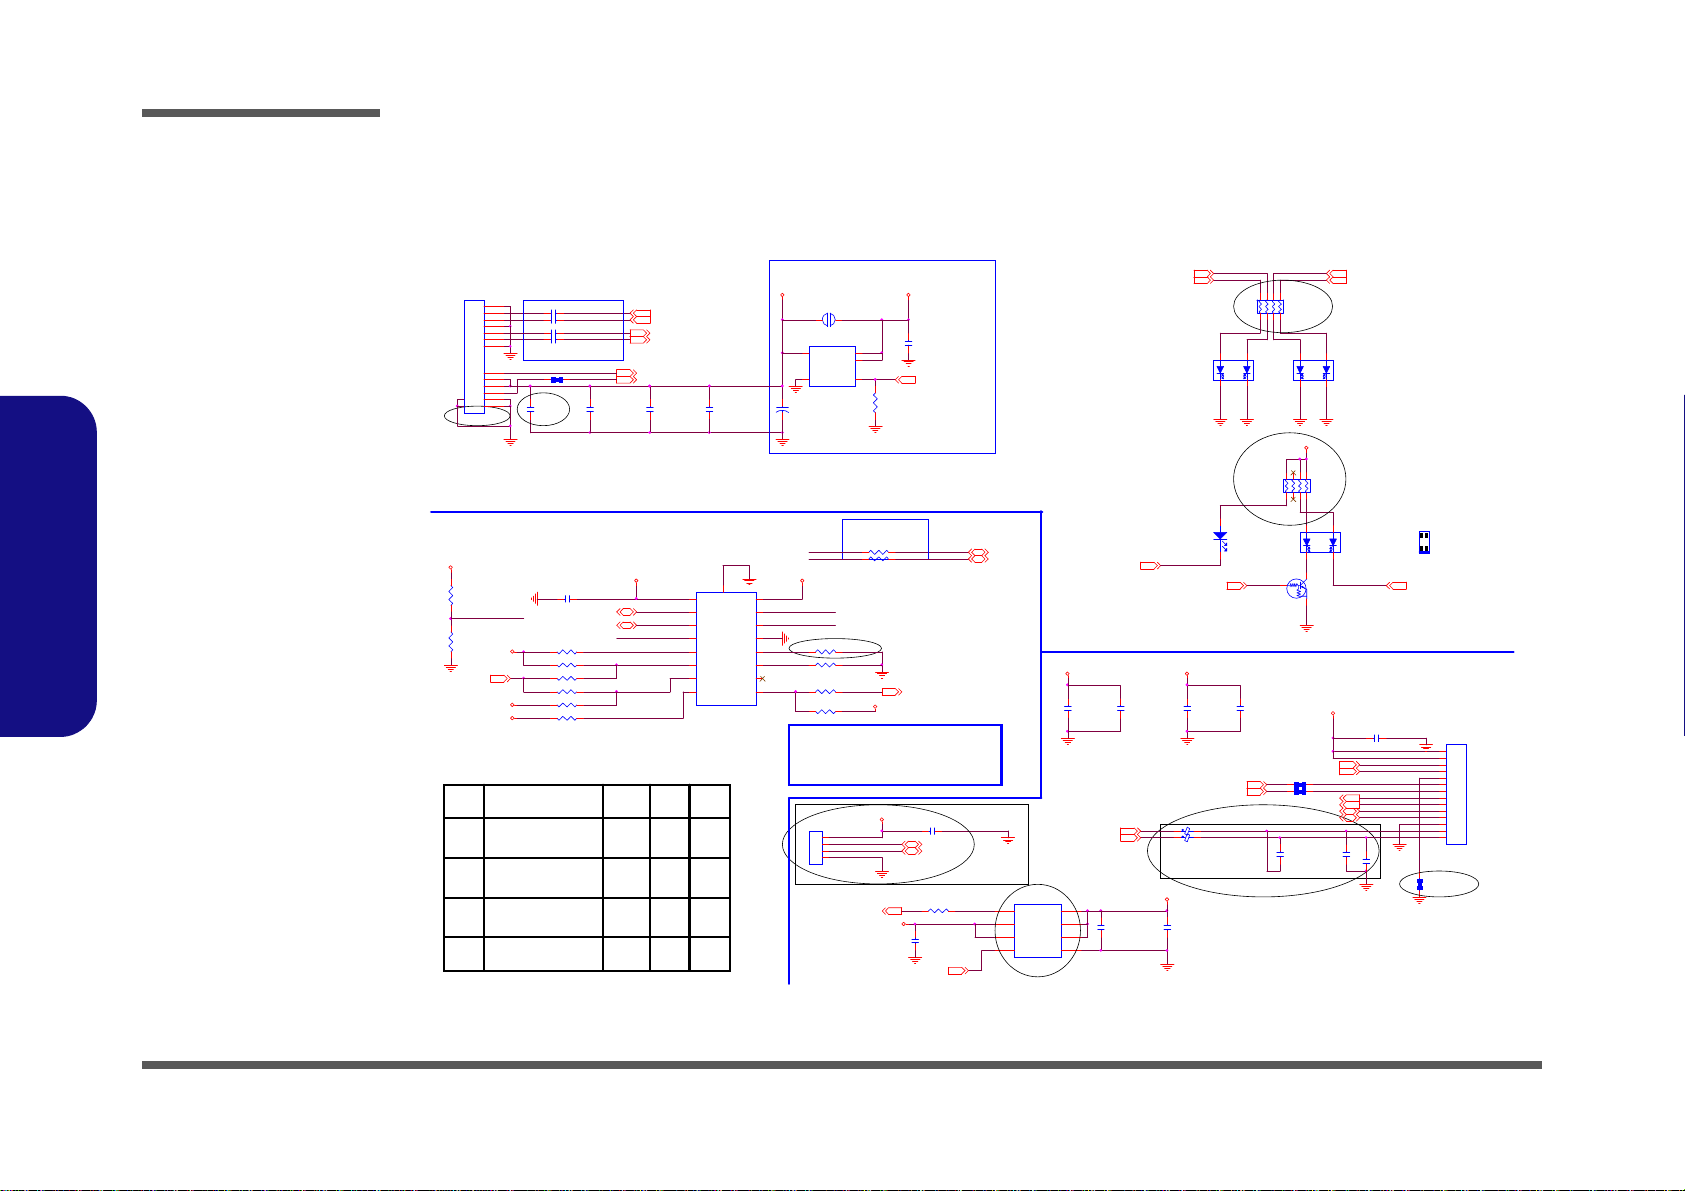
Schematic Diagrams
Pin swap 3/30
Pin swap 3/30
W/O USB CHARGE »Ý¤W¥ó
VDD5
VDD5
VDD5
143
2
WLAN/BT
LED
HDD LED
SATA_LED#12
11Power on & ChargeMode 4
Power off & Charge
1
(VDD5)
CTL3
(VDD5)
CTL2
(DD_ON)
CTL1
Close to J_AUDIO1
Mode 3
Mode 2
Mode 1
0
000Power off & Discharge
10
Power off & Charge 11
1
J_AUDIO2
*85201-04051
1
2
3
4
R256
*28mil_short_06
¤£±µOC PinR
¤£¤W¥ó.
¥i·L½Õ
3/27
SATA_LED#
R441 *1 0K_04
R438 *1 0K_04
C345
10u_6.3V_X5R_06
BT_EN WLAN_LED#
Q7
DTC114EUA
CE
B
USB_OC#8913,16
R372 *0_04
BAT LED
C443 * 10u_6.3V_X5R_06
R409 *10K_04
VDD5
WLAN_LED# 21
BT_EN21,28
5VS_ODD
EMI Require
C377
1u_6.3V_X5R_04
SATA_RXP2 12
SATA_RXN2 12
SATA_ODD_PRSNT# 17
R440 * 10K_04
R269 * 10K_04
R439 *1 0K_04
R268 *1 0K_04
4/2
SATA_ODD_DA# 16
R374 *15mil_short _06
R379 *15mil_short _06
USB_PP116
USB_PN116
USB1_PN1
¹s¥ó¸m©ó°T¸¹¤À¤ä ³B
USB_PN1
USB_PP1 USB1_PP1
R266 *0_04
R267 *0_04
SG
Y
D8
RY-SP155HY YG4-1
1
3
2
4
SG
Y
D7
RY-SP1 55HYY G4-1
1
3
2
4
6-52-55002-04B
6-52-55001 -040
6-52-55002 -04B
6-52-55002 -042
6-52-55001-040
6-52-55002-042
2
3/23
USB_PP916
USB_PN916
J_AUDIO1
85201-14051-01
PCB Footprint = 85201-14x5_r
1
2
3
4
5
6
7
8
10
11
12
13
14
9
USB_PP1
USB_PN1
TPS254X_ILIM_SE L
RN17
220_8P4R_04
123
45
678
M_PQFP16
G_OC#01
USB1_PP1
USB1_PN1
R427
*10K_04
R433
*0_04
TPS254X_ILIM_SEL
ILIM_SEL
( FOR TPS2543/TPS2540 ¦³¤£¦P)
ILIM_SEL=HI , FOR TPS2543
ILIM SEL=LOW, FOR TPS2540A
To South Bridge OC Pin.
VDD5
TI«Øij§ó§ï¨Ï¥Î,
Ãö¾÷¥R¹q
R407 *24K_1%_04
3/23
R410 *0_04
PIN GND1 ~ 4 = G ND
C383
*0.1u_16V_Y5V_04
5V
R408 *40.2K_04
C286
*0.1u_16V_Y5V_04
Zero Power O DD
¹s¥ó¸m©ó°T¸¹¤À¤ä³B
C485
180p_50V_NPO_04
SATA ODD
C262
22u_6.3V_X5R_08
PJ23 * OPEN-3mm
1 2
C382
22u_6.3V_X5R_08
U26
*TPS2540A
CTL1
6
NC
9
DM_IN
11
DM_O
2
DP_IN
10
IN
1
EN/D SC
5
DP_O
3
ILIM_SEL
4
CTL2
7
CTL3
8
OUT
12
FAULT#
13
GND
14
ILIM1
15
ILIM0
16
PPAD
17
C264
*0.1u_16V_Y5V_04
R301
*100K_04
C359 0.01u_16V_X7R_04
C348
*0.1u_16V_Y5V_04
C357 0.01u_16V_X7R_04
C283
*0.1u_16V_Y5V_04
U14
*G5243A
VIN
4
VIN
5
EN
3
VOUT
1
GND
2
C356 0.01u_16V_X7R_04
C484
1000p_50V_X7R_04
C339
*1u_6.3V_X5R_04
USB1_PP1 23
USB1_PN1 23
C355 0.01u_16V_X7R_04
C350
0.1u_16V_Y5V_04
LED_PWR 28
C353
1u_6.3V_X5R_04
+
C341
*220u_6.3V_6.3*4. 2
R306 *10mil_short _04
J_ODD1
203601-1
S1
S2
S3
S4
S5
S6
S7
P1
P2
P3
P4
P5
P6GND1
GND2
W550EU
3/28
LED_ACIN 28
3.3VS
5VS
RN18
220_8P4R_04
123
45
678
C483
180p_50V_NPO_04
LED_BAT_FULL28
SPKOUTR+_R27
L37 FCM1005KF-121T03
USB_PP10 16
USB_PN10 16
SPKOUTR-_R27
SG
Y
D9
RY-SP155HY YG4-1
1
3
2
4
DD_ON28, 29, 30
L38 FCM1005KF-121T03
LED_BAT_CHG28
100 MIL
USB Charge PORT
USBVCC2
5V
USBVCC03
VDD5
2A
U21
SY6288DCAC
VOUT1
6
VOUT38VIN2
3
VIN12VOUT2
7
GND1EN#
4
FLG#
5
2A
100 MIL
USBVCC03
C487 *0.01u_16V_X7R_04
MIC 1-R27
USB_PN9
HEADPHONE- L27
MIC1 -R
USB_PP9
JD_SENSE27
JD_SENSE_B27
MIC1 -L
FOR AUDIO BOARD
USBVCC03
HEADPHON E-RR
HEADPHON E-LL
1.1A 60mils
MIC 1-L27
HEADPHONE- R27
USBVCC03
C263 *0.01u_16V_X7R_04
Change MSO8 4/2
USB_OC#01 16,23
POWER ON LED
¹q®e½Ð¾aª ñJ_ODD1
SATA_TXN2 12
SATA_TXP2 12
SATA_ODD_PWRGT 17
DD_ON#23,29,32
D6
RY-SP170YG34-5M
AC
Sheet 25 of 42
SATA ODD, LED,
USB CHARGE
SATA ODD, LED, USB CHARGE
B.Schematic Diagrams
B - 26 SATA ODD, LED, USB CHARGE
Page 79
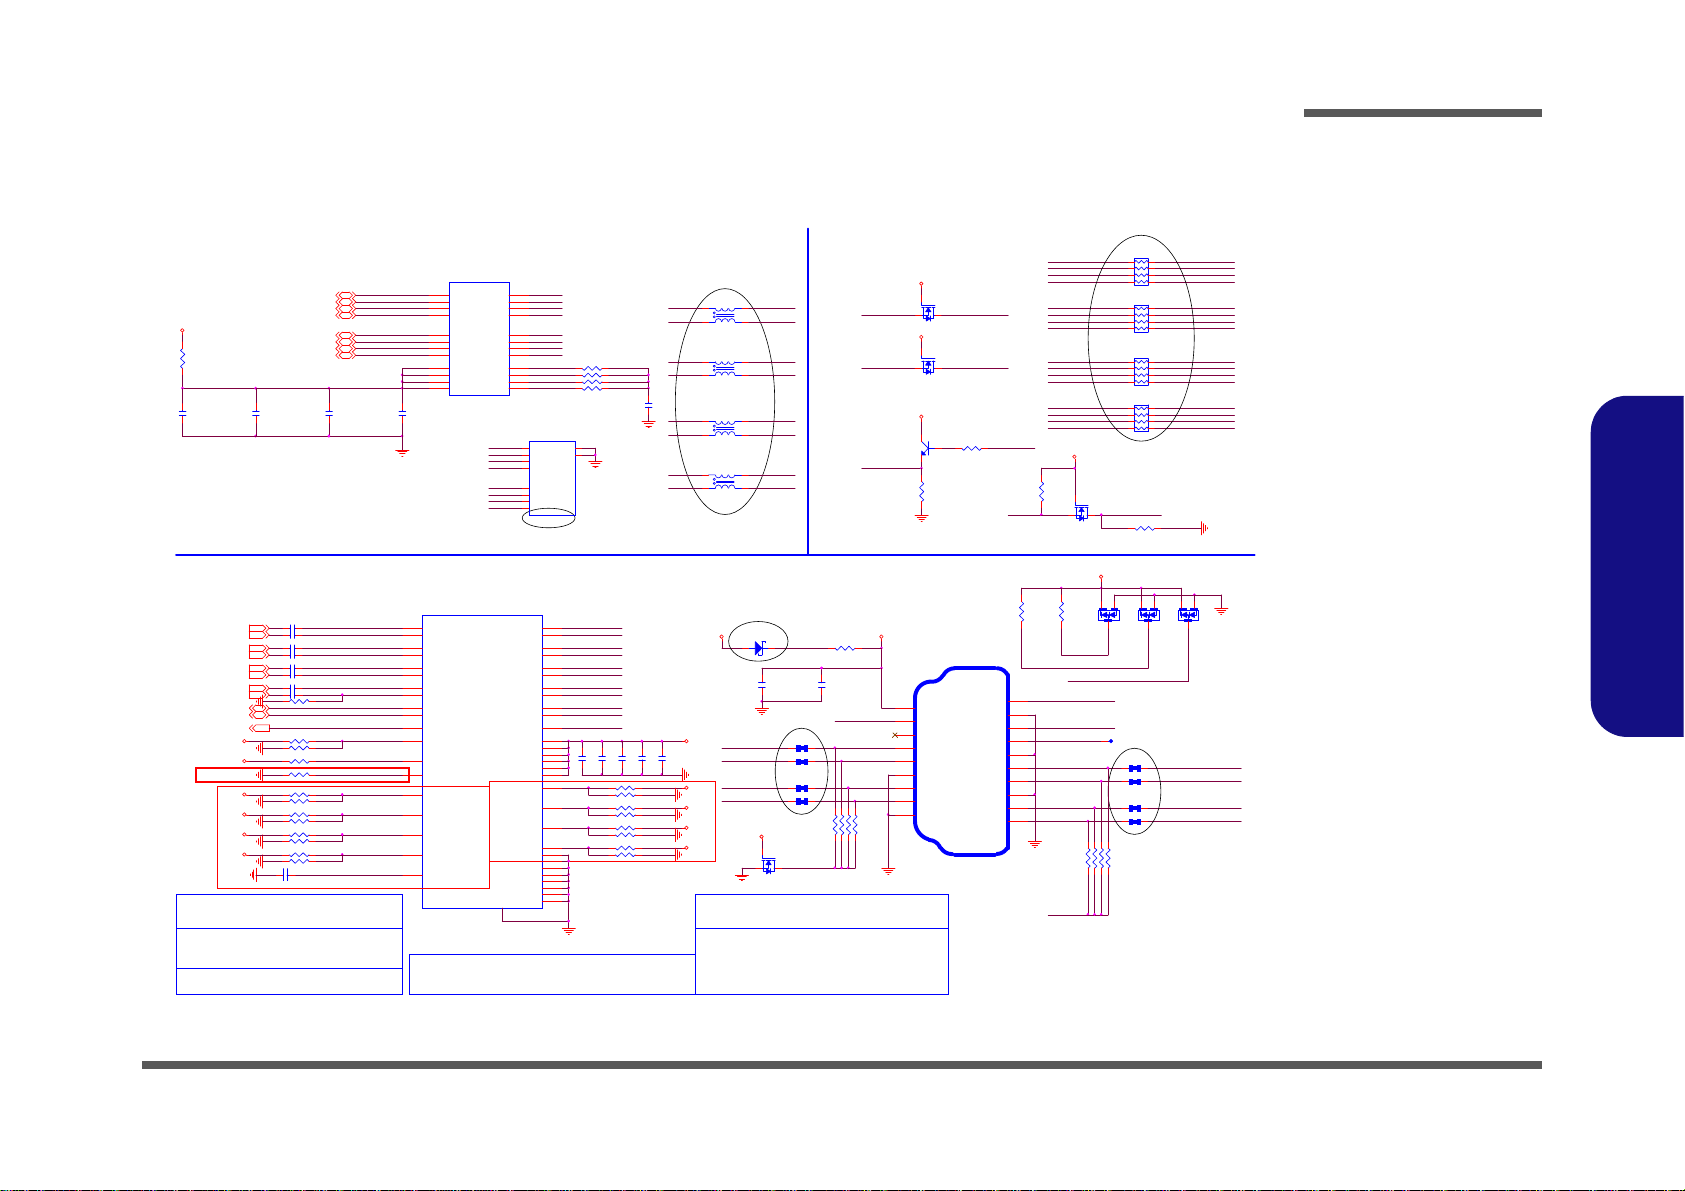
HDMI, RJ45
R169 *10mil_short_04
R228
*200K_1%_04
TCT3
TCT4
TCT2
R179 *10mil_short_04
HDMI_SCL-C
HDMI_SDA-C
HDMI_HPD-C
For ESD
C374
*0.1u_16V_Y5V_04
U7
*PS8171QFN48GTR
IN_D1+
39
IN_D1-
38
IN_D2+
42
IN_D2-
41
IN_D3+
45
IN_D3-
44
IN_D4+
48
IN_D4-
47
SCL
9
SDA
8
HPD/HPDX
7
OE#
25
DCC_EN
32
RT_EN#/CEXT
10
PC0/PEQ
3
PC1/PI O
4
REXT
6
GND[ 6]/EMI 0
27
CFG/PRE
35
DDCBUF_EN/DDCBUF
34
OUT_D1+
22
OUT_D1-
23
OUT_D2+
19
OUT_D2-
20
OUT_D3+
16
OUT_D3-
17
OUT_D4+
13
OUT_D4-
14
SCL_SI NK
28
SDA_SI NK
29
HPD_SINK
30
VCC[1]
2
VCC[2]/APD
11
VCC[3]
15
VCC[4]
21
VCC[5]
26
VCC[ 6]/EMI1
33
VCC[7]
40
VCC[8]
46
GND[1]/ Reserv ed0
1
GND[2 ]
5
GND[3]/ Reserv ed1
12
GND[4 ]
18
GND[5 ]
24
GND[7 ]
31
GND[8 ]
36
GND[9 ]
37
GND[10]
43
GND
49
C384
*0.1u_16V_Y5V_04
HDMI_C TRLCLK15
EMI0,EMI1: EMI reduction and filter setting, 3 level CMOS input,
EMI1 internal pull-up at ~ 500k ohm
EMI0 internal pull-down at ~ 500k ohm
[EMI1,EMI0]=HL: No EMI reduction
EMI0=High: Increased rise/fall time
MID, Increased rise/fall time,2nd
EMI1=LOW: EMI filter setting 1
MID: Reserved
APD: Automatic power down managementl, 3 level CMOS input,
internal pull-up at ~ 500k ohm
APD=LOW: Automatic power down disable
APD=High: Automatic power down enable
APD=MID: Reserved
HDMI_CTRLDATA15
3.3VS
3.3VS
3.3VS
R366 *4.7K_04
PRE/CFG
C199 *2.2u_6.3V_X5R_04
CEXT/RT_EN#
R204 *10mil_short_04
3.3VS
PS8101»PPS8171®t²§
HDMI_HPD15
DCC_EN#
R222 *4.7K_04
3.3VS
R216 *4.7K_04
TMDS_DATA0#-R
TMDS_DATA2-R
TMDS_DATA2#-R
TMDS_DATA0-R
PS8101»PPS8171®t²§
EMI0/GND
APD/VCC
EMI1/VCC
RS/GND
R363 *4.7K_04
R3.5
R191 *4.7K_04
R185 *0_04
R186 *4.7K_04
R214 *4.7K_04
R226 *4.7K_04
R196 *4.7K_04
3.3VS
R364 *4.7K_04
3.3VS
3.3VS
3.3VS
C239 0.1u_10V_X7R_04
C236 0.1u_10V_X7R_04
C238 0.1u_10V_X7R_04
C237 0.1u_10V_X7R_04
C240 0.1u_10V_X7R_04
C243 0.1u_10V_X7R_04
C242 0.1u_10V_X7R_04
C241 0.1u_10V_X7R_04
R3.5
R3.5
FOR TI1442
¹w¯d2.2K¹ï¦a,¤ £¤W¥ó
FOR
TI1442»Ý-קï49 9-->3.4K
HDMIC_CLKCN_C
HDMIC_C1CN_C
HDMIC_C2CN_C
HDMIC_C2CP_C
HDMIC _CLKCP_C
HDMIC_C0CN_C
HDMIC_C1CP_C
R210 *10mil_short_04
HDMIC_C0CP_C
DDCBUF: DDC Active Buffer enable and setting, 3 level CMOS input,
internal pull-down at ~ 500k ohm
DDCBUF=LOW: No DDC active buffer, passive DDC level shifting
DDCBUF=High: Active DDC bufer enable, setting 1
DDCBUF=MID: Active DDC bufer enable, setting 2
PRE: TMDS output driver pre-emphasis level setting,
3 level CMOS input, internal pull-down at ~ 500k ohm
PRE=LOW: No pre-emphasis
PEQ: TMDS iutput equalization control, 3 level CMOS input,
internal pull-down at ~ 500k ohm
PEQ=LOW: Mid level EQ(Default)
PEQ=High: High level EQ
PEQ=MID: Low level EQ
HPDX: Output level and polarity of HPD is defined by PIO
PIO=LOW: [email protected] CMOS output
PIO=High: HPD=HPD_SINK#(inverted HPD)@0.9V
PIO: Internal pull down ~ 500k ohm
¦¹°Ï¶ô,W/ LEVELSHIFT®É¤W¥ó
R230 *4.7K_04
R360 *0_04
R217 *4.7K_04
R221 *4.7K_04
R211 *499K_1%_04
R205 *4.7K_04
R236 *4.7K_04
3.3VS
3.3VS
R365 *4.7K_04
DDCBUF_EN
C202
*0.1u_16V_Y5V_04
HDMI_CTRLCLK
PC0
OE#
REXT
HDMI_HPD-C
HDMI_CTRLDATA
PC1
3.3VS
C385
*0.1u_16V_Y5V_04
TMDS_DATA1-R
TMDS_DATA1#-R
HDMI_SCL-C
HDMI_SDA-C
TMDS_CLOCK-R
TMDS_CLOCK#-R
R220 *4.7K_04
PIN 49=GND
HDMIC_C2CP15
HDMIC_CLKCN15
HDMIC_CLKCP15
HDMIC_C1CN15
HDMIC_C1CP15
HDMIC_C2CN15
HDMIC_C0CN15
HDMIC_C0CP15
R369 *2.2K_04
C379
*0.1u_16V_Y5V_04
R227
*10K_04
TMDS_DATA0-R
TMDS_DATA0#-R
TMDS_D ATA0- L
TMDS_DATA0#-L
¦pªG¦³¤Wlevel shift, R241-n§ï¬°100K
TMDS_DATA1#-L
TMDS_DATA1-L
4/5
TMDS_DATA2-L
TMDS_CLOCK#-L
TMDS_DATA2#-L
TMDS_DATA0#-L
TMDS_CLOCK-L
TMDS_DATA0-L
TMDS_CLOCK#-R
TMDS_DATA1#-R
TMDS_D ATA1- R
TMDS_CLOCK-R
R145 *10mil_short _04
TMDS_DATA2#-R
TMDS_DATA2-R
TMDS_DATA0-R
TMDS_DATA0#-R
5VS_HDMI
3/23
R156 *10mil_short _04
J_HDMI1
C12822-100A
SHIELD2
2
TMDS DA TA 1 +
4
TMDS DA TA 1 -
6
SHIELD0
8
TMDS CL OCK +
10
TMDS CL OCK -
12
RESERVED
14
SDA
16
+5V
18
TMDS D ATA2+
1
TMDS DA TA2 -
3
SHIELD1
5
TMDS D ATA0+
7
TMDS DA TA0 -
9
CLK SHIELD
11
CEC
13
SCL
15
DDC/CEC GND
17
HOT P L UG D ETE C T
19
R190 *10mil_short _04
L26 *W CM2012F2S-SHORT
1
4
2
3
R195 *10mil_short _04
5VS_HDMI
5VS
VDD10
RN13
*0_8P4R_04_SHORT
1
2
3456
7
8
HDMI_SDA-CHDMI_CTRLDATA
HDMI_HPD
3.3VS
HDMIGND
3.3VS
RN14
*0_8P4R_04_SHORT
1
2
3456
7
8
RN15
*0_8P4R_04_SHORT
1
2
3456
7
8
L2 * WCM2012F2S-SHORT
1
4
2
3
RN16
*0_8P4R_04_SHORT
1
2
3456
7
8
3/23
LAN PORT
L1 * WCM2012F2S-SHORT
1
4
2
3
D2
RB551V-30S2
A C
L28 *W CM2012F2S-SHORT
1
4
2
3
LAN_MDIP0
LAN_MDIN0
LAN_MDIN2
LAN_MDIN3
LAN_MDIP2
LAN_MDIN024
LAN_MDIP3
LAN_MDIP1
LAN_MDIN1
LAN_MDIP224
LAN_MDIN224
LAN_MDIP024
LAN_MDIP124
LAN_MDIP324
LAN_MDIN324
LAN_MDIN124
5VS_HDMI _IN
TMDS_C LOC K-L
TMDS_D ATA0#
TMDS_D ATA2
TMDS_D ATA2#
HDMI_CEC
HDMI_SDA-C
HDMI_HPD-C
HDMI_SCL-C
TMDS_D ATA0
FOR W/O LEVEL SHIFT
TMDS_CLOCK-R
TMDS_DATA1-R
HDMI_HPD-C
TMDS_D ATA1- L
HDMI CONNECTOR
3/28
TMDS_D ATA2- L TMDS_DATA2-R
HDMI_HPD
C167
*10u_6.3V_X5R_06
3/23
Q5
*2N3904
B
E C
S
D
G
Q16B
MTDK5S6R
5
34
S
D
G
Q16A
MTDK5S6R
2
61
HDMIC_C0CP_C
HDMIC_C0CN_C
HDMIC_C1CN_C
HDMIC_C1CP_C
HDMIC_C2CN_C
HDMIC_C2CP_C
HDMIC_CLKCN_C
HDMIC_CLKCP_C
R141680_04
TMDS_C LOC K#-L
R157680_04
R194680_04
R189680_04
TMDS_C LOC K#
TMDS_C LOC K
D17
*BAV99 RECTI FI E R
A
C
AC
TMDS_D ATA1#
C16
0.01u_16V_X7R_04
TMDS_CLOCK#-R
D16
*BAV99 RECTI FI E R
A
C
AC
TMDS_D ATA1
R10
*0_04
C164
22u_6.3V_X5R_08
R8 75_04
TMDS_DATA1#-R
LMX3+
LMX3-
LMX1+
LMX4+
LMX1-
LMX4-
LMX2LMX2+
R355
2.2K_04
R111 1_04
TMDS_DATA1#-L
R2 75_04
5VS
Q6
MTN7002ZHS3
G
DS
L27
NS892402
TCT1
1
TD1+
2
TD1-
3
TCT2
4
TD2+
5
TD2-
6
TCT3
7
TD3+
8
TD3-
9
TCT4
10
TD4+
11
TD4-12MX4-
13
MX4+
14
MCT4
15
MX3-
16
MX3+
17
MCT3
18
MX2-
19
MX2+
20
MCT2
21
MX1-
22
MX1+
23
MCT1
24
LMX2+
LMX4-
LMX2-
LMX1-
LMX3-
DLMX1+LMX1+
DLMX1-
R178680_04
R7 75_04
DLMX2-
R168680_04
DLMX2+
R203680_04
DLMX3+
DLMX3-
LMX3+
R209680_04
DLMX4-
LMX4+ DLMX4+
C297
1000p_2KV_X7R_12_H125
C10
*0.01u_16V_X7R_04
R3 75_04
HDMIGND
C8
*0.01u_16V_X7R_04
R352
2.2K_04
Q17
MTN7002ZHS3
G
DS
R241 20K_1%_04
C9
*0.01u_16V_X7R_04
D14
*BAV99 RECTI F IE R
A
C
AC
TMDS_DATA2#-L
HDMI_SCL-CHD MI_CTRLCLK
TMDS_DATA2#-R
HDMI_HPD-C
R237
1M_04
TCT1
3/23
3.3VS
NMCT_RNMCT_4
NMCT_2
NMCT_3
NMCT_1
FOR INTEL GRAPHIC
DLMX4+
DLMX3+
DLMX1+
DLMX2-
DLMX4-
DLMX3-
Main 6-21-B4060-008
DLMX1DLMX2+
130451-0M
J_RJ1
DD-
8
DD+
7
DB-
6
DC-
5
DC+
4
DB+
3
DA-
2
DA+1shield
GND1
shield
GND2
Sheet 26 of 42
HDMI, RJ45
Schematic Diagrams
B.Schematic Diagrams
HDMI, RJ45 B - 27
Page 80
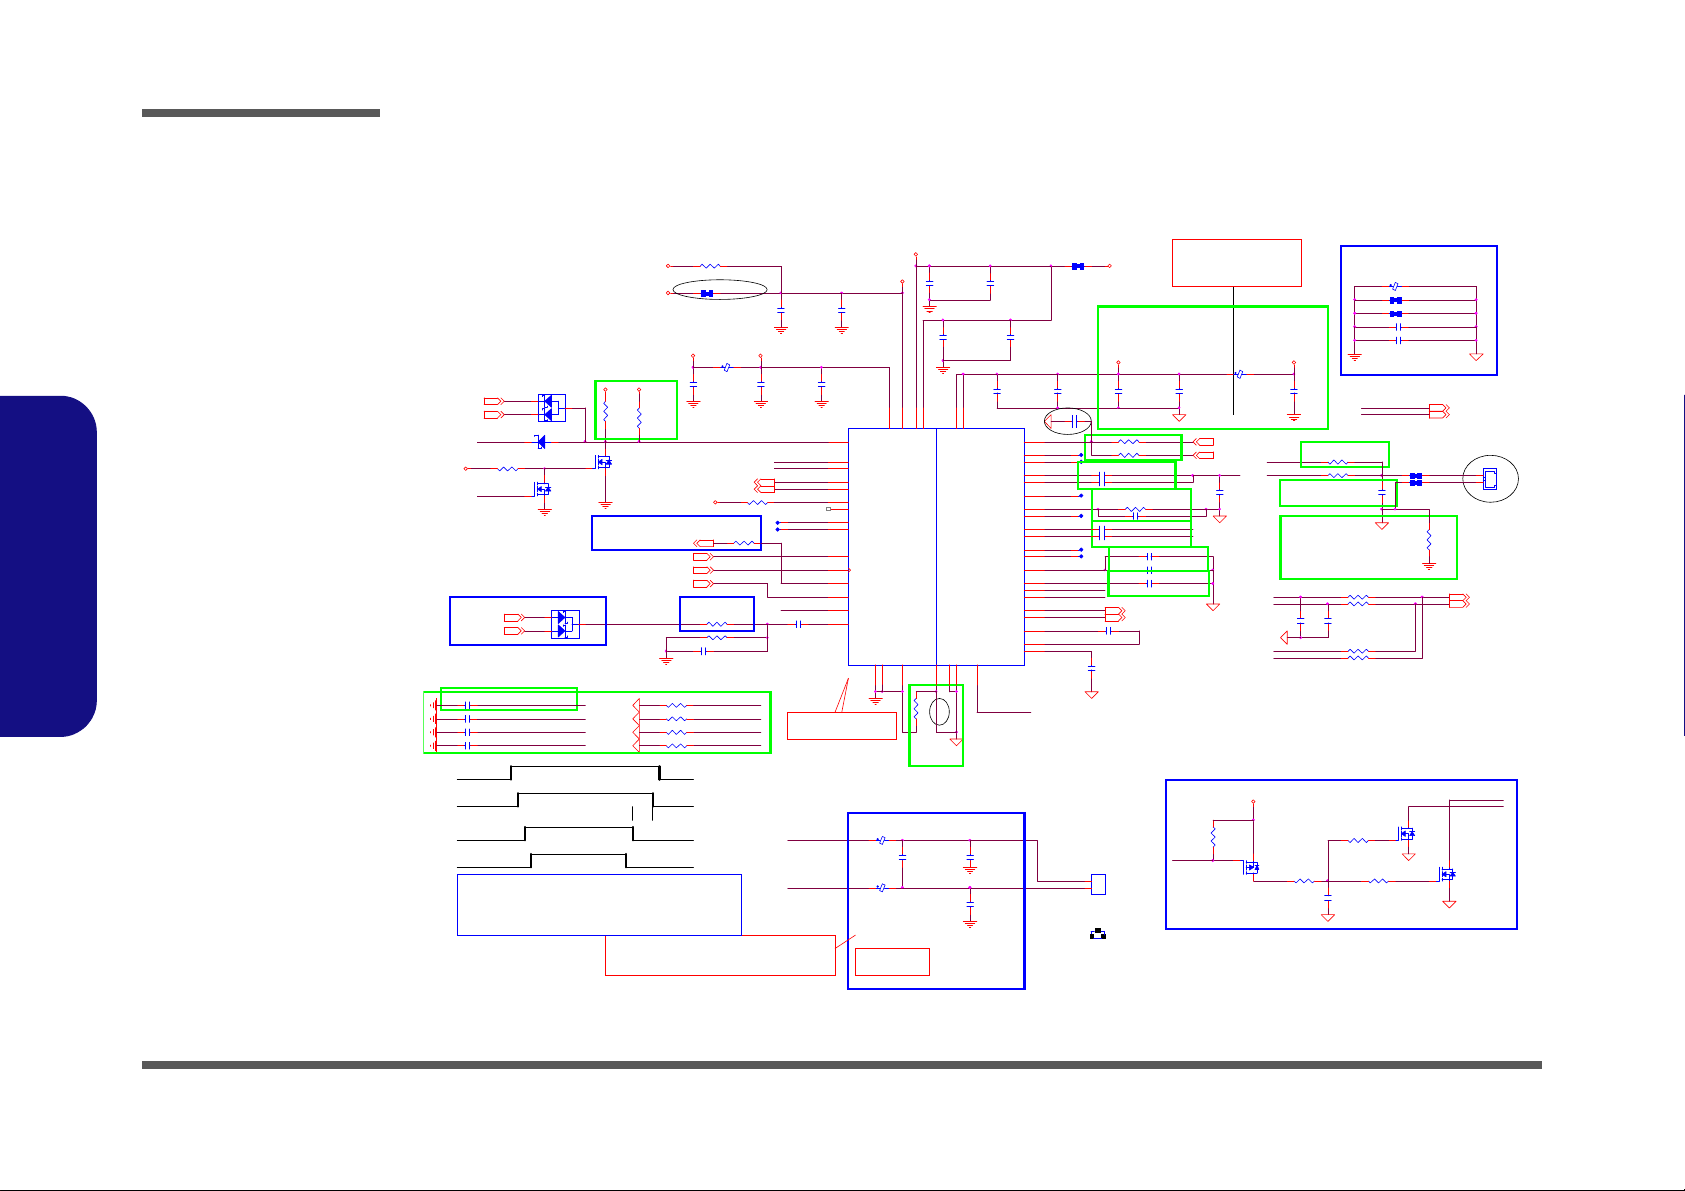
Schematic Diagrams
INT_MIC
MIC2 -VRE FO
MIC2_R
MIC2_L
DMIC-CLK
DMIC-DAT
HDA_RST#
BEEP_R PCBEEP
AZ_SDIN0_R LDO_CAP
HEADPH ONE-L
MIC2- VREF O
MIC1-VREFO-R
OPVEE-ALC26 9
CBN-AL269
CBP-ALC 269
HEADPH ONE-R
HEADPH ONE-L
MIC1- R_R
LINE1-R
LINE1-L
MIC1-L_R
SENSE-B
MONO-OUT
LINE2-L
LINE2-RSPKOUTL+
SPKOUTL-
MIC1_R
MIC1_L
BEEP
R459 *1M_04
MIC2_R
MIC2_L
MIC1-L_R
MIC 1- VR EF O-L
R464 *1M_04
MIC 1- R_R
R465 *1M_04
R462 *1M_04
AUDG
Very clos e to Aud io Cod ec
AUDG
C456 22p_50V_NPO_04
FOR VT1802P
AUDG
AUDG
HDA_SD OUT
HDA_SD IN0
HDA_SY NC
HDA_RST#
C471 22p_50V_NPO_04
C468 22p_50V_NPO_04
C459 22p_50V_NPO_04
ANALOG DIGIT AL
3/23
GND and AUDG space is
60mils ~ 100mils
Layout note:
AUDG_R 22
AUDG_R
SPKOUTR-_R25
SPKOUTR+_R25
R412 100K_04
3.3VS_AUD
INT_MIC_OUT
EAPD_MODE
AUDG_R
AUDG
C480
0.022u_16V_X7R_04
VT1802P 10u
AUDG
INT_MIC_OUT 22
C460
*0.022u_16V_X7R_04
HEADPH ONE-R
ALC269VB L25,C704 -n¤W¥ó
VT1802P L25 ,C704¤£¤W¥ó
MIC1_L
VREF-ALC269
SENSE_A
HDA_RST#
AZ_RST # F o r 3. 3V
HDA Link De-p op
PD# Control
AZ_RST # F or 1 . 5V
HDA Link De-p op
C462
*0.022u_16V_X7R_04
EAPD_MODE
SPKOUTL-
SPKOUTL+_LSPKOUTL+
2 1
J_SPK1
Layou t note :
Close to code c
EMI Require
L19
FCM1005KF-121T03
L21
FCM1005KF-121T03
C278
1000p_50V_X7R_04
LEFT
SPKOUTL-_L
J_SPKL1
85204-02001
1
2
C280
180p_50V_NPO_04
C274
180p_50V_NPO_04
Please Let LC Filter together and close to Codec.IF
Speaker wire le ngth is less than 8000mils It don't
need the LC Filter.
INT_MIC_OUT
µøLAYOU Tª¬ªp, ¦p¤Ó »·¥i¼u©Ê
ÃB¥~¤Á¤ @GROUND¦A »PGND³s±µ
For 3.3V HDA Link.
For 1.5V HDA Link.
20 mil
JDREF
C466
100p_50V_NPO_04
C481 100p_50V_ NPO_04
C470
0.1u_16V_Y5V_0 4
C479 0. 1u_16V_Y5V_04
C440
0.1u_16V_Y5V_04
C461 0. 1u_16V_Y5V_04
R467 10K_04
R453 3. 3K_1%_04
C455
2.2u_6.3V_X5R_06
L36 *H CB1005KF-121T20
Q22
*NDS352AP
G
D S
VT1802P
100P
VT1802P
3.3K_04
C445 2.2u_6.3V_X5R_06
R434
*10K_04
R454 * 100K_04
C431
0.1u_16V_Y5V_04
C476
10u_10V_Y5V_08
C473 10u_6.3V_X5R_06
C425
10u_6.3V_X5R_06
C482
*1u_6.3V_Y 5V_04
C444
0.1u_16V_Y5V_04
C441
10u_6.3V_X5R_06
Headphone Anti-Pop Circuit
Spe a ke r 4 oh m ------> 40 m i l s
Spe a ke r 8 oh m ------> 20 m i l s
AZ_RST#
Speaker wire length less than 8000mils , It don't need LC Filter.
5VS
INT_MIC
R406
*220K_04
C442
*10u_6.3V_X5R_06
PD#
C478 1u_6.3V_X5R_04
SPKOUTR+,R-,L+,L- Trace width
3.3VS _AUD
20ms
R452 * 0_06
R460 20K_1%_04
JP2 *10m il_short_ 04
R425
*10K_04
R428
*10K_04
C472 10u_6.3V_X5R_06
C467 * 10u_6.3V_X5R_06
C427
10u_6.3V_X5R_06
C464
10u_6.3V_X5R_06
C
A
A
D19
BAT54CS3
1
2
3
C437
0.1u_16V_Y5V_04
C477 100p_50V_NPO_04
R400
*15mil_shor t_06
R456 1K_04
C463
0.1u_16V_Y5V _04
C434
10u_6.3V_X5R_06
Q18
*2N7002W
G
DS
R466 39. 2K_1%_04
L35
*HCB1005KF -121T20
L33
HCB1005KF-121T20
C469 0.1u_10V_X7R_04
R463 5. 1K_1%_04
R442 33_04
R436
*4.7K_04
Q23
*BSS138_NL
G
DS
S
D
G
Q21B
*MTDK5S6R
5
34
C465 10u_6.3V_X5R_06
R450
*0_04
S
D
G
Q21A
*MTDK5S6R
2
61
C438
0.1u_16V_Y5V_04
C475 10u_6.3V_X5R_06
C474 10u_6.3V_X5R_06
JP1 *10m il_short_ 04
R461 5. 1K_04
AUDG
AUDG
AUDG
AUDG
VT1802P NC PIN
VT1802P 10u
AUDG
5VS
5VS_AUD 5VS
3.3VS
5VS_AUD
5VS_AUD
3.3VS_AUD
1.5V
3.3VS_AUD
3.3VS
AUDG
AUDG
AUDG
HDA_SPKR12
JD_SENSE _B 25
JD_SENSE 25
KBC_BEEP28
HDA_BI TCLK12
HDA_SY NC12
HDA_SD OUT12
HDA_SDIN012
KBC_MUTE#28
R426
10K_04
HDA_RST#12
PULL HIGH 3. 3VS_AUD FOR VT1802 P
PULL HIGH 5V S_AUD FO R ALC269VB
3.3VS_AUD
AUDG
CODEC (ALC269 & VT1802P)
R471
*10mil_s hort_04
FOR VOLUMN
ADJUST
VT1802P±µAUDG
ALC269 ±µ GND
·í½T»{¤£·| Åܧó«á, ¥i§ïSHORT¹ s¥ó
C488 *100p_50V_NPO_04
C
A
A
D20
BAT54AS3
1
2
3
PVDD1_2
DVDD_IO
VT1802P 10u
AUDG
Thermal Pad place 9
Via hole .
R457
*0_04
Close to Codec
EMI Require
4/2
MIC1_R
J_INTMIC1
*85205-02701
2
1
D18 *RB751S-40C2
AC
4/2
VT1802P 5.1K_1%_04
EAPD_MODE
MIC1 -VRE FO- R
MIC1 -VRE FO- L
MIC1-R 25
MIC1-L 25
R449 75_1%_04
R443 4. 7K_1%_04
R446 4. 7K_1%_04
R445 75_1%_04
Close to Codec
R472 *10mi l_short_04
R420 *28mil_s hort_06
HEADPHONE-L 25
HEADPHONE-R 25
DIGITAL
ANALOG
U27
VT1802P_A3
DVDD1
1
GPIO0-DMIC-DAT
2
GPIO1-DMIC-CLK
3
PD#
4
SDATA-OUT
5
BIT-CLK
6
DVSS2
7
SDATA-IN
8
DVDD-IO
9
SYNC
10
RESET#
11
PCBEEP
12
Sense A
13
LINE2-L
14
LINE2-R
15
MIC2-L
16
MIC 2- R
17
Sense-B
18
JDREF
19
MONO-OUT
20
MIC1-L
21
MIC 1- R
22
LINE1-L
23
LINE1-R
24
AVSS1
26
VREF
27
LDO_CAP
28
MIC2-VREFO
29
MIC1- VREF O-R
30
MIC1-VREFO-L
31
HP-OUT-L
32
AVSS2
37
OPVEE
34
CBN
35
CBP
36
HP-OUT-R
33
PVDD1
39
SPK-L+
40
SPK-L-
41
PVSS142PVSS2
43
SPK-R+
45
SPK-R-
44
PVDD2
46
SPDIFC 2/EAPD
47
SPDIFO
48
AVDD238AVDD1
25
GND
49
PD#
3/23
PC BEEP
Layout Note:
Very close to
Audio Cod ec
Sheet 27 of 42
AUDIO CODEC
VT1802P
AUDIO CODEC VT1802P
B.Schematic Diagrams
B - 28 AUDIO CODEC VT1802P
Page 81
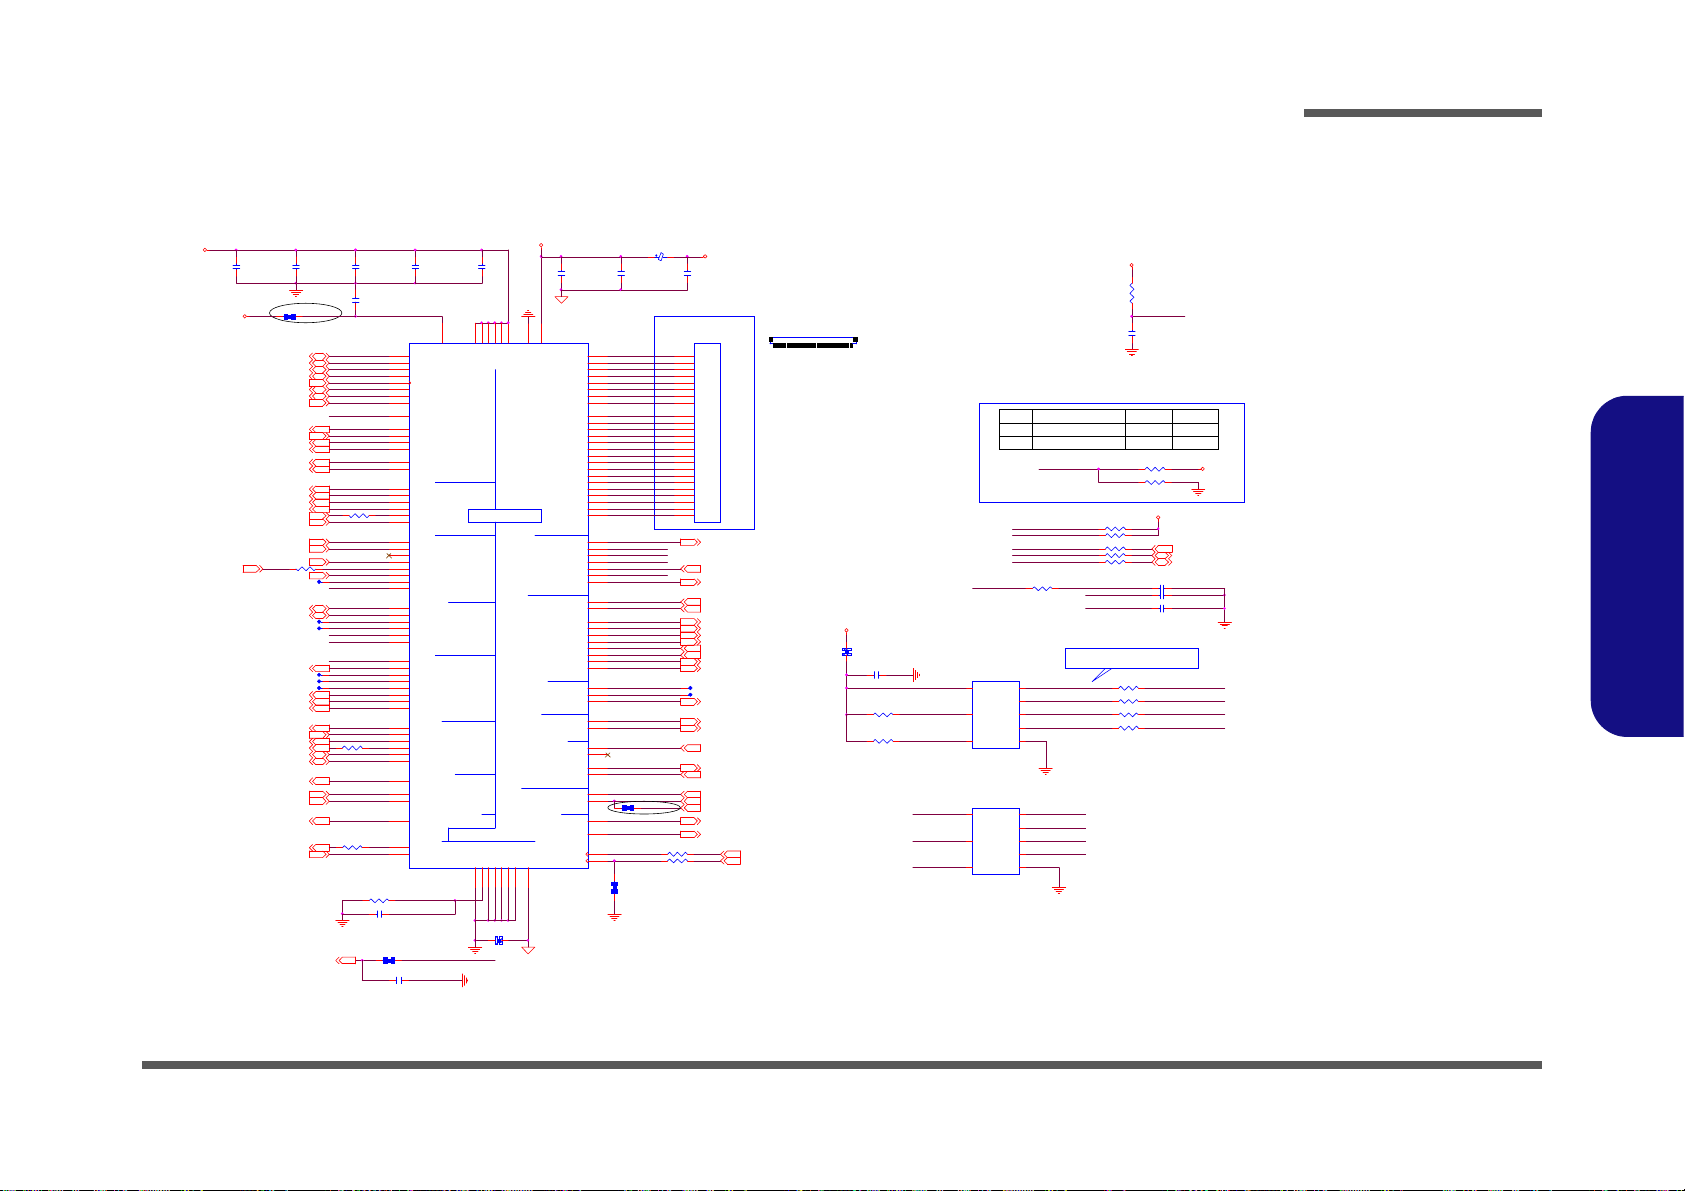
KBC-ITE IT8518E
0V
RX
VCORE_PWRGD 14
dGPU_RST#
3G_DET#
TP_D ATA22
LPC_AD212,22
SERIR Q12,22
LPC_AD012,22
SMD_BAT_R35
SMC_BAT_R35
LPC_AD112,22
TP_CLK22
LPC_AD312,22
LPC_FRAME#12, 22
SMD_CPU_THERM 13
SMC_CPU_THERM 13
EC_VCC
PCLK_KBC
L9 *28mil_short_0 6
SWI# 14
KBC_RS T# 1780CLK21
3G_EN21
CCD_EN 22
AC_PRESENT14,16
DD_ON 25,29,30
PWR_BTN#14
ME_W E12
RSMRST# 14
HSPI_CE# 12
HSPI_MSI 12
6-04-25640-490
PM_PCH_PWR OK 14
3IN121
SMI#16,17
SCI#17
H_PROCHOT#_EC 3
R91 *0_04
R90 43_1%_04
R86 * 0_04
J_KB1
85208-24051
24
23
22
14
12
11
21
8
20
19
6
5
18
4
17
10
9
7
3
2
1
16
15
13
C178
1u_6.3V_X5R_04
R166 *10K_04
R307 47_04
C185
0.1u_16V_Y 5V_04
C174
0.1u_16V_Y 5V_04
SMC_CPU_THERM_R
C183 * 0.1u_16V_Y 5V_04
R303 15_1%_04
R144 * 10_04
C172
0.1u_16V_Y 5V_04
R354 *0_04
K/B MATRIX
FLASH
LPC
SMBUS
PS/2
PWM
UART
DAC
CLOCK
IT8518
CIR
ADC
WAKE UP
PWM/COUNTER
LPC/WAKE UP
EXT GPIO
GP INTERRUPT
WAKE UP
GPIO
U5
IT8518E/H X
WRST#
14
LPCCLK
13
LAD0
10
LAD1
9
LAD2
8
LAD3
7
LFRAME#
6
( PD )LPCPD#/WUI6/GPE6
17
SERIR Q
5
ECSMI#/ GPD 4( PU )
15
ECSCI # /G PD 3( PU )
23
GA20/ GPB5
126
KBRST#/ GPB6 ( PU )
4
KSI0/ STB#
58
KSI1/A FD#
59
KSI2/INIT#
60
KSI3/SL IN#
61
KSI4
62
KSI5
63
KSI6
64
KSI7
65
KSO0/PD 0
36
KSO1/PD 1
37
KSO2/PD 2
38
KSO3/PD 3
39
KSO4/PD 4
40
KSO5/PD 5
41
KSO6/PD 6
42
KSO7/PD 7
43
KSO8/ACK#
44
KSO9/BU SY
45
KSO10/P E
46
KSO11/E RR#
51
KSO12/SLC T
52
KSO13
53
KSO14
54
KSO15
55
VCC
11
VSTBY26VSTBY50VSTBY92VSTBY
114
VSTBY
127
VSTBY
121
VBAT
3
AVCC
74
PS2CLK0/GP F0( PU )
85
PS2DAT0/GPF 1( PU )
86
PS2CLK1/GP F2( PU )
87
( PD )TMRI0/WUI2/GPC4
120
( PD )TMRI1/WUI3/GPC6
124
LPCRST#/WUI4/GPD2( PU )
22
( PD )WUI5/GPE5
35
PWRSW/G PE4( PU )
125
RI1#/WUI0/GPD0( PU )
18
RI2#/WUI1/GPD1( PU )
21
( PD )RING#/PWRFAIL#/LPCRST#/GPB7
112
TXD/GPB1( PU )
109
RXD/GPB0( PU )
108
( PD )CTX/GPB2
123
PS2DAT1/GPF 3( PU )
88
PS2CLK2/GP F4( PU )
89
PS2DAT2/GPF 5( PU )
90
( PD )TACH0 / GPD 6
47
( PD )TACH1 / GPD 7
48
PWM0/GPA0 ( PU )
24
PWM1/GPA1 ( PU )
25
PWM2/GPA2 ( PU )
28
PWM3/GPA3 ( PU )
29
PWM4/GPA4 ( PU )
30
PWM5/GPA5 ( PU )
31
PWM6/GPA6 ( PU )
32
PWM7/GPA7 ( PU )
34
ADC0/ GPI0
66
ADC1/ GPI1
67
ADC2/ GPI2
68
ADC3/ GPI3
69
ADC4/ GPI4
70
ADC5/ GPI5
71
ADC6/ GPI6
72
ADC7/ GPI7
73
VSS1VSS12VSS27VSS49VSS
122
VSS
113
AVSS
75
CK32KE
2
CK32K
128
DAC3/GPJ3
79
DAC2/GPJ2
78
GPJ1
77
GPJ0
76
( PD )E GC S # /G P E 2
83
( PD )E GC L K /G P E 3
84
( PD )EGAD/GPE1
82
GINT/GPD5( PU )
33
L80LLAT/GPE7( PU )
20
VSS
91
DAC5/GPJ5
81
DAC4/GPJ4
80
PWUREQ#/GPC7( PU )
16
( PD )CR X/G PC 0
119
( PD )KSO16/GPC3
56
( PD )KSO17/GPC5
57
( PD )GPH 0/I D 0
93
( PD )GPH 1/I D 1
94
( PD )GPH 2/I D 2
95
( PD )GPH 3/I D 3
96
( PD )GPH 4/I D 4
97
( PD )GPH 5/I D 5
98
( PD )GPH 6/I D 6
99
( PD )GPG 1/ I D7
107
SMCLK0/ GPB3
110
SMDAT0/GPB 4
111
SMCLK1/ GPC1
115
SMDAT1/GPC 2
116
SMCLK2/ GPF 6( PU )
117
SMDAT2/GPF 7( PU )
118
FLFR AME#/GPG 2
100
FLAD0/SCE#
101
FLAD1/SI
102
FLAD2/ SO
103
FLAD3/GPG6
104
FLCLK/SCK
105
( PD )FLRST#/WUI7/ GPG0/TM
106
( PD )L80H LAT/GPE0
19
SYS_R ESET#14
NC2
SHORT
L10
HCB1005KF -121T20
C175 0. 1u_16V_Y5 V_04
R150 *1 0K_04
R151 10K_04
C165
*0.1u_1 6V_Y5V_04
C192 1u_6.3V_ X5R_04
R308 47_04
C358
0.1u_16V_Y 5V_04
R112 * 0_04
C203
0.1u_16V_Y5V _04
6-03-08518-0P2
R136 * 0_04
NC1 SHORT
C173
*0.1u _16V_Y 5V_04
C176 *1 0p_50V_NPO_04
R155
100K_04
3/23
R162 *10mil_s hort_04
KB-SO1
KB-SO8
KB-SO4
KB-SI0
R309 4.7 K_04
R167 10K_04
KB-SO7
KB-SO10
KB-SO6
C158
*0.1u_16V _Y5V_04
KB-SO14
C160
0.1u_16V_Y 5V_04
KB-SO0
KB-SI3
KB-SI6
U16
MX25L6406EM21-12G
CE#
1
SO
2
WP#
3
VSS
4
SI
5
SCK
6
HOLD#
7
VDD
8
HSPI_MSO 12
R88 *0_04
R94 * 0_04
R304 15_1%_04
KB-SI1
KB-SI7
R302 1K_04
KB-SO11
KB-SI2
KB-SI5
KB-SO12
KB-SO5
KB-SO9
KB-SI4
KB-SO13
KB-SO2
KB-SO3
VDD3
VDD3
VDD3
KBC_AVD D
VDD3
VDD3
VDD3
3.3VS
SMC_CPU_THERM_R
CK32K
LAN_PCIE_WAKE# 24
SMD_CPU_THERM_R
KBC_SPI _SO_R
KBC_SPI _SCLK_ R
KBC_HOLD#
SPI_VDD_1
64Mbit
KBC_FLASH
BRIGHTNESS11
KBC_SPI_SCLK
KBC_SPI_SO
KBC_SPI_C E#_R
KBC_SPI _SI_R KBC_SPI_SI
LED_BAT_FUL L25
LED_PWR25
KBC_SPI_CE#
LED_BAT_CHG25
KBC_MUTE#27
GA2017
LED_ACI N25
KBC_BE EP27
3G_POWER_EN 21
WLAN_EN21
CPU_FAN22
BKL_EN 11
BT_EN 21,25
PCLK_KBC_R
BAT_VOLT
PCLK_KBC
KBC_WR ESET#
LCD_BRIGHTNESS
CCD_DET#
BAT_DET
KBC_AGND
KBC_AGN D
EC MODULE CHOOSE (FOR DIFFERENCE K/B TYPE)
PME# 16
CCD_DET#
KBC_SPI_*_R = 0.1"~0.5"
USB_CH ARGE_EN 29, 30
KBC_SPI _CE#
PMOSFET_ CONTROL# 35
LED_SCR OLL#
R181 10_04
3G_DET#21
R82
*10mil_short_04
LED_NUM#
LED_CAP#
LCD_BRIGHTNESS
KBC_SPI_CE#_R
KBC_HOLD#
KBC_SPI_SI_R
KBC_FLASH
KBC_SPI_SCLK_ R
BAT_VOLT
U15
*MX25L3205DM2I-12G
ACA-SPI-004-T03
CE#
1
SO
2
WP#
3
VSS
4
SI
5
SCK
6
HOLD#
7
VDD
8
SPI_VDD_1
KBC_SPI_SO_R
R95
*10mil_s hort_04
ALL_SYS_PW RGD 11,14 ,29,33
LID_SW #11,23
SUSB# 6,14, 29
SUSC# 14,32
THER M_VO LT2
BT_DET#21
BAT_VOLT35
BAT_DET35
HSPI_SCLK 12
CPU_FANSEN 22
WLAN_D ET#21
ICPPE# 17
NB_ENAVD D 11,15
KBC_SPI _SI
KBC_SPI _SO
MOD EL_ ID
CK32KE
KBC_SPI _SCLK
KB-SO15
C159
10u_6.3V_X5R_06
MODEL_ ID
SUS_PW R_ACK 14
SMD_CPU_THERM_R
R96 * 0_04
TOTAL_ CU R35
Co-lay SPI ROM
1
TOTAL_C UR _R
TOTAL_ CU R_R
MODEL_ID
3.3VV1.0
R151 10K/ R150 X
VER.
VOLTAGE
J_KB1
R151 X /R1 50 10K
WLAN_CON_POWER21
SMC_CPU_THERM_R
SMD_VGA_TH ERM
SMC_VGA_TH ERM
C184 1u_6.3V_ X5R_04
24
EC_VSS
3/23
RX
AC_DET
BUF _PL T_R ST#16,21,24
AC_IN#35
PWR_SW#29
PCLK_KBC16
CRIT_TEMP_REP#17
H_PECI 3,17,29
KBC_WR ESET#
USB_CH ARGE_ EN29,30
Sheet 28 of 42
KBC-ITE IT8518E
Schematic Diagrams
B.Schematic Diagrams
KBC-ITE IT8518E B - 29
Page 82
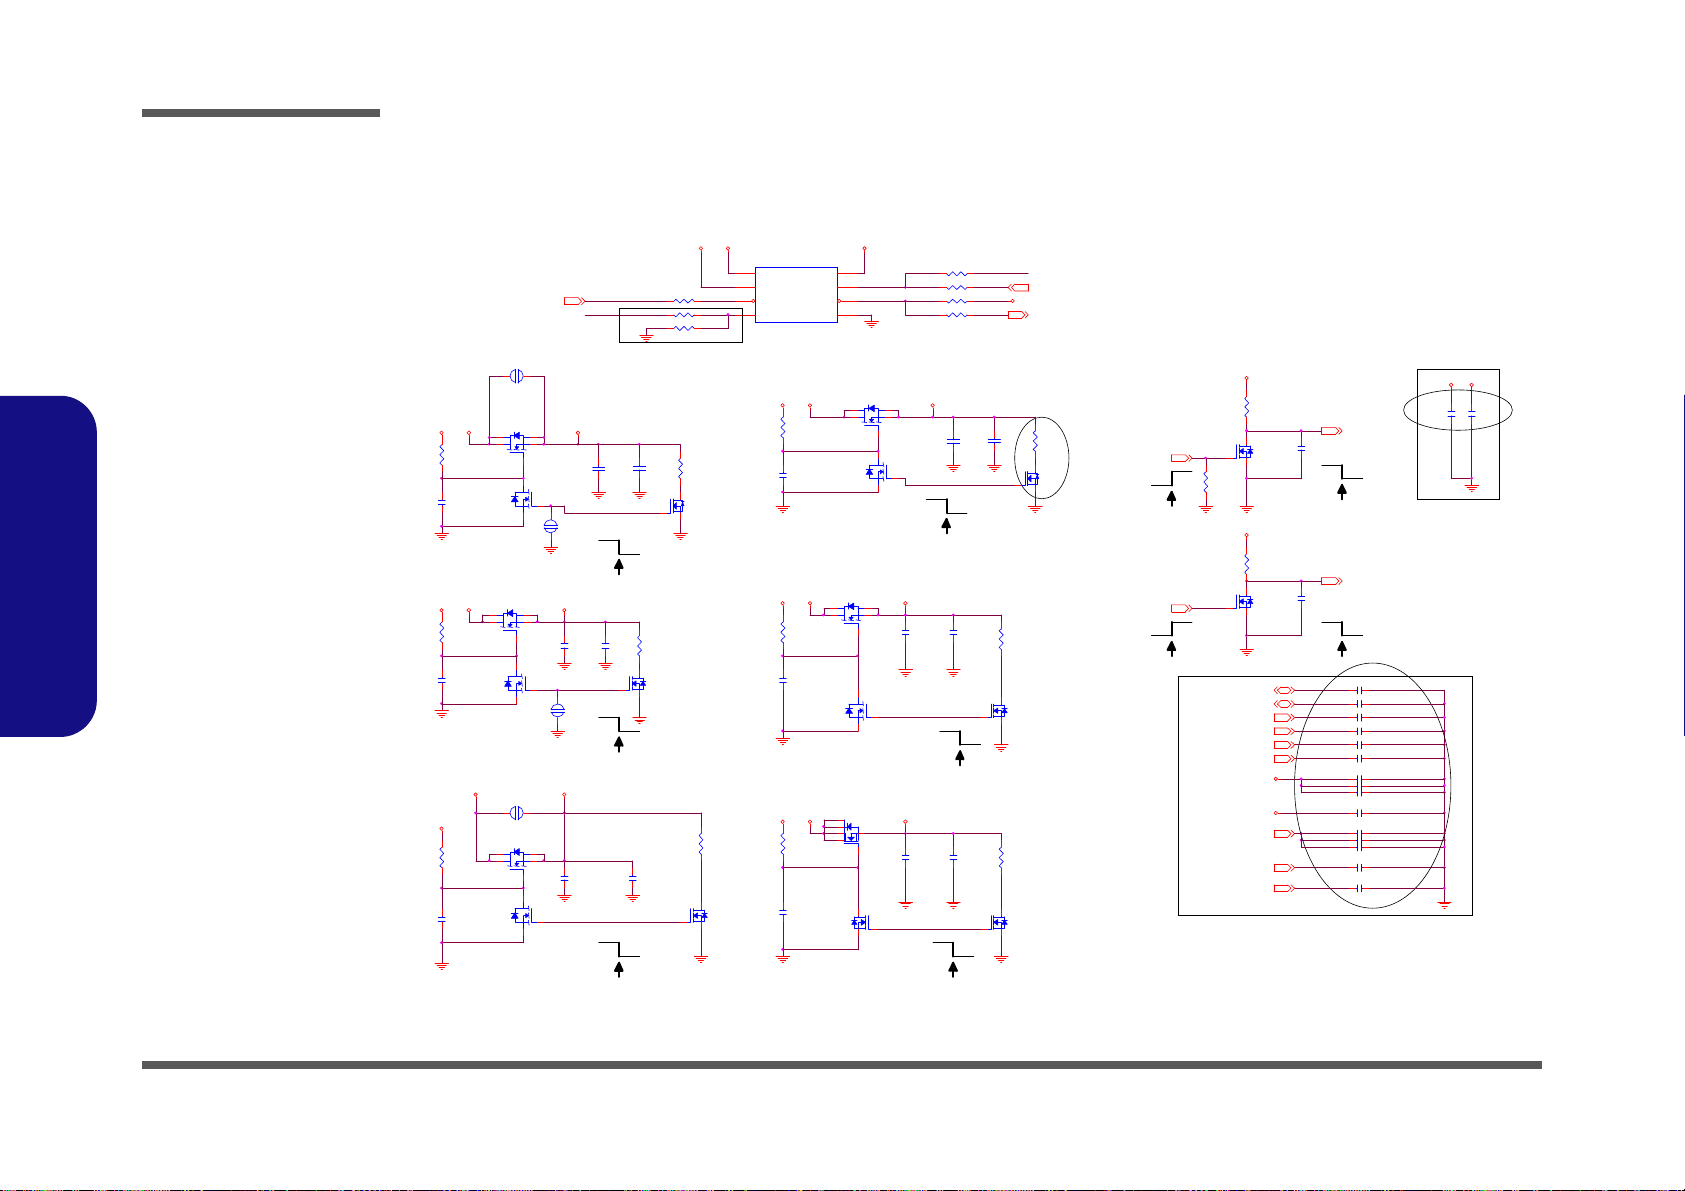
Schematic Diagrams
H_PM_SYNC3,14
DD_ON
C489 * 0.0 1u_16V_X7R_ 04
3.3VS
C499 0.01 u_16V_X7R_04
C496 * 0.0 1u_50V_X7R_ 04
DD_ON#
3/23
C491 * 0.0 1u_16V_X7R_ 04
VDD3
1.5VS_EN1
H_PECI3,17,28
VIN1
DD_ON#
VIN VA
PR114
*100_1%_04
PC74
*0.1u_16V_Y 5V_04
PC69
*10u_ 10V_Y 5V_08
PQ14
*MTN7002ZHS3
G
DS
C500 * 0.0 1u_16V_X7R_ 04
C497 * 0.0 1u_50V_X7R_ 04
H_CPUPWRGD3,17
C492 * 0.0 1u_16V_X7R_ 04
C502 0.01 u_16V_X7R_04
S
D
G
PQ15A
MTDK5S6R
2
61
S
D
G
PQ15B
MTDK5S6R
5
34
SUSB
PWR_SW# 28
ON
ON
SUSB
ON
ON
EMI Requ ire
ON
3A
VDD5SYS15V
SYS15V VDD5
3.3VSSY S15V
5VS
1.5V
3.3VSYS15 V
5V
SYS15 V 1.5VS
VIN
H_SNB_IVB#3,17
VIN
1.5VS_CPU
VDD3
VDD 3
VDD3
VDD 3
1.5V
SYS15V
PJ16 * OPEN-3mm
12
5V
NMOS
SUSB
SUSB
1.5VS_LO
5VS_EN1
3.3V
Power Plane
PR98 1K_04
NMOS
3A
DD_ON# 23,25,32
PWR_SW#_R
SUSB 31,32
ON
5VS
NMOS
PC73
*0.1u_16V _Y5V_04
PC80
*0.01u_50V_X7 R_04
PC64
1000p_50V_X7R_04
PR171
100_04
PR183
1M_04
ON
PC72
2200p_50 V_X7R_04
PR106
1M_04
PR109
1M_04
PQ11A
MTNN2 0N0 3Q8
1
3
7
28
3.3VS
S
D
G
PQ40A
MTDK5S6R
2
61
PC162
*0.1u_16V_Y 5V_04
NMOS
PR113
100_04
PC149
0.1u_16V_Y 5V_04
PR172
1M_04
PQ12A
MTNN20N03Q8
1
3
7
28
PC148
2200p_50 V_X7R_04
PC76
0.1u_16V_Y5V_04
PR112
1M_04
PC150
10u_6.3V_X5R_06
PQ37
MTN7002ZHS3
G
DS
PR184
1M_04
PJ14
*40mil
12
PQ36A
MTNN2 0N0 3Q8
1
3
7
28
PC70
3300p_50 V_X7R_04
PQ42B
MTNN20N03Q8
6
5
4
PR99 10K_0 4
PC66
*0.1u_16V _Y5V_04
PU7
P2808B0
VA
1
VIN
2
M_B TN #
3
INSTANT-ON4GND
5
PWR_SW#
6
DD_ON_LATCH
7
VIN1
8
PR107
75_04
PJ15
*40mil
12
PC79
*0.01u_50V_X7 R_04
PQ42A
MTNN20N03Q8
1
3
7
28
EMI request 4/2
PC63
*0.1u_16V_Y 5V_04
PR181
100K_04
PC68
4700p_50V_X7R_04
PC75
2200p_50V_X7R_04
PR105
10K_04
PQ11B
MTNN2 0N0 3Q8
6
5
4
PQ36B
MTNN20N03Q8
6
5
4
PC77
10u_6.3V_X5R_0 8
PC67
10u_6.3V_X5R_0 6
PR173 1K_04
PJ10
*OPEN-8mm
1 2
PQ41A
MTNN20N 03Q8
1
3
7
28
PQ12B
MTNN20N03Q8
6
5
4
ON
PQ41B
MTNN20N03Q8
6
5
4
PR182
100K_04
1.5VS
200mA
NMOS
1.5VS_CPU
NMOS
ON
15A
PQ13
MTN2604G6
3
2 4
1
5
6
EMI
DD_ON25,28,30
M_BTN#22
SUSB#6, 14,28
PC71
10u_6.3V_X5R_06
PQ9
*2SK3018S3
G
DS
PR108
*75_04
C501 0.01 u_16V_X7R_04
ON
3.3VS_EN1
DD_ON#
3.3VS_ LO
1.5VS_CPU_LO
SUSB
1.5VS_CPUEN1
DDON_LATCH
3.3V_EN1
PQ8
2SK3018S3
G
DS
5V_EN1
¹w¯dPJ17¡Acost down 5V MOS
1.8VS_PW RGD14,31
C493 * 0.0 1u_16V_X7R_ 04
C503 0.01 u_16V_X7R_04
PR97 100K_ 04
PM_DRAM_PWRGD3,14
PR110
*100_1%_04
PC158
*0.1u_16V_Y5V_04
PC159
10u_10V_Y5V_ 08
PQ10
*MTN7002ZHS3
G
DS
ALL_SYS_PWRGD11, 14,28, 33
C498 * 0.0 1u_16V_X7R_ 04
C494 * 0.0 1u_16V_X7R_ 04
W USB Charge ¤W¥ó
WO USB Charge ¤£¤W¥ó
3/23
S
D
G
PQ40B
MTDK5S 6R
5
34
SUSB#6,14,28
R331 *1K_04
USB_CHARGE_EN
R332 *1 00K_04
PR96 *100K_04
USB_CHARGE_EN 28,30
DELAY_PWRGD14,3 3
C495 * 0.0 1u_50V_X7R_ 04
VIN
C490 * 0.0 1u_16V_X7R_ 04
Sheet 29 of 42
5VS, 3VS, 1.5VS
CPU
5VS, 3VS, 1.5VS CPU
B.Schematic Diagrams
B - 30 5VS, 3VS, 1.5VS CPU
Page 83
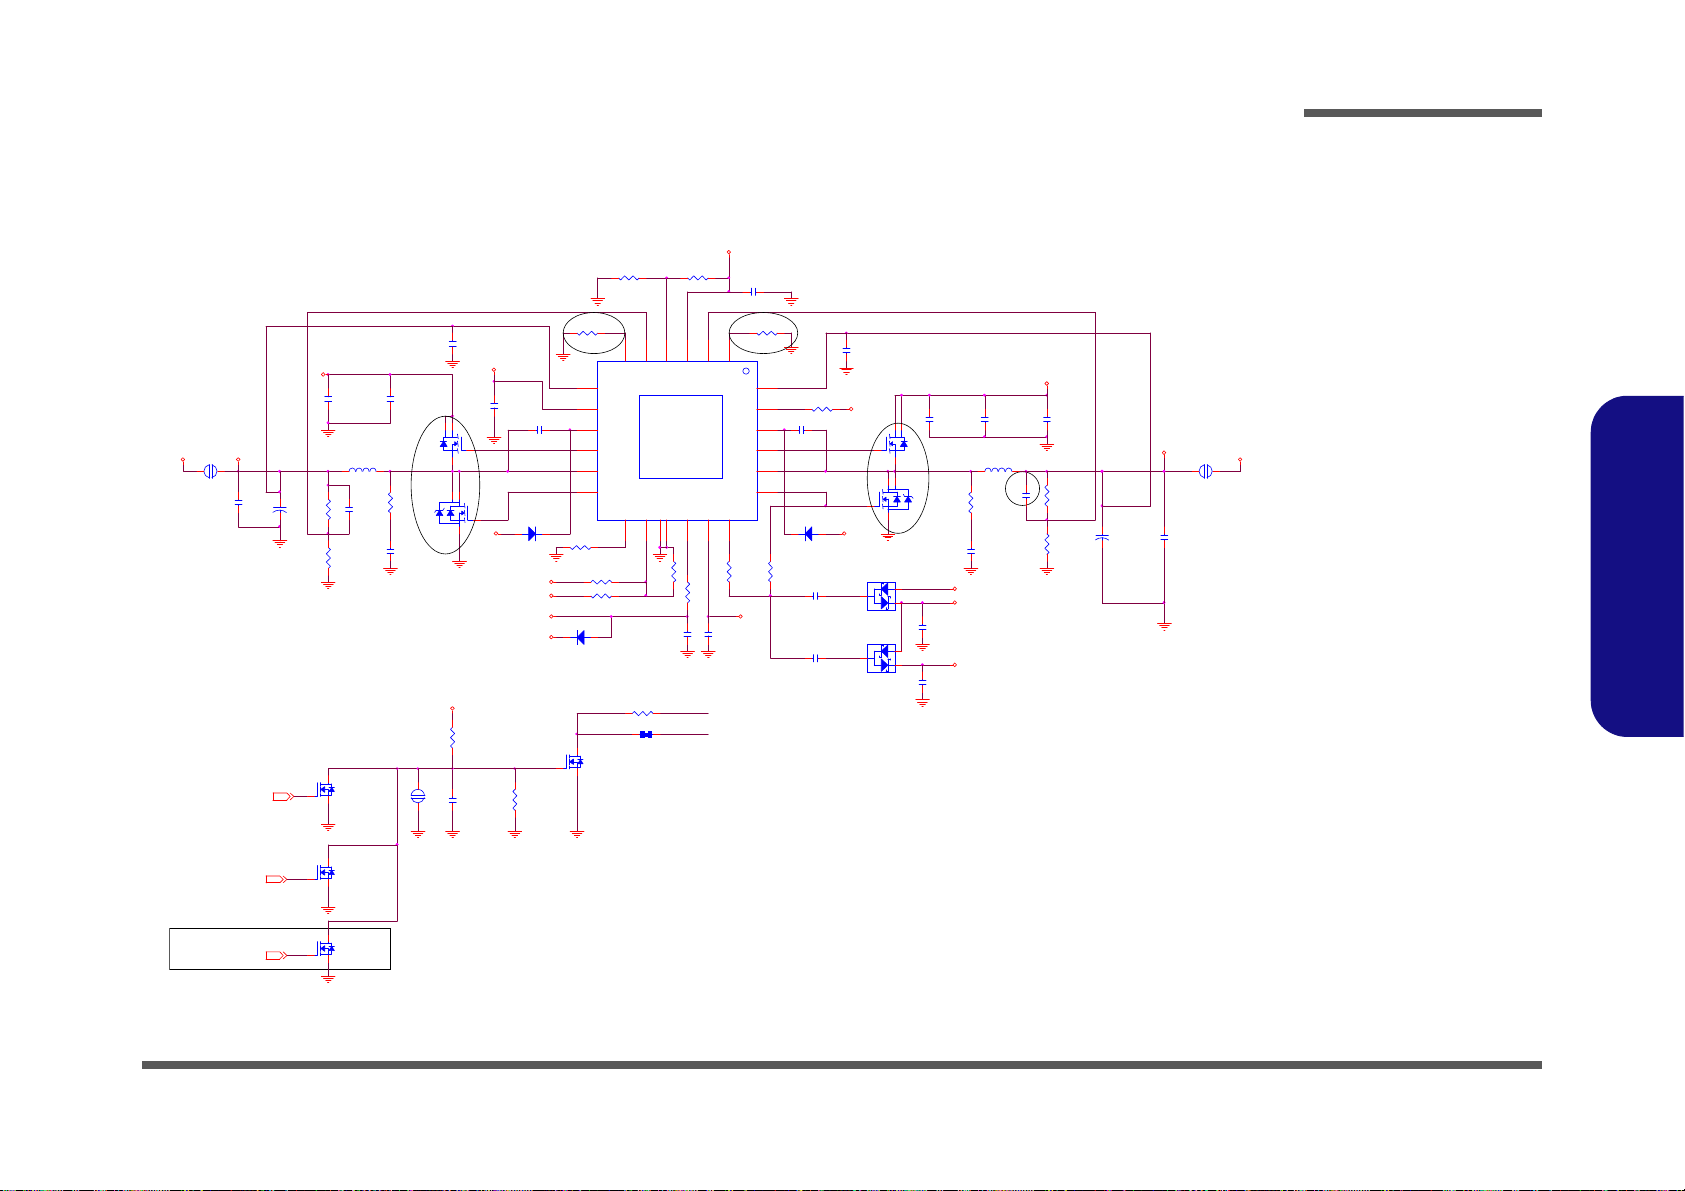
VDD3, VDD5
3/23
UGATE2
DD_ON_EN_VDD
VREG5
LGATE1
Support Intel V-Pro Function
5A
EN_ALL
Rb
5A
VFB2
Ra
UGATE1
EN_5V
EN_3V
VIN_618 2
LGATE2
TONSEL
EN_3V5V
PHASE1
VFB1
SKIPSEL
5608POK
EN_3V
PR104
*5.1_06
PC60
*220p_ 50V_N PO_04
VIN
VIN
M990125
EN_5V
BOOT2
VDD3 VDD5
BOOT1
PHASE2
PC57
4.7u_25V_X5R_0 8
PR177
*0_04
+
PC166
220u_6.3V _6.3*6. 3*4. 2
PC49
1u_10V_Y 5V_06
PR174 *0_04
PD8
RB0540S2
A C
PJ13
*OPEN-5mm
12
PR178
*20mil _04
DD_ON25,28,29
AC_IN35
PC15 7
4.7u_25V_X5R_0 8
PR179
*680K_1%_ 04
PR10 1
*0_04
SYS5V
SYS10V
SYS3V
VDD3
SYS15V
PC58
4.7u_25V_X5R_0 8
VIN
VDD5SYS5V
VIN1
SYS5V
PU6
G5608
VREF
3
EN1
1
VFB1
2
TONSEL
4
LDO5
17
LGATE1
19
PHASE1
20
VFB2
5
UGATE2
10
VCLK
18
BOOT2
9
EN2
6
VO2
7
LDO3
8
PHASE2
11
LGATE2
12
EN013SKIPSEL14GND15VIN
16
UGATE1
21
BOOT1
22
POK
23
VO1
24
GND PAD
25
C
A
A
PD9
BAT54SS3
1
2
3
PC153
1u_10V_Y 5V_06
PJ11
*40mil
12
PR10 0 * 20mil _04
PC62
*220p_50V_NPO_04
PC55
2200p_50V_X7R_04
PR175
110K_1%_04
PC59
4.7u_25V_ X5R_08
PR103
*5.1_06
PQ7
*MTN7002ZHS3
G
DS
PC50
100p_50V_N PO_04
S
D
G
PQ6A
MTDK5S6R
2
61
R101
*10m il_sho rt_04
PC56
0.1u_50V_ Y5V_06
PD7
RB0540S2
AC
PC52
2200p_50V_X7R_04
PC156
1u_10V_Y 5V_06
PR89
30K_1%_06
PC48 *1000p_50V_X7R _04
PC151
1000p_ 50V_X7R_ 04
+
PC16 5
220u_6.3V_ 6.3*6. 3*4.2
PR176 *10K_04
PC53
0.01u_50V_ X7R_04
PC65
0.1u_16V_Y 5V_04
PR95
10K_04
PC54
0.01u _50V_X7R _04
PJ12
*OPEN-5mm
1 2
PC61
4.7u_25V_X5R_0 8
PR94
20K_1%_04
PR90 *20mil _04
PL11
TMPC0603H-4R 7M-Z01
12
PC163
0.1u_16V_Y 5V_04
PR10 2 * 0_04
C
A
A
PD6
BAT54SS3
1
2
3
PC51
0.1u_16V_Y 5V_04
PR180
2.2_06
PR91
13K_1%_06
PR88
110K_1%_04
PC154
0.1u_10V_X7R_ 04
PR92
18.7K_1%_06
PQ38A
EMB17A03V
3
4
5
6
S
D
G
PQ6B
MTDK5S6R
5
34
PL12
TMPC0603H-4R 7M-Z01
1 2
PR87
100K_04
PC152
1000p_50V_X7R_04
PR93 *0_04
VREF_VDD
VREG3
VREF_VDD
VREG5VREG5
VREG5
VREG5
PC155
0.1u_10V_X7R_0 4
For USB Charge
PD10
RB75 1V
AC
3/29
3/29
USB_CHARGE_EN28,29
PQ39A
EMB17A03V
3
4
5
6
PQ39B
EMB17A03 V
1
2
7
8
PQ5
*MTN7002ZHS3
G
DS
4/3
PQ38B
EMB17A03V
1
2
7
8
4/3
Sheet 30 of 42
VDD3, VDD5
Schematic Diagrams
B.Schematic Diagrams
VDD3, VDD5 B - 31
Page 84
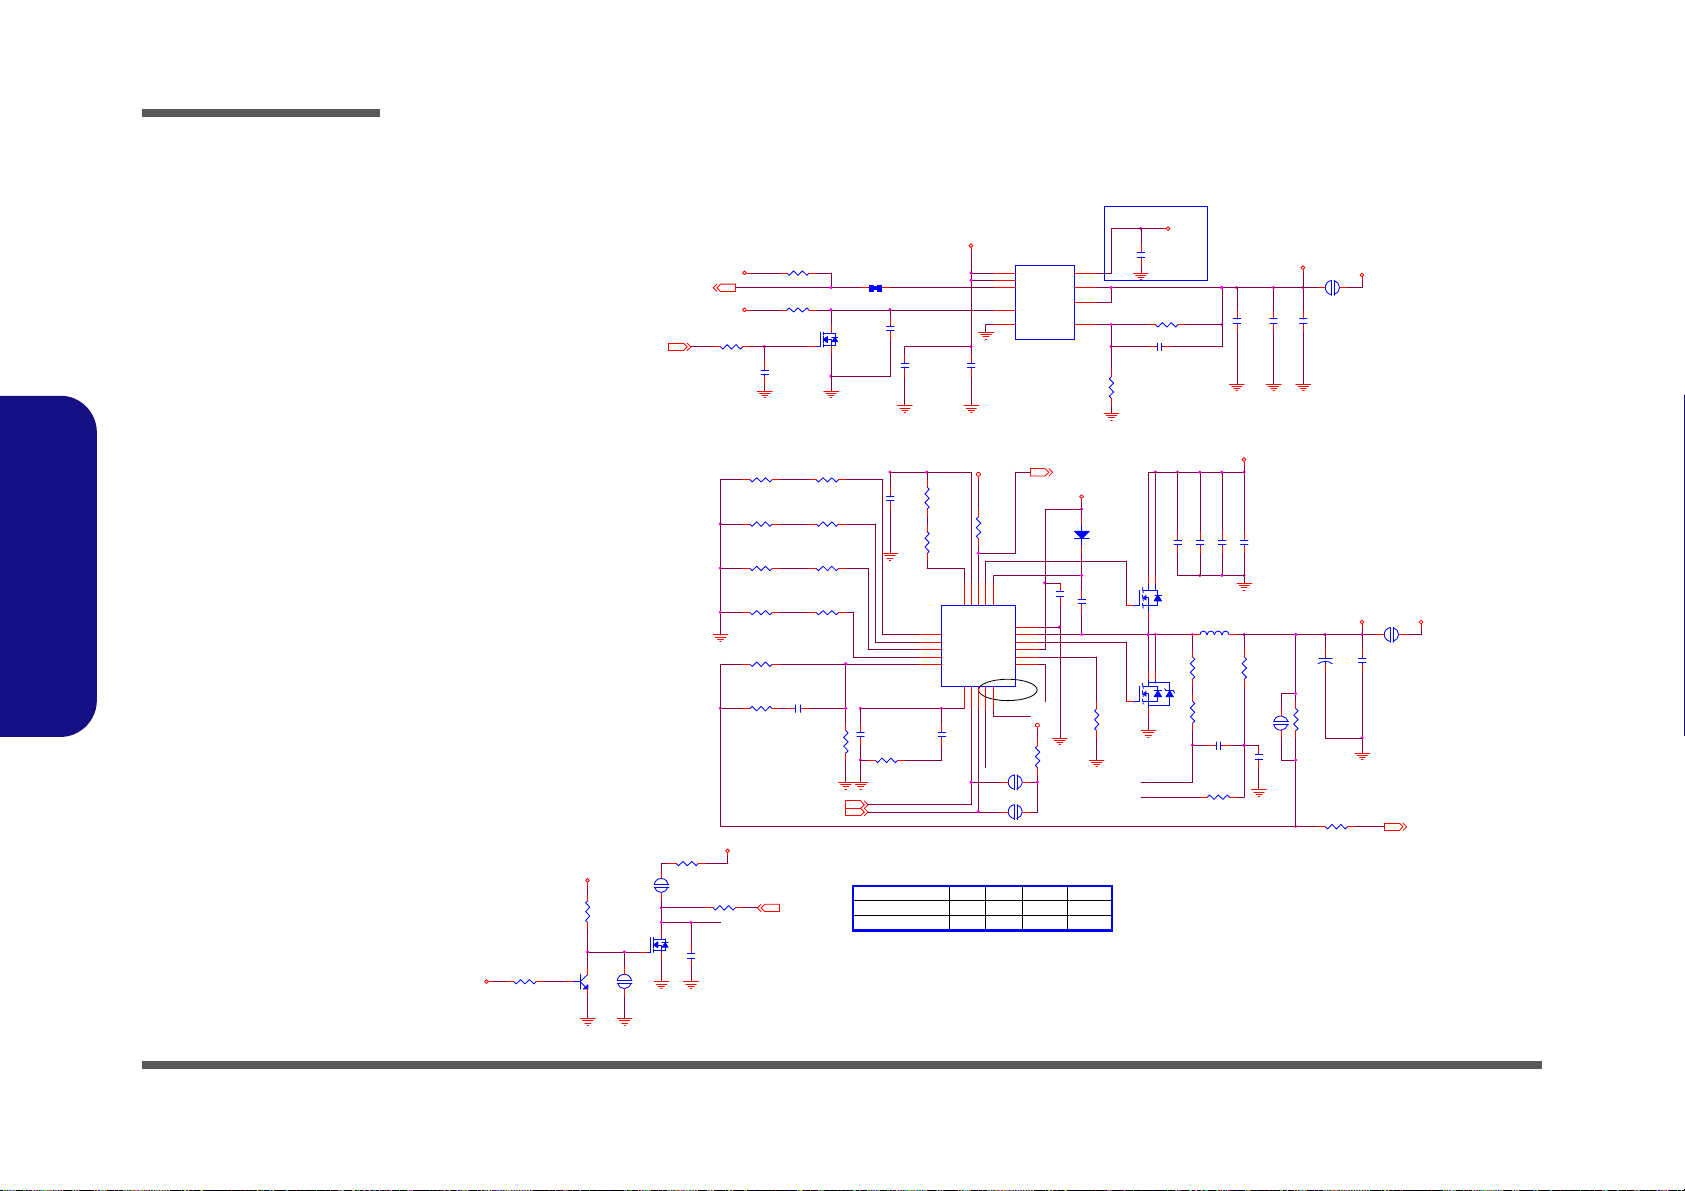
Schematic Diagrams
PC144
0.1u_16V_Y5V_04
PC34
*1u_6.3V_X5R_04
PR82 1M_04
PQ30
2SK3018S3
G
DS
PU5
AX6615ESA
GND
1
VCNTL
6
VOUT
3
VIN
5
VOUT
4
VFB
2
POK
7
EN
8
VIN
9
PC143
10u_6.3V_X5R_06
PR83 10K_04
PR84 10K_04
PJ22
*OPEN-3mm
1 2
PR85 1.3K_1%_04
PQ28
BTN3904
B
E C
5V
1.8VS
V1.8
PR165 10K_04
POK_6610
SUSB29,32
1.8VS_PWRGD
VFB_6610
EN1.8VS
1.05VS
2A
2A
1.8VS_PWRGD14, 29
-n²¾¾aªñPIN6 ¸}
6-02-06615-320
6-02-07113-320
1.8VS
0.85VS_EN 14
PR71 *0_04
3/29
COMP_0.85VS
VCCSA_VID1
PJ6
*6mil
12
EN1.8VS1
PC32 0.1u_50V_Y5V_06
PR160
100_04
PR43 *20mil_04
PR54
9.31K_1%_04
3.3V
SS_0.85VS
VCCSA_VID 06
VCCSA_VID 16
0.8V10.725V
10
0
PC133
*0.1u_10V_X5R_04
0
0
0.675V
0.85VS_PWRGD 14
VCCSA_SEN SE 6
0.9V
VCCSA_VID1
SET2_0.85VS
SET1_0.85VS
5V
PR162
10K_04
CSN_0.85VS
SET0 SET2 SET3SET1
VDD3
LG_0.85VS
FB_0.85VS
CSP_0.85VS
RT_0.85VS
0.85V_ON
Vout= 0.8*(PR73+PR72)/PR72=1.84V
CSN_0.85VS
EAP_0. 85VS
VCCSA_VID0
SET3_0.85VS
SET0_0.85VS
0.85VS
5V
3.3V
CSP_0.85VSCSP
0.85V_ON
VIN
0.85VS
V0.85
1
VCCSA_VID0
1
BOOT_0.85VS
6A
PJ19
*40mil
12
PHASE_0.85VS
PC124
0.01u_50V_X7R_04
PR42
10_04
3.3V
PJ5
*40mil
12
PR48
9.31K_1%_04
PR45
22_04
3.3V
PR68
100K_04
PR60
*0_04
5V
+
PC116
220u_6.3V_6.3*6.3*4. 2
PC126
0.1u_10V_X7R_04
PR62
*20mil_ 04
PC33 0.1u_50V_Y5V_06
PC47 82p_50V_NPO_04
PC130
1u_6.3V_X5R_04
PR69
12K_1%_04
PQ26B
PD1503YVS
4
3
5
6
PC125
0.022u_16V_X7R_04
PC128 4.7u_25V_X5R_08
PU4
UP1509
BOOT
1
UG
2
POK
3
SS
4
EAP
5
SET3
6
SET2
7
SET1
8
SET0
9
FB
10
COMP11VID 012VID113EN/PSM14CSN
15
CSP
16
RT
17
VCC
18
LG
19
PHASE
20
GND
21
PR52
1K_1%_04
PC26
0.01u_50V_X7R_04
PC131
0.1u_25V_X7R_06
PC29
47p_50V_NPO_04
PD15
RB0540S2
AC
PJ3
*40mil
12
PR56
10.7K_1%_04
PR57
10K_1%_04
PR164
*20mil_04
PR163
*20mil_04
PQ26A
PD1503YVS
7
8
1
2
PR51
15K_1%_04
PC129 4.7u_25V_X5R_08
PL8
TMPC0603H-1R0M-Z01
1 2
PR161
1.3K_1%_04
PR67
33K_1%_04
PC123
0.1u_16V_Y5V_04
PJ4
*OPEN-5mm
1 2
PR49
12K_1%_04
PR55
10K_1%_04
PR63
100K_1%_04
PR65
10K_04
PC146
10u_6.3V_X5R_06
PR50
9.1K_1%_04
PC45
*1u_6.3V_Y5V_04
PC147
2.2u_6.3V_X5R_06
PC145
0.1u_16V_Y5V_04
PC46
2200p_50V_X7R_04
PQ35
2SK3018S3
G
DS
PR86
1K_1%_04
PR70 100K_04
PC142
*10u_6.3V_X5R_06
PJ20
*40mil
12
R56 *10mil_short_04
Sheet 31 of 42
Power 0.85VS,
1.8VS
Power 0.85VS, 1.8VS
B.Schematic Diagrams
B - 32 Power 0.85VS, 1.8VS
Page 85
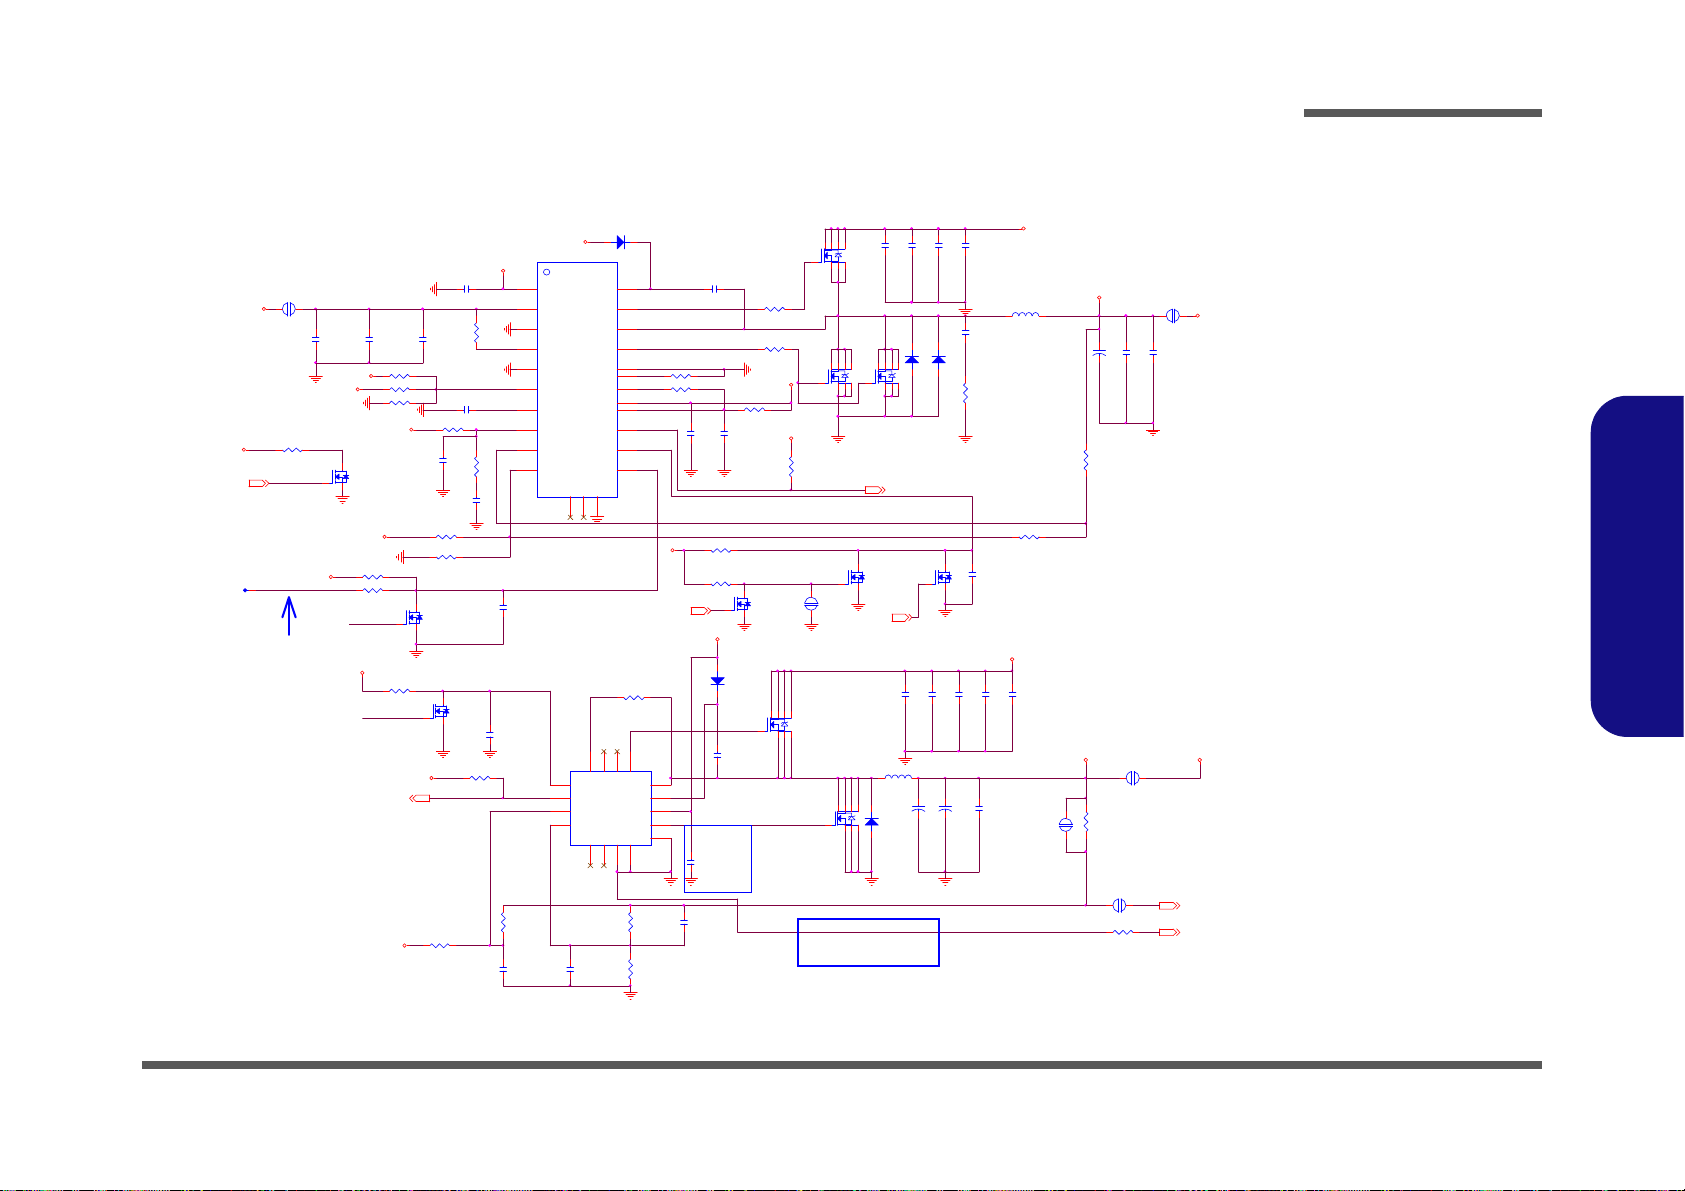
POWER 1.5V/1.05VS
VIN
V1.05 1.05VS
COMP_VDD
MODE
PQ46
2SK3018S3
G
DS
PQ34
2SK3018S3
G
DS
PC172
10u_6.3V_X5R_ 06
SUSB
CS
10A
5V
VBST
VTTEN
DRVH
PR193 *0_04
PR191 *0_04
+
PC164
220u_6.3V_6 .3*6. 3*4. 2
1.05VS
FB_1.05VS_6127
PC168
0.1u_50V_Y5V_06
PJ27
*40mil
12
PC178
0.1u_10V_X7R_04
PD18
*SK34SA
A C
PR194
100K_04
PR190 *20mil_04
PU8
G5616
VTTGND
1
VLDOIN
23
VTT
24
VTTSNS
2
GND
3
MODE
4
VTTREF5VCC5
14
PGOOD
13
S5
11
S3
10
VDDQSET
9
VDDQSNS
8
COMP
6
CS
16
PGND
18
DRVL
19
LL
20
DRVH
21
VBST
22
PVCC5
15
CS_GND
17
NC7NC12GND
25
S
D
G
PQ48B
MTDK5 S6R
5
34
PC42
0.01u_16V_X7R_04
PR202 100K_04
PC181
*1000p_50V _X7R_04
PR79
9.31K_1% _04
PC43
*20p_50V_N PO_04
PR198 *10K_1%_04
PR169 6.2K_1%_04
PR168 *90.9K_04
PR185
*5.1_06
PC170
4.7u_25V_X5R_08
PC175
10u_6.3V _X5R_06
PC171
4.7u_25V_X5R_08
PC136
4.7u_25V_X5R_08
PR201 47K _04
PC35
0.1u_50V_Y5V_06
PC177
1u_6.3V_X5R_04
PC135
0.1u_16V_Y5V_04
PC167
*1000p_50V _X7R_04
PQ29
ME4894-G
4
62738
5
1
PJ8
*6mil
12
PR75
0_04
PJ24
*OPEN-8mm
1 2
PC169
0.1u_50V_Y5V_06
PJ26
*OPEN-2mm
12
PD16
SK34SA
A C
PC173 0.1u_10V_X7R_ 04
PC40
*0.1u_16V_Y5V_04
PC176
10u_6.3V_X5R_ 06
15A
1.5V
PU1
G5413
LX
1
BST
2
VCC
3
DL
4
GND5RTN6N.C7N.C
8
FB
9
VOUT
10
PGD
11
EN
12
ILIM
13
N.C14N.C
15
DH
16
PAD
17
PC161
0.1u_16V_Y5V_04
+
PC132
*220u_6.3V_6.3*6.3*4.2
PR187 *28m il_06
PQ47
*MTN7002ZHS3
G
DS
PR111
3.3_06
PR192
*28mil_06
PR189 2.2_06
PC141
*15p_50V_N PO_04
PR203 100K_04
PQ32
ME4626 -G
4
62738
5
1
PR204 *100K_04
PD19
CSOD140SH
A C
PC182
0.1u_16V_Y5V_04
PJ21
*OPEN-8mm
1 2
PR170
*20mil _04
PR197 10K_1%_04
PQ33
*MTN7002Z HS3
G
DS
PC179
1u_6.3V_X5R_04
PR76 *22_04
VIN
PC174
*10u_6.3V_X5R_06
1.5V
VDDQ
PR188 6.2K_1%_04
3.3V
VTT_MEM
5V
5V
VTT_MEM
5V
PC37
0.1u_50V_Y5V_06
PC160
0.1u_16V_Y5V_04
PR200 *28mil_06
PR195
*10_04
PR78 10K_04
PC41
0.1u_10V_X7R_04
PR196 10.7K_1%_04
+
PC139
220u_6 .3V_6 .3*6 .3* 4.2
PC138
4.7u_25V_X5R_08
PR186
0_06
PD17
RB0540S 2
AC
PR199
*28mil _06
S
D
G
PQ48A
MTDK5 S6R
2
61
PC180
*1000p_50V _X7R_04
PC183
0.1u_16V_Y5V_04
PD20
RB0540S2
A C
PR77
100K_04
PR80
4.02K_1% _04
PC44
1u_6.3V_ X5R_04
LL
VTTREF
VTT
VTTSNS
VDDQSNS
DDR1.5V_PWRGD
1.5S_CPU_PWRGD
SUSB
PQ43
ME4894 -G
4
62738
5
1
VDDQ SET
PQ45
*ME4626-G
4
62738
5
1
PQ44
ME4626-G
4
62738
5
1
VDDQ
5V
VDDQ
5V
5V
R1
R2
5V
5V
R2
Vout=(R1/R2+1)*0.75
R1
Vout=(R1/R2+1)*0.75
VTT_MEM
DRVL
PL13
TMPC1004H-1R 0M-Z01
1 2
PK3906
1.05V _ON
VCCP_ SENSE _G5413
DDR1.5V_PWRGD 14
LX
DL
1.05VS_PWRGD14
BST
ILIM
DH
1.05VS_PWRGD
S5_6163
DD_ON#23,25,29
SUSB29,31
SUSC#14 ,28
FOR S3 REDUCE ¹w¯d
PR81 * 0_04
VSSP_SENSE 5
VCCP_SENSE 5
PJ9*6mil
12
PC137
*4.7u_25V_X5R_08
PL9
TMPC0603H-1R 0M-Z01
1 2
»Ý©Ô¨ìIC PIN5,6 ªþªñ¤U¦a
-n²¾¾aªñPIN3 ¸}
SUSB
3.3V
5V
Sheet 32 of 42
POWER 1.5V/
1.05VS
Schematic Diagrams
POWER 1.5V/1.05VS B - 33
B.Schematic Diagrams
Page 86
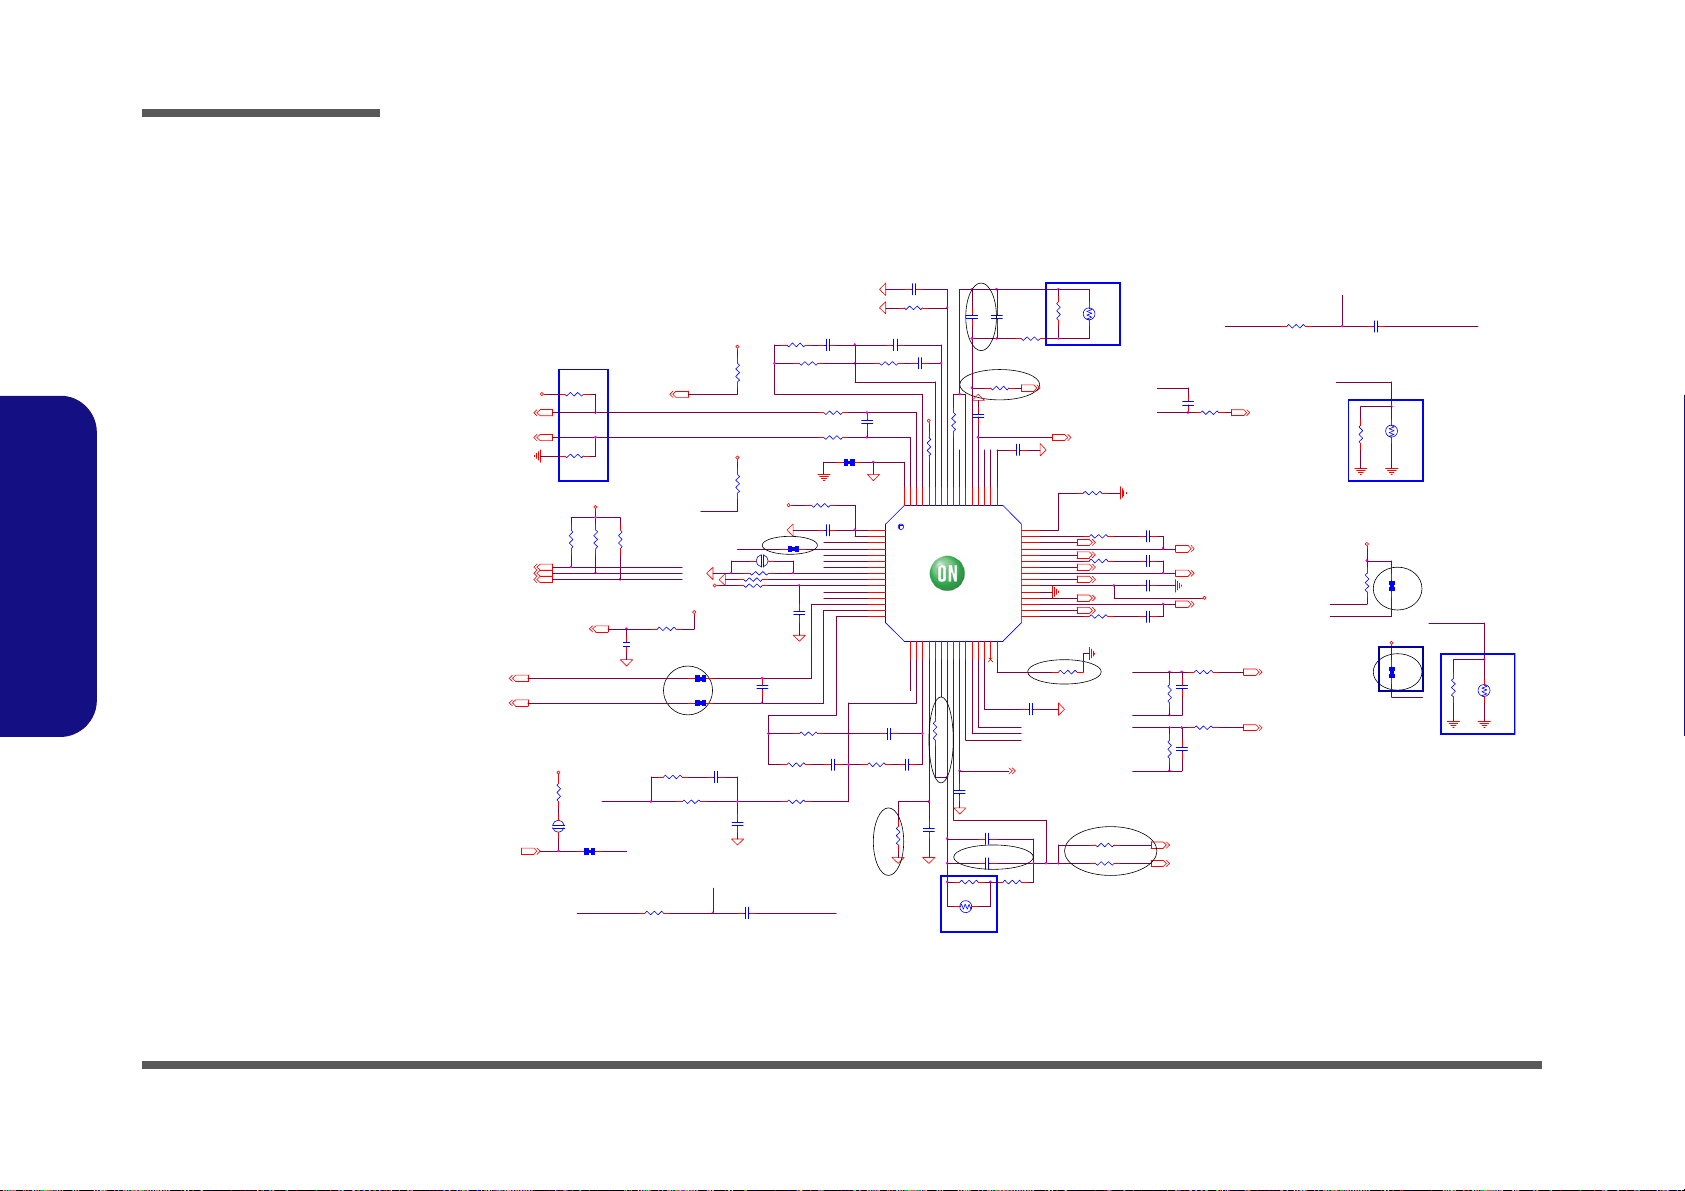
Schematic Diagrams
PC14
*1u_10V_Y 5V_06
DROOP
3/29
PR47
*10mil_s hort_04
PR23 10K_04
PR6
*10mil_s hort_04
3/23
PR17 *10mil_shor t_04
PR124 100K_1%_06
PC110 0 .22u_10V_X5R_0 4
PR154
8.25K_1%_04
PR126 2_06
PC89 33p_50V_NPO_04
PR122 39. 2K_1%_04
PJ2 *6mil
1 2
PR135 49.9_1%_04
PR149 0_04
PC84 1000p_50V_X7R_04
PC113 10p_50V_NPO_04
PC24 2.2 u_6.3V_X5R_04
PC101
1000P_50V_X7R_04
PJ1
*6mil
12
PR26
*75_04
PR32 90.9K _1%_04 PR53
*0_04
PR145 2_06
PR61
100_04
PC2
0.047u_10V_ X7R_04
PU3
NCP6132 AMNR26
TSNSA
46
IOUTA
54
EN
4
VRHOT#
11
SDIO
5
ALERT#
6
ROSC
9
SCLK
7
VRDY A
3
CSCOMP22CSP325CSREF24CSSUM
23
LGA
41
TRBSTA#
57
PVCC
36
BST2
40
HG2
39
SW2
38
LG2
37
PGND
35
COMP
18
VSP
14
DROOP21FB
17
DIFF
15
CSP1
27
SWA
42
HGA
43
VSPA
59
DIFFA
58
DROOPA
52
FBA
56
COMPA
55
CSREFA
49
CSSUMA
50
CSP2A
48
VRMP
10
VRDY
12
DRVEN
29
VSN
13
LG1
34
SW1
33
VSNA
60
ILIMA
53
EPAD
61
VCC
1
IOUT
19
HG1
32
CSP2
26
CSCOMPA
51
TSNS
28
ILIM20TRBST #
16
PWM
30
BST1
31
BSTA
44
CSP1A
47
PWMA
45
VDDBP
2
VBOOT
8
PR152 11.8K_1%_04 02
PC25
0.047u_10V _X7R_04
PC82 470p_5 0V_X7R_04
RT2
100K_NT C_06_A
1 2
RT4
100K_NTC _06_A
1 2
PC111
1000p_50V_X7R_04
PC114
330P_50V_X7R_ 04
PR133 10_1%_04
PC3
0.047u_10V_ X7R_04
PC27 1000p_50V_X7R_04
PR123 1 0.7K_1%_04
PR147 19.6K_1 %_04
PC98 0.22u_10V_X5R_04
PC87 100p_50V_NPO_04
PR58
100_04
PC21 0.1u_10V_X7R_04
PC122
33p_50V_NPO _04
PR146 0_04
PC22
1000p_50V_X7R_04
PR132 1.21K_1%_04
PC120
2200p_50V_X7R_04
PR46 3. 48k_1%_04
PR159
10_1%_04
PR166
8.25K_1%_0 4
PR141
75_1%_04
PC23 0.1u_10V_X7R_04
RT3
100K_NTC _06_A
1 2
PC13 0.1u_10V_X7R_04
PR142 2_06
PC90 680p_5 0V_X7R_04
PC11
1000p_50V_X7R _04
PR118
165K_1%_04
PR31 1K_0 4
PR41 24K_1% _04
PR121 4.12K_1%_0402
PR157 124K_1%_06
PR40
10K_04
PR36 *10mil_short _04
PR7 6.98K_1%_04
PR150 *0_04
PC17
0.01u_50V_X7R_0 4
PC85 1200p_ 50V_X7R_04
PR21
24K_1%_04
PR158
165K_1%_04
PR5 6.98K_1%_04
PR156
4.3K_1%_04
RT1
100K_NTC_0 6_A
12
PC102 2 .2u_6.3V_X5R _04
PC83 4700p_50V_X7R_04
PC106 0 .22u_10V_X5R_0 4
PC10
4700p_50V_X7R_04
PR119 100K_1%_06
PR9 11. 5K_1%_04
PC12
1000p_50V_X7R_04
PR35 10K_04
PR120
75K_1%_04
PR140
54.9_1%_04
PR144
130_1%_04
PR148 1 .6K_1%_04
PR125 2.43K_1%_04
PR39
10K_04
PR151 1K_1%_04
PR134 1K_1%_04
PC115
470p_50V_X7R _04
PR167
75K_1%_04
PR44 2_06
5VS
3.3VS
5VS
5VS
1.05VS
5VS
VIN
3.3VS
1.05VS
VGFX_CORE
5VS
SGND
SWN1 34
CSREF 34
3.3VS
SWN2 34
SWN1 34
SWN2 34
SW1A 34
H_PROCHOT#3
VR1_VSSGT_SEN SEA6
VR1_VCC GT_SENSEA6
SWN1A 34
SW1 34
SW2 34
HG1A 34
CSREFA 34
SWN1A 34
LG2 34
HG2 34
LG1A 34
ALL_SYS_PW RGD11,14,2 8,29
HG1 34
LG1 34
H_CPU_SVIDCLK5
H_CPU_SVIDALRT#5
H_CPU_SVIDDAT5
DELAY_PWRGD14,29
3/23
VCORE_VC C_SEN SE5
VCORE_VSS _SENSE5
VBOOT
PUT COLSE
TO VCORE
HOT SPOT
TSENSE
CSREFA
TRBST#
CSCOMPA
IMON
CSCOMP
IMONA
TRBST#
TRBST A#
VSP
H_CPU_SVIDCLK
PUT COLSE
TO CPU
SOCKET
H_CPU_SVIDDAT
H_CPU_SVIDALRT#
CSREFA
H_PROCHOT#
CSSUMA
CSSUM
CSREF
H_CPU_SVIDDAT
VR_RDYA
CSP1A
IMONAIMONA
DROOPA
FBA
Option for
1 phase GT
H_PROCHOT#
VSN
CSP1A
CSP1A
CSP3
VR_RDY A
PUT COLSE
TO VGFX
HOT SPOT
CSCOMPA
CSP1
TSENSETSENSE
DELAY_PWRGD
CSP2A
H_CPU_SVIDALRT#
TSEN SEA
H_CPU_SVIDCLK
CSP3
PUT COLSE
TO VCORE
Phase 1
Inductor
CSREFA
TSENSEA
CSP2
CSP2A
PUT COLSE
TO GT
Inductor
VR_EN
CSREF
VR_EN
CSCOMPCSCOMPCSCOMPCSCOMPCSCOMPCSCOMP
DROOP
Option for
2 phase CPU
3/29
PR4
*1K_1%_04
CSREF
CSP2
DROOPA
PR34 *10mi l_short_04
PR13
*1K_1%_04
CSP1
CSREF
3/23
3/29
3/29
3/29
PR139 *10mil_s hort_04
PR138 *10mil_s hort_04
Sheet 33 of 42
POWER VCORE1
B.Schematic Diagrams
B - 34 POWER VCORE1
POWER VCORE1
Page 87
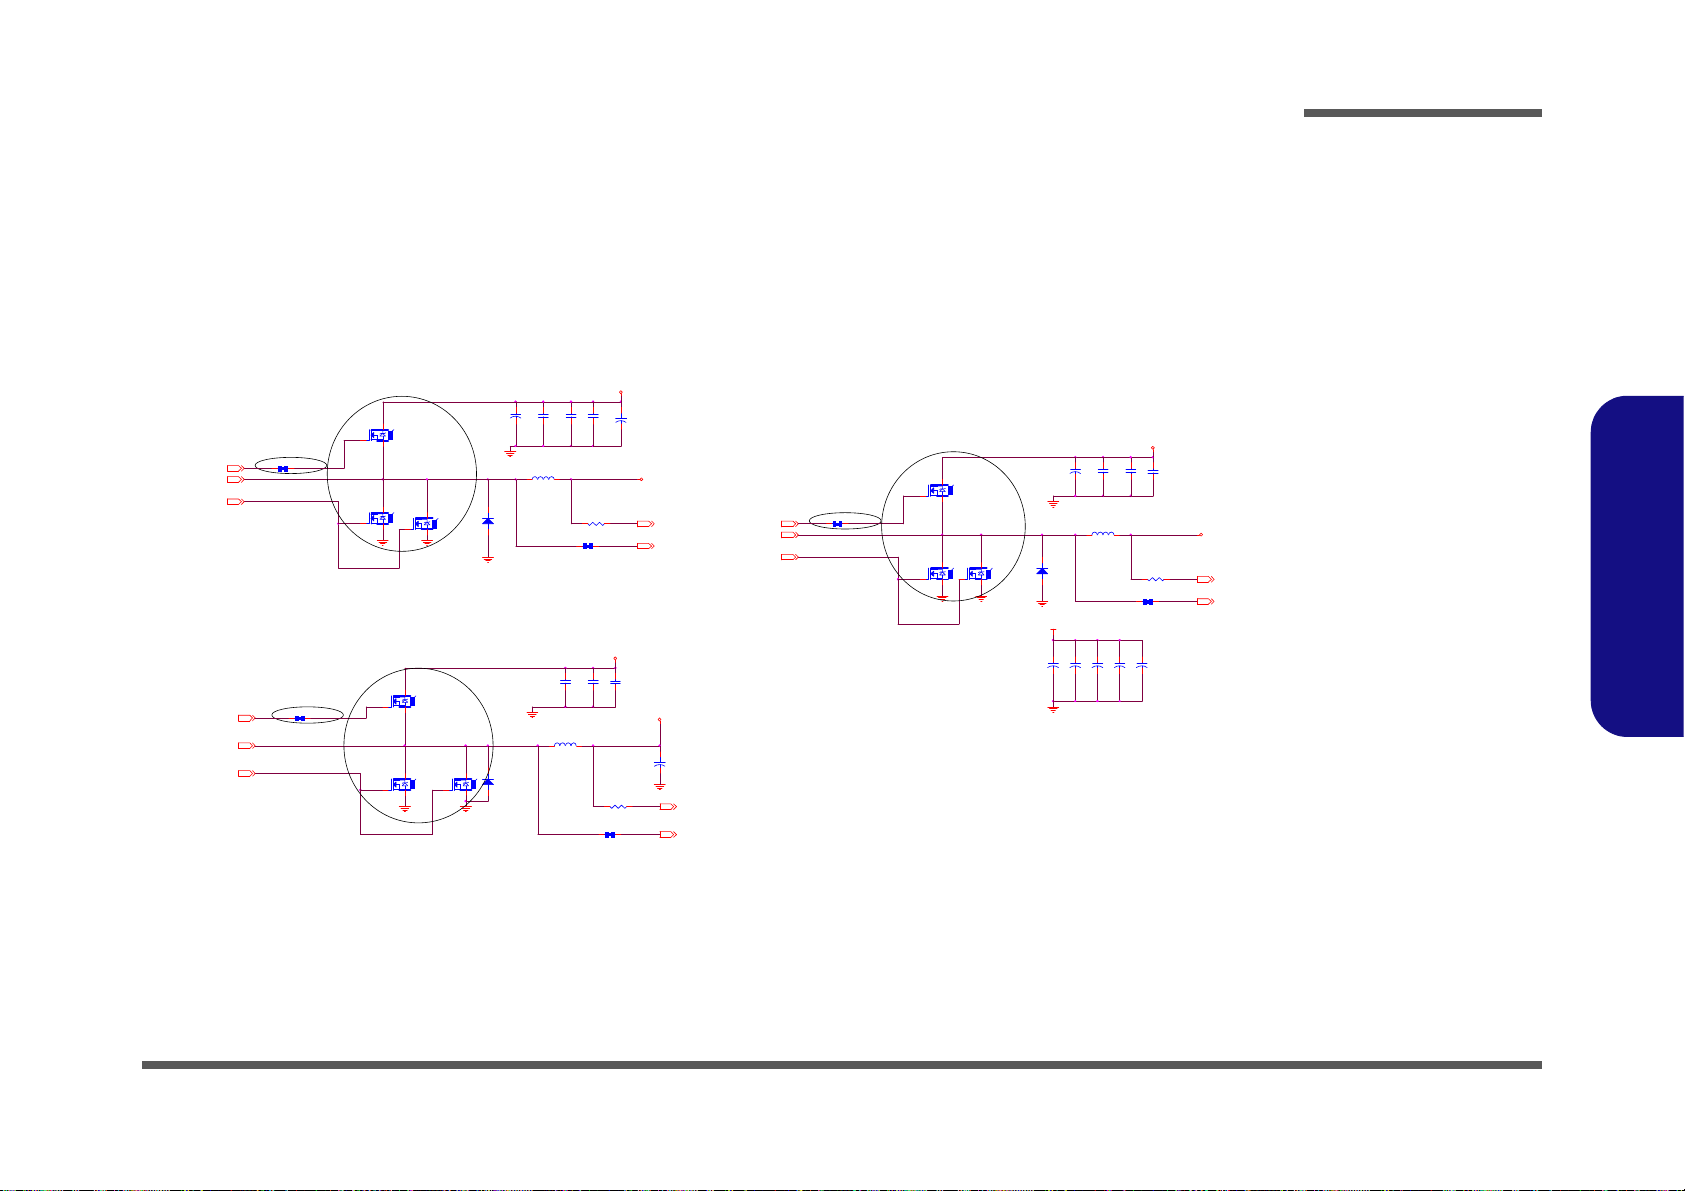
POWER VCORE2
3/23
3/23
PL10
0.36UH _10*10* 3.5
1 2
HG_1
CSREF
LG1
CSREF
HG_2
LG2
SW2
LG1A
SW1
PR72 *28mil_short_06
SW1A
DCR 1.1mohm
DCR 1.1moh m
DCR 1.1moh m
PQ24
MDU1512
G
DS
PL6
0.36U H _12.9 *14*3. 8
1 2
+
PC112
330uF_2.5V_9m_6.3*6
PC88
4.7u_25V_X5R_08
PQ23
MDU1512
G
DS
PR155
10_04
PD5
CSOD140SH
A C
+
PC81
*15u_25V _6.3* 4.4
PQ27
MDU1512
G
DS
+
PC119
330uF_2.5V_9m_6.3*6
PC38
4.7u_25V_ X5R_08
PQ4
MDU1516
G
DS
PC31
4.7u_25 V_X5R_08
PC5
0.1u_50V_Y5V_06
PC92
4.7u_25V_X5R_08
PQ31
MDU1 512
G
DS
PC36
4.7u_25V_ X5R_08
PC28
0.1u_50V_ Y5V_06
PC30
4.7u_25 V_X5R_08
PL7
0.36U H _12.9* 14*3. 8
1 2
PQ3
MDU1516
G
DS
+
PC121
*330uF_2.5V_9m_6 . 3* 6
PQ25
MDU1 512
G
DS
PC39
0.1u_50V_Y5V_06
PR20
10_04
PD14
FM5822
A C
+
PC134
*15u_25V_6.3*4.4
PD13
FM5822
A C
PR74
10_04
HG1
PQ22
MDU1512
G
DS
+
PC118
330uF_2.5V_9m_6.3*6
+
PC117
330uF_2.5V_9m_6.3*6
PQ18
MDU1516
G
DS
VIN
VIN
VCORE
VCORE
VCORE
VGFX_CORE
VIN
CSREF 33
SWN1 33
CSREF 33
SW133
HG133
SWN2 33
LG1A33
SW1A33
HG1A33
LG133
LG233
SW233
HG233
SWN1A 33
CSREFA 33
25A
25A
25A
+
PC140
330uF_2. 5V_9m _6.3*6
PR153 *10mil_short_04
HG_1A
3/23
HG1A
+
PC127
*330uF_25V
3/28
PR66 *28mil_short_06
HG2
3/28
3/28
PR131 *28mil_s hort_06
PR19 *10mil _short_0 4
PR73 *10mil_s hort_ 04
Sheet 34 of 42
POWER VCORE2
Schematic Diagrams
B.Schematic Diagrams
POWER VCORE2 B - 35
Page 88
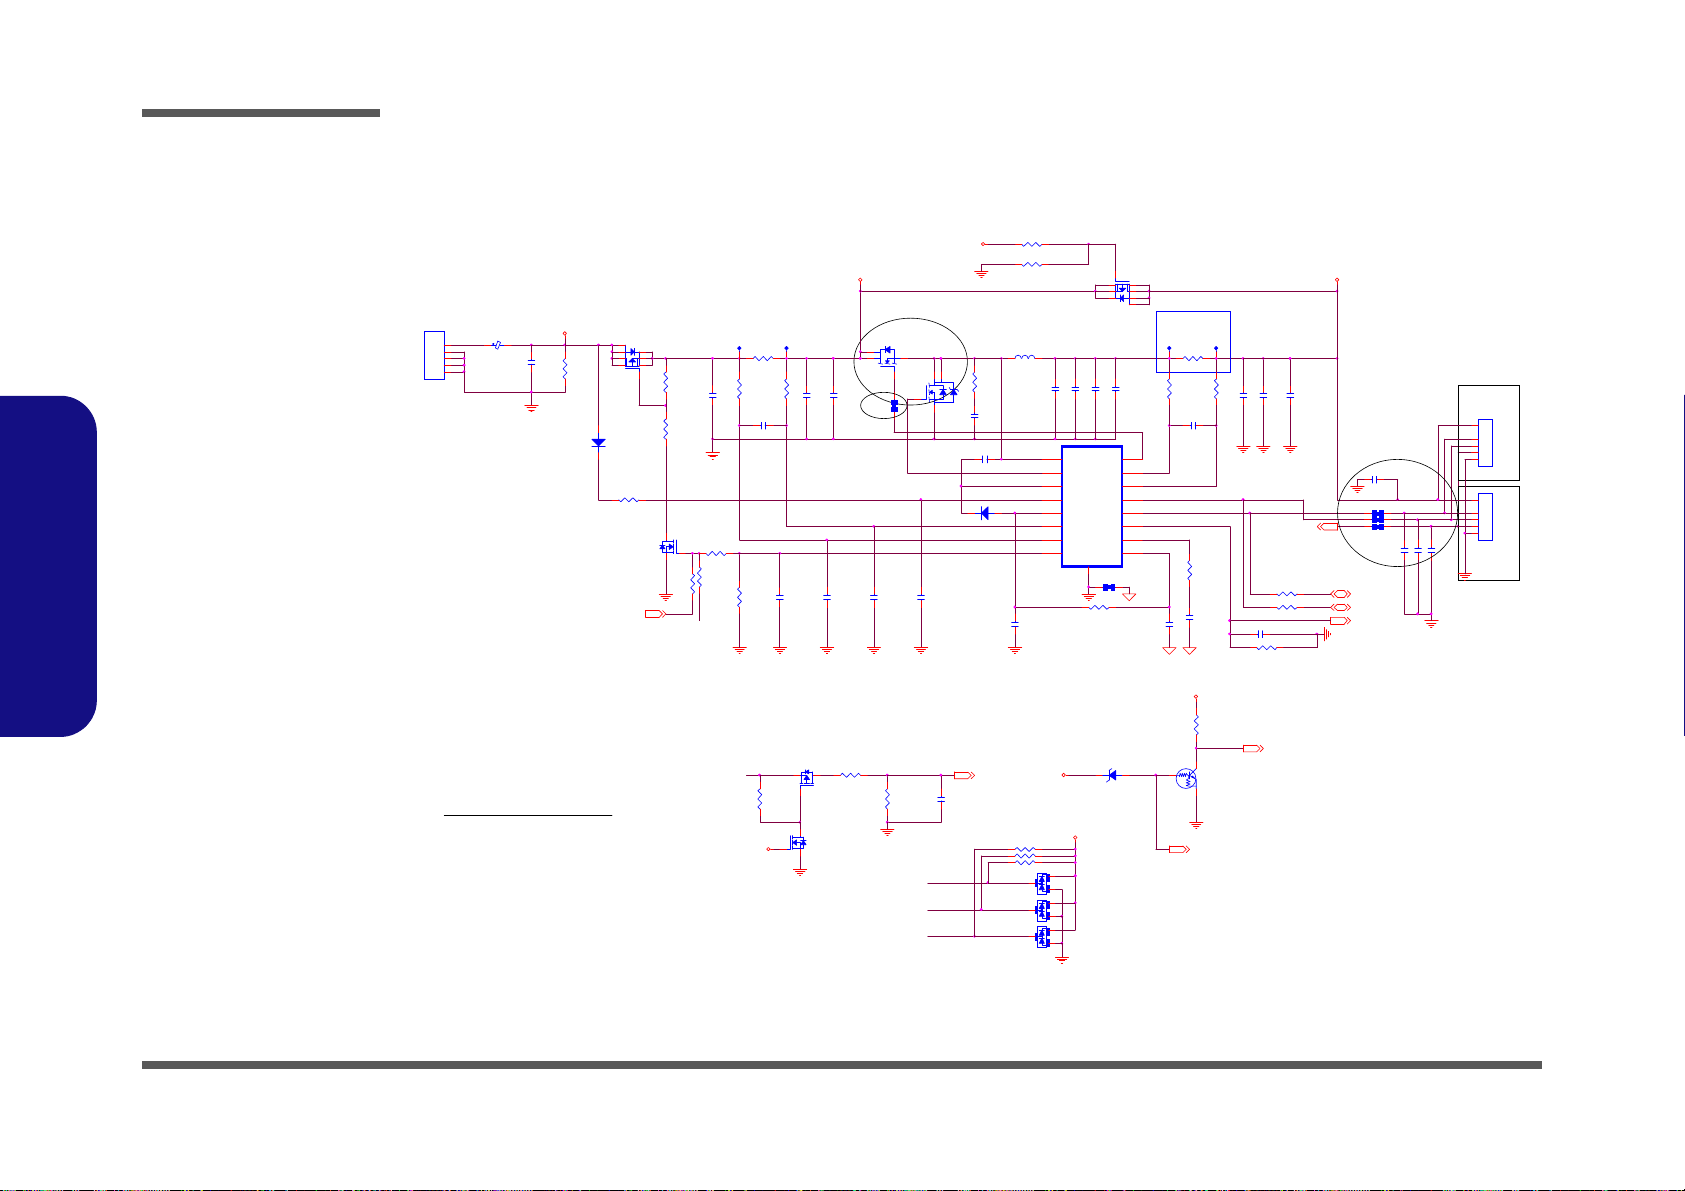
Schematic Diagrams
PR18
*0_04
PL3 *10mil_short_04
W550EU
4/3
SMD_BAT
W540EU
SMC_BAT
JBATTA 2
53022-00571-001
1
2
3
4
5
SMC_BAT
BAT_DET
VAC
LX_CHG
IACM
IACP
AC AV
V_BAT
JBATTA 1
*53022-00571-001
1
2
3
4
5
1) All power tra ces should be routed on th e outer layers
GNDP, VAD, VSYS, LX, VCHG, VBATT
2) Use Kelvin connec tions f or R3, R4
(seperate force and measurement traces)
3) R23 and R24 are dummy resistors , for layout pur pos es only
(serves as single point connect i on betw een GNDP & GNDA)
4) Footprint TO-236 is equiv alent to SOT-23
5) Footprint SIP/1P is a single hole axial pad
6) All r esisitors, c apacitor s and semiconductors are SMD
7) Potentiometers, and test points are axial devices
BST_ ICHM
VDDP
ICHP
IAC1
8.2UH_7.3* 6.6*2.8MM
PQ2
2SK3018S3
G
DS
¾aªñJBATTA1
PC8
4.7u_25V_X5R_08
C302 47P_50V_NPO_04
PR12
100K_04
PR117
100K_04
PC1
0.1u_50V_Y5V_06
PR8
100_04
PU2
OZ8681
LX
14
LDR
16
BST
12
VAC
1
VDDP
15
IACM
3
VDDA
6
SDA
11
ICHP
5
ICHM
4
COMP
8
HDR
13
BASE
17
SCL
10
IAC
7
IACP
2
ACAV
9
PC18
0.047u_10V_X7R_04
PR128 *20m il_04
PR14
300K_1%_04
PD12
ZD5245BS2
AC
PC91 0.1u_50V_Y5V_06
PL5
TMPB0603M-8R2MN-Z01
PC100
1u_10V_Y5V_06
PC109
*220p_50V_NPO_04
PC9 4.7u_25V_X5R_08
PR38 *20mil_04
PC97
0.47u_10V_Y5V_04
PD3
*BAV99N3
A
C
AC
PC19 4.7u_25V_X5R_08
PC104
1u_25V_Y5V_08
PC103
1u_10V_Y5V_06
PQ1
DTC114EUA
CE
B
PR25 10K_04
PQ21
MEP4435Q8
4
62
5731
8
PR22
100K_1%_04
PC99
4.7u_25V_X5R_08
PC105
4.7u_25V_X5R_08
PD4
*BAV99N3
A
C
AC
PR2 10_06
PC93
4.7u_25V_X5R_08
PQ16
MEP4435Q8
4
6 2
5
7 3
1
8
PR16
0.01_1%_32
PC15 4. 7u_25V_X5R_08
PQ19
MTP3403N3
G
DS
PR28
*15mil_short _06
PR1 10_06
PR37 *470K_04
J_DC _JACK1
50932-00301-001
GND2
GND1
2
1
3
PC96
0.1u_50V_Y5V_06
PR129 4.7K_04
PR27
10K_04
PR33
10_06
PR136
*20mil_04
PC108
*1u_25V_08
PR116
15K_04
PC107
*1u_25V_08
PR29 10_06
PC20
0.047u_10V_X7R_04
PC16 4.7u_25V_X5R_08
PR30 10_06
PC78 4. 7u_25V_X5R_08
PR130 *20m il_04
PC7
0.1u_16V_Y5V_04
PR143
*5.1_06
PQ17
2SK3018S3
G
DS
PC86
1000P_50V_X7R_04
PR127 4.7K_04
PL1
HCB4532K-800_18
PR115
0.01_1%_32
PD11 MDL914S2
AC
PR15
60.4K_1%_04
PD2
*BAV99N3
A
C
AC
PR3
10K_04
VIN V_BAT
VDD3
VDD3
VA
VA
VDD3
VA
SMD_BAT_R 28
BAT_DET28
TOTAL_CUR 28
SMC_BAT_R 28
AC_IN 30
AC_IN# 28
BAT_VOLT 28
COMP
LDR
SMD_BAT
PC95
*30p_50V_NPO_04
PC4
*30p_50V_NPO_04
PL2 *10mil_short_04
PR24 24K_1%_04
3/23
PR11 100K_04
PMOSFET _ CONTROL#28
PR10
0_04
PD1
RB0540S2
AC
PC94
*30p_50V_NPO_04
AC_IN
PC6 *0.01u_50V_X7R_04
V_BAT
PQ20A
EMB17A03V
3
4
5
6
PR137
*20mil_short _04
PQ20B
EMB17A03V
1
2
7
8
PL4 *10mil_short_04
3/23
Sheet 35 of 42
AC IN, CHARGER
B.Schematic Diagrams
B - 36 AC IN, CHARGER
AC IN, CHARGER
Page 89
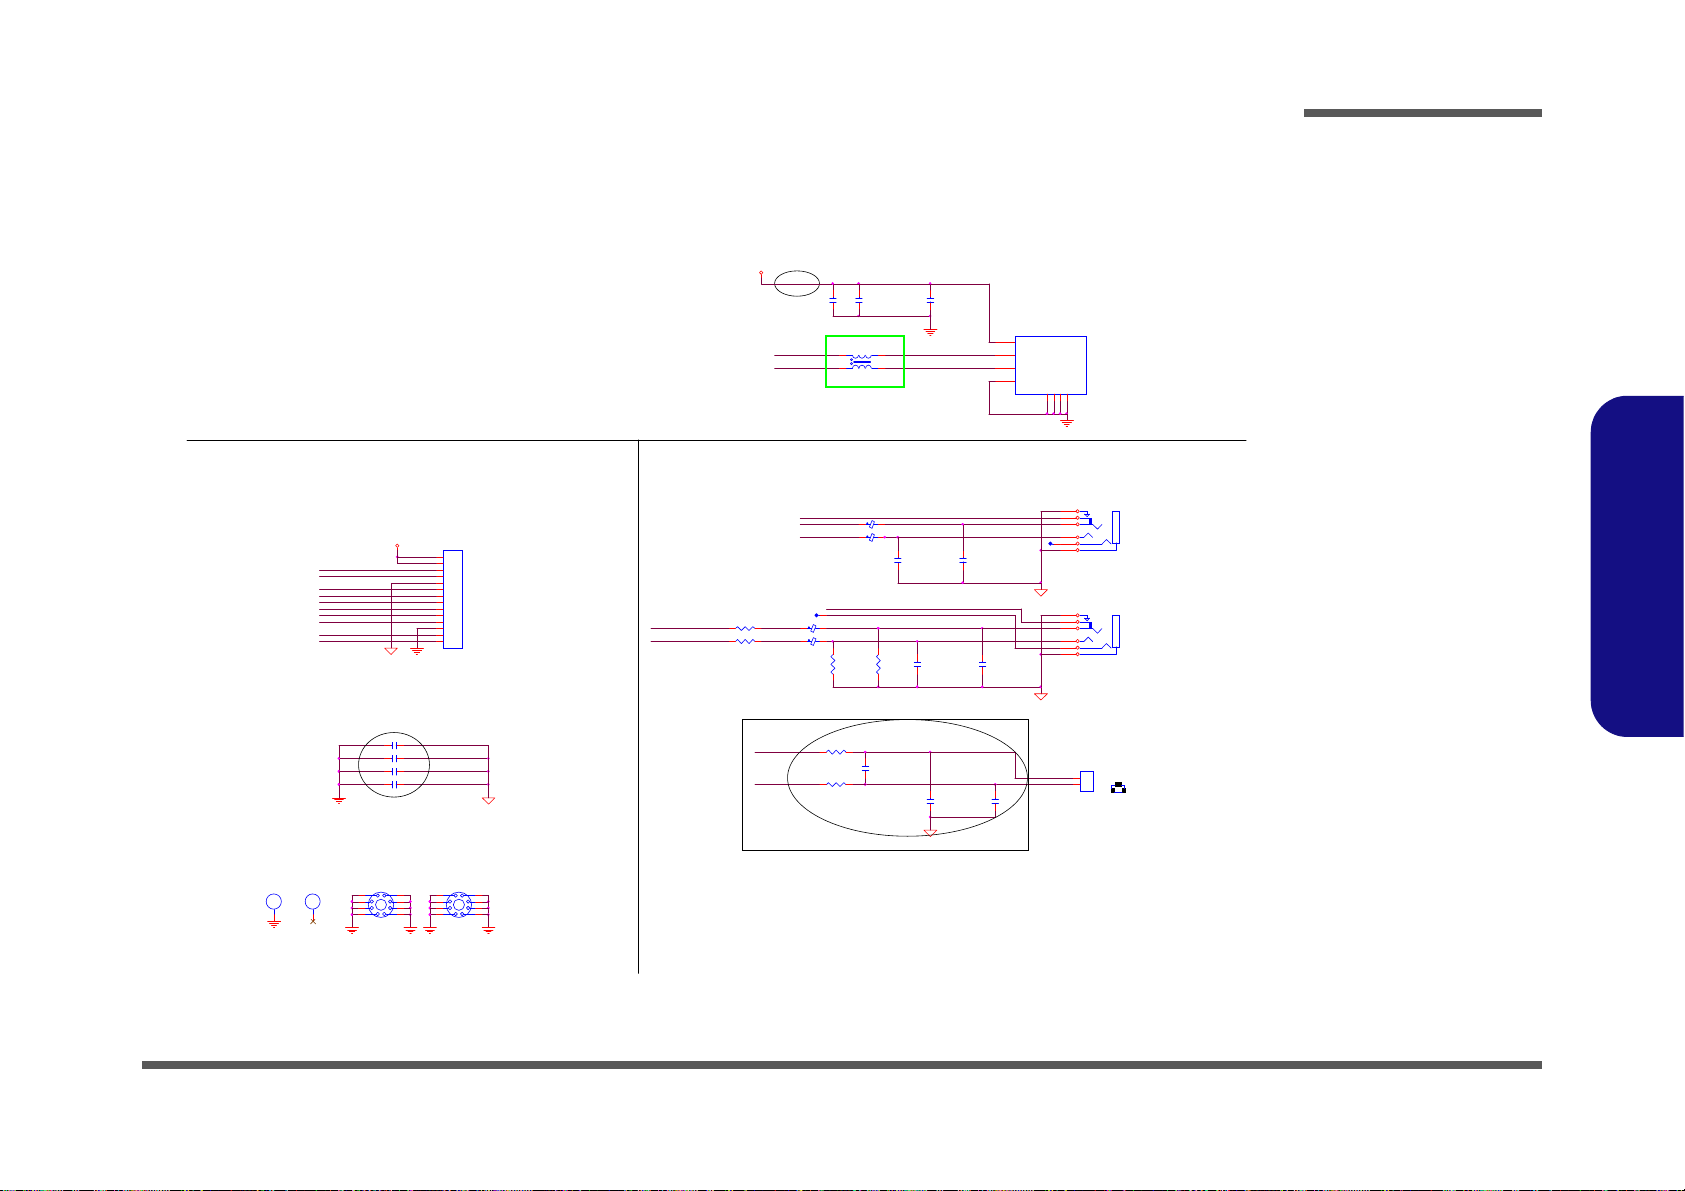
AUDIO BOARD
AMIC1-R
ASPKOUTR-_R
ASPKOUTR+_R
ASPKOUTR-
ASPKOUTR-
ASPKOUTR+
AHP_SENSE
ASPKOUTR+
AUSB_PN1
AUSB_PP1
ASPK_HP#
AUSB_PN1
AHP_SENSE
AUSB_PN1_R
AUSB_PP1 AUSB_PP1_R
AC14
*180p_50V_NPO_04
1
AH3
MTH8_0D2_8
2
3
4
5 6
7
8
9
AJ_USB1
US04036BCA081
V+
1
GND1
GND1
DATA_L
2
DATA_H
3
GND
4
GND2
GND2
GND4
GND4
GND3
GND3
AL6
*WCM2012F 2S-SHORT
1
4
2
3
AJ_SPKR1
85204-02001
85204-02R
1
2
1
AH2
MTH8_0D2_8
2
3
4
5 6
7
8
9
AC9 *0.1u_16V_Y5V_04
R
L
AJ_MIC1
2SJ-T351-S23
2
6
5
3
1
4
AC5
100p_50V_NPO_04
AC12
*180p_50V_NPO_04
R
L
AJ_HP1
2SJ-T351-S23
2
6
5
3
1
4
AC10 *0. 1u_16V_Y5V_04
AC1 *0.1u_16V_Y5V_04
AR2 68_04
AC8
100p_50V_NPO_04
AR4
*1K_04
AR1
*1K_04
AL1 F CM1005KF-121T03
AC11 *0. 1u_16V_Y5V_04
AC13
*1000p_50V_X7R_04
AL4 FC M1005KF-121T03
AC6
100p_50V_NPO_04
AC7
100p_50V_NPO_04
AH1
C59D59
AL3 FC M1005KF-121T03
AC4
0.1u_16V_Y5V_04
A_AUDG
AR3 68_04
AL2 F CM1005KF-121T03
A_USBVCC
A_AUDG
A_AUDG
Change footprint
D02A
A_AUDG
A_AUDG
BLACK
2
TO M/B
BLACK
AUDIO JACK
6-20-4315 0-102
J_SPK1
6-20-B2800-106
6-20-4311 0-102
MIC IN
1
60 mil
USB PORT
HEADPHONE
6-21-B49 B0-104
6-20-B2800-106
6-21-B49 C0-104
Port3
AJ_AUD IO1
85201-14051-01
PCB Footpr int = 85201-14X5_L
1
2
3
4
5
6
7
8
9
10
11
12
13
14
AGND
AGND
AGND
AGND AGND AGND
AGND
AGND
AHEADPH ONE-L
AMIC1-L
AHEADPH ONE-R
AMIC_SENSE
3/23
AR5 0_04
AR6 0_04
AH5
O6X4_5B3X1 _5D3X 1_5
3/27
Close to AJ_AUDIO1
AMIC1-R
A_USBVCC
AHEADPHONE-L
AMIC_SENSE
AHEADPHONE-R
AMIC1-L
4/2
AGND
AC2
22u_6.3V_X5R_08
AC3
22u_6.3V_X5R_08
Sheet 36 of 42
AUDIO BOARD
Schematic Diagrams
B.Schematic Diagrams
AUDIO BOARD B - 37
Page 90
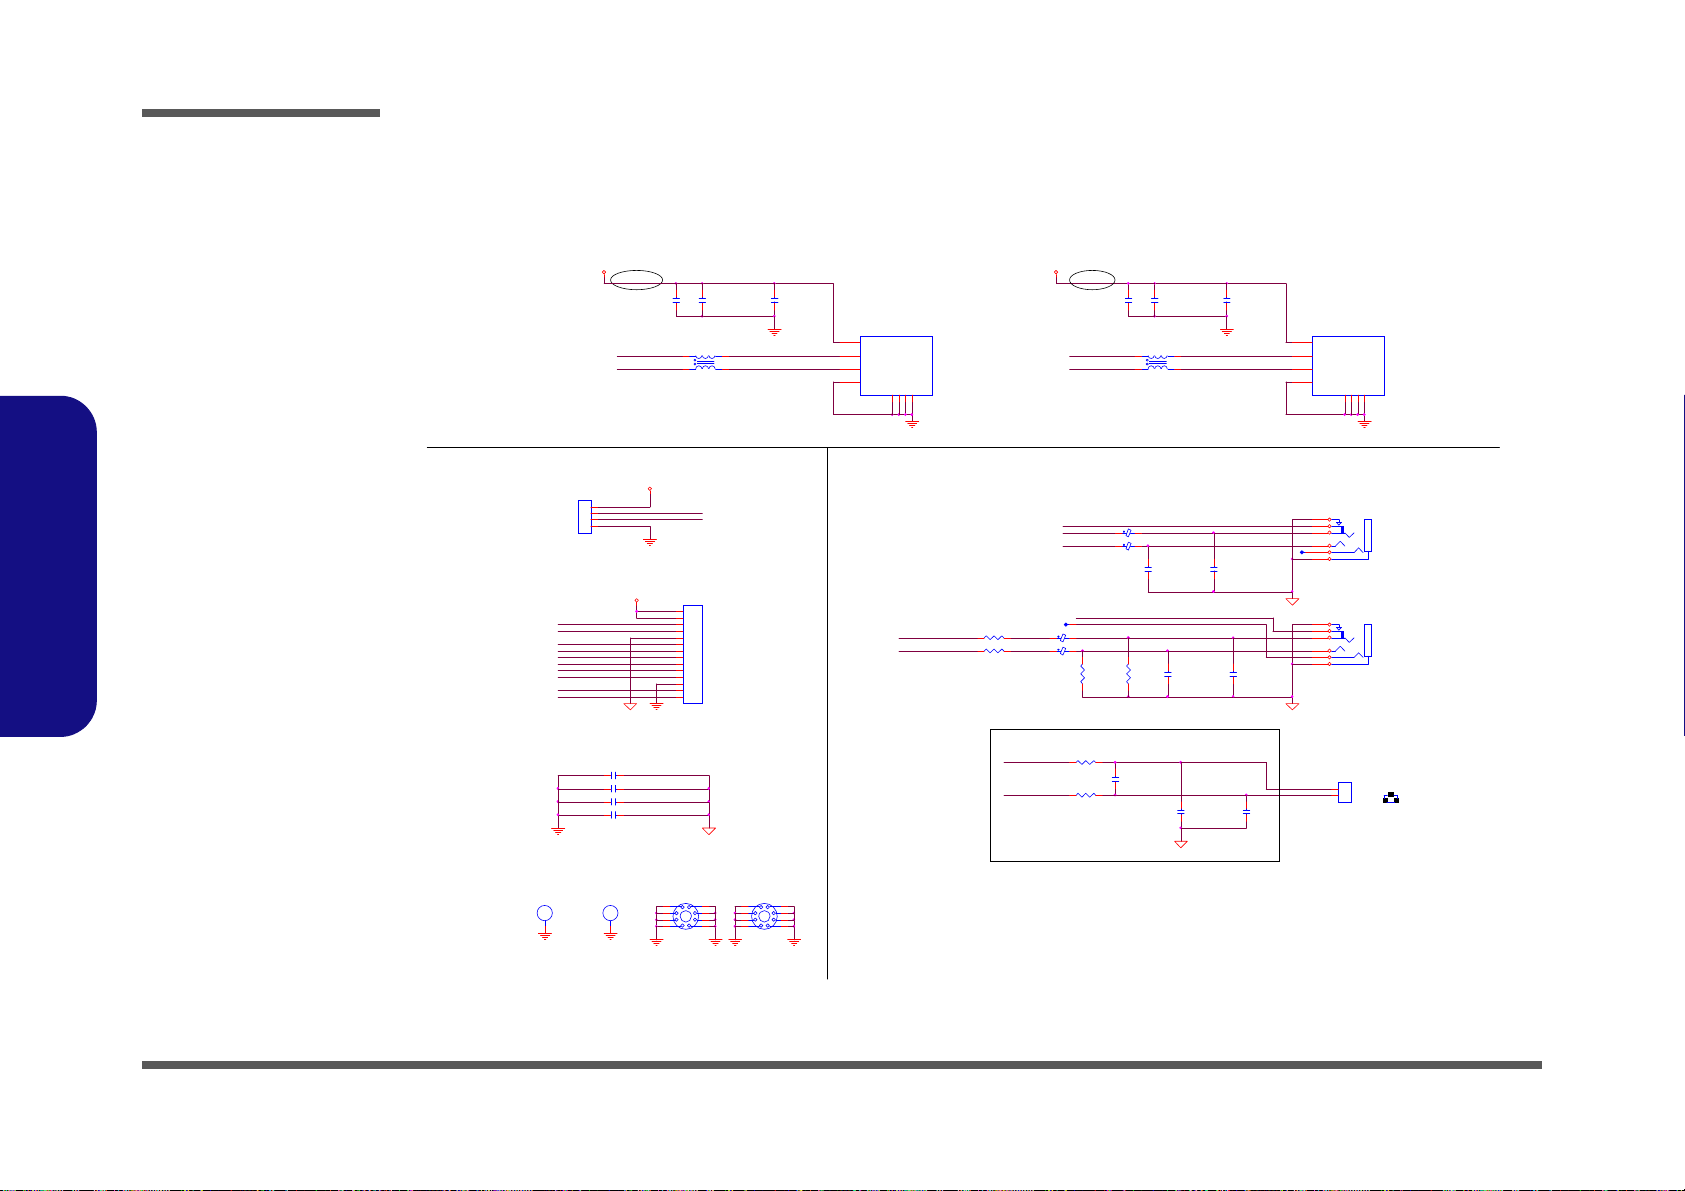
Schematic Diagrams
AAUSB_PP2
AAUSB_PN2
AA_USBVCC
AAJ_AUDIO2
*85201-04051
1
2
3
4
AAGND
AAH4
H5_2B2_2D2_2
AAGND
AAUSB_PN2_R
AAUSB_PP2 AAUSB_PP2_R
AAUSB_PN 2
AAC17
*0.1u_16V_Y 5V_04
AAJ_USB2
*US04036B CA081
V+
1
GND1
GND1
DATA_L
2
DATA_H
3
GND
4
GND2
GND2
GND4
GND4
GND3
GND3
AAL8
*WCM2012F2S-SHORT
1
4
2
3
AAC15
*22u_6.3V_X5R _08
AAC16
*22u_6.3V_X5R_08
AAGND
AA_USBVCC
Port4
6-21-B49C0-104
6-21-B49B0-104
60 mil
AAGND
4/2 4/2
AAMIC1-R
AASPKOUTR -
AASPKOUTR-
AASPKOUTR+
AASPKOUTR-_R
AASPKOUTR+_R
AAUSB_PP1
AAUSB_PN 1
AAHP_SENSE
AASPKOUTR +
AAHP_SENSE
AASPK_HP#
AAUSB_PN1_R
AAUSB_PP1 AAUSB_PP1_R
AAUSB_PN 1
AAMIC_SENSE
AAMIC1-L
AAHEADPHONE-R
AAHEADPHONE-L
AAMIC1-L
AAHEAD PHONE-L
AAMIC_SENSE
AAHEAD PHONE-R
AAMIC1-R
AAR4
*1K_04
AAJ_AUD IO1
*85201-14051-01
PCB Footprint = 85201-14X5_L
1
2
3
4
5
6
7
8
9
10
11
12
13
14
AAR2 *68_04
AAC4
*0.1u_16V_Y5V_04
AAR1
*1K_04
AAL3 *FCM1005KF-121T03
AAH5
T6X5 _2 B3 X2_ 2D 3 X2_ 2
AAL6
*WCM2012F2S-SHORT
1
4
2
3
AAC11 *0. 1u_16V_Y5 V_04
AAC13
*1000p_50V_X7R_04
AAC6
*100p_50V_NPO_04
AAJ_SPKR 1
*85204-02001
1
2
AAR5 *0_04
AAR3 *68_04
R
L
AAJ_MIC 1
*2SJ-T351-S23
2
6
5
3
1
4
AAJ_USB 1
*US0403 6BCA081
V+
1
GND1
GND1
DATA_L
2
DATA_H
3
GND
4
GND2
GND2
GND4
GND4
GND3
GND3
AAC8
*100p_50V_NPO_04
AAR6 *0_04
AAL2 *FCM1005KF-121 T03
AAL1 *FCM1005KF-121 T03
AAC14
*180p_50V_NPO_04
AAC10 *0. 1u_16V_Y5 V_04
1
AAH2
MTH8_0D2_8
2
3
4
5 6
7
8
9
1
AAH3
MTH8_0D2_8
2
3
4
5 6
7
8
9
R
L
AAJ_H P1
*2SJ-T351-S23
2
6
5
3
1
4
AAC5
*100p_50V_NPO_04
AAC9 *0.1u_16V_Y5V_04
AAC3
*22u_6.3V_X5R_08
AAC12
*180p_50V_NPO_04
AAC7
*100p_50V_NPO_04
AAC2
*22u_6.3V_X5R_08
AAL4 *FCM1005KF-121T03
AAC1 *0.1u_16V_Y5V_04
AA_USBVCC
AA_AUDG
AAGND AAGN D
AA_AUDG
AA_AUDG
AA_AUDG
AA_AUDG
AAGND
AAGND
AAGND
AAGND
AAGND
AAGND
AA_USBVCC
AAGND
6-20-B2800-106
1
60 mil
USB PORT
HEADPHONE
6-20-43150-102
6-20-B2800-106
6-20-43110-102
MIC IN
2
TO M/B
BLACK
AUDIO JACK
BLACK
Close to AAJ_AUDIO1
Port3
6-21-B49C0-104
6-21-B49B0-104
Sheet 37 of 42
AUDIO BOARD
(W550EU)
AUDIO BOARD (W550EU)
B.Schematic Diagrams
B - 38 AUDIO BOARD (W550EU)
Page 91
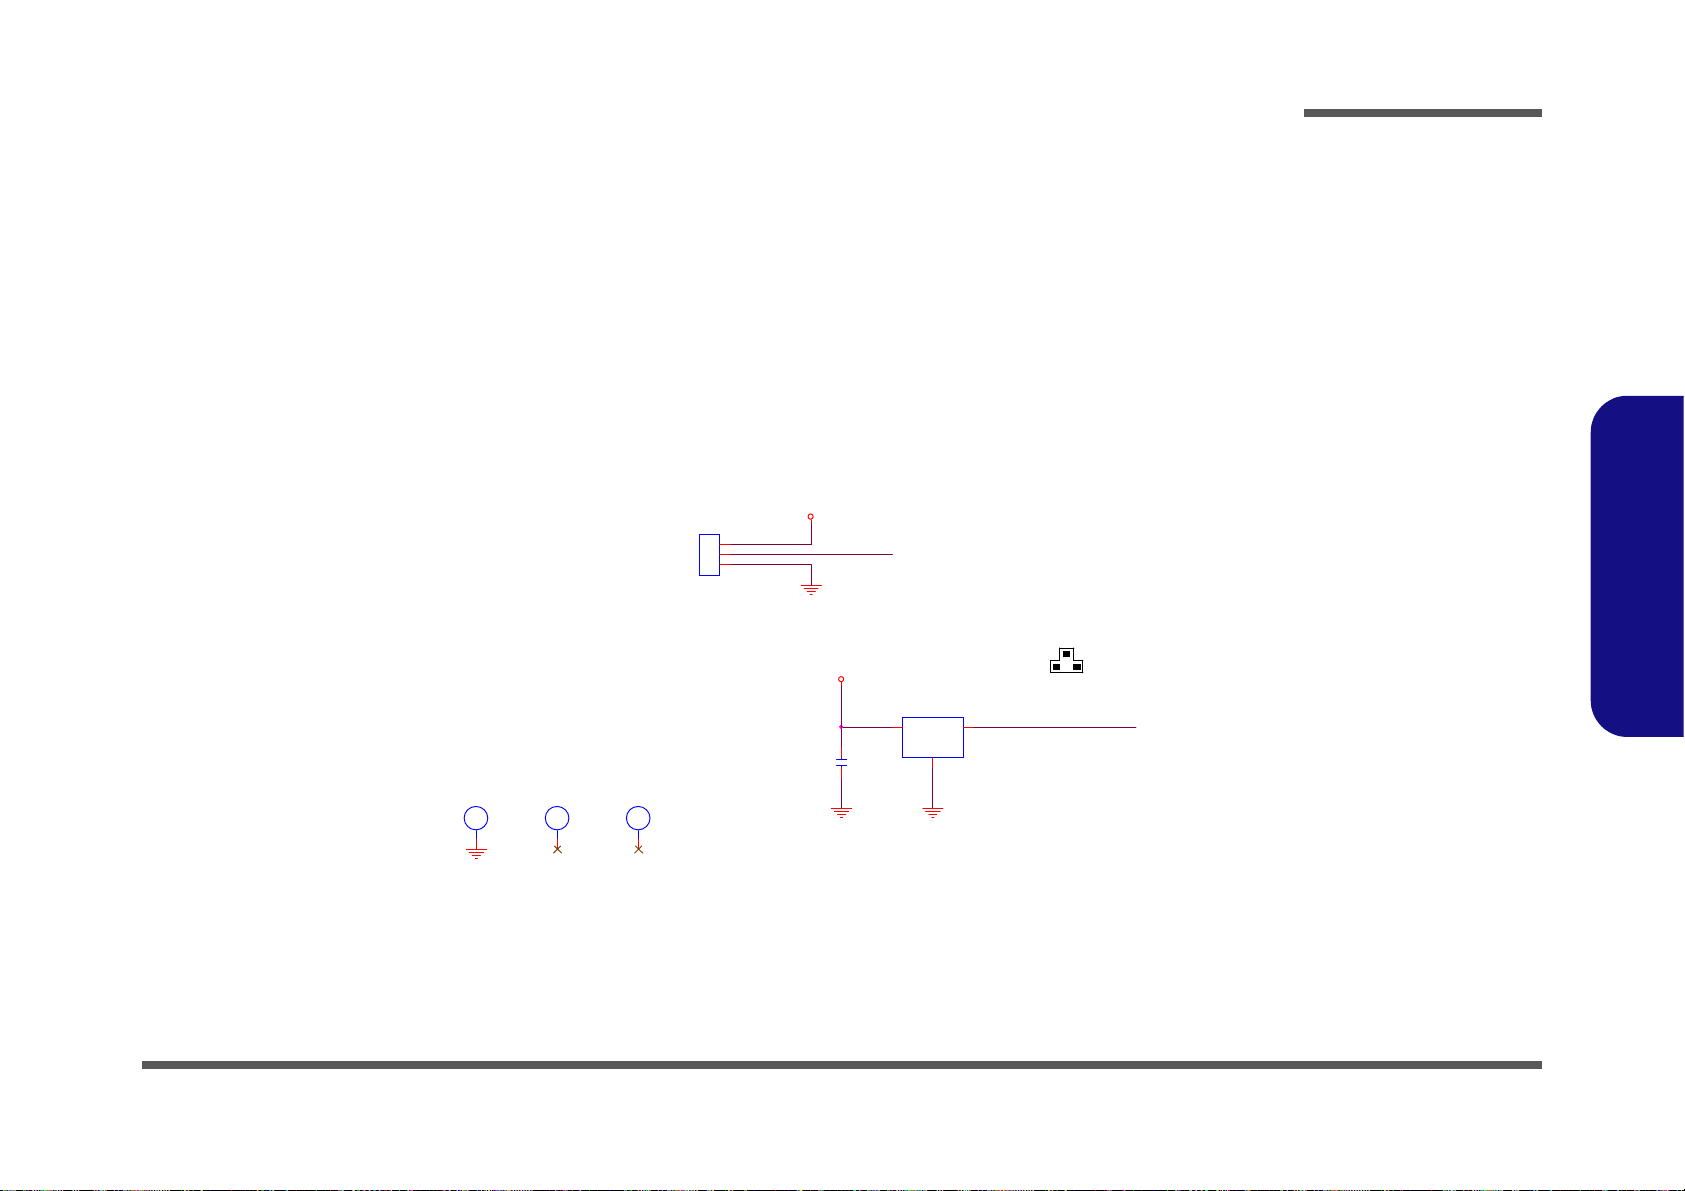
LID SW BOARD (W550EU)
2
3
1
L_U1
*MH248-ALFA-ESO
VCC1OUT
2
GND
3
6-02-00268-LC1
6-02-00248-LC2
L_C1
*0.1u_16V_Y5V_04
L_3.3V
For 15"
L_LID_SW#
L_LID_SW#
LH2
C43D43
LH3
C43D43
LID SWITCH BOARD
L_3.3V
L_GND
L_GND L_GND
LJ_LID1
*85204-03001
1
2
3
LH1
H2_3B5_0D2_3
L_GND
Sheet 38 of 42
LID SW BOARD
(W550EU)
Schematic Diagrams
B.Schematic Diagrams
LID SW BOARD (W550EU) B - 39
Page 92
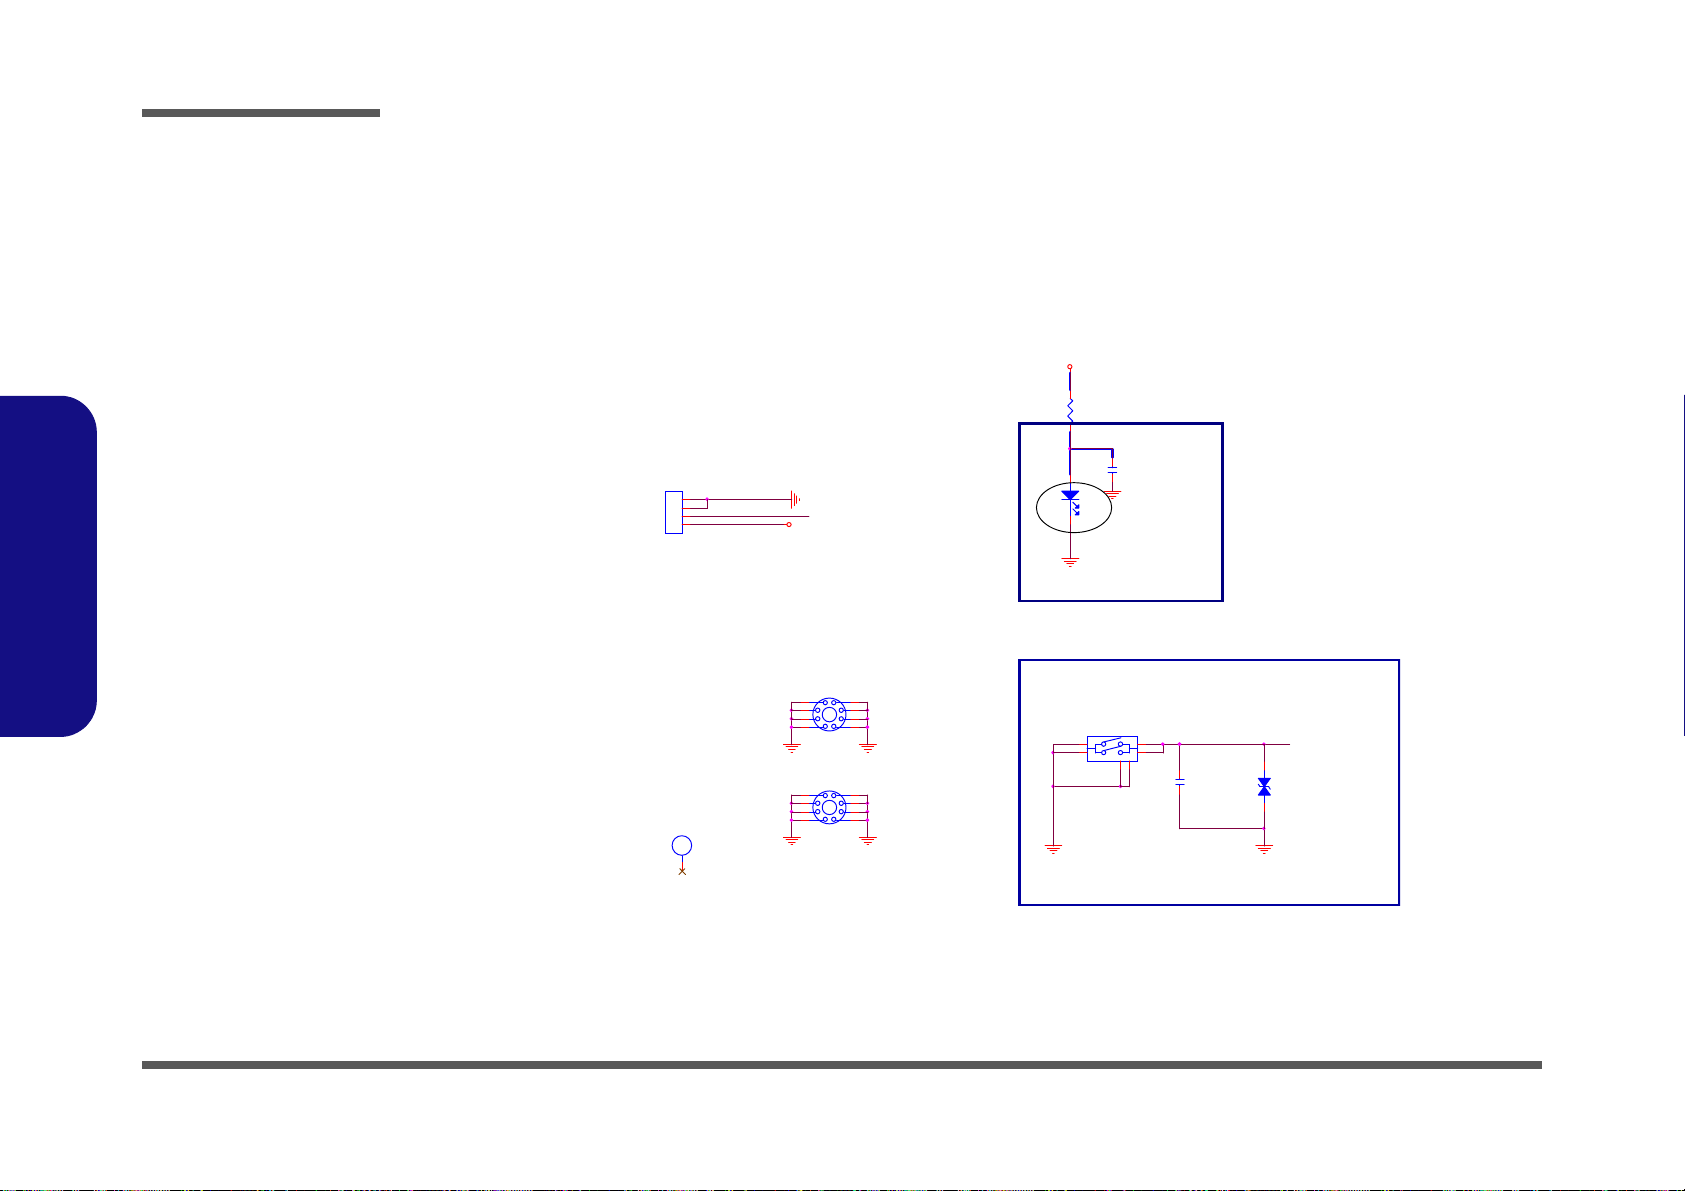
Schematic Diagrams
SR1
220_04
SC2
*0.1u_16V_Y5V_04
SJ_SW1
85201-04051
1
2
3
4
SC1
0.1u_50V_Y5V_06
1
SMH1
MTH6_0D2_2
2
3
4
5 6
7
8
9
SPWR_SW1
TJG -53 2- V-T/R
3
1
4
2
5
6
SD1
*V15AVLC0402
12
SH1
H2_2B4_2D2_2
1
SMH2
MTH6_0D2_2
2
3
4
5 6
7
8
9
SD2
RY-SP150DBW71-5A
AC
S_3.3VS
SMGND
SMGND
SMGND
SMGNDSMGND
6-52-56001-028
S_3.3VS
SMGND
SMGNDSMGND
SMGND
6-52-56001-023
6-52-56000-020
6-52-56001-022
6-24-30003-006
POWER BUTTON
6-53-3050B-042
VARISTOR
POWER
SWITCH
LED
20mil
POWER SW & LED
Z4301
3/28
SM_BTN#
SM_BTN#
20mil
Sheet 39 of 42
POWER SW
BOARD
B.Schematic Diagrams
POWER SW BOARD
B - 40 POWER SW BOARD
Page 93
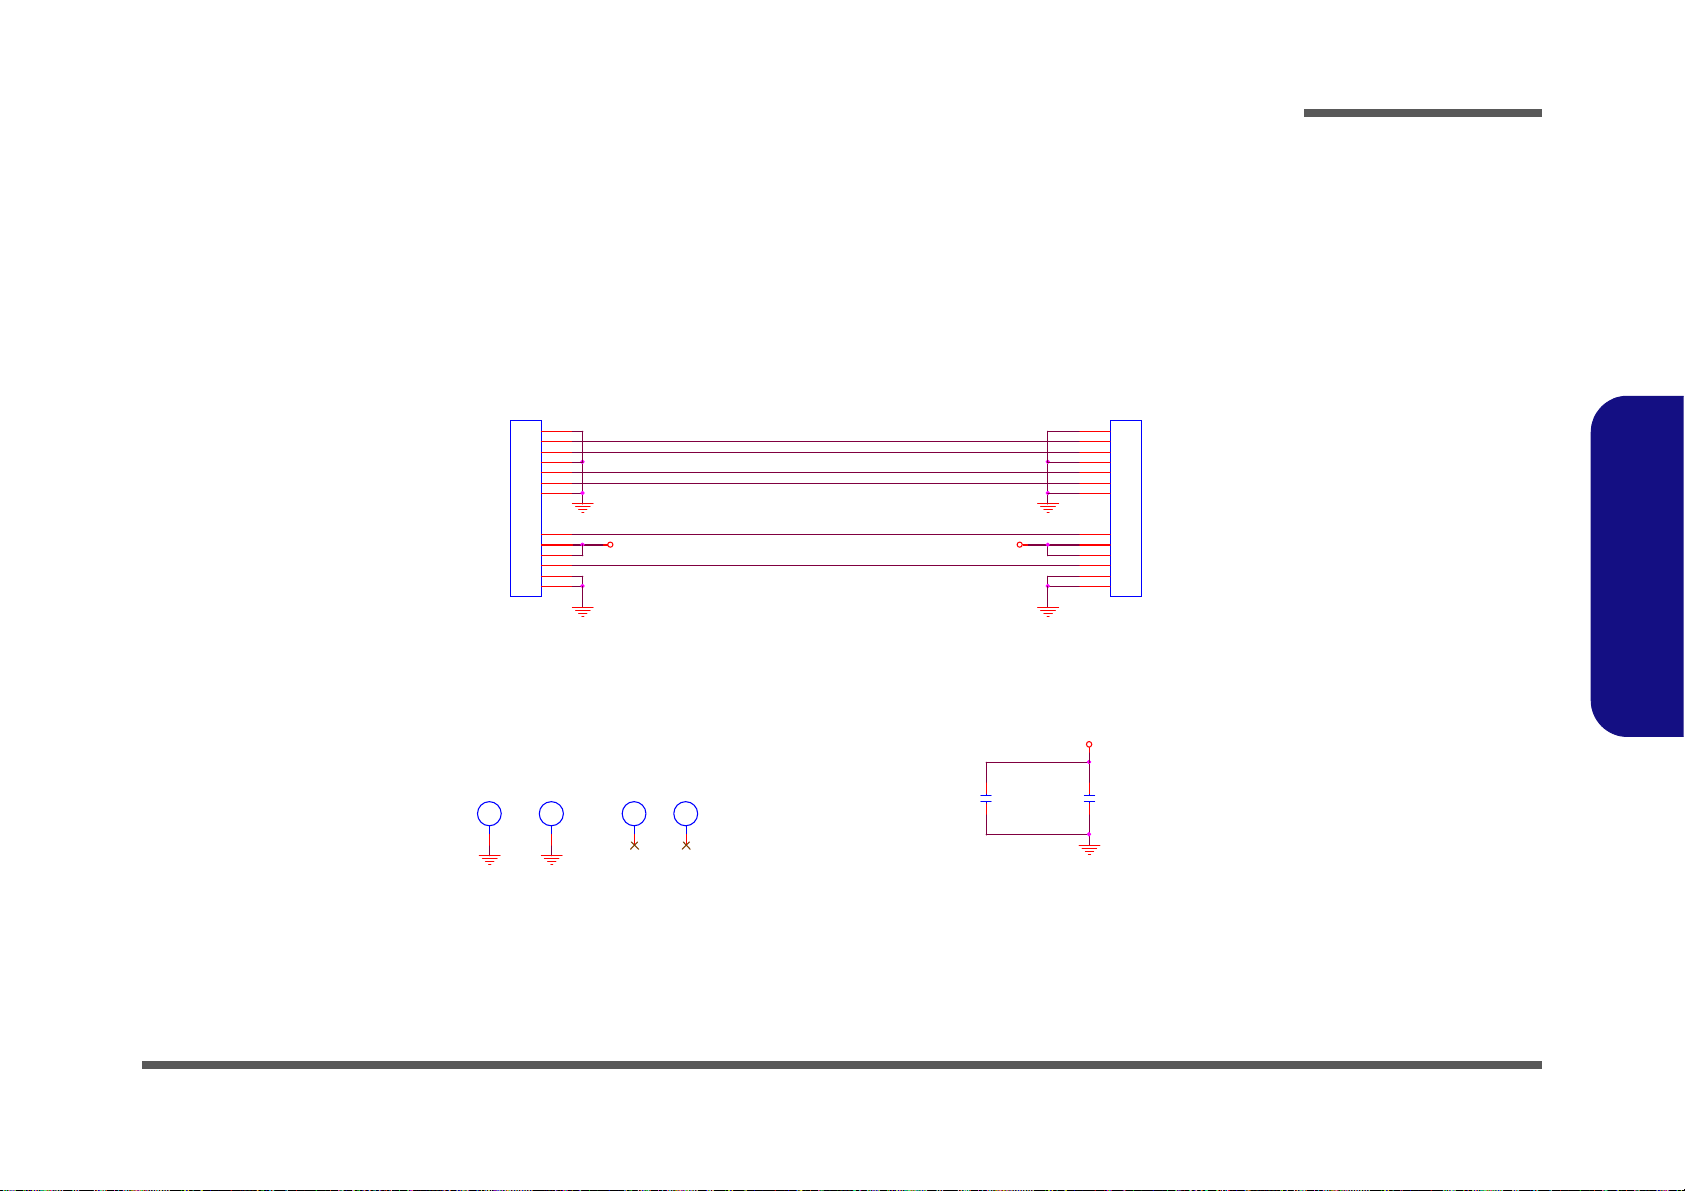
EXTERNAL ODD BOARD
ODD BOARD
QJ_ODD2
*202001-1
S1
S2
S3
S4
S5
S6
S7
P1
P2
P3
P4
P5
P6
QJ_ODD1
*242003-1
S1
S2
S3
S4
S5
S6
S7
P1
P2
P3
P4
P5
P6
Q_SATA_TXP1
Q_SATA_ODD_DA#
Q_SATA_RXP1
Q_SATA_TXN1
Q_ODD_DETECT#
Q_SATA_RXN1
Q_5VS
Q_5VS
Q_5VS
PIN
GND1~3=QGND
6-21-14030-013
PIN
GND1~2=WGND
6-21-13010-013(DIP)
QC2
*0.1u_16V_Y 5V_04
QC3
*0.1u_16V_Y5V_04
QH3
C87D87
QH1
H7_0D2_3
QH2
H7_0D2_3
QH4
C87D87
QGND QGND
QGND
QGND
QGND
QGND
QGND
TO ODDFROM M/B
Sheet 40 of 42
EXTERNAL ODD
BOARD
Schematic Diagrams
B.Schematic Diagrams
EXTERNAL ODD BOARD B - 41
Page 94
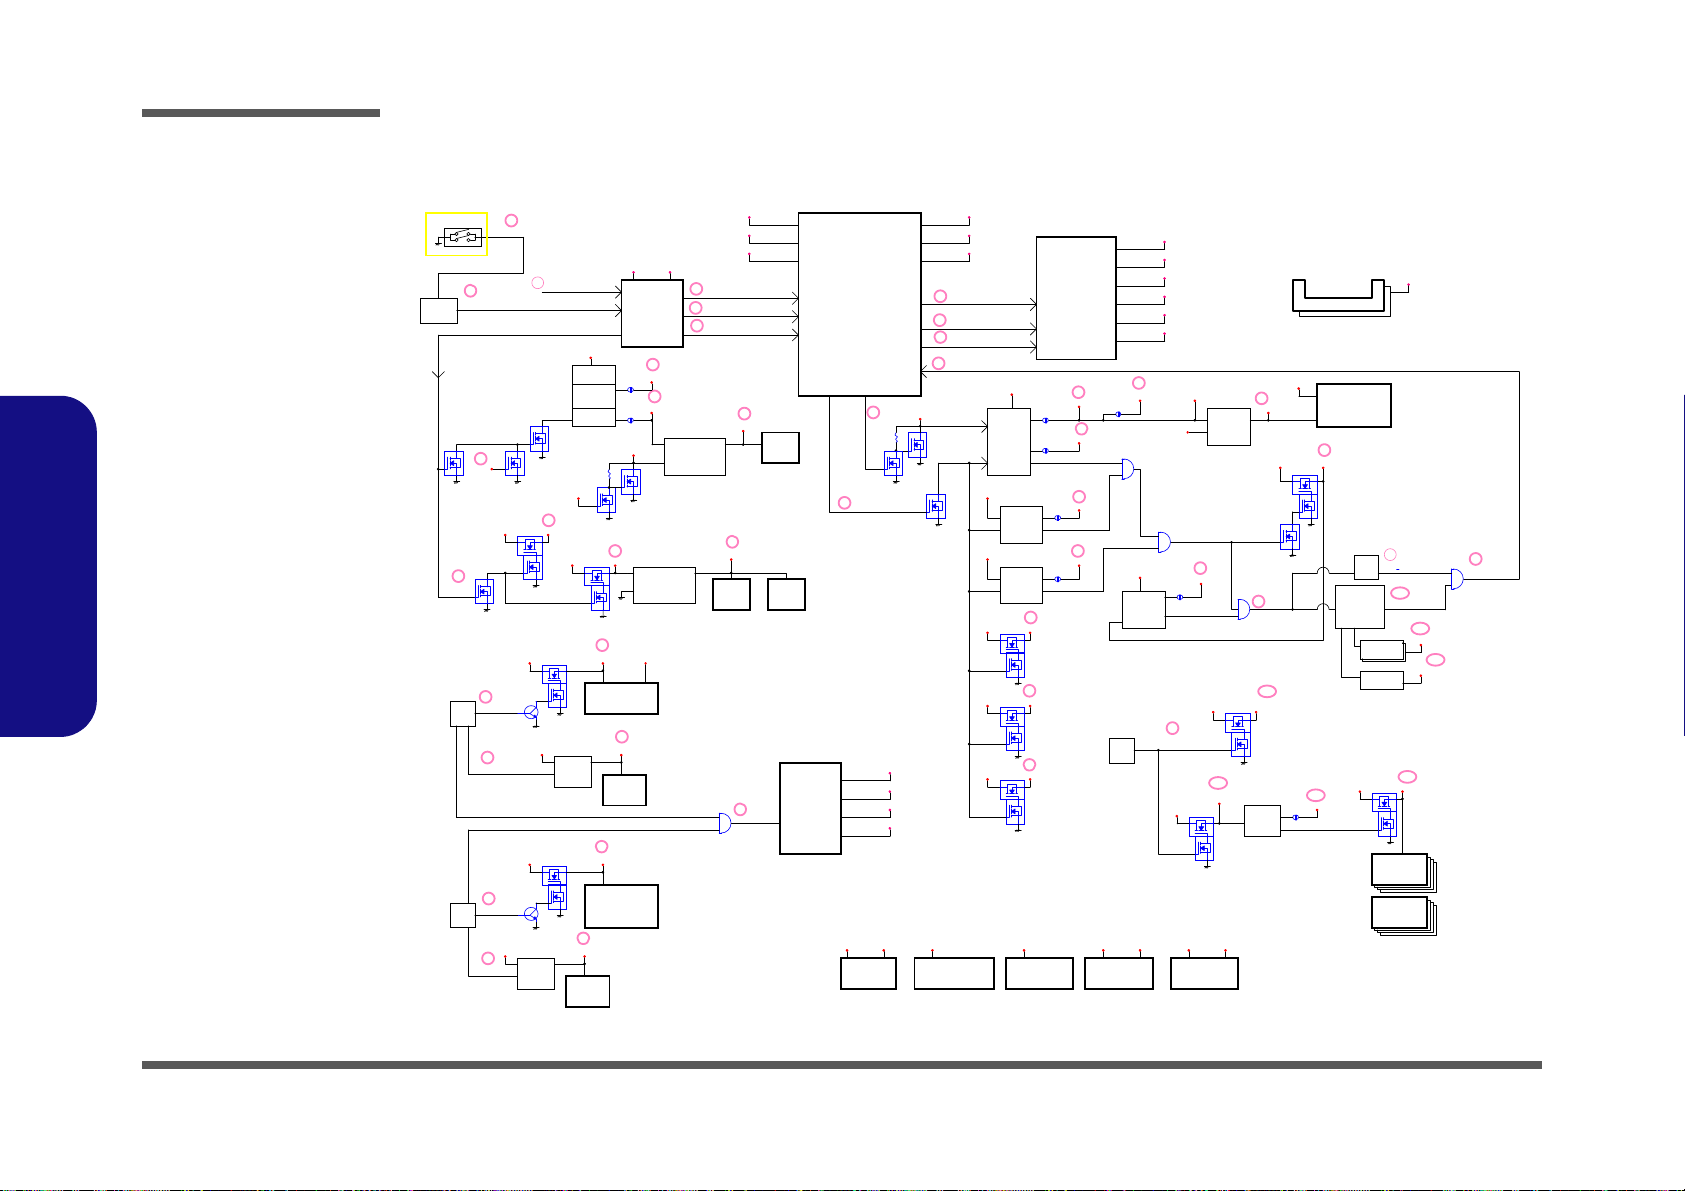
Schematic Diagrams
PWR SW B'd
UNCOREPWRGOOD
DVDD(1.2V)
CardReader
JMC251C
3.3VS
WLAN MINI CARD
3.3V
0
DD_ON#
USB
PORT1
EN
VDD3
VDD5
DD_ON_EN_VDD
3c
VDD5
0c
EN_5V
3.3V
3a
RT9715BGS
USBVCC01
3
DD_ON
EN
0b
VDD3
5V
USB
PORT0
USBVCC3.0
VIN
USB
PORT3
3b
TPS2540
VIN
5VS
CODEC ALC269
3.3VS
1.8VS
VDD3
3.3V
5VS
18
13b
PG
10
1.05VS_PWRGD
EN
DDR1.5V_PWRGD
1.5VS
uP6127
PGEN
VIN
EN
3.3VS
VDD5
VIN
uP6163
EN
1.5V
3G_3.3V
5V
3G_POWER
G5243
3G MINI CARD
3.3V
EC
CCD
5V_CCD
CCD_EN
?
AX6615
1.8VS_PWRGD
?
?
?
PG
PU6
PQ64
PQ66
PU4
1.5V
PQ65
PQ63
PQ24
PQ4
SO-DIMM
PQ35
PQ7
PU8
PJ1
PJ20
PU10
U18
PJ6
14
PJ26
PJ27
PU7
5b
1.5VS_CPU
1.5V
5a
PJ9
VTT_MEM
6e
PJ7
PU5
PU11
6d
1.05VS
PJ25
PQ57
PU3
PU1,PU2
PU12
U26
U34
U4
EC
Q6
U7,U8,U30,U31
U3,U5,U25,U28
U17
U29
U37
U14
U32
U1
Q30
U19
U22A
U22B
U22C
U22D
U11
U9
VIN
PJ5
uP6122
PQ27A
PG
1.05VS
1.05VS_VTT_EN
0.85VS_PWRGD
EN
EN
PQ27B
0.85VS
6
1.05VS_VTT
SUSB
SUSB#
5V
VCORE
M_BTN#
CPU
SUSC#
5
PQ11
1.05VS_VTT
1.8VS
12A
8.5A
0.85VS
VGFX_CORE
6A
1.2A
1
1.05VS
33A
3.3VS
48A
2.92A
1.5VS
1.5VS_CPU
Cougar
Point
RTCVCC
3.3V
1.05VS_VTT
PMSYS_PWRGD_BUF
DRAMPWROK
5VS_ODD
NB_ENAVDD
dGPU_RST#
PEXRST#
PEX_VDD
17
?
PERSTB#
ODD
3V3_RUN
23A
PANEL
P0
Mode:
EN
0.1A
1.5A
4A
FBVDDQ
G5243
3.3V
NVVDD
SB
6f
6a
6c
6b
?
7
8
SATA_ODD_PWRGT
9
13a
VIN
5VS
GPU
3.3VS
SATA HDD
PLT_RST#
?
PLVDD
5VS
?
16c
VGA Frame
Buffer c
3V3_RUN
16a
dGPU_PWR_EN#
PS_NVVDD_PGOOD#
1.05VS
16b
VGA Frame
Buffer A
FBVDDQ
EN
16
PEX_VDD
16d
EC
1.5V
PG
uP6122
3.3V
NVVDD
PG
SYS_PWROK
NCP6131S
DELAY_PWRGD
VCORE
NCP5199
SM_DRAMPWROK
ALL_SYS_PWRGD
EN
11
VGFX_CORE
NCP5199
PM_PCH_PWROK
RESET#
GS7113
USB 3.0
uPD720200
3.3V
1.5V
5c
1.05V
EN
5V
SYS_PWROK
ALL_SYS_PWRGD
PWR_SW#
9
IT8518
P2808B
2
3.3VS VDD3
10
PM_PCH_PWROK
PWR_BTN#
PWRBTN#
RSMRST#
4a
4b
RSMRST#,
DPWROK
Always
enable
VIN
0a
VDD3
uP6182
5VS
Touch Pad
PWROK,
APWROK
SYS_PWROK
SLP_S3# SLP_S4#
PWOCPWRGD
PLTRST#
14
H_CPUPWRGD
PLT_RST#
15
12
Sheet 41 of 42
Power Diagram
Power Diagram
B.Schematic Diagrams
B - 42 Power Diagram
Page 95
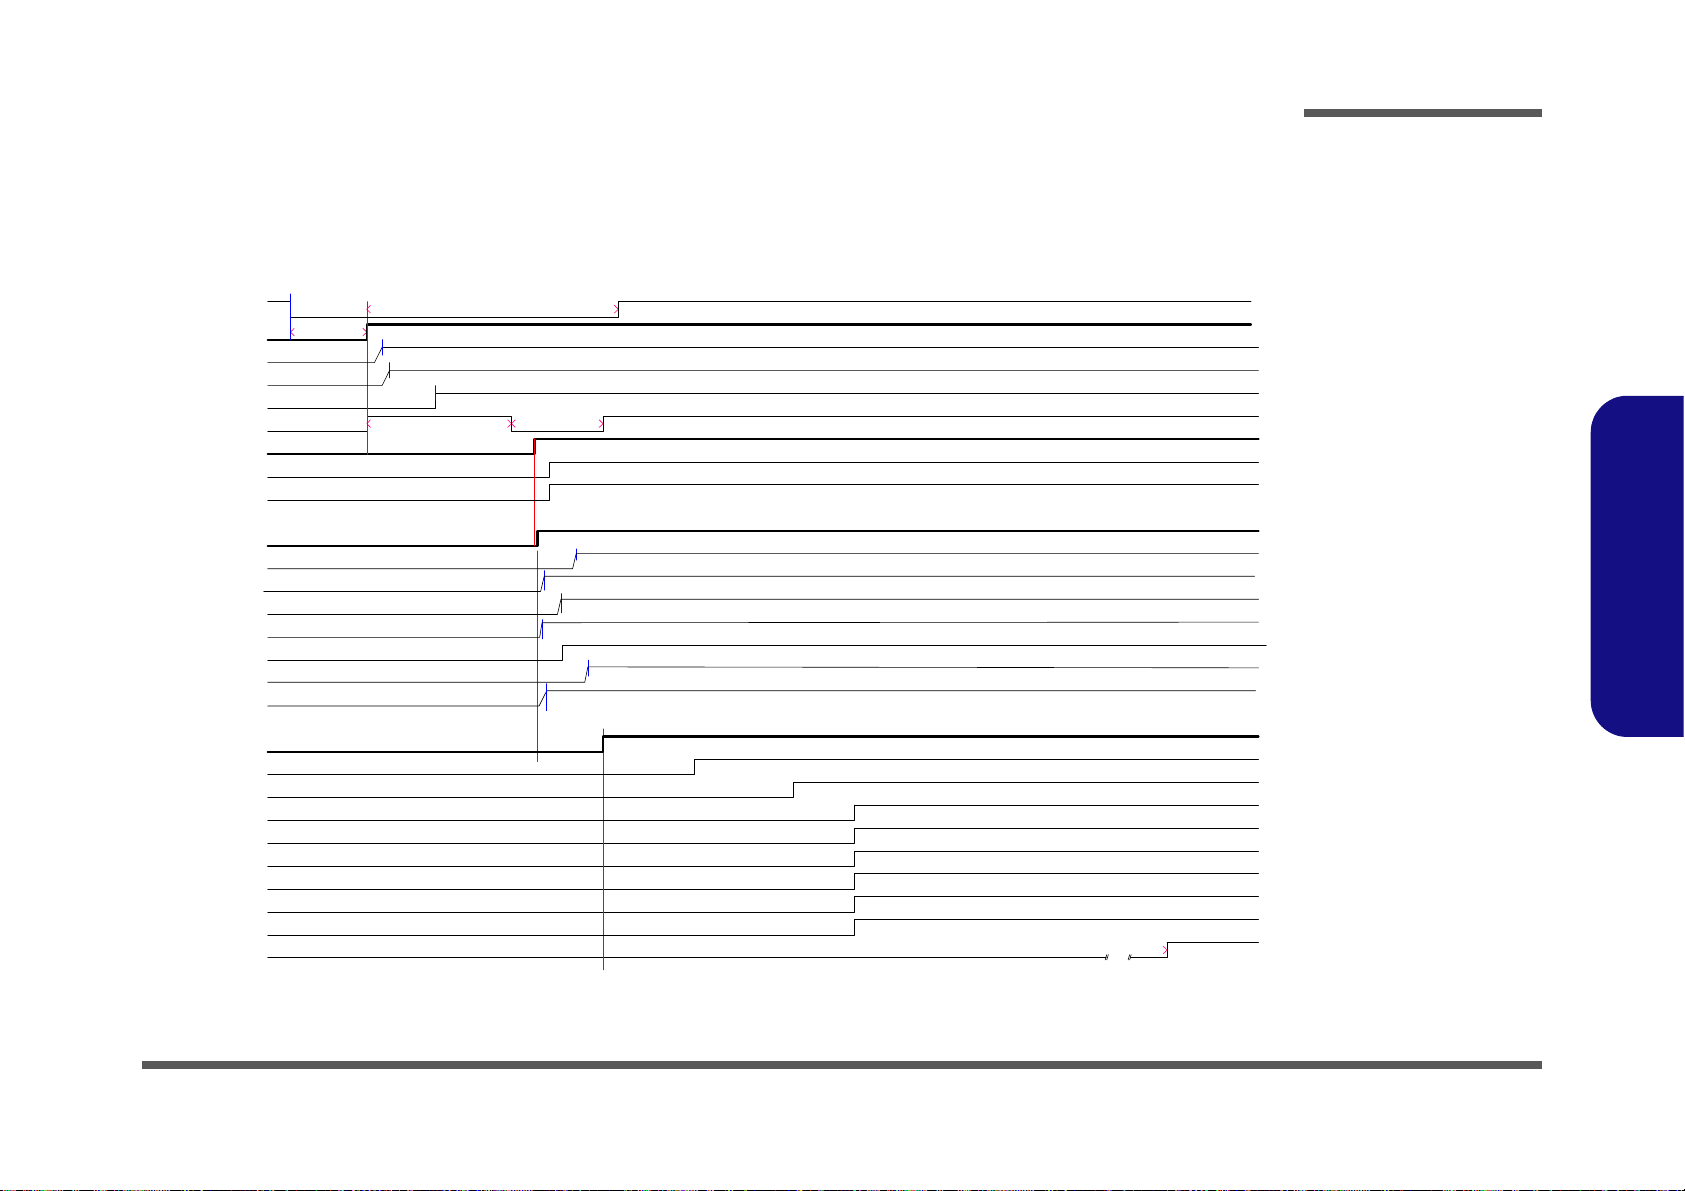
S4_STATE# S4_STATE#
SUSB#
PWR_BTN#
1.5V
1.5VS_CPU
5V
DD_ON
RSMRST#
SUSC#
PM_DRAM_PWRGD
5VS
3.3VS
VTT_MEM
1.05VS
0.85VS
3.3V
SUSC#
DD_ON
RSMRST#
M_BTN#
5V
PWR_BTN#
4ms
260us
ALL_SYS_PWRGD
434ms
VGFX_CORE
1.2ms
32us
H_CPUPWRGD
PM_PCH_PWROK
DELAY_PWRGD
SYS_PWROK
VCORE
PLT_RST#
PM_DRAM_PWRGD
ALL_SYS_PWRGD
POWER ON SEQUENCE
0.85VS
4.56s
434ms
434ms
434ms
434ms
434ms
M_BTN#
506ms
28ms
1.28ms
5.6ms
1.24ms
SUSB#
DELAY_PWRGD
VCORE
332ms
VGFX_CORE
PM_PCH_PWROK
SYS_PWROK
H_CPUPWRGD
PLT_RST#
1.8VS
292ms
1.56ms
2.9ms
3.3VS
1.8VS
1.5VS
1.05VS
3ms
5VS
VTT_MEM
1.2ms
2.4ms
3.3V
1.5VS
1.16ms
100ms
200ms
52ms
218ms
Sheet 42 of 42
Power On SEQ
Power On SEQ
Schematic Diagrams
B.Schematic Diagrams
Power On SEQ B - 43
Page 96

Schematic Diagrams
B.Schematic Diagrams
B - 44
Page 97
Appendix C:Updating the FLASH ROM BIOS
BIOS Version
Make sure you download the latest correct
version of the BIOS appropriate for the computer model you are
working on.
You should only
download BIOS versions that are
V1.01.XX or higher as
appropriate for your
computer model.
Note that BIOS versions
are not backward compatible and therefore
you may not downgrade your BIOS to an
older version after up-
grading to a later version (e.g if you upgrade
a BIOS to ver 1.01.05,
you MAY NOT then go
back and flash the BIOS
to ver 1.01.04).
To update the FLASH ROM BIOS, you must:
• Download the BIOS update from the web site.
• Unzip the files onto a bootable CD/DVD/USB Flash Drive.
• Reboot your computer from an external CD/DVD/USB Flash Drive.
• Use the flash tools to update the flash BIOS using the commands indicated below.
• Restart the computer booting from the HDD and press F2 at startup enter the BIOS.
• Load setup defaults from the BIOS and save the default settings and exit the BIOS to restart the computer.
• After rebooting the computer you may restart the computer again and make any required changes to the default BIOS
settings.
Download the BIOS
1. Go to www.clevo.com.tw and point to E-Services and click E-Channel.
2. Use your user ID and password to access the appropriate download area (BIOS), and download the latest BIOS files
(the BIOS file will be contained in a batch file that may be run directly once unzipped) for your computer model
(see sidebar for important information on BIOS versions).
Unzip the downloaded files to a bootable CD/DVD/ or USB Flash drive
1. Insert a bootable CD/DVD/USB flash drive into the CD/DVD drive/USB port of the computer containing the
downloaded files.
2. Use a tool such as Winzip or Winrar to unzip all the BIOS files and refresh tools to your bootable CD/DVD/USB
flash drive (you may need to create a bootable CD/DVD with the files using a 3rd party software).
Set the computer to boot from the external drive
1. With the bootable CD/DVD/USB flash drive containing the BIOS files in your CD/DVD drive/USB port, restart the
computer and press F2 (in most cases) to enter the BIOS.
2. Use the arrow keys to highlight the Boot menu.
3. Use the “+” and “-” keys to move boot devices up and down the priority order.
4. Make sure that the CD/DVD drive/USB flash drive is set first in the boot priority of the BIOS.
5. Press F4 to save any changes you have made and exit the BIOS to restart the computer.
BIOS Update
C:BIOS Update
C - 1
Page 98

BIOS Update
Use the flash tools to update the BIOS
1. Make sure you are not loading any memory management programs such as HIMEM by holding the F8 key as you
see the message “Starting MS-DOS”. You will then be prompted to give “Y” or “N” responses to the programs
being loaded by DOS. Choose “N” for any memory management programs.
2. You should now be at the DOS prompt e.g: DISK C:\> (C is the designated drive letter for the CD/DVD drive/USB
flash drive).
3. Type the following command at the DOS prompt:
4. The utility will then proceed to flash the BIOS.
5. You should then be prompted to press any key to restart the system or turn the power off, and then on again but
make sure you remove the CD/DVD/USB flash drive from the CD/DVD drive/USB port before the computer
restarts.
Restart the computer (booting from the HDD)
1. With the CD/DVD/USB flash drive removed from the CD/DVD drive/USB port the computer should restart from
the HDD.
2. Press F2 as the computer restarts to enter the BIOS.
C:BIOS Update
3. Use the arrow keys to highlight the Exit menu.
4. Select Load Setup Defaults (or press F3) and select “Yes” to confirm the selection.
5. Press F4 to save any changes you have made and exit the BIOS to restart the computer.
C:\> Flash.bat
Your computer is now running normally with the updated BIOS
You may now enter the BIOS and make any changes you require to the default settings.
C - 2
 Loading...