

Page 1
Windows XP Information
Battery Information
Please follow these simple guidelines to get the best use out of your battery.
New Battery
Always completely discharge, then fully charge, a new battery (see “Battery FAQ”
on page D - 26 for instructions on how to do this).
Battery Life
Your computer’s battery life is dependent upon many factors, including the programs
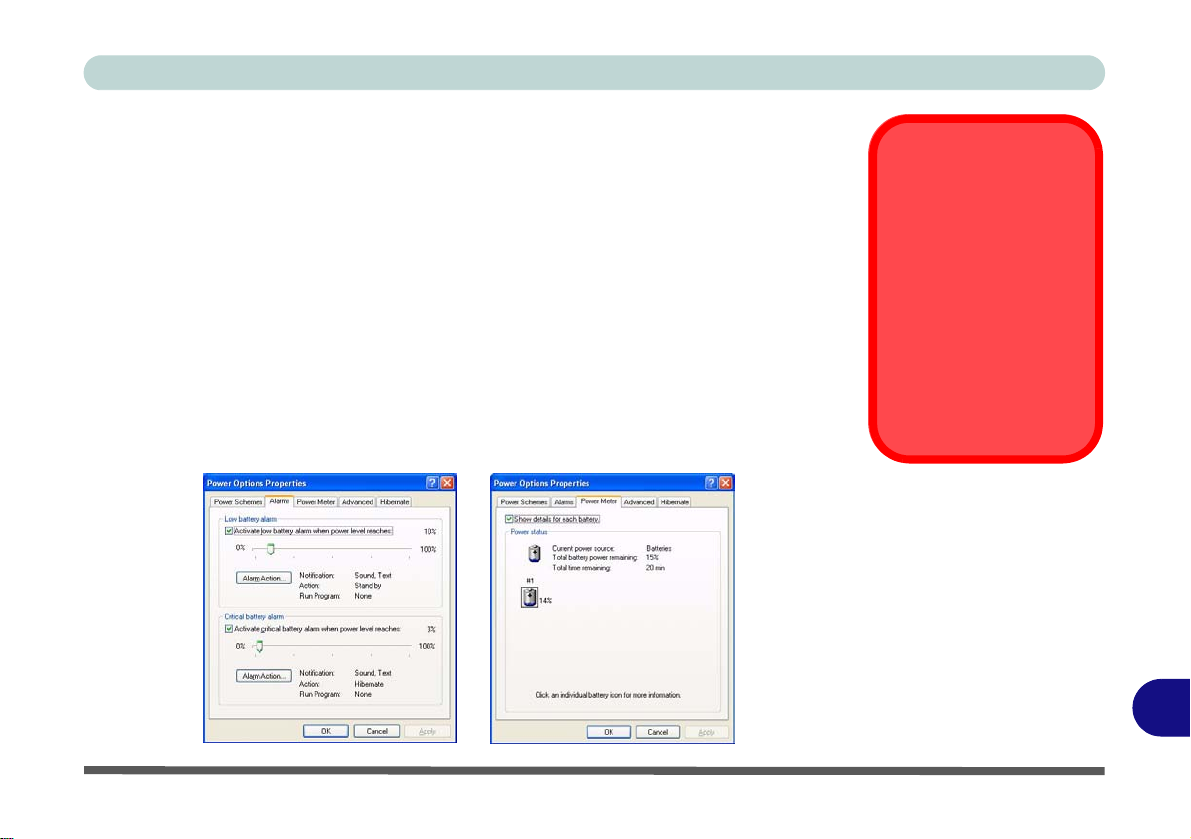
you are running, and peripheral devices attached. Power Options (you may set low
battery Alarms and actions, and check the Power Meter from the Power Options
control panel), and settings in the OS will help prolong the battery life if configured
appropriately.
Low Battery
Warning
When the battery is critically low, immediately
connect the AC/DC
adapter to the computer
or save your work, otherwise, the unsaved
data will be lost when
the power is depleted.
Figure D - 15
Power Options
(Alarm & Power
Meter)
Battery Information D - 23
D
Page 2

Windows XP Information
Battery life may be shortened through improper maintenance. To optimize the life and improve its performance, fully discharge and recharge the battery at least once every 30 days.
We recommend that you do not remove the battery yourself. If you need to remove the battery for any reason,
see “Removing the Battery” on page 6 - 3.
Recharging the Battery with the AC/DC Adapter
The battery pack automatically recharges when the AC/DC adapter is attached and plugged into an electrical outlet. If the computer is powered on, and in use, it will take several hours to fully recharge the battery. When the
computer is turned off but plugged into an electrical outlet, battery charge time is less. (Refer to “LED Indica-
tors” on page 1 - 7 for information on the battery charge status, and to “Battery Information” on page D - 23
for more information on how to maintain and properly recharge the battery pack.)
Conserving Battery Power
To conserve battery power:
Lower the brightness level of the LCD display. The system will decrease LCD brightness slightly to save power when it is not powered by
the AC/DC adapter.
Close modem or communication applications when they are not being used.
D
Remove any unused PC Cards from the computer (PC Cards quickly use up battery power even if the system enters sleep mode).
Disconnect any unnecessary external devices.
D - 24 Battery Information
Page 3

Proper handling of the Battery Pack
• DO NOT disassemble the battery pack under any circumstances
• DO NOT expose the battery to fire or high temperatures, it may explode
• DO NOT connect the metal terminals (+, -) to each other
Damaged Battery Warning
Should you notice any physical defects (e.g. the battery is bent ou t of shape after being
dropped), or any unusual smells emanating from the notebook battery, shut your computer
down immediately and contact your service center. If the battery has bee n d roppe d we do
not recommend using it any further, as even if the computer continues to work with a damaged battery in place, it may cause circuit damage, which may possibly result in fire . It is
recommended that you replace your computer battery every two years.
Windows XP Information
Battery Information D - 25
D
Page 4

Windows XP Information
Battery FAQ
Caution
Danger of explosion if
battery is incorrectly replaced.
Replace only with the
same or equivalent type
recommended by the
manufacturer. Discard
used battery according
to the manufacturer’s instructions.
How do I completely discharge the battery?
Use the computer with battery power until it shuts down due to a low battery. Don’t
turn off the computer by yourself even when you see a message that indicates the battery is critically low, just let the computer use up all of the battery power and shut
down on its own. Disable the Power Options functions in the Control Panel, espe-
cially any Alarms (unclick the tickboxes - see page D - 23) and Schemes (change
all the settings to Never - see page D - 18). As the battery nears the end of its life save
and close any critical files.
How do I fully charge the battery?
When charging the battery, don’t stop until the LED charging indicator light changes
from orange to green.
How do I maintain the battery?
Completely discharge and charge the battery at least once every 30 days or after
about 20 partial discharges.
D
D - 26 Battery Information
Page 5
Windows XP Information
Driver Installation
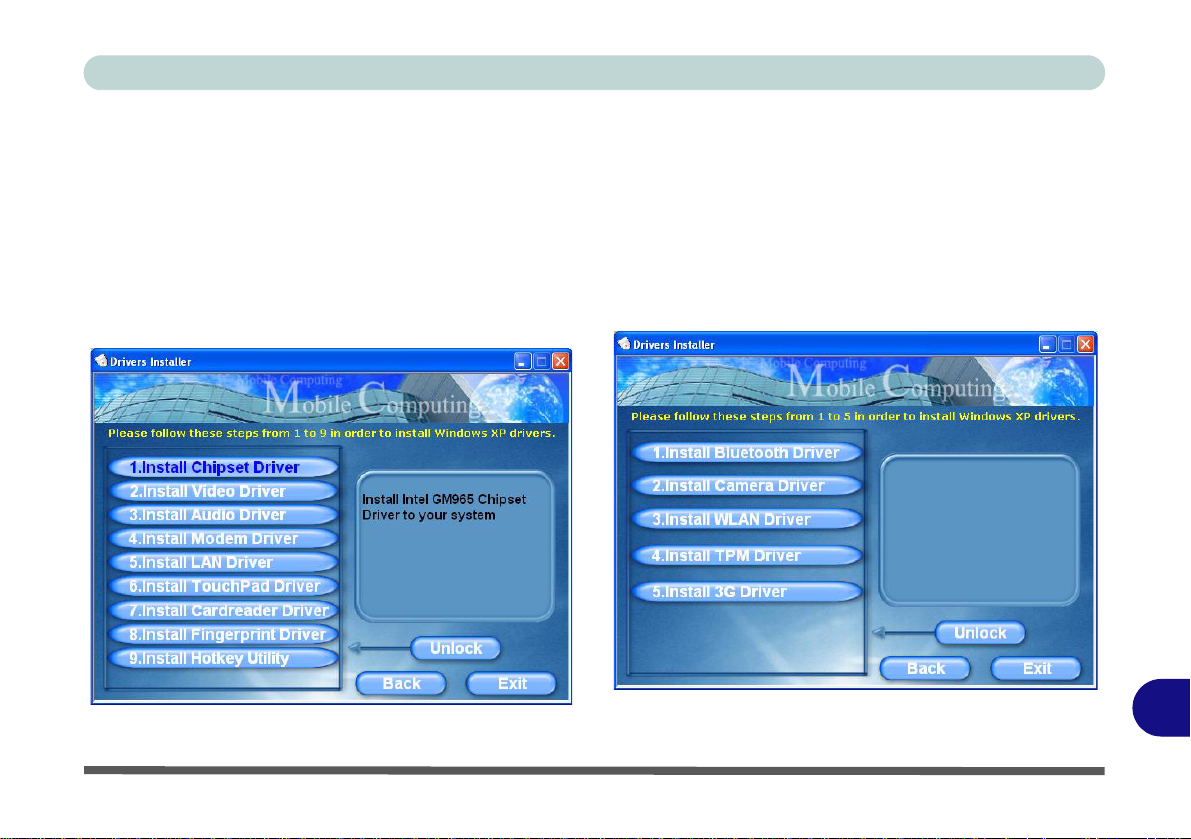
Insert the Device Drivers & Utilities + User’s Manual
CD-ROM, click Install WinXP Drivers/Install Option
Drivers (button) and then click the appropriate driver
name from the Drivers Installer menu. Follow the instructions to install the driver. Alternatively click Start,
navigate (Browse..) to the executable file and then follow the manual setup instructions.
1. Check the driver installation order from Table 5 (the
drivers must be installed in this order) which is the
same as that listed in the Drivers Installer menu
below.
2. Click to select the driver you wish to install, after
installing each driver it will become greyed out (if you
need to reinstall any driver, click the Unlock button).
3. Follow the instructions for each individual driver
installation procedure as listed on the following pages.
Figure 5 - Drivers Installer Screen 1
Figure 6 - Drivers Installer Screen 2
Driver Installation D - 27
D
Page 6

Windows XP Information
WinXP SP2 Driver Page # Driver Location Notes
D
Chipset Page D - 30 X:\Drivers\Chipset\Setup.exe
Video Page D - 30 X:\Drivers\Video\Setup.exe
Audio Page D - 30 X:\Drivers\Audio\Setup.exe
Modem Page D - 30 X:\Drivers\Modem\ssetup.exe
LAN Page D - 30 X:\Drivers\Lan\setup.exe
TouchPad Page D - 31 X:\Drivers\TouchPad\Setup.exe
CardReader Page D - 31 X:\Drivers\CardReader\Setup.exe
Fingerprint Reader Page D - 31 X:\Drivers\Fingerprint\Application\x86\autorun.exe
Hot Key Page D - 31 X:\Drivers\Hotkey\Setup.EXE
Bluetooth Module Page D - 32 X:\Drivers\Options\Bluetooth\Setup.exe
PC Camera Module Page D - 36
WLAN Module Page D - 43 X:\Drivers\Options\WLAN\Intel\Autorun.exe
TPM Security Chip Page D - 49 X:\Drivers\Options\TPM\setup.exe
3.5G Module Page D - 51 X:\Drivers\Options\3G\3G_Watcher\3G_Watcher_Generic.msi
X:\Drivers\Options\Camera\Sertek\Setup.exe (for 1.3M pixel Camera)
X:\Drivers\Options\Camera\Dmax\Setup.exe (for 2.0M pixel Camera)
Table 5 - Driver Installation
Manual Driver
Installation
If you wish to install the drivers manually, click the Exit
button to quit the Drivers
Installer application, and then
browse to the executable file
in the location listed in this
table, and follow the installation procedure for each driver.
Note that X is the drive letter
assigned to the CD/DVDROM drive.
D - 28 Driver Installation
Page 7

Updating/Reinstalling Individual Drivers
If you wish to update/reinstall individual drivers it may
be necessary to uninstall the original driver.To do this go
to the Control Panel in the Windows OS and doubleclick the Add/Remove Programs item. If you see the
individual driver listed (if not see below), uninstall it,
following the on screen prompts (it may be necessary to
restart the computer). Go to the appropriate section of the
manual to complete the update/reinstall procedure for the
driver in question.
Windows XP Information
Windows XP Service Pack 2
Make sure you install Windows XP Service Pack 2 (or a
Windows XP version which includes Service Pack 2) be-
fore installing any drivers. Service Pack 2 includes support for USB 2.0.
If you have upgraded the system by installing Service
Pack 2 (i.e. your Windows XP version does not include
Service Pack 2) then follow these instructions:
If the driver is not listed in the Add/Remove Programs
item:
1. Click Start (menu), point to Settings and click Control
Panel (or click Start > Control Panel).
2. Double-click System (icon); System (icon) is in
Performance and Maintenance (category).
3. Click Hardware (tab) > Device Manager (button).
4. Double-click the device you wish to update/reinstall the
driver for (you may need to click “+”).
5. Look for the Update Driver button (check the Driver
tab) and follow the on screen prompts.
1.Click Start (menu), point to Settings and click Con-
trol Panel (or click Control Panel).
2.Double-click System (icon); System (icon) is in Per-
formance and Maintenance (category).
3.Click the Hardware (tab) > Device Manager (button).
4.Click “+” next to Other Devices (if its sub-items are
not shown).
5.Right-click Universal Serial Bus (USB) Controller
and select Uninstall > OK (if you don’t see the item
then there is no need to take any further action).
6.Restart the computer and it will fi nd the USB 2.0 controller.
D
Driver Installation D - 29
Page 8

Windows XP Information
Driver Installation Procedure
Chipset
1. Click 1.Install Chipset Driver > Yes.
2. Click Next > Yes > Next > Next.
3. Click Finish to restart the computer.
Video
1. Click 2.Install Video Driver > Yes.
2. Click Next > Yes > Next > Next.
3. Click Finish to restart the computer.
Audio
1. Click 3.Install Audio Driver > Yes.
2. Click Next.
3. Click Finish to restart the computer.
Modem
1. Click 4.Install Modem Driver > Yes.
2. Click OK.
3. The modem is ready for dial-up configuration.
Modem Country Selection
Be sure to check if the modem country selection is appropriate for you (Control Panel > Phone and Modem
Options).
LAN
1. Click 5.Install LAN Driver > Yes.
2. Click Next.
3. Click Install > Finish.
4. The network settings can now be configured.
D
D - 30 Driver Installation
Page 9

Windows XP Information
TouchPad
1. Click 6.Install Touchpad Driver > Yes.
2. Click Next > Next > Next.
3. Click Finish to restart the computer.
CardReader
1. Click 7.Install Cardreader Driver > Yes.
2. Click Next > Next.
3. Click Finish to restart the computer.
Fingerprint Reader Module
See “Fingerprint Reader Driver Installation” on
page D - 46.
Hot Key
1. Click 9.Install Hotkey Utility > Yes.
2. Click Next > Install.
3. Click Finish > Finish to restart the computer.
Module Drivers
See the following pages for the driver installation procedures for any of the optional modules included in
your purchase configuration.
Wireless LAN, Bluetooth & 3.5G Modules
Wireless Device Operation Aboard Aircraft
The use of any portable electronic transmission devices
aboard aircraft is usually prohibited. Make sure the module(s)
are OFF if you are using the computer aboard aircraft.
Wireless LAN, Bluetooth & 3.5 G Modules Power To ggle
Enable power to the modules as follows:
Fn + F11 = Wireless LAN Module Power Toggle
Fn + F12 = Bluetooth Module Powe r To gg l e
Fn + _ = 3.5G Module Power Toggle
The LED indicator will be
and
orange
if the Bluetooth module is on. The LED indicator
will be
green
if the 3.5G module is on.
green
if the WLAN module is on,
D
Driver Installation D - 31
Page 10

D
Windows XP Information
Bluetooth Module
Wireless Device
Operation Aboard
Aircraft
The use of any portable
electronic transmission devices aboard aircraft is usually prohibited. Make sure
the module(s) are OFF if
you are using the computer
aboard aircraft.
Use the Fn + F12 key combination to toggle power to
the Bluetooth module, and
check the indicator to see if
the module is powered on
or not (see Table 1 - 5, on
page 1 - 10/ Table 1 - 2, on
page 1 - 7).
Before installing the optional Bluetooth module driver use the Fn + F12 key combination to toggle power to the module.
Bluetooth Driver Installation
1. Make sure the module is powered on, and then insert the Device Drivers &
2. Click Install Option Drivers (button).
3. Click 1.Install Bluetooth Driver (button).
4. Click Install Software Drivers v2.3.0.1.
5. Choose the language you prefer, and click OK.
6. Click Next.
7. Click the button to accept the license agreement, then click Next.
8. Click Next > Next > Install.
9. Click Finish.
10.The IVT Corporation BlueSoleil - Main Window screen appears on restart.
11.You can configure the settings at any time by going to the IVT Corporation
12.View the BlueSoleil User Guides from the Help Menu (press F1) in the IVT
Utilities + User’s Manual CD-ROM into the CD/DVD drive.
BlueSoleil - Main Window control panel (Start > Programs/All Programs
> IVT BlueSoleil), or by clicking the taskbar icon .
Corporation BlueSoleil - Main Window control panel.
D - 32 Bluetooth Module
Page 11

Windows XP Information
User Guide
View the BlueSoleil User
Guides (Contents and In-
Help
dex) from the
(or press the
the
IVT Corporation
BlueSoleil - Main Win-
control panel. Click
dow
BlueSoleil User Guides
in the
Contents
click to select the appropriate User Guide from
the panel on the right.
Figure D - 1
Bluetooth Control
Panel & User Guides
menu
F1
key) in
tab, and
Bluetooth Module D - 33
D
Page 12

Windows XP Information
Bluetooth Local Area Connection Icon
Disconnecting
In order to have the taskbar
icon display the correct
connection status, you will
need to exit the IVT Corpo-
ration BlueSoleil - Main
Window by clicking the File
menu and selecting Exit
(see over).
After exiting the program
you can then use the Fn +
F12 key combination to turn
off the Bluetooth module.
If you use the close button,
or turn off the Bluetooth
module (by using the Fn +
F12) the taskbar icon will
not display the correct status
If you want to display the Local Area Connection icon for the Bluetooth connection
in the taskbar, set it up as follows:
1. Access the Network Connections control panel in Windows (Start > Settings >
2. Right-click the Bluetooth connection icon, and select Properties.
3. Click to put a tick in the “Show icon in the no tification area when connected”
4. Close the control panels and the icon for the Bluetooth connection will be
Network Connections OR Start > Connect To > Show all Connections) or by
clicking the taskbar icon .
box.
displayed in the taskbar when connected (see sidebar and overleaf).
D
Figure D - 2
Local Area
Connection
D - 34 Bluetooth Module
Page 13

Windows XP Information
5. Use the Fn + F12 key combination to turn on the Bluetooth module.
6. Run the IVT Corporation BlueSoleil program from the desktop icon or Start menu.
7. The connection status will then be displayed.
Figure D - 3 - Bluetooth Connected
8. To disconnect click File from the IVT Corporation BlueSoleil - Main Window , and select Exit (the Local Area
Connection will then display “A network cable is unplugged”).
9. Do not use the close button or Fn + F12 key combination before clicking File > Exit or the correct status will
not be displayed.
10. You can then use the Fn + F12 key combination to turn off the Bluetooth module (check the LED icon for the
Bluetooth module power status).
Figure D - 4 - Bluetooth Disconnected
D
Bluetooth Module D - 35
Page 14

Windows XP Information
PC Camera Module
Taking Still Pictures
Double-click the
Computer
desktop, or go the
menu and point to
Computer
.
Double-click the
Cam, NB Pro
Click
in the
box.
icon on the
Start
, then click it.
Bison-
icon.
Take a new picture
Camera Tasks
Before installing the optional PC Camera module driver use the Fn + F10 key combination to toggle power to the module. There are 2 camera options available for this
computer, depending on your purchase configuration. The 1.3M pixel camera mod-
My
ule uses the BisonCap application to capture video files, and the 2.0M pixel camera
module uses the Video View application to capture video files.
My
PC Camera Driver Installation
1. Make sure the module is powered on, and then insert the Device Drivers &
2. Click Install Option Drivers (button).
3. Click 2.Install Camera Driver > Yes.
For the 1.3M Pixel Camera Module:
1. Choose the language you prefer and click OK > Next.
2. Click Finish to restart the computer.
3. Run the BisonCap application program from the BisonCam shortcut on the
Utilities + User’s Manual CD-ROM into the CD/DVD drive.
desktop, or from the BisonCam item in the Start > Programs/All Programs
menu (if the hardware is turned off use the Fn + F10 key combination to turn
it on again).
D
D - 36 PC Camera Module
Page 15

Windows XP Information
For the 2.0M Pixel Camera Module:
1. Click Install.
2. Click to select Yes or No in answer to the power system question.
3. Click to select Yes or No to enable/disable the Digital Zoom function.
4. Click Finish > Finish to restart the computer.
5. Run the Video View application program from the Video View shortcut on the desktop, or from the
USB2.0 PC Camera item in the Start > Pr ograms/All Programs menu (if the hardware is turned off
use the Fn + F10 key combination to turn it on again).
PC Camera Audio Setup (all camera modules)
If you wish to capture video & audio with your camera, it is necessary to setup the audio recording options in
Windows.
1. G o to the Start menu and point to Settings (or just click Control Panel) and click Control Panel, then double-
click the Sounds & Audio Devices icon (Sounds, Speech, and Audio Devices in Category View).
2. Click Advanced in the Volume > Device volume tab.
3. Click Options and scroll down and click Properties.
4. Select Realtek HD Audio input from the Mixer device menu.
5. Make sure the Mic Volume (check box) is checked, then click OK.
6. Boost the volume in the Recording section (in the Recording Control menu) as high as it will go.
7. Close the Recording Control window, and then click OK.
8. Run the BisonCap application program from the Start > Programs/All Programs > BisonCam menu.
9. G o to the Devices menu heading and select Realtek HD Audio input (it should have a tick alongside it).
10. Go to the Capture menu heading and select Capture Audio (it should have a tick alongside it).
D
PC Camera Module D - 37
Page 16

D
Windows XP Information
BisonCap (for 1.3M pixel camera modules)
Pre-Allocating File
Space
You may pre-allocate the
file size for the capture file
BisonCap
in the
gram. You can choose to
ignore this by clicking
Cancel
.
Pre-allocating space on
the hard disk can improve
the capture quality (particularly of large capture
files), by reducing the
amount of work the hard
disk has to do in finding
space for the video data
as it is being captured.
You may find it helpful to
defragment the HDD before capture.
pro-
BisonCap is a video viewer useful for general purpose video viewing and testing,
and can capture video files to .avi format.
1. Run the BisonCap application from the Start > Prog rams/All Programs > Bison-
2. Go to the Capture menu heading (if you wish to capture audio check “PC Camera
3. On the first run of the program (if you have not set the captured file) you will be
4. Click OK to start capturing the video, and press Esc to stop the capture.
5. If you wish to, you may go to the File menu and select Save Captured Video As...,
Set Capture File
In the BisonCap program you will only be asked to set the capture file name on the
first run of the program. When you run the program the next time the file will automatically be overwritten with the newly captured file. To avoid overwriting files you
can go to the Set Capture File.. option in the File menu, and set the file name and
location before capture. Set the name and location then click Open
Cancel to ignore the file size if prompted).
Cam menu (it is recommended that you set the capture file before the capture
process - see Set Capture File below).
Audio Setup (all camera modules)” on page D - 37) and select Start Capture.
asked to choose a file name and size (see the sidebar - Pre-Allocating File
Space) for the captured file. Click Start Ca pture again.
choose a file name and location, and then click Open (you can view the file using
the Windows Media Player).
(you can choose
D - 38 PC Camera Module
Page 17

Windows XP Information
Eliminating Screen Flicker (BisonCap)
If you find that the video screen in the BisonCap program is flickering, you can try
to adjust the setting in the Video Capture Filter options.
1. Run the BisonCap application.
2. Go to Options and scroll down to select “Video Capture Filter...”.
3. Click either 50Hz or 60Hz under Frequency in Property Page (tab).
Figure D - 5
Video Capture Filter
PC Camera Module D - 39
D
Page 18

Windows XP Information
Video View (for 2.0M pixel camera module)
Pre-Allocating File
Space
You may pre-allocate
the file size for the capture file in the Video
View program.
Pre-allocating space on
the hard disk can improve the capture quality (particularly of large
capture files), by reducing the amount of work
the hard disk has to do
in finding space for the
video data as it is being
captured.
Video View is a video viewer useful for general purpose video viewing and testing,
and can capture video files to .avi format.
1. Run the Video View program from the Start > Programs/All Programs > USB2.0
2. Go to the Capture menu heading (if you wish to capture audio check “PC Camera
3. Click OK (the file location will be displayed in the pop-up box) to start capturing the
Set Capture File
Prior to capturing video files you may Set Capture File... To avoid overwriting files
you can go to the Set Capture File.. option in the File menu, and set the file name
and location before capture. Set the name and location then click Open
choose Cancel to ignore the file size if prompted).
PC Camera menu (it is recommended that you set the capture file before the capture process - see Set Capture File below).
Audio Setup (all camera modules)” on page D - 37) and select Start Capture.
video, and press Esc to stop the capture.
(you can
D
D - 40 PC Camera Module
Page 19

Windows XP Information
Eliminating Screen Flicker (Video View)
If you find that the video screen in the Video View program is flickering, you can try
to adjust the setting in the Video Capture Filter options.
1. Run the Video View prog r am .
2. Go to Options and scroll down to select Video Capture Filter....
3. Click either 50Hz or 60Hz under Flickering Reduction in Image (tab).
Figure D - 6
Video Capture Filter
PC Camera Module D - 41
D
Page 20

Windows XP Information
Zoom (Video View)
If you have enabled digital zoom when installing the 2.0M Pixel Camera driver you
may use the Options > Setting menu to zoom the camera in and out.
D
Figure D - 7
Setting
1. Run the Video View program.
2. Go to Options and scroll down to select Setting.
3. Use the slider to adjust the zoom level, and click OK to save the setting.
Snapshot Folder
The Snapshot folder’s
default location is on the
desktop. Do not move
this folder or an error
may appear when you
try to take a still picture.
If you accidentally delete or move the folder,
you can create a new
Snapshot folder on the
desktop in order to capture the files.
Figure D - 8
Snapshot Folder
D - 42 PC Camera Module
Still Image Capture (Video View)
You can capture still images by using the Snapshot command from the Capture
menu.
1. Run the Video View program.
2. Go to Capture and select Snapshot.
3. The picture (in JPEG format) will be placed in the Snapshot folder on the desktop.
Page 21

Windows XP Information
WLAN Module
Before installing the Wireless LAN driver use the Fn + F11 key combination to toggle power to the module.
Intel WLAN Driver Installation
1. Make sure the module is powered on, then insert the Device Drivers & Utilities + User’s Manual CDROM(WinXP) into the CD/DVD drive.
2. Click Install Option Drivers (button).
3. Click 3.Install WLAN Driver > Yes.
4. Click Install Software (button).
5. Click the button to accept the license and click Next > Next > OK.
6. Click OK to complete the installation.
7. Configure the settings by going to the Intel (R) PROSet Wireless control panel (S tart > Programs/
All Programs > Intel PROSet Wireless), or by double-clicking the taskbar icon .
User Guide
You can view the User Guides from the Device Drivers &
Utilities + User’s Manual CD-ROM (WinXP).
Click Install Option Drivers and then click the Unlock button. Click 3.Install WLAN Dr iver > Yes. Click View User
Guide (button).
Figure D - 9 - Intel PROSet/Wireless
D
WLAN Module D - 43
Page 22

Windows XP Information
Network
Connection
D
Use the
work Connections
trol panel to access
available wireless networks (
Network Connections
or
Show all Connections
Windows Net-
con-
Start > Se tting s >
Start > Connect To >
).
Figure D - 10
Wireless Network
Control Panels
D - 44 WLAN Module
Page 23

Windows XP Information
Security Modules (Fingerprint & TPM)
The encrypted channel between the Trusted Platform Module security chip and
the optional fingerprint reader with Protector Suite Software provides a high lev-
el of security for your computer. A further level of security and control is provided
in the BIOS (see “Security Menu” on page 5 - 10).
The fingerprint reader and Protector Suite Software allow you to:
• Access or Lock your computer
• Protect sensitive files
• Display and file your favorite web pages
• Fill in frequently used dialogs
• Run your favorite applications
The TPM security chip allows you to create and manage digital certificates for user
and platform authentication. This type of security is usually administered within
large enterprises and organizations, and therefore requires implementation by a system administrator before users can access security features.
Individual users can use the TPM as an authentication with the fingerprint reader.
Password Warning
If you set passwords for
any of the security modules, NEVER forget your
password.
The consequences of
this could be serious. If
you cannot remember
your boot password you
must contact your vendor and you may lose all
of the information on
your hard disk.
See overleaf for information installing and configuring the Protector Suite Software, and see “Trusted Platform Module” on page 7 - 25 for information on TPM.
D
WLAN Module D - 45
Page 24

Windows XP Information
Fingerprint Reader Module
Help & Manual
If you have included the fingerprint reader in your purchase option you will need to
install the driver as per the instructions below.
D
Right-click the taskbar icon
to bring up the menu to
select
Help
.
Insert the Device Drivers &
Utilities + User’s Manual
CD-ROM and click Install
WinXP Drivers (button).
Click Unlock (button) and
then click 8.Install Finger-
print Driver > Yes.
Click
Documentation
open the folder containing
the manual in .pdf format.
to
Make sure you have administrator’s rights to your computer, and have a Windows
password enabled for full security protection.
Before beginning the enrollment process it is recommended that you go through the
fingerprint tutorial. To run the tutorial click Start > Programs/All Programs > Pro-
tector Suite QL > Fingerprint Tutorial after installing the driver.
Fingerprint Reader Driver Installation
1. Insert the Device Drivers & Utilities + User’s Manual CD-ROM (WinXP)
into the CD/DVD drive.
2. Click Install WinXP Drivers.
3. Click 8.Install Fingerprint Driver > Yes.
To install the Adobe Acrobat
Reader software to read the
file, i
nsert the Device Driv-
ers & Utilities + User’s Manual CD-ROM and click
User’s Manual (button),
and click Install Acrobat
Reader (button).
4. Click Software Installation.
5. Click Next > Next > Next.
6. Click Finish > Yes to restart the computer.
7. See overleaf for information on enrolling fingerprints etc.
D - 46 Fingerprint Reader Module
Page 25

Windows XP Information
User Enrollment
1. Click Start > Programs/All Programs > Protector Suite QL > User Enrollment, or double click the taskbar
icon .
2. On the first run of the program you will be asked to click the button to accept the license, and then click OK.
3. Click Next and select “Enrollment to the hard disk”, and click Finish.
4. Click Next and you will then be prompted to enter your Windows password ( note: If you have not set a
password Protector Suite QL cannot secure access to your computer).
5. Click Next > Next (tick the “Run interactive tutorial” tickbox to run through the Fingerprint Tutorial).
6. Click Next for each window of the tutorial (you can click the button to “skip tutorial” at any time).
7. Clic k the button above any of the fingers to begin the enrollment process for that finger.
8. Swipe the finger three times to enroll that finger.
9. Repeat the process for all the fingers you wish to enroll (see below), and then click Next.
Fingerprint
Enrollment
Note that it is strongly recommended that you enroll
more than one finger in
case of injury etc.
Figure D - 11 - Fingerprint Enrollment
Fingerprint Reader Module D - 47
D
Page 26

Windows XP Information
10. If you put a tick in the “Enable Advanced Security for the current user” tickbox you will be asked to input a
PIN before continuing (choose TPM key with PIN and enable and create a backup password).
11. Click Next > Finish.
12. Right-click the taskbar icon to bring up the menu that allows you to Edit Fingerprints , start Control C enter,
access the Help menu etc. You can also run the Control Center etc. from the Protector Suite QL item in the
Programs/All Programs menu.
13. See “Help & Manual” on page D - 46 for further details.
14. If you swipe your finger over the reader at any time you can access the Biomenu to lock the computer,
register websites, open the Control Center and access the Help menu.
D
Figure D - 12 - Control Center & Biomenu
D - 48 Fingerprint Reader Module
Page 27

Windows XP Information
TPM Security Chip
If you have included the Trusted Platform Module security chip module in your purchase option, you will
have the appropriate software provided on the Device Drivers & Utilities + User’s Manual CD-ROM (WinXP).
After installing the driver as per the instructions below, see “Trusted Platform Module” on page 7 - 17 for full
instructions on initializing the TPM etc.
TPM Utility Installation
1. Enable the TPM state in the BIOS (see “Initializing TPM” on page 7 - 17).
2. Insert the Device Drivers & Utilities + User’s Manual CD-ROM (WinXP) into the CD/DVD drive.
3. Click Install Option Drivers (button).
4. Click 4.Install TPM Driver > Yes.
5. Click Next.
6. Click the button to accept the license agreement, and then click Next.
7. Click Next > Next > Install.
8. Click Finish (you may then go straight to the initialization process if you have checked the option).
9. Run the
item in the
10. See overleaf for instructions on initializing the TPM.
TPM
application program from the shortcut on the desktop, or from the
Start > Programs/All Programs
menu.
TPM Secure Tools
TPM Security Chip D - 49
D
Page 28

Windows XP Information
Initializing TPM
Password Warning
Do not lose the password. If you do so you
will be unable to make
administrative changes
unless you clear the
TPM. This could then result in data loss.
Recovery Token
Note the location of the
emergency recovery token. It is recommended
that you save the file to
removable media such
as a USB Flash drive (or
backup using the tool
provided - see page 7 -
28).
On the first run of the program you will need to initialize the TPM.
1. Run the application from the Security Manager shortcut on the desktop, or from the
2. Click Next.
3. Type a TPM owner password, and then retype to confirm the password.
4. Click Next to create a recovery token (see sidebar).
5. Click Next and create a password reset token file if required.
6. Click Next and specify a location for the emerge nc y recove ry data path (a root path
7. Click Next > Next to begin the Initialization process.
8. Click Finish to begin the user initialization.
9. Click Next, and type a TPM user password, and then retype to confirm the
10. Click Next and create a password reset secret file if required (click in the tickbox).
11. Click Next > Next to begin the user Initialization process.
12. Click Finish (it is recommended that you use the Backup and Restore module to
13. Enter the user password and click Logon.
14. For further details on using the Security Manager see “TPM Manager” on page 7
TPM Secure Tools item in the Start > Programs/All Programs menu.
to restore user keys if you need to reinstall the OS).
password.
make a backup).
- 22.
D
D - 50 TPM Security Chip
Page 29

Windows XP Information
3.5G Module
If you have included an optional 3.5G module in your purchase option follow the instructions on page 7 - 37 to
install the USIM card (which will be provided by your service provider), and then install the application.
Before installing the application, make sure that the 3.5G module is on. Use the Fn + _ key combination
(see “Function/Hot Key Indicators” on page 1 - 10) to toggle power to the 3.5G module.
3G Watcher Application Installation
1. Make sure the module is powered on, and then insert the Device Drivers & Utilities + User’s Manual
CD-ROM (WinXP) into the CD/DVD drive.
2. Click Install Option Drivers (button).
3. Click Install 3GWatcher > Yes.
4. Click Next.
5. Choose your region, and click Next.
6. Click the button to accept the license agreement, and then click Next.
7. Click Next > Install.
8. Click Finish, and the 3G Watcher icon will appear on the desktop.
9. Y ou can access the 3G Watcher application from the Start menu (Start > Programs/All Programs >
Sierra Wireless > 3G Watcher), or by clicking the desktop icon .
10. Make sure you enable power to the module by pressing the Fn + _ key combination (the icon
will be green).
11. See “Setting Up a Carrier Profile” on page 7 - 41 and “Connecting to the Service Provider” on
page 7 - 43 for instructions on using the 3G Watcher application.
D
3.5G Module D - 51
Page 30

Windows XP Information
D
D-52
 Loading...