


Introduction (English)
This Concise User’s Guide introduces the main features
of your computer. The English version of this guide begins on page 1. The expanded User’s Manual is on the
Device Drivers & Utilities + User’s Manual CD-ROM.
Einführung (Deutsch)
Dieses Ausführliche Benutzerhandbuch führt Sie in die
Hauptfunktionen des Notebooks ein. Die deutsche Version des Handbuchs beginnt auf Seite 45. Das erweiterte
Benutzerhandbuch finden Sie auf der CD-ROM für die
Gerätetreiber und Hilfsprogramme (CD-ROM Device
Drivers & Utilities + User's Manual).
Présentation (Français)
Ce Guide Utilisateur Concis présente les fonctionnalités
principales de votre ordinateur. La version française de
ce guide commence à la page 89. Le Manuel de l'Utilisa-
teur étendu se trouve sur le CD-ROM de Pilotes & Utilitaires + Manuel de l'Utilisateur (CD-ROM Device
Drivers & Utilities + User's Manual).
Introducción (Español)
Esta Guía del Usuario Concisa le presenta las características principales de su ordenador. La versión española de
esta guía comienza en la página 133. El Manual del usua-
rio completo se encuentra en el CD-ROM de Controladores del dispositivo y Utilidades + Manual del usuario
(CD-ROM Device Drivers & Utilities + User's Manual).
Introduzione (Italiano)
La presente Guida Rapida per l'Utente introduce le caratteristiche principali del computer. La versione italiana di
questa guida inizia da pagina 177. Il Manuale utente
completo si trova nel CD contenente driver e utilità +
Manuale utente (CD-ROM Device Drivers & Utilities +
User's Manual).
I

Contents
Notice .................... ............................... .................................. ........... 1
About this Concise User Guide .........................................................2
Instructions for Care and Operation ..................................................3
System Startup ..................................................................................6
System Software ...............................................................................8
System Map: Top View with LCD Panel Open (Models A & B) ....9
System Map: Top View with LCD Panel Open (Model C) ............10
LED Indicators ................................................................................11
Keyboard .........................................................................................12
Hot-Key Buttons .............................................................................14
System Map: Front & Rear Views ..................................................16
System Map: Left View .............. ............................................. .......17
System Map: Right View ................................................................18
System Map: Bottom View .............................................................19
Windows Vista Start Menu & Control Panel ..................................20
Video Features ................................................................................21
Audio Features ................................................................................23
Power Management Features .......................... ................................24
Driver Installation ... ........................................................................26
Wireless LAN .................................................................................29
PC Camera ......................................................................................30
Fingerprint Reader ..........................................................................34
Bluetooth Configuration in Windows Vista ...................................36
Troubleshooting ..............................................................................38
Specifications ............... ................................. .................................. 40
Inhalt
Hinweis ..................... ..... ....... ...... ..... ...... ..... ...... ..... ....... ...... ..... ...... ..45
Über das Ausführliche Benutzerhandbuch ......................................46
Hinweise zu Pflege und Betrieb ......................................................47
Schnellstart .................. ............................................ ........................50
Systemsoftware ...............................................................................52
Systemübersicht: Ansicht von oben mit geöffnetem
LCD-Bildschirm (Modelle A & B) .................................................53
Systemübersicht: Ansicht von oben mit geöffnetem
LCD-Bildschirm (Modell C) ...........................................................54
LED-Anzeigen ................................................................................55
Tastatur ................... ......................... ........................ ........................56
Hot-Key-Tasten ...................... ................................. ........................58
Systemübersicht: Ansicht von vorne und Rückansicht ...................60
Systemübersicht: Ansicht von links ................................................61
Systemübersicht: Ansicht von rechts ..............................................62
Systemübersicht: Ansicht von unten ...............................................63
Windows Vista Startmenü und Systemsteuerung ...........................64
Grafikfunktionen .................................................................. ...........65
Audiofunktionen ..............................................................................67
Energieverwaltungsfunktionen . ....... .... ....... ...... ..... ....... .... ....... .... ....68
Installation der Treiber ....................................................................70
Wireless LAN ..................................................................................73
PC-Kamera ...................... ............................................. ...................74
Fingerabdruckleser ................. .............................................. ...........78
Bluetooth-Konfiguration in Windows Vista ................................. ..80
Fehlerbehebung ...............................................................................82
Technische Daten ............................................................................84
II

Sommaire
Avertissement .................................................................................89
A propos de ce Guide Utilisateur Concis ........................................90
Instructions d’entretien et d’utilisation ...........................................91
Guide de démarrage rapide .............................................................94
Logiciel système .............................................................................96
Carte du système : Vue du dessus avec l’écran
LCD ouvert (Modèles A & B) ........................................................97
Carte du système : Vue du dessus avec l’écran
LCD ouvert (Modèle C) ..................................................................98
Indicateurs LED ..............................................................................99
Clavier ................... ........................... ........................... .................. 100
Boutons Hot-Key ..........................................................................102
Carte du système : Vues de face & arrière .. .. ................................104
Carte du système : Vue de gauche ................................................105
Carte du système : Vue de droite ......... .........................................106
Carte du système : Vue d’en dessous ...... ......................................107
Menu Démarrer & Panneau de configuration de Windows Vista 108
Caractéristiques vidéo ...................................................................109
Caractéristiques audio ...................................................................111
Caractéristiques de gestion de l’alimentation ...............................112
Installation du pilote .....................................................................114
LAN sans fil ............................ ............................................ ..........117
Caméra PC ....................................................................................118
Lecteur d'empreintes digitales .......................................................122
Configuration Bluetooth dans Windows Vista .............................124
Dépannage .................... .... ....... .... ....... ....... .... ....... ....... .... ....... .... ...126
Spécifications ............... ................................. ................................ 128
Contenidos
Aviso .............................................................................................133
Acerca de esta Guía del Usuario Concisa .....................................134
Instrucciones para el cuidado y funcionamiento ................ ...........135
Guía rápida para empezar ..............................................................138
Software de sistema ..... ..................................................................140
Mapa del sistema: Vista superior con panel
LCD abierto (Modelos A & B) .....................................................141
Mapa del sistema: Vista superior con panel
LCD abierto (Modelo C) ...............................................................142
Indicadores LED .................. .........................................................143
Teclado ..................... ............................................... ......................144
Botones Hot-Key ...........................................................................146
Mapa del sistema: Vistas frontal y posterior .................................148
Mapa del sistema: Vista izquierda ................................................149
Mapa del sistema: Vista derecha ...................................................150
Mapa del sistema: Vista inferior ...................................................151
Menú Inicio y Panel de control de Windows Vista .......................152
Parámetros de vídeo ......................................................................153
Características de audio .................................................................155
Funciones de administración de energía .......................... .............156
Instalación de controladores ..........................................................158
LAN Wireless ................................................................................161
Cámara PC .....................................................................................162
Lector de huellas digitales .............................................................166
Configuración de Bluetooth en Windows Vista ............................168
Solución de problemas ................................. .................................170
Especificaciones ................ ............................................... .............172
III

Sommario
Avviso ........................ ............................................ ....................... 177
Informazioni sulla Guida Rapida per l'Utente .................. .. ..........178
Istruzioni per la custodia e il funzionamento ................................179
Guida di avvio rapido ....................................................................182
Software del sistema ............................... ......................................184
Descrizione del sistema: Vista superiore con pannello
LCD aperto (Modelli A & B) ........................................................185
Descrizione del sistema: Vista superiore con pannello
LCD aperto (Modello C) ...............................................................186
Indicatori LED ..............................................................................187
Tastiera ................ ................ ............. ............... ................ ............. . 188
Pulsanti Hot-Key ...........................................................................190
Descrizione del sistema: Vista anteriore e posteriore ...................192
Descrizione del sistema: Vista sinistra .........................................193
Descrizione del sistema: Vista destra ...........................................194
Descrizione del sistema: Vista inferiore .......................................195
Menu Start e Pannello di controllo di Windows Vista .................196
Funzioni video ........... ...................................................................197
Funzionalità audio . ........................................................................199
Funzioni di risparmio energetico ..................................................200
Installazione driver ........................................................................202
LAN Wireless ...............................................................................205
Camera PC ....................................................................................206
Lettore d’impronte digitali ........................ ....................................210
Configurazione Bluetooth in Windows Vista ...............................212
Risoluzione dei problemi ........ ............................................... .......214
Specifiche tecniche .......................................................................216
IV

Concise User’s Guide
Notice
The company reserves the right to revise this publication or to change its contents without notice. Information contained herein is for reference only and does not constitute a commitment on the part of the manufacturer or any subsequent vendor. They assume no responsibility or liability for any errors or inaccuracies that may appear in this
publication nor are they in anyway responsible for any loss or damage resulting from the use (or misuse) of this publication.
This publication and any accompanying software may not, in whole or in part, be reproduced, translated, transmitted
or reduced to any machine readable form without prior consent from the vendor, manufacturer or creators of this publication, except for copies kept by the user for backup purposes.
Brand and product names mentioned in this publication may or m ay not be copyrights and/or registe red trademarks
of their respective companies. They are mentioned for identification purposes only and are not intended as an endorsement of that product or its manufacturer.
© November 2007
Trademarks
This product incorporates copyright protection technology that is protected by method claims of certain U.S. patents
and other intellectual property rights owned by Macrovisio n Corporation and other rights owners. Use of this copyright protection technology must be authorized by Macrovision Corporation, and is intended for home or other limited
viewing uses only unless otherwise authorized by Macrovision Corporation. Reverse engineering or disasse mbly is
prohibited.
Intel, Celeron, and Intel Core are trademarks/registered trademarks of Intel Corporation.
English
Notice - 1

Concise User’s Guide
About this Concise User Guide
This quick guide is a brief introduction to getting your system started. This is a supplement, and not a substitute for
the expanded English language User’s Manual in Adobe Acrobat format on the Device Drivers & Utilities + User’s
Manual CD-ROM supplied with your computer. This CD-ROM also contains the drivers and utilities necessary for
the proper operation of the computer.
English
Some or all of the computer’s features may already have been setup. If they aren’t, or you are planning to re-configure
(or re-install) portions of the system, refer to the expanded User’s Manual. The Device Drivers & Utilities + User’s
Manual CD-ROM does not contain an operating system.
Regulatory Information
Regulatory notices and information are contained in the expanded User’s Manual on the Device Drivers & Utilities
+ User’s Manual CD-ROM.
Wireless Device Operation Aboard Aircraft
The use of any portable electronic transmission devices aboard ai rcraft is usually prohi bited. Make sure the wireless modules are
OFF if you are using the computer aboard aircraft.
2 - About this Concise User Guide

Concise User’s Guide
Instructions for Care and Operation
The computer is quite rugged, but it can be damaged. To prevent this, follow these suggestions:
• Don’t drop it, or expose it to shock. If the computer falls, the case and the components could be damaged.
• Keep it dry, and don’t overheat it. Keep the computer and power supply away from any kind of heating element.
This is an electrical appliance. If water or any other liquid gets into it, the computer could be badly damaged.
• A void interference. Keep the computer away from high capacity transformers, electric motors, and other strong mag-
netic fields. These can hinder proper performance and damage your data.
• Follow the proper working procedures for the computer. Shut the computer down properly and don’t forget to
save your work. Remember to periodically save your data as data may be lost.
• Take care when using peripheral devices.
Servicing
Do not attempt to service the computer yourself. Doing so may violate your warranty and expose you and the computer to electric shock. Refer all servicing to authorized service personnel. Unplug the computer from the power supply. Then refer servicing to qualified service personnel under any of the following conditions:
• When the power cord is damaged or frayed.
• If the computer has been exposed to any liquids.
• If the computer does not work no rmally when you follow the operating instructions.
• If the computer has been dropped or damaged (do not touch the poisonous liquid if the LCD panel breaks).
• If there is an unusual odor, heat or smoke coming from your computer.
English
Instructions for Care and Operation - 3

Concise User’s Guide
Power Safety
The computer has specific power requirements:
• Only use an AC/DC adapter ap proved for use with this computer.
• Your AC/DC adapter may be designed for in ternational travel but it still requires a steady, uninterrupted power supply.
English
If you are unsure of your local power specifications, consult your service representative or local power company.
• The AC/DC adapter may have either a 2-prong or a 3-prong grounded plug. The third prong is an important safety feature; do not defeat its purpose. If you do not have access to a compatible outlet, have a qualified electrician install one.
• When you want to unplug the power cord, be sure to disconnect it by the plug head, not by its wire.
• Make sure the socket and any extension cord(s) you use can support the total current load of all the connected devices.
• Before cleaning the computer, make sure it is disconnected from any external power supplies.
Power Safety Warning
Before you undertake any upgrade procedures, make sure that you have turned off the power, and disconnected all peripherals
and cables (including telephone lines). It is advisable to also remove your battery in order to prevent accidentally turning the machine on.
Power Off Before Traveling
Make sure that your notebook is completely powered off before putting it into a travel bag (or any such container). Putting a n otebook which is powered on in a travel bag may cause the vent(s) to be blocked. To prevent your computer from overheating make
sure nothing blocks the vent(s) while the computer is in use.
Cleaning
Do not apply cleaner directly to the computer, use a soft clean cloth. Do not use volatile (petroleum distillates) or
abrasive cleaners on any part of the computer.
4 - Instructions for Care and Operation

Concise User’s Guide
Battery Precautions
• Only use batteries designed for this computer. The wrong battery type may explode, leak or damage the computer.
• Do not continue to use a battery that has been dropped, or that appears damaged (e.g. bent or twisted) in any way.
Even if the computer continues to work with a damaged battery in place, it may cause circuit damage, which may possibly result in fire.
• Recharge the batteries using the notebook’s system. Incorrect recharging may make the battery explode.
• Do not try to repair a battery pack. Refer any battery pac k repair or replacement to your servi ce representative or qualified service personnel.
• Keep children away from, and promptly dispose of a damaged battery. Always dispose of batteries carefully . Batteries
may explode or leak if exposed to fire, or improperly handled or discarded.
• Keep the battery away from metal appliances.
• Affix tape to the battery contacts before disposing of the battery.
• Do not touch the battery contacts with your hands or metal objects.
Battery Disposal & Caution
The product that you have purchased contains a rechargeable battery. The battery is recyclable. At the end of its us eful life, under
various state and local laws, it may be illega l to dispose of thi s battery into the mun icipal waste stream. Check with your loc al solid
waste officials for details in your area for recycling options or proper disposal.
Danger of explosion if battery is incorrectl y repl aced. Repl ace only wi th th e same o r equi val ent typ e recommen ded b y th e manufacturer. Discard used battery according to the manufacturer’s instructions.
English
Instructions for Care and Operation - 5
Concise User’s Guide
Note that you should al-
English
ways shut your computer
down by choosing the
Shut Down command
from the Lock Button
Menu in Windows Vista.
This will help prevent hard
disk or system problems.
Note that Model C computers have latches on
the Lid/LCD. Move the left
latch to the unlock position, and slide the right
latch (and hold it in place)
while raising the lid.
Shut Down
Model C Computers
System Startup
1. Remove all packing materials.
2. Place the computer on a stable surface.
3. Securely attach any peripherals you want to use with the notebook (e.g. keyboard and mouse)
to their ports.
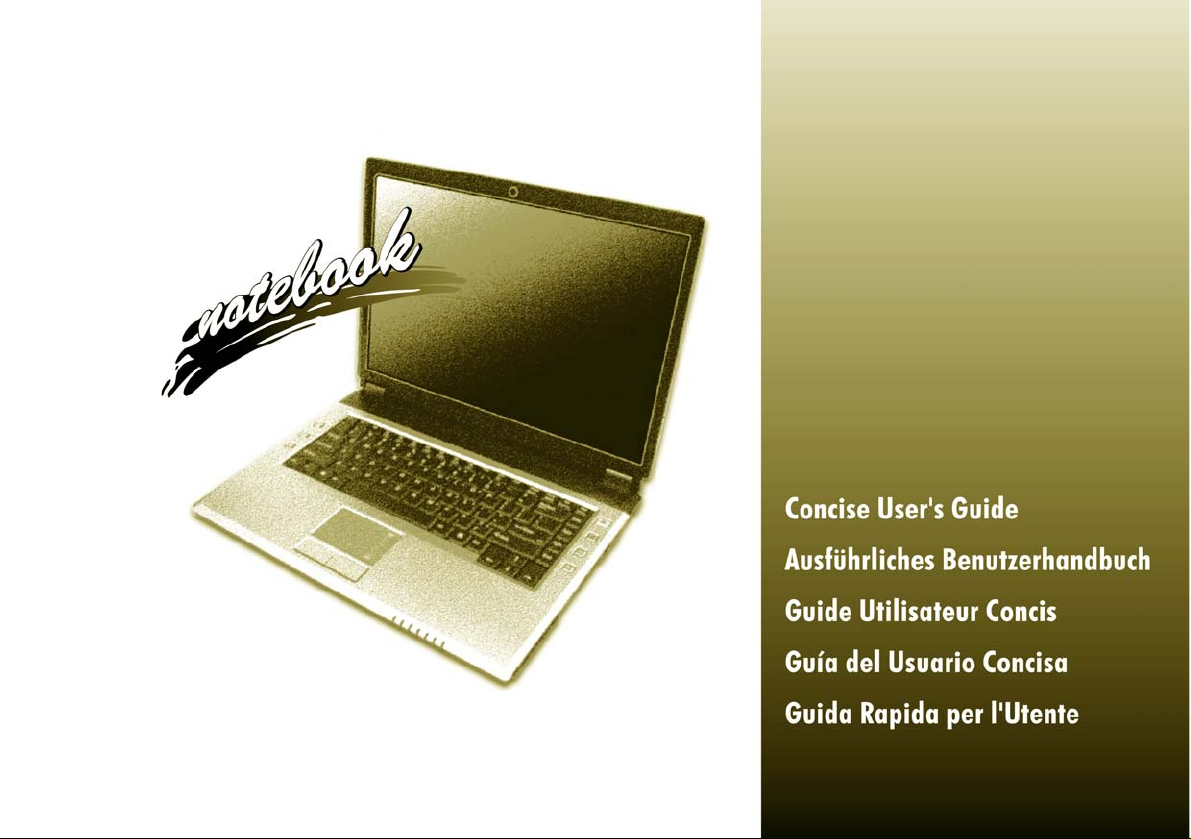
4. Attach the AC/DC adapter to the DC-In jack at the rear of the computer, then plug the AC
power cord into an outlet, and connect the AC power cord to the AC/DC adapter.
5. Use one hand to carefully raise the lid/LCD to a comfortable viewing angle, while using the
other hand (as illustrated in Figure 1 below) to support the base of the computer (Note: Never
lift the computer by the lid/LCD).
6. Press the power button to turn the computer “on”.
6 - System Startup
Figure 1
Opening the Lid/LCD/Computer with AC/DC Adapter Plugged-In
Concise User’s Guide
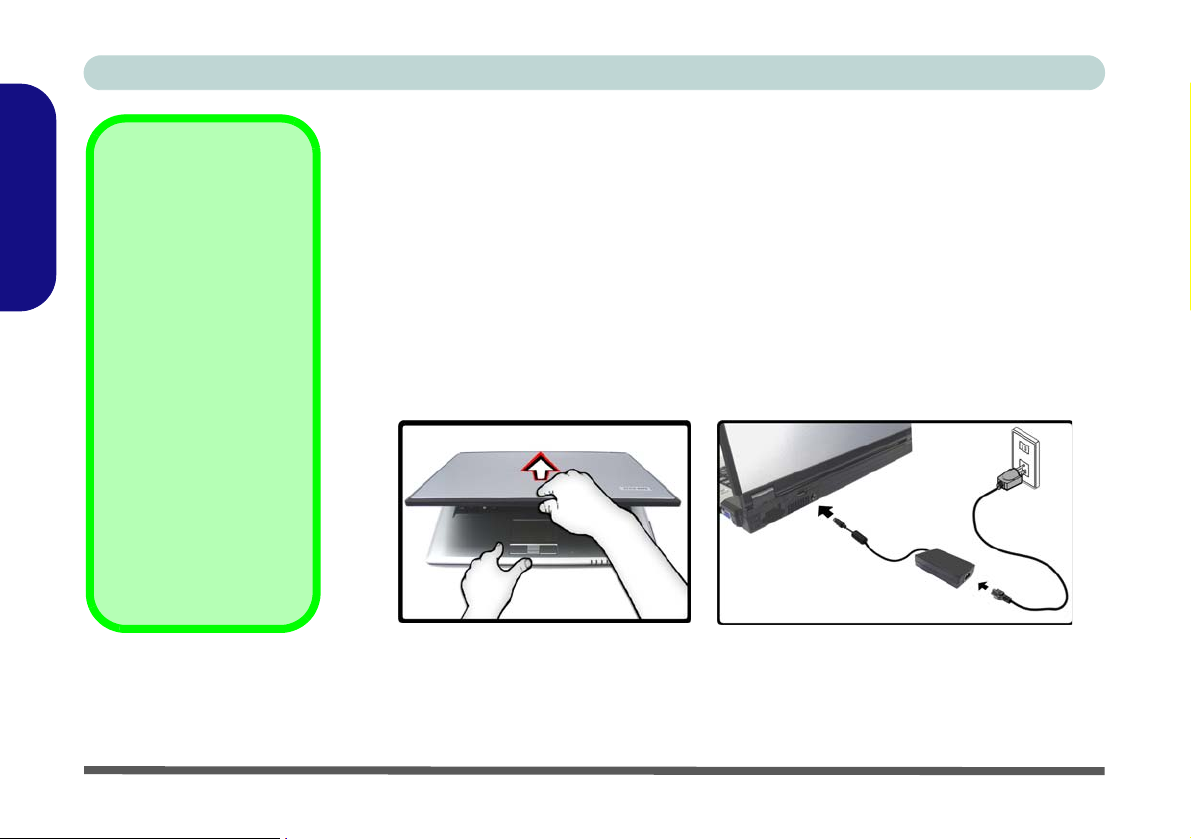
Model Differences
This notebook series includes three different model types. The models di ffer as indicated in the table below.
Feature Model A Model B Model C
Video Adapter
Windows Vista
Version Supported
Fingerprint Reader
Zoom & Audio
Record Buttons
AC/DC Adapter
LCD Type
VIA VN896CE Integrated Video
System
(Internal On Chip)
Windows Vista Home Basic Edi-
tion (64-bit)
No Optional
Yes
65W (DC Output 19V, 3.42A or 18.5V, 3.5A) 90W (DC Output 19V, 4.74A)
15.4" WXGA
15.4" WXGA+
See Table 4, on page 14
NVIDIA GeForce 8400M G (NB8M-SE) Discrete Video System
(External On Board)
Windows Vista Home Basic Edition (64-bit)
Windows Vista Home Premium Edition/
Business Edition/Enterprise Edition/Ultimate Edition (64-bit)
No
17" WXGA
17.1" WSXGA+
17.1" WUXGA
English
Table 1 - Model Differences
System Startup - 7
Concise User’s Guide
System Software
Your computer may already come with system software
pre-installed. Where this is not the case, or where you are
re-configuring your computer for a different system, you
English
will find this manual refers to the Microsoft Windows
Vista operating system
the drivers and utilities is available in Chapters 4 & 7 of
the expanded User’s Manual on the Device Drivers &
Utilities + User’s Manual CD-ROM.
If you are installing/re-installing new system software, you
will need to install the appropriate drivers. Drivers are programs which act as an interface between the computer and
a hardware component e.g. a wireless network mod ule. It is
very important that you install the drivers in the order listed
in Table 5, on pa ge 26. You will be unable to use most advanced controls until the necessary drivers and utilities are
properly installed.
. Further information on installing
Drivers
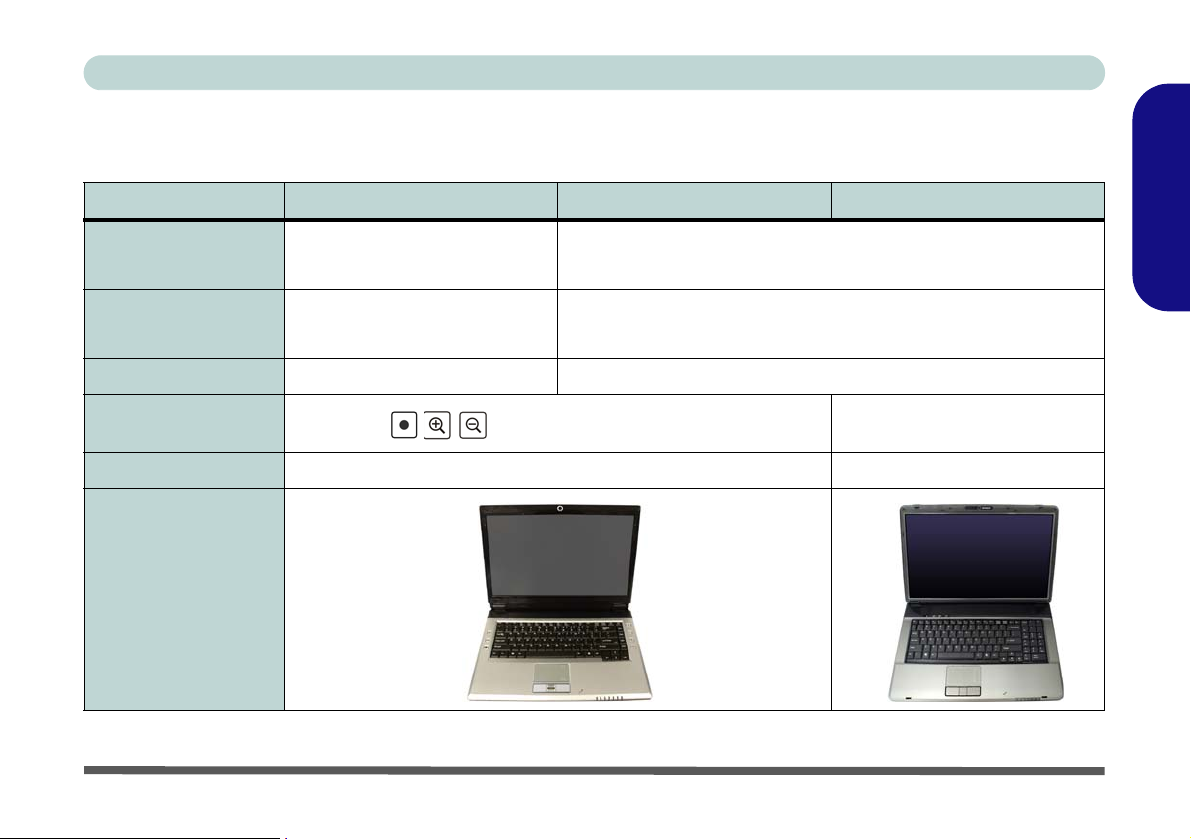
Operating Systems Supported
Operating System
Note
Model A Models B & C
*Windows XP Home Edition or
Professional
Windows Vista (64-bit) Home
Basic Edition
Windows Vista
(64-bit) Home
Premium/Business/Enterprise/
Ultimate Editions
In order to run Win-
dows Vista without
limitations or
decreased perfor-
mance, your computer
requires a minimum
1GB of system mem-
ory (RAM).
*For information on the Windows XP OS see the Device
Drivers & Utilities + User’s Manual CD-ROM.
Not Included
Operating Systems (e.g. Windows Vista/Windows XP)
and applications (e.g. word processing, spreadsheet and
database programs) have their own manuals, so please
consult the appropriate manuals.
8 - System Software
Concise User’s Guide
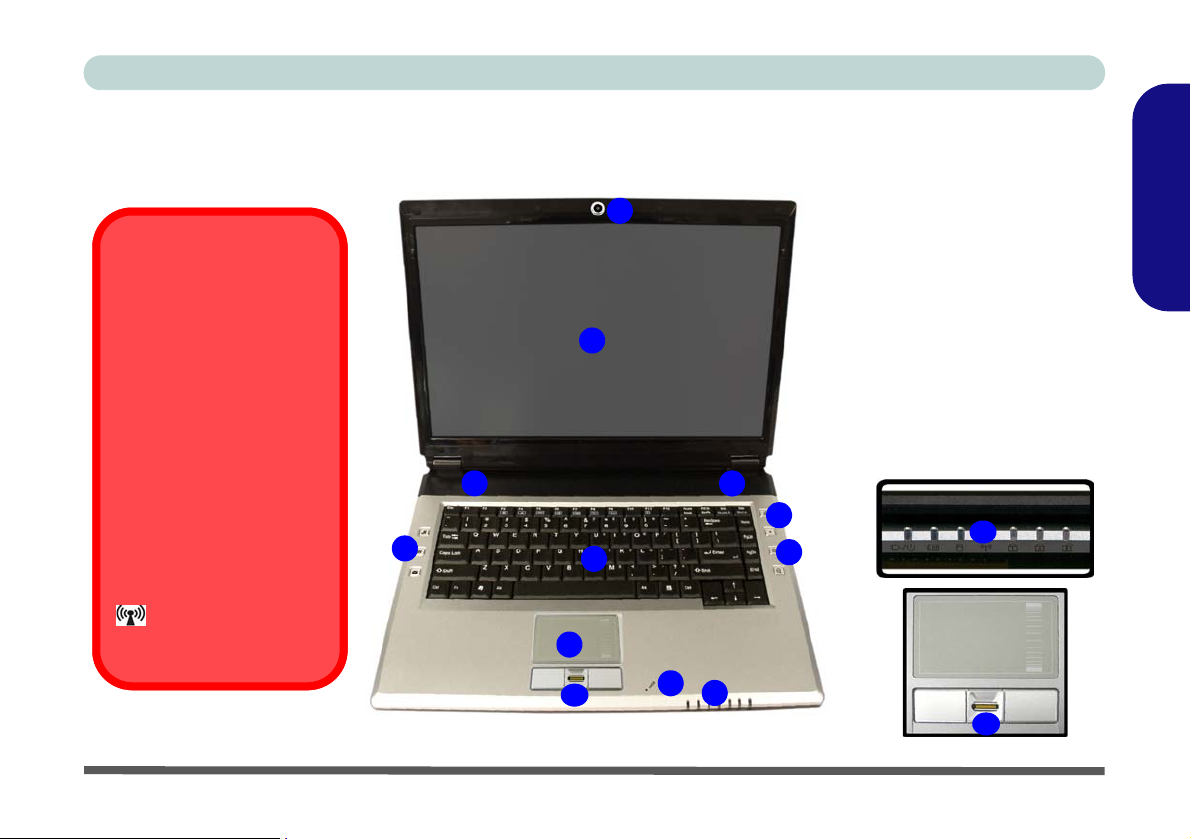
System Map: Top View with LCD Panel Open (Models A & B)
1
Wireless Device
Operation Aboard Aircraft
The use of any portable
electronic transmission devices aboard aircraft is usually prohibited. Make sure
the module(s) are OFF if
you are using the computer
aboard aircraft.
Use the appropriate function
key combination (see
Table 3, on page 13) to
toggle power to the wireless
modules (WLAN/Bluetooth),
and check the LED indicator
to see if the modules
are powered on or not (see
Table 2, on page 11).
Figure 2 - Top View with LCD Panel Open (Models A & B)
3
5
7
10
2
3
4
6
8
9
5
1. Optional Built-In PC
Camera
2. LCD
3. Speakers
4. Power Button
5. Hot-Key Buttons
6. Keyboard
7. TouchPad and Buttons
8. Built-In Microphone
9. LED Indicators
10. Fingerprint Reader
(Optional for Model B
Computers only)
9
10
English
System Map: Top View with LCD Panel Open (Models A & B) - 9

Concise User’s Guide
1. Optional Built-In PC
Camera
2. LCD
3. Speakers
4. Power Button
English
5. Hot-Key Buttons
6. Keyboard
7. TouchPad and Buttons
8. Built-In Microphone
9. LED Indicators
10. Fingerprint Reader
(Optional)
4
9
10
System Map: Top View with LCD Panel Open (Model C)
1
Wireless Device
Operation Aboard Aircraft
The use of any portable
electronic transmission devices aboard aircraft is usually prohibited. Make sure
the module(s) are OFF if
you are using the computer
5
aboard aircraft.
Use the appropriate function
key combination (see
Table 3, on page 13) to
toggle power to the wireless
modules (WLAN/Bluetooth),
and check the LED indicator
to see if the modules
are powered on or not (see
Table 2, on page 11).
3
5
4
Figure 3 - Top View with LCD Panel Open (Model C)
10
2
3
6
7
8
9
10 - System Map: Top View with LCD Panel Open (Model C)

Concise User’s Guide
LED Indicators
The LED indicators display helpful information about the current status of the computer.
Table 2 - LED Indicators
Icon Color Description
Green Number Lock (Numeric Keypad) Activated
Green Caps Lock Activated
Green Scroll Lock Activated
Green The Computer is On
Blinking Green The Computer is in Sleep Mode
Orange The AC/DC Adapter is Plugged In & the Computer is Powered Off
Orange The AC/DC Adapter is Plugged In & the Battery is Charging
Blinking Orange The Battery has Reached Critically Low Power Status
Green The Battery is Fully Charged
Green Hard Disk Activity
Green The WLAN/Bluetooth Module(s) is/are Powered On
English
LED Indicators - 11
Concise User’s Guide
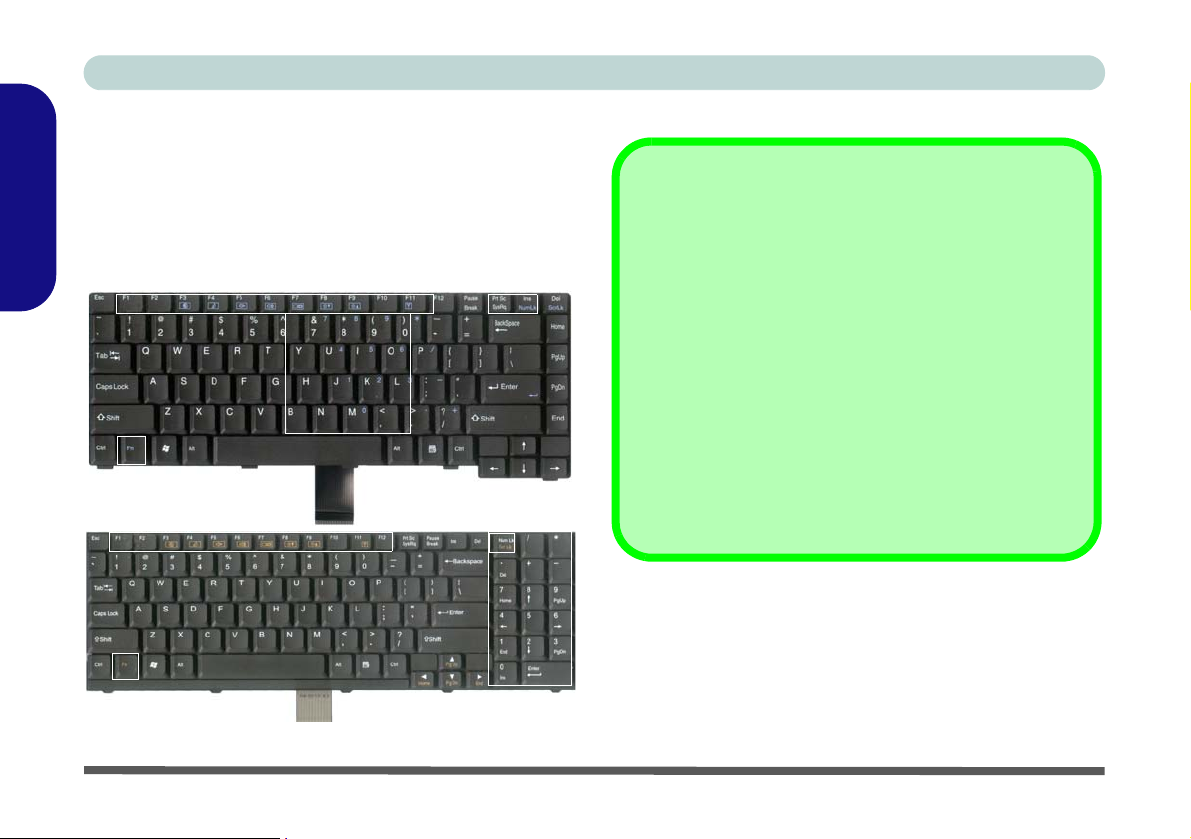
Keyboard
The keyboard has a numeric keypad for easy numeric
data input, and features function keys to allow you to
change operational features instantly.
C computers have a numeric keypad to the right of the
English
main keyboard.
Function Keys
Numeric
Keypad
Note that Model
NumLk &
ScrLk Keys
Special Characters
Some software applications allow the number-keys to be
used with Alt to produce special characters. These special
characters can only be produced by using the numeric ke ypad. Regular number keys (in the upper row of the keyboard) will not work. Make sure that the numeric keypad
(NumLk) is on.
Other Keyboards
Fn Key
Models A & B
Function Keys
Fn Key
Model C
12 - Keyboard
Figure 4 - Keyboard
NumLk/
ScrLk Key
Numeric
Keypad
If your keyboard is damaged or you just want to make a
change, you can use any standard USB keyboard. The system will detect and enable it automatica lly. However special
functions/hot keys unique to the system’s regular keyboard
may not work.
Concise User’s Guide
A
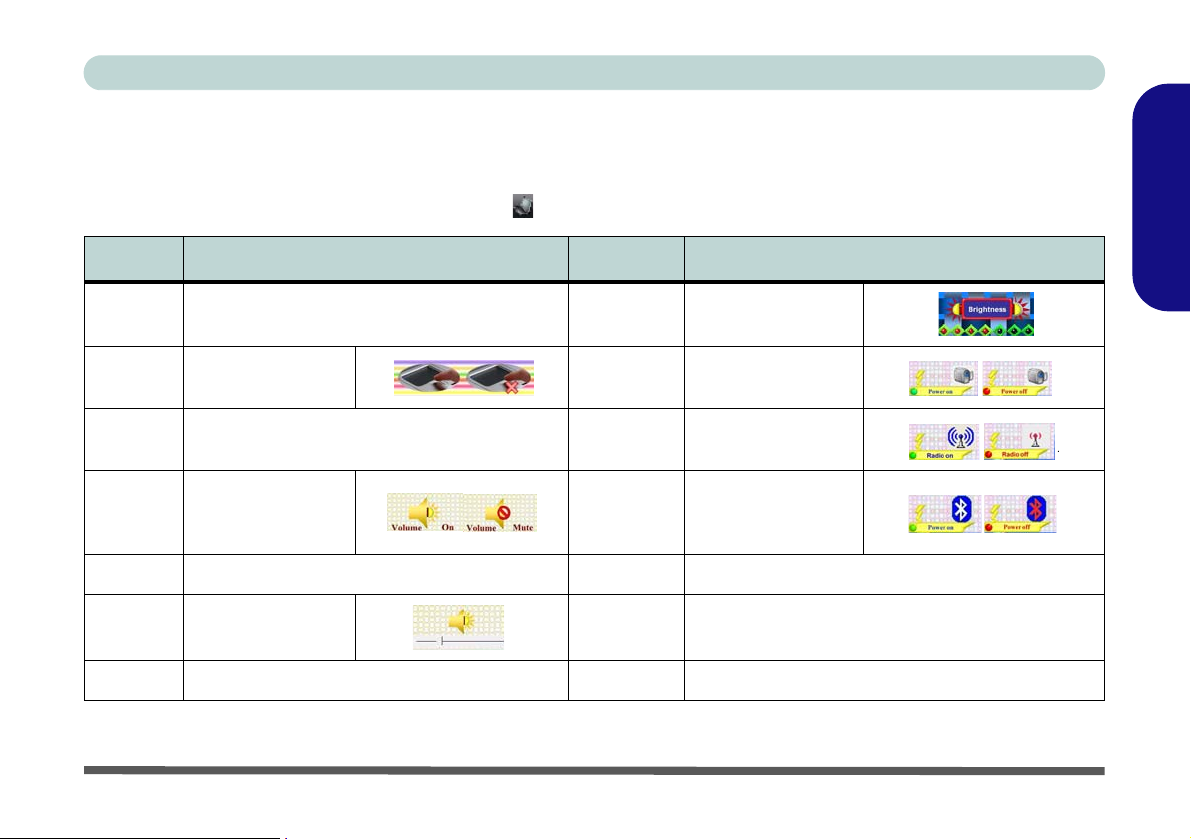
Function Keys & Visual Indicators
The function keys (F1 - F12 etc.) will act as hot keys when pressed while the Fn key is held down (see Table 3). In
addition to the basic function key combinations; visual indicators are available when the hot key driver is installed
(see page 28). After installing the driver an icon will appear in the taskbar.
Keys Function Keys Function
Fn + ~ Play/Pause (in Audio/Video Programs) Fn + F8/F9
Fn + F1
Fn + F2
Fn + F3 Mute Toggle Fn + F12
Fn + F4 Sleep Toggle Fn + ScrLk Scroll Lock Toggle
Fn + F5/F6Volume Decrease/
Fn + F7 Display Toggle NumLk Number Lock (Numeric Keypad) Toggle (Model C)
TouchPad
Toggle
Turn LCD Backlight Off
(Press a key to or use TouchPad to turn on)
Increase
Fn + F10
Fn + F11
Fn + NumLk
Brightness
Decrease/Increase
PC Camera Power
Toggle
WLAN Module
Power Toggle
Bluetooth
Module Power
Toggle
Number Lock (Numeric Keypad) Toggle
(Models A & B)
English
Table 3 - Function Keys & Visual Indicators
Keyboard - 13
Concise User’s Guide
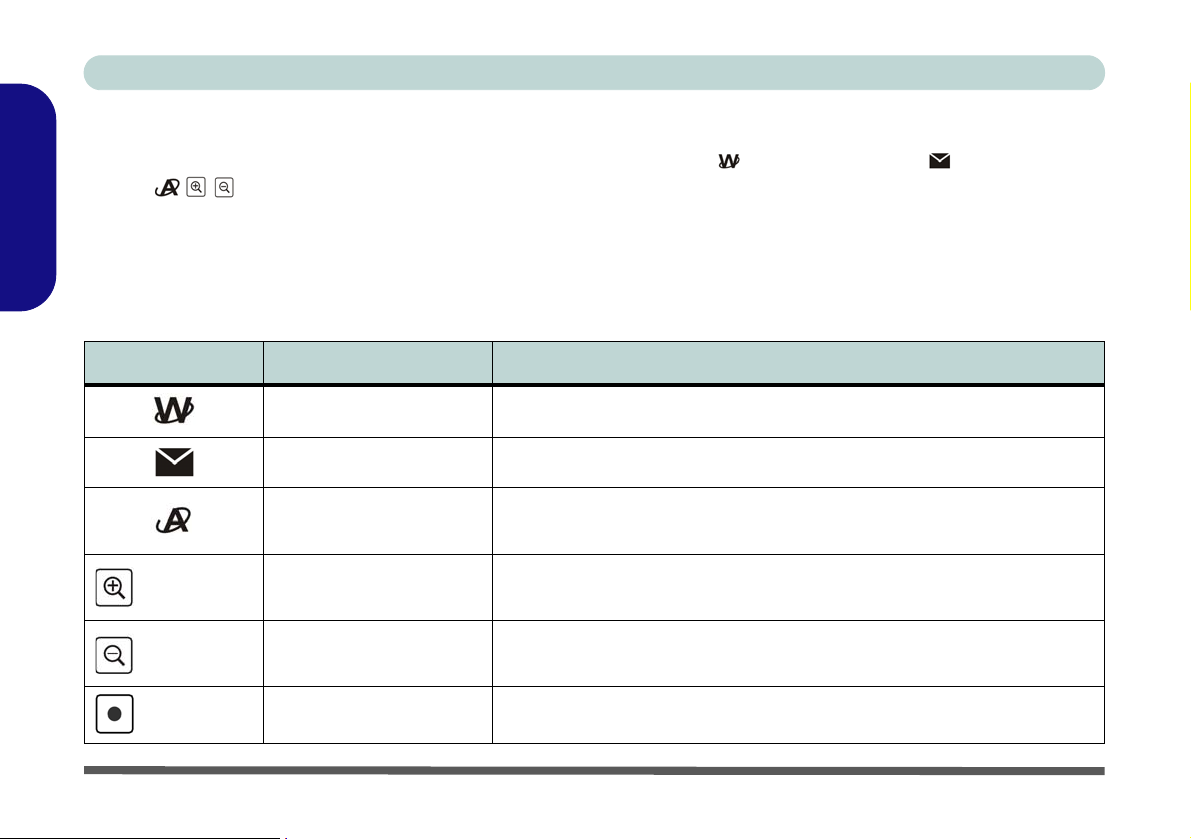
Hot-Key Buttons
The Hot-Key buttons give quick access to the default internet browser and e-mail program . The PC Camera
buttons
PC Camera module is installed. If you have not included a PC Camera module in your purchase option, you can install the Quick Button driver (QButton) to enable you to use the Hot-Key buttons to launch applications of your choice
English
(see “Application Quick Buttons” on page 15 for details). Note that Model C computers do not support the audio
record or camera zoom hot keys functions.
Hot-Key Button Function
can be used to run the camera application, to take still pictures and to zoom the camera in/out if a
Table 4 - Hot-Key Buttons
Activate the Default Internet Program
Activate the Default E-Mail Browser
PC Camera I nstalled Activate the BisonCap/VideoV iew program/Take Still Picture (See Page 33)
PC Camera Not Installed Activate Application Quick Button 1 (See Page 15)
Models A & B
Only
Models A & B
Only
PC Camera Installed Camera Zoom-In (See Page 33)
PC Camera Not Installed Activate Application Quick Button 2 (See Page 15)
PC Camera Installed Camera Zoom-Out (See Page 33)
PC Camera Not Installed Activate Application Quick Button 3 (See Page 15)
Models A & B
Only
14 - Hot-Key Buttons
Audio Record Start/Stop (See Page 23)
Concise User’s Guide
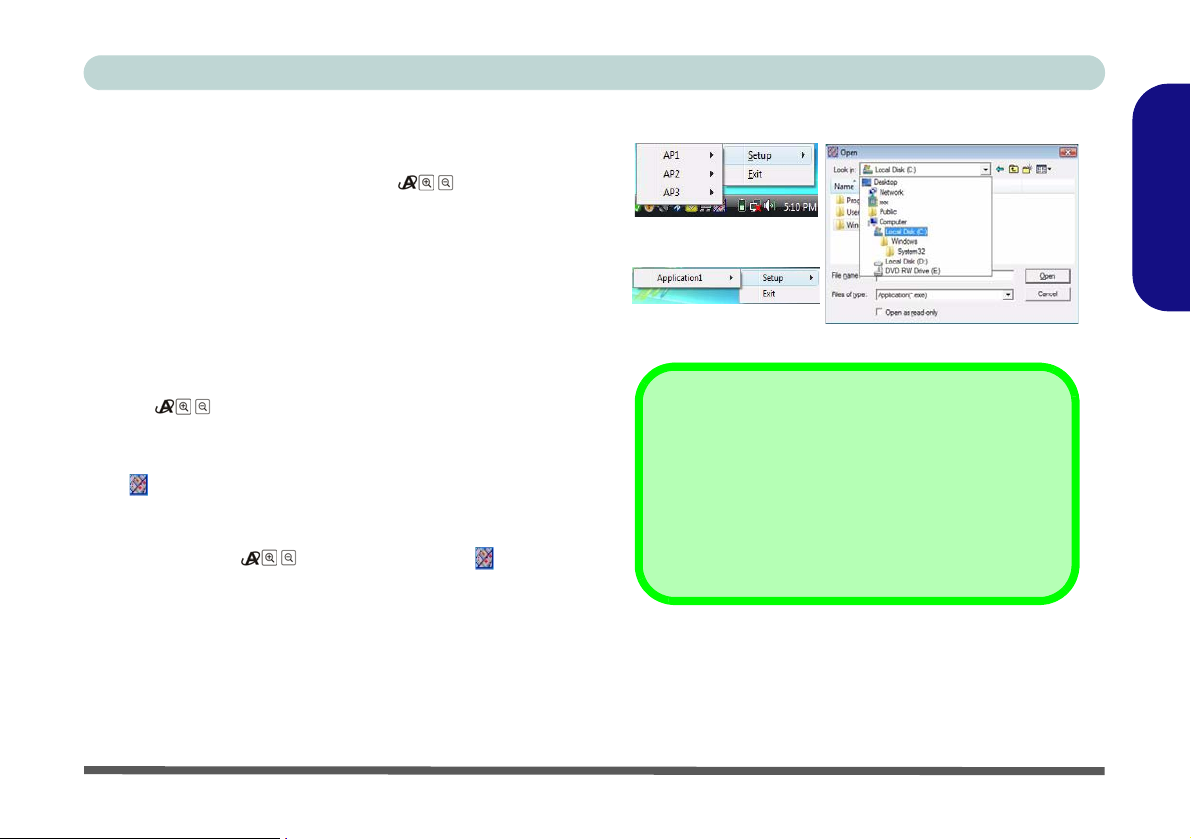
Application Quick Buttons
Note that the Quick Button driver (QButton) is designed
to allow use of the Hot-Key buttons as application
quick buttons in absence of the optional PC camera (only
install the Quick Button driver if the PC Camera is
not installed). You will need to install the quick button
utility to enable the functions.
The application quick buttons give instant access to userdefined applications, with one quick button press. To
configure a program to open when the application quick
buttons (see
low the instructions below.
tons will function as long as the program is running (the
icon will appear in the taskbar). If the program is not
running you will need to restart the computer.
1. Press a button or right-click the icon in the
taskbar.
2. Select Setup from the menu, scroll to AP1/2/3 (or just
Application1 for Model C computers) and select
Custom.
3. An Open dialog box will appear on the screen.
4. Browse to the directory where the desired application.exe
program exists (see below).
5. Double-Click on the program file or choose Open.
Table 4, on page 14) are pressed fol-
The application quick but-
English
Models A & B
Model C
Application.exe
You will need to locate the actual application executable (.exe) file, not just the shortcut. To find the
application right-click its shortcut on the desktop
and click Properties. Click the shortcut (tab) and
see where the executable file is located by clicking
the Open File Location (button).
Figure 5 - Application Quick Button Configuration
Screens
Hot-Key Buttons - 15
Concise User’s Guide
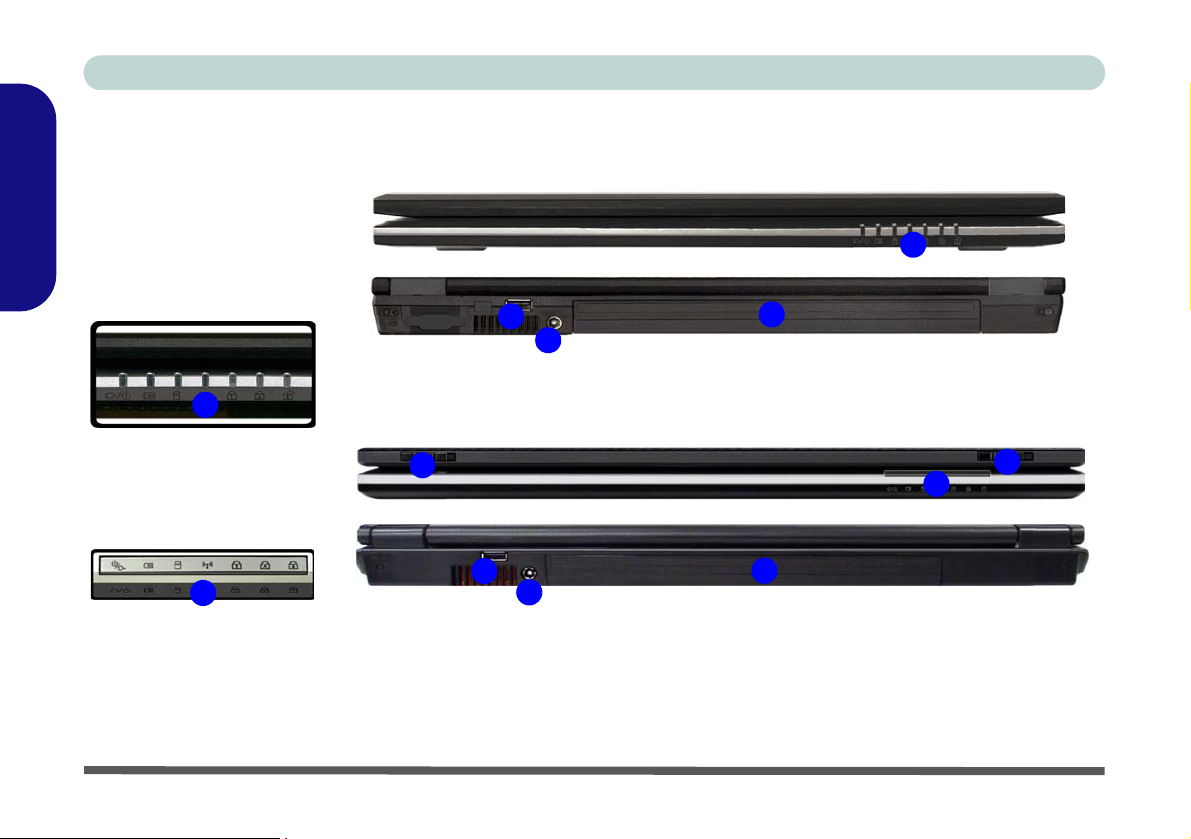
1. LED Indicators
2. 1 * USB 2.0 Port
3. DC-In Jack
English
4. Battery
5. LCD Latches
(Model C Only)
System Map: Front & Rear Views
Front
1
1
5
2
1
16 - System Map: Front & Rear Views
2
Rear
4
3
Models A & B
5
Front
Rear
4
1
3
Model C
Figure 6 - Front & Rear Views

Concise User’s Guide
System Map: Left View
Models A & B
1
1
If you need to manually eject a CD/DVD (e.g. due to an unexpecte d power interruption) you may
push the end of a straightened paper clip into the emergency eject hole. Do not use a sharpened
pencil or similar object that may break and become lodged in the hole.
2
3
Model C
2
CD Emergency Eject
Figure 7 - Left View
4
5
637
4
8
657
1. Security Lock Slot
English
2. Optical Device Drive
Bay (for CD/DVD
Device)
3. Emergency Eject Hole
4. RJ-11 Modem Jack
5. S/PDIF-Out Jack
6. Microphone-In Jack
8
7. Headphone-Out Jack
8. Line-In Jack
System Map: Left View - 17
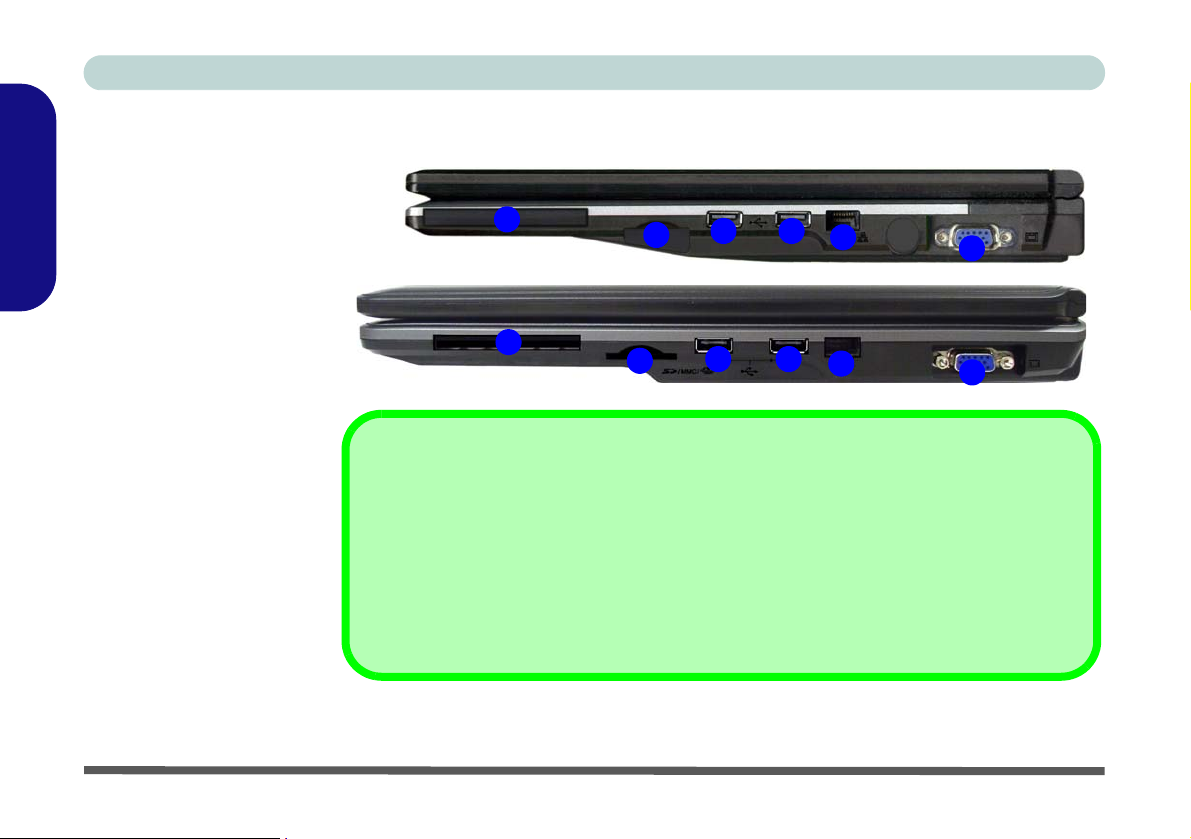
Concise User’s Guide
1. ExpressCard/54(34)
2. 7-in-1 Card Reader
English
3. 2 * USB 2.0 Ports
4. RJ-45 LAN Jack
5. External Monitor Port
Slot
System Map: Right View
Models A & B
1
2
3
Model C
3
4
5
The ExpressCard slot accepts either ExpressCard/34 or ExpressCard/54 formats.
The card reader allows you to use the most popular digital storage card formats:
MMC (MultiMedia Card) / SD (Secure Digital) / MS (Memory Stic k) / MS Pro (Memory Stick Pro)
MS Duo (requires PC adapter) / Mini SD (requires PC ada pter) / RS MMC (requires PC adapter)
18 - System Map: Right View
1
2
3
3
4
5
ExpressCard Slot
7-in-1 Card Reader
Figure 8 - Right View
Concise User’s Guide
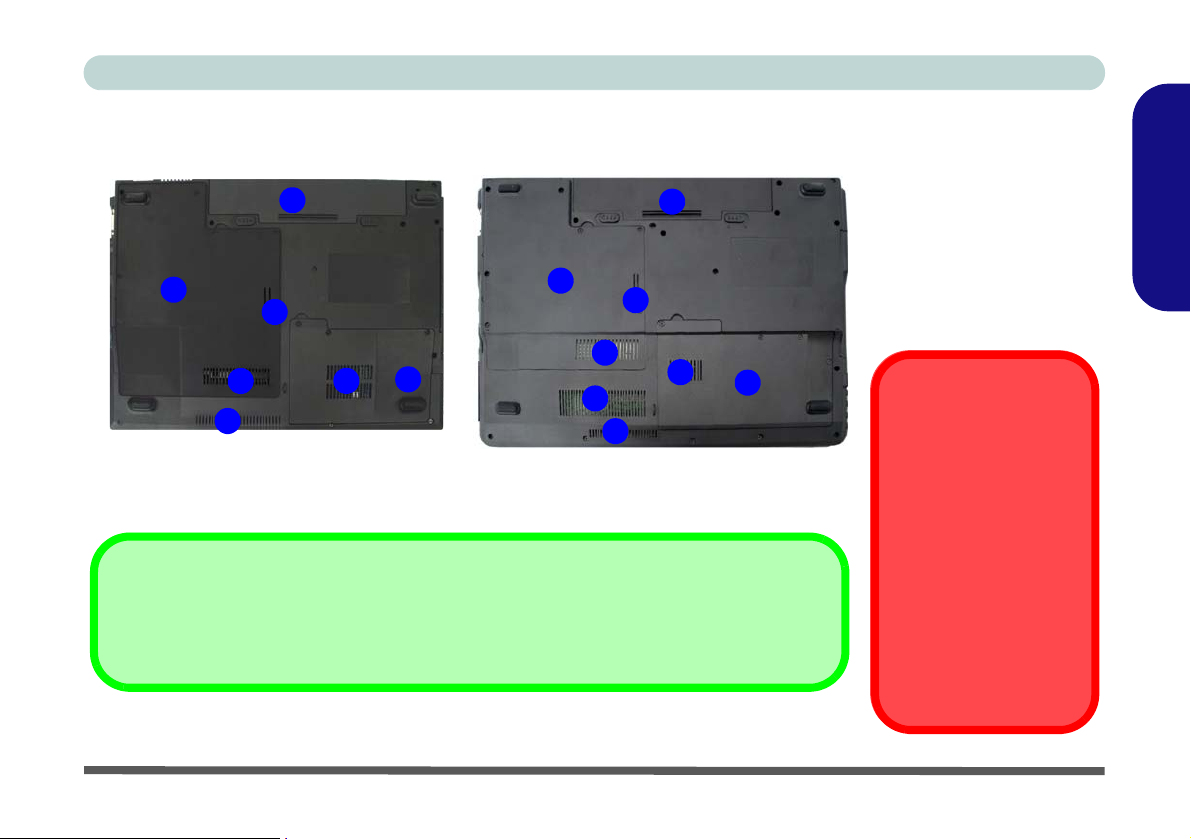
System Map: Bottom View
2
Models A & B
4
4
1
1
1
1
3
1
1
Battery Information
Always completely discharge, then fully charge, a new battery before using it. Completely discharge and charge the battery at least once every 30 days or after about 20 partial discharges.
Figure 9 - Bottom View
Model C
1
1
2
1
3
1. Vent
2. Battery
3. Hard Disk Bay Cover
4. CPU/RAM Bay Cover
CPU
The CPU is not a user
serviceable part. Accessing the CPU in any
way may violate your
warranty.
Overheating
To prevent your computer from overheating
make sure nothing
blocks any vent while the
computer is in use.
English
System Map: Bottom View - 19
Concise User’s Guide
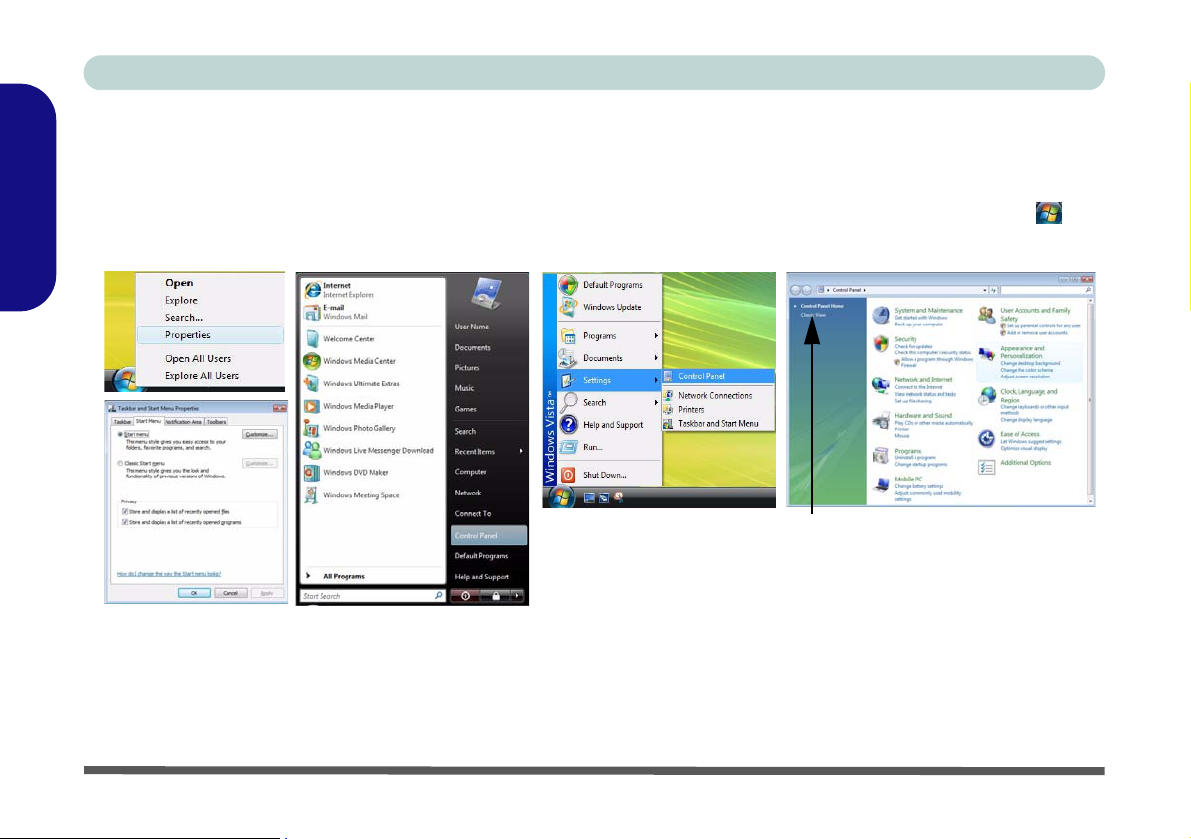
Windows Vista Start Menu & Control Panel
Most of the control panels, utilities and programs within Windows Vista (and most other Windows versions) are accessed from the Start menu. When you install programs and utilities they will be installed on your hard disk drive,
and a shortcut will usually be placed in the Start menu and/or the desktop. Right-click the Start menu icon , and
then select Properties if you want to customize the appearance of the Start menu.
English
Click here to toggle Classic View
Figure 10 - Start Menu & Control Panel
In many instances throughout this manual you will see an instruction to open the Control Panel. The Control Panel
is accessed from the Start menu, and it allows you to configure the settings for most of the key features in Windows
(e.g. power, video, network, audio etc.). Windows Vista provides basic controls for many of the features, however
many new controls are added (or existing ones are enhanced) when you install the drivers listed in Table 5, on
page 26. To see all controls it may be necessary to toggle to Classic View on.
20 - Windows Vista Start Menu & Control Panel

Concise User’s Guide
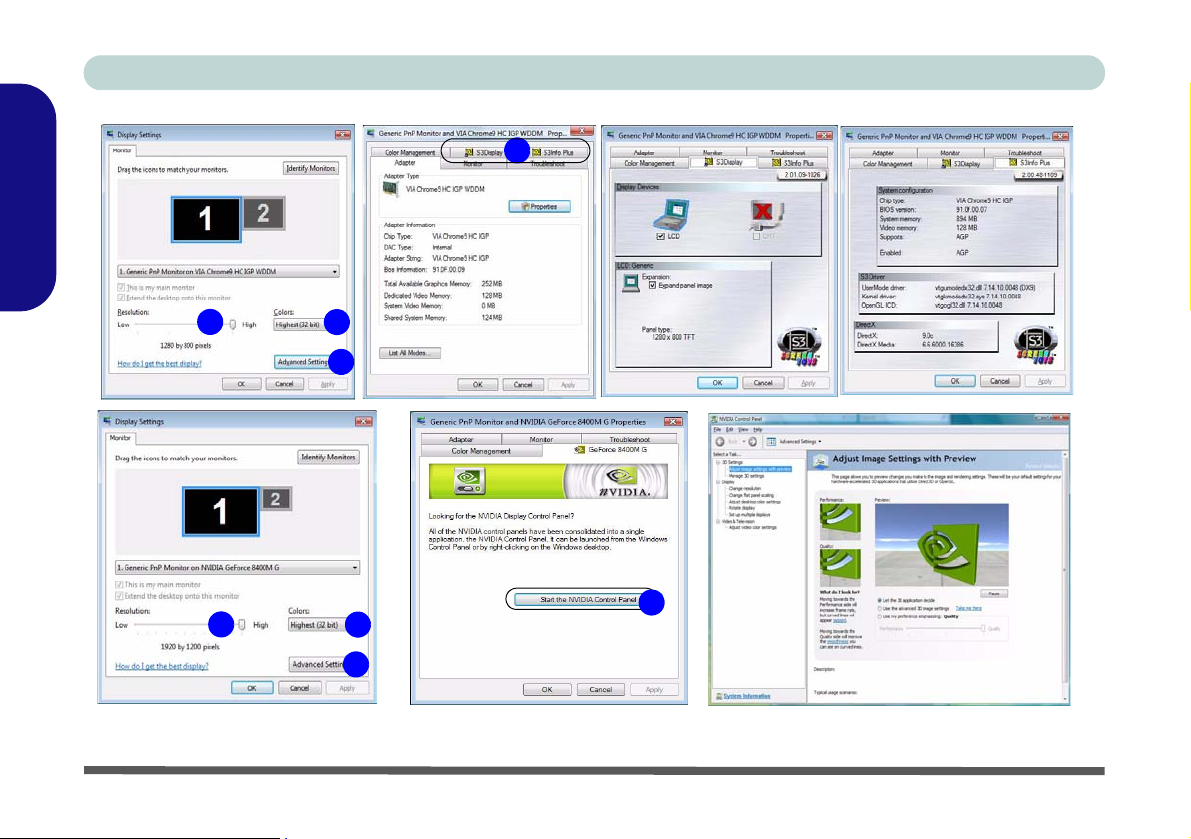
Video Features
This computer features two different (either VIA for Model A or NVIDIA for Models B & C) video options.
You will be provided with an appropriate driver on the
You can switch display devices, and configure display options, from the Display Settings control panel (in Person-
alization) in Windows Vista.
To access Display Settings in Windows Vista:
1. Click Start, and click Control Panel (or point to Settings and click Control Panel).
2. Click Adjust screen resolution under the Appearanc e and Personalization menu (or double-click Personalization >
Display Settings).
3. Move the slider to the preferred setting in Resolution: (Figure 11 on page 22).
4. Click the arrow, and scroll to the preferred setting In Colors: (Figure 11 on page 22).
5. Click Advanced Settings (button) (Figure 11 on page 22) to bring up the Advanced Settings tabs.
3
For VIA
1. Clicking through the S3 tabs (Figure 11 on page 22) allows you to make any video adjustments you require.
4
For NVIDIA
1. Click GeForce 8400M G (tab).
2. Click Start the NVIDIA Control Panel (Figure 11 on page 22) to access the control panel.
3. The NVIDIA Control Panel can also be accessed by right-clicking the desktop, and then clicking NVIDIA Control Panel.
5
Device Drivers & Utilities + User’s Manual CD-ROM.
1
2
English
Video Features - 21
Concise User’s Guide
English
4
1
1
3
1
22 - Video Features
2
3
5
2
3
Figure 11 - Display Settings

Concise User’s Guide
Audio Features
You can configure the audio options on your computer
from the Sound control panel in Windows, or from the
VIA Audio Deck icon in the taskbar, or on the desktop
(this will bring up the VIA Audio Deck menu). The
volume may also be adjusted by means of the Fn + F5/
F6 key combination.
Click any of the buttons (e.g. ) on the left to expand the audio menu selections.
Figure 12 - VIA Audio Deck Configuration Menus
Recording Audio (Models A & B Only)
The audio record Hot-Key button allows you to record
audio from either the built-in microphone, or from a microphone connected to the microphone-in jack.
1. Press the audio record Hot-Key button to begin the
recording process (the record icon will flash in the
top left of the screen).
2. Press the audio record Hot-Key button again to stop the
recording process (the record icon will disappear in the top
left of the screen).
3. The recorded audio file (in .wav format) will appear in the
Wav folder (Computer > Local Disk (C) > Users > (Your
Login Name) > Wav).
4. Double-click the file to playback the recorded audio.
Sound Volume Adjustment
The sound volume level is set using the volume
control within Windows. Click the Volume icon
in the taskbar to check the setting.
English
Audio Features - 23
Concise User’s Guide
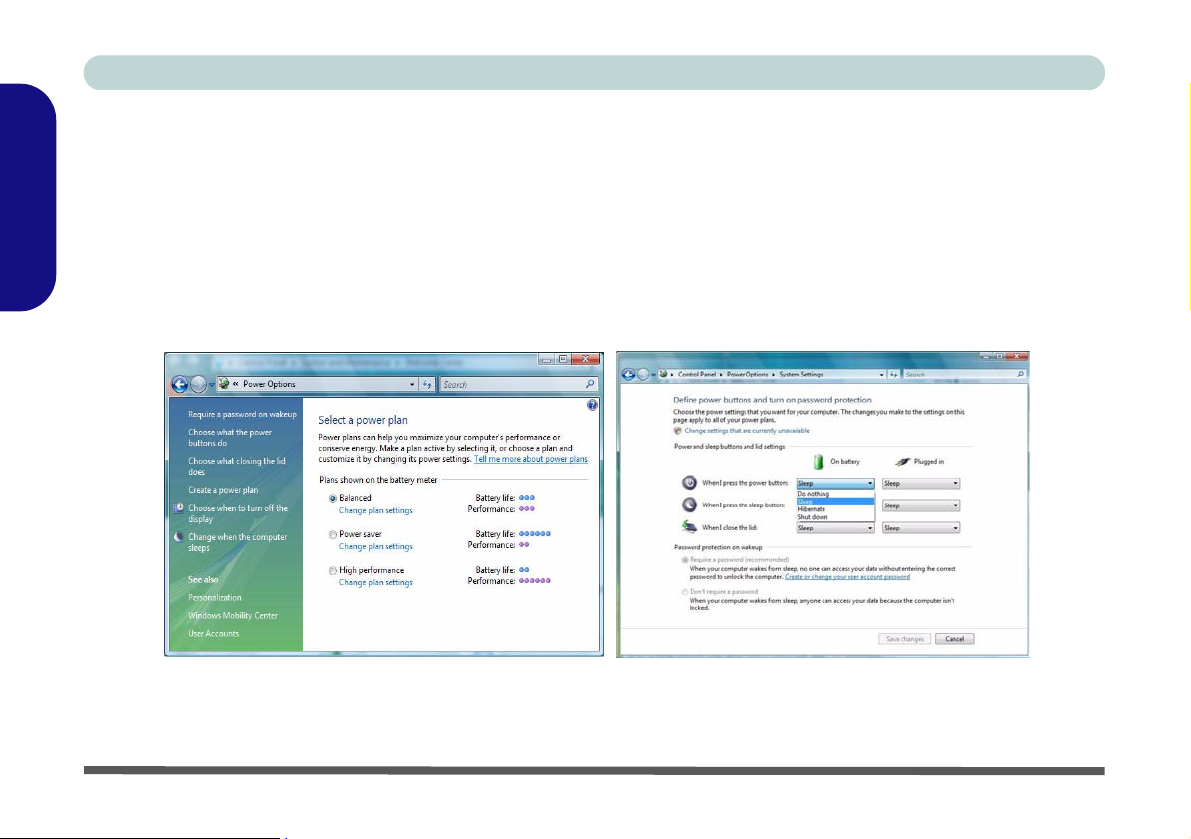
Power Management Features
The Power Options (Hardware and Sound menu) control panel icon in Windows (see page 20) allows you to configure power management features for your computer. You can conserve power by means of power plans and configure the options for the power button, sleep button, computer lid (when closed), display and sleep mode from
the left menu. Note that the power saver plan may have an affect on computer performance.
English
Click to select one of the existing plans, or click Create a power plan in the left menu and select the options to create
a new plan. Click Change Plan Settings and click Change advanced power settings to access further configuration
options.
Note: Sleep is the default power saving state in Windows Vista
24 - Power Management Features
Figure 13 - Power Options

Concise User’s Guide
Battery Information
Please follow these simple guidelines to get the best use out of your battery.
Battery Charging on Model B & C Computers
Note that Model B & C computers under a heavy load (e.g. using applications which
require a lot of video processing), while running on battery power, will take time (3
to 20 minutes before charging begins) to recharge the battery when plugged in to the
AC/DC adapter. This is due to safety considerations which dictate that the battery
should only start to recharge when the computer has reached a safe temperature to do
so.
Make sure you save your work when the battery LED is blinking orange, and plug in
the AC/DC adapter. The battery LED will change from blinking orange to orange
when the battery starts to charge (3 to 20 minutes before charging begins).
Low Battery
Warning
When the battery is critically low, immediately
connect the AC/DC
adapter to the computer
or save your work, otherwise, the unsaved data
will be lost when the power is depleted.
English
Power Management Features - 25

Concise User’s Guide
Driver Installation
The Device Drivers & Utilities + User’s Manual CDROM contains the drivers and utilities necessary for the
proper operation of the computer. Insert the CD-ROM
English
and click Install Drivers (button), or Option Drivers
(button) to access the Optional driver menu.
Install the drivers in the order indicated in Table 5. After installing each driver it will become grayed out (if you
need to reinstall any driver, click Unlock).
Manual Driver Installation
Click the Browse CD button in the Drivers Installer application and browse to the executable file in the appropriate driver folder.
Windows Update
After installing all the drivers make sure you enable
Window Update in order to get all the latest security updates etc. (all updates will include the latest hotfixes
from Microsoft).
Driver (Windows Vista) Page #
Video (VIA-Model A) page 27
Video (NVIDIA-Models B & C) page 27
Audio page 27
Modem page 27
LAN page 27
Card Reader page 27
TouchPad page 27
Hot-Key
Quick Button Utility page 28
Wireless LAN Module(Optional) page 29
PC Camera Module (Optional) page 30
Fingerprint Reader (Optional) page 34
Bluetooth (Optional)
Note: No driver installation required (see page 36)
USB Advance AP (Model A) page 28
Enable Windows Update (see left)
page 28
26 - Driver Installation
Table 5 - Driver Installation

Concise User’s Guide
Driver Installation Procedure
Video (VIA - Model A)
1. Click Install Drivers.
2. Click 1.Install Video Driver > Yes.
3. Click Next > Next.
4. Click Finish to restart the computer.
Video (NVIDIA - Models B & C)
1. Click Install Drivers.
2. Click 1.Install Video Driver > Yes.
3. Click Next.
4. Click Finish to restart the computer.
Audio
1. Click Install Drivers.
2. Click 2.Install Audio Driver > Yes.
3. Click Next.
4. Click the button to accept the license and click Next.
5. Click Next > Next > Next.
6. Click Finish to restart the computer.
Modem
1. Click Install Drivers.
2. Click 3.Install Modem Driver > Yes.
3. Click OK.
4. The modem is ready for dial-up configuration.
LAN
1. Click Install Drivers.
2. Click 4.Install LAN Driver > Yes.
3. Click OK.
4. The network settings can now be configured.
Card Reader
1. Click Install Drivers.
2. Click 5.Install Cardreader Driver > Yes.
3. Click Next > Next.
4. Click Finish to restart the computer.
TouchPad
1. Click Install Drivers.
2. Click 6.Install Touchpad Driver > Yes.
3. Click Next.
4. Click Finish > Restart Now to restart the computer.
English
Driver Installation - 27

Concise User’s Guide
Hot-Key
1. Click Install Drivers.
2. Click 7.Install Hotkey Driver > Yes.
3. Click Next > Install.
4. Click Finish > Finish to restart the computer.
English
Application Quick Buttons
If you do not have a PC Camera module installed, you
can install the Quick Button driver (QButton) to enable
you to use the hot key buttons to launch applications of
your choice (see “Application Quick Buttons” on
page 15 for details).
You will need to install the Quick Button driver (QButton) manually as it does not appear in the Drivers Install-
er menu.
1. Insert the Device Drivers & Utilities + User’s Man-
ual CD-ROM and click Browse CD (button).
2. Double-click to open the Option > QButton folders.
3. Double-click the Setup.exe file.
4. Click Next > Finish to restart the computer.
.
USB Advance AP (Model A)
Install this driver for Model A computers only. This
will help prevent USB 1.1 keyboards and/or mice
ceasing to respond after resuming from the Hibernate
power-saving state.
1. Click Option Drivers (button).
2. Click 4.USB Advance AP > Yes.
3. Click Close to complete the installation.
4. Make sure you run W indows Update (see “Windows
Update” on page 26) to check for any critical
updates.
28 - Driver Installation

Concise User’s Guide
Wireless LAN
Power Toggle for the Wireless LAN Module
Enable power to the Wireless LAN module by using the
Fn + F11 key combination. When the Wireless LAN mod-
ule is powered on, the LED will be green and the indicator
Wireless LAN Driver Installation
1. Make sure the module is powered on.
2. Click Option Drivers (button).
3. Click 1.Install WLAN Driver > Yes.
4. Choose the language you prefer and click Next.
5. Click Next > Install.
6. Click Finish to complete the installation.
Note: The operating system is the default setting for
Wireless LAN control in Windows Vista.
will briefly be displayed.
Connecting to a Wireless Network
Make sure the Wireless LAN module is turned on.
1. Click the taskbar wireless icon , and then click Connect
to a network (or right-click the icon , and then click
Connect to a network).
2. In the Show list, click to choose Wireless from the dropdown menu.
3. A list of currently available networks will appear.
4. Click a network, and then click Connect.
5. If you do not see a network you want to connect to, click
Set up a connection or network (a list of options will
appear allowing manual searching, and creating a new
network).
6. Move the cursor over the taskbar icon to see the
connection status.
7. To disconnect from the wireless network you can click the
taskbar wireless icon , and then select Connect or
disconnect to access the network menu, and click
Disconnect (or right-click the icon , and then click
Disconnect from).
English
Wireless LAN - 29

Concise User’s Guide
PC Camera
There are 2 camera options available for this computer.
The 1.3M pixel camera module uses the BisonCap application to capture video files. The 2.0M pixel camera
module uses the VideoView application to capture video
English
files.
PC Camera Driver Installation
For the 1.3M Pixel Camera Module:
1. Turn on the module using Fn + F10 (the indicator
will briefly be displayed when the module is
powered on).
2. Click Option Drivers (button).
3. Click 2.Install Camera Driver > Yes.
4. Choose the language you prefer and click Next >
Next.
5. Click Finish to restart the computer.
6. Run the BisonCap application program from the
BisonCam shortcut on the desktop, or from the
BisonCam item in the Start > Programs/All
Programs menu (if the hardware is turned off use the
Fn + F10 key combination to turn it on again).
For the 2.0M Pixel Camera Module:
1. Turn on the module using Fn + F10 (the indicator
will briefly be displayed when the module is
powered on).
2. Click Option Drivers (button).
3. Click 2.Install Camera Driver > Yes.
4. Click Install.
5. Click to select Yes or No in answer to the power
system question.
6. Click Finish > Finish to restart the computer
7. Run the VideoView application program from the
VideoView shortcut on the desktop, or from the
USB2.0 PC Camera item in the Start > Programs/
All Programs menu (if the hardware is turned off
use the Fn + F10 key combination to turn it on
again).
Color Scheme Setup
Before running the PC Camera application, make sure the Color Scheme in Windows Vista is set to Windows Aero (Con-
trol Panel > Appearance and Personalization >
Personalization > Windows Color and Appearance).
30 - PC Camera

Concise User’s Guide
PC Camera Hot-Key Buttons
You can use the PC Camera Hot-Key buttons
to run the BisonCap or VideoView program, to take still
pictures and to zoom the camera in and out (Models A &
B only).
Hot-Key Button Function
Activate the BisonCap/VideoView
program/Take Still Picture
(See Page 33)
Models A & B
Only
Models A & B
Only
Table 6 - PC Camera Hot-Key Buttons
Camera Zoom-In
(See Page 33)
Camera Zoom-Out
(See Page 33)
PC Camera Audio Setup
If you wish to capture video & audio with your camera,
it is necessary to setup the audio recording options in
Windows.
1. Click Start, and click Control Panel (or point to Settings
and click Control Panel).
2. Click Sound (Hardware and Sound).
3. Click Recording (tab).
4. Right-click “Microphone (VIA High Definition Audio)”
(external microphone)/“Front Mic (VIA High Definition
Audio)” (internal microphone) and make sure the item is
not disabled.
5. Double-click Microphone/Front Mic (or select Properties
from the right-click menu).
6. Click Levels (tab), and adjust the Microphone slider to
the level required.
7. Click OK and close the control panels.
8. Run the BisonCap/VideoView program from the Start >
Programs/All Programs > BisonCam/USB2.0 PC
Camera menu.
9. Go to the Devices menu heading and select Front Mic
(VIA High Definition Audio) or Microphone (VIA High
Definition Audio) (it should have a tick alongside it).
10. Go to the Capture menu heading and select Capture
Audio (it should have a tick alongside it).
English
PC Camera - 31

Concise User’s Guide
BisonCap/VideoView
The BisonCap (for 1.3M pixel camera) and VideoView
(for 2.0M pixel camera) applications are video viewers
useful for general purpose video viewing and testing, and
can capture video files to .avi format.
English
1. Run the BisonCap/VideoView program from the Start >
Programs/All Programs > BisonCam/USB2.0 PC Camera menu (it is recommended that you Set Capture File
before the capture process - see “Set Capture File”
below).
2. Go to the Capture menu heading (if you wish to capture
audio see “PC Camera Audio Setup” on page 31) and
select Start Capture.
3. Click OK (the file location will be displayed in the pop-up
box) to start capturing the video, and press Esc to stop the
capture (you can view the file using the Wind ows Media
Player).
Set Capture File
Prior to capturing video files you may select the Set Capture File... option in the File menu, and set the file name
and location before capture (this will help avoid accidentally overwriting files). Set the name and location then
click Open, then set the “Capture file size:” and click
OK. You can then start the capture process as above.
Eliminating Screen Flicker
If you find that the video screen in the BisonCap/VideoView program is flickering, you can try to adjust the set-
ting in the Video Capture Filter options.
For BisonCap:
1. Run the BisonCap program.
2. Go to Options and scroll down to select Video Ca pture
Filter....
3. Click either 50Hz or 60Hz under Frequency in Property
Page (tab).
For VideoView:
1. Run the VideoView program.
2. Go to Options and scroll down to select Video Ca pture
Filter....
3. Click either 50Hz or 60Hz under Flickering Reduction in
Image (tab).
32 - PC Camera

Concise User’s Guide
Taking Still Pictures
The BisonCap and VideoView programs allow you to
take still pictures.
1. Run the BisonCap/VideoView program.
2. (BisonCap) Go to Options and select Take Picture.
or
(VideoView) Go to Capture and select SnapShot.
3. The picture (in JPEG format) will be placed in the
Snapshot folder on the desktop (do not move or
rename the folder).
Zoom
The BisonCap and VideoView programs allow you to
zoom the camera in and out.
For BisonCap:
1. Run the BisonCap program.
2. Go to Zoom and select Zoom Out/Zoom In.
For VideoView:
1. Run the VideoView program.
2. Go to Options and scroll down to select Setting (use the
slider to adjust the zoom level, and click OK to save the
setting).
Adding/Removing a PC Camera
Note that the Quick Button and PC Camera drivers cannot
co-exist.
If you wish to add a PC Camera module to your computer
at a later date, then uninstall the Quick Button Driver (entitled Multimedia Keyboard Driver) before inst alling the PC
Camera and driver. Drivers can be uninstalled from the Pro-
grams and Features control panel in Windows.
If you wish to remove a PC Camera module from your computer at a later date, then uninstall the PC Camera Driver af ter removing the camera module. You can then insert the
Device Drivers & Utilities + User’s Manual CD-ROM and
install the Quick Button driver (QButton)
Installer menu.
from th e Drivers
English
PC Camera - 33

Concise User’s Guide
Fingerprint Reader
If you have included the fingerprint reader in your purchase option (Optional for Model B & C computers
only) you will need to install the driver as per the instructions below.
English
Make sure you have administrator’s rights to your computer, and have a Windows password enabled for full security protection.
Before beginning the enrollment process it is recommended that you go through the fingerprint tutorial. To
run the tutorial click Start > Programs/All Programs >
Protector Suite QL > Fingerprint Tutorial after installing the driver.
Fingerprint Reader Driver Installation
1. Click Option Drivers (button).
2. Click 3.Install FingerPrint Driver > Yes.
3. Click Software Installation .
4. Click Next > Next > Next.
5. Click Finish > Yes to restart the computer.
Help & Manual
Right-click the tas kbar icon to bring up the menu to sel ect
Help
.
Insert the Device Drivers & Utilities + User’s Manual CD-
ROM and click Option Drivers (button). Click Unlock (but-
ton) and then click 3.Install FingerPrint Driver > Yes.
Click
Documentation
in .pdf format.
To install the Adobe A crobat Reader sof tware to r ead the file,
i
nsert the Device Drivers & Utilities + User’s Manual CD-
ROM and click User’s Manual (button), and click Install Ac-
robat Reader (button).
to open the folder containing the manual
User Enrollment
1. Click Start > Programs/All Programs > Pr otector Suite
QL > User Enrollment, or double click the taskbar icon
.
2. On the first run of the program you will be asked to click
the button to accept the license, and then click OK.
3. Click Next and select “Enrollment to the hard disk”, and
click Finish.
34 - Fingerprint Reader

Concise User’s Guide
4. If you have not set a Windows password you will be
prompted to do so (note: If you have not set a password
Protector Suite QL cannot secure access to your
computer).
5. Click Next and you will then be prompted to enter your
Windows password.
6. Click Next > Next (if you have the “Run interactive
tutorial” tickbox selected you will run through the
Fingerprint Tutorial).
7. Click Next for each window of the tutorial (you can click
the button to “skip tutorial” at any time).
8. Click the button above any of the fingers to begin the
enrollment process for that finger.
9. Swipe the finger three times to enroll that finger.
10. Repeat the process for all the fingers you wish to enroll,
and then click Next.
11. Click Finish.
12. Click any of the headings under “Learn more about:” to
get more information on any topic.
13. Click Close.
14. Restart the computer.
15. Right-click the taskbar icon to bring up the menu that
allows you to Edit Fingerprints, Start Control Center,
access the Help menu etc. You can also run the Control
Center etc. from the Protector Suite QL item in the
Programs/All Programs menu.
16. See “Help & Manual” on page 34 for further details.
17. If you swipe your finger over the reader at any time you
can access the Biomenu to lock the computer, register
websites, open the Control Center and access the Help
menu.
18. The Control Center allows you to change the Settings,
enroll Fingerprints and get Help.
Fingerprint Enrollment
Note that it is strongly recommended that you enroll
more than one finger in case of injury etc.
Figure 14 - Fingerprint Enrollment
English
Fingerprint Reader - 35

Concise User’s Guide
Bluetooth Configuration in Windows Vista
Setup your Bluetooth Device so the
English
Computer Can Find it
1. Turn your Bluetooth device (e.g. PDA, mobile phone etc.) on.
2. Make the device discoverable (to do this check your
device documentation).
To Turn the Bluetooth Module on
1. Press the Fn + F12 key combination to power on the Bluetooth module.
2. A Bluetooth icon will appear in the taskbar (you may
need to enable the option from the Bluetooth control
.
panel)
3. You can then do any of the following to access the
Bluetooth Devices control panel.
• Double-click the icon to access the Bluetooth Devices
control panel.
•Click Start, and click Control Panel (or point to Settings
and click Control Panel), and then click Bluetooth
Devices (Hardware and Sound).
• Click/Right-click the icon and choose an option from
the menu.
Bluetooth Data
Transfer
Note that transferring
data between the computer and a Bluetooth
enabled device is supported in one direction
only (simultaneous
data transfer is not
supported).
Figure 15 - Bluetooth Devices & Click Icon Menu
To Add a Bluetooth Device
1. Access the Bluetooth Devices control panel.
2. Click Options (tab), and make sure that Allow Bluetooth
devices to connect to this computer check box
(Connections) has a tick inside it.
3. Click Devices (tab), and then click Add.
4. The Add Bluetooth Device Wizard will appear.
36 - Bluetooth Configuration in Windows Vista

Concise User’s Guide
5. Click to select “My device is set up and ready to be
found”, and then click Next.
Figure 16 - Add Bluetooth Device Wizard
6. The Wizard will then search for any available Bluetooth
devices within range.
7. Select the device you want to communicate with, and click
Next.
8. Select an appropriate passkey option and click Next
Finish.
>
Figure 17 - Passkey Option
To Change Settings for the Bluetooth Device
1. Access the Bluetooth Devices control panel.
2. Click on the device you want to change and click
Properties to:
• Change the name of the device (click General, type a new
name and click OK).
• Enable/Disable a service (click Services, tick/clear the
check box next to the service and click OK).
To Make your Computer Discoverable To Bluetooth Devices
1. Access the Bluetooth Devices control panel.
2. Click Options, and make sure that Allow Bluetooth
devices to find this computer check box (Discovery)
has a tick inside it.
3. Make sure that Alert me when a new Bluetooth device
wants to connect check box (Connections) has a tick
inside it, if you want to be notified when a Bluetooth device
wants to connect.
Figure 18
Bluetooth
Devices
Options
English
Bluetooth Configuration in Windows Vista - 37

Concise User’s Guide
Troubleshooting
Problem Possible Cause - Solution
English
The Wireless LAN/Bluetooth
modules cannot be detected.
The Bluetooth module is off
after resuming from Sleep.
A file cannot be copied to/from a
connected Bluetooth device.
The captured video files from the
PC Camera are taking up too
much disk space.
38 - Troubleshooting
The modules are off. Check the LED indicator and/or function key indicator to see if the
WLAN/Bluetooth module is on or off (see “LED Indicators” on page 11). If the LED
indicator is off, then press the Fn + F11 (WLAN) or Fn + F12 (Bluetooth) key
combination(s) in order to enable the modules (see Table 3, on page 13).
The Bluetooth module’s default state will be off after resuming from the Sleep power-saving
state. Use the key combination (Fn + F12) to power on the Bluetooth module after the
computer resumes from Sleep.
Transferring data between the computer and a Bluetooth enabled device is supported in
one direction only (simultaneous data transfer is not supported). If you are copying a
file from your computer to a Bluetooth enabled device, you will not be able to copy a file
from the Bluetooth enabled device to your computer until the file tran sfer process fro m the
computer has been completed.
Note that capturing high resolution video files requires a substantial amount of disk space
for each file.
Note that the Windows Vista system requires a minimum of 15GB of free space on the C:
drive system partition. It is recommended that you save the capture video file to a location
other than the C:drive, limit the file size of the captured video or reduce video resolution
(Options > Video Capture Pin... > Output Size).

Concise User’s Guide
Screen Resolution Error (Models B & C Only)
If you are experiencing either screen resolution reduction, or screen flickering after resuming from Sleep in Win-
dows Vista only then follow the instructions below to fix this problem. This error arises in compliance with Windows
Vista policy, which triggers TMM (Transient Multimon Manager) when the notebook lid (S3) is closed. TMM dis-
connects the LCD display from the OS and then adds the LCD display back when the lid is opened. This may trigger
TMM to restore an old display setting which may result in screen flickering or a screen resolution change.
1. Go to the Control Panel in th e Windows OS and double-click the Administrative Tools icon (System and Maintenance).
2. Double-click Task Scheduler (Schedule Tasks)
3. Double-click Task Scheduler Library > Microsoft > Windows, and click MobilePC to open the control panel.
4. Right-click TMM and select Disable, and then close all the control panels.
English
Figure 19 - Control Panel System and Maintenance
Troubleshooting - 39

Concise User’s Guide
Specifications
English
The specifications listed in this Appendix are correct at the time of going to press. Certain items (particularly processor types/
speeds and CD/DVD device types) may be changed, delayed or updated due to the manufacturer's release schedule. Check
with your service center for details.
Feature Specification
Latest Specification Information
Processor Intel® Core™2 Duo Processor
(478-pin) Micro-FC-PGA Package
T7300/ T7500/ T7700/ T7800
Intel® Core™2 Duo Processor
(478-pin) Micro-FC-PGA Package
T7100
Intel® Celeron® M Processor
(478-pin) Micro-FCPGA Package
530/ 540/ 550
Core Logic VIA VN896CE + VT8237A
Memory Two 200 Pin SO-DIMM Sockets Supporting 533/667 MHz DDRII (DDR2)
Memory Expandable up to 2GB
65nm (65 Nanometer) Process Techn olog y
4MB On-die L2 Cache & 800MHz FSB
2.0/ 2.2/ 2.4/ 2.6 GHz
65nm (65 Nanometer) Process Techn olog y
2MB On-die L2 Cache & 800MHz FSB
1.8 GHz
65nm (65 Nanometer) Process Techn olog y
1MB On-die L2 Cache & 533MHz FSB
1.73/ 1.86/ 2.0 GHz
40 - Specifications

Concise User’s Guide
Feature Specification
Security Security (Kensington® Type) Lock Slot BIOS Password
BIOS One 8Mb SPI Flash ROM Phoenix™ BIOS
LCD Options Models A & B Model C
15.4" WXGA (1280 * 800) TFT LCD
15.4" WXGA+ (1440 * 900) TFT LCD
Storage One Changeable 12.7mm(h) Optical Device (CD/DVD) Type Drive (see “Optional” on page 43 for drive
options)
One Easy Changeable 2.5" 9.5 mm (h) SATA HDD
Audio Intel High Definition Audio Compliant Interface
3D Stereo Enhanced Sound System
Sound-Blaster PRO™ Compatible
Video Adapter Model A Models B & C
VIA VN896CE Integrated Video System
(Internal On Chip)
Integrated 128bit 2D/3D Graphic Engine
Supports CRT Resolutions up to 2048 * 1536
MS DirectX® 9.0 Compatible
17.0" WXGA (1440 * 900) TFT LCD
17.1" WSXGA+ (1680 * 1050) TFT LCD
17.1" WUXGA (1920 * 1200) TFT LCD
2 * Built-In Speakers
Built-In Microphone
NVIDIA GeForce 8400M G (NB8M-SE) Discrete
Video System (External On Board)
TurboCache™ Total Graphics Memory up to
895MB (with System Memory)
128MB Using On Board DDRIII (DDR3) Memory
Supports Dual Display and Ergonomic Refresh
Rates up to 2048 * 1536
MS DirectX® 10.0 Compatible
English
Specifications - 41

Concise User’s Guide
Feature Specification
Keyboard &
Pointing Device
English
Interface Three USB 2.0 Ports
Card Reader Embedded 7-in-1 Card Reader (MS/ MS Pro/ SD/ Mini SD/ MMC/ RS MMC/ MS Duo)
ExpressCard Slot One ExpressCard/54(34) Slot
Power
Management
Communication 56K Plug & Play Fax/Modem, V.90/92 Compliant
Power Models A & B Model C
Winkey Keyboard Built-In TouchPad with Scrolling Function
One S/PDIF Out Jack
One External Monitor Port
One Headphone-Out Jack
One Microphone-In Jack
One Line-In Jack
Note: MS Duo/ Mini SD/ RS MMC Cards require a PC adapter
Supports ACPI 2.0
10Mb/100Mb Ethernet LAN
802.11b/g USB Wireless LAN Module (Option)
Full Range AC/DC Adapter 19V, 3.42A or 18.5V,
3.5A (65W), 100-240V, 50-60Hz
6 Cell Smart Lithium-Ion Battery Pack, 4000mAH (All Models)
or
6 Cell Smart Lithium-Ion Battery Pack, 4400mAH (Models B & C)
One RJ-11 Modem Jack
One RJ-45 LAN Jack
One DC-in Jack
Bluetooth 2.0 + EDR Module (Factory Option)
1.3M or 2.0M Pixel USB PC Camera Module
(Factory Option)
Full Range AC/DC Adapter 19V, 4.74A (90W), 100-
240V, 50-60Hz
42 - Specifications

Concise User’s Guide
Feature Specification
Environmental
Spec
Dimensions
& Weight
Optional Optical Drive Module Options:
Temperature
Operating: 5°C – 35°C
Non-Operating: -20°C – 60°C
Models A & B Model C
360mm (w) * 267mm (d) * 25.4-34mm (h)
2.6 kg With 6 Cell Battery
DVD/CD-RW Combo Drive Module
DVD-Dual (Super Multi) Drive Module
802.11b/g USB Wireless LAN Module
English
Relative Humidity
Operating: 20% – 80%
Non-Operating: 10% – 90%
397mm (w) * 280.5mm (d) * 39mm (h)
2.98 kg +/- 3% With 6 Cell Battery and Without
Optional Modules
Fingerprint Reader Module
(Factory Option for Models B & C Only)
1.3M or 2.0M Pixel USB PC Camera Module
(Factory Option)
Bluetooth 2.0 + EDR Module (Factory Option)
Specifications - 43

Concise User’s Guide
English
44

Ausführliches Benutzerhandbuch
Hinweis
Das Unternehmen behält sich das Recht vor, diese Publikation ohne Vorankündigung zu überarbeiten und den Inhalt zu
verändern. Alle enthaltenen Informationen sind nur Anhaltspunkte und stellen keine Verpflichtung seitens des Herstellers
oder Wiederverkäufers dar. Sie übernehmen weder Verantwortung oder Haftung für mögliche Fehler oder Ungenauigkeiten dieser Publikation noch sind sie in irgendeiner Weise verantwort lich für Verluste o der Schäden aus der Nutzun g (oder
fehlerhaften Nutzung) dieser Publikation.
Die Publikation und alle beiliegende Software darf nicht, ganz oder in Teilen, ohne vorheriges Einverständnis des Verkäufers, Herstellers oder Autors dier Publikation reproduziert, üb ersetzt, übertragen oder in maschinenlesbare Form umgewandelt werden, abgesehen von Kopien, die für Archivzwecke erstellt werden.
In dier Publikation erwähnte Marken- und Produktnamen können Copyrights und/oder eingetragene Warenzeichen ihrer
jeweiligen Firmen in. Sie werden nur zu Identi fikationszwecken erwäh nt und sind nicht als Werbu ng für die Produkte oder
ihre Hersteller gedacht.
© November 2007
Warenzeichen
Dies Produkt beinhaltet durch Urheberrechte geschützte Technologie, die durch Ansprüche bestimmter US-Patente und andere geistige Eigentumsrechte geschützt ist, welche der Ma crovision Corporation und anderen Recht sbesitzern gehö rt. Die
Verwendung dier durch Urheberrechte geschüt zten Technologie muß von der Macrovision Corporation genehmigt werden
und dient nur für den Heimgebrauch bzw. andere beschränkte Ansichtszwecke, wenn nicht anderweitig von der Macrovision Corporation genehmigt. Reverse Engineering oder Auseinandernehmen ist untersagt.
Deutsch
Intel, Celeron, und Intel Core sind warenzeichen/eingetragenes warenzeichen de r Intel Corporation.
Hinweis - 45

Ausführliches Benutzerhandbuch
Über das Ausführliche Benutzerhandbuch
Diese Kurzanleitung soll einen Überblick über die Schritte geben, die daz u notw en dig sind, das System zu starten. Dieses
ist nur eine Ergänzung und kein Ersatz für das erweiterte englischspra chi ge Benutzerhandbuch, das auf der mitgelieferten
CD-ROM Device Drivers & Utilities + User's Manual im Adobe-Acrobat-Format vorliegt. Diese CD-ROM enthält auch
die Treiber und Utility-Programme, die für einen einwandfreien Betrieb des Notebooks notwendig sind.
Einige oder alle Funktionen des Notebooks sind bereits eingerichtet worden. Falls das nicht der Fall ist oder wenn Sie einzelne Teile des Systems neu konfigurieren (oder neu installieren) möchten, finden Sie eine Anleitung im erweiterten Be-
nutzerhandbuch. Die CD-ROM Device Drivers & Utilities + User's Manual enthält nicht das Betriebssystem.
Deutsch
Informationen zu gesetzlichen Vorschriften
Die Informationen zu gesetzlichen Vorschriften finden Sie im erweiterten Benutzerhandbuch auf der CD-ROM Device
Drivers & Utilities + User's Manual.
Betrieb von Wireless-Geraten in Flugzeugen
In der Regel ist die Benutzung jeglicher tragbarer elektronischer Funkgeräte in Flugzeugen verboten. Achten
Sie darauf, daß die Wireless-Module AUSGESCHALTET sind, wenn Sie das Noteb ook im Flugzeug benutzen.
46 - Über das Ausführliche Benutzerhandbuch

Ausführliches Benutzerhandbuch
Hinweise zu Pflege und Betrieb
Das Notebook ist zwar sehr stabil, kann aber dennoch beschädigt werden. Damit es nicht dazu kommt, sollten Sie die folgenden Hinweise beachten:
• Das Gerät darf nicht herunterfallen und in anderer Form Stößen ausgesetzt werden. W enn der Computer fällt, können das
Gehäuse und andere Komponenten beschädigt werden.
• Halten Sie den Computer trocken, Das Gerät darf nichtüberhitzt werden. Computer und Netzteil dürfen nicht in der Nähe von
Wärmequellen stehen oder gelagert werden. Dies ist ein elektrisches Gerät. Wenn Wasser oder andere Flüssigkeiten eindringen,
kann der Computer stark beschädigt werden.
• V ermeid en Sie Interferenzen mit ander en Geräten. Halten Sie den Computer fern von magnetischen Feldern, die von Stromquel-
len, Monitoren, Magneten etc. erzeugt werden. Die können die Leistung beeinträchtigen und Ihre Daten beschädigen.
• Achten Sie auf die richtige Bedienung des Computers. Schalten Sie ihn erst aus, wenn alle Programme geschlossen wurden
(speichern Sie Ihre Daten!). Speichern Sie regelmäßig Ihre Daten, da diese verloren gehen können, wenn der Akku verbraucht ist.
• Seien Sie vorsichtig bei der Verwendung von Peripheriegeräten.
Reparatur
Reparieren Sie das Gerät nicht selbst. Damit verstoßen Sie gegen die Garantiebedingungen und Sie können Schäden am
Gerät und an der eigenen Gesundheit verursachen. Überlassen Sie alle Reparaturen autorisiertem Fachpersonal. Trennen
Sie das Notebook vom Stromnetz. Unter den folgenden Umständen sollten Sie das Gerät zur Reparatur geben:
• Wenn das Netzkabel oder der AC/DC-Adapter beschädigt oder zerschlissen sind.
• Wenn der Computer Regen ausgesetzt war oder mit Flüssigkeiten in Berührung gekommen ist.
• Wenn der Computer unter Beachtung der Bedienungsanweisungen nicht korrekt arbeitet.
• Wenn der Computer heruntergefallen ist oder beschädigt wurde (berühren Sie nicht die giftige Flüssigkeit des LCD-Bildschirms).
• Wenn ein ungewöhnlicher Geruch, Hitze oder Rauch aus dem Computer entweicht.
Hinweise zu Pflege und Betrieb - 47
Deutsch

Ausführliches Benutzerhandbuch
Stromsicherheit
Für dieses Computer werden bestimmte Stromanforderungen gestellt:
• Verwen den Sie nur einen AC/DC-Adap ter, der für die Verwendung mit diesem Computer zugelassen ist.
• Der AC/DC-Adapter kann zwar für internationale Benutzung vorgesehen sein, benötigt aber trotzdem eine gleichmäßige, ununterbrochene Stromversorgung. Wenn Sie sich über Ihre lokalen Stromspezifikationen nicht im klaren sind, wenden Sie sich an Ihren
Servicevertreter oder Ihre lokale Stromgellschaft.
• Der AC/DC-Adapter kann einen zwei- oder dreipoligen geerdeten Netzstecker haben. Der dritte Pol hat eine wichtige Sicherheitsfunktion. Setzen Sie die nicht außer Kraft. Wenn Sie keinen Zugang zu einer passenden Steckdose haben, lassen Sie von einem qualifizierten Elektriker eine solche einbauen.
• Fassen Sie das Netzkabel am Stecker und nicht am Kabel an, wenn Sie es vom Stromnetz trennen möchten.
Deutsch
• Achten Sie darauf, daß die Steckdose und alle verwendeten Verlängerungskabel die Gesamtstromlast aller angeschlossenen Geräte trägt.
• Trennen Sie den Computer vor dem Reinigen von allen externen Stromquellen.
Warnung zur Stromsicherheit
Bevor Sie Schritte zum Aufrüsten des Computers unternehmen, müssen Sie zunächst das Gerät ausschalten und alle Peripheriegeräte
und Kabel (einschließlich Telefonkabel) abtrennen. Sie sollten auch den Akku herausnehmen, damit das Gerät nicht versehentlich eingeschaltet werden kann.
Vor dem Transport in einer Tasche ausschalten
Achten Sie darauf, dass Ihr Notebook ausgeschaltet ist, wenn Sie es fur den Transport z.B. wahrend einer Reise in eine Tasche einpakken. In einer Tasche kann/konnen die Luftungsoffnung(en) verdeckt werden. Wenn das Gerat dann noch eingeschaltet ist, kann es uberhitzt werden. Damit das eingeschaltete Notebook nicht uberhitzt wird, stellen Sie sicher, dass die Luftungsoffnung(en) immer frei sind.
Reinigung
• Tragen Sie Reinigungsmittel nicht direkt auf das Computer auf. Reinigen Sie es mit einem weichen, sauberen Tuch.
• Verwenden Sie keine flüchtigen Reinigungsmittel (Petroleumdestillate) oder Scheuermittel zum Reinigen des Computers.
48 - Hinweise zu Pflege und Betrieb

Ausführliches Benutzerhandbuch
Sicherheitshinweise zum Akku
• Verwenden Sie nur Akkus, die für diesen Computer entwickelt wurde n. Ein falscher Akku-Typ kann explodieren , auslaufen oder
den Computer beschädigen.
• Verwenden Sie den Akku nicht mehr, wenn er heruntergefallen ist oder in anderer Weise beschädigt (z.B. verzogen) ist. Auch wenn
das Notebook mit dem beschädigten Akku zu funktionieren schein, können dadurch Stromkreise beschädigt werden, die schließlich
einen Brand verursachen können.
• Laden Sie die Akkus über das Notebook auf. Durch falsches Laden kann der Akku explodieren.
• Versuchen Sie nicht, Akku s zu reparie re n. Lassen Sie die Akkupacks durch den Servicevertreter oder qualifiziertes Fachpersonal
reparieren oder austauschen.
• Halten Sie Kinder vom Akku fern und entsorgen Sie beschädigte Akkus sofort. Seien Sie vorsichtig bei der Entsorgung der Akkus.
Akkus können explodieren oder auslaufen, wenn sie Feuer ausgesetzt sind oder unsachgemäß behandelt oder entsorgt werden.
• Halten Sie den Akku von Metallgeräten fern.
• Bringen Sie Klebeband auf den Akkukontakten an, bevor Sie den Akku entsorgen.
• Berühren Sie die Akkukontakte nicht mit Ihren Händen oder mit metallenen Gegenständen.
Entsorgen der Akkus/Batterien & Achtung
Das von Ihnen gekaufte Produkt enthält einen aufladbaren Akku. Dier Akku ist wiederverwertbar. Nach verschiedenen nationalen
und regionalen Getzgebungen kann es verboten in, einen nicht mehr gebrauchsfähigen Akku in den normalen Hausmüll zu werfen. Informieren Sie sich bei Ihrem regionalen Entsorgungsunternehmen über Recycling-Möglichkeiten oder korrekte Entsorgung.
Wenn ein falscher Akku eingesetzt wird, besteht Explosionsgefahr. Tauschen Sie den Akku nur durch den gleichen oder einen
baugleichen Typ aus, der vom Hersteller empfohlen wird. Entsorgen Sie den verbrauchten Akku entsprechend der Anweisungen
des Herstellers.
Deutsch
Hinweise zu Pflege und Betrieb - 49

Ausführliches Benutzerhandbuch
Bitte beachten Sie, daß der
Computer immer mit dem
Befehl Herunterfahren in
das Menü der Schaltfläche
Sperren
heruntergefahren werden
muß. Dadurch werden
Deutsch
Festplatten- bzw. Systemprobleme vermieden.
Beachten Sie, dass die Geräte des Modells C am
Deckel/LCD Riegel haben.
Schieben Sie den linken
Riegel in die Öffnen-Stellung, schieben Sie dann
den rechten Riegel (halten
Sie ihn in dieser Stellung),
und heben Sie gleichzeitig
den Deckel an.
Herunterfahren
in Windows Vista
Modell C
Schnellstart
1. Entfernen Sie das gesamte Verpackungsmaterial.
2. Legen Sie das Notebook auf eine stabile Unterlage.
3. Schließen Sie alle Peripheri egeräte, die Sie mit dem Note book verwenden wollen (z. B. Tastatur und
Maus), an die entsprechenden Schnittstellen an.
4. Schließen Sie den AC/DC-Adapter an die DC-Eingangs buchse an der Rückseite d es Notebooks an.
Verbinden Sie dann das Netzkabel mit einer Netzsteckdose und dem AC/DC-Adapter.
5. Klappen Sie den Deckel/LCD vorsic htig mit einer Hand auf, und öffnen Sie ihn auf einen
angenehmen Sichtwinkel. Mit der anderen Hand halten Sie das Unterteil des Notebooks fest (siehe
Abb. 1 unten) (Hinweis: Heben Sie den Computer niemals am Deckel/LCD hoch).
6. Drücken Sie auf den Netzschalter, um das Notebook einzuschalten.
Abb. 1
Öffnen des Deckels/LCD/Notebooks mit angeschlossenem AC/DC-Adapter
50 - Schnellstart

Ausführliches Benutzerhandbuch
Modellunterschiede
Diese Notebook-Serie umfasst drei verschiedene Modelltypen. Die Modelle unterscheiden sich wie in der Tabelle beschrieben.
Funktion Modell A Modell B Modell C
Videoadapter
Unterstützte Windows
Vista-Version
Fingerabdruckleser Nein Option
VIA VN896CE Integrated Video
System (auf dem Chip)
Windows Vista Home Basic
Edition (64-bit)
NVIDIA GeForce 8400M G (NB8M-SE) Discrete Video System
(extern onboard)
Windows Vista Home Basic Edition (64-bit)
Windows Vista Home Premium Edition/Business Edition/Enterprise
Edition/Ultimate Edition (64-bit)
Deutsch
Zoomtasten &
Audioaufnahmetaste
AC/DC-Adapter 65W (DC-Ausgang 19V, 3,42A oder 18,5V, 3,5A) 90W (DC-Ausgang 19V, 4,74A)
LCD-Typ
Ja
siehe Tabelle 4 auf Seite 58
15,4" WXGA
15,4" WXGA+
Nein
17" WXGA
17,1" WSXGA+
17,1" WUXGA
Tabelle 1 - Modellunterschiede
Schnellstart - 51

Ausführliches Benutzerhandbuch
Systemsoftware
Möglicherweise wurde das Notebook bereits mit vorinstallierter Software ausgeliefert. Ist das nicht der Fall, oder
wenn Sie das Notebook für ein anderes System neu konfigurieren möchten, finden Sie dazu eine Anleitung in diesem
Handbuch zum Betriebssystem Microsoft Windows Vista.
Weitere Informationen zur Installation der Treiber und
Hilfsprogramme finden Sie in den Kapiteln 4 und 7 des erweiterten Benutzerhandbuchs auf der CD-ROM Device
Drivers & Utilities + User's Manual.
Deutsch
Treiber
Wenn Sie eine neue Systemsoftware installieren oder erneut installieren, müssen Sie die geeigneten Treiber installieren. Treiber sind Programme, die als Schnittstelle zwischen dem
Computer und einer Hardware-Komponente, z.B. einem Wireless-Netzwerkmodul, dienen. Es ist sehr wichtig, dass Sie die
Treiber in der in Tabelle 5 auf Seite 70 angegebenen Reihenfolge installieren. Sie können die meisten erweiterten Einstellungen nicht benutzen, bevor nicht die notwendigen Treiber und
Hilfsprogramme sachgemäß installiert sind.
Unterstützte Betriebssysteme
Betriebssystem
Anmerkung
Modell A Modelle B & C
*Windows XP (Home Edition oder
Professional)
Windows Vista (64-bit) Home Basic
Edition
Windows Vista
(64-bit)
Home Premium Edi-
tion/Business Edition/
Enterprise Edition/
Ultimate Edition
*Informationen zum Betriebssystem Windows XP finden
Sie auf der CD-ROM Device Drivers & Utilities + User’s
Manual.
Nicht enthalten
Zu den Betriebssystemen (z.B. Windows Vista/Windows
XP) und zu den Programmen (z.B. Textverarbeitung, Kal-
kulationsprogramme und Datenbanken) gibt es eigene
Handbücher, in denen Sie entsprechende Informationen finden.
Windows Vista kann
nur dann mit voller Leistung laufen, wenn der
Computer über einen
Systemspeicher
(RAM) von minde-
stens 1GB verfügt.
52 - Systemsoftware

Ausführliches Benutzerhandbuch
Systemübersicht: Ansicht von oben mit geöffnetem LCD-Bildschirm (Modelle A & B)
1
Die Benutzung drahtlos
angeschlossener Geräte in
Flugzeugen
In der Regel ist die Benutzung
jeglicher tragbarer elektronischer Funkgeräte in Flugzeugen verboten. Achten Sie
darauf, daß die Module AUSGESCHALTET sind, wenn Sie
das Notebook im Flugzeug
benutzen.
Drücken Sie die entsprechenden Tastenkombinationen (siehe Tabelle 3 auf Seite 57), um
das WLAN- und das BluetoothModul ein- und auszuschalten.
Prüfen Sie die Statusanzeige
, um festzustellen, ob die
Module ein- oder ausgeschaltet
sind (siehe Tabelle 2 auf Seite
55).
5
3
Abb. 2 - Ansicht von oben mit geöffnetem LCD-Bildschirm (Modelle A & B)
10
2
3
4
6
5
7
8
9
1. Optionale PC-Kamera
2. LCD-Bildschirm
3. Lautsprecher
4. Netzschalter
5. Hot-Key-Tasten
6. Tastatur
7. TouchPad mit Tasten
8. Mikrofon
9. LED-Anzeigen
10.Fingerabdruckleser
(optional nur für Modell
B)
9
10
Deutsch
Systemübersicht: Ansicht von oben mit geöffnetem LCD-Bildschirm (Modelle A & B) - 53

Ausführliches Benutzerhandbuch
1. Optionale PC-Kamera
2. LCD-Bildschirm
3. Lautsprecher
4. Netzschalter
5. Hot-Key-Tasten
6. Tastatur
7. TouchPad mit Tasten
8. Mikrofon
9. LED-Anzeigen
Deutsch
10.Fingerabdruckleser
(Option)
4
9
10
Systemübersicht: Ansicht von oben mit geöffnetem LCD-Bildschirm (Modell C)
Die Benutzung drahtlos
angeschlossener Geräte in
Flugzeugen
In der Regel ist die Benutzung
jeglicher tragbarer elektronischer Funkgeräte in Flugzeugen verboten. Achten Sie
darauf, daß die Module AUSGESCHALTET sind, wenn Sie
das Notebook im Flugzeug
5
benutzen.
Drücken Sie die entsprechenden Tastenkombinationen (siehe Tabelle 3 auf Seite 57), um
das WLAN- und das BluetoothModul ein- und auszuschalten.
Prüfen Sie die Statusanzeige
, um festzustellen, ob die
Module ein- oder ausgeschaltet
sind (siehe Tabelle 2 auf Seite
55).
Abb. 3 - Ansicht von oben mit geöffnetem LCD-Bildschirm (Modell C)
3 3
5
4
10
1
2
6
7
8
9
54 - Systemübersicht: Ansicht von oben mit geöffnetem LCD-Bildschirm (Modell C)

Ausführliches Benutzerhandbuch
LED-Anzeigen
Die LED-Anzeigen auf dem Computer zeigen wichtige Informationen über den aktuellen Status des Computers.
Tabelle 2 - LED-Anzeigen
Symbol Farbe Beschreibung
Grün Die Funktion NumLk (Nummerntastatur) ist aktiviert
Grün Caps-Lock ist aktiviert
Grün Scroll-Lock ist aktiviert
Grün Der Computer ist angeschaltet
Lampe blinkt grün Das System ist im konfigurierten Energiesparmodus
Orange Der AC/DC-Adapter ist angeschlossen und der Computer ist ausgeschaltet
Orange Der AC/DC-Adapter ist angeschlossen und der Akku wird geladen
Lampe blinkt Orange Der Akku hat einen kritisch niedrigen Stromstatus erreicht
Grün Der Akku ist voll geladen
Grün Es wird auf die Festplatte zugegriffen
Grün Das/Die Wireless-LAN- oder/und Bluetooth-Modul/Module ist/sind eingeschaltet
Deutsch
LED-Anzeigen - 55

Ausführliches Benutzerhandbuch
Tastatur
Die Tastatur hat eine eingebettete Nummerntastatur für einfache Zahleneingabe. Mit der Fn-Taste können Sie auf Tastendruck einige Betriebsfunktionen des Computers
ändern. Beachten Sie, dass das Notebook-Modell C am
rechten Rand der Haupttastatur eine Nummerntastatur hat.
Abb. 4 - Tastatur
Funktionstasten
Deutsch
Nummemtastatur
Sonderzeichen
Bei einigen Programmen können die Nummern-Tasten zur
Erzeugung von Sonderzeichen zusammen mit der Taste Alt
gedrückt werden. Diese Sonderzeichen können nur mit der
Nummerntastatur erzeugt werden. Die normalen Zahlentasten (in der oberen Tastenreihe der Tastatur) können dazu
nicht verwendet werden. Die Funktion NumLk muß aktiviert
sein.
Fn Taste
Fn Taste
56 - Tastatur
Modelle A & B
Funktionstasten
Modell C
NumLk & ScrLk Tasten
Num/Rollen Taste
Nummemtastatur
Andere Tastaturen
Wenn Ihre Tastatur beschädigt ist oder Sie aus anderen
Gründen eine andere benutzen möchten, können Sie hierzu
jede Standard-USB-Tastatur verwenden. Sie wird automatisch vom System erkannt und aktiviert. Es ist jedoch möglich, daß Sonderfunktionen/Hotkeys, die speziell auf die
Standard-Tastatur des Computers zugeschnitten sind, bei
anderen Tastaturen nicht funktionieren.

Ausführliches Benutzerhandbuch
A
Funktionstasten und visuelle Anzeigen
Wenn die Funktionstasten (F1 - F12) gleichzeitig mit der Fn-Taste gedrückt werden, funktionieren sie wie Hotkeys. Neben den Tastenkombinationen für die Gru ndf un kti on en gi bt es visuelle Anzeigen, wenn der Treiber für die Hotkeys (H ot Key Driver) installiert ist (siehe Seite 72). Wenn der Treiber installiert ist, erscheint in der Taskleiste das Symbol .
Tasten Funktion Tasten Funktion
Fn + ~
Fn + F1
Fn + F2
Fn + F3
Fn + F4 Wechsel Schlaf/Wiederaufnahme
Fn + F5/
F6
Fn + F7 Wechseln der Anzeigegerate Num
Wiedergabe/Pause (in Audio /Videoprogrammen) Fn + F8/F9
TouchPad aktivieren/
deaktivieren
LCD-Hintergrundlicht ausschalten
(zum Einschalten beliebige Taste drücken oder
TouchPad berühren)
Stummschaltung/
Stummschaltung auf -
heben
Audio-Lautstärke ver-
ringern/erhöhen
Fn + F10
Fn + F11
Fn + F12
Fn + ScrLk/
Rollen
Fn +
NumLk
LCD-Helligkeit ver-
ringern/erhöhen
PC-Kamera aktivie-
ren/deaktivieren
Wireless-LAN aktivieren/deaktivieren
Bluetooth aktivieren/
deaktivieren
Ein-/Ausschalten des Scroll-Modus
Ein-/Ausschalten des NumLk (Nummerntastatur)
(Modelle A & B)
Ein-/Ausschalten des NumLk (Nummerntastatur)
(Modell C)
Tabelle 3 - Funktionstasten & visuelle Anzeigen
Deutsch
Tastatur - 57

Ausführliches Benutzerhandbuch
Hot-Key-Tasten
Mit den Hot-Key-Tasten haben Sie einen dire kten Zugriff auf den Standard-Internetbrowser und das E-Mail-Programm
. Wenn ein PC-Kameramodul installiert ist, dienen die Hot-Key-Tasten für die PC-Kamera zum Starten des
Kameraprogramms, zum Aufnehmen von Fotos und zu m Ve rg röß ern/Verkleinern der Aufnahmen. Wenn kein PC-K ameramodul installiert ist, können Sie den Direkttasten-Treiber (QButton) installieren, sodass Sie die Hot-Key-Tasten so
festlegen können, dass von Ihnen festgelegt e Programme damit gestartet werd en können
ter
“Anwendungs-Direkttasten” auf Seite 59). Beachten Sie, dass das Notebook-Modell C die Hotkey-Tastenfunktionen
für Audioaufnahme und Kamera-Zoom nicht unterstützt.
(Detailinformationen finden Sie un-
Deutsch
Hot-Key-Taste Funktion
Modelle
A & B
Modelle
A & B
Modelle
A & B
58 - Hot-Key-Tasten
Tabelle 4 - Hot-Key-Tasten
Einen Standard-Internet browser aktivieren
Das Standard-E-Mail-Programm aktivieren
PC-Kamera angeschlossen
Keine PC-Kamera angeschlossen Anwendungs-Direkttaste 1 aktivieren (siehe Seite 59)
PC-Kamera angeschlossen Kamera vergrößern (siehe Seite 77)
Keine PC-Kamera angeschlossen Anwendungs-Direkttaste 2 aktivieren (siehe Seite 59)
PC-Kamera angeschlossen Kamera verkleinern (siehe Seite 77 )
Keine PC-Kamera angeschlossen Anwendungs-Direkttaste 3 aktivieren (siehe Seite 59)
Das BisonCap/VideoView-Programm aktivieren/Fotos aufnehmen (siehe
Seite 77)
Audioaufnahme starten/stoppen (siehe Seite 67)

Ausführliches Benutzerhandbuch
Anwendungs-Direkttasten
Beachten Sie, dass mit dem Direkttasten-Treiber (QB utton)
die Hot-Key-Tasten als Anwendungs-Direkttasten
nur dann verwendet werden können, wenn die optionale
PC-Kamera nicht angeschlossen und installiert ist (der
Treiber kann nur dann installiert werden, wenn die PCKamera nicht installiert ist). Um die Tastenfunktionen zu
aktivieren, muss der Direkttasten-Treiber (QButton) installiert werden (siehe “Anwendungs-Direkttasten” auf
Seite 72).
Mit den Direkttasten haben Sie mit nur einem Tastendruck
direkten Zugriff auf benutzerdefinierte Anwendungen. Um
eine Taste so zu konfigurieren, dass ein bestimmtes Programm beim Drücken dieser Taste
(siehe
Tabelle 4 auf Seite 58), müssen Sie die folgenden
Anweisungen ausführen. Solange das Programm läuft,
funktionieren auch die Direkttasten (das Symbol wird in
der Taskleiste angezeigt). Wenn das Programm nicht läuft,
muss der Computer neu gestartet werden.
1. Drücken Sie auf eine Anwendungs-Direkttaste oder
klicken Sie mit der rechten Maustaste auf das Symbol in
der Taskleiste.
2. Wählen Sie Setup aus dem Menü, scrollen Sie zu AP1/2/3
(oder beim Notebook-Modell C nur Application1) und
wählen Sie Benutzerdefiniert.
geöffnet wird
3. Ein Dialogfeld Öffnen erscheint auf dem Bildschirm.
4. Wechseln Sie zum Verzeichnis, in dem sich das gewünschte
.exe-Datei des Programms befindet (siehe unten).
5. Klicken Sie doppelt auf die Programmdatei oder wählen Sie
Öffnen.
Deutsch
Modelle A & B
Modell C
Application.exe
Sie müssen die eigentliche ausführbare (.exe) Programmdatei angeben, nicht nur die Verknüpfung. Um das Programm
zu finden, klicken Sie mit der rechten Maustaste auf die Verknüpfung auf dem Desktop und klicken auf Eigenschaften.
Klicken Sie auf Verknüpfung (Registerkarte) und suchen
das Verzeichnis, in dem sich die ausführbare Datei befindet,
indem Sie auf Dateipfad öffnen (Schaltfläche) klicken.
Abb. 5 - Konfigurationsfenster für die An-
wendungs-Direkttasten
Hot-Key-Tasten - 59

Ausführliches Benutzerhandbuch
1. LED-Anzeigen
2. USB Anschluss
3. DC-Eingangsbuchse
4. Akkufach
5. LCD-Riegel
(Modell C)
Deutsch
Systemübersicht:
Ansicht von vorne und Rück-
ansicht
Vorderseite
2
3
1
5 5
1
2
3
Abb. 6 - Ansicht von vorne und Rückansicht
Rückseite
Modelle A & B
Vorderseite
Rückseite
Modell C
4
4
1
1
60 - Systemübersicht: Ansicht von vorne und Rückansicht

Ausführliches Benutzerhandbuch
Systemübersicht:
Ansicht von links
Modelle A & B
1
2
5
4 637
8
Modell C
1
2
3
65 748
CD/DVD-Notauswurf
Wenn eine CD/DVD manuell entnommen werden muß (z.B. wegen eines Stromausfalls) können Sie
mit dem Ende einer geradegebogenen Büroklammer in das Notauswurfloch drücken. Verwenden Sie
hierzu aber keinen spitzen Bleistift oder ähnliche Objekte, die im Loch abbrechen und darin stekkenbleiben könnten.
Abb. 7 - Ansicht von links
1. SicherheitsschloßBuchse
2. Schacht für optisches
Laufwerk (für CD/DVDGeräte)
3. Notauswurfloch
4. RJ-11-Telefonbuchse
5. S/PDIF-Ausgangsbuchse
6. Mikrofon-Eingangsbuchse
7. Kopfhörer-Ausgangsbuchse
8. Line-Eingangsbuchse
Deutsch
Systemübersicht: Ansicht von links - 61

Ausführliches Benutzerhandbuch
1. ExpressCard/54(34)Steckplatz
2. 7-in-1 Kartenleser
3. 2 USB 2.0 Anschlüsse
4. RJ-45 LAN-Buchse
5. Schnittstelle für externen Monitor
Deutsch
Systemübersicht:
Ansicht von rechts
Modelle A & B
1
2
43
3
5
Modell C
1
2
3
3
4
5
ExpressCard-Steckplatz
Der ExpressCard-Steckplatz kann sowohl für ExpressCard/34 als auch Express Card/54 verwendet
werden.
7-in-1 Kartenleser
Mit dem Kartenleser können einige der neuesten digitalen Speicherkarten gelesen werden.
MMC (MultiMedia Card) / SD (Secure Digital) / MS (Memory Stick) /
MS Pro (Memory Stick Pro) / MS Duo (PC adapter erforderlich) /
Mini SD (PC adapter erforderlich) / RS MMC (PC adapter erforderlich)
62 - Systemübersicht: Ansicht von rechts
Abb. 8 - Ansicht von rechts

Ausführliches Benutzerhandbuch
Systemübersicht:
Modelle A & B
4
1
1
1
Ansicht von unten
2
3
1
4
Modell C
1
1
1
2
1
3
1
Hinweis zum Akku
Ein neuer Akku sollte bei seiner ersten Verwendung zuerst einmal vollständig entladen und dann komplett wieder geladen werden. Entladen und laden Sie den Akku mindestens einmal im Monat oder nach
etwa 20 Teilentladungen einmal
vollständig.
Abb. 9 - Ansicht von unten
1. Luftungsoffnung
2. Akku
3. Abdeckung des Festplattenschachts
4. Abdeckung des CPU/
RAM-Schachts
Garantie
Die CPU darf nicht vom
Anwender repariert werden. Jeglicher Zugriff auf
die CPU führt zum Verlust
der Garantieansprüche.
Überhitzung
Zum Schutz vor Überhitzung Ihres Computers
dürfen die Luftungsoffnung(en) nicht während
das Notebook in Betrieb
ist verdeckt werden.
Deutsch
Systemübersicht: Ansicht von unten - 63

Ausführliches Benutzerhandbuch
Windows Vista Startmenü und Systemsteuerung
Die meisten Einstellfenster, Utilitys und Programme erreichen Sie in Windows Vista (und bei den meisten anderen Versionen von Windows) über das Start-Menü. Wenn Sie Prog ramme und Utilitys installieren, werden di ese auf der Festplatte
installiert. Eine Verknüpfung davon wird in das Start-Menü und/oder auf dem Desktop erstellt. Klicken Sie mit der rechten
Maustaste auf das Startmenü-Symbol , und wählen Sie die Option Eigenschaften, um das Erscheinungsbild des Start-
menüs zu ändern.
Deutsch
Klicken Sie hier, um in die Klassische Ansicht zu wechseln
Abb. 10 - Startmenü und Systemsteuerung
In diesem Benutzerhandbuch finden Sie wiederholt die Aufforderung, die Systemsteuerung zu öffnen. Zur Systemsteuerung gelangen Sie über das Start-Menü. In der Systemsteuerung können Sie die Einstellungen für die meisten w ichtige n
Windows-Funktionen (z.B. Strom, Video, Netzwerk, Audio) vornehmen. Windows Vista bietet für viele dieser Funktione n
Einstellfenster, wobei viele neue Fenster bereits hinzugefügt werden (oder die bestehenden verbessert werden), wenn Sie
die in Tabelle 5 auf Seite 70 aufgeführten Treiber installieren. Es kann sinnvoll sein, die klassische Ansicht des Startmenüs
einzustellen.
64 - Windows Vista Startmenü und Systemsteuerung

Ausführliches Benutzerhandbuch
Grafikfunktionen
Dieses Notebook verfügt je nach Mode ll über zwei verschiede ne Videooptionen ( VIA bei Modell A und NVIDIA bei Modellen B & C). Auf der CD-ROM Device Drivers & Utilities + User's Manual befindet sich der jeweils dazugehörige
Treiber.
Wenn der Grafiktreiber installiert ist, können Sie bei Windows Vista im Einstellfenster Anzeigeeinstellungen die Anzei-
gegeräte wechseln und Anzeigeoptionen konfigurieren.
So öffnen Sie in Windows Vista das Dialogfeld Anzeigeeinstellungen:
1. Klicken Sie Start (Menü) und klicken Sie Systemsteuerung (oder zeigen auf Einstellungen und klicken Systemsteuerung).
2. Klicken Sie im Menü Darstellung und Anpassung auf Bildschi rmauflösung anp ass en (oder doppelkl icken Sie auf Anpassung >
Anzeige).
3. Verschieben Sie den Regler auf die gewünschte Einstellung für die Auflösung (siehe Abb. 11 auf Seite 66).
4. Klicken Sie auf den Pfeil, und wählen Sie die gewünschte Einstellung für die Farbtiefe (siehe Abb. 11 auf Seite 66).
5. Klicken Sie auf Erweiterte Einstellungen (Schaltfläche) , (siehe Abb. 11 auf Seite 66) um das Einstellfenster Erweiterte
Eigenschaften aufzurufen.
3
1
2
Für VIA
1. Klicken Sie auf die verschiedenen S3-Registerkarten (siehe Abb. 11 auf Seite 66), um die erforderlichen Einstellungen vorzu-
nehmen.
4
Für NVIDIA
1. Klicken Sie auf GeForce 8400M G (Registerkarte).
2. Klicken Sie auf NVIDIA Systemsteuerung starten (siehe Abb. 11 auf Se ite 66), um das Einstellfenster aufzurufen.
3. Sie können die NVIDIA Systemsteuerung auch aufrufen, indem Sie mit der rechten Maustaste auf den De sktop kli cken und in dem
Menü NVIDIA Systemsteuerung wählen.
5
Grafikfunktionen - 65
Deutsch

Ausführliches Benutzerhandbuch
4
Deutsch
66 - Grafikfunktionen
1
1
2
3
5
2
3
Abb. 11 - Anzeigeeinstellungen

Ausführliches Benutzerhandbuch
Audiofunktionen
Die Audioeinstellungen können Sie bei Windows durch
Anklicken des Soundsymbols oder des VIA Audio
Deck-Symbols in der Taskleiste bzw. auf dem Desktop
aufrufen (dadurch wird das VIA Audio Deck-Menü ge-
öffnet). Die Lautstärke können Sie durch Drükken der Tastenkombination Fn + F5/F6 ändern.
Klicken Sie links auf eine der Tasten (z. B. ), um die
Optionen des Audiomenüs zu erweitern.
Abb. 12 - VIA Audio Deck-Konfigurationmenüs
Audioaufnahmen (Modelle A & B)
Mit der Hot-Key-Taste für die Audioaufnahme können
Sie Ton entweder über das eingebaute Mikrofon od er über
ein an den Mikrofonanschluss angeschlossenes Mikrofon
aufnehmen.
1. Drücken Sie auf die Hot-Key-T aste für die Au dioaufnahme ,
um die Aufnahme zu starten (oben links im Bildschirm blinkt
das Aufnahmesymbol ).
2. Drücken Sie ein zweites Mal auf die Hot-Key-Taste für die
Audioaufnahme
im Bildschirm wird das Aufnahmesymbol nicht mehr
angezeigt).
3. Die aufgenommene Audiodatei (im Format .wav) erscheint im
Ordner Wav (Computer > Lokaler Datenträger (C:) >
Benutzer > (Ihr Loginnamen) > Wav).
4. Klicken sie doppelt auf die Datei, um die Audiowiedergabe zu
starten.
, um die Aufnahme zu beenden (oben links
Lautstärkeeinstellung
Die Lautstärke wird mit den Windows-Lautstär-
kereglern (oder den Lautstärkereglern am Notebook) eingestellt. Überprüfen Sie die Einstellung,
indem Sie in der Taskleiste auf das Lautstärke-
Symbol klicken.
Deutsch
Audiofunktionen - 67

Ausführliches Benutzerhandbuch
Energieverwaltungsfunktionen
Die Energieoptionen von Windows (siehe Seite 64) ermöglichen Ihnen die Konfiguration der Optionen für das Energiemanagement des Computers. Si e könn en St rom spar en, indem Sie Energiesparpläne erstellen, die Netzschalter-, Energie-
spartasten- und Zuklappeinstellung (beim Schließen des Deckels) konfigurieren und im linken Menü den Anzeige- und
Energiesparmodus festlegen. Beachten Sie, dass sich die Energiesparpläne (Energiesparmodus) auf die Computerlei-
stung auswirken.
Wählen Sie einen bestehenden Plan aus, oder klicken Sie im linken Menü auf Energiesparplan erstellen, und wä hlen Sie
die Optionen, um einen neuen Plan zu erstellen. Klicken Sie auf Energieplaneinstellungen ändern, und klicken Sie auf
Erweiterte Energieeinstellungen ändern, um weitere Optionen für die Konfiguration aufzurufen.
Deutsch
Hinweis: Bei Windows Vista ist die Standardeinstellung Energie sparen
Abb. 13 - Energieoptionen
68 - Energieverwaltungsfunktionen

Ausführliches Benutzerhandbuch
Hinweise zum Akku
Zur optimalen Nutzung Ihres Akkus befolgen Sie bitte diese einfachen Anweisungen.
Laden des Akkus bei Computer-Modellen B und C
Beachten Sie, dass es bei den Computermodellen B und C im Akkubetrieb und bei hoher Belastung (z. B. Anwendungen mit einem hohen Anteil an Videoverarbeitung) eine gewisse
Zeitlang dauert, bis das Aufladen des Akkus beginnt, wenn sie an den Netzadapter angesteckt
werden (3 bis 20 Minuten). Aus Sicherheitsgründen startet der Ladevorgang nämlich erst,
wenn der Computer eine sichere Temperatur erreicht hat.
Speichern Sie Ihre Arbeit, wenn die Akku-LED orange blinkt und stecken Sie den Netzadapter an. Die Akku-LED wechselt von orang e blinken zu orange, wen n das Laden des Akkus
beginnt (3 bis 20 vor dem eigentlichen Ladevorgang).
Warnung zu niedrigem
Akkuladestand
Wenn der Ladestand des
Akkus sehr niedrig ist, sollten Sie das Notebook sofort über den ACNetzadapter mit dem
Stromnetz verbinden. Ist
das nicht möglich, sollten
Sie sofort Ihre Arbeit speichern, da die ungespeicherten Daten anderenfalls
bei einer Unterbrechung
der Stromversorgung verloren gehen können.
Deutsch
Energieverwaltungsfunktionen - 69

Ausführliches Benutzerhandbuch
Installation der Treiber
Die CD-ROM "Device Drivers & Utilities + User's Manual" enthält die Treiber und Hilfsprogramme, die für das ein -
wandfreie Funktionieren des Notebooks notwendig sind.
Legen Sie die mitgelieferte CD-ROM
Install Drivers (Schaltfläche), oder klicken Sie auf Option
Drivers (Schaltfläche), um das optionale Treibermenü auf-
zurufen.
Installieren Sie die Treiber in der in Tabelle 5 angegebenen
Deutsch
Reihenfolge
. Nachdem ein Treiber installiert wurde , wird er
grau dargestellt (wenn einer dieser Treiber ein weiteres Mal
installiert werden soll, klicken Sie auf die Schaltfläche Unlock).
Manuelle Treiber-Installation
Klicken Sie in der Anwendung Drivers Installer auf die
Schaltfläche Browse CD (CD durchsuchen) und navigieren
Sie zu der ausführbaren Datei in dem Ordner für Ihren Treiber.
Windows Update
Nachdem Sie alle Treiber installiert haben, sollten Sie die
Funktion Windows Update aktualisieren, um immer die
neuesten Sicherheits-Updates usw. zu erhalten (die Updates
enthalten die neuesten Fehlerbehebungen von Microsoft).
und klicken Sie auf
Treiber (Windows Vista) Seite #
Video (VIA-Modell A) Seite 71
Video (NVIDIA-Modelle B & C) Seite 71
Audio Seite 71
Modem Seite 71
Network (LAN) Seite 71
Kartenleser Seite 71
TouchPad Seite 71
Hot-Key Seite 72
Anwendungs-Direkttasten Seite 72
Wireless-LAN (Option) Seite 73
PC-Kamera
Fingerabdruckleser (Option) Seite 78
Bluetooth-Modul (Option)
Hinweis: Ein Treiber muss nicht installiert werden
Seite 80
USB Advance AP (Modell A) Seite 72
Windows Update aktivieren (siehe links)
(Option)
)
Tabelle 5 - Installationsvorgang
Seite 74
(siehe
70 - Installation der Treiber

Ausführliches Benutzerhandbuch
Installationsverfahren für den Treiber
Video (VIA - Modell A)
1. Klicken Sie auf Install Drivers.
2. Klicken Sie auf 1.Install Video Driver > Ja.
3. Klicken Sie auf Weiter > Weiter.
4. Klicken Sie auf Fertig stellen, um das Notebook neu zu
starten.
Video (NVIDIA - Modelle B & C)
1. Klicken Sie auf Install Drivers.
2. Klicken Sie auf 1.Install Video Driver > Ja.
3. Klicken Sie auf Weiter.
4. Klicken Sie auf Fertig stellen, um das Notebook neu zu
starten.
Audio
1. Klicken Sie auf Install Drivers.
2. Klicken Sie auf 2.Install Audio Driver > Ja.
3. Klicken Sie auf Weiter.
4. Klicken Sie auf die Schaltfläche Ich stimme zu, und dann
auf Weiter.
5. Klicken Sie auf Weiter > Weiter > Weiter.
6. Klicken Sie auf Fertigstellen, um das Notebook neu zu
starten.
Modem
1. Klicken Sie auf Install Drivers.
2. Klicken Sie auf 3.Install Modem Driver > Ja.
3. Klicken Sie auf OK.
4. Ihr Modem ist nun bereit zur Konfiguration.
Deutsch
LAN
1. Klicken Sie auf Install Drivers.
2. Klicken Sie auf 4.Install LAN Driver > Ja.
3. Klicken Sie auf OK.
4. Nun können die Netzwerkeinstellungen konfiguriert
werden.
Kartenleser
1. Klicken Sie auf Install Drivers.
2. Klicken Sie auf 5.Install Cardreader Driver > Ja.
3. Klicken Sie auf Weiter > Weiter.
4. Klicken Sie auf Fertig stellen, um das Notebook neu zu
starten.
TouchPad
1. Klicken Sie auf Install Drivers.
2. Klicken Sie auf 6.Install Touchpad Driver > Ja.
3. Klicken Sie auf Weiter.
4. Klicken Sie auf Fertig stellen > Jetzt neu starten, um das
Notebook neu zu starten.
Installation der Treiber - 71

Ausführliches Benutzerhandbuch
Hot-Key
1. Klicken Sie auf Install Drivers.
2. Klicken Sie auf 7.Install Hotkey Driver > Ja.
3. Klicken Sie auf Next > Install.
4. Klicken Sie auf Finish > Finish, um das Notebook neu zu
starten.
Anwendungs-Direkttasten
Wenn kein PC-Kameramodul installiert ist, können Sie
den Direkttasten-Treiber installieren, sodass Sie die Hot-
Deutsch
Key-Tasten so festlegen können, dass von Ihnen festge legte
Programme damit gestartet werden können
tionen finden Sie unter
Seite 59
).
“Anwendungs-Direkttasten” auf
Der Direkttasten-Treiber (QButton) muss manuell installiert werden, da er nicht im Drivers Installer-Menü erscheint.
1. Legen Sie die CD-ROM Device Drivers & Utilities +
User’ s Manual in das CD/DVD-Laufwerk und klicken auf
Browse CD
2. Klicken Sie doppelt auf die Ordner Option > QButton.
3. Klicken Sie doppelt auf Setup.exe.
4. Klicken Sie auf Weiter > Fertigstellen, um das Notebook
neu zu starten.
(Schaltfläche).
(Detailinforma-
USB Advance AP (Modell A)
Installieren Sie diesen Treiber nur beim Notebook-Modell
A. Dadurch wird vermieden, dass USB 1.1-Tastaturen
und/oder -Mäuse nach dem Aufwecken aus dem Ruhezustand nicht mehr reagieren.
1. Klicken Sie auf Option Drivers (Schaltfläche).
2. Klicken Sie auf 4.USB Advance AP > Ja.
3. Klicken Sie auf Close, um die Installation abzuschließen.
4. Sehen Sie regelmäßig bei Windows Update (siehe
“Windows Update” auf Seite 70) nach, ob wichtige
Aktualisierungen vorhanden sind.
72 - Installation der Treiber

Ausführliches Benutzerhandbuch
Wireless LAN
Ein- und Ausschalten des Wireless-LAN-Moduls
Das Wireless-LAN-Modul wird durch Drücken der Tastenkombination (Fn + F11)
Modul eingeschaltet ist, leuchtet die LED grün und erscheint kurz die Anzeige .
Installieren des Wireless-LAN-Treibers
1. Schalten Sie das Modul ein.
2. Klicken Sie auf Option Drivers
3. Klicken Sie auf 1.Install WLAN Driver > Ja.
4. Wählen Sie eine Sprache und klicken auf Weiter.
5. Klicken Sie auf Weiter > Installieren.
6. Klicken Sie auf Fertig stellen, um die Installation
abzuschließen.
Hinweis: Das Betriebssystem ist die Standardeinstellung für
die Steuerung des Wireless LAN
eingeschaltet. Wenn das Wireless-LAN-
(Schaltfläche).
bei Windows Vista.
Anschließen an ein Drahtlosnetzwerk
Stellen Sie sicher, dass das Wireless-LAN-Modul aktiviert ist.
1. Klicken Sie auf das Wireless-Symbol in der Taskleiste,
und klicken Sie dann auf Verbindung mit einem Netz-
werk herstellen (oder klicken Sie mit der rechten Maustaste auf das Symbol , und klicken Sie dann auf
Verbindung mit einem Netzwerk herstellen).
2. Klicken Sie in der Liste Anzeigen aus dem DropdownMenü die Option Drahtlosnetzwerke.
3. Eine Liste der verfügbaren Netzwerke wird angezeigt.
4. Klicken Sie auf ein Netzwerk und dann auf Verbinden.
5. Wenn das gewünschte Netzwerk nicht angezeigt wird,
klicken Sie auf Eine Verbindung oder ein Netzwerk
einrichten (eine Liste der Optionen wird angezeigt, die
eine manuelle Suche und Einstellung eines neuen
Netzwerks ermöglichen).
6. Schieben Sie den Cursor über das Taskleistensymbol ,
um den Verbindungsstatus aufzurufen.
7. Wenn Sie die Verbindung zum Wireless-Netzwerk trennen
möchten, klicken Sie in der Taskleiste auf das WirelessSymbol , und wählen Sie dann die Opti on Verbindung
herstellen oder T r ennen, um das Netzwerkmenü aufzurufen. Klicken Sie dann auf Trennen (oder klicken Sie mit
der rechten Maustaste auf das Symbol , und klicken Sie
dann auf Verbindung trennen von).
Deutsch
Wireless LAN - 73

Ausführliches Benutzerhandbuch
PC-Kamera
Dieses Notebook verfügt über zwei Kameraoptionen. Das
1,3M-Pixel-Kamera-Modul verwendet für die Aufnahme
von Videodateien die Anwendung BisonCap. Das 2,0MPixel-Kamera-Modul verwendet für die Aufnahme von
Videodateien VideoView.
Installieren des PC-Kamera-Treibers
Für 1,3M-Pixel-PC-Kamera-Modul:
Deutsch
1. Schalten Sie das Modul mit der Tastenkombination Fn +
F10 ein (wenn das Modul eingeschaltet wird, erscheint
kurz die Anzeige ).
2. Klicken Sie auf Option Drivers
3. Klicken Sie auf 2.Install Camera Driver > Ja.
4. Wählen Sie eine Sprache und klicken auf Weiter.
5. Klicken Sie auf Weiter > Fertig stellen, um das
Computer neu zu starten.
6. Die BisonCap-Software wird über die Verknüpfung auf
dem Desktop oder über den Eintrag BisonCam im Menü
Start > Programme/Alle Programme gestartet (wenn
die Hardware ausgeschaltet wurde, können Sie sie mit der
Tastenkombination Fn + F10 wieder einschalten).
(Schaltfläche).
Für 2,0M-Pixel-PC-Kamera-Modul:
1. Schalten Sie das Modul mit der Tastenkombination Fn +
F10 ein (wenn das Modul eingeschaltet wird, erscheint
kurz die Anzeige ).
2. Klicken Sie auf Option Drivers
3. Klicken Sie auf 2.Install Camera Driver > Ja.
4. Klicken Sie auf Installieren.
5. Wählen Sie als Antwort auf die Frage zum Stromsystem
Ja oder Nein.
6. Klicken Sie auf Fertig stellen > Fertig stellen, um das
Notebook neu zu starten.
7. Die VideoView-Software wird über die Verknüpfung auf
dem Desktop oder über den Eintrag USB2.0 PC Camera
im Menü Start > Programme/Alle Programme gestartet
(wenn die Hardware ausgeschaltet wurde, können Sie sie
mit der Tastenkombination Fn + F10 wieder einschalten).
(Schaltfläche).
Einrichten des Farbschemas
Das Farbschema von Windows Vista sollte auf WindowsAero eingestellt werden, ehe Sie die PC Camera-Anwen-
dung ausführen (Systemsteuerung > Darstellung und
Anpassung > Anpassung > Fensterfarbe und -darstellung).
74 - PC-Kamera

Ausführliches Benutzerhandbuch
Hot-Key-Tasten für die PC-Kamera
Mit den Hot-Key-Tasten für die PC-Kamera können Sie, das Programm BisonCap/VideoView starten, Fotos aufnehmen und die Kameraaufnahme vergrößern und
verkleinern (nur Modelle A & B).
Hot-Key-Taste Funktion
Das BisonCap/VideoView-Programm akti-
vieren/Fotos aufnehmen (siehe Seite 77)
Modelle
A & B
Modelle
A & B
Tabelle 6 - Hot-Key-Tasten für die PC-Kamera
Kamera vergrößern (siehe Seite 77)
Kamera verkleinern (siehe Seite 77)
Audio-Setup für die PC-Kamera
Wenn Sie mit der Kamera Video- und Audio-Daten aufnehmen möchten, müssen Sie bei Windows die Optionen für die
Audio-Aufnahme einstellen.
1. Klicken Sie Start (Menü) und klicken Sie Systemsteuerung
(oder zeigen auf Einstellungen und klicken Systemsteue-
rung).
2. Klicken Sie auf Sound (Hardware und Sound).
3. Klicken Sie auf Aufnahme (Registerkarte).
4. Klicken Sie mit der rechten Maustaste auf “Mikrofon (VIA
High Definition Audio)” (externes Mikrofon)/”Front Mic (VIA
High Definition Audio) (internes Mikrofon)” und stellen Sie
sicher, dass die Funktion nicht deaktiviert ist.
5. Klicken sie doppelt auf Mikrofon/Front Mic (oder wählen Sie
aus dem Rechtsklick-Menü die Option Eigenschaften).
6. Klicken Sie auf Pegel (Registerkarte), und regeln Sie die
Einstellung von Mikrofon.
7. Klicken Sie auf OK und
8. Starten Sie das Programm BisonCap/VideoView aus dem
Menü Start > Programme/Alle Programme > BisonCam/
USB2.0 PC Camera.
9. Rufen Sie das Menü Geräte/Devices auf, und wählen Sie
Mikrofon/Front Mic (VIA High Definition Audio) (es sollte mit
einem Häkchen gekennzeichnet sein).
10. Rufen Sie das Menü Aufnahme/Capture auf, und wählen Sie
Audio aufnehmen/Capture Audio (es sollte mit einem
Häkchen gekennzeichnet sein).
schließen Sie alle Fenster.
Deutsch
PC-Kamera - 75

Ausführliches Benutzerhandbuch
BisonCap/VideoView
Die Anwendungen BisonCap (für 1,3-Megapixel-Kame-
ras) und VideoView (für 2,0-Megapixel -Kameras) sind
Video-Viewer-Programme für die allgemeine Videowiedergabe und -prüfung. Die Videodateien werden im Format
.avi aufgenommen.
1. Starten Sie das Programm BisonCap/VideoView aus dem
Menü Start > Programme/Alle Programme > BisonCam/
USB2.0 PC Camera (es wird empfohlen, vor der Aufnahme
Deutsch
die Aufnahmedatei einzustellen - siehe "Einstellen der
Aufnahmedatei" weiter unten).
2. Gehen Sie zum Menü Aufnahme/Capture (wenn Sie Ton
aufnehmen möchten, siehe “Audio-Setup für die PC-
Kamera” auf Seite 75)
starten/Start Captu re.
3. Klicken Sie auf OK (der Speicherort der Datei wird im Pop-upFenster angezeigt), um die Aufzeichnung zu starten, und auf
Esc, um sie zu stoppen (Die Datei können Sie sich dann mit
Windows Media Player ansehen).
und wählen Sie dann Aufnahme
Einstellen der Aufnahmedatei
Vor dem Aufnehmen von Videodateien können Sie im
Menü Datei/File die Option Aufnahmedatei einst./Set
Capture File wählen und den Dateinamen und den Speicherort für die aufgenommene Datei festlegen (dadurch
können Sie vermeiden, dass andere Dateien versehentlich
überschrieben werden). Wählen Sie den Namen und den
Speicherort, und klicken Sie auf Öffnen. Legen Sie dann
bei "Capture file size:" die Größe der Aufnahmedatei fest,
und klicken Sie auf OK. Nun können Sie den Aufnahmevorgang wie oben beschrieben starten.
Bildschirmflimmern beseitigen
Wenn das Videobild bei der Wiedergabe mit dem Programm BisonCap/VideoView flimmern sollte, können Sie
bei den Optionen des Video Aufnahme Filters/Video
Capture Filters die Einstellung vornehmen.
Für BisonCap:
1. Starten Sie das Programm BisonCap.
2. Gehen Sie zu Optionen und wählen Sie "Video Aufnahme
Filter...".
3. Wählen Sie aus dem Feld Frequenz in der Registerkarte
Eigenschaftenseite entweder 50Hz oder 60Hz.
Für VideoView:
1. Starten Sie das Programm VideoView.
2. Gehen Sie zu Options und wählen Sie "Video Capture
Filter...".
3. Wählen Sie aus dem Feld Flickering Reduction in der
Registerkarte Image entweder 50Hz oder 60Hz.
76 - PC-Kamera

Fotografieren
Mit den Programmen BisonCap und VideoView können
Sie auch fotografieren.
1. Starten Sie das Programm BisonCap/VideoView.
2. (BisonCap) Gehen Sie zum Menü Optionen und wählen Sie
dann Fotografieren.
oder
(VideoView) Gehen Sie zum Menü Capture und wählen Sie
dann SnapShot.
3. Das Bild (im Format JPEG) wird im Desktopordner Snapshot
gespeichert (der Ordner darf nicht verschoben oder
umbenannt werden).
Ausführliches Benutzerhandbuch
Anschließen/Entfernen einer PC-Kamera
Beachten Sie, dass die Treiber der Direkttasten und der PC-Kamera nicht gleichzeitig installiert sein können.
Wenn Sie eine PC-Kamera an das Notebook anschließen
möchten, müssen Sie zuerst den vorhandenen DirekttastenTreiber (Multimedia Keyboard Driver) deinstallieren und dann
erst den Kameratreiber und die PC-Kamera installieren. Die
Treiber können im Windows-Fenster Programme und Funk-
tionen deinstalliert werden.
Deutsch
Zoom
Mit den Programmen BisonCap und VideoView können
Sie das Kamerabild verkleinern und vergrößern.
Für BisonCap:
1. Starten Sie das Programm BisonCap.
2. Gehen Sie zum Menü Zoom und wählen Sie dann
Vergrößern/Verkleinern.
Für VideoView:
1. Starten Sie das Programm VideoView.
2. Gehen Sie zum Menü Options und wählen Sie dann Setting
(verwenden Sie den Schieberegler zu Einstellen der
Vergrößerung, und klicken Sie auf OK, um die Einstellung zu
speichern).
Wenn Sie die PC-Kamera nicht mehr benötigen und entfernen,
sollten Sie auch den PC-Kameratreiber deinstallieren. Dann
können Sie die Device Drivers & Utilities + User's Manual
CD-ROM einlegen und wieder den Direkttasten-Treiber
(QButton) aus dem Menü Drivers Installer installieren.
PC-Kamera - 77

Ausführliches Benutzerhandbuch
Fingerabdruckleser
Wenn das von Ihnen erworbene Gerät über einen Fingerabdruckleser verfügt (optional nur für die Modelle B und C)
müssen Sie den Treiber entsprechend der folgenden Anweisung installieren.
Für einen vollen Schutz müssen Sie für den Computer Administratorrechte und ein Windows-Kennwort aktiviert haben.
Deutsch
Bevor Sie mit der Registrierung beginnen, sollten Sie d as
Lernprogramm zum Fingerabdruckleser durchgehen. Um
das Lernprogramm zu starten, klicken Sie auf Start > Pro-
gramme/ Alle Programme > Protector Suite QL > Fingerprint Tutorial (Fingerabdruck-Lernprogramm).
Installieren des FingerabdruckleserTreibers
1. Klicken Sie auf Option Drivers (Schaltfläche).
2. Klicken Sie auf 3.Install FingerPrint Driver > Ja.
3. Klicken Sie auf Softwareinstallation.
4. Klicken Sie auf Weiter > Weiter > Weiter.
5. Klicken Sie auf Fertig stellen > Ja, um das Notebook neu
zu starten.
Hilfe & Handbuch
Klicken Sie mit der rechten Maustaste auf das Taskleistensymbol und wählen Sie aus dem Menü die Option Help (Hilfe).
Legen Sie die CD-ROM Device Drivers & Utilities + User's Manu-
al ein und klicken Sie auf Option Drivers. klicken Sie auf Unlock
(Schaltfläche) und dann klicken Sie auf 3.Install FingerPrint
Driver > Ja.
Klicken Sie auf Documentation um den Ordner zu öffnen, in
dem Sich das Benutzerhandbuch im .pdf- Format befindet.
Um die Adobe Acrobat Reader-Softwa re zu installie ren, die Sie
benötigen, um die Datei lesen zu können, legen Sie die CD-ROM
Device Drivers & Utilities + User’s Manual ein, und klicken sie au f
User’s Manual (Schaltfläc he) und dann auf Install Acrobat
Reader (Schaltfläche).
Benutzerregistrierung
1. Klicken Sie auf Start > Programme/ Alle Programme > Pro-
tector Suite QL > Benutzerregistrierung, oder doppelklik-
ken Sie in der Taskleiste auf das Symbol .
2. Wenn das Programm das erste Mal gestartet wird, werden Sie
gefragt, ob Sie die Lizenzvereinbarung annehmen möchten.
Klicken Sie dann auf OK.
3. Klicken Sie auf Weiter und wählen Sie “Registrierung auf
der Festplatte”, und klicken Sie auf Fertig stellen.
78 - Fingerabdruckleser

Ausführliches Benutzerhandbuch
4. Wenn Sie kein Windows-Kennwort eingerichtet haben,
werden Sie dazu aufgefordert (Hinweis: W enn kein Kennwort
festgelegt wurde, kann Protector Suite QL nicht den Zugriff
auf den Computer sichern).
5. Wenn Sie auf Weiter klicken und werden Sie aufgefordert , Ihr
Windows-Kennwort einzugeben.
6. Klicken Sie auf Weiter > Weiter (Markieren Sie das
Kontrollfeld bei “Interaktives Lernprogramm ausführen”,
um das Fingerabdruck-Lernprogramm durchzugehen).
7. Klicken Sie bei jedem Fenster des Lernprogramms auf Weiter
(sie können jederzeit auch auf die Schaltfläche
“Lernprogramm überspringen” klicken).
8. Klicken Sie auf eine der Tasten über einem beliebigen Finger,
um mit der Registrierung dieses Fingers zu beginnen.
9. Tippen Sie dreimal mit dem Finger auf, um diesen Finger zu
registrieren.
10. Wiederholen Sie diese n Vorgang für alle Finger, die registriert
werden sollen (siehe unten), und dann klicken Sie auf Weiter
> Fertig stellen.
11. Klicken Sie auf einen der Einträge unter "Weitere
Informationen zu:", um weitere Informationen über dieses
Thema zu erhalten.
12. Klicken Sie auf Schließen.
13. Starten Sie das Notebook neu.
14. Klicken Sie mit der rechten Maustaste auf das
Taskleistensymbol um das Menü mit den Optionen zu
starten, mit denen Sie Fingerabdrücke bearbeiten, auf das
Control Center zugreifen, die Hilfe aufrufen können. Sie
können das Control Center usw.
Protector Suite QL im Menü Start > Pro gr am me /Alle
Programme starten.
15. Eine ausführliche Beschreibung finden Sie unter “Hilfe &
Handbuch” auf Seite 78.
16. Wenn Sie mit dem Finger auf den Fingerabdruckleser tippen,
können Sie auf das Biomenü zugreifen, um den Computer
zu sperren, Websites zu registrieren, das Control Center
zu öffnen und das Hilfe-Menü aufzurufen.
17. Im Control Center können Sie die Einstellungen und
Fingerabdrücke bearbeiten, und h ier erhal te n Si e auch Hilfe
dazu.
auch über den Eintrag
Fingerabdruckregistrierung
Beachten Sie, dass es für den Fall einer Verletzung o. ä.
sinnvoll ist, mehr als einen Finger zu registrieren.
Abb. 14 - Fingerabdruckregistrierung
Deutsch
Fingerabdruckleser - 79

Ausführliches Benutzerhandbuch
Bluetooth-Konfiguration in Windows Vista
Richten Sie Ihr Bluetooth-Gerät so ein, dass der Computer es erkennen kann
1. Schalten Sie Ihr Bluetooth-Gerät (z. B. PDA, Mobiltelefon) ei n.
2. Schalten Sie das Gerät in den Erkennbar-Modus (eine
Beschreibung dazu finden Sie in der dazugehörigen
Dokumentation).
Deutsch
Einschalten des Bluetooth-Moduls
1. Schalten Sie das Bluetooth-Modul mit der Tastenkombination
Fn + F12 ein.
2. In der Taskleiste erscheint das Bluetooth-Symbol
(möglicherweise müssen Sie die Option über das BluetoothFenster aktivieren).
3. Führen Sie dann einen der folgenden Schritte aus, um das
Fenster Bluetooth-Geräte aufzurufen.
• Klicken Sie doppelt auf das Symbol , um das Fenster
Bluetooth-Geräte aufzurufen.
• Klicken Sie Start (Menü) und klicken Sie Systemsteue-
rung (oder zeigen auf Einstellungen und klicken Systemsteuerung), und klicken Sie dan auf Bluetooth-Geräte
(Hardware und Sound).
• Klicken/klicken Sie mit der rechten Maustaste auf das
Symbol und wählen Sie eine Option aus dem Menü.
Bluetooth-
Datenübertragung
Beachten Sie, dass die
Datenübertragung zwischen dem Notebook und
einem Bluetooth-Gerät
nur in einer Richtung
möglich ist (eine gleichzeitige Datenübertragung in beide
Richtungen wird nicht
unterstützt).
Abb. 15 - Fenster "Bluetooth-Geräte" und beim Ank-
licken des Symbols angezeigtes Menü
Hinzufügen eines Bluetooth-Geräts
1. Rufen Sie das Fenster Bluetooth-Geräte auf.
2. Klicken Sie auf Optionen (Registerkarte), und machen Sie ein
Häkchen bei Bluetooth-Geräte können eine Verbindung
mit diesem Computer herstellen (Verbindungen).
3. Klicken Sie auf Geräte (Registerkarte) und klicken Sie dann
auf Hinzufügen.
4. Der Assistent zum Hinzufügen von Bluetooth-Geräten
erscheint.
80 - Bluetooth-Konfiguration in Windows Vista

Ausführliches Benutzerhandbuch
5. Klicken Sie auf “Gerät ist eingerichtet und kann erkannt
werden”, und klicken Sie dann auf Weiter.
Abb. 16 - Assistent zum Hinzufügen von Bluetooth-
Geräten
6. Der Assistent sucht dann innerhalb der Reichweite nach
verfügbaren Bluetooth-Geräten.
7. Wählen Sie das Gerät aus, mit dem Sie kommunizieren
möchten, und klicken Sie auf Weiter.
8. Wählen Sie einen geeigneten Hauptschlüssel, und klicken Sie
auf Weiter > Fertig stellen.
Ändern der Einstellungen für das Bluetooth-Gerät
1. Rufen Sie das Fenster Bluetooth-Geräte auf.
2. Klicken Sie auf das Gerät, das Sie ändern möchten, und dann
auf Eigenschaften, um:
•den Namen des Geräts zu ändern (klicken Sie auf Allgemein,
geben Sie einen neuen Nam en e in, und klic ken Si e au f OK).
•einen Dienst zu aktivieren/deaktivieren (klicken Sie auf Die n-
ste, markieren Sie das Kontrollkästchen neben im Feld Dienst
(oder entfernen die Markierung), und klicken Sie auf OK).
Schalten des Computers in den Erkennbar-Modus Für Bluetooth-Geräte
1. Rufen Sie das Fenster Bluetooth-Geräte auf.
2. Klicken Sie auf Optionen (Registerkarte), und machen Sie ein
Häkchen bei Bluetooth-Geräte können diesen Computer
ermitteln (Suche).
3. Machen Sie ein Häkchen bei Benachrichtigung anzeigen,
wenn ein Bluetooth-Gerät eine V erbindung herstellen möchte
(V erbi ndungen), wenn Sie benachrich tigt werden möchten, wenn
ein Bluetooth-Gerät eine V erbindung herstellen möcht e.
Abb. 18
Bluetooth-Geräte -
Optionen
Deutsch
Abb. 17 - Hauptschlüssel-Option
Bluetooth-Konfiguration in Windows Vista - 81

Ausführliches Benutzerhandbuch
Fehlerbehebung
Problem Mögliche Ursache - Lösung
Die Module Wireless-LAN/
Bluetooth können nicht erkannt
werden.
Das Bluetooth-Modul ist aus,
Deutsch
wenn das Gerät aus dem
Energiesparmodus zurückkehrt.
Eine Datei kann nicht auf ein/von
einem angeschlossenen
Bluetooth-Gerät übertragen
werden.
Die mit der PC-Kamera
aufgenommenen Dateien
benötigen zu viel Spei cherplatz.
82 - Fehlerbehebung
Das/Die Modul(e) ist/sind ausgeschaltet. Stellen Sie anhand der Anzeige-LED
Modul an- oder ausgeschaltet ist (siehe “LED-Anzeigen” auf Seite 55). Wenn die AnzeigeLED nicht leuchtet, drücken Sie die Tastenkombination Fn + F11 (WLAN) oder Fn + F12
(Bluetooth), um das/die Modul(e) zu aktivieren (siehe Tabelle 3 auf Seite 57).
Das Bluetooth-Modul ist standardmäßig ausgeschaltet, wenn es aus dem Energiesparmodus
zurückkehrt. Drücken Sie die Tastenkombination (Fn + F12), um das Bluetooth-Modul nach der
Rückkehr aus dem Energiesparmodus wieder einzuschalten.
Die Datenübertragung zwischen dem Notebook und einem Bluetooth-Gerät nur in einer
Richtung möglich ist (eine gleichzeitige Datenübertragung in beide Richtung en wird
nicht unterstützt). Sie können eine Datei vom Notebook auf ein aktiviertes Bluetooth-Gerät nur
dann kopieren, wenn nicht gleichzeitig Dateien vom Gerät zum Computer übertragen werden.
Dieser Vorgang muss zuerst abgeschlossen werden.
Videodateien, die mit hoher Aufl ösung auf genommen werden, erf ordern sehr viel Speicherpl atz.
Beachten Sie, dass das Betriebssystem Windows Vista mindestens 15 GB freien Speicher im
Laufwerk C: der Systempartition benötigt. Es wird empfohlen, die aufgenommenen
Videodateien in einem anderen Laufwerk als C: zu speichern, die Dateigröße der
Aufnahmedateien zu beschränken oder die Auflösung der Videos zu verringern (Optionen/
Options > Video Aufnahme konfigurieren.../Video Capture Pin... > Ausgabegröße).
fest, ob das

Ausführliches Benutzerhandbuch
Bildschirmauflösungs-Fehler (Modelle B & C)
Wenn nach der Wiederaufnahme aus dem Schlafmodus (nur in Windows Vista) entweder die Bildschirmauflösung
geringer ist oder der Bildschirm flimmert, führen Sie die folgenden Schritte aus, um dieses Problem zu beheben. Dieser
Fehler tritt im Zusammenhang mit Windows Vista auf, welches beim Schließen des Notebooks (S3) TMM (Transient Multimon Manager) auslöst. TMM trennt den LCD-Bildschirm vom Betriebssystem und verbindet ihn wieder, wenn das Notebook geöffnet wird. Dieser Vorgang kann dazu führen, dass TMM veranlasst wird, eine alte Bildschirmeinstellung
wiederherzustellen, die dann zum Bildschirmflimmern fü hrt oder eine Änderung der Auflösung zur Folge hat.
1. Klicken Sie Start (Menü), klicken Sie Systemsteuerung (oder zeigen auf Einstel lungen und klicken Systemsteuerung)
und doppelklicken Sie auf Verwaltung (System und Wartung).
2. Doppelklicken Sie auf Aufgabenplanung (Aufgaben planen).
3. Doppelklicken Sie auf Aufgabenplanungbibliot > Microsoft > Windows, und klicken Sie auf MobilePC um die
Systemsteuerung zu öffnen.
4. Klicken Sie mit der rechten Maustaste auf TMM und wählen Sie Deaktivieren,
Systemsteuerungen.
und schließen dan Sie alle
Deutsch
Abb. 19 - System und Wartung (Systemsteuerung)
Fehlerbehebung - 83

Ausführliches Benutzerhandbuch
Technische Daten
Aktualität der technischen Daten
Die in diesem Anhang aufgeführten technischen Daten sind zum Zeitpunkt der Druckstellung richtig. Bestimmte Elemente (insbesondere Prozessortypen/-geschwindigkeiten) können im Rahmen des Entwicklungsplans des Herstellers zwischenzeitlich geändert oder aktualisiert werden. Detailinformationen erhalten Sie bei Ihrem Servicezentrum.
Deutsch
Funktion Technische Daten
Prozessor Typen
Core Logic
Speicher
84 - Technische Daten
Intel Core 2 Duo Prozessor
Micro-FCPGA-Paket (478-pin)
T7300/ T7500/ T7700/ T7800
Intel Core 2 Duo Prozessor
Micro-FCPGA-Paket (478-pin)
T7100
Intel Celeron M Prozessor
Micro-FCPGA-Paket (478-pin)
530/ 540/ 550
VIA VN896CE + VT8237A
Zwei 200-Pin SODIMM-Sockel, Unterstützung von DDRII (DDR2) 533/ 667 Speicher
Speicher auf bis zu 2GB erweiterbar
(65nm) 65 Nanometer-Prozesstechnologie
4 MB L2 Cache & 800-MHz-Systembus (FSB)
2,0/ 2,2/ 2,4/ 2,6 GHz
(65nm) 65 Nanometer-Prozesstechnologie
2 MB L2 Cache & 800-MHz-Systembus (FSB)
1,8 GHz
(65nm) 65 Nanometer-Prozesstechnologie
1 MB L2 Cache & 533-MHz-Systembus (FSB)
1,73/ 1,86/ 2,0 GHz

Ausführliches Benutzerhandbuch
Funktion Technische Daten
Sicherheit
BIOS
LCD-Optionen
Speicher
Audio
Öffnung für Sicherheitsschloß (Typ Kensington) BIOS-Paßwort
Phoenix BIOS (8Mb SPI Flash-ROM) Phoenix BIOS
Modelle A & B Modell C
15,4" - WXGA (1280 x 800) TFT LCD
15,4" - WXGA+ (1440 x 900) TFT LCD
Ein Austauschbares optisches Laufwerk (12,7 mm Höhe) für CDs/DVDs
Eine einfach auszuwechselnde SATA-2,5"-Festplatte (9,5 mm Höhe)
Intel High-Definition-Audio-kompatible Schnittstelle
3D Stereo-Soundsystem
Kompatibel mit Sound-Blaster PRO
™
17,0" - WXGA (1440 * 900) TFT LCD
17,1" - WSXGA+ (1680 * 1050) TFT LCD
17,1" - WUXGA (1920 * 1200) TFT LCD
2 eingebaute Lautsprecher
Eingebautes Mikrofon
Videoadapter Modell A Modelle B & C
VIA VN896CE Integrated Video System (auf dem
Chip)
Unterstützt Analog Monitor Pixel Auflösung bis 2048 *
1536
Integrierter 128-bit 2D/3D Grafikbeschleuniger
Kompatibel mit MS DirectX 9
NVIDIA GeForce 8400M G (NB8M-SE) Discrete Video
System (extern onboard)
TurboCache™ - gesamter Grafikspeicher bis zu 895 MB
(mit Systemspeicher)
128MB DDR3 Videospeicher on Board
Unterstützt Dual-Display und ergonomische Bildwiederholfrequenzen von bis zu 2048 * 1536
Kompatibel mit MS DirectX 10
Deutsch
Technische Daten - 85

Ausführliches Benutzerhandbuch
Funktion Technische Daten
Tastatur
Zeigegerät
Schnittstellen
Deutsch
Kartenleser
Kommunikation
ExpressCardSteckplatz
Energieverwaltung
“Win Key”-Tastatur
Eingebautes TouchPad (integrierte Rolltastenfunktion)
Drei USB 2.0-Anschlüsse
Eine Schnittstelle für externen Monitor
Eine Lautsprecher/Kopfhörer-Ausgangsbuchse
Eine Mikrofon-Eingangsbuchse
Eine Line-Eingangsbuchse (Line-In)
Festes 7-in-1 Kartenleser-Modul (MS/ MS Pro/ SD/ Mini SD/ MMC/ RS MMC/ MS Duo)
Hinweis: MS Duo/ Mini SD/ RS MMC Karte erfordert PC-Adapter
56K MDC-Modem (V.90- und V.92-kompatibel)
10Mb/100Mb Ethernet LAN
USB 802.11b/g Wireless LAN-Modul (Option)
ExpressCard/54(34)-Steckplatz
Unterstützt ACPI v2.0
Eine S/PDIF-Ausgangsbuchse
Eine RJ-11 Buchse für Modem
Eine RJ-45-Buchse für LAN
Eine DC-Eingangsbuchse
USB Bluetooth 2.0 + EDR-Modul (
1,3M oder 2,0M Pixel USB PC-Kamera-Modul (Werk-
seitige Option)
Werkseitige Option
)
86 - Technische Daten

Ausführliches Benutzerhandbuch
Funktion Technische Daten
Stromversor-
gung
Umgebungsbedingungen
Abmessungen
und Gewicht
Optional
Modelle A & B Modell C
AC/DC-Adapter für den gesamten S pannungsbe reich
AC-Eingang: 100-240 V, 50-60Hz
DC-Ausgang: 19V, 3,42A oder 18,5V, 3,5A (65W)
Akkupack mit Smart-Lithium-Ionen (6- Zellen), 4000mAH (Alle Modelle)
oder
Akkupack mit Smart-Lithium-Ionen (6-Zellen), 4400mAH (Modelle B & C)
Temperatur
In Betrieb: 5ºC – 35ºC
Bei Aufbewahrung: -20ºC – 60ºC
AC/DC-Adapter für den gesamten Spannungsbereich
AC-Eingang: 100-240 V, 50-60Hz
DC-Ausgang: 19V, 4,74A (90W)
Relative Luftfeuchtigkeit
In Betrieb: 20 – 80%
Bei Aufbewahrung: 10 – 90%
Modelle A & B Modell C
360 (B) x 267 (T) x 25,4-34 (H) mm
2,6 kg mit 6-Zellen-Akku
Optionen für optische Laufwerks-Module:
Kombiniertes-Laufwerk
DVD-Dual (Super Multi)-Laufwerk
USB 802.11b/g Wireless LAN-Modul
397 (B) x 280,5 (T) x 39 (H) mm
2,98 kg +/- 3 % mit 6-Zellen-Akku und ohne optionale
Module
Fingerabdruckleser
(Werkseitige Option - nur für Modelle B & C)
1,3M oder 2,0M-Pixel USB PC-Kamera-Modul (Werk-
seitige Option)
USB Bluetooth 2.0 + EDR-Modul (Werkseitige Option)
Deutsch
Technische Daten - 87

Ausführliches Benutzerhandbuch
Deutsch
88

Guide Utilisateur Concis
Avertissement
La compagnie se réserve le droit de revoir cette publication ou de modifier son contenu sans préavis. Les informations
qu’elle contient sont pour référence seul emen t et n’en ga gent pas la responsabilité du fabricant ou d’aucun distributeur. Ils
n’assument aucune responsabilité en cas d’erreurs ou d’imprécisions qui pourraient se trouver dans cette publication et ne
sont en aucun cas responsable d’aucunes pertes ou dommages résultant de l’util isation (corre cte ou incorrecte) de cette publication.
Cette publication et les logiciels qui l’accompagnent ne peuvent pas, dans leur intégrité ou en partie, être reproduits, traduits, transmits ou convertis en format électronique sans l’autorisation préalable du vendeur, du fabricant ou des créateurs
de cette publication, à l’exception de copies conservées par l’utilisateur pour archive.
Les noms de marques ou de produits mentionnés dans cette publication peuvent ou pas être protégés et/o u être des marques
déposées par leur compagnies respectives. Ils sont mentionnés dans un but d’i dentification seulemen t et ne signi fient pas
l’approbation de ce produit ou de son fabricant.
© Novembre 2007
Marques déposées
Ce produit incorpore une technologie de protection des droits d'auteur protégée par certains brevets américains et autres
droits sur la propriété intellectuelle appartenant à Macrovision Corporation et d’autres prop riétaires légitimes. L’utilisation
de cette technologie de protection des droits d'auteur doit être autorisé par Macrovision Corporation, et n’est prévu que dans
un cadre privé ou limité, à moin s d’obtenir l ’autorisation de Ma crovision Corporation. L'ingénierie inverse et le désassemblage sont interdits.
Français
Intel, Celeron, et Intel Core sont des marques déposées ou enregistrées d’Intel Corporation déposées.
Avertissement - 89

Guide Utilisateur Concis
A propos de ce Guide Utilisateur Concis
Ce guide rapide est une brève introduction à la mise en route de votre système. l s’agit d’un supplément, et non pas d’une
alternative au Manuel de l’Utilisateur en Anglais complet au format Adobe Acroba t sur le CD-ROM Device Drivers &
Utilities + User's Manual fourni avec votre ordinateur. Ce CD-ROM contient aussi les pilotes et utilitaires nécessaires au
fonctionnement correct de votre ordinateur portable.
Certains ou tous les éléments de l’ordinateur peuvent avoir été déjà instal lés. Si ce n’est pas le cas, ou si vous avez l’int ention de reconfigurer (ou réinstaller) des portions du système, reportez-vous au Manuel de l’Utilisateur complet. Le CD-
ROM Device Drivers & Utilities + User’s Manual ne contient pas de système d’exploitation.
Informations de contrôle
Des mises en garde et informations de contrôle sont incluses dans le Manuel de l'Utilisateur complet qui se trouve sur le
CD-ROM Device Drivers & Utilities +User’s Manual.
Francais
Utilisation des appareils sans fil à bord d'un avion
L'utilisation de tout appareil électronique de transmission est généralement interdite à bord d'un avion. Assurez-vous que les modules sans fil sont éteints si vous utilisez l'ordinateur à bord d'un
avion.
90 - A propos de ce Guide Utilisateur Concis

Guide Utilisateur Concis
Instructions d’entretien et d’utilisation
L ’ordinateur portable est robuste, mais il peut toutefois être endommagé. Afin d’éviter ceci, veuillez suivre ces recommandations :
• Ne le laissez pastomber. Ne l’exposez à aucun choc ou vibration. Si l’ordinateur tombe, le boîtier et d’autres éléments pour-
raient être endommagés.
• Gardez-le sec. Ne le laisser pas surchauffer. Tenez l’ordinateur et son alimentation externe à distance de toute source de chaleur.
Il s’agit d’un appareil électrique. Si de l’eau ou tout autre liquide venait à pénétrer à l’intérieur de votre ordinateur, il pourrait être
sérieusement endommagé.
• Evitez les interférences. Tenez l’ordinateur à distance de transformateurs à haute capacité, moteurs électriques, et autres appareils
générateurs de champs magnétiques importants. Ceux-ci peuvent gêner ses performances normales et endommager vos données.
• Suivez les procédures appropriées d’utilisation de votre ordinateur. Arrêtez l’ordinateur correctement, et fermez tous vos programmes (n’oubliez pas d’enregistrer votre travail). N’oubliez pas d’enregistrer vos données régulièrement puisqu’elles peuvent
être perdues si la batterie est vide.
• Soyez prudent lorsque vous utilisez des périphériques.
Révision
N’essayez pas de réaliser les opérations de révision de votre ordinateur par vous-même. Le faire pourrait annulez votre
garantie et vous exposez à des chocs électriques. Pour toute opération de révision, adressez-vous à des personnes agrées.
Débranchez votre ordinateur de toute source d’alimentation. Puis adressez-vous à des professionnels agréés si vous rencontrez l’une des situations suivantes :
• S i le cordon d’alimentation ou l’adaptateu r CA /CC est endommagé, abimé ou effiloché.
• Si votre ordinateur a été exposé à la pluie ou tout autre liquide.
• Si votre ordinateur ne fonctionne pas normalement bien que vous ayez suivi les instructions de mise en marche à la lettre.
• Si votre ordinateur est tombé par terre ou a été endommagé de quelque manière que ce soit (ne touchez pas le liquide qui sortirait
de l’écran LCD au cas où celui-ci serait cassé : il est très dangereux et contient des produits qui pourraient vous empoisonner).
• Si une odeur inhabituel, de la chaleur ou de la fumée apparaissait sortant de votre ordinateur.
Français
Instructions d’entretien et d’utilisation - 91

Guide Utilisateur Concis
Sécurité electrique
Votre ordinateur possède des besoins en énergie propre :
• Utilisez uniquement un adaptateur CA/CC agréé avec votre ordinateur.
• Votre adaptateur CA/CC peut avoir été conçu pour les voyages internationaux mais il lui faut tout de même une source de courant
régulière et ininterrompue. Si vous n’êtes pas sûr des caractèristiques du réseau électrique local, consultez notre représentant de
service ou la compagnie électrique locale.
• L’adaptateur CA/CC que vous utilisez, peut être à 2 broches ou à 3 broches, comprenant une prise de terre. Cette prise de terre est
un des éléments de sécurité importants, ne vous en passez pas ! Si une prise murale compatible n’est pas disponible, demandez à un
électricien qualifié de vous en installez une.
• Quand vous voulez débrancher le cordon d’alimentation, ne tirez pas sur le fil, mais attrapez la tête de la prise.
• Assurez-vous que la prise murale et la (les) rallonge(s) que vous utilisez peuvent supporter la consommation électrique de tous les
appareils qui y sont reliées.
• Avant de nettoyez votre ordinateur, assurez-vous qu’il n’est relié à aucune source de courant.
Francais
Mise en garde pour le sécurité electrique
Avant d’entreprendre des procédures de mise à niveau, assurez-vous d’avoir éteint l’ordina-teur, et déconnecté tous les périphériques et
câ-bles (y compris les cor-dons téléphoniques). Il est également conseillé d’enlever la batterie afin d’éviter d’allumer l’ap-pareil par mégarde.
Eteignez avant de partir en voyage
Assurez-vous que votre notebook est complètement éteint avant de le mettre dans un sac de voyage (ou tout autre bagage similaire). Si
vous placez le notebook allumé dans un sac de voyage, cela peut obstruer la (les) ventilation(s). Pour éviter que votre ordinateur ne surchauffe, assurez-vous que rien n'obstrue la (les) ventilation(s) quand l'ordinateur est en cours d'utilisation.
Nettoyage
• N’appliquez pas de produit de nettoyage directement sur l’ordinateur, utilisez un bout de tissu propre et souple.
• N’utilisez pas de produit de nettoyage volatil (des distillés pétrôle) ou abrasifs sur aucun des éléments de l’ordinateur.
92 - Instructions d’entretien et d’utilisation

Guide Utilisateur Concis
Précautions à prendre pour la batterie
• Utilisez uniquement des batteries conçues pour votre ordinateur. Un mauvais type de batterie peut provoquer des explosions, des
fuites et/ou endommager votre ordinateur.
• Ne continuez pas d'utiliser une batterie qui est tombée, ou qui paraît endommagée (ex: tordue ou vrillée) d'une manière quelconque.
Même si l'ordinateur continue de fonctionner avec la batterie en place, cela peut détériorer le circuit, pouvant déclencher un incendie.
• Rechargez les batteries en utilisant le système de l’ordinateur portable. Un rechargement incorrect peut provoquer l’explosion de la
batterie.
• N’essayez jamais de réparer la batterie. Au cas où votre batterie aurait besoin d’être réparée ou changée, veuillez vous adresser à
votre représentant de service ou à des professionnels qualifiés.
• Gardez les batteries endommagées hors de portée des enfants et débarrassez-vous en le plus vite possible. Veuillez toujours jeter les
batteries avec précautions. Les batteries peuvent exploser ou se mettre à fuire si elles sont exposées au feu ou si elles sont manipulées ou jetées d’une façon non appropriée.
• Gardez la batterie loin des appareils métalliques.
• P lacez un morceau de scotch sur les contacts de la batterie avant de la jeter.
• Ne touchez pas les contacts de la batterie avec les mains ou avec des objects en métal.
Elimination de la batterie & avertissement
Le produit que vous venez d’acheter contient une batterie rechargeable. Cette batterie est recyclable. Quand elle n’est plus utilisable, en fonction des lois locales des différents états et pays, il peut être illégal de s’en débarrasser en la jetant avec les ordures
ménagères normales. Vérifiez auprès du responsible local de l’élimination des déchets solides de votre quartier pour vous informer des possibilités de recyclage ou de la manière appropriée de la mettre au rebut.
Il existe un danger d’explosion si la batterie est replacée de façon incorrecte. Remplacez-la uniquement par des batteries de
même type ou de type équivalent, recommendé par le fabricant. Eliminez les batteries usagées selon les instructions du fabricant.
Français
Instructions d’entretien et d’utilisation - 93

Guide Utilisateur Concis
Veuillez noter que vous devriez toujours éteindre votre ordinateur en utilisant la
commande Arrêter du
menu du bouton de ver-
rouillage de Windows Vis-
ta. Cette précaution évite
des problèmes de disque
dur ou de système.
Remarquez que les ordina-
Francais
teurs de Modèle C comportent des loquets sur le
couvercle/LCD. Déplacez
le loquet gauche sur la position déverrouillée, et faites coulisser le loquet droit
(et maintenez-le) tout en
soulevant le couvercle.
Arrêt
Modèle C
Guide de démarrage rapide
1. Enlevez tous les emballages.
2. Posez l’ordinateur sur une surface stable.
3. Connectez fermement les périp hériques que vous souhaitez utiliser avec votre ordinateur portable
(par ex. clavier et souris) à leurs ports respectifs.
4. Branchez l'adaptateur CA/CC à la prise d'entrée CC à l’arrière de l’ordinateur, branchez ensuite le
cordon secteur à une prise murale, puis à l’adaptateur CA/CC.
5. D'une main, soulevez soigneuse ment le couverc le/LCD pour obtenir un angl e de vision confortable,
de l'autre main (comme illustré dans la Figure 1 ci-dessous) maintenez la base de l'ordinateur
(Remarque : Ne soulevez jamais l'ordinateur par le couvercle/LCD).
6. Pressez le bouton de mise en marche pour allumer.
Figure 1
Ouvrir le couvercle/LCD/ordinateur avec un adaptateur CA/CC branché
94 - Guide de démarrage rapide
 Loading...