


Contents
About this Quick Guide ....................................................................1
System Startup ..................................................................................3
System Map: Front View with LCD Panel Open .............................4
System Map: Front, Left, Right, & Rear Views ............................. ..5
System Map: Bottom View . ..............................................................6
Keyboard & Function Keys ..............................................................7
3.75G/HSPA Module ........................................................................8
Driver Installation ......................................... ....................................9
Troubleshooting ..............................................................................10
Specifications ................. .................................... ............................. 11
Inhalt
Über diese Kurzanleitung ...............................................................13
Schnellstart ................... .................... .................. ................. ............15
Systemübersicht: Ansicht von vorne mit geöffnetem
LCD-Bildschirm .............................................................................16
Systemübersicht: Ansicht von vorne, links, rechts und hinten .......17
Systemübersicht: Ansicht von unten ...............................................18
Tastatur & Funktionstasten .............................................................19
3.75G/HSPA-Modul .......................................................................20
Installation der Treiber ....................................................................21
Fehlerbehebung ...............................................................................22
Technische Daten ............................................................................23
Sommaire
A propos de ce guide rapide ............................................................25
Guide de démarrage rapide .............................................................27
Carte du système: Vue de face avec l’écran LCD ouvert ...............28
Carte du système: Vues de face, gauche, droite & arrière ..............29
Carte du système: Vue d’en dessous ...............................................30
Clavier & touches fonction ............................................. ................31
Module 3.75G/HSPA ......................................................................32
Installation du pilote ........................................................................33
Dépannage ......................... ...................................... ........................34
Spécifications ..................................................................................35
Contenidos
Acerca de esta guía rápida ...............................................................37
Guía rápida para empezar ................................................................39
Mapa del sistema: Vista frontal con panel LCD abierto .................40
Mapa del sistema: Vistas frontal, izquierda, derecha e posterior ....41
Mapa del sistema: Vista inferior .....................................................42
Teclado & teclas de función ..................... .......................................43
Módulo 3.75G/HSPA ......................................................................44
Instalación de controladores ............................................................45
Solución de problemas ....................................................................46
Especificaciones ................ ................................................. .............47
Sommario
Informazioni su questa guida rapida ...............................................49
Guida di avvio rapido ......................................................................51
Descrizione del sistema: Vista anteriore con pannello
LCD aperto ......................................................................................52
Descrizione del sistema: Vista anteriore, sinistra,
destra e posteriore ...........................................................................53
Descrizione del sistema: Vista inferiore ..........................................54
Tastiera & tasti funzione ..................... ............................................55
Modulo 3.75G/HSPA ......................................................................56
Installazione driver ...... ....................................................................57
Risoluzione dei problemi ................................................................58
Specifiche tecniche ..........................................................................59

Overview
The docking station provides your computer with an easy connectable desktop environment when portability is not required. This allows for easy connections to external displays, USB devices (with a full range of extra USB ports), audio
devices and provides a battery charging facility.
Model Differences
This docking station series includes two different model types that differ as indicated in the table below.
Feature Model A Model B
English
Video Adapter
Hard Disk Backup
Power Supply
120W (19V/6.3A) AC/DC Adapter 90W (19V/4.74A) AC/DC Adapter
Yes None
Yes Optional
Table 1 - Model Differences
Compatibility
Note that this docking station is compatible with particular compatible computer models with the appropriate docking
connector only. Please contact your service center for full details.
1

Instructions for Care and Operation
The docking station is quite rugged, but it can be damaged. To
prevent this, follow these suggestions:
• Don’t drop it, or expose it to shock. If the device falls, the case and
the components could be damaged.
• Keep it dry, and don’t overheat it . Keep the device and power supply
away from any kind of heating element. This is an electrical appliance.
If water or any other liquid gets into it, the device could be badly dam-
English
aged.
• Avoid interference. Keep the device away from high capacity trans-
formers, electric motors, and other strong magnetic fields. These can
hinder proper performance and damage your data.
• Follow the proper working procedures for the device.
Servicing
Do not attempt to service the device yourself. Doing so may violate your warranty and expose you and the device to electric
shock. Refer all servicing to authorized service personnel. Unplug
the device from the power supply. Then refer servicing to qualified service personnel under any of the following conditions:
• When the power cord or AC/DC adapter is damaged or frayed.
• If the device has been exposed to any liquids.
• If the device does not work normally when you follow the operating
instructions.
• If the device has been dropped or damaged.
• If there is an unusual odor, heat or smoke coming from your device.
Safety Information
• Only use an AC/DC adapter approved for use with this device.
• Before cleaning the device, make sure it is disconnected from any
external power supplies, peripherals and cables.
• Use a soft clean cloth to clean the device, but do not apply cleaner
directly to the device. Do not use volatile (petroleum distillates) or
abrasive cleaners on any part of the device.
2

Computer and Docking Station
Hot Docking or Cold Docking
If your docking station includes the video adapter option (Model A), then the computer must be cold docked to the docking station
(i.e. the computer must be powered off before docking).
If your docking station does not include the video adapter option (Model B), then the computer may be hot d ocked (i.e. the computer
is powered on before docking) or cold docked to the docking station (i.e. the computer must be powered off before docking).
Hot Docking/Hot Undocking & Power Saving Modes
If the computer is in a power-saving state (Sleep or Hibernate), or is resuming from a power saving state, do not attempt to hot dock
or hot undock the system.
Moving the Docking Station
Note that if the notebook is docked with the docking station, do not attempt to move the docked unit in order to avo id losing connection. If you wish to move the docking station, then make sure you undock the notebook from the docking station before doing so.
The computer may hot or cold dock/undock with the docking station (see the note below), i.e. the computer may be
powered on (hot docking/undocking) or powered off (cold docking/undocking) when docking or undocking. However
if you intend to hot dock/undock the system then make sure that the hot key driver, provided on the computer’s Device
Drivers & Utilities + User’s Manual disc, is installed.
Docked System Power
The system power for a docked unit should be provided only by the docking station’s AC/DC adapter plugg ed in to the
DC-In jack at the rear of the docking station (make sure the computer’s AC/DC adapter is not used at any time
when the computer is docked). Follow the instructions on the next pages to safely dock and undock your computer
with the docking station.
English
3

Docking the Computer with the Docking Station
1
1
1. Remove all packing materials and place the docking station on a stable surface.
2. Securely attach any peripherals you want to use with the docking station (e.g. keyboard and mouse) to their ports.
3. Attach the AC/DC adapter to the DC-In jack at the rear of the docking station, and then plug the AC power cord into an outlet, and
connect the AC power cord to the AC/DC adapter.
4. The power button LED on the docking station will be orange.
English
Figure 1 - Docking Station with AC/DC Adapter Plugged
5. Make sure the computer’s hot key driver is installed if you intend to hot dock the system.
4

6. Close the notebook computer’s lid/LCD and turn the computer over (if you are using the optional 9 cell battery make sure you
2
2
Docking Port Cover
Make sure you keep the cover closed when the computer is not docked in the station. This will help prevent foreign objects and/
or dust getting in to the contact area.
remove the battery before attempting to dock the computer with the docking station).
7. Slide the notebook computer’s docking port cover latch in the direction of the arrow at point to open the cover (failure to open the
cover of the docking port before connecting the computer to the docking station may result in irreparable damage to the connector on
the docking station).
English
Figure 2 - Opening the Docking Port
5

8. Make sure that the notebook computer’s AC/DC adapter is NOT ATTACHED to the computer’s DC-In jack.
AC/DC Adapter
Use only the docking station’s AC/DC adapter plugged-in to the docking station’s DC-In jack to power the computer.
If you use only the computer’s AC/DC adapter to power the docked system, the power button LED will still indicate power, but
there will not be sufficient power for the whole system.
English
9. If your docking station includes the video adapter (Model A) make sure the notebook computer is POWERED OFF (check the
computer is not in Sleep mode) before docking the computer with the station (see Hot Docking or Cold Docking on page 3).
6
Figure 3 - Docking Station with AC/DC Adapter Plugged-In & Computer Docked

10. Ensure that the lock switch on the right side of the docking station is in the unlock position (the lock switch LED will not display any
3
4
Lock Switch LED
Slide the lock switch on the right of the docking station to lock the docked system. The lock switch LED will turn green.
3
4
color).
11. Carefully hold the notebook computer at an angle of approximately 45 degrees, and rest it against the rubber stoppers on the docking
station.
12. Align the docking marker on the top of the computer’s lid/LCD with the docking marker on top of the docking station .
English
Figure 4 - Align the Docking Markers and Slide the Lock Switch
13. Once aligned, firmly, but carefully, press the computer down onto the docking station so that the docking connectors line up.
14. Slide the lock switch on the side of the computer in to the lock position and the lock switch LED will turn green.
15. If the system was hot docked then the power button LED on the docking station will be green.
16. If the system was cold docked then the power button LED on the docking station will be orange.
17. The LED indicators on the computer will then display the power status of the computer.
7

18. If the system was cold docked you will need to press the power button on the docking station to turn both the computer and docking
LAN Jack & Docking
Note that when the computer is docked
with the docking station, the notebook’s
LAN Jack can no longer be used. When
the system is docked use the docking
station’s LAN jack.
station “on” (alternatively you may open the notebook computer’s lid/LCD and press the notebook’s power button to turn the system
on).
English
Figure 5 - Press the Power Button (if cold docking)
19. The power button LED on the docking station will turn green when the system is on.
20. If you have connected an external monitor, keyboard and mouse to the appropriate ports you can use the external devices without
opening the lid/LCD of the notebook computer.
21. You can use the notebook computer’s keyboard if you do not have an attached keyboard.
22. (Model A Only) You must use one of the ports on the video controller to connect your external display, and you cannot use
the notebook computer’s LCD as the display device.
23. (Model B Only) You can also use the compu ter’s LCD if you do not have a display att ached to the externa l monitor po rt, or DVI-D Port.
8

Undocking the Computer from the Docking Station
Hot Undocking or Cold Undocking
If your docking station includes the video adapter (Model A), then the computer must be cold undocked
from the docking station (i.e. the computer must be powered off before undocking).
If your docking station does not include the video adapter (Model B), then the computer m ay be hot undocked (i.e. the computer is still powered on before undocking) or cold undocked from the docking station (i.e. the computer must be powered off before undocking).
Shutdown
Note that you should always shut your computer down by choosing the Shut Down command from the
Start menu in Windows. This will help prevent hard disk or system problems.
If you want to hot undock the system make sure the computer’s hot key driver is installed.
1. If your docking station includes the video adapter (Model A) you will need to shut the computer down before undocking the system
(see below).
2. If your computer includes the video adapter (Model A) then shut the computer d own as per the norm al Windows shutdown pr ocedure.
English
9

Cold Undocking the System
123
3
2
1
1. Shut the computer down as per the normal Windows shutdown procedure (select Shut Down from the Start menu in Windows 7).
2. If the system is powered off, but still connected to the docking station’s AD/DC adapter, then the power button LED on the docking
station will be orange.
3. Slide the lock switch on the side of the docking station in to the unlock position, and the green light on the lock switch LED will go
off.
4. Press the Eject button on the docking station while carefully holding the notebook computer with one hand.
5. You can then lift the notebook computer off the docking station.
6. After disconnecting the computer from the docking station, slide the docking port cover latch in the direction of the arrow.
English
Figure 6 - Slide the Switch to Unlock & Press the Eject Button (Close the Docking Port)
Hot Undocking the System (Model B Only)
1. With the docked system powered on, click the taskbar icon and select Safely Remove Hardware and Eject Media.
2. Select Eject Docking Station.
3. The Undock Complete message will appear in the taskbar.
4. The power button LED on the docking station will be orange (the I/O ports and connectors on the docking station are no longer
operable).
10

Note: If you wish to reactivate docking at this point see Re-Activating Docking (Model B Only) on page 12.
123
3
2
1
Running Applications & Eject Docking Station
Note that when you select Eject Docking Station the system will close active applications and power
off the docking station and computer. This also includes any active backup jobs being run by the Backup
Now EZ application.
Figure 7 - Slide the Switch to Unlock & Press the Eject Button (Close the Docking Port)
5. Slide the lock switch on the side of the docking station in to the unlock position, and the green light on the lock switch LED will turn
off.
6. Press the Eject button on the docking station while carefully holding the notebook computer with one hand.
7. You can then lift the notebook computer off the docking station.
8. After disconnecting the computer from the docking station, slide the docking port cover latch on the bottom of the notebook
computer in the direction of the arrow.
English
11

Re-Activating Docking (Model B Only)
If you have selected to Safely Remove Hardware and Eject Media from the taskbar in Windows, and have not yet
unlocked and ejected the computer, you can reactivate the docking.
1. Click the taskbar icon and right-click the hot key icon .
2. Select Docking.
3. Select Active Docking.
4. The system will now be docked and the I/O ports and connectors on the docking station will be operable.
English
12

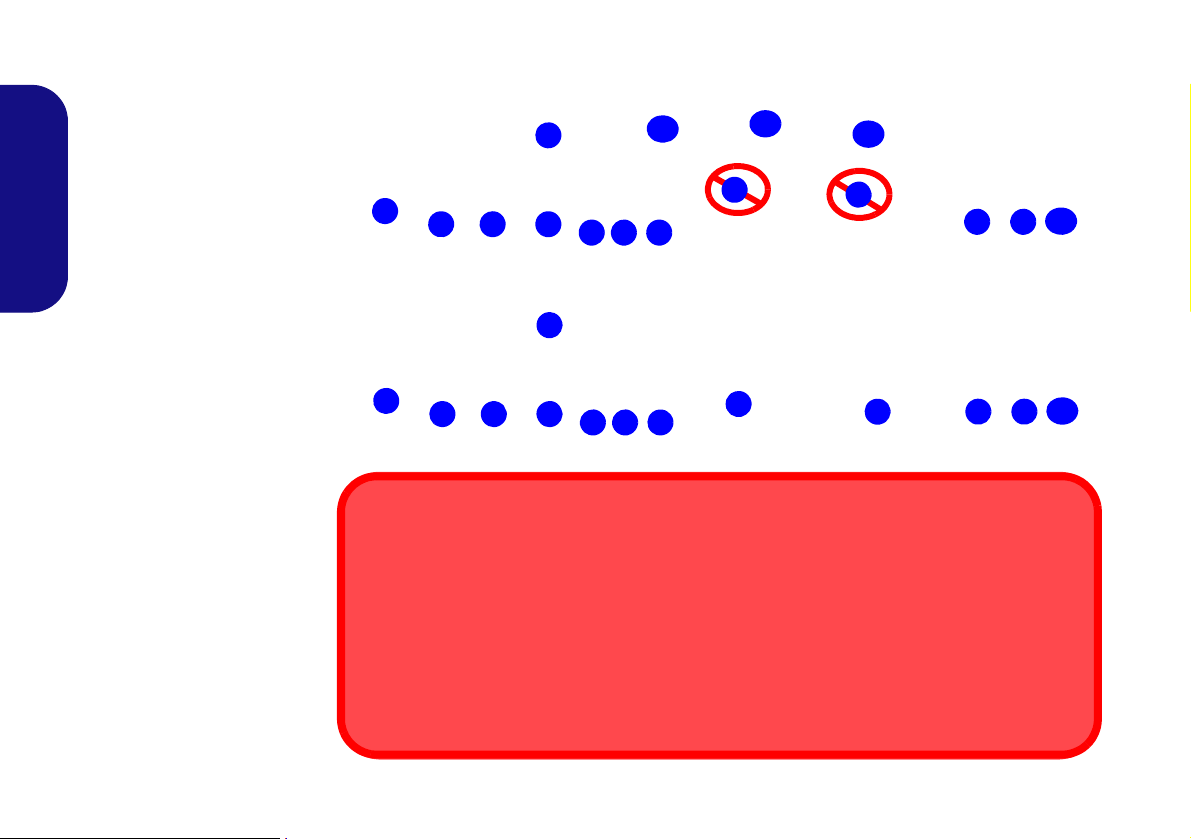
System Map: Front View
Figure 8
Front View
1. Power Button LED
2. Backup Button
(For Model A and
optional for Model B)
3. Eject Button
4. Docking Port
5. Retaining Pins
6. Eject Pins
2
5
1
4
6
3
5
6
English
13
System Map: Rear View
Figure 9
Rear View
1. Security Lock Slot
2. USB 2.0 Ports
3. Headphone Jack
4. Microphone Jack
5. S/PDIF-Out Jack
6. DVI-D Out Port (Digital) (Model B Only)
7. External Monitor Port
(Model B Only)
8. Serial (COM) Port
9. RJ-45 LAN Jack
10. DC-In Jack
The following ports are
provided with the NVIDIA video adapter:
11. Display Port
12. DVI-D Out Port (Digital)
13. HDMI-Out Port
2
1
3
11
12
13
Model A (Rear View with Video Controller)
2 2
2
4 5
8 9
10
Video Ports
If your purchase configuration includes the video adapter (Model A), make sure you connect any
video cables to the ports provided by the video adapter ( i.e. ports 11, 12 or 13 in the figure above)
and not to the lower DVI-D Port 6 or external monitor port 7 (these ports do not function with
the video adapter).
LAN Jack & Docking
Note that when the computer is docked with the docking station, the notebook’s LAN Jack can no
longer be used. When the system is docked use the docking station’s LAN jack.
2
1
3
6
7
2 2
2
4 5
8 9 10
Model B (Rear View without Video Controller)
6
7
English
14
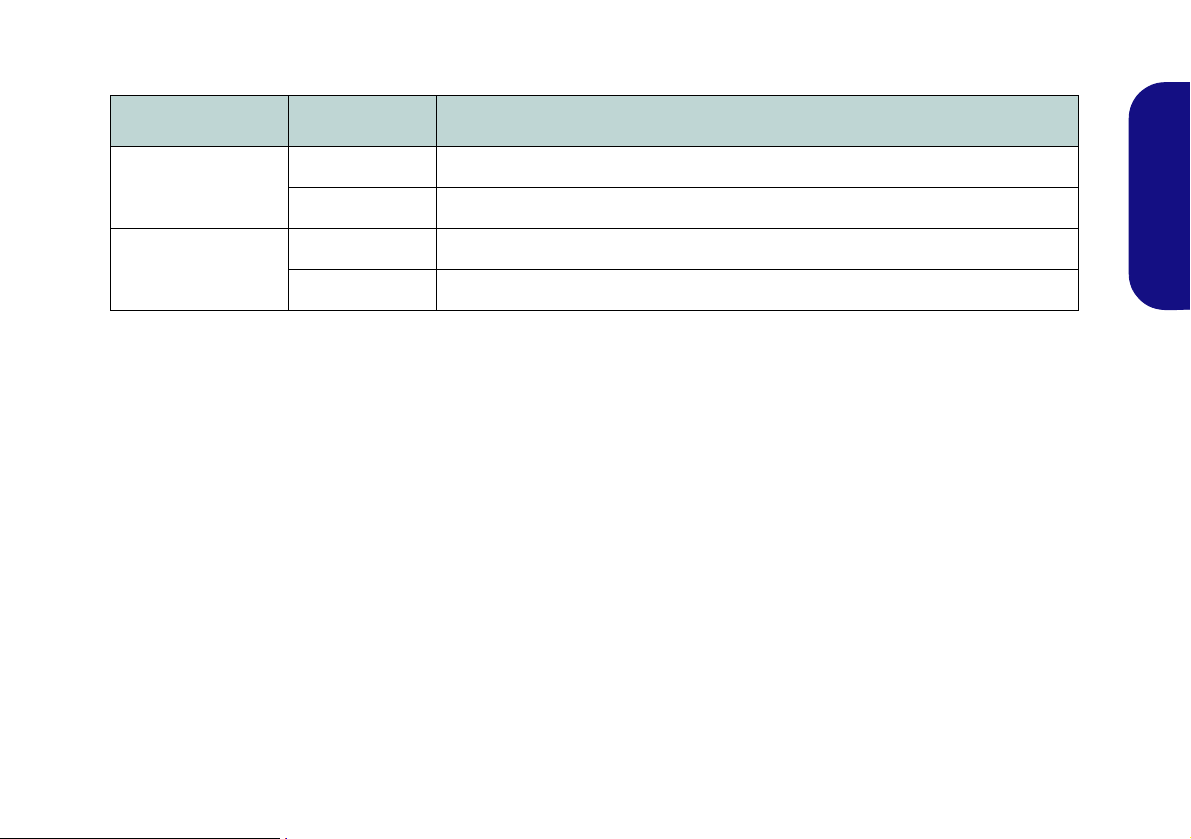
Power Button LED & Lock Switch LED
Icon Color Description
Orange The AC/DC Adapter is Plugged In and the Computer is Off or in Hibernate Mode*
Green The Docking St ation is On or in Sleep Mode
Green The computer is docked with the docking station and locke d
Lock Switch LED
Off The computer is not docked with the docking station
Table 2 - Power Button LED & Lock Switch LED
*To confirm the computer’s power status check the LED Power Indicators on the computer itself.
English
15

System Map: Left & Right Views
Figure 10
Left & Right Views
1. Vent
2. USB 2.0 Ports
3. Eject Button
4. Lock Switch LED
5. Lock Switch
2
1
4
2
2
5
3
English
16

Power Button Configuration
Hot Docking/Hot Undocking &
Power Saving Modes
If the computer is in a power-saving
state (Sleep or Hibernate), or is resuming from a power saving state,
do not attempt to hot dock or hot undock the system.
To prevent your computer from entering a power-saving state if you choose to work with the lid/LCD closed, then it
may be necessary to redefine what the computer is set to do if the lid/LCD is closed when plugged in.
1. Click Start, and click Control Panel (or point to Settings and click Control Panel).
2. Click Power Options (Hardware and Sound).
3. Click Choose what closing the lid does (in the left pane).
4. Set the When I close the lid: option when the computer is plugged in to Do nothing.
5. Click Save Changes and close the control panel.
Figure 11 - Power Options (Choose what closing the lid does)
English
17

NVIDIA Video (Model A only)
2
1
3
Video Adapter Ports
Install the video driver as instructed below.
NVIDIA Video Driver Installation
1. Make sure the system is docked with the docking station and an external display is connected to any one of the video controller
ports (you must use the video adapter ports to connect an external display and not the lower DVI-D Out Port or external monitor port).
English
Figure 12 - Rear View with Video Adapter
2. Insert the Device Drivers & Utilities + User’s Manual disc provided with the docking station.
3. Click Start (menu) and click Computer.
4. Double-click the DVD disc.
5. Double-click to open each of the following folders:
\Drivers\01_Nvidia\257.30.
6. Double-click to open one of the following folders depending upon your operating system version:
\32bit (for Windows 7 32-bit OS).
\64bit (for Windows 7 64-bit OS).
7. Double-click setup (Application).
8. Click Next > Next.
9. Click Finish to restart the computer.
18

NVIDIA Control Panel
The NVIDIA Control Panel provides additional video
configuration controls and tools which allow quick access
to features such as display configuration, 3D Settings and
Help menus.
To access the NVIDIA Control Panel
1.
Click
Start
and click
2. Click to select NVIDIA Physx Properties.
All Programs > NVIDIA Corporation.
OR
1. Right-click the desktop and select NVIDIA Control Panel from
the menu.
:
Display Devices
Note that you can use an appropriate cable connected to
any of the display ports on the video adapter (do not use
the lower DVI-D or external monitor ports) to connect an
external display. You may have up to 3 displays con-
nected to the Display Port, DVI-D Out Port and
HDMI-Out Port, but the GPU will only support the
use of 2 displays at a time.
English
19

Hard Disk Backup
(For Model A and optional for Model B)
Note that the hard disk is intended for backup purposes
only, so do not install any operating system to the back-
up hard disk on the docking station.
Backup Now EZ Installation
English
1. Insert the Device Drivers & Utilities + User’s Manual disc provided with the docking station.
2. Click Start (menu) and click Computer.
3. Double-click the DVD disc.
4. Double-click to open each of the following folders:
\Drivers\02_Backup
5. Double-click Setup (Application).
6. Select the installation language and click OK.
7. Click Next.
8. Click the button to accept the license agreement and click
Next.
9. Click Next > Next.
10. Click Finish to restart the computer.
11. Access the Backup Now EZ application from the Start menu
(Start > Programs/All Programs > NTI Backup Now EZ), or
by double-clicking the Backup Now EZ icon on the desktop
.
Backup Now EZ Application
1. Access the Backup Now EZ application from the Start menu
(Start > Programs/All Programs > NTI Backup Now EZ), or
by double-clicking the Backup Now EZ icon on the desktop
.
2. On the first run of the program you will be asked to register
(recommended).
3. The Welcome screen will now appear (this will appear on the
first run of the program, after this you will be taken to the main
menu screen).
4. The main screen will display two backup jobs and options that
allow you to modify and enable/disable the jobs.
5. If the Backup Location (External Disk) shows Unavailable
then click Modify to access the backup destination options.
6. You can set a Destination Capacity Alert to notify you when
the backup hard disk has reached the percentage capacity
selected.
7. You may also encrypt (password protect) your backup jobs,
however do not forget your password.
8. Click Finish to confirm the backup destination options.
9. The program will prompt you to select whether you want to run
the job now or not.
20

Starting a Backup Job
1
1
Help
Click the Help top menu and select Help Topics to access the list of contents etc.
1. Press the Backup button on the docking station.
Figure 13 - Backup Button
2. Backup Now EZ will be launched and will display the two
backup jobs:
• File and Folder Backup
• Complete System Backup
3. You can adjust the settings for either of the jobs by clicking on
Modify.
4. If the backup jobs are selected they will have a green tick
alongside them.
5. The top menu will have three options (Action, Tools and
Help).
6. Click to select any of the menu options sub-menus.
7. Click the Backup button to begin executing any selected
backup jobs (if the destination drive is not available then an
error message will appear).
English
21
Specifications
Latest Specification Information
The specifications listed in this section
are correct at the time of going to
press. Certain items may be changed,
delayed or updated due to the manufacturer's release schedule. Check
with your service center for details.
English
Interface
Seven USB 2.0 Ports
(Model B Only) One External Monitor Port
(Model B Only) One DVI-D Out Port
One Headphone-Out Jack
One Microphone-In Jack
One S/PDIF-Out Jack
One RJ-45 LAN Jack
One Serial (COM) Port
One Docking Port
One DC-In Jack
=======================================
The Following Ports are included with the
NVIDIA® Video Adapter
(Model A Only) One DVI-D Out Port
(Model A Only) One HDMI Out Port
(Model A Only) One Display Port
Storage
One Changeable 2.5" 9.5 mm (h) SATA
HDD (For Model A and optional for
Model B)
Video Adapter
(Model A Only) NVIDIA® Quadro FX
880M Video Card
1GB GDDR3 Video RAM
Supports Microsoft DirectX
® 10.1
Power
Model A:
Full Range AC/DC Adapter
AC Input: 100 - 240V, 50 - 60Hz
DC Output: 19V, 6.3A (120W)
Model B:
Full Range AC/DC Adapter
AC Input: 100 - 240V, 50 - 60Hz
DC Output: 19V, 4.74A (90W)
Security
Security (Kensington® Type) Lock Slot
Environmental Spec
Temperature
Operating: 5
Non-Operating: -20°C - 60°C
Relative Humidity
Operating: 20% - 80%
Non-Operating: 10% - 90%
°C - 35°C
Dimensions & Weight
300mm (w) * 195mm (d) * 39.5mm (h)
Model A:
974g (Included VGA card and HDD)
634g (Without VGA card and Without
HDD)
Model B:
634g
22
Übersicht
Mit der Dockingstation erhält Ihr Computer eine einfach anschließbare Desktopumgebung, wenn Mobilität nicht erforderlich ist. So können externe Displays, USB-Geräte (mit verschiedenen zusätzlichen USB-Ports) und Audiogeräte
angeschlossen werden.
Modellunterschiede
Diese Dockingstation-Serie umfasst zwei verschiedene Modelltypen, die sich in Folgendem unterscheiden.
Funktion Modell A Modell B
Deutsch
Videoadapter
Festplattensicherung
Stromquelle
AC/DC-Adapter, 120W (19V/6,3A) AC/DC-Adapter , 90W (19V/4,74A)
Standard Nein
Standard Optional
Tabelle 1 - Modellunterschiede
Kompatibilität
Diese Dockingstation ist nur mit bestimmten Computermodellen kompatibel, die über den dazugehörigen Dockinganschluss verfügen. Ausführliche Informationen erhalten Sie bei Ihrem Servicecenter.
1

Hinweise zu Pflege und Betrieb
Die Dockingstation ist zwar sehr stabil, kann aber dennoch
beschädigt werden. Damit es nicht dazu kommt, sollten Sie
die folgenden Hinweise beachten:
• Das Gerät darf nicht herunterfallen und in anderer Form
Stößen ausgesetzt werden. Wenn das Gerät fällt, können das
Gehäuse und andere Komponenten beschädigt werden.
• Das Gerät darf nicht nass werden und sich nicht überhitzen.
das Gerät und das Netzteil dürfen nicht in der Nähe einer Wärmequelle stehen. Dies ist ein elektrisches Gerät. Wenn Wasser
oder andere Flüssigkeiten eindringen, kann das Gerät stark
beschädigt werden.
• Vermeiden Sie Interferenzen mit anderen Geräten. Halten Sie
Deutsch
das Gerät fern von magnetischen Feldern, die von Stromquellen,
Monitoren, Magneten etc. erzeugt werden. Die können die Leistung beeinträchtigen und Ihre Daten beschädigen.
• Achten Sie auf die richtige Bedienung des Geräts.
Reparatur
Nehmen Sie vor dem Reinigen des Wenn Sie versuchen, das
Gerät selbst zu reparieren, können Ihre Garantieansprüche
verloren gehen. Außerdem besteht Stromschlaggefahr für
Ihre Gesundheit und das Gerät durch frei liegende Teile. Lassen Sie Reparaturarbeiten nur von qualifizierten Reparaturfachleuten durchführen, insbesondere wenn folgende
Umstände vorliegen:
• Wenn das Gerät heruntergefallen ist oder beschädigt wurde.
• Wenn ein ungewöhnlicher Geruch, Hitze od er Rauch aus dem
Gerät entweicht.
Sicherheitsinformationen
• Verwenden Sie nur einen AC/DC-Adapter, der für die Verwendung mit diesem Gerät zugelassen ist.
• Trennen Sie vor dem Reinigen des Geräts es von allen externen
Stromquellen, Peripheriegeräten und Kabeln.
• Reinigen Sie das Gerät mit einem weichen, sauberen Tuch.
Tragen Sie das Reinigungsmittel nicht direkt auf das Gerät auf.
Verwenden Sie keine flüchtigen Reinigungsmittel (Petroleumdestillate) oder Scheuermittel zum Reinigen des Geräts.
• Wenn das Netzkabel oder der AC/DC-Adapt e r beschädigt oder
zerschlissen sind.
• Wenn das Gerät Regen ausgesetzt war oder mit Flüssigkeiten in
Berührung gekommen ist.
• Wenn das Gerät unter Beachtung der Bedienungsanweisungen
nicht korrekt arbeitet.
2

Computer und Dockingstation
Anschließen bei eingeschaltetem oder ausgeschaltetem Gerät
Wenn Ihre Dockingstation die Videoadapteroption umfasst (Modell A), muss die Dockingstation bei ausgeschaltetem Computer
angeschlossen werden (der Computer muss vor dem Anschließen ausgeschaltet werden).
Wenn die Dockingstation nicht die Videoadapteroption enthält (Modell B), kann die Station sowohl bei laufendem Computer (d. h.
der Computer wird vor dem Anschließen eingeschaltet) als auch bei ausgeschaltete m Compute r angeschlos sen werden ( der Computer muss vor dem Anschließen ausgeschaltet werden).
Anschließen und Abtrennen bei laufendem Gerät mit Stromsparmodus
Wenn sich der Computer in einem Stromsparmodus befindet (Standby oder Ruhezustand), oder wenn er gerade aus einem
Stromsparmodus wieder gestartet wird, darf das System nicht angeschlossen oder abgetrennt werden.
Bewegen der Dockingstation
Während das Notebook mit der Dockingstation verbunden ist, sollte die angeschlossene Einheit nicht bewegt werden, um die Verbindung nicht zu verlieren. Ändern Sie die Position der Dockingstation erst, wenn Sie sie vom Notebook abgetrennt haben.
Die Dockingstation kann sowohl an den ausgeschalteten als auch an den eingeschalteten Computer angeschlossen und
abgetrennt werden (siehe Hinweis unten). Wenn Sie die Station bei laufendem System anschli eßen/abtrennen möchten,
muss der Hotkey-Treiber (er befindet sich auf der Disc Device Drivers & Utilities + User’s Manual) installiert ist.
Deutsch
Stromversorgung angeschlossener Geräte
Ein angeschlossenes Gerät sollte nur über den AC/DC-Adapter der Dockingstation mit Strom versorgt werden, der an
die DC-Eingangsbuchse an der Rückseite an der Rückseite der Dockingstation angeschlossen wird (der AC/DC-Adapter des Computers darf niemals verwendet werden, wenn die Dockingstation angeschlossen ist). Folgen Sie den Anweisungen auf der nächsten Seite, um den Computer sicher an die Dockingstatio n an zuschließen un d von ihr abzutrennen.
3

Anschließen des Computers an die Dockingstation
1
1
1. Entfernen Sie das gesamte Verpackungsmaterial und legen Sie die Dockingstation auf eine stabile Unterlage.
2.
Schließen Sie alle Peripheriegeräte, die Sie mit der Dockingstation verwenden wollen (z. B. Tastatur und Maus), an die entsprechenden
Schnittstellen an.
3. Schließen Sie den AC/DC-Adapter an die DC-Eingangsbuchse an der Rückseite der Dockingstation an. Verbinden Sie dann das
Netzkabel mit einer Netzsteckdose und dem AC/DC-Adapter .
4. Die Stromanzeige-LED der Dockingstation leuchtet orangefarben.
Deutsch
Abb. 1 - Dockingstation mit angeschlossenem AC/DC-Adapter
4

5. Wenn Sie die Station bei laufendem System anschließen möchten, muss der Hotkey-Treiber installie rt sein.
2
2
Dockinganschlussfach
Das Fach muss verschlossen sein, wenn der Computer mit der Dockingstation verbu nden ist. Auf diese Weise wird verm ieden,
dass Fremdkörper und/oder Staub in den Kontaktbereich gelangen.
6. Schließen Sie den Deckel/LCD-Bildschirm des Notebooks, und drehen Sie es um (wenn Sie den optionalen 9-Zellen-Akku
verwenden, müssen Sie ihn herausnehmen, bevor Sie den Computer mit der Dockingstation verbinden).
7. Schieben Sie den Riegel des Dockinganschlussfachs in Pfeilrichtung , um das Fach zu öffnen (wird das Fach nicht geöf fnet, bevor
der Computer an die Dockingstation angeschlossen wird, kann der Stecker der Dockingstation schwer beschädigt werden).
Deutsch
Abb. 2 - Öffnen des Dockinganschlusses
5

8. Stellen Sie sicher, dass der AC/DC-Adapter NICHT an die DC-Eingangsbuchse des Computers angeschlossen ist.
AC/DC-Adapter
Der Computer darf nur über den AC/DC-Adapter, der an die DC-Eingangsbuchse der Dockingstation angeschlossen ist, mit
Strom versorgt werden.
Wird das Dockingsystem nur über den AC/DC-Adapter des Computers mit Strom versorgt, leuchtet zwar die StromanzeigeLED, der Strom reicht aber nicht aus, um das gesamte System mit Strom zu versorgen.
Deutsch
Abb. 3 - Dockingstation mit angeschlossenem AC/DC-Adapter und Computer
9. Wenn Ihre Dockingstation den Videoadap ter ehthält (Modell A), muss das Notebook AUSGESCHALTET sein (prüfen Sie, ob sich der
Computer nicht im Standby-Modus befindet), bevor Sie den Computer an die Dockingstation anschließen (
eingeschaltetem oder ausgeschaltetem Gerät" auf Seite 3
6
siehe "Anschließen bei
).

10. Der Sperrriegel an der rechten Seite der Dockingstation muss sich in entriegelter Position befinden (die Sperrriegel-LED leuchtet
3
4
Sperrriegel-LED
Schieben Sie den Sperrriegel rechts an der Dockingstation in die verriegelte Position. Die Sperrriegel-LED beginnt grün zu
leuchten.
3
4
nicht).
11. Halten Sie das Notebook vorsichtig in einem Winkel von etwa 45°, und lehnen Sie es gegen die Gummistopfen der Dockingstation.
12. Richten Sie die Dockingmarkierungen an der oberen Kante des Deckels/LCD-Monitors an den Markierungen auf der Dockingstation
aus.
Deutsch
Abb. 4 - Ausrichten der Dockingmarkierungen und verriegeln des Sperrriegels
13. Ist der Computer richtig ausgerichtet, drücken Sie ihn so weit in die Dockingstation, bis die Dockinganschlüsse ineinander greifen.
14. Schieben Sie den Sperrriegel seitlich am Computer in die verriegelte Position. Die Sperrriegel-LED beginnt grün zu leuchten.
15. Wenn das System bei laufendem Gerät angeschlossen wurde, leuchtet die Stromanzeige-LED der Dockingstation grün.
16. Wurde das System bei ausgeschaltetem Gerät angeschlossen, leuchtet die Stromanzeige-LED der Dockingstation orangefarben.
17. Die LED-Anzeigen des Computers beginnen dann den Stromstatus des Computers anzuzeigen.
7

18. Wurde das System bei ausgeschaltetem Gerät angeschlossen, müssen Sie den Netzschalter der Dockingstation drücken, um den
LAN-Buchse und Docking
Wenn der Computer an die Dockingstation angeschlossen ist, kann die LANBuchse des Notebooks nicht verwendet
werden. Ist das System angeschlossen,
müssen Sie die LAN-Buchse der Dokkingstation verwenden.
Computer und die Dockingstation einzuschalten (oder Sie öffnen den Deckel/LCD-Bildschirm des Notebooks und drücken auf den
Netzschalter des Notebooks, um das System einzuschalten).
Deutsch
Abb. 5 - Netzschalter drücken (wenn Computer bei ausgeschaltetem Gerät angeschlossen wird)
19. Die Stromanzeige-LED der Dockingstation leuchtet grün, wenn das System eingeschaltet ist.
20. Wenn extern ein Monitor, eine Tastatur oder eine Maus angeschlossen sind, an die entsprechenden Ports angeschlossen sind, können
Sie diese externen Geräte verwenden, ohne den Deckel/LCD-Monitor des Notebooks öffnen zu müssen.
21. Wenn keine Tastatur angeschlossen ist, können Sie die Tastatur des Notebooks verwenden.
22. (Nur Modell A) Der externe Monitor an einen der Ports des Videocontrollers muss angeschlossen werden, und der LCD-
Monitor des Notebooks kann nicht als Anzeigegerät verwendet werden.
23. (Nur Modell B) Wenn kein externer Monitor an die Schnittstelle für den externen Monitor oder an den DVI-D-Ausgangsanschluss
angeschlossen ist, können Sie den LCD-Monitor des Computers verwenden.
8

Abtrennen des Computers von der Dockingstationn
Abtrennen bei eingeschaltetem oder ausgeschaltetem Gerät
Wenn Ihre Dockingstation die Videoadapteroption enthält (Modell A), muss der Computer ausgeschaltet werden, bevor
er von der Dockingstation abgetrennt wird (der Computer muss vor dem Abtrennen ausgeschaltet werden).
Wenn die Dockingstation nicht die Videoadapteroption enthält (Modell B), kann der Computer sowohl einge schaltet (d. h.
der Computer ist vor dem Abtrennen noch eingeschaltet) als auch ausgeschaltet von der Docking station abgetr ennt werden (der Computer muss vor dem Abtrennen ausgeschaltet werden).
Herunterfahren
Bitte beachten Sie, daß der Computer immer mit dem Befehl Herunterfahren im Menü Start heruntergefahren werden
muß. Dadurch werden Festplatten- bzw. Systemprobleme vermieden.
Wenn der das die Dockingstation bei laufendem Gerät abgetrennt werden soll, muss der Hotkey-Treiber installiert sein.
1. Wenn Ihre Dockingstation den Videoadapter enthält (Modell A), muss der Computer zuerst ausgeschaltet werden, bevor Sie ihn
abtrennen (siehe unten).
2. Wenn Ihre Dockingstation den Videoadapter enthält (Modell A), schalten Sie den Computer mit der normalen Windows-
Ausschaltprozedur aus.
Deutsch
9

Abtrennen des Systems bei ausgeschaltetem Gerät
123
3
2
1
1. Schalten Sie den Computer mit der normalen Windows-Ausschaltprozedur aus (wählen Sie bei Windows 7 im Menü St art die Option
Herunterfahren).
2. Ist das System ausgeschaltet, aber immer noch an den AD/DC-Adapter der Dockingst ation angeschlossen, leu chtet die S tr omanzeigeLED der Dockingstation orangefarben.
3. Schieben Sie den Sperrriegel seitlich am Computer in entriegelter Position (die Sperrriegel-LED leuchtet nicht).
4. Drücken Sie auf die Auswurf-Taste der Dockingstation. Halten Sie dabei das Notebook vorsichtig mit einer Hand fest.
5. Sie können das Notebook dann aus der Dockingstation herausheben.
6. Nachdem Sie den Computer von der Dockingstation abgetrennt haben, schieben Sie den Riegel des Dockinganschlusses in
Pfeilrichtung.
Deutsch
Abb. 6 - Riegel in entriegelte Position schieben und Auswurftaste dr ücken (Dockinganschluss schließen)
Abtrennen des Systems bei eingeschaltetem Gerät (Nur Modell B)
1. Ist das System eingeschaltet und an die Dockingstation angeschlossen, klicken Sie auf das Taskleistensymbol und wählen Sie Hardware sicher entfernen und Medium auswerfen.
2. Wählen Sie Dockingstation auswerfen.
3. In der Taskleiste erscheint die Meldung Abdocken abgeschlossen.
4. Die Stromanzeige-LED der Dockingstation leuchtet orangefarben (die E/A-Ports und Anschlüsse der Dockingstation können dann
nicht mehr verwendet werden).
10

Hinweis: Wenn die Dockingverbindung an dieser Stelle wieder aktiviert werden soll, lesen Sie weiter bei "Reaktivieren
1
2
3
3
2
1
Starten von Anwendungen und Auswerfen der Dockingstation
Wenn Sie die Option Dockingstation auswerfen wählen, schließt das System alle Anwendungen und scha ltet die
Dockingstation und den Computer aus. Dazu gehören auch aktive Sicherungsaufgaben, die von der Anwendung
Backup Now EZ ausgeführt werden.
Abb. 7 - Riegel in entriegelte Position schieben und Auswurftaste drücken (Dockinganschluss schließ en)
der Dockingverbindung (Nur Modell B)" auf Seite 12.
5. Schieben Sie den Sperrriegel seitlich am Computer in entriegelter Position (die Sperrriegel-LED leuchtet nicht).
6. Drücken Sie auf die Auswurf-Taste der Dockingstation. Halten Sie dabei das Notebook vorsichtig mit einer Hand fest.
7. Sie können das Notebook dann aus der Dockingstation herausheben.
8. Nachdem Sie den Computer von der Dockingstation abgetrennt haben, schieben Sie den Riegel des Dockinganschlusses in
Pfeilrichtung.
Deutsch
11

Reaktivieren der Dockingverbindung (Nur Modell B)
Wenn Sie in der Windows-Taskleiste die Option Hardware sicher entfernen und Medium auswerfen gewählt, aber
noch nicht den Computer entriegelt und ausgeworfen haben, kann die Dockingverbindung reaktiviert werden.
1. Klicken Sie auf das Symbol in der Taskleiste und klicke n Sie mit der rechten Maustaste auf das Hotkey-Symbol .
2. Wählen Sie Docking.
3. Wählen Sie Active Docking.
4. Das System wird jetzt angeschlossen, und die E/A-Ports und Anschlüsse sind wieder funktionsfähig.
Deutsch
12

Systemübersicht: Ansicht von vorne
Abb. 8
Ansicht von vorne
1. Stromanzeige-LED
2. Sichern-Taste
(Für Modell A und
optional für Modell B)
3. Auswurf-Taste
4. Docking-Anschluss
5. HaltestifteRetaining Pins
6. Auswurfstifte
2
5
1
4
6
3
5
6
Deutsch
13

Systemübersicht: Ansicht von hinten
Abb. 9
Ansicht von hinten
1. SicherheitsschloßBuchse
2. USB 2.0-Anschlüsse
3. KopfhörerAusgangsbuchse
4. MikrofonEingangsbuchse
5. S/PDIF-Ausgangsbuchse
6. DVI-DAusgangsanschluss
(Digital) - (nur Modell B)
7. Schnittstelle für externen
Monitor (nur Modell B)
8. Serielle (COM)
Schnittstelle
9. RJ-45 LAN-Buchse
10. DC-Eingangsbuchse
Die folgenden Ports sind
nur mit dem NVIDIAVideoadapter verfügbar:
11. Displayanschluss
12. DVI-DAusgangsanschluss
(Digital)
13. HDMIAusgangsanschluss
2
1
3
11
12
13
2 2
2
4 5
8
9
10
Video-Ports
Wenn Ihr Modell den Videoadapter enthält (Modell A), müssen alle Videokabel an die Ports des
Videoadapters angeschlossen werden (z. B. in der obigen Abbildung die Ports 11, 12 oder 13) und
nicht an den unteren DVI-D-Ausgangsanschluss 6 oder an die Schnittstelle für den externen Monitor 7 (diese Ports funktionieren nicht mit dem Videoadapter).
LAN-Buchse und Docking
Wenn der Computer an die Dockingstation angeschlossen ist, kann die LAN-Buchse des
Notebooks nicht verwendet werden. Ist das System angeschlossen, m üssen Sie die LAN-Buchs e
der Dockingstation verwenden.
2
1
3
6
7
2 2
2
4 5
8
9
10
Modell A (Ansicht von hinten mit Videocontroller)
Modell B (Ansicht von hinten ohne Videocontroller)
6
7
Deutsch
14

Stromanzeige-LED & Sperrriegel-LED
Symbol Farbe Beschreibung
Orange
Grün Die Dockingstation ist eingeschaltet oder im Standby-Modus
Grün Der Computer ist an die Dockingstation angeschlossen und v erriegelt
Sperrriegel-LED
Aus Der Computer ist nicht an die Dockingstation angeschlossen
Tabelle 2 - Stromanzeige-LED & Sperrriegel-LED
Der AC/DC-Adapter ist angeschlossen und der Computer ist ausgeschaltet oder
im Ruhezustand*
*Den Stromstatus des Computers können Sie anhand der Stromanzeige-LEDs des Computers ablesen.
Deutsch
15

Systemübersicht: Ansicht von links und rechts
Abb. 10
Ansicht von links und
rechts
1. Luftungsoffnung
2. USB 2.0-Anschlüsse
3. Auswurf-Taste
4. Sperrriegel-LED
5. Sperrriegel
2
1
4
2
2
5
3
Deutsch
16

Konfiguration des Netzschalters
Anschließen und Abtrennen bei
laufendem Gerät mit
Stromsparmodus
Wenn sich der Computer in einem
Stromsparmodus befindet (Standby
oder Ruhezustand), oder wenn er
gerade aus einem Stromsparmodus
wieder gestartet wird, darf das System nicht angeschlossen oder
abgetrennt werden.
Damit der Computer bei geschlossenem Deckel/LCD-Monitor nicht in einen Stromsparmodus wechselt, müssen Sie
neu festlegen, was der Computer bei geschlossenem Deckel/LCD-Monitor tun soll, wenn er mit Strom versorgt wird.
1. Klicken Sie Start (Menü) und klicken Sie Systemsteuerung (oder zeigen auf Einstellungen und klicken Systemsteuerung).
2. Klicken Sie auf Energieoptionen (Hardware und Sound).
3. Klicken Sie auf Auswählen, was beim Zuklappen des Computers geschehen soll (im linken Feld).
4. Wählen Sie bei Beim Zuklappen: für den eingeschalteten Computer die Option Nichts unternehmen.
5. Klicken Sie auf Änderungen speichern und schließen Sie die Systemsteuerung.
Abb. 11 - Energieoptionen (Auswählen, was beim Zuklappen des Computers geschehen soll)
Deutsch
17

NVIDIA-Video (nur Modell A)
2
1
3
Videoadapter-Ports
Installieren Sie den Video-Treiber wie unten beschrieben.
Installieren des NVIDIA-Video-Treibers
1. Stellen Sie sicher, dass das System an die Dockingstation angesch lossen und ein exter ner Monitor an einen Port des Videoco ntrollers
angeschlossen ist (externe Monitore müssen an die Videoadapter-Ports angeschlossen werden, nicht an den unteren DVI-D-Ausgangsanschluss oder an die Schnittstelle für den externen Monitor).
Deutsch
Abb. 12 - Ansicht von hinten mit Videocontroller
2. Legen Sie die Disc Device Drivers & Utilities + User’s Manual ein, die Sie zusammen mit der Dockingstation erhalten haben.
Klicken Sie Start (Menü) und klicken Sie Computer.
3.
4. Klicken Sie doppelt auf die DVD.
5. Klicken Sie doppelt auf die folgenden Ordner:
\Drivers\01_Nvidia\257.30.
6. Klicken Sie doppelt auf den für Ihre Betriebssystemversion bestimmten Ordner:
\32bit (für Windows 7, 32-bit).
\64bit (für Windows 7, 64-bit).
7. Klicken Sie doppelt auf setup (
8. Klicken Sie auf Weiter > Weiter.
9. Klicken Sie auf Fertig stellen, um den Computer neu zu starten.
Programm).
18

NVIDIA Systemsteuerung
Die NVIDIA-Systemsteuerung bietet zusätzliche Videokonfigurationsregler und –werkzeuge, mit denen Sie
einen schnellen Zugriff auf Funktionen wie die Monitorkonfiguration, 3D-Einstellungen und Hilfe-Menüs
haben.
So öffnen Sie die NVIDIA Systemsteuerung :
1. Klicken Sie Start (Menü) und klicken Sie Alle Programme >
NVIDIA Corporation.
2. Klicken Sie NVIDIA Physx Properties.
Oder
1. Klicken Sie mit der rechten Maustaste auf den Desktop und
dann aus dem Menü die Option NVIDIA Systemsteuerung
wählen.
Anzeigegeräte
Schließen Sie einen externen Monitor mit einem
geeigneten Kabel an einen beliebigen Display-Port des
Videoadapters an (verwenden Sie nicht den unteren DVID-Ausgangsanschluss oder die Schnittstelle für den externen Monitor). Sie können bis zu 3 Monitore an den Display-Port, an den DVI-D-Ausgangsanschluss und an den
HDMI-Ausgangsanschluss anschließen. Die GPU unterstützt jedoch nur die Verwendung von 2 Monitoren auf
einmal.
Deutsch
19

Festplattensicherung
(Für Modell A und optional für Modell B)
Die Festplatte dient nur zu Sicherungszwecken. Aus die-
sem Grund dürfen Sie kein Betriebssystem auf die Sicherungsfestplatte der Dockingstation installieren.
Installieren von Backup Now EZ
1. Legen Sie die Disc Device Drivers & Utilities + User’s Manual
ein, die Sie zusammen mit der Dockingstation erhalten haben.
Klicken Sie Start (Menü) und klicken Sie Computer.
2.
3. Klicken Sie doppelt auf die DVD.
4. Klicken Sie doppelt auf die folgenden Ordner:
Deutsch
\Drivers\02_Backup
5. Klicken Sie doppelt auf setup (
6. Wählen Sie eine Sp rache für die Inst allation und klicken Sie auf
OK.
7. Klicken Sie auf Next.
8. Klicken Sie auf die Schaltfläche), um die Lizenzvereinbarung
anzunehmen und klicken Sie auf Next.
9. Klicken Sie auf Next > Next.
10. Klicken Sie auf Finish, um den Computer neu zu starten.
Starten Sie die Anwendung Backup Now EZ über das St art-
11.
Menü (Start > Programme/ AlleProgramme >
Now EZ
(
) oder durch doppelt Anklicken des Symbols
Backup Now EZ) auf den Desktop.
Programm).
NTI Backup
Anwendung Backup Now EZ
1. Starten Sie die Anwendung Backup Now EZ über das Start-
Menü (Start > Programme/ AlleProgramme >
Now EZ
(
2. Beim ersten Programmstart werden Sie aufgefordert, es zu
registrieren (empfohlen).
3. Das Willkommen-Fenster erscheint (es erscheint nur beim
ersten Start des Programms, danach werden Sie sofort zum
Hauptfenster weitergeleitet).
4. Im Hauptfenster werden zwei Sicherungsaufträge und
Optionen zum Ändern und Aktivieren/Deaktivieren dieser
Aufträge angezeigt.
5. Wenn die Option Sicherungsort (Externe Festplatte) als
Unavailable angezeigt wird, klicken Sie auf Ändern, um die
Optionen zum Festlegen des Zielspeicherorts aufzurufen.
6. Sie können eine Ablageortkapazität-Anzeige festlegen, die
Sie benachrichtigt, wenn die Sicherungsfestplatte bis zur
festgelegten Datenmenge voll ist.
7. Sie können Ihre Sicherungsaufträge auch verschlüsseln (mit
einem Passwort schützen). Achten Sie aber dann darauf, dass
Sie das Passwort nicht vergessen.
8. Klicken Sie auf Beenden, um die Optionen zu bestätigen.
9. Jetzt werden Sie vom Programm gefragt, ob der Auftrag sofort
gestartet werden soll.
) oder durch doppelt Anklicken des Symbols
Backup Now EZ) auf den Desktop.
NTI Backup
20

Starten eines Sicherungsauftrags
1
1
Hilfe
Klicken Sie auf das Menü Hilfe, und wählen Sie Hilfethemen, um z. B. eine Inhaltsliste aufzurufen.
1. Drücken Sie auf die Sichern-Taste an der Dockingstation.
Abb. 13 - Sichern-Taste
2. Backup Now EZ wird gestartet. Die zwei Sicherungsaufträge
werden angezeigt:
• Datei- und Ordnersicherung
• Vollständige Systemsicherung
7. Klicken Sie auf die Sichern-Taste , um die ausgewählten
Sicherungsaufträge zu starten (wenn das Ziellaufwerk nicht
verfügbar ist, erscheint eine Fehlermeldung).
Deutsch
3. Für jeden dieser Aufträge können Sie die Einstellungen
ändern, indem Sie auf Ändern klicken.
4. Wenn die Sicherungsaufträge ausgewählt sind, sind sie mit
einem grünen Häkchen gekennzeichnet.
5. Das Hauptmenü enthält drei Optionen (Vorgang, Tools und
Hilfe).
6. Wählen Sie eines dieser Menüs durch Anklicken aus, um das
dazugehörige Untermenü aufzurufen.
21

Technische Daten
Aktualität der technischen Daten
Die in diesem Teil aufgeführten
technischen Daten sind zum Zeitpunkt der Druckstellung richtig. Bestimmte Elemente (insbesondere
Prozessortypen/-geschwindigkeiten) können im
Rahmen des Entwicklungsplans des
Herstellers zwischenzeitlich
geändert oder aktualisiert werden.
Detailinformationen erhalten Sie bei
Ihrem Servicezentrum.
Deutsch
Schnittstellen
Sieben USB 2.0-Anschlüsse
(Nur Modell B) Eine Schnittstelle für
externen Monitor
(Nur Modell B) Ein DVI-D-
Ausgangsanschluss
Eine Lautsprecher/Kopfhörer-
Ausgangsbuchse
Eine Mikrofon-Eingangsbuchse
Eine S/PDIF-Ausgangsbuchse
Eine RJ-45 LAN-Buchse
Eine serielle Schnittstelle
Ein Docking-Anschluss
Eine DC-Eingangsbuchse
=======================================
Die folgenden Ports sind nur mit dem
NVIDIA-Videoadapter verfügbar:
(Nur Modell A) Ein DVI-DAusgangsanschluss
(Nur Modell A) Ein HDMIAusgangsanschluss
(Nur Modell A) Ein Displayanschluss
Speicher
Eine austauschbare SATA-2,5"-Festplatte
(9,5mm Höhe) - Für Modell A und
optional für Modell B
Videoadapter
(Nur Modell A) NVIDIA® Quadro FX
880M Video karte
1GB GDDR3 Video-RAM On Board
Kompatibel mit MS DirectX®10.1
Stromversorgung
Modell A:
AC/DC-Adapter für den gesamten
Spannungsbereich
AC-Eingang: 100-240 V, 50-60Hz
DC-Ausgang: 19V, 6,3A (120W)
Modell B:
AC/DC-Adapter für den gesamten
Spannungsbereich
AC-Eingang: 100-240 V, 50-60Hz
DC-Ausgang: 19V, 4,74A (90W)
Sicherheit
Öffnung für Sicherheitsschloß (Typ
Kensington)
Umgebungsbedingungen
Temperatur
In Betrieb: 5ºC – 35ºC
Bei Aufbewahrung: -20ºC – 60ºC
Relative Luftfeuchtigkeit
In Betrieb: 20 – 80 %
Bei Aufbewahrung: 10 – 90 %
Abmessungen und Gewicht
300 (B) x 195 (T) x 39,5 (H) mm
Modell A:
974g (mit VGA-Karte und Festplatte)
634g (ohne VGA-Karte und ohne
Festplatte)
Modell B:
634g
22

Présentation
La station d’accueil offre à votre ordinateur un environnement pratique de connectivité de bureau quand la portabilité
n’est pas nécessaire. Ceci facilite les connexions à des écrans externes, périphériques USB (avec de nombreux ports
USB supplémentaires), périphériques audio, et facilite le chargement de la batterie.
Différences de modèles
Cette série de stations d’accueil inclut deux types de modèles dont les dif férences sont indiquées dans le tableau ci-dessous.
Caractéristique Modèle A Modèle B
Adaptateur vidéo
Sauvegarde du disque dur
Alimentation électrique
Adaptateur AC/DC - 120W (19V/6,3A) Adaptateur AC/DC - 90W (19V/4.74A)
Tableau 1 - Différences de modèles
Standard Non
Standard Optionnelle
Compatibilité
Notez que cette station d’accueil est compatible avec des modèles d’ordinateur particuliers et équipé du câble de
connexion adapté. Contactez votre centre de services pour plus d’informations.
Français
1

Instructions d’entretien et d’utilisation
La station d’accueil est robuste, mais il peut toutefois être endommagé. Afin d’éviter ceci, veuillez suivre ces recommandations :
• Ne le laissez pastomber. Ne l’exposez à aucun choc ou vibra-
tion. Si le dispositif tombe, le boîtier et d’autres éléments pourraient être endommagés.
• Gardez-le sec. Ne le laisser pas surchauffer. Tenez le dispositif
et son alimentation externe à distance de toute source de chaleur.
Il s’agit d’un appareil électrique. Si de l’eau ou tout autre liquide
venait à pénétrer à l’intérieur de votre dispositif, il pourrait être
sérieusement endommagé.
• Evitez les interférences. Tenez le dispositif à distance de trans-
formateurs à haute capacité, moteurs électriques, et autres appareils générateurs de champs magnétiques importants. Ceux-ci
peuvent gêner ses performances normales et endommager vos
données.
• Suivez les procédures appropriées d’utilisation de votre dispo-
Français
sitif.
Révision
Si vous essayez de réparer le dispositif par vous-même, votre
garantie sera annulée et vous risquez de vous exposer et d'exposer le dispositif à des chocs électriques. Confiez toute réparation à un technicien qualifié, particulièrement dans les cas
suivants:
• Si le cordon d’alimentation ou l’adaptateur AC/DC est endommagé, abimé ou effiloché.
• Si votre dispositif a été exposé à la pluie ou tout autre liquide.
• Si votre dispositif ne fonctionne pas normalement bien que vous
ayez suivi les instructions de mise en marche à la lettre.
• Si votre dispositif est tombé par terre ou a été endommagé.
• Si une odeur inhabituel, de la chaleur ou de la fumée apparaissait
sortant de votre dispositif.
Informations de sécurité
• Utilisez uniquement un adaptateur AC/DC agréé avec votre dispositif.
•
Avant de nettoyer le dispositif, retirez la batterie et assurez-vous
que
le dispositif est débranché de toute alimentation électrique
externe, périphériques et câbles.
• Utilisez un chiffon propre et doux pour nettoyer le dispositif, mais
n'appliquez pas d'agent de nettoyage directement sur le dispositif.
N’utilisez pas de produit de nettoyage volatil (des distillés
pétrôle) ou abrasifs sur aucun des éléments du dispositif.
2

Ordinateur et station d’accueil
Connexion à chaud ou à froid
Si votre station d’accueil inclut l’option d’adaptateur vidéo (Modèle A), alors l’ordinateur doit être connecté à froid à la station d’accueil (l’ordinateur doit être éteint avant d’effectuer la connexion).
Si votre station d’accueil n’inclut pas l’option d’adaptateur vidéo (Modèle B), alors l’ordinateur peut être connecté à cha ud ( l’ord inateur est allumé avant la connexion) ou à froid à la station d’accueil (l’ordinateur doit être éteint avant d’effectuer la connexion).
Connexion/déconnexion à chaud et modes d’économie d’énergie
Si l’ordinateur est en mode d’économie d’énergie (Veille ou Veille prolongée), ou se ‘réveille’ de cet état, n’essayez pas de connecter/
déconnecter le système à chaud.
Déplacer la station d’accueil
Notez que si l'ordinateur portable est connecté à la station d'accueil, n’essayez pas de déplacer l’unité connectée pour éviter de
perdre la connexion. Si vous souhaitez déplacer la station d’accueil, vérifiez que l’ordinateur portable est déconnecté de la station
d’accueil avant de procéder.
L’ordinateur peut se connecter/déconnecter de la station d’accueil à chaud ou à froid (lisez la note ci-dessous). Cela
signifie que l’ordinateur peut-être allumé (hot docking/undocking) ou éteint (cold docking/undocking) lors de la
connexion/déconnexion de la station d’accueil. Cependant, si vous souhaitez connecter/déconnecter le système à chaud,
vérifiez que le pilote de touche de raccourci du disque Device Drivers & Utilities + User's Manual, est installé.
Alimentation du système connecté
L’alimentation du système connecté doit être fournie uniquement par l’adaptateur AC/DC de la station d’accueil branché à une prise d’entrée DC à l'arrière de la station (vérifiez que l’adaptateur AC/DC de l’ordinateur n’est pas branché
quand l’ordinateur est connecté à la station d’accueil). Suivez les instructions des pages suivantes pour connecter/déconnecter votre ordinateur de la station d’accueil en toute sécurité.
Français
3

Connecter l’ordinateur à la station d’accueil
1
1
1. Enlevez tous les emballages et posez la station d'accueil sur une surface stable.
2. Connectez fermement les périphériques que vous souhaitez utiliser avec la station d'accueil (par ex. clavier et souris) à leurs ports
respectifs.
3. Branchez l'adaptateur AC/DC à la prise d'entrée DC à l’arrière de la station d'accueil, branchez ensuite le cordon secteur à une prise
murale, puis à l’adaptateur AC/DC.
4. La LED du bouton d'alimentation de la station d’accueil deviendra orange.
Français
4
Figure 1 - Connexion de la station avec l'adaptateur AC/DC branché

5. Pour connecter à chaud le système, vérifiez que le pilote de touche de raccourci (Hot-Key) de l’ordinateur est installé.
2
2
Capot du port d’interface
Gardez bien le capot fermé quand l'ordinateur n'est pas connecté à la station. Ceci permettra d’empêcher les corps étrangers
et la poussière de pénétrer dans la zone de contact.
6. Fermez le capot/LCD de l’ordinateur portable et retournez-le (si vous utilisez la batterie optionnelle 9, n'oubliez pas de retirer la
batterie avant de connecter l'ordinateur à la station d'accueil).
7. Déplacez le loquet du capot du port d’interface de l’ordinateur dans le sens de la flèche pour ouvrir le couvercle (si vous n’ouvrez
pas le capot du port d’interface avant de connecter l’ordinateur à la st ation d’a ccueil, le connecteu r de la st ation d’accueil risque d’être
irrémédiablement endommagé).
Français
Figure 2 - Ouverture du port d’interface
5

8. Vérifiez que l’adaptateur AC/DC de l’ordinateur portable N'EST PAS CONNECTÉ à la prise d’entrée DC de l'ordinateur..
Adaptateur AC/DC
Utilisez uniquement l’adaptateur AC/DC de la station d’accueil branché à la prise de courant DC-In de la station pour alimenter
l’ordinateur.
Si vous n’utilisez que l’adaptateur AC/DC de l’ordinateur pour alimenter le système connecté, la LED du bouton d’alimentation
sera allumée, mais l’alimentation ne sera pas suffisante pour le système tout entier.
Français
9. Si votre station d’accueil inclut l’adaptateur vidéo (Modèle A), vérifiez que l’ordinateur portable est ÉTEINT (vérifiez que l’ordinateur
n'est pas en mode Veille) avant de connecter l'ordinateur à la station (reportez-vous à Connexion à chaud ou à froid à la page 3).
6
Figure 3 - Connexion de la station avec l'adaptateur AC/DC branché et l’ordinateur connecté

10. Vérifiez que le commutateur de verrouillage à droite de la station d'accueil est sur la position déverrouillée (la LED du commutateur
3
4
LED du commutateur de verrouillage
Déplacez le commutateur de verrouillage à droite de la station d'accueil pour verrouiller le syst ème connecté. La LED
du commutateur de verrouillage deviendra verte.
3
4
de verrouillage ne s'allume pas).
11. Maintenez l’ordinateur portable avec un angle d’environ 45 degrés, et posez-le sur les bouchons en caoutchouc de la station d’accueil.
12. Alignez le marqueur de connexion sur le dessus du LCD/capot de l’ordinateur avec le marqueur sur le dessus de la station d’accueil
.
Français
Figure 4 - Aligner les marqueurs de connexion et déplacer le commutateur de verrouillage
13. Une fois les marqueurs alignés, fermement mais avec précaution, appuyez l'ordinateur dans la station d’accueil pour que les
connecteurs d’ancrage s’alignent.
14. Déplacez le commutateur de verrouillage à droite de l’ordinateur sur la position verrouillée et la LED du commutateur de verrouillage
deviendra verte.
15. Si le système a été connecté à chaud, alors la LED du bouton d’alimentation
16. Si le système a été connecté à froid, la LED du bouton d'alimentation de la station d’accueil deviendra orange.
17. Les indicateurs LED de l’ordinateur affichent alors l’état de l’alimentation.
de la station d’accueil devient vert.
7

18. Si le système a été connecté à froid, vous devez appuyer sur le bouton d'alimentation de la station d'accueil pour allumer l'ordinateur
Prise réseau et connexion à la
station
Quand l’ordinateur est connecté à la
station d’accueil, la prise réseau de
l’ordinateur portable ne peut pas
être utilisée. Quand le système est
connecté, utilisez la prise réseau de
la station d’accueil.
.
et la station d'accueil (autrement vous pouvez ouvrir le LCD/couvercle de l’ordinateur et appuyez sur le bouton d’alimentation de
l’ordinateur portable pour allumer le système).
Français
19. La LED du bouton d'alimentation de la station d’accueil deviendra verte quand le système est allumé.
20. Si vous avez connecté un écran, un clavier et une souris externes aux ports correspondants, vous pouvez utiliser les périphériques
externes sans ouvrir le LCD/capot de l’ordinateur portable.
21. Vous pouvez utiliser le clavier de l’ordinateur portable si vous n’avez pas connecté de clavier externe.
22. (Modèle A seulement) Vous devez utiliser un des ports du contrôleur vidéo pour connecter votre écran externe, et vous ne
pouvez pas utiliser le LCD de l’ordinateur portable comme périphérique d’affichage.
23. (Modèle B seulement) Vous pouvez également utiliser le LCD de l’ordinateur si vous n’avez pas connecté d’écran au port d’écran
externe ou au port DVI-D.
Figure 5 - Appuyer sur le bouton d’alimentation (en cas de connexion à froid)
8

Déconnecter l’ordinateur de la station d’accueil
Déconnexion à chaud ou à froid
Si votre station d’accueil inclut l’adaptateur vidéo (Modèle A), alors l’ordinateur doit être déconnecté à
froid de la station d’accueil (l’ordinateur est éteint avant d’effectuer la déconnexion).
Si votre station d’accueil n’inclut pas l’adaptateur vidéo (Modèle B), alors l’ordinateur peut-être déconnecté à chaud (l’ordinateur est allumé avant d’effectuer la déconnexion) ou à froid de la station d’a ccueil
(l’ordinateur est éteint avant d’effectuer la déconnexion).
Arrêt
Veuillez noter que vous devriez toujours éteindre votre ordinateur en utilisant la commande Arrêter du
menu Démarrer. Cette précaution évite des problèmes de disque dur ou de système.
Pour déconnecter à chaud le système, vérifiez que le pilote de touche de raccourci de l’ordinateur est installé.
1. Si votre station d’accueil inclut l’adaptateur vidéo (Modèle A), vous devrez arrêter l’ordinateur avant de déconnecter le système (voir
ci-dessous).
2. Si votre station d’accueil inclut l’adaptateur vidéo (Modèle A), éteignez l’ordinateur en suivant la procédure habituelle d’arrêt de
Windows.
Français
9

Déconnexion à froid du système
123
3
2
1
1. Éteignez l’ordinateur en suivant la procédure habituelle d’arrêt de Windows (sélectionnez Arrêter dans le menu Démarrer de Win-
dows 7).
2. Si le système est éteint, mais qu’il est toujours connecté à l’adaptateur AC/DC de la station d’accueil, alors la LED du bouton
d'alimentation de la station d’accueil deviendra orange.
3. Déplacez le commutateur de verrouillage à droite de l’ordinateur sur la position déverrouillée (la LED du commutateur de
verrouillage ne s'allume pas).
4. Appuyez sur le bouton Ejecter sur la station d’accueil tout en maintenant soigneusement l'ordinateur portable d'une main.
5. Ensuite, vous pouvez sortir l’ordinateur portable de la station d’accueil.
6. Après avoir déconnecté l’ordinateur de la station d’accueil, déplacez le loquet du capot du port d ’interface dans la direction de la flèche.
Français
Figure 6 - Déplacer le commutateur pour déverrouiller et appuyer sur le bouton Ejecter (Fermer le port d’interface)
Déconnecter le système à chaud (Modèle B seulement)
1. Avec le système connecté et allumé, cliquez sur l'icôn e de la barre des tâ ches et sélectionnez Reti rer le périphérique en toute sécurité et éjecter le média.
2. Sélectionnez Éjecter Station d’accueil.
3. Le message Retrait terminé apparaît dans la barre des tâches.
4. La LED du bouton d'alimentation de la station d’accueil deviendra orange (les ports E/S et les connecteurs de la station d’accueil
ne sont plus opérables).
10

Remarque : Si vous souhaitez réactiver la connexion, voir Réactiver la connexion (Modèle B seulement) on page 12.
123
3
2
1
Exécution des applications et éjection de la station d’accueil
Si vous sélectionnez Éjecter Station d’accueil, le système fermera les applications actives et éteindra la station d’accueil
et l’ordinateur. Ceci inclut également toutes les tâches de sauvegarde a ctives exécutées par l’application Backup Now EZ.
Figure 7 - Déplacer le commutateur pour déverrouiller et appuyer sur le bouton Ejecter (Fermer le port d’interface)
5. Déplacez le commutateur de verrouillage à droite de l’ordinateur sur la position déverrouillée (la LED du commutateur de
verrouillage ne s'allume pas).
6. Appuyez sur le bouton Ejecter sur la station d’accueil tout en maintenant soigneusement l'ordinateur portable d'une main.
7. Ensuite, vous pouvez sortir l’ordinateur portable de la station d’accueil.
8. Après avoir déconnecté l’ordinateur de la station d’accueil, déplacez le loquet du capot du port d’interface dans la direction de la flèche.
Français
11

Réactiver la connexion (Modèle B seulement)
Si vous avez sélectionné Retirer le périphérique en toute sécurité et éjecter le média de la barre des tâches dans Windows, et si vous n’avez pas déjà déverrouillé et éjecté l’ordinateur, vous pouvez réactiver la connexion.
1. Cliquez sur l’icône de la barre des tâches et cliquez-droit sur l’icône hot-key .
2. Sélectionnez Docking.
3. Sélectionnez Active Docking.
4. Le système est maintenant connecté et les ports et les connecteurs E/S de la station d’accueil sont opérables.
Français
12

Carte du système: Vue de face
Figure 8
Vue de face
1. LED du bouton d'alimentation
2. Bouton Sauvegarde
(Pour Modèle A et
optionnel pour Modèle
B)
3. Bouton Ejecter
4. Port d’interface
5. Chevilles de maintien
6. Broches d’éjection
2
5
1
4
6
3
5
6
Français
13

Figure 9
Vue arrière
1. Fente de verrouillage de
sécurité
2. Ports USB 2.0
3. Prise de sortie hautparleurs/casque
4. Prise d'entrée de
microphone
5. Prise de sortie S/PDIF
6. Port de sortie DVI-D
(Digital) - (Modèle B
seulement)
7. Port moniteur externe
(Modèle B seulement)
8. Port série (COM)
9. Prise réseau RJ-45
10. Prise d’entrée DC
Les ports suivants sont
fournis seulement avec
l’adaptateur vidéo NVIDIA :
11. Port d’affichage
12. Port de sortie DVI-D
(Digital)
13. Port de sortie HDMI
2
1
3
11
12
13
2 2
2
4 5
8 9
10
Ports vidéo
Si la configuration que vous avez achetée inclut l'adaptateur vidéo (Modèle A), assurez-vous
d’avoir connecté tous les câbles vidéo aux ports fournis par l’adaptateur vidéo (par exemple, les
ports 11, 12 ou 13 dans la figure ci-de ssus) et non à la prise d e sortie DVI-D 6 ou au port moniteur
externe 7 (ces ports ne fonctionnent pas avec l’adaptateur vidéo).
Prise réseau et connexion à la station
Quand l’ordinateur est connecté à la station d’accueil, la prise réseau de l’ordinateur portable ne
peut pas être utilisée. Quand le système est connecté, utilisez la prise réseau de la station d’accueil.
2
1
3
6
7
2 2
2
4 5
8 9
10
Modèle B (Vue arrière sans contrôleur vidéo)
Modèle A (Vue arrière avec contrôleur vidéo)
6
7
Français
Carte du système: Vue arrière
14

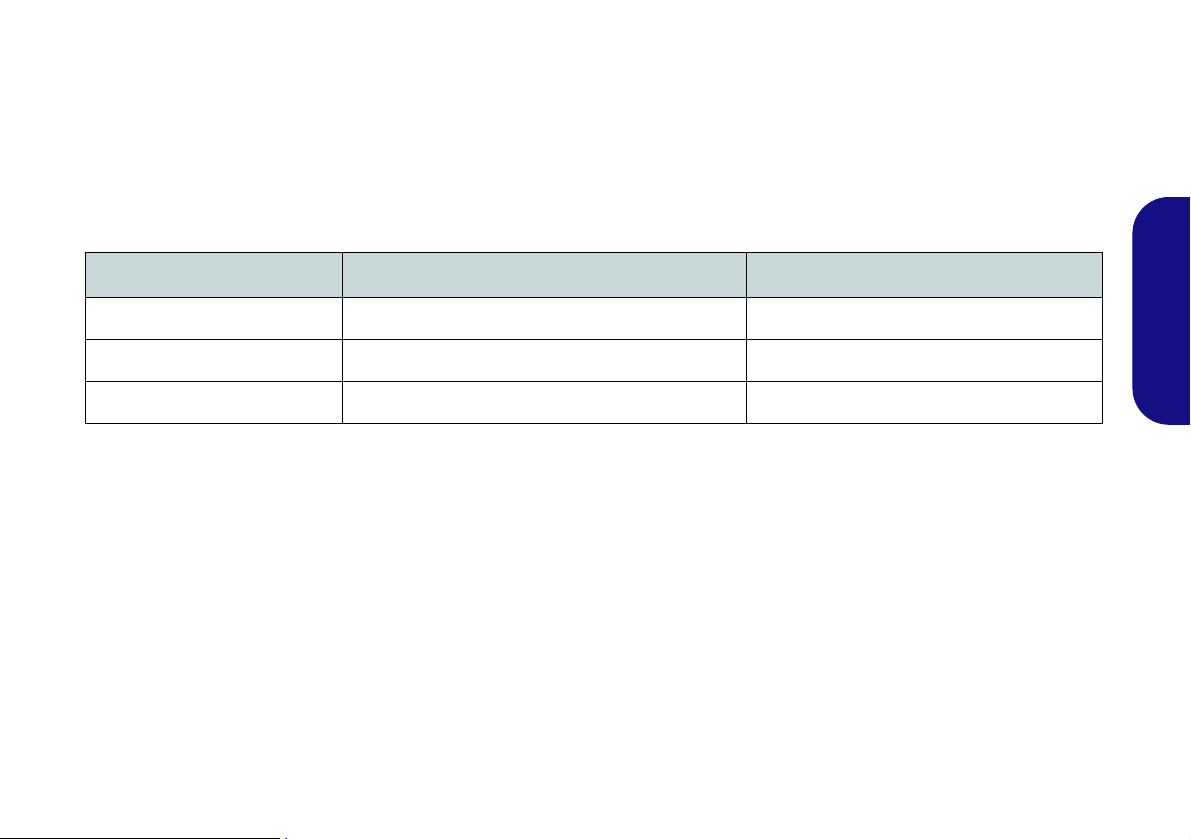
LED du bouton d'alimentation & LED du commutateur de verrouillage
Icône Couleur Description
Orange L’alimentation CC est branchée et l’ordinateur est éteint ou en mode veille prolongée*
Vert La station d’accueil est allumée ou en mode veille
LED du commutateur
de verrouillage
Tableau 2 - LED du bouton d'alimentation & LED du commutateur de verrouillage
Vert L’ordinateur est ancré dans la station d’accueil et verrouillé
éteint L’ordinateur n’ est pas ancré dans la station d’accueil
*Pour confirmer l’état de l’alimentation de l’ordinateur, vérifiez les indicateurs LED sur l’ordinateur.
Français
15

Carte du système: Vues gauche & droite
Figure 10
Vues gauche & droite
1. Ventilation
2. Ports USB 2.0
3. Bouton Ejecter
4. LED d’alimentation de
connexion
5. Commutateur de
verrouillage
2
1
4
2
2
5
3
Français
16

Configuration du bouton d’alimentation
Connexion/déconnexion à chaud
et modes d’économie d’énergie
Si l’ordinateur est en mode d’économie d’énergie (Veille ou Veille prolongée), ou se ‘réveille’ de cet état,
n’essayez pas de connecter/déconnecter le système à chaud.
Pour éviter que votre ordinateur bascule en mode d'économie d'énergie, si vous choisissez de travailler avec le LCD/
capot fermé, alors il est nécessaire de redéfinir l’action de l’ordinateur quand ce dernier est branché et le LCD/capot est
fermé.
1. Cliquez sur le menu Démarrer, et cliquez sur Panneau de configuration (ou pointez sur Paramètres et cliquez sur Panneau de
configuration).
2. Cliquez sur Options d’alimentation (Matériel et audio).
3. Cliquez sur Choisir l’action qui suit la fermeture du capot (dans le panneau de gauche).
4. Définissez l’option Lorsque je referme le capot: quand l’ordinateur est branché sur Ne rien faire.
5. Cliquez sur Enregistrer les modifications et fermez le panneau de contrôle.
Français
Figure 11 - Options d’alimentation (Choisir l’action qui suit la fermeture du capot)
17

NVIDIA Video (Modèle A seulement)
2
1
3
Ports de l’adaptateur vidéo
Installez le pilote video comme indiqué ci-dessus.
Installation du pilote NVIDIA Video
1. Vérifiez que le système est connecté à la station d’accueil et qu’un écra n externe est connect é à n’imp orte quel po rt du contrô leur
vidéo (utilisez les ports de l’adaptateur vidéo pour connecter l’écran externe et non pas le port de sortie DVI-D (inférieur) ou le port
moniteur externe).
Figure 12 - Vue arrière sans contrôleur vidéo
2. Insérez le disque Device Drivers & Utilities + User's Manual fourni avec la station d’accueil.
Français
3. Cliquez sur le menu Démarrer et cliquez sur Ordinateur.
4. Cliquez deux fois sur le disque DVD.
5. Cliquez deux fois pour ouvrir chacun des dossiers suivants :
\Drivers\01_Nvidia\257.30.
6. Cliquez deux fois pour ouvrir un des dossiers suivants en fonction de la version de votre système d'exploitation :
\32bit (pour Windows 7, 32-bit).
\64bit (pour Windows 7, 64-bit).
7. Cliquez deux fois sur setup (Application).
8. Cliquez sur Next > Next.
9. Cliquez sur Finish pour redémarrer votre ordinateur.
18

Panneau de configuration NVIDIA
Le Panneau de configuration NVIDIA fournit des commandes et des outils de configuration vidéo supplémentaires qui permettent d’accéder à des fonctions comme la
configuration d'affichage, les paramètres 3D et les menus
d’aide.
Pour accéder au Panneau de configuration NVIDIA:
1. Cliquez sur le menu Démarrer, et cliquez sur Tous les pro-
grammes > NVIDIA Corporation.
2. Cliquez sur NVIDIA Physx Properties.
OU
1. Cliquez-droit sur le bureau et sélectionnez Panneau de configuration NVIDIA
dans le menu.
Périphériques d’affichage
Notez que vous pouvez connecter le câble adéquat à n’importe quel port d’affichage de l’adaptateur vidéo (n’utilisez pas le port de Sortie DVI-D inférieur
moniteur externe) pour connecter un écran externe. Vous
pouvez connecter jusqu’à 3 écrans aux ports d’affichage,
de Sortie DVI-D et de sortie HDMI, mais le GPU ne supportera que 2 écrans à la fois.
ou le port
Français
19

Sauvegarde du disque dur
(Pour Modèle A et optionnel pour Modèle B)
Notez que le disque dur est prévu uniquement pour des ap-
plications de sauvegarde, donc n’installez pas un système
d’exploitation sur le disque dur de sauvegarde de la station
d’accueil.
Installation de l’application Backup Now EZ
1. Insérez le disque Device Drivers & Utilities + User's Manual
fourni avec la station d’accueil.
2. Cliquez sur le menu Démarrer et cliquez sur Ordinateur.
3. Cliquez deux fois sur le disque DVD.
4. Cliquez deux fois pour ouvrir chacun des dossiers suivants :
\Drivers\02_Backup
5. Cliquez deux fois sur setup (Application).
6. Sélectionnez la langue d'installation et cliquez sur OK.
Français
7. Cliquez sur Suivant.
8. Cliquez sur le bouton pour accepter la licence et cliquez sur
Suivant.
9. Cliquez sur Suivant > Suivant.
10. Cliquez sur Terminer pour redémarrer votre ordinateur.
Accédez à l’application Backup Now EZ depuis le menu
11.
Démarrer (Démarrer > Programmes/Tous les programmes >
NTI Backup Now EZ), ou en doublecliquant sur l'icône
(
Backup Now EZ) sur le bureau.
Application Backup Now EZ
1. Accédez à l’application Backup Now EZ depuis le menu
Démarrer (Démarrer > Programmes/Tous les programmes >
NTI Backup Now EZ), ou en doublecliquant sur l'icône
(
Backup Now EZ) sur le bureau.
2. Lors de la première exécution du programme, il vous sera
demandé de vous enregistrer (recommandé).
3. L’écran de Bienvenue apparaît (ce dernier apparaît lors de la
première exécution, après vous êtes dirigé vers l'écran du
menu principal).
4. L’écran principal affichera deux tâches de sauvegarde et les
options vous permettant de modifier et d’activer/désactiver les
tâches.
5. Si l’Emplacement de sauvegarde (Disque externe) affiche
Indisponible alors cliquez sur Modifier pour accéder aux
options de destination de sauvegarde.
6. Vous pouvez définir une Alerte capacité de destination pour
être averti quand le disque dur de sauvegarde atteint la
capacité du pourcentage sélectionné.
7. Vous pouvez également coder (protection par mot de passe)
vos tâches de sauvegarde, cependant n’oubliez pas votre mot
de passe.
8. Cliquez sur T erminer pour con firmer les options d e destination
de sauvegarde.
9. Le programme vous demandera de décider si, oui ou n on, vous
souhaitez exécuter la tâche maintenant.
20

Démarrage de la tâche de sauvegarde
1
1
Aide
Cliquez sur le menu du haut Aide et sélectionnez Sujets
d’aide pour accéder à la liste de contenus, etc.
1. Appuyez sur le bouton Sauvegarde de la station d’accueil.
Figure 13 - Bouton Sauvegarde
2. L’application Backup Now EZ s’exécute et propose deux
tâches de sauvegarde :
• Sauvegarde de fichier et de dossier
• Sauvegarde système complet
3. Vous pouvez régler les paramètres pour une des tâches en
cliquant sur Modifier.
4. Si les tâches de sauvegarde sont sélectionnées, elles seront
cochées d’une marque en vert .
5. 5. Le menu du haut propose trois options (Action, Outils et
Aide).
6. Cliquez pour sélectionner l’un des sous-menus d’options du
menu.
7. Cliquez sur le bouton Sauvegarde pour lancer l’exécution
des tâches de sauvegarde (si le disque de destination n’est p as
disponible, alors un message d’erreur apparaît).
Français
21

Spécifications
Dernières informations de
spécification
Les spécifications énumérées dans
cette section sont correctes à l'heure
de la mise sous presse. Certains éléments (particulièrement les types de
processeur/vitesse unique) peuvent
être modifiés ou mis à niveau en fonction du calendrier des parutions du fabricant. Voyez auprès de votre
service clientèle pour les détails.
Français
Interface
Sept ports USB 2.0
(Modèle B seulement) Un port moniteur
externe
(Modèle B seulement) Un port de Sortie
DVI-D
Une prise de sortie haut-parleurs/casque
Une prise d'entrée de microphone
Une prise de sortie S/PDIF
Une prise réseau RJ-45
Un port série (COM)
Un port d’interface)
Une prise d’entrée en DC
=======================================
Les ports suivants sont fournis seulement
avec l’adaptateur vidéo NVIDIA optionnel :
(Modèle A seulement) Un port de Sortie
DVI-D
(Modèle A seulement) Un port de Sortie
HDMI
(Modèle A seulement) Un port d’affichage
Stockage de données
Un disque dur SATA échangeable de 2,5"
9,5mm (H) - Pour Modèle A et optionnel
pour Modèle B
Adaptateur vidéo
(Modèle A seulement) Carte vidéo
NVIDIA Quadro FX 880M
RAM Vidéo interne GDDR3 1Go
Compatible avec MS DirectX® 10.1
Mise en marche
Modèle A:
Adaptateur AC/DC pleine bande
Entrée AC: 100-240V, 50-60Hz
Sortie DC: 19V, 6,3A (120W)
Modèle B:
Adaptateur AC/DC pleine bande
Entrée AC: 100-240V, 50-60Hz
Sortie DC: 19V, 4,74A (90W)
Sécurité
Fente de verrouillage de sécurité (type
Kensington)
Spécifications environnementales
Température
En fonction : 5
Eteint : -20
Humidité relative
En fonction : 20% - 80%
Eteint : 10% - 90%
°C- 35°C
°C - 60°C
Dimensions physiques & poids
300 (l) x 195 (p) x 25,1 - 39,5 (h) mm
Modèle A:
974g (avec carte VGA et disque dur)
634g (sans VGA card et sans HDD)
Modèle B:
634g
22

Vista previa
La estación soporte ofrece a su ordenador un entorno de sobremesa de fácil conexión cuando no necesita portabilidad.
Ésta permite conexiones fáciles a pantallas externas, dispositivos USB (con un rango total de puertos USB extra), dispositivos de audio y además la posibilidad de carga de batería.
Diferencias de modelos
Esta serie de estaciones soporte incluye dos tipos de modelos distintos que se diferencian según se indica en la siguiente
tabla.
Característica Modelo A Modelo B
Adaptador de vídeo
Copia de seguridad del disco duro
Fuente de alimentación
Adaptador AC/DC - 120W (19V/6,3A) Adaptador AC/DC - 90W (19V/4,74A)
Tabla 1 - Diferencias de modelos
Estándar No
Estándar Opcional
Compatibilidad
Tenga en cuenta que esta estación soporte solamente es compatible con modelos de ordenador que tengan el conector
apropiado para la estación. Contacte con su centro de servicios para más detalles.
Español
1

Instrucciones para el cuidado y funcionamiento
La estación soporte es muy robusta, pero puede dañarse.
Para evitar esto, siga estas sugerencias:
• No lo deje caer ni lo exponga a golpes fuertes. Si el
dispositivo se cae, la carcasa y los componentes podrían
dañarse.
• Manténgalo seco y no lo sobrecaliente. Mantenga el
dispositivo y fuente de alimentación alejados de cualquier tipo
de fuente de calor. Esto es un aparato eléctrico. Si se derrama
agua u otro líquido en su interior, el dispositivo podría dañarse
seriamente.
• Evite las interferencias. Mantenga el dispositivo alejado de
transformadores de alta capacidad, motores eléctricos y otros
campos magnéticos fuertes. Éstos pueden dificultar el correcto
funcionamiento y dañar los datos.
• Siga las instrucciones apropiadas de manejo del
dispositivo.
Español
Servicio
Si intenta reparar el dispositivo usted mismo, podría anular
la garantía y exponerse usted y el dispositivo a descarga
eléctrica. Deje que sea personal de reparación cualificado el
que realice las reparaciones, especialmente bajo cualquiera
de estas condiciones:
• Cuando el cable de alimentación o el adaptador AC/DC esté
dañado o pelado.
• Si el dispositivo ha estado expuesto a la lluvia u otros líquidos.
• Si el dispositivo no funciona con normalidad tras seguir las
instrucciones de uso.
• Si el dispositivo se ha caído o dañado.
• Si hay un olor fuera de lo normal, calor o humo que sale del
dispositivo.
Información de seguridad
• Utilice solamente un adaptador AC/DC aprobado para su uso
con este dispositivo.
• Antes de limpiar el dispositivo, quite la batería y asegúrese de
que el dispositivo esté desconectado de cualquier fuente de
alimentación externa, periféricos y cables.
• Utilice un trapo limpio y suave para limpiar el dispositivo, pero
no aplique limpiador directamente en el dispositivo. No utilice
limpiadores volátiles (derivados del petróleo) o limpiadores
abrasivos en ningún lugar del dispositivo.
2

Ordenador y estación soporte
Conexión en caliente o conexión en frío
Si su estación soporte incluye la opción del adaptador de vídeo (Modelo A), el ordenador debe conectarse en frío a la estación
soporte (es decir, el ordenador debe estar apagado antes de la conexión).
Si su estación soporte no incluye la opción del adaptador de vídeo (Modelo B), el ordenador pued e conectarse en caliente (es decir,
el ordenador está encendido antes de la conexión) o conectarse en frío a la estación soporte.
Conexión en caliente/Conexión en frío y modos de ahorro de energía
Si el ordenador está en modo ahorro de energía (Suspendido o Hibernado), o si se está reanudando de un estado de ahorro de
energía, no intente conectar o desconectar el sistema en caliente.
Mover la estación soporte
Tenga en cuenta que si el portátil está conectado a la estación soporte, no podrá mover la unidad conectada para evitar perder la
conexión. Si desea mover la estación soporte, asegúrese de desconectar el portátil de la estación soporte antes de hacerlo.
El ordenador puede conectarse/desconectarse en caliente o en frío con la estación soporte (ver la nota siguiente), por
ejemplo, el ordenador puede estar encendido (conexión/desconexión en caliente) o apagado (conexión/desconexión en
frío) cuando se conecta o se desconecta. Sin embargo, si va a conectar o desconectar el sistema en caliente, asegúrese
de que el controlador hot key, incluido en el disco Device Drivers & Utilities + User’s Manual está instalado.
Corriente del sistema de soporte
La corriente del sistema para una unidad conectada debería suministrarse únicamente a través del adaptador AC/D C de
la estación soporte enchufado al conector de entrada DC de la parte posterior de la estación (Asegúrese de que el adaptador AC/DC del ordenador no se esté utilizando mientras el ordenador esté conectado a la estación). Siga las instrucciones en las páginas siguientes para conectar y desconectar con seguridad su ordenador a la estación soporte.
Español
3

Conectar el ordenador a la estación soporte
1
1
1. Quite todos los materiales del embalaje y coloque la estación soporte en una superficie estable.
2. Conecte en los puertos correspondientes los periféricos que desee utilizar con la estación soporte (p. ej. teclado y ratón).
Conecte el adaptador AC/DC al conector de entrada DC que está del lado posterior de la estación soporte, y luego conecte el cable de
3.
alimentación AC en un eschufe y al adaptador.
4. El LED del botón de encendido de la estación soporte cambiará a naranja.
Español
Figura 1 - Estación soporte con el adaptador AC/DC enchufado
4

5. Asegúrese de que el controlador hot key está instalado si va a conectar el sistema en caliente.
2
2
Tapa del conector del soporte
Asegúrese de mantener la tapa cerrada cuando el ordenador no esté conectado a la estación. Esto ayudará a evitar que objetos extraños y/o polvo entre en el área de los contactos.
6. Cierre la tapa/LCD del portátil y gire el ordenador (si utiliza la batería opcional de 9 células asegúrese de quitar la batería antes de
intentar conectar el ordenador a la estación soporte).
7. Deslice el pestillo de la tapa del conector del soporte del ordenador portátil en la dirección de la flecha hasta abrir la tapa (si no
abre la tapa del conector del soporte antes de conectar el ordenador a la estación soporte podría provocar daños
irreparables en el conector de ésta).
Español
Figura 2 - Abrir el conector del soporte
5

8. Asegúrese de que el adaptador AC/DC del ordenador portátil NO ESTÉ ENCHUFADO en el conector de entrada DC del ordenador.
Adaptador AC/DC
Utilice solamente el adaptador AC/DC de la estación soporte enchufado a el conector de entrada DC del ordenador portátil
para alimentar de corriente al ordenador.
Si solamente utilice el adaptador AC/DC del ordenador para alimentar al sistema conectado, el LED del botón de encendido
todavía indicará corriente, pero no habrá potencia suficiente para todo el sistema.
Español
9. Si su estación soporte incluye el adaptador de víde o (Modelo A), asegúrese de que el ordenador portátil esté APAGADO (compruebe
que el ordenador no esté en modo Suspendido) antes de conectar el ordenador a la estación (consulte Conexión en caliente o
conexión en frío en la página 3).
Figura 3 - Estación soporte con el adaptador AC/DC enchufado y el ordenador conectado
6

10. Asegúrese de que el interruptor de bloqueo de la derecha de la estación soporte esté en la posición de desbloqueo (el LED del
3
4
LED del interruptor de bloqueo
Deslice el interruptor de bloqueo de la derecha de la estación soporte para bloquear el sistema conectado. El LED del interruptor de bloqueo se encenderá en verde.
3
4
interruptor de bloqueo no mostrará ningún color).
11. Sostenga el ordenador portátil con cuidado en un ángulo aproximado de 45 grados y déjelo descansar sobre los tacos de goma de la
estación soporte.
12. Alinee la marca de conexión en la parte superior de la tapa/LCD del ordenad or con la marca en la p arte superior d e la estación soporte
.
Español
Figura 4 - Alinear las marcas de conexión y deslizar el interruptor de bloqueo
13. Una vez alineado, presione el ordenador hacia abajo con firmeza, pero con cuidado, hasta encajar en la estación soporte de manera
que los conectores queden alineados.
14. Deslice el interruptor de bloqueo del lateral del ordenador a la posición bloqueo y el LED del interruptor de bloqueo se encenderá
en verde.
15. Si el sistema se ha conectado en caliente, el LED del botón de encendido de la estación soporte será verde.
16. Si el sistema se ha conectado en frío, entonces el LED del botón de encendido de la estación soporte cambiará a naranja.
17. Los indicadores LED del ordenador mostrarán entonces el estado de la corriente del ordenador.
7

18. Si el sistema se ha conectado en frío, necesitará presionar el botón de alimentación de la estación soporte para "encender" el
Conector LAN y conexión
Tenga en cuenta que cuando el ordenador está conectado a la estación soporte, el conector LAN del portátil no podrá
utilizarse. Cuando el sistema esté conectado, utilice el conector LAN de la estación soporte.
ordenador y la estación soporte (alternativamente puede abrir la tap a/LCD del ordenador port átil y presionar el botón de en cendido del
ordenador para encender el sistema).
Figura 5 - Presione el botón de encendido (si conecta en frío)
19. El LED del botón de encendido de la estación soporte cambiará a verde cuando el sistema esté encendido.
20. Si ha conectado un monitor, teclado y rató n e xtern os a los pue rtos apropiados, podrá utilizar los dispositivo s externos sin abrir la t ap a/
Español
LCD del ordenador portátil.
21. Puede utilizar el teclado del ordenador portátil si no tiene un teclado enchufado.
22. (Sólo Modelo A) Deberá utilizar uno de los puertos del controlador de vídeo para conectar su pantalla externa, y no puede
utilizar la pantalla LCD del ordenador portátil como dispositivo de pantalla.
23. (Sólo Modelo B) También puede utilizar la pantalla LCD del ordenado r si no tiene una pant alla conectada al pue rto monitor externo, o
puerto DVI-D.
8

Desconectar el ordenador de la estación soporte
Desconexión en caliente o desconexión en frío
Si su estación soporte incluye el adaptador de vídeo (Modelo A) , el o rden ador deb e desconectarse en
frío de la estación soporte (es decir, el ordenador debe estar apagado antes de la desconexión).
Si su estación soporte no incluye el adaptador de vídeo (Modelo B), el ordenador puede desconectarse
en caliente (es decir, el ordenador está todavía encendido antes de la desconexión) o desconectarse
en frío de la estación soporte.
Apagar
Por favor, tenga en cuenta que debería siempre apagar el ordenador eligiendo la opción Apagar desde
el menú Inicio. Esto le ayudará a evitar problemas con el disco duro o el sistema.
Si desea desconectar en caliente el sistema, asegúrese de que el controlador hot key esté instalado.
1. Si su estación soporte incluye el adaptado r de vídeo (Modelo A), necesitará ap agar el ordenador an tes de desconect ar el sistema (ver
a continuación).
2. Si su estación soporte incluye el adaptador de vídeo (Modelo A), apague el ordenador siguiendo el proceso normal para apagar en
Windows.
Español
9

Desconexión en frío del sistema
123
3
2
1
1. Apague el ordenador siguiendo el proceso normal para apagar en Windows (seleccione Apagar en el menú Inicio en Windows 7).
2. Si el sistema está apagado y sigue conectado al adaptador AC/DC de la estación soporte, entonces el LED del botón de encendido
de la estación soporte cambiará a naranja.
3. Deslice el interruptor de bloqueo del lateral del ordenador a la posición de desbloqueo (el LED del interruptor de bloqueo no
mostrará ningún color).
4. Presione el botón de Expulsión en la estación soporte mientras sostiene con cuidado el ordenador portátil con una mano.
5. Entonces podrá levantar el ordenador portátil de la estación soporte.
6. Tras desconectar el ordenador de la estación soporte, deslice el pestillo de la tap a del conector del soporte en la dirección de la flecha.
Español
Figura 6 - Deslice el interruptor para desbloquear y presione el botón de expulsión (cierre el conector del soporte)
Desconexión en caliente del sistema (sólo Modelo B)
1. Con el sistema conectado encendido, haga clic en el icono de la barra de tareas y seleccione Quitar hardware de forma segura y
expulsar el medio.
2. Seleccione Expulsar Estación de acoplamiento.
3. El mensaje Desacoplamiento completo aparecerá en la barra de tareas.
4. El LED del botón de encendido de la estación soporte cambiará a naranja (los puertos I/O de la estación soporte ya no son
utilizables).
10

Nota: Si desea reactivar la conexión en este punto, consulte Volver a activar la conexión (sólo Modelo B) en la pági-
1
2
3
3
2
1
Ejecutar aplicaciones y expulsar la estación soporte
Tenga en cuenta que cuando seleccione Expulsar Estación de acoplamiento el sistema cerrará las
aplicaciones abiertas y apagará la estación soporte y el ordena dor. Esto también incluye cualquier ta rea
en segundo plano en ejecución por la aplicación Backup Now EZ.
Figura 7 - Deslice el interruptor para desbloquear y presione el botón de expulsión (cierre el conector del soporte)
na 12.
5. Deslice el interruptor de bloqueo del lateral del ordenador a la posición de desbloqueo (el LED del interruptor de bloqueo no
mostrará ningún color).
6. Presione el botón de Expulsión en la estación soporte mientras sostiene con cuidado el ordenador portátil con una mano.
7. Entonces podrá levantar el ordenador portátil de la estación soporte.
8. Tras desconectar el ordenador de la estación soporte, deslice el pestillo de la tap a del conector del soporte en la dirección de la flecha.
Español
11

Volver a activar la conexión (sólo Modelo B)
Si ha seleccionado Quitar hardware de forma segura y expulsar el medio en la barra de tareas de Windows y todavía
no ha desbloqueado y expulsado el ordenador, podrá reactivar la conexión de la estación.
1. Haga clic en el icono de la barra de tareas y haga clic con el botón derecho en icono Hot-Key .
2. Seleccione Docking.
3. Seleccione Active Docking.
4. El sistema ahora estará conectado y los puerto I/O y conectores de la estación soporte estarán operativos.
Español
12

Mapa del sistema: Vista frontal
Figura 8
Vista frontal
1. LED del botón de encendido
2. Botón Copia de
seguridad
(Para Modelo A y
opcional para Modelo
B)
3. Botón de Expulsión
4. Conector del soporte
5. Patillas de retención
6. Patillas de expulsión
2
5
1
4
6
3
5
6
Español
13

Mapa del sistema: Vista posterior
Figura 9
Vista posterior
1. Ranura del cierre de
seguridad
2. Puertos USB 2.0
3. Conector de salida de
auriculares
4. Conector de entrada
para micrófono
5. Conector de salida S/
PDIF
6. Puerto para salida DVI-D
(Digital) - (sólo Modelo
B)
7. Puerto para monitor
externo (sólo Modelo B)
8. Puerto serie (COM)
9. Conector LAN RJ-45
10. Conector de entrada DC
Los puertos siguientes
sólo se incluyen con el
adaptador de vídeo NVIDIA:
11. Puerto de pantalla
12. Puerto para salida DVI-D
(Digital)
13. Puerto de salida de
HDMI
2
1
3
11
12
13
2 2
2
4 5
8 9
10
Puertos para vídeo
Si su configuración de compra incluye el adaptador de vídeo (Modelo A ) , ase gúre se de conecta r
los cables de vídeo a los puertos del adaptador de vídeo (es decir, los puertos 11, 12 o 13 de la
figura anterior) y no al puerto para salida DVI-D 6 o al p uerto para monitor externo 7 (estos puertos
no funcionan con el adaptador de vídeo).
Conector LAN y conexión
Tenga en cuenta que cuando el ordenador está conectad o a la estación soporte, el cone ctor LAN
del portátil no podrá utilizarse. Cuando el sistema esté conectado, utilice el conector LAN de la
estación soporte.
2
1
3
6
7
2 2
2
4 5
8 9 10
Modelo A (Vista posterior con el controlador de vídeo)
Modelo B (Vista posterior sin el controlador de vídeo)
6
7
Español
14

LED del botón de encendido & LED del interruptor de bloqueo
Icono Color Descripción
La corriente DC está enchufada y el ordenador está apagado o en modo Hiber-
nado*
LED del interruptor
de bloqueo
Naranja
Verde La estación soporte está encendida o en modo Suspendido
Verde El ordenador está conectado a la estación soporte y está bloquea do
Apagado El ordenador no está conectado a la estación soporte
Tabla 2 - LED del botón de encendido & LED del interruptor de bloqueo
*Para confirmar el estado de corriente del ordenador, compruebe los indicadores de corriente LED del ordenador.
Español
15

Figura 10
Vistas izquierda & dere-
cha
1. Rejilla
2. Puertos USB 2.0
3. Botón de Expulsión
4. LED del interruptor de
bloqueo
5. Interruptor de bloqueo
2
1
4
2
2
5
3
Español
Mapa del sistema: Vistas izquierda & derecha
16

Configuración del botón de encendido
Conexión en caliente/Conexión en
frío y modos de ahorro de energía
Si el ordenador está en modo ahorro
de energía (Suspendido o Hibernado), o si se está reanudando de un
estado de ahorro de energía, no intente conectar o desconectar el sistema en caliente.
Para evitar que el ordenador entre en el modo ahorro de energía si elige trabajar con la tapa/LCD cerrada, entonces puede que sea necesario redefinir lo que el ordenador debe hacer si la tapa/LCD está cerrada al conectarlo.
1. Haga clic en Inicio (menú), y haga clic en Panel de control (o vaya a Configuración y haga clic en Panel de control).
2. Haga clic en Opciones de energía (Hardware y sonido).
3. Haga clic en Elegir el comportamiento del cierre de la tapa (en el panel izquierdo).
4. Ajuste la opción Al cerrar la tapa: con el ordenador conectado a No hacer nada.
5. Haga clic en Guardar cambios y
cierre el panel de control.
Figura 11 - Opciones de energía (Elegir el comportamiento del cierre de la tapa)
Español
17

Vídeo NVIDIA (sólo Modelo A)
2
1
3
Puertos del adaptador de vídeo
Instale el controlador de vídeo como se describe a continuación.
Instalación del controlador de vídeo NVIDIA
1. Asegúrese de que el sistema esté conectado a la estación soporte y que una pantalla externa esté conectada a cualquiera de los
puertos del controlador de vídeo (debe utilizar los puertos d el adapta dor de vídeo para co nectar una p ant alla externa y no e l puerto de
salida inferior DVI-D Out o el puerto del monitor externo).
Figura 12 - Vista posterior con el adaptador de vídeo
2. Inserte el disco Device Drivers & Utilities + User’s Manual incluido con la estación soporte.
3. Haga clic en Inicio (menú) y haga clic en Equipo.
4. Haga doble clic en el disco DVD.
5. Haga doble clic para abrir cada una de las siguientes carpetas:
\Drivers\01_Nvidia\257.30.
Español
6. Haga doble clic para abrir una de las carpetas siguientes dependiendo de la versión de su sistema operativo:
\32bit (para Windows 7, 32-bit).
\64bit (para Windows 7, 64-bit).
7. Haga doble clic en setup (Aplicación).
8. Haga clic en Siguiente > Siguiente.
9. Haga clic en Terminar para reiniciar el sistema.
18

Panel de control de NVIDIA
El Panel de control NVIDIA ofrece unos controles y herramientas de configuración de vídeo adicionales que permiten un acceso rápido a características como la
configuración de pantalla, Configuración 3D y menús de
Ayuda.
Para acceder al Panel de control de NVIDIA:
1. Haga clic en Inicio (menú), y haga clic en Todos los programas > NVIDIA Corporation.
2. Haga clic en NVIDIA Physx Properties.
O
1. Haga clic con el botón derecho en el escritorio y seleccione
Panel de control de NVIDIA en el menú.
Dispositivos de pantalla
Tenga en cuenta que puede utilizar un cable apropiado conectado a cualquiera de los puertos del adaptador de vídeo
(no utilice el puerto inferior DVI-D ni el de monitor externo) para conectar una pantalla externa. Puede tener hasta
3 pantallas conectadas al puerto de pantalla, al puerto para
salida DVI-D y al puerto de salida de HDMI, pero la GPU
sólo soporta el uso de 2 pantallas a la vez.
Español
19

Copia de seguridad del disco duro
(Para Modelo A y opcional para Modelo B)
Tenga en cuenta que el disco duro sólo sirve para propó-
sitos de copia de seguridad, por tanto no instale ningún
sistema operativo en el disco duro de copia de seguridad
de la estación soporte.
Instalación de Backup Now EZ
1. Inserte el disco Device Drivers & Utilities + User’s Manual
incluido con la estación soporte.
2. Haga clic en Inicio (menú) y haga clic en Equipo.
3. Haga doble clic en el disco DVD.
4. Haga doble clic para abrir cada una de las siguientes carpetas:
\Drivers\02_Backup
5. Haga doble clic en setup (Aplicación).
6. Seleccione el idioma de instalación y haga clic en OK.
7. Haga clic en Siguiente.
8. Haga clic en el botón para aceptar la licencia y haga clic en
Siguiente.
9. Haga clic en Siguiente > Siguiente.
Español
10. Haga clic en Terminar para reiniciar el sistema.
11. Acceda a la aplicación Backup Now EZ en el menú Inicio
(Inicio > Programas/Todos los programas > NTI Backup
Now EZ), o haciendo doble clic en el icono (Backup Now
EZ) en el escritorio.
Aplicación Backup Now EZ
1. Acceda a la aplicación Backup Now EZ en el menú Inicio (Inicio > Programas/Todos los programas > NTI Backup Now
EZ), o haciendo doble clic en el icono (Backup Now EZ)
en el escritorio.
2. En la primera ejecución del programa se le pedirá que se
registre (recomendado).
3. La pantalla de Bienvenida aparecerá (sólo aparecerá la
primera vez que se ejecute el programa, después se abrirá
directamente la pantalla del menú principal).
4. La pantalla principal mostrará dos tareas de copia de
seguridad y opciones que le permiten modificar y activarlas o
desactivarlas.
5. Si la Ubicación de la copia de seguridad (Disco externo)
muestra No disponible (Unavailable) entonces haga clic en
Modificar para acceder a las opciones de destino de la copia
de seguridad.
6. Puede ajustar una Alerta de capacidad del destino para
avisarle cuando el disco duro de copia de seguridad haya
alcanzado el porcentaje de la capacidad seleccionado.
7. También puede cifrar (proteger con contraseña) sus tareas de
copia de seguridad, pero no olvide la contraseña.
8. Haga clic en Finalizar para confirmar las opciones de destino
de la copia de seguridad.
9. El programa le pedirá que seleccione si desea ejecut ar la t area
ahora o no.
20

Iniciar una tarea de copia de seguridad
1
1
Ayuda
Haga clic en el menú superior Ayuda y seleccione Temas de ayuda para acceder a la lista de contenidos, etc.
1. Presione el botón Copia de seguridad en la estación
soporte.
Figura 13 - Botón Copia de seguridad
2. Backup Now EZ se abrirá y mostrará las dos tareas de copia
de seguridad:
• Copia de seguridad de carpeta y archivo
• Copia de seguridad del sistema completo
7. Haga clic en el botón Copia de seguridad para iniciar la
ejecución de cualquier tarea de copia de seguridad
seleccionada (si la unidad de destino no está disponible
aparecerá un mensaje de error).
Español
3. Puede ajustar la configuración para cualquiera de las tareas
haciendo clic en Modify (Modificar).
4. Si las tareas de copia de seguridad están seleccionadas,
tendrán una marca verde junto a ellas.
5. El menú superior tendrá tres opciones (Acción, Herramientas
y Ayuda).
6. Haga clic para seleccionar cualquiera de los submenús en las
opciones del menú.
21

Especificaciones
Información actualizada de
especificaciones
Las especificaciones listadas en esta
sección son correctas en el momento
de publicación. Ciertas opciones (particularmente tipos/velocidades de procesadores) pueden cambiar o
actualizarse según la fecha de lanzamiento del fabricante. Diríjase a su
centro de servicios para más detalles.
Español
Interfaz
Siete puertos USB 2.0
(Sólo Modelo B) Un puerto para monitor
externo
(Sólo Modelo B) Un puerto para salida
DVI-D
Un conector de salida de altavoces/
auriculares
Un conector de entrada para micrófono
Un conector de salida S/PDIF
Un conector LAN RJ-45
Un puerto serie (COM)
Un conector del soporte
Un conector de entrada DC
=======================================
Los puertos siguientes sólo se incluyen
con el adaptador de vídeo NVIDIA
opcional:
(Sólo Modelo A) Un puerto para salida
DVI-D
(Sólo Modelo A) Un conector de salida
HDMI
(Sólo Modelo A) Un puerto de pantalla
Almacenamiento
Un HDD SATA inte rcambiable de 2,5"
9,5mm (h)
para Modelo B
- Para Modelo A y opcional
Adaptador de vídeo
(Sólo Modelo A) Tarjeta de vídeo
NVIDIA® Quadro FX 880M
1GB de RAM de vídeo GDDR3
Compatible con DirectX® 10.1
Alimentación
Modelo A:
Adaptador de AC/DC autodetector de
corriente
Entrada AC: 100-240V, 50-60Hz
Salida DC: 19V, 6,3A (120W)
Modelo B:
Adaptador de AC/DC autodetector de
corriente
Entrada AC: 100-240V, 50-60Hz
Salida DC: 19V, 4,74A (90W)
Seguridad
Ranura para cierre de seguridad (tipo
Kensington®)
Especificaciones del ambiente
Temperatura
En funcionamiento: 5°C - 35°C
Apagado: -20°C - 60°C
Humedad relativa
En funcionamiento: 20% - 80%
Apagado: 10% - 90%
Dimensiones y peso
300 (a) x 195 (l) x 39,5 (h) mm
Modelo A:
974g (incluyendo tarjeta VGA y HDD)
634g (sin tarjeta VGA y sin HDD)
Modelo B:
634g
22

Cenni generali
La stazione di alloggiamento fornisce al computer un semplice sistema di collegamento sulla scrivania nelle situazioni
in cui non è richiesta la portabilità. Essa consente di collegare facilmente monitor esterni, dispositivi USB (con una gamma completa di porte USB extra), periferiche audio e inoltre è dotata di una funzionalità per la ricarica della batteria.
Differenze dei modelli
Questa serie di stazioni di alloggiamento comprende due tipi di modelli d ifferenti che variano tra lo ro per le caratteristiche
indicate nella tabella seguente.
Funzionalità Modello A Modello B
Adattatore video
Backup su disco rigido
Fonte di alimentazione
Adattatore AC/DC - 120W (19V/6,3A) Adattatore AC/DC - 90W (19V/4,74A)
Tabella 1 - Differenze dei modelli
Standard No
Standard Opzionale
Compatibilità
Si noti che la stazione di alloggiamento è compatibile con particolari modelli di computer, solo quelli dotati solo del
connettore appropriato per la stazione. Per i dettagli rivolgersi al centro assistenza.
Italiano
1

Istruzioni per la custodia e il funzionamento
La stazione di alloggiamento è abbastanza rigida, ma è possibile
che possa essere danneggiata. Per evitare qualsiasi danno, attenersi ai seguenti suggerimenti:
• Non lasciarlo cadere ed evitare urti. Se il dispositivo cade, è possi-
bile che il telaio e i componenti possano esserne danneggiati.
• T enerlo all'asciutto e non pr ovocarne il surriscaldamento. Tenere il
dispositivo e l'alimentazione lontani da ogni tipo di impianto di riscaldamento. Si tratta di un apparato elettrico. Se acqua o altri liquidi
dovessero penetrarvi, esso potrebbe risultarne seriamente danneggiato.
• Evitare le interferenze. Tenere il dispositivo lontano da trasformatori
ad alta capacità, motori elettrici e altri int ensi camp i magnetici. Ciò ne
può impedire il corretto funzionamento e danneggiare i dati.
• Attenersi alle corrette procedure di lavoro con il dispositivo.
Assistenza
Ogni tentativo di riparare da soli il dispositivo può annullare la garanzia ed esporre l'utente a scosse elettriche. Per l'assistenza rivolgersi solo a personale tecnico qualificato, in particolar modo nelle
situazioni seguenti:
• Quando il cavo di alimentazione è danneggiato o logorato.
• Se il dispositivo è stato esposto alla pioggia o ad altri liquidi.
• Se il dispositivo non funziona normalmente dopo aver seguito corret-
tamente le istruzioni operative.
• Se il dispositivo è caduto o si è danneggiato.
• Se c'è un odore non usuale, calore o fumo che fuoriesce dal disposi-
tivo.
Informazioni di sicurezza
• Utilizzare esclusivamente un adattatore approvato per l'utilizzo di questo dispositivo.
• Prima di pulire il dispositivo ricordare sempre di rimuovere la batteria
e di scollegare il dispositivo da qualsiasi fonte di alimentazione
esterna, da periferiche e altri cavi.
• Per pulire il dispositivo utilizzare solo un panno morbido e pulito, evitando di applicare detergenti direttamente sul dispositivo. Non utilizzare detergenti volatili (distillati di petrolio) o abrasivi su qualsiasi
parte del dispositivo.
Italiano
2

Computer e stazione di alloggiamento
Aggancio a caldo o a freddo
Se la stazione di alloggiamento include l'opzione della scheda video (Modello A), il computer deve essere ag ganciat o a fre ddo alla
stazione di alloggiamento (ossia il computer deve essere spento prima di agganciarlo).
Se la stazione di alloggiamento non include l'opzione della scheda video (Modello B), il computer può essere agg anciato sia a caldo
(cioè il computer è acceso già prima di agganciarlo) che a freddo alla stazione di alloggiamento (ossia il computer deve essere spento prima di agganciarlo).
Aggancio/sgancio a caldo e modalità di risparmio energetico
Se il computer è in uno stato di risparmio energetico (Sospensione o Ibernazione) o se si sta riprendendo da uno stato di risparmio
energetico, evitare di agganciare o sganciare il sistema.
Spostamento della stazione di alloggiamento
È importante tenere presente che se il notebook è agganciato alla stazione di alloggiamento , è necessario evitare di spostare l'unità
agganciata al fine di evitare che si scolleghino le connessioni. Per spostare la stazione di alloggiamento, sganciare prima il notebook
dalla stazione e poi spostarla.
Il computer può essere agganciato/sganciato a caldo o a freddo alla stazione di alloggiamento (vedere la nota sotto), ciò
significa che il computer può essere acceso (aggancio/sgancio a caldo) o spento (aggancio/sgancio a fr eddo) quando lo
si aggancia o lo si sgancia. Se però si intende agganciare/sganciare a caldo il sistema è necessario che sia installato il
driver hot key, che si trova sul disco Device Drivers & Utilities + User's Manual del computer.
Italiano
Alimentazione del sistema agganciato
L'alimentazione del sistema di un'unità agganciata dovrebbe essere fornita solo dall'alimentatore AC/DC della stazione
di alloggiamento, collegato al jack DC-In che si trova sul retro della stazione (quando il computer è agganciato, assicurarsi che l'alimentatore AC/DC del computer non venga assolutamente utilizzato). Seguire le istruzioni riportate nelle
pagine che seguono per sapere come agganciare e sganciare il computer alla stazione di alloggiamento in modo sicuro.
3

Aggancio del computer alla stazione di alloggiamento
1
1
1. Eliminare tutti i materiali di imballo e appoggiare la stazione di alloggiamento su una superficie stabile.
2. Collegare bene le periferiche che si desidera usare con la stazione di alloggiamento (per esempio tastiera e mouse) alle porte
corrispondenti.
3.
Collegare l'adattatore AC/DC al jack di ingresso DC situato sul retro della stazione di alloggiamento, quindi inserire il cavo di
alimentazione AC in una presa e collegare il cavo di alimentazione AC all'adattatore AC/DC.
4. Il LED del pulsante di alimentazione sulla stazione di alloggiamento è di colore arancione.
Italiano
Figura 1 - Stazione di alloggiamento con alimentatore AC/DC collegato
4

5. È necessario che sia installato il driver hot key se però si intende agganciare a caldo il sistema.
2
2
Coperchio della porta di aggancio
Tenere il coperchio chiuso quando il computer non è agganciato alla staz ione. I n que sto m odo si impe dirà a oggetti estranei e
alla polvere di finire sull'area di contatto del connettore.
6. Chiudere il coperchio/schermo LCD del computer notebook e capovolgere quest'ultimo (se si utilizza la batteria a 9 celle opzionale,
rimuovere la batteria prima di agganciare il computer alla stazione di alloggiamento).
7. Far scorrere il fermo del coperchio della porta per la stazione di alloggiamento del comp uter notebook nella direzione della freccia ,
fino ad aprire il coperchio (se non si apre il coperchio della porta per la stazione prima di collegare il computer alla stazione di
alloggiamento potrebbe causare un danno irreparabile al connettore della stazione di alloggiamento).
Italiano
Figura 2 - Apertura della porta di alloggiamento
5

8. Assicurarsi che l'alimentatore AC/DC del computer notebook NON SIA COLLEGATO al jack DC-In del computer.
Adattatore AC/DC
Fare in modo che vi sia solo l'adattatore AC/DC della stazione di alloggiamento collegato al jack DC-In della stazione stessa
per alimentare il computer.
Se si utilizza solo l'alimentatore AC/DC del computer per alimentare il sistema di alloggiamento, il LED del pulsante di alimentazione indicherà sempre la presenza di alimentazione, ma non vi sarà energia sufficiente per l'intero sistema.
Italiano
9. Se la stazione di alloggiamento include la scheda video (Mo dello A) , verificare che il computer notebook sia SPENTO ( controllare che
il computer non sia in modalità Sospensione) prima di agganciarlo alla stazione (vedere Aggancio a caldo o a freddo a pagina 3).
6
Figura 3 - Stazione di alloggiamento con alimentatore AC/DC collegato e computer agganciato

10. Verificare che il fermo di blocco che si trova sul lato destro della stazione di alloggiamento sia nella posizione di sblocco (il LED
3
4
LED fermo di blocco
Spostare il fermo di blocco che si trova sul lato destro della stazione di alloggiamento verso la posizione che blocca
il sistema agganciato. Il LED fermo di blocco si accende di colore verde.
3
4
fermo di blocco non mostra alcun colore).
11. Tenere inclinato il computer notebook di circa 45 gradi e appoggiarlo sui fermi di gomma sulla stazione di alloggiamento.
12. Allineare il marcatore della stazione sulla parte superiore del coperchio/schermo LCD del computer con quello presente sopra la
stazione stessa .
Figura 4 - Allineare i marcatori di alloggiamento e spostare il fermo di blocco
13. Dopo aver allineato i componenti in modo saldo ma facendo attenzione, spingere il computer verso il basso sulla stazione di
alloggiamento allineando i connettori di alloggiamento.
14. Spostare il fermo di blocco laterale del computer nella posizione di blocco, il LED fermo di blocco si accende di colore verde.
15. Se il sistema è stato agganciato a caldo, il LED del pulsante di alimentazione sulla stazione di alloggiamento si accende di colore verde.
16. Se il sistema è stato agganciato a freddo, il LED del pulsante di alimentazione sulla stazione di alloggiamento è di color e arancione.
17. Gli indicatori LED sul computer mostrano lo stato di alimentazione del computer.
Italiano
7

18. Se il sistema è stato agganciato a freddo, sarà necessario premere il pulsante di alimentazione sulla stazione di alloggiamento per
Jack per LAN e aggancio
Si noti che quando il computer è agganciato alla stazione di alloggiamento, il
jack per LAN del notebook non può essere utilizzato. Quando il sistema è agganciato, utilizzare il jack per LAN della
stazione di alloggiamento.
accendere sia il computer che la stazione di alloggiamento (in alternativa è possibile aprire il coperchio/schermo LCD del computer
notebook e premere il pulsante di alimentazione del notebook per accendere il sistema).
Figura 5 - Premere il pulsante di alimentazione (in caso di aggancio a freddo)
19. Il LED del pulsante di alimentazione sulla stazione di alloggiamento è di colore verde quando il sistema è acceso.
20. Se si è collegato un monitor esterno, una tastiera e un mouse alle rispettive porte, è possibile u tilizzare i dispositivi esterni senza aprire
il coperchio/schermo LCD del computer notebook.
21. È possibile utilizzare la tastiera del computer notebook nel caso in cui non sia collegata una tastiera.
22. (Solo Modello A) È necessario utilizzare una delle porte del controller video per collegare lo schermo esterno, e non sarà
possibile utilizzare lo schermo del computer notebook come unità di visualizzazione.
23. (Solo Modello B) È possibile anche utilizzare lo schermo LCD del computer se non si dispone di uno schermo collegato alla p ort a del
Italiano
monitor esterno, oppure alla porta DVI-D.
8

Sgancio del computer dalla stazione di alloggiamento
Sgancio a caldo e a freddo
Se la stazione di alloggiamento include la scheda video (Modello A), il computer deve essere sganciato
a freddo dalla stazione di alloggiamento (ossia il computer deve essere spento prima di sganciarlo).
Se la stazione di alloggiamento non include la scheda video (Modello B), il computer può essere sganciato sia a caldo (cioè il computer è acceso già prima di sganciarlo) che a freddo dalla stazione di alloggiamento (ossia il computer deve essere spento prima di sganciarlo).
Spegnimento
È importante tenere presente che è sempre necessario spegnere il computer scegliendo il coma ndo Arresta il sistema disponibile dal menu Start. In questo modo si evitano problemi al sistema o al disco ri-
gido.
Per sganciare a caldo il sistema, verificare che il sia stato installato il driver hot key del computer.
1. Se la stazione di alloggiamento include la scheda video (Modello A), sarà necessario spegnere il computer prima di sganciare il
sistema (vedere sotto).
2. Se la stazione di alloggiamento include la scheda video (Modello A), spegnere il computer con la normale procedura di spegnimento
di Windows.
Italiano
9

Sgancio a freddo del sistema
123
3
2
1
Figura 6
Spostare il fermo
per sbloccare il
sistema e preme-
re il pulsante di
espulsione (chiu-
dere la porta di al-
loggiamento)
1. Spegnere il computer con la normale procedura di spegnimento di Windows (scegliere Arresta il sistema dal menu Start di Win-
dows 7).
2. Quando il sistema è spento ma è ancora collegato l'alimentatore AD/DC della stazione di alloggiamento, il LED del pulsante di
alimentazione sulla stazione di alloggiamento è di colore arancione.
3. Spostare il fermo di blocco laterale del computer nella posizione di sblocco (il LED fermo di blocco non mostra alcun colore).
4. Premere il pulsante di Espulsione sulla stazione di alloggiamento mentre si tiene il computer notebook con una mano.
5. A questo punto è possibile sollevare e sganciare il computer notebook dalla stazione di alloggiamento.
6. Dopo aver sganciato il computer dalla stazione di alloggiamento, fare scorrere il fermo del coperchio della porta di alloggiamento
nella direzione della freccia.
Italiano
Sgancio a caldo del sistema (solo Modello B)
1. Con la stazione di alloggiamento accesa, fare clic sull'icona nell'area di notifica e selezionare Rimozione sicura dell'hardware ed
espulsione supporti.
2. Selezionare Espelli Alloggiamento di espansione.
3. Nell'area di notifica del sistema compare il messaggio Disinserimento dall'alloggiamento di espansione completato.
4. Il LED del pulsante di alimentazione sulla stazione di alloggiamento è di colore arancione (le porte di I/O e i connettori sulla
stazione di alloggiamento non sono più utilizzabili).
10
 Loading...