

Clever Choice TD-3018 Owner's Manual
Digital Wrist Blood Pressure Monitor
OWNER'S
MANUAL
311-3018100-017
Version 3.0, DEC, 2009

2
TABLE OF CONTENTS
BEFORE YOU START
Warnings and Precautions 03
Intended Use 04
Health Information 05
ABOUT THIS SYSTEM
Content of the System 06
Device Description 07
PREPARATIONS BEFORE USE
Low Power Warning 08
Batteries Installation and Replacement 09
Setting the Monitor 10
MEASURE BLOOD PRESSURE
Suggestions before Measuring 13
Applying the Wrist Cuff 14
Testing Your Blood Pressure 15
USE MEMORY
Viewing Results on the Monitor 17
Viewing Results on a Personal Computer 18
Erasing Memories 20
MAINTAINANCE 21
ERROR MESSAGE 23
TROUBLESHOOTING 24
SPECIFICATIONS 25
WARRANTY INFORMATION 26

3
BEFORE YOU START
Warnings and Precautions
Do NOT use the device to diagnose
newborns and on infants or persons
who cannot communicate, for it might
lead to serious accidents.
This device does not serve as a cure
of any symptoms or disease. The
data measured are only for reference. Always consult your physician
to have the results interpreted.
Do not use the device for purposes
other than measuring blood pressure.
Disassembly or modication the unit
or wrist cuff may lead to permanent
reading error.
This device is not able to measure in
the presence of common arrhythmia,
such as arterial or ventricular pre-
mature beats or arterial brillation. It
may produce reading error.

4
BEFORE YOU START
Intended Use
Thank you for purchasing this CLEVER CHOICE Wrist Blood
Pressure Monitor (BPM). CLEVER CHOICE measures blood
pressure non-invasively based on the Oscillometric method.
This device is designed for individuals age 16 and above,
for home use only. Please read these instructions carefully
before measuring.
This owner’s manual contains important information that you
must know about your system. Please read it carefully. For
other questions regarding this monitor, please contact the
dealer for service.
A warranty registration card is included with your system.
Please complete it and mail it to us; if you prefer to ll it out
online, please visit http://www.SimpleDiagnostics.com
Features
One touch. Accurate result in 20 seconds.
Comfortable automatic ination and deation.
Memories for readings up to 352 sets, with time/date and
automatically calculated average.
Automatic turn-off after idle 3 minutes.

5
BEFORE YOU START
Health Information
Knowing your blood pressure trend tells whether your body
is in good condition or not. Human blood pressure naturally
increases after reaching middle age. This symptom is a result of continuous aging of the blood vessel. Further causes
include obesity, lack of exercise, and cholesterol (LDL) adhering to the blood vessels. Rising of blood pressure accelerates hardening of the arteries, and the body becomes more
susceptible to apoplexy and coronary infarction. The WHO
(world health organization) published the guideline of blood
pressure range:
Optimal
Normal
High – Normal
Grade 1 Hypertension ("mild")
Grade 2 Hypertension ("moderate")
Grade 3 Hypertension ("severe")
180
160
140
130
120
80 85 90 100 1 1 0
(mmHg)
(mmHg)
systolic
diastolic

6
ABOUT THIS SYSTEM
Content of the System
uMonitor
vWrist Cuff (connected to the moni-
tor)
wStorage Case
xOwner’s Manual
yTwo 1.5V AAA batteries
Please check your system to be sure you have everything
above. If not, please return your system to the place of purchase.
7
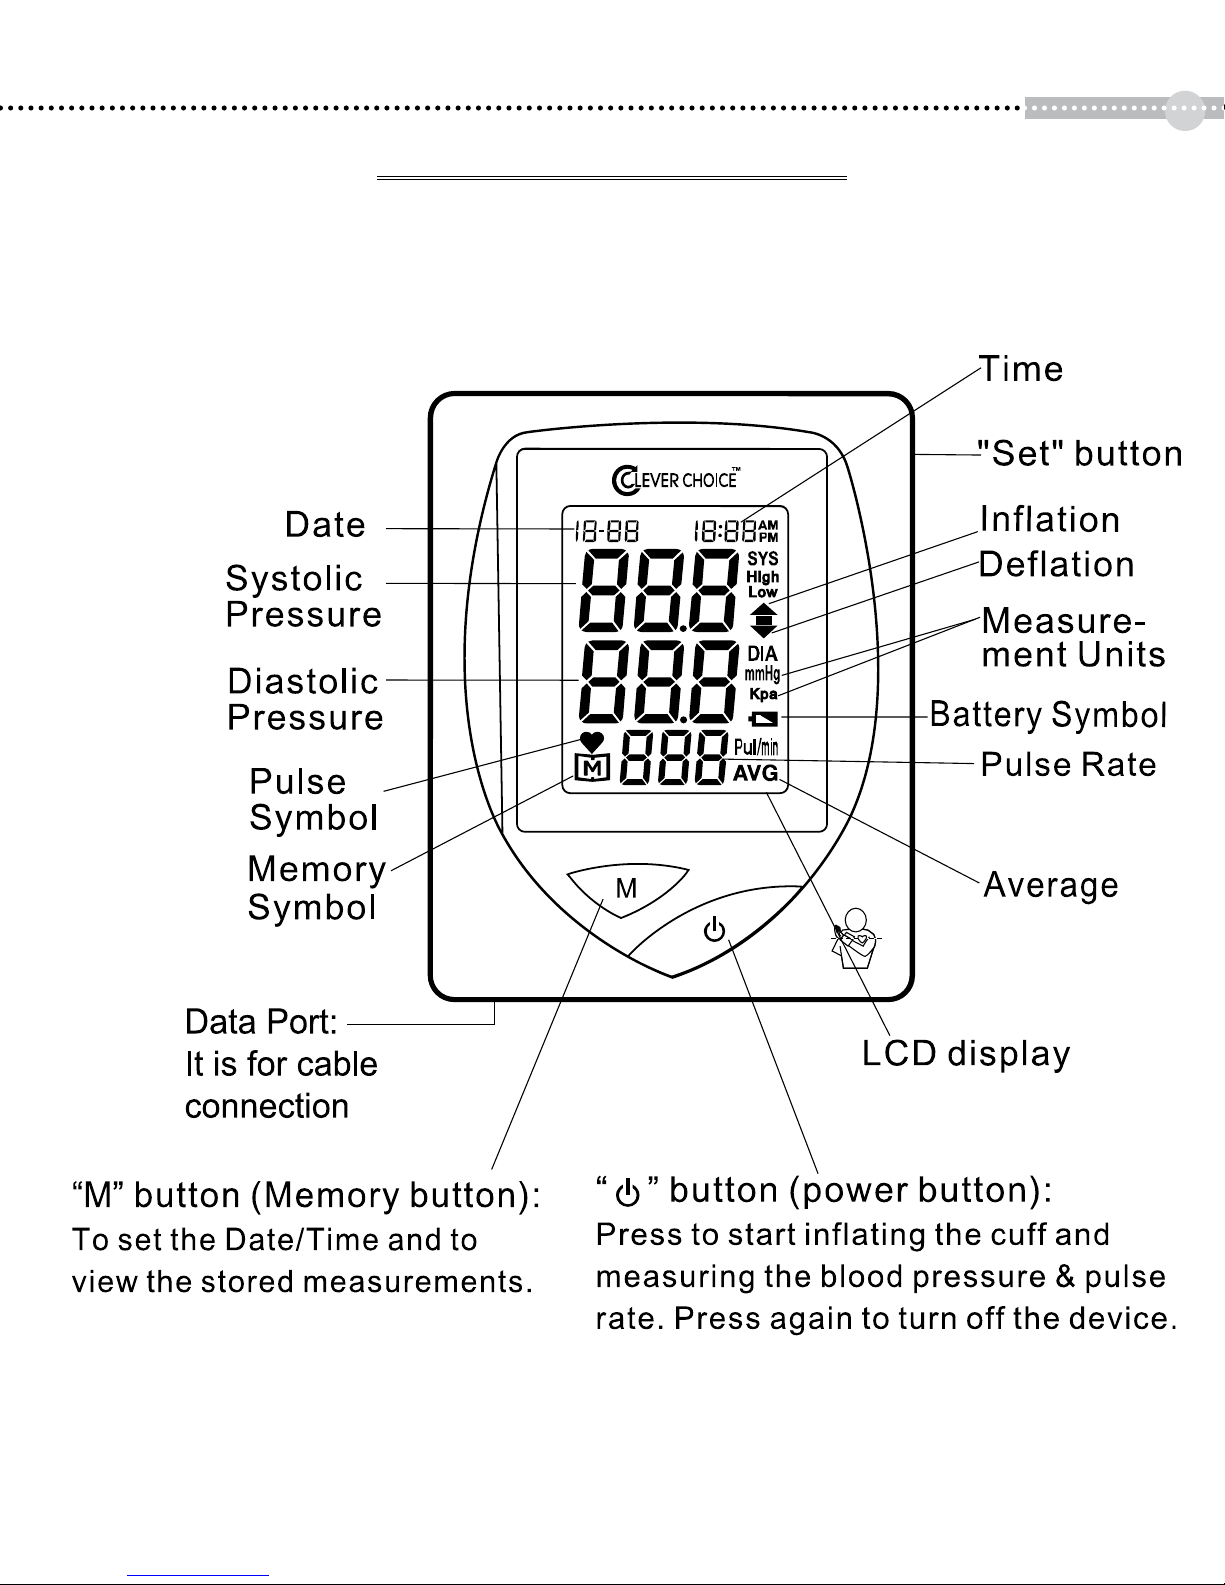
ABOUT THIS SYSTEM
Device Description

8
PREPARATIONS BEFORE USE
Your monitor comes with batteries already installed. When
replacing, use ONLY 1.5V AAA size alkaline batteries. Please
use alkaline batteries for best performance and longest life.
Low Power Warning
The monitor will remind you when the power is getting low by
displaying two different messages:
uBattery Symbol
appears with
your test result. (Fig. 1) This means
it is about time to change the batteries although still 30 more measurements can be made.
vBattery Symbol
ashes by itself. (Fig. 2) This means you must
change the batteries before making
any measurements.
(Fig 1)
(Fig 2)

9
PREPARATIONS BEFORE USE
Batteries Installation and Replacement
To replace the batteries, please make sure the monitor is
turned off.
Step1- Please make sure the monitor is
turned off. Press the edge of the
battery cover and push upward.
(Fig. 3)
Note:
Replacing the batteries does not affect
previous test results stored in the monitor. But you may need to update the settings.
Step2- Remove battery cover. (Fig. 4) And
remove the batteries inside.
Note:
Do not use different type, date or brand
name batteries together. Use only new
batteries of the required size and type.
Step3- Insert two 1.5V AAA size alkaline
batteries. Make sure the + (positive) and – (negative) marks match
those indicated in the battery compartment. (Fig. 5) If inserted correctly, you will hear a “beep”.
(Fig 4)
(Fig 5)
(Fig 3)
 Loading...